35
RV DataSat 840 - Operation Manual - V2.0 - 2.1.2016 1 2015 RV DataSat 840 Operation Manual Mobil Satellite Technologies 7/20/2015 RV DataSat 840 Operation Manual
| Date post: | 28-Mar-2018 |
| Category: |
Documents |
| Upload: | truongdang |
| View: | 218 times |
| Download: | 1 times |

RV DataSat 840 - Operation Manual - V2.0 - 2.1.2016
1
2015
RV DataSat 840 Operation Manual
Mobil Satellite Technologies
7/20/2015
RV DataSat 840 Operation Manual

RV DataSat 840 - Operation Manual - V2.0 - 2.1.2016
2
Table of Contents Table of Figures ....................................................................................................................................... 3
System Specifications .............................................................................................................................. 5
RV DataSat 840 Antenna Mechanical Information ................................................................................ 5
Azimuth ........................................................................................................................................... 5
Elevation.......................................................................................................................................... 5
Skew ................................................................................................................................................ 5
RV DataSat 840 Antenna Electrical Information ................................................................................... 5
Power Consumption ........................................................................................................................ 5
Evolution X5 Satellite Router Information ............................................................................................ 6
Interfaces ........................................................................................................................................ 6
Mechanical/Environmental .............................................................................................................. 6
Safety Instructions ................................................................................................................................... 7
System Overall Connection Diagram ........................................................................................................ 8
Installation .............................................................................................................................................. 9
Site Survey ........................................................................................................................................... 9
Tools and Supplies ............................................................................................................................. 11
Materials Provided ............................................................................................................................ 11
Materials Not Provided ...................................................................................................................... 11
System Installation ............................................................................................................................ 13
Normal Operation ................................................................................................................................. 21
Site Survey ......................................................................................................................................... 21
System Operation .............................................................................................................................. 21

RV DataSat 840 - Operation Manual - V2.0 - 2.1.2016
3
Satellite Aquisition ......................................................................................................................... 21
Stowing the system for travel ........................................................................................................ 22
Bandwidth Sign Up. ........................................................................................................................... 23
Controller Configuration ........................................................................................................................ 27
DataSAT ACU-1 Satellite Antenna Controller Setup ............................................................................ 27
Confirming the ACU IP address ...................................................................................................... 28
Network Settings ........................................................................................................................... 28
RF Settings ..................................................................................................................................... 29
Dish Calibration ............................................................................................................................. 29
Toubleshooting ..................................................................................................................................... 32
Azimuth Overcurrent ......................................................................................................................... 32
Incorrect or blank GPS values ............................................................................................................ 32
Inside the RV ................................................................................................................................. 32
On the Antenna ............................................................................................................................. 32
Emergency Operation ........................................................................................................................ 33
Elevation........................................................................................................................................ 34
Azimuth ......................................................................................................................................... 34
Skew .............................................................................................................................................. 34
Support and Assistance ......................................................................................................................... 35
Mobil Satellite Technologies business location .................................................................................. 35
Assistance Options available .............................................................................................................. 35
Technical Support hours of operation ................................................................................................ 35
Technical Support assistance process ................................................................................................ 35
Table of Figures Figure 1 - Caution Symbol - Denotes a potential hazard ........................................................................... 7
Figure 2 - RF Hazard Caution Sign - Sample .............................................................................................. 7
Figure 3 - System Connection Diagram .................................................................................................... 8
Figure 4 - Antenna Clearance ................................................................................................................. 10
Figure 5 - Antenna Aligned .................................................................................................................... 13
Figure 6 - Under Antenna Sealer ............................................................................................................ 14
Figure 7 - Antenna Screws Installed ....................................................................................................... 15

RV DataSat 840 - Operation Manual - V2.0 - 2.1.2016
4
Figure 8 - Control Cable Wiring Diagram ................................................................................................ 16
Figure 9 - Control Cable Stripped length ................................................................................................ 16
Figure 10 - Proper condition of Molex connections ................................................................................ 16
Figure 11 - Antenna Junction Box........................................................................................................... 17
Figure 12 - Clamshell ............................................................................................................................. 18
Figure 13 – Sample Antenna Install Picture ............................................................................................ 20
Figure 14 - DataSAT ACU-1 .................................................................................................................... 21
Figure 15 - Insta-Sat 1 ............................................................................................................................ 23
Figure 16 - Insta-Sat 2 ............................................................................................................................ 23
Figure 17 - Insta-Sat 3 ............................................................................................................................ 24
Figure 18 - Insta-Sat 4 ............................................................................................................................ 24
Figure 19 - Insta-Sat 5 ............................................................................................................................ 25
Figure 20 - Insta-Sat 6 ............................................................................................................................ 25
Figure 21 - Insta-Sat 7 ............................................................................................................................ 26
Figure 22 - Insta-Sat 8 ............................................................................................................................ 26
Figure 23 - ACU-1 Controller Initial Screen ............................................................................................. 27
Figure 24 - Compatible Web Browsers ................................................................................................... 27
Figure 25 - Controller Front Page ........................................................................................................... 27
Figure 26 - Controller Front Panel - IP .................................................................................................... 28
Figure 27 - Controller Front Panel - IP .................................................................................................... 28
Figure 28 - Controller Network Settings ................................................................................................. 28
Figure 29 - Controller RF Settings ........................................................................................................... 29
Figure 30 - Controller - Calibration ......................................................................................................... 30
Figure 31 - Controller - Searching........................................................................................................... 30
Figure 32 - Controller - Optimizing ......................................................................................................... 31
Figure 33 - Controller - Complete ........................................................................................................... 31
Figure 34 - GPS Connections .................................................................................................................. 33

RV DataSat 840 - Operation Manual - V2.0 - 2.1.2016
5
System Specifications
RV DataSat 840 Antenna Mechanical Information
Azimuth
Total Travel 374 degrees Total Travel Time 59 seconds Degrees per second 6.4 degrees/second Counts per degree 11.1790909 Total Travel Counts 4166 counts
Elevation
Total Travel 159.3 degrees Total Travel Time 45 seconds Degrees per second 3.5 degrees/second Counts per degree 18.61818167 Total Travel Counts 2966 counts Max Travel Elevation 84 degrees – Sat Look Angle Stowed Position -75.3 degrees – Sat Look Angle
Skew
Total Travel 122 degrees (+/- 61 degrees from zero) Total Travel Time 12.5 seconds Degrees per second 9.76 degrees/second Counts per degree 6.6432683 Total Travel Counts 817 counts
RV DataSat 840 Antenna Electrical Information
Power Consumption
Off = .06 Amps
Idle = .10 - .12 Amps
Searching = .20 - 43 Amps

RV DataSat 840 - Operation Manual - V2.0 - 2.1.2016
6
Evolution X5 Satellite Router Information
Interfaces SatCom Interfaces TX Out: Type-F, 950–1700 MHz, +7dBm/-35dBm RX In: Type-F, 950–2150 MHz, -5dBm
(max) composite/ -125+10*log(Fsym)dBm (min) single carrier
Software controllable 10 MHz reference on TX Out and TX In ports
BUC IFL Interface +24V, max. 70W, (120W PSU) (please refer to X5 Installation Manual for full list of
supported BUCs)
LNB IFL Interface +19V (Nominal), 500mA max DiSEqC (Voltage 14V/19V + 22KHz tone)
Data Interfaces LAN: Single 10/100, 802.1q VLAN RS-232: RJ45 (Console connection )
Protocols Supported TCP, UDP, ACL, ICMP, IGMP, RIP Ver2, Static Routes, NAT, DHCP, DHCP Helper, Local
DNS Caching, OpenAMIP, cRTP and GRE
Traffic Engineering Group QoS, QoS (Priority Queuing and CBWFQ), Strict Priority Queuing, Application Based
QoS, Minimum CIR, CIR (Static and Dynamic), Rate Limiting
Other Features Built-in Automatic Uplink Power, Frequency and Timing Control, Authentication, Spread
Spectrum** , Antenna Control Interface (OpenAMIP)
Mechanical/Environmental Size W 11.5 in (29.2 cm) x D 9.9 in (25.1 cm) x H 2 in (5.1cm)
Weight 4.4 lbs (1.99 Kg)
Operating Temperature 0˚ to +50˚C (32˚ to +122˚F) at Sea Level with temperature gradient of 1˚C per 1 min
0˚ to +45˚C (32˚ to +113˚F) at 10,000 Feet with temperature gradient of 1˚C per 1 min
For ODU power consumption <70W (please refer to X5 Installation Manual for details)
Humidity Max 90% non-condensing humidity
Input Voltage 100–240 VAC Universal Input, 2A, 50–60 Hz
Radio Standards EN 301-428 v1.3.1 — Ku-Band System Level Specification EN 301-443 v1.3.1 — C-Band
System Level Specification
Safety Standards Complies with IEC 60950, EN 60950-1, UL 60950-1, CSA C22.2 No.60950-1-03
Emission Standard Complies with EN 55022 Class B, FCC Part 15 Class B, CISPR 22 Class B, EN 61000-3-2,
EN 61000-3-3
EMC/Immunity Standard Complies with EN 55024, EN 301-489-1, EN 301-489-12, EN 61000-4-2, EN 61000-4-3, EN
61000-4-4, EN 61000-4-5, EN 61000-4-6, EN 61000-4-11
Certification FCC, CE, and RoHS Compliant
*Not supported for use with DVB-S2 outbound in iDX 3.0 and above
iDirect • 13861 Sunrise Valley Drive, Herndon, VA 20171 • Tel: +1 703.648.8000 +1 866.345.0983 • www.idirect.net

RV DataSat 840 - Operation Manual - V2.0 - 2.1.2016
7
Safety Instructions
Figure 1 - Caution Symbol - Denotes a potential hazard
Do not stand in front of the antenna during operation. This area is considered a Radio
Frequency Hazard. It is highly recommended you post a RF Hazard sign such as the one
below.
Figure 2 - RF Hazard Caution Sign - Sample
If using a generator be sure that it is stable and full of fuel prior to connecting the
satellite electronics.
Prevent access to the area occupied by the antenna with hazard cones and safety tape
to prevent personnel from running into the exposed boom.
Power must be disconnected or unplugged prior to disconnecting or connecting any
cables.
Follow all recommended shipping requirements to prevent equipment damage.
All electronic equipment is susceptible to breakage from power surges. We recommend
you install a battery backup with a line conditioner applicable to your vehicle.
While transporting equipment on rough terrain move slow to prevent excessive
vibration or shock to mounted electronic equipment.
Do not ship the equipment upside down as damage will occur.
WARNING: Damage resulting from a failure to observe any of the Safety
Instructions listed in this manual is NOT covered under warranty.

RV DataSat 840 - Operation Manual - V2.0 - 2.1.2016
8
System Overall Connection Diagram
Figure 3 - System Connection Diagram

RV DataSat 840 - Operation Manual - V2.0 - 2.1.2016
9
Installation A professional installation is always recommended. If you choose to self install the antenna or use local
labor the following information applies.
NOTE: This guide is not meant to replace a professional installer and in no way represents a definitive
guide on system installation. Other steps may be necessary to successfully complete the installation of
your satellite antenna at your chosen location. Proceed at your own risk.
Site Survey 1. Identify where the electronics will be stored inside the vehicle.
Caution: The electronics cabinet needs to be well ventilated. We recommend a
louvered door or open cabinet.
Caution: Be careful to ensure that power is available or can be run to the selected
location.
2. Identify the location where you will drill a hole to pass wiring from inside to outside of your
vehicle.
Caution: Vehicle construction varies greatly. If you are unsure of how to safely drill
through your vehicle roof or cap obtain a professional installation.
3. Identify where the antenna will be mounted on the roof.
Caution: All interconnecting cables come standard at 30 feet long. Ensure no more than
25 feet between the electronics and the antenna on the roof. This will allow for a required 3
to 5 foot long service loop. CABLES CANNOT BE CUT OR EXTENDED without rendering your
system non operational. Excess cable should be stored and securely fastened where it will not
be damaged.
4. Prior to installing the antenna system verify there is sufficient operating space. The antenna
rotates in a 360 degree circle projecting 40 inches from the center of the circular antenna base
as shown in Figure 4.
Caution: Pay particular attention to protrusions from the roof such as air conditioning
units, rack structures or other antennas.

RV DataSat 840 - Operation Manual - V2.0 - 2.1.2016
10
Figure 4 - Antenna Clearance
5. If the surface where the antenna is to be installed is weak or flexible, metal sheeting must be
installed to stiffen the roof and prevent the antenna from flexing.
Caution: A mounting surface that flexes will cause the mounting screws to work loose
potentially causing the antenna to break free.
6. If the surface where the antenna is to be installed is not flat, a flat supporting structure must be
built.
Caution: A mounting surface that is not flat will cause undue stress on the mounting
screws potentially causing the antenna to break free.
7. Antenna weight should be distributed over support or cross beams. If you are unable to
distribute weight then plating should be placed under the entire frame, drill holes through the

RV DataSat 840 - Operation Manual - V2.0 - 2.1.2016
11
mount plate as needed to secure the antenna to the roof. Ensure bolts penetrate the support
beams under the mount plate.
Caution: A mounting surface that is not strong enough to support the weight of the
antenna may cause structural damage to your vehicle.
Tools and Supplies
Materials Provided 1. RV DataSat Antenna
2. Mounted 3 wire connector box
3. Pre-configured RV DataSat Antenna Control Unit 1 (ACU-1) with power supply
4. Pre-loaded SD card for ACU-1
5. Pre-terminated control cable for ACU-1
6. Pre-configured iDirect X5 modem with power supply
7. Pre-configured ASUS RT-N12 Wireless N300 Router with power supply
8. Pre-terminated White Coax 30 feet long
9. Pre-terminated Black Coax 30 feet long
10. Pre-terminated Black Coax jumper 18 inches long
11. Pre-terminated Yellow Ethernet cable 3 foot long
12. Pre-terminated Blue Ethernet cable 3 foot long
Materials Not Provided 1. 9 Volt DC battery
2. 7/16” wrench
3. 1/4 inch nut driver
4. Small diameter drill bit long enough to go through the ceiling of your coach
5. Small standard (jewelers) screwdriver
6. 1” hole saw
7. 1 power strip or Uninterruptible Power Supply (UPS) suitable for your application.
8. Mounting screws (The proper size for your application is up to you) examples include #14 1 inch
self tapping screws for metal plate or #12 pan head screws for most RV applications. Stainless
Steel is recommended both for strength and to limit corrosion.
9. Appropriate bit for the mounting screws selected
10. 1 – 2 tubes of DICOR self-leveling sealer Dicor Products – Elkhart, Indiana 465141 – 800-837-
2059 - www.dicor.com (available at most RV dealerships)
11. 1 tube of dielectric compound Boss Products Accumetric, LLC - Elizabethtown KY 42701 - 800-
928-2677 www.bossproducts.com
RV DataSat 840 - Operation Manual - V2.0 - 2.1.2016
12
12. 1 tube clear silicone #315 Boss Products Accumetric, LLC - Elizabethtown KY 42701 - 800-928-
2677 www.bossproducts.com or similar.
13. Approximately 20 – 25 Black wire ties.
14. Approximately 20 Black wire clips P/N GCD12BLK or similar
Caution: Do not use white clips or wire ties externally as they become brittle when
exposed to UV light.
15. Split Loom cable wrap
Caution: Legacy antennas, built before 11/30/2015, have a known issue with the
controller and RF cabling developing significant wear due to regular usage during azimuth
rotation. If your antenna was built before this time, a Split Loom cable wrap should be
installed over the Controller and RF cable assemblies, where they are fed up through the
mount and make contact during rotation.

RV DataSat 840 - Operation Manual - V2.0 - 2.1.2016
13
System Installation 1. If you would like to test your satellite system prior to installation, do so now.
Caution: Failure to test the antenna system prior to completing this install may result in
significant rework time.
Caution: If you choose to test the dish prior to install, ensure that it is securely fastened
to a pallet or other structure to prevent it from tipping over while operating.
2. Clear out the cabinet location(s) where the electronics will be housed and where the pass
through hole to the roof will be cut.
3. At the installation location identified during the site survey, verify the area clean and clear of
debris.
Caution: Mounting surface must be clean for the antenna to properly seal to the roof.
This will help prevent water penetration and allow the antenna to sit level.
Lift the antenna system into place.
Caution: The antenna base must be oriented toward the front of the vehicle (which will
place the reflector toward the rear) to prevent damage to the antenna system due to wind
forces while the vehicle is in motion.
Caution: The antenna is heavy and should be lifted carefully into place. TWO MAN LIFT
IS RECOMMENDED to prevent injury to personnel.
Figure 5 - Antenna Aligned

RV DataSat 840 - Operation Manual - V2.0 - 2.1.2016
14
4. Verify the rail edges are over support beams.
Caution: A mounting surface that is not strong enough to support the weight of the
antenna may cause structural damage to your vehicle.
5. Inspect the interior structure for existing wires or tubing where the screws will penetrate the
roof of your vehicle.
Caution: Screws that penetrate any existing wires or tubing in your vehicle may cause
damage to existing equipment or be a hazard to personnel.
6. Raise the antenna using a 9 Volt DC battery in accordance with the “Emergency Operation”
instructions in this manual.
7. Trace all holes you will put a screw in.
Caution: As a bare minimum you must put a screw in all pre-drilled holes on the mount
plate. In the event the pre-drilled holes do not align with your support structure it is highly
desirable that you drill extra holes as needed prior to using Dicor sealer.
Figure 6 - Under Antenna Sealer
8. Lift the mount plate and put Dicor sealer over the locations where the antenna screws will
penetrate the mounting surface (including any extra screw locations you drilled).

RV DataSat 840 - Operation Manual - V2.0 - 2.1.2016
15
9. Lower the mount plate gently onto the mounting surface.
10. Secure the mount plate to the roof using the mounting screws you selected.
Caution: Screws that are too long may penetrate the interior roof structure of your
vehicle.
Caution: Screws that are too short may not be adequate to hold the antenna on the
roof.
Figure 7 - Antenna Screws Installed
11. Liberally coat the screw heads with Dicor to prevent water penetration.
12. Using a small diameter drill bit make a small pilot hole in the roof where the cabling will pass
through.
13. Drill the larger 1 inch hole using the 1 inch drill bit or hole saw.
Caution: Proceed slowly, 1 layer at a time, verifying after each layer is removed that no
cables or other critical components will be damaged by the hole.
14. Look into the hole and verify no cabling or other obstructions are in the way.
15. Remove the green molex connector from the control cable using the small flat screwdriver.
16. Pass the control, white coaxial and black coaxial cables through the hole.
17. Reinstall the green molex connector back onto the control cable.

RV DataSat 840 - Operation Manual - V2.0 - 2.1.2016
16
Figure 8 - Control Cable Wiring Diagram
Caution: The wires for the control cable should be stripped back to ¼” from the end.
Figure 9 - Control Cable Stripped length
Caution: When the control cable is reattached to the green Molex connector, be careful
of the wire placement. If the wires are placed too far into the connector, it will clamp down
on the outer shielding, and will not make a good connection to the wire causing erratic
behavior of the antenna. The connections on the Molex connector will appear as in Figure 10
below.
Figure 10 - Proper condition of Molex connections
12 - Tan – GPS RX Data In
11 - Pink – 15 to 18 VDC out to GPS
10 - White – GPS and Counter Input Common (Ground)
9 - Gray – Skew Count In
8 - Purple – Elevation Count In
7 - Blue – Azimuth Count In
6 - Green – Skew Motor Volts –
5 - Yellow – Skew Motor Volts +
4 - Orange – Elevation Motor Volts –
3 - Red –Elevation Motor Volts +
2 - Brown – Azimuth Motor Volts –
1 - Black – Azimuth Motor Volts +

RV DataSat 840 - Operation Manual - V2.0 - 2.1.2016
17
Caution: Ensure electrical connections are restored properly or damage to electronic
equipment may occur.
18. Put Dielectric compound in both exterior coaxial cable connections.
19. Secure wires starting from the antenna junction box and working toward the roof penetration
using wire clips.
Figure 11 - Antenna Junction Box
20. Carefully tie the 3 wires together to create a “service loop” of approximately 2 - 3 feet.
21. Secure the service loop to the roof using wire clips.
22. Working toward the roof penetration secure the cables to the roof approximately every 10 - 12
inches until you reach the roof penetration.
Caution: Place a wire fastener close to the roof penetration to help prevent cable
movement while Dicor is curing.
23. Put Dicor over all screws to prevent water leakage.
24. Push all excess cable down into the hole until wires are dressed nicely.
Caution: Ensure wires will not rub against the sharp edges of the hole in order to
prevent electrical shorts or open cables. Use a file as necessary to blunt sharp edges.
Caution: It is advisable to place the open end of the clamshell toward the rear end of
the vehicle to prevent pressure on the opening while driving in the rain.

RV DataSat 840 - Operation Manual - V2.0 - 2.1.2016
18
25. Put silicone in the hole to fill the void and help prevent water penetration.
Caution: Do not use Dicor for this purpose, it is self leveling and will simply drain
through the hole into your vehicle.
26. Once the silicone has set use Dicor around the Silicone to water seal the cable penetration area.
27. Fill the clam shell with Dicor and put a bead of Dicor around the seating surface of the clam
shell.
28. Screw the clamshell to the roof.
29. Apply Dicor over the clam shell mounting screws and around the outside seam. Pay particular
attention to the cable entry point.
Figure 12 - Clamshell
30. Inside the electronics cabinet, carefully wrap excess cable into a coil and secure to the back of
the cabinet.
31. Securely fasten the electronics into the selected storage location.
Caution: Do not stack electronics equipment as it will cause excessive heat buildup and
potentially damage some or all of your equipment.
Caution: Do NOT stack the control unit on top of the modem. Doing so will cause the
controller to overheat and lock up. Make sure you leave at least a 1.5” air gap between all
components
Caution: Failure to thoroughly secure the equipment in the cabinet may cause danger
to the electronics or personnel during travel.

RV DataSat 840 - Operation Manual - V2.0 - 2.1.2016
19
32. Connect the equipment in accordance with the overall system drawing (Figure 3).
a. Black control cable from ACU to the antenna junction box.
b. Black coaxial cable from ACU “LNB In” to the antenna junction box.
Note: Use dielectric grease on the external coaxial connection.
c. White coaxial cable from modem “TX out” to the antenna junction box TX.
Note: Use dielectric grease on the external coaxial connection.
d. Black jumper cable from ACU “RX In” to the modem “RX IN”
e. Yellow Ethernet cable from ACU “LAN port” to the Router Port 1 (yellow).
f. Blue Ethernet cable from Router WAN port (blue) to the modem “Lan A” port.
g. Power cable Router to power strip.
h. Power cable Modem to power strip.
i. Power cable ACU to power strip.
j. Power strip to AC power source.
33. Power on all electronic equipment including the RV DataSat ACU-1, ASUS Router and iDirect X5
Modem.
34. Test operate the RV DataSat system using the normal operation section of this manual.
Caution: If you encounter any problems with normal operation of the system contact
MobilSat Technical Support prior to continuing this installation.
35. The system is ready for normal use.

RV DataSat 840 - Operation Manual - V2.0 - 2.1.2016
20
Figure 13 – Sample Antenna Install Picture

RV DataSat 840 - Operation Manual - V2.0 - 2.1.2016
21
Normal Operation
Site Survey 1. Prior to operating the antenna system, verify there are no trees, buildings or power lines
obstructing your view to the southern sky.
2. Elevated locations are recommended.
3. Do not place the dish with a pedestrian crossing or highway immediately to the south.
System Operation
Satellite Aquisition
1. Power on your electronics equipment.
a. iDirect X5 Modem – Plug into power strip/UPS.
b. DataSAT ACU-1 – Plug into power strip/UPS, Press the front panel “Power” button.
Figure 14 - DataSAT ACU-1
c. ASUS wireless router – Plug into power strip/UPS, Press the back panel power button.
d. Apply power to your power strip/UPS as appropriate.
2. Allow 2 to 3 minutes for a normal boot process.
a. The iDirect X5 modem is booted up normally when the Rx and Net lights are solid
amber.
b. The ACU-1 controller is booted up normally when the display shows as follows
c. The ASUS router will display a blue power and wireless light approximately 15 seconds
after a normal start.
3. Press the green “Search” button on the front of the ACU-1.
4. Wait for the search to complete (approximately 3 to 15 minutes).
5. Allow 2 minutes for the modem to enter the network. All 5 lights on the front panel will be solid
green once that is complete.
6. Browse to any web page. If this is your first attempt to use the system or your service plan has
expired, you will be redirected to the service sign up page. The latest detailed instructions can
be found at http://www.mobilsat.com/Insta-Sat/

RV DataSat 840 - Operation Manual - V2.0 - 2.1.2016
22
Stowing the system for travel
1. Press the “Stow” button on the front panel of the ACU-1.
2. Verify the system stowed by physically inspecting it.
Caution: It is critical to physically inspect the dish prior to moving the vehicle as
traveling with the dish up will result in total destruction of the antenna.

RV DataSat 840 - Operation Manual - V2.0 - 2.1.2016
23
Bandwidth Sign Up.
1. The landing page. Enter or create a login.
Figure 15 - Insta-Sat 1
2. Read and acknowledge the subscriber agreement
Figure 16 - Insta-Sat 2

RV DataSat 840 - Operation Manual - V2.0 - 2.1.2016
24
3. Select your desired service plan and select “Continue”
Figure 17 - Insta-Sat 3
4. Enter your account information and select “Continue”
Figure 18 - Insta-Sat 4

RV DataSat 840 - Operation Manual - V2.0 - 2.1.2016
25
5. Enter you payment information and select “Continue”
Figure 19 - Insta-Sat 5
6. Verify all information is correct and select “Sign-Up”
Figure 20 - Insta-Sat 6

RV DataSat 840 - Operation Manual - V2.0 - 2.1.2016
26
7. Click the link to access the login page
Figure 21 - Insta-Sat 7
8. Log into your account
Figure 22 - Insta-Sat 8
9. Select “Internet Login” to begin browsing the internet or select “Manage Account” to view
remaining account balance etc.

RV DataSat 840 - Operation Manual - V2.0 - 2.1.2016
27
Controller Configuration
DataSAT ACU-1 Satellite Antenna Controller Setup
The ACU comes pre- configured. In the event your configuration is lost or at the direction of a
technician you may need to access the configuration screens.
Turn on the ACU-1 Controller Power located on the front right side of the controller. The LCD
should power on as shown below.
Figure 23 - ACU-1 Controller Initial Screen
Open a Web Browser.
Figure 24 - Compatible Web Browsers
Enter the Controller IP Address. Default is 192.168.1.250.
Figure 25 - Controller Front Page

RV DataSat 840 - Operation Manual - V2.0 - 2.1.2016
28
Confirming the ACU IP address
If the ACU-1 HTML page does not come up you can confirm the controller IP address by using
the Front Panel Menu commands. These are the Power/Menu, Search/Up, and Stow/Down
buttons. Pressing the Power one time when the Controller is already on will enter the Menu
Mode.
Using The Down button keep stepping the command until MENU 9: is displayed.
Figure 26 - Controller Front Panel - IP
Press the Power/Menu button one more time to see the Controller IP Address.
Figure 27 - Controller Front Panel - IP
Network Settings
Move the mouse to highlight Configuration then select Network Settings.
Figure 28 - Controller Network Settings

RV DataSat 840 - Operation Manual - V2.0 - 2.1.2016
29
Confirm the Subnet Mask, Modem Gateway, and Primary DNS Server are as shown above.
RF Settings
Move the mouse to highlight Configuration then select RF Settings.
Figure 29 - Controller RF Settings
Confirm the LNB settings are correct as shown above. Any errors on this page will result in the
Antenna Controller not finding the correct satellite or the Modem not getting an RX Lock.
Dish Calibration
Move the mouse to highlight Configuration then select Dish Calibration.

RV DataSat 840 - Operation Manual - V2.0 - 2.1.2016
30
Figure 30 - Controller - Calibration
Select Start. A Dish Calibration is required one time to complete installation and configuration.
Once completed the System is ready for use.
Press Search to begin.
Figure 31 - Controller - Searching
Controller will peak and Optimize.

RV DataSat 840 - Operation Manual - V2.0 - 2.1.2016
31
Figure 32 - Controller - Optimizing
Search Complete.
Figure 33 - Controller - Complete

RV DataSat 840 - Operation Manual - V2.0 - 2.1.2016
32
Toubleshooting
Azimuth Overcurrent In the event that you receive an Azimuth Overcurrent error, then it is possible that the heading of the
antenna matches the Azimuth look angle, causing the antenna not to peak on the satellite signal.
1. The issue is caused by a Blind Spot on the antenna. Try to move your vehicle, so as to change
the heading of the antenna. This will only need to be changed by a couple of degrees.
2. After moving vehicle, verify if problem re-occurs. If problem re-occurs, please contact tech
support at the number listed below.
Incorrect or blank GPS values In the event that the controller does not have any GPS or is showing the incorrect GPS location, try to
power off your equipment and start over. If the issue persists, follow the steps below.
Inside the RV
1. Check the 12 Position Green Terminal Connector is snapped in securely to the ACU
Caution: Failure to power off the electronics prior to unplugging any cable may result in damage to the electronics or their associated power supplies.
2. The last 3 wires on the right end of connector are for the GPS. Check the White (10), Pink (11), and Tan (12) wires are properly stripped and secured in the Green connector.
3. With a voltmeter, check for 15-18 VDC between position 10 (White) and 11 (Pink)
On the Antenna
1. Stow dish
2. Remove the skew cover on the back side of the dish.
3. Check if the power LED (Blue) lit or blinking?
4. Verify that the white connector on the right side of the GPS module fully connected?
5. Are the 3 leads of the GPS +5VDC module secured with terminal screws?
6. Check the Red, Orange and White wires are properly stripped and secured in the terminal
connector.
7. With a Voltmeter, check for 15-18VDC between position 5 (White) and 7 (Red)
RV DataSat 840 - Operation Manual - V2.0 - 2.1.2016
33
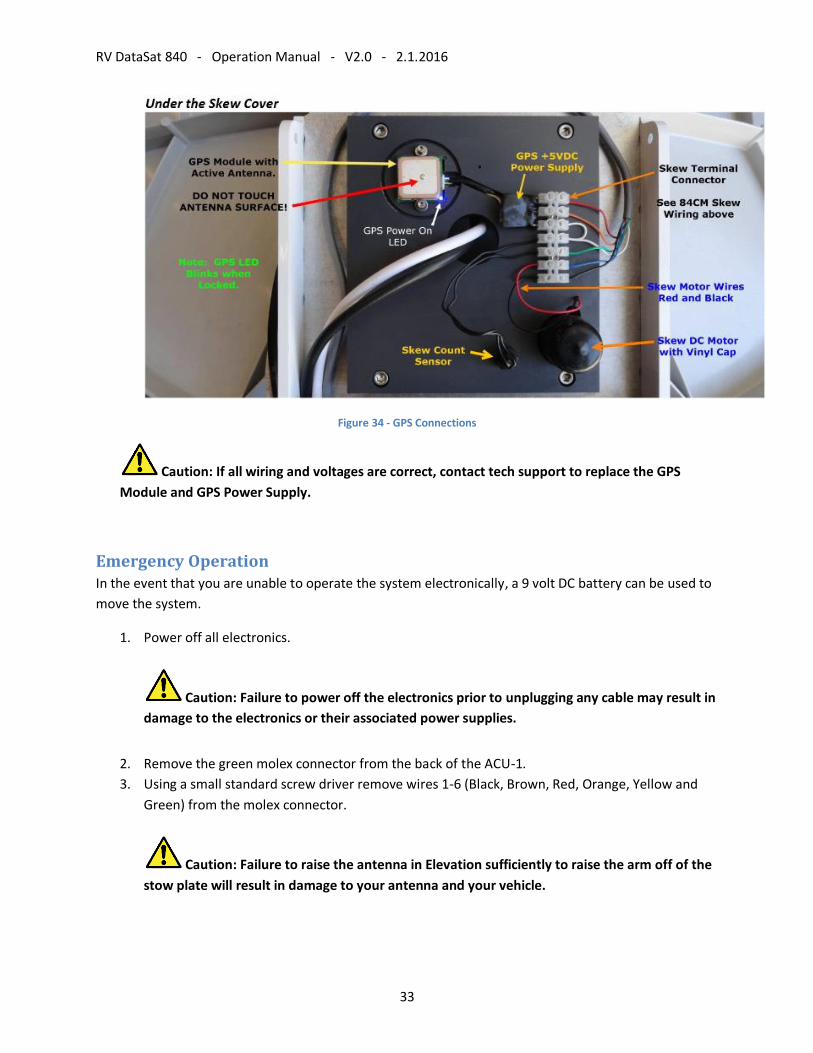
Figure 34 - GPS Connections
Caution: If all wiring and voltages are correct, contact tech support to replace the GPS
Module and GPS Power Supply.
Emergency Operation In the event that you are unable to operate the system electronically, a 9 volt DC battery can be used to
move the system.
1. Power off all electronics.
Caution: Failure to power off the electronics prior to unplugging any cable may result in
damage to the electronics or their associated power supplies.
2. Remove the green molex connector from the back of the ACU-1. 3. Using a small standard screw driver remove wires 1-6 (Black, Brown, Red, Orange, Yellow and
Green) from the molex connector.
Caution: Failure to raise the antenna in Elevation sufficiently to raise the arm off of the
stow plate will result in damage to your antenna and your vehicle.

RV DataSat 840 - Operation Manual - V2.0 - 2.1.2016
34
4. Connect the wires to the terminals on the 9 Volt battery to move the antenna. All movements
are relative to standing behind the dish.
Elevation
a. Red to Positive (+), Orange to Negative (-) = Elevation UP b. Red to Negative (-), Orange to Positive (+) = Elevation DOWN
Azimuth
c. Black to Positive (+), Brown to Negative (-) = Azimuth Clockwise d. Black to Negative (-), Brown to Positive (+) = Azimuth Counter-Clockwise
Skew e. Yellow to Positive (+), Green to Negative (-) = Skew Counter-Clockwise f. Yellow to Negative (-), Green to Positive (+) = Skew Clockwise
5. Restore all wires to the appropriate slot in the molex connector. 6. Reseat the molex connecter into the ACU-1.
RV DataSat 840 - Operation Manual - V2.0 - 2.1.2016
35
Support and Assistance
Mobil Satellite Technologies business location
2021 Scenic Parkway Chesapeake, VA. 23323
Assistance Options available
For sales requests call 757-312-8300 x1 or email [email protected]
For technical assistance call 757-312-8300 x2 or email
For shipping requests call 757-312-8300 x3 or email [email protected]
For service requests call 757-312-8300 x4 or email [email protected]
For billing requests call 757-312-8300 x5 or email [email protected]
Fax any documentation to 757-282-7702
Technical Support hours of operation
8:30am to 9pm 7 days per week except holidays.
Technical Support assistance process
When calling for support please be at the satellite equipment and have the
serial number of the iDirect modem ready. Technical support will take your
contact information and create a case to track your issue.
The warranty for most products is 1 year and requires the customer deliver
the affected equipment to the manufacturer.


![Efficient Fair Queuing Using Deficit Round-Robincheung/papers/netw-QoS/1998-shreedhar-DDR.pdfEfficient Fair Queuing Using Deficit Round-Robin ... Round-robin scheduling [13] can be](https://static.documents.pub/doc/80x56/5b1aba927f8b9a3c258e022e/efficient-fair-queuing-using-deficit-round-cheungpapersnetw-qos1998-shreedhar-ddrpdfefficient.jpg)


