This section describes how to use the rewinder safely. Be sure to read the following information carefully before using the rewinder.
Pictographic Symbols
This operator manual use a variety of pictographic symbols. These symbols emphasize the safe and correct use of the rewinder and to prevent injury to others and property damage. The explanation of the symbols are as follows. Be sure to understand these symbols well before you read the main text.
WARNINGIgnoring the instructions marked by this symbol and erroneously operating the rewinder could result in death or serious injury.
CAUTIONIgnoring the instructions marked by this symbol and erroneously operating the rewinder could result in injury or property damage.
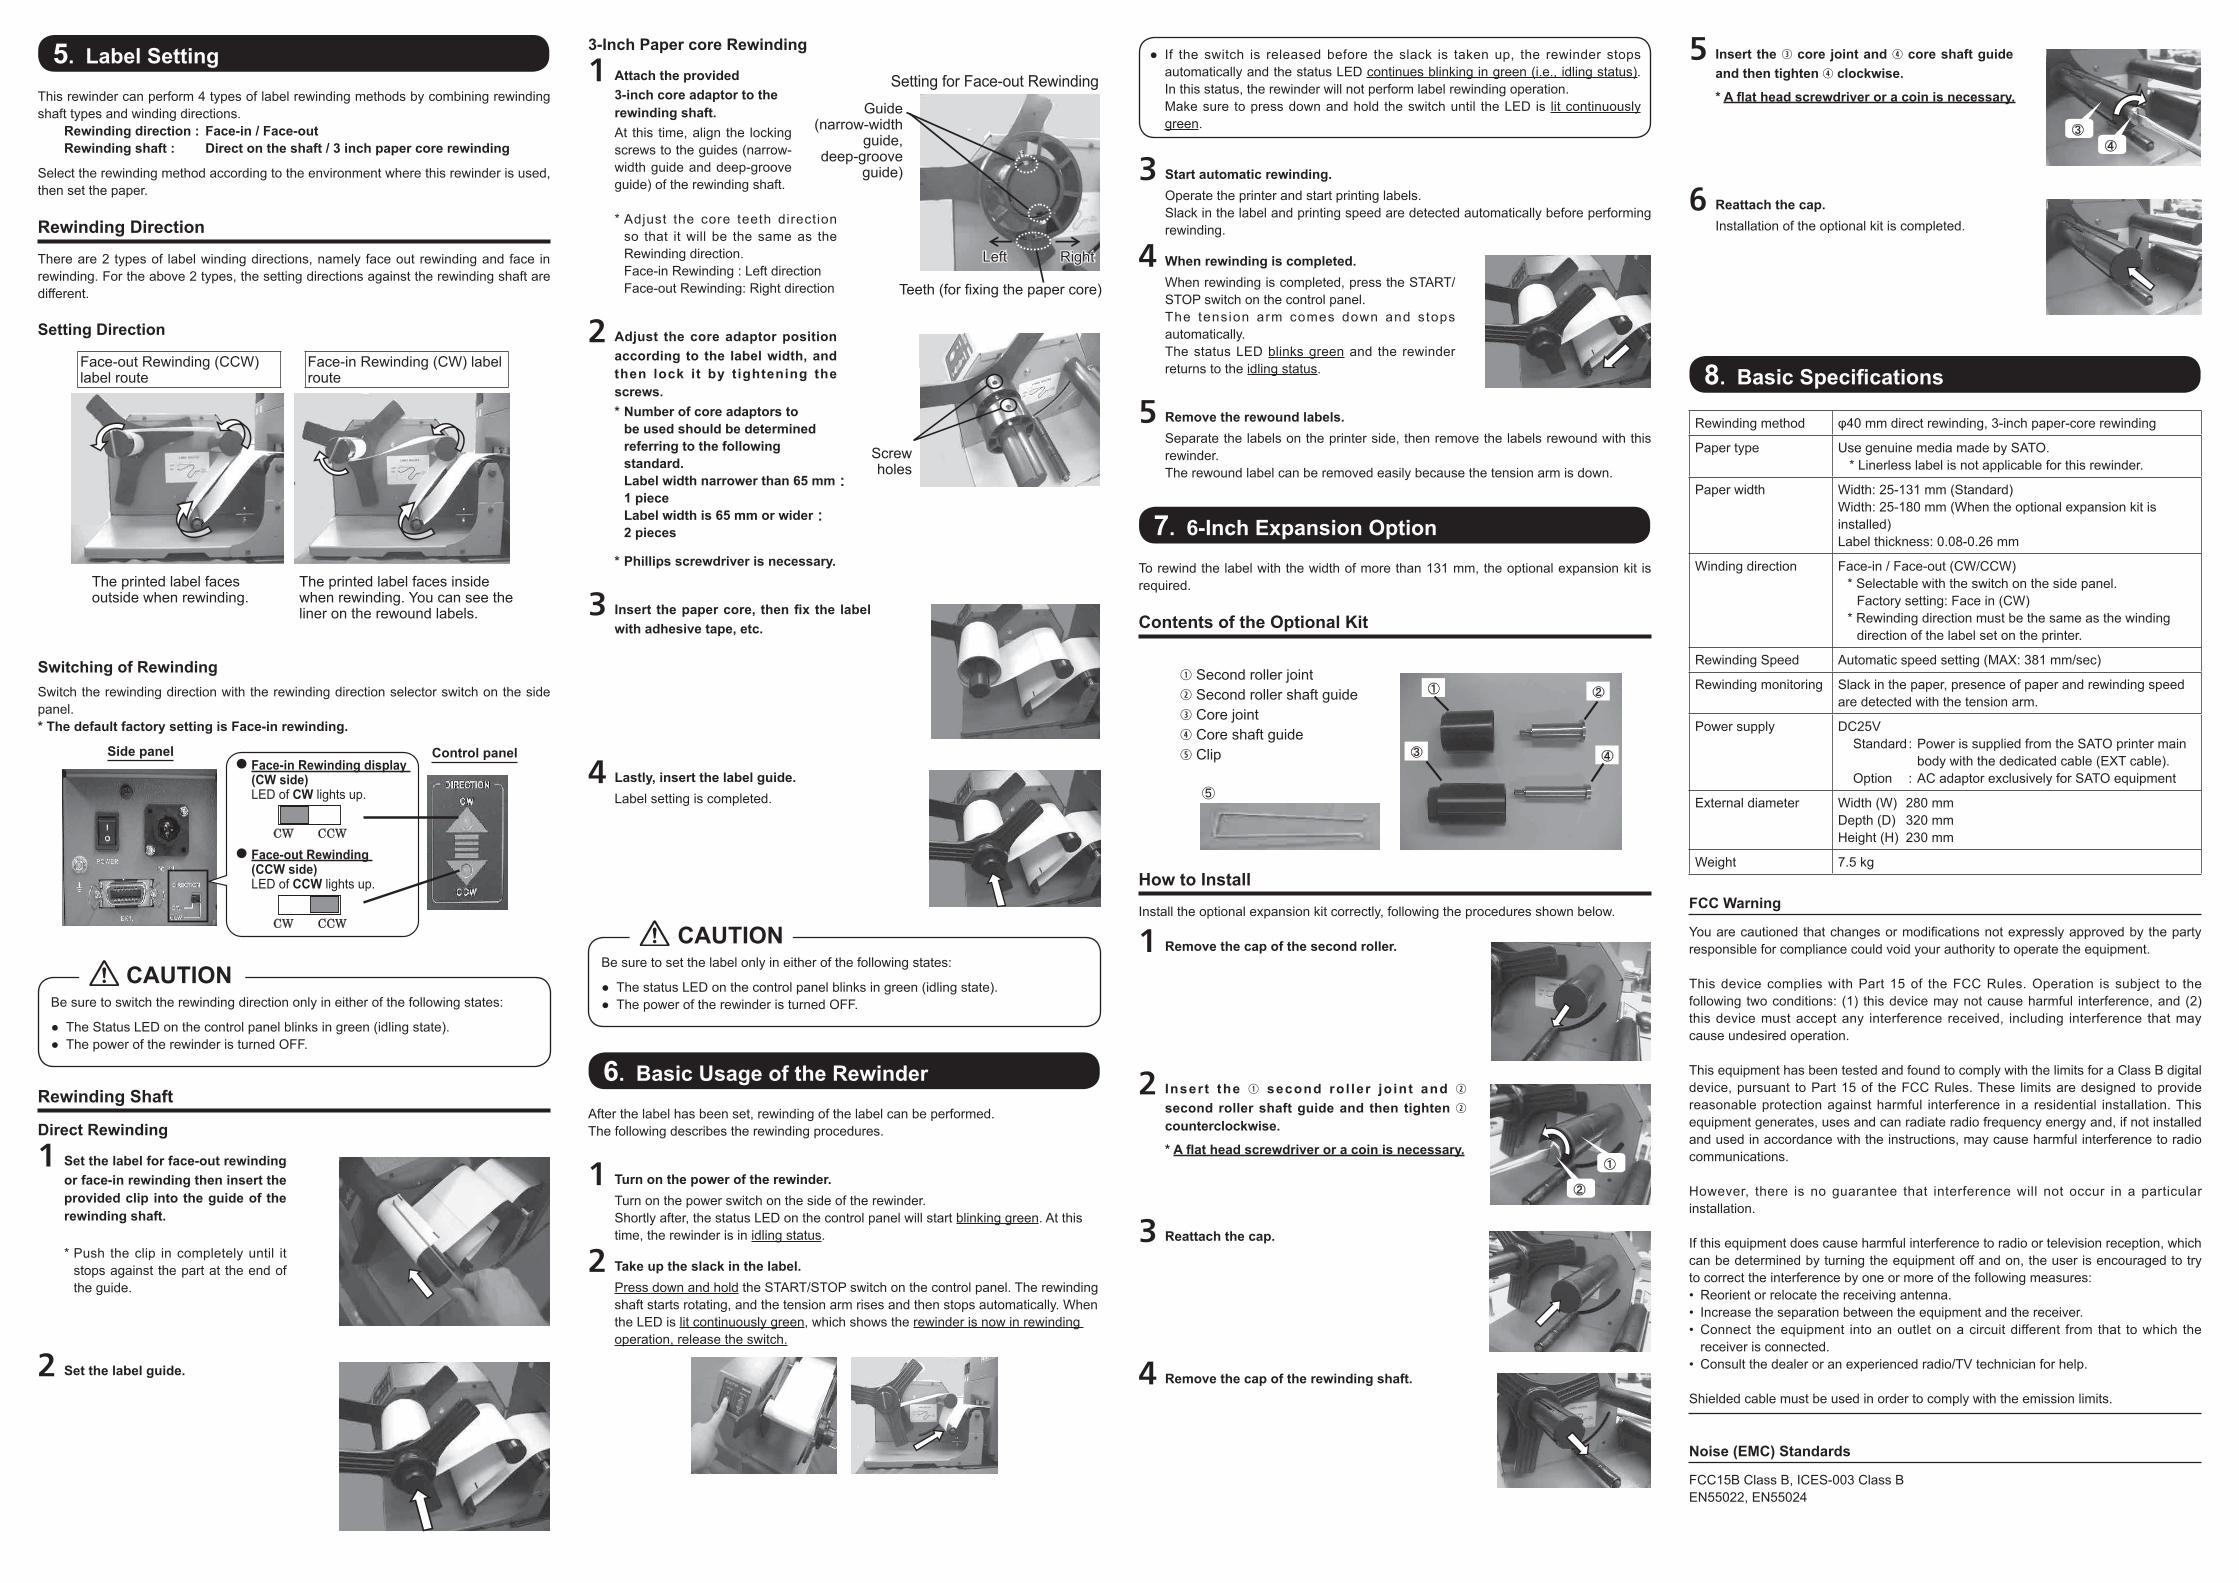
Symbol example
The pictograph means “Caution is required.” A specific warning symbol is contained inside this pictograph.
The pictograph means “Should not be done.” What is specifically prohibited is contained in or near the pictograph.
The pictograph means “Must be done.” What is specifically to be done is contained in the pictograph.
WARNING
Do not set on an unstable areaDo not set on an unstable area, such as a wobbly table or slanted area or an area subject to strong vibration. If the rewinder falls off or topples over, it could injure someone.
Do not place containers full of water or other liquid on the rewinderDo not place flower vases, cups, or other containers holding liquids, such as water or chemicals, or small metal objects near the rewinder. If they are spilled and get inside the rewinder, immediately turn off the power switch, unplug the power cord from the outlet, and contact your SATO reseller or technical support center. Using the rewinder in this condition could cause a fire or electric shock.
Do not put objects inside the rewinderDo not insert or drop in metal or burnable objects inside the rewinder’s openings (cable outlets, etc.). If foreign objects do get inside the rewinder, immediately turn off the power switch, unplug the power cord from the outlet, and contact your SATO reseller or technical support center. Using the rewinder in this condition could cause a fire or electric shock.
When the rewinder has been dropped or brokenIf the rewinder is dropped or broken, immediately turn off the power switch, unplug the power cord from the outlet, and contact your SATO reseller or technical support center. Using the rewinder in this condition could cause a fire or electric shock.
Do not use the rewinder when something is abnormal about itContinuing to use the rewinder in the event something is abnormal about it, such as smoke or unusual smells coming from it, could result in fire or electric shock. Immediately turn off the power switch, unplug the power cord from the outlet, and contact your SATO reseller or technical support center for repairs. It is dangerous for the customer to try to repair it, so absolutely do not attempt repairs on your own.
Do not disassemble the rewinderDo not disassemble or modify the rewinder. Doing so could result in fire or electric shock. Ask your SATO reseller or technical support center to conduct internal inspections, adjustments, and repairs.
CAUTION
Do not place in areas with high humidityDo not place the rewinder in areas with high humidity or where condensation forms. If condensation forms, immediately turn off the power switch and do not use the rewinder until it dries. Using the rewinder while condensation is on it could result in electric shock.
Carrying the Rewinder• When moving the rewinder, always unplug the power cord from the outlet
and check to make sure all external wires are disconnected before moving it. Moving the rewinder with the wires still connected could damage the cords or connecting wires and result in a fire or electrical shock.
• Do not carry the rewinder with media loaded in it. The media could fall out and cause an injury.
• When setting the rewinder on the floor or a stand, make sure not to get your fingers or hands pinched under the rewinder feet.
1. Main Body and Accessories① ②
⑥④ ③
⑤
OperatorManual
RWG500 main body Label guide EXT cable Clip 3-inch core adaptor (2 pieces) Operator Manual (this sheet)
How to connect the AC adaptor (optional)Insert the plug of the AC adaptor in the connector for AC adaptor connection , and fix it by turning clockwise .
①
②
①
②
3. First Roller Height Setting
Depending on the printer to be connected, adjust the first roller height to either the upper or lower position.
1Check the height of the Media discharge outlet of the printer to be used.If the Media discharge outlet and the first roller of the rewinder are not equal in height, adjust the height with the following procedure:
2Removethesetscrews(1screweachleftandright)thatlockthefirstroller. * Phillips screwdriver is necessary.
3Slidethefirstrollerupwardordownwardsothattheheightoftherollermatches the height of the Media discharge outlet of the printer.Reinstall and tighten the removed set screws (1 screw each left and right).
Roller position: Upper side
Roller position: Lower side
Set screw on the upper side
Set screw on the lower side
4. Connection to Printer
1Place the rewinder at the front of the printer and align with the Media discharge outlet of the printer.
2Connect the EXT cable to the EXT connector of the printer.* For the position of the EXT connector, refer to the operating manual of the
printer.
3Connect other side of the EXT cable to the EXT. connector for RWG500.
● Make sure the power of both the printer and the rewinder are turned off before connecting/disconnecting them.
● Make sure that the rewinder is set correctly in front of the printer, otherwise labels would not be rewinded properly.
This rewinder can perform 4 types of label rewinding methods by combining rewinding shaft types and winding directions.
Rewinding direction : Face-in / Face-outRewinding shaft : Direct on the shaft / 3 inch paper core rewinding
Select the rewinding method according to the environment where this rewinder is used, then set the paper.
Rewinding Direction
There are 2 types of label winding directions, namely face out rewinding and face in rewinding. For the above 2 types, the setting directions against the rewinding shaft are different.
Setting Direction
Face-out Rewinding (CCW) label route
Face-in Rewinding (CW) label route
The printed label faces outside when rewinding.
The printed label faces inside when rewinding. You can see the liner on the rewound labels.
Switching of RewindingSwitch the rewinding direction with the rewinding direction selector switch on the side panel.* The default factory setting is Face-in rewinding.
●
●
CW CCW
CW CCW
Side panel Control panelFace-in Rewinding display (CW side)LED of CW lights up.
Face-out Rewinding (CCW side)LED of CCW lights up.
Be sure to switch the rewinding direction only in either of the following states:
● The Status LED on the control panel blinks in green (idling state).● The power of the rewinder is turned OFF.
CAUTION
Rewinding Shaft
Direct Rewinding
1Set the label for face-out rewinding or face-in rewinding then insert the provided clip into the guide of the rewinding shaft.
* Push the clip in completely until it stops against the part at the end of the guide.
2Set the label guide.
3-Inch Paper core Rewinding
1Attach the provided 3-inch core adaptor to the rewinding shaft.At this time, align the locking screws to the guides (narrow-width guide and deep-groove guide) of the rewinding shaft.
* Adjust the core teeth direction so that it will be the same as the Rewinding direction.Face-in Rewinding : Left directionFace-out Rewinding: Right direction
2Adjust the core adaptor position according to the label width, and then lock it by tightening the screws.* Number of core adaptors to
be used should be determined referring to the following standard.Label width narrower than 65 mm :1 pieceLabel width is 65 mm or wider :2 pieces
* Phillips screwdriver is necessary.
3Insertthepapercore,thenfixthelabelwith adhesive tape, etc.
4Lastly, insert the label guide.Label setting is completed.
Be sure to set the label only in either of the following states:
● The status LED on the control panel blinks in green (idling state).● The power of the rewinder is turned OFF.
CAUTION
6. Basic Usage of the Rewinder
After the label has been set, rewinding of the label can be performed.The following describes the rewinding procedures.
1Turn on the power of the rewinder. Turn on the power switch on the side of the rewinder.
Shortly after, the status LED on the control panel will start blinking green. At this time, the rewinder is in idling status.
2Take up the slack in the label. Press down and hold the START/STOP switch on the control panel. The rewinding
shaft starts rotating, and the tension arm rises and then stops automatically. When the LED is lit continuously green, which shows the rewinder is now in rewinding operation, release the switch.
Guide
(narrow-width guide,
deep-groove guide)
Teeth (for fixing the paper core)
Setting for Face-out Rewinding
RightLeft
Screw holes
● If the switch is released before the slack is taken up, the rewinder stops automatically and the status LED continues blinking in green (i.e., idling status). In this status, the rewinder will not perform label rewinding operation.
Make sure to press down and hold the switch until the LED is lit continuously green.
3Start automatic rewinding.Operate the printer and start printing labels.Slack in the label and printing speed are detected automatically before performing rewinding.
4When rewinding is completed. When rewinding is completed, press the START/
STOP switch on the control panel.The tension arm comes down and stops automatically.The status LED blinks green and the rewinder returns to the idling status.
5Remove the rewound labels.Separate the labels on the printer side, then remove the labels rewound with this rewinder.The rewound label can be removed easily because the tension arm is down.
7. 6-Inch Expansion Option
To rewind the label with the width of more than 131 mm, the optional expansion kit is required.
Contents of the Optional Kit
Second roller joint Second roller shaft guide Core joint Core shaft guide Clip
How to Install
Install the optional expansion kit correctly, following the procedures shown below.
1Remove the cap of the second roller.
2Insert the second rol ler jo int and second roller shaft guide and then tighten counterclockwise.
* Aflatheadscrewdriveroracoinisnecessary.
3Reattach the cap.
4Remove the cap of the rewinding shaft.
① ②
④③
⑤
①
②
5Insert the core joint and core shaft guide and then tighten clockwise.
* Aflatheadscrewdriveroracoinisnecessary.
6Reattach the cap.Installation of the optional kit is completed.
8. BasicSpecificationsRewinding method φ40 mm direct rewinding, 3-inch paper-core rewinding
Paper type Use genuine media made by SATO.* Linerless label is not applicable for this rewinder.
Paper width Width: 25-131 mm (Standard)Width: 25-180 mm (When the optional expansion kit is installed)Label thickness: 0.08-0.26 mm
Winding direction Face-in / Face-out (CW/CCW)* Selectable with the switch on the side panel.
Factory setting: Face in (CW)* Rewinding direction must be the same as the winding
You are cautioned that changes or modifications not expressly approved by the party responsible for compliance could void your authority to operate the equipment.
This device complies with Part 15 of the FCC Rules. Operation is subject to the following two conditions: (1) this device may not cause harmful interference, and (2) this device must accept any interference received, including interference that may cause undesired operation.
This equipment has been tested and found to comply with the limits for a Class B digital device, pursuant to Part 15 of the FCC Rules. These limits are designed to provide reasonable protection against harmful interference in a residential installation. This equipment generates, uses and can radiate radio frequency energy and, if not installed and used in accordance with the instructions, may cause harmful interference to radio communications.
However, there is no guarantee that interference will not occur in a particular installation.
If this equipment does cause harmful interference to radio or television reception, which can be determined by turning the equipment off and on, the user is encouraged to try to correct the interference by one or more of the following measures:• Reorient or relocate the receiving antenna.• Increase the separation between the equipment and the receiver.• Connect the equipment into an outlet on a circuit different from that to which the
receiver is connected.• Consult the dealer or an experienced radio/TV technician for help.
Shielded cable must be used in order to comply with the emission limits.