47
Ryder Northrop Grumman Supplier Training

Ryder Northrop Grumman Supplier
Training

How to Access Ryder Online
This section will demonstrate step by step instructions on how to access the
Ryder Online system.

Click on Sign Up to create a new profile.
Select Supplier from the user type options.
The user will need to provide a valid Purchase Order number, with the destination city and state listed on the Purchase Order number.
How to access
RyderOnline

Next, users will be prompted to entertheir contact information.
Click Sign Up to complete the registration process.
How to access
RyderOnline

The user will receive an email with their temporary password
Click the complete the sign up link.
The email address used for sign up will be the users username.
You will need to reset your password before logging into the system for the first time.
How to access
RyderOnline

After logging in for the first time, the user will be taken through a brief walkthrough on how to setup their user profile.
How to access
RyderOnline

How to Update
Location Profiles
By default, only locations tied to your Northrop Grumman POs will load.
Add a new location by clicking the New Location button, or edit existing locations by clicking into them.

How to Update
Location Profiles
Changes can be made to the Location Name, Time zone and the Latitude/Longitude.
Ensure that an the Address 2 line includes any suite, building number, etc. identifiers
You may also add a memo for special instructions
Following any changes, remember to Validate the address.

How to Update
Location Profiles
Click Add Contact to add specify the Point of Contact for that location.
Users may enter N/a, or other placeholders if a POC is not necessary
Multiple persons can be entered.
At shipment creation, users will have the ability to select from all contacts entered here.
Check the Is Primary box to set a contact as the primary contact for a location.

Next, you will be prompted to update your location’s small parcel account information.
The Account Number is used to verify Daily Pickup. You will NOT be charged for entering it.
If your location is set up for a daily pickup, flag this by enabling the Daily Pickup check box in the Accounts section.
Information for more than one small parcel account/carrier can be added to a location profile.
How to access
RyderOnline

How to Create a Shipment in Order
Fulfillment
This section will demonstrate step by step instructions on how to create a shipment using
the Order Fulfillment Tool.

Proprietary and Confidential
Summary: Ryder Order Fulfillment
PO Line Items will load based on what is flagged as “Actionable” or “Non-Actionable”.
Actionable:
Non-Date Managed PO Line Items
Date Management will allow fulfillment 30 days from the On Dock Date, for all sectors except MS.
For MS, Date Management will be 30 days from the
On Dock Date or the NRD/MRP date.
Non-Actionable:
Date Managed PO Line Item and the Need/Due On Dock Date is more than 30 days out.
PO Line Items flagged as “Closed”.
PO Line Items flagged as “Deleted”.
PO Line Items flagged as “Fulfilled”.
PO Line Items flagged as “Locked”.
As a supplier user only PO Line Items associated with your company will be visible in Order Fulfillment.”
12

How to Use Order
Fulfillment
The Order Fulfillment screen load without results at login.
Selecting APPLY will load all Actionable POs by default.
Users may also search for specific POs and line items if needed.
Search for multiple criteria by adding a [SPACE] between each number and click APPLY.
Additional filters include: PO Origin / Destination, Buyer Code, Description, PSA, Delivery Date, Create Date, Line Item Number, and Item Status

Start the shipment create process by selecting a PO and Line Item.
Add multiple items to a shipment by selecting multiple PO lines.
POs will be automatically added to the same shipment if they can be shipped together.
If multiple PO’s are not able to ship together, they will be separated into different shipments by the system.
Line Items with a RED “PSA” symbol indicate Priority Shipment Authorization.
How to Use Order
Fulfillment

Differing Destinations
Differing Purchase Order Origins
PSA and non-PSA When PSAs are combined with differing authorization levels,
the shipments shall be rated and moved at the different levels of service authorization.
When TL, LTL, or Heavy Air, if there is space left in the shipment (to allow non-PSA handling units to be included), then non-PSA should try to be accommodated so that cost savings is realized for moving together.
Differing Sectors
HAZMAT and non-HAZMAT
Differing FOB terms
FOB indicators EKKO-INCO2 = 1, 2, or 4. (1 = Destination, 2 = Origin, 4 = Open end. *A 4 operates like a 2)
How to Use Order
Fulfillment
The following scenarios will NOT allow POs to be combined within the same Shipment:

Navigate to the shipment details by clicking the Shipments icon
By default the Origin and Destination is pre-populated based on the information received on the PO.
Origin information can be changed by selecting an address from the “Address Book”, or by manually entering the address information.
How to Use Order
Fulfillment

Users will then input the Handling Unit specs.
A Handling Unit is a physical unit consisting of packaging materials and the goods contained on/in it.
The Planned Quantity will default to 0 and is required to be updated. This is what the user plans to ship.
The Additional Options menu is available at the Item and Handling Unit levels.
Use this to Edit or add information to the Item / Handling Unit.
For Example: Dimensions will allows you to specify dimensions at the Item level.
How to Use Order
Fulfillment

The SPLIT option gives the user the option to split a specific item across multiple new handling units.
Selecting MOVE will give the user the option to move a specific item from one handling unit to another.
If an item requires serialization, the user will enter this information via the SERIALIZAION option
How to Use Order
Fulfillment

How to Use Order
Fulfillment
Click on the detail icon (i) to enter handling unit specs.
Users will be asked to enter the information upon submitting the shipment, if it is not entered here beforehand.
Selecting a package from the PACKAGING drop down will auto populate the dimensions on the handling unit.
CLEAR PLANNED will zero out any planned quantity that has been added to that handling unit.
Selecting DELETE will remove all items and planned quantity attached to that handling unit from the shipment.

For Hazmat shipments, click on the Hazmat icon to enter all hazmat information.
Users are then prompted to confirm that the item falls under hazardous classification
To ensure proper routing, all user submitted information must be entered exactly as shown in the Hazmat handbook
How to Use Order
Fulfillment

How to Use Order
Fulfillment
Selecting “Split All” will separate each piece will into its own handling unit.
A Planned Quantity must be entered prior to selecting this action.
Users will also have the ability to include tracking devices in shipments. The user will be able to enter the tracking unit ID for each Handling Unit.

A pickup date is required and selected by the supplier user.
This date can be manually entered, or selected using the calendar.
The system will not let a user select a date in the past.
If users would like to specify a ready Time, this should be entered in the Special Instructions memo.
Additional notes/memos can be added in the special instructions.
This section is NOT for added required equipment and/or equipment options. This is a freeform message that will be applied to the shipment.
How to Use Order
Fulfillment

If the PO Line item was received with PREPAID FOB Terms, the Vendor Truck option will default to yes.
POs for the MS Sector ignore this freight terms restriction.
Transportation will NOT be scheduled by Ryder if the Vendor Truck option is marked as Yes.
If a PSA is assigned to the PO Line item, Vendor Truck can be changed to YES or NO.
If no PSA is not assigned, Vendor Truck cannot be changed.
How to Use Order
Fulfillment

Start additional options section by selecting your equipment type.
Multiple options can be selected in the dropdown
Selecting VENDOR TRUCK will auto-route the shipment as customer pickup. If VENDOR TRUCK is marked as yes, Ryder will NOT schedule the transportation for that shipment.
How to Use Order
Fulfillment

How to Use Order
Fulfillment
Drag and drop a file from your computer or click in the field to select a document to upload.
Uploaded documents will be added to the shipment and can be viewed through the tracking screens, in the shipment documents section.

How to Use Order
Fulfillment
If any required information is missing at the handling unit level, the user will be prompted to enter this information before the shipment can be submitted.
Enter any missing information and click on Save and Submit.

How to Use Order
Fulfillment
After submission, users will be redirected to a confirmation screen.
Small Parcel Shipments are assigned to a carrier and load number immediately after creation.
For TL, LTL and other non-parcel sized shipments, a BOL will be generated when the load has been processedat the Ryder TMC and Tender Accepted by a carrier.
The supplier will be notified by email that the BOL is ready to print.
LTL Shipments must be processed by 11am to ensure same-day pickup.
How to Use Order
Fulfillment
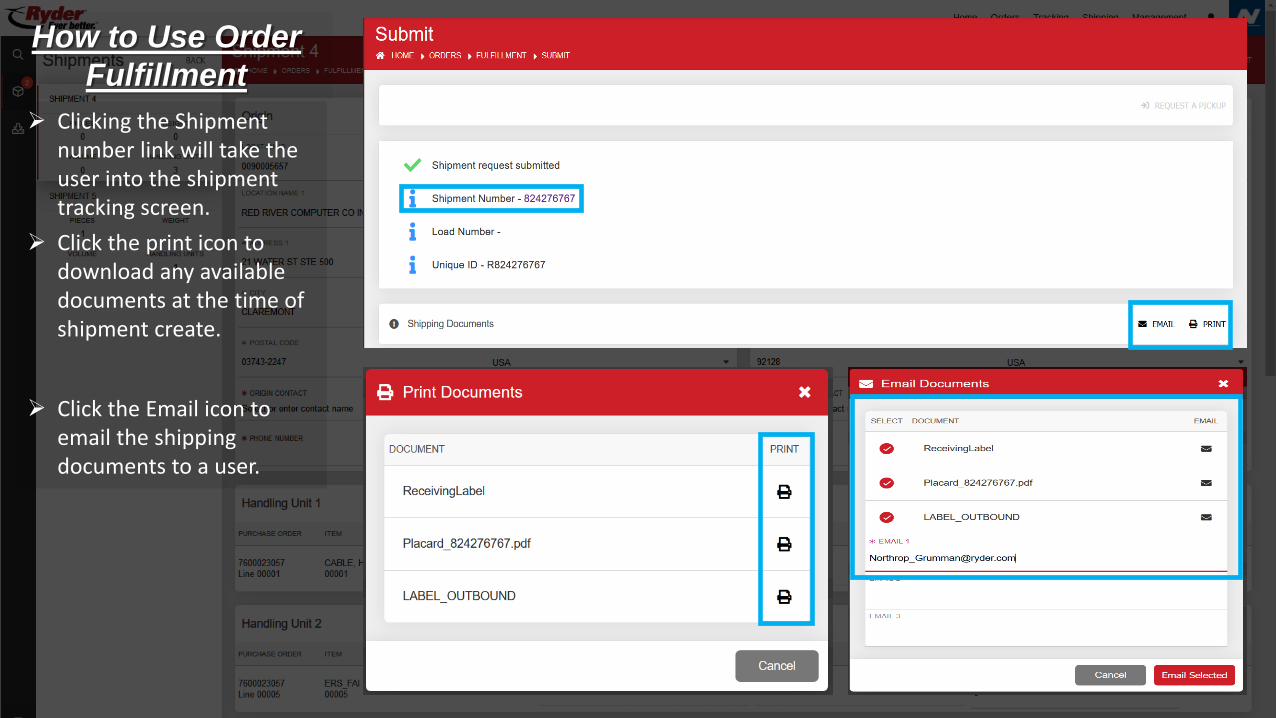
Clicking the Shipment number link will take the user into the shipment tracking screen.
Click the print icon to download any available documents at the time of shipment create.
Click the Email icon to email the shipping documents to a user.
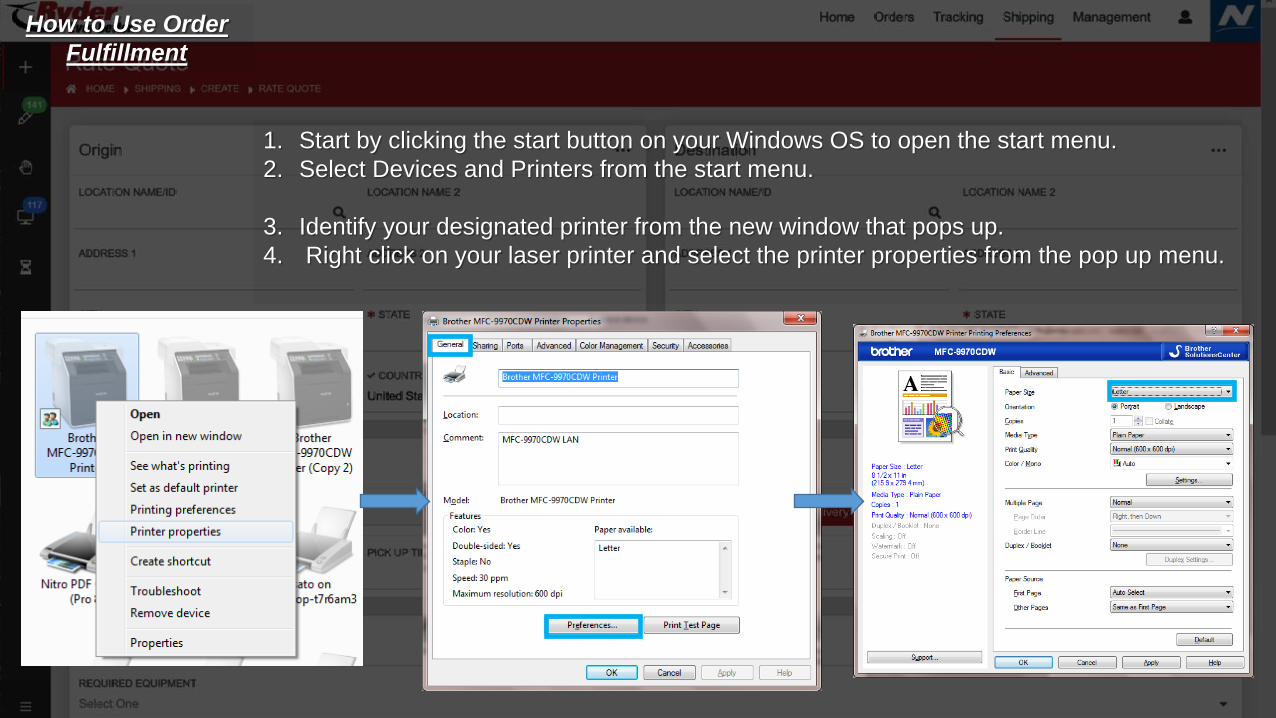
1. Start by clicking the start button on your Windows OS to open the start menu.
2. Select Devices and Printers from the start menu.
3. Identify your designated printer from the new window that pops up.
4. Right click on your laser printer and select the printer properties from the pop up menu.
How to Use Order
Fulfillment

How to Use Order
Fulfillment
Open the PDF file generated
by the Ryder website.

How to Create a Misc. Shipment
From a PO
This section will demonstrate step by step instructions on how to create a Misc.
Shipment.

Creating a Misc.
Shipment
Misc. Shipment creation is used only for unique circumstances.
To begin the process, search for the PO that will be used as the template for your shipment.
Next, click on the Details icon for the PO.

Creating a Misc.
Shipment
Click on Create a Miscellaneous Shipment, located on the bottom left of the details screen.
Creating a Misc.
Shipment
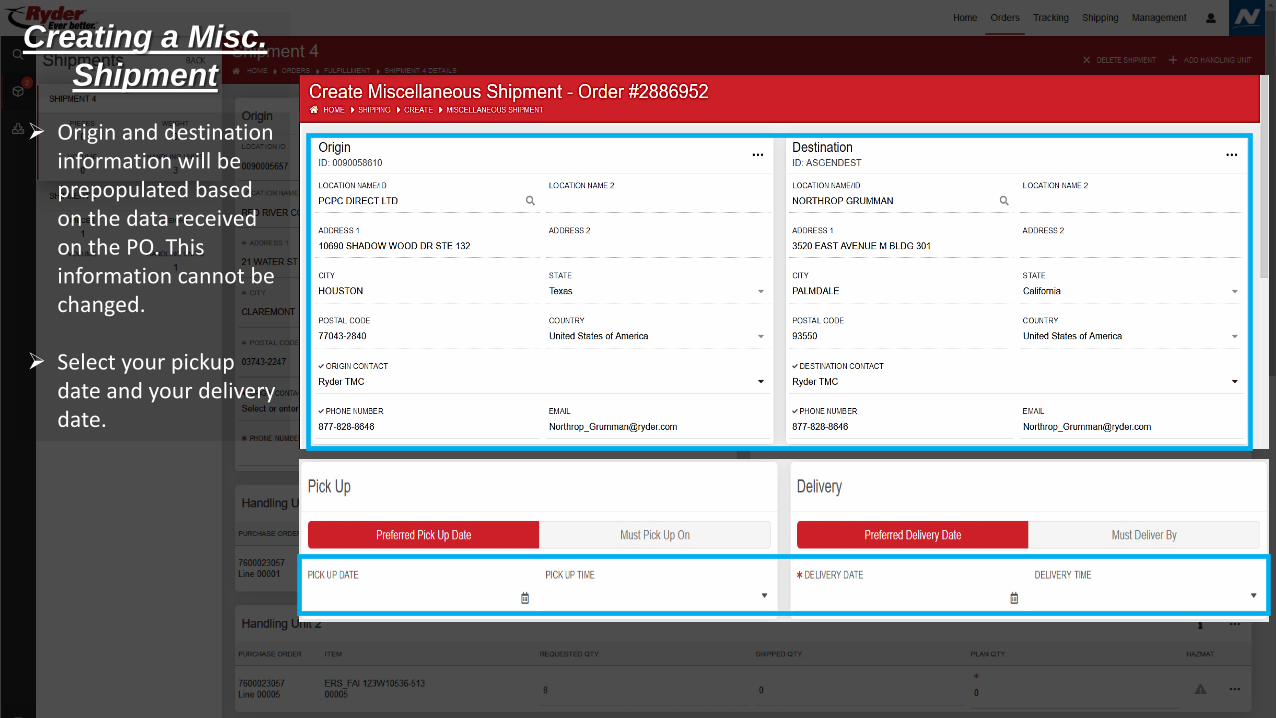
Origin and destination information will be prepopulated based on the data received on the PO. This information cannot be changed.
Select your pickup date and your delivery date.

Creating a Misc.
Shipment
Detail information will also be pre-populated based on the details received on the PO.
Any additional shipment instructions can be added in the shipment memo section.

Creating a Misc.
Shipment
Selecting Vendor Truck in the Options section will route your shipment as a Vendor scheduled truck.
Ryder will not book any transportation for shipments marked as Vendor Truck.
The equipment typeselected determines what equipment optionsare available to the user.
Multiple options can be selected in the dropdown
Creating a Misc.
Shipment
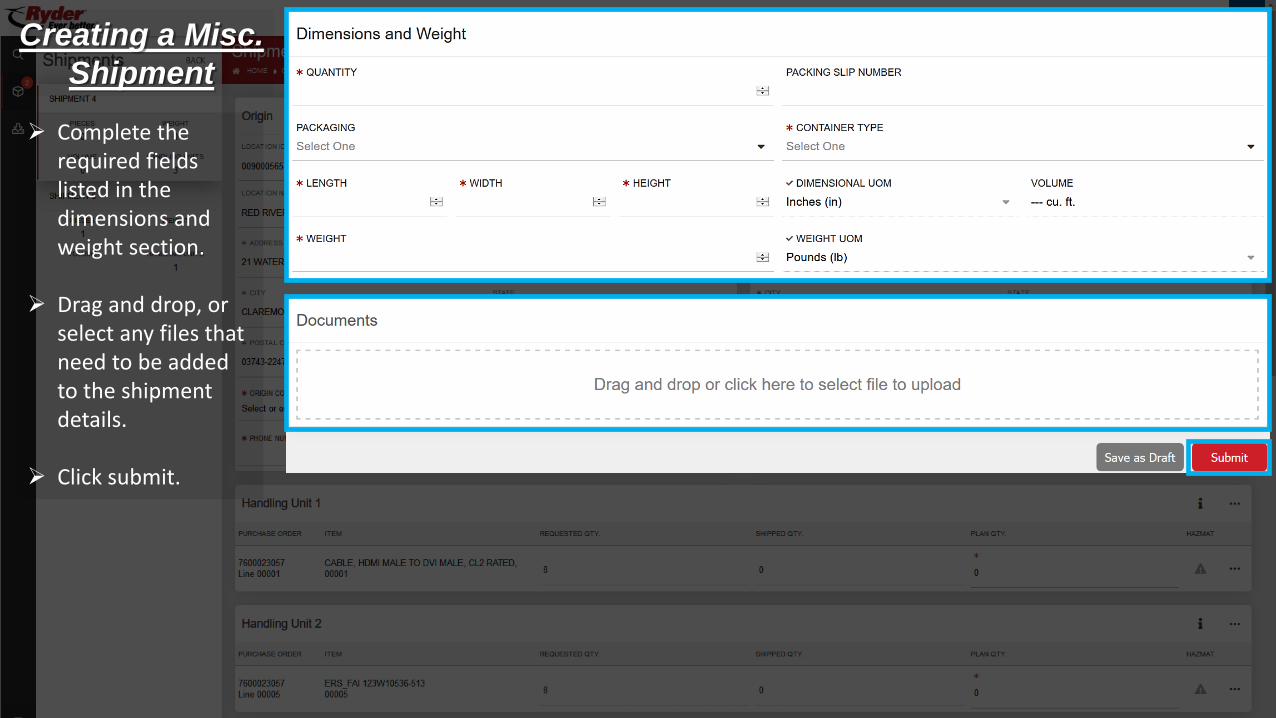
Complete the required fields listed in the dimensions and weight section.
Drag and drop, or select any files that need to be added to the shipment details.
Click submit.

Creating a Misc.
Shipment
If routed Parcel, your parcel label will be available to print on the shipment summary screen.
Shipping Placards will also be available to print from the shipment summary screen.

Creating a Misc.
Shipment
The user will have the option to email shipment details from the shipment summary screen.

Alert Definition

Managing your Alerts
Users may create customized alerts, to receive emails once specific actions occur in the system
Alerts can be generated from Load events, or down to the PO level.

Managing your
Alerts
Here is an example of an event generated from the load level.
The user would like to receive an email notification once a BOL is generated for any loads with the following criteria:
HOT AS Sector designation shipping from the
vendor MATHTECH INC (Origin Address ID# 90002643)

Tracking Using RyderOnline
This section will demonstrate step by step instructions on how to print a BOL and/or reprint shipping documents
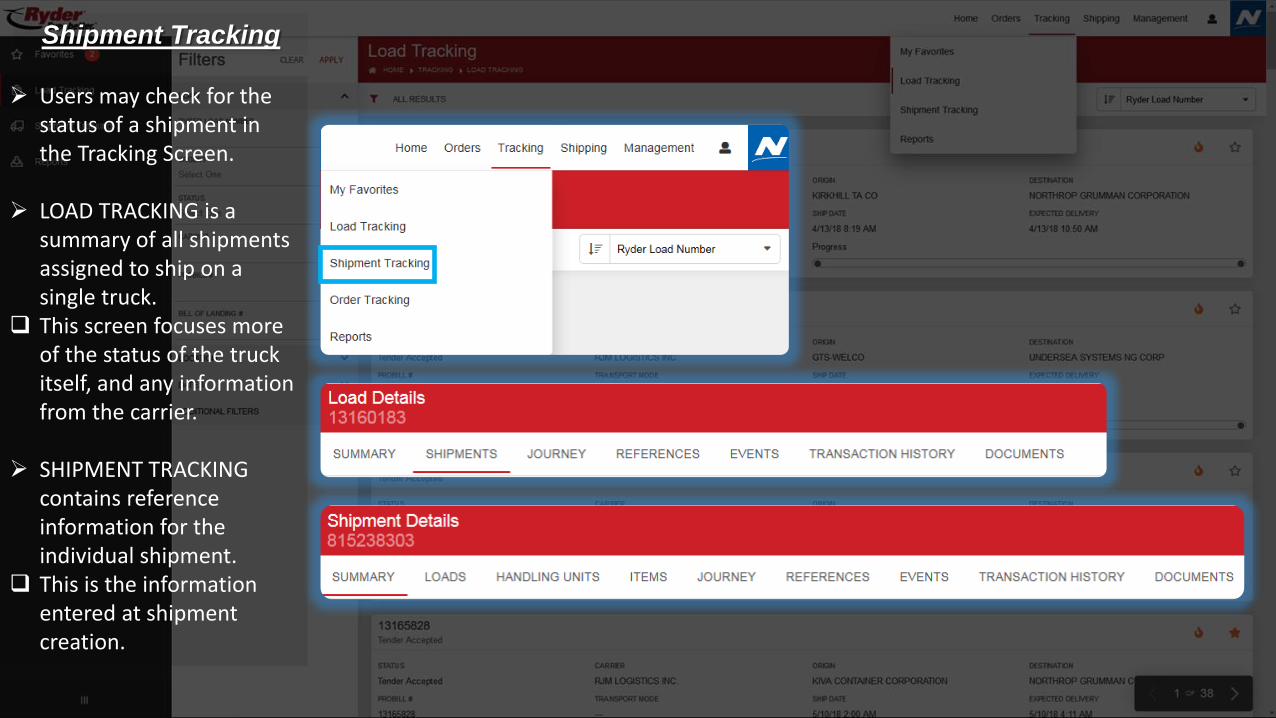
Users may check for the status of a shipment in the Tracking Screen.
LOAD TRACKING is a summary of all shipments assigned to ship on a single truck.
This screen focuses more of the status of the truck itself, and any information from the carrier.
SHIPMENT TRACKING contains reference information for the individual shipment.
This is the information entered at shipment creation.
Shipment Tracking

Shipment Tracking Example:
Super User would like to view all inbound orders with the following criteria –
Supplier:HYDROFORM USA
(Users may perform a wildcard search by partially entering the Origin Name)
Scheduled Ship Date:05/31/2018 – [Present] RESULTS
Proprietary and Confidential
Ryder Order Fulfillment FAQ
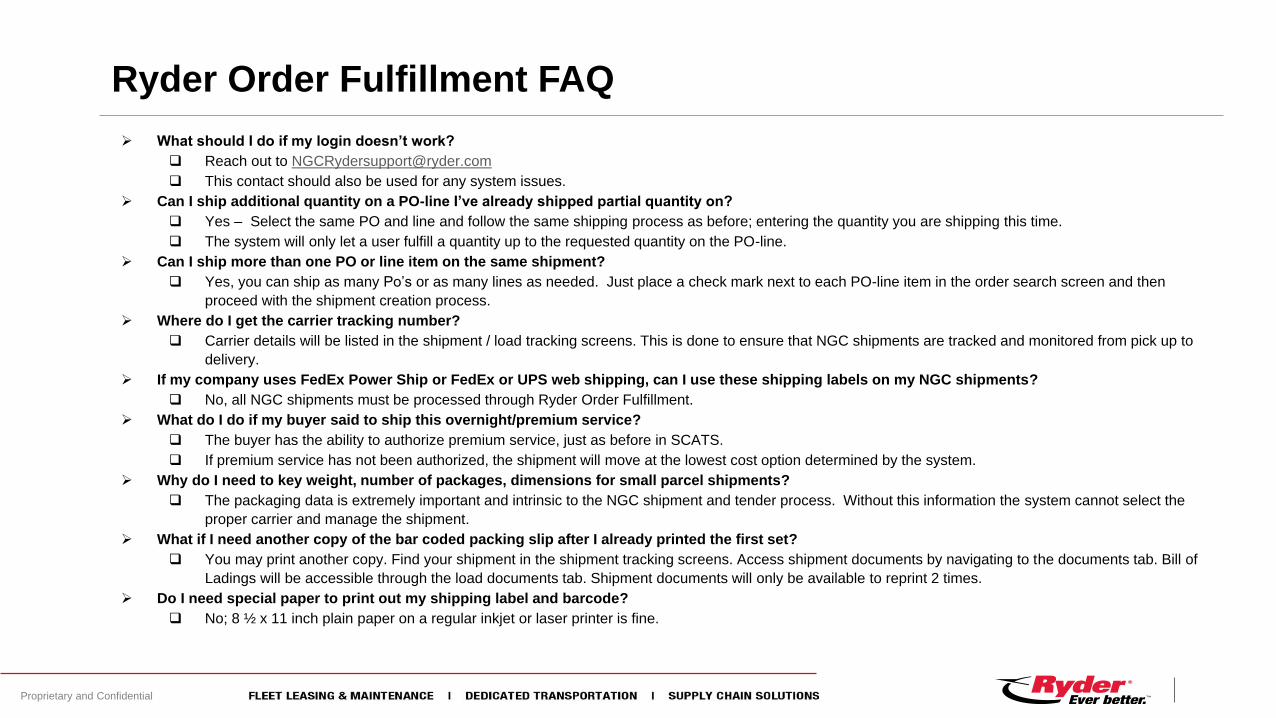
What should I do if my login doesn’t work?
Reach out to [email protected]
This contact should also be used for any system issues.
Can I ship additional quantity on a PO-line I’ve already shipped partial quantity on?
Yes – Select the same PO and line and follow the same shipping process as before; entering the quantity you are shipping this time.
The system will only let a user fulfill a quantity up to the requested quantity on the PO-line.
Can I ship more than one PO or line item on the same shipment?
Yes, you can ship as many Po’s or as many lines as needed. Just place a check mark next to each PO-line item in the order search screen and then
proceed with the shipment creation process.
Where do I get the carrier tracking number?
Carrier details will be listed in the shipment / load tracking screens. This is done to ensure that NGC shipments are tracked and monitored from pick up to
delivery.
If my company uses FedEx Power Ship or FedEx or UPS web shipping, can I use these shipping labels on my NGC shipments?
No, all NGC shipments must be processed through Ryder Order Fulfillment.
What do I do if my buyer said to ship this overnight/premium service?
The buyer has the ability to authorize premium service, just as before in SCATS.
If premium service has not been authorized, the shipment will move at the lowest cost option determined by the system.
Why do I need to key weight, number of packages, dimensions for small parcel shipments?
The packaging data is extremely important and intrinsic to the NGC shipment and tender process. Without this information the system cannot select the
proper carrier and manage the shipment.
What if I need another copy of the bar coded packing slip after I already printed the first set?
You may print another copy. Find your shipment in the shipment tracking screens. Access shipment documents by navigating to the documents tab. Bill of
Ladings will be accessible through the load documents tab. Shipment documents will only be available to reprint 2 times.
Do I need special paper to print out my shipping label and barcode?
No; 8 ½ x 11 inch plain paper on a regular inkjet or laser printer is fine.
Proprietary and Confidential
Ryder Order Fulfillment FAQ
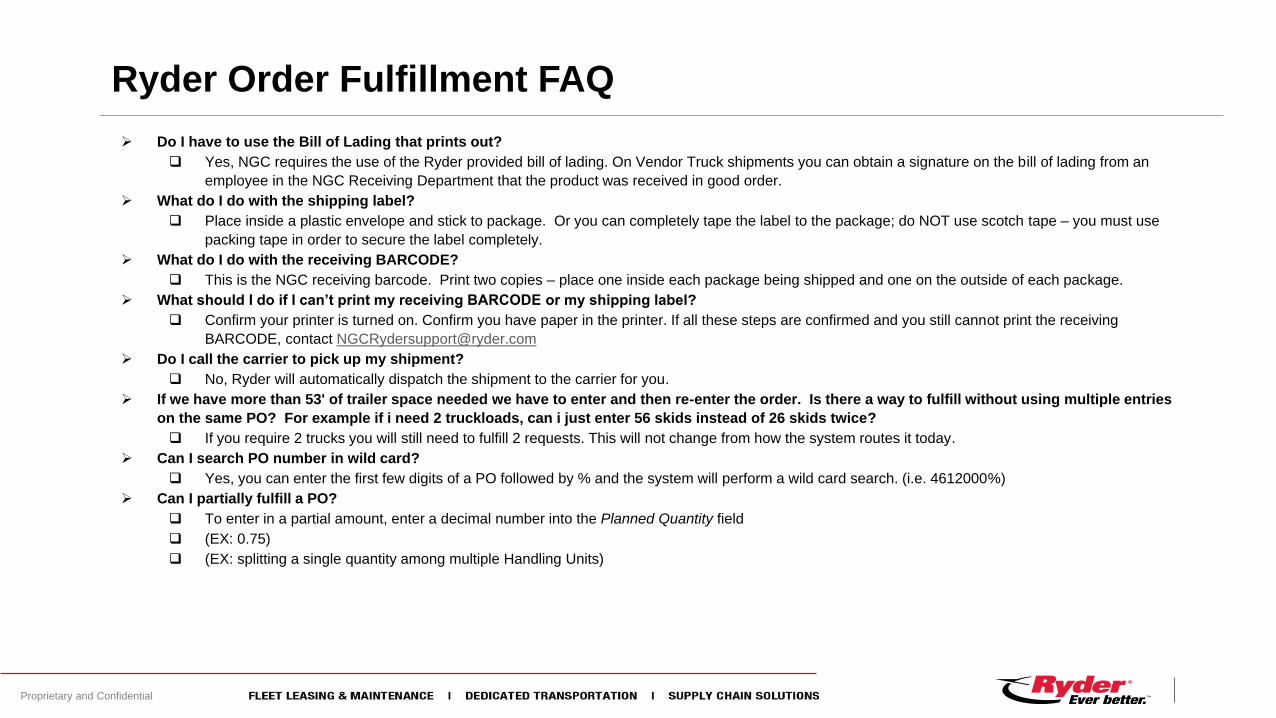
Do I have to use the Bill of Lading that prints out?
Yes, NGC requires the use of the Ryder provided bill of lading. On Vendor Truck shipments you can obtain a signature on the bill of lading from an
employee in the NGC Receiving Department that the product was received in good order.
What do I do with the shipping label?
Place inside a plastic envelope and stick to package. Or you can completely tape the label to the package; do NOT use scotch tape – you must use
packing tape in order to secure the label completely.
What do I do with the receiving BARCODE?
This is the NGC receiving barcode. Print two copies – place one inside each package being shipped and one on the outside of each package.
What should I do if I can’t print my receiving BARCODE or my shipping label?
Confirm your printer is turned on. Confirm you have paper in the printer. If all these steps are confirmed and you still cannot print the receiving
BARCODE, contact [email protected]
Do I call the carrier to pick up my shipment?
No, Ryder will automatically dispatch the shipment to the carrier for you.
If we have more than 53' of trailer space needed we have to enter and then re-enter the order. Is there a way to fulfill without using multiple entries
on the same PO? For example if i need 2 truckloads, can i just enter 56 skids instead of 26 skids twice?
If you require 2 trucks you will still need to fulfill 2 requests. This will not change from how the system routes it today.
Can I search PO number in wild card?
Yes, you can enter the first few digits of a PO followed by % and the system will perform a wild card search. (i.e. 4612000%)
Can I partially fulfill a PO?
To enter in a partial amount, enter a decimal number into the Planned Quantity field
(EX: 0.75)
(EX: splitting a single quantity among multiple Handling Units)


