61
6.5 s Abs s Abs

6.5s Abss Abs

Something big is about to come...
s Abs

Index
s Abs
Tattoo Equinox Elegance Statuario Pietra Grey St.Vincent Junoon
Technical information
10264050647076
90

120 cm46.97”
120 cm46.97”
260 cm102.4”
120 cm46.97”
Architectural modularity
The sizes are specially made to
perfectly fit in every room you could
imagine with minimum number of
joints.
260 cm (102”) is the optimal size for all
ceiling heights.
Modularidad arquitectónica
Los formatos de están
especialmente diseñados para encajar
en cualquier tipo de estancia que
puedas imaginar con el mínimo
número de juntas.
260 cm (102”) es la dimensión optima
para cualquier altura de techo.
s Abs
s Abs
7

Sizes
Finishes
9
Polished / Pulido Natural Non-SlipSatin / Satinado
162x324162 x 324 cm63.8” x 127.6”
120x260119,3 x 260,0 cm 46.97” x 102.4”
60x26059,55 x 260,0 cm23.45” x 102.4”
120x120119,3 x 119,3 cm 46.97” x 46.97”
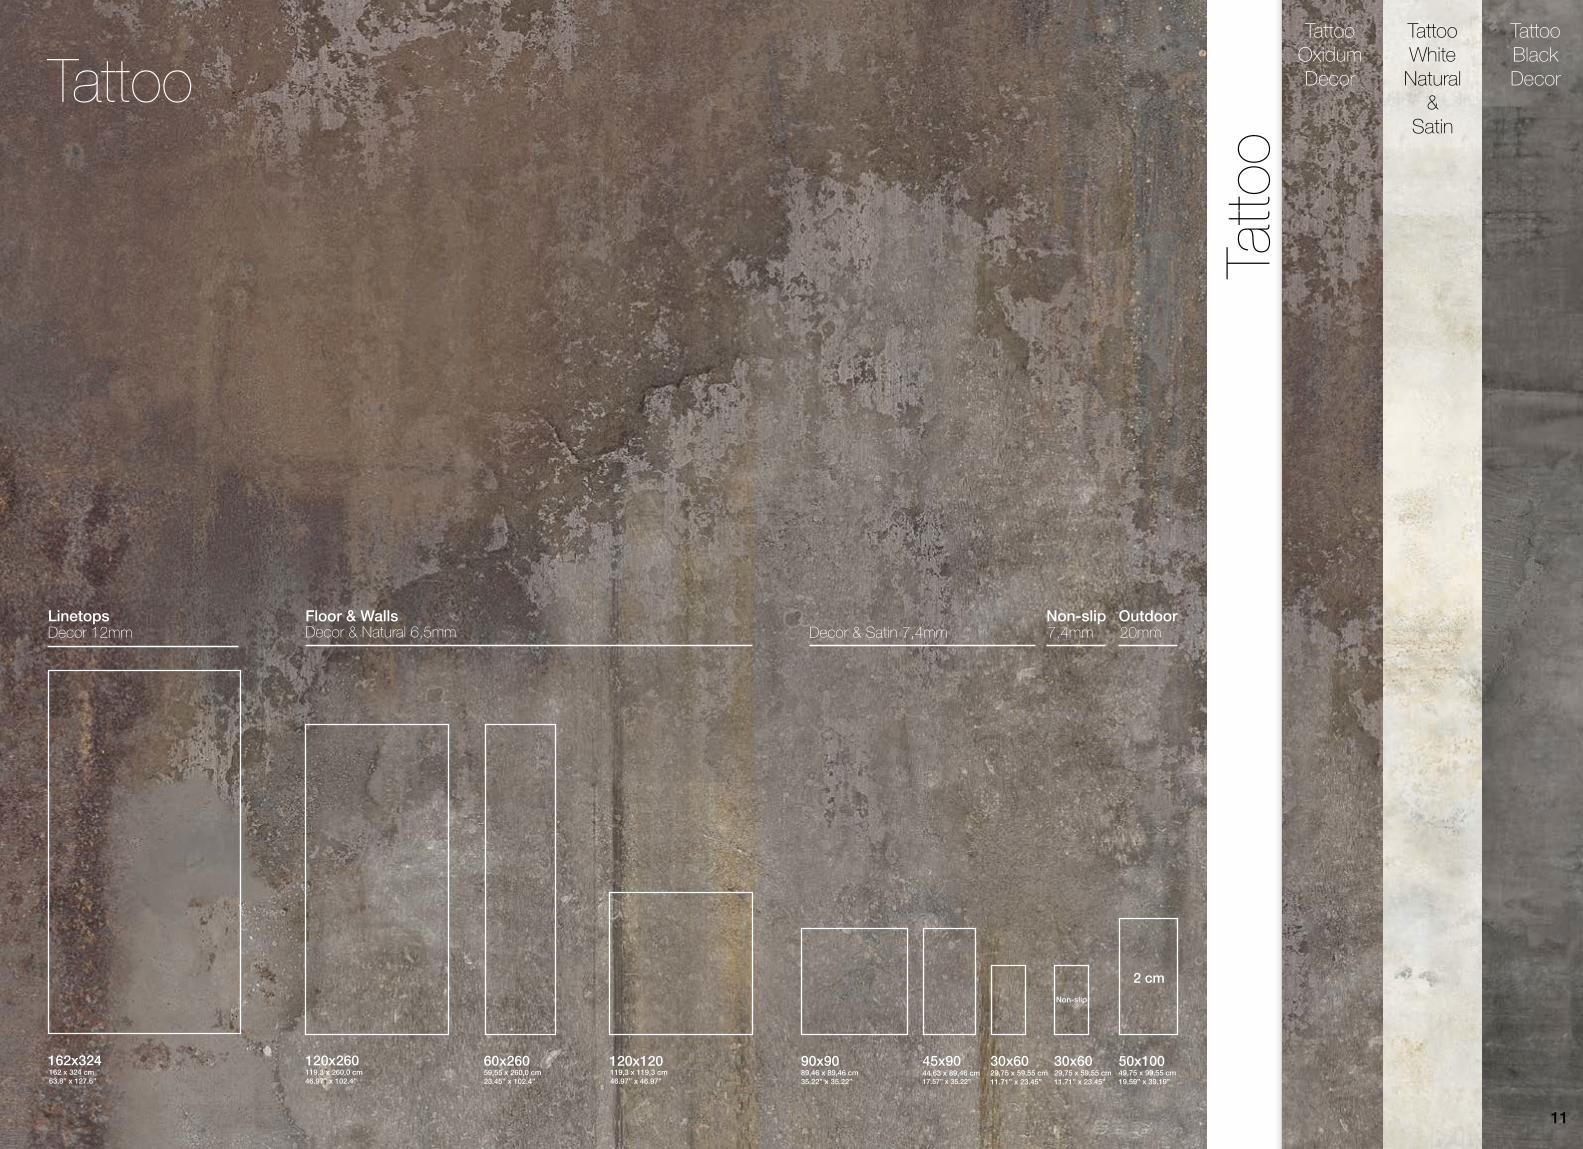
Linetops Floor & Walls Floor & Walls6,5mm12mm 7,4mm
45x9044,63 x 89,46 cm17.57” x 35.22”
90x9089,46 x 89,46 cm 35.22” x 35.22”
Non-slip
30x6029,75 x 59,55 cm 11.71” x 23.45”
7,4mmNon-slip
50x10049,75 x 99,55 cm 19.59” x 39.19”
2 cm
20mmOutdoor
60x6059,55 x 59,55 cm 23.45” x 23.45”
30x6029,75 x 59,55 cm 11.71” x 23.45”
60x12059,55 x 119,3 cm23.45” x 46.97”
s Abs
TattooTattooWhiteNatural
& Satin
TattooOxidumDecor
TattooBlackDecor
11
Decor & Satin 7,4mm
162x324162 x 324 cm63.8” x 127.6”
120x260119,3 x 260,0 cm 46.97” x 102.4”
60x26059,55 x 260,0 cm23.45” x 102.4”
120x120119,3 x 119,3 cm 46.97” x 46.97”
Linetops Floor & WallsDecor & Natural 6,5mmDecor 12mm
45x9044,63 x 89,46 cm17.57” x 35.22”
90x9089,46 x 89,46 cm 35.22” x 35.22”
30x6029,75 x 59,55 cm 11.71” x 23.45”
50x10049,75 x 99,55 cm 19.59” x 39.19”
2 cmNon-slip
30x6029,75 x 59,55 cm 11.71” x 23.45”
20mm7,4mmOutdoorNon-slip
Tatto
o

Tattoo Oxidum Decor
13
Tattoo Oxidum Decor Linetops 162x324
Tattoo Oxidum Decor 120x260
Tattoo Oxidum Decor 60x260
Tattoo Oxidum Decor 120x120
Tattoo Oxidum Decor 90x90
Tattoo Oxidum Decor 45x90
Tattoo Oxidum Decor 30x60
G-4630
G-4583
G-4583
G-4583
G-1372
G-1250
G-1202
Linetops 12 mm
Floor and Walls 6,5 mm
Floor and Walls 7,4 mm

15Tattoo Oxidum Decor 120x260 & 120x120

Tattoo Black Decor
17
Tattoo Black Decor 120x260
Tattoo Black Decor 60x260
Tattoo Black Decor 120x120
Tattoo Black Decor 90x90
Tattoo Black Decor 45x90
Tattoo Black Decor 30x60
Tattoo Black Non-Slip 30x60
Tattoo Black Solid 2 CM 50x100
G-4583
G-4583
G-4583
G-1372
G-1250
G-1202
G-1232
G-1258
Floor and Walls 6,5 mm
Floor and Walls 7,4 mm
Non-Slip 7,4 mm
Solid 2 CM 20 mm

19Tattoo Black Decor120x120

21Tattoo Black Decor120x120

Tattoo White Natural / White Satin
23
Tattoo White Natural 120x260
Tattoo White Natural 60x260
Tattoo White Natural 120x120
Tattoo White Satin 90x90
Tattoo White Satin 45x90
Tattoo White Satin 30x60
Tattoo Black Non-Slip 30x60
G-4574
G-4574
G-4574
G-1372
G-1250
G-1202
G-1232
Floor and Walls 6,5 mm
Floor and Walls 7,4 mm
Non-Slip 7,4 mm

25Tattoo White Natural 120x260 & Equinox Grey Natural 120x120
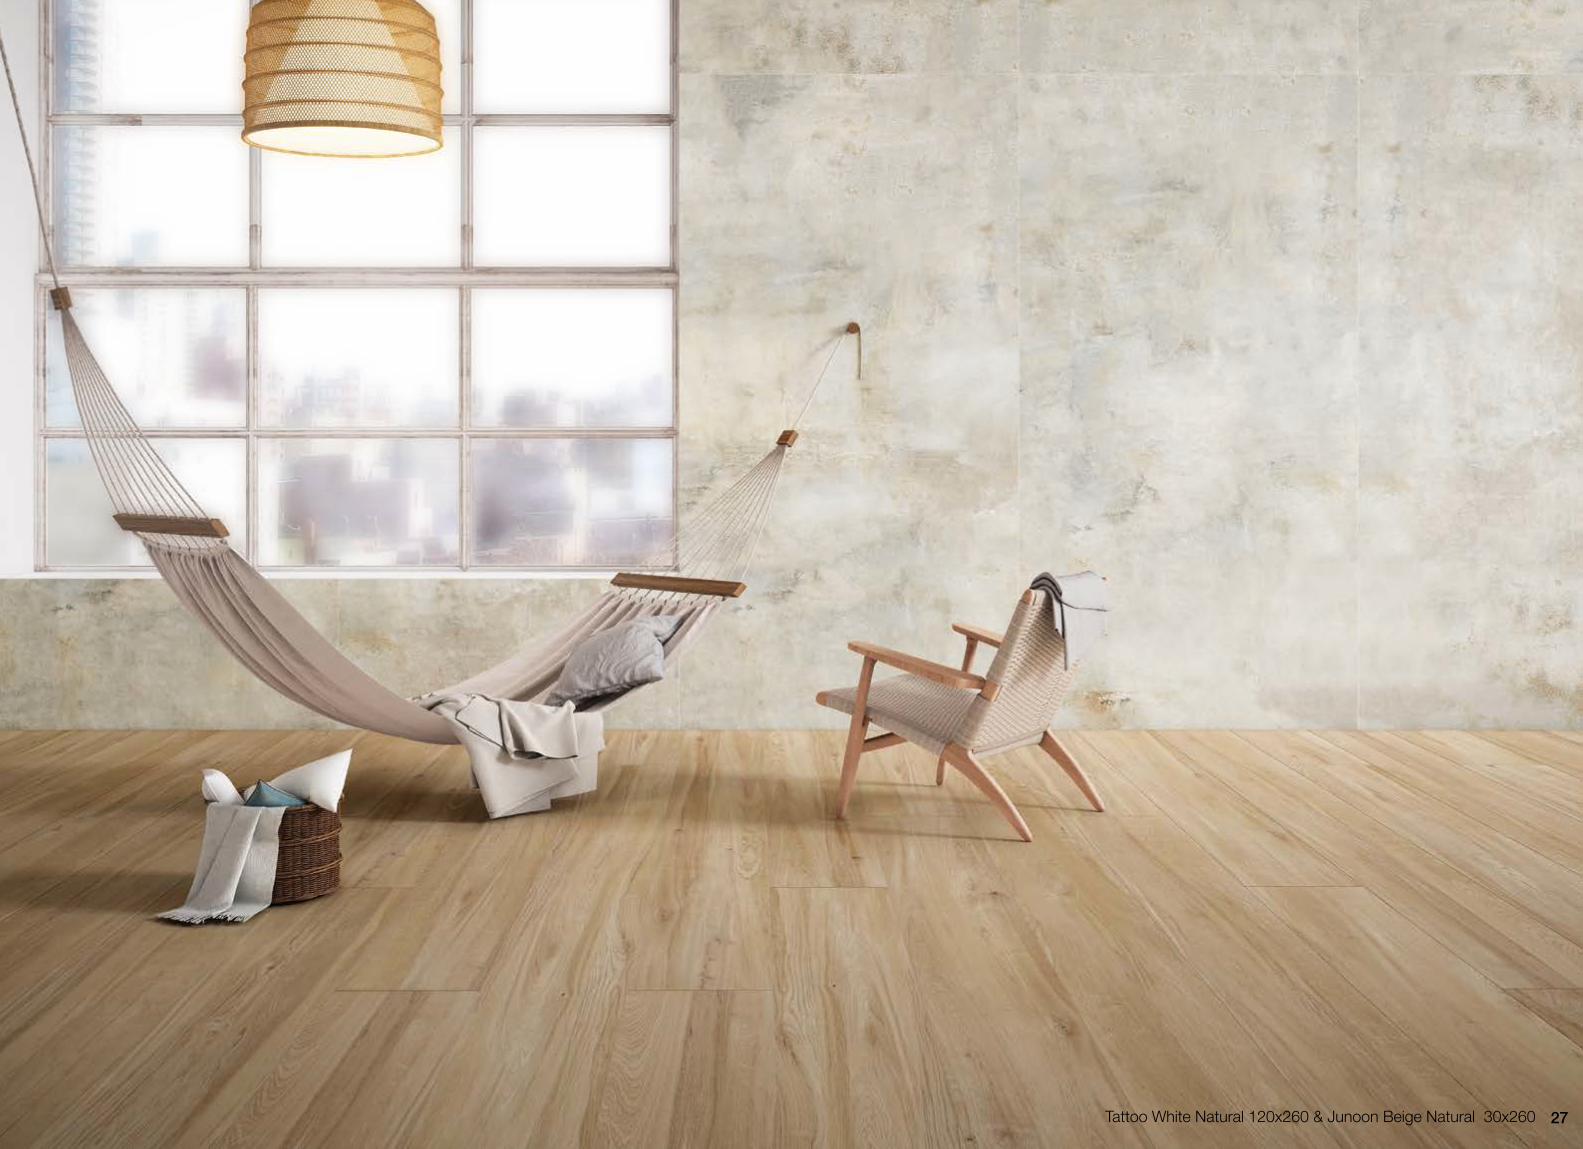
27Tattoo White Natural 120x260 & Junoon Beige Natural 30x260

Equinox
Equi
nox
EquinoxGrey
Natural&
Satin
EquinoxWhiteNatural
&Satin
EquinoxAnthracite
Natural&
Satin
29
60x6059,55 x 59,55 cm 23.45” x 23.45”
30x6029,75 x 59,55 cm 11.71” x 23.45”
60x12059,55 x 119,3 cm23.45” x 46.97”
Satin 7,4mm 20mm7,4mmOutdoorNon-slip
162x324162 x 324 cm63.8” x 127.6”
120x260119,3 x 260,0 cm 46.97” x 102.4”
60x26059,55 x 260,0 cm23.45” x 102.4”
120x120119,3 x 119,3 cm 46.97” x 46.97”
Linetops Floor & WallsNatural 6,5mmNatural 12mm
50x10049,75 x 99,55 cm 19.59” x 39.19”
2 cmNon-slip
30x6029,75 x 59,55 cm 11.71” x 23.45”

Equinox White Natural 120x260
Equinox White Natural 60x260
Equinox White Natural 120x120
Equinox White Satin 60x120
Equinox White Satin 60x60
Equinox White Satin 30x60
Floor and Walls 6,5 mm
Floor and Walls 7,4 mm
G-4577
G-4577
G-4577
G-1282
G-1180
G-1162
Equinox White Natural / White Satin
31
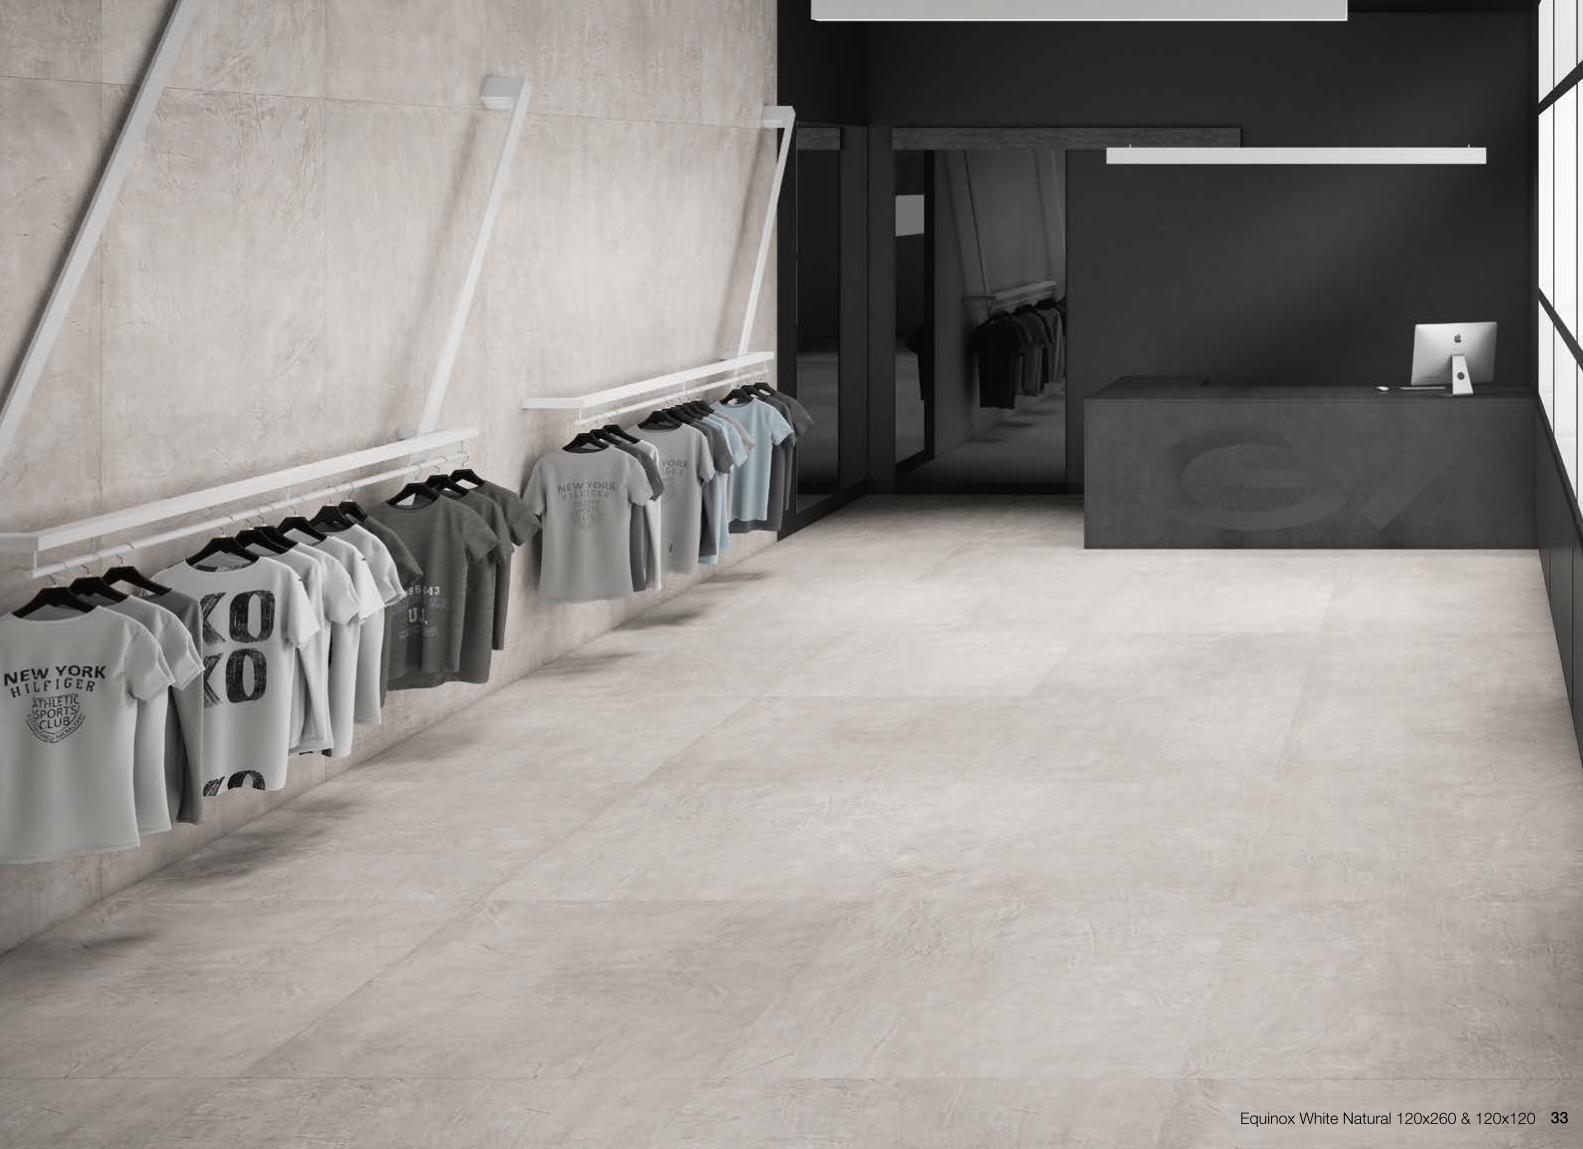
Equinox White Natural 120x260 & 120x120 33
Equinox Grey Natural / Grey Satin
3535
Equinox Grey Natural Linetops 162x324
Equinox Grey Natural 120x260
Equinox Grey Natural 60x260
Equinox Grey Natural 120x120
Equinox Grey Satin 60x120
Equinox Grey Satin 60x60
Equinox Grey Satin 30x60
Equinox Grey Non-Slip 30x60
Equinox Grey Solid 2 CM 50x100
G-4629
G-4577
G-4577
G-4577
G-1282
G-1180
G-1162
G-1194
G-1258
Linetops 12 mm
Floor and Walls 6,5 mm
Floor and Walls 7,4 mm
Non-Slip 7,4 mm
Solid 2 CM 20 mm
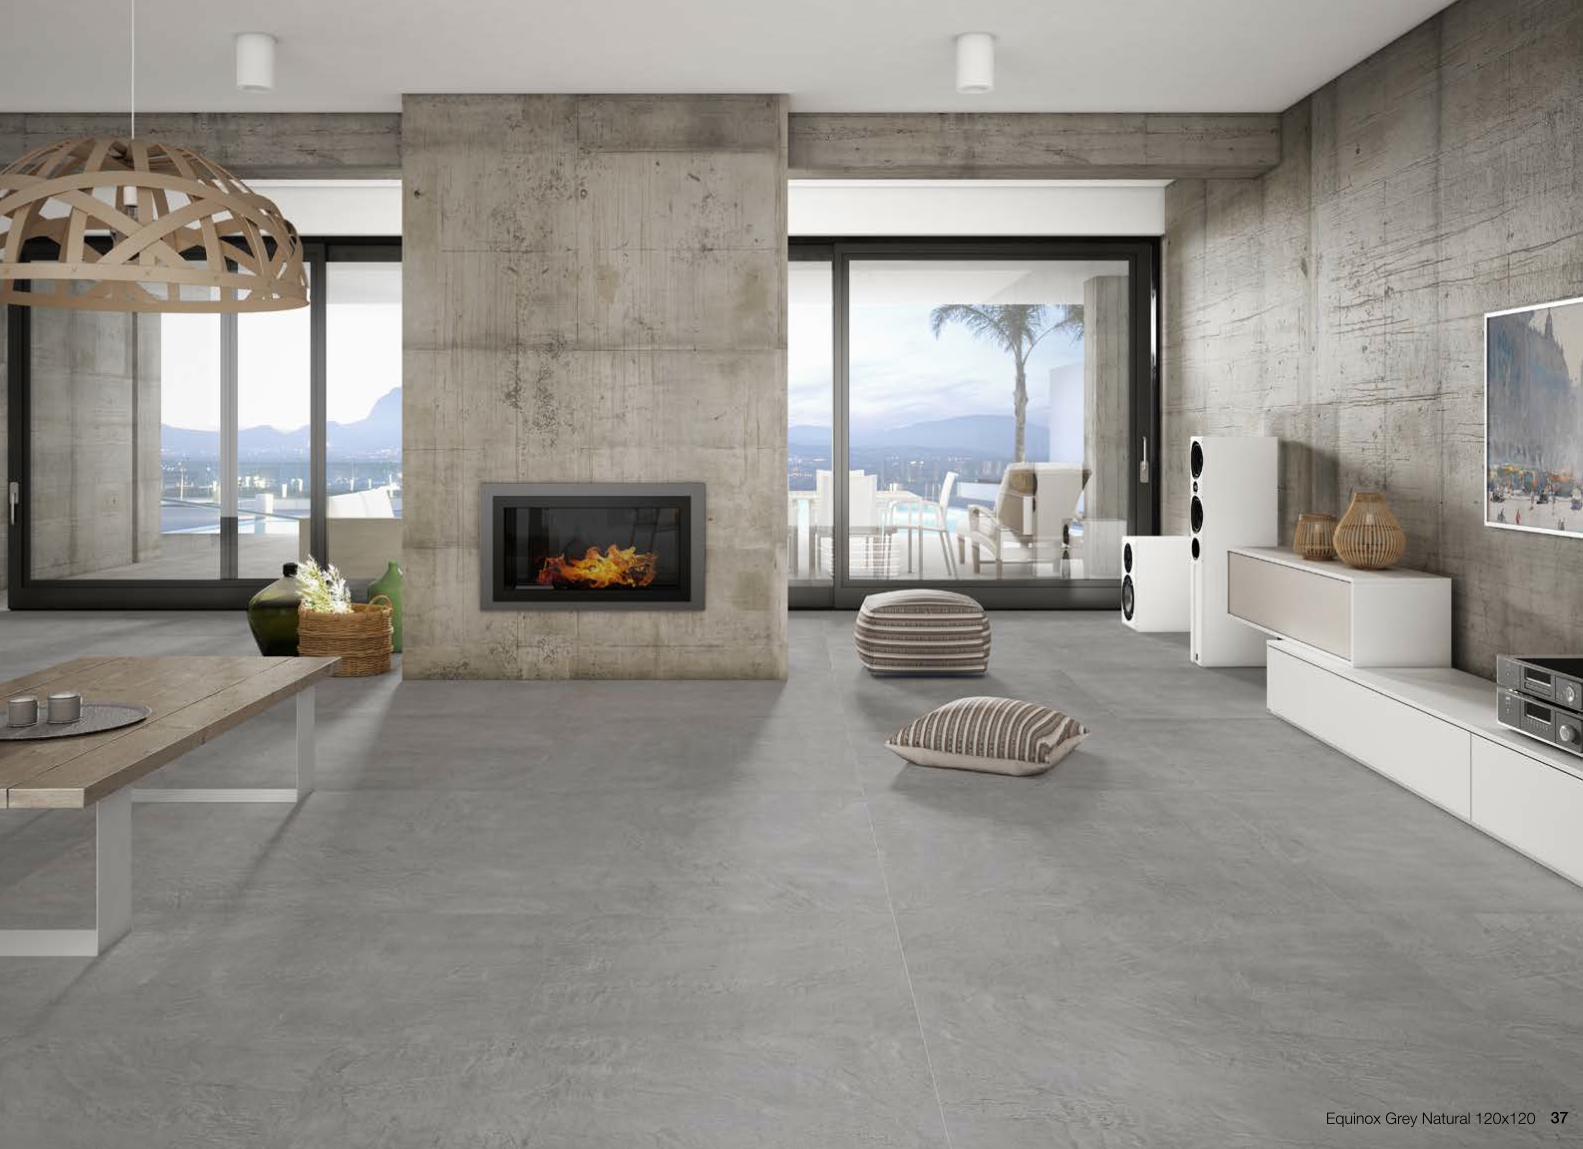
Equinox Grey Natural 120x120 37

Equinox Anthracite Natural / Anthracite Satin
39
Equinox Anthracite Natural 120x260
Equinox Anthracite Natural 60x260
Equinox Anthracite Natural 120x120
Equinox Anthracite Satin 60x120
Equinox Anthracite Satin 60x60
Equinox Anthracite Satin 30x60
Equinox Anthracite Non-Slip 30x60
G-4577
G-4577
G-4577
G-1298
G-1202
G-1180
G-1208
Floor and Walls 6,5 mm
Floor and Walls 7,4 mm
Non-Slip 7,4 mm
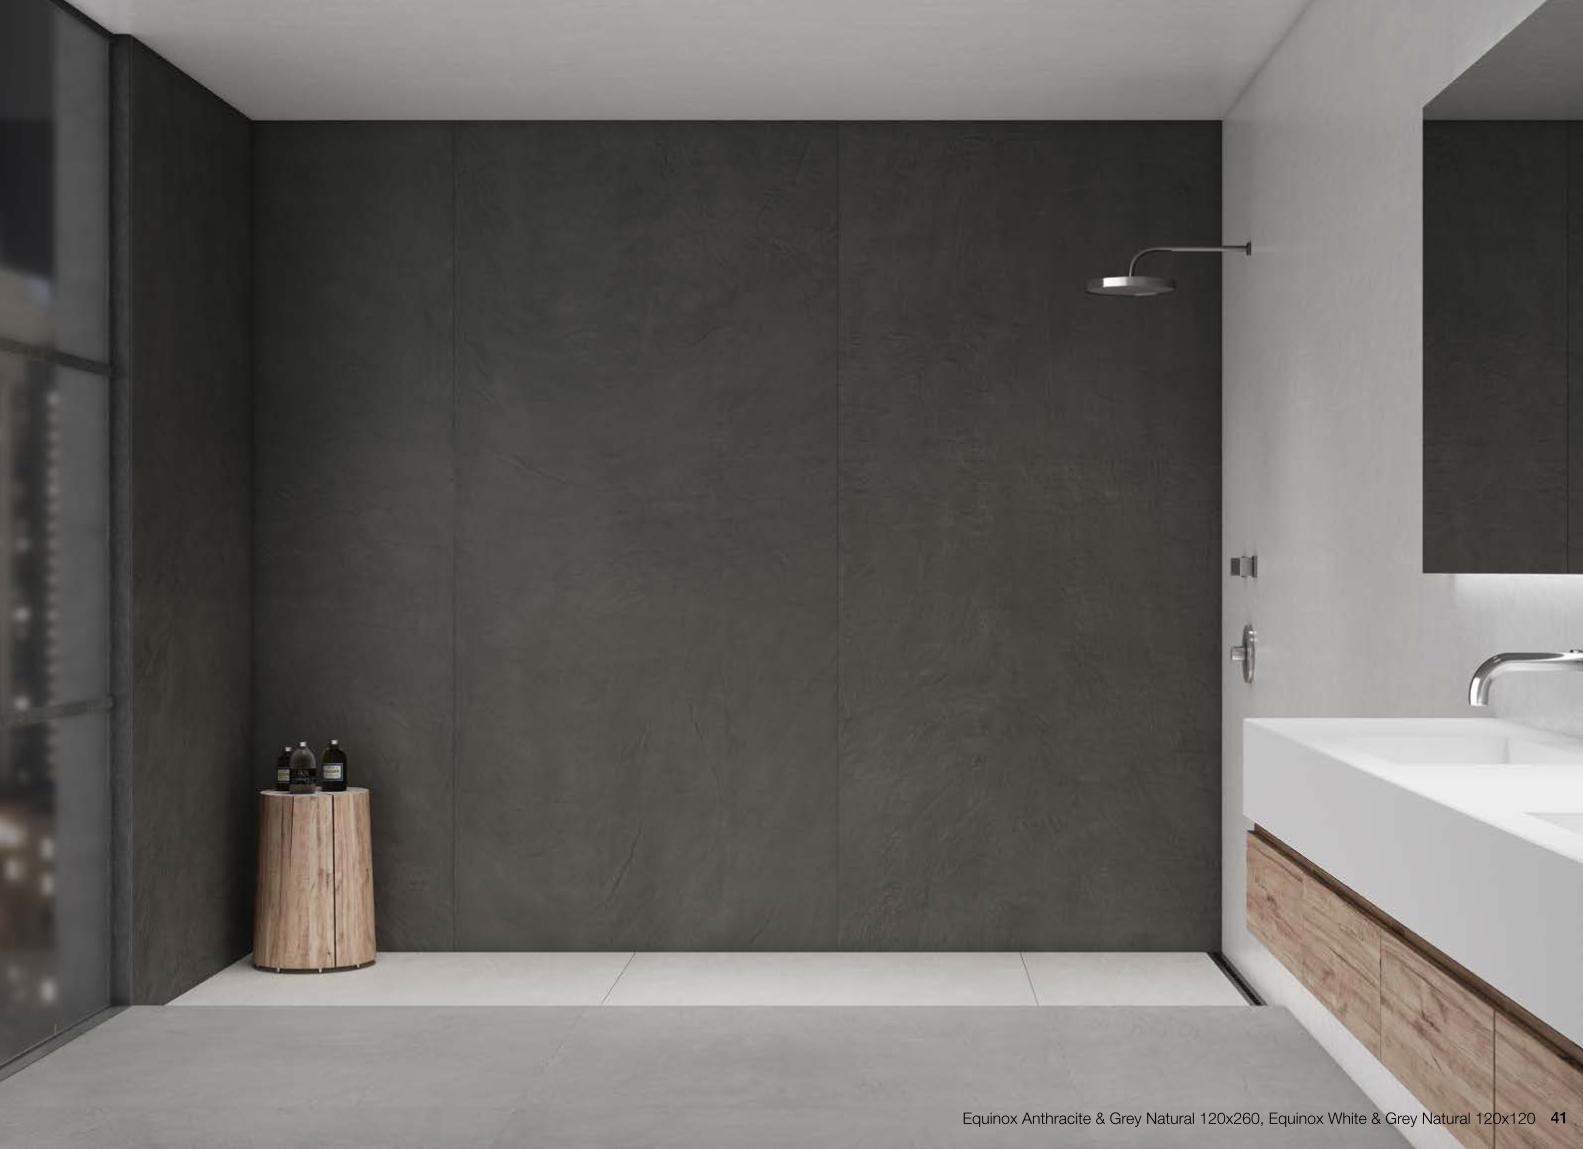
41Equinox Anthracite & Grey Natural 120x260, Equinox White & Grey Natural 120x120
Elegance
43
Eleg
ance
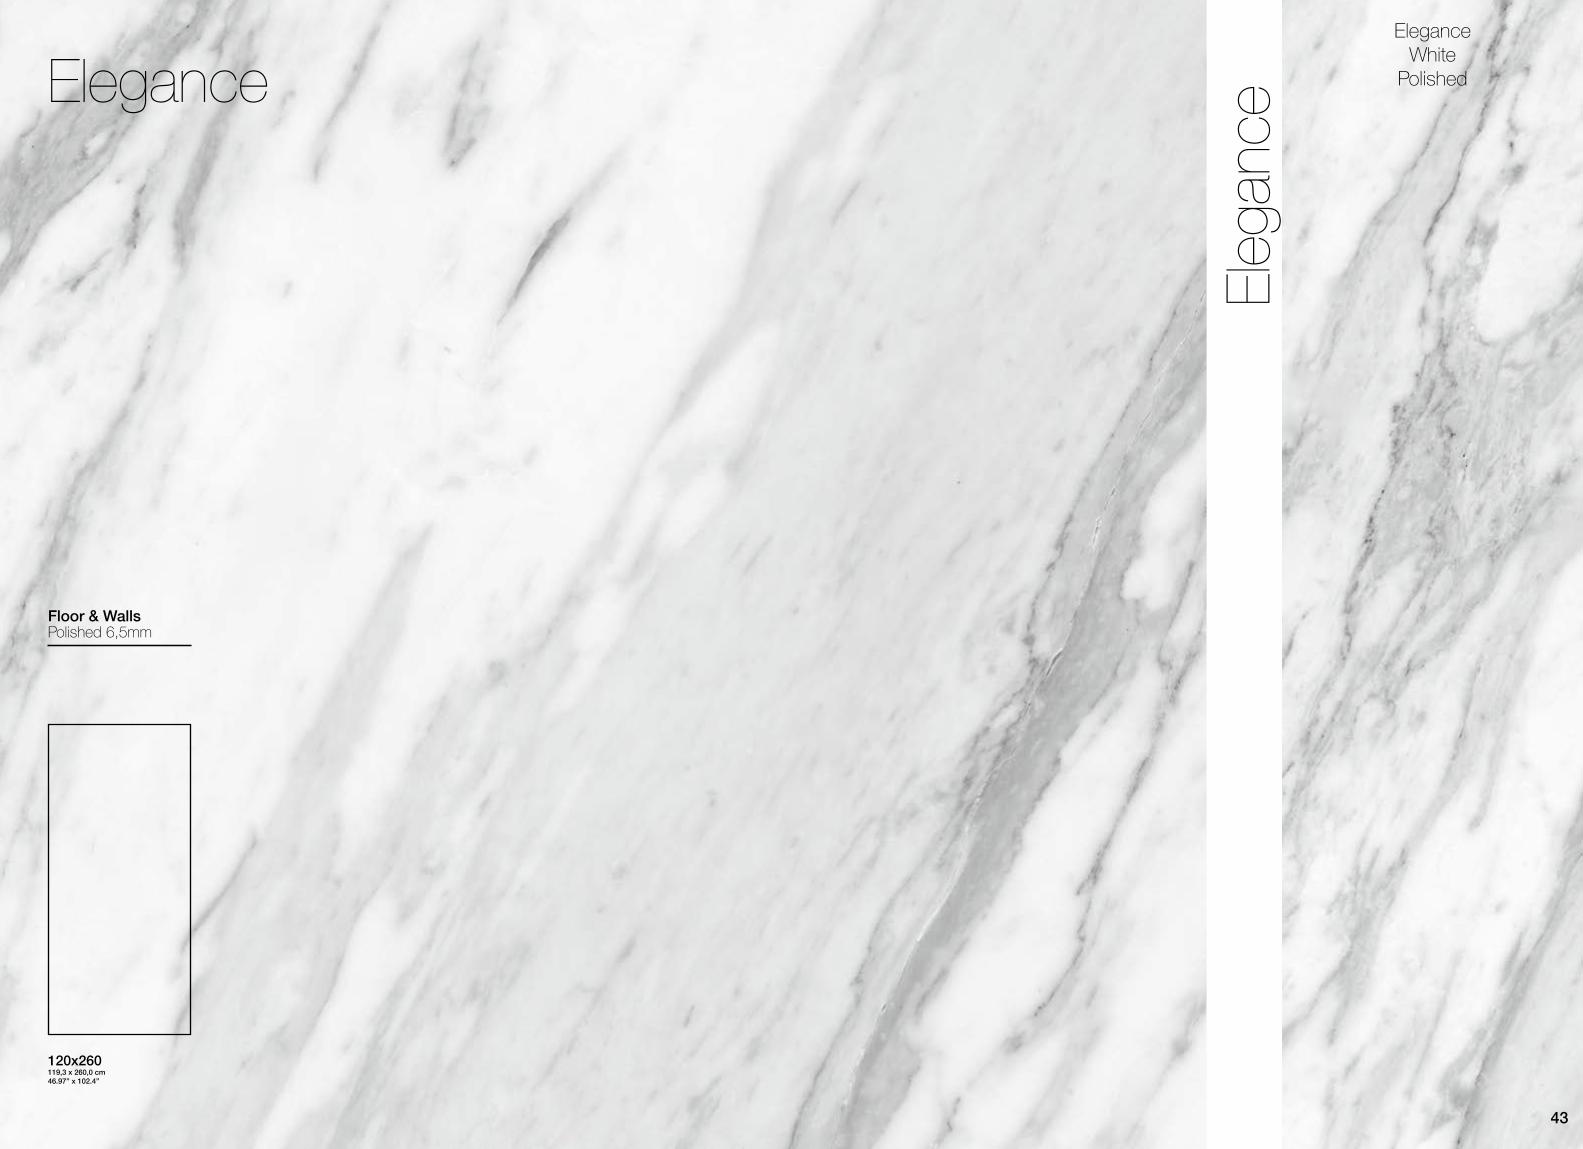
EleganceWhite
Polished
120x260119,3 x 260,0 cm 46.97” x 102.4”
Floor & WallsPolished 6,5mm

Elegance White Polished
Block A Block B
4545*Elegance White Polished Bookmatch 120x260 block A & block B not sold separately / Los bloques A y B 120x260 de Elegance White Polished Bookmatch no se venden por separado.
Bookmatch
Elegance White Polished BL.A 120x260*
Floor and Walls 6,5 mmG-4604
Elegance White Polished BL.B 120x260* G-4604G-4604

Block A
Block B
Block B Block A
Block A
Block B
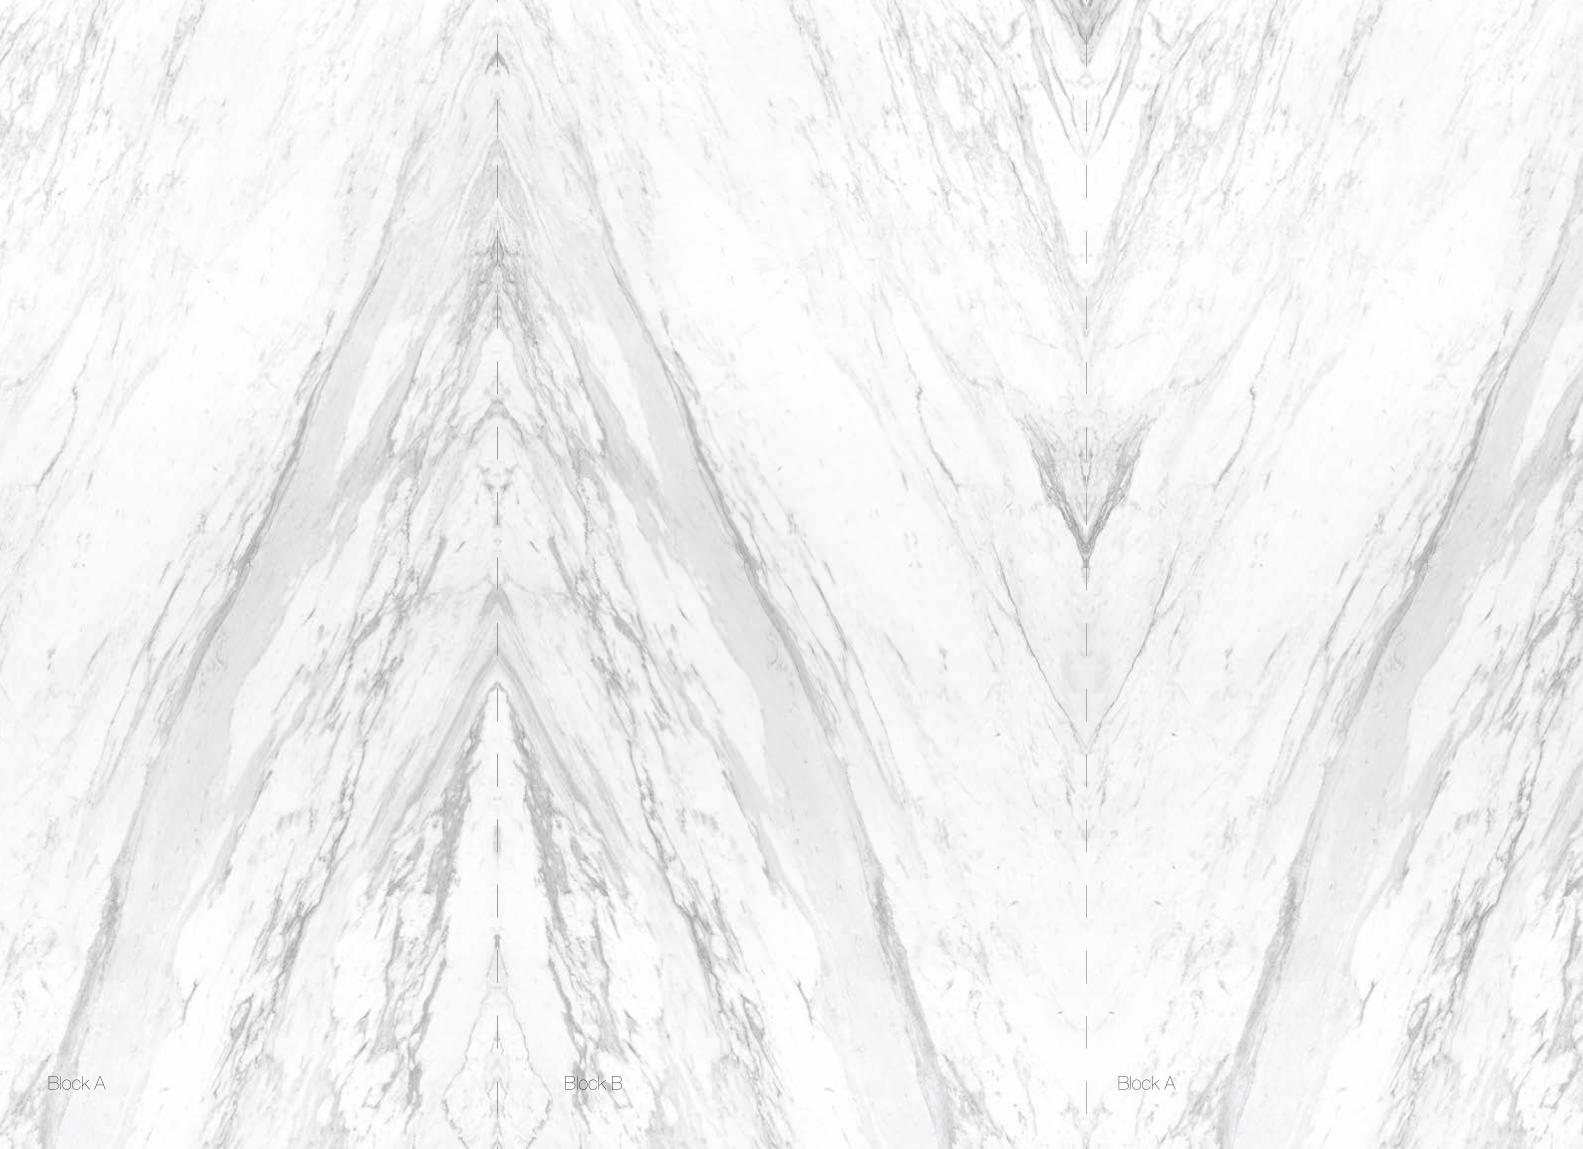
Block A Block B Block A

50 Elegance White Polished Bookmatch 120x260 & Equinox Anthracite Natural 120x260 51

StatuarioStatuario
ExtraWhite Natural
StatuarioExtraWhite
Polished
53
Sta
tuar
io
162x324162 x 324 cm63.8” x 127.6”
120x260119,3 x 260,0 cm 46.97” x 102.4”
60x26059,55 x 260,0 cm23.45” x 102.4”
120x120119,3 x 119,3 cm 46.97” x 46.97”
Linetops Floor & WallsNatural & Polished 6,5mmNatural & Polished 12mm

Statuario Extra White Polished
*Statuario White Polished Bookmatch 120x260 block A & block B not sold separately / Los bloques A y B 120x260 de Statuario White Polished Bookmatch no se venden por separado.
Block A Block B
Bookmatch
5555
Statuario Extra White Polished BL.A 120x260*
Floor and Walls 6,5 mmG-4604
Linetops 12 mmStatuario Extra White Polished BL.A 162x324*
Statuario Extra White Polished BL.B 162x324*
G-4649
G-4649
Statuario Extra White Polished BL.B 120x260* G-4604
Block A Block B Block A

Statuario Extra White Natural Bookmatch 162x324 & Equinox Grey Natural 120x120 59
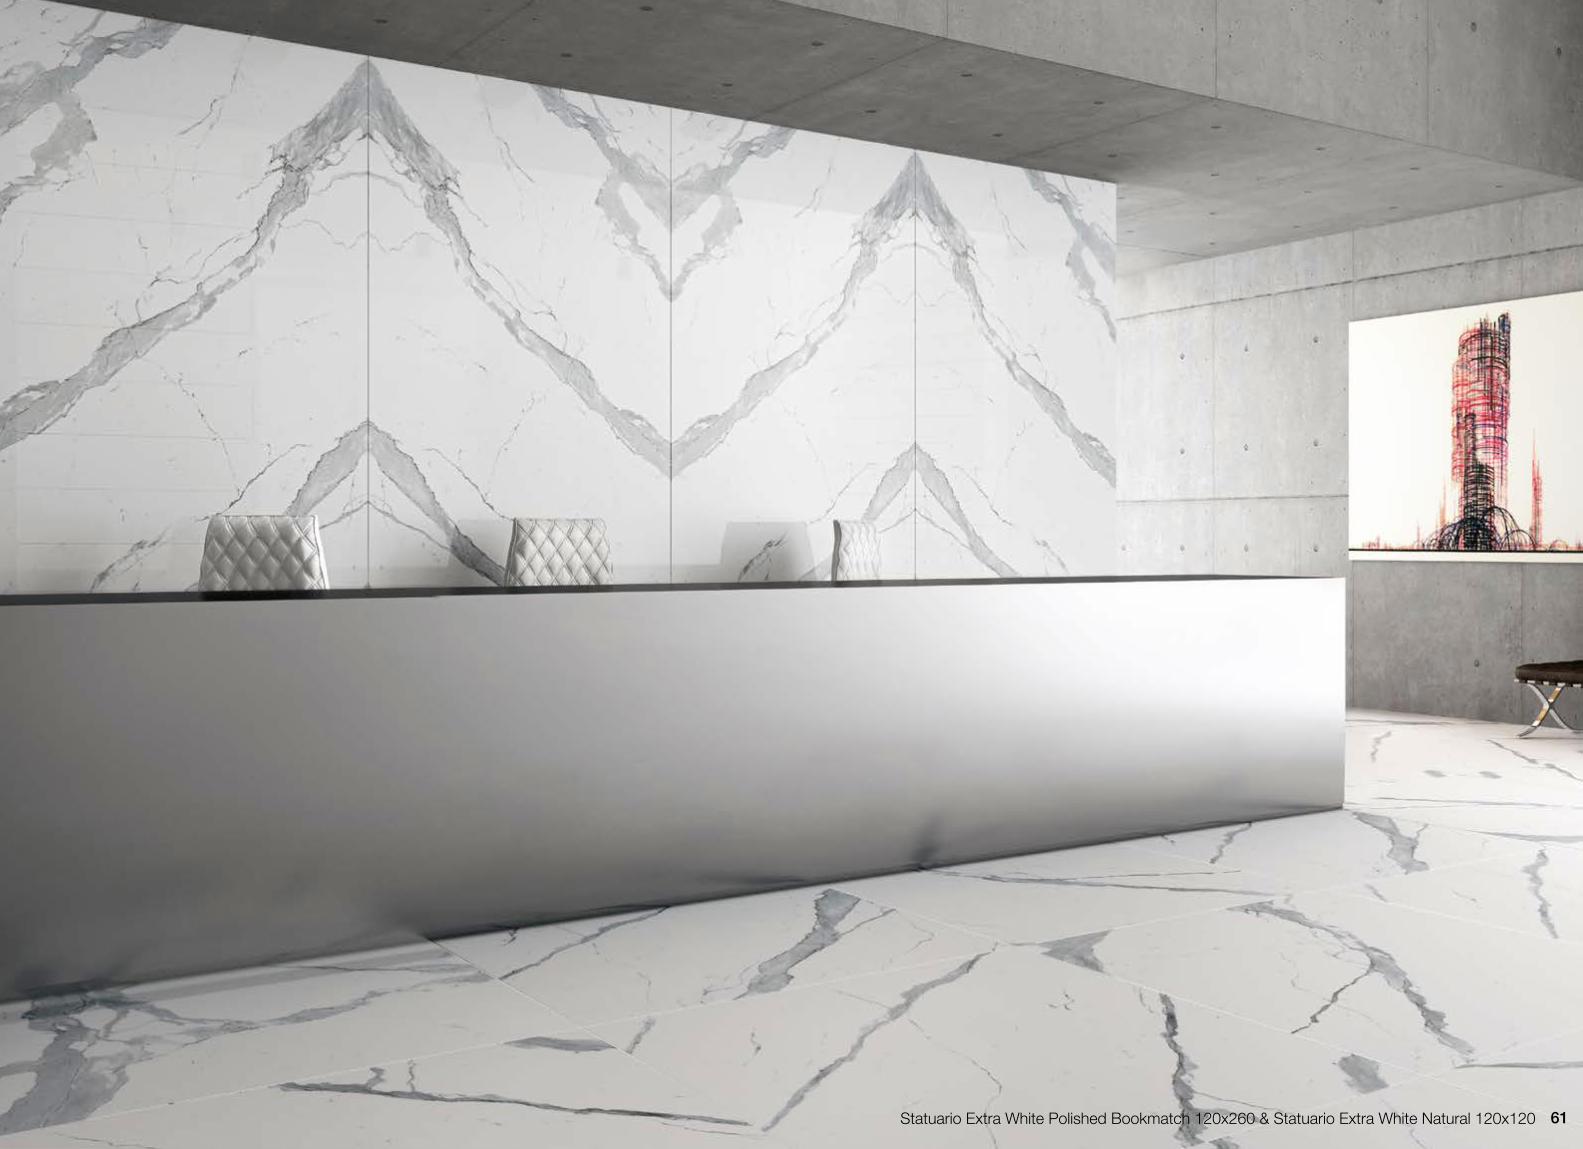
Statuario Extra White Polished Bookmatch 120x260 & Statuario Extra White Natural 120x120 61
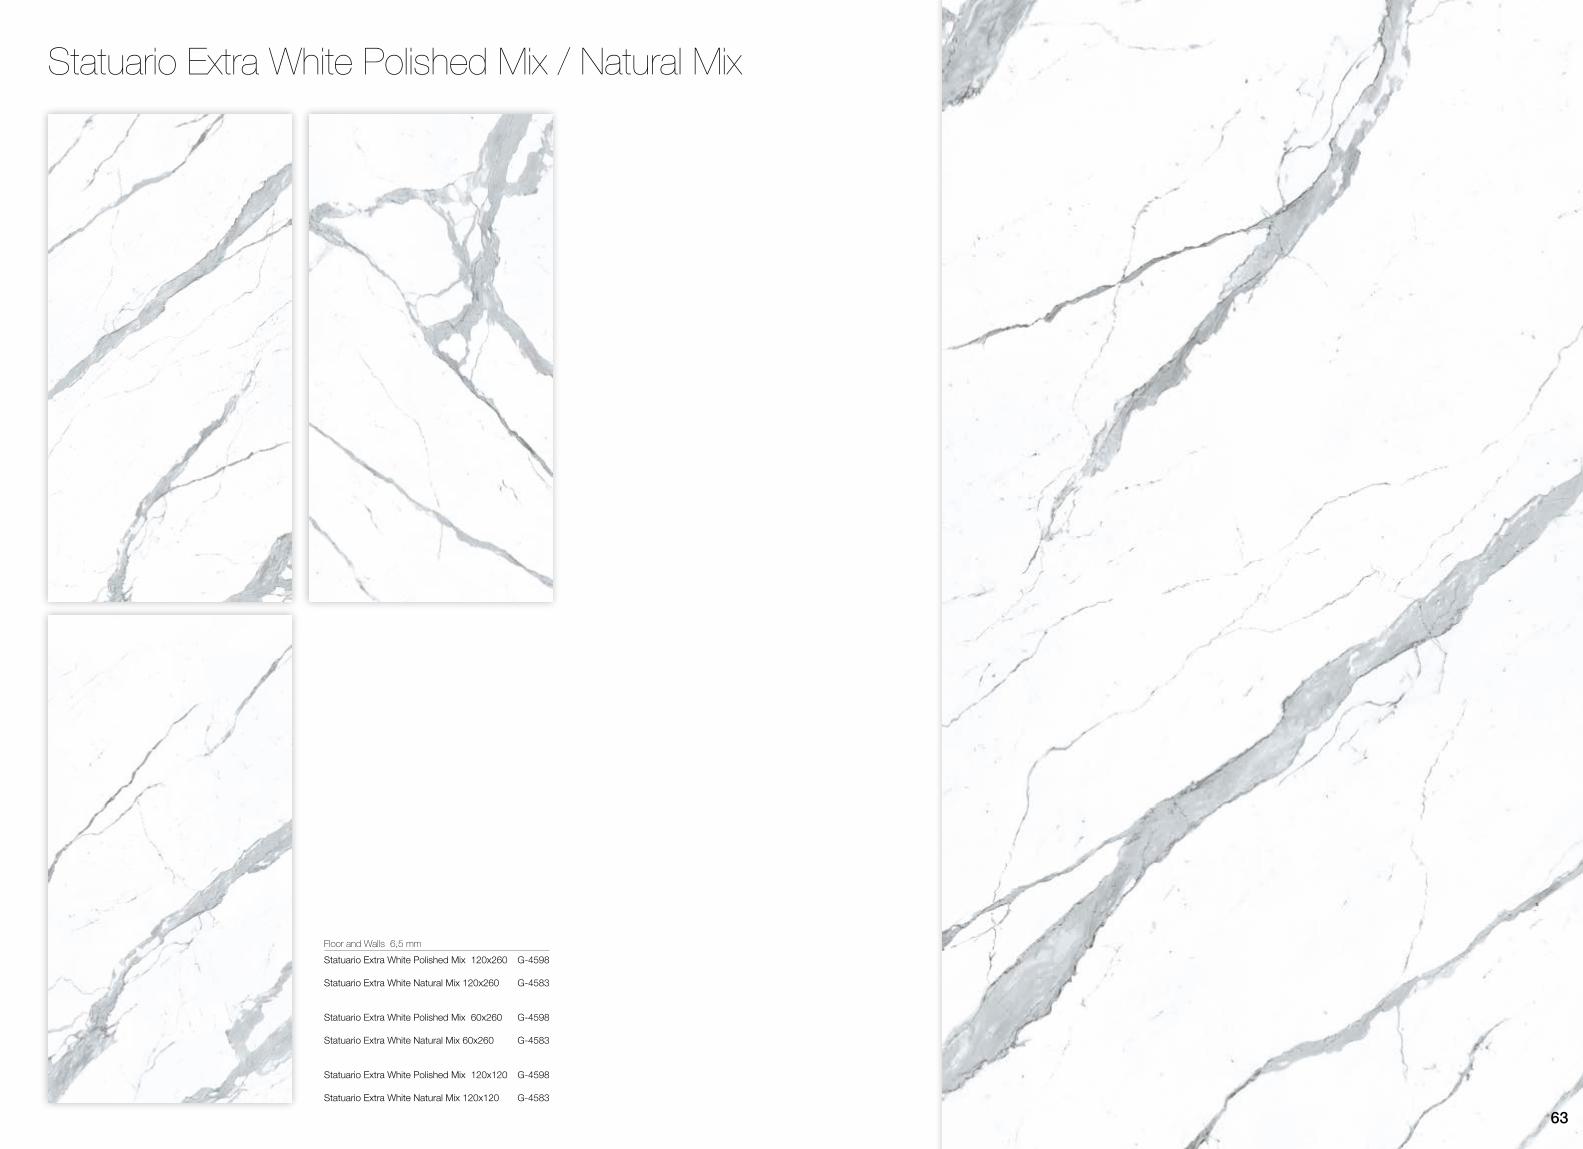
Statuario Extra White Polished Mix 120x260
Statuario Extra White Natural Mix 120x260
Statuario Extra White Polished Mix 60x260
Statuario Extra White Natural Mix 60x260
Statuario Extra White Polished Mix 120x120
Statuario Extra White Natural Mix 120x120
Floor and Walls 6,5 mmG-4598
G-4583
G-4598
G-4583
G-4598
G-4583
Statuario Extra White Polished Mix / Natural Mix
63

Statuario Extra White Polished 120x260 & Junoon Beige Natural 30x260 65

Pietra greyPietra Grey
Natural
PietraGrey
Polished
67
Piet
ra G
rey
162x324162 x 324 cm63.8” x 127.6”
120x260119,3 x 260,0 cm 46.97” x 102.4”
60x26059,55 x 260,0 cm23.45” x 102.4”
120x120119,3 x 119,3 cm 46.97” x 46.97”
Linetops Floor & WallsNatural & Polished 6,5mmNatural & Polished 12mm

Pietra Grey Polished / Natural
69
Pietra Grey Polished 162x324
Pietra Grey Natural 162x324
Pietra Grey Polished 120x260
Pietra Grey Natural 120x260
Pietra Grey Polished 60x260
Pietra Grey Natural 60x260
Pietra Grey Polished 120x120
Pietra Grey Natural 120x120
Floor and Walls 6,5 mmG-4595
G-4580
G-4595
G-4580
G-4595
G-4580
Linetops 12 mmG-4642
G-4632
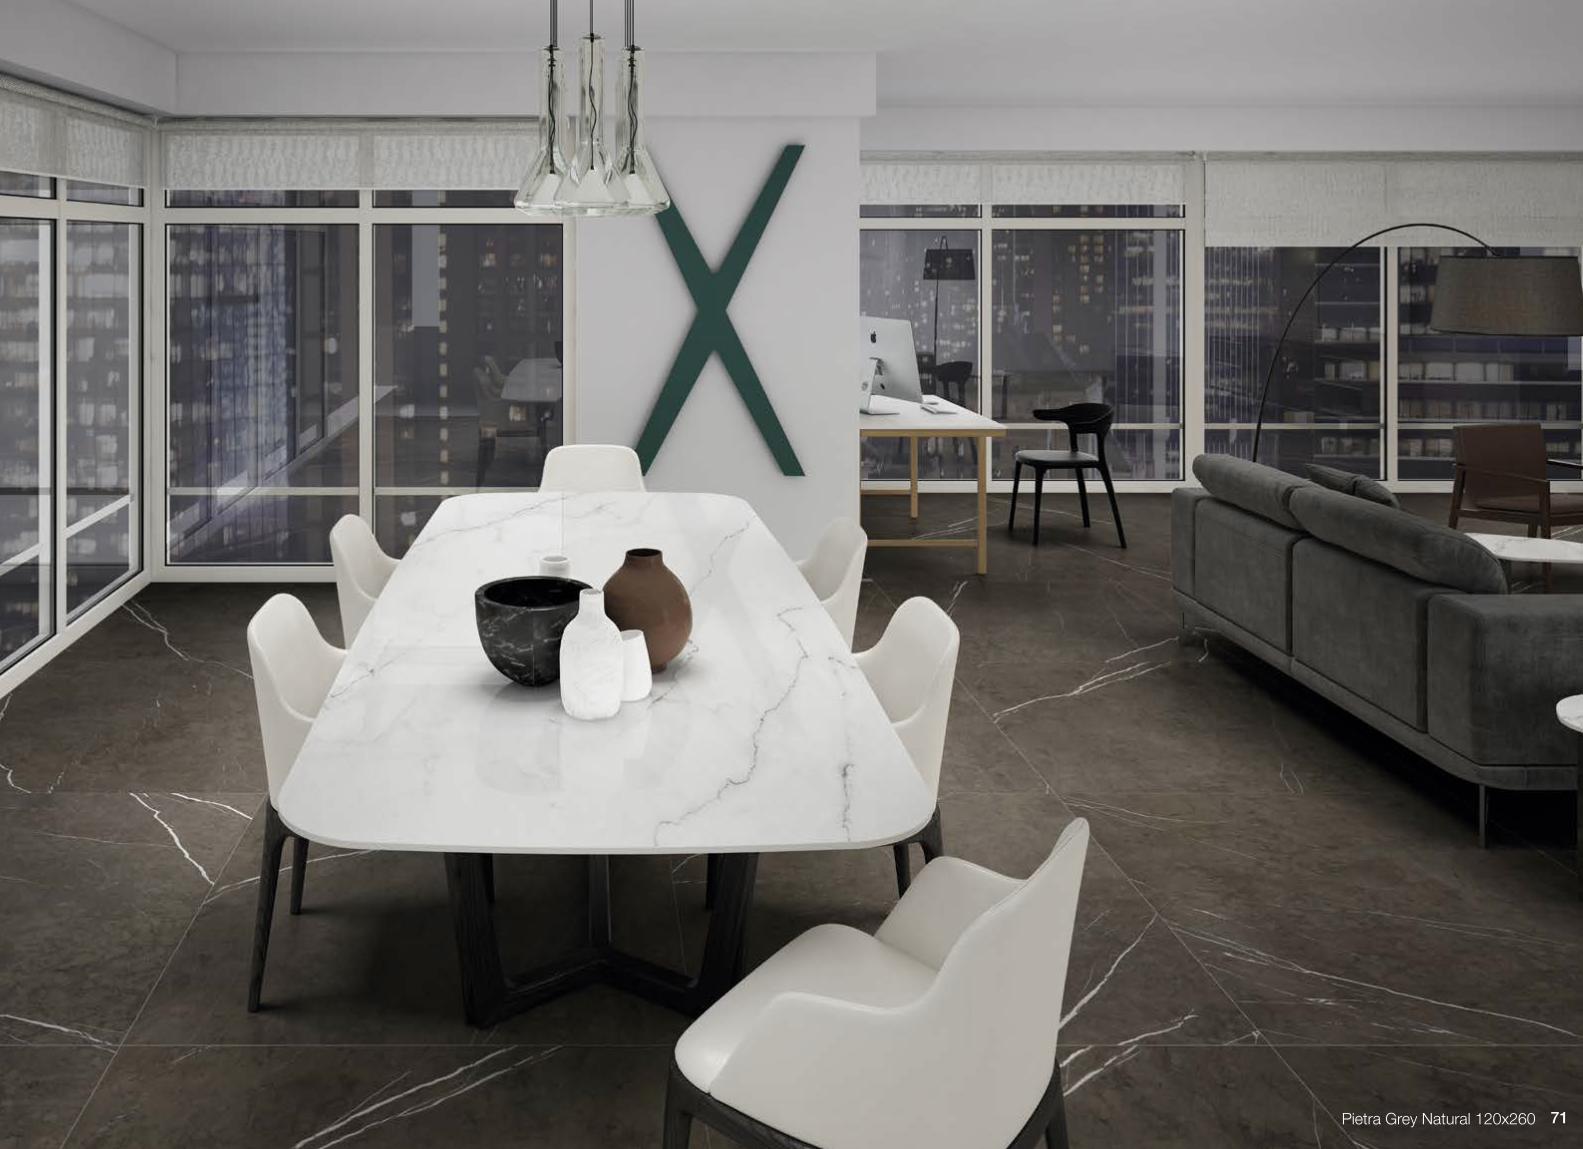
Pietra Grey Natural 120x260 71

Pietra Grey Natural 120x260, Pietra Grey Polished 120x120 & Equinox White Natural 120x260 73

St. VincentSt.VincentAnthracite
Natural
St.VincentAnthracitePolished
75
St.V
ince
nt
162x324162 x 324 cm63.8” x 127.6”
120x260119,3 x 260,0 cm 46.97” x 102.4”
60x26059,55 x 260,0 cm23.45” x 102.4”
120x120119,3 x 119,3 cm 46.97” x 46.97”
Linetops Floor & WallsNatural & Polished 6,5mmNatural & Polished 12mm
G-4630 G-4583 G-4583 G-4583
50x10049,75 x 99,55 cm 19.59” x 39.19”
2 cm
20mmOutdoor
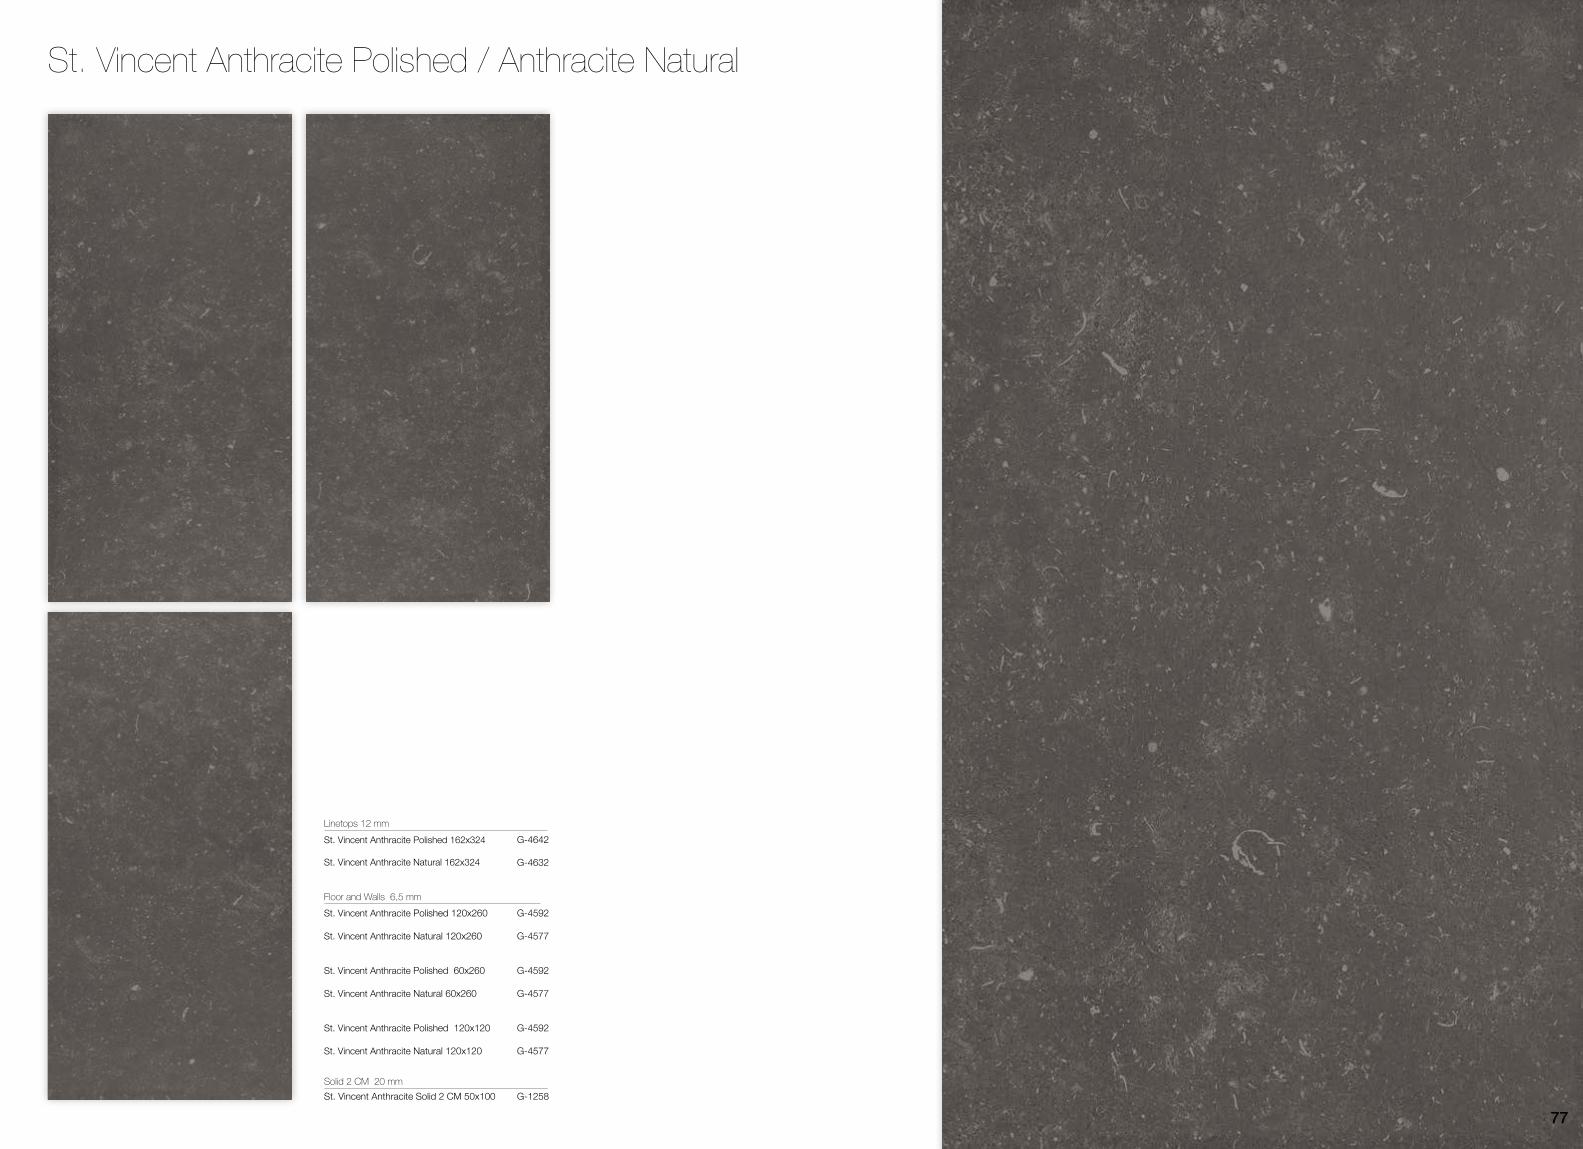
St. Vincent Anthracite Polished 162x324
St. Vincent Anthracite Natural 162x324
St. Vincent Anthracite Polished 120x260
St. Vincent Anthracite Natural 120x260
St. Vincent Anthracite Polished 60x260
St. Vincent Anthracite Natural 60x260
St. Vincent Anthracite Polished 120x120
St. Vincent Anthracite Natural 120x120
Floor and Walls 6,5 mmG-4592
G-4577
G-4592
G-4577
G-4592
G-4577
Linetops 12 mmG-4642
G-4632
St. Vincent Anthracite Solid 2 CM 50x100
Solid 2 CM 20 mmG-1258
St. Vincent Anthracite Polished / Anthracite Natural
77
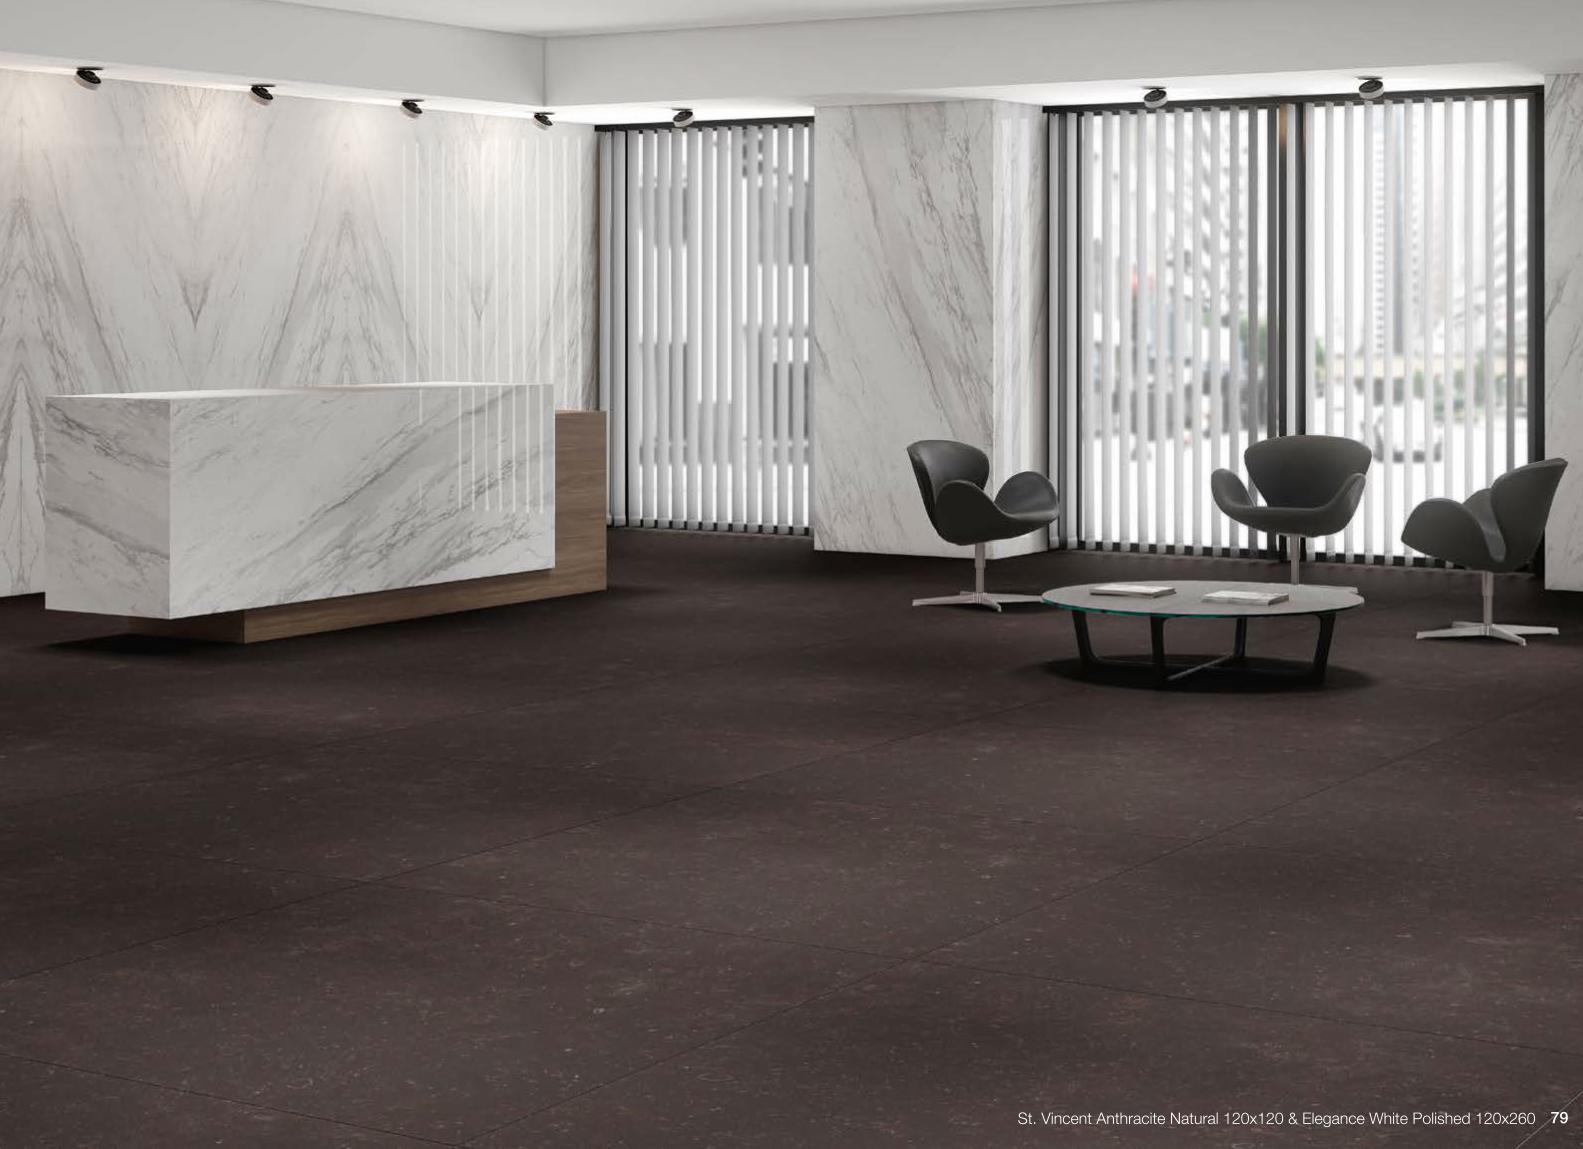
79St. Vincent Anthracite Natural 120x120 & Elegance White Polished 120x260
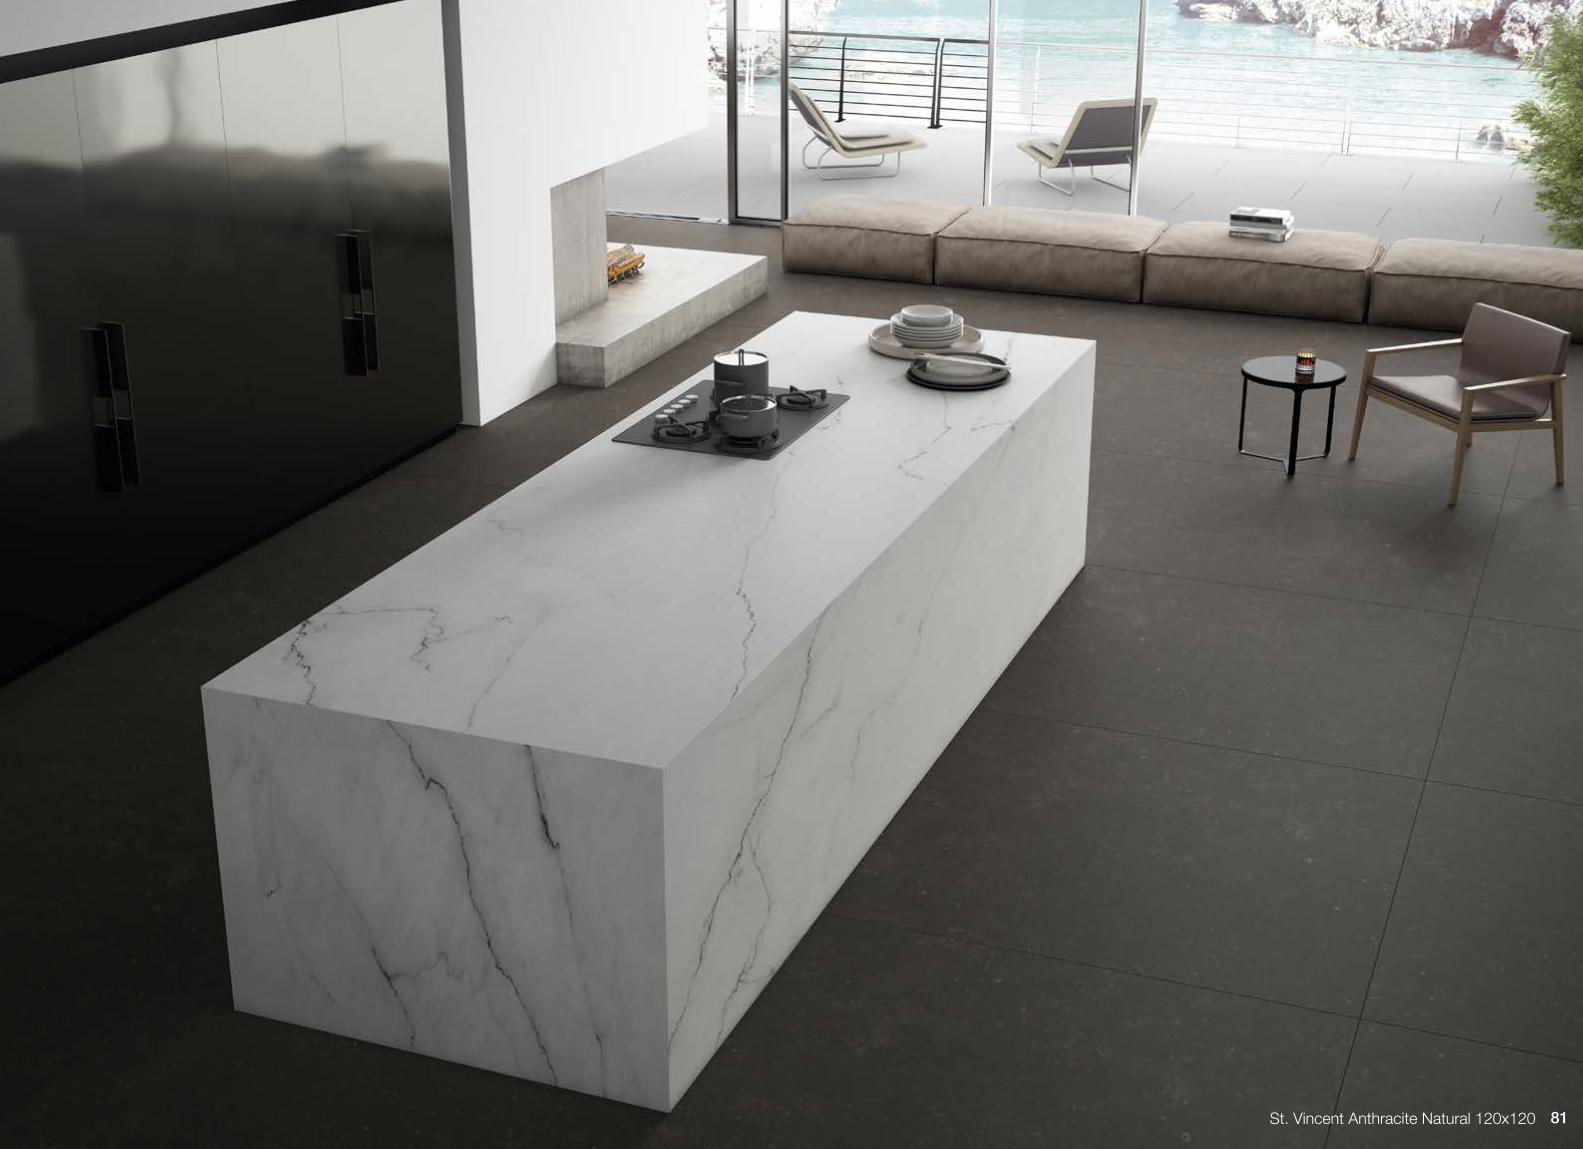
81St. Vincent Anthracite Natural 120x120

Juno
on
JunoonJunoonBeigeNatural
JunoonMapleNatural
JunoonBrownNatural
83
120x260119,3 x 260,0 cm 46.97” x 102.4”
30x26029,75 x 260,0 cm11,81” x 102.4”
Floor & WallsNatural 6,5mm
50x10049,75 x 99,55 cm 19.59” x 39.19”
2 cm
20mmOutdoor
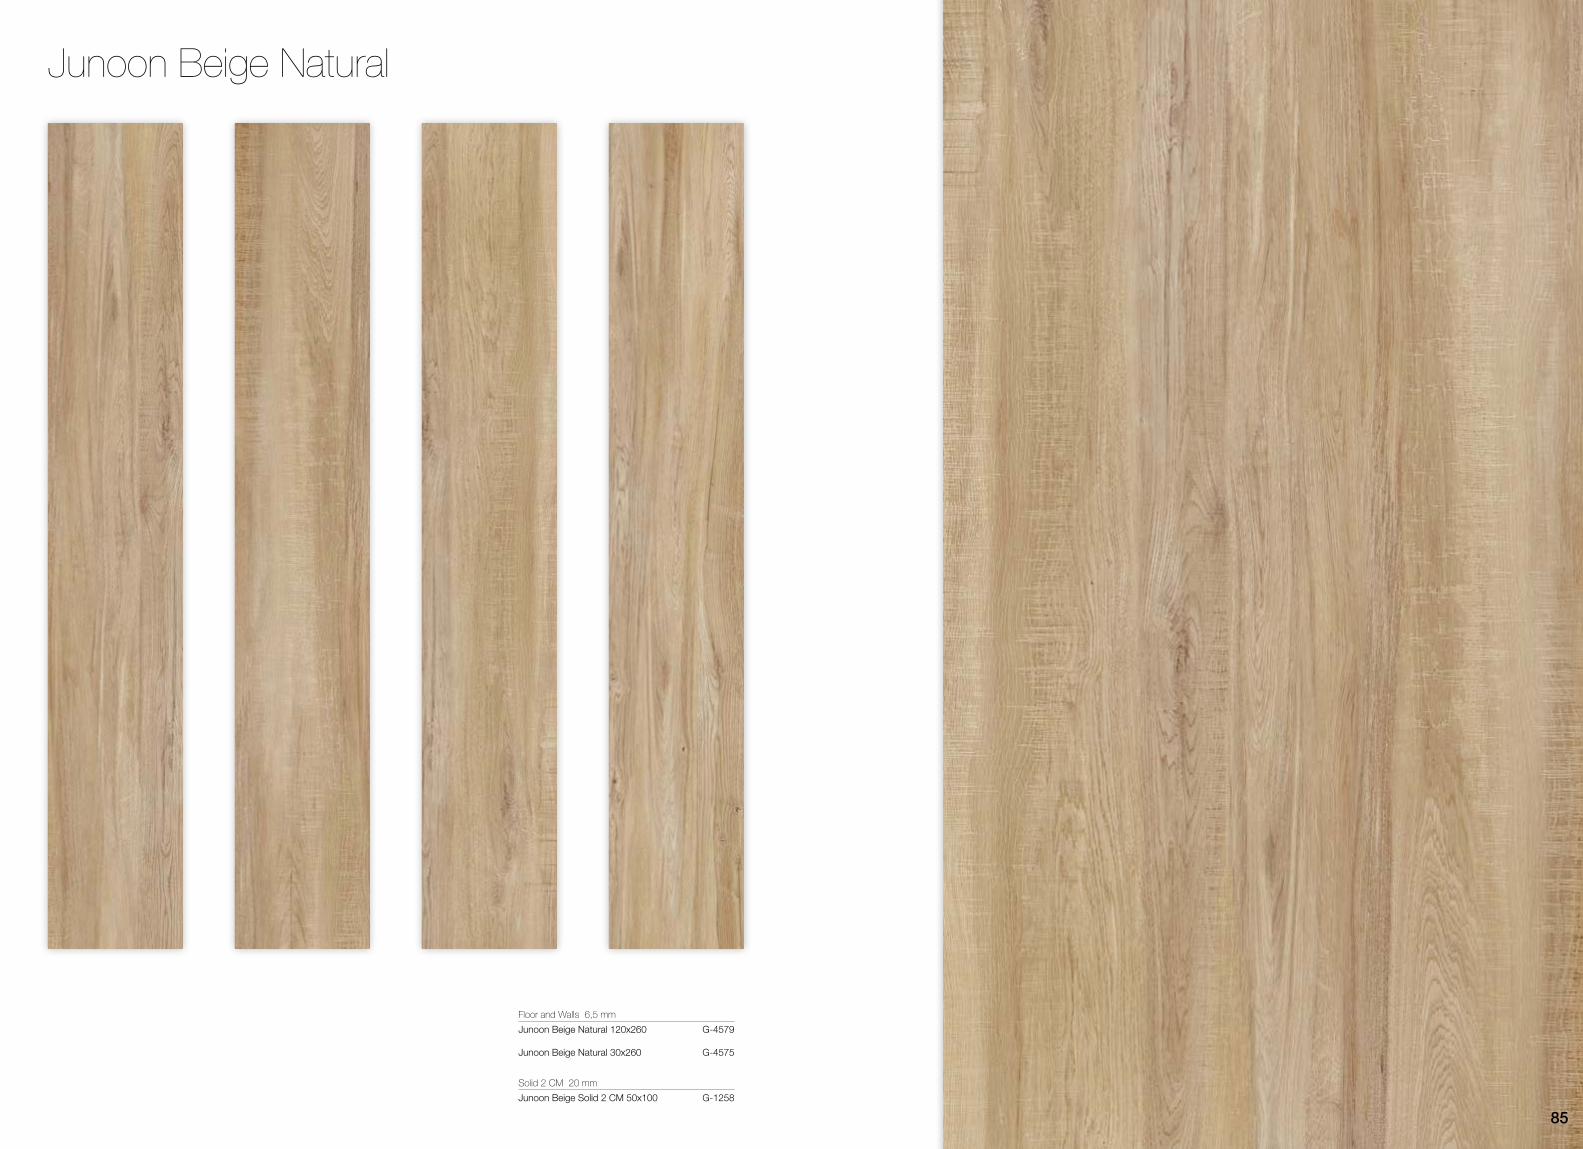
Junoon Beige Natural 120x260
Junoon Beige Natural 30x260
Floor and Walls 6,5 mmG-4579
G-4575
Junoon Beige Solid 2 CM 50x100
Solid 2 CM 20 mmG-1258
Junoon Beige Natural
85

Junoon Beige Natural 30x260 & Equinox White Natural 120x260 87

Junoon Maple Natural
89
Junoon Maple Natural 120x260
Junoon Maple Natural 30x260
Floor and Walls 6,5 mmG-4579
G-4575
Junoon Maple Solid 2 CM 50x100
Solid 2 CM 20 mmG-1258
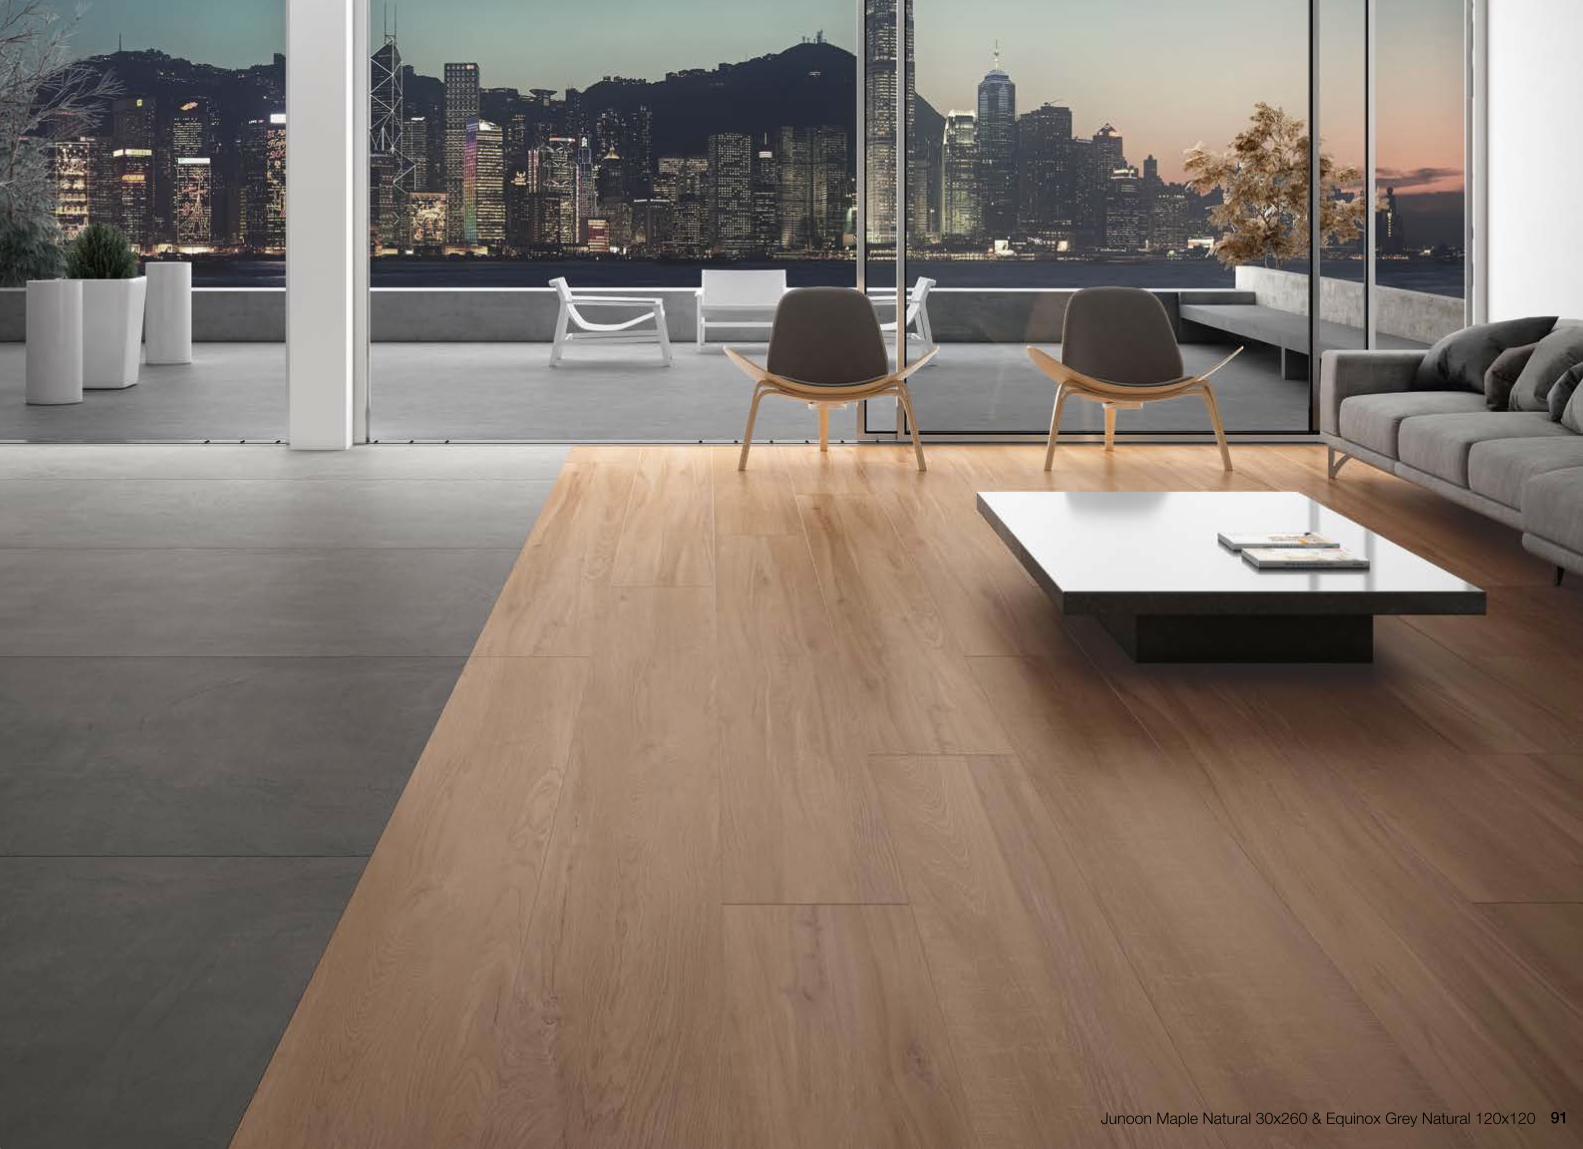
Junoon Maple Natural 30x260 & Equinox Grey Natural 120x120 91

Junoon Brown Natural
9393
Junoon Brown Natural 120x260
Junoon Brown Natural 30x260
Floor and Walls 6,5 mmG-4579
G-4575
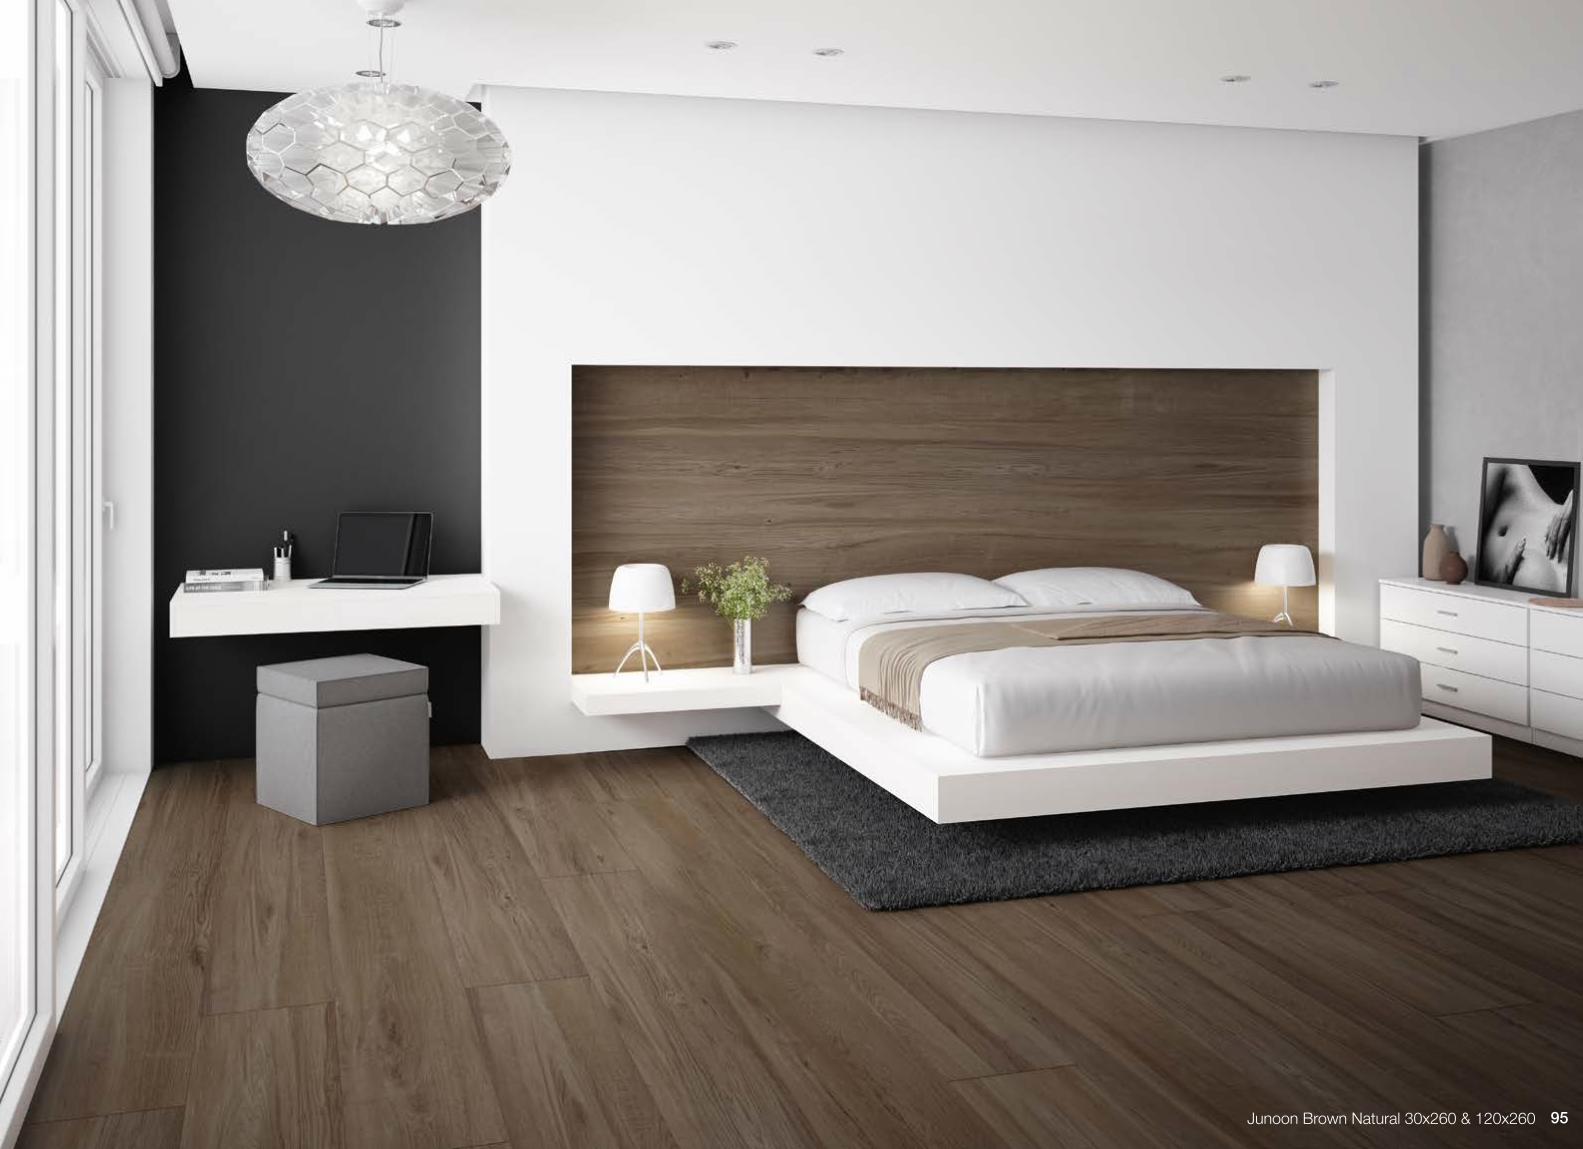
Junoon Brown Natural 30x260 & 120x260 95

Technicalinformation
97
s Abs
Technical information Floor & wall installation Pavimentado y alicatado Cutting Corte Cleaning & maintenance Limpieza y mantenimiento Specs / Características Product list / listado de productos Packing Handling / Manipulación
92949698
100101102104106118

Surface preparationIf the fixing surface is smooth (self-levelling mortar bed), it needs to be pre-roughened before cleaning by sandpapering with extra-large grit to enhance bonding.The fixing surface shall be flat and cleaned of any dust or impurities by using an acid solvent (e.g. hydrochloric acid) as well as a base solvent (e.g. ammonia).
Choosing the right adhesive The tiles shall be installed in both interiors and exteriors using class C2 cementitious adhesives with highly flexible S2 type enhanced deformability according to standard EN12004. In exteriors subject to extreme heat or places exposed to harsh climate conditions, it is advisable to use adhesives with class E extended open time according to standard EN12004. For outdoor tile installations in very cold climates it is recommended to use type F fast-setting adhesives according to standard EN12004 to avoid freezing of the mixing water.
Adhesive application The adhesive shall be applied by buttering and floating with a notched trowel between 5 and 8mm. Buttering and floating involves applying the bonding material both to the back of the ceramic tile and to the fixing surface to assure full contact between the two adhered surfaces and the bonding material. The grooves made with the notched trowel must cross each other without ever displaying a preferential direction.
The pieces need to be raised and placed with a positioning frame by suction pads to avoid any stress build-up in the piece during handling. After positioning the piece, it is essential to tap its entire surface with a mallet or rubber trowel to keep any air pockets from forming in the adhesive.
Positioning
Leveling (1)1- Slab2- Mortar bed3- Leveling system
It is imperative for a correct positioning the use of leveling systems for ensuring good adjustment between slabs.Use at least two wedges for every side for an optimum result.
Floor & wall installation
2
3
1 (1)
For an easy positioning is recomended the use of positioning systems as the one described (2).This kind of system offers good grip and security since it has vacuum cups to ensure slab stability and metal structure to avoid bending.
Positioning system (2)
Expansion joints (3)During the positioning, joint spacers must be used to maintain a minimum joint of 2mm in interiors and of 5mm in exteriors. Never use a butt joint installation, as this entails cancellation of any applicable product guarantee. Maintaining the joint well assures appropriate adhesive strength during vibrations, taps, and temperature changes by allowing a certain leeway in dimensional and planimetric variations during appropriate use of the material.
Movement joints (3)Flexible movement joints shall be installed at each end of the installation, leaving a sufficient margin for movement between the structural elements and the tiles. These joints shall be at least 10mm wide and are to be observed both at the ends and at each 8–14 square metres of tile, depending on traffic and climate. In addition, structural joints shall always be respected to avoid any complementary shift between the material and the building’s structural elements, as this drastically adversely affects material bonding to the substrate.
Grouting and cleaningIt is recommended to use class CG2 cementitious grouting material according to EN13888 with water resistant and antimould properties. The grouting material shall be applied after proper setting of the adhesive and previous cleaning any overflowing adhesive material.Grouting shall be followed by thorough surface cleaning with a non-oil-based neutral pH detergent and subsequent ab-sorption of the excess surplus water.
(2)
Movement Joint
Expansion Joint
120x120 slab
(3)
99

Preparación de la superficie de colocaciónSi la superficie es lisa (lecho de cemento pulido) tiene que prepararse, previo a su limpieza, mediante lijado con papel de grano extragrande para mejorar su adherencia.La superficie sobre la que se situe debe ser plana y limpiada de polvo e impurezas utilizando tanto un disolvente ácido (Ej. salfumán) como básico (Ej. amoniaco).
Elección del adhesivo correctoPara colocación tanto en interiores como en exteriores se deben utilizar adhesivos cementosos clase C2 con mejora en deformabilidad tipo S2 “altamente flexible” de acuerdo a la norma EN12004.En casos exteriores de extremo calor o en lugares con condiciones climáticas duras, es recomendable utilizar adhesivos con tiempo abierto ampliado de clase E según la norma EN12004.Para colocaciones exteriores en climas muy frios se recomienda el uso de adhesivos de fraguado rápido tipo F según la norma EN12004 para evitar la congelación del agua de mezcla.
Aplicación del ahesivoEl adhesivo debe ser aplicado mediante doble encolado con una llana dentada de entre 5 y 8mm. El doble encolado consiste en la utilización de material adherente tanto en la parte posterior del material cerámico como en la superficie de posicionamiento con el fin de garantizar el contacto total entre los adheridos y el adherente.Los surcos formados con la llana dentada deben entrecruzarse entre ellos sin mantener en ningún momento una direc-cionalidad preferente.
Las piezas deben ser levantadas y situadas con un carro de posicionamiento por ventosas para evitar la acumulación de tensiones en la pieza durante su manipulación.Una vez posicionada la pieza es imperativo dar golpes con un mazo o llana de goma a lo largo de toda la superficie para evitar la formación de bolsas de aire en el adhesivo.
Posicionamiento
Nivelación (1)1- Slab2- Lecho de mortero3- Sistema de nivelación
Es imperativo para un correcto posicionamiento el uso de sistemas de nivelación para asegurar el buen ajuste entre slabs.Es necesario utilizar almenos dos cuñas por cada lado para un resultado óptimo.
Pavimentado y alicatado
2
3
1 (1)
Para una colocación rápida y fácil se recomienda el uso de sistemas de colocación como el descrito en (2).Este tipo de sistema ofrece el agarre y seguridad necesario gracias a la utilización de ventosas para garantizar la estabili-dad y una estructura metálica que previene el doblado del slab.
Sistema de colocación (2)
Juntas de dilatación (3)Durante el posicionamiento es imperativo el uso de controladores de junta para mantener una junta mínima de 2mm en interiores y 5mm en exteriores. No se recomienda en ningún caso la colocación sin junta, suponiendo esto la anulación de cualquier garantía que haya vigente sobre el producto.El buen mantenimiento de la junta garantiza la correcta adherencia durante vibraciones, golpes y cambios de temperatu-ra, al permitir cierto juego durante las variaciones dimensionales y planimétricas de un uso adecuado del material.
Juntas de movimiento (3)Las juntas de movimiento flexible deben posicionarse en cada uno de los finales de colocación, dejando margen de movimiento suficiente entre los elementos estructurales y las baldosas. Estas juntas deben tener un mínimo de 10mm y respetarse tanto en los extremos como cada 8-14 metros cuadrados de baldosa según el transito y climatología.Además, las juntas estructuras deben ser respetadas en todo momento para evitar un desplazamiento complementario entre el material y los elementos estructurales de la edificación, situación que desfavorece de manera drástica la adhere-cia del material en el sustrato.
Rejuntado y limpiezaSe recomienda el uso de material de rejunte cementoso clase CG2 según EN13888 con propiedades hydrófugas y an-timoho. El material de rejunte debe ser aplicado después del correcto fraguado del adhesivo y previa limpieza de material adhesivo rebosante,Una vez aplicado, se requiere una limpieza exaustiva de la superficie con un detergente ph neutro de base no aceitosa y la posterior absorción del exceso de agua sobrante.
Junta de Movimiento
Junta de dilatación
120x120 slab
(3)
(2)
101

Cutting
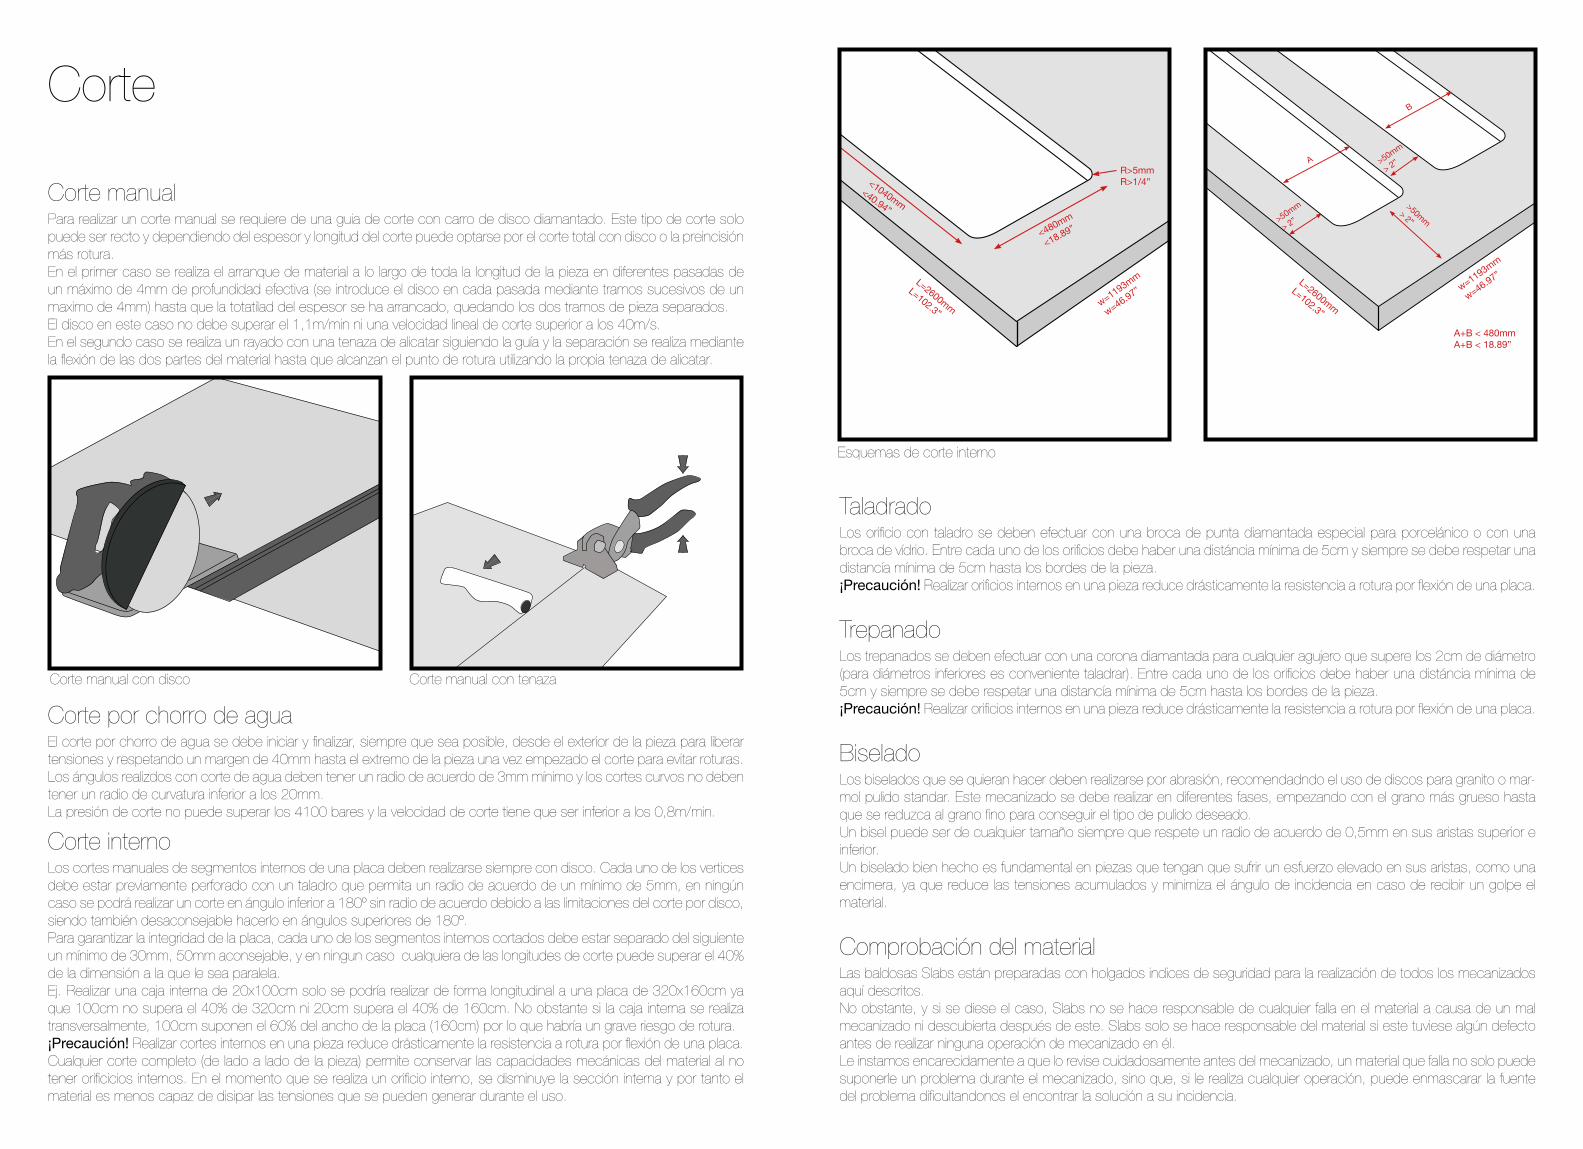
Manual cuttingManual cutting requires a cutting guide with a diamond disk carriage. This type of cut can only be straight and, depen-ding on the thickness and length of the cut, cutting may be performed by through cutting with the disk or by scoring and breaking. In the first case, the material is removed along the entire length of the piece in several passes of a maximum of 4mm effective depth (the disk is introduced in each pass along successive stretches to a maximum of 4mm) until the entire thickness has been removed, thus yielding two separate tile segments. In this case the disk shall not travel faster than 1.1m/min or have a linear cutting speed above 40m/s.In the second case, involving scoring and breaking, scoring is performed with tile pliers following the guide and separation takes place by bending the two segments until fracture occurs, using the tile pliers.
Manual cutting with disk Manual cutting with pliers
Waterjet cuttingWaterjet cutting should start and end, whenever possible, from the outside of the piece to release stresses, observing a margin of 40mm to the end of the piece once cutting has started to avoid failure.The angles made by water cutting shall have a minimum fillet radius of 3mm and the curving cuts shall not have a curvature radius below 20mm. Cutting pressure shall not exceed 4100 bar and cutting speed shall be below 0.8m/min.
Manual cutting of internal segments of a slab shall always be done with a disk. Each of the vertices shall be perforated beforehand with a drill providing a minimum fillet radius of 5mm; in no case, shall it be possible to perform a cut at an angle smaller than 180º without a fillet radius owing to the constraints on disk cutting, it also being inadvisable to do so at angles larger than 180º. To assure slab integrity, each cut out internal segment must be separated from the following by at least 30mm, 50mm being advisable and, in no case, shall any cutting length exceed 40% of the dimension parallel to it. For example, making an internal box of 20x100cm can only be done longitudinally on a slab of 320x160cm as 100cm does not exceed 40% of 320cm and 20cm does not exceed 40% of 160cm. However, if the internal box were made cross-sectionally, 100cm would correspond to 60% of the slab width (160cm), therefore entailing serious risk of failure. Warning! Performing internal cuts in a slab drastically reduces the slab’s resistance to failure by bending.Any complete cut (from side to side of the piece) conserves the mechanical performance features of the material as there are no internal openings. When an internal opening is made, the internal cross-section decreases and the material may therefore not be able to dissipate the stresses that could arise during use.
Inner cutting
Inner cutting schemes
Check your materialSlabs are made with comfortable safety margins for the performance of all the machining operations described above. However, Slabs accepts no responsibility for any failure of the material because of bad machining or discovered after such machining, should this occur. Slabs only accepts responsibility for the material if it has any defect before any machining operation is performed on it. We earnestly urge you, please, to check the material before machining; a material that fails may not only entail a problem during machining but, if any operation is performed on it, it may mask the source of the problem, making it difficult for us to address its occurrence.
TrepanationTrepanning shall be carried out with a diamond crown for any hole larger than 2cm in diameter (drilling is advisable for smaller diameters). The shall be a minimum distance of 5cm between each opening and a minimum distance of 5mm to the piece edges.Warning! Performing internal openings in a slab drastically reduces the slab’s resistance to failure by bending..
BevelllingBevelling shall be performed by abrasion, it being recommended to use disks for standard polished marble or granite. This machining operation shall be done in different stages, starting with the coarsest grit and then reducing grit size down to the fine grit required to obtain the desired polishing finish. A bevel bit may be of any size provided it has a fillet radius of 0.5mm at its top and bottom edges.Good bevelling is essential in pieces subject to high stress at their edges, such as worktops, as it reduces stress build-up and minimises the angle of incidence if the material receives a blow.
DrillingDrill holes shall be made with a special diamond-tipped drill bit for porcelain tile or with a glass drill bit. There shall be a minimum distance of 5cm between each hole and a minimum distance of 5cm to the piece edges.Warning! Performing internal openings in a slab drastically reduces the slab’s resistance to failure by bending.
>50mm
> 2”
>50mm
> 2”
>50mm> 2”
A
B
A+B < 480mmA+B < 18.89”
<480mm
<18.89”
<1040mm<40.94”
R>5mmR>1/4”
w=1193mm
w=46.97” w=1193mm
w=46.97”L=2600mm
L=102.3”
L=2600mm
L=102.3”
Corte manualPara realizar un corte manual se requiere de una guia de corte con carro de disco diamantado. Este tipo de corte solo puede ser recto y dependiendo del espesor y longitud del corte puede optarse por el corte total con disco o la preincisión más rotura.En el primer caso se realiza el arranque de material a lo largo de toda la longitud de la pieza en diferentes pasadas de un máximo de 4mm de profundidad efectiva (se introduce el disco en cada pasada mediante tramos sucesivos de un maximo de 4mm) hasta que la totatilad del espesor se ha arrancado, quedando los dos tramos de pieza separados.El disco en este caso no debe superar el 1,1m/min ni una velocidad lineal de corte superior a los 40m/s.En el segundo caso se realiza un rayado con una tenaza de alicatar siguiendo la guía y la separación se realiza mediante la flexión de las dos partes del material hasta que alcanzan el punto de rotura utilizando la propia tenaza de alicatar.
Corte por chorro de aguaEl corte por chorro de agua se debe iniciar y finalizar, siempre que sea posible, desde el exterior de la pieza para liberar tensiones y respetando un margen de 40mm hasta el extremo de la pieza una vez empezado el corte para evitar roturas. Los ángulos realizdos con corte de agua deben tener un radio de acuerdo de 3mm mínimo y los cortes curvos no deben tener un radio de curvatura inferior a los 20mm.La presión de corte no puede superar los 4100 bares y la velocidad de corte tiene que ser inferior a los 0,8m/min.
Los cortes manuales de segmentos internos de una placa deben realizarse siempre con disco. Cada uno de los vertices debe estar previamente perforado con un taladro que permita un radio de acuerdo de un mínimo de 5mm, en ningún caso se podrá realizar un corte en ángulo inferior a 180º sin radio de acuerdo debido a las limitaciones del corte por disco, siendo también desaconsejable hacerlo en ángulos superiores de 180º.Para garantizar la integridad de la placa, cada uno de los segmentos internos cortados debe estar separado del siguiente un mínimo de 30mm, 50mm aconsejable, y en ningun caso cualquiera de las longitudes de corte puede superar el 40% de la dimensión a la que le sea paralela.Ej. Realizar una caja interna de 20x100cm solo se podría realizar de forma longitudinal a una placa de 320x160cm ya que 100cm no supera el 40% de 320cm ni 20cm supera el 40% de 160cm. No obstante si la caja interna se realiza transversalmente, 100cm suponen el 60% del ancho de la placa (160cm) por lo que habría un grave riesgo de rotura.¡Precaución! Realizar cortes internos en una pieza reduce drásticamente la resistencia a rotura por flexión de una placa.Cualquier corte completo (de lado a lado de la pieza) permite conservar las capacidades mecánicas del material al no tener orificicios internos. En el momento que se realiza un orificio interno, se disminuye la sección interna y por tanto el material es menos capaz de disipar las tensiones que se pueden generar durante el uso.
Corte interno
Corte
Corte manual con disco Corte manual con tenaza
Comprobación del materialLas baldosas Slabs están preparadas con holgados indices de seguridad para la realización de todos los mecanizados aquí descritos.No obstante, y si se diese el caso, Slabs no se hace responsable de cualquier falla en el material a causa de un mal mecanizado ni descubierta después de este. Slabs solo se hace responsable del material si este tuviese algún defecto antes de realizar ninguna operación de mecanizado en él.Le instamos encarecidamente a que lo revise cuidadosamente antes del mecanizado, un material que falla no solo puede suponerle un problema durante el mecanizado, sino que, si le realiza cualquier operación, puede enmascarar la fuente del problema dificultandonos el encontrar la solución a su incidencia.
TrepanadoLos trepanados se deben efectuar con una corona diamantada para cualquier agujero que supere los 2cm de diámetro (para diámetros inferiores es conveniente taladrar). Entre cada uno de los orificios debe haber una distáncia mínima de 5cm y siempre se debe respetar una distancía mínima de 5cm hasta los bordes de la pieza.¡Precaución! Realizar orificios internos en una pieza reduce drásticamente la resistencia a rotura por flexión de una placa.
BiseladoLos biselados que se quieran hacer deben realizarse por abrasión, recomendadndo el uso de discos para granito o mar-mol pulido standar. Este mecanizado se debe realizar en diferentes fases, empezando con el grano más grueso hasta que se reduzca al grano fino para conseguir el tipo de pulido deseado.Un bisel puede ser de cualquier tamaño siempre que respete un radio de acuerdo de 0,5mm en sus aristas superior e inferior.Un biselado bien hecho es fundamental en piezas que tengan que sufrir un esfuerzo elevado en sus aristas, como una encimera, ya que reduce las tensiones acumulados y minimiza el ángulo de incidencia en caso de recibir un golpe el material.
TaladradoLos orificio con taladro se deben efectuar con una broca de punta diamantada especial para porcelánico o con una broca de vídrio. Entre cada uno de los orificios debe haber una distáncia mínima de 5cm y siempre se debe respetar una distancía mínima de 5cm hasta los bordes de la pieza.¡Precaución! Realizar orificios internos en una pieza reduce drásticamente la resistencia a rotura por flexión de una placa.
>50mm
> 2”
>50mm
> 2”
>50mm> 2”
A
B
A+B < 480mmA+B < 18.89”
<480mm
<18.89”
<1040mm<40.94”
R>5mmR>1/4”
w=1193mm
w=46.97” w=1193mm
w=46.97”L=2600mm
L=102.3”
L=2600mm
L=102.3”
Esquemas de corte interno
Cleaning & maintenanceEng
The first cleaning “after installation”.The most important cleaning operation is performed immediately after laying the tiles. This involves the complete removal of residues and dirt from the tile placement. An inadequate or late removal of this waste can create a cementitious layer on the tile capable of absorbing all forms of dirt. This may give the impression that the tile gets dirty when the actual problem resides in the surface film of dirt which was not removed immediately after laying.
Once the grouting of the tiles is finished, it is important, while the grout is still wet, to carefully remove any excess material immediately. This can be done using a sponge and plenty of clean water, repeating this as many times as necessary. Do not perform the cleaning with metal tools, scrapers or abrasive pads. For stubborn stains, clean with alcohol and lukewarm water and rub with a clean cloth. If they do not disappear, check with the relevant technical department.Once the above mentioned washing is done, another washing should be carried out using basic or alkaline degreasing agents, as acid washing can leave stickiness on the pavement which could help retain dirt. In areas where water is calca-reous, it is convenient to dry the surface, in order to prevent the deposition of carbonates which will reduce the surfaces’ gleam.
Regular maintenanceMany available cleaning products for general use can be used with our products. For daily cleaning, one can use deter-gents or degreasing products diluted in warm water, following each product’s instructions.It is important that the cleaner does not have oil, animal fat, or soap base. These components may leave an invisible residue whilst absorbing dirt (lime stratifications detergent or residues). It is also important that the tile receives a thorough rinsing with clean water after the cleaning process is complete.The low water absorption and high standards met by all porcelain tiles ensure a product which is easy to maintain. Our products do not require the use of sealants or waxes. These superficial coatings can really affect the performance of the tile in a negative manner.
It is important to note that hydrofluoric acid (HF) and derivatives can irreparably damage the tile.
The general steps for regular cleaning of our ceramic products can be summarized as follows:• Remove any solid or liquid waste from the tile, sweeping with a soft bristle broom or vacuuming.
• Clean up liquid spills as soon as possible with lukewarm water.
• Apply the recommended amount and dilution of the cleaner for the tile (follow the cleaner manufacturer’s instructions). The wiper must remain in the tile a minimum period of 5 minutes.
• For unpolished tiles, scrub with a nylon sponge or soft bristle brush. A floor machine equipped with a nylon pad or bristle brush can be used for heavily soiled surfaces. For polished tiles, clean with a nonabrasive cloth.
• Remove the dirty cleaning solution and water with a vacuum cleaner or cloth. Rinse the porcelain tile with clean water and remove again with a vacuum cleaner, mop or towel. It is absolutely essential that all detergent residues are removed completely from the tile. Any remaining detergent that dries on the tiles surface can form a coating that can trap dirt and be very difficult to remove. The tile should be rinsed several times to remove all detergent residues.
During use, the cleaning of the tiles should be similar to window cleaning. Ammonia and even bleach type products can be employed, but both must be diluted in water.
In case of special stains and/or particularly resistant, it is advisable to use specific detergents according to the cleaners’ manufacturer. Do not forget that removing any type of stain is easier when it is still fresh.It is important to always do a pre-test the detergent products result on a small sample of the porcelain.
Limpieza y mantenimientoEsp
La primera limpieza “después de la colocación”La operación de limpieza más importante se lleva a cabo inmediatamente “después de la colocación de la baldosa”. Esto implica la eliminación completa de los residuos de lechada y de la suciedad de la colocación de las propias baldosas. Una eliminación inade-cuada o tardía de estos residuos puede crear sobre la baldosa una película cementosa capaz de absorber toda forma de suciedad, dando la impresión que se ensucia la baldosa, cuando el problema está en la película superficial de suciedad. Una vez efectuado el rejuntado de las baldosas, es importante cuando el material de rejuntado todavía está fresco, eliminar el material sobrante cuidadosa e inmediatamente, utilizando para ello una esponja y agua limpia abundante, repitiendo esta operación tantas veces como sea necesario. No debe realizarse la limpieza del material con espátulas metálicas ni estropajos abrasivos. En el caso de manchas resistentes, limpiar con alcohol y agua caliente y frotar con un paño limpio. Si no desaparecen, consultar con el departamento técnico correspondiente.Una vez efectuado el lavado mencionado arriba, deberá efectuarse un lavado básico o alcalino utilizando detergentes desengrasan-tes, ya que el lavado ácido puede dejar una untuosidad sobre el pavimento que podría contribuir a retener la suciedad. En aquellas zonas donde el agua sea calcárea conviene secar la superficie para evitar la deposición de carbonatos que disminuyen el brillo superficial.
Mantenimiento regularMuchos productos de limpieza de uso general que están disponibles son aceptables para el uso en nuestros productos. Se puede emplear para la limpieza diaria detergentes o desengrasantes diluidos en agua caliente, según indicaciones del envase del limpiador. Es importante que el limpiador no tenga base de aceite, grasa animal, o jabón. Estos componentes pueden dejar un residuo invisible al atrapar la suciedad (estratificaciones de cal de detergente o residuos de suciedad). También es importante que la baldosa reciba un enjuague a fondo con agua limpia después que el proceso de limpieza se haya completado.La densidad inherente y baja absorción de agua de todos los productos aseguran un producto que es fácil de mantener. No requieren el uso de selladores o ceras. Estos recubrimientos superficiales pueden realmente afectar negativamente el rendimiento de la baldosa.
Es muy importante tener en cuenta que el ácido Fluorhídrico (HF) y derivados pueden dañar irremediablemente la baldosa.
Los pasos generales de limpieza regular para nuestros productos cerámicos se pueden resumir del siguiente modo: • Retirar cualquier residuo sólido o líquido de la baldosa, barriendo con una escoba de cerdas suaves o pasar la aspiradora.
• Limpiar los derrames líquidos tan pronto como sea posible.
• Aplicar la cantidad y dilución del limpiador recomendadas para la baldosa (ver indicaciones del fabricante del limpiador). El limpiador deberá permanecer en la baldosa un periodo mínimo de tiempo de 5 minutos.
• Para baldosas sin pulir, frotar con una esponja de nylon o un cepillo de cerdas suaves. Para superficies muy sucias puede usarse una máquina de piso equipado con una almohadilla de nylon o con un cepillo de cerdas. Para baldosas pulidas , limpie con un trapo no abrasivo o un paño.
• Retirar la solución de limpieza sucia y el agua con una aspiradora o un trapo. Enjuague la pieza con agua limpia y retire de nuevo con una aspiradora, fregona, o una toalla. Es absolutamente esencial para todos los residuos de detergente que se eliminen por completo de la baldosa. Cualquier resto de detergente que se seque sobre la baldosa puede formar un recubrimiento que puede atrapar la suciedad y será muy difícil de eliminar. La baldosa debe enjuagarse varias veces para eliminar todos los residuos de detergente.
Durante su uso, la limpieza de la baldosa debe hacerse de forma similar a la limpieza de cristales. Se puede emplear productos de tipo amoniacal e incluso lejía, ambos diluidos en agua.En caso de manchas particulares y/o especialmente resistentes, es aconsejable usar detergentes específicos según especifica-ciones del fabricante del limpiador. No hay que olvidar que la eliminación de cualquier tipo de mancha resulta más fácil cuando ésta todavía está fresca.Es importante hacer siempre una prueba previa antes de usar los productos detergentes.
107

>250cm
>130cm
>80cm
>80cm
<80cm
<80cm
<250cm
<130cm
Handling / Manipulación
109
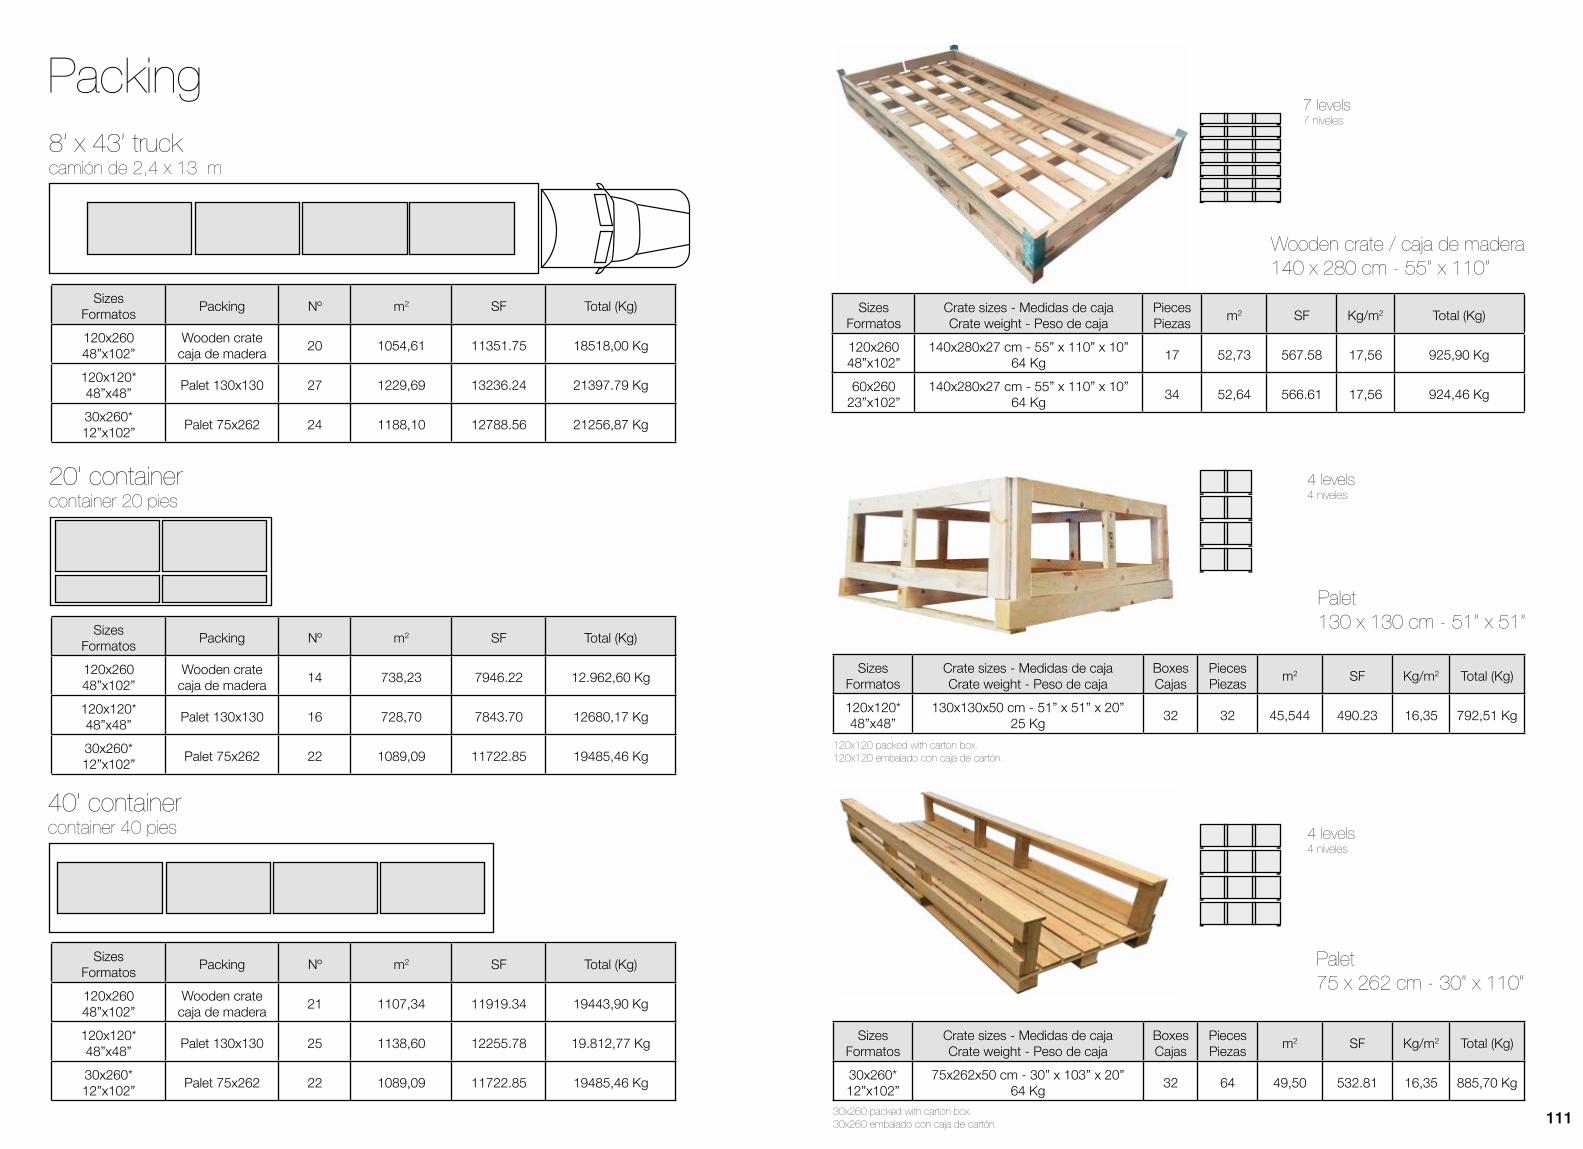
Packing
111
Palet75 x 262 cm - 30” x 110”
Sizes Formatos
Crate sizes - Medidas de cajaCrate weight - Peso de caja
BoxesCajas
PiecesPiezas
m2 SF Kg/m2 Total (Kg)
120x120*48”x48”
130x130x50 cm - 51” x 51” x 20”25 Kg
32 32 45,544 490.23 16,35 792,51 Kg
Sizes Formatos
Crate sizes - Medidas de cajaCrate weight - Peso de caja
BoxesCajas
PiecesPiezas
m2 SF Kg/m2 Total (Kg)
30x260*12”x102”
75x262x50 cm - 30” x 103” x 20”64 Kg
32 64 49,50 532.81 16,35 885,70 Kg
Sizes Formatos
Crate sizes - Medidas de cajaCrate weight - Peso de caja
PiecesPiezas
m2 SF Kg/m2 Total (Kg)
120x26048”x102”
140x280x27 cm - 55” x 110” x 10”64 Kg
17 52,73 567.58 17,56 925,90 Kg
60x26023”x102”
140x280x27 cm - 55” x 110” x 10”64 Kg
34 52,64 566.61 17,56 924,46 Kg
8’ x 43’ truck camión de 2,4 x 13 m
SizesFormatos
Packing Nº m2 SF Total (Kg)
120x26048”x102”
Wooden cratecaja de madera
20 1054,61 11351.75 18518,00 Kg
120x120*48”x48”
Palet 130x130 27 1229,69 13236.24 21397.79 Kg
30x260*12”x102”
Palet 75x262 24 1188,10 12788.56 21256,87 Kg
20’ containercontainer 20 pies
SizesFormatos
Packing Nº m2 SF Total (Kg)
120x26048”x102”
Wooden cratecaja de madera
14 738,23 7946.22 12.962,60 Kg
120x120*48”x48”
Palet 130x130 16 728,70 7843.70 12680,17 Kg
30x260*12”x102”
Palet 75x262 22 1089,09 11722.85 19485,46 Kg
40’ containercontainer 40 pies
SizesFormatos
Packing Nº m2 SF Total (Kg)
120x26048”x102”
Wooden cratecaja de madera
21 1107,34 11919.34 19443,90 Kg
120x120*48”x48”
Palet 130x130 25 1138,60 12255.78 19.812,77 Kg
30x260*12”x102”
Palet 75x262 22 1089,09 11722.85 19485,46 Kg
Wooden crate / caja de madera140 x 280 cm - 55” x 110”
Palet130 x 130 cm - 51” x 51”
4 levels4 niveles
120x120 packed with carton box.120x120 embalado con caja de cartón.
30x260 packed with carton box.30x260 embalado con caja de cartón.
7 levels7 niveles
4 levels4 niveles
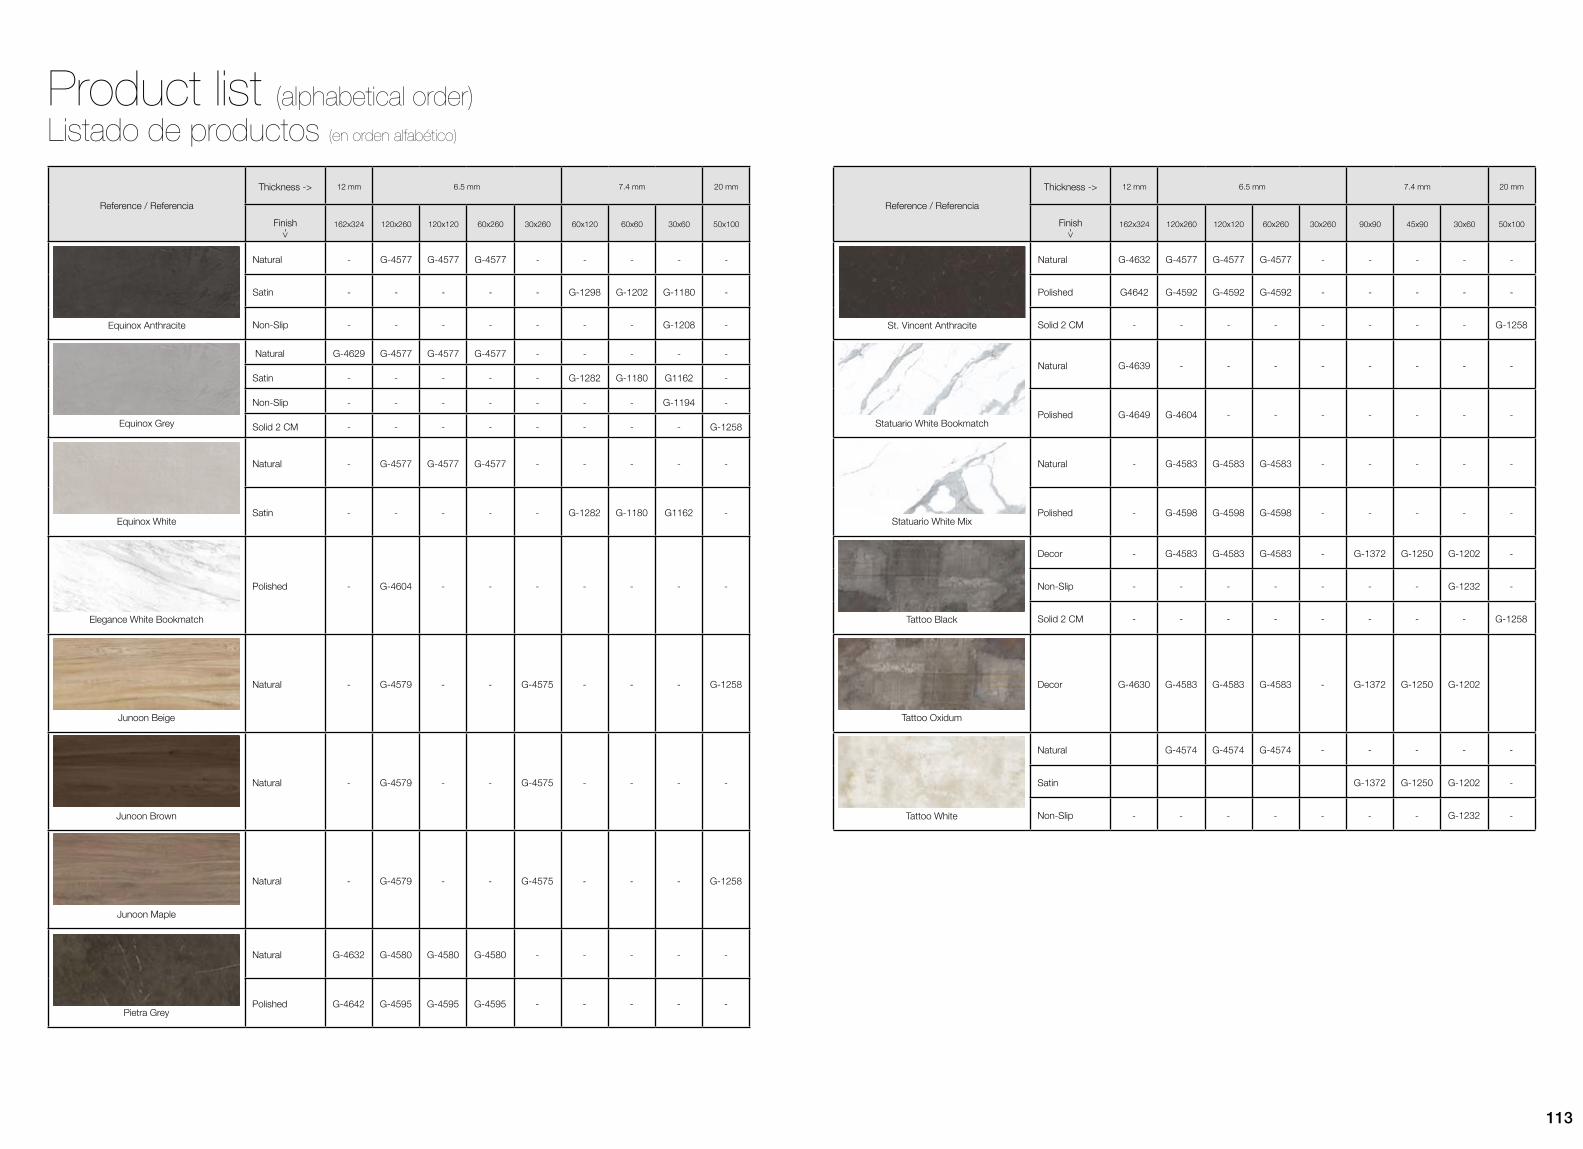
Reference / Referencia
Thickness -> 12 mm 6.5 mm 7.4 mm 20 mm
Finish 162x324 120x260 120x120 60x260 30x260 60x120 60x60 30x60 50x100
Equinox Anthracite
Natural - G-4577 G-4577 G-4577 - - - - -
Satin - - - - - G-1298 G-1202 G-1180 -
Non-Slip - - - - - - - G-1208 -
Equinox Grey
Natural G-4629 G-4577 G-4577 G-4577 - - - - -
Satin - - - - - G-1282 G-1180 G1162 -
Non-Slip - - - - - - - G-1194 -
Solid 2 CM - - - - - - - - G-1258
Equinox White
Natural - G-4577 G-4577 G-4577 - - - - -
Satin - - - - - G-1282 G-1180 G1162 -
Elegance White Bookmatch
Polished - G-4604 - - - - - - -
Junoon Beige
Natural - G-4579 - - G-4575 - - - G-1258
Junoon Brown
Natural - G-4579 - - G-4575 - - - -
Junoon Maple
Natural - G-4579 - - G-4575 - - - G-1258
Pietra Grey
Natural G-4632 G-4580 G-4580 G-4580 - - - - -
Polished G-4642 G-4595 G-4595 G-4595 - - - - -
Reference / Referencia
Thickness -> 12 mm 6.5 mm 7.4 mm 20 mm
Finish 162x324 120x260 120x120 60x260 30x260 90x90 45x90 30x60 50x100
St. Vincent Anthracite
Natural G-4632 G-4577 G-4577 G-4577 - - - - -
Polished G4642 G-4592 G-4592 G-4592 - - - - -
Solid 2 CM - - - - - - - - G-1258
Statuario White Bookmatch
Natural G-4639 - - - - - - - -
Polished G-4649 G-4604 - - - - - - -
Statuario White Mix
Natural - G-4583 G-4583 G-4583 - - - - -
Polished - G-4598 G-4598 G-4598 - - - - -
Tattoo Black
Decor - G-4583 G-4583 G-4583 - G-1372 G-1250 G-1202 -
Non-Slip - - - - - - - G-1232 -
Solid 2 CM - - - - - - - - G-1258
Tattoo Oxidum
Decor G-4630 G-4583 G-4583 G-4583 - G-1372 G-1250 G-1202
Tattoo White
Natural G-4574 G-4574 G-4574 - - - - -
Satin G-1372 G-1250 G-1202 -
Non-Slip - - - - - - - G-1232 -
Product list (alphabetical order)Listado de productos (en orden alfabético)
113
-> ->

Reference / Referencia
St. Vincent Anthracite
Statuario Extra White Bookmatch
Statuario Extra White Mix
Tattoo Black
Tattoo Oxidum
Tattoo White
Reference / Referencia Values / Valores
Equinox Anthracite
Equinox Grey
Equinox White
Elegance White Bookmatch
Junoon Beige
Junoon Brown
Junoon Maple
Pietra Grey
Anti-Slip ValuesValores Anti-Slip
115
CLASSB
DIN 51097
CLASE1
UNE-ENV 12633
DCOF>0,42
ANSI A137.1 S-9.6.1
DINR10
DIN 51130
Natural
CLASSB
DIN 51097
CLASE1
UNE-ENV 12633
DCOF>0,42
ANSI A137.1 S-9.6.1
DINR10
DIN 51130
Natural
CLASE1
UNE-ENV 12633
DCOF>0,42
ANSI A137.1 S-9.6.1
DINR10
DIN 51130
Satin
CLASE1
UNE-ENV 12633
DCOF>0,42
ANSI A137.1 S-9.6.1
DINR10
DIN 51130
Satin
CLASE1
UNE-ENV 12633
DCOF>0,42
ANSI A137.1 S-9.6.1
DINR10
DIN 51130
Decor
CLASE1
UNE-ENV 12633
DCOF>0,42
ANSI A137.1 S-9.6.1
DINR10
DIN 51130
Satin
CLASE1
UNE-ENV 12633
DCOF>0,42
ANSI A137.1 S-9.6.1
DINR10
DIN 51130
Decor
CLASSB
DIN 51097
CLASE1
UNE-ENV 12633
PTV>36
LOW SLIP POTENTIAL
PTV>36
LOW SLIP POTENTIAL
PTV>36
LOW SLIP POTENTIAL
PTV>36
LOW SLIP POTENTIAL
PTV<24
HIGH SLIP POTENTIAL
PTV>36
LOW SLIP POTENTIAL
PTV>24
MODERATE SLIP POTENTIAL
PTV>24
MODERATE SLIP POTENTIAL
PTV>36
LOW SLIP POTENTIAL
PTV>36
LOW SLIP POTENTIAL
PTV>36
LOW SLIP POTENTIAL
PTV>24
MODERATE SLIP POTENTIAL
DCOF>0,42
ANSI A137.1 S-9.6.1
DINR10
DIN 51130
Natural
CLASE1
UNE-ENV 12633
DCOF>0,42
ANSI A137.1 S-9.6.1
DINR10
DIN 51130
Satin
CLASSB
DIN 51097
CLASE1
UNE-ENV 12633
DCOF>0,42
ANSI A137.1 S-9.6.1
DINR10
DIN 51130
Natural
CLASE1
UNE-ENV 12633
DCOF>0,42
ANSI A137.1 S-9.6.1
DINR10
DIN 51130
Satin
CLASE1
UNE-ENV 12633
DCOF>0,42
ANSI A137.1 S-9.6.1
DINR10
DIN 51130
Natural
CLASE1
UNE-ENV 12633
DCOF>0,42
ANSI A137.1 S-9.6.1
DINR10
DIN 51130
Natural
CLASE1
UNE-ENV 12633
DCOF>0,42
ANSI A137.1 S-9.6.1
DINR10
DIN 51130
Natural
CLASE1
UNE-ENV 12633
DCOF>0,42
ANSI A137.1 S-9.6.1
DINR10
DIN 51130
Natural
CLASSC
DIN 51097
CLASE3
UNE-ENV 12633
DCOF>0,42
ANSI A137.1 S-9.6.1
DINR11
DIN 51130
Non-Slip
CLASSC
DIN 51097
CLASE3
UNE-ENV 12633
DCOF>0,42
ANSI A137.1 S-9.6.1
DINR11
DIN 51130
Non-Slip
CLASSC
DIN 51097
CLASE3
UNE-ENV 12633
DCOF>0,42
ANSI A137.1 S-9.6.1
DINR11
DIN 51130
Non-Slip
CLASSC
DIN 51097
CLASE3
UNE-ENV 12633
DCOF>0,42
ANSI A137.1 S-9.6.1
DINR11
DIN 51130
Non-Slip
CLASE2
UNE-ENV 12633
DCOF>0,42
ANSI A137.1 S-9.6.1
DINR10
DIN 51130
Natural
CLASE1
UNE-ENV 12633
DCOF>0,42
ANSI A137.1 S-9.6.1
DINR9
DIN 51130
Natural

TECHNICAL CHARACTERISTICSCARACTERÍSTICAS TÉCNICAS
STANDARD TEST METHODMÉTODO DE LA NORMA
STANDARD PRESCRIBED VALUESVALOR PRESCRITO POR LA NORMA
SLABS VALUEVALOR SLABS
MEASUREMENTS SURFACE APPEARANCE / DIMENSIONES Y ASPECTO SUPERFICIAL
NOMINAL THICKNESS/ ESPESOR NOMINAL 6,5mm - 1/4”
LENGTH AND WIDTH / LONGITUD Y ANCHURA UNE - EN ISO 10545 - 2 +/- 0.6 % max +/- 0.1 %
THICKNESS / ESPESOR UNE - EN ISO 10545 - 2 +/- 5.0 % max +/- 2.0 %
ORTHOGONALITY / ORTOGONALIDAD UNE - EN ISO 10545 - 2 +/- 0.6 % max +/- 0.2 %
SURFACE FLATNESS / PLANITUD DE SUPERFICIE UNE - EN ISO 10545 - 2 +/- 0.5 % max +/- 0.2 %
PHYSICAL PROPERTIES / PROPIEDADES FÍSICAS
WATER ABSORPTION / ABSORCIÓN DE AGUA UNE - EN ISO 10545 - 3 < 0.5 % <0.1 %
BENDING RESISTANCE / RESISTENCIA A LA FLEXIÓN UNE - EN ISO 10545 - 4 > 35 N/mm2 >50 N/mm2
BREAKING STRENGTH / FUERZA DE ROTURA UNE - EN ISO 10545 - 4 > 700 N >2000 N
RESISTANCE TO DEEP ABRASION / RESISTENCIA A LA ABRASIÓN PROFUNDA UNE - EN ISO 10545 - 6 < 175 mm3 <170mm3
TEMPERATURE SHOCK RESISTANCE / RESISTENCIA AL CHOQUE TERMICO UNE - EN ISO 10545 - 9 NO SURFACE DEFECTS SHOULD BE VISIBLE Resistant / Resistente
RESISTANCE TO COLD / RESISTENCIA A LA HELADA UNE - EN ISO 10545 - 12 NO SURFACE DEFECTS OR CRACKS SHOULD BE VISIBLE ANTI-ICE / Antihielo
ANTI-SLIP / ANTIDESLIZAMIENTO
DIN 51130 - -
DIN 51097 - -
UNE - ENV 12633 - -
ASTM C 1028-96 - -
BS EN 13036-4 - -
COLOUR RESISTANCE TO LIGHT / RESISTENCIA DEL COLOR A LA LUZ DIN 51094 THERE SHOULD BE NO COLOUR VARIATIONS NO ALTERATIONS
CHEMICAL PROPERTIES / PROPIEDADES QUÍMICAS
CHEMICAL RESISTANCE / RESISTENCIA QUÍMICA UNE - EN ISO 10545 - 13 RESISTANCE TO CHEMICAL PRODUCTSMin. ULB /UHB
RESISTANCE TO STAINING / RESISTENCIA A LAS MANCHAS UNE - EN ISO 10545 - 14 4
NO DEBE PRESENTAR DEFECTOS VISIBLES
NO DEBE PRESENTAR DEFECTOS O ROTURAS VISIBLES
NO DEBE PRESENTAR VARIACIONES DE COLOR
>3RESISTENCIA A PRODUCTOS QUÍMICOS
Kg
Specs / CaracterísticasPolished / Pulido
Recommended informationAll products receive a protective coating to prevent possible attacks during their placement in the implementation process at work. This protection
should be completely removed resulting in clean material. Please consult our commercial network if you have any questions regarding recommen-
ded cleaning for our products.
Información recomendadaTodos los productos llevan una aplicación protectora para evitar posibles agresiones durante su colocación en el proceso de ejecución de la
obra. Esta aplicación debe eliminarse completamente para conseguir una limpieza óptima del material.
Consulte con nuestra red comercial cualquier duda acerca de las recomendaciones de limpieza de nuestro producto.
Information reommandéeTous nos produits viennent avec une pélicule protectrice pour éviter les éventuelles agressions lors de la pose du matériel sur chantier. Cette
protection doit être complètement éliminée pour obtenir un nettoyage optimum des carreaux.
Veuillez consulter auprès de notre réseau commercial pour toute demande sur les recommandations de nettoyage de nos produits.
Empfohlene informationAlle Produkte sind mit einer Schutzschicht versehen um mögliche Angriffe während der Verlegung und Verarbeitung zu vermeiden. Diese Schut-
zschicht muss vollständig entfernt werden um eine optimale Reinigung des Materials zu erzielen. Bei Fragen zur Reinigungsempfehlung unserer
Produkte wenden sie sich bitte an unser Händlernetz.
General information / Información general
TECHNICAL CHARACTERISTICSCARACTERÍSTICAS TÉCNICAS
STANDARD TEST METHODMÉTODO DE LA NORMA
STANDARD PRESCRIBED VALUESVALOR PRESCRITO POR LA NORMA
SLABS VALUEVALOR SLABS
MEASUREMENTS SURFACE APPEARANCE / DIMENSIONES Y ASPECTO SUPERFICIAL
NOMINAL THICKNESS/ ESPESOR NOMINAL 6,5mm - 1/4”
LENGTH AND WIDTH / LONGITUD Y ANCHURA UNE - EN ISO 10545 - 2 +/- 0.6 % max +/- 0.1 %
THICKNESS / ESPESOR UNE - EN ISO 10545 - 2 +/- 5.0 % max +/- 2.0 %
ORTHOGONALITY / ORTOGONALIDAD UNE - EN ISO 10545 - 2 +/- 0.6 % max +/- 0.2 %
SURFACE FLATNESS / PLANITUD DE SUPERFICIE UNE - EN ISO 10545 - 2 +/- 0.5 % max +/- 0.2 %
PHYSICAL PROPERTIES / PROPIEDADES FÍSICAS
WATER ABSORPTION / ABSORCIÓN DE AGUA UNE - EN ISO 10545 - 3 < 0.5 % <0.1 %
BENDING RESISTANCE / RESISTENCIA A LA FLEXIÓN UNE - EN ISO 10545 - 4 > 35 N/mm2 >50 N/mm2
BREAKING STRENGTH / FUERZA DE ROTURA UNE - EN ISO 10545 - 4 > 700 N >2000 N
RESISTANCE TO DEEP ABRASION / RESISTENCIA A LA ABRASIÓN PROFUNDA UNE - EN ISO 10545 - 6 < 175 mm3 <170mm3
TEMPERATURE SHOCK RESISTANCE / RESISTENCIA AL CHOQUE TERMICO UNE - EN ISO 10545 - 9 NO SURFACE DEFECTS SHOULD BE VISIBLE Resistant / Resistente
RESISTANCE TO COLD / RESISTENCIA A LA HELADA UNE - EN ISO 10545 - 12 NO SURFACE DEFECTS OR CRACKS SHOULD BE VISIBLE ANTI-ICE / Antihielo
ANTI-SLIP / ANTIDESLIZAMIENTO
DIN 51130 - See table / Ver tabla*
DIN 51097 - -
UNE - ENV 12633 - -
ANSI A137.1 S-9-6-1 - >0,42
BS EN 13036-4 - -
COLOUR RESISTANCE TO LIGHT / RESISTENCIA DEL COLOR A LA LUZ DIN 51094 THERE SHOULD BE NO COLOUR VARIATIONS NO ALTERATIONS
CHEMICAL PROPERTIES / PROPIEDADES QUÍMICAS
CHEMICAL RESISTANCE / RESISTENCIA QUÍMICA UNE - EN ISO 10545 - 13 RESISTANCE TO CHEMICAL PRODUCTSMin. ULB /UHB
RESISTANCE TO STAINING / RESISTENCIA A LAS MANCHAS UNE - EN ISO 10545 - 14 4
NO DEBE PRESENTAR DEFECTOS VISIBLES
NO DEBE PRESENTAR DEFECTOS O ROTURAS VISIBLES
NO DEBE PRESENTAR VARIACIONES DE COLOR
>3RESISTENCIA A PRODUCTOS QUÍMICOS
Kg
Specs / CaracterísticasNatural
117
Tests for polished finish characteristics done in Statuario White Polished 120x260. Average test result value on March 2017. Consult specific product test result value before supplying.Pruebas para las características del acabado pulido realizadas sobre el producto Statuario White Polished 120x260. Valor de media a fecha de Marzo 2017. Consultar valor de un producto específico antes del suministro.
*See Anti-Slip Values table - pages 114-115*Ver tabla de valores Anti-Slip - páginas 114-115
Statuario White Polished Tattoo Oxidum Decor
Tests for natural finish characteristics done in Tattoo Oxidum Decor 120x260. Average test result value on March 2017. Consult specific product test result value before supplying.Pruebas para las características del acabado natural realizadas sobre el producto Tattoo Oxidum Decor 120x260. Valor de media a fecha de Marzo 2017. Consultar valor de un producto específico antes del suministro.

s AbsCtra. Castellón – San Juan de Moró, hm.7,5 - 12130 SAN JUAN DE MORÓ (Castellón) SpainTel. +34 964 701 120 - Export Fax +34 964 701 067 - Fax Nacional 964 701 195 - [email protected]
www.apavisaslabs.com
SLABS02 / 0318


