109
Salesforce External Identity Implementation Guide Salesforce, Spring ’20 @salesforcedocs Last updated: February 5, 2020
Salesforce External IdentityImplementation Guide
Salesforce, Spring ’20
@salesforcedocsLast updated: February 5, 2020

© Copyright 2000–2020 salesforce.com, inc. All rights reserved. Salesforce is a registered trademark of salesforce.com, inc.,as are other names and marks. Other marks appearing herein may be trademarks of their respective owners.
CONTENTS
EXTERNAL IDENTITY FOR CUSTOMERS AND PARTNERS GUIDE . . . . . . . . . 1
HOW CAN I USE SALESFORCE IDENTITY FOR EXTERNAL USERS? . . . . . . . . 2Acquire and Engage New Users . . . . . . . . . . . . . . . . . . . . . . . . . . . . . . . . . . . . . . . . . . . 2Deliver a Consistent Experience with a Single Identity Across All Channels . . . . . . . . . . . . . . . . 3Secure and Manage Your Customer and Partner Ecosystems . . . . . . . . . . . . . . . . . . . . . . . . 3Integrate and Customize to Your Business Needs . . . . . . . . . . . . . . . . . . . . . . . . . . . . . . . . 4Extend External Identity to Your Website . . . . . . . . . . . . . . . . . . . . . . . . . . . . . . . . . . . . . . . 4What Is Salesforce Identity for External Users? . . . . . . . . . . . . . . . . . . . . . . . . . . . . . . . . . . . 4External Identity Licenses . . . . . . . . . . . . . . . . . . . . . . . . . . . . . . . . . . . . . . . . . . . . . . . . . 4
External Identity License Details . . . . . . . . . . . . . . . . . . . . . . . . . . . . . . . . . . . . . . . . . 5External Identity and Communities . . . . . . . . . . . . . . . . . . . . . . . . . . . . . . . . . . . . . . . . . . 7Learn More with Trailhead . . . . . . . . . . . . . . . . . . . . . . . . . . . . . . . . . . . . . . . . . . . . . . . . 7
EXTERNAL IDENTITY IMPLEMENTATION CHECKLIST . . . . . . . . . . . . . . . . . . . 8
CREATE A TYPICAL EXTERNAL IDENTITY IMPLEMENTATION . . . . . . . . . . . . 10Prepare Your Org . . . . . . . . . . . . . . . . . . . . . . . . . . . . . . . . . . . . . . . . . . . . . . . . . . . . . 10
Create a Developer Org . . . . . . . . . . . . . . . . . . . . . . . . . . . . . . . . . . . . . . . . . . . . . 11Set Up My Domain . . . . . . . . . . . . . . . . . . . . . . . . . . . . . . . . . . . . . . . . . . . . . . . . . 11Control Authorization with Custom Profiles and Roles . . . . . . . . . . . . . . . . . . . . . . . . . . 11Create an Account for CRM Integration . . . . . . . . . . . . . . . . . . . . . . . . . . . . . . . . . . . 12
Create a Branded Login Page . . . . . . . . . . . . . . . . . . . . . . . . . . . . . . . . . . . . . . . . . . . . . 12Select a Community Template . . . . . . . . . . . . . . . . . . . . . . . . . . . . . . . . . . . . . . . . . 13Control External User Access to Your Community . . . . . . . . . . . . . . . . . . . . . . . . . . . . 15Brand Your Community with the Login & Registration Page . . . . . . . . . . . . . . . . . . . . . . 16Customize Your Login Pages with Experience Builder . . . . . . . . . . . . . . . . . . . . . . . . . 19Activate Your Community . . . . . . . . . . . . . . . . . . . . . . . . . . . . . . . . . . . . . . . . . . . . 21
Enable Self-Registration . . . . . . . . . . . . . . . . . . . . . . . . . . . . . . . . . . . . . . . . . . . . . . . . . 21Add a Self-Registration Page . . . . . . . . . . . . . . . . . . . . . . . . . . . . . . . . . . . . . . . . . . 21Add Fields to Collect Additional Information . . . . . . . . . . . . . . . . . . . . . . . . . . . . . . . . 22Add a Password Field to Enable Login Directly During Registration . . . . . . . . . . . . . . . . 24
Enable Self-Registration for B2C Users (Optional) . . . . . . . . . . . . . . . . . . . . . . . . . . . . . . . . 25Enable Person Accounts . . . . . . . . . . . . . . . . . . . . . . . . . . . . . . . . . . . . . . . . . . . . 26Configure Self-Registration for Person Accounts . . . . . . . . . . . . . . . . . . . . . . . . . . . . . 26
SET UP SSO FOR YOUR USERS . . . . . . . . . . . . . . . . . . . . . . . . . . . . . . . . . . . . . 28Social Sign-On . . . . . . . . . . . . . . . . . . . . . . . . . . . . . . . . . . . . . . . . . . . . . . . . . . . . . . . 28Create an Auth. Provider . . . . . . . . . . . . . . . . . . . . . . . . . . . . . . . . . . . . . . . . . . . . . . . . 29
Customize Your Registration Handler . . . . . . . . . . . . . . . . . . . . . . . . . . . . . . . . . . . . . . . 29Enable Your Auth. Provider in Your Community . . . . . . . . . . . . . . . . . . . . . . . . . . . . . . . . . 30Accept User Identity with SAML and Just-In-Time Provisioning . . . . . . . . . . . . . . . . . . . . . . . 30
SET UP SSO FOR YOUR APPS . . . . . . . . . . . . . . . . . . . . . . . . . . . . . . . . . . . . . . 31Set Up SSO and Access for Mobile Apps . . . . . . . . . . . . . . . . . . . . . . . . . . . . . . . . . . . . . . 31
Create a Connected App for Your Mobile App . . . . . . . . . . . . . . . . . . . . . . . . . . . . . . 31Install the Salesforce Mobile SDK . . . . . . . . . . . . . . . . . . . . . . . . . . . . . . . . . . . . . . . 32Create a Mobile App . . . . . . . . . . . . . . . . . . . . . . . . . . . . . . . . . . . . . . . . . . . . . . 32Configure the Mobile App to Point to Your Community . . . . . . . . . . . . . . . . . . . . . . . . 32More About Single Sign-On for Your Mobile App . . . . . . . . . . . . . . . . . . . . . . . . . . . . 33
Set Up SSO and Access for Your Web App . . . . . . . . . . . . . . . . . . . . . . . . . . . . . . . . . . . . 33Create a Connected App for Your Web App . . . . . . . . . . . . . . . . . . . . . . . . . . . . . . . 34Create a Sample Service Provider on Heroku . . . . . . . . . . . . . . . . . . . . . . . . . . . . . . . 34Configure Salesforce Identity to Provide Identity for Your App . . . . . . . . . . . . . . . . . . . . 35Authorize Your Web App . . . . . . . . . . . . . . . . . . . . . . . . . . . . . . . . . . . . . . . . . . . . 35Configure Your App to Trust Salesforce Identity . . . . . . . . . . . . . . . . . . . . . . . . . . . . . 35Personalize Your App with Custom Attributes . . . . . . . . . . . . . . . . . . . . . . . . . . . . . . 36More About Single Sign-On for Your Web App . . . . . . . . . . . . . . . . . . . . . . . . . . . . . . 36
DYNAMIC URLS: DETERMINE YOUR BRAND AT RUN TIME . . . . . . . . . . . . 37Dynamic Branding for Multiple Brands . . . . . . . . . . . . . . . . . . . . . . . . . . . . . . . . . . . . . . . 37Dynamic Branding Using the Login & Registration Page . . . . . . . . . . . . . . . . . . . . . . . . . . . 39
Set Up Dynamic URLs . . . . . . . . . . . . . . . . . . . . . . . . . . . . . . . . . . . . . . . . . . . . . . 40
QUICKER AND EASIER LOGINS WITH IDENTITY VERIFICATION . . . . . . . . . 41Choose a Login Page Type . . . . . . . . . . . . . . . . . . . . . . . . . . . . . . . . . . . . . . . . . . . . . . 42Use Login Discovery to Simplify Login . . . . . . . . . . . . . . . . . . . . . . . . . . . . . . . . . . . . . . . . 43Extend the Login Discovery Handler in Apex . . . . . . . . . . . . . . . . . . . . . . . . . . . . . . . . . . . 45Choose a Self-Registration Page Type . . . . . . . . . . . . . . . . . . . . . . . . . . . . . . . . . . . . . . . 47Use the Configurable Self-Reg Page for Easy Sign-Up . . . . . . . . . . . . . . . . . . . . . . . . . . . . 48Extend the Configurable Self-Reg Handler in Apex . . . . . . . . . . . . . . . . . . . . . . . . . . . . . . . 50View Your Users’ Identity Verification Methods . . . . . . . . . . . . . . . . . . . . . . . . . . . . . . . . . . 51Create Custom Error Messages in the Login Discovery and Self-Registration Handlers . . . . . . . 53
CUSTOMIZE LOGIN PAGES IN APEX FOR FULL CONTROL . . . . . . . . . . . . . 54Create a Custom Login Page in Visualforce . . . . . . . . . . . . . . . . . . . . . . . . . . . . . . . . . . . 55
Create a Custom Login Page from a Github Project . . . . . . . . . . . . . . . . . . . . . . . . . . . 57Choose Your Passwordless Login Implementation . . . . . . . . . . . . . . . . . . . . . . . . . . . . . . . 58Create a Custom Passwordless Login Page . . . . . . . . . . . . . . . . . . . . . . . . . . . . . . . . . . . 61
Passwordless Login Coding Considerations . . . . . . . . . . . . . . . . . . . . . . . . . . . . . . . 63Create a Custom Identity Verification (Verify) Page . . . . . . . . . . . . . . . . . . . . . . . . . . . . . . . 64Add Dynamic Branding to Custom Login Pages . . . . . . . . . . . . . . . . . . . . . . . . . . . . . . . . 66
Extend an Endpoint with the Experience ID . . . . . . . . . . . . . . . . . . . . . . . . . . . . . . . . 67
Contents
EMBEDDED LOGIN: ALLOW VISITORS TO LOG IN TO YOUR WEBPAGES . . . . . . . . . . . . . . . . . . . . . . . . . . . . . . . . . . . . . . . . . . . . . . . . . . . . . . . . . . 69Embedded Login in Action . . . . . . . . . . . . . . . . . . . . . . . . . . . . . . . . . . . . . . . . . . . . . . . 70How to Implement Embedded Login . . . . . . . . . . . . . . . . . . . . . . . . . . . . . . . . . . . . . . . . 73Implement Embedded Login . . . . . . . . . . . . . . . . . . . . . . . . . . . . . . . . . . . . . . . . . . . . . 74
Step 1: Enable Resource Sharing Across Domains . . . . . . . . . . . . . . . . . . . . . . . . . . . . 75Step 2: Create the Embedded Login Connected App . . . . . . . . . . . . . . . . . . . . . . . . . . 76Step 3: Enable Embedded Login on a Web Page . . . . . . . . . . . . . . . . . . . . . . . . . . . . 78Step 4: Write Login and Logout Functions . . . . . . . . . . . . . . . . . . . . . . . . . . . . . . . . . 82Step 5: Handle the Embedded Login Callback . . . . . . . . . . . . . . . . . . . . . . . . . . . . . . 83
Embedded Login Advanced Authentication Features . . . . . . . . . . . . . . . . . . . . . . . . . . . . . 88Embedded Login Considerations . . . . . . . . . . . . . . . . . . . . . . . . . . . . . . . . . . . . . . . . . . 90Embedded Login Meta Tag Reference . . . . . . . . . . . . . . . . . . . . . . . . . . . . . . . . . . . . . . . 91
MANAGE COMMUNITIES FOR EXTERNAL IDENTITY . . . . . . . . . . . . . . . . . . . 95Extend External Identity Sessions (Beta) . . . . . . . . . . . . . . . . . . . . . . . . . . . . . . . . . . . . . . 95Create Lightweight Contactless External Identity Users . . . . . . . . . . . . . . . . . . . . . . . . . . . . 96Upgrade a Contactless User to a Community License . . . . . . . . . . . . . . . . . . . . . . . . . . . . 98Downgrade Users with Community Licenses to Contactless External Identity Users . . . . . . . . . 98
EXTERNAL IDENTITY ON GITHUB AND TRAILBLAZER COMMUNITY . . . . 100
INDEX . . . . . . . . . . . . . . . . . . . . . . . . . . . . . . . . . . . . . . . . . . . . . . . . . . . . . . . . . . . 101
Contents


EXTERNAL IDENTITY FOR CUSTOMERS AND PARTNERSGUIDE
Salesforce Identity for Customers and Partners improves your engagement with your external users. With little effort on your part, youcan provide your external users a login page that reflects your brand. You can further customize the login process with the providedtools. This product is similar to Salesforce Identity but intended for your external users, whereas Salesforce Identity maintains the identityof your internal users.
Learn how to set up and manage a community for your external users. For brevity, Salesforce Identity for Customers and Partners isreferred to as external identity.
1
HOW CAN I USE SALESFORCE IDENTITY FOR EXTERNALUSERS?
Salesforce Identity for Customers and Partners offers a broad set of capabilities for connecting with your customers and partners, as wellas extensive customization and integration options. Here are some common use cases and features.
Acquire and Engage New Users
Your business is growing, and you need to onboard customers and partners quickly. Salesforce Identity can help enable and scaleyour customer and partner acquisition processes with self-registration, social sign-on, and CRM integration.
Deliver a Consistent Experience with a Single Identity Across All Channels
Salesforce Identity lets you engage with your users everywhere. Get a single, 360-degree view of your users while delivering aconsistent, streamlined end-user experience for your brand.
Secure and Manage Your Customer and Partner Ecosystems
By centralizing management of your users, Salesforce Identity makes life easy for your admins. They have a single place to manageIdentity users and create reports and dashboards on their access.
Integrate and Customize to Your Business Needs
Salesforce Identity is integrated into the Salesforce Platform and is fully customizable, extensible, and scalable for any business.
Extend External Identity to Your Website
Salesforce Identity Embedded Login makes it easy to incorporate authentication into websites. Creating authenticated sessionsbetween your community and website visitors extends your reach with your customers. For example, you can require that your userslog in before they access your website. Or when customers change billing information on the website, Salesforce can update theircontact information. As you collect information about a user, you can tailor the experience accordingly.
What Is Salesforce Identity for External Users?
Salesforce Identity is an Identity and Access Management (IAM) service that connects users to your apps, services, and devices. Itprovides a centralized point of management for your admins and provides a single, trusted identity for your end users. Traditionally,IAM services have focused on employee-facing use cases. Today, companies are using identity as a way to better connect with theircustomers and partners. We call this external identity.
External Identity Licenses
External Identity is a type of Salesforce license that enables you to deliver identity services, such as single sign-on (SSO) and socialsign-on. External Identity is a standalone license and purchased in blocks of active users. These users are typically consumers of yourbusiness, such as purchasers, patients, partners, and dealers.
External Identity and Communities
Communities are branded spaces for employees, customers, and partners to connect. You can customize and create communitiesto deliver specific business apps and services, including identity services.
Learn More with Trailhead
For a fun way to get a better understanding of external identity, take advantage of Trailhead. You can find identity modules in theSecure Identity and Access Management trail.
Acquire and Engage New Users
Your business is growing, and you need to onboard customers and partners quickly. Salesforce Identity can help enable and scale yourcustomer and partner acquisition processes with self-registration, social sign-on, and CRM integration.
2
Self-RegistrationExternal users can create user accounts quickly and easily with fully branded and customizable registration processes.
Social Sign-OnCustomers and prospects can bring their own identity from social networks and public providers, such as Facebook, Google, Amazon,and PayPal.
CRM and Back-Office IntegrationYou can easily integrate your customers with your Salesforce org. When you run registration on your customer platform, identitydata is no longer stuck in an IT system. Enrich your CRM data, create leads, link to your back-office customer records, and driveapproval processes by implementing an external identity solution.
Deliver a Consistent Experience with a Single Identity Across AllChannels
Salesforce Identity lets you engage with your users everywhere. Get a single, 360-degree view of your users while delivering a consistent,streamlined end-user experience for your brand.
Single Sign-On (SSO)Save your users’ time by letting them log in once to seamlessly access your apps. Uses secure industry standards like SAML, OpenID,and OAuth.
Mobile IdentityDeliver mobile apps to your customers with automatic SSO, authorization, and mobile-specific policies. Salesforce gives you a robust,open-source mobile SDK to easily create your mobile apps.
Cloud Directory ServicesAdapt your business with customizable fields, automatable workflows, batch processing, and delegated administration throughcloud Cloud directory services.
Secure and Manage Your Customer and Partner Ecosystems
By centralizing management of your users, Salesforce Identity makes life easy for your admins. They have a single place to manageIdentity users and create reports and dashboards on their access.
Authorization and Policy ManagementDeliver the right experience to your users at the right time and for the right reasons. Built-in access management, authorization, androbust policies make it easy for you to effective identity management.
Multifactor AuthenticationAdd an extra layer of security when logging in or accessing critical resources using secure, mobile two-factor authentication.
Provisioning and Unprovisioning AppsProvide access and personalization to your apps with a customizable push-provisioning engine for just-in-time provisioning andsingle sign-on.
Reporting and DashboardsGain visibility into usage, adoption, and security with drag-and-drop customizable reports and dashboards.
3
Deliver a Consistent Experience with a Single Identity AcrossAll Channels
How Can I Use Salesforce Identity for External Users?
Integrate and Customize to Your Business Needs
Salesforce Identity is integrated into the Salesforce Platform and is fully customizable, extensible, and scalable for any business.
Fully BrandedExtend your company’s brand securely with drag-and-drop branding for login, self-registration, and federation services. Control andcustomize branding at run time depending on certain conditions, like who the user is or from where the user is logging in.
Workflows and Business ProcessesScale your administration and integration efforts with visually designed workflow processes.
Open APIs and Open StandardsTake advantage of the full suite of development tools that Salesforce Identity offers. It provides APIs for everything you need andsupports major open identity standards, including SAML, OAuth 2.0, OpenID Connect, and SCIM.
Extend External Identity to Your Website
Salesforce Identity Embedded Login makes it easy to incorporate authentication into websites. Creating authenticated sessions betweenyour community and website visitors extends your reach with your customers. For example, you can require that your users log in beforethey access your website. Or when customers change billing information on the website, Salesforce can update their contact information.As you collect information about a user, you can tailor the experience accordingly.
Your web developers aren’t required to know anything about authentication services to add login capabilities to their web pages. Theycan rely on Embedded Login to take care of the process of authenticating users. Web developers just add a few HTML meta tags to aweb page and a JavaScript function to determine what happens when a user successfully logs in. When your website visitors access thepage, they enter their credentials in a login form generated by Embedded Login.
What Is Salesforce Identity for External Users?
Salesforce Identity is an Identity and Access Management (IAM) service that connects users to your apps, services, and devices. It providesa centralized point of management for your admins and provides a single, trusted identity for your end users. Traditionally, IAM serviceshave focused on employee-facing use cases. Today, companies are using identity as a way to better connect with their customers andpartners. We call this external identity.
When used for external identities, Salesforce Identity transforms CRM contacts into real digital identities that can self-register, log in,update their profile, and securely access web and mobile apps with a single identity. Plus, it’s customized to your specific business processand brand using the power of the Salesforce Platform.
By delivering identity services directly from the same platform you use for sales, service, and marketing, you can recognize users acrossall your digital channels and create a consistent experience for customers and partners across all lines of business. The information andinsight gathered converge with your existing CRM data and processes, thus building a single view of all your relationships.
Using Salesforce Identity, you build deeper, richer relationships with customers and partners by creating and maintaining a single identityfor interaction across all channels.
External Identity Licenses
External Identity is a type of Salesforce license that enables you to deliver identity services, such as single sign-on (SSO) and social sign-on.External Identity is a standalone license and purchased in blocks of active users. These users are typically consumers of your business,such as purchasers, patients, partners, and dealers.
4
Integrate and Customize to Your Business NeedsHow Can I Use Salesforce Identity for External Users?
With an External Identity license, you can access several standard objects and 10 custom objects to deliver powerful self-service applications.The license includes extra data storage and API requests. Make sure that your org has sufficient resources before rolling out your externalidentity system. For more information, contact your Salesforce representative.
External Identity works with Community licenses. It’s also included for free with all paid community user licenses in Enterprise, Performance,and Unlimited Editions. Each Developer Edition org includes five External Identity user licenses. You can upgrade the External Identitylicense to a Community license to benefit from Community features, including Cases, Contracts, Notes, Orders, and Tasks.
These licenses are also available for managing user identities.
Identity OnlyEnables use cases similar to External Identity for your internal employees.
Identity ConnectAn on-premises component that synchronizes users with Microsoft Active Directory (AD). While not commonly used in externalscenarios, occasionally companies store their external users in AD.
Customer Community Plus or Partner CommunityFor customers who want to implement delegated administration. Admins with either a Customer Community Plus or PartnerCommunity license can manage their users with external identity licenses.
Note: External Identity Allocations
We recommend that the number of External Identity license users in your external identity community not exceed 10 millionunique users per month. If you require additional user licenses beyond this limit, contact your Salesforce account executive.Exceeding this limit can result in an extra charge and decrease expected functionality.
External Identity License Details
The Salesforce External Identity User license lets you deliver identity services, including single sign-on (SSO), to your customers andpartners. It is a standalone license that you can buy for blocks of users who are consumers of your business, such as customers,purchasers, patients, partners, and dealers.
External Identity License Details
EDITIONS
Available in: SalesforceClassic
External Identity licenses areavailable in: Enterprise,Performance, Unlimited,and Developer Editions
USER PERMISSIONS
To assign and manageexternal identity users:• Manage Users
To enable Communities:• Customize Application
The Salesforce External Identity User license lets you deliver identity services, including single sign-on(SSO), to your customers and partners. It is a standalone license that you can buy for blocks of userswho are consumers of your business, such as customers, purchasers, patients, partners, and dealers.
With the External Identity license, you can store and manage customers and partners. You canauthenticate external users in several ways.
• Username and password
• Single Sign-On (SSO)
• Passwordless login, such as a verification code sent in an email or text message
• Social identity provider, such as Facebook or Twitter
With External Identity, customers and partners can easily create their own user accounts usingself-registration.
You can upgrade the External Identity User license to a community license.
The External Identity User profile defines a set of object permissions that you can assign to anexternal identity user. It also defines a default External Identity User profile, which contains a morelimited set of object permissions. For example, with the default profile, users can read accounts.With the full license, users can read and update accounts.
5
External Identity License DetailsHow Can I Use Salesforce Identity for External Users?
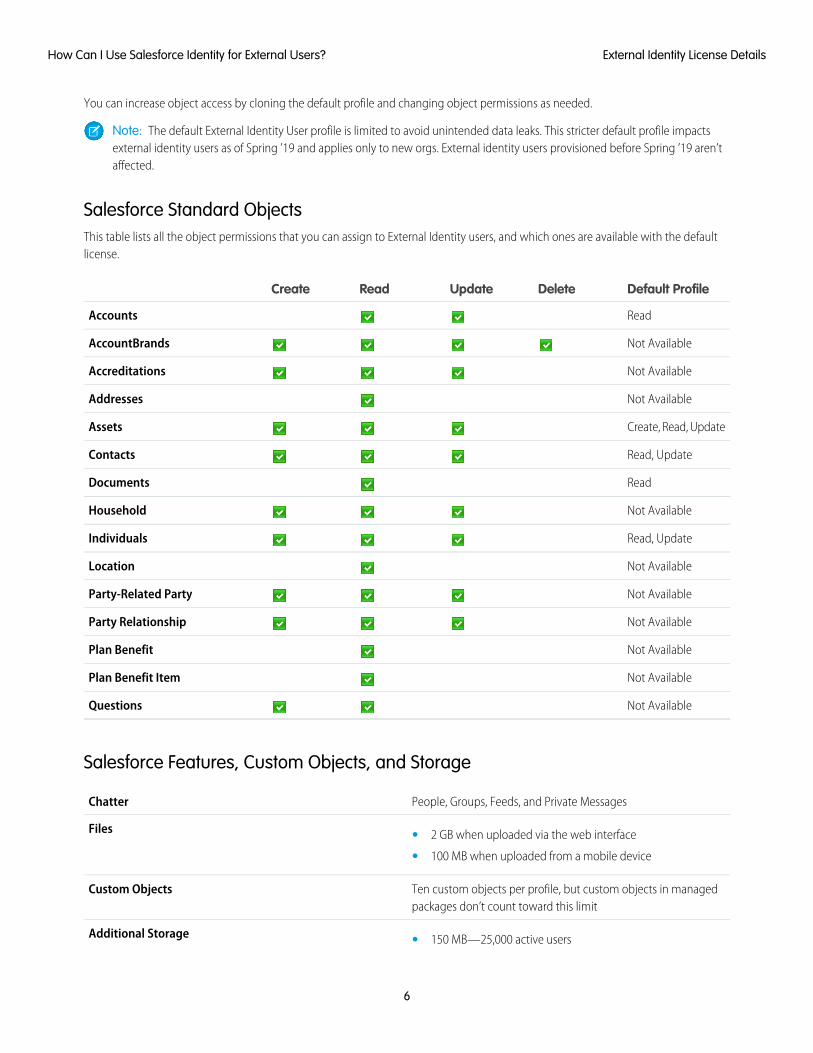
You can increase object access by cloning the default profile and changing object permissions as needed.
Note: The default External Identity User profile is limited to avoid unintended data leaks. This stricter default profile impactsexternal identity users as of Spring ’19 and applies only to new orgs. External identity users provisioned before Spring ’19 aren’taffected.
Salesforce Standard ObjectsThis table lists all the object permissions that you can assign to External Identity users, and which ones are available with the defaultlicense.
Default ProfileDeleteUpdateReadCreate
ReadAccounts
Not AvailableAccountBrands
Not AvailableAccreditations
Not AvailableAddresses
Create, Read, UpdateAssets
Read, UpdateContacts
ReadDocuments
Not AvailableHousehold
Read, UpdateIndividuals
Not AvailableLocation
Not AvailableParty-Related Party
Not AvailableParty Relationship
Not AvailablePlan Benefit
Not AvailablePlan Benefit Item
Not AvailableQuestions
Salesforce Features, Custom Objects, and Storage
People, Groups, Feeds, and Private MessagesChatter
Files • 2 GB when uploaded via the web interface
• 100 MB when uploaded from a mobile device
Ten custom objects per profile, but custom objects in managedpackages don’t count toward this limit
Custom Objects
Additional Storage • 150 MB—25,000 active users
6
External Identity License DetailsHow Can I Use Salesforce Identity for External Users?

• 2 GB—250,000 active users
• 10 GB—1,000,000 active users
• 60 GB—5,000,000 active users
External Identity and Communities
Communities are branded spaces for employees, customers, and partners to connect. You can customize and create communities todeliver specific business apps and services, including identity services.
Salesforce External Identity uses communities for its deployment. Deploying external identity as a community gives you the ability toconfigure identity for your external users so they can easily recognize your brand. They can also have the same experience regardless ofwhich app they’re accessing or whether they’re using their desktop or mobile device. You can act as both a service provider and identityprovider for all your apps without your customers realizing that the service runs on Salesforce. Similar to My Domain, a community canhave a unique subdomain name, for example, https://mycompanyname.force.com. Or, the community can be configuredwith your custom SSL domain, such as https://community.mycompanyname.com.
Don’t confuse community user licenses with underlying community capabilities. Salesforce provides community licenses for use caseslike customer self-service, but there is no correlation between a community and a community license.
For more information, see Salesforce Communities Overview in the Salesforce Help.
Learn More with Trailhead
For a fun way to get a better understanding of external identity, take advantage of Trailhead. You can find identity modules in the SecureIdentity and Access Management trail.
Identity BasicsGet an overview of the features in Salesforce Identity, and see how external identity fits into its feature set. Familiarize yourself withkey identity terms, like single sign-on, social sign-on, identity providers, and service providers. Get familiar with the identity protocols,Security Assertion Markup Language, OAuth 2.0, and OpenID Connect.
External Identity for CustomersWalk through the entire process of setting up external identity on a trial developer org.
7
External Identity and CommunitiesHow Can I Use Salesforce Identity for External Users?
EXTERNAL IDENTITY IMPLEMENTATION CHECKLIST
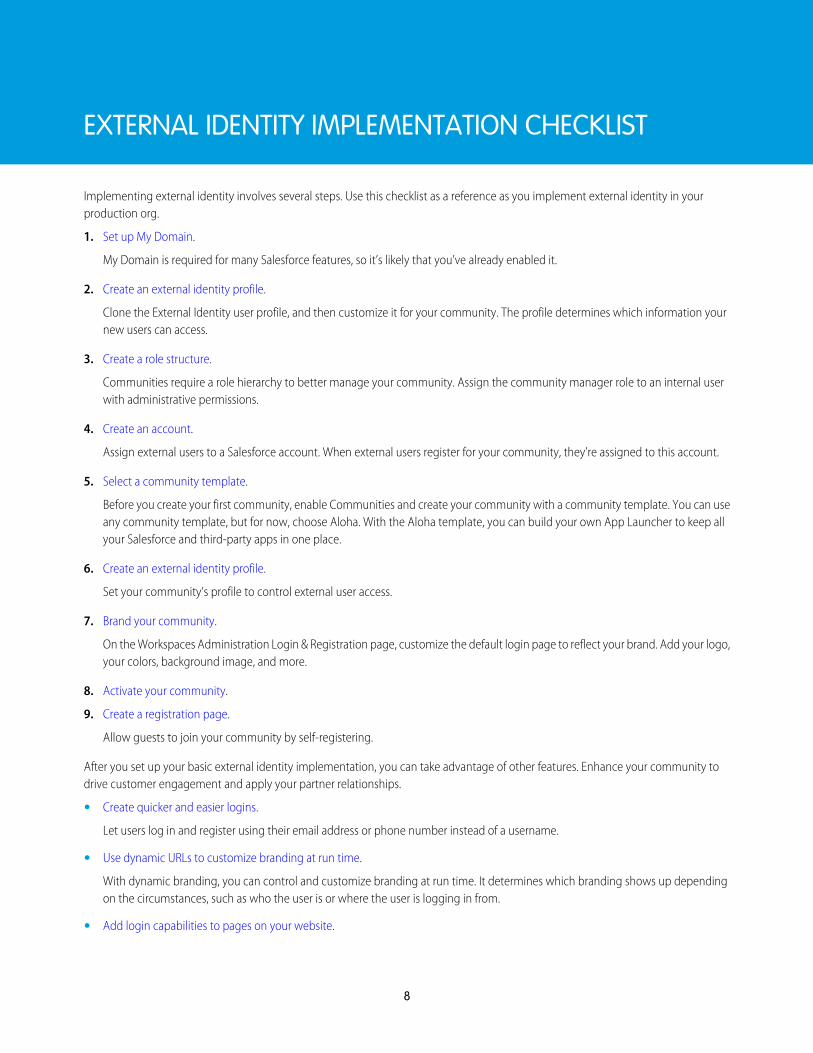
Implementing external identity involves several steps. Use this checklist as a reference as you implement external identity in yourproduction org.
1. Set up My Domain.
My Domain is required for many Salesforce features, so it’s likely that you’ve already enabled it.
2. Create an external identity profile.
Clone the External Identity user profile, and then customize it for your community. The profile determines which information yournew users can access.
3. Create a role structure.
Communities require a role hierarchy to better manage your community. Assign the community manager role to an internal userwith administrative permissions.
4. Create an account.
Assign external users to a Salesforce account. When external users register for your community, they’re assigned to this account.
5. Select a community template.
Before you create your first community, enable Communities and create your community with a community template. You can useany community template, but for now, choose Aloha. With the Aloha template, you can build your own App Launcher to keep allyour Salesforce and third-party apps in one place.
6. Create an external identity profile.
Set your community’s profile to control external user access.
7. Brand your community.
On the Workspaces Administration Login & Registration page, customize the default login page to reflect your brand. Add your logo,your colors, background image, and more.
8. Activate your community.
9. Create a registration page.
Allow guests to join your community by self-registering.
After you set up your basic external identity implementation, you can take advantage of other features. Enhance your community todrive customer engagement and apply your partner relationships.
• Create quicker and easier logins.
Let users log in and register using their email address or phone number instead of a username.
• Use dynamic URLs to customize branding at run time.
With dynamic branding, you can control and customize branding at run time. It determines which branding shows up dependingon the circumstances, such as who the user is or where the user is logging in from.
• Add login capabilities to pages on your website.
8
Add Embedded Login metadata tags to any web page to require users to log in to access it.
• Manage communities for external identity.
Manage external identity users to make it easy for them to stay in your community longer. You can also create lightweight externalcommunities by creating users without contacts (contactless users). These features are available only to users with an External Identitylicense.
9
External Identity Implementation Checklist
CREATE A TYPICAL EXTERNAL IDENTITY IMPLEMENTATION
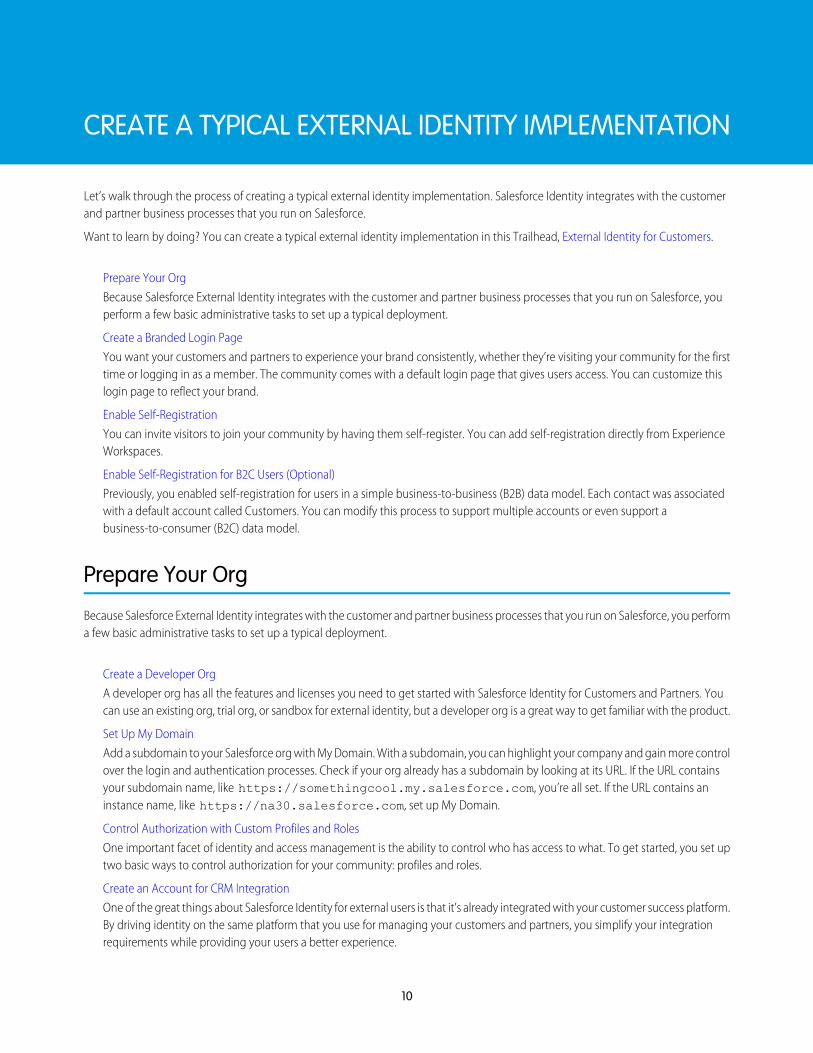
Let’s walk through the process of creating a typical external identity implementation. Salesforce Identity integrates with the customerand partner business processes that you run on Salesforce.
Want to learn by doing? You can create a typical external identity implementation in this Trailhead, External Identity for Customers.
Prepare Your Org
Because Salesforce External Identity integrates with the customer and partner business processes that you run on Salesforce, youperform a few basic administrative tasks to set up a typical deployment.
Create a Branded Login Page
You want your customers and partners to experience your brand consistently, whether they’re visiting your community for the firsttime or logging in as a member. The community comes with a default login page that gives users access. You can customize thislogin page to reflect your brand.
Enable Self-Registration
You can invite visitors to join your community by having them self-register. You can add self-registration directly from ExperienceWorkspaces.
Enable Self-Registration for B2C Users (Optional)
Previously, you enabled self-registration for users in a simple business-to-business (B2B) data model. Each contact was associatedwith a default account called Customers. You can modify this process to support multiple accounts or even support abusiness-to-consumer (B2C) data model.
Prepare Your Org
Because Salesforce External Identity integrates with the customer and partner business processes that you run on Salesforce, you performa few basic administrative tasks to set up a typical deployment.
Create a Developer Org
A developer org has all the features and licenses you need to get started with Salesforce Identity for Customers and Partners. Youcan use an existing org, trial org, or sandbox for external identity, but a developer org is a great way to get familiar with the product.
Set Up My Domain
Add a subdomain to your Salesforce org with My Domain. With a subdomain, you can highlight your company and gain more controlover the login and authentication processes. Check if your org already has a subdomain by looking at its URL. If the URL containsyour subdomain name, like https://somethingcool.my.salesforce.com, you’re all set. If the URL contains aninstance name, like https://na30.salesforce.com, set up My Domain.
Control Authorization with Custom Profiles and Roles
One important facet of identity and access management is the ability to control who has access to what. To get started, you set uptwo basic ways to control authorization for your community: profiles and roles.
Create an Account for CRM Integration
One of the great things about Salesforce Identity for external users is that it’s already integrated with your customer success platform.By driving identity on the same platform that you use for managing your customers and partners, you simplify your integrationrequirements while providing your users a better experience.
10

Create a Developer OrgA developer org has all the features and licenses you need to get started with Salesforce Identity for Customers and Partners. You canuse an existing org, trial org, or sandbox for external identity, but a developer org is a great way to get familiar with the product.
1. Go to https://developer.salesforce.com/signup.
2. Enter your contact information.
3. Enter a unique username.
4. Submit the form, and wait for your welcome email.
5. In the welcome email, click the link to set your password.
That’s it—you now have your own developer org.
Set Up My DomainAdd a subdomain to your Salesforce org with My Domain. With a subdomain, you can highlight your company and gain more controlover the login and authentication processes. Check if your org already has a subdomain by looking at its URL. If the URL contains yoursubdomain name, like https://somethingcool.my.salesforce.com, you’re all set. If the URL contains an instance name,like https://na30.salesforce.com, set up My Domain.
1. In your developer org, from Setup, enter My Domain in the Quick Find box, then select My Domain.
2. Enter the subdomain name you want to use within the Salesforce URL. For example, a company called Universal Containers usesthe subdomain universalcontainers. The the company’s login URL would behttps://universalcontainers.my.salesforce.com.
3. Click Check Availability. If the name is already taken, choose a different one.
4. Click Register Domain. Salesforce updates its domain registries with your new subdomain. When complete, you receive an emailmessage with a subject like, “Your Developer Edition domain ready for testing.” It takes just a few minutes.
5. After you receive the email, click the link to go to your subdomain. You’re automatically signed in to the domain.
6. Return to Setup, and on the My Domain page, click Deploy to Users.
This step is often missed. So make sure that you deploy to users before you continue.
Control Authorization with Custom Profiles and RolesOne important facet of identity and access management is the ability to control who has access to what. To get started, you set up twobasic ways to control authorization for your community: profiles and roles.
Clone and customize the external identity profile to control what your customers can access in your Salesforce org. Create a role for yourcommunity manager so that the manager can modify the external identity profile and manage the community.
1. In your developer org, from Setup, enter Profiles in the Quick Find box, then select Profiles.
a. Next to External Identity User, click Clone.
b. Enter a name for the profile. Let’s call it Customers.
c. Click Save.
2. Customize the external identity profile.
a. Click Edit.
b. Search for API Enabled, and then select the checkbox next to this permission.
11
Create a Developer OrgCreate a Typical External Identity Implementation

API Enabled gives users API access to your org’s data through any back-end mechanism.
c. Click Save.
3. Create a role structure.
Communities requires a user role hierarchy to help control how users share Salesforce data. Assign a role to the user who managesyour community.
a. From Setup, enter Role in the Quick Find box, then select Roles.
b. From the dropdown list, select Product-based Sample, then select Set Up Roles.
c. Under CEO, click Add Role.
d. For the role label, enter Customer Manager.
e. Click Save.
4. Add the external identity role to the user community manager so that the manager can modify the External Identity profile.
Note: The person who manages the community for your company must have a role. However, you can’t assign roles to userswho have the external identity license.
a. From Setup, enter Users in the Quick Find box, then select Users.
b. Next to your username, click Edit.
c. Under Role, select Customer Manager.
d. Click Save.
You’ve now learned the basics of authorizing users. For more information about configuring authorization, check out the Data SecurityTrailhead module. For more information about creating users and securing access, see the User Management Trailhead module.
Create an Account for CRM IntegrationOne of the great things about Salesforce Identity for external users is that it’s already integrated with your customer success platform.By driving identity on the same platform that you use for managing your customers and partners, you simplify your integration requirementswhile providing your users a better experience.
External users are tied into the CRM data model within Salesforce. So when your external users register or update their profile, you geta consistent view of the external user within your Sales and Service processes.
1. In your developer org, switch to Sales.
2. Click the Accounts tab.
3. Create an account called Customers.
4. Click Save.
You’ve now completed all the prerequisites for creating an external identity community. To learn more, check out the Accounts andContacts Trailhead module.
Create a Branded Login Page
You want your customers and partners to experience your brand consistently, whether they’re visiting your community for the first timeor logging in as a member. The community comes with a default login page that gives users access. You can customize this login pageto reflect your brand.
12
Create an Account for CRM IntegrationCreate a Typical External Identity Implementation

To learn how login page branding works, watch the How to Set Up a Community for Identity and Deploy a Branded Login Page video.Then follow these steps to create your own external identity community.
Select a Community Template
After you enable Salesforce Communities, you can create your external identity community using any community template thatSalesforce provides. With each template, Salesforce creates a default set of pages to handle the login experience, which includeslogin, self-registration, password resets, and identity verification.
Control External User Access to Your Community
Set your community’s profile to control external user access. The profile enables single sign-on access to your community.
Brand Your Community with the Login & Registration Page
With little effort, you can brand your community starting with the first pages a user sees when they click your community’s URL.Salesforce Identity gives you a point-and-click way to customize the login page that prompts users to log in to your community.These branding options apply to related login pages, including pages for users to verify their identity or reset passwords and for newusers to register. If you’ve set up login flows, they use these branding settings.
Customize Your Login Pages with Experience Builder
Using Experience Builder is one way to customize your login pages easily. Experience Builder pages are available after you publishyour community.
Activate Your Community
To complete your external identity community setup, you must activate it.
Select a Community TemplateAfter you enable Salesforce Communities, you can create your external identity community using any community template that Salesforceprovides. With each template, Salesforce creates a default set of pages to handle the login experience, which includes login, self-registration,password resets, and identity verification.
When you enable Communities, you provide a community domain. The community domain collects all your communities under oneURL. Typically, your community domain is your company domain.
1. From Setup, enter Communities in the Quick Find box, then select Communities Settings.
2. Select Enable communities.
3. Enter a memorable domain name.
Keep in mind that customers and partners interact with this domain name. After you choose this name, you can’t change it. Lateron, you can add a custom SSL domain to have more control over your community branding.
4. Select Check Availability.
5. Click Save, and then click OK.
The Communities feature is now enabled for your org. Next, create your external identity community.
6. Click New Community.You’re shown a series of community templates. You can use any Community template, but for this example, let’s choose Aloha.
13
Select a Community TemplateCreate a Typical External Identity Implementation
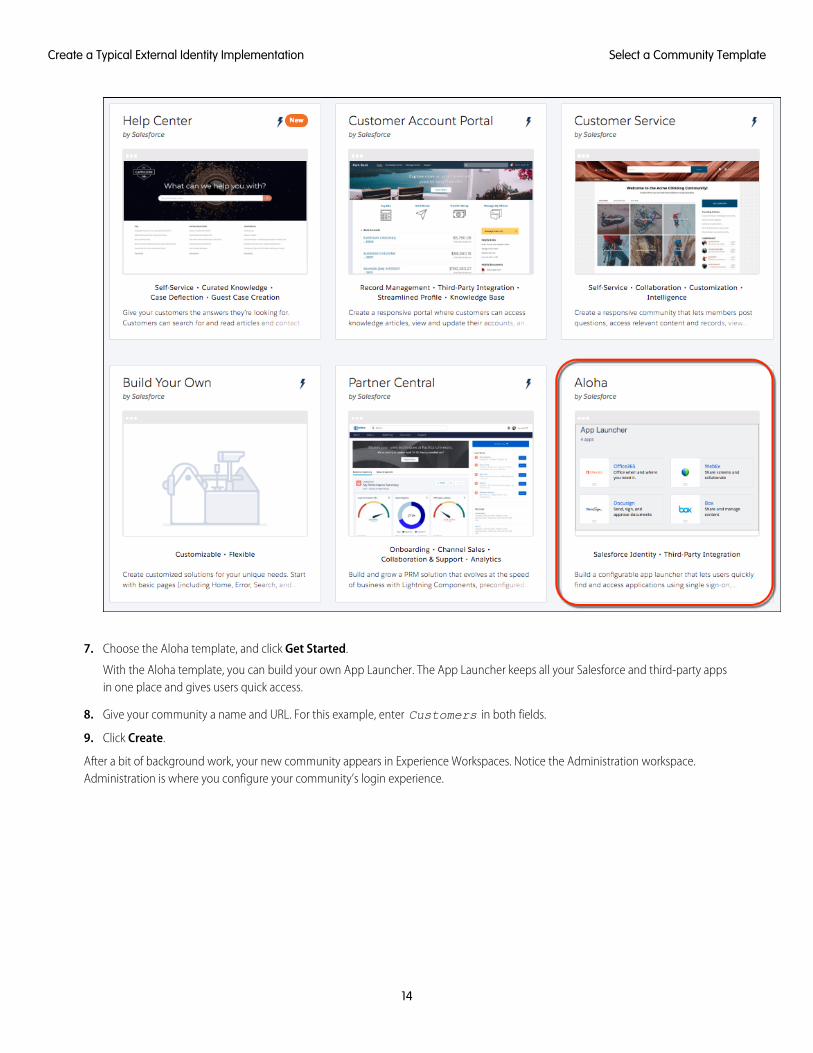
7. Choose the Aloha template, and click Get Started.
With the Aloha template, you can build your own App Launcher. The App Launcher keeps all your Salesforce and third-party appsin one place and gives users quick access.
8. Give your community a name and URL. For this example, enter Customers in both fields.
9. Click Create.
After a bit of background work, your new community appears in Experience Workspaces. Notice the Administration workspace.Administration is where you configure your community’s login experience.
14
Select a Community TemplateCreate a Typical External Identity Implementation
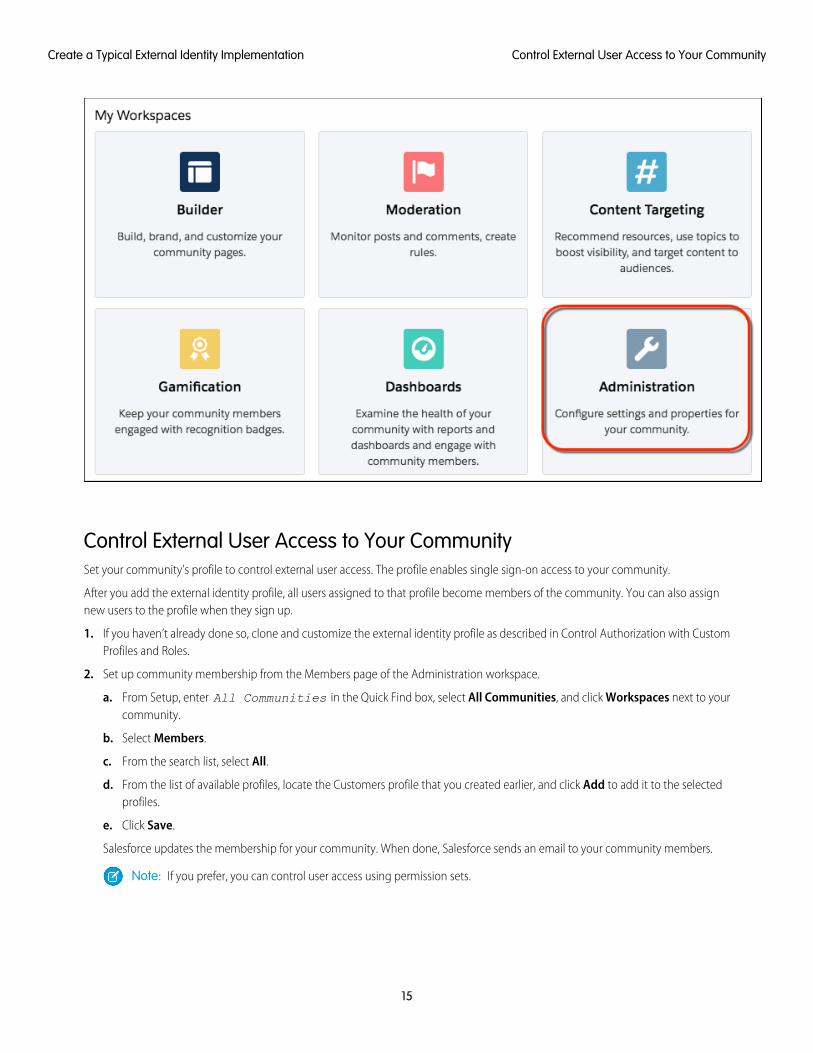
Control External User Access to Your CommunitySet your community’s profile to control external user access. The profile enables single sign-on access to your community.
After you add the external identity profile, all users assigned to that profile become members of the community. You can also assignnew users to the profile when they sign up.
1. If you haven’t already done so, clone and customize the external identity profile as described in Control Authorization with CustomProfiles and Roles.
2. Set up community membership from the Members page of the Administration workspace.
a. From Setup, enter All Communities in the Quick Find box, select All Communities, and click Workspaces next to yourcommunity.
b. Select Members.
c. From the search list, select All.
d. From the list of available profiles, locate the Customers profile that you created earlier, and click Add to add it to the selectedprofiles.
e. Click Save.
Salesforce updates the membership for your community. When done, Salesforce sends an email to your community members.
Note: If you prefer, you can control user access using permission sets.
15
Control External User Access to Your CommunityCreate a Typical External Identity Implementation
Brand Your Community with the Login & Registration PageWith little effort, you can brand your community starting with the first pages a user sees when they click your community’s URL. SalesforceIdentity gives you a point-and-click way to customize the login page that prompts users to log in to your community. These brandingoptions apply to related login pages, including pages for users to verify their identity or reset passwords and for new users to register.If you’ve set up login flows, they use these branding settings.
For convenience, you can use the sample logos and backgrounds we provide by downloading this file:https://www.salesforceidentity.info/ExternalIdentityAssets.zip. Or use your own.
The branding options you set here apply to all types of login pages, except Experience Builder pages.
1. From Setup, enter All Communities in the Quick Find box, then click Workspaces next to your community.
2. Select Administration, and select Login & Registration.
3. Next to Choose Logo Type, select File.
4. Next to Logo File, upload a logo. If you don’t have your own logo, upload fix-logo.png from the sample files that youdownloaded.
Instead of uploading a file, you can enter a URL where you store your branding assets. This URL can use a dynamic value to determinewhich logo appears at run time. The URL contains the expid placeholder {expid}, for example,https://www.my-cms.com/{expid}/logo.png. When customers click a link to log in, how the login page looksdepends on the expid value indicated in the login URL.
5. Next to Background Type, select Color, and select your color.
Optionally, you can enter a Background Image URL to an image or a color gradient. This URL can also use a dynamic value to determinewhich background image appears at run time.
6. Choose the color of the login buttons. These buttons appear on all login pages, including Log In, Verify, and Sign Up.
7. Optionally, enter a URL for Right Frame URL to display content on the right side of the login page. Leave it blank for now.
The content of the right-frame URL displays in an iframe to the right of the login form. The right-frame URL is useful, for example, todisplay a branded image or topical announcements.
8. For Footer Text, enter any text, such as a copyright, to display at the bottom of the login form.
9. Click Save.
10. Notice that Default Page appears for the login page (1) and password pages (2). These default pages come with the Aloha template.
16
Brand Your Community with the Login & Registration PageCreate a Typical External Identity Implementation
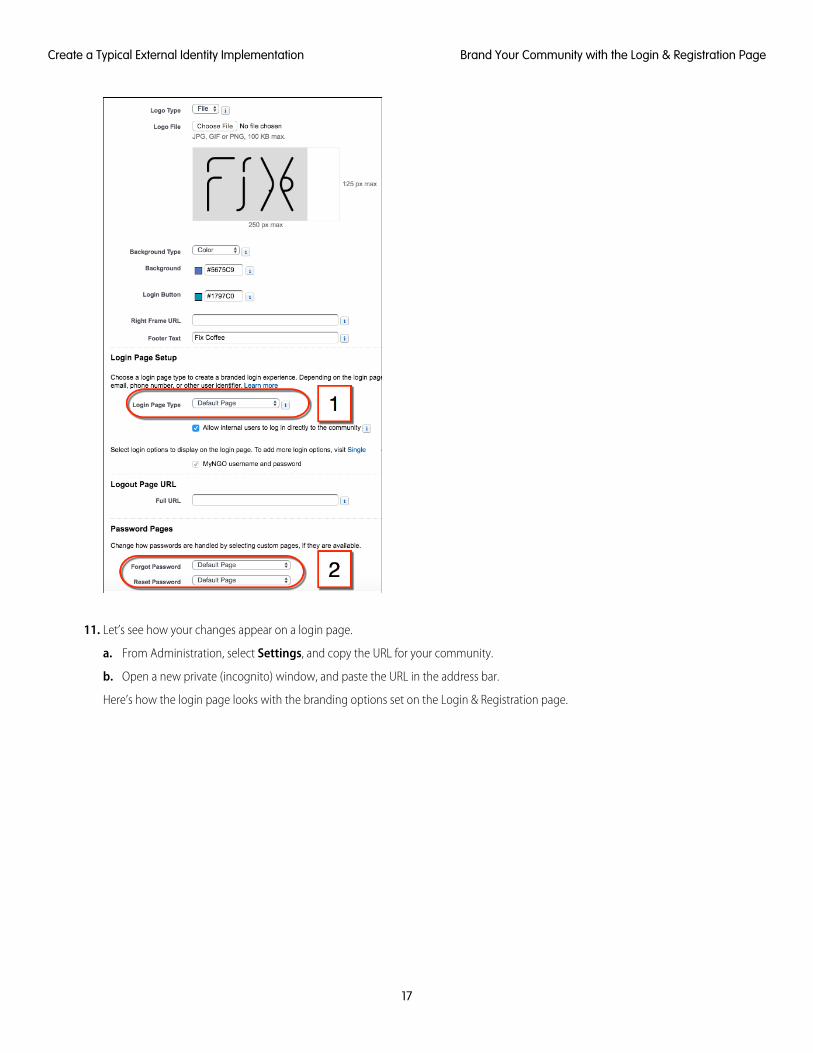
11. Let’s see how your changes appear on a login page.
a. From Administration, select Settings, and copy the URL for your community.
b. Open a new private (incognito) window, and paste the URL in the address bar.
Here’s how the login page looks with the branding options set on the Login & Registration page.
17
Brand Your Community with the Login & Registration PageCreate a Typical External Identity Implementation
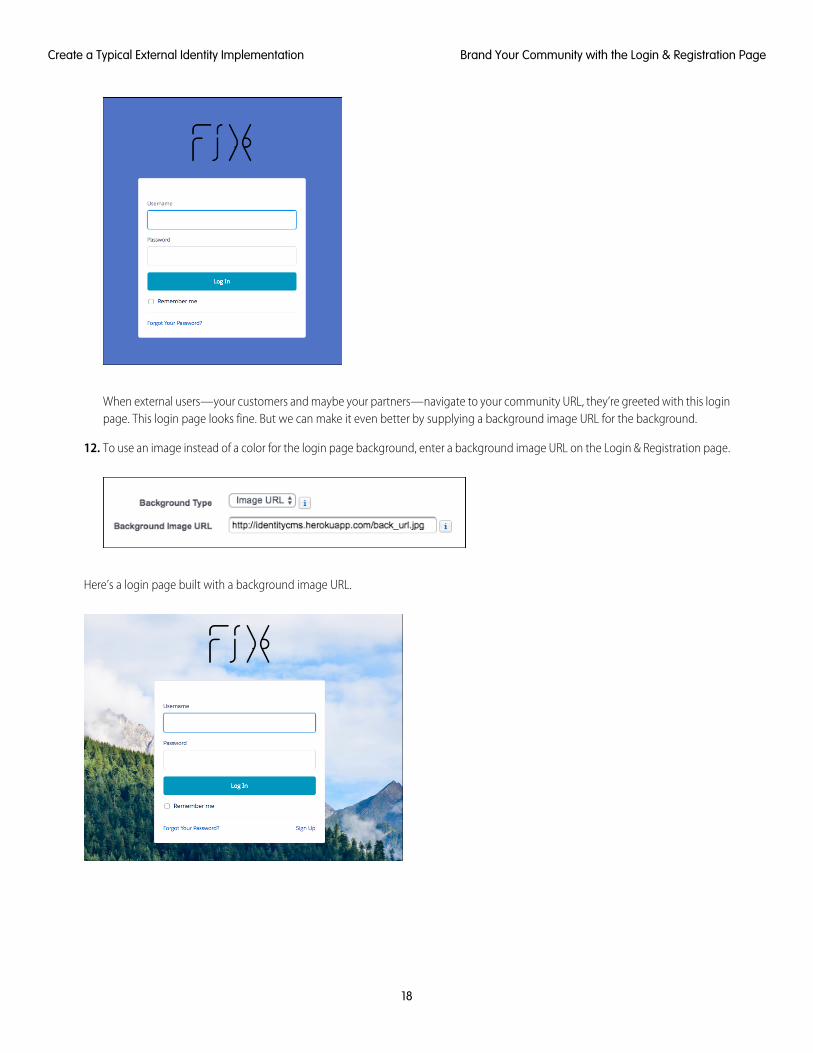
When external users—your customers and maybe your partners—navigate to your community URL, they’re greeted with this loginpage. This login page looks fine. But we can make it even better by supplying a background image URL for the background.
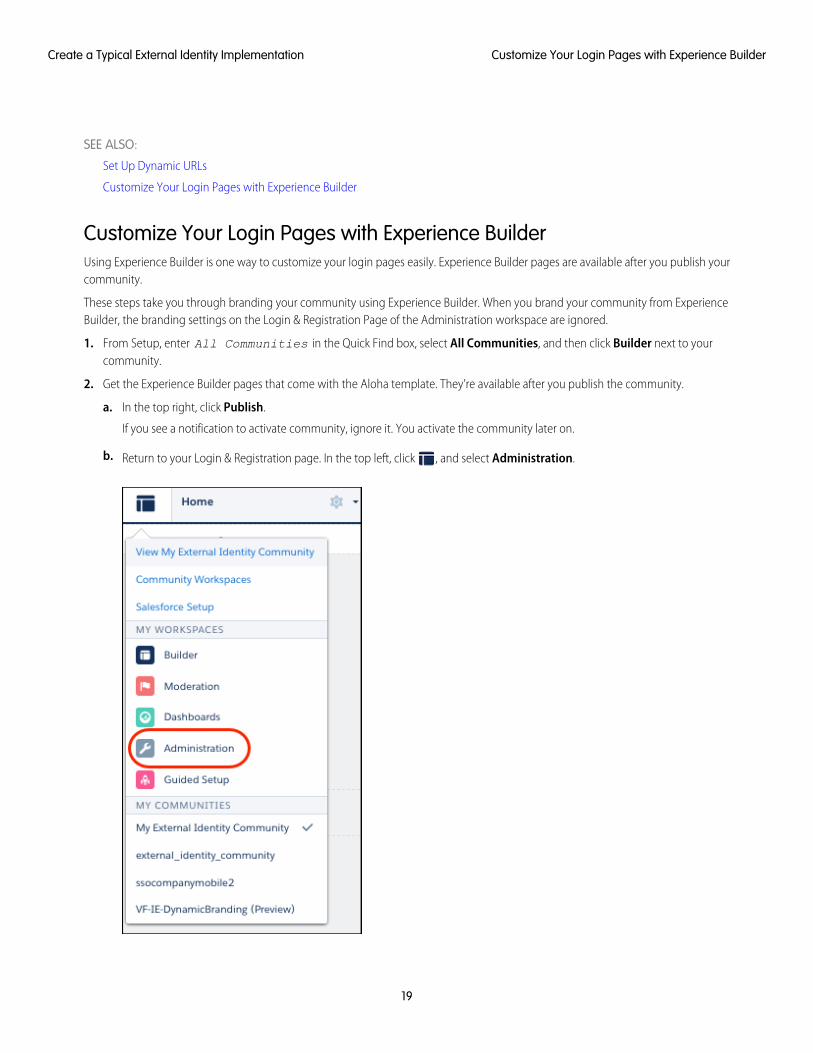
12. To use an image instead of a color for the login page background, enter a background image URL on the Login & Registration page.
Here’s a login page built with a background image URL.
18
Brand Your Community with the Login & Registration PageCreate a Typical External Identity Implementation
SEE ALSO:
Set Up Dynamic URLs
Customize Your Login Pages with Experience Builder
Customize Your Login Pages with Experience BuilderUsing Experience Builder is one way to customize your login pages easily. Experience Builder pages are available after you publish yourcommunity.
These steps take you through branding your community using Experience Builder. When you brand your community from ExperienceBuilder, the branding settings on the Login & Registration Page of the Administration workspace are ignored.
1. From Setup, enter All Communities in the Quick Find box, select All Communities, and then click Builder next to yourcommunity.
2. Get the Experience Builder pages that come with the Aloha template. They’re available after you publish the community.
a. In the top right, click Publish.
If you see a notification to activate community, ignore it. You activate the community later on.
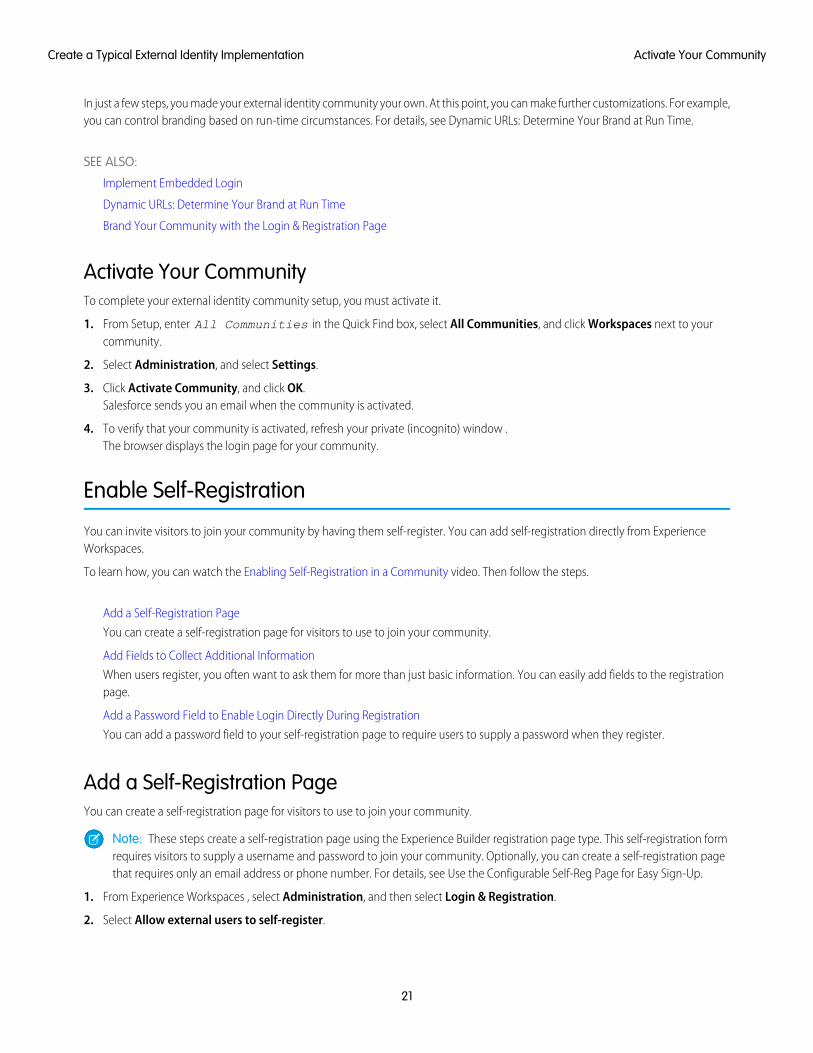
b. Return to your Login & Registration page. In the top left, click , and select Administration.
19
Customize Your Login Pages with Experience BuilderCreate a Typical External Identity Implementation

c. Select Login & Registration.
d. Under Login Page Setup, select Experience Builder Page, and then select login from the page picker.
e. Click Save.
f. Return to Experience Builder. At the top of Workspaces, select Administration, then select .
3. At the top of Builder, click the dropdown next to Setup (1), then select Login (2).
Your login page now appears in Experience Builder. You can further brand it with Experience Builder.
4. Select .
5. Under Background Image, select Clear and upload a new background image. If you don’t have a background image, uploadcupontablesmall.png from the sample files you downloaded.
6. Click Publish.
20
Customize Your Login Pages with Experience BuilderCreate a Typical External Identity Implementation
In just a few steps, you made your external identity community your own. At this point, you can make further customizations. For example,you can control branding based on run-time circumstances. For details, see Dynamic URLs: Determine Your Brand at Run Time.
SEE ALSO:
Implement Embedded Login
Dynamic URLs: Determine Your Brand at Run Time
Brand Your Community with the Login & Registration Page
Activate Your CommunityTo complete your external identity community setup, you must activate it.
1. From Setup, enter All Communities in the Quick Find box, select All Communities, and click Workspaces next to yourcommunity.
2. Select Administration, and select Settings.
3. Click Activate Community, and click OK.Salesforce sends you an email when the community is activated.
4. To verify that your community is activated, refresh your private (incognito) window .The browser displays the login page for your community.
Enable Self-Registration
You can invite visitors to join your community by having them self-register. You can add self-registration directly from ExperienceWorkspaces.
To learn how, you can watch the Enabling Self-Registration in a Community video. Then follow the steps.
Add a Self-Registration Page
You can create a self-registration page for visitors to use to join your community.
Add Fields to Collect Additional Information
When users register, you often want to ask them for more than just basic information. You can easily add fields to the registrationpage.
Add a Password Field to Enable Login Directly During Registration
You can add a password field to your self-registration page to require users to supply a password when they register.
Add a Self-Registration PageYou can create a self-registration page for visitors to use to join your community.
Note: These steps create a self-registration page using the Experience Builder registration page type. This self-registration formrequires visitors to supply a username and password to join your community. Optionally, you can create a self-registration pagethat requires only an email address or phone number. For details, see Use the Configurable Self-Reg Page for Easy Sign-Up.
1. From Experience Workspaces , select Administration, and then select Login & Registration.
2. Select Allow external users to self-register.
21
Activate Your CommunityCreate a Typical External Identity Implementation
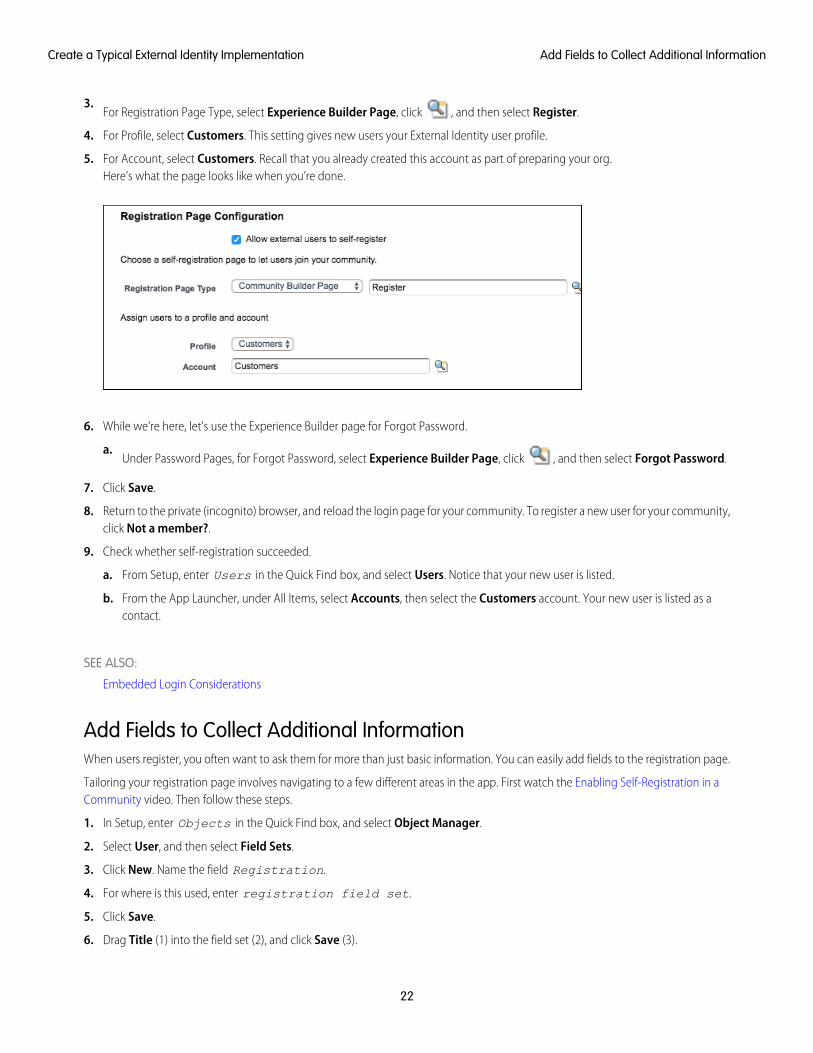
3.For Registration Page Type, select Experience Builder Page, click , and then select Register.
4. For Profile, select Customers. This setting gives new users your External Identity user profile.
5. For Account, select Customers. Recall that you already created this account as part of preparing your org.Here’s what the page looks like when you’re done.
6. While we’re here, let’s use the Experience Builder page for Forgot Password.
a.Under Password Pages, for Forgot Password, select Experience Builder Page, click , and then select Forgot Password.
7. Click Save.
8. Return to the private (incognito) browser, and reload the login page for your community. To register a new user for your community,click Not a member?.
9. Check whether self-registration succeeded.
a. From Setup, enter Users in the Quick Find box, and select Users. Notice that your new user is listed.
b. From the App Launcher, under All Items, select Accounts, then select the Customers account. Your new user is listed as acontact.
SEE ALSO:
Embedded Login Considerations
Add Fields to Collect Additional InformationWhen users register, you often want to ask them for more than just basic information. You can easily add fields to the registration page.
Tailoring your registration page involves navigating to a few different areas in the app. First watch the Enabling Self-Registration in aCommunity video. Then follow these steps.
1. In Setup, enter Objects in the Quick Find box, and select Object Manager.
2. Select User, and then select Field Sets.
3. Click New. Name the field Registration.
4. For where is this used, enter registration field set.
5. Click Save.
6. Drag Title (1) into the field set (2), and click Save (3).
22
Add Fields to Collect Additional InformationCreate a Typical External Identity Implementation
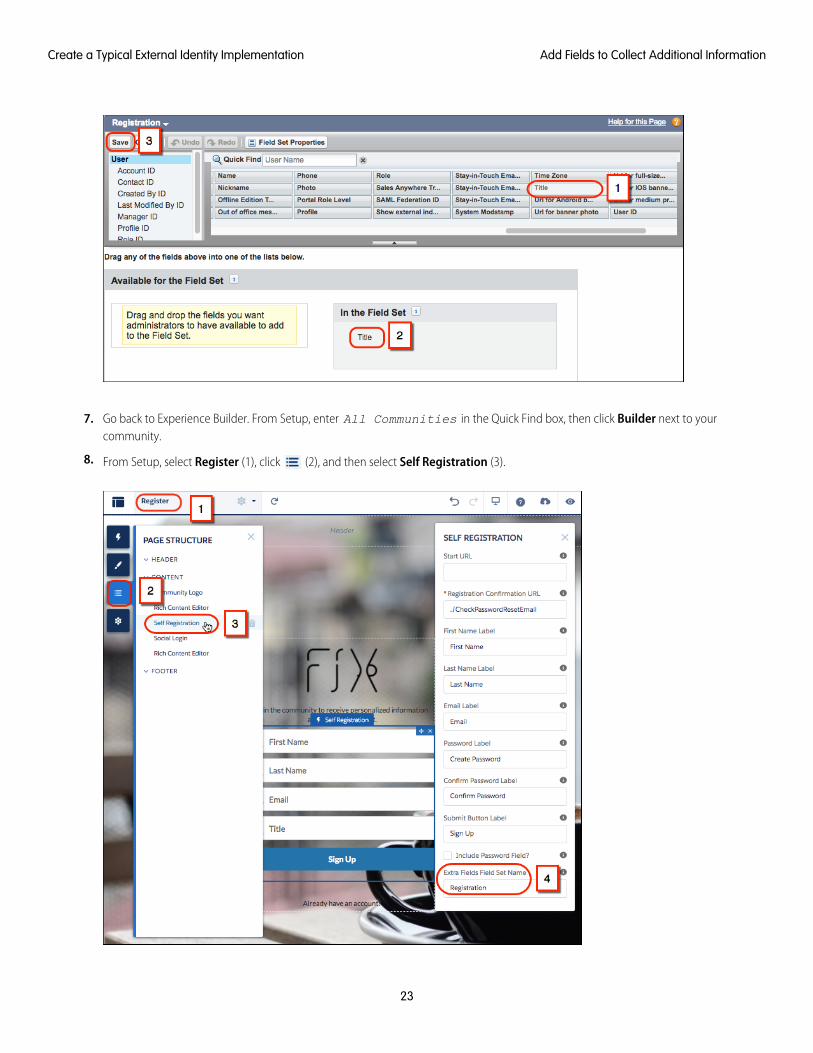
7. Go back to Experience Builder. From Setup, enter All Communities in the Quick Find box, then click Builder next to yourcommunity.
8. From Setup, select Register (1), click (2), and then select Self Registration (3).
23
Add Fields to Collect Additional InformationCreate a Typical External Identity Implementation
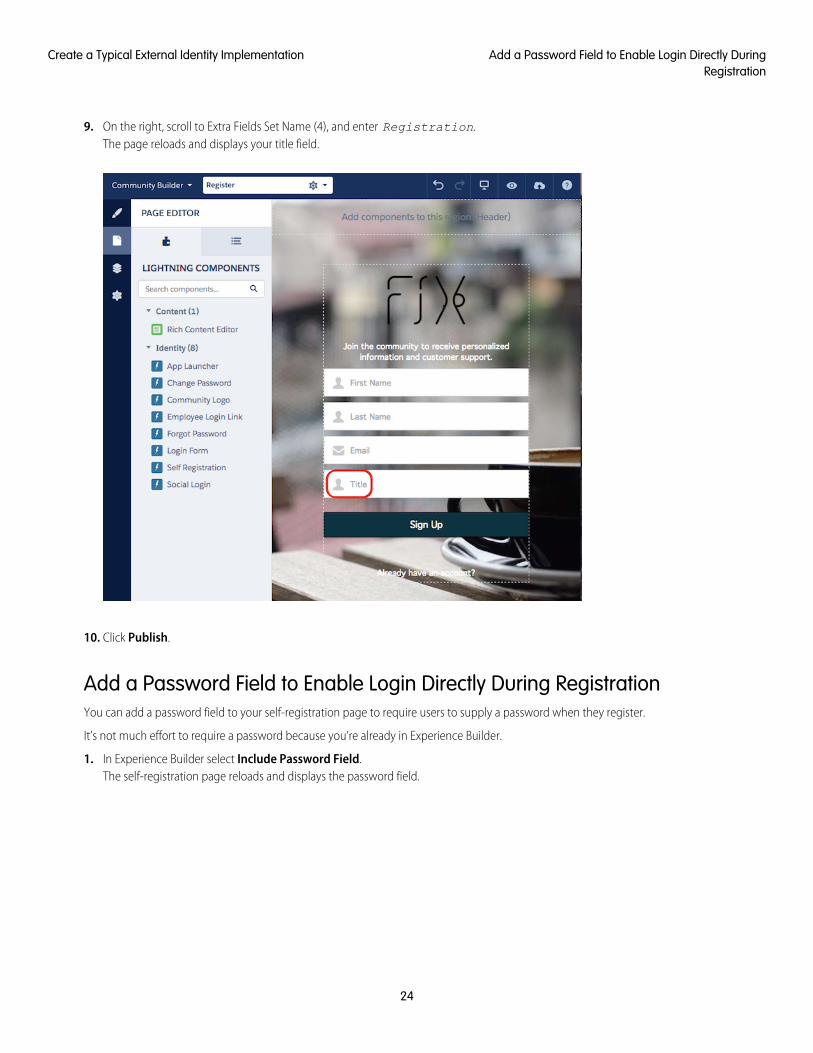
9. On the right, scroll to Extra Fields Set Name (4), and enter Registration.The page reloads and displays your title field.
10. Click Publish.
Add a Password Field to Enable Login Directly During RegistrationYou can add a password field to your self-registration page to require users to supply a password when they register.
It’s not much effort to require a password because you’re already in Experience Builder.
1. In Experience Builder select Include Password Field.The self-registration page reloads and displays the password field.
24
Add a Password Field to Enable Login Directly DuringRegistration
Create a Typical External Identity Implementation
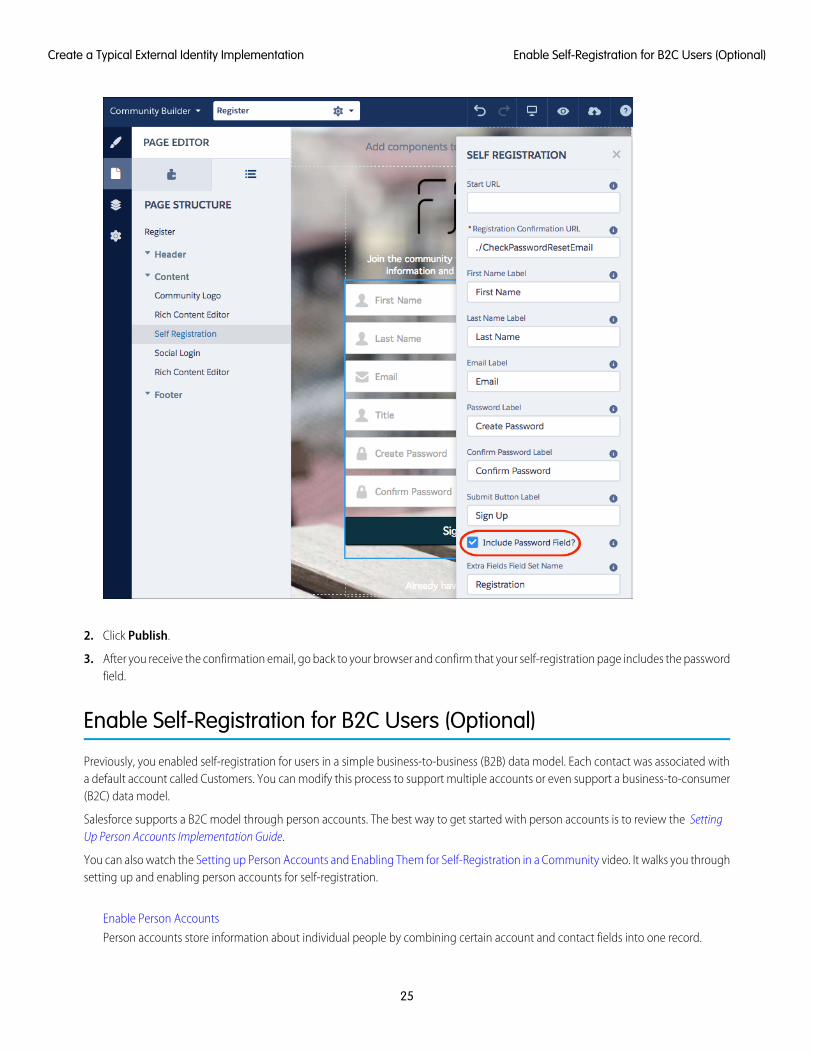
2. Click Publish.
3. After you receive the confirmation email, go back to your browser and confirm that your self-registration page includes the passwordfield.
Enable Self-Registration for B2C Users (Optional)
Previously, you enabled self-registration for users in a simple business-to-business (B2B) data model. Each contact was associated witha default account called Customers. You can modify this process to support multiple accounts or even support a business-to-consumer(B2C) data model.
Salesforce supports a B2C model through person accounts. The best way to get started with person accounts is to review the SettingUp Person Accounts Implementation Guide.
You can also watch the Setting up Person Accounts and Enabling Them for Self-Registration in a Community video. It walks you throughsetting up and enabling person accounts for self-registration.
Enable Person Accounts
Person accounts store information about individual people by combining certain account and contact fields into one record.
25
Enable Self-Registration for B2C Users (Optional)Create a Typical External Identity Implementation

Configure Self-Registration for Person Accounts
You can use person accounts instead of business accounts for self-registration.
SEE ALSO:
Salesforce Help: What Is a Person Account?
Enable Person Accounts
EDITIONS
Business accounts availablein: both Salesforce Classicand Lightning Experience
Business accounts availablein: All Editions
Person accounts availablein: Both Salesforce Classicand Lightning Experience
Person accounts availablein Professional, Enterprise,Performance, Unlimited,and Developer Editions
USER PERMISSIONS
To enable person accounts:• Customize Application
Person accounts store information about individual people by combining certain account andcontact fields into one record.
Important: After Person Accounts is enabled, it can’t be disabled. We recommend that youcreate a sandbox to preview how Person Accounts affect your Salesforce org.
1. Make sure you meet the following prerequisites.
• The account object has at least one record type.
• User profiles that have read permission on accounts have read permission on contacts.
• The organization-wide default sharing is set so that either Contact is Controlled by Parentor both Account and Contact are Private.
2. From Setup, enter Account Settings in the Quick Find box, and then select AllowCustomer Support to enable Person Accounts.
We’ll verify your org meets the prerequisites, then send you an email with additional information.If you don’t see a message verifying you meet the prerequisites, go back to step 1.
3. Contact Salesforce Customer Support by logging a case to enable Person Accounts.
Refer to the email we sent about what to include in the case.
4. After Person Accounts is enabled, a person account record type is created. You can createadditional record types for person account if needed.
5. Assign the person account record type to user profiles.
Configure Self-Registration for Person AccountsYou can use person accounts instead of business accounts for self-registration.
1. Assign record types to your community’s security profile by updating your community’s public-access settings. This step ensuresthat the security profile that controls anonymous access in your community has access to account record types.
a. From Setup, enter All Communities in the Quick Find box, then select All Communities and click Manage next to theCustomers community.
b. Select Administration, select Pages, then select Go to Lightning Platform.
c. Click Public Access Settings.
d. Under Record Type Settings, click Edit next to Accounts.
e. Select business and person record types and add them to Selected Record Types.
f. Click Save.
2. Update the self-registration setting on your login configuration page to use person accounts.
26
Enable Person AccountsCreate a Typical External Identity Implementation

a. From Setup, enter All Communities in the Quick Find box, then select All Communities and click Workspaces next tothe Customers community.
b. Select Administration, and then select Login & Registration.
c. Scroll down to Registration and make sure that the default Account field is empty. By removing the default, new users are createdas person accounts.
d. Click Save.
You’re done. New users that register with your branded self-registration page are now B2C-style users using person accounts.
27
Configure Self-Registration for Person AccountsCreate a Typical External Identity Implementation
SET UP SSO FOR YOUR USERS
While self-registration is a great way to get started, often users exist in your back-office systems or with social providers, such as Facebook,LinkedIn, or Twitter. With Salesforce Identity, you can use these existing sources with single sign-on (SSO) and just-in-time (JIT) provisioning.SSO and JIT provisioning let you create and update user accounts on the fly.
The following methods are available for SSO into Salesforce and communities.
Social sign-onSalesforce users can authenticate and log in from different social identity providers, such as a Twitter and Facebook. They can alsolog in through open federation standards like OpenID Connect.
Federated authenticationUse Security Assertion Markup Language (SAML) to send authentication and authorization data between affiliated but unrelatedweb services.
Delegated authenticationIntegrate Salesforce with various legacy authentication technologies.
Both federated authentication and social sign-on let you accept identities from existing identity providers and create users or link to andupdate existing users. Social sign-on is a common and effective way to engage your customers without having them create accounts.
Social Sign-On
Salesforce Identity supports a variety of public authentication providers, such as LinkedIn, Google, Facebook, Twitter, and open-standardOpenID Connect through the auth. providers framework. Using these providers, you can accept identity and link to existing Salesforceusers. You can also create and update users on the fly using identity information asserted by the provider.
Create an Auth. Provider
You choose which Auth. providers can access your Salesforce org from Setup. With a few clicks, you can add the option to log inwith one or more social accounts. Here’s how to set up Facebook as an Auth. provider.
Customize Your Registration Handler
The registration handler is an Apex class that handles the heavy lifting of creating users, updating users, and linking to existing users,accounts, and contacts. You can also integrate more business processes, such as creating opportunities or calling out to back-officecustomer systems.
Enable Your Auth. Provider in Your Community
You created an Auth. provider for Facebook and customized it with a registration handler. Now instruct the login page in yourcommunity to display Facebook as an option on your external identity community’s login page.
Accept User Identity with SAML and Just-In-Time Provisioning
With Salesforce Identity, you can bring your own identity from standards-based systems using SAML. You can integrate with existingSAML identity providers, letting users access your community based on your own authentication systems. And you can use SAMLwith just-in-time (JIT) provisioning to create or update users ion the fly as part of the SSO process.
Social Sign-On
Salesforce Identity supports a variety of public authentication providers, such as LinkedIn, Google, Facebook, Twitter, and open-standardOpenID Connect through the auth. providers framework. Using these providers, you can accept identity and link to existing Salesforceusers. You can also create and update users on the fly using identity information asserted by the provider.
28

The video Setting Up Social Sign-On walks you through setting up social sign-on. To get started, the following steps help you set upsocial sign-on with Facebook. The process is similar for all providers, so if you don’t use Facebook, you can easily substitute anotherprovider.
Create an Auth. Provider
You choose which Auth. providers can access your Salesforce org from Setup. With a few clicks, you can add the option to log in withone or more social accounts. Here’s how to set up Facebook as an Auth. provider.
1. In your developer org, from Setup, enter Auth. Providers in the Quick Find box, then select Auth. Providers.
2. Click New and select Facebook for the provider type.
3. Name the Auth. provider Facebook and enter the URL suffix.
4. For this exercise, leave the Consumer Key, Consumer Secret, User Info Endpoint URL, and Default Scopes fields empty. When youleave these fields empty, Salesforce Identity uses a default app when interacting with Facebook. You can’t customize the brand thatusers see nor the scope of access you request from the provider. In a real deployment, you register an app with the provider andconfigure your own consumer key (client_id) and consumer secret (client_secret).
5. For Registration Handler, select Automatically create a registration handler template.
6. For Execute Registration As, choose your admin to run the registration handler.
Execute Registration As provides the context in which the registration handler runs. By assigning a user to the handler, operationsperformed by the handler are easily traced back to the registration process. For example, if a contact is created, this user creates it.In production, you typically create a system user for the Execute Registration As user.
Note: This step is required and often gets overlooked.
7. For Icon URL, select Choose one of our sample icons.
8. In the new window, find a Facebook icon that you want to use, click it, and copy the URL.
9. Close the window and paste the URL as your Icon URL.
10. Click Save.
Customize Your Registration Handler
The registration handler is an Apex class that handles the heavy lifting of creating users, updating users, and linking to existing users,accounts, and contacts. You can also integrate more business processes, such as creating opportunities or calling out to back-officecustomer systems.
You can edit the generated registration handler. Or to get started, use one of our open-source samples.
1. In another browser window, open the registration handler,https://github.com/salesforceidentity/IdentityTrail-Module3/blob/master/SimpleFacebookRegistrationHandler.cls.
This class creates an account and contact, and it also creates an opportunity during user creation.
2. Click raw and copy the code.
3. Return to your Auth. provider and click AutoGeneratedRegHandler.
4. Click Edit.
5. Select all the code and paste it over the old code.
6. Click Save.
29
Create an Auth. ProviderSet Up SSO for Your Users
You now have a fully functional Auth. provider that’s ready for social sign-on with Facebook.
Enable Your Auth. Provider in Your Community
You created an Auth. provider for Facebook and customized it with a registration handler. Now instruct the login page in your communityto display Facebook as an option on your external identity community’s login page.
1. From Setup, enter All Communities in the Quick Find box, then select All Communities.
2. Click Workspaces next to your community.
3. Select Administration, then select Login & Registration and confirm that Facebook shows up in the checkbox under Login.
4. Click Save.
5. Test your changes by going to your community in a new private (incognito) browser or window.
6. Reload the login page.
7. Click the Facebook logo.
8. Log in with your Facebook account.
You are immediately granted access to the community. If you return to the browser where you are administering Salesforce, go toAccounts and drill into the Customer account. You find that you show up as a contact. When you view your contact, you see that youhave an opportunity associated with the contact. The registration handler created the opportunity.
For more information on configuring social sign-on for various providers, see Social Sign-On. You can find more sample Apex classesthat implement the RegistrationHandler interface on the GitHub repository, https://github.com/salesforceidentity.
Accept User Identity with SAML and Just-In-Time Provisioning
With Salesforce Identity, you can bring your own identity from standards-based systems using SAML. You can integrate with existingSAML identity providers, letting users access your community based on your own authentication systems. And you can use SAML withjust-in-time (JIT) provisioning to create or update users ion the fly as part of the SSO process.
We assume that you’re already familiar with SAML authentication protocols and you know how to work with your identity provider toconfigure SSO for your company. For more information on setting up SSO, watch the see Setting up Single Sign-On ( Salesforce Classic)video.
To use JIT provisioning, you pass a Salesforce-defined set of attributes in your SAML assertion. Or use Apex provisioning handlers to haveSalesforce Identity adapt to existing third-party schemas. For more information, see Just-in-Time Provisioning for Communities inSalesforce Help.
30
Enable Your Auth. Provider in Your CommunitySet Up SSO for Your Users
SET UP SSO FOR YOUR APPS
You can use Salesforce Identity to establish identity for your users with self-registration, social sign-on, and branded login services. Youcan also provide SSO and access to web and mobile apps with identity services like SAML, OpenID Connect, or OAuth engines.
Set Up SSO and Access for Mobile Apps
Use the Salesforce Mobile SDK to create mobile apps that integrate with your org’s identity setup. You use the OAuth protocol toconnect Salesforce Identity with mobile apps. OAuth is an open standard used for authorization that provides applications secure,delegated access to services on behalf of a user—without sharing the user’s credentials. Fortunately, you don’t need to know muchabout OAuth to use it. Salesforce Identity and Salesforce work together.
Set Up SSO and Access for Your Web App
Salesforce Identity works as an identity provider to provide SSO to other apps. You can use SAML to set up SSO with web apps.
Set Up SSO and Access for Mobile Apps
Use the Salesforce Mobile SDK to create mobile apps that integrate with your org’s identity setup. You use the OAuth protocol to connectSalesforce Identity with mobile apps. OAuth is an open standard used for authorization that provides applications secure, delegatedaccess to services on behalf of a user—without sharing the user’s credentials. Fortunately, you don’t need to know much about OAuthto use it. Salesforce Identity and Salesforce work together.
To walk through creating a mobile app for SSO, check out the video How to Create a Sample Mobile App and Take Advantage of SalesforceIdentity. Then follow these steps to create a sample mobile app. To get started, we create a connected app that supports OAuth. Theprocess is similar to using the SAML protocol.
Create a Connected App for Your Mobile App
The connected app integrates your mobile app with Salesforce Identity.
Install the Salesforce Mobile SDK
Salesforce Mobile SDK is an open-source suite of familiar technologies (including a REST API and OAuth 2.0). You use the SDK torapidly build HTML5, native, and hybrid mobile apps that connect to the Salesforce platform.
Create a Mobile App
Let’s use the Salesforce Mobile SDK to jump-start our app.
Configure the Mobile App to Point to Your Community
Let’s teach the mobile app about your community to finish the identity configuration.
More About Single Sign-On for Your Mobile App
You’ve learned the basics of acting as an identity provider for mobile apps. For more information, several Trailhead modules canguide you.
Create a Connected App for Your Mobile AppThe connected app integrates your mobile app with Salesforce Identity.
This example assumes that you’re using macOS and iOS. The steps for Android are similar.
31
1. From Setup, enter Apps in the Quick Find box, and then select App Manager.
2. Click New Connected App.
3. Enter a name for your app. Let’s call it My Mobile App.
4. For Contact Email, enter your email address.
5. Select Enable OAuth Settings.
6. Enter a callback URL. Use mymobileapp://callback.
7. For Available OAuth Scopes, select id, openid, api, refresh_token, web, and visualforce.
8. Click Save.
9. Click Continue.
Install the Salesforce Mobile SDKSalesforce Mobile SDK is an open-source suite of familiar technologies (including a REST API and OAuth 2.0). You use the SDK to rapidlybuild HTML5, native, and hybrid mobile apps that connect to the Salesforce platform.
If you don’t already have the Salesforce Mobile SDK, follow the installation instructions in the Salesforce Mobile SDK Development Guideto download it.
Create a Mobile AppLet’s use the Salesforce Mobile SDK to jump-start our app.
1. At a command line, change to a directory where you want to create your app assets.
2. Run forceios create.
3. For application type, enter native.
4. For application name, enter MyMobileApp.
5. Press Enter to create the app in the current directory.
6. For package name, enter com.yourcompany.
7. For organization name, enter YourCompany.
8. Return to the Connected App page in your Developer org and copy the consumer key.
9. Paste the key in the forceios utility as the value for Connected App ID.
10. Return to the Connected App page in your Developer org and copy the callback URL.
11. Paste the URL in the forceios utility as the value for the Callback URI.
12. Press Enter.
The Mobile SDK creates a mobile app project for you.
Configure the Mobile App to Point to Your CommunityLet’s teach the mobile app about your community to finish the identity configuration.
1. At a command line, change to the app’s directory cd MyMobileApp.
2. Open your app in XCode: open MyMobileApp.xcodeproj.
32
Install the Salesforce Mobile SDKSet Up SSO for Your Apps
3. In your Developer org, copy your community URL, omitting https://. If you don’t recall the URL, from Setup, enter Communitiesand then select All Communities.
4. Return to XCode.
5. In the file browser, expand MyMobileApp > Supporting Files.
6. Click MyMobileApp-info.plist.
7. Select the SFDCOAuthLoginHost key value and replace login.salesforce.com with your community URL (again, without https://).
Now all you have to do is build your app. Click the triangle-shaped button to build your app and watch it connect to your community.You can now log in to your app, even using social sign-on if you want. With Salesforce Identity, you focus on building your app ratherthan spending resources integrating identity.
More About Single Sign-On for Your Mobile AppYou’ve learned the basics of acting as an identity provider for mobile apps. For more information, several Trailhead modules can guideyou.
• Salesforce Identity How-To video series
• Mobile Basics Trailhead module
• Native iOS Trailhead module
• Native Android Trailhead module
• HTML5 & Hybrid Trailhead module
Set Up SSO and Access for Your Web App
Salesforce Identity works as an identity provider to provide SSO to other apps. You can use SAML to set up SSO with web apps.
Here’s an example of using SAML with a sample app. For an overview, watch the How to Set Up Single Sign-On with a Sample ApplicationUsing SAML video.
Create a Connected App for Your Web App
A connected app is an application that integrates with Salesforce Identity using APIs and identity services. Connected apps usestandard identity protocols like SAML, OAuth, and OpenID Connect to authenticate, provide single sign-on, and provide tokens foruse with Salesforce APIs.
Create a Sample Service Provider on Heroku
To implement single sign-on, you need an app that speaks SAML. We’ve prepared a free sample that gets you up and running quickly.
Configure Salesforce Identity to Provide Identity for Your App
Teach Salesforce Identity about the SAML configuration of your new app.
Authorize Your Web App
The Salesforce Identity SAML identity provider understands your app via the connected app, but your users aren’t authorized toaccess it. You still have to configure authorization.
Configure Your App to Trust Salesforce Identity
Even though you’ve described your sample app to Salesforce Identity, your app doesn’t yet trust Salesforce to act as an identityprovider. You must configure the app to accept SAML messages. This process is known as SAML metadata exchange.
33
More About Single Sign-On for Your Mobile AppSet Up SSO for Your Apps
Personalize Your App with Custom Attributes
You might notice that your app displays attributes of the user’s identity. These attributes are shared through standard SAML attributeassertions, which is useful when you want to personalize the app by providing more information about the user.
More About Single Sign-On for Your Web App
You’ve learned the basics of acting as an identity provider for your web app. For more information, use the following resources.
Create a Connected App for Your Web AppA connected app is an application that integrates with Salesforce Identity using APIs and identity services. Connected apps use standardidentity protocols like SAML, OAuth, and OpenID Connect to authenticate, provide single sign-on, and provide tokens for use withSalesforce APIs.
Let’s create a SAML-based connected app that users can see and administrators can manage.
1. From Setup, enter Apps in the Quick Find box, then select App Manager.
2. Click New Connected App.
3. Give your app a name. Let’s call it My SSO App.
4. For Contact Email, enter your email address.
5. Select Choose one of our sample logos.
6. In the new window, select a logo you like and copy the URL.
7. Close the window, and paste the URL in the Logo URL field in your Connected App window.
8. Click Enable SAML.
You now have the basics of a connected app in place, but you need to connect the app to something. Let’s set up another app so youcan establish trust between the app and Salesforce Identity for SSO.
Create a Sample Service Provider on HerokuTo implement single sign-on, you need an app that speaks SAML. We’ve prepared a free sample that gets you up and running quickly.
The sample app runs on Heroku. Heroku is a Salesforce Platform offering that provides platform as a service in a wide variety of languages.It also offers an amazing developer experience. As you see, deploying a new app can be as simple as clicking a button. If you don’t havea Heroku account, sign up for free at Heroku.
After you have a Heroku account, go to https://toolbelt.heroku.com and install the Heroku tool belt. Then follow thesesteps.
1. In a new browser window, go to https://github.com/salesforceidentity/heroku-identity-java.
2. Click Deploy to Heroku. A new page in the Heroku Dashboard displays that clones the sample for you.
3. On the dashboard, you can optionally name the app.
4. Click Deploy for Free.
5. Heroku copies the app that you’ll control. When the copy is complete, click View.
6. Click Login.Because you haven’t configured the app to trust Salesforce as an identity provider, you see instructions about how to set it up.
34
Create a Connected App for Your Web AppSet Up SSO for Your Apps
Configure Salesforce Identity to Provide Identity for Your AppTeach Salesforce Identity about the SAML configuration of your new app.
1. Copy the Start URL value on your apps page. (It’s the same as the Entity ID and ACS URL for this particular app.)
2. Return to your connected app window.
3. Paste the Start URL value into the Start URL, Entity ID, and ACS URL fields.
4. Click Save.
You’ve now configured a connected app with metadata for your sample SAML service provider.
Authorize Your Web AppThe Salesforce Identity SAML identity provider understands your app via the connected app, but your users aren’t authorized to accessit. You still have to configure authorization.
1. In the connected app window, click Manage.
2. Scroll to the Profiles section and click Manage Profiles.
3. Choose your Customers and System Administrator profiles.
4. Click Save.
Anyone with the Customers or System Administrator profile can use SAML to access the app.
Configure Your App to Trust Salesforce IdentityEven though you’ve described your sample app to Salesforce Identity, your app doesn’t yet trust Salesforce to act as an identity provider.You must configure the app to accept SAML messages. This process is known as SAML metadata exchange.
Just as you’ve provided metadata about the app to Salesforce, you provide metadata about Salesforce to the app. In practice, this processvaries from app to app, but the fundamentals remain the same. You give the app:
• A unique name of the identity provider
• URLs where the app runs
• A certificate to validate single sign-on messages from the identity provider
Salesforce Identity exposes standard SAML metadata documents that can be downloaded or accessed via a URL. The sample app youdeploy accepts metadata either way. Let’s take the easy route and use the URL.
1. Access the SAML metadata through a URL.
a. Scroll to the SAML Login Information section and expand the section for your community.
b. Copy the Metadata Discovery Endpoint value.
c. On a command line, use Heroku Toolbelt to update the configuration of the app: set --app your_app_nameSAML_METADATA=your metadata url>
You’ve now configured your sample service provider to trust your Salesforce Identity IDP.
2. Let’s test it!
a. Return to your sample app and reload the page.
b. You’re now automatically signed in as your administrator using SAML.
3. Test the configuration with a user.
35
Configure Salesforce Identity to Provide Identity for Your AppSet Up SSO for Your Apps
a. In a new private (incognito) browser or window, load your app.
b. Click Login.
c. Click the Facebook icon. If necessary, log in with Facebook.
You’re returned to your app through SSO.
Personalize Your App with Custom AttributesYou might notice that your app displays attributes of the user’s identity. These attributes are shared through standard SAML attributeassertions, which is useful when you want to personalize the app by providing more information about the user.
Connected apps let you extend this information through custom attributes. Using custom attributes, you can enrich the data sent toyour app declaratively, choosing from attributes of users, their profiles, and their Salesforce org. When the app interacts with Salesforceover SAML or OpenID Connect, these attributes are shared in a standardized way.
1. Go to the Connected Apps page for your app.
2. Scroll to Custom Attributes and click New.
3. Set the Attribute key to Profile.
4. Click Insert Field.
5. Click $Profile and find the name.
6. Click Insert.
7. Return to your sample service provider and log out.
8. Click Login to get single sign-on, including your new attribute.
Custom attributes are flexible, and you can use the Salesforce formula language to combine or transform attributes for your particularuse case. For example, you can create a custom attribute called “IsOver18” with a formula like this.
IF(($User.BirthDay__c - TODAY() + 6574 ) >= 0, 'false', 'true' )
At runtime, the attribute logic looks at a custom date field on the user object, calculates whether the user is over 18, and discloses trueor false. This attribute allows you to assert that the user meets a business policy without disclosing the actual birthday to the targetapplication.
For more information on using formulas, review the Using Formula Fields Trailhead module. You can also construct custom attributesusing Apex.
SEE ALSO:
Retrieve User Information with Custom Attributes
More About Single Sign-On for Your Web AppYou’ve learned the basics of acting as an identity provider for your web app. For more information, use the following resources.
Setting up Single Sign-On (Salesforce Classic) video
Examples for Setting Up Identity Providers and Service Providers
36
Personalize Your App with Custom AttributesSet Up SSO for Your Apps
DYNAMIC URLS: DETERMINE YOUR BRAND AT RUN TIME
Add dynamic branding to your external community to extend the functionality of your login page. From the Login & Registration pageof the Administration workspace, you can brand your external identity community login experience on pages used to log in users, verifyidentities, reset passwords, and register new members. You can replace the Salesforce logo with yours, change the color of yourbackground and login button, and modify the footer text. You can also provide a URL to display content on the right side of your loginform. With dynamic branding, you control and customize branding at run time depending on current circumstances, like who the useris or where the user is logging in from.
Dynamic Branding for Multiple Brands
Dynamic branding is ideal for multi-brand companies. You can create a single login page that determines which brand appears atrun time. All brands are served from the same login page that serves the same community.
Dynamic Branding Using the Login & Registration Page
You can implement dynamic branding for login pages from Experience Workspaces on the Login & Registration page of theAdministration workspace. Create dynamic URLs by including a placeholder that resolves at run time.
SEE ALSO:
Implement Embedded Login
Customize Your Login Pages with Experience Builder
Dynamic Branding for Multiple Brands
Dynamic branding is ideal for multi-brand companies. You can create a single login page that determines which brand appears at runtime. All brands are served from the same login page that serves the same community.
In our scenario, Fix Corporation has a single external community to handle its two brands, Fix Coffee and Fix Chocolate. The corporationuses dynamic branding to customize the login experience for each brand. When customers click a link to log in, Fix presents a login pagebased on the brand indicated in the login URL.
Fix has a set of resources—including a logo and right-frame URL—for each brand. These resources are hosted on its content managementsystem (CMS). So, for example, the URL to the Fix Coffee logo is https://www.my-cms.com/coffee/logo.png. Likewise,the URL to the Fix Chocolate logo is https://www.my-cms.com/chocolate/logo.png.
Fix implements dynamic branding by using a placeholder, or experience ID (expid) in the URL to represent each brand. That is, the URLcontains the expid dynamic URL, which is then replaced by its value at run time.
In our scenario, the dynamic URL uses the expid: https://www.my-cms.com/{expid}/logo.png. Then {expid} becomeseither https://www.my-cms.com/coffee/logo.png or https://www.my-cms.com/chocolate/logo.pngat run time.
If the customer at run time clicks a link to log in to Fix Coffee, the link contains an expid query parameter set to expid=coffee:
https://fix.force.com/login?expid=coffee
This URL is the login endpoint to the community branded as Fix Coffee.
It’s up to your implementation to determine how the expid query parameter is set. For example, it can be contained in an email link orset with a click of a button. In our scenario, the user selects the brand from the Reseller Partner Program page.
37
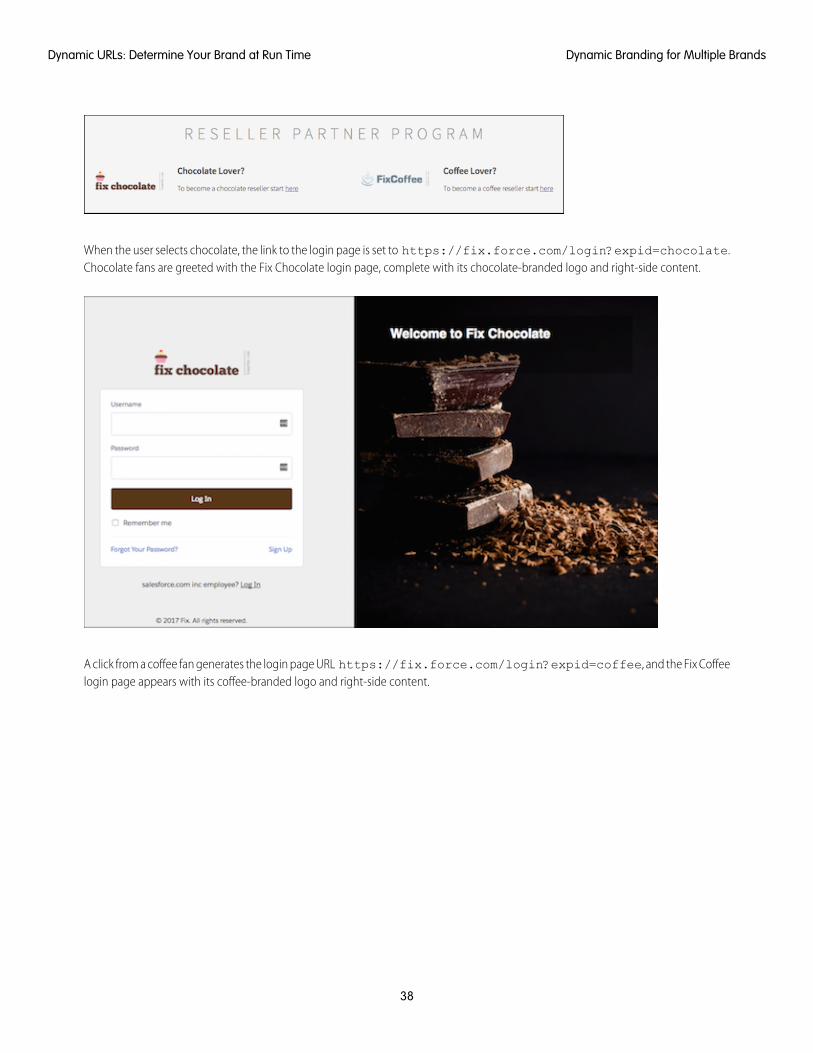
When the user selects chocolate, the link to the login page is set to https://fix.force.com/login?expid=chocolate.Chocolate fans are greeted with the Fix Chocolate login page, complete with its chocolate-branded logo and right-side content.
A click from a coffee fan generates the login page URL https://fix.force.com/login?expid=coffee, and the Fix Coffeelogin page appears with its coffee-branded logo and right-side content.
38
Dynamic Branding for Multiple BrandsDynamic URLs: Determine Your Brand at Run Time
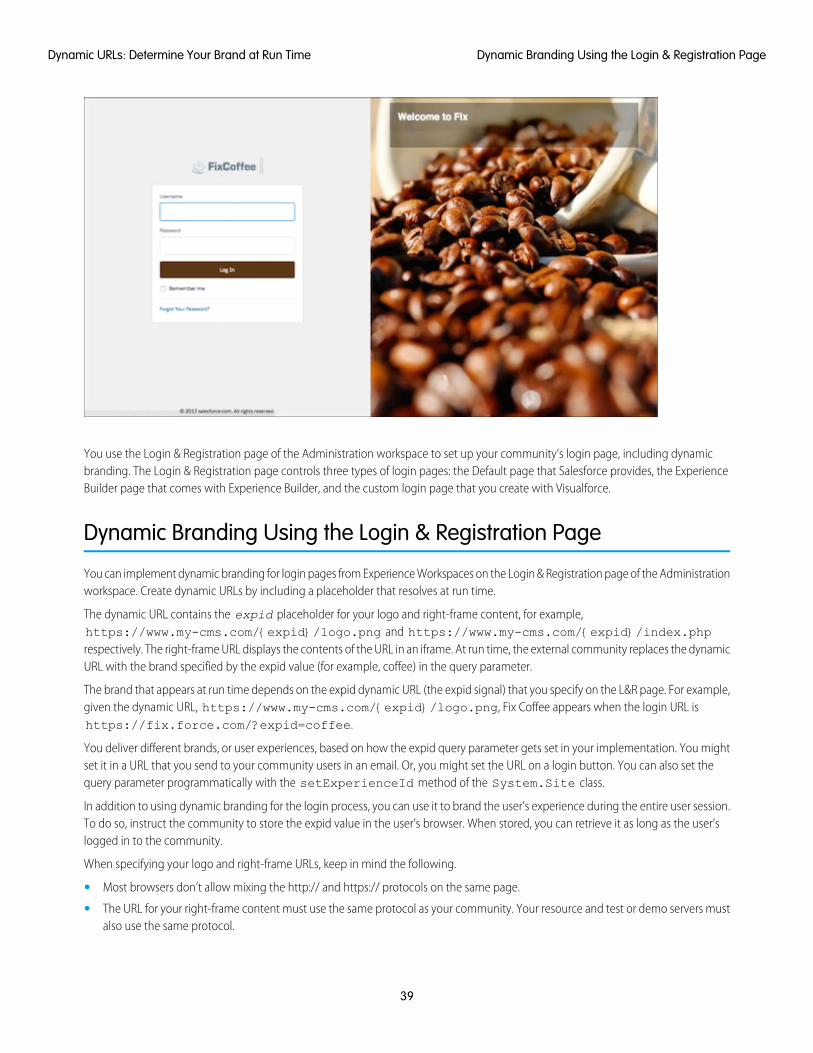
You use the Login & Registration page of the Administration workspace to set up your community’s login page, including dynamicbranding. The Login & Registration page controls three types of login pages: the Default page that Salesforce provides, the ExperienceBuilder page that comes with Experience Builder, and the custom login page that you create with Visualforce.
Dynamic Branding Using the Login & Registration Page
You can implement dynamic branding for login pages from Experience Workspaces on the Login & Registration page of the Administrationworkspace. Create dynamic URLs by including a placeholder that resolves at run time.
The dynamic URL contains the expid placeholder for your logo and right-frame content, for example,https://www.my-cms.com/{expid}/logo.png and https://www.my-cms.com/{expid}/index.phprespectively. The right-frame URL displays the contents of the URL in an iframe. At run time, the external community replaces the dynamicURL with the brand specified by the expid value (for example, coffee) in the query parameter.
The brand that appears at run time depends on the expid dynamic URL (the expid signal) that you specify on the L&R page. For example,given the dynamic URL, https://www.my-cms.com/{expid}/logo.png, Fix Coffee appears when the login URL ishttps://fix.force.com/?expid=coffee.
You deliver different brands, or user experiences, based on how the expid query parameter gets set in your implementation. You mightset it in a URL that you send to your community users in an email. Or, you might set the URL on a login button. You can also set thequery parameter programmatically with the setExperienceId method of the System.Site class.
In addition to using dynamic branding for the login process, you can use it to brand the user’s experience during the entire user session.To do so, instruct the community to store the expid value in the user’s browser. When stored, you can retrieve it as long as the user’slogged in to the community.
When specifying your logo and right-frame URLs, keep in mind the following.
• Most browsers don’t allow mixing the http:// and https:// protocols on the same page.
• The URL for your right-frame content must use the same protocol as your community. Your resource and test or demo servers mustalso use the same protocol.
39
Dynamic Branding Using the Login & Registration PageDynamic URLs: Determine Your Brand at Run Time
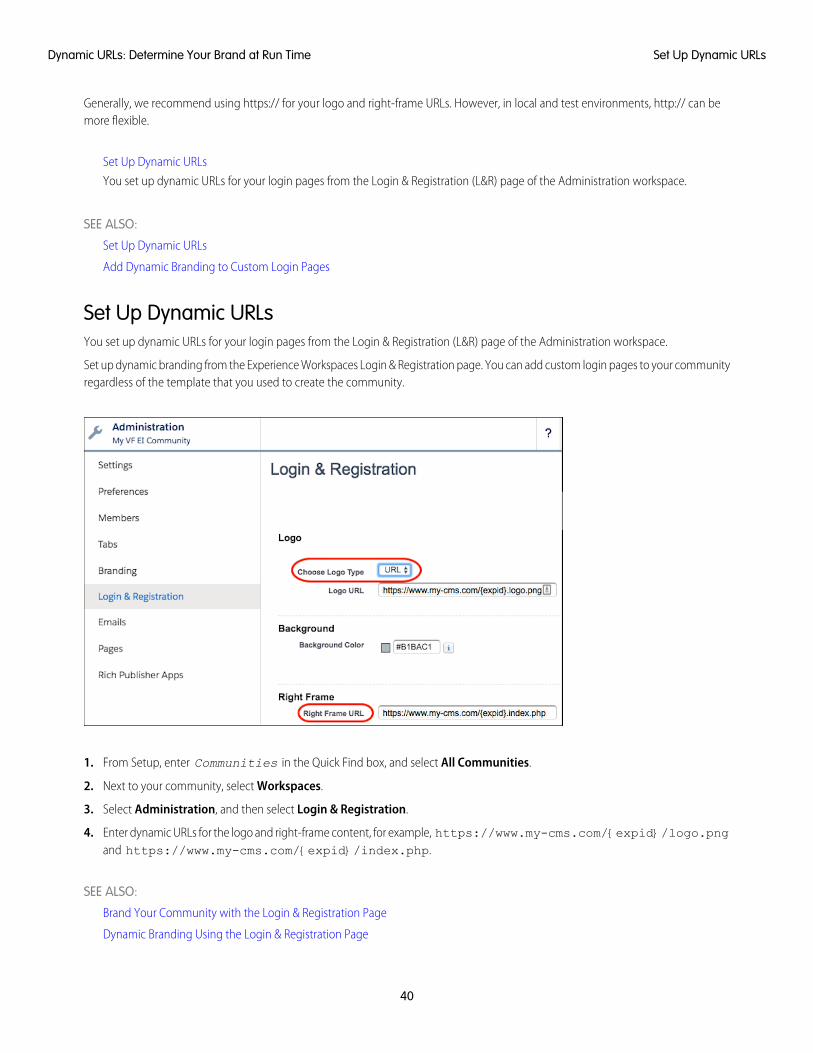
Generally, we recommend using https:// for your logo and right-frame URLs. However, in local and test environments, http:// can bemore flexible.
Set Up Dynamic URLs
You set up dynamic URLs for your login pages from the Login & Registration (L&R) page of the Administration workspace.
SEE ALSO:
Set Up Dynamic URLs
Add Dynamic Branding to Custom Login Pages
Set Up Dynamic URLsYou set up dynamic URLs for your login pages from the Login & Registration (L&R) page of the Administration workspace.
Set up dynamic branding from the Experience Workspaces Login & Registration page. You can add custom login pages to your communityregardless of the template that you used to create the community.
1. From Setup, enter Communities in the Quick Find box, and select All Communities.
2. Next to your community, select Workspaces.
3. Select Administration, and then select Login & Registration.
4. Enter dynamic URLs for the logo and right-frame content, for example, https://www.my-cms.com/{expid}/logo.pngand https://www.my-cms.com/{expid}/index.php.
SEE ALSO:
Brand Your Community with the Login & Registration Page
Dynamic Branding Using the Login & Registration Page
40
Set Up Dynamic URLsDynamic URLs: Determine Your Brand at Run Time
QUICKER AND EASIER LOGINS WITH IDENTITY VERIFICATION
These days, users are given more login options. They can identify themselves using a phone number or email address instead of ausername. And, instead of a password, they can verify that their identity with a verification code sent to their email address or mobiledevice. Salesforce External Identity gives you an easy way to implement these alternate login mechanisms. With a few clicks, you canquickly deploy login and sign-up pages for your community.
You create login pages from Experience Workspaces on the Login & Registration page of the Administration workspace. Developers canmodify existing login pages or create them with Visualforce and Apex.
Choose a Login Page Type
When you create a community with a template, Salesforce takes care of the login process. You can choose from a few login pagetypes to control the login experience for your community.
Use Login Discovery to Simplify Login
If you want external users to log in with another identifier than their username, such as a phone number or email address, configureyour community with the Login Discovery Page. After users enter the identifier, they are challenged to verify themselves. For example,they might need to enter a verification code sent via email or text. If the user correctly enters the code on the Verify page generatedby Salesforce, the user is logged in to your community. If SSO-enabled, Login Discovery can send the user directly to the identityprovider login page. With Login Discovery, users can identity themselves using an email address or phone number. It also supportscustom identifiers, such as an employee number or federation ID, in Apex.
Extend the Login Discovery Handler in Apex
When you select the Login Discovery Page for your login page, Salesforce generates the AutocreatedDiscLoginHandler, whichcontains logic for users to log in with their email address or phone number. You can modify the handler in Apex to customize thelogin process. For example, you can have users log in with a vendor ID, employee number, or other identifier. And you can customizethe handler’s lookup logic to invoke the appropriate authentication flow. If your org is configured with multiple identity providers(IdP), your code can “discover” the IdP for the particular user and log the user directly into your community.
Choose a Self-Registration Page Type
You can choose from a few page types to implement self-registration for your community.
Use the Configurable Self-Reg Page for Easy Sign-Up
You can use the default self-registration page to sign up visitors with a username and password. But to give visitors a simpler,mobile-centric self-registration experience, use the Configurable Self-Reg Page. With this self-registration page, users can sign upwith only an email address or phone number, instead of having to create a username and password. With this lightweight sign-upprocess, you can limit the amount of information that you collect from the users when they sign up. On subsequent logins, you canget more information, building a member's profile through progressive profiling powered by the login flow.
Extend the Configurable Self-Reg Handler in Apex
When you select the Configurable Self-Reg Page registration type on the Login & Registration page, Salesforce generates theAutoCreatedConfigSelfReg handler. The handler contains logic for users to register with their email address or phone number. Youcan modify the handler in Apex to customize self-registration. You might want to add logic to ensure that a new member’s emailaddress and phone number are unique in your org. Or you can set up SSO for your new external users.
View Your Users’ Identity Verification Methods
Salesforce maintains information about each user’s identity verification history. You can get this information from the user interfaceor API.
41
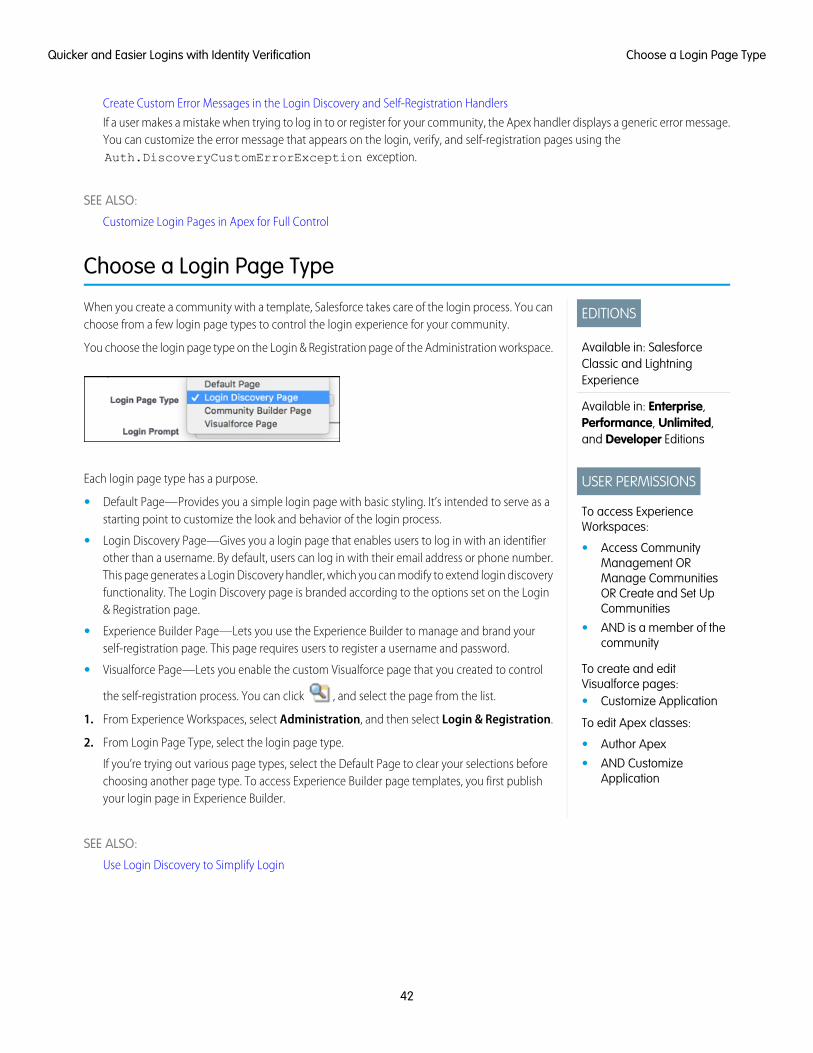
Create Custom Error Messages in the Login Discovery and Self-Registration Handlers
If a user makes a mistake when trying to log in to or register for your community, the Apex handler displays a generic error message.You can customize the error message that appears on the login, verify, and self-registration pages using theAuth.DiscoveryCustomErrorException exception.
SEE ALSO:
Customize Login Pages in Apex for Full Control
Choose a Login Page Type
EDITIONS
Available in: SalesforceClassic and LightningExperience
Available in: Enterprise,Performance, Unlimited,and Developer Editions
USER PERMISSIONS
To access ExperienceWorkspaces:
• Access CommunityManagement ORManage CommunitiesOR Create and Set UpCommunities
• AND is a member of thecommunity
To create and editVisualforce pages:• Customize Application
To edit Apex classes:
• Author Apex
• AND CustomizeApplication
When you create a community with a template, Salesforce takes care of the login process. You canchoose from a few login page types to control the login experience for your community.
You choose the login page type on the Login & Registration page of the Administration workspace.
Each login page type has a purpose.
• Default Page—Provides you a simple login page with basic styling. It’s intended to serve as astarting point to customize the look and behavior of the login process.
• Login Discovery Page—Gives you a login page that enables users to log in with an identifierother than a username. By default, users can log in with their email address or phone number.This page generates a Login Discovery handler, which you can modify to extend login discoveryfunctionality. The Login Discovery page is branded according to the options set on the Login& Registration page.
• Experience Builder Page—Lets you use the Experience Builder to manage and brand yourself-registration page. This page requires users to register a username and password.
• Visualforce Page—Lets you enable the custom Visualforce page that you created to control
the self-registration process. You can click , and select the page from the list.
1. From Experience Workspaces, select Administration, and then select Login & Registration.
2. From Login Page Type, select the login page type.
If you’re trying out various page types, select the Default Page to clear your selections beforechoosing another page type. To access Experience Builder page templates, you first publishyour login page in Experience Builder.
SEE ALSO:
Use Login Discovery to Simplify Login
42
Choose a Login Page TypeQuicker and Easier Logins with Identity Verification
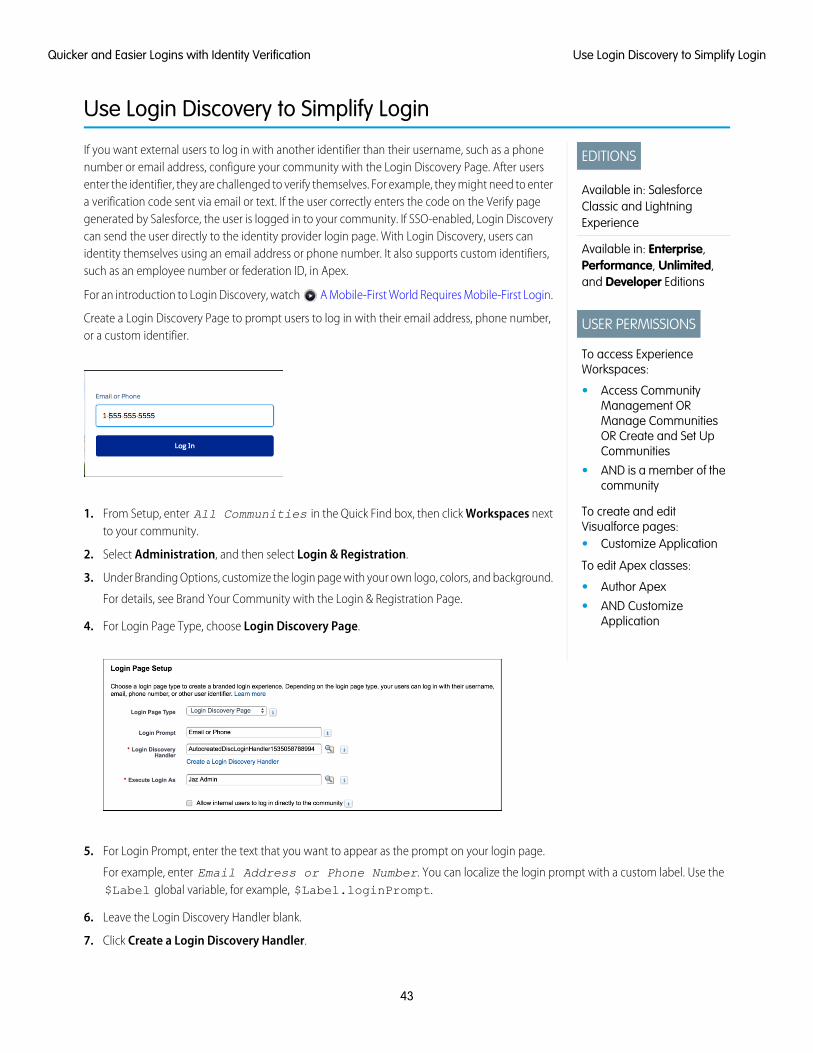
Use Login Discovery to Simplify Login
EDITIONS
Available in: SalesforceClassic and LightningExperience
Available in: Enterprise,Performance, Unlimited,and Developer Editions
USER PERMISSIONS
To access ExperienceWorkspaces:
• Access CommunityManagement ORManage CommunitiesOR Create and Set UpCommunities
• AND is a member of thecommunity
To create and editVisualforce pages:• Customize Application
To edit Apex classes:
• Author Apex
• AND CustomizeApplication
If you want external users to log in with another identifier than their username, such as a phonenumber or email address, configure your community with the Login Discovery Page. After usersenter the identifier, they are challenged to verify themselves. For example, they might need to entera verification code sent via email or text. If the user correctly enters the code on the Verify pagegenerated by Salesforce, the user is logged in to your community. If SSO-enabled, Login Discoverycan send the user directly to the identity provider login page. With Login Discovery, users canidentity themselves using an email address or phone number. It also supports custom identifiers,such as an employee number or federation ID, in Apex.
For an introduction to Login Discovery, watch A Mobile-First World Requires Mobile-First Login.
Create a Login Discovery Page to prompt users to log in with their email address, phone number,or a custom identifier.
1. From Setup, enter All Communities in the Quick Find box, then click Workspaces nextto your community.
2. Select Administration, and then select Login & Registration.
3. Under Branding Options, customize the login page with your own logo, colors, and background.
For details, see Brand Your Community with the Login & Registration Page.
4. For Login Page Type, choose Login Discovery Page.
5. For Login Prompt, enter the text that you want to appear as the prompt on your login page.
For example, enter Email Address or Phone Number. You can localize the login prompt with a custom label. Use the$Label global variable, for example, $Label.loginPrompt.
6. Leave the Login Discovery Handler blank.
7. Click Create a Login Discovery Handler.
43
Use Login Discovery to Simplify LoginQuicker and Easier Logins with Identity Verification
Salesforce generates a default login discovery handler after you save the page. But continue to fill out the page before you save it.
8. For Execute Login As, choose an admin with Manage Users permission.
Execute Login As provides the context in which the Login Discovery handler runs. By assigning a user to the handler, operationsperformed by the handler are easily traced back to the login process. In production, you typically create a system user for the ExecuteLogin As user.
9. Make sure that Allow internal users to log in directly to the community isn’t selected.
The Login Discovery Page doesn’t support internal users (employees) logging in to the community directly. However, you cancustomize the handler to redirect users to an IdP. For internal users, you can set up Login Discovery with My Domain. From your MyDomain Authentication Configuration settings, set the login page type to Discovery.
10. Click Save.Salesforce generates a default login discovery handler and populates the Login Discovery Handler field with its name. This handleraccepts an email address or phone number from the login page and emails or texts a verification code to the user. If the user’s emailor phone number isn’t verified, the user is prompted for a password.
You can modify the Login Discovery handler in Apex to extend its functionality. For details, see theAuth.LoginDiscoveryHanlderInterface in the Apex Developer Guide.
Note: To support text-message verification, you purchase a license for Identity Verification Credits. This usage-based licenseprovides your org a predetermined number of SMS messages for identity verification.
SEE ALSO:
View Your Users’ Identity Verification Methods
Create a Custom Passwordless Login Page
Extend the Login Discovery Handler in Apex
Choose a Login Page Type
44
Use Login Discovery to Simplify LoginQuicker and Easier Logins with Identity Verification

Extend the Login Discovery Handler in Apex
EDITIONS
Available in: SalesforceClassic and LightningExperience
Available in: Enterprise,Performance, Unlimited,and Developer Editions
USER PERMISSIONS
To access ExperienceWorkspaces:
• Access CommunityManagement ORManage CommunitiesOR Create and Set UpCommunities
• AND is a member of thecommunity
To create and editVisualforce pages:• Customize Application
To edit Apex classes:
• Author Apex
• AND CustomizeApplication
When you select the Login Discovery Page for your login page, Salesforce generates theAutocreatedDiscLoginHandler, which contains logic for users to log in with their email address orphone number. You can modify the handler in Apex to customize the login process. For example,you can have users log in with a vendor ID, employee number, or other identifier. And you cancustomize the handler’s lookup logic to invoke the appropriate authentication flow. If your org isconfigured with multiple identity providers (IdP), your code can “discover” the IdP for the particularuser and log the user directly into your community.
Before you extend Login Discovery, let’s review the Apex code for the generated handler. Even ifyou don’t want to change the default implementation, it’s helpful to understand how the logindiscovery process works. The Apex code contains comments where you can customize the code.
1. Find the name of the Login Discovery handler from the Login & Registration page.
a. From Setup, enter All Communities in the Quick Find box, then click Workspacesnext to your community.
b. Select Administration, then select Login & Registration.
c. Under Login Page Setup, notice the name next to Login Discovery Handler, for example,AutocreatedDiscLoginHandler1535677786093.
2. Locate the handler from Setup.
a. From Setup, enter Apex in the Quick Find box, then click Apex Classes next to yourcommunity.
b. To view the code, from the list of Apex classes, locate the handler, and click the name toopen it.
3. Optionally, change the autocreated handler name.
a. Click Edit.
The name of the Login Discovery handler appears in the first line of code: global classAutocreatedDiscLoginHandler1535677786093 implementsAuth.LoginDiscoveryHandler.
b. Replace AutocreatedDiscLoginHandler1535677786093 with your own, for example,DiscoveryHandlerMyCommunity.
c. Click Save.
d. Refresh your Login & Registration page to see the renamed handler in the Login Discovery Handler field.
4. Now let’s look at the Apex code.
This Apex code example implements the Auth.LoginDiscoveryHandler interface. It checks whether the user who is loggingin has a verified email or phone number, depending on which identifier was supplied on the login page. If verified, withAuth.VerificationMethod.EMAIL or Auth.VerificationMethod.SMS, we send a challenge to the identifier, eitherthe user’s email address or mobile device. If the user enters the code correctly on the verify page, the user is redirected to the communitypage specified by the start URL. If the user isn’t verified, the user must enter a password to log in. The handler also checks that the emailand phone number are unique with this code: users.size()==1.
45
Extend the Login Discovery Handler in ApexQuicker and Easier Logins with Identity Verification
Note: Passwordless login works only with verified methods. You can check the verification status on the User object, for example,with User list view, a report, or the API. Make sure that your solution handles the case where the user doesn’t have a verificationmethod. This code example falls back to a password.
The default discoverable login handler checks whether the user entered a valid email address or phone number before redirectingthe user to the verification page. If an invalid entry is made, the handler returns an error. Because this behavior is vulnerable touser enumeration attack, make sure that your solution prevents this attack. For example, you can create a dummy page similar tothe verification page and redirect the user to the dummy page when invalid user identifier is entered. Also, use generic errormessages to avoid providing additional information.
The discoveryResult function calls the Site.passwordlessLogin method to log the user in with the specified verificationmethod. The getSsoRedirect function looks up whether the user logs in with SAML or an Auth Provider. Add theimplementation-specific logic to handle the lookup.
SEE ALSO:
Apex Developer Guide: LoginDiscoveryHandler Interface
Create a Custom Passwordless Login Page
Use Login Discovery to Simplify Login
Choose Your Passwordless Login Implementation
46
Extend the Login Discovery Handler in ApexQuicker and Easier Logins with Identity Verification

Choose a Self-Registration Page Type
EDITIONS
Available in: SalesforceClassic and LightningExperience
Available in: Enterprise,Performance, Unlimited,and Developer Editions
USER PERMISSIONS
To access ExperienceWorkspaces:
• Access CommunityManagement ORManage CommunitiesOR Create and Set UpCommunities
• AND is a member of thecommunity
To create and editVisualforce pages:• Customize Application
To edit Apex classes:
• Author Apex
• AND CustomizeApplication
You can choose from a few page types to implement self-registration for your community.
You choose the self-registration page type on the Login & Registration page of the Administrationworkspace.
Each self-registration page type has advantages.
• Default Page—Gives you a simple self-registration page with basic styling. It’s intended to serveas a starting point to customize the look and behavior of self-registration.
• Configurable Self-Reg Page—Gives you the ability to decide which identifiers guests registerwith, such as an email address, phone number, or username. You choose whether to requirethem to verify their identity and the information to collect when they register. With this page,you make it easy for guests to sign up with a minimum amount of information. The ConfigurableSelf-Reg Page is branded according to the options set on the L&R page.
• Experience Builder Page—Lets you use the Experience Builder to manage and brand yourself-registration page. This page requires users to register a username and password.
• Visualforce Page—Lets you enable your custom Visualforce page for self-registration. Click
, and select your page from the list.
Here are some points to consider when deciding which registration page to use.
• The Configurable Self-Reg Page generates a handler that you can modify to extendself-registration functionality. It gives you more flexibility while avoiding the need to create acustom page.
• The Experience Builder Page is an easy way to set up self-registration using the ExperienceBuilder design tool, but limits you to prompt for username and password. If you use anotherself-registration page, you can still use Experience Builder to manage your community.
• The Default and Visualforce pages give you complete control over the look and feel of the self-registration process.
1. From Experience Workspaces, select Administration, and then select Login & Registration.
2. Select the self-registration page type.
If you’re trying out various page types, select the Default Page to clear your selections before choosing another page type. To accessExperience Builder page templates, you first publish your login page in Experience Builder.
SEE ALSO:
Use the Configurable Self-Reg Page for Easy Sign-Up
47
Choose a Self-Registration Page TypeQuicker and Easier Logins with Identity Verification

Use the Configurable Self-Reg Page for Easy Sign-Up
EDITIONS
Available in: SalesforceClassic and LightningExperience
Available in: Enterprise,Performance, Unlimited,and Developer Editions
USER PERMISSIONS
To access ExperienceWorkspaces:
• Access CommunityManagement ORManage CommunitiesOR Create and Set UpCommunities
• AND is a member of thecommunity
To create and editVisualforce pages:• Customize Application
To edit Apex classes:
• Author Apex
• AND CustomizeApplication
You can use the default self-registration page to sign up visitors with a username and password.But to give visitors a simpler, mobile-centric self-registration experience, use the ConfigurableSelf-Reg Page. With this self-registration page, users can sign up with only an email address orphone number, instead of having to create a username and password. With this lightweight sign-upprocess, you can limit the amount of information that you collect from the users when they signup. On subsequent logins, you can get more information, building a member's profile throughprogressive profiling powered by the login flow.
Create a configurable sign-up page from your community’s Workspaces Login & Registration page.It’s available when you create the login page using a Login Discovery Page, Visualforce Page, orDefault Page. If your login page type is a Experience Builder Page, Configurable Self-Reg Page isn’tavailable.
For an introduction to configurable self-registration, watch A Mobile-First World RequiresMobile-First Login.
1. From Setup, enter All Communities in the Quick Find box, then click Workspaces nextto your community.
2. Select Administration, and then select Login & Registration.
3. Select Allow external users to self-register.
4. For Registration Page Type, select Configurable Self-Reg Page.
The Login & Registration page displays fields for setting up self-registration.
48
Use the Configurable Self-Reg Page for Easy Sign-UpQuicker and Easier Logins with Identity Verification
5. For User Fields, select which fields to display on the self-registration page.
Users are required to supply this information when they register. If the information isn’t supplied, the handler populates the fieldswith dummy values. For example, if a last name isn't requested at sign-up, the user is assigned a last name likeExternalUser1550768707871.
6. Leave Configurable Self-Reg Handler blank.
7. Click Create a configurable self-reg handler.
Salesforce generates a self-registration handler after you save the page. But continue to fill out the page before you save it.
8. For Execute Registration As, choose a Salesforce admin with Manage Users permission.
Execute Registration As provides the context in which the Configurable Self-Reg handler runs. By assigning a user to the handler,operations performed by the handler are easily traced back to the registration process. For example, if a contact is created, this usercreates it. In production, you typically create a system user for the Execute Registration As user.
9. For Verification Method, if you want visitors to verify their identity when they sign up, select either Email or Text Message.
To require users to enter a password when they log in, select None.
The verification method is independent of the user fields you select. For example, if you select Email as a user field and None as theverification method, Salesforce collects the user’s email address, prompts for a password instead of sending a verification code.
10. If you want users to create a password when they sign up, select Include Password.
When selected, the sign-up page contains Password and Confirm Password fields. Even if you set up email or text verification, youcould collect a password at sign-up as a precaution. For example, if text-message verification is required but the mobile device isn’tavailable, the user can log in with a password.
Note: If you select None as the verification method, you must select Include Password. Otherwise, the new user can’t login.
If you don’t select Include Password, Salesforce generates a random password when the user is created.
11. For Profile, select a profile configured for your org, such as an External Identity, Customer Community User, or Partner CommunityUser profile.This setting assigns new users a profile to control access. The profile selected here is passed to the Configurable Self-Reg handler.Unless modified, the new user is assigned this profile. If you don’t specify a value here, make sure that your handler sets a user profileexplicitly before inserting a user. Every user requires a profile.
12. For Account, choose the account to contain your community members. Each member is listed as a contact in the account.The account selected here is passed to the Configurable Self-Reg handler. Leave the field blank if your org is set up for Personaccounts. If you want, you can override Account in Apex. For example, you can disassociate external users from accounts to createcontactless users.
13. Click Save.Salesforce generates a configurable self-registration handler and populates the Configurable Self-Reg Handler field with its name.The resulting sign-up form prompts users to register with the user fields that you selected. A user is created only if identity verificationis successful.
14. Check whether self-registration works.
a. From a private (incognito) browser, open your community login page.
b. Click Sign Up, and register a new user.
c. If prompted for an email address or phone number, enter your own to complete the verification process.
d. If verification succeeds, you are directed to the start page configured for your community, typically the community’s home page.
49
Use the Configurable Self-Reg Page for Easy Sign-UpQuicker and Easier Logins with Identity Verification
You can modify the handler in Apex to extend its functionality. For example, you can add logic to ensure that the new member’s emailaddress and phone number are unique in your org. You can also control how the user is created and populate fields on the self-reg formwith your values. However, the handler can’t change the prompts on the self-registration form. These prompts are determined by theuser fields selected on the Login & Registration page, such as First Name, Last Name, and so on.
To modify the Configurable Self-Reg handler in Apex, see the Auth.ConfigurableSelfRegHandler Interface in the ApexDeveloper Guide.
SEE ALSO:
Choose a Self-Registration Page Type
Extend the Configurable Self-Reg Handler in Apex
When you select the Configurable Self-Reg Page registration type on the Login & Registration page, Salesforce generates theAutoCreatedConfigSelfReg handler. The handler contains logic for users to register with their email address or phone number. You canmodify the handler in Apex to customize self-registration. You might want to add logic to ensure that a new member’s email addressand phone number are unique in your org. Or you can set up SSO for your new external users.
You can find the generated Configurable Self-Reg handler from the Setup Apex Classes page. Its name begins withAutoCreatedConfigSelfReg. When Salesforce generates the default handler, it appends digits to ensure that the name is unique. Youcan rename the handler to something more meaningful.
Before you extend the configurable self-reg handler, let’s review the Apex code for the generated handler. Even if you don’t want tochange the default implementation, it’s helpful to understand how the configurable self-registration process works. When you openthe handler in Apex, you can see that the code contains comments in places where you can customize the code.
1. Find the name of the Configurable Self-Reg handler on the Login & Registration page.
a. From Setup, enter All Communities in the Quick Find box, then click Workspaces next to your community.
b. Select Administration, and select Login & Registration.
c. Under Registration Page Configuration, notice the name next to Configurable Self-Reg Handler, for example,AutocreatedConfigSelfReg1535145601649.
2. Locate the handler from Setup.
a. From Setup, enter Apex in the Quick Find box, then click Apex Classes next to your community.
b. To view the code, from the list of Apex classes, locate the handler, and click the name to open it.
3. Optionally, rename the handler for your convenience.
a. Click Edit.
The name of the Configurable Self-Reg Handler appears in the first line of code: global classAutocreatedConfigSelfReg1532475901849 implements Auth.ConfigurableSelfRegHandler.
b. Replace the autocreated name with your own, for example, ConfigureSelfRegHandlerMyCommunity.
c. Click Save.
d. To see the renamed handler in the Configurable Self-Reg Handler field, refresh your Login & Registration page.
4. Now let’s look at the Apex code.
Verification occurs by email if the admin chose Email as the verification method when setting up the Configurable Self-Reg handler onthe Login & Registration (L&R) page. When a visitor clicks the sign-up link from the login page, Salesforce prompts for an email address
50
Extend the Configurable Self-Reg Handler in ApexQuicker and Easier Logins with Identity Verification
and then sends a one-time password to the specified email address. If the visitor enters the verification code successfully on the verifypage, the user is created and logged in. Likewise, if the admin chose Text Message as the verification method on the L&R page, the visitoris prompted to enter a phone number. Salesforce sends a challenge (verification code) via SMS to the user. If successful, the user iscreated and logged in. Requiring verification before creating a user reduces the number of dummy users cluttering your org.
The Auth.ConfigurableSelfRegHandler class contains logic for generating the user fields required to create a user in casethe user doesn’t supply them. The handler generates default values, ensuring that the values are unique by appending a timestamp.You can modify the handler to make sure that the email address and phone number of the external user are also unique.
SEE ALSO:
Apex Developer Guide: ConfigurableSelfRegHandler Interface
View Your Users’ Identity Verification Methods
USER PERMISSIONS
To view and customize theIdentity VerificationsMethods report from IdentityVerification History:• Manage Two-Factor
Authentication in UserInterface
To access the IdentityVerifications Methods reportfrom the AdministrativeReports folder in Reports:• View Setup and
Configuration
To create custom reportsand dashboards aboutidentity verification history:• Manage Two-Factor
Authentication in API
Salesforce maintains information about each user’s identity verification history. You can get thisinformation from the user interface or API.
User Identity Verification Methods from SetupYou can determine which verification methods your users have registered.
1. From Setup, enter Users in the Quick Find box, then select Users.
2. Click Create New View.
3. Under Available Fields, select these fields that report verification method activity, and click Save.
Admin Trusted Mobile NumberIndicates whether the user has a mobile phone number that an admin added or the userself-registered. Salesforce can text a verification code to that number when verifying identityfor authenticator apps but not for passwordless login.
Note: As a security measure, when users add or update a mobile number in AdvancedUser Details, they must log in again to verify their identity. As a result, unsaved changesin the app are lost. To disable this security measure, contact Salesforce Support.
One-Time Password AppIndicates whether the user has connected an authenticator app that generates verificationcodes, also known as time-based one-time passwords. The user can verify identity by entering a code generated by the app.
Salesforce AuthenticatorIndicates whether the user has connected the Salesforce Authenticator mobile app. The user can verify identity by approving anotification sent to the app.
Temporary CodeIndicates whether the user has a temporary verification code. Admins or non-admin users with the Manage Two-Factor Authenticationin User Interface permission generate temporary codes and set when the code expires.
U2F Security KeyIndicates whether the user has registered a U2F security key. The user can verify identity by inserting the security key into a USB port.
User Verified EmailIndicates whether the user self-registered and verified an email address. Salesforce can send a verification code to the user at thatemail address.
51
View Your Users’ Identity Verification MethodsQuicker and Easier Logins with Identity Verification

User Verified Mobile NumberIndicates whether the user self-registered and verified a mobile phone number. Salesforce can text a verification code to the userat that number.
API Identity VerificationDetermine the user’s verification methods with TwoFactorMethodsInfo.
Set verification methods for external users with System.UserManagement.registerVerificationMethod. This exampleregisters identity verification by text message.
System.UserManagement.registerVerificationMethod(Auth.VerificationMethod.SMS, '/');
Likewise, you can deregister a verification method, for example, when a user loses access to the mobile device, with theSystem.UserManagement.deregisterVerificationMethod.
System.UserManagement.deregisterVerificationMethod(Auth.VerificationMethod.SMS, '/');
SEE ALSO:
Object Reference for Salesforce and Lightning Platform: TwoFactorMethodsInfo
Apex Developer Guide: UserManagement Class
Passwordless Login Coding Considerations
See How Your Users Are Verifying Their Identity
Use Login Discovery to Simplify Login
52
View Your Users’ Identity Verification MethodsQuicker and Easier Logins with Identity Verification
Create Custom Error Messages in the Login Discovery andSelf-Registration Handlers
EDITIONS
Available in: SalesforceClassic and LightningExperience
Available in: Enterprise,Performance, Unlimited,and Developer Editions
USER PERMISSIONS
To access ExperienceWorkspaces:
• Access CommunityManagement ORManage CommunitiesOR Create and Set UpCommunities
• AND is a member of thecommunity
To create and editVisualforce pages:• Customize Application
To edit Apex classes:
• Author Apex
• AND CustomizeApplication
If a user makes a mistake when trying to log in to or register for your community, the Apex handlerdisplays a generic error message. You can customize the error message that appears on the login,verify, and self-registration pages using the Auth.DiscoveryCustomErrorExceptionexception.
1. From Setup, enter Apex in the Quick Find box, then click Apex Classes.
2. From the list of Apex classes, find the class that implementsAuth.LoginDiscoveryHandler or Auth.ConfigurableSelfRegHandler.
You can find the name of the handlers on the Login & Registration page of the Administrationworkspace. If you haven’t renamed the handlers, the names are similar toAutocreatedDiscLoginHandler1535677786093 andAutocreatedConfigSelfReg1532475901849.
3. Edit the Apex class to add the custom error message using theAuth.DiscoveryCustomErrorException exception.
For example, throw new Auth.DiscoveryCustomErrorException('Customerror message defined by the admin.').
4. Optionally, instead of entering the custom error message in the Apex class, you can create theerror message as a custom label.
Custom labels are custom text values that can be translated to the user’s native language. Inthis example, CustomError is a custom label.
throw newAuth.DiscoveryCustomErrorException(Label.CustomError)
Note: You create a custom error message from the Custom Labels Setup page. The errormessage can be up to 200 characters.
Login Discovery custom error messages appear on the login page. Configurable self-registrationerror messages appear on the verify page if you selected the Email or Text Message verificationmethod when configuring self-registration. If you selected None, the error message appears onthe self-registration page.
SEE ALSO:
Salesforce Help: Custom Labels
Apex Developer Guide: LoginDiscoveryHandler Interface
Apex Developer Guide: ConfigurableSelfRegHandler Interface
53
Create Custom Error Messages in the Login Discovery andSelf-Registration Handlers
Quicker and Easier Logins with Identity Verification
CUSTOMIZE LOGIN PAGES IN APEX FOR FULL CONTROL
EDITIONS
Available in: SalesforceClassic and LightningExperience
Available in: Enterprise,Performance, Unlimited,and Developer Editions
You can create a custom login page completely in Apex for full control over the look and behaviorof your community’s login page. Usually, the point-and-click Login & Registration Page gives youmost of what you need to handle your community’s login experience. But if you want to customizelogin further, we recommend that you modify the Apex controllers and Visualforce pages thatSalesforce provides rather than starting from scratch. For example, you can add dynamic brandingso that the login page displayed is decided at run time. Or you can use Apex to implementpasswordless login programmatically.
Create a Custom Login Page in Visualforce
Create your custom login page in Visualforce, and associate it with your community from theLogin & Registration page of the Administration workspace. You can also create custom Visualforce pages for password, forgotpassword, and self-registration. You can add these login pages to your community regardless of the template you use to create thecommunity.
Choose Your Passwordless Login Implementation
When implementing passwordless login, you have a few options for customizing it depending on how much customization youneed. You can modify the default login handler, or create a custom login page and let Salesforce handle identity verification. Or youcan create a custom login page and handle identity verification too.
Create a Custom Passwordless Login Page
You implement passwordless login from Experience Workspaces on the Login & Registration page of the Administration Workspace.For complete control, you can implement passwordless login in Apex as a custom login page. The custom login controller includeslogic to locate the user based on the identifier entered on the login page. It then checks which verification methods the user haspreviously registered. The controller logs in the user by whichever method is configured.
Create a Custom Identity Verification (Verify) Page
By default, when implementing passwordless login, Salesforce performs the identity verification process for you. It sends the verificationcode, displays the Verify page where the user enters the code, and confirms the user's identity. Instead of using the default SalesforceVerify page, you can create your own with Visualforce and a pair of Apex methods. You can replace the Verify page for self-registration,passwordless login, and registration of a user’s identity verification methods.
Add Dynamic Branding to Custom Login Pages
For custom login pages, you can implement dynamic URLs with a custom login Apex controller. Use the Apex methodsgetExperienceId and setExperienceId of the System.Site class to retrieve and store the expid value.
54
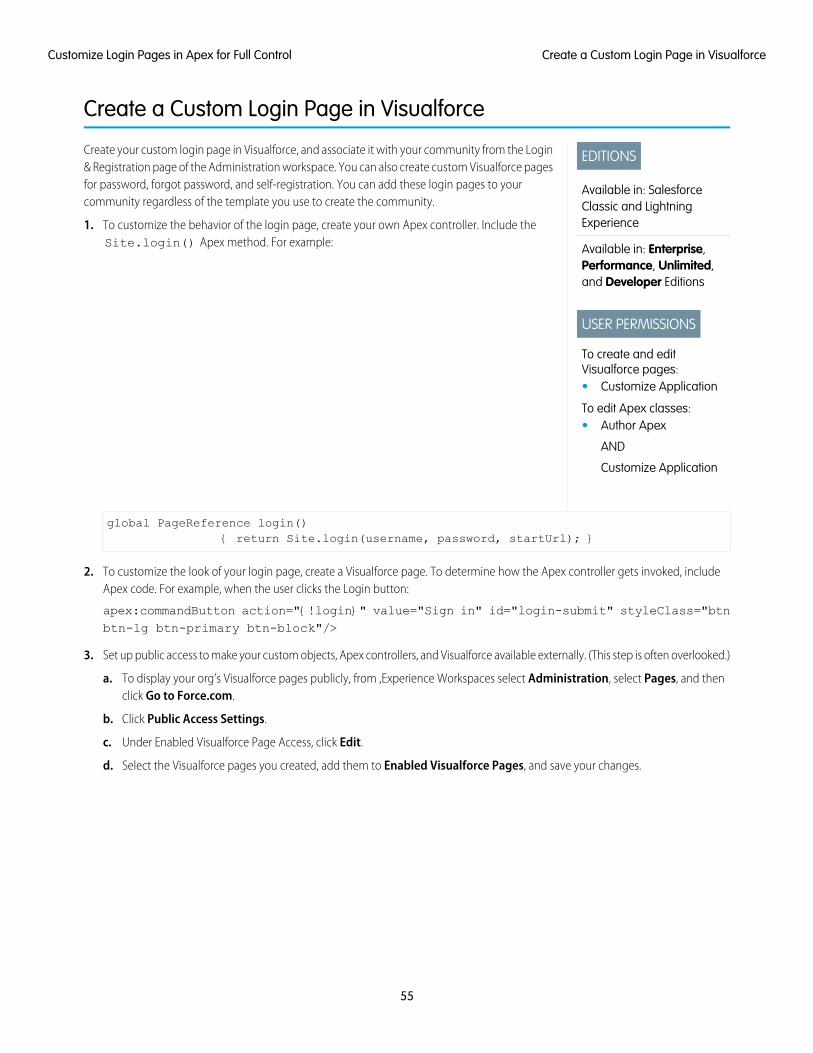
Create a Custom Login Page in Visualforce
EDITIONS
Available in: SalesforceClassic and LightningExperience
Available in: Enterprise,Performance, Unlimited,and Developer Editions
USER PERMISSIONS
To create and editVisualforce pages:• Customize Application
To edit Apex classes:• Author Apex
AND
Customize Application
Create your custom login page in Visualforce, and associate it with your community from the Login& Registration page of the Administration workspace. You can also create custom Visualforce pagesfor password, forgot password, and self-registration. You can add these login pages to yourcommunity regardless of the template you use to create the community.
1. To customize the behavior of the login page, create your own Apex controller. Include theSite.login() Apex method. For example:
global PageReference login(){ return Site.login(username, password, startUrl); }
2. To customize the look of your login page, create a Visualforce page. To determine how the Apex controller gets invoked, includeApex code. For example, when the user clicks the Login button:
apex:commandButton action="{!login}" value="Sign in" id="login-submit" styleClass="btnbtn-lg btn-primary btn-block"/>
3. Set up public access to make your custom objects, Apex controllers, and Visualforce available externally. (This step is often overlooked.)
a. To display your org’s Visualforce pages publicly, from ,Experience Workspaces select Administration, select Pages, and thenclick Go to Force.com.
b. Click Public Access Settings.
c. Under Enabled Visualforce Page Access, click Edit.
d. Select the Visualforce pages you created, add them to Enabled Visualforce Pages, and save your changes.
55
Create a Custom Login Page in VisualforceCustomize Login Pages in Apex for Full Control

e. If necessary, enable Apex classes for public access. Under Enabled Apex Class Page Access, click Edit, select the classes, and addthem to Enabled Apex Classes.
4. From your Login & Registration page, replace the community’s default pages with your custom Visualforce pages.
a. From Experience Workspaces, select Administration, and then select Login & Registration.
b.Under Login Page Setup, select Visualforce Page, click , and then select your custom Visualforce page from the list.
c.If you created Visualforce pages for password or registration, select Visualforce Page, click , and select your customVisualforce page from the list.
56
Create a Custom Login Page in VisualforceCustomize Login Pages in Apex for Full Control

5. View your custom login page from a browser in private (incognito) mode.
Create a Custom Login Page from a Github Project
When creating custom code for your login page, it’s often helpful to start out with an existing example for guidance. SalesforceIdentity provides a Github custom login page project that you can modify.
Create a Custom Login Page from a Github Project
EDITIONS
Available in: SalesforceClassic and LightningExperience
Available in: Enterprise,Performance, Unlimited,and Developer Editions
USER PERMISSIONS
To create and editVisualforce pages:• Customize Application
To edit Apex classes:• Author Apex
AND
Customize Application
When creating custom code for your login page, it’s often helpful to start out with an existingexample for guidance. Salesforce Identity provides a Github custom login page project that youcan modify.
1. On Github, locate the Salesforce Identity custom login page project.
a. Download the project to your computer.
b. Upload the zipped _include directory from the project to Salesforce as a static resourcecalled include with Cache Control set to Public.
c. Create a field set named Registration to contain the user information for yourcommunity members, such as the user’s name, company name, and email.
d. If you want to set up an Auth. provider for social sign-on, create a custom URL field on theUser object.
2. Install the Apex controllers and Visualforce pages from the Github project to your org accordingto the project’s README.
3. Make your Visualforce pages available publicly.
a. From Experience Workspaces, select Administration, select Pages, and then click Go toForce.com.
b. Click Public Access Settings.
c. Under Enabled Visualforce Page Access, click Edit.
d. Select the Visualforce pages you created, add them to Enabled Visualforce Pages, and save your changes.
57
Create a Custom Login Page from a Github ProjectCustomize Login Pages in Apex for Full Control
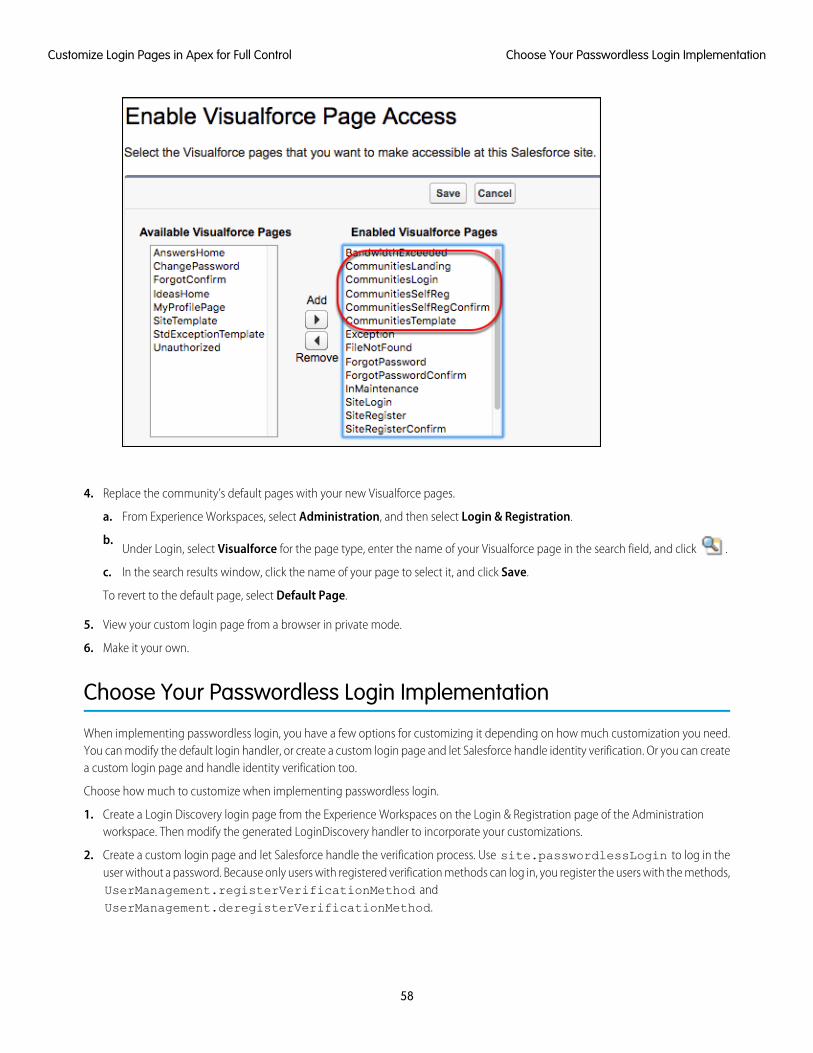
4. Replace the community’s default pages with your new Visualforce pages.
a. From Experience Workspaces, select Administration, and then select Login & Registration.
b.Under Login, select Visualforce for the page type, enter the name of your Visualforce page in the search field, and click .
c. In the search results window, click the name of your page to select it, and click Save.
To revert to the default page, select Default Page.
5. View your custom login page from a browser in private mode.
6. Make it your own.
Choose Your Passwordless Login Implementation
When implementing passwordless login, you have a few options for customizing it depending on how much customization you need.You can modify the default login handler, or create a custom login page and let Salesforce handle identity verification. Or you can createa custom login page and handle identity verification too.
Choose how much to customize when implementing passwordless login.
1. Create a Login Discovery login page from the Experience Workspaces on the Login & Registration page of the Administrationworkspace. Then modify the generated LoginDiscovery handler to incorporate your customizations.
2. Create a custom login page and let Salesforce handle the verification process. Use site.passwordlessLogin to log in theuser without a password. Because only users with registered verification methods can log in, you register the users with the methods,UserManagement.registerVerificationMethod andUserManagement.deregisterVerificationMethod.
58
Choose Your Passwordless Login ImplementationCustomize Login Pages in Apex for Full Control
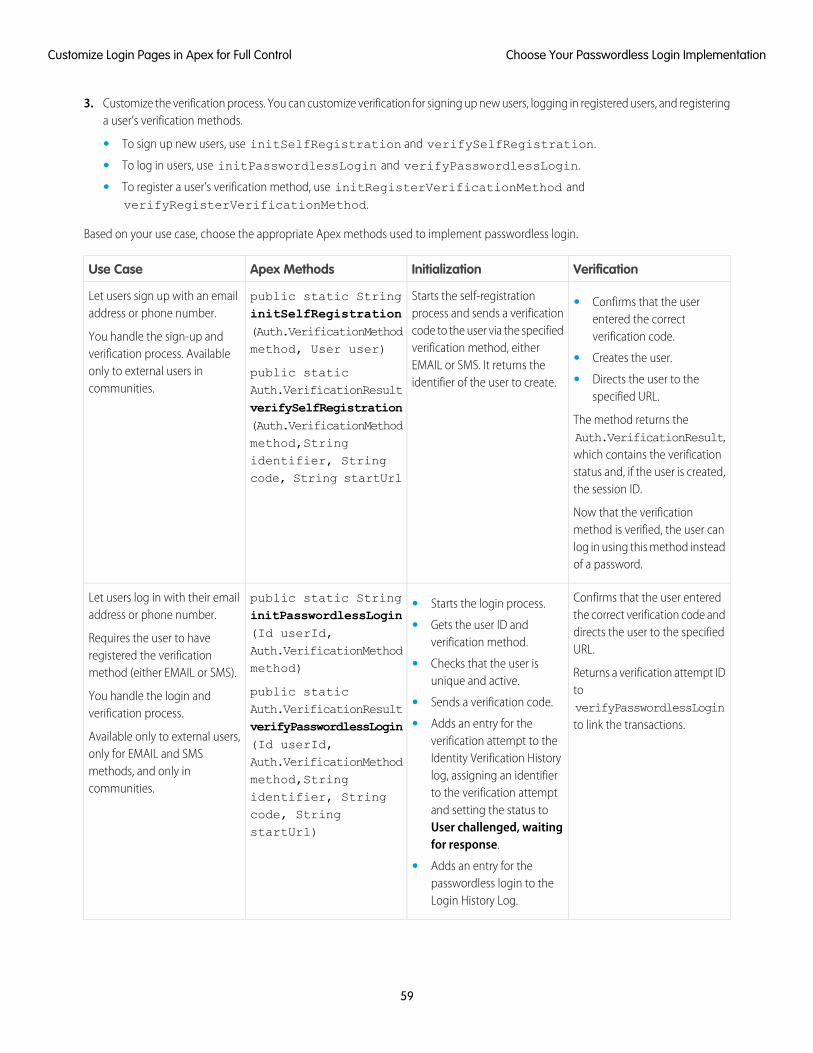
3. Customize the verification process. You can customize verification for signing up new users, logging in registered users, and registeringa user’s verification methods.
• To sign up new users, use initSelfRegistration and verifySelfRegistration.
• To log in users, use initPasswordlessLogin and verifyPasswordlessLogin.
• To register a user’s verification method, use initRegisterVerificationMethod andverifyRegisterVerificationMethod.
Based on your use case, choose the appropriate Apex methods used to implement passwordless login.
VerificationInitializationApex MethodsUse Case
Starts the self-registrationprocess and sends a verification
public static StringinitSelfRegistration
Let users sign up with an emailaddress or phone number.
You handle the sign-up andverification process. Available
• Confirms that the userentered the correctverification code.code to the user via the specified
verification method, eitherEMAIL or SMS. It returns theidentifier of the user to create.
(Auth.VerificationMethodmethod, User user)
public staticAuth.VerificationResult
• Creates the user.only to external users incommunities.
• Directs the user to thespecified URL.
verifySelfRegistrationThe method returns theAuth.VerificationResult,
(Auth.VerificationMethodmethod,String
which contains the verificationidentifier, Stringcode, String startUrl status and, if the user is created,
the session ID.
Now that the verificationmethod is verified, the user canlog in using this method insteadof a password.
Confirms that the user enteredthe correct verification code and
public static StringinitPasswordlessLogin
Let users log in with their emailaddress or phone number.
Requires the user to haveregistered the verificationmethod (either EMAIL or SMS).
• Starts the login process.
• Gets the user ID andverification method.
directs the user to the specifiedURL.
Returns a verification attempt IDto
(Id userId,Auth.VerificationMethodmethod)
public staticAuth.VerificationResult
• Checks that the user isunique and active.
You handle the login andverification process.
• Sends a verification code. verifyPasswordlessLoginto link the transactions.• Adds an entry for the
verification attempt to theverifyPasswordlessLogin(Id userId,
Available only to external users,only for EMAIL and SMS Identity Verification HistoryAuth.VerificationMethodmethods, and only incommunities.
log, assigning an identifierto the verification attemptand setting the status to
method,Stringidentifier, Stringcode, StringstartUrl) User challenged, waiting
for response.
• Adds an entry for thepasswordless login to theLogin History Log.
59
Choose Your Passwordless Login ImplementationCustomize Login Pages in Apex for Full Control
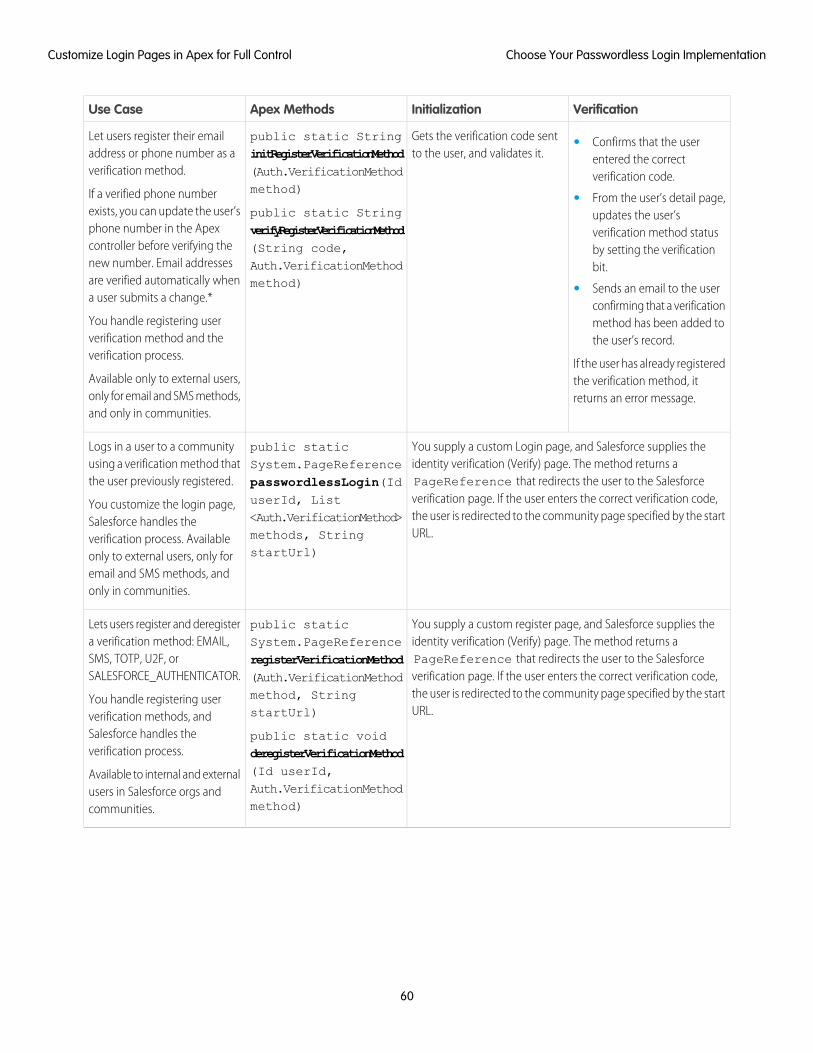
VerificationInitializationApex MethodsUse Case
Gets the verification code sentto the user, and validates it.
public static StringinitRegisterVerificationMethod(Auth.VerificationMethodmethod)
public static StringverifyRegisterVerificationMethod
Let users register their emailaddress or phone number as averification method.
If a verified phone numberexists, you can update the user’sphone number in the Apexcontroller before verifying the
• Confirms that the userentered the correctverification code.
• From the user’s detail page,updates the user’sverification method statusby setting the verificationbit.
(String code,Auth.VerificationMethodmethod)
new number. Email addressesare verified automatically whena user submits a change.*
• Sends an email to the userconfirming that a verification
You handle registering userverification method and theverification process.
method has been added tothe user’s record.
If the user has already registeredthe verification method, itreturns an error message.
Available only to external users,only for email and SMS methods,and only in communities.
You supply a custom Login page, and Salesforce supplies theidentity verification (Verify) page. The method returns a
public staticSystem.PageReference
Logs in a user to a communityusing a verification method thatthe user previously registered.
You customize the login page,Salesforce handles the
PageReference that redirects the user to the Salesforceverification page. If the user enters the correct verification code,the user is redirected to the community page specified by the startURL.
passwordlessLogin(IduserId, List<Auth.VerificationMethod>methods, StringstartUrl)
verification process. Availableonly to external users, only foremail and SMS methods, andonly in communities.
You supply a custom register page, and Salesforce supplies theidentity verification (Verify) page. The method returns a
public staticSystem.PageReference
Lets users register and deregistera verification method: EMAIL,SMS, TOTP, U2F, orSALESFORCE_AUTHENTICATOR.
You handle registering userverification methods, and
PageReference that redirects the user to the Salesforceverification page. If the user enters the correct verification code,the user is redirected to the community page specified by the startURL.
registerVerificationMethod(Auth.VerificationMethodmethod, StringstartUrl)
public static voidderegisterVerificationMethod
Salesforce handles theverification process.
(Id userId,Available to internal and externalusers in Salesforce orgs andcommunities.
Auth.VerificationMethodmethod)
60
Choose Your Passwordless Login ImplementationCustomize Login Pages in Apex for Full Control
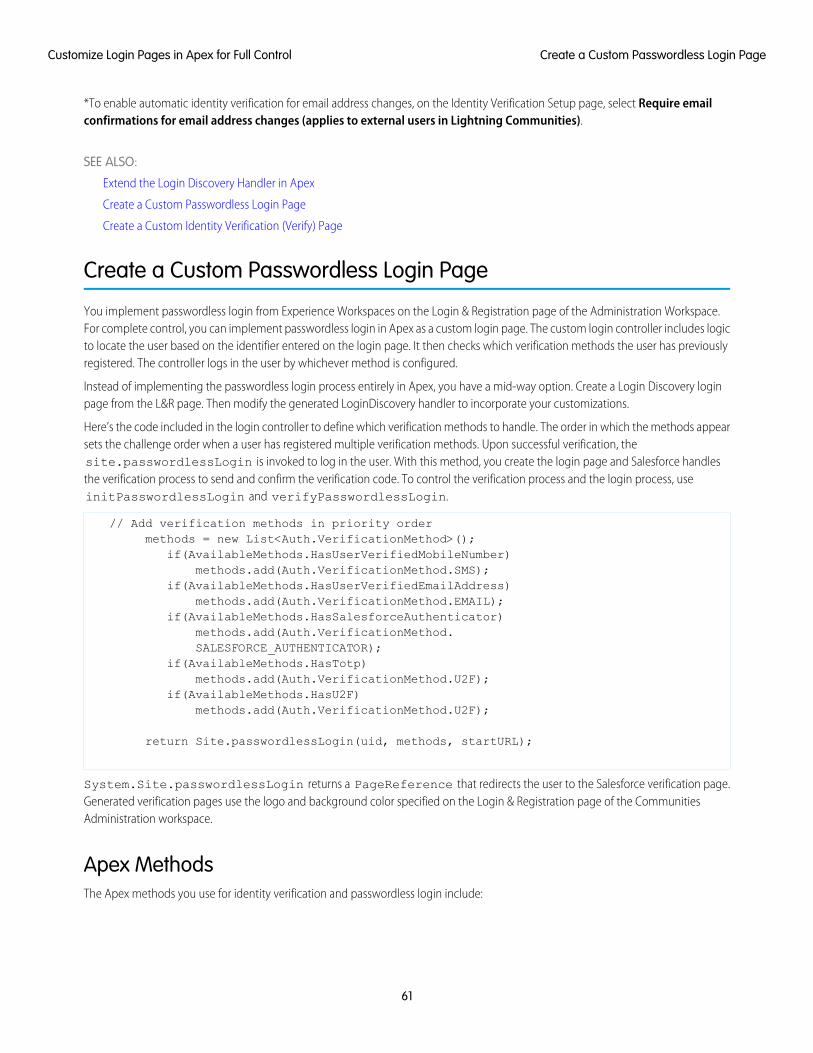
*To enable automatic identity verification for email address changes, on the Identity Verification Setup page, select Require emailconfirmations for email address changes (applies to external users in Lightning Communities).
SEE ALSO:
Extend the Login Discovery Handler in Apex
Create a Custom Passwordless Login Page
Create a Custom Identity Verification (Verify) Page
Create a Custom Passwordless Login Page
You implement passwordless login from Experience Workspaces on the Login & Registration page of the Administration Workspace.For complete control, you can implement passwordless login in Apex as a custom login page. The custom login controller includes logicto locate the user based on the identifier entered on the login page. It then checks which verification methods the user has previouslyregistered. The controller logs in the user by whichever method is configured.
Instead of implementing the passwordless login process entirely in Apex, you have a mid-way option. Create a Login Discovery loginpage from the L&R page. Then modify the generated LoginDiscovery handler to incorporate your customizations.
Here’s the code included in the login controller to define which verification methods to handle. The order in which the methods appearsets the challenge order when a user has registered multiple verification methods. Upon successful verification, thesite.passwordlessLogin is invoked to log in the user. With this method, you create the login page and Salesforce handlesthe verification process to send and confirm the verification code. To control the verification process and the login process, useinitPasswordlessLogin and verifyPasswordlessLogin.
// Add verification methods in priority ordermethods = new List<Auth.VerificationMethod>();
if(AvailableMethods.HasUserVerifiedMobileNumber)methods.add(Auth.VerificationMethod.SMS);
if(AvailableMethods.HasUserVerifiedEmailAddress)methods.add(Auth.VerificationMethod.EMAIL);
if(AvailableMethods.HasSalesforceAuthenticator)methods.add(Auth.VerificationMethod.SALESFORCE_AUTHENTICATOR);
if(AvailableMethods.HasTotp)methods.add(Auth.VerificationMethod.U2F);
if(AvailableMethods.HasU2F)methods.add(Auth.VerificationMethod.U2F);
return Site.passwordlessLogin(uid, methods, startURL);
System.Site.passwordlessLogin returns a PageReference that redirects the user to the Salesforce verification page.Generated verification pages use the logo and background color specified on the Login & Registration page of the CommunitiesAdministration workspace.
Apex MethodsThe Apex methods you use for identity verification and passwordless login include:
61
Create a Custom Passwordless Login PageCustomize Login Pages in Apex for Full Control
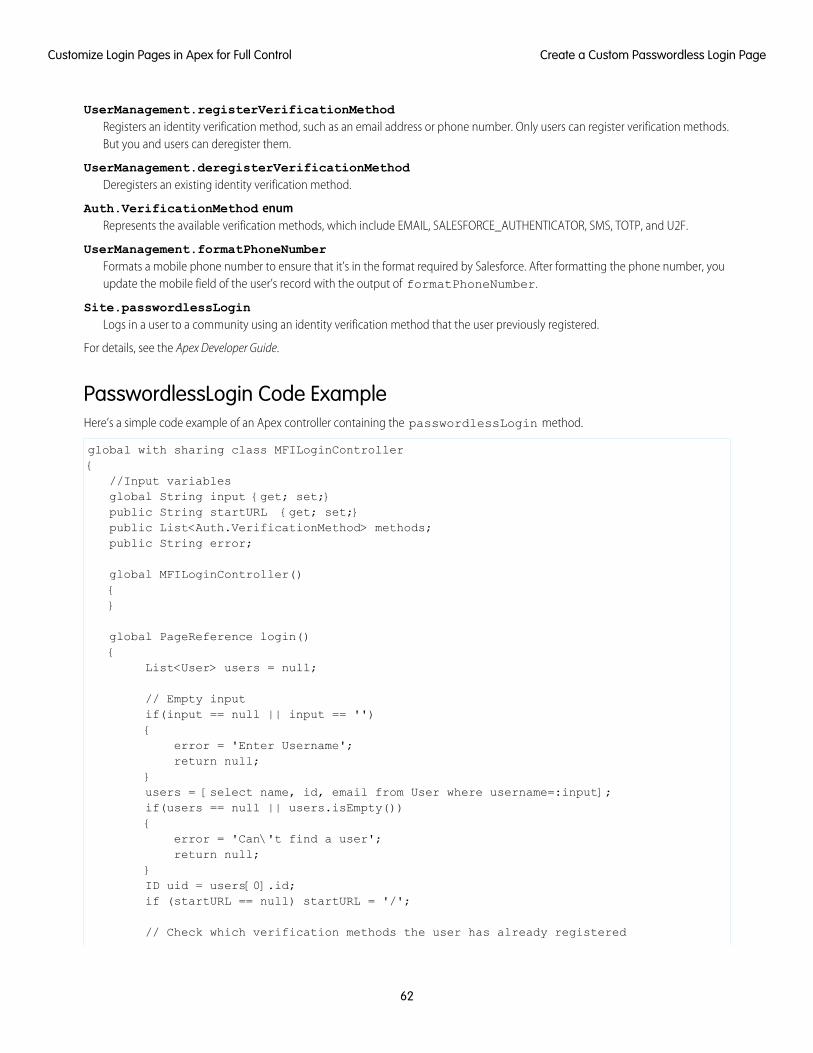
UserManagement.registerVerificationMethodRegisters an identity verification method, such as an email address or phone number. Only users can register verification methods.But you and users can deregister them.
UserManagement.deregisterVerificationMethodDeregisters an existing identity verification method.
Auth.VerificationMethod enumRepresents the available verification methods, which include EMAIL, SALESFORCE_AUTHENTICATOR, SMS, TOTP, and U2F.
UserManagement.formatPhoneNumberFormats a mobile phone number to ensure that it’s in the format required by Salesforce. After formatting the phone number, youupdate the mobile field of the user’s record with the output of formatPhoneNumber.
Site.passwordlessLoginLogs in a user to a community using an identity verification method that the user previously registered.
For details, see the Apex Developer Guide.
PasswordlessLogin Code ExampleHere’s a simple code example of an Apex controller containing the passwordlessLogin method.
global with sharing class MFILoginController{
//Input variablesglobal String input {get; set;}public String startURL {get; set;}public List<Auth.VerificationMethod> methods;public String error;
global MFILoginController(){}
global PageReference login(){
List<User> users = null;
// Empty inputif(input == null || input == ''){
error = 'Enter Username';return null;
}users = [select name, id, email from User where username=:input];if(users == null || users.isEmpty()){
error = 'Can\'t find a user';return null;
}ID uid = users[0].id;if (startURL == null) startURL = '/';
// Check which verification methods the user has already registered
62
Create a Custom Passwordless Login PageCustomize Login Pages in Apex for Full Control
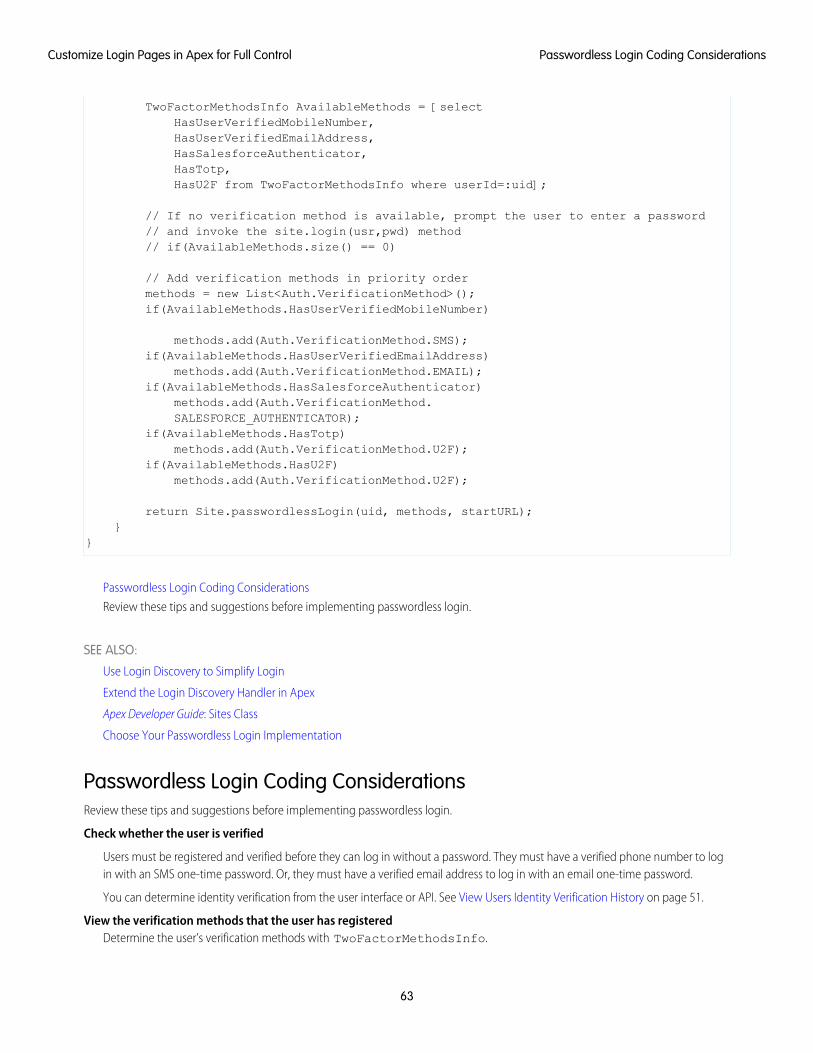
TwoFactorMethodsInfo AvailableMethods = [selectHasUserVerifiedMobileNumber,HasUserVerifiedEmailAddress,HasSalesforceAuthenticator,HasTotp,HasU2F from TwoFactorMethodsInfo where userId=:uid];
// If no verification method is available, prompt the user to enter a password// and invoke the site.login(usr,pwd) method// if(AvailableMethods.size() == 0)
// Add verification methods in priority ordermethods = new List<Auth.VerificationMethod>();if(AvailableMethods.HasUserVerifiedMobileNumber)
methods.add(Auth.VerificationMethod.SMS);if(AvailableMethods.HasUserVerifiedEmailAddress)
methods.add(Auth.VerificationMethod.EMAIL);if(AvailableMethods.HasSalesforceAuthenticator)
methods.add(Auth.VerificationMethod.SALESFORCE_AUTHENTICATOR);
if(AvailableMethods.HasTotp)methods.add(Auth.VerificationMethod.U2F);
if(AvailableMethods.HasU2F)methods.add(Auth.VerificationMethod.U2F);
return Site.passwordlessLogin(uid, methods, startURL);}
}
Passwordless Login Coding Considerations
Review these tips and suggestions before implementing passwordless login.
SEE ALSO:
Use Login Discovery to Simplify Login
Extend the Login Discovery Handler in Apex
Apex Developer Guide: Sites Class
Choose Your Passwordless Login Implementation
Passwordless Login Coding ConsiderationsReview these tips and suggestions before implementing passwordless login.
Check whether the user is verified
Users must be registered and verified before they can log in without a password. They must have a verified phone number to login with an SMS one-time password. Or, they must have a verified email address to log in with an email one-time password.
You can determine identity verification from the user interface or API. See View Users Identity Verification History on page 51.
View the verification methods that the user has registeredDetermine the user’s verification methods with TwoFactorMethodsInfo.
63
Passwordless Login Coding ConsiderationsCustomize Login Pages in Apex for Full Control
Handle errors returned by system.site.passwordlessLoginIf the system.site.passwordlessLogin method returns an error because the user can’t be verified, handle the error.For example, redirect the user to an IdP, or use an alternate page to collect the password and invoke the site.login method.
Get more identity information after a user log inSet up a login flow to kick off after the user logs in, for example, to register a phone number. Use the System.UserManagementregister and deregister methods to manage user verification registration.
Make sure a user’s email address and mobile phone number are uniqueThe User object stores the email address and phone number in User.Mobilephone and User.Email, respectively. Butthese fields aren’t unique. To ensure uniqueness, store a copy of the email and phone in a unique field, such asUser.CommunityNickname. Or create a custom field to store the values.
Get two verification methods for each user (for recovery)We recommend that your users have two verification methods, for example, a phone number and password, or phone number andemail address. You can collect this information when users sign up. Or you can collect the information on subsequent logins usinga login flow.
Make sure that the phone number is in a format that Salesforce expectsUse the System.UserManagement.formatPhoneNumber method to ensure that the phone number is formattedcorrectly.
Determine how the login controller logs in the userWhen implementing passwordless login, build the login controller to locate the user based on the identifier entered on the loginpage. Then check which verification methods the user has registered. Set up the controller to invoke the login process by whichevermechanism is configured, for example, passwordless login, SSO, or social sign-on.
You can completely remove passwordsAssign users the Is Single Sign-On Enabled user permission. This user permission is available when your org is enabled for delegatedauthentication—contact Salesforce to enable it. After you enable the feature, you can assign users the permission.
SEE ALSO:
View Your Users’ Identity Verification Methods
Create a Custom Identity Verification (Verify) Page
By default, when implementing passwordless login, Salesforce performs the identity verification process for you. It sends the verificationcode, displays the Verify page where the user enters the code, and confirms the user's identity. Instead of using the default SalesforceVerify page, you can create your own with Visualforce and a pair of Apex methods. You can replace the Verify page for self-registration,passwordless login, and registration of a user’s identity verification methods.
Salesforce provides this default Verify page. You can add your own logo, background, and button colors. Salesforce performs the identityverification process.
64
Create a Custom Identity Verification (Verify) PageCustomize Login Pages in Apex for Full Control

When you create your own Verify page, you can use Visualforce and have full control of the layout. You can also control the identityverification process in the Apex controller. This custom Verify page uses different fonts and colors and has a different layout. Instead ofa separate Verify page, users receive their verification code and enter it directly on the Login page.
Custom Verification for Signup, Login, and Register Verification MethodsTo implement your own verification process, you use Apex methods under the System.UserManagement class. The methodscome in pairs—one to send the verification code, and one to verify that the verification code is correct. Which methods you use dependson when you require identity verification.
• To sign up new users, use initSelfRegistration and verifySelfRegistration.
• To log in users, use initPasswordlessLogin and verifyPasswordlessLogin.
• To register a user’s verification method, use initRegisterVerificationMethod andverifyRegisterVerificationMethod.
Example: Customize Verification for Registering Verification MethodsThis code example customizes the Verify page for registering a verification method. When the user enters a verification code on theVisualforce page, it invokes registerUser(). The method gets the User ID of the user who’s registering the verification methodand the user’s phone number. It also gets the user’s registration status to check whether the phone number is already verified. If theuser is registered with a different phone number, the number is updated.
public void registerUser() {try {
exceptionText='';String userId = UserInfo.getUserId();
65
Create a Custom Identity Verification (Verify) PageCustomize Login Pages in Apex for Full Control
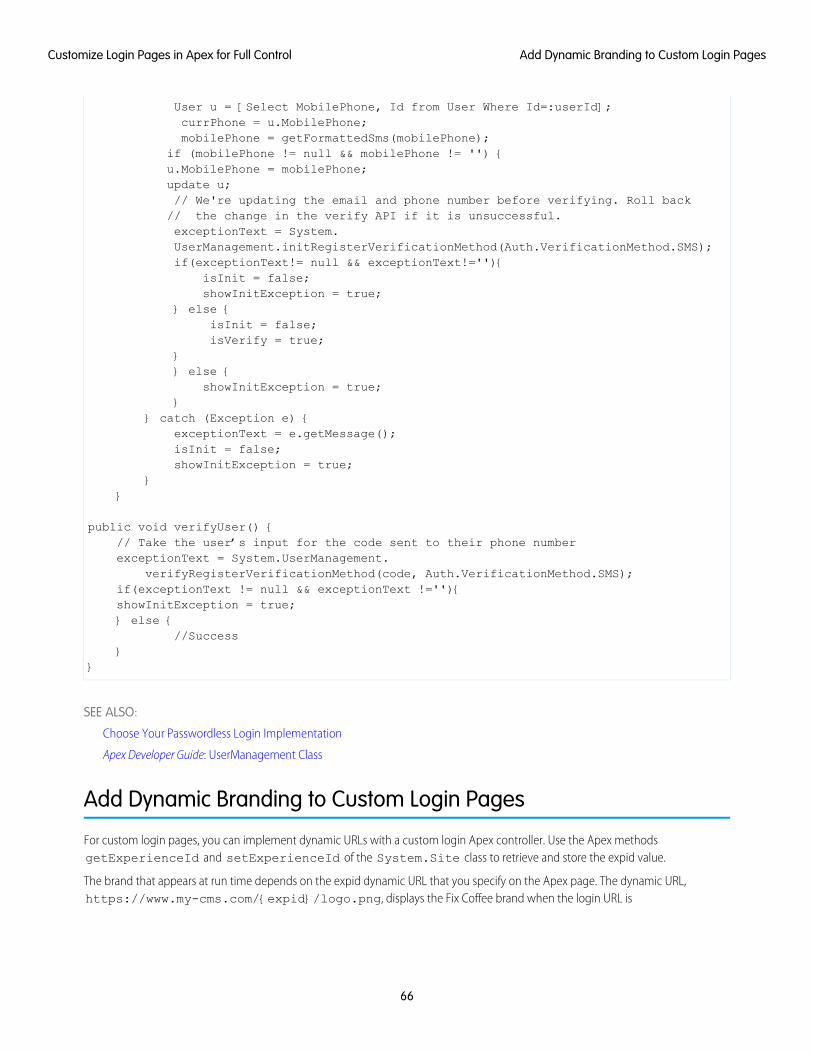
User u = [Select MobilePhone, Id from User Where Id=:userId];currPhone = u.MobilePhone;mobilePhone = getFormattedSms(mobilePhone);
if (mobilePhone != null && mobilePhone != '') {u.MobilePhone = mobilePhone;update u;// We're updating the email and phone number before verifying. Roll back// the change in the verify API if it is unsuccessful.exceptionText = System.UserManagement.initRegisterVerificationMethod(Auth.VerificationMethod.SMS);if(exceptionText!= null && exceptionText!=''){
isInit = false;showInitException = true;
} else {isInit = false;isVerify = true;
}} else {
showInitException = true;}
} catch (Exception e) {exceptionText = e.getMessage();isInit = false;showInitException = true;
}}
public void verifyUser() {// Take the user’s input for the code sent to their phone numberexceptionText = System.UserManagement.
verifyRegisterVerificationMethod(code, Auth.VerificationMethod.SMS);if(exceptionText != null && exceptionText !=''){showInitException = true;} else {
//Success}
}
SEE ALSO:
Choose Your Passwordless Login Implementation
Apex Developer Guide: UserManagement Class
Add Dynamic Branding to Custom Login Pages
For custom login pages, you can implement dynamic URLs with a custom login Apex controller. Use the Apex methodsgetExperienceId and setExperienceId of the System.Site class to retrieve and store the expid value.
The brand that appears at run time depends on the expid dynamic URL that you specify on the Apex page. The dynamic URL,https://www.my-cms.com/{expid}/logo.png, displays the Fix Coffee brand when the login URL is
66
Add Dynamic Branding to Custom Login PagesCustomize Login Pages in Apex for Full Control
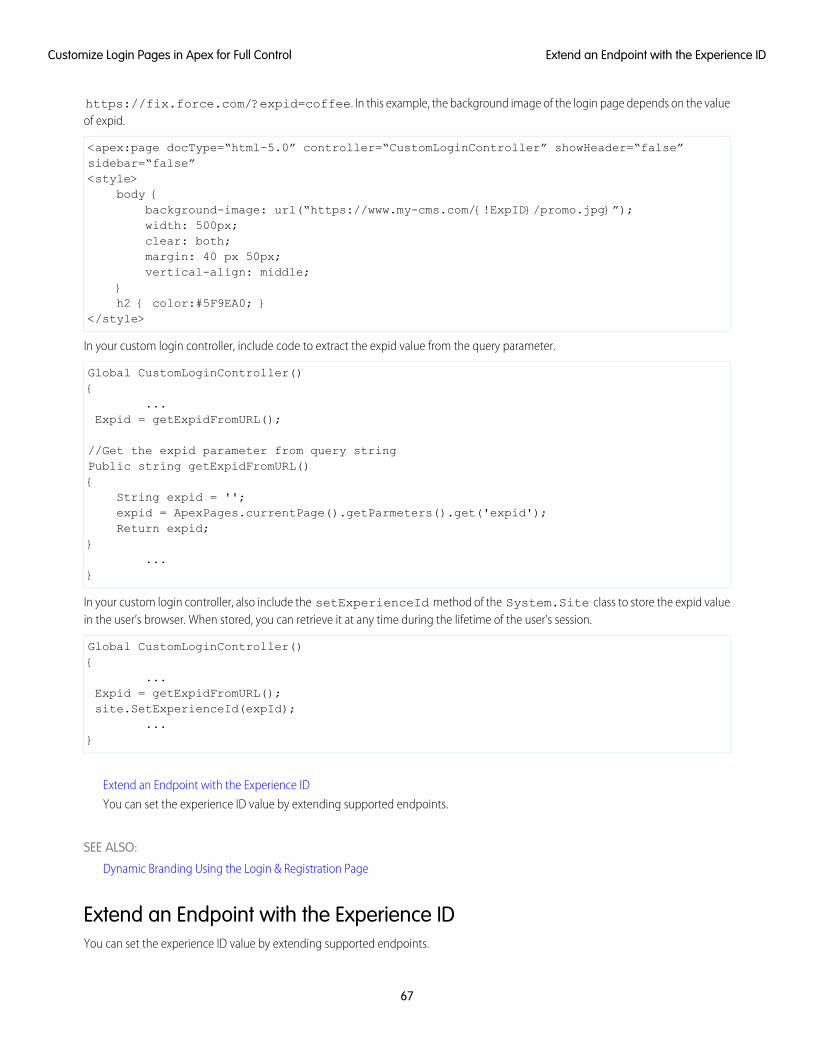
https://fix.force.com/?expid=coffee. In this example, the background image of the login page depends on the valueof expid.
<apex:page docType=“html-5.0” controller=“CustomLoginController” showHeader=“false”sidebar=“false”<style>
body {background-image: url(“https://www.my-cms.com/{!ExpID}/promo.jpg}”);width: 500px;clear: both;margin: 40 px 50px;vertical-align: middle;
}h2 { color:#5F9EA0; }
</style>
In your custom login controller, include code to extract the expid value from the query parameter.
Global CustomLoginController(){
...Expid = getExpidFromURL();
//Get the expid parameter from query stringPublic string getExpidFromURL(){
String expid = '';expid = ApexPages.currentPage().getParmeters().get('expid');Return expid;
}...
}
In your custom login controller, also include the setExperienceId method of the System.Site class to store the expid valuein the user’s browser. When stored, you can retrieve it at any time during the lifetime of the user’s session.
Global CustomLoginController(){
...Expid = getExpidFromURL();site.SetExperienceId(expId);
...}
Extend an Endpoint with the Experience ID
You can set the experience ID value by extending supported endpoints.
SEE ALSO:
Dynamic Branding Using the Login & Registration Page
Extend an Endpoint with the Experience IDYou can set the experience ID value by extending supported endpoints.
67
Extend an Endpoint with the Experience IDCustomize Login Pages in Apex for Full Control
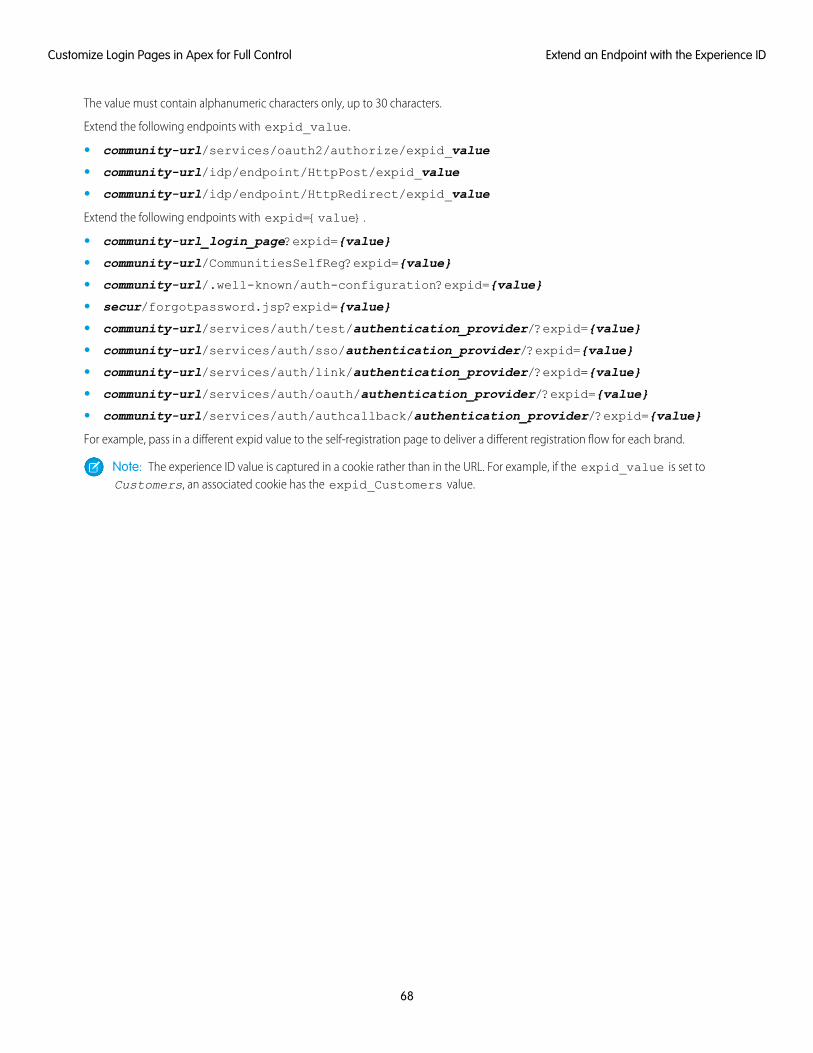
The value must contain alphanumeric characters only, up to 30 characters.
Extend the following endpoints with expid_value.
• community-url/services/oauth2/authorize/expid_value
• community-url/idp/endpoint/HttpPost/expid_value
• community-url/idp/endpoint/HttpRedirect/expid_value
Extend the following endpoints with expid={value}.
• community-url_login_page?expid={value}
• community-url/CommunitiesSelfReg?expid={value}
• community-url/.well-known/auth-configuration?expid={value}
• secur/forgotpassword.jsp?expid={value}
• community-url/services/auth/test/authentication_provider/?expid={value}
• community-url/services/auth/sso/authentication_provider/?expid={value}
• community-url/services/auth/link/authentication_provider/?expid={value}
• community-url/services/auth/oauth/authentication_provider/?expid={value}
• community-url/services/auth/authcallback/authentication_provider/?expid={value}
For example, pass in a different expid value to the self-registration page to deliver a different registration flow for each brand.
Note: The experience ID value is captured in a cookie rather than in the URL. For example, if the expid_value is set toCustomers, an associated cookie has the expid_Customers value.
68
Extend an Endpoint with the Experience IDCustomize Login Pages in Apex for Full Control
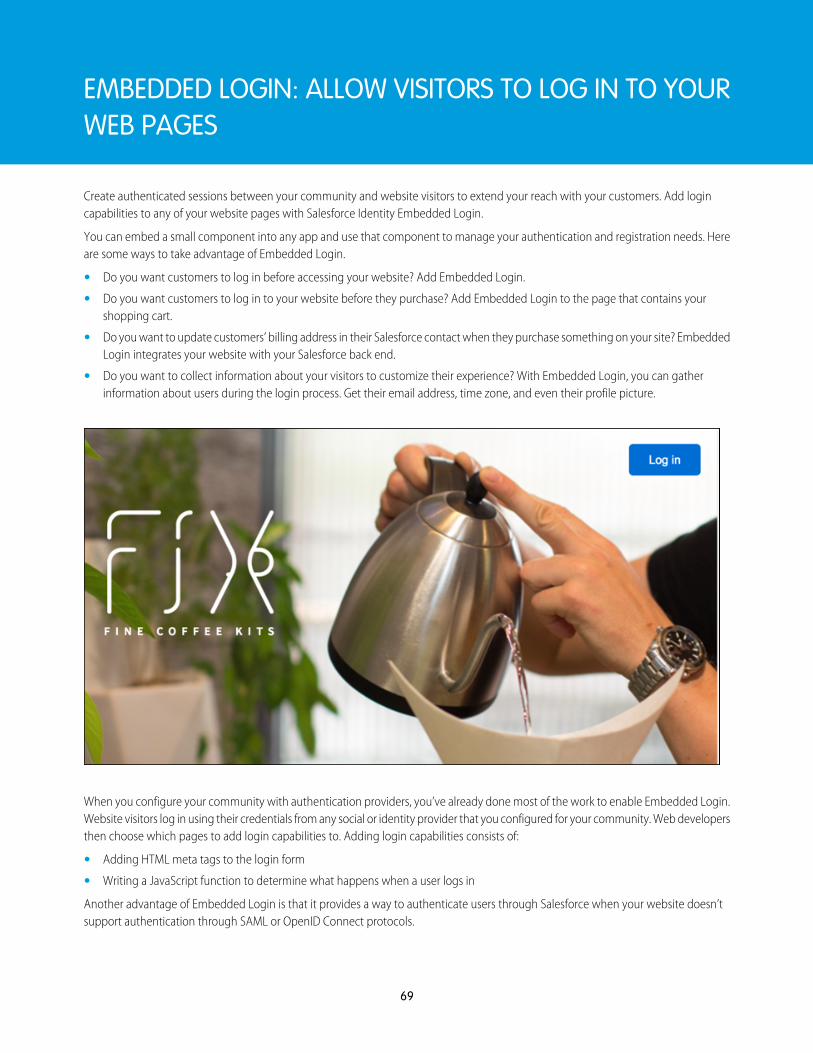
EMBEDDED LOGIN: ALLOW VISITORS TO LOG IN TO YOURWEB PAGES
Create authenticated sessions between your community and website visitors to extend your reach with your customers. Add logincapabilities to any of your website pages with Salesforce Identity Embedded Login.
You can embed a small component into any app and use that component to manage your authentication and registration needs. Hereare some ways to take advantage of Embedded Login.
• Do you want customers to log in before accessing your website? Add Embedded Login.
• Do you want customers to log in to your website before they purchase? Add Embedded Login to the page that contains yourshopping cart.
• Do you want to update customers’ billing address in their Salesforce contact when they purchase something on your site? EmbeddedLogin integrates your website with your Salesforce back end.
• Do you want to collect information about your visitors to customize their experience? With Embedded Login, you can gatherinformation about users during the login process. Get their email address, time zone, and even their profile picture.
When you configure your community with authentication providers, you’ve already done most of the work to enable Embedded Login.Website visitors log in using their credentials from any social or identity provider that you configured for your community. Web developersthen choose which pages to add login capabilities to. Adding login capabilities consists of:
• Adding HTML meta tags to the login form
• Writing a JavaScript function to determine what happens when a user logs in
Another advantage of Embedded Login is that it provides a way to authenticate users through Salesforce when your website doesn’tsupport authentication through SAML or OpenID Connect protocols.
69
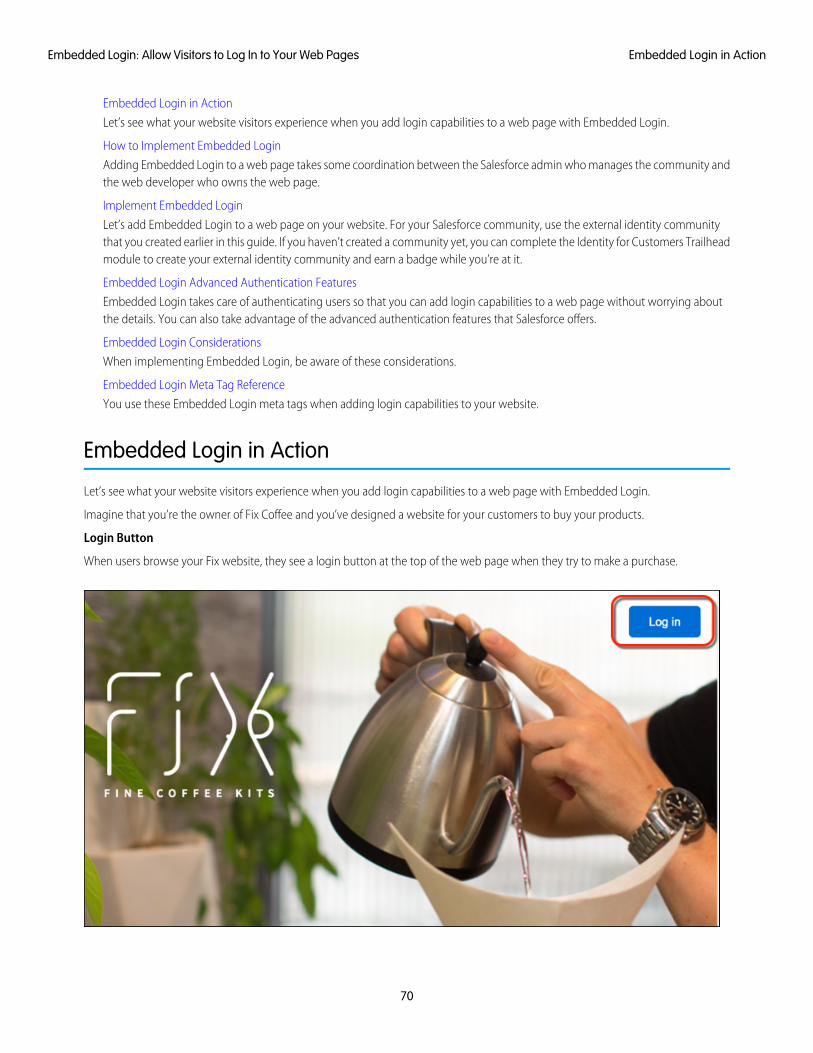
Embedded Login in Action
Let’s see what your website visitors experience when you add login capabilities to a web page with Embedded Login.
How to Implement Embedded Login
Adding Embedded Login to a web page takes some coordination between the Salesforce admin who manages the community andthe web developer who owns the web page.
Implement Embedded Login
Let’s add Embedded Login to a web page on your website. For your Salesforce community, use the external identity communitythat you created earlier in this guide. If you haven’t created a community yet, you can complete the Identity for Customers Trailheadmodule to create your external identity community and earn a badge while you’re at it.
Embedded Login Advanced Authentication Features
Embedded Login takes care of authenticating users so that you can add login capabilities to a web page without worrying aboutthe details. You can also take advantage of the advanced authentication features that Salesforce offers.
Embedded Login Considerations
When implementing Embedded Login, be aware of these considerations.
Embedded Login Meta Tag Reference
You use these Embedded Login meta tags when adding login capabilities to your website.
Embedded Login in Action
Let’s see what your website visitors experience when you add login capabilities to a web page with Embedded Login.
Imagine that you’re the owner of Fix Coffee and you’ve designed a website for your customers to buy your products.
Login Button
When users browse your Fix website, they see a login button at the top of the web page when they try to make a purchase.
70
Embedded Login in ActionEmbedded Login: Allow Visitors to Log In to Your Web Pages
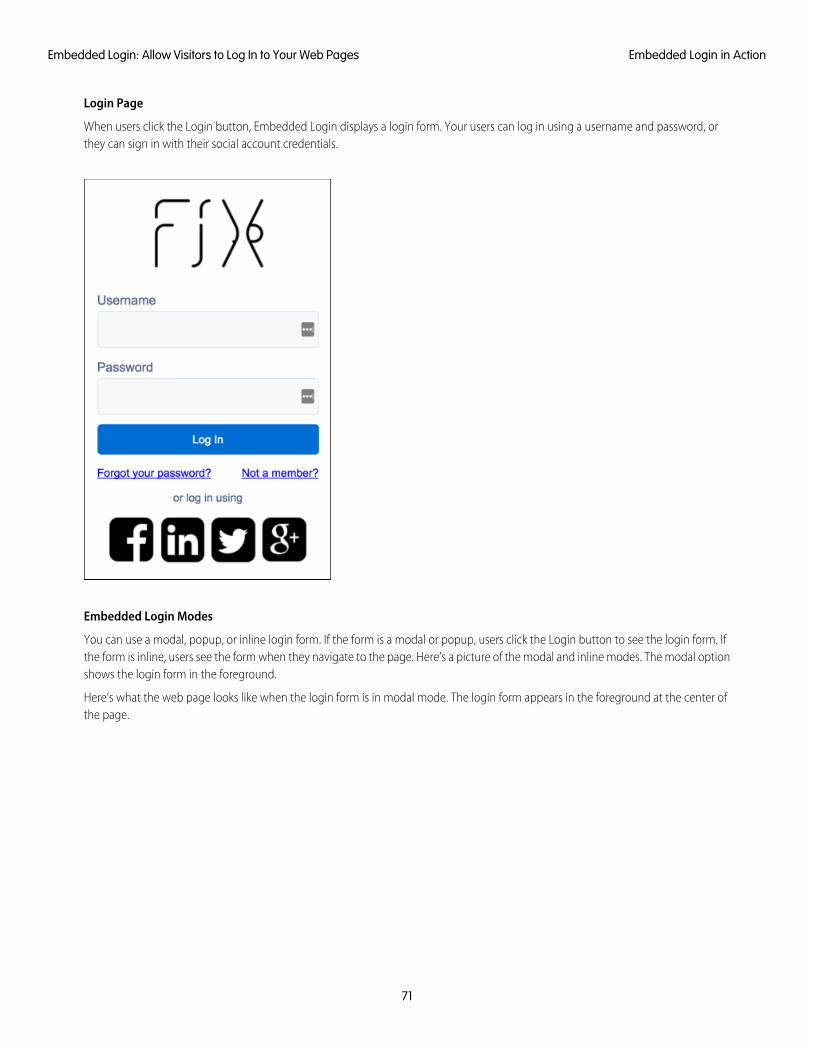
Login Page
When users click the Login button, Embedded Login displays a login form. Your users can log in using a username and password, orthey can sign in with their social account credentials.
Embedded Login Modes
You can use a modal, popup, or inline login form. If the form is a modal or popup, users click the Login button to see the login form. Ifthe form is inline, users see the form when they navigate to the page. Here’s a picture of the modal and inline modes. The modal optionshows the login form in the foreground.
Here’s what the web page looks like when the login form is in modal mode. The login form appears in the foreground at the center ofthe page.
71
Embedded Login in ActionEmbedded Login: Allow Visitors to Log In to Your Web Pages
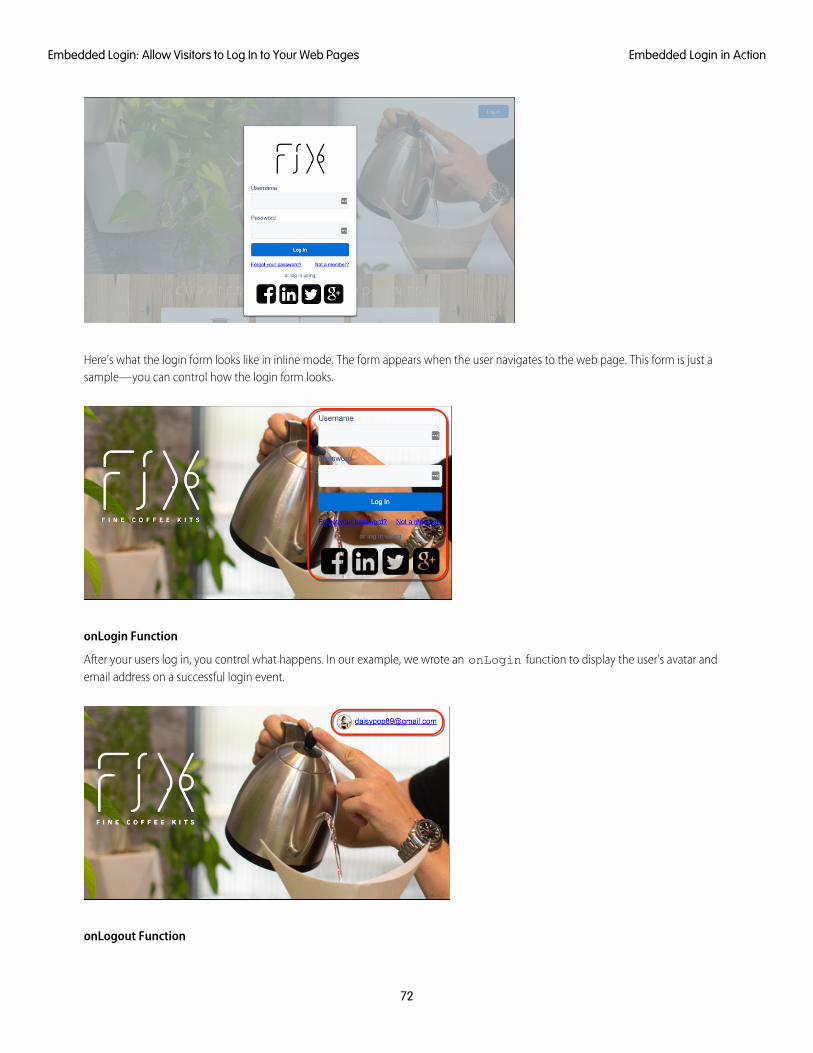
Here’s what the login form looks like in inline mode. The form appears when the user navigates to the web page. This form is just asample—you can control how the login form looks.
onLogin Function
After your users log in, you control what happens. In our example, we wrote an onLogin function to display the user’s avatar andemail address on a successful login event.
onLogout Function
72
Embedded Login in ActionEmbedded Login: Allow Visitors to Log In to Your Web Pages
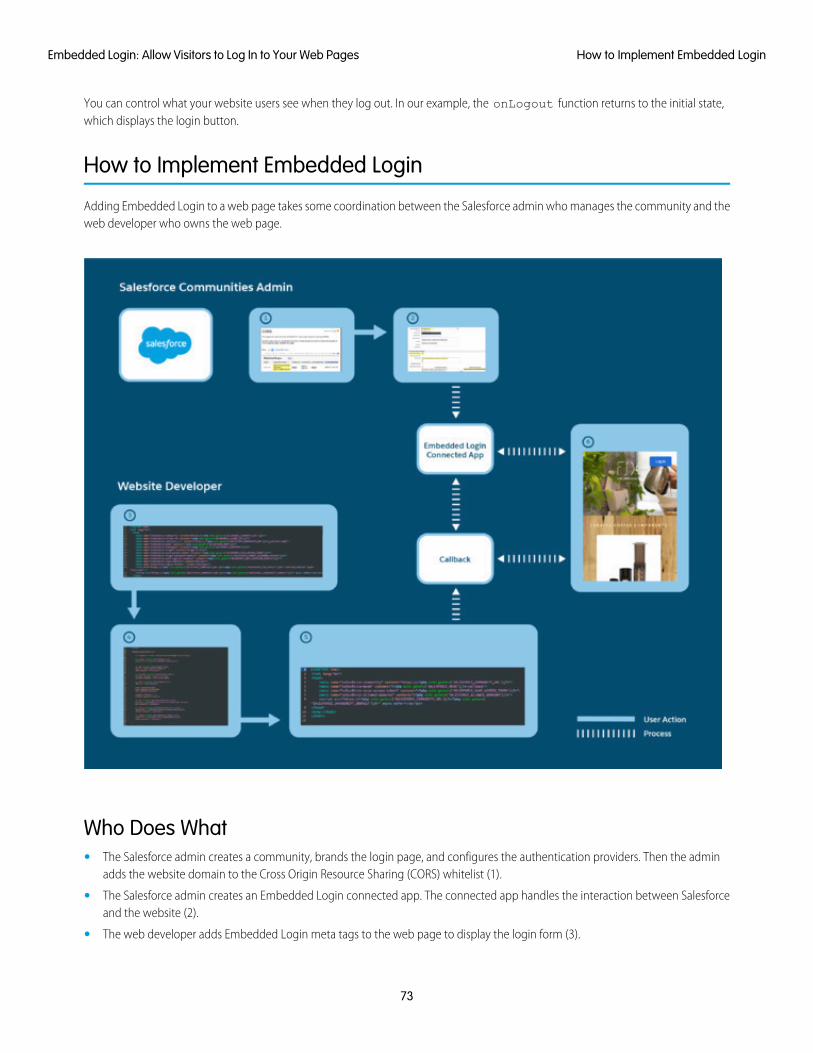
You can control what your website users see when they log out. In our example, the onLogout function returns to the initial state,which displays the login button.
How to Implement Embedded Login
Adding Embedded Login to a web page takes some coordination between the Salesforce admin who manages the community and theweb developer who owns the web page.
Who Does What• The Salesforce admin creates a community, brands the login page, and configures the authentication providers. Then the admin
adds the website domain to the Cross Origin Resource Sharing (CORS) whitelist (1).
• The Salesforce admin creates an Embedded Login connected app. The connected app handles the interaction between Salesforceand the website (2).
• The web developer adds Embedded Login meta tags to the web page to display the login form (3).
73
How to Implement Embedded LoginEmbedded Login: Allow Visitors to Log In to Your Web Pages
• The web developer supplies JavaScript functions and the onlogin and onlogout specifications to determine what happenswhen the user logs in and out. The logout function is optional. (4).
• The web developer creates a callback to handle the authentication response, specifying callback-specific meta tags (5).
• The result is a web page with login capabilities (6).
What’s Happening Behind the Scenes1. When a user clicks the button and enters credentials in the login form, Salesforce authenticates the user. Then Salesforce checks the
connected app to determine the type of access token to grant.
2. Salesforce sends the access token to the callback.
3. The callback uses the access token to pull the user’s information from Salesforce and cache it locally.
4. The onlogin function determines which information to display to the user.
5. If the website requires ongoing interaction with Salesforce after authentication, the connected app maintains a connection betweenthe web page and the Salesforce community.
Implement Embedded Login
Let’s add Embedded Login to a web page on your website. For your Salesforce community, use the external identity community thatyou created earlier in this guide. If you haven’t created a community yet, you can complete the Identity for Customers Trailhead moduleto create your external identity community and earn a badge while you’re at it.
Use your own website to add login capabilities to a web page. Or test it out by creating a simple web app on Heroku in a few minutes.Navigate to https://heroku.com/apps, and click Sign Up for Free.
Make sure that your community works before you add Embedded Login by testing various login scenarios. For example, can communityusers log in with their username and password? Can visitors join the community? Can users log in through all the social authenticationproviders that you set up?
Now you’re ready to add login capabilities with Embedded Login.
Step 1: Enable Resource Sharing Across Domains
Embedded Login entails making web requests outside the website boundaries, but for security reasons, web requests are restrictedto the current domain. To enable a website to share resources beyond its boundaries, the Salesforce admin adds trusted websitedomains to Salesforce’s CORS (Cross-Origin-Resource-Sharing) whitelist. CORS is an industry standard that enables web browsers tomake requests from origins other than their own.
Step 2: Create the Embedded Login Connected App
From your Salesforce community, create an Embedded Login connected app to connect your community with your website. Theconnected app handles communication between your web page and the Salesforce back end.
74
Implement Embedded LoginEmbedded Login: Allow Visitors to Log In to Your Web Pages

Step 3: Enable Embedded Login on a Web Page
On the web page where you want to add login capabilities, enter Embedded Login meta tags inside the <head> HTML elementat the top of the page.
Step 4: Write Login and Logout Functions
On the web page, provide a login and optional logout JavaScript function in the body to handle onLogin and onLogoutevents. With these functions, you determine what happens when users log in and out successfully. You have full control over whathappens.
Step 5: Handle the Embedded Login Callback
When a user logs in to a website, the Embedded Login callback receives the access token and uses it to retrieve user information.Both the access token and user information can be stored to local storage. Depending on your implementation, you can create acallback to handle the response on either the website (client) or the server.
SEE ALSO:
Customize Your Login Pages with Experience Builder
Dynamic URLs: Determine Your Brand at Run Time
Step 1: Enable Resource Sharing Across DomainsEmbedded Login entails making web requests outside the website boundaries, but for security reasons, web requests are restricted tothe current domain. To enable a website to share resources beyond its boundaries, the Salesforce admin adds trusted website domainsto Salesforce’s CORS (Cross-Origin-Resource-Sharing) whitelist. CORS is an industry standard that enables web browsers to make requestsfrom origins other than their own.
Salesforce CORS Whitelist and Access-Control-Allow-Origin
Embedded Login populates the Access-Control-Allow-Origin response header with the origin (domain plus protocol) specified in theCORS whitelist. If CORS isn’t set up, the Access-Control-Allow-Origin header value is set to null, which effectively block all requests.
For Embedded Login to enable resource sharing across boundaries, the origin listed in the CORS whitelist—theAccess-Control-Allow-Origin—must match the origin listed in the request. But an exact match isn’t required. Here are some examples.
Why?Match?RequestCORS
Accept requests from all ports inthis domain.
https://salesforce.com:6109https://salesforce.com
Accept requests only from port6109.
https://salesforce.comhttps://salesforce.com:6109
Accept requests from allsubdomains in this domain.
https://trailhead.salesforce.comhttps://*.salesforce.com
The CORS whitelist must list thisdomain.
https://salesforce.comhttps://trailhead.salesforce.com
Accept requests fromcommunities in this domain.
https://salesforce.com/myCommunityhttps://salesforce.com
Accept requests only from thiscommunity.
https://salesforce.comhttps://salesforce.com/myCommunity
75
Step 1: Enable Resource Sharing Across DomainsEmbedded Login: Allow Visitors to Log In to Your Web Pages

Why?Match?RequestCORS
Accept requests from the loginpage of this community in thisdomain.
https://salesforce.com/myCommunity/loginhttps://salesforce.com/myCommunity
The CORS whitelist must be setup to accept requests from otherdomains.
https://salesforce.com/myCommunitynone
1. From Setup, enter CORS in the Quick Find box, then select CORS.
2. Click New.
3. Enter the domain where Embedded Login is deployed.
For example, https://embeddedlogin.herokuapp.com allows access to all pages hosted onembeddedlogin.herokuapp.com.
To handle multiple domains, you can use a regular expression to add them all to the whitelist at once. Or you can list each domainindividually.
Note: By default, browsers cache the Embedded Login JavaScript, including your CORS settings, for 24 hours. You can changehow often the cache refreshes with the salesforce-cache-max-age meta tag. If you change the value, test thechange by clearing the cache between each change or using an incognito window.
SEE ALSO:
Salesforce Help: Add Your Website to the CORS Whitelist
Step 2: Create the Embedded Login Connected AppFrom your Salesforce community, create an Embedded Login connected app to connect your community with your website. Theconnected app handles communication between your web page and the Salesforce back end.
The connected app controls how the initial authentication process is handled. Then it continues to handle the interaction between thewebsite and community during the user’s active session. When creating the connected app, you supply the callback URL, which is usedto retrieve the access token during the initial authentication process.
The Salesforce connected app and callback URL are interconnected, so you have a “chicken or egg” issue. The Embedded Login connectedapp needs the website’s callback URL. The website needs the Embedded Login connected app URL. For now, specify a placeholder. Youcan come back later to replace it with the correct URL.
Use the Salesforce wizard to create a connected app for Embedded Login. It takes only a few minutes.
1. Start the connected app wizard.
• In Lightning Experience, from Setup, enter App, then select App Manager. Click New Connected App.
• In Classic, from Setup, enter Apps, then select App. Under Connected Apps, click New.
2. Complete these fields.
• App name, for example, Embedded Login
• Your email address
3. Click Enable OAuth Settings.
76
Step 2: Create the Embedded Login Connected AppEmbedded Login: Allow Visitors to Log In to Your Web Pages

4. For the callback URL, enter https://your_website/your_webpage/_callback.php, where _callback.phpis the name of your future callback.
5. For the OAuth scope, select Allow access to your unique identifier (openID). You can add other options if your web page requiresmore access to Salesforce, but it isn’t necessary.
6. Click Save.
It can take a few minutes for the changes to take effect.
7. Click Continue.The new connected app opens and populates the consumer key, which is the app’s unique identifier to identify itself to Salesforce.
8. Copy the consumer key for later. You use it when entering meta tags. It’s the value for the meta tag salesforce_client_id.
9. Click Manage, and then click Edit Policies.
10. Under OAuth Policies, select Admin approved users are pre-authorized.
11. Click Yes.
77
Step 2: Create the Embedded Login Connected AppEmbedded Login: Allow Visitors to Log In to Your Web Pages
12. Click Save.
13. Under Profiles, click Manage Profiles and select the profiles that can access this connected app. Choose the profile you createdwhen you set up your community.
14. Optionally, you can get more user information by adding custom attributes to the connected app.
15. Click Save.
Retrieve User Information with Custom Attributes
As part of the login process, Embedded Login retrieves information from Salesforce about the user who’s logging in. You determinewhat kind of information to collect by creating custom attributes for your Embedded Login connected app.
SEE ALSO:
Create a Connected App for Your Web App
Salesforce Help: Connected Apps
Salesforce Help: Connected App and OAuth Terminology
Retrieve User Information with Custom AttributesAs part of the login process, Embedded Login retrieves information from Salesforce about the user who’s logging in. You determinewhat kind of information to collect by creating custom attributes for your Embedded Login connected app.
You can create custom attributes for your Embedded Login connected app either declaratively or programmatically.
• Declaratively—Go to the Setup page for your Embedded Login connected app. Under Custom Attributes, choose the user informationthat you want to collect.
• Programmatically—Use the customAttributes method of the Apex class Auth_ConnectedAppPlugin. The EmbeddedLogin connected app retrieves the user’s attributes from the UserInfo endpoint or through a SAML assertion and usescustomAttributes to update the attribute values. For more information, see ConnectedAppPlugin Class.
You can also write JavaScript and use the returned access token to call other Salesforce APIs. However, this option is more difficult toimplement and less efficient. For the user information that you can retrieve, see Identity URLs.
SEE ALSO:
Personalize Your App with Custom Attributes
Salesforce Help: UserInfo Endpoint
Step 4: Write Login and Logout Functions
Step 3: Enable Embedded Login on a Web PageOn the web page where you want to add login capabilities, enter Embedded Login meta tags inside the <head> HTML element atthe top of the page.
Here’s what you see when you inspect the web page.
78
Step 3: Enable Embedded Login on a Web PageEmbedded Login: Allow Visitors to Log In to Your Web Pages

The top (1) contains a set of meta tags that specify how to display the login form. The bottom (2) contains a link to your CSS resourcesand a script to invoke Embedded Login on the server.
Let’s take a closer look at the code.
The CSS and servlet URLs reside on static endpoints hosted by your community. You replacehttps://embeddedlogin-developer-edition.na99.force.com/demo/ with the path to your community.
<linkhref="https://embeddedlogin-developer-edition.na99.force.com/demo/servlet/servlet.loginwidgetcontroller?type=css"rel="stylesheet" type="text/css" />
<scriptsrc="https://embeddedlogin-developer-edition.na99.force.com/demo/servlet/servlet.loginwidgetcontroller?type=javascript_widget"async defer></script>
79
Step 3: Enable Embedded Login on a Web PageEmbedded Login: Allow Visitors to Log In to Your Web Pages

Next, let’s see how to implement Embedded Login by populating the web page <head> element.
Add Embedded Login Meta Tags to Your Web Page
You enter meta tags on your web page where you want to add login capabilities with Embedded Login. You specify the Salesforcecommunity URL, what the login form looks like, and the location of the CSS style sheet.
Replace the Embedded Login CSS with Your Own
Embedded Login comes with a default style sheet, which styles the login button and login form. If you want to replace the defaultCSS with your own, you have a few options.
Change How to Invoke Embedded Login on the Server
You can change the default behavior of Embedded Login on the server by modifying the <script> tag inside the <head>HTML element at the top of the web page.
Add Embedded Login Meta Tags to Your Web PageYou enter meta tags on your web page where you want to add login capabilities with Embedded Login. You specify the Salesforcecommunity URL, what the login form looks like, and the location of the CSS style sheet.
On the web page where you want to add to login capabilities, add Embedded Login information within the <head> HTML element.
1. Open the web page that you want to add login capabilities to.
2. In the <head> HTML element at the top of the file, enter these required meta tags, specifying the values from your configuration.
• salesforce-community
• salesforce-client-id
• salesforce-redirect-uri
• salesforce-mode
• salesforce-target
• salesforce-login-handler
• salesforce-logout-handler
• salesforce-server-callback (required if you’re using a server-side callback)
3. Optionally, enter these meta tags.
• salesforce-forgot-password-enabled
• salesforce-self-register-enabled
• salesforce-register-starturl-enabled
• salesforce-mask-redirects
• salesforce-use-min-js
• salesforce-cache-max-age
• salesforce-save-access-token
4. Enter the link to the location of CSS resources. The CSS resides on a static endpoint hosted by your community.
<linkhref="https://embeddedlogin-developer-edition.na99.force.com/demo/servlet/servlet.loginwidgetcontroller?type=css"rel="stylesheet" type="text/css" />
80
Step 3: Enable Embedded Login on a Web PageEmbedded Login: Allow Visitors to Log In to Your Web Pages

5. Add this Embedded Login script, replacing the community URLhttps://embeddedlogin-developer-edition.na99.force.com/demo with your own.
<scriptsrc="https://embeddedlogin-developer-edition.na99.force.com/demo/servlet/servlet.loginwidgetcontroller?type=javascript_widget"async defer></script>
SEE ALSO:
Replace the Embedded Login CSS with Your Own
Change How to Invoke Embedded Login on the Server
Embedded Login Meta Tag Reference
Create an Embedded Login Client-Side Callback
Replace the Embedded Login CSS with Your OwnEmbedded Login comes with a default style sheet, which styles the login button and login form. If you want to replace the default CSSwith your own, you have a few options.
Use whichever method you prefer.
• Override the CSS directly in the web page.
• Edit the Embedded Login CSS. The style sheet is located in your community URL resource folder.
• Replace the style sheet with your own by updating the link on your web page with the location of your style sheet.
Note: If you replace the style sheet, be sure to define all the necessary styling. Embedded Login doesn’t provide default styleswhen you supply your own CSS.
Change How to Invoke Embedded Login on the ServerYou can change the default behavior of Embedded Login on the server by modifying the <script> tag inside the <head> HTMLelement at the top of the web page.
The script loads a Java servlet that enables login capabilities. You can add these parameters to the script to change how the EmbeddedLogin servlet behaves.
min=falseGenerates a readable JavaScript version. By default, Embedded Login loads the JavaScript in a minimized, lightweight state that’shard to read. Use min=false to generate a response that’s easier to read.
<script src="https://embeddedlogin-developer-edition.na99.force.com/demo/servlet/servlet.loginwidgetcontroller?type=javascript_widget&min=false" async defer></script>
cacheMaxAge=nSets the cache control maximum age header, which the browser uses to determine whether the cached content is fresh or must berefreshed from the server. By default, the cache is cleared every 24 hours. You can change the maximum age, where n is the specifiednumber of seconds. To improve performance, increase the cache age. However, as a result, you receive JavaScript updates fromSalesforce less frequently because the updates occur when the cache is cleared. Here, the cache refreshes every three days.
<script src="https://embeddedlogin-developer-edition.na99.force.com/demo/servlet/servlet.loginwidgetcontroller?type=javascript_widget&cacheMaxAge=259200" asyncdefer></script>
81
Step 3: Enable Embedded Login on a Web PageEmbedded Login: Allow Visitors to Log In to Your Web Pages

Embedded Login supports localization. For example, it localizes the login form based on browser settings. All labels, errors, and actionsmatch the browser’s language setting. See Embedded Login Advanced Authentication Features.
SEE ALSO:
Embedded Login Advanced Authentication Features
Step 4: Write Login and Logout FunctionsOn the web page, provide a login and optional logout JavaScript function in the body to handle onLogin and onLogout events.With these functions, you determine what happens when users log in and out successfully. You have full control over what happens.
1. Add a login function to the body of the web page.
Here’s a code example that replaces the login button with user’s name and profile picture (avatar) upon successful login. TheEmbedded Login response returns the user information.
function onLogin(identity) {
var targetDiv = document.querySelector(SFIDWidget.config.target);
var avatar = document.createElement('a');avatar.href = "javascript:showIdentityOverlay();";
var img = document.createElement('img');img.src = identity.photos.thumbnail;img.className = "sfid-avatar";
var username = document.createElement('span');username.innerHTML = identity.username;username.className = "sfid-avatar-name";
var iddiv = document.createElement('div');iddiv.id = "sfid-identity";
avatar.appendChild(img);avatar.appendChild(username);iddiv.appendChild(avatar);
targetDiv.innerHTML = '';targetDiv.appendChild(iddiv);
}
2. Optionally, add code to the login function to retrieve user information from Salesforce.
3. Optionally, add a logout function to the body of the web page.
You can write a function to determine what happens when a user logs out. This code example clears the user’s Salesforce sessionand reloads the login button.
function onLogout() {SFIDWidget.init();
82
Step 4: Write Login and Logout FunctionsEmbedded Login: Allow Visitors to Log In to Your Web Pages
}
SEE ALSO:
Retrieve User Information with Custom Attributes
Step 5: Handle the Embedded Login CallbackWhen a user logs in to a website, the Embedded Login callback receives the access token and uses it to retrieve user information. Boththe access token and user information can be stored to local storage. Depending on your implementation, you can create a callback tohandle the response on either the website (client) or the server.
Way back in Step 2, when you created a connected app, you supplied the URL to this callback. The callback is mainly for security, andit’s used to receive the access token. It then uses the token to fetch user information from Salesforce and write the information to thelocal storage, which is on the community domain. After writing user information to local storage—which is equivalent to a successfullogin, the callback redirects the user back to the index page.
The main difference between a client-side and server-side callback is how the access token is received. For a normal client-side callbackthat’s a web page, the callback receives the access token. For a server-side callback, the server gives the callback a one-time code. Thenthe callback exchanges the code for an access token.
For server-side callbacks, after using the access token to get the user information, the server writes the information out to the servedfile, such as an HTML file. After the user information is read on the client, it is written to local storage, which is on the community domain.
For more information about the login authentication process and relationship between the callback and connected app, see EmbeddedLogin Authentication Features.
Create an Embedded Login Client-Side Callback
To create a client-side callback, you add a web page to your website and specify a few Embedded Login meta tags inside the<head> HTML element.
Create an Embedded Login Server-Side Callback
To create a server-side callback, create a servlet using your preferred language. Use the server-side callback instead of a client-sidecallback web page to avoid exposing the access token on the client.
Create an Embedded Login Client-Side CallbackTo create a client-side callback, you add a web page to your website and specify a few Embedded Login meta tags inside the <head>HTML element.
The client-side callback takes the access token from Salesforce and writes it to local browser storage for future access. Regardless of howmany web pages that you add login capabilities to, you create only one callback page.
Note: For security, the callback page must be on the same domain as the web pages containing Embedded Login.
1. Create a page on your website and call it _callback, for example, _callback.php.
2. Enter the following required meta tags inside the <head> HTML element of this _callback page.
• salesforce-community
• salesforce-allowed-domains
• salesforce-mode (where the value ends in -callback)
83
Step 5: Handle the Embedded Login CallbackEmbedded Login: Allow Visitors to Log In to Your Web Pages
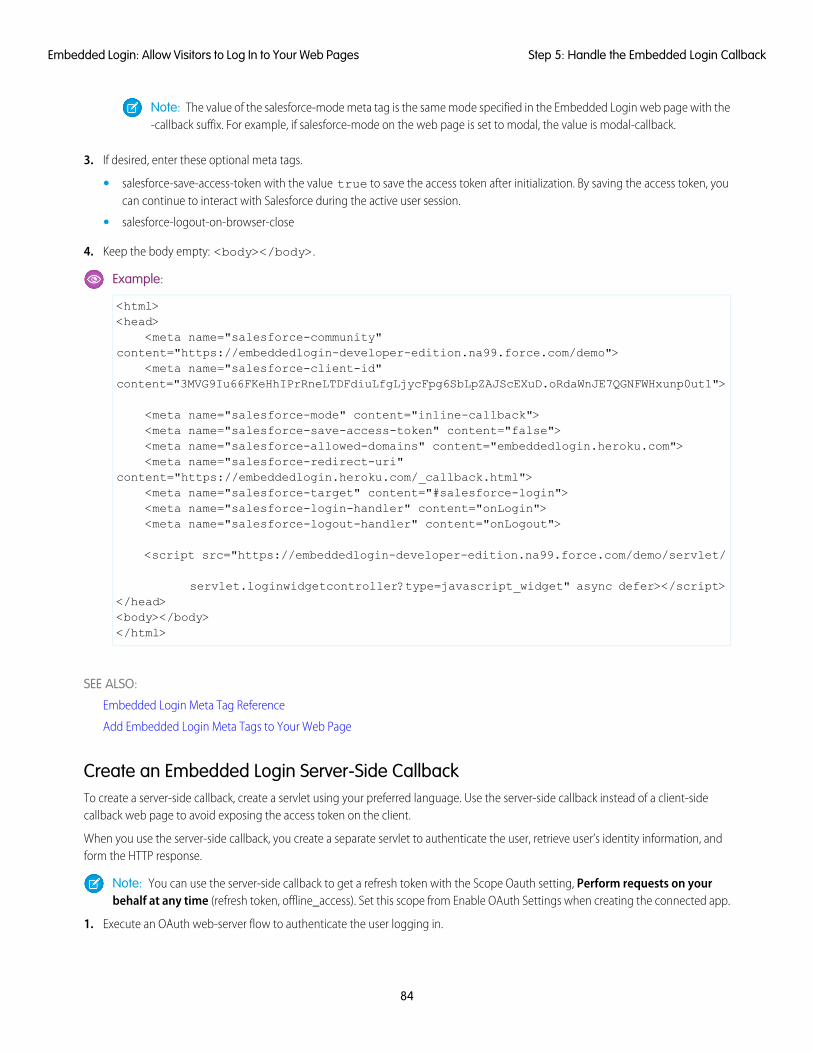
Note: The value of the salesforce-mode meta tag is the same mode specified in the Embedded Login web page with the-callback suffix. For example, if salesforce-mode on the web page is set to modal, the value is modal-callback.
3. If desired, enter these optional meta tags.
• salesforce-save-access-token with the value true to save the access token after initialization. By saving the access token, youcan continue to interact with Salesforce during the active user session.
• salesforce-logout-on-browser-close
4. Keep the body empty: <body></body>.
Example:
<html><head>
<meta name="salesforce-community"content="https://embeddedlogin-developer-edition.na99.force.com/demo">
<meta name="salesforce-client-id"content="3MVG9Iu66FKeHhIPrRneLTDFdiuLfgLjycFpg6SbLpZAJScEXuD.oRdaWnJE7QGNFWHxunp0ut1">
<meta name="salesforce-mode" content="inline-callback"><meta name="salesforce-save-access-token" content="false"><meta name="salesforce-allowed-domains" content="embeddedlogin.heroku.com"><meta name="salesforce-redirect-uri"
content="https://embeddedlogin.heroku.com/_callback.html"><meta name="salesforce-target" content="#salesforce-login"><meta name="salesforce-login-handler" content="onLogin"><meta name="salesforce-logout-handler" content="onLogout">
<script src="https://embeddedlogin-developer-edition.na99.force.com/demo/servlet/
servlet.loginwidgetcontroller?type=javascript_widget" async defer></script></head><body></body></html>
SEE ALSO:
Embedded Login Meta Tag Reference
Add Embedded Login Meta Tags to Your Web Page
Create an Embedded Login Server-Side CallbackTo create a server-side callback, create a servlet using your preferred language. Use the server-side callback instead of a client-sidecallback web page to avoid exposing the access token on the client.
When you use the server-side callback, you create a separate servlet to authenticate the user, retrieve user’s identity information, andform the HTTP response.
Note: You can use the server-side callback to get a refresh token with the Scope Oauth setting, Perform requests on yourbehalf at any time (refresh token, offline_access). Set this scope from Enable OAuth Settings when creating the connected app.
1. Execute an OAuth web-server flow to authenticate the user logging in.
84
Step 5: Handle the Embedded Login CallbackEmbedded Login: Allow Visitors to Log In to Your Web Pages

Issue an HTTP POST against the community’s token endpoint where the grant_type parameter must be authorization_code. Theserver process received the authorization code in an HTTP request and now the process must include the code in this POST.
If the HTTP POST completes properly, the user who's logging in is authenticated and Salesforce returns the access token in the JSONbody.
2. Parse the results of the OAuth web-server flow.
Use the access token to get identity information about the now authenticated user. If you added customer attributes when youcreated the Embedded Login connected app (Step 2: Create the Embedded Login Connected App), the custom attributes areincluded in the JSON body.
3. Form an HTML response.
The response must contain these meta tags.
• salesforce-community
• salesforce-mode (where the value ends in -callback)
Note: The value of the salesforce-mode meta tag is the same mode specified in the Embedded Login web page with the-callback suffix. For example, if salesforce-mode on the web page is set to modal, the value is modal-callback.
• salesforce-server-callback (where the value must be true)
• salesforce-server-response
• salesforce-server-starturl
• salesforce-target
• salesforce-allowed-domains
You can include the salesforce-save-access-token with the value true to save the access token after initialization. By saving theaccess token, you can continue to interact with Salesforce during the active user session.
4. In your Embedded Login web page, specify these meta tags.
a. Add the salesforce-server-callback meta tag with the value true. This meta tag indicates that the callback to handle the HTTPresponse is on the server.
<meta name="salesforce-server-callback" content="true">
b. Make sure that the salesforce-redirect-uri meta tag references the location of the server-side callback servlet. Use the same URLas specified in the callback URL field of your Embedded Login connected app.<meta name="salesforce-redirect-uri"content="https://embeddedlogin.heroku.com/servlet/servlet.serversidecallback>
c. Make sure that the salesforce-mode on this web page matches the mode on the server-side callback.
Example:
Note: This server callback servlet uses base64 encoding in the server response.
package servlet;
import org.apache.commons.httpclient.HttpClient;import org.apache.commons.httpclient.methods.GetMethod;import org.apache.commons.httpclient.methods.PostMethod;
import org.json.JSONObject;
import javax.servlet.ServletConfig;
85
Step 5: Handle the Embedded Login CallbackEmbedded Login: Allow Visitors to Log In to Your Web Pages
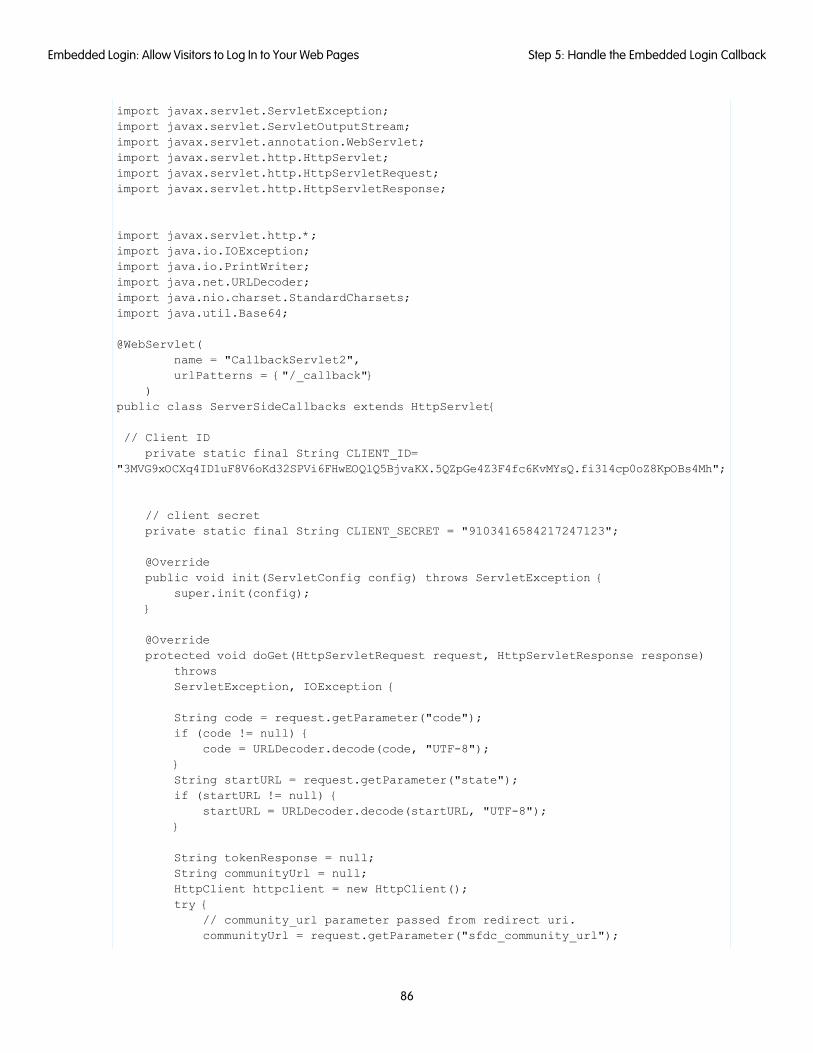
import javax.servlet.ServletException;import javax.servlet.ServletOutputStream;import javax.servlet.annotation.WebServlet;import javax.servlet.http.HttpServlet;import javax.servlet.http.HttpServletRequest;import javax.servlet.http.HttpServletResponse;
import javax.servlet.http.*;import java.io.IOException;import java.io.PrintWriter;import java.net.URLDecoder;import java.nio.charset.StandardCharsets;import java.util.Base64;
@WebServlet(name = "CallbackServlet2",urlPatterns = {"/_callback"}
)public class ServerSideCallbacks extends HttpServlet{
// Client IDprivate static final String CLIENT_ID=
"3MVG9xOCXq4ID1uF8V6oKd32SPVi6FHwEOQlQ5BjvaKX.5QZpGe4Z3F4fc6KvMYsQ.fi314cp0oZ8KpOBs4Mh";
// client secretprivate static final String CLIENT_SECRET = "9103416584217247123";
@Overridepublic void init(ServletConfig config) throws ServletException {
super.init(config);}
@Overrideprotected void doGet(HttpServletRequest request, HttpServletResponse response)
throwsServletException, IOException {
String code = request.getParameter("code");if (code != null) {
code = URLDecoder.decode(code, "UTF-8");}String startURL = request.getParameter("state");if (startURL != null) {
startURL = URLDecoder.decode(startURL, "UTF-8");}
String tokenResponse = null;String communityUrl = null;HttpClient httpclient = new HttpClient();try {
// community_url parameter passed from redirect uri.communityUrl = request.getParameter("sfdc_community_url");
86
Step 5: Handle the Embedded Login CallbackEmbedded Login: Allow Visitors to Log In to Your Web Pages

// Token endpoint : communityUrl + "/services/oauth2/token";PostMethod post = new PostMethod(communityUrl+"/services/oauth2/token");post.addParameter("code",code);post.addParameter("grant_type","authorization_code");// Consumer key of the Connected App.post.addParameter("client_id", CLIENT_ID);// Consumer Secret of the Connected App.post.addParameter("client_secret",CLIENT_SECRET);
// Callback URL of the Connected App.post.addParameter("redirect_uri",
"https://boiling-brushlands-41143.herokuapp.com/_callback");
httpclient.executeMethod(post);tokenResponse = post.getResponseBodyAsString();post.releaseConnection();
System.err.println("tokenResponse: " + tokenResponse);} catch (Exception e) {throw new ServletException(e);
}
JSONObject identityJSON = null;try {
JSONObject token = new JSONObject(tokenResponse);// get the access token from the responseString accessToken = token.getString("access_token");String identity = token.getString("id");httpclient = new HttpClient();GetMethod get = new GetMethod(identity + "?version=latest");get.setFollowRedirects(true);get.addRequestHeader("Authorization", "Bearer " + accessToken);
// get identity information using the access tokenhttpclient.executeMethod(get);String identityResponse = get.getResponseBodyAsString();get.releaseConnection();identityJSON = new JSONObject(identityResponse);identityJSON.put("access_token", accessToken);
} catch (Exception e) {throw new ServletException(e);
}
response.setContentType("text/html; charset=utf-8");PrintWriter out = response.getWriter();
// Notice that we’re using base64 encodedString outputStr = "<html><head>\n" +
"<meta name=\"salesforce-community\" content=\""+ communityUrl +"\">\n" +// notice the -callback in the salesforce-mode content value"<meta name=\"salesforce-mode\" content=\"modal-callback\">\n" +"<meta name=\"salesforce-server-callback\" content=\"true\">\n" +
87
Step 5: Handle the Embedded Login CallbackEmbedded Login: Allow Visitors to Log In to Your Web Pages

// send the identity information back to the Embedded Login"<meta name=\"salesforce-server-response\" content='" +Base64.getEncoder().encodeToString(identityJSON.toString().
getBytes(StandardCharsets.UTF_8))+"'>\n" +"<meta name=\"salesforce-server-starturl\" content='" + startURL +"'>\n"
+"<meta name=\"salesforce-target\" content= \"#salesforce-login\">\n"+
"<meta name=\"salesforce-allowed-domains\"content=\"boiling-brushlands-41143.herokuapp.com\">\n" +"<script src=\""+ communityUrl +"/servlet/servlet.loginwidgetcontroller?type=javascript_widget\"" +" async defer></script>\n" +"</head><body></body></html>";
out.write(outputStr);}
}
SEE ALSO:
Step 2: Create the Embedded Login Connected App
Embedded Login Meta Tag Reference
Embedded Login Meta Tag Reference
REST API Developer Guide: Understanding the Web Server OAuth Authentication Flow
REST API Developer Guide: Finding Additional Resources
Salesforce Help: Authenticate Apps with OAuth
Embedded Login Advanced Authentication Features
Embedded Login takes care of authenticating users so that you can add login capabilities to a web page without worrying about thedetails. You can also take advantage of the advanced authentication features that Salesforce offers.
Multi-Language Support in Embedded LoginSet the locale code parameter dynamically in the Embedded Login script. This example displays the embedded login page in Japanese.
<script src="https://embeddedlogin-developer-edition.na99.force.com/demo/servlet/servlet.loginwidgetcontroller?type=javascript_widget&locale=jp" async defer></script>
Use the following Salesforce-defined (nonstandard) locale codes with the locale parameter.
• Chinese (Simplified): cn
• Chinese (Traditional): tw
• Danish: da
• Dutch (Netherlands): nl
• English (Australian): au
88
Embedded Login Advanced Authentication FeaturesEmbedded Login: Allow Visitors to Log In to Your Web Pages
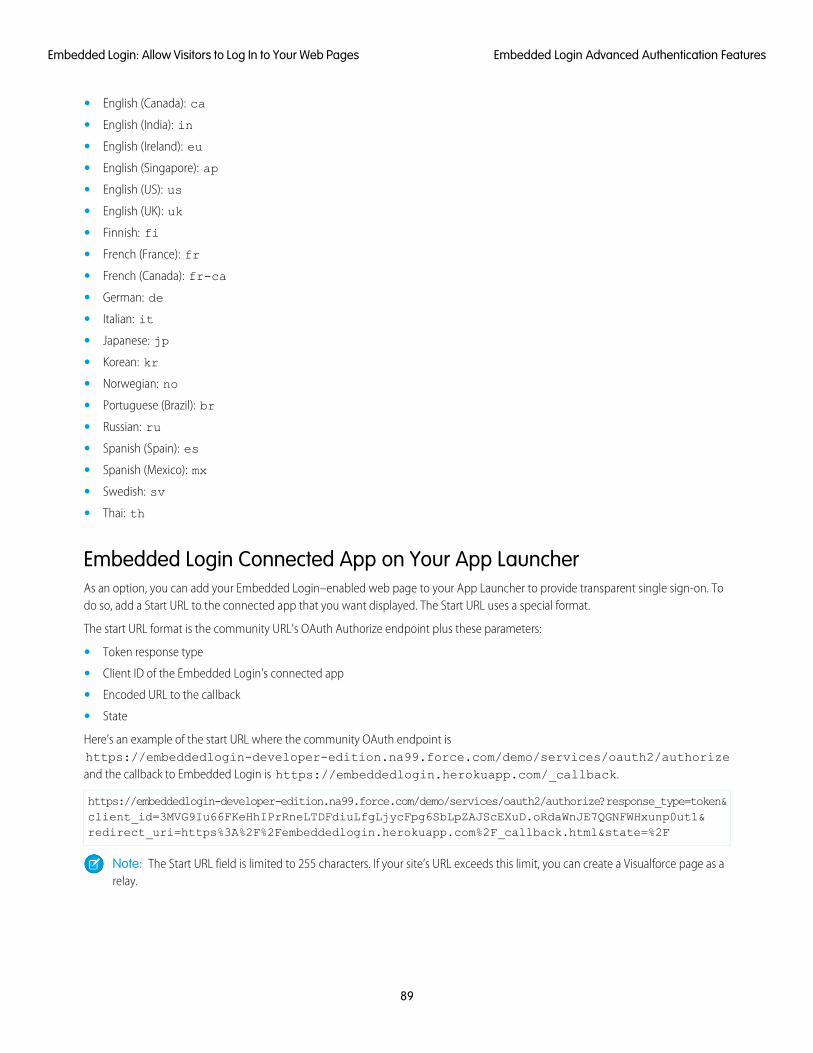
• English (Canada): ca
• English (India): in
• English (Ireland): eu
• English (Singapore): ap
• English (US): us
• English (UK): uk
• Finnish: fi
• French (France): fr
• French (Canada): fr-ca
• German: de
• Italian: it
• Japanese: jp
• Korean: kr
• Norwegian: no
• Portuguese (Brazil): br
• Russian: ru
• Spanish (Spain): es
• Spanish (Mexico): mx
• Swedish: sv
• Thai: th
Embedded Login Connected App on Your App LauncherAs an option, you can add your Embedded Login–enabled web page to your App Launcher to provide transparent single sign-on. Todo so, add a Start URL to the connected app that you want displayed. The Start URL uses a special format.
The start URL format is the community URL's OAuth Authorize endpoint plus these parameters:
• Token response type
• Client ID of the Embedded Login's connected app
• Encoded URL to the callback
• State
Here’s an example of the start URL where the community OAuth endpoint ishttps://embeddedlogin-developer-edition.na99.force.com/demo/services/oauth2/authorizeand the callback to Embedded Login is https://embeddedlogin.herokuapp.com/_callback.
https://embeddedlogin-developer-edition.na99.force.com/demo/services/oauth2/authorize?response_type=token&client_id=3MVG9Iu66FKeHhIPrRneLTDFdiuLfgLjycFpg6SbLpZAJScEXuD.oRdaWnJE7QGNFWHxunp0ut1&redirect_uri=https%3A%2F%2Fembeddedlogin.herokuapp.com%2F_callback.html&state=%2F
Note: The Start URL field is limited to 255 characters. If your site’s URL exceeds this limit, you can create a Visualforce page as arelay.
89
Embedded Login Advanced Authentication FeaturesEmbedded Login: Allow Visitors to Log In to Your Web Pages
Embedded Login Authentication ProcessIt’s helpful to be familiar with the Salesforce authentication process. Here’s an overview.
1. The user enters a username and password or social credentials in the login form on the web page.
2. Salesforce validates the credentials and then redirects the response to the OpenID authorization endpointhttps://login.salesforce.com/services/oauth2/authorize. The connected app ID of the Embedded Loginconnected app is passed in, which specifies how the OAuth access token is granted. Salesforce issues the access token based onhow the connected app is configured.
3. Salesforce sends the access token to the callback.
4. The callback receives the access token, parses it out as a message, and caches the access token. If it’s a client-side callback, the tokenis cached in the web browser local storage.
5. The callback uses the access token to call the Salesforce Identity service endpoint to pull the required and authorized informationabout the user.
6. The callback stores the user information with the access token.
7. Embedded Login gets the user information from storage and checks the online function to determine which login information toshow on the web page and how.
8. If the website doesn’t require ongoing interaction with Salesforce after initial login, the access token can be released. If the webpage continues to interact with Salesforce, the access token remains in storage. The connected app maintains the connectionbetween the page and Salesforce and uses the access token to retrieve data from Salesforce.
The authentication process happens in an iframe, and Salesforce sets the salesforce-mask-redirects meta tag to true to hide the processfrom the user. However, if your org uses login flows or two-factor authentication, you set the salesforce-mask-redirects meta tag to false.The user takes the journey to Salesforce to complete the login process.
Relationship Between the Embedded Login Callback and Connected AppThe Embedded Login connected app is at the core of the authentication process and controls ongoing communication between thewebsite and Salesforce after initial authentication. The callback is involved during the initial authentication process, receiving the accesstoken and the user information passed from Salesforce. When the initial authentication is complete, the connected app takes over. Itmaintains the connection with your Salesforce community as long as the session is active.
SEE ALSO:
Salesforce Help: Authenticate Apps with OAuth
Identity Implementation Guide: Configure and Use the App Launcher
Embedded Login Considerations
When implementing Embedded Login, be aware of these considerations.
Supported BrowsersEmbedded Login is supported on all browsers that support Lightning Experience. Embedded Login works on these browsers: GoogleChrome, Mozilla Firefox, Apple Safari, Microsoft Edge, and Internet Explorer 11.
90
Embedded Login ConsiderationsEmbedded Login: Allow Visitors to Log In to Your Web Pages

HTTP and HTTPS URLsModern browsers don’t allow mixing the HTTP and HTTPS protocols on the same page. Your right-frame content is inside an iframe,so the URL must use the same protocol as your community. Generally, we recommend using HTTPS for logo and right-frame URLs.However, in local and test environments, HTTP can be more flexible.
URL Redirection for Self-Registration and Forgot Password LinksEmbedded Login handles logging in with username and password or social credentials, but relies on the community to handleself-registration and forgotten passwords. When customers complete the password or self-registration page, they must navigateback to your website. They’re not redirected to the website automatically.
OAuth PoliciesOAuth policies control how the Embedded Login connected app handles authentication. Website visitors are prompted to approveaccess when the default OAuth policy allows users to self-authorize. To avoid this interruption, set the OAuth policy to Adminapproved users are pre-authorized, as mentioned in Step 2: Create the Embedded Login Connected App.
Error Configuring CORSIf you get an error that contains the phrase … an ancestor value violates the following Content SecurityPolicy directive, configure CORS according to instructions in Step 1: Enable Resource Sharing Across Domains.
HTML5 localStorage for Storing DataEmbedded Login stores data locally within the user’s browser using localStorage, which is more secure than storing data incookies. localStorage can store large amounts of data locally without affecting website performance. localStorage isper origin (per domain and protocol). All pages from one origin can store and access the same data. Data in localStorage hasno expiration date and is cleared only through JavaScript or by clearing the browser cache or locally stored data.
Note: If you get “access denied” messages, check whether localStorage is available.
Missing Login Button Due to Limited Access to Cookies
If a user sets the browser to block third-party websites from storing cookies and other data locally, the Login button doesn’t appearon the web page. For example, if the Chrome Block third-party cookies option is set, the Login button doesn’t appear.
While this behavior applies to all browsers, it particularly applies to Safari due to its cookie and local storage blocking policies. Toenable Embedded Login in Safari, uncheck Prevent cross-site tracking in Safari’s privacy preferences.
Note: Salesforce issues a session cookie only to record encrypted authentication information during a specific session. Thesession cookie doesn’t include the username and password of the user. Salesforce doesn’t use cookies to store other confidentialuser and session information. Instead Salesforce implements more advanced security methods based on dynamic data andencoded session IDs.
SEE ALSO:
Add a Self-Registration Page
Salesforce Help: Recommendations and Requirements for All Browsers
Salesforce Help: Supported Browsers for Lightning Experience
Embedded Login Meta Tag Reference
You use these Embedded Login meta tags when adding login capabilities to your website.
salesforce-allowed-domainsSpecifies domains that can access the access token and user information. Use this meta tag only on callback. The callback must belocated in the same domain as the Embedded Login web page. String.
91
Embedded Login Meta Tag ReferenceEmbedded Login: Allow Visitors to Log In to Your Web Pages

<meta name="salesforce-allowed-domains" content="embeddedlogin.herokuapp.com">
salesforce-cache-max-ageSets the cache control maximum age header. Optional. The browser uses this header to determine whether the cached content isfresh or must be refreshed from the server after the specified number of seconds. Integer. By default, the cache is cleared every 24hours. To improve performance, increase the cache maximum age. However, as a result, you receive JavaScript updates from Salesforceless frequently because updates occur when the cache is cleared. In this example, the cache is cleared every minute.
<meta name="salesforce-cache-max-age" content="60">
salesforce-client-idThe Embedded Login connected app’s consumer key, which is the unique identifier for the connected app. When the Salesforceadmin creates the Embedded Login connected app, the app generates a unique identifier in the consumer key field. String.
<meta name="salesforce-client-id"content="3MVG9Iu66FKeHhIPrRneLTDFdiuLfgLjycFpg6SbLpZAJScEXuD.oRdaWnJE7QGNFWHxunp0ut1">
salesforce-communityCommunity URL of the Salesforce community hosting your identity services. String.
<meta name="salesforce-community"content="https://embeddedlogin-developer-edition.na99.force.com/demo">
salesforce-expidSpecifies the value of the experience ID for the current user session. Use this tag to support dynamic branding on your login page.String.
<meta name="salesforce-expid" content="coffee">
salesforce-forgot-password-enabledIndicates whether to show the forgot password link on the login form. Optional. Boolean, false by default. If your communityenabled the forgot password link, set this link to true.
<meta name="salesforce-forgot-password-enabled" content="true">
salesforce-login-handlerJavaScript function to call on a successful login event. Optional. You have full control over what happens when users log in successfully.For example, you can replace the login button with the user’s name and profile picture. String.
<meta name="salesforce-login-handler" content="onlogin">
salesforce-logout-handlerJavaScript function to call on a successful logout event. Optional. You have full control over what happens when users log outsuccessfully. For example, you can clear the user’s session and reload the login button. String.
<meta name="salesforce-logout-handler" content="onlogout">
salesforce-logout-on-browser-closeDeletes the user’s Embedded Login session after they close their browser window. Optional. Boolean, true by default. Set tofalse if you want users to remain logged in even after they close the browser.
<meta name="salesforce-logout-on-browser-close" content="true">
salesforce-mask-redirectsControls the login process. By default, Embedded Login uses a simple authentication process that’s completed inside an iframe andhidden from the user with a mask redirect. Boolean, true by default.
Set to false to invoke a custom login flow. Your org can use a custom login flow to add more steps to the login process. Forexample, the flow can prompt the user for a second factor of authentication, collect or update user data, or display a custom logoor message. If your org uses a custom login flow, set salesforce-mask-redirects to false and work with your Salesforce admin tointegrate the login flow with Embedded Login.
92
Embedded Login Meta Tag ReferenceEmbedded Login: Allow Visitors to Log In to Your Web Pages
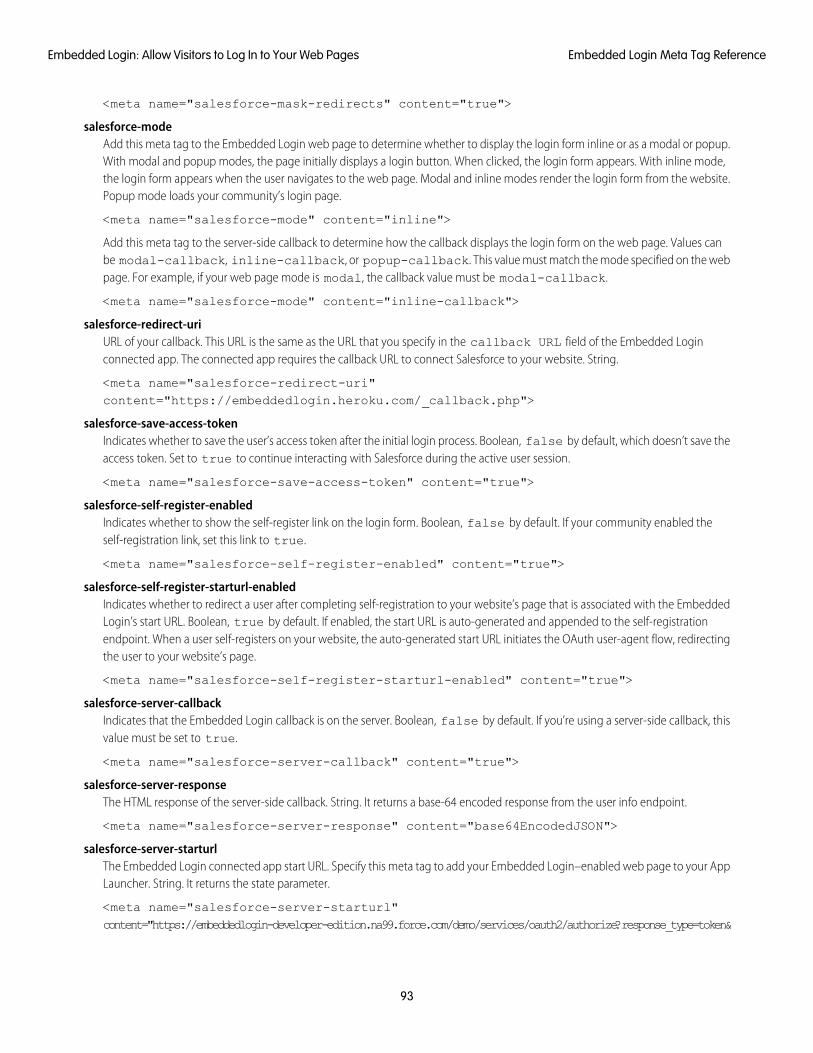
<meta name="salesforce-mask-redirects" content="true">
salesforce-modeAdd this meta tag to the Embedded Login web page to determine whether to display the login form inline or as a modal or popup.With modal and popup modes, the page initially displays a login button. When clicked, the login form appears. With inline mode,the login form appears when the user navigates to the web page. Modal and inline modes render the login form from the website.Popup mode loads your community’s login page.
<meta name="salesforce-mode" content="inline">
Add this meta tag to the server-side callback to determine how the callback displays the login form on the web page. Values canbe modal-callback, inline-callback, or popup-callback. This value must match the mode specified on the webpage. For example, if your web page mode is modal, the callback value must be modal-callback.
<meta name="salesforce-mode" content="inline-callback">
salesforce-redirect-uriURL of your callback. This URL is the same as the URL that you specify in the callback URL field of the Embedded Loginconnected app. The connected app requires the callback URL to connect Salesforce to your website. String.
<meta name="salesforce-redirect-uri"content="https://embeddedlogin.heroku.com/_callback.php">
salesforce-save-access-tokenIndicates whether to save the user’s access token after the initial login process. Boolean, false by default, which doesn’t save theaccess token. Set to true to continue interacting with Salesforce during the active user session.
<meta name="salesforce-save-access-token" content="true">
salesforce-self-register-enabledIndicates whether to show the self-register link on the login form. Boolean, false by default. If your community enabled theself-registration link, set this link to true.
<meta name="salesforce-self-register-enabled" content="true">
salesforce-self-register-starturl-enabledIndicates whether to redirect a user after completing self-registration to your website’s page that is associated with the EmbeddedLogin’s start URL. Boolean, true by default. If enabled, the start URL is auto-generated and appended to the self-registrationendpoint. When a user self-registers on your website, the auto-generated start URL initiates the OAuth user-agent flow, redirectingthe user to your website’s page.
<meta name="salesforce-self-register-starturl-enabled" content="true">
salesforce-server-callbackIndicates that the Embedded Login callback is on the server. Boolean, false by default. If you’re using a server-side callback, thisvalue must be set to true.
<meta name="salesforce-server-callback" content="true">
salesforce-server-responseThe HTML response of the server-side callback. String. It returns a base-64 encoded response from the user info endpoint.
<meta name="salesforce-server-response" content="base64EncodedJSON">
salesforce-server-starturlThe Embedded Login connected app start URL. Specify this meta tag to add your Embedded Login–enabled web page to your AppLauncher. String. It returns the state parameter.
<meta name="salesforce-server-starturl"content="https://embeddedlogin-developer-edition.na99.force.com/demo/services/oauth2/authorize?response_type=token&
93
Embedded Login Meta Tag ReferenceEmbedded Login: Allow Visitors to Log In to Your Web Pages

client_id=3MVG9Iu66FKeHhIPrRneLTDFdiuLfgLjycFpg6SbLpZAJScEXuD.oRdaWnJE7QGNFWHxunp0ut1&redirect_uri=https%3A%2F%2Fembeddedlogin.herokuapp.com%2F_callback.html&state=%2F">
salesforce-targetIdentifier of the visible HTML element, such as a button or link, which executes a JavaScript function when clicked. For example, touse a login button as a target, #salesforce-login refers to a <div> in the body of the web page, divid=salesforce-login. String.
<meta name="salesforce-target" content="#salesforce-login">
salesforce-use-login-page-background-colorDetermines the background color of the Embedded Login login form. Boolean, true by default. If true, it uses the backgroundcolor specified on the Experience Workspaces Administration | Login & Registration page. If false, the color specified in the localCSS is used.
<meta name="salesforce-use-login-page-background-color" content="false">
salesforce-use-login-page-button-colorDetermines the color of the login button on the Embedded Login login form. Boolean, true by default. If true, it uses the buttoncolor specified on the Experience Workspaces Administration | Login & Registration page. If false, the color specified in the localCSS is used.
<meta name="salesforce-use-login-button-color" content="false">
salesforce-use-min-jsIndicates whether to generate JavaScript in a readable or minimized lightweight version. Boolean, true by default. Set to falseto generate readable JavaScript.
<meta name="salesforce-use-min-js" content="false">
SEE ALSO:
Create an Embedded Login Client-Side Callback
94
Embedded Login Meta Tag ReferenceEmbedded Login: Allow Visitors to Log In to Your Web Pages
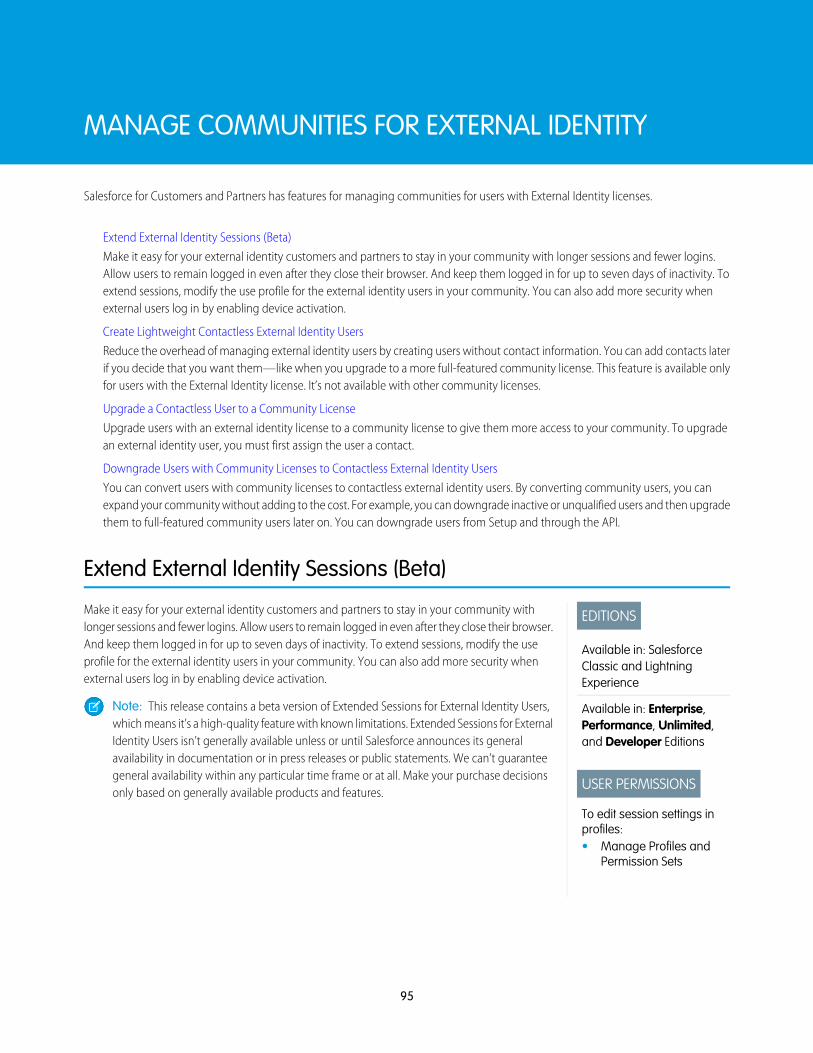
MANAGE COMMUNITIES FOR EXTERNAL IDENTITY
Salesforce for Customers and Partners has features for managing communities for users with External Identity licenses.
Extend External Identity Sessions (Beta)
Make it easy for your external identity customers and partners to stay in your community with longer sessions and fewer logins.Allow users to remain logged in even after they close their browser. And keep them logged in for up to seven days of inactivity. Toextend sessions, modify the use profile for the external identity users in your community. You can also add more security whenexternal users log in by enabling device activation.
Create Lightweight Contactless External Identity Users
Reduce the overhead of managing external identity users by creating users without contact information. You can add contacts laterif you decide that you want them—like when you upgrade to a more full-featured community license. This feature is available onlyfor users with the External Identity license. It’s not available with other community licenses.
Upgrade a Contactless User to a Community License
Upgrade users with an external identity license to a community license to give them more access to your community. To upgradean external identity user, you must first assign the user a contact.
Downgrade Users with Community Licenses to Contactless External Identity Users
You can convert users with community licenses to contactless external identity users. By converting community users, you canexpand your community without adding to the cost. For example, you can downgrade inactive or unqualified users and then upgradethem to full-featured community users later on. You can downgrade users from Setup and through the API.
Extend External Identity Sessions (Beta)
EDITIONS
Available in: SalesforceClassic and LightningExperience
Available in: Enterprise,Performance, Unlimited,and Developer Editions
USER PERMISSIONS
To edit session settings inprofiles:• Manage Profiles and
Permission Sets
Make it easy for your external identity customers and partners to stay in your community withlonger sessions and fewer logins. Allow users to remain logged in even after they close their browser.And keep them logged in for up to seven days of inactivity. To extend sessions, modify the useprofile for the external identity users in your community. You can also add more security whenexternal users log in by enabling device activation.
Note: This release contains a beta version of Extended Sessions for External Identity Users,which means it’s a high-quality feature with known limitations. Extended Sessions for ExternalIdentity Users isn’t generally available unless or until Salesforce announces its generalavailability in documentation or in press releases or public statements. We can’t guaranteegeneral availability within any particular time frame or at all. Make your purchase decisionsonly based on generally available products and features.
95

1. From Setup, enter Profiles in the Quick Find box, then select Profiles.
2. Next to the external identity profile that you want to use as the basis for the new profile, click Clone.
3. Name the profile, and click Save.
4. Click Session Settings.
5. Under Session Settings, for Session Times Out After, select a timeout value.
Extend the session length to make it easy for your customers and partners to stay in your community. You can extend sessiontimeouts for external identity users for up to seven days. When the session times out, the user must log in again.
6. To keep external identity users logged in until they log out, select Keep users logged in when they close the browser.
This setting lets external identity user sessions remain active until users log out of the community or when the session times out. Ifnot selected, external identity users are logged out when they close their browser.
7. To add more security when external users log in, select Enable device activation.
When selected, Salesforce requires external users to verify their identity when they log in from a different browser or device. Thisoption applies to all external user licenses—External Identity and community licenses.
8. Click Save.
Create Lightweight Contactless External Identity Users
EDITIONS
Available in: SalesforceClassic and LightningExperience
Available in: Professional,Enterprise, Performance,Unlimited, and DeveloperEditions
USER PERMISSIONS
To create contactless users:• Manage User OR
Manage External UserOR Edit Self-Service User
Reduce the overhead of managing external identity users by creating users without contactinformation. You can add contacts later if you decide that you want them—like when you upgradeto a more full-featured community license. This feature is available only for users with the ExternalIdentity license. It’s not available with other community licenses.
Typically, when Salesforce creates an external identity user in a community, it adds the user’s contactinformation. But if your implementation doesn’t require contact information for external users,consider going contactless. Without contacts, you don’t have to worry about keeping user andcontact records in sync. You can simply maintain a user database for identity purposes. For example,you can delay creating contacts for the guests registering for your community until after they’requalified.
You can add contactless users to a new or existing community.
96
Create Lightweight Contactless External Identity UsersManage Communities for External Identity

To create a contactless external identity user, you create a user record using Apex, SOAP, or Bulk API.
User u = new User();u.FirstName = 'Jane';u.LastName = 'Doe';u.Email = '[email protected]';u.Alias = 'jane';u.Username = '[email protected]';u.CommunityNickname = 'Jane';u.LocaleSidKey = 'en_US';u.TimeZoneSidKey = 'GMT';u.ProfileID = '00exx000000jvN4'; // Profile that's associated with the EI licenseu.LanguageLocaleKey = 'en_US';u.EmailEncodingKey = 'UTF-8';insert u;
To handle self-registration for contactless users, create a custom self-registration page and create contactless users through the API.Then enable self-registration for your community by selecting Allow external users to self-register from the community’s Login &Registration page.
To add a contact to the contactless external identity user, create a contact (1), and associate the contact with the user (2).
Considerations
• The Login As feature isn’t supported for contactless users because contacts are required.
• Delegated admins can’t manage contactless users.
• System for Cross-Domain Identity Management (SCIM) isn’t supported for contactless user creation.
• External identity users without contacts have the same access to objects as users with contacts.
97
Create Lightweight Contactless External Identity UsersManage Communities for External Identity

Upgrade a Contactless User to a Community License
EDITIONS
Available in: SalesforceClassic and LightningExperience
Available in: Enterprise,Performance, Unlimited,and Developer Editions
USER PERMISSIONS
To add a contact to acontactless user:• Manage User OR
Manage External UserOR Edit Self-Service User
Upgrade users with an external identity license to a community license to give them more accessto your community. To upgrade an external identity user, you must first assign the user a contact.
Note: The Contactless User feature is available only for the External Identity license, whichis available to customers who have purchased the Identity for Customers and Partners product.
1. To add a contact to a contactless external identity user, update the user’s record with Apex,SOAP, or Bulk API.
Account a = [SELECT Id FROM Account WHERE Id = '001xx000003DIyf'];Contact c = new Contact();c.FirstName = 'Sonia’;c.LastName = 'James';c.AccountId = a.id;insert c;User u = [SELECT Id FROM User WHERE Id = ‘005xx000001TLlf’];u.ContactId=c.id;update u;
2. Upgrade to a community license.
a. From Setup, enter Users in the Quick Find box, then select Users.
b. Click Edit next to the user you want to upgrade.
c. Select the new license, profile, and role for the user.
d. Optionally, specify a new profile and role.
e. Save your changes.
Downgrade Users with Community Licenses to Contactless ExternalIdentity Users
You can convert users with community licenses to contactless external identity users. By converting community users, you can expandyour community without adding to the cost. For example, you can downgrade inactive or unqualified users and then upgrade them tofull-featured community users later on. You can downgrade users from Setup and through the API.
98
Upgrade a Contactless User to a Community LicenseManage Communities for External Identity
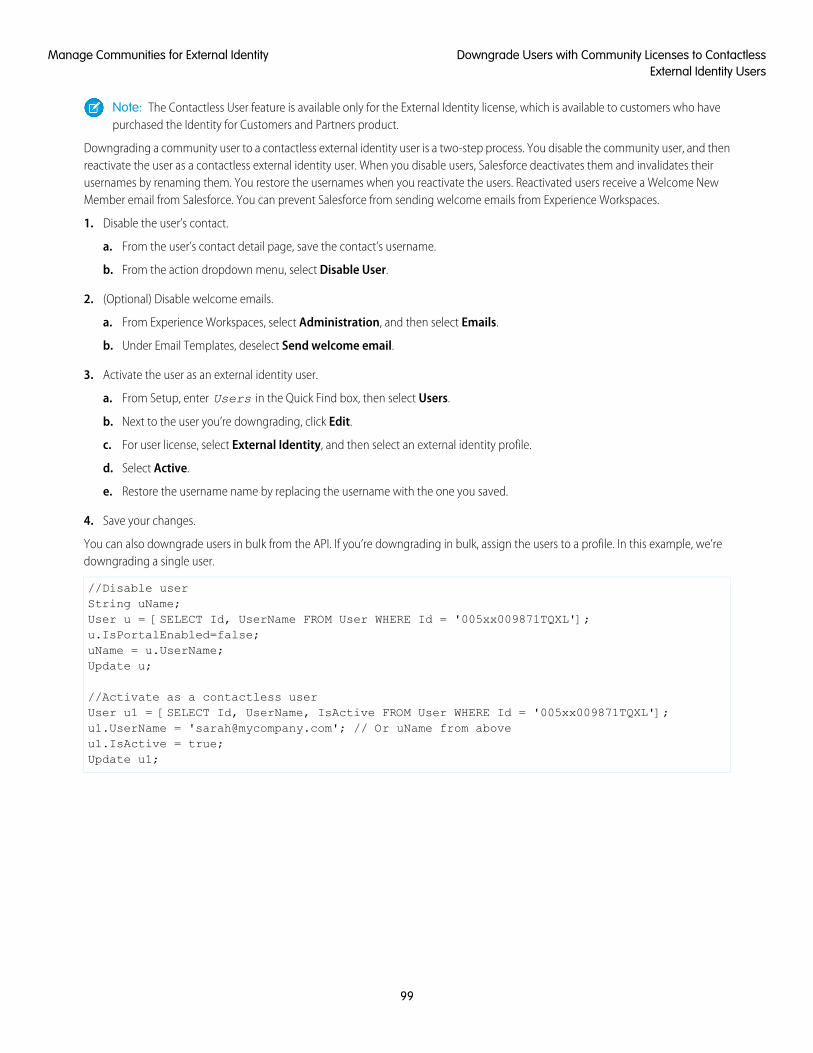
Note: The Contactless User feature is available only for the External Identity license, which is available to customers who havepurchased the Identity for Customers and Partners product.
Downgrading a community user to a contactless external identity user is a two-step process. You disable the community user, and thenreactivate the user as a contactless external identity user. When you disable users, Salesforce deactivates them and invalidates theirusernames by renaming them. You restore the usernames when you reactivate the users. Reactivated users receive a Welcome NewMember email from Salesforce. You can prevent Salesforce from sending welcome emails from Experience Workspaces.
1. Disable the user’s contact.
a. From the user’s contact detail page, save the contact’s username.
b. From the action dropdown menu, select Disable User.
2. (Optional) Disable welcome emails.
a. From Experience Workspaces, select Administration, and then select Emails.
b. Under Email Templates, deselect Send welcome email.
3. Activate the user as an external identity user.
a. From Setup, enter Users in the Quick Find box, then select Users.
b. Next to the user you’re downgrading, click Edit.
c. For user license, select External Identity, and then select an external identity profile.
d. Select Active.
e. Restore the username name by replacing the username with the one you saved.
4. Save your changes.
You can also downgrade users in bulk from the API. If you’re downgrading in bulk, assign the users to a profile. In this example, we’redowngrading a single user.
//Disable userString uName;User u = [SELECT Id, UserName FROM User WHERE Id = '005xx009871TQXL'];u.IsPortalEnabled=false;uName = u.UserName;Update u;
//Activate as a contactless userUser u1 = [SELECT Id, UserName, IsActive FROM User WHERE Id = '005xx009871TQXL'];u1.UserName = '[email protected]'; // Or uName from aboveu1.IsActive = true;Update u1;
99
Downgrade Users with Community Licenses to ContactlessExternal Identity Users
Manage Communities for External Identity

EXTERNAL IDENTITY ON GITHUB AND TRAILBLAZERCOMMUNITY
We’ve covered the basics of setting up Salesforce Identity for external users. What you’ve learned in this guide provides the basis forcustomizing Salesforce Identity to your specific business goals.
However, you can do much more with Salesforce Identity. For more information on customizing Salesforce Identity for your business,check out our advanced samples on the Salesforce Identity GitHub account.
If you don’t see an answer to your question or a solution to your problem, post to the Salesforce Identity group in the TrailblazerCommunity. The Salesforce Identity Team loves to hear from customers.
100

INDEX
<head> 78<script> 78, 81$Profile 36
Aaccess token 83–84account 2, 12, 95–96, 98activate community 21Admin approved users are pre-authorized 76, 90Admin Trusted Mobile Phone 51All users may self-authorize 90Allow access to your unique identifier (openID) 76Aloha template 13App Launcher 88App manager 76Auth. provider 30Auth. providers 29authentication 4authentication process 73, 83, 88Authenticator App 51
Bbackground image 16base64 encoding 84Brand 73browser storage 83
Ccache age 81callback 84callback handler 83checklist 8clear session 82Client ID 80clone external identity profile 11cloud directory services 3code example 78, 82–84, 88communities 7Communities
Apex 58, 61, 64branding 55custom login page 58, 61, 64login 55passwordless login 58, 61, 64self-registration 55
configurable self-registrationLogin & Registration page 48
configurable self-registration handler 50configurable self-registration page 48connected app 31, 34ConnectedAppPlugin class 78Consumer key 80CORS 73, 75, 90create developer org 11CRM 2, 4, 12, 95–96, 98Cross Origin Resource Sharing (CORS) 75CSS stylesheet 78, 81custom attributes 36, 78custom error exception
LoginDiscovery handler 53custom fields 78custom login page 12, 41
Ddashboards 3Default Page 42, 47definition 4delegated authentication 28developer org 11domain name 11domain URLs 75dynamic 55, 58, 61, 64
EEmbedded Login 4encoding 84Entity ID 35Experience Builder 19, 42, 47Experience Workspaces menu 13extend sessions 95External Identity license 5external identity profile 15
FFacebook 28, 30, 35federated authentication 28field sets 22forceios utility 32forgot password 16
101

Ggithub 57GitHub 29, 100
HHeroku 34
IIAM services 1, 7Identity Basics 7Identity Connect 4Identity only license 4Identity providers 69Identity URLs 78Identity Verification 51iframe 16implementation 8
JJavaScript 81JIT 28, 30just-in-time provisioning 3, 28, 30
Llicense 5licenses 4login discovery handler 45login discovery page 43login page 19, 57login page type 42logo 16, 34
Mmask redirects 80membership to community 15Metadata Discovery Endpoint 35minimize JavaScript 81mobile identity 3, 31multi-factor authentication 3My Domain 11
NNot a member link 21
OOAuth 31OAuth policies 76, 90One-Time Password App 51
onLogin 82onLogout 82OpenID Connect 69
Ppassword on login page 24passwordless login
about 41considerations 63Login & Registration page 43verify users 51, 63
permission sets 15person accounts 25profiles 4, 11–12, 15, 26, 35–36
Rreadable JavaScript 81register domain 11registration handler 29resources 81roles 11
SSalesforce Authenticator 51SAML 34–35, 69SAML-based connected app 34sandboxes 11, 24Security Policy directive 90self-registration 2, 4, 21, 25–26, 95–96, 98self-registration page type 47server-side callback 84servlet updates 81session timeout 95SFDCOAuthLoginHost 32single sign-on 3, 29Social sign-on providers 69start URL 35Start URL 88
TTemporary Code 51title field 22Trailblazer Community 100Trailhead 7
Uuse cases 4, 7, 25, 28
102
Index
Vverification methods 51, 63Verified Mobile Phone 51Visualforce 57Visualforce Page 42, 47
Wwebsite 4whitelist 75workflows 3–4
XXCode 32
103
Index


