13
Salesforce Lightning Partner Management Salesforce, Spring ’17 @salesforcedocs Last updated: March 11, 2017
Salesforce Lightning PartnerManagement
Salesforce, Spring ’17
@salesforcedocsLast updated: March 11, 2017

© Copyright 2000–2017 salesforce.com, inc. All rights reserved. Salesforce is a registered trademark of salesforce.com, inc.,as are other names and marks. Other marks appearing herein may be trademarks of their respective owners.
CONTENTS
Salesforce Lightning Partner Management . . . . . . . . . . . . . . . . . . . . . . . . . . . . . . . . . . 1
Install the Lightning Partner Management Solution . . . . . . . . . . . . . . . . . . . . . . . . . . . . . . . 2Prep Your Org for a Partner Community . . . . . . . . . . . . . . . . . . . . . . . . . . . . . . . . . . . . . . . 3Create a Partner Community . . . . . . . . . . . . . . . . . . . . . . . . . . . . . . . . . . . . . . . . . . . . . . 3Expose Sales and Marketing Data in Your Partner Community . . . . . . . . . . . . . . . . . . . . . . . . 5
Customize Lead Management in Your Partner Community . . . . . . . . . . . . . . . . . . . . . . 6Manage Marketing Development Funds in a Partner Community . . . . . . . . . . . . . . . . . . 7
Index . . . . . . . . . . . . . . . . . . . . . . . . . . . . . . . . . . . . . . . . . . . . . . . . . . . . . . . . . . . . . 9

SALESFORCE LIGHTNING PARTNER MANAGEMENT
EDITIONS
Available in: SalesforceClassic and LightningExperience
Available in: Enterprise,Performance, Unlimited,and Developer Editions
Quickly set up a custom, branded space where you can invite your partners and work on drivingchannel sales together. This prepackaged solution is optimized for channel managers and partnersto collaborate on and track sales data. A simplified setup combined with rich branding and aresponsive UI let you quickly build an exclusive online experience, so you can invite your channelpartners and track and monitor your sales together from a single location.
What You Get Out of the Box
The Lightning Partner Management solution contains prepackaged pages, components, businesslogic, and other features that support channel management (sales + marketing) processes.
Channel managers and partners can create and share leads, opportunities, accounts, and contacts together. In addition, the LightningPartner Management solution provides these capabilities:
• Partner account management
• Partner recruitment, onboarding, and support
• Lead distribution
• Deal registration
• Content library
• Partner analytics
• Marketing development fund management
1
Install the Lightning Partner Management Solution
EDITIONS
Available in: SalesforceClassic and LightningExperience
Available in: Enterprise,Performance, Unlimited,and Developer Editions
USER PERMISSIONS
To install the LightningPartner Managementsolution:• “Customize Application”
“Create and Set UpCommunities”
“DownloadAppExchangePackages”
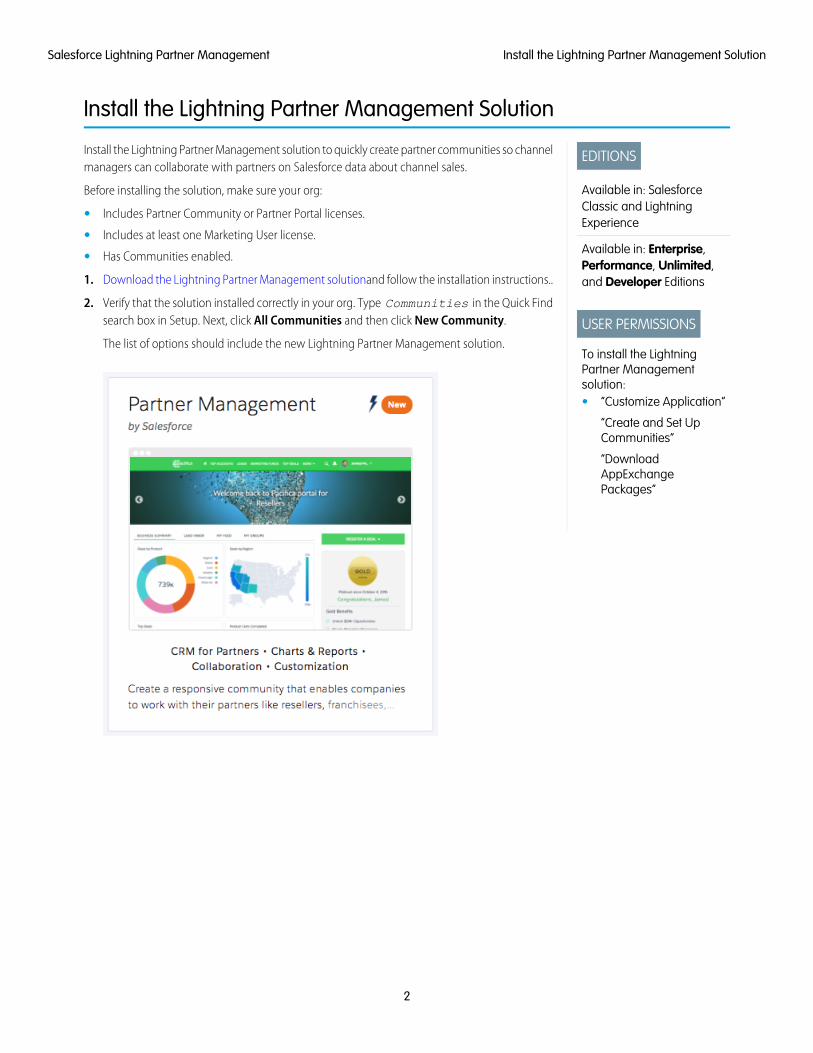
Install the Lightning Partner Management solution to quickly create partner communities so channelmanagers can collaborate with partners on Salesforce data about channel sales.
Before installing the solution, make sure your org:
• Includes Partner Community or Partner Portal licenses.
• Includes at least one Marketing User license.
• Has Communities enabled.
1. Download the Lightning Partner Management solutionand follow the installation instructions..
2. Verify that the solution installed correctly in your org. Type Communities in the Quick Findsearch box in Setup. Next, click All Communities and then click New Community.
The list of options should include the new Lightning Partner Management solution.
2
Install the Lightning Partner Management SolutionSalesforce Lightning Partner Management
Prep Your Org for a Partner Community
EDITIONS
Available in: SalesforceClassic and LightningExperience
Available in: Enterprise,Performance, Unlimited,and Developer Editions
Prep your org for partner users and data management before you create a community with theLightning Partner Management solution.
Note: Buy partner licenses and install the Lightning Partner Management package beforeyou perform these steps.
1. Set up profiles, permissions, and objects in your org for partner users.
• Clone the standard Partner User profile.
• Edit the Partner user profile and include access to the Deal Registration and Sales recordtypes for leads. Modify other profile permissions based on your business needs.
• Assign the “Global Partner Permissions” and “MDF Permissions” permission sets to partnerusers.
• Modify sharing groups and rules to account for partner users.
• Check organization-wide defaults for all the objects you want to share with your partners in the community.
2. Assign the channel manager role to the people in your internal org that work closely with partners. Give them the necessarypermissions to be create and manage partner accounts, partner users, and sales and marketing data.
3. Next, create partner accounts and partner users. Channel managers can also do this. Create partner accounts for each partnerorganization that you work with. Add the people that you work with as contacts on the respective partner accounts and convertthem to partner users.
4. Assign a partner license, the Partner User profile, and a partner role to each partner user.
SEE ALSO:
Manage Partner Relationships in Communities
Create a Partner Community
USER PERMISSIONS
To create a partnercommunity with theLightning PartnerManagement solution:• “Create and Set Up
Communities”
“DownloadAppExchangePackages”
Creating a partner community is simple and quick with the Lightning Partner Management solution.
After you install the Lightning Partner Management solution:
1. In Setup, enter Communities in the Quick Find box, and select All Communities from thefiltered list, then click New Community.
2. Choose Partner Management.
3
Prep Your Org for a Partner CommunitySalesforce Lightning Partner Management

3. Click Get Started.
4. Give the community a name and a unique URL qualifier and click Create.
The URL qualifier value is appended to your community domain name to create a unique URL for this community. For example, ifyour domain is UniversalTelco.force.com and you’re creating a partner community, you can designate the URL asUniversalTelco.force.com/partners.
5. On the confirmation page, click Build & Customize to customize and build your community with Community Builder.
6. Open Community Workspaces or Community Management. Activate the community from Administration > Settings.
7. Next, go back to Community Builder and click Publish to publish your changes.
Important: Publishing the community is a prerequisite for some for using the custom pages available in the Lightning PartnerManagement solution.
8. Optionally, customize the community look and feel from the branding editor and publish your community again.
SEE ALSO:
Edit Community Pages and Components in Community Builder
Implementation Guide: Using Templates to Build Communities
4
Create a Partner CommunitySalesforce Lightning Partner Management
Expose Sales and Marketing Data in Your Partner Community
USER PERMISSIONS
To customize a partnercommunity with theLightning PartnerManagement solution:• “Create and Set Up
Communities”
The Lightning Partner Management solution comes prepackaged with custom objects and pagestargeted at channel management. Adding an object or page to the navigation menu offers a quickand easy way to expose Salesforce sales and marketing data in your org. Predesigned custom pagesare loaded with components that can be associated with information relevant to partners.
After you create a community with the Lightning Partner Management solution, switch to the PageEditor view in Community Builder.
1. Open Community Workspaces or Community Management.
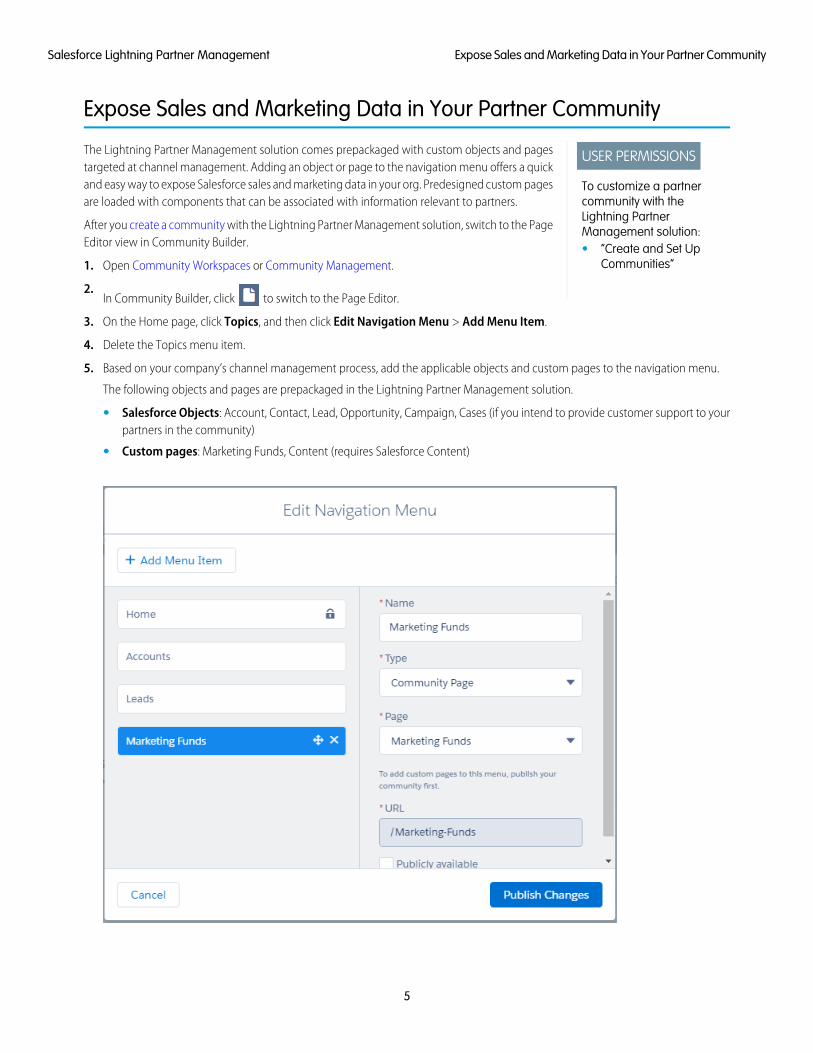
2.In Community Builder, click to switch to the Page Editor.
3. On the Home page, click Topics, and then click Edit Navigation Menu > Add Menu Item.
4. Delete the Topics menu item.
5. Based on your company’s channel management process, add the applicable objects and custom pages to the navigation menu.
The following objects and pages are prepackaged in the Lightning Partner Management solution.
• Salesforce Objects: Account, Contact, Lead, Opportunity, Campaign, Cases (if you intend to provide customer support to yourpartners in the community)
• Custom pages: Marketing Funds, Content (requires Salesforce Content)
5
Expose Sales and Marketing Data in Your Partner CommunitySalesforce Lightning Partner Management
6. Enter a name, select the type (object or page), and fill out the other details for each object or page. To add the next object or page,click Add Menu Item. Repeat until you’ve added all items.
• Adding an object to the navigation menu automatically creates a record list view for that object in your community. When apartner user clicks the navigation menu item for an object, a list of object records they have permission to access is displayed.You can select a default list view while adding objects to the navigation menu.
• Predesigned pages contain components targeted at partner users. Most components can be customized to expose views ofSalesforce data relevant to your partner sales network.
7. Click Publish Changes when you’re done with all the objects.
8. Optionally, customize the template header and welcome text in the Headline component.
9. Click the components within each tab on the Home page. Customize each component and associate a dashboard, list view, or dataof your choice, where appropriate. The tabs, dashboards, list views, and components come prepackaged in the Lightning PartnerManagement solution.
• Business Summary: Select a dashboard, such as Partner Account Management, from the dropdown list from the componenteditor.
• My Leads: Select an appropriate list view for leads. We recommend All Open Leads or My Unread Leads.
• My Feed: Optionally, customize the size and type of publisher.
• My Groups: Customize the group list view.
10. Customize the actions associated with the Register a Deal button on the home page. The button and actions are prepackaged inthe Lightning Partner Management solution. For these to work as intended, set up approval workflows for lead submission and dealregistration.
11. Customize how leads are handled in your community by managing lead record types, lead assignment rules, and creating approvalworkflows.
12. Optionally, customize marketing fund management for your partner community.
Customize Lead Management in Your Partner Community
USER PERMISSIONS
To customize a partnercommunity with theLightning PartnerManagement solution:• “Create and Set Up
Communities”
The Register a Deal button on the Home page of the Lightning Partner Management solution comespreconfigured with actions suited to channel management. You can define approval workflowsand use assignment rules to manage your lead queue or automatically route them to the channelmanager for approval.
To make sure partner community members can use lead management functionality:
• Assign the Partner user profile to partner users.
• Edit the Partner user profile and include access to the Deal Registration and Sales record typesfor leads.
• Assign the “Global Partner Permissions” and “MDF Permissions” permission sets to partner users.
On the Register a Deal button, the Deal Registration and New Lead actions are associated with two different lead record types calledDeal Registration and Sales (included in the solution). Deal Registration automatically sends a registered deal submitted by a partner tothe channel manager (or another authorized user) for approval. Set up and customize approval workflows for deal registration to workas intended. The Sales Lead creates a lead and is subject to any assignment rules that you define. The Lightning Partner Managementsolution comes with basic prepackaged assignment rules. Modify or add rules per your company’s needs.
• To view or manage record type assignments for leads, in Setup, type Leads in the Quick Find box and go to Leads > RecordTypes.
6
Customize Lead Management in Your Partner CommunitySalesforce Lightning Partner Management
• To create approval workflows, type Approval in the Quick Find box in Setup, and then click Workflow & Approvals > ApprovalProcesses.
• To modify lead assignment rules, in Setup, type Leads in the Quick Find box and go to Leads > Assignment Rules
SEE ALSO:
Edit Community Pages and Components in Community Builder
Manage Marketing Development Funds in a Partner Community
USER PERMISSIONS
To customize a partnercommunity with theLightning PartnerManagement solution:• “Create and Set Up
Communities”
The Lightning Partner Management solution contains a custom page and custom objects to helpyou manage marketing funds for your partners. You can allocate and manage marketing fundbudgets, requests, claims, and allocations for your partners from your community.
Add the Marketing Funds custom page to your community’s navigation menu to manage marketingfunds in your community. The buttons and components on this page use the following customobjects to store this data:
• Budget
• Budget Entry
• Fund Claim
• Fund Request
To make sure partner community members can use lead management functionality:
• Assign the Partner user profile to partner users.
• Edit the Partner user profile and include access to the Deal Registration and Sales record types for leads.
• Assign the “Global Partner Permissions” and “MDF Permissions” permission sets to partner users.
Customize the Marketing Funds page and associate the components on the page with your preferred view of Salesforce data that youwant to share with your partners.
1. Open Community Workspaces or Community Management.
2. Go to Community Builder and from the Pages menu, select Marketing Funds.
7
Manage Marketing Development Funds in a PartnerCommunity
Salesforce Lightning Partner Management

3.Click and switch to the Page Editor. All the components on this page are customizable.
4. Click and customize the headline component messaging for your partners.
5. Click through each tab and customize each component within the tabs. Make sure that you select the component within the taband not the tab set. Select an appropriate list view filter for each, as shown in the examples.
• MDF Budgets: Select Active Budgets.
• Fund Requests: Select Pending.
• Fund Claims: Select All.
6. Optionally, customize the Create a Fund Request button to add or remove actions.
7. Next, create workflows for new Fund Requests and Fund Claims with inputs from your Sales and Marketing teams. Go to Setup andtype Approval in the Quick Find box, and then click Workflow & Approvals > Approval Processes.
SEE ALSO:
Edit Community Pages and Components in Community Builder
8
Manage Marketing Development Funds in a PartnerCommunity
Salesforce Lightning Partner Management

INDEX
Ccommunities
lead management 6marketing funds management 7partners 1–3, 5
LLightning Partner Management
lead management 6marketing data 5marketing funds management 7
Lightning Partner Management (continued)sales data 5
Ppartner community
create 3lead management 6marketing data 5marketing funds management 7sales data 5
partnerscommunities 1–3
9


