58
Art Curriculum Sample

Art Curr
iculum
Sam
ple

Legal NoticesCorporate Headquarters 5530 St. Patrick Suite 2210 Montreal, Quebec Canada H4E 1A8 Tel: (514) 278-8666 Fax: (514) 278-2666 www.toonboom.com
DisclaimerThe content of this manual is covered by a specific limited warranty and exclusions and limit of liability under the applicable License Agreement as supplemented by the special terms and conditions for Adobe®Flash® File Format (SWF). Please refer to the License Agreement and to those special terms and conditions for details.
The content of this manual is the property of Toon Boom Animation Inc. and is copyrighted. Any reproduction in whole or in part is strictly prohibited. For further information, please contact Toon Boom Animation Inc. at the Corporate Headquarters address.
Copyright © 2011 by Toon Boom Animation Inc. All rights reserved.
TrademarksFlip Boom All-Star is a trademark owned by Toon Boom Animation Inc. All other trademarks are the property of their respective owners.
CreditsDocumentation Development: Peter Cawthorne
Content Development: Marie-Eve Chartrand, Anouk Whissell, Shabana Ali, Annie Rodrigue, Sébastien Stasse.
Art Development: Marie-Eve Chartrand, Anouk Whissell, Shabana Ali, Tania Gray, Annie Rodrigue.
Publication DateOctober 2011
Art Curr
iculum
Sam
ple

1
Contents
About This Learning Curriculum ................................................................................................ 3
Activities........................................................................................................................................................... 7
Sample Material ........................................................................................................................................ 9What is in the Sample Material Package? ....................................................................................................... 10How to Install the Sample Material Package .................................................................................................. 12
Evaluation Grids...................................................................................................................................... 13Obtaining Copies of the Evaluation Grids ...................................................................................................... 13Student Evaluation - M1: Shapes and Characters ........................................................................................... 14Student Evaluation - M2: Creating Characters from the Library .................................................................... 17Student Evaluation - M3: Introduction to Animation ...................................................................................... 19Student Evaluation - M4: Experimenting With Animation .............................................................................. 22Student Evaluation - M5: Weather Animation ................................................................................................ 25Student Evaluation - M6: Background Design ................................................................................................ 28Student Evaluation - M7: Walk-cycle Animation ............................................................................................. 30Student Evaluation - M8: Title and End Credits .............................................................................................. 32Student Evaluation - M9: Adding Sound Effects from the Library .................................................................. 35Student Evaluation - M10: Recording Dialogue and Sound ........................................................................... 37Student Evaluation - M11: Importing Music and Sound ................................................................................. 40
Art Curr
iculum
Sam
ple

2
Flip Boom All-Star 2 - Teacher Guide
Art Curr
iculum
Sam
ple

About This Learning CurriculumYou have in front of you the introduction to art and animation curriculum created by Toon Boom Animation. This curriculum is designed for students who are at an elementary education level. The content of this curriculum is substantial and covers many topics.
This chapter is divided as follows:
• Who is this Curriculum Intended For?, on page 4
• What is the Goal?, on page 4
• What is the Approach?, on page 4
• Which Topics are Covered?, on page 4
• About the Modules, on page 6
• Outlines, on page 6
• Sample Material, on page 6
Art Curr
iculum
Sam
ple
4
Flip Boom All-Star 2 - Teacher Guide
Who is this Curriculum Intended For?This curriculum is intended for elementary education schools which teach an introduction to drawing, arts and animation.
What is the Goal?The goal of this curriculum is to guide the student through his first steps in the art world where he will improve his drawing skills and discover animation using intuitive and user-friendly technology.
What is the Approach?In this curriculum, the student will not only learn to use a great animation software but also learn all about the basics of drawing and animation.
Instead of learning the software by reading technical documents, the student will learn by participating in the course which Toon Boom Animation has compiled. This course introduces the student to all of the most popular drawing principles and design tips. The idea behind this curriculum is to seamlessly integrate Toon Boom’s software into the school course plan and support the teaching of arts and animation. By the time the student reaches the end of the course, he will have acquired drawing skills, basic animation skills and have successfully completed all the essential drawing exercises.
This course is not a software learning curriculum, it is an art and animation curriculum assisted by the use of Toon Boom Animation technology.
Which Topics are Covered?Here is a list of some of the main topics covered in this curriculum:
• Drawing Shapes
• Designing Characters
• Creating Characters out of Shapes and Templates
• Bouncing Ball
• Animation Principles
• Walk-cycle
• Weather and Effects Animation
• Background Design
• Title and End Credits
• Word Animation
• Adding Sound Effects
• Recording Dialogue
• Importing Background Music
Art Curr
iculum
Sam
ple

About This Learning Curriculum
5
How is The Curriculum Organized?This curriculum is consists of two books and sample material:
• Teacher Guide
• Workbook
Teacher Guide
The Teacher Guide is only intended for the teacher. It contains explanations related to the modules, activities and outline as well as evaluation grids for the student workbook.
Here is what you will find in the Teacher Guide:
• Activities
• Sample Material
• Evaluation Grids
Workbook
The workbook is comprised of several modules and contains all the theory and activities for the entire course. With this workbook, the student has all the tools he needs to learn and practice his drawing and animation skills.
Here is a list of all the modules contained in the workbook:
• M1: Shapes and Characters
• M2: Creating Characters From the Library
• M3: Introduction to Animation
• M4: Experimenting With Animation
• M5: Weather Animation
• M6: Background Design
• M7: Walk-Cycle Animation
• M8: Title and End Credits
• M9: Adding Sound Effects from the Library
• M10: Recording Dialogue and Sound
• M11: Importing Music and SoundArt C
urricu
lum S
ample

6
Flip Boom All-Star 2 - Teacher Guide
About the ModulesThe workload in this course can vary depending on the number of topics which you want to teach the student, what focus of the class is, and the duration of the classes.
The curriculum is split into modules to make your task easier. These modules are composed of theory sections and activities.
If your classes are rather short, you can ask the students to read the theory part of the selected module as homework, working in this way will allow the students to be prepared when they begin the next class.
The main activities are explained in depth and have detailed step-by-steps to enable both the student and the teacher to clearly understand the topic at hand. Once these main activities are done, the student can complete some of the extra activities as homework. These extra activities are less detailed, allowing the student to practice and apply what he learned during the class.
OutlinesThis curriculum has several modules. Not all art and animation programs focus on all of these themes. This curriculum is made to be broken-down and reorganized depending on the topics being taught.
Sample MaterialMost exercises in this curriculum come with sample material. Sometimes, the students require assets from the library in order to start their exercise.
Reference examples are also provided in the sample material package. Whether or not you decide to provide these to the students is up to you. These can be used as a reference so that they can see what their final output should look like.
Art Curr
iculum
Sam
ple

14
Flip Boom All-Star 2 - Teacher Guide
Student Evaluation - M1: Shapes and CharactersThis section is designed for the teacher to evaluate the progress of the student throughout the year.
There are standard criteria based on language, organization, as well as questions relating to the activities covered in the book.
Student Name:
Class:
Grade or Student Year:
Date:
Evaluation Criteria
General Classwork
Overall organization of work
Neatness
Follows logical process
Asks questions
Diligence
Understands task at hand
Computer Skills
Activity Related
Completes all tasks
Uses imagination
Use of colour
Activity 1: Drawing Basic Shapes
Understands task
Exc
eed
s E
xpec
tati
ons
Ach
ieve
s E
xpec
tati
ons
Par
tly
Ach
ieve
s E
xpec
tati
ons
Do
es N
ot
Rea
ch
Exp
ecta
tio
ns
Yes
No
Art Curr
iculum
Sam
ple

Evaluation Grids
15
Understands the Interface
Makes use of at least two Drawing tools
Completes all tasks
Uses imagination
Use of colour
Activity 2: Drawing Characters Step by Step
Understands task
Understands the Interface
Makes use of at least two Drawing tools
Completes all tasks
Uses imagination
Use of colour
Activity 3: Drawing Characters
Understands task
Understands the Interface
Makes use of at least two Drawing tools
Completes all tasks
Uses imagination
Use of colour
Activity 4: Drawing an Action
Understands task
Understands the Interface
Makes use of at least two Drawing tools
Evaluation Criteria
Exc
eed
s E
xpec
tati
ons
Ach
ieve
s E
xpec
tati
ons
Par
tly
Ach
ieve
s E
xpec
tati
ons
Do
es N
ot
Rea
ch
Exp
ecta
tio
ns
Yes
No
Art Curr
iculum
Sam
ple

16
Flip Boom All-Star 2 - Teacher Guide
Completes all tasks
Uses imagination
Use of colour
Action is convincing and understandable
Activity 5: Drawing a Character from a Description
Choose a description
Understands the task
Completes the task
Draw the Chosen Character in Flip Boom All-Star
Understands the task
Completes the task
Illustrates the task well
Evaluation Criteria
Exc
eed
s E
xpec
tati
ons
Ach
ieve
s E
xpec
tati
ons
Par
tly
Ach
ieve
s E
xpec
tati
ons
Do
es N
ot
Rea
ch
Exp
ecta
tio
ns
Yes
No
Art Curr
iculum
Sam
ple

Art Curr
iculum
Sam
ple

Legal NoticesCorporate Headquarters 5530 St. Patrick Suite 2210 Montreal, Quebec Canada H4E 1A8 Tel: (514) 278-8666 Fax: (514) 278-2666 www.toonboom.com
DisclaimerThe content of this manual is covered by a specific limited warranty and exclusions and limit of liability under the applicable License Agreement as supplemented by the special terms and conditions for Adobe®Flash® File Format (SWF). Please refer to the License Agreement and to those special terms and conditions for details.
The content of this manual is the property of Toon Boom Animation Inc. and is copyrighted. Any reproduction in whole or in part is strictly prohibited. For further information, please contact Toon Boom Animation Inc. at the Corporate Headquarters address.
Copyright © 2011 by Toon Boom Animation Inc. All rights reserved.
TrademarksFlip Boom All-Star is a trademark owned by Toon Boom Animation Inc. All other trademarks are the property of their respective owners.
CreditsDocumentation Development: Peter Cawthorne
Content Development: Marie-Eve Chartrand, Anouk Whissell, Shabana Ali, Annie Rodrigue, Sébastien Stasse.
Art Development: Marie-Eve Chartrand, Anouk Whissell, Shabana Ali, Tania Gray, Annie Rodrigue.
Publication DateOctober 2011
Art Curr
iculum
Sam
ple

Contents
Introduction .................................................................................................................................................. 5
Shapes and Characters....................................................................................................................... 7Theory ............................................................................................................................................................... 8
What is Animation? ..................................................................................................................................... 8Discovering Flip Boom All-Star’s Interface ............................................................................................... 10
Activity 1: Drawing Basic Shapes .................................................................................................................... 22Activity 2: Drawing Characters Step by Step .................................................................................................. 25
Drawing a Bear ......................................................................................................................................... 25Drawing a Worker ..................................................................................................................................... 30Drawing a Bird .......................................................................................................................................... 33
Activity 3: Drawing Characters ........................................................................................................................ 37Activity 4: Drawing an Action .......................................................................................................................... 39Activity 5: Drawing a Character From a Description ...................................................................................... 40
Choose a Description ............................................................................................................................... 40Draw the Chosen Character in Flip Boom All-Star ................................................................................... 40
Creating Characters From the Image Library .............................................................. 43Theory ............................................................................................................................................................. 44
The Image Library ..................................................................................................................................... 44The Collections ......................................................................................................................................... 45The Graphics ............................................................................................................................................. 46
Activity 1: Creating Basic Shape Friends ........................................................................................................ 47What’s in the Basic Shape Friends Collection .......................................................................................... 47Building your Basic Shape Friends ............................................................................................................ 48
Activity 2: Personalizing the Graphics ............................................................................................................. 50
Introduction to Animation ............................................................................................................. 53Theory ............................................................................................................................................................. 54
How Does the Bouncing Ball Work? ......................................................................................................... 54Show/Hide Previous/Next Pages .............................................................................................................. 55Draw Behind ............................................................................................................................................. 56
Activity 1: Animating the Ball .......................................................................................................................... 58Activity 2: Colouring the Bouncing Ball and More .......................................................................................... 64Activity 3: More Uses for Draw Behind ........................................................................................................... 67Activity 4: Animating One of the Character’s Features .................................................................................. 68
Experimenting With Animation ................................................................................................ 69Theory ............................................................................................................................................................. 70
Making use of the Show/Hide Previous/Next Pages option .................................................................... 70Using the Bring To The Front button ....................................................................................................... 71Using the Send To The Back button ......................................................................................................... 72
Art Curr
iculum
Sam
ple
1

Flip Boom All-Star 2 - Student Workbook
Activity 1: Animating Letters ...........................................................................................................................73Activity 2: Animating Colours ..........................................................................................................................76Activity 3: Animating a Greeting Card ............................................................................................................79Activity 4: Animating Basic Shapes ..................................................................................................................80Activity 5: A Planet and its Many Moons .........................................................................................................87
Weather Animation ..............................................................................................................................89Theory ..............................................................................................................................................................90
Rain ............................................................................................................................................................91Snow ..........................................................................................................................................................92Water Droplet ...........................................................................................................................................93Lightning ...................................................................................................................................................94Dust ...........................................................................................................................................................95Understanding Cycles ...............................................................................................................................96
Activity 1: Animating a Rain Cycle ...................................................................................................................97Activity 2: Animating a Snow Cycle .................................................................................................................99Activity 3: Animating Lightning .....................................................................................................................101Activity 4: Animating Dust .............................................................................................................................104Activity 5: Combining Effects in a Scene .......................................................................................................106
Background Design............................................................................................................................107Theory ............................................................................................................................................................108
How to Draw a Background ....................................................................................................................108Visualizing the Scene ...............................................................................................................................108Perspective ..............................................................................................................................................114
Activity 1: Draw and Paint a Background ......................................................................................................117Activity 2: Include your Characters and Make it Rain ....................................................................................120
Walk-Cycle Animation......................................................................................................................121Theory ............................................................................................................................................................122
The Walk-cycle ........................................................................................................................................122Activity 1: Animating a Walk-cycle ................................................................................................................124Activity 2: How a Character Runs ..................................................................................................................131
Title and End Credits........................................................................................................................133Preparing Your Animation .............................................................................................................................134Activity 1: Adding a Title ...............................................................................................................................137Activity 2: Adding End Credits ......................................................................................................................139Activity 3: Adding Scenes ..............................................................................................................................140
Adding Sound Effects from the Library ...........................................................................141Theory ............................................................................................................................................................142
Choosing a Sound for your Animation ....................................................................................................142Opening the Sound Library .....................................................................................................................142Previewing Different Sounds in the Library .............................................................................................143
Activity 1: Adding Sound to Your Project .....................................................................................................144Dragging a Sound from the Library ........................................................................................................144Using the Arrow to Add a Sound from the Library .................................................................................145Previewing your Animation with Sound ..................................................................................................145
Activity 2: Moving and Removing a Sound ...................................................................................................146Moving a Sound in your Project ..............................................................................................................146Removing a Sound from your Project .....................................................................................................147
Art Curr
iculum
Sam
ple
2

Activity 3: Tips for Adding More Sounds ...................................................................................................... 148Sound Icon .............................................................................................................................................. 148Overlapping Sounds ............................................................................................................................... 148Using the Arrow to Add a Second Sound .............................................................................................. 149Changing the Playback Speed ................................................................................................................ 150
Recording Dialogue and Sound............................................................................................. 151Theory ........................................................................................................................................................... 152
Before you Start to Record Sound .......................................................................................................... 152The Record Sound Window ................................................................................................................... 152
Activity 1: Splat! Crack! Kaboom! .................................................................................................................. 154Activity 2: Recording Sound .......................................................................................................................... 155
Importing Music and Sound....................................................................................................... 159Theory ........................................................................................................................................................... 160
How to Import a Sound File .................................................................................................................... 160Using the Sound Element Editor ............................................................................................................ 162
Activity 1: Editing and Placing Your Sound .................................................................................................. 166Activity 2: Creating a Fade-In and Fade-Out ................................................................................................ 168
Fade-In .................................................................................................................................................... 168Fade-Out ................................................................................................................................................. 169
Activity 3: Other Uses for Volume Shifts ....................................................................................................... 170
Art Curr
iculum
Sam
ple
3

Flip Boom All-Star 2 - Student Workbook
Art Curr
iculum
Sam
ple
4

Introduction
In this workbook, you will learn how to get started in the world of animation. Throughout the following lessons, you will find out about drawing tools and how to develop your drawing skills and imagination.
You will start learning your very first animation theories. Go through the steps of a bouncing ball and animate your own! With Flip Boom All-Star 2, you will animate, colour and even draw a character while following a description.
You will get acquainted with some of the more advanced functions of Flip Boom All-Star 2 to create animations like animated letters, colours or shapes. You will also be
Art Curr
iculum
Sam
ple
Flip Boom All-Star 2 - Student Workbook
introduced to the history of animation and will get to try your hand at some of the old animation toys.
You will observe and experiment with some of nature’s phenomena. The following lessons will introduce you to atmospheric effects and animation as well as background design and perspective.
You will learn about some of the mechanics of animation such as a simple walk-cycle and adding scenes to your film projects. As you progress, you will get acquainted with more advanced tools and options in Flip Boom All-Star 2.
Here is a list of all the modules contained in your workbook:
• M1: Shapes and Characters, on page 7
• M2: Creating Characters From the Image Library, on page 43
• M3: Introduction to Animation, on page 53
• M4: Experimenting With Animation, on page 69
• M5: Weather Animation, on page 89
• M6: Background Design, on page 107
• M7: Walk-Cycle Animation, on page 121
• M8: Title and End Credits, on page 133
• M9: Adding Sound Effects from the Library, on page 141
• M10: Recording Dialogue and Sound, on page 151
• M11: Importing Music and Sound, on page 159
Art Curr
iculum
Sam
ple
6

M1: Shapes and Characters
This module is divided into these two topics:
• Theory, on page 8
• Activity 1: Drawing Basic Shapes, on page 22
• Activity 2: Drawing Characters Step by Step, on page 25
• Activity 3: Drawing Characters, on page 37
• Activity 4: Drawing an Action, on page 39
• Activity 5: Drawing a Character From a Description , on page 40
Art Curr
iculum
Sam
ple

Flip Boom All-Star 2 - Student Workbook
TheoryThis section is divided as follows:
• What is Animation?, on page 8
• Discovering Flip Boom All-Star’s Interface, on page 10
What is Animation?Have you ever wondered how animation is done?
Animation is a series of drawings of the same character. Each drawing has slight changes in it. These small changes create the illusion of movement. You need to flip through the drawings to see it move.
You can create an illusion of movement with only a few drawings. In the picture above there are only three different drawings. It is easy to understand that the cat catches the string.
Animation does not need complex characters. Animation can be made by drawing shapes. The shapes may be circles, squares, triangles, lines or colours.
What is the cat doing?
1
2
3
Art Curr
iculum
Sam
ple
8

Shapes and Characters
How about an animation of the phases of the moon?
Or a growing flower made out of shapes?
Or animated colours?
1 2 3 4
5 6 7 8Art C
urricu
lum S
ample
9

Flip Boom All-Star 2 - Student Workbook
Discovering Flip Boom All-Star’s InterfaceThis lesson will be your first time using the Flip Boom All-Star software. Look at this section if you need help with the application.
The Interface
The INTERFACE is what you see when you start the Flip Boom All-Star software. This is where you draw, colour and play your animation.
It’s like a large drawing pad. You have all the pencils, paints and tools to make a picture and then turn it into a cartoon.
The interface is made of many sections. You will learn about new tools and features in each lesson.
This is called an INTERFACE
Art Curr
iculum
Sam
ple
10
Shapes and Characters
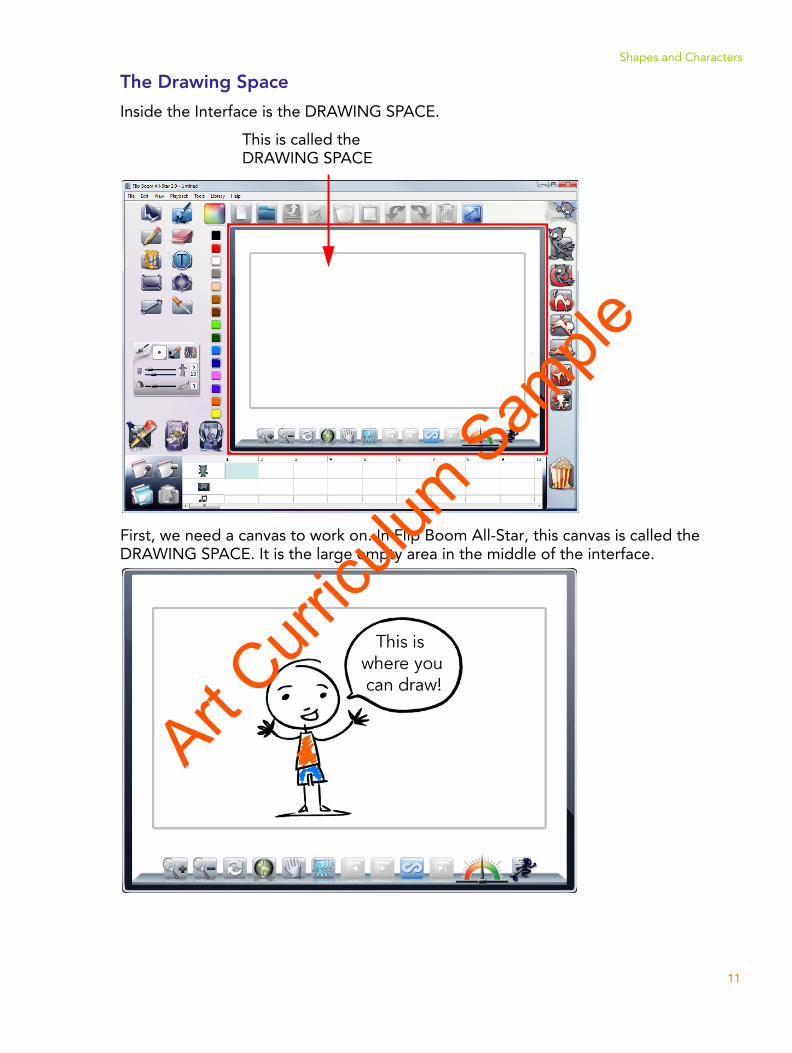
The Drawing Space
Inside the Interface is the DRAWING SPACE.
First, we need a canvas to work on. In Flip Boom All-Star, this canvas is called the DRAWING SPACE. It is the large empty area in the middle of the interface.
This is called the DRAWING SPACE
Art Curr
iculum
Sam
ple
11
Flip Boom All-Star 2 - Student Workbook
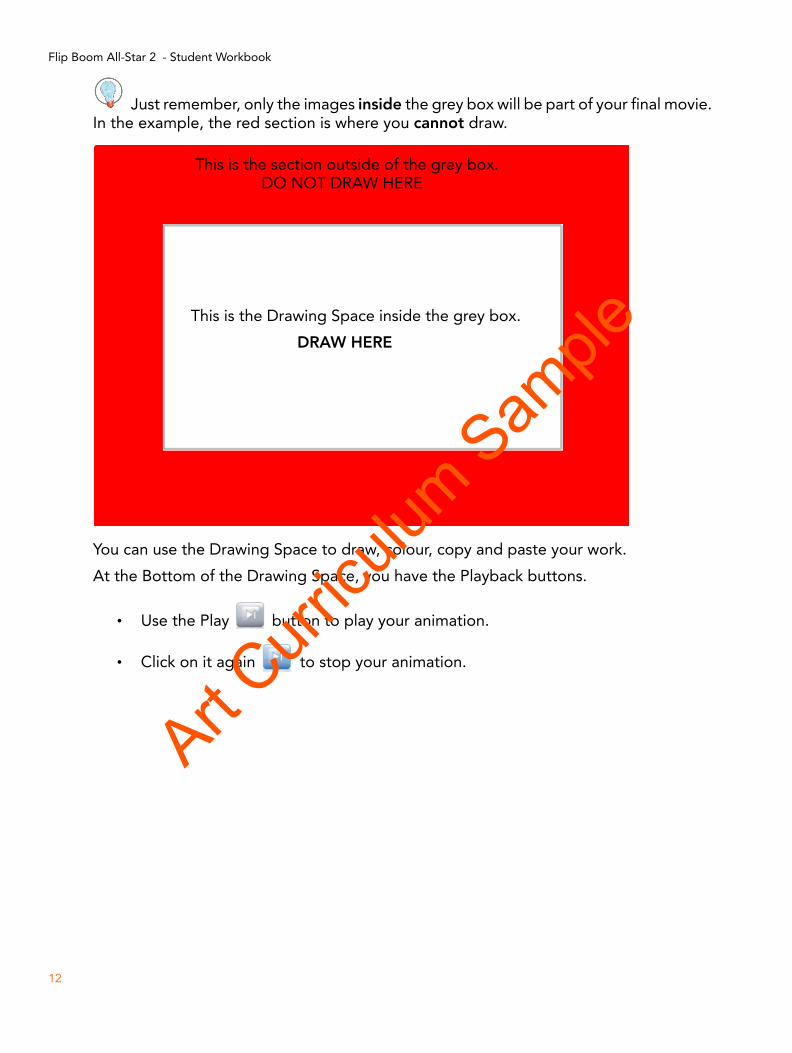
Just remember, only the images inside the grey box will be part of your final movie. In the example, the red section is where you cannot draw.
You can use the Drawing Space to draw, colour, copy and paste your work.
At the Bottom of the Drawing Space, you have the Playback buttons.
• Use the Play button to play your animation.
• Click on it again to stop your animation.
This is the Drawing Space inside the grey box.
DRAW HERE
This is the section outside of the grey box. DO NOT DRAW HERE
Art Curr
iculum
Sam
ple
12

Shapes and Characters
The Colour Palette
Inside the Interface is the COLOUR PALETTE.
Use the Colour Palette to choose the colour to draw or paint with.
This is called the COLOUR PALETTE
Colours
Colour Picker
Colour Wheel
Art Curr
iculum
Sam
ple
13

Flip Boom All-Star 2 - Student Workbook
Colours
The coloured squares in the Palette are the Colours. To select a colour, click on a colour. A white border shows that this colour is selected.
Colour Picker
Click on the Colour Picker button to use this tool. With this, you can pick any colour from the Drawing Space. The selected Colour from the Palette will be replaced with the colour that you picked.
Colour Wheel
Click on the Colour Wheel button to open the Colour Wheel. Then click anywhere in the Colour Wheel to select a colour. The selected Colour Pot will change to use that colour.
The colour changes to the same yellow as in the drawing of the sun.
Art Curr
iculum
Sam
ple
14

Shapes and Characters
The Basic Drawing Tools
Flip Boom All-Star comes with a set of drawing and painting tools.
Inside the Interface are the DRAWING TOOLS.
Brush tool
You paint strokes in the Drawing Space by using the Brush tool.
Click on the Brush tool button to select it. Then, draw a line, like this:
These are the DRAWING TOOLS
Can’t see the Drawing Tools? Click on this button to make them appear.
This line is called a Stroke. Each time you draw a line, it creates a new stroke.Art C
urricu
lum S
ample
15

Flip Boom All-Star 2 - Student Workbook
Do not try to fill a shape with the Brush Tool. It’s not accurate enough for this task. Use the Paint Tool instead.
Fill done with the Brush Tool
Fill done with the Paint Tool
Advanced Brush Settings
You can change the size of your brush. Use the Minimum and Maximum sliders in the Brush Properties. The Brush Properties are under all the Drawing Tools. It changes depending on which Tool is selected.
With a Pen Tablet, the brush tool works like a real pen!
• Click on the white square with a dot in its centre to reveal the various Brush tips available. Click on one to select it.
• Use the Style Picker to take up the properties of a line created by the Brush in the Drawing Space. This includes its size, smoothness and colour.
• The Draw Behind button allows you to draw strokes behind previously drawn images. Usually new strokes are drawn on top of previously drawn images.
• The Minimum Size slider controls the thinner portion of your line. This is when you apply little pressure on your pen.
• The Maximum Size slider controls the wider portion of your line.This is when you apply more pressure on your pen.
• You can modify the smoothness of your line with the Smoothness slider. A higher value will soften the jaggedness of the strokes.
Art Curr
iculum
Sam
ple
16

Shapes and Characters
Paint tool
The Paint tool fills shapes with colour.
The shapes must be closed or else the Paint tool will not work.
Draw a circle with the Brush tool. Click on the Paint tool button to select it. Now click in the middle of the circle to fill it!
You can change the colour of a stroke using the Paint tool.
This shape is not closed so the Paint tool did not fill the shape.
This shape is closed so the Paint tool filled the shape.
Click on the stroke with the Paint Tool to colour it.
Before After
Art Curr
iculum
Sam
ple
17

Flip Boom All-Star 2 - Student Workbook
Eraser tool
With the Eraser tool you can erase any part of your drawing.
Click on the Eraser tool button and erase a part of your drawing.
Advanced Eraser Settings
You can change the Eraser Settings using the various options in the Eraser Properties.
The Eraser Properties work just like the Brush Properties.
• Click on the white square with a dot in its centre to reveal the various Eraser tips available. Click on one to select it.
• Use the Style Picker, from the Brush Properties panel, to select a brush stroke from the Drawing Space. Click on the Eraser tool to see those settings transferred to the Eraser Properties panel. This includes size and smoothness.
• The Minimum Size slider controls the thinner portion of your eraser line. This is when you apply little pressure on your pen.
• The Maximum Size slider controls the wider portion of your eraser line.This is when you apply more pressure on your pen.
• You can modify the smoothness of your line with the Smoothness slider. A higher value will soften the jaggedness of the strokes. Art C
urricu
lum S
ample
18

Shapes and Characters
Text tool
The Text tool allows you to add text to the Drawing Space.
Click on the Text tool button. Write a word in the Drawing Space!
Advanced Text Tool Settings
Select different fonts and sizes for the Text tool in the Text Properties. This is also where the Bold and Italic options are.
Use the drop-down menu to choose a font
Change size here
These are the Bold and Italic buttons
Art Curr
iculum
Sam
ple
19
Flip Boom All-Star 2 - Student Workbook
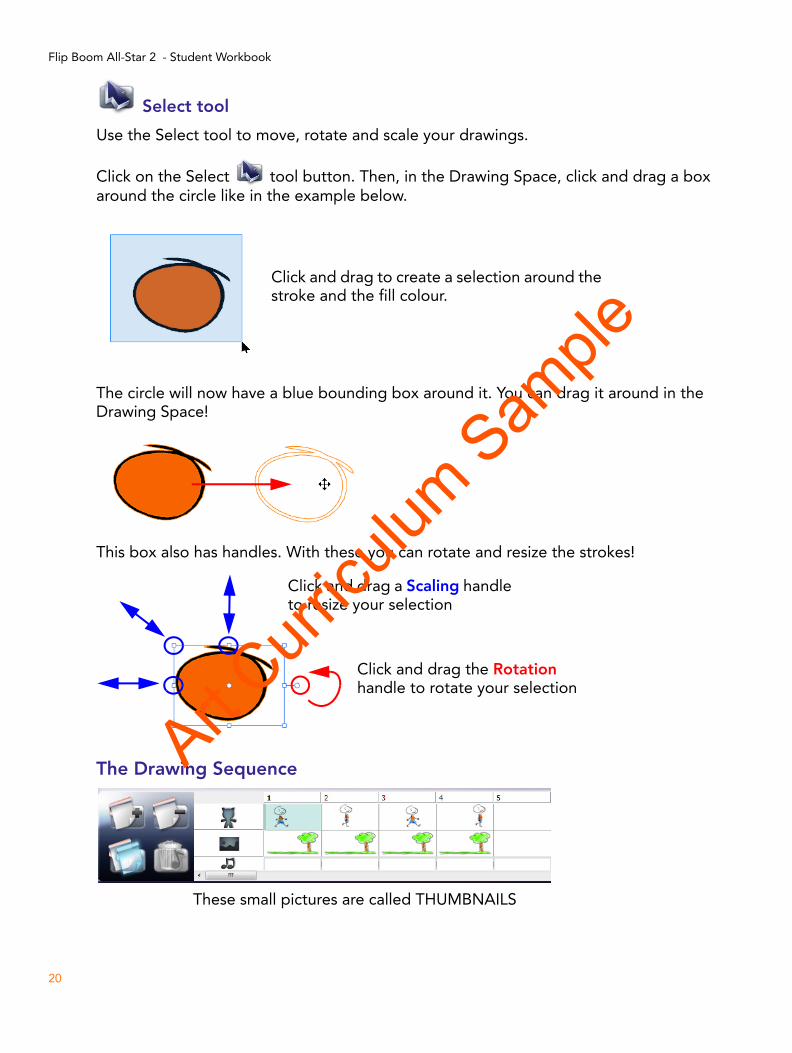
Select tool
Use the Select tool to move, rotate and scale your drawings.
Click on the Select tool button. Then, in the Drawing Space, click and drag a box around the circle like in the example below.
The circle will now have a blue bounding box around it. You can drag it around in the Drawing Space!
This box also has handles. With these you can rotate and resize the strokes!
The Drawing Sequence
Click and drag to create a selection around the stroke and the fill colour.
Click and drag the Rotation handle to rotate your selection
Click and drag a Scaling handle to resize your selection
These small pictures are called THUMBNAILS
Art Curr
iculum
Sam
ple
20

Flip Boom All-Star 2 - Student Workbook
Activity 1: Drawing Basic ShapesUse what you have just learned to complete this activity!
Now you know how to use the basic drawing tools. The best way to improve your artistic skill is to practice!
To draw basic shapes:
1. Double-click on the Flip Boom All-Star icon.
2. Name your project BasicShapes followed by your initials, for example BasicShapesAW, and click on Create.
3. Select the Brush tool. Then select a colour of your choice in the Colour Palette.
4. In the Drawing Space, trace a shape such as a triangle.
Art Curr
iculum
Sam
ple
22
Shapes and Characters
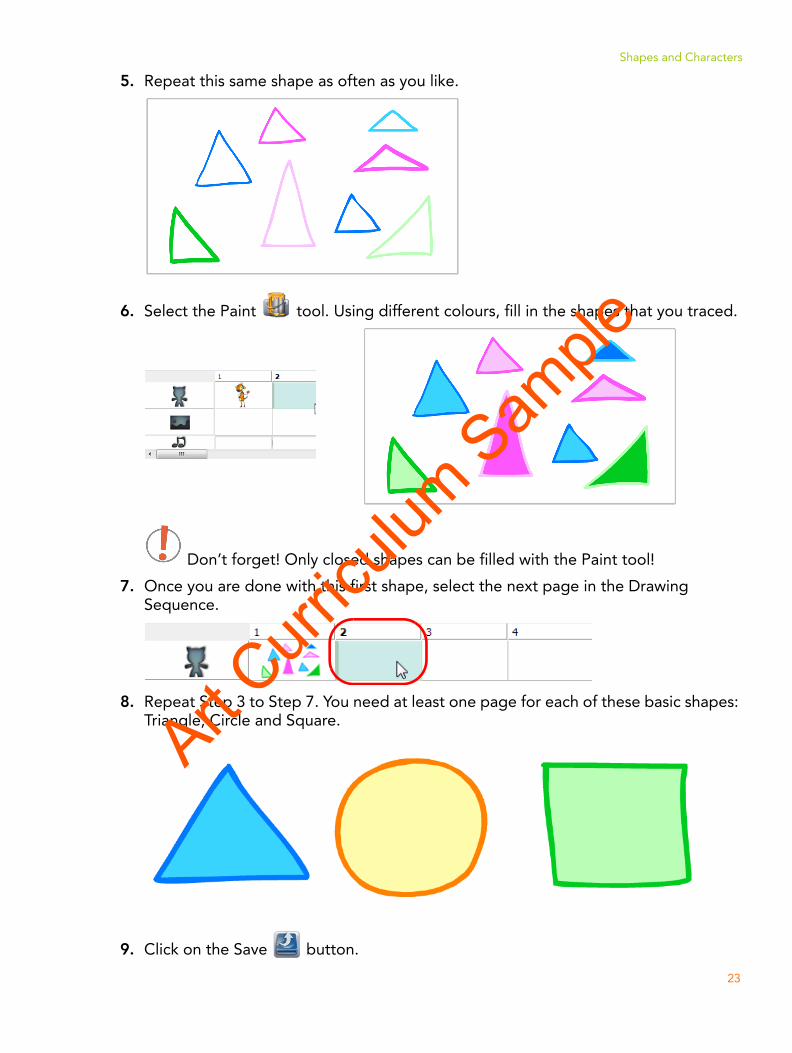
5. Repeat this same shape as often as you like.
6. Select the Paint tool. Using different colours, fill in the shapes that you traced.
Don’t forget! Only closed shapes can be filled with the Paint tool!
7. Once you are done with this first shape, select the next page in the Drawing Sequence.
8. Repeat Step 3 to Step 7. You need at least one page for each of these basic shapes: Triangle, Circle and Square.
9. Click on the Save button.
Art Curr
iculum
Sam
ple
23

Shapes and Characters
Activity 2: Drawing Characters Step by StepHere are some step by step projects for you to practice your drawing skills. You will draw a bear, a worker, and a bird with shapes.
Drawing a Bear
To draw a bear:
1. Double-click (click twice quickly) on the Flip Boom All-Star icon.
2. Name your project Characters followed by your initials, for example CharactersAW, and click on Create.
3. Select the Brush tool. Then select a colour of your choice in the Colour Palette.
Art Curr
iculum
Sam
ple
25

Flip Boom All-Star 2 - Student Workbook
4. In the Drawing Space, trace a simple circle.
5. Draw two dots for the eyes.
Art Curr
iculum
Sam
ple
26

Shapes and Characters
6. You can now draw a nose and a mouth.
7. Add two ears and a line for the tummy also.
Art Curr
iculum
Sam
ple
27

Flip Boom All-Star 2 - Student Workbook
8. Add small details to the ears, and eyebrows.
9. Now that the face is complete, you can draw arms and legs!
Art Curr
iculum
Sam
ple
28

Shapes and Characters
10.Finish by colouring it in.
Art Curr
iculum
Sam
ple
29

Flip Boom All-Star 2 - Student Workbook
Drawing a Worker
To draw the worker:
1. In the same project you used to draw the bear, on a new page, draw a square.
2. Start with the eyes. Each eye is made up of a line with a dot underneath.
Art Curr
iculum
Sam
ple
30

Shapes and Characters
3. Add the nose.
4. Then the mouth.
5. You can now add a hat and some shorts.
Art Curr
iculum
Sam
ple
31

Flip Boom All-Star 2 - Student Workbook
6. And the legs and arms.
7. Finish by colouring it in!
Art Curr
iculum
Sam
ple
32

Shapes and Characters
Drawing a Bird
1. In the same project you used to draw the worker, in a new page, draw a triangle.
2. Draw two dots for the eyes.
Art Curr
iculum
Sam
ple
33

Flip Boom All-Star 2 - Student Workbook
3. Add a small triangle for the beak.
4. Draw two lines, one on each side for the wings.
5. Then you can add feathers.
Art Curr
iculum
Sam
ple
34
Shapes and Characters
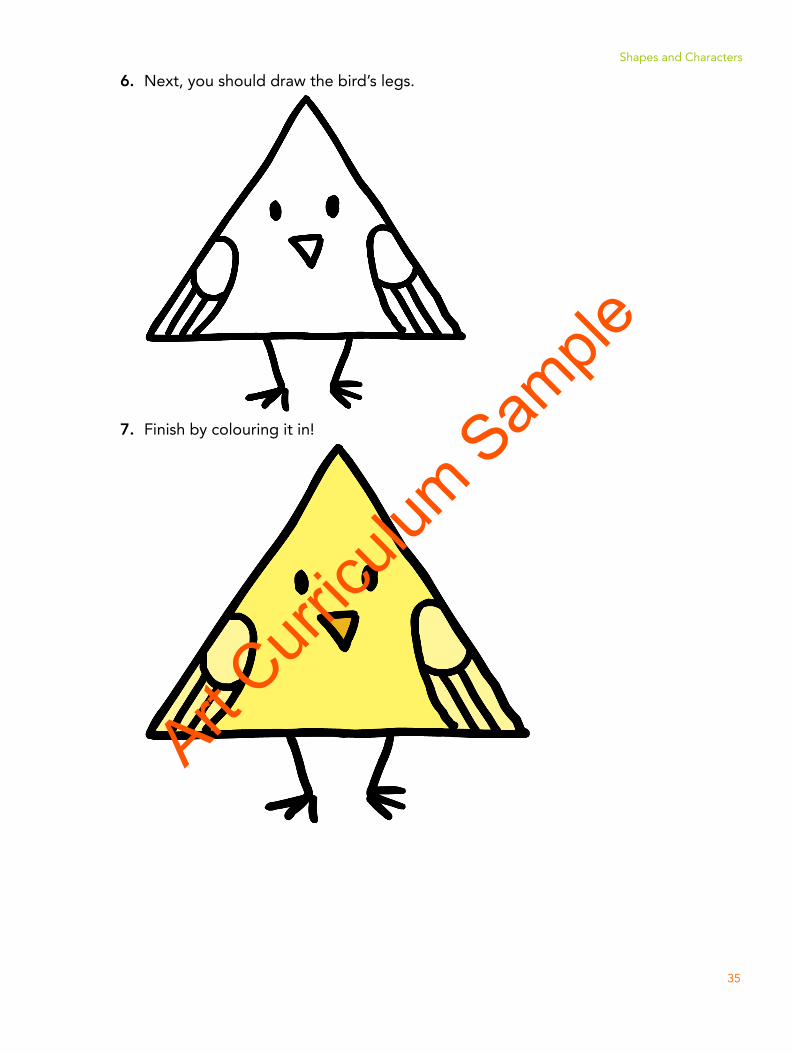
6. Next, you should draw the bird’s legs.
7. Finish by colouring it in!
Art Curr
iculum
Sam
ple
35

Flip Boom All-Star 2 - Student Workbook
Here are more suggestion of shape characters you could try to do:
Art Curr
iculum
Sam
ple
36

Shapes and Characters
Activity 3: Drawing Characters
Use your imagination to draw some characters. Try to draw different types of character: Girl, Boy, Young person, Old person, a Superhero or even an Animal.
To draw characters:
1. Double-click on the Flip Boom All-Star icon.
2. Name your project MyCharacters followed by your initials, then click on Create.3. Draw a character in the Drawing Space. Use the Drawing tools and Colour Palette.
Remember to keep your drawing inside the grey rectangle.
Art Curr
iculum
Sam
ple
37

Flip Boom All-Star 2 - Student Workbook
4. Once you are done with this first character, select the next page in the Drawing Sequence.
5. Repeat Step 3 and Step 4 until you have at least 6 characters.
6. Click on the Save button.
When you are done with this activity, you can draw even more characters!
Art Curr
iculum
Sam
ple
38

Shapes and Characters
Activity 4: Drawing an ActionTake the characters you have drawn and think of actions they could do.
• This little girl loves flowers! Draw her watering a flower.
• Find actions where your character must use an object.
• You could also take two or more of your characters. Imagine them in a situation together, like playing ball!
Art Curr
iculum
Sam
ple
39

Flip Boom All-Star 2 - Student Workbook
Activity 5: Drawing a Character From a Description
Choose a DescriptionRead the five character descriptions below. Choose the one that you like best.
1. A balloon-shaped boy with a striped shirt and a tiny hat.2. A small fairy girl the size of a flower. She has silky wings and a wand.3. An angry lion with big paws and a bushy mane.4. A muscular superhero wearing a costume, mask and cape.5. A cylindrical robot with a dome-shaped lid. It has buttons on the front panel and
long, spindly arms.
Draw the Chosen Character in Flip Boom All-Star
From the description, create a character in Flip Boom All-Star. You will use the following tools:
Brush tool
Paint tool
Draw Behind
Art Curr
iculum
Sam
ple
40

Shapes and Characters
With the Rotate feature , you can rotate the Drawing Space. This will help you to draw comfortably.
Remember to save your project once you have drawn your character.
Art Curr
iculum
Sam
ple
41

M3: Introduction to Animation
This module is divided as follows:
• Theory, on page 54
• Activity 1: Animating the Ball, on page 58
• Activity 2: Colouring the Bouncing Ball and More, on page 64
• Activity 3: More Uses for Draw Behind, on page 67
• Activity 4: Animating One of the Character’s Features, on page 68Art Curr
iculum
Sam
ple

Introduction to Animation
Activity 3: More Uses for Draw Behind
The Draw Behind button is a very useful. You can do many things with it. Try out some of the suggestions below:
• Sometimes you want to fill a small area with colour but can’t seem to do it with
the Paint tool. Using Draw Behind along with the Brush tool is the solution!
• Use Draw Behind and the Brush tool to add shading to a character.
Here is a greyscale version of the character. The shading is more obvious.
Here is a colour version of the character with shading.
Art Curr
iculum
Sam
ple
67

Flip Boom All-Star 2 - Student Workbook
Activity 4: Animating One of the Character’s Features It is time to animate your character. Choose one small part of the character to animate such as the character’s hair growing.
1. Using the Duplicate button, make a copy of your first page.
2. In the second page, erase the part of your character that you wish to animate.
3. Use the Show/Hide Previous/Next Pages button. Redraw the missing part a slightly different position than the start position. Don’t forget to colour it in as well.
You can use if you need to get in closer. You can use if you need to back out again.
4. Repeat Step 1 to Step 3 at least four more times. You should have at least six pages in your Drawing Sequence.
5. Click on the and to watch your animation play.6. Save your project.
What is different in these three drawings?
2 31
Art Curr
iculum
Sam
ple
68

M9: Adding Sound Effects from the Library
Not only can you record sound over your animation, but you can also add sounds from a bank of prerecorded samples. The Sound Library comes with over a 100 different sounds that you can add to your animation to make it even better!
This module is divided as follows:
• Theory, on page 142
• Activity 1: Adding Sound to Your Project, on page 144
• Activity 2: Moving and Removing a Sound, on page 146
• Activity 3: Tips for Adding More Sounds, on page 148Art C
urricu
lum S
ample

Flip Boom All-Star 2 - Student Workbook
Activity 1: Adding Sound to Your Project
Once you have decided on a sound you like, the next step is to add it to your animation. You will add it directly to the sound row. There are two different ways to add sounds to your project. Then you can preview your animation with the added sound.
Dragging a Sound from the LibraryThe first way to add a sound is to drag it directly from the library, and drop it in the sound row.
1. After you’ve decided what sound you want to add, click to select it in the Sound library.
2. Once your sound is selected, drag it directly from the library, and drop it in the sound row. The sound cannot start in the middle of a page, so if you drop the sound in the middle of a page, it will automatically snap to either the start or end of that page, depending on which side it was closer to.
3. Once you have the sound where you want it, let go of the mouse and the sound will turn blue. This means the sound has been added to your animation.Art C
urricu
lum S
ample
144

Adding Sound Effects from the Library
Using the Arrow to Add a Sound from the Library
You can also use the Import Sound button, located to the right of the catalog browser, to add a sound to the first available spot.
1. After you’ve decided what sound you want to add, select it in the Sound library.
2. Click on the Import Sound button, to add the selected sound to the first frame of your animation.
3. Your sound will be added to the first frame of your animation, or if you already have another sound in the Drawing Sequence, your sound will be added directly the end of that sound clip.
Previewing your Animation with Sound
Once you have a sound in your project, press the Play button to preview everything together.Art C
urricu
lum S
ample
145


![HOME [] · We combine Illinois State Board of Education approved Creative Curriculum and Redleaf Family Childcare Curriculum. These curriculums meet each child’s individual needs](https://static.documents.pub/doc/80x56/5f0a98827e708231d42c6842/home-we-combine-illinois-state-board-of-education-approved-creative-curriculum.jpg)


