26
SAP SQN Technical User Manual 8-Step Web Portal Rev 3.1 10-30-09 1
| Date post: | 31-Oct-2018 |
| Category: |
Documents |
| Upload: | nguyencong |
| View: | 236 times |
| Download: | 0 times |

SAP SQN Technical User Manual
8-Step Web Portal
Rev 3.1
10-30-09
1

Table of Contents
Section Description Page
1.1 Logging into SAP via the portal 3
2.1 Entering a Specific Known Notification
Number
4
2.2.1 Using the Search Help to Find a Notification 6
2.2.2 Exporting Your Search to Excel 8
3.1 Step 1 – Problem Definition 9
3.2 Step 2 – Measurement Method 10
3.3 Step 3 – Containment Summary 11
3.4 Step 4 – Root Cause Analysis 14
3.5 Step 5 – 7 Diamonds Analysis 15
3.6 Step 6 – Implementation of Corrective Action 16
3.7 Step 7 – Effectiveness of Corrective Action 17
3.8 Step 8 – Problem Prevention and
Institutionalization of Corrective Action
18
4.1 Logging Follow Ups 19
5.1 Viewing the Print Preview and Printing an 8-
Step
20
6.1 Submitting an 8-Step 21
7.1 Uploading an Attachment 22
7.2 Downloading an Attachment 23
8.1 Changing to Another Notification 24
9.1 Logging Off 25
10.1 FAQ 26
2

Section 1.1: Logging into SAP via the Portal
3
1. Log into the following website or, if you have been assigned an 8-Step, click on the link in your e-mail. If you received the link in an e-mail make note of the notification number that has been referenced.https://sap.allisontransmission.com/sap/bc/webdynpro/sap/zqqmd_8dprocess4_app2?sap-system-login-basic_auth=X&sap-client=100&sap-lang
2. You will see a popup window prompting you to log in as shown below. The logon is case sensitive to make sure your caps lock is not engaged. If you fail to enter the correct username and password combination three times in a row your username will be locked and you will need to call the helpdesk at 317-242-2653 in order to have it reset.
3. Upon successfully logging in you will come to the blank 8-Step page as shown below.
4. For all the various steps of the 8-Step process, instruction on general navigation and what each step is for are shown in the User Manual box shown by the red arrow above.
Section 2.1: Entering a Specific Known Notification Number
4
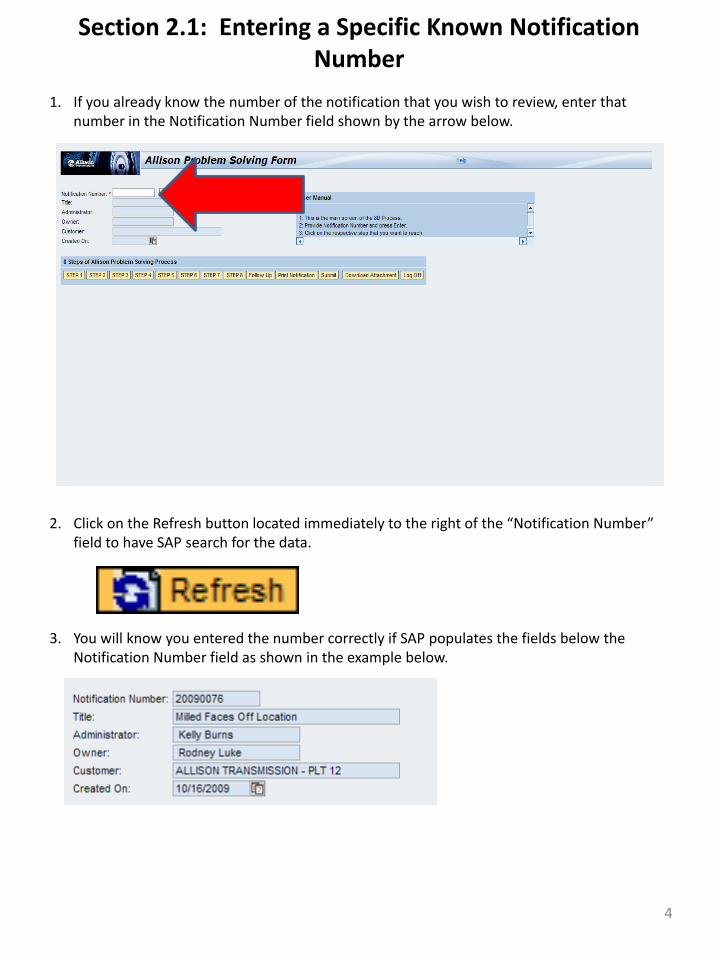
1. If you already know the number of the notification that you wish to review, enter that number in the Notification Number field shown by the arrow below.
2. Click on the Refresh button located immediately to the right of the “Notification Number” field to have SAP search for the data.
3. You will know you entered the number correctly if SAP populates the fields below the Notification Number field as shown in the example below.

Section 2.1: Entering a Specific Known Notification Number (cont)
5
4. You may get an error message after hitting the Refresh button as shown below.
* That error can be caused by a couple reasons. The first possibility is that the number you entered is not in the database and was typed incorrectly.
* The second possibility is that you are an outside vendor and the vendor id number in your user master does not match the vendor number referenced on the notification. In this case you will need to contact your Supplier Quality representative to have them get this setting corrected. In the mean time you will need to submit your 8-Step using the manual form. This can also be obtained by your Supplier Quality representative.

Section 2.2.1: Using the Search Help to Find a Notification Number
6
1. If you do not already know the notification number you want to view, you can use the Search Notification functionality of this website by clicking on the button indicated by the red arrow below.
2. Clicking on that button will open a popup list of all the notifications that you are permitted to view via the web portal. If you are an Allison-badged employee or contactor you should be able to view all notifications. If you are a Supplier, your list will be limited to only those notifications that reference the same vendor number as is entered into your user master.

Section 2.2.1: Using the Search Help to Find a Notification Number (cont)
7
3. You can navegate through the list by clicking on the up and down arrow buttons indicated by the red arrow below.
4. If you want to filter your results, please refer to section 2.2.2 of this document.
5. If you want to download the list to Excel, please refer to section 2.2.4 of this document.
6. Once you have found the notification you want to view, click on the box to the left of the Notification number. This will highlight the line.
7. Click on the Select and Close button.8. This will return you to the main screen and populate the Notification Number field with
the corresponding number from the Search Notification popup. 9. Click on the Refresh button to view the notification.

Section 2.2.2: Exporting your Search to Excel
8
1. In order to download contents of your search to Microsoft Excel, position your cursor over the Export button and click on the lower right hand corner of that button with your mouse.
2. Once it appears, click on the Export to Microsoft Excel dropdown.
3. A standard Windows popup will appear prompting you to either Open, Save, or Cancel.

Section 3.1: Step 1 – Problem Definition
9
1. Click on the Step 1 button to enter the Problem Definition.
This section includes a complete description of the issue. Be as specific and complete in your description as possible.
• What was the problem that prompted the problem solving investigation?• Where was the problem found?• How was the problem found?• How many units/pieces were impacted?• When was the problem found?
2. The screen for Step 1 appears as shown below.
3. Enter the text of the Problem Description in the large text box. This is a long text field so you are not limited to the size of your description.
4. Once you are done you can either click on the Save button or click on another button on the menu bar. Either will automatically save the changes you have made.

Section 3.2: Step 2 – Measurement Method
10
1. Click on the Step 2 button to enter the Measurement Method
This section covers the gauging method at the time of the creation of the problem parts/units/assemblies. If a different method was used to sort parts, then that should be included in Step 3 under method of check. If changes are being made to this process as a result of the investigation, then those should be included in Step 6 detailing corrective actions.
• What was the measurement method in place when the problem was created? Describe.
• What was the frequency of check?• How was the gauge verified? Describe process used to verify that the gauge being
used as the measurement method is accurate.• How was the gauging process verified to be robust?• How was it verified that the correct gage was used?
2.The screen for Step 2 appears as shown below.
3. Enter the text of the Measurement Method in the large text box. This is a long text field so you are not limited to the size of your description.
4. Once you are done you can either click on the Save button or click on another button on the menu bar. Either will automatically save the changes you have made.
Section 3.3: Step 3 – Containment Summary
11
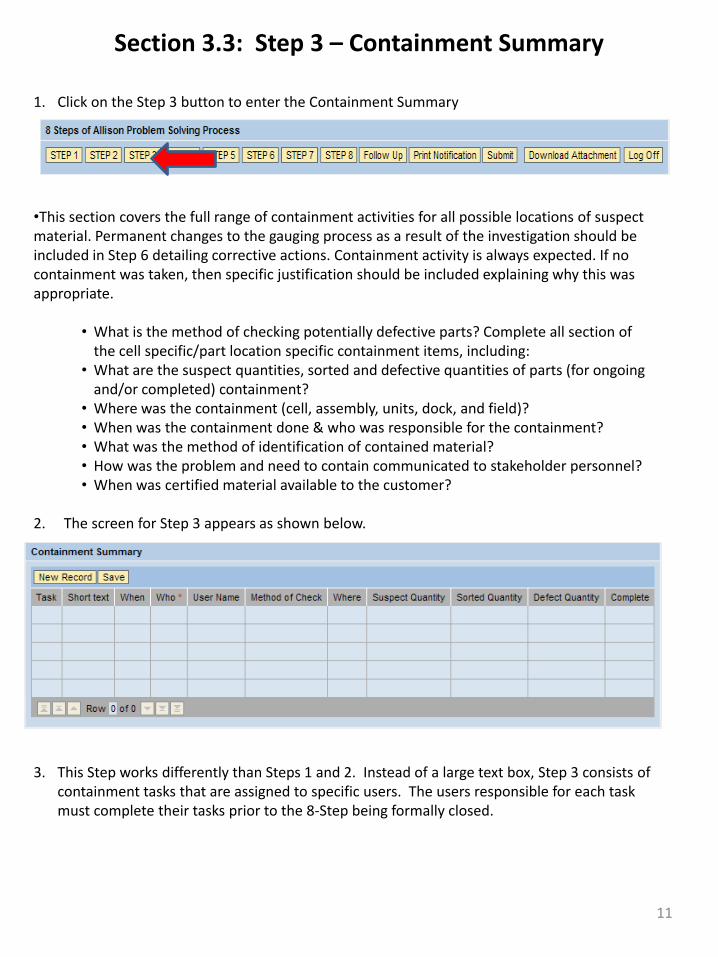
1. Click on the Step 3 button to enter the Containment Summary
•This section covers the full range of containment activities for all possible locations of suspect material. Permanent changes to the gauging process as a result of the investigation should be included in Step 6 detailing corrective actions. Containment activity is always expected. If no containment was taken, then specific justification should be included explaining why this was appropriate.
• What is the method of checking potentially defective parts? Complete all section of the cell specific/part location specific containment items, including:
• What are the suspect quantities, sorted and defective quantities of parts (for ongoing and/or completed) containment?
• Where was the containment (cell, assembly, units, dock, and field)?• When was the containment done & who was responsible for the containment?• What was the method of identification of contained material?• How was the problem and need to contain communicated to stakeholder personnel?• When was certified material available to the customer?
2. The screen for Step 3 appears as shown below.
3. This Step works differently than Steps 1 and 2. Instead of a large text box, Step 3 consists of containment tasks that are assigned to specific users. The users responsible for each task must complete their tasks prior to the 8-Step being formally closed.
Section 3.3: Step 3 – Containment Summary (cont)
12
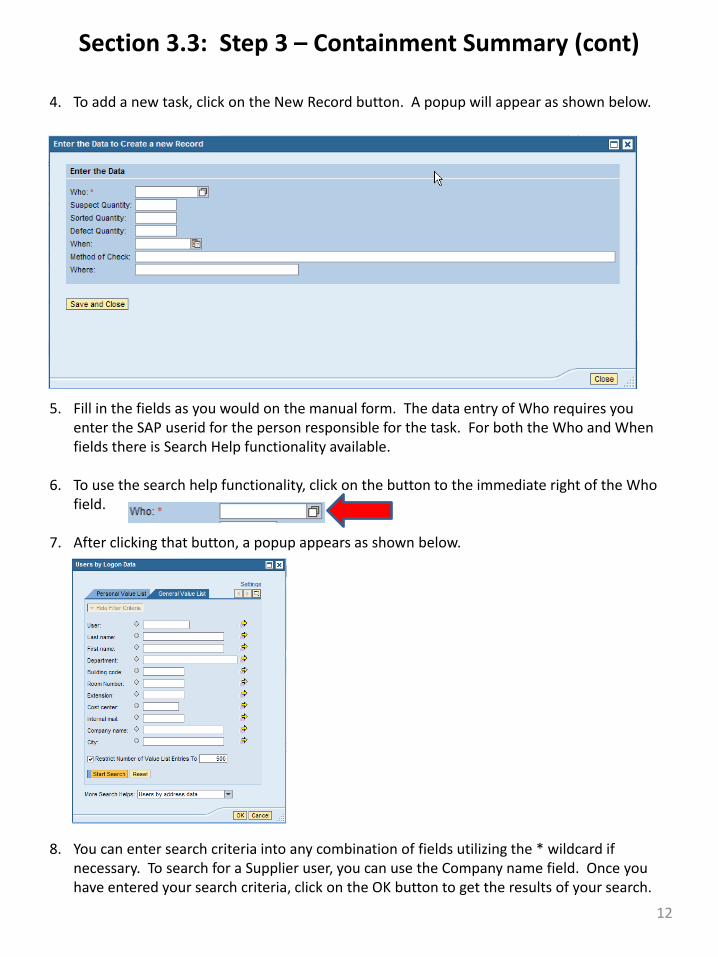
4. To add a new task, click on the New Record button. A popup will appear as shown below.
5. Fill in the fields as you would on the manual form. The data entry of Who requires you enter the SAP userid for the person responsible for the task. For both the Who and When fields there is Search Help functionality available.
6. To use the search help functionality, click on the button to the immediate right of the Who field.
7. After clicking that button, a popup appears as shown below.
8. You can enter search criteria into any combination of fields utilizing the * wildcard if necessary. To search for a Supplier user, you can use the Company name field. Once you have entered your search criteria, click on the OK button to get the results of your search.
Section 3.3: Step 3 – Containment Summary (cont)
13
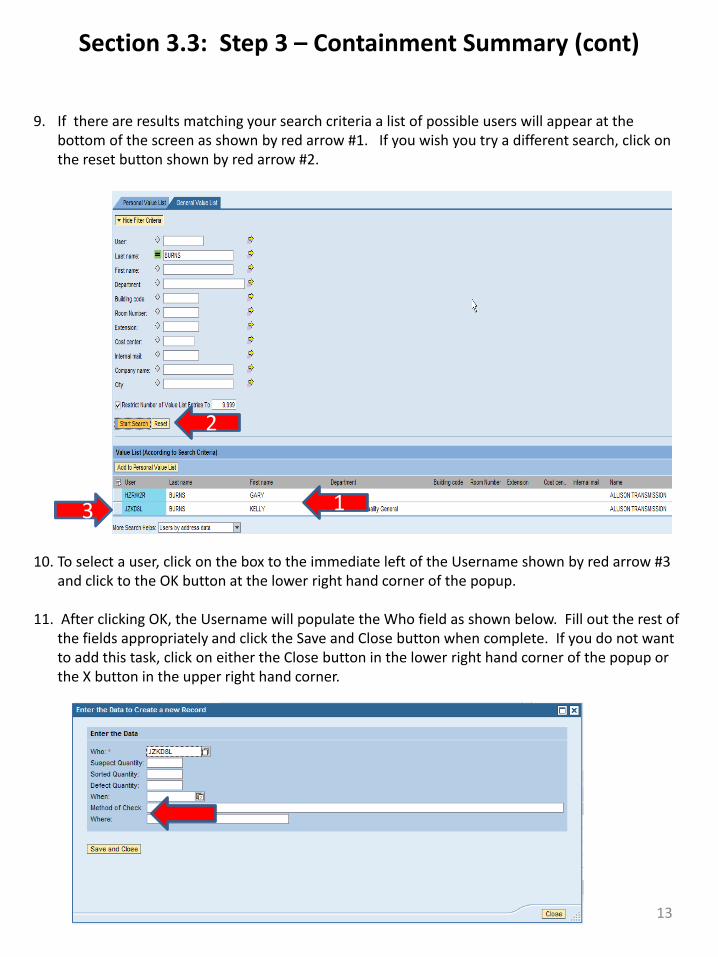
9. If there are results matching your search criteria a list of possible users will appear at the bottom of the screen as shown by red arrow #1. If you wish you try a different search, click on the reset button shown by red arrow #2.
10. To select a user, click on the box to the immediate left of the Username shown by red arrow #3 and click to the OK button at the lower right hand corner of the popup.
11. After clicking OK, the Username will populate the Who field as shown below. Fill out the rest of the fields appropriately and click the Save and Close button when complete. If you do not want to add this task, click on either the Close button in the lower right hand corner of the popup or the X button in the upper right hand corner.
1
2
3

Section 3.4: Step 4 – Root Cause Analysis
14
1. Click on the Step 4 button to enter the Root Cause Analysis
This section covers the processes used and results of the investigation into the root cause of the problem. The root cause of the problem includes not only why there might have been a failure to detect or contain, but also why the process produced the defective part/unit/assembly. All possibilities considered, even if discarded, should be included. All evidence supporting the conclusion should be included.
• What was the root cause of the problem? Describe the specificconclusion of the investigation: failure in execution, processing,machine function, tooling, material/stock issue, handling, etc.
• Was the cause a common cause or a special cause? How was thatdetermined?
• Were Statistical or other Tools used and with what results?• Gage/Machine/Process Capability Studies• Run/Control Charts• Cause/Effect Diagrams• Flow Diagrams• Pareto Analysis• Histogram Analysis• 5-Why Analysis
2.The screen for Step 4 appears as shown below.
3. Enter the text of the Measurement Method in the large text box. This is a long text field so you are not limited to the size of your description.
4. Once you are done you can either click on the Save button or click on another button on the menu bar. Either will automatically save the changes you have made.

Section 3.5: Step 5 – 7 Diamonds Analysis
15
1. Click on the Step 5 button to enter the 7 Diamonds Analysis
This section covers the basic checklist of process elements that must be correct to ensure a capable process. Specific failures discovered in one of the above elements may be covered in detail in Step 4 if it is part of the problem root cause.
2.The screen for Step 5 appears as shown below.
3.You can answer each question by typing Y, N, or NA in each of the corresponding fields. These fields are required in order to submit the 8-Step but the Comments fields is option. When completed, either click on the Save button or select another Step from the Button bar.

Section 3.6: Implementation of Corrective Action
16
1. Click on the Step 6 button to enter the Implementation of Corrective Action.
This section covers the specific, detailed description of all actions implemented to prevent reoccurrence of the problem in the future. Changes to detection, specifications, processing elements, errorproofing etc. should all be included in this section. The 8-step owner is responsible to coordinate and communicate with those persons responsible for completing identified activities. All items assigned to someone other than the owner of the investigation that are not complete at the time of the 8-step presentation, must be discussed with theresponsible party prior to presentation for follow-up. If the item has not been implemented, then implementation dates should be realistic and reflect the agreement of the person assigned. Standard document updates will be reviewed in Step 8 and action items generated from that step. Those changes do not need to be duplicated in Step 6.
• What action items make up the planned solution, including changes to the process, gauging, tooling, material, specifications, errorproofing, communication, training, handling/labeling, etc.?
This section functions using tasks in the same way that Step 3 functions. Refer to the instructions for Step 3 to understand how to create and process tasks in Step 6.
Section 3.7: Step 7 – Effectiveness of Corrective Action
17
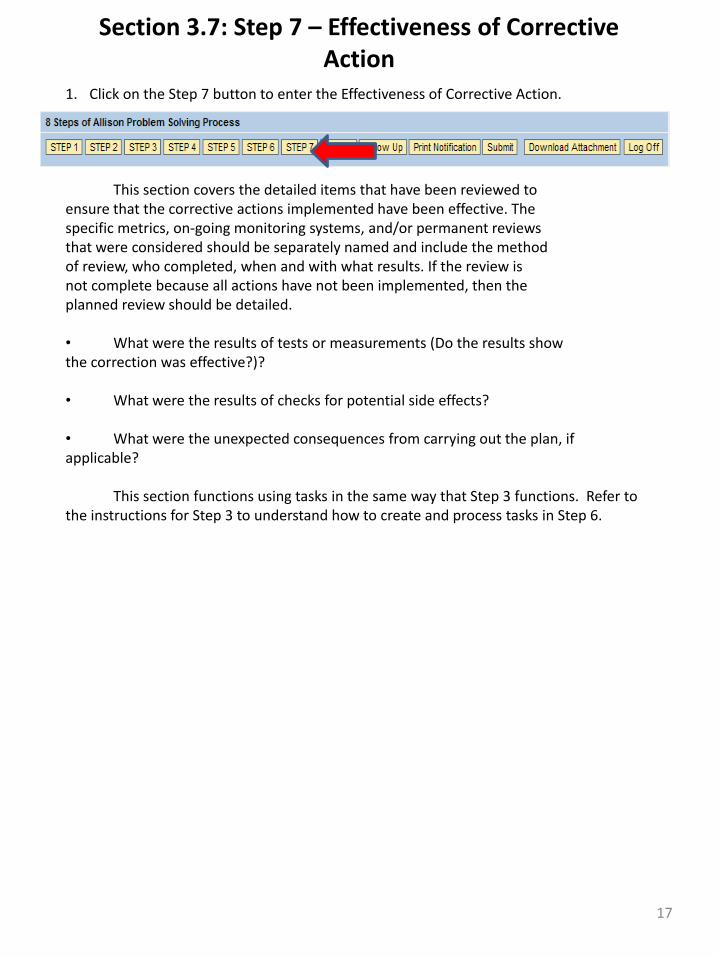
1. Click on the Step 7 button to enter the Effectiveness of Corrective Action.
This section covers the detailed items that have been reviewed toensure that the corrective actions implemented have been effective. Thespecific metrics, on-going monitoring systems, and/or permanent reviewsthat were considered should be separately named and include the methodof review, who completed, when and with what results. If the review isnot complete because all actions have not been implemented, then theplanned review should be detailed.
• What were the results of tests or measurements (Do the results showthe correction was effective?)?
• What were the results of checks for potential side effects?
• What were the unexpected consequences from carrying out the plan, ifapplicable?
This section functions using tasks in the same way that Step 3 functions. Refer to the instructions for Step 3 to understand how to create and process tasks in Step 6.

Section 3.8 – Step 8 – Problem Prevention and Institutionalization of Corrective Action
18
1. Click on the Step 8 button to enter the Problem Prevention and Institutionalization of Corrective Action section.
This section covers the required document review to ensure thatcorrective actions are institutionalized
As with Step 6, the 8-step owner is responsible to coordinate andcommunicate all the tasks shown on this section.
If all reviews are not complete at the time of presentation, theresponsible party must be in agreement with the target date expected.
The owner of the 8-Step is the default person responsible for all the tasks in Step 8. The owner can reassign these tasks by changing the username in the Who column. The Target Date and Completed on fields function the same as the When fields on Steps 3, 6, and 7. Only mark the task complete when it has been actually performed versus when you plan to do it. If the task does not apply, click the N/A checkbox.
If you completed a task in error you can contact the Administrator of the 8 Step to reset the status.

Section 4.1: Logging Follow-Ups
19
1. Click on the Follow Up button to log a follow up.
2. The popup shown below will appear. Click on the drop down indicated by the Red Arrow to see all the open tasks to which you can log follow ups.
3. Pick the task you want to follow up by scrolling down and selecting it with your mouse.
4. Enter your follow up in the text box and click on the Save Follow Up Comment button.

5.1: Viewing the Print Preview and Printing an 8-Step
20
1. Click on the Print Notification button to view the 8-Step form.
2. A popup will appear and you can either print the 8-Step or save the pdf to your computer by clicking on the buttons shown by the Red Arrow. Be sure you have a default printer set up for your computer if you want to be able to view the 8-Step.
Section 6.1: Submitting an 8-Step
21
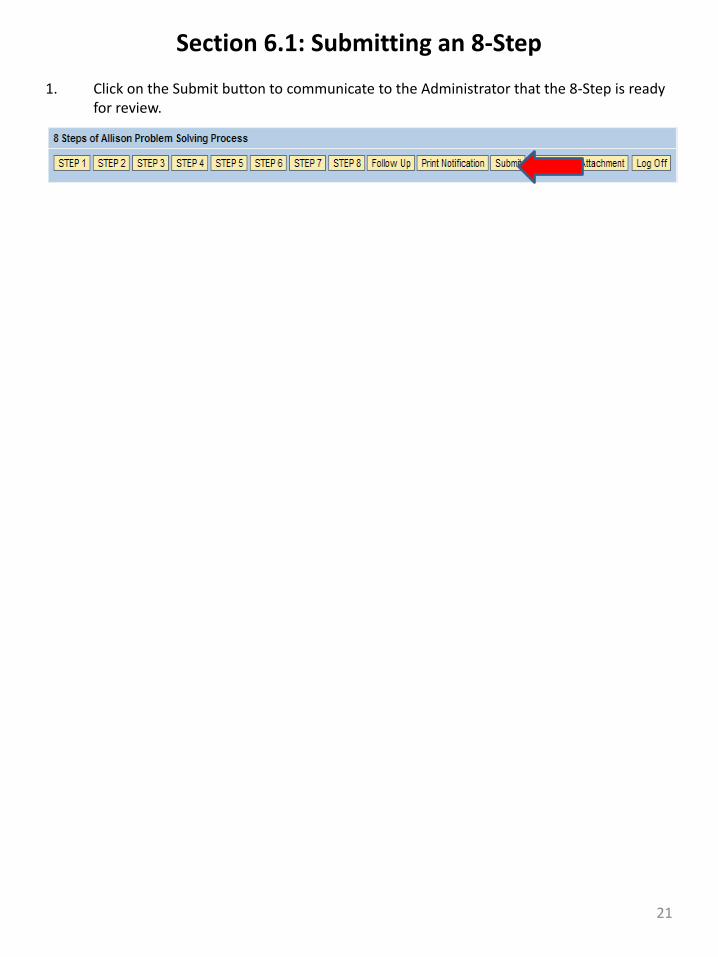
1. Click on the Submit button to communicate to the Administrator that the 8-Step is ready for review.

Section 7.1: Uploading an Attachment
22
1. Click on the Upload Attachment button to attach supporting documents to the 8-Step.
2. The popup shown below will appear. Click on the Browse button to find your file using the standard Windows file menu popup.
3. Once you select your file, the filepath will appear in the field to the left of the Browse button. Click on the Upload File button to upload it to the 8-Step. Only common file types are permitted to be loaded onto the server. You cannot upload .vbs or .exe type files for security reasons.

Section 7.2: Downloading an Attachment
23
1. Click on the Download Attachment button to view and download supporting documents from the 8-Step.
2. The popup shown below will appear. Click on the button to the left of the file you want to view and then click the Download Selected File hyperlink.
Section 8.1: Changing to Another Notification
24
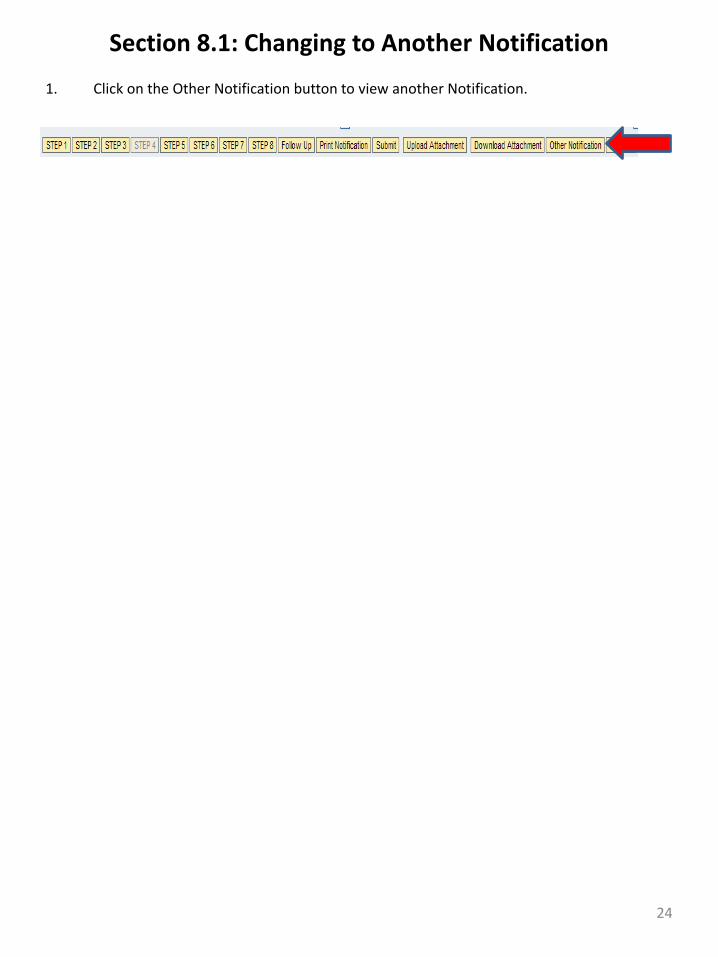
1. Click on the Other Notification button to view another Notification.

Section 9.1: Logging Off
25
1. Click on the Log Off button to exit the application.

Section 10.1: Frequently Asked Questions (FAQ)
26
Issue Possible Solution
When I click on the Print 8-Step Form , nothing comes up.
Make sure you have a default printer set up in Windows. If you have SAPGUI access, click on the System > User Profile> Own Data drop down from any screen in SAP. On the Defaults tab make sure you Output Device is set to LOCL and hit save. If you are a supplier or do not have SAPGUI access, contact the Helpdesk at 317-242-2653 to have the Output Device in your User Profile set to “LOCL”
My password is locked. Call the Helpdesk at 317-242-2653. Make sure to tell them to reset your SAP GPD 100 password.
I have a questions about the business procedure associated with this.
Contact the Subject Matter Expert for your area (i.e. Supplier Quality Supervisor, Plant Quality Supervisor, etc.). If you are a supplier, contact your Supplier Support Engineer at Allison.


