107
SAS ® IT Management Adapter 3.1 for SAP User’s Guide

SAS® IT Management Adapter 3.1 for SAPUser’s Guide
TW9807ColorTitlePage.indd 1 2/12/09 1:13:15 PM

The correct bibliographic citation for this manual is as follows: SAS Institute Inc. 2009.SAS ® IT Management Adapter 3.1 for SAP: User’s Guide. Cary, NC: SAS Institute Inc.
SAS® IT Management Adapter 3.1 for SAP: User’s GuideCopyright © 2009, SAS Institute Inc., Cary, NC, USAAll rights reserved. Produced in the United States of America.For a hard-copy book: No part of this publication may be reproduced, stored in aretrieval system, or transmitted, in any form or by any means, electronic, mechanical,photocopying, or otherwise, without the prior written permission of the publisher, SASInstitute Inc.For a Web download or e-book: Your use of this publication shall be governed by theterms established by the vendor at the time you acquire this publication.U.S. Government Restricted Rights Notice. Use, duplication, or disclosure of thissoftware and related documentation by the U.S. government is subject to the Agreementwith SAS Institute and the restrictions set forth in FAR 52.227-19 Commercial ComputerSoftware-Restricted Rights (June 1987).SAS Institute Inc., SAS Campus Drive, Cary, North Carolina 27513.1st electronic book, March 2009SAS® Publishing provides a complete selection of books and electronic products to helpcustomers use SAS software to its fullest potential. For more information about oure-books, e-learning products, CDs, and hard-copy books, visit the SAS Publishing Web siteat support.sas.com/publishing or call 1-800-727-3228.SAS® and all other SAS Institute Inc. product or service names are registered trademarksor trademarks of SAS Institute Inc. in the USA and other countries. ® indicates USAregistration.Other brand and product names are registered trademarks or trademarks of theirrespective companies.
iii
Contents
Chapter 1 Introduction to the SAS IT Management Adapter for SAP 1 Overview 1
SAP Server Performance Data Extraction 3 Business Warehouse Server Performance Data Extraction 3 Tables 4
Chapter 2 Installing and Configuring the SAS IT Management Adapter for SAP 7 Introduction 7
System Requirements 7 Installation Sequence 8 Prepare the Environment 8 Define Users 8
Define an SAP Library and an SAP Server 11 Test the SAP Connection to SAS Data Integration Studio 16 Create a Directory for Administrative Data 19 Import the SAS IT Management Adapter for SAP Sample Metadata 19
Chapter 3 Customizing the SAS IT Management Adapter for SAP 29 Customization Tasks 29
Install SAP Transports 29 Install Additional Transport for Indirect Extraction 30 Use Transport Files to Install ABAP Functions 30 Set Up Hubs to Extract Performance Data 30
Connect To SAP Destination Servers 30 Extract Business Warehouse Server Performance Data 31 Set Up SAP Authorization 32 Test ABAP Functionality 33
Chapter 4 SAS Data Integration Studio Jobs 35 Introduction 35 Job Naming Conventions 35 Initialization Jobs 37 Other Jobs 42
Jobs in z/OS 43
Appendix 1 Scheduling 45 Set Up Scheduling 45 Install an SAP Gateway 45 Install the ABAP Function ZSASPIPE 48
Set Up and Schedule a Variant of ZSASPIPE 48 Define the Job to Execute 51 Test the Environment Setup 51

iv Contents Chapter Error! No text of specified style in document.
Test the SAS System in the SAP Environment 51
Troubleshoot the Failure of a Scheduled SAP Job to Run 52
Appendix 2 Terms and Statistics Files Duration 55 Terms and Definitions 55 Statistics Files Duration 56
Appendix 3 Restricting Permission on the SAP User Account 57 Overview 57 Create an Authorization 58
Create and Edit a Profile 69 Associate the Profile with a User Account 85
Appendix 4 The RFC Destination for the Hub 91 Overview 91 RFC Connection to Another Machine 95

1 Introduction to the SAS IT Management Adapter for SAP
Overview .......................................................................................................................................................................... 1 SAP Server Performance Data Extraction ..................................................................................................................... 3 Business Warehouse Server Performance Data Extraction .......................................................................................... 3 Tables ............................................................................................................................................................................... 4
Overview
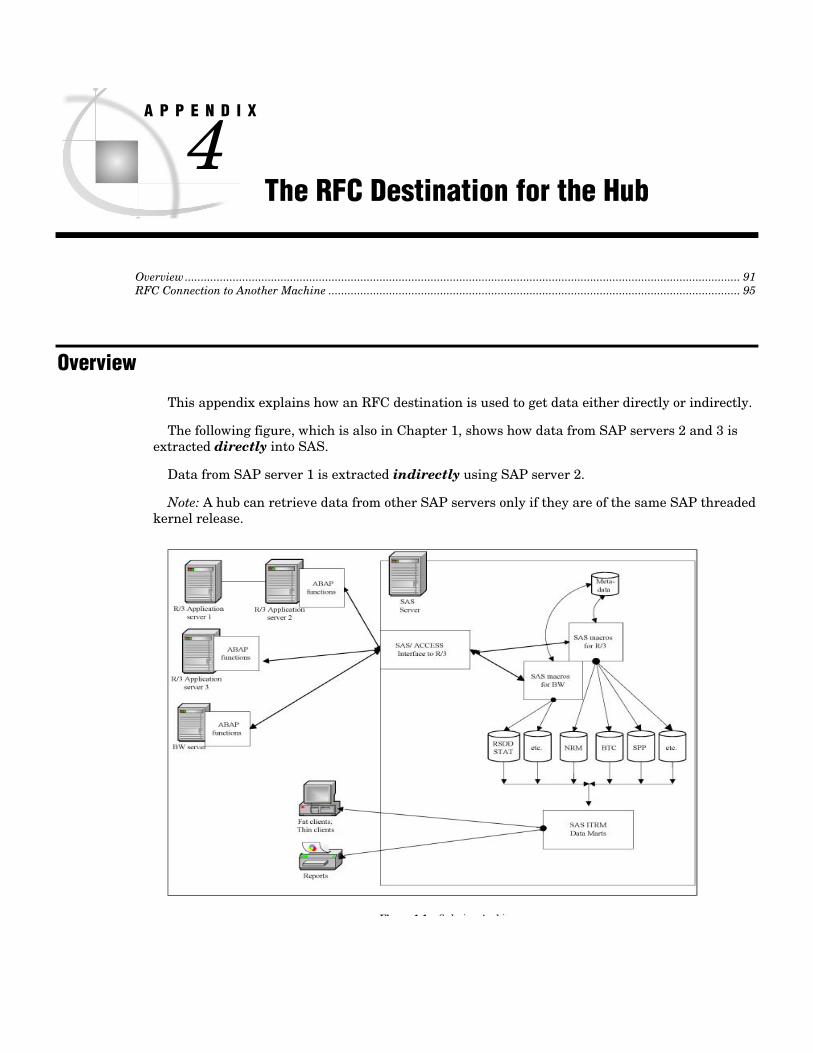
SAP stores performance data as statistics files on stand-alone SAP servers. The SAS IT Management Adapter for SAP provides code to read these statistics files and transform them into a ready-to-use format. The files are then exported to SAS IT Resource Management. Figure 1.1 illustrates this process.
A typical SAP installation uses more than one SAP server and several SAP instances. The SAS IT Management Adapter for SAP provides the capability to choose and customize SAP instances and to monitor their performance. In addition, a business warehouse server can be part of an SAP installation. Its performance can be analyzed using the underlying SAP server performance data.
The SAS IT Management Adapter for SAP consists of the following components:
SAP Servers: SAP servers collect performance data the standard way. Additional Advanced Business Application Programming (ABAP) functions are installed on the SAP servers to support the SAS Data Surveyor for SAP and to allow indirect calls of standard SAP ABAP functions.
SAS Management Console Client: The SAS Management Console client is used to define the SAP servers that are accessed by the SAS IT Management Adapter for SAP.
SAS Data Integration Studio Client: The SAS Data Integration Studio client provides technology that the SAS IT Management Adapter for SAP uses to generate and submit code to the SAS Application Server.
SAS Metadata Server: SAS Data Integration Studio and SAS Management Console do not store data locally. They communicate with the SAS Metadata Server, which stores and retrieves metadata from the jobs and tables in SAS IT Resource Management and SAS Data Integration Studio.
C H A P T E R
2 Overview Chapter 1
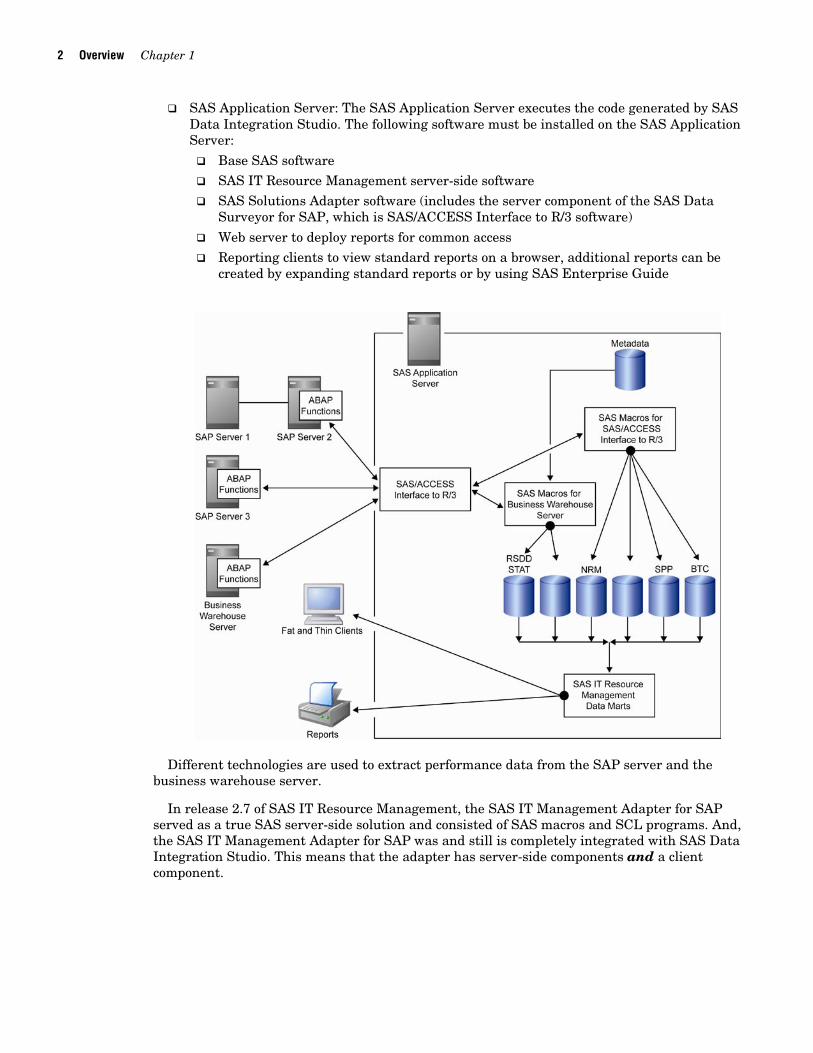
SAS Application Server: The SAS Application Server executes the code generated by SAS Data Integration Studio. The following software must be installed on the SAS Application Server:
Base SAS software SAS IT Resource Management server-side software SAS Solutions Adapter software (includes the server component of the SAS Data
Surveyor for SAP, which is SAS/ACCESS Interface to R/3 software)
Web server to deploy reports for common access Reporting clients to view standard reports on a browser, additional reports can be
created by expanding standard reports or by using SAS Enterprise Guide
Different technologies are used to extract performance data from the SAP server and the business warehouse server.
In release 2.7 of SAS IT Resource Management, the SAS IT Management Adapter for SAP served as a true SAS server-side solution and consisted of SAS macros and SCL programs. And, the SAS IT Management Adapter for SAP was and still is completely integrated with SAS Data Integration Studio. This means that the adapter has server-side components and a client component.

Introduction to the SAS IT Management Adapter for SAP Business Warehouse Server Performance Data Extraction 3
To extract data, SAS Data Integration Studio users have to define extraction jobs as primary input to SAS data sets in the Rawdata library. The Rawdata library is the input library for the SAS IT Resource Management staging jobs, as displayed in the following diagram:
Multiple steps are required before you can run the SAS IT Management Adapter for SAP to extract performance data from SAP. Separate transformations are used to extract standard SAP statistics and business warehouse server performance tables.
SAP Server Performance Data Extraction
To understand the workflow, suppose there is an SAP server called Server1. A system administrator defines Server1 and its library metadata in SAS Management Console. The system administrator drags and drops the library for Server1 onto a job in SAS Data Integration Studio that monitors the server. Thereafter, the system administrator deploys the job to extract performance data for Server1 on a regular hourly basis.
Next, SAS code calls an SAP ABAP function directly, or calls an ABAP function provided by SAS to extract performance data from Server1. The SAS code assembles the performance data into a logical SAS table in the Rawdata library.
The table populates SAS IT Resource Management data marts. Reports about Server1 are generated for SAS IT Resource Management.
Business Warehouse Server Performance Data Extraction
The business warehouse server runs on a standard SAP threaded kernel. Therefore, business warehouse performance can be monitored using the same methodology.
Additional business warehouse server performance data can be collected by extracting data at the infocube level. For example, an infocube query has a single record that identifies the

4 Tables Chapter 1
resources that were used by the query. The information in this record can be collected in an underlying table that stores performance data for the entire SAP system. This infocube performance data can help identify problem queries.
The SAS IT Management Adapter for SAP provides the tools to extract the business warehouse infocube performance data using SAS Data Surveyor for SAP technology. The extraction involves exploiting SAP’s threaded kernel. There is no need for business warehouse server-specific technology.
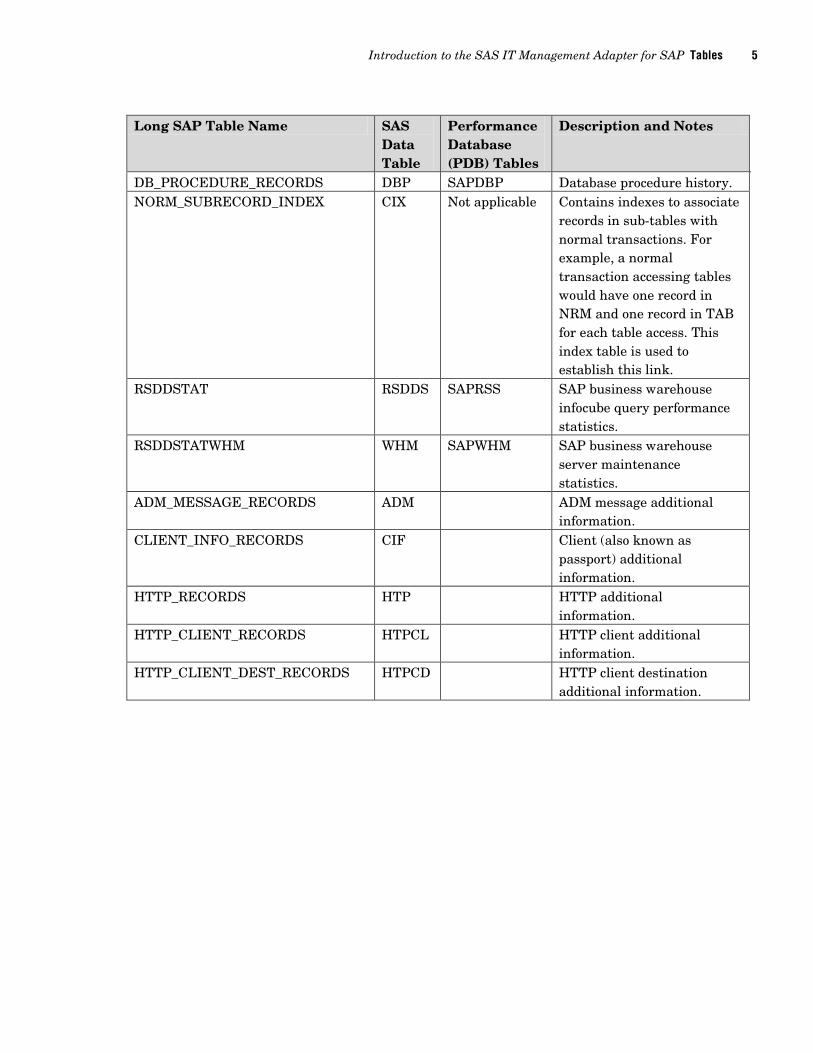
Tables
The following table lists the tables that contain the extracted performance data from the SAP system.
Long SAP Table Name SAS Data Table
Performance Database (PDB) Tables
Description and Notes
V2_NORMAL_RECORDS NRM SAPR3S SAPHST SAPSMT SAPSYS SAPTRN SAPTSK
Normal transaction history.
V2_BTC_STEP_RECORDS BTC SAPBTCH Batch transaction history. V2_NORMAL_RECORDS, V2_BTC_STEP_RECORDS
NRM BTC
SAPWKLD SAPWKLD is built on a combination of NRM and BTC.
V2_TABLE_RECORDS TAB SAPTAB Table access history. Not collected in SAP by default because collecting table access statistics places a heavy load on the SAP system.
V2_RFC_CLIENT_RECORDS RC0 SAPRC0 RFC client access history. V2_RFC_SERVER_RECORDS RS0 SAPRS0 RFC server access history. V2_RFC_CLIENT_DEST_RECORDS RCD SAPRCD RFC client destination access
history. V2_RFC_SERVER_DEST_RECORDS RSD SAPRSD RFC server destination
access history. V2_SPOOL_PRINT_RECORDS SPP SAPSPP Printing history. V2_SPOOL_ACTIVITY_RECORDS SPA SAPSPA Spool activity history. V2_RFC_TIME_INT_RECORDS TII SAPTII Time int history (typically
not collected by default).
Introduction to the SAS IT Management Adapter for SAP Tables 5
Long SAP Table Name SAS
Data Table
Performance Database (PDB) Tables
Description and Notes
DB_PROCEDURE_RECORDS DBP SAPDBP Database procedure history. NORM_SUBRECORD_INDEX CIX Not applicable Contains indexes to associate
records in sub-tables with normal transactions. For example, a normal transaction accessing tables would have one record in NRM and one record in TAB for each table access. This index table is used to establish this link.
RSDDSTAT RSDDS SAPRSS SAP business warehouse infocube query performance statistics.
RSDDSTATWHM WHM SAPWHM SAP business warehouse server maintenance statistics.
ADM_MESSAGE_RECORDS ADM ADM message additional information.
CLIENT_INFO_RECORDS CIF Client (also known as passport) additional information.
HTTP_RECORDS HTP HTTP additional information.
HTTP_CLIENT_RECORDS HTPCL HTTP client additional information.
HTTP_CLIENT_DEST_RECORDS HTPCD HTTP client destination additional information.

6 Tables Chapter 1

2 Installing and Configuring the SAS IT Management Adapter for SAP
Introduction ..................................................................................................................................................................... 7 System Requirements....................................................................................................................................................... 7 Installation Sequence ...................................................................................................................................................... 8 Prepare the Environment ................................................................................................................................................ 8
Define Users ............................................................................................................................................................. 8 Define an SAP Library and an SAP Server ........................................................................................................... 11 Test the SAP Connection to SAS Data Integration Studio ................................................................................... 16 Create a Directory for Administrative Data .......................................................................................................... 19
Import the SAS IT Management Adapter for SAP Sample Metadata ......................................................................... 19
Introduction As part of the installation and configuration of the SAS IT Management Adapter for SAP, the
system administrator must complete the following steps:
1 Verify that the environment meets the system requirements.
2 Follow the correct installation sequence.
3 Prepare the environment.
4 Import sample metadata.
All of these steps are necessary before you can use the SAS IT Management Adapter for SAP.
System Requirements
The SAS IT Management Adapter for SAP requires that the following be installed:
SAS Foundation
SAS IT Resource Management SAS/ACCESS Interface to R/3 software SAP, Release 4.0 or later SAS Data Integration Studio
SAS Data Surveyor for SAP For specific installation instructions, see the product’s documentation.
C H A P T E R
8 Prepare the Environment Chapter 2
Installation Sequence
Here is the recommended order for installing the components and software:
1 Install SAS Foundation, SAS IT Resource Management, and SAS/ACCESS Interface to R/3 software on the SAP server.
2 Install SAP on the server.
3 Install SAS Data Integration Studio on the client server.
4 Install SAS Data Surveyor for SAP on the client server.
5 Install SAS IT Management Adapter for SAP.
6 Import the SAS IT Management Adapter for SAP sample metadata.
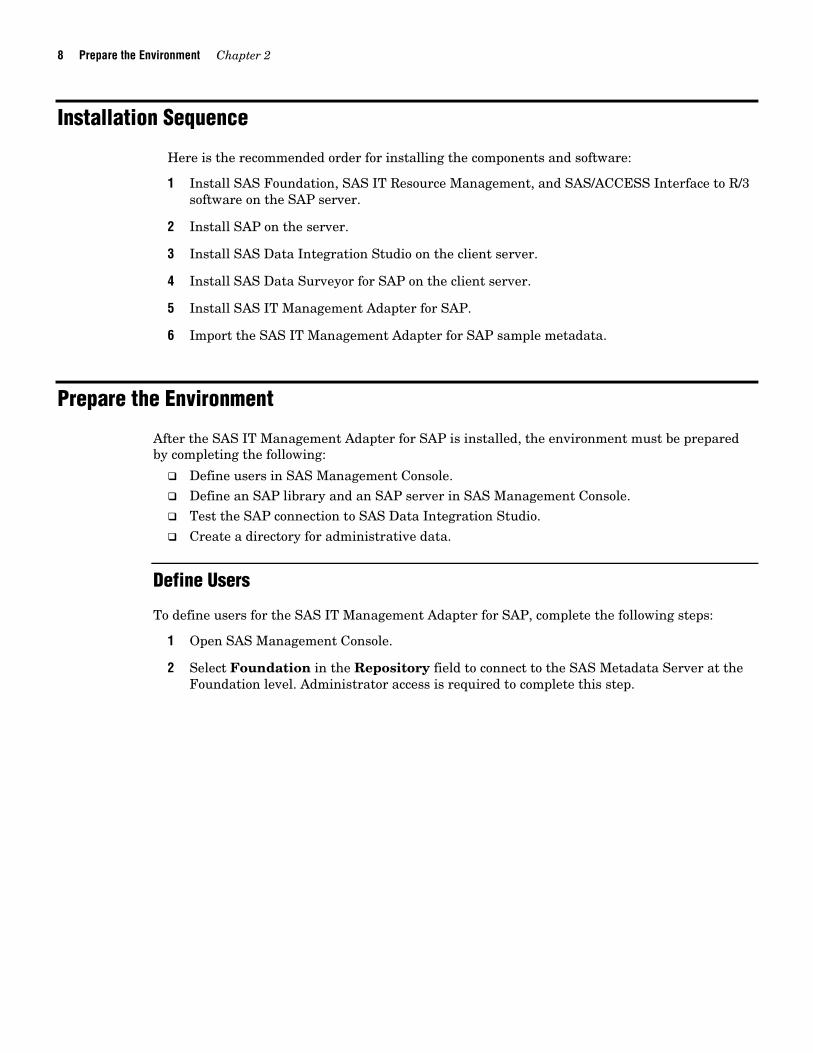
Prepare the Environment
After the SAS IT Management Adapter for SAP is installed, the environment must be prepared by completing the following:
Define users in SAS Management Console. Define an SAP library and an SAP server in SAS Management Console. Test the SAP connection to SAS Data Integration Studio.
Create a directory for administrative data.
Define Users
To define users for the SAS IT Management Adapter for SAP, complete the following steps:
1 Open SAS Management Console.
2 Select Foundation in the Repository field to connect to the SAS Metadata Server at the Foundation level. Administrator access is required to complete this step.
Configuration Prepare the Environment 9
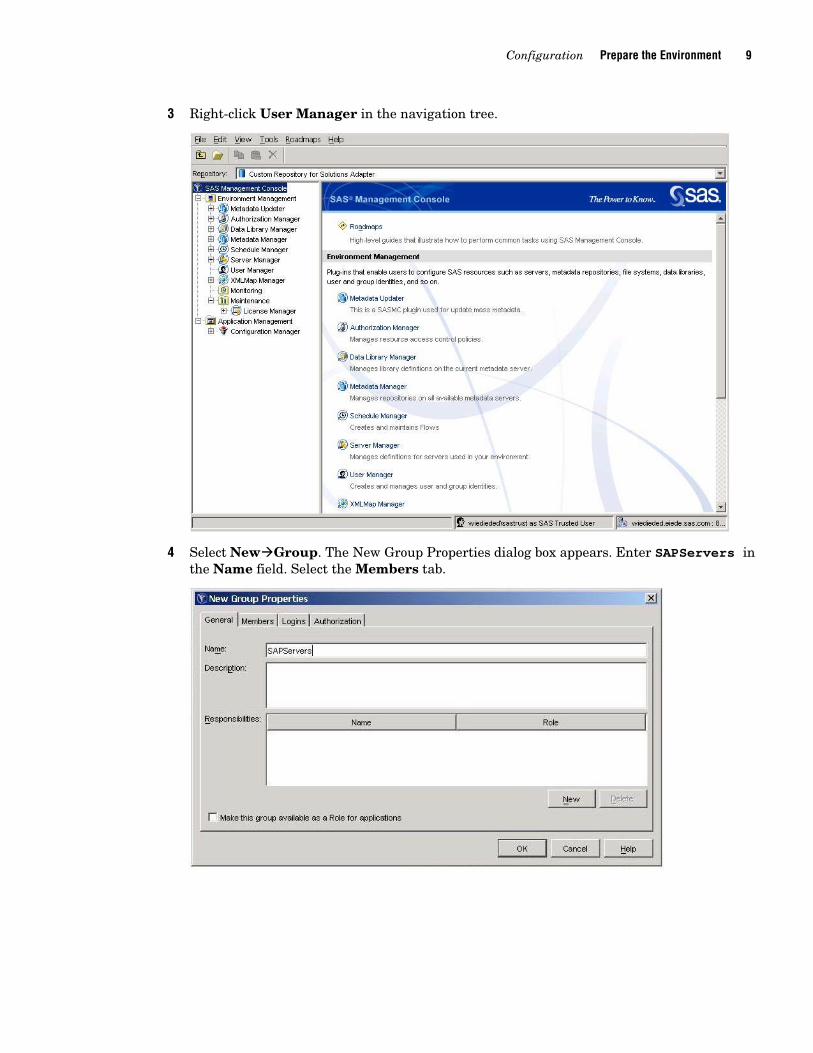
3 Right-click User Manager in the navigation tree.
4 Select NewGroup. The New Group Properties dialog box appears. Enter SAPServers in
the Name field. Select the Members tab.

10 Prepare the Environment Chapter 2
5 Select SAS Trusted User under Available Members. Click the single arrow to move the selected member to Current Members.
6 Select the Logins tab.

Configuration Prepare the Environment 11
7 Click New. The New Login Properties dialog box appears.
8 Complete the following steps:
a Enter the user ID and password for the SAP server.
b Select SAPAuth from the Authentication Domain menu. If this domain is not available, click New, enter SAPAuth as the name for a new authentication domain, and enter a short description. Click OK to save the new authentication domain.
c Click OK to save the new login properties.
d Click OK to save the new group properties.
Define an SAP Library and an SAP Server
To define an SAP library and an SAP server for the SAS IT Management Adapter for SAP, complete the following steps:
1 Open SAS Management Console.
2 In the Repository field, select a repository that is solely dependent on the Foundation repository to connect to the SAS Metadata Server at the Foundation level.
Note: An SAP library and an SAP server should be defined in a Custom repository that is solely dependent on the Foundation repository. If there is no repository that meets this requirement, a new repository must be created.
3 Expand Data Library Manager in the navigation tree.

12 Prepare the Environment Chapter 2
4 Right-click SAS Libraries, and then select New Library. The New Library Wizard appears.
5 Select SAP Library from the Enterprise Applications Libraries folder.
6 Click Next. Enter a unique name and description.

Configuration Prepare the Environment 13
7 Click Next.
8 Enter a name in the Libref field.
9 Click Next.
10 In the Database Server field, select a database server that contains parameters that
connect to the SAP server. If no database server meets this requirement, a new database server must be created.
14 Prepare the Environment Chapter 2
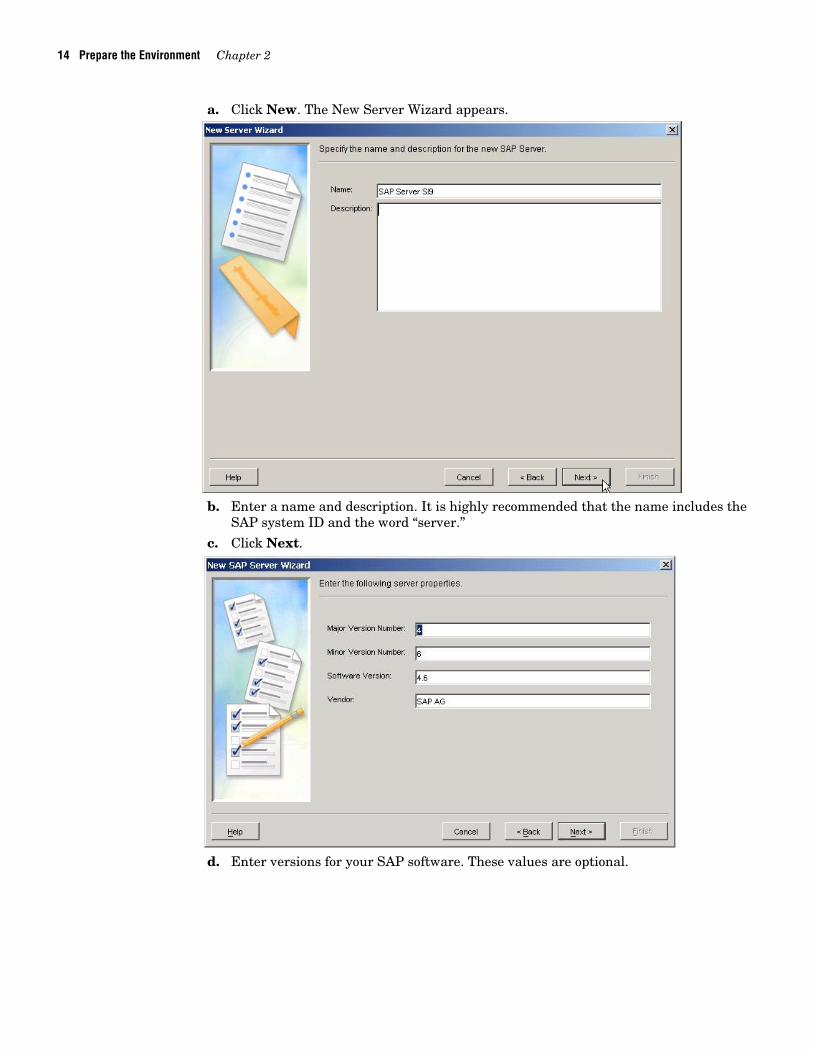
a. Click New. The New Server Wizard appears.
b. Enter a name and description. It is highly recommended that the name includes the
SAP system ID and the word “server.”
c. Click Next.
d. Enter versions for your SAP software. These values are optional.
Configuration Prepare the Environment 15
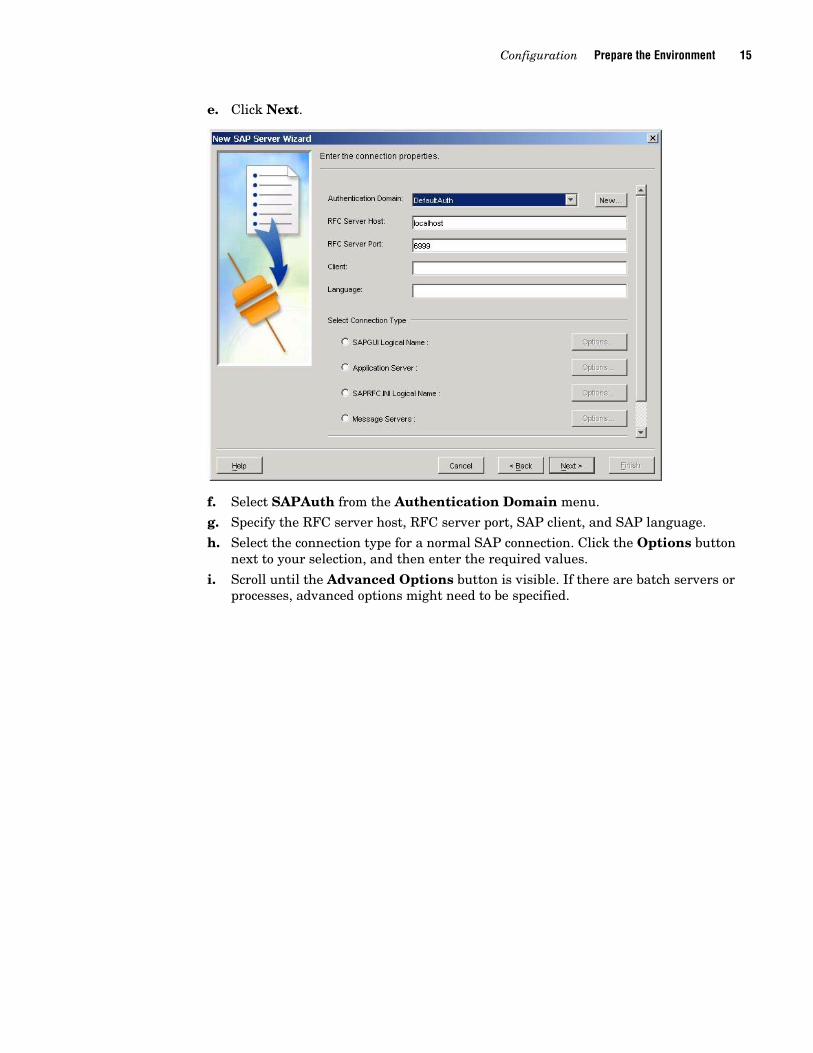
e. Click Next.
f. Select SAPAuth from the Authentication Domain menu.
g. Specify the RFC server host, RFC server port, SAP client, and SAP language.
h. Select the connection type for a normal SAP connection. Click the Options button next to your selection, and then enter the required values.
i. Scroll until the Advanced Options button is visible. If there are batch servers or processes, advanced options might need to be specified.
16 Prepare the Environment Chapter 2
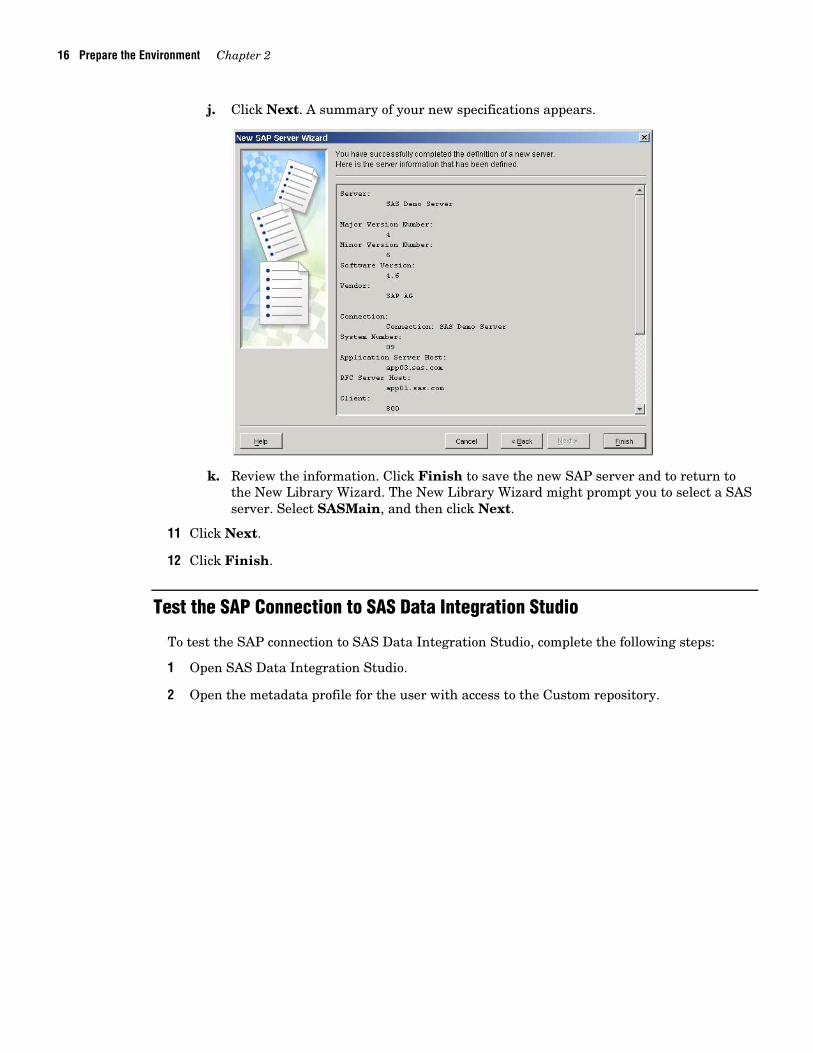
j. Click Next. A summary of your new specifications appears.
k. Review the information. Click Finish to save the new SAP server and to return to the New Library Wizard. The New Library Wizard might prompt you to select a SAS server. Select SASMain, and then click Next.
11 Click Next.
12 Click Finish.
Test the SAP Connection to SAS Data Integration Studio
To test the SAP connection to SAS Data Integration Studio, complete the following steps:
1 Open SAS Data Integration Studio.
2 Open the metadata profile for the user with access to the Custom repository.
Configuration Prepare the Environment 17
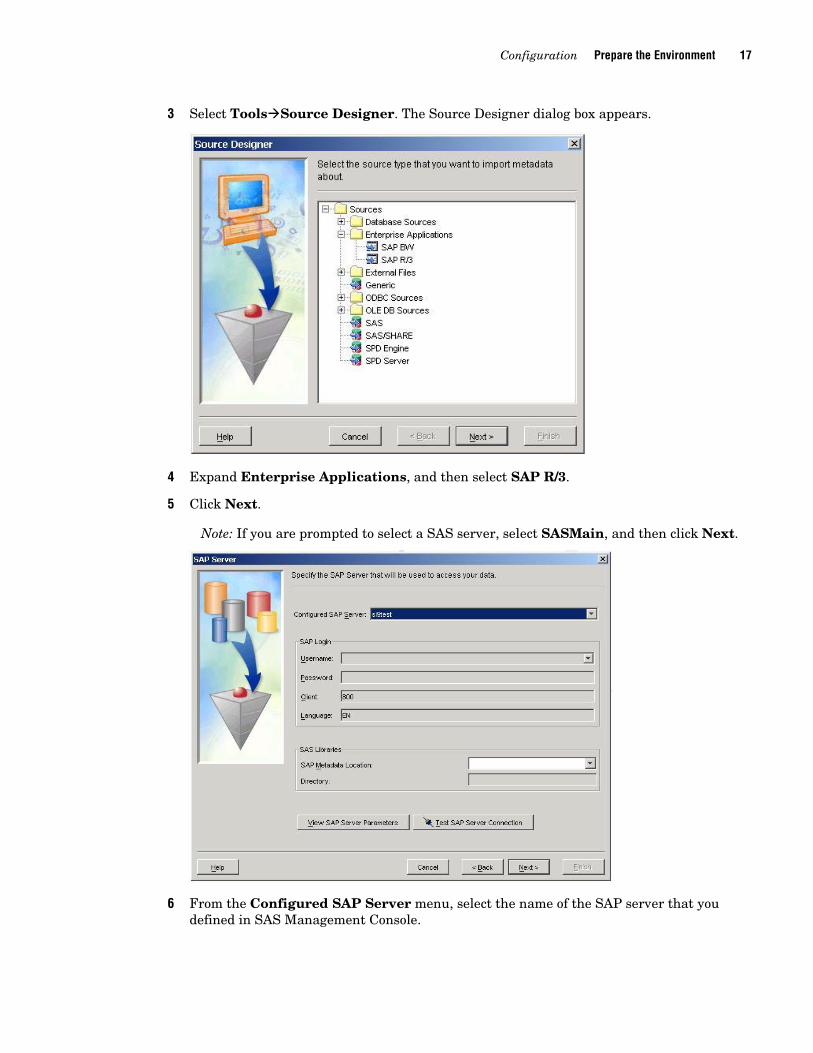
3 Select ToolsSource Designer. The Source Designer dialog box appears.
4 Expand Enterprise Applications, and then select SAP R/3.
5 Click Next.
Note: If you are prompted to select a SAS server, select SASMain, and then click Next.
6 From the Configured SAP Server menu, select the name of the SAP server that you
defined in SAS Management Console.
18 Prepare the Environment Chapter 2
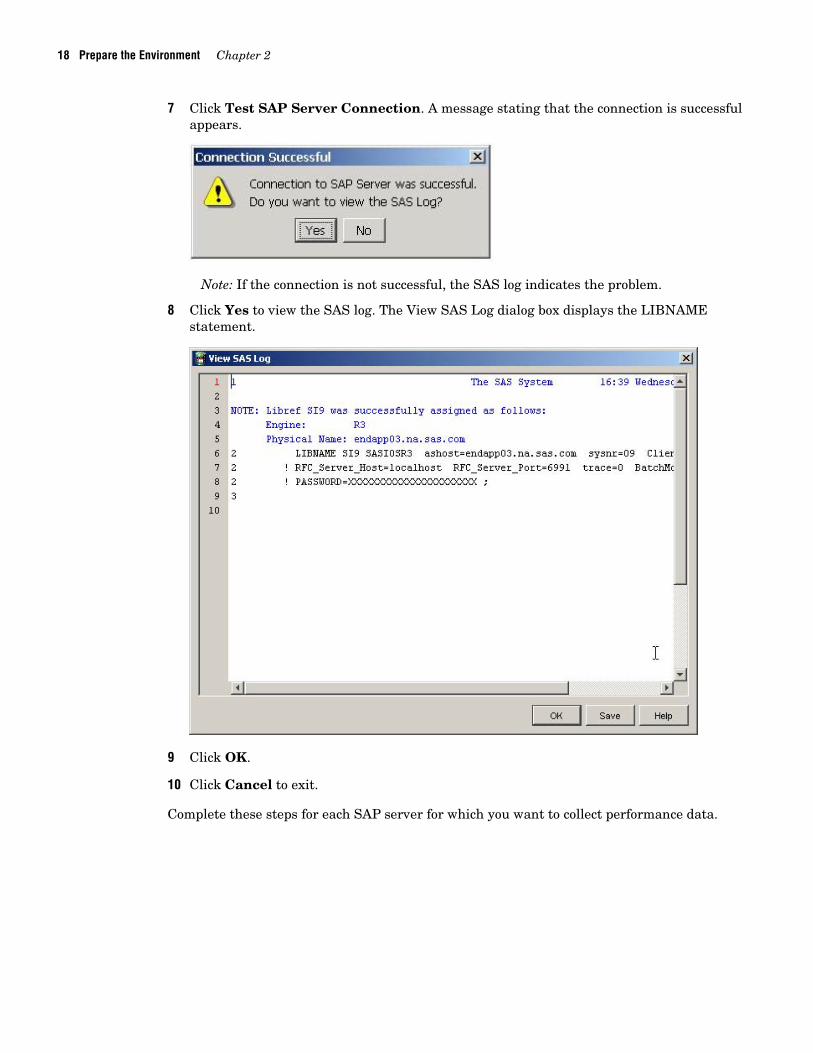
7 Click Test SAP Server Connection. A message stating that the connection is successful appears.
Note: If the connection is not successful, the SAS log indicates the problem.
8 Click Yes to view the SAS log. The View SAS Log dialog box displays the LIBNAME statement.
9 Click OK.
10 Click Cancel to exit.
Complete these steps for each SAP server for which you want to collect performance data.
Configuration Import the SAS IT Management Adapter for SAP Sample Metadata 19
Create a Directory for Administrative Data
1 Create a directory for administrative data on the SAS Application Server. The path should be relative to the SASMain path. For example:
X:\SAS\9.1\Lev1\SASMain\ITRM_adapter\admin
2 Create a directory for the Rawdata library on the SAS Application Server. The path should be relative to the SASMain path. For example:
X:\SAS\9.1\Lev1\SASMain\ITRM_adapter\rawdata
Import the SAS IT Management Adapter for SAP Sample Metadata
Sample metadata is included with the SAS IT Management Adapter for SAP. The metadata is located in itmadaptsap.spk and is installed on the client machine. For example, a typical location for the sample metadata is C:\Program Files\SAS\SASITMAdapterSAP\3.1\ETLComponentsPackage). The metadata needs to be imported using SAS Data Integration Studio.
20 Import the SAS IT Management Adapter for SAP Sample Metadata Chapter 2
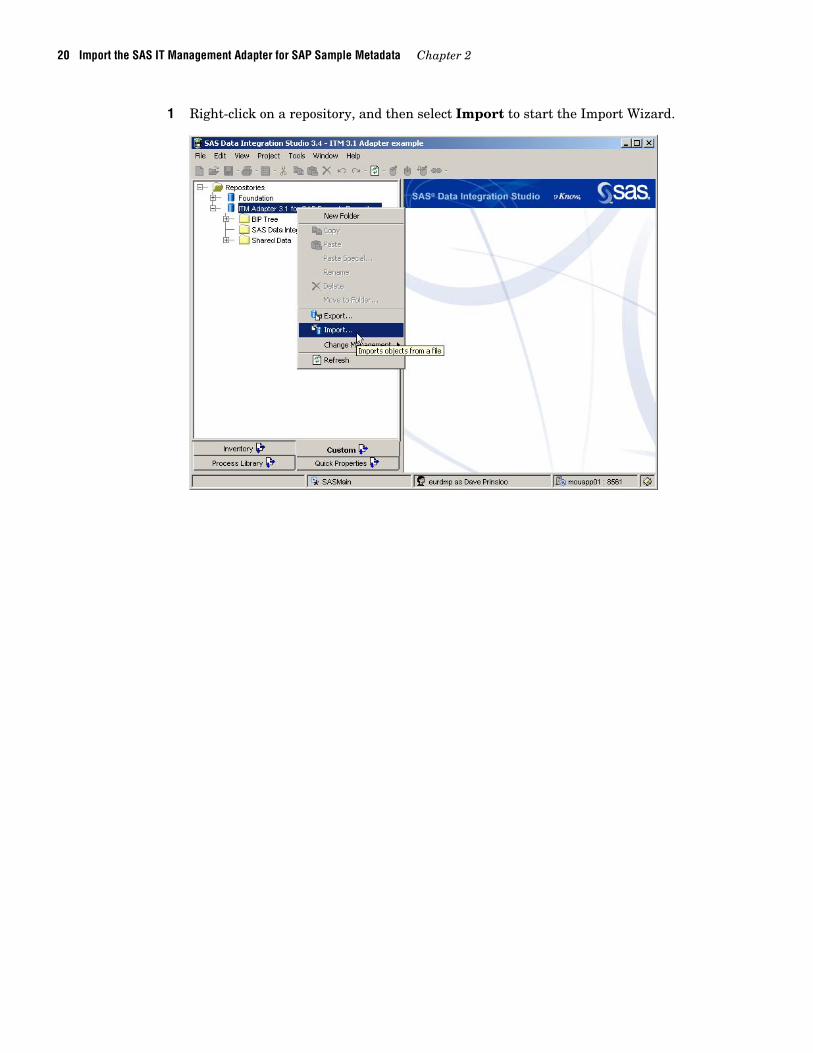
1 Right-click on a repository, and then select Import to start the Import Wizard.

Configuration Import the SAS IT Management Adapter for SAP Sample Metadata 21
2 Click Browse, and then select itmadaptsap.spk. Check All Objects, and then click Next.

22 Import the SAS IT Management Adapter for SAP Sample Metadata Chapter 2
3 Verify that the SAS Application Server SASMain is set correctly.
4 Select an SAP sample library.

Configuration Import the SAS IT Management Adapter for SAP Sample Metadata 23
5 Select a target library for the SAP sample library. Be sure to select a defined SAP library. If no defined SAP library is available, open SAS Management Console and add a library to the repository.
.

24 Import the SAS IT Management Adapter for SAP Sample Metadata Chapter 2
6 Select locations in your local environment. Click Next.

Configuration Import the SAS IT Management Adapter for SAP Sample Metadata 25
7 Verify that all directories and paths appear correctly.
26 Import the SAS IT Management Adapter for SAP Sample Metadata Chapter 2
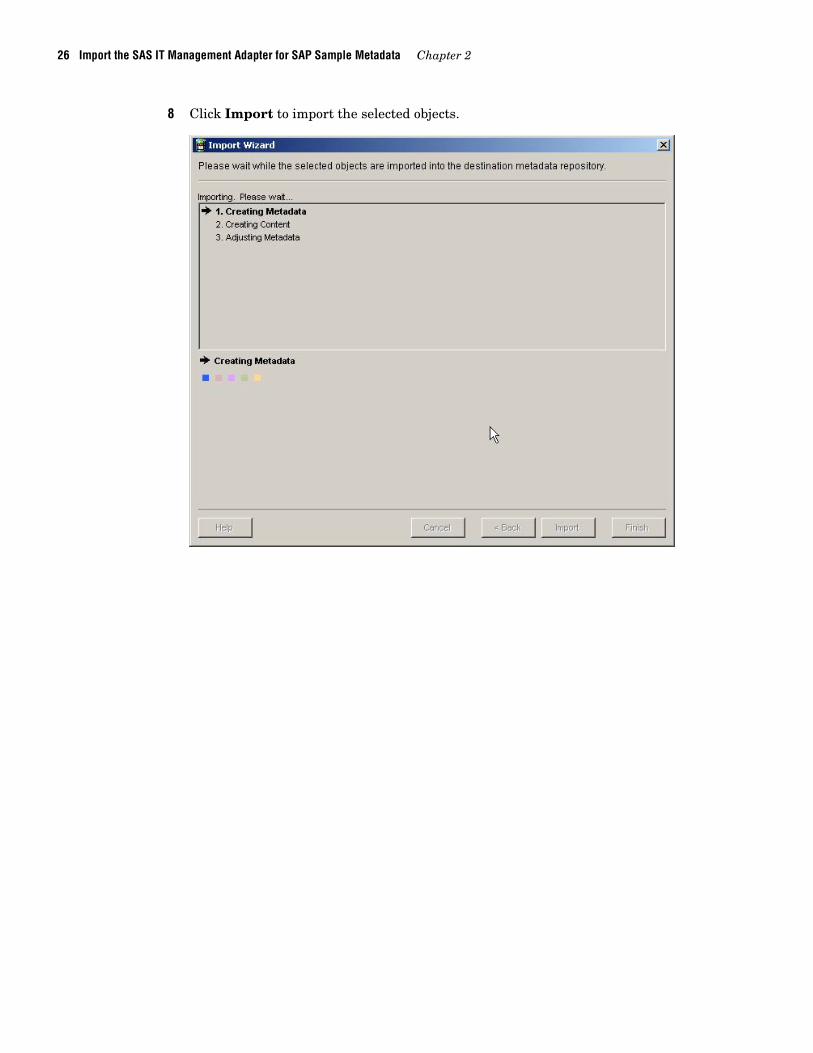
8 Click Import to import the selected objects.

Configuration Import the SAS IT Management Adapter for SAP Sample Metadata 27
9 Click View Log to review the SAS log. The SAS log might contain the warning The person ETL Developer 1 was not found. You can ignore the warning.

28 Import the SAS IT Management Adapter for SAP Sample Metadata Chapter 2
10 A new folder named ITM Adapter for SAP is added to the ITM Adapter for SAP Example Repository.
Customizing the SAS IT Management Adapter for SAP
Customization Tasks ............................................................................................................................................................. 29 Install SAP Transports .......................................................................................................................................... 29 Install Additional Transport for Indirect Extraction ............................................................................................ 30 Use Transport Files to Install ABAP Functions .................................................................................................... 30 Set Up Hubs to Extract Performance Data ............................................................................................................ 30 Connect To SAP Destination Servers ..................................................................................................................... 30 Extract Business Warehouse Server Performance Data ........................................................................................ 31 Set Up SAP Authorization ..................................................................................................................................... 32 Test ABAP Functionality ....................................................................................................................................... 33
Customization Tasks The SAS IT Management Adapter for SAP requires customization to work at each site. The
system administrator must perform the following tasks:
1 Install SAP transports.
2 Install an additional transport for indirect extraction.
3 Use transport files to install ABAP functions.
4 Set up hub servers to extract performance data.
5 Connect to SAP destination servers.
6 Extract business warehouse server performance data.
7 Set up SAP authorization.
8 Test ABAP functionality.
Furthermore, the SAS IT Management Adapter for SAP uses the SAS Data Surveyor for SAP. The server component of the SAS Data Surveyor for SAP is SAS/ACCESS Interface to R/3 software. SAS/ACCESS Interface to R/3 software requires additional setup. For more information, see the installation instructions for this product.
The following sections provide approximate instructions on how to complete these tasks. For specific information on how to complete these tasks in your environment, see your SAP documentation.
Install SAP Transports There are two ways to gather performance data from an SAP server:
1 Direct extraction: This requires installing standard SAP transports on each SAP server.
C H A P T E R
3

30 Customization Tasks Chapter 3
2 Indirect extraction: This involves extracting data via a hub SAP server that has standard SAP transports installed, as well as an additional transport installed. A destination is configured on the hub, which enables the hub to connect to the server from which data is to be extracted.
Note: Indirect extraction can be used only with SAP servers that are of the same threaded kernel release. If there is more than one release represented in the SAP server environment, you must use direct extraction for individual SAP servers.
The main difference between the two ways is the effort to install the SAP transports on each server (direct extraction) versus the effort to configure the destination on the hub. Also, indirect extraction has additional overhead for the hub.
Install Additional Transport for Indirect Extraction An additional transport needs to be installed. The SAPKI31001INSAS transport is provided for
SAP releases 4.6C or later (up to, but not including, SAP release 6.10). The SAPKI31002INSAS transport is provided for SAP release 6.10 or later. Each transport installs the RFC function /SAS/SAPWL_STATREC_READ_FILE, which is provided by SAS.
The transports are located in the \itmadaptsap\sasmisc directory. The directory location is relative to the location where SAS Foundation is installed (for example, x:\Program Files\SAS\SAS 9.1\itmadaptsap\sasmisc).
Use Transport Files to Install ABAP Functions Additional transport files for SAP releases 4.5B, 4.6B, 4.6C, 4.6D, 6.10, and 6.20 need to be
installed.
The transports are located in the \itmadaptsap\sasmisc directory. The directory location is relative to the location where SAS Foundation is installed (for example, x:\Program Files\SAS\SAS 9.1\itmadaptsap\sasmisc). In this directory, the transprt.tar file (for UNIX) or the transprt.zip file (for Windows) needs to be unzipped into a local directory.
From the local directory, a system administrator with the necessary privileges can install the transport files using the SAP Transport Manager.
Set Up Hubs to Extract Performance Data Some SAP servers need to function as adapter gateway servers (or hubs). The ABAP function
Z_SAS_SAPWL_STATREC_READ_FILE needs to be installed on each server that is a hub.
SAS calls this ABAP function to extract performance data for the hub and for other SAP servers. Multiple extractions can be channeled through a single hub, which means that only one or two servers might need to function as hubs.
Note: A hub is needed for each unique SAP release because underlying data structures can change between releases. Remote function calls between SAP instances that have different underlying data structures can result in corrupt data.
Connect To SAP Destination Servers Servers connect to a hub using an SAP destination. On the hub, an ABAP function extracts
data from other servers using an SAP destination defined on the hub itself.

Customizing the SAS IT Management Adapter for SAP Customization Tasks 31
An SAP destination must be defined for each server on each hub, so that the server’s
performance data can be extracted by the hub.
To define an SAP destination, complete the following steps:
1 Issue transaction SM59 from SAP, and then provide the following:
a. For the RFC destination, specify system-id_hostname (for example, SI9_ENDAPP09).
b. For connection type, enter 3.
c. For description, enter Connection to SI9 on appserver.pc.domain.com.
2 In the Technical Settings section, verify the following setting and information:
a. Do not allow load distribution.
b. A host name or IP address of the SAP server has been specified.
3 In the Logon and Security sections, provide the following:
a. A user ID and password for non-trusted systems to run code on the target SAP system.
4 In the Special Options section, complete the following steps:
a. Set the Unicode flag based on the setting of the target SAP server.
b. Review all other settings and make sure they meet the local site’s standards.
Extract Business Warehouse Server Performance Data The business warehouse server performance data is extracted using standard ABAP functions.
No additional ABAP functions are required. However, each ABAP function must be installed on each business warehouse server, meaning performance data for business warehouse servers cannot be extracted through a hub. But, a business warehouse server can function as a hub.
In addition, business warehouse servers must be activated to collect performance data. To activate a business warehouse server, complete the following steps:
1 Access the business warehouse server workbench by issuing transaction RSA1.
2 From the workbench, select ToolsBW Statistics for InfoCubes.
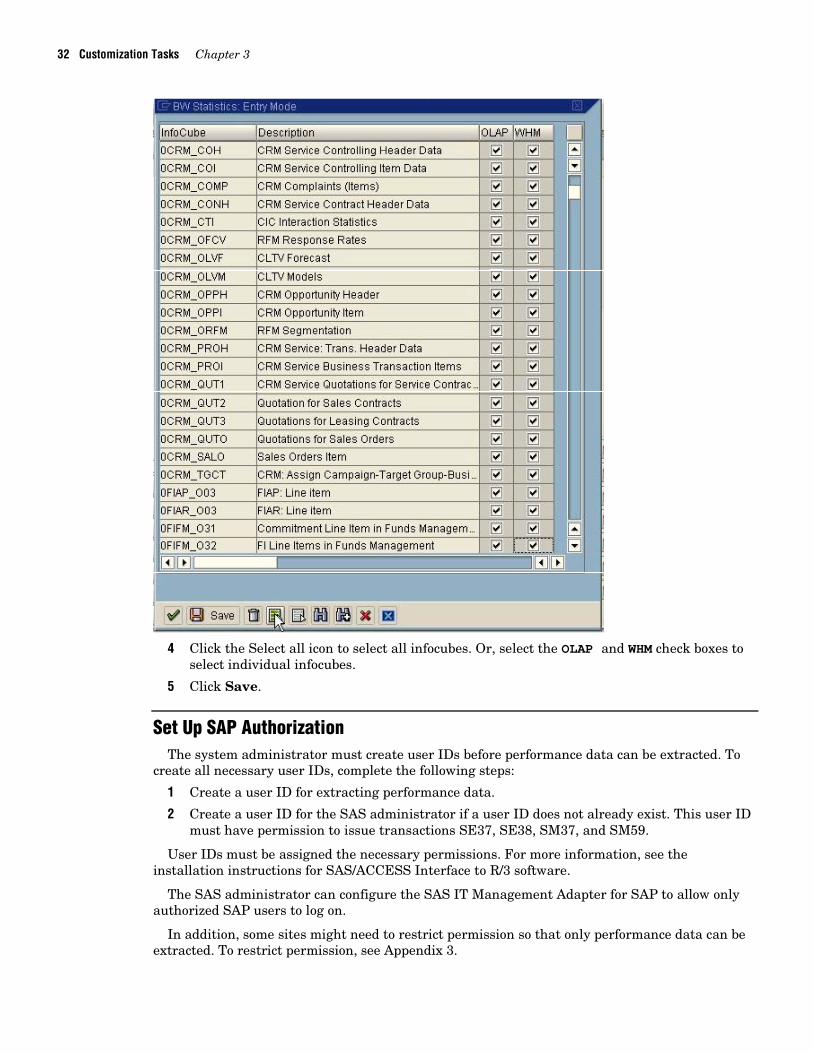
3 The BW Statistics: Entry Mode window appears with a listing of all active infocubes.
32 Customization Tasks Chapter 3
4 Click the Select all icon to select all infocubes. Or, select the OLAP and WHM check boxes to select individual infocubes.
5 Click Save.
Set Up SAP Authorization The system administrator must create user IDs before performance data can be extracted. To
create all necessary user IDs, complete the following steps:
1 Create a user ID for extracting performance data.
2 Create a user ID for the SAS administrator if a user ID does not already exist. This user ID must have permission to issue transactions SE37, SE38, SM37, and SM59.
User IDs must be assigned the necessary permissions. For more information, see the installation instructions for SAS/ACCESS Interface to R/3 software.
The SAS administrator can configure the SAS IT Management Adapter for SAP to allow only authorized SAP users to log on.
In addition, some sites might need to restrict permission so that only performance data can be extracted. To restrict permission, see Appendix 3.

Customizing the SAS IT Management Adapter for SAP Customization Tasks 33
Test ABAP Functionality To ensure that ABAP functions are correctly installed, run a test job using the ABAP
Workbench function.
Once all ABAP functions are installed and the SAS environment is customized, execute the test job. The job should not take more than a few minutes because the ABAP Workbench function extracts only a few test records.

34 Customization Tasks Chapter 3

SAS Data Integration Studio Jobs
Introduction ........................................................................................................................................................................... 35 Job Naming Conventions ....................................................................................................................................... 35 Initialization Jobs .................................................................................................................................................. 37 Other Jobs .............................................................................................................................................................. 42 Jobs in z/OS .......................................................................................................................................................... 43
Introduction This chapter describes the SAS Data Integration Studio jobs that are provided with the SAS IT
Management Adapter for SAP. The SAS Data Integration Studio jobs require customization so that they reference the SAP servers.
Job Naming Conventions
The jobs use the following naming conventions:
Ordering Jobs: An ordering job has a numeric prefix that indicates its order of execution. A job with a lower number is executed before a job with a higher number. The display order of the job is the same as its execution order. Numbering between jobs is not contiguous so that additional jobs can be added between two existing jobs.
Internal Jobs: An internal job is submitted from within another job (using a LOOP construct). It has a two-part prefix, separated by an underscore. The first part of the prefix refers to the calling job, and the second part refers to the individual internal job. For example, the prefix 0020_10 refers to an internal job that is called by the job with the prefix 0020. Internal jobs are grouped in subfolders. Internal jobs cannot be executed independently because the parameters set up by the calling job are not available.
Alternative Jobs: When there is more than one job that achieves the same results, an additional alphabetic character is added to the prefix. For example, 0010A and 0010B represent alternative jobs, but only one of these two jobs is required.
C H A P T E R
4
36 Introduction Chapter 4
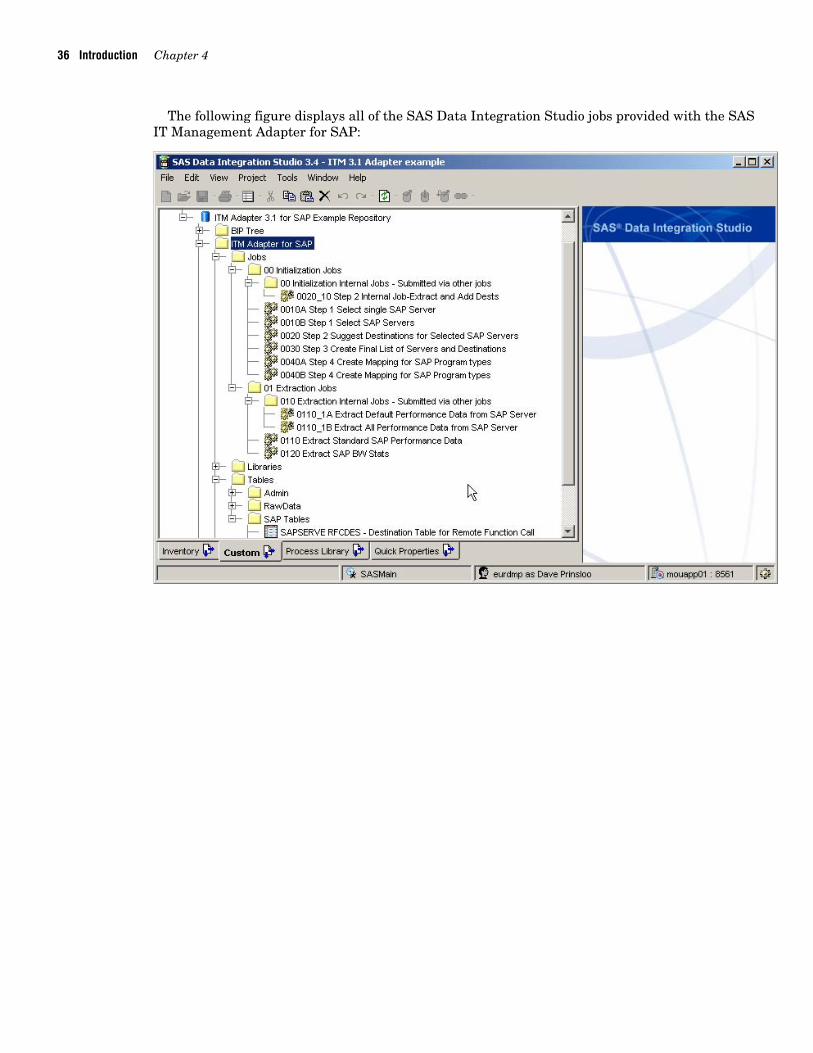
The following figure displays all of the SAS Data Integration Studio jobs provided with the SAS IT Management Adapter for SAP:

SAS Data Integration Studio Jobs Introduction 37
Initialization Jobs
A few of the initialization jobs are listed in the following sections. The job descriptions and figures provide a high-level overview of the SAS Data Integration Studio interface and how to work with the jobs.
0010A Step 1 Select Single SAP Server
This job is an alternative job for job 0010B Step 1 Select SAP Servers. This job lists the servers that are monitored. You can customize this job by associating the library of the relevant SAP server to a job. To do this, select the library and drop it on the empty drop zone. The job collects the attributes of the library and saves it in the Admin SAP Server Libraries table.
0010B Step 1 Select SAP Servers
This job is an alternative job for job 0010A Step 1 Select Single SAP Server. This job lists the servers that are monitored. This job appends the attributes of different SAP servers to the Admin SAP Server Libraries table. To associate the library of the relevant SAP server to the job, select the library and drop it on the empty drop zone.
.

38 Introduction Chapter 4
You can customize this job to perform any of the following functions:
To add an SAP library to job 0010B Step 1 Select SAP Servers, select SI9 SAP Library and drop it on the appropriate library.

SAS Data Integration Studio Jobs Introduction 39
To delete a branch of the job, right-click on a LibrefCollector object, and then select Delete.
40 Introduction Chapter 4
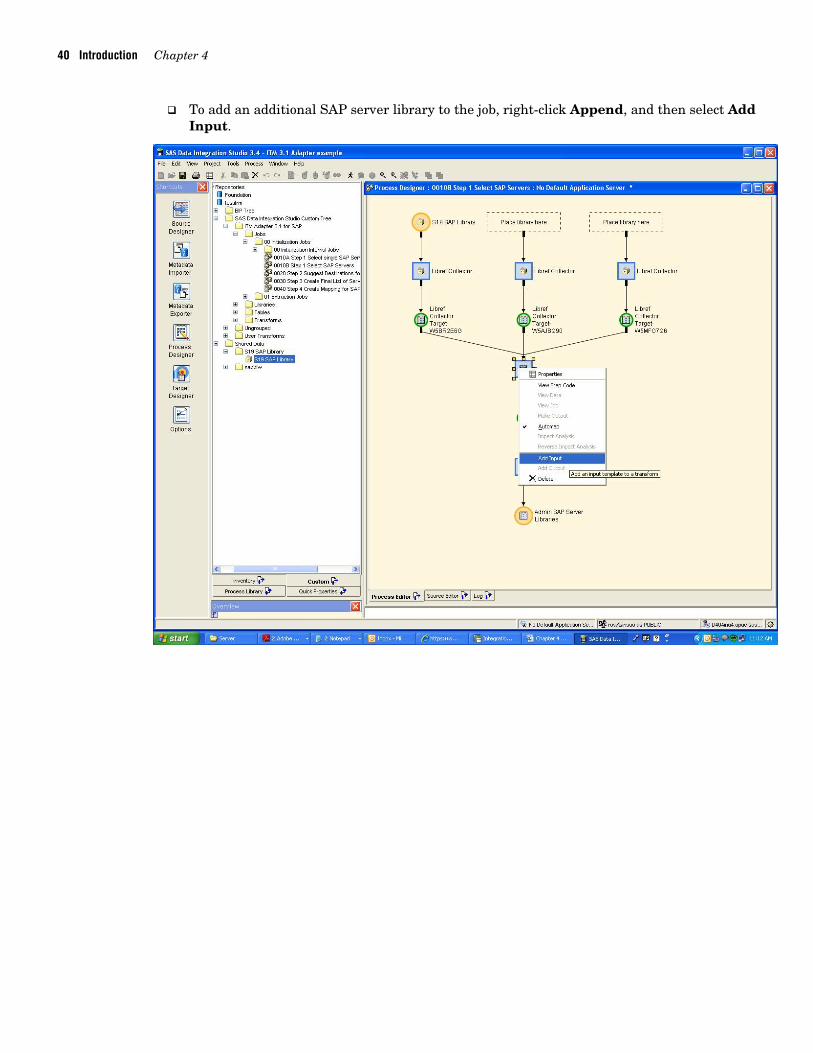
To add an additional SAP server library to the job, right-click Append, and then select Add Input.

SAS Data Integration Studio Jobs Introduction 41
To add the Libref Collector transformation to the job, drop the Libref Collector object on the newly created drop zone. The Libref Collector object can be found in the Process Library in the Access folder.

42 Introduction Chapter 4
0020_10 Step 2 Internal Job-Extract and Add Dests
This job collects the attributes of all of the libraries and saves them in a table.
Other Jobs
The remaining jobs and brief descriptions are listed. These jobs are not customized.
0020 Step 2 Suggest Destinations for Selected SAP Servers: Extracts destinations from SAP servers.
0030 Step 3 Create Final List of Servers and Destinations: Extracts the final list of libraries and destinations to extract statistical data from SAP servers.
0040 Step 4 Create Mapping for SAP Program Types: Extracts objects from SAP servers to map them to SAP programs.
0110_1A Extract Default Performance Data from SAP Server: Extracts default SAP performance data from all SAP servers.
0110_1B Extract All Performance Data from SAP Server: Extracts SAP performance data from all SAP servers to populate the raw data tables.
0120 Extract SAP BW Stats: This job extracts the SAP business warehouse server performance data from all SAP business warehouse servers.

SAS Data Integration Studio Jobs Introduction 43
Jobs in z/OS
If you are executing on a SAS Workspace Server in z/OS, then add the following options to the SAS configuration file or to the individual SAS IT Management Adapter for SAP batch jobs:
options nocardimage; options linesize=300;
Note: These options are required. Without these options, the default values in z/OS might truncate the inherently long string of parameters that are associated with LIBNAME statements that access SAP.

44 Introduction Chapter 4

1 Scheduling
Set Up Scheduling ......................................................................................................................................................... 45 Install an SAP Gateway ................................................................................................................................................ 45
Install the ABAP Function ZSASPIPE .................................................................................................................. 48 Set Up and Schedule a Variant of ZSASPIPE....................................................................................................... 48
Define the Job to Execute ............................................................................................................................................... 51 Test the Environment Setup .......................................................................................................................................... 51
Test the SAS System in the SAP Environment ...................................................................................................... 51 Troubleshoot the Failure of a Scheduled SAP Job to Run ........................................................................................... 52
Set Up Scheduling
The SAS IT Management Adapter for SAP uses the SAP scheduler to submit SAS jobs. Although other scheduling methods can be used, they are not documented in this guide. It is recommended that you use the standard SAP scheduler.
To use the SAP scheduler, you must install the following software:
An SAP gateway An additional ABAP function (ZSASPIPE)
Install an SAP Gateway
A local SAP gateway is required to schedule SAS jobs. Before you install the local SAP gateway, verify the following:
For Windows NT, verify that Microsoft Management Console (MMC) is installed. Verify that the SAP MMC snap-in is installed.
If either of these components needs to be installed, see the specific component’s documentation.
To install the local SAP gateway, complete the following steps:
1 Issue transaction SM59 to set up a TCP/IP connection.
2 Reference the local SAP gateway on the machine that executes SAS.
3 Specify that the activation type is Start, and that the program to start is RFCEXEC. (This program is located in RFCSDK, which is distributed by SAP.)
4 On the command line in SAP, enter SM59.
A P P E N D I X

46 Set Up Scheduling Appendix 1
The Display and maintain RFC destinations window appears.
5 To create a new destination, click Create. The RFC Destination dialog box appears.
6 Enter an RFC destination name, such as RFCEXEC_hostname, where hostname is the machine on which the SAS server is installed.
7 For a TCP or IP connection, enter T in the Connection type field.
8 In the Description field, enter a short description, such as Start RFCEXEC on hostname.
9 Click Enter.

Scheduling Set Up Scheduling 47
The RFC Destination RFCEXEC_hostname dialog box appears.
10 Click on the Explicit host tab. The Explicit host dialog box appears.
11 Specify the program as rfcsdkpath\rfcexec.exe, where rfcsdkpath is the path for RFCSDK. The pathname must not contain blank spaces.
12 Specify the Target host as the host name or IP address.

48 Set Up Scheduling Appendix 1
13 To specify SAP gateway information, select DestinationGateway options.
14 In the Gateway host field, specify the SAS server name. In the Gateway service field, specify the service that is associated with the gateway.
15 Click O.K.
16 In the RFC Destination RFCEXEC_hostname dialog box, click Test connection.
If the RFC destination is correctly configured and if the SAP gateway server is running, the following status bar appears:
Install the ABAP Function ZSASPIPE
To install the ABAP function ZSASPIPE, complete the following steps:
1 Log on using a user ID that has been registered with an SAP developer key.
2 Issue transaction SE38 to create a new function called ZSASPIPE.
3 Upload the code from your_install_path\ZSASPIPE.ab4.
4 Enter a description, such as Run command via remote pipe.
Set Up and Schedule a Variant of ZSASPIPE
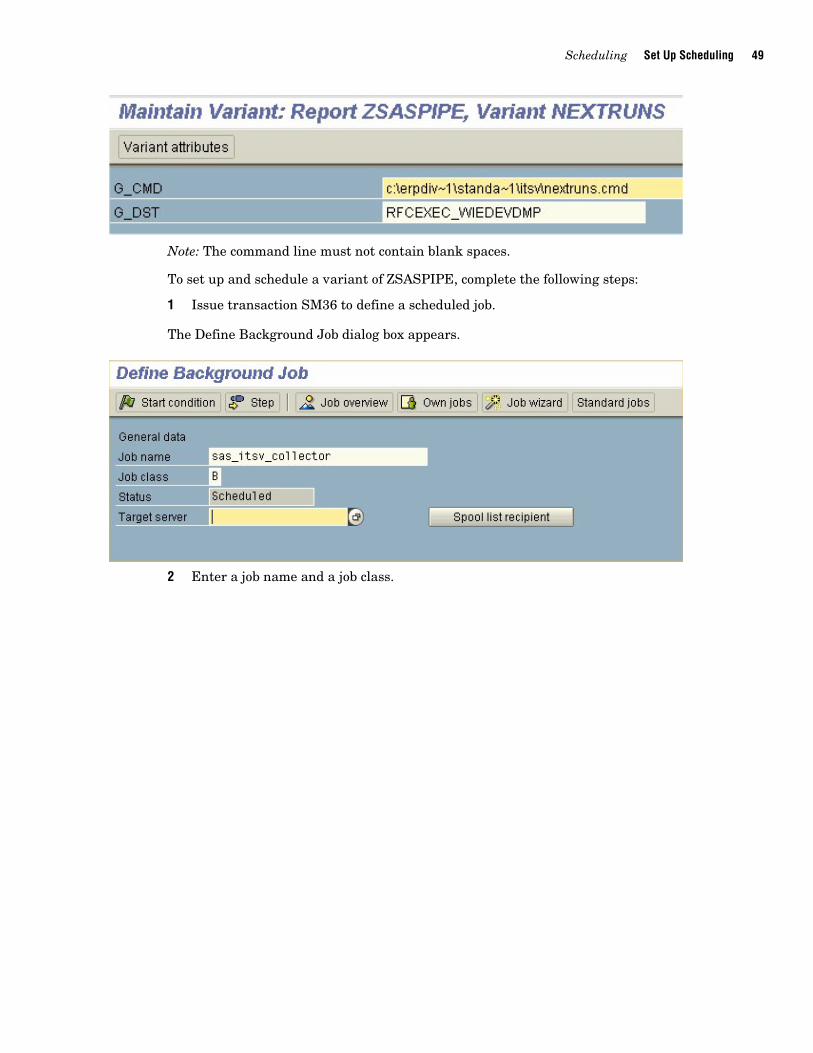
Create a variant of ZSASPIPE and name it NEXTRUNS.CMD. The variant specifies that ZSASPIPE must execute NEXTRUNS.CMD on the specified machine through the destination that was created in the RFC Destination dialog box.
Scheduling Set Up Scheduling 49
Note: The command line must not contain blank spaces.
To set up and schedule a variant of ZSASPIPE, complete the following steps:
1 Issue transaction SM36 to define a scheduled job.
The Define Background Job dialog box appears.
2 Enter a job name and a job class.
50 Set Up Scheduling Appendix 1
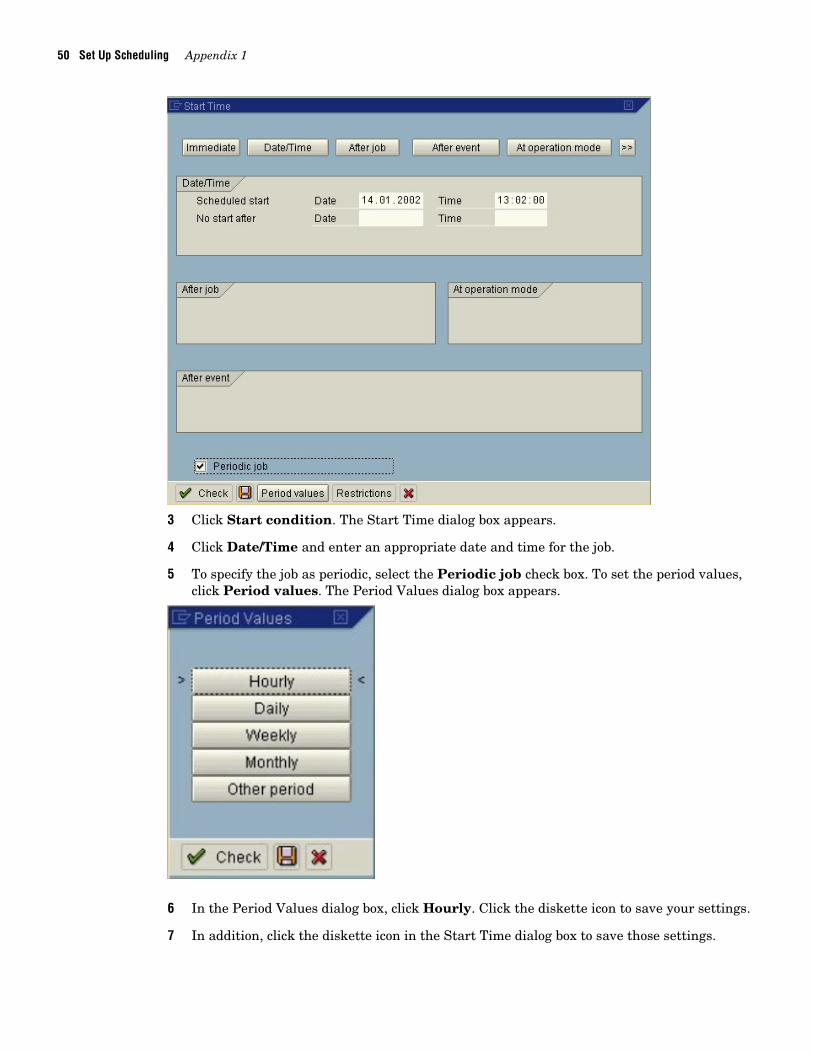
3 Click Start condition. The Start Time dialog box appears.
4 Click Date/Time and enter an appropriate date and time for the job.
5 To specify the job as periodic, select the Periodic job check box. To set the period values, click Period values. The Period Values dialog box appears.
6 In the Period Values dialog box, click Hourly. Click the diskette icon to save your settings.
7 In addition, click the diskette icon in the Start Time dialog box to save those settings.
Scheduling Test the Environment Setup 51
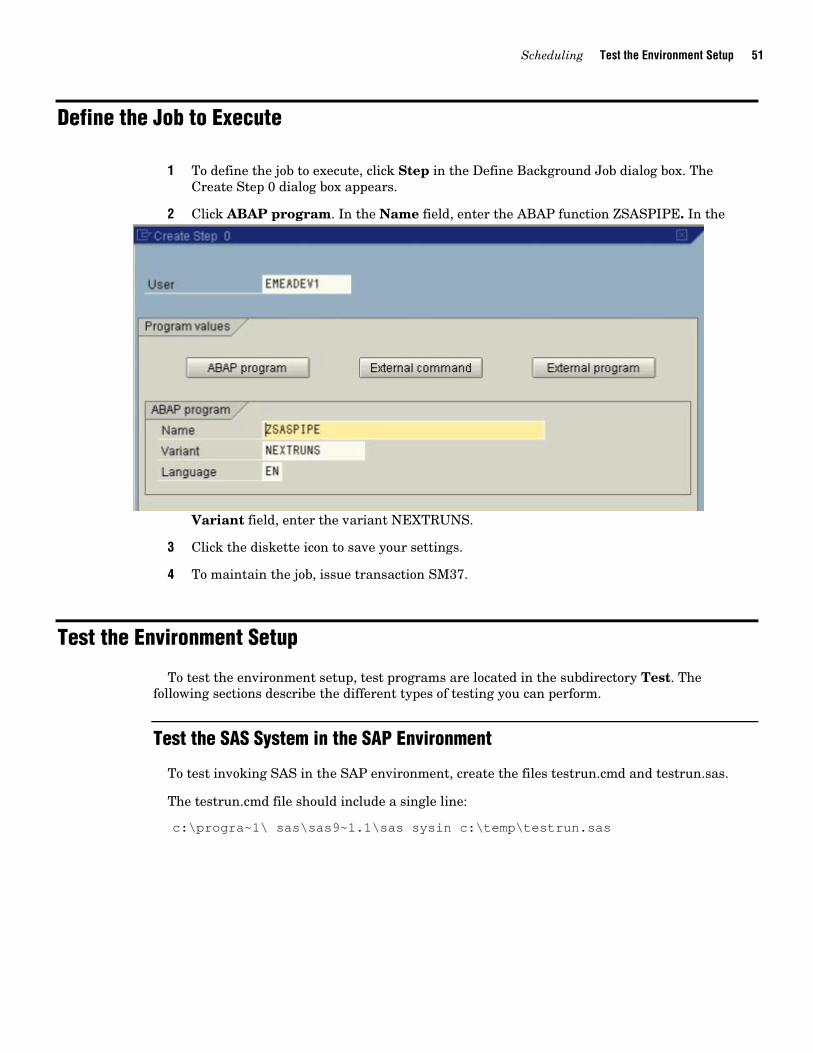
Define the Job to Execute
1 To define the job to execute, click Step in the Define Background Job dialog box. The Create Step 0 dialog box appears.
2 Click ABAP program. In the Name field, enter the ABAP function ZSASPIPE. In the
Variant field, enter the variant NEXTRUNS.
3 Click the diskette icon to save your settings.
4 To maintain the job, issue transaction SM37.
Test the Environment Setup
To test the environment setup, test programs are located in the subdirectory Test. The following sections describe the different types of testing you can perform.
Test the SAS System in the SAP Environment
To test invoking SAS in the SAP environment, create the files testrun.cmd and testrun.sas.
The testrun.cmd file should include a single line:
c:\progra~1\ sas\sas9~1.1\sas sysin c:\temp\testrun.sas
52 Troubleshoot the Failure of a Scheduled SAP Job to Run Appendix 1
To execute this command file from SAP, ensure that the paths that contain commands do not include blank spaces. For example, cd \program files\SAS\SAS 9.1 is valid because the cd command is known. However, c:\program files\sas\sas 9.1\sas is not valid because SAP will attempt to execute a command with parameter files \sas\sas and 9.1\sas.
The testrun.sas file should look something like this:
data _null_; put ‘hello world’; run;
The testrun.sas file can also test the local SAP gateway setup. First, ensure that the testrun.cmd file works correctly when it is invoked locally. For example, in Windows, double-click Windows Explorer. If the testrun.cmd file runs successfully, then create a variant of the testrun.cmd file for ZSASPIPE, and then execute it from SAP.
This testing confirms that the installation of ZSASPIPE and the RFC destination are correct.
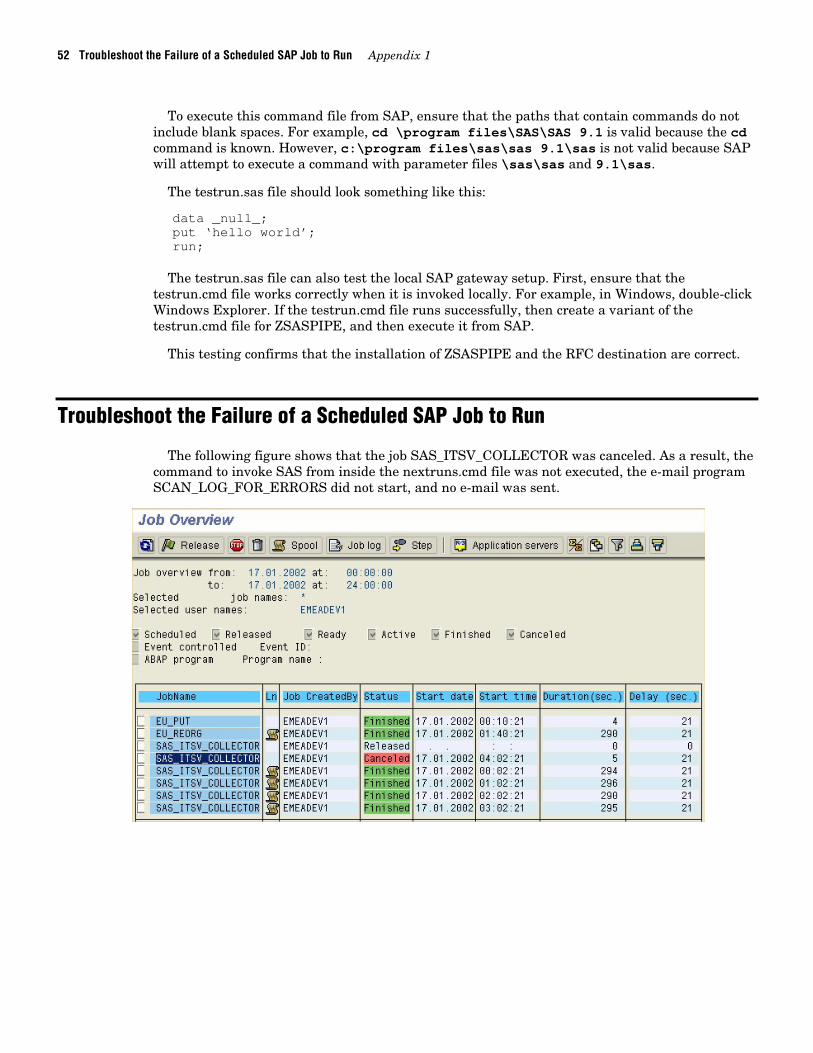
Troubleshoot the Failure of a Scheduled SAP Job to Run
The following figure shows that the job SAS_ITSV_COLLECTOR was canceled. As a result, the command to invoke SAS from inside the nextruns.cmd file was not executed, the e-mail program SCAN_LOG_FOR_ERRORS did not start, and no e-mail was sent.

Scheduling Troubleshoot the Failure of a Scheduled SAP Job to Run 53
To determine why this job failed, drill down in the job overview by double-clicking on the job name in the JobName column. The Job Log Entries dialog box appears.
The most likely reason for failure is that the local SAP gateway was not active when the job was invoked on the SAP server. This reason is not clear from the Job Log Entries dialog box.
To avoid this problem, ensure that the local SAP gateway is automatically started.
1 Verify that the Services (Local) property setting is set to Autostart = 1. This property setting is in the profile for the service when the stand-alone gateway is installed.
2 To find the profile filename on Windows, select StartProgramsAdministrative Tools Services. The Services dialog box appears.
3 Locate the service SAPsysid_sysno, where sysid is the system ID, and sysno is the gateway setup system number.

54 Troubleshoot the Failure of a Scheduled SAP Job to Run Appendix 1
4 To open the Properties dialog box, double-click on the service on the Tree tab. The Properties dialog box for that service appears.
5 In this example, the service SAPD2_14 is set up to start automatically. If this is not the case with your service, then set the startup type to Automatic.
6 Note the information in the Path to executable field. From the job name, SAP automatically generates an editable startsrv.exe profile text file, located in the profile directory. In the example, the location is pf=C:\usr\sap\DP2\sys\START_G14_wiedevdmp.
7 Open the profile text file with a text editor and confirm that the file includes the statement Autostart = 1. If it does not, add the statement, but not as the last line of the file. Note the initial cap A in Autostart. Note the blank spaces before and after the equal sign. # generated by R3SETUP Autostart = 1 SAPSYSTEMNAME = DP2 INSTANCE_NAME = G14 SAPSYSTEM = 14 SAPGLOBALHOST = wiedevdmp # start message server _GW = gwrd.exe Start_Program_05 = local $(DIR_EXECUTABLE)\$(_GW) pf=$(DIR_PROFILE)\DP2_G14_wiedevdmp

2 Terms and Statistics Files Duration
55Terms and Definitions ............................................................................................................................................... 55 Statistics Files Duration ............................................................................................................................................. 56
Terms and Definitions
The following terms and their definitions are extracted from SAP notes.
Front-End System
SAP measures time as starting when the request from the front-end system reaches the server, and ending when the final data package is sent from the server. During the transaction, several communication steps might occur between the server and the front-end system. These are called round trips.
During a round trip, the server transfers data for the controls to the front-end system. The user context is rolled out. The time to do these two tasks is roll-wait time. The time line for every round trip is measured on the server in GUI time. The influence of network performance and front-end system performance on the SAP response time can be defined with the help of GUI time.
The difference between the first time measurement (how SAP measures time) and the second time measurement (SAP response time) is included as front-end network time. In other words, it is the total network time for the first and the final communication steps between the front-end system and the server. The front-end network time is not included in the GUI time.
DBRequestTime
DBRequestTime—database request time—is the time that it takes to process logical database requests (calls to the SAP database interface).
Response Time
Response time is the total time used on the server, including database request time.
The response time of a dialog step is the time that it takes from the request of the dialog to the application dispatcher to when the work is actually processed. The response time consists of single values, such as:
CPU time load+gen time
queue time database request time
A P P E N D I X
56 Statistics Files Duration Appendix 2
All dialog steps that are initiated directly by the front-end user are evaluated. Automatic ABAP functions or dialog steps of the SAPSYS user are not relevant.
The response time value, which measures overall system performance, is reported to transaction RZ20. This transaction is executed every five minutes. The length of the run time to report the response time depends on the number of users logged on and the number of dialog steps.
Statistics Files Duration
As of Release 4.6D (for application statistics—Base SAS, Release 6.10), the threaded kernel starts a statistics file on the hour. This procedure offers two advantages:
Access to the statistics file is much faster. Updated statistics files are available.
Before Release 4.6D, the collector deleted the statistics file if it was larger than a defined size. In the current release, the duration for storing the statistics files can be specified (for example, 48 hours). The collector deletes statistics files that are older than the specified time if all records from the statistics file have been processed.
The duration should always be shorter than the value for the stat/max file. A stat/max file defines the maximum number of statistics files that are allowed. When you reach the limit, the threaded kernel overwrites the older statistics files.
A reasonable value for a stat/max file is 72 hours. If this value is set to 0, SAP works with one statistics file only, as it did in releases before 4.6D.
When SAP is invoked, statistics files older than seven days are automatically deleted. In addition, for each collector that runs, files older than the specified duration are deleted.
3 Restricting Permission on the SAP User Account
Overview .............................................................................................................................................................................. 57 Create an Authorization ...................................................................................................................................................... 58 Create and Edit a Profile .................................................................................................................................................... 69 Associate the Profile with a User Account .......................................................................................................................... 85
Overview
The example detailed in this appendix was performed on Release 4.6C. In this example, the system administrator creates a new authorization, uses it in a profile, and defines a user account that will use the profile. (In addition, the user account is designated as a system account, which prevents interactive logons.) Here is the sequence of events:
1 Create the authorization SASCPIC.
2 Specify the program that SASCPIC is allowed to execute. Using the SAP authorization administration, enter the program name SAPLZSASX with the function group ZSASX).
3 Specify that only activities 37 and 51 are allowed.
4 Save your settings. Activate SASCPIC.
5 Create a new profile named ITRM using the SASCPIC authorization. (The profile uses other more standard authorizations as well, such as those that allow CPIC and RFCs to run.)
6 Associate the new ITRM profile with the SAP user ID and account that performs data extractions.
By completing these steps, the account can be used only for extracting performance data. Functions in the ZSASX function group are the only functions that can be used to return data. Any attempt to extract tables or metadata will result in an error that indicates a lack of permission.
A P P E N D I X

58 Create an Authorization Appendix 3
Create an Authorization
To create an authorization, complete the following steps:
1 In the SAP Easy Access window, under Manual Maintenance, click SU03 – Edit Authorizations Manually.
Restricting Permission on the SAP User Account Create an Authorization 59
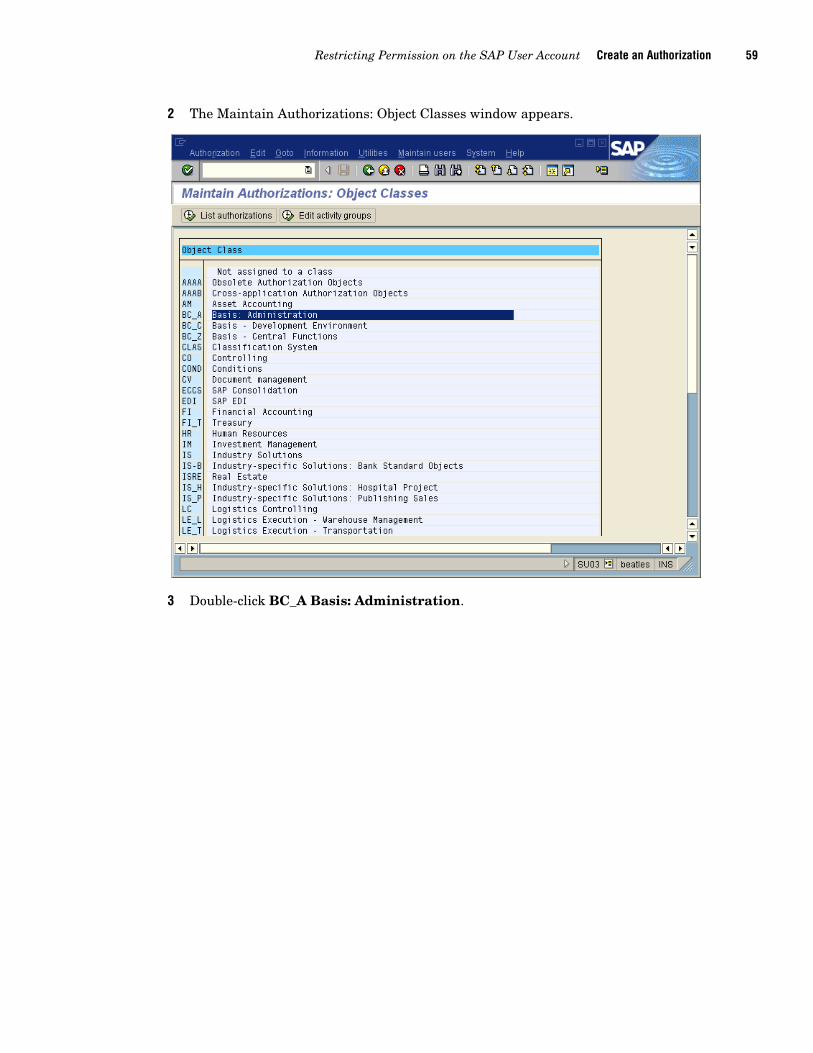
2 The Maintain Authorizations: Object Classes window appears.
3 Double-click BC_A Basis: Administration.

60 Create an Authorization Appendix 3
The Object List window appears.
4 In the Object column, double-click S_CPIC.

Restricting Permission on the SAP User Account Create an Authorization 61
The Authorization List window appears.
5 Select AuthorizationCreate. The Create New Authorization dialog box appears.
6 In the Text field, enter a description for this authorization. Click the check mark.
62 Create an Authorization Appendix 3
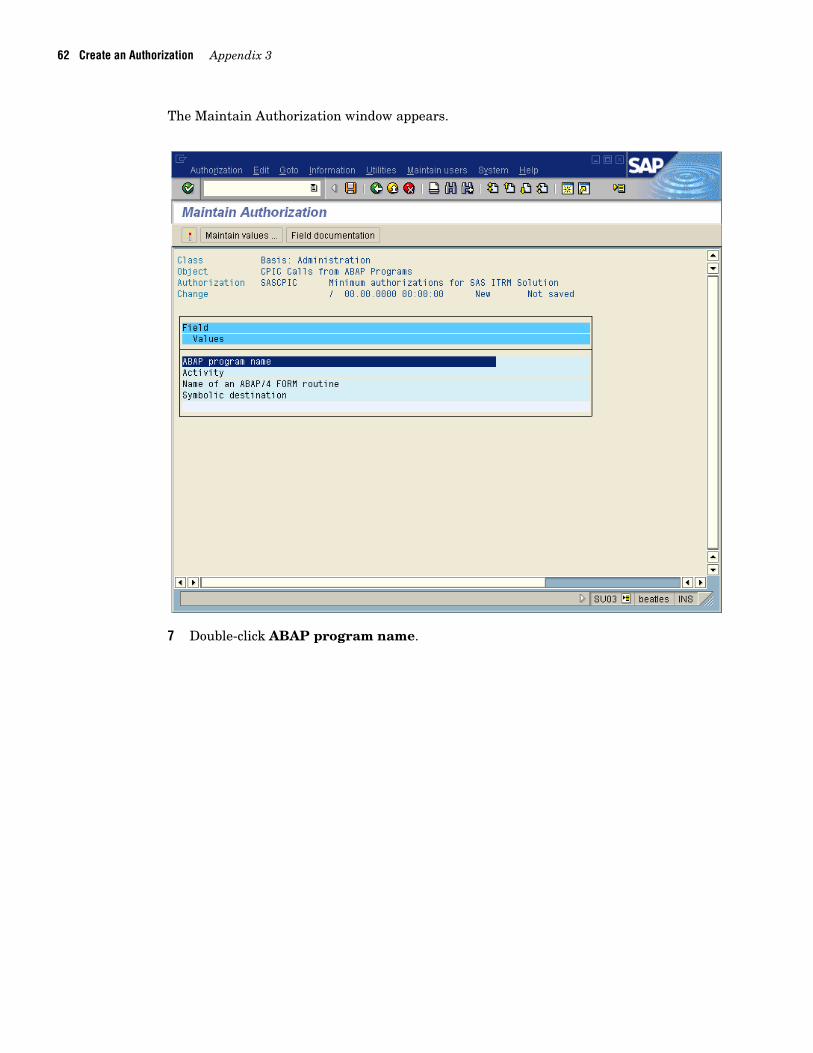
The Maintain Authorization window appears.
7 Double-click ABAP program name.

Restricting Permission on the SAP User Account Create an Authorization 63
The Maintain Field Values dialog box appears.
8 To restrict permission for S_CPIC so that it can execute only the SAPLZSASX program, complete the following steps:
a. Type SAPLZSASX in the ‘From’ column (where ZSASX is the function group).
b. Note that there is no value for ‘To’. c. Click the diskette icon to save your changes.
Here is an example of the system-generated code associated with the ZSASX function group:
******************************************************************* * System-defined Include-files. * ******************************************************************* INCLUDE LZSASXTOP. " Global Data INCLUDE LZSASXUXX. " Function Modules ******************************************************************* * User-defined Include-files (if necessary). * ******************************************************************* * INCLUDE LZSASXF... " Subprograms * INCLUDE LZSASXO... " PBO-Modules * INCLUDE LZSASXI...
Permission is restricted so that only the function module Z_SAS_SAPWL_STATREC_READ_FILE can be executed.

64 Create an Authorization Appendix 3
9 In the Maintain Authorization window, double-click Activity.
Restricting Permission on the SAP User Account Create an Authorization 65
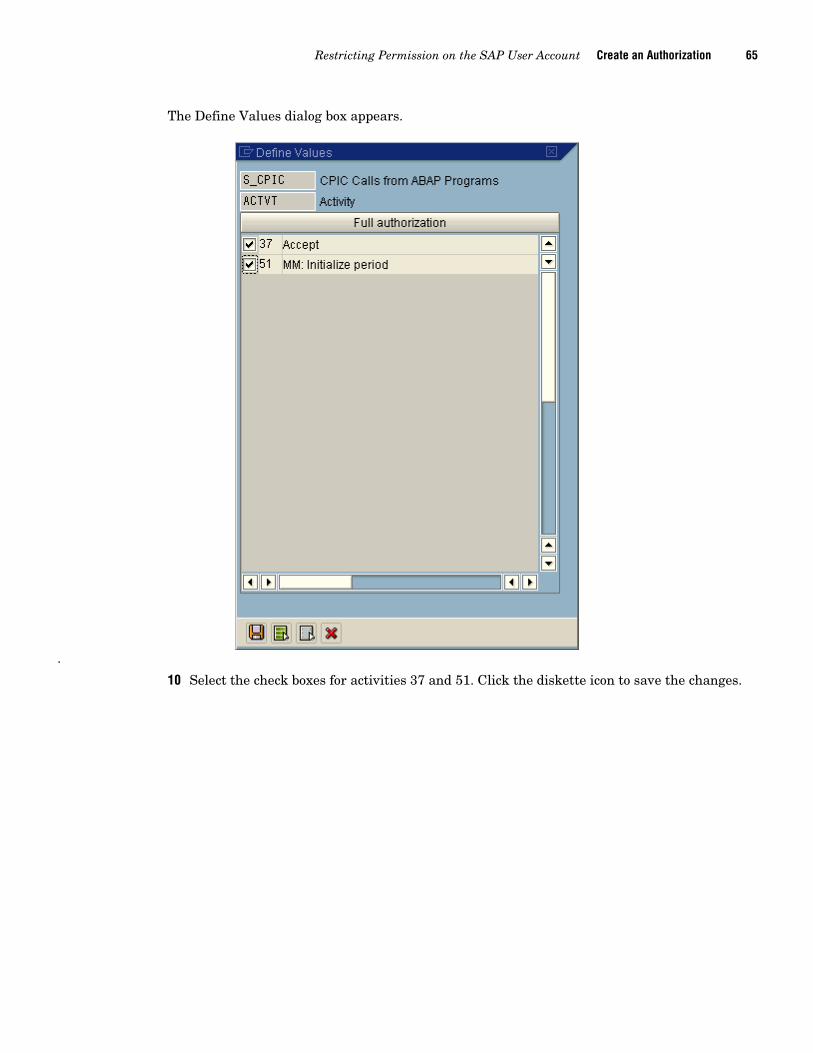
The Define Values dialog box appears.
.
10 Select the check boxes for activities 37 and 51. Click the diskette icon to save the changes.
66 Create an Authorization Appendix 3
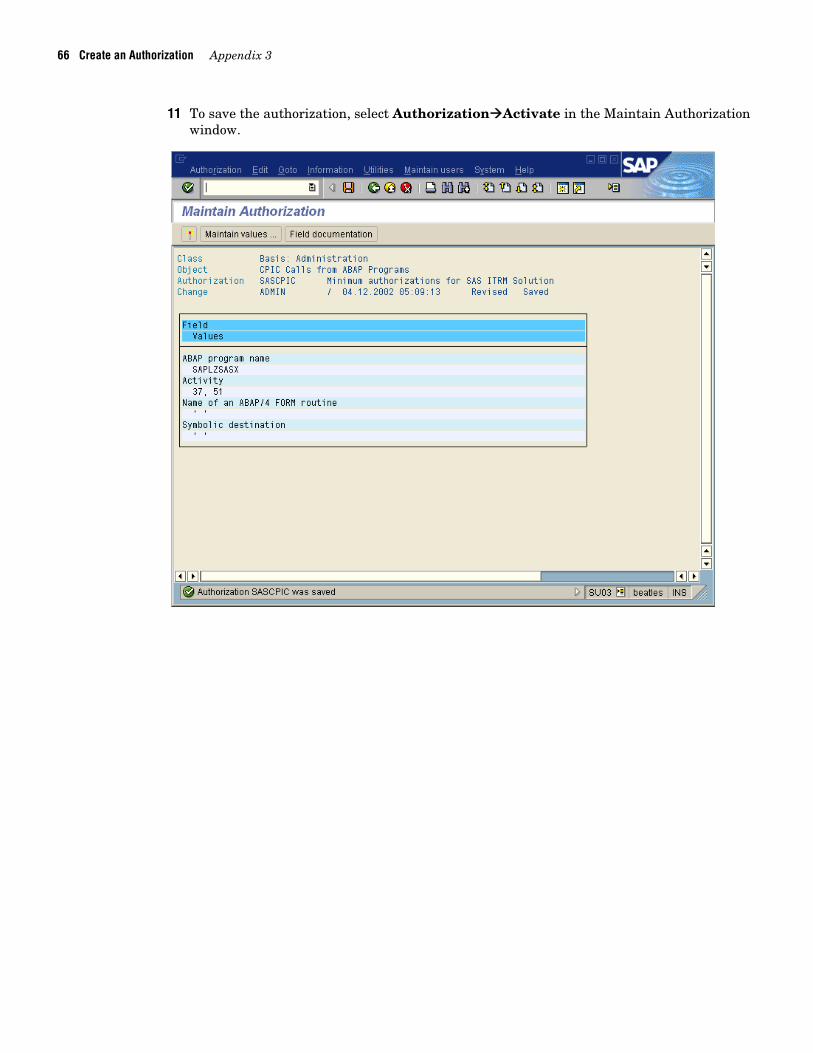
11 To save the authorization, select AuthorizationActivate in the Maintain Authorization window.

Restricting Permission on the SAP User Account Create an Authorization 67
The Activate Authorization: Execution Screen window appears.
12 Select AuthorizationActivate.

68 Create an Authorization Appendix 3
A message appears in the status bar at the bottom of the window stating Authorization SASCPIC was activated.

Restricting Permission on the SAP User Account Create and Edit a Profile 69
Create and Edit a Profile
To create a profile, complete the following steps:
1 In the SAP Easy Access window, under Manual Maintenance, click SU02 – Edit Profiles Manually.
70 Create and Edit a Profile Appendix 3
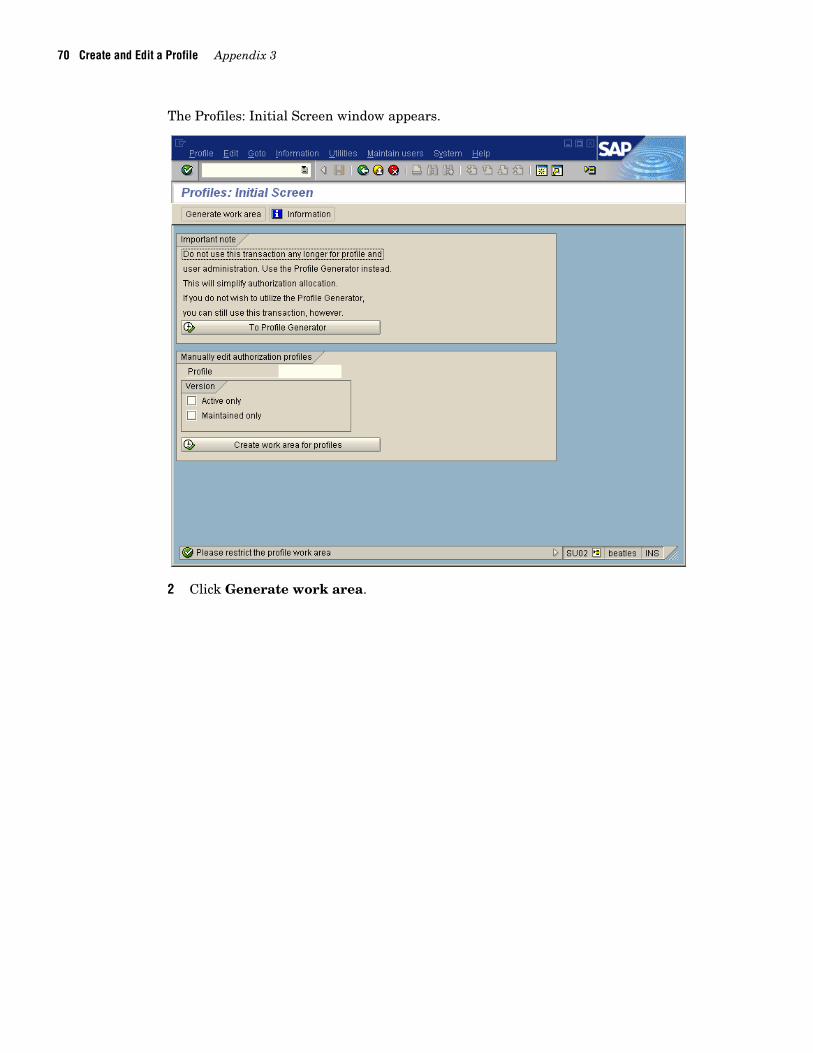
The Profiles: Initial Screen window appears.
2 Click Generate work area.
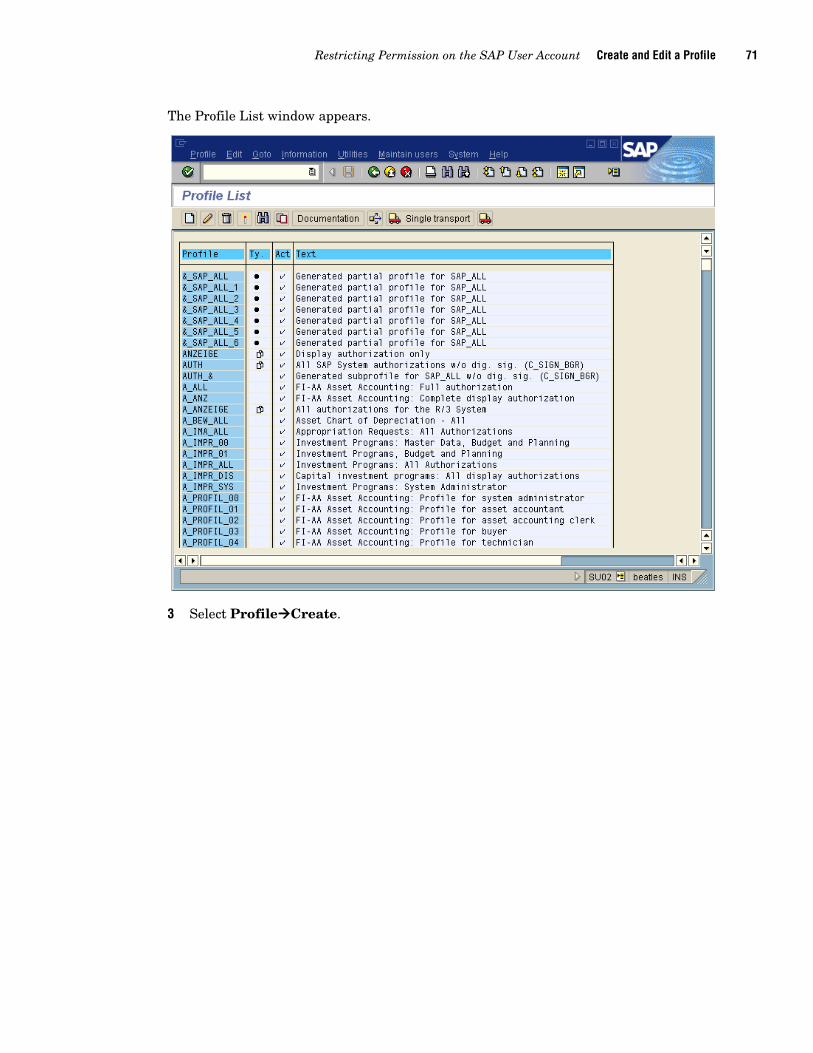
Restricting Permission on the SAP User Account Create and Edit a Profile 71
The Profile List window appears.
3 Select ProfileCreate.

72 Create and Edit a Profile Appendix 3
The Create New Profile dialog box appears.
4 To create a new profile, complete the following steps:
a. In the Profile field, enter a profile name.
b. In the Text field, enter a description.
c. Under ProfType, select Single profile.
d. Click the check mark to save the profile.
The Maintain Profile window appears.
5 To edit the profile, click Add object.
Restricting Permission on the SAP User Account Create and Edit a Profile 73
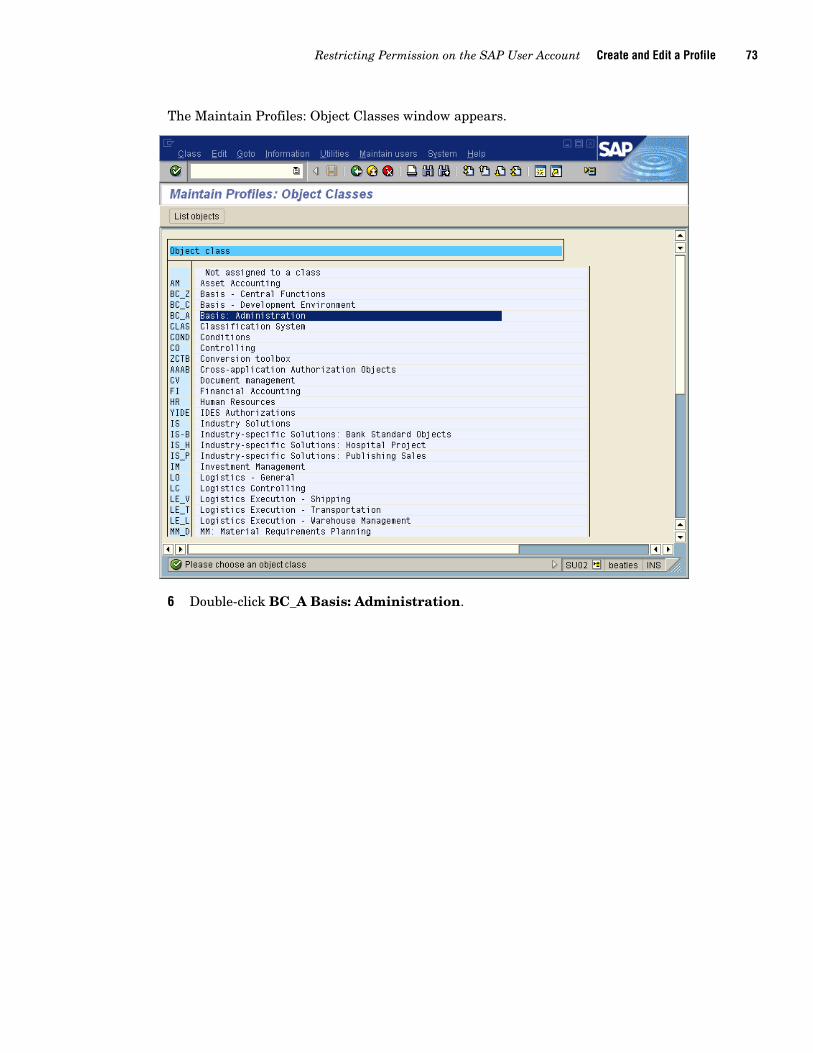
The Maintain Profiles: Object Classes window appears.
6 Double-click BC_A Basis: Administration.
74 Create and Edit a Profile Appendix 3
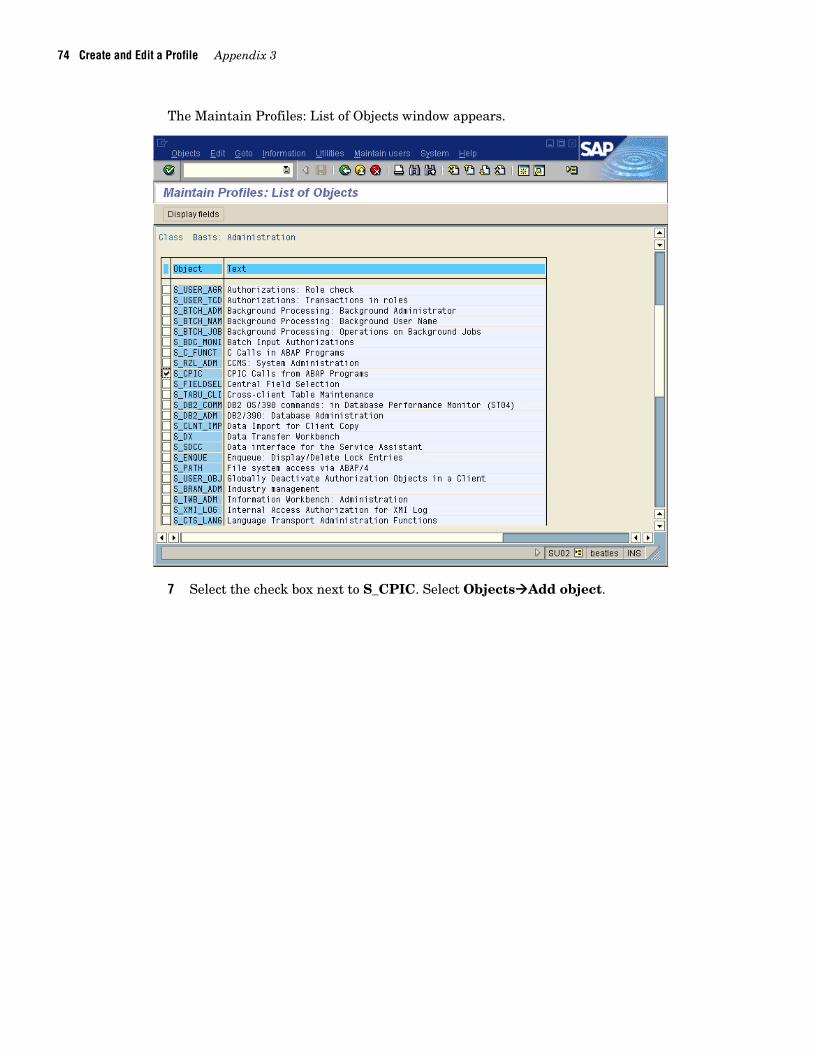
The Maintain Profiles: List of Objects window appears.
7 Select the check box next to S_CPIC. Select ObjectsAdd object.

Restricting Permission on the SAP User Account Create and Edit a Profile 75
The Maintain Profile window appears.
8 In the Authorization column, click .

76 Create and Edit a Profile Appendix 3
A list of associated authorizations for the object S_CPIC appears in the Restrictions window.
9 Double-click SASCPIC.

Restricting Permission on the SAP User Account Create and Edit a Profile 77
The Maintain Profile window appears.
10 Click Add object. The authorization SASCPIC is associated with the object S_CPIC.

78 Create and Edit a Profile Appendix 3
The Maintain Profiles: Object Classes window appears.
11 Double-click AAAB Cross-application Authorization Objects.
Restricting Permission on the SAP User Account Create and Edit a Profile 79
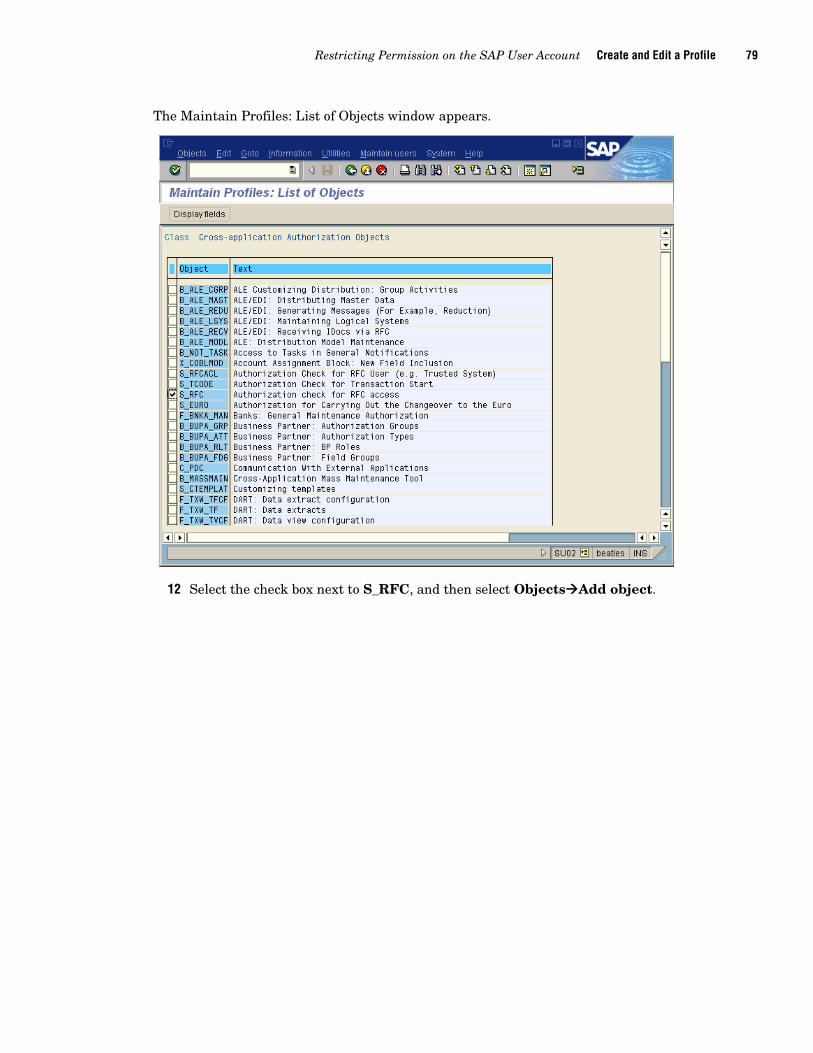
The Maintain Profiles: List of Objects window appears.
12 Select the check box next to S_RFC, and then select ObjectsAdd object.
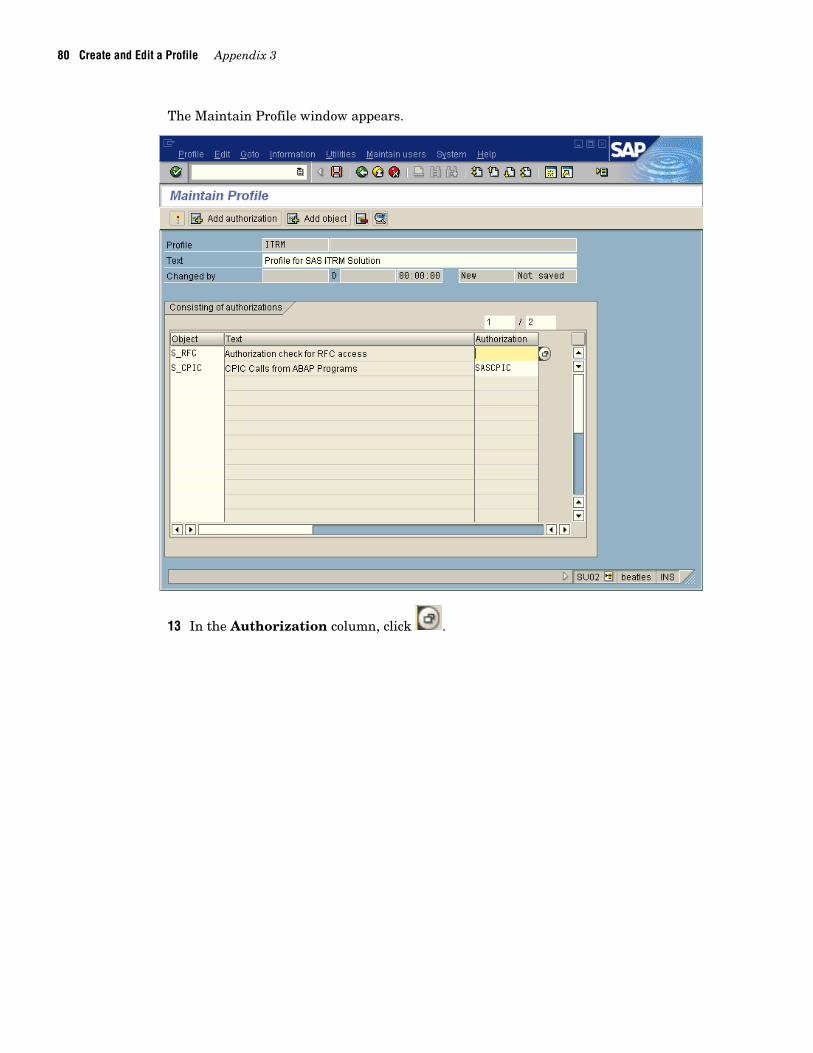
80 Create and Edit a Profile Appendix 3
The Maintain Profile window appears.
13 In the Authorization column, click .

Restricting Permission on the SAP User Account Create and Edit a Profile 81
A list of associated authorizations for the object S_RFC appears in the Restrictions window.
14 Double-click S_RFC_ALL.
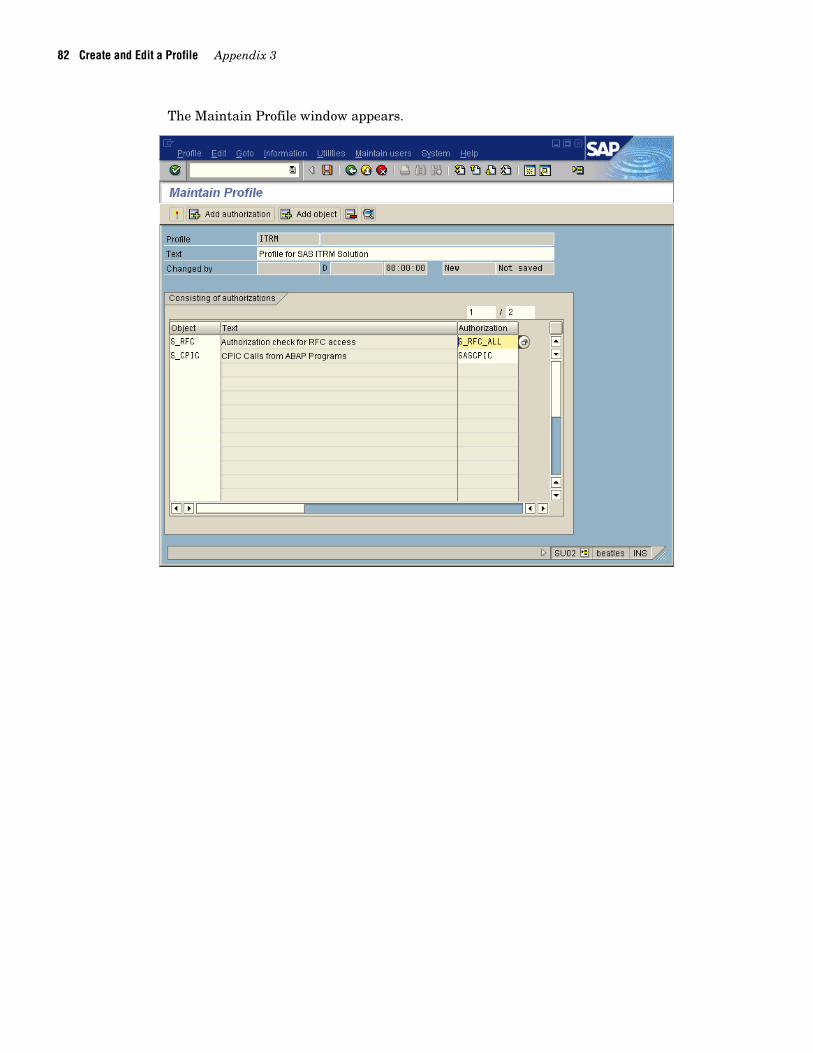
82 Create and Edit a Profile Appendix 3
The Maintain Profile window appears.
Restricting Permission on the SAP User Account Create and Edit a Profile 83
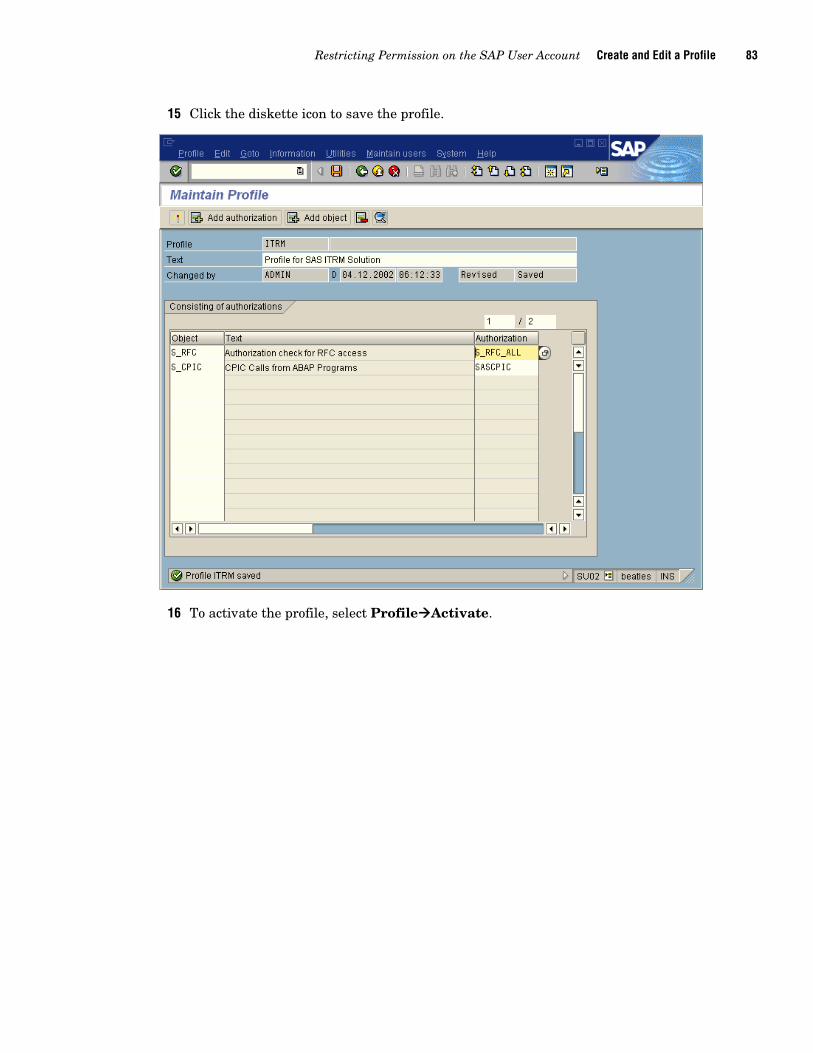
15 Click the diskette icon to save the profile.
16 To activate the profile, select ProfileActivate.

84 Create and Edit a Profile Appendix 3
The Activate Profile: Execution Screen window appears.
17 To activate execution, select ProfileActivate. The profile is created and activated.

Restricting Permission on the SAP User Account Associate the Profile with a User Account 85
Associate the Profile with a User Account
To associate the profile with a user account, complete the following steps:
1 In the SAP Easy Access window, under User Maintenance, click SU01 - Users.

86 Associate the Profile with a User Account Appendix 3
The User Maintenance: Initial Screen window appears.
2 In the User field, enter a user name. Click .

Restricting Permission on the SAP User Account Associate the Profile with a User Account 87
The Maintain User window appears.
The Maintain User window displays user account logon information. The account can be a system account to ensure no interactive logons.
3 To apply the previously defined authorization profile, select the Profiles tab.

88 Associate the Profile with a User Account Appendix 3
4 Select the ITRM profile, and then click . From the list that appears, select ITRM.
5 Click the diskette icon to save your changes.
Restricting Permission on the SAP User Account Associate the Profile with a User Account 89
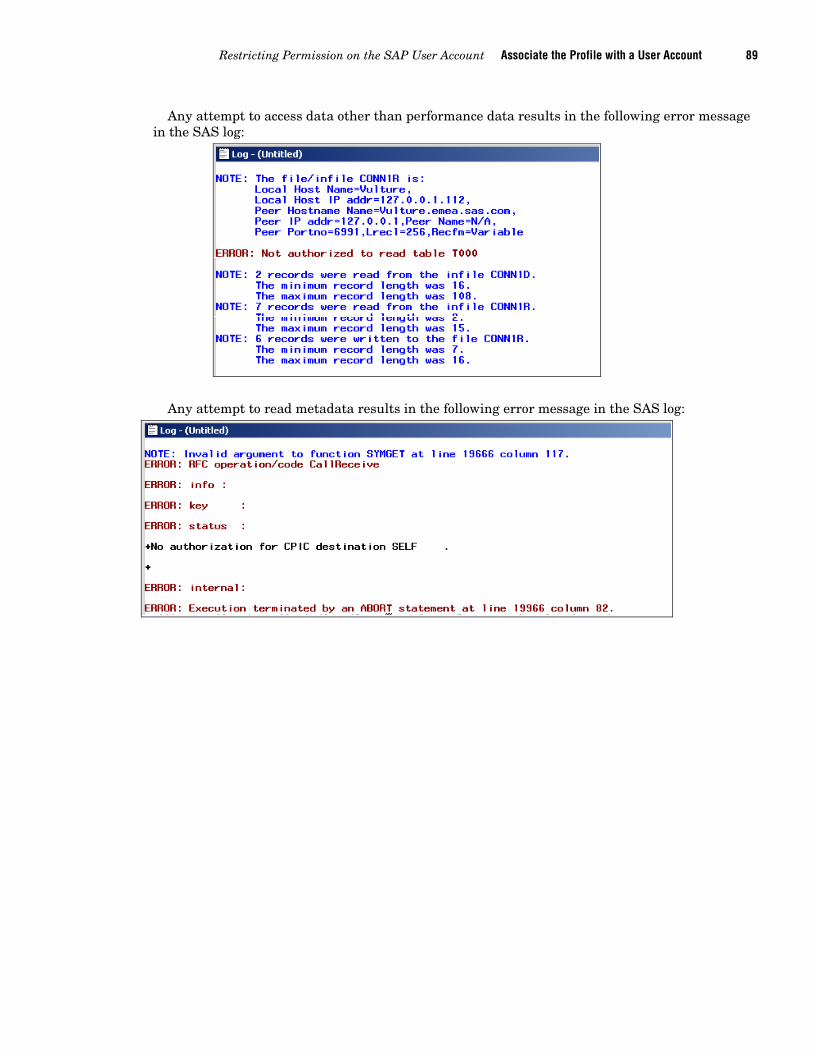
Any attempt to access data other than performance data results in the following error message in the SAS log:
Any attempt to read metadata results in the following error message in the SAS log:

90 Associate the Profile with a User Account Appendix 3
4 The RFC Destination for the Hub
Overview .............................................................................................................................................................................. 91 RFC Connection to Another Machine ................................................................................................................................. 95
Overview
This appendix explains how an RFC destination is used to get data either directly or indirectly.
The following figure, which is also in Chapter 1, shows how data from SAP servers 2 and 3 is extracted directly into SAS.
Data from SAP server 1 is extracted indirectly using SAP server 2.
Note: A hub can retrieve data from other SAP servers only if they are of the same SAP threaded kernel release.
A P P E N D I X

92 Overview Appendix 4
SAP server 2 is used as a hub to get data from SAP server 1 using an SAP destination.
The advantage of direct access is that there is no load on the hub.
The advantage of indirect access is that you do not have to install any ABAP functions or maintain a remote machine.
The disadvantage of using a hub is that if the hub is down, then extractions from other machines are not made.
Note: If there are no restrictions on installing ABAP functions on each machine, then you should use direct access.
The following example shows an SAP business warehouse server (release 6.10) being used as an adapter gateway server. The SAS/ACCESS Interface to R/3 connection profile is BWv30A. This profile has the user account information. The RFC destination for this adapter gateway server is the predefined NONE internal connection.
Type SM59 on the command line to display the RFC destination. The Display and maintain RFC destinations window appears. To display the internal connection properties for NONE, double-click NONE.

The RFC Destination for the Hub Overview 93
The RFC Destination NONE window appears. The properties for the RFC Destination NONE are displayed. The following figure shows the Technical settings tab.
94 Overview Appendix 4
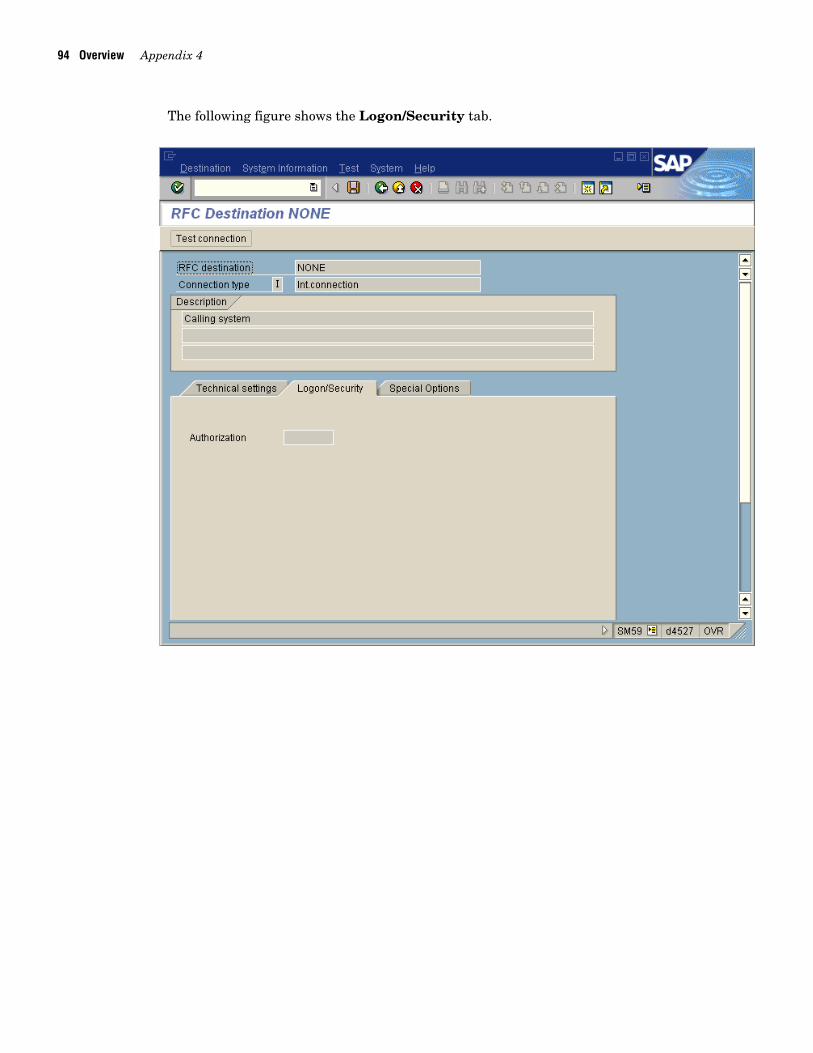
The following figure shows the Logon/Security tab.
The RFC Destination for the Hub RFC Connection to Another Machine 95
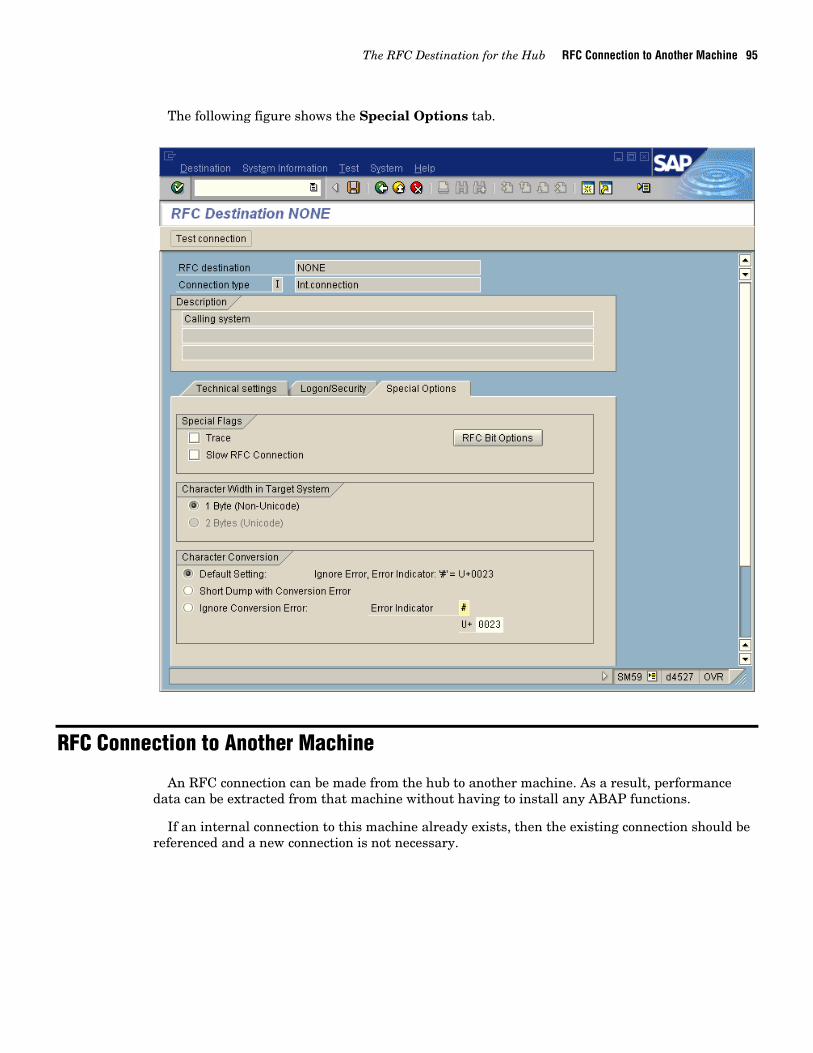
The following figure shows the Special Options tab.
RFC Connection to Another Machine
An RFC connection can be made from the hub to another machine. As a result, performance data can be extracted from that machine without having to install any ABAP functions.
If an internal connection to this machine already exists, then the existing connection should be referenced and a new connection is not necessary.

96 RFC Connection to Another Machine Appendix 4
1 Type SM59 on the command line to display the RFC destination. The Display and maintain RFC destinations window appears.
2 To display the internal connection properties for TSTEST3, double-click TSTEST3.

The RFC Destination for the Hub RFC Connection to Another Machine 97
The RFC Destination TSTEST3 window appears.
Note: The connection type is 3. The system number is 17 (this is the instance number of the
other machine). The target host is tstest3.eur.sas.com, which is the IP address of the other machine.
98 RFC Connection to Another Machine Appendix 4
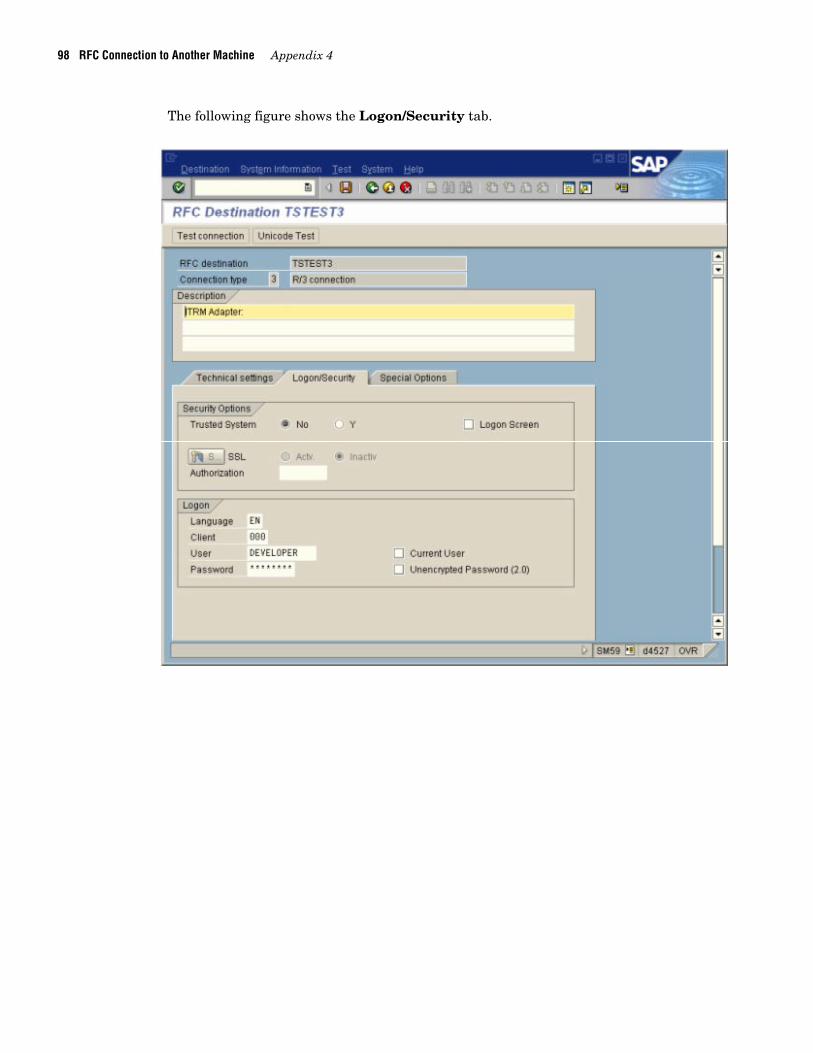
The following figure shows the Logon/Security tab.

The RFC Destination for the Hub RFC Connection to Another Machine 99
The following figure shows the Special Options tab.

100 RFC Connection to Another Machine Appendix 4

Your Turn
We welcome your feedback.� If you have comments about this book, please send them to [email protected].
Include the full title and page numbers (if applicable).� If you have comments about the software, please send them to [email protected].

66
SAS® Publishing Delivers!Whether you are new to the work force or an experienced professional, you need to distinguish yourself in this rapidly changing and competitive job market. SAS® Publishing provides you with a wide range of resources to help you set yourself apart. Visit us online at support.sas.com/bookstore.
SAS® Press Need to learn the basics? Struggling with a programming problem? You’ll find the expert answers that you need in example-rich books from SAS Press. Written by experienced SAS professionals from around the world, SAS Press books deliver real-world insights on a broad range of topics for all skill levels.
s u p p o r t . s a s . c o m / s a s p r e s sSAS® Documentation To successfully implement applications using SAS software, companies in every industry and on every continent all turn to the one source for accurate, timely, and reliable information: SAS documentation. We currently produce the following types of reference documentation to improve your work experience:
• Onlinehelpthatisbuiltintothesoftware.• Tutorialsthatareintegratedintotheproduct.• ReferencedocumentationdeliveredinHTMLandPDF– free on the Web. • Hard-copybooks.
s u p p o r t . s a s . c o m / p u b l i s h i n gSAS® Publishing News Subscribe to SAS Publishing News to receive up-to-date information about all new SAS titles, author podcasts, and new Web site features via e-mail. Complete instructions on how to subscribe, as well as access to past issues, are available at our Web site.
s u p p o r t . s a s . c o m / s p n
SAS and all other SAS Institute Inc. product or service names are registered trademarks or trademarks of SAS Institute Inc. in the USA and other countries. ® indicates USA registration. Otherbrandandproductnamesaretrademarksoftheirrespectivecompanies.©2009SASInstituteInc.Allrightsreserved.518177_1US.0109


