69PO (69PO) 3 IN 1 VALVE ENGLISH 4.875” X 7.25” 10/21/2013 SAVE THESE INSTRUCTIONS Page 1 69PO SAVE THESE INSTRUCTIONS Page 2 (69PO) 3 IN 1 VALVE ENGLISH 4.875” X 7.25” 10/21/2013 069-*PO-R0-1410 Quick-inflation cap Quick-exhaust cap Optional inflation cap Quick-inflation cap O-ring Quick-exhaust cap O-ring Rubber diaphragm 3 IN 1 VALVE INSTRUCTION TO INFLATE WITH QUICK-INFLATION VALVE 1. Ensure the quick-exhaust and the optional inflation caps are securely tightened. 2. Turn the quick-inflation cap fully counterclockwise. See Fig 1-a. 3. Pull the quick-inflation cap to open. See Fig 1-b. 4. Insert the inflation opening of an air pump directly into the quick-inflation valve. See Fig 2. 5. Inflate the product to approximately 80% of desired firmness. CAUTION: To prevent bursting, do not over inflate or use high pressure air compressor. 6. Align the two " " on the cap with the arrows on both side of the quick-exhaust cap tabs and push in firmly. See Fig 3-a. 7. Turn the quick-inflation cap fully clockwise to close. See Fig 3-b. a b Fig 1 Fig 2 a b Fig 3 Fig 4 Fig 6 Fig 5 Fig 7 TO INFLATE WITH OPTIONAL INFLATION VALVE 8. Ensure the quick-exhaust and the quick-inflation caps are securely tightened. 9. Pull the optional inflation cap tab to open. See Fig 4. 10. Insert the nozzle of an air pump into the inflation valve. See Fig 5. 11. Inflate the product to approximately 80% of desired firmness. CAUTION: To prevent bursting, do not over inflate or use high pressure air compressor. 12. Close the optional inflation cap securely after inflation. See Fig 6. TO ADJUST 13. If the product is too firm, open the quick-inflation cap, repeat steps #2 and #3. 14. Gently press one of the 3 protruding tabs on the quick-inflation valve to release a small amount of air. CAUTION: Do not bend or fold down the black rubber diaphragm. See Fig 7. 15. When the desired firmness is achieved, replace the quick-inflation cap back. See Fig 3.
Transcript
69PO
(69PO) 3 IN 1 VALVE ENGLISH 4.875” X 7.25” 10/21/2013
SAVE THESE INSTRUCTIONSPage 1
69PO
SAVE THESE INSTRUCTIONSPage 2
(69PO) 3 IN 1 VALVE ENGLISH 4.875” X 7.25” 10/21/2013
069-*PO-R0-1410
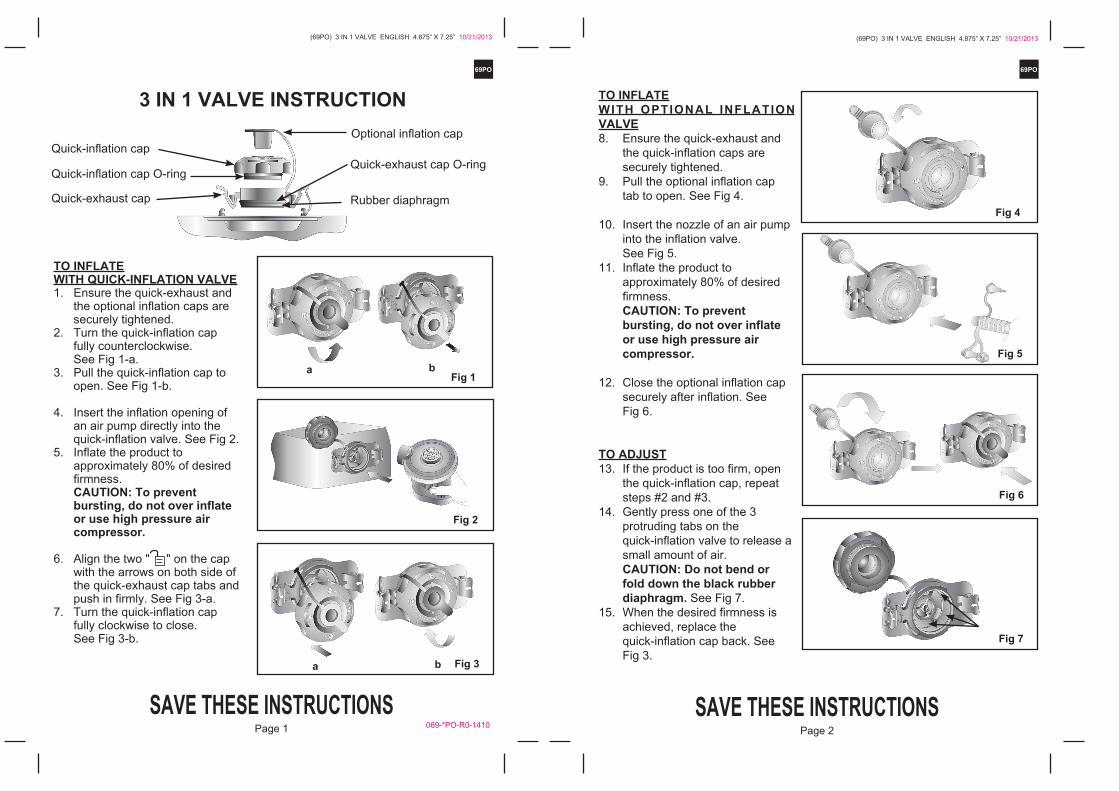
Quick-inflation cap
Quick-exhaust cap
Optional inflation cap
Quick-inflation cap O-ringQuick-exhaust cap O-ring
Rubber diaphragm
3 IN 1 VALVE INSTRUCTION
TO INFLATEWITH QUICK-INFLATION VALVE1. Ensure the quick-exhaust and the optional inflation caps are securely tightened. 2. Turn the quick-inflation cap fully counterclockwise. See Fig 1-a.3. Pull the quick-inflation cap to open. See Fig 1-b.
4. Insert the inflation opening of an air pump directly into the quick-inflation valve. See Fig 2.5. Inflate the product to approximately 80% of desired firmness. CAUTION: To prevent bursting, do not over inflate or use high pressure air compressor.
6. Align the two " " on the cap with the arrows on both side of the quick-exhaust cap tabs and push in firmly. See Fig 3-a.7. Turn the quick-inflation cap fully clockwise to close. See Fig 3-b.
a bFig 1
Fig 2
a b Fig 3
Fig 4
Fig 6
Fig 5
Fig 7
TO INFLATEWITH OPTIONAL INFLATION VALVE8. Ensure the quick-exhaust and the quick-inflation caps are securely tightened. 9. Pull the optional inflation cap tab to open. See Fig 4.
10. Insert the nozzle of an air pump into the inflation valve. See Fig 5.11. Inflate the product to approximately 80% of desired firmness. CAUTION: To prevent bursting, do not over inflate or use high pressure air compressor.
12. Close the optional inflation cap securely after inflation. See Fig 6.
TO ADJUST13. If the product is too firm, open the quick-inflation cap, repeat steps #2 and #3.14. Gently press one of the 3 protruding tabs on the quick-inflation valve to release a small amount of air. CAUTION: Do not bend or fold down the black rubber diaphragm. See Fig 7.15. When the desired firmness is achieved, replace the quick-inflation cap back. See Fig 3.
69PO 69PO69PO
(69PO) 3 IN 1 VALVE ENGLISH 4.875” X 7.25” 10/21/2013
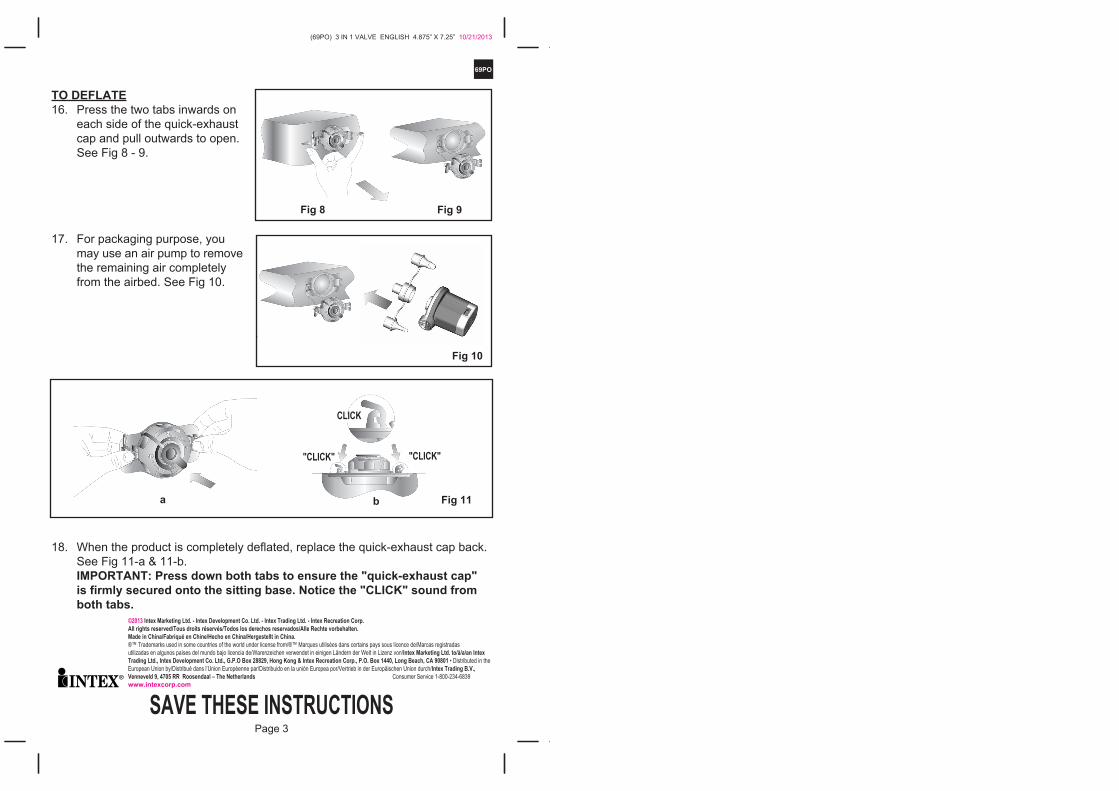
TO DEFLATE16. Press the two tabs inwards on each side of the quick-exhaust cap and pull outwards to open. See Fig 8 - 9.
17. For packaging purpose, you may use an air pump to remove the remaining air completely from the airbed. See Fig 10.
18. When the product is completely deflated, replace the quick-exhaust cap back. See Fig 11-a & 11-b. IMPORTANT: Press down both tabs to ensure the "quick-exhaust cap" is firmly secured onto the sitting base. Notice the "CLICK" sound from both tabs.
Fig 11b
"CLICK" "CLICK"
CLICK
a
168PO
(168PO) AP638 ELECTRIC PUMP ENGLISH 4.875” X 7.25” 04/24/2012
SAVE THESE INSTRUCTIONSPage 1
168PO
SAVE THESE INSTRUCTIONSPage 2
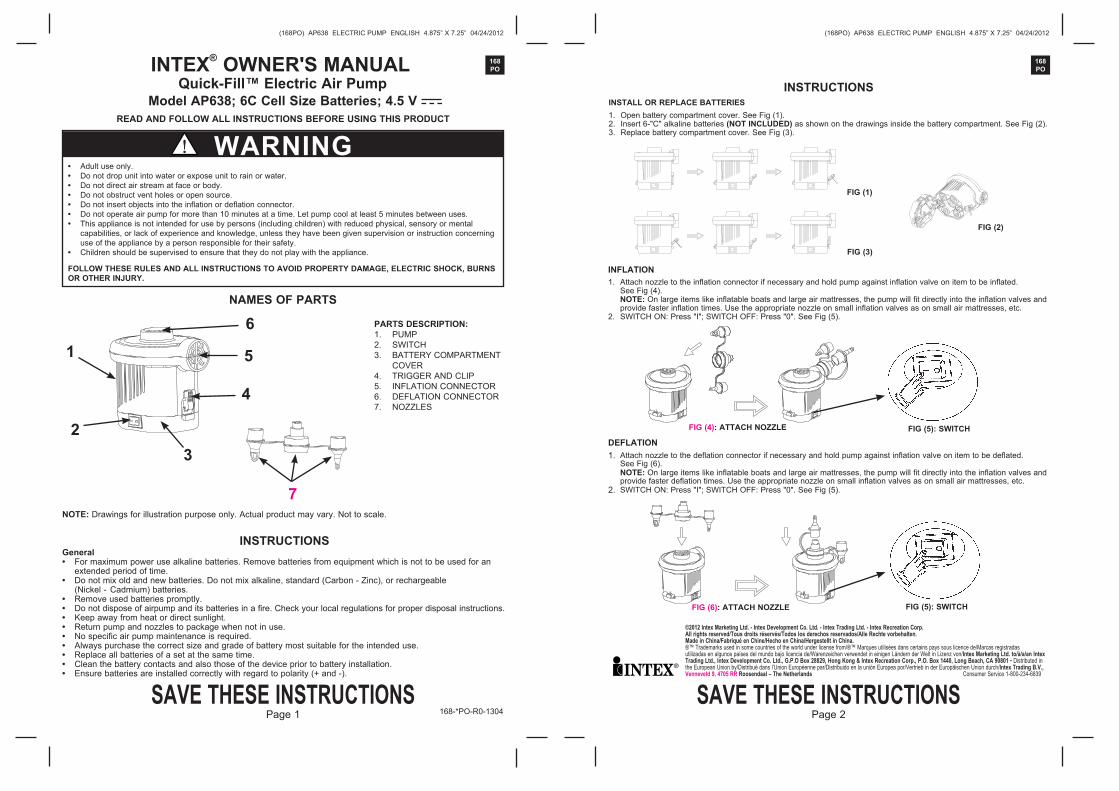
INFLATION1. Attach nozzle to the inflation connector if necessary and hold pump against inflation valve on item to be inflated. See Fig (4). NOTE: On large items like inflatable boats and large air mattresses, the pump will fit directly into the inflation valves and provide faster inflation times. Use the appropriate nozzle on small inflation valves as on small air mattresses, etc.2. SWITCH ON: Press "I"; SWITCH OFF: Press "0". See Fig (5).
DEFLATION1. Attach nozzle to the deflation connector if necessary and hold pump against inflation valve on item to be deflated. See Fig (6). NOTE: On large items like inflatable boats and large air mattresses, the pump will fit directly into the inflation valves and provide faster deflation times. Use the appropriate nozzle on small inflation valves as on small air mattresses, etc.2. SWITCH ON: Press "I"; SWITCH OFF: Press "0". See Fig (5).
READ AND FOLLOW ALL INSTRUCTIONS BEFORE USING THIS PRODUCT
INTEX® OWNER'S MANUALQuick-Fill™ Electric Air Pump
Model AP638; 6C Cell Size Batteries; 4.5 V
PARTS DESCRIPTION:1. PUMP2. SWITCH3. BATTERY COMPARTMENT COVER4. TRIGGER AND CLIP5. INFLATION CONNECTOR6. DEFLATION CONNECTOR7. NOZZLES
FIG (5): SWITCH
INSTRUCTIONSGeneral• For maximum power use alkaline batteries. Remove batteries from equipment which is not to be used for an extended period of time.• Do not mix old and new batteries. Do not mix alkaline, standard (Carbon - Zinc), or rechargeable (Nickel - Cadmium) batteries.• Remove used batteries promptly.• Do not dispose of airpump and its batteries in a fire. Check your local regulations for proper disposal instructions.• Keep away from heat or direct sunlight.• Return pump and nozzles to package when not in use.• No specific air pump maintenance is required.• Always purchase the correct size and grade of battery most suitable for the intended use.• Replace all batteries of a set at the same time.• Clean the battery contacts and also those of the device prior to battery installation.• Ensure batteries are installed correctly with regard to polarity (+ and -).
NAMES OF PARTS
INSTRUCTIONSINSTALL OR REPLACE BATTERIES1. Open battery compartment cover. See Fig (1).2. Insert 6-"C" alkaline batteries (NOT INCLUDED) as shown on the drawings inside the battery compartment. See Fig (2).3. Replace battery compartment cover. See Fig (3).
(168PO) AP638 ELECTRIC PUMP ENGLISH 4.875” X 7.25” 04/24/2012
• Adult use only.• Do not drop unit into water or expose unit to rain or water.• Do not direct air stream at face or body.• Do not obstruct vent holes or open source.• Do not insert objects into the inflation or deflation connector.• Do not operate air pump for more than 10 minutes at a time. Let pump cool at least 5 minutes between uses.• This appliance is not intended for use by persons (including children) with reduced physical, sensory or mental capabilities, or lack of experience and knowledge, unless they have been given supervision or instruction concerning use of the appliance by a person responsible for their safety.• Children should be supervised to ensure that they do not play with the appliance. FOLLOW THESE RULES AND ALL INSTRUCTIONS TO AVOID PROPERTY DAMAGE, ELECTRIC SHOCK, BURNS OR OTHER INJURY.
WARNING
NOTE: Drawings for illustration purpose only. Actual product may vary. Not to scale.