ASTON MARTIN CLIENT SERVICES 7 November, 2017 Page 1 of 20 SERVICE BULLETIN Reference number: SB-01-0420 Issued: 7 November, 2017 Subject: Front License Plate Plinth Installation Model(s): V8 Vantage (all variants), V12 Vantage S, DB11 and Vanquish (Includes S ) VIN Range: All Applicable to: All Dealers Distribute to: After Sales Manager Executive Manager Service Manager Sales Manager Warranty Staff Technician(s) Parts Staff Reason for this Service Bulletin Some markets do not need a front license plate plinth to be installed to a vehicle. This bulletin gives instruction how to install a front license plate plinth if a vehicle moves to a region where this becomes a legal requirement. V8 Vantage V8 Vantage has the license plate plinth installed directly on to the front bumper. Note: For 18MY Vantage AMR, refer to V12 Vantage S. Workshop Procedure Note: It is possible that the front bumper will not have the mounting holes or the hardware for the front number plate plinth installed. A new bumper must be installed with the correct hardware before the license plate plinth can be installed. Federal, GCC and Chinese Market: 1. Install and torque the four bolster studs to the front bumper armature to 23 Nm (refer to Figure 1). Figure 1
Model(s): V8 Vantage (all variants), V12 Vantage S, DB11 and Vanquish (Includes S )
VIN Range: All
Applicable to: All Dealers
Distribute to: After Sales Manager Executive Manager Service Manager Sales Manager
Warranty Staff Technician(s) Parts Staff
Reason for this Service Bulletin
Some markets do not need a front license plate plinth to be installed to a vehicle. This bulletin gives instruction how to install a front license plate plinth if a vehicle moves to a region where this becomes a legal requirement.
V8 Vantage V8 Vantage has the license plate plinth installed directly on to the front bumper.
Note: For 18MY Vantage AMR, refer to V12 Vantage S.
Workshop Procedure
Note: It is possible that the front bumper will not have the mounting holes or the hardware for the front number plate plinth installed. A new bumper must be installed with the correct hardware before the license plate plinth can be installed.
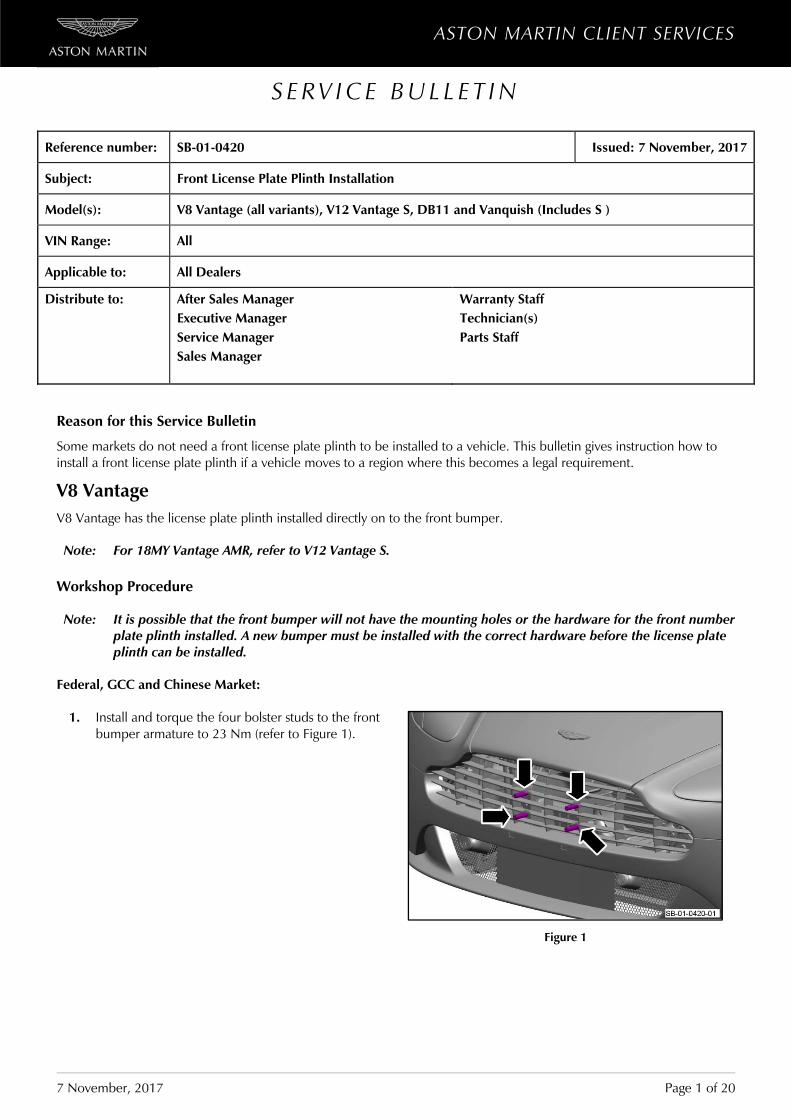
Federal, GCC and Chinese Market:
1. Install and torque the four bolster studs to the front bumper armature to 23 Nm (refer to Figure 1).
Figure 1
SERVICE BULLETIN SB-01-0420
7 November, 2017 Page 2 of 20
2. Put the bolster plate into position (refer to Figure 2).
Figure 2
3. Install the four screws that attach the bolster plate to the bolster studs (refer to Figure 3). For Federal and GCC markets do steps 4 and 5. For Chinese market do steps 6 and 7
Figure 3
4. Put the license plate plinth into position (refer to Figure 4).
Figure 4
SERVICE BULLETIN SB-01-0420
7 November, 2017 Page 3 of 20
5. Install the five screws that attach the license plate plinth to the bolster plate (refer to Figure 5).
Figure 5
6. Put the license plate plinth into position (refer to Figure 6)
Figure 6
7. Install the three screws that attach the license plate plinth to the bolster plate (refer to Figure 7)
Figure 7
SERVICE BULLETIN SB-01-0420
7 November, 2017 Page 4 of 20
Rest of World
8. Install and torque the four bolster studs to the front bumper armature to 23 Nm (refer Figure 8
Figure 8
9. Put the bolster plate into position (refer Figure 9
Figure 9
10. Install the four screws that attach the bolster plate to the bolster studs (refer to Figure 10)
Figure 10
SERVICE BULLETIN SB-01-0420
7 November, 2017 Page 5 of 20
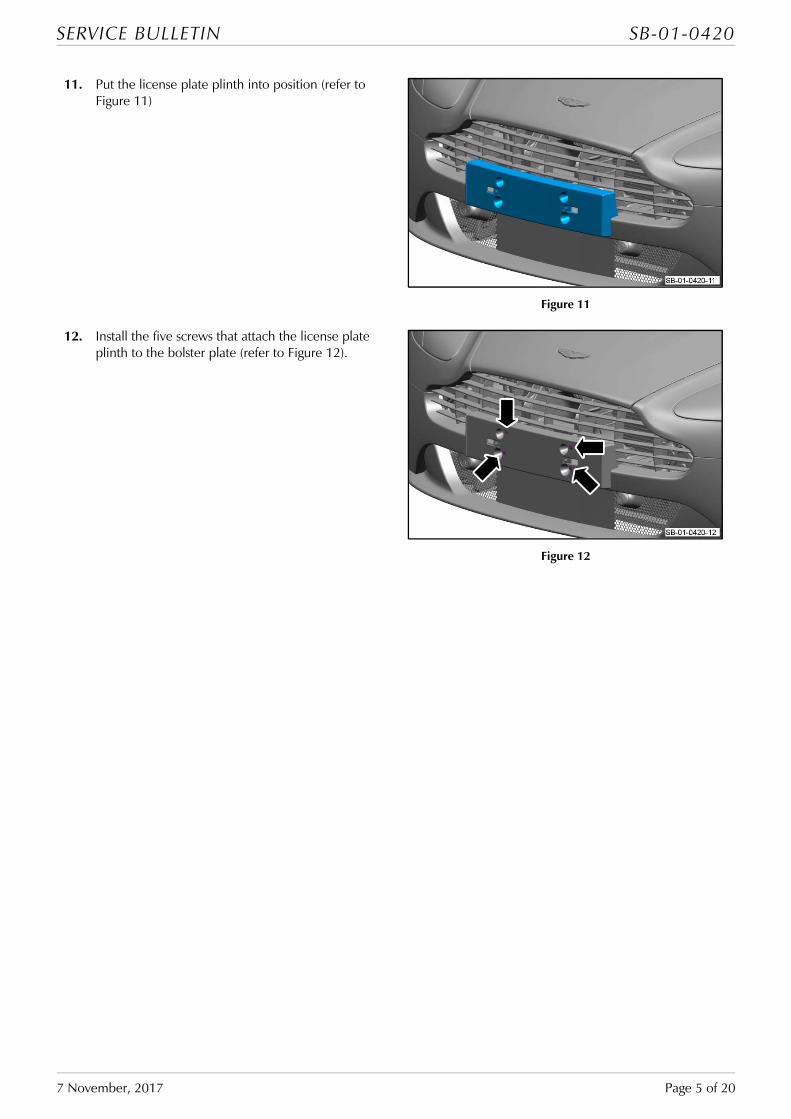
11. Put the license plate plinth into position (refer to Figure 11)
Figure 11
12. Install the five screws that attach the license plate plinth to the bolster plate (refer to Figure 12).
Figure 12
SERVICE BULLETIN SB-01-0420
7 November, 2017 Page 6 of 20
V12 Vantage S
Workshop Procedure
Note: It is possible that the front bumper will not have the mounting holes or the hardware for the front number plate plinth installed. A new bumper must be installed with the correct hardware before the license plate plinth can be installed.
Federal, GCC and Chinese Markets
Four support bolster studs must be installed into the front bumper armature before the front license plate plinth can be installed. It may be necessary to modify the radiator grille for Chinese and Federal markets to be able to install the bolster studs.
1. If the radiator grille has the holes for the bolster studs go to step 4.
2. Use the attached template to mark out where the grille needs to be modified.
3. Use a suitable tool to remove the marked areas of the radiator grille.
4. Install and torque the four bolster studs to the front bumper armature to 23 Nm (refer to Figure 13.
Figure 13
5. Put the bolster plate into position (refer to Figure 14.
Figure 14
SERVICE BULLETIN SB-01-0420
7 November, 2017 Page 7 of 20
6. Install and torque the four screws that attach the bolster plate to the bolster studs to 5 Nm (refer to Figure 15. For Federal and GCC markets do steps 7 and 8. For Chinese market do steps 9 and 10.
Figure 15
7. Put the license plate plinth into position (refer to Figure 16
Figure 16
8. Install the five screws that attach the license plate plinth to the bolster plate (refer to Figure 17
Figure 17
SERVICE BULLETIN SB-01-0420
7 November, 2017 Page 8 of 20
9. Put the license plate plinth into position (refer to Figure 18
Figure 18
10. Install the three screws that attach the license plate plinth to the bolster plate (refer to Figure 19
Figure 19
SERVICE BULLETIN SB-01-0420
7 November, 2017 Page 9 of 20
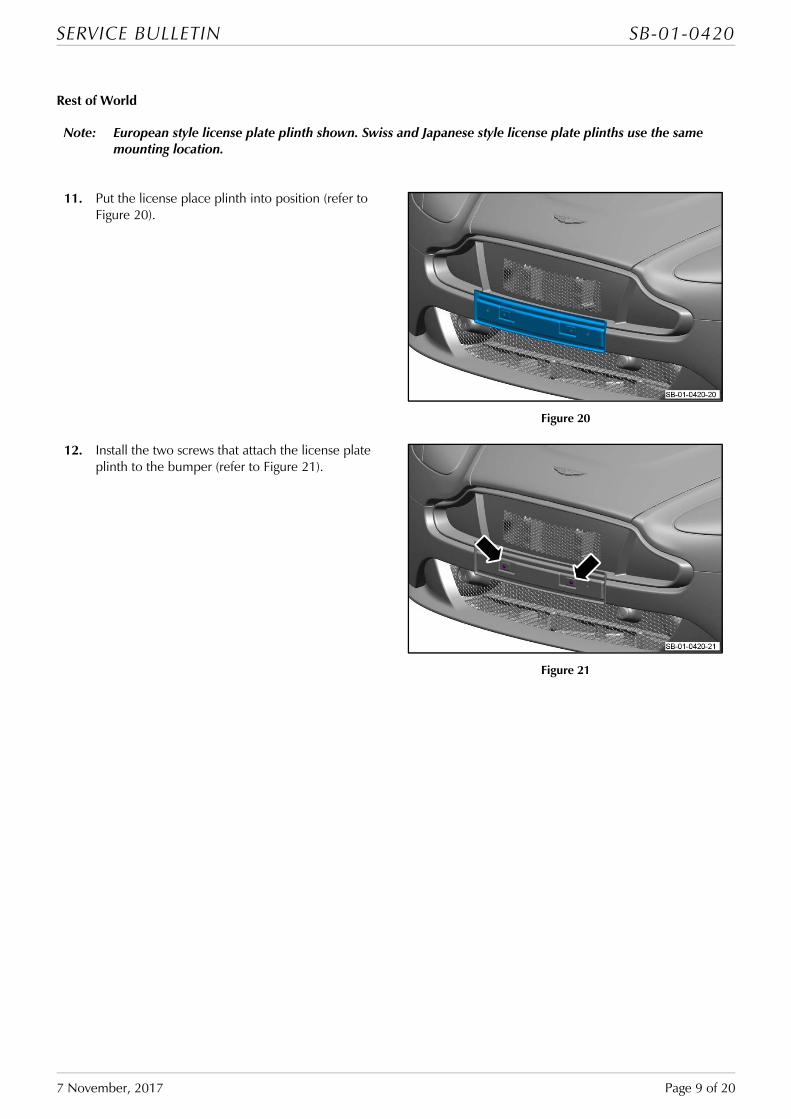
Rest of World
Note: European style license plate plinth shown. Swiss and Japanese style license plate plinths use the same mounting location.
11. Put the license place plinth into position (refer to Figure 20).
Figure 20
12. Install the two screws that attach the license plate plinth to the bumper (refer to Figure 21).
Figure 21
SERVICE BULLETIN SB-01-0420
7 November, 2017 Page 10 of 20
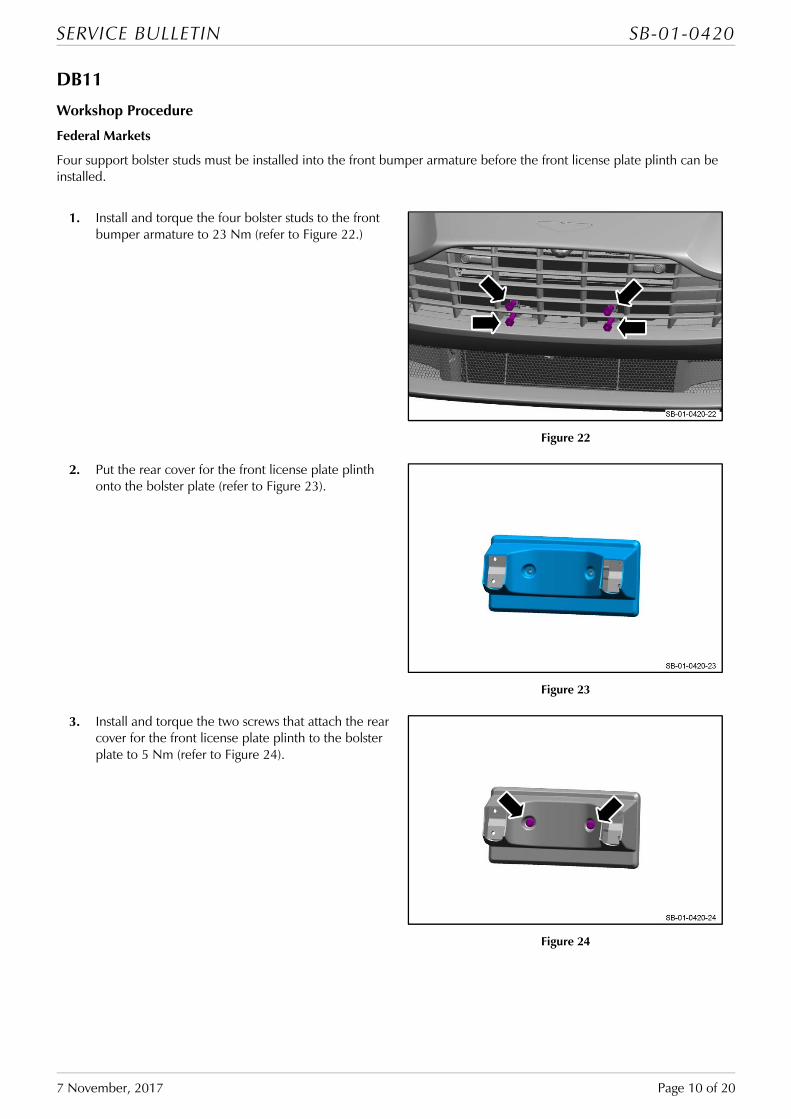
DB11
Workshop Procedure
Federal Markets
Four support bolster studs must be installed into the front bumper armature before the front license plate plinth can be installed.
1. Install and torque the four bolster studs to the front bumper armature to 23 Nm (refer to Figure 22.)
Figure 22
2. Put the rear cover for the front license plate plinth onto the bolster plate (refer to Figure 23).
Figure 23
3. Install and torque the two screws that attach the rear cover for the front license plate plinth to the bolster plate to 5 Nm (refer to Figure 24).
Figure 24
SERVICE BULLETIN SB-01-0420
7 November, 2017 Page 11 of 20
4. Put the bolster assembly into position (refer to Figure 25).
Figure 25
5. Install and torque the four bolts that attach the bolster assembly to the bolster studs to 9 Nm (refer to Figure 26).
Figure 26
6. Put the front cover for the front license plate plinth into position (refer to Figure 27)
Figure 27
SERVICE BULLETIN SB-01-0420
7 November, 2017 Page 12 of 20
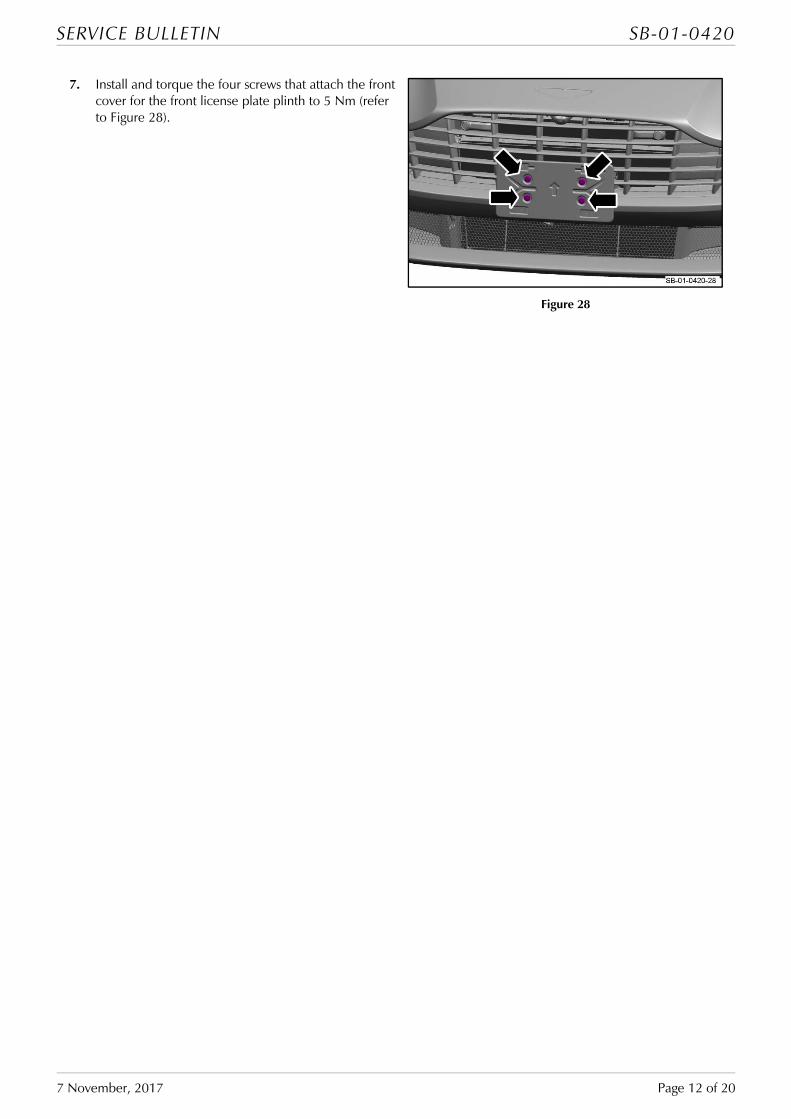
7. Install and torque the four screws that attach the front cover for the front license plate plinth to 5 Nm (refer to Figure 28).
Figure 28
SERVICE BULLETIN SB-01-0420
7 November, 2017 Page 13 of 20
Rest of World
The front bumper for DB11 has guide marks on the inside to show where to drill holes for installation of the front license plate plinth.
Note: European style license plate plinth shown. All markets except federal use the same mounting location.
8. Remove the front bumper (refer to Workshop Manual procedure 01.19.AA)
9. Use a drill with an applicable size drill bit to make two holes at the positions shown (refer to Figure 29)
Figure 29
10. Install the front bumper (refer to Workshop Manual procedure 01.19.AA)
11. Put the front license plate plinth into position (refer to Figure 30).
Figure 30
12. Install the two screws that attach the front license plate plinth to the bumper (refer to Figure 31).
Figure 31
SERVICE BULLETIN SB-01-0420
7 November, 2017 Page 14 of 20
Vanquish (Includes S) Both the Vanquish and the Vanquish S have the front license plate plinth mounted to the front bumper.
Workshop Procedure
Note: Chinese front license plate plinth shown. All markets use the same installation procedure.
1. Put the front license plate plinth into position (refer to Figure 32)
Figure 32
2. With the front license plate in position, make two marks on the front bumper. These will show where to drill the two holes for the screws that will hold the front license plate plinth (refer to Figure 33).
Figure 33
3. Use a drill with an applicable drill bit to make two holes in the positions marked in step 2 (refer to Figure 34).
Figure 34
SERVICE BULLETIN SB-01-0420
7 November, 2017 Page 15 of 20
4. Use an applicable tool to install two clinch nuts to the bumper (refer to Figure 35)
Figure 35
5. Put the front license plate plinth into position (refer to Figure 36).
Figure 36
6. Install the two screws that attach the front license plate plinth to the front bumper (refer to Figure 37)
Figure 37
SERVICE BULLETIN SB-01-0420
7 November, 2017 Page 16 of 20
Rapide S
Workshop Procedure
Federal and Gulf Markets
Two support bolster studs and a bolster bar must be installed into the front bumper armature before the front license plate plinth can be installed.
1. If necessary, install the top central over rider for the front bumper (Refer to Workshop Manual Procedure 01.19.AT)
2. Install and torque the two bolster studs to the front bumper armature to 23 Nm (refer to Figure 38).
Figure 38
3. Put the bolster bar for the front license plate plinth into position (refer to Figure 39).
Figure 39
4. Install and torque the two screws that bolster for the front license plate plinth to the front bumper armature (refer to Figure 40).
Figure 40
SERVICE BULLETIN SB-01-0420
7 November, 2017 Page 17 of 20
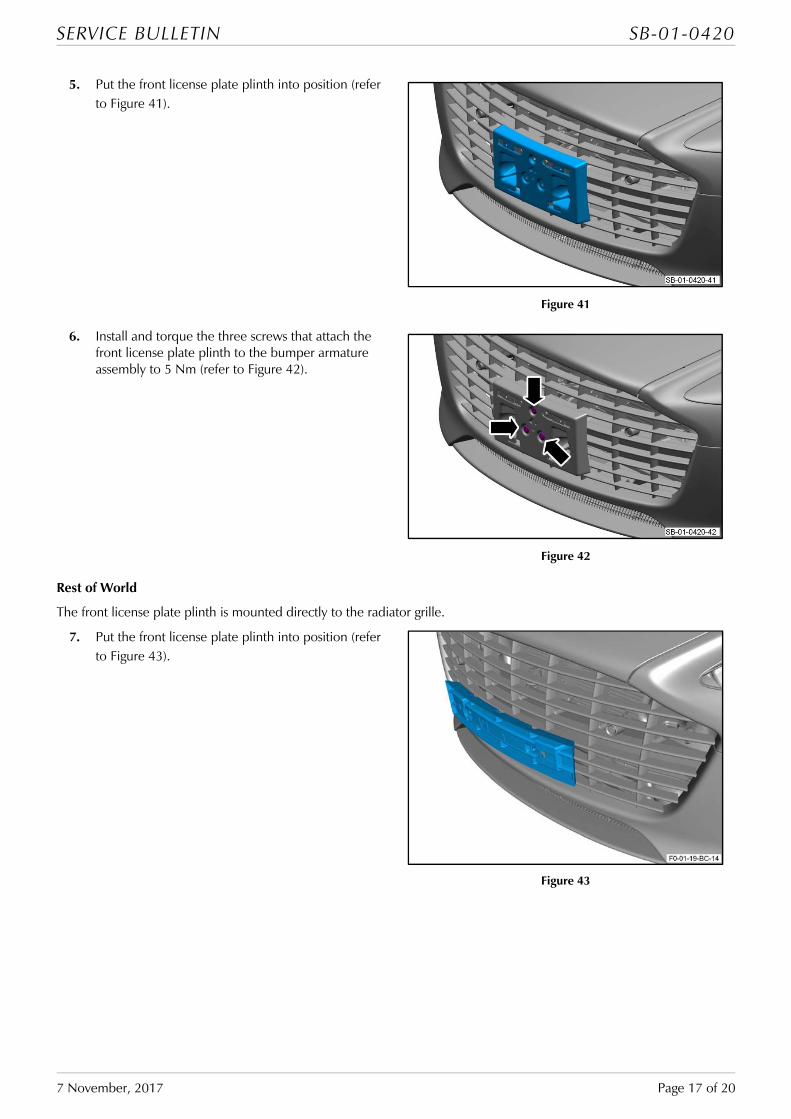
5. Put the front license plate plinth into position (refer to Figure 41).
Figure 41
6. Install and torque the three screws that attach the front license plate plinth to the bumper armature assembly to 5 Nm (refer to Figure 42).
Figure 42
Rest of World
The front license plate plinth is mounted directly to the radiator grille.
7. Put the front license plate plinth into position (refer to Figure 43).
Figure 43
SERVICE BULLETIN SB-01-0420
7 November, 2017 Page 18 of 20
8. Install and tighten the two screws that attach the front licence plate to the plinth for the front licence plate (refer to Figure 44).
Note: The mounting brackets must hook behind the radiator grille
Figure 44
SERVICE BULLETIN SB-01-0420
7 November, 2017 Page 19 of 20
Part Data
V8 Vantage
Description Part Number
Dealer Fit Front Plate Plinth Bag (Row) GG33‐78‐10837
Dealer Fit Front Plate Plinth Bag (Federal/Japan/Gulf) GG33‐78‐10838
Dealer Fit Front Plate Plinth Bag (Swiss) GG33‐78‐10839
Vantage GT8
Description Part Number
Dealer Fit Front Plate Plinth Bag (Japan) HG3Y‐78‐10012
V12 Vantage
Description Part Number
Dealer Fit Front Plate Plinth Bag (Row) GD23‐78‐10187
Dealer Fit Front Plate Plinth Bag (Federal /Gulf) GD23‐78‐10188
Dealer Fit Front Plate Plinth Bag (Swiss) GD23‐78‐10189
Dealer Fit Front Plate Plinth Bag (China) GD23‐78‐10190
Dealer Fit Front Plate Plinth Bag (Japan) GD23‐78‐10191
Vantage GT12
Description Part Number
Dealer Fit Front Plate Plinth Bag (Row) GD2Y‐78‐10007
Dealer Fit Front Plate Plinth Bag (Gulf) GD2Y‐78‐10008
Dealer Fit Front Plate Plinth Bag (Japan) GD2Y‐78‐10009
Vanquish (Includes S)
Description Part Number
Dealer Fit Front Plate Plinth Bag (Row) GG43‐78‐11482
Dealer Fit Front Plate Plinth Bag (Japan) GD33‐78‐10143
Dealer Fit Front Plate Plinth Bag (Federal/Swiss/Gulf) GD33‐78‐10144
DB9
Description Part Number
Dealer Fit Front Plate Plinth Bag (Japan) GG43‐7811483
Dealer Fit Front Plate Plinth Bag (Federal/Swiss/Gulf) GG43‐78‐11484
Dealer Fit Front Plate Plinth Bag (Row) GG43‐78‐11482
DB11
Description Part Number
Dealer Fit Front Plate Plinth Bag (Row) HY53‐78‐10069
Dealer Fit Front Plate Plinth Bag (Swiss) HY53‐78‐10070
Dealer Fit Front Plate Plinth Bag (Japan) HY53‐78‐10071
SERVICE BULLETIN SB-01-0420
7 November, 2017 Page 20 of 20
Rapide S
Description Part Number
Dealer Fit Front Plate Plinth Bag (Row) GD43‐78‐10186
Dealer Fit Front Plate Plinth Bag (Federal /Gulf) GD43‐78‐10187
Dealer Fit Front Plate Plinth Bag (Swiss) GD43‐78‐10188
Dealer Fit Front Plate Plinth Bag (Japan) GD43‐78‐10189
Bumper Overrider, Front Central DD43‐17E953‐AA
Bolt, M8x50 W500113‐S442
Warranty Data
Not applicable
Failure Mode Description
Not applicable
If you have any questions related to this Service Bulletin, please contact: Aston Martin Technical Services on: +44 (0) 1926 644720, email: [email protected],
Or contact your After Sales Manager.
The English version of this Service Bulletin is written in Simplified Technical English to ASD-STE100™.