57
Agent User’s Manual SBG UnderWriting System (Surety Bond Guarantee) Phase 2 eApplications U.S. Small Business Administration Version Number 2.3 September 2007
Agent User’s Manual SBG UnderWriting System (Surety Bond Guarantee) Phase 2 eApplications U.S. Small Business Administration Version Number 2.3 September 2007

Revision Sheet
User’s Manual Page 2
TABLE OF CONTENTS 1 GENERAL INFORMATION..................................................................................................... 5
1.1 SYSTEM OVERVIEW............................................................................................................ 5 1.2 AUTHORIZED USE PERMISSION........................................................................................... 5 1.3 POINTS OF CONTACT.......................................................................................................... 5
1.3.1 Information............................................................................................................... 5 1.4 TERMS AND ABBREVIATIONS............................................................................................... 6
2 SYSTEM SUMMARY .............................................................................................................. 8 2.1 SYSTEM CONFIGURATION................................................................................................... 8
3 GETTING STARTED............................................................................................................. 10 3.1 REQUEST AN SBA GLS USER ID AND PASSWORD............................................................. 10 3.2 CHANGE PASSWORD........................................................................................................ 13 3.3 PROFILE .......................................................................................................................... 14 3.4 ACCESS (SYSTEM SELECTION) ......................................................................................... 16
4 LOGGING IN ......................................................................................................................... 17 4.1 GENERAL LOGIN SYSTEM – CHOOSE FUNCTION ................................................................ 18 4.2 GENERAL INSTRUCTIONS.................................................................................................. 19
5 PUSHBUTTONS ................................................................................................................... 21 5.1 SEARCH APPLICATION - EDIT ............................................................................................ 21 5.2 EDIT LIST......................................................................................................................... 22 5.3 NEW BUSINESS................................................................................................................ 23 5.4 BUSINESS INFORMATION................................................................................................... 24
6 PRINCIPAL INFORMATION................................................................................................. 26 6.1 ADD NEW PRINCIPAL........................................................................................................ 27
7 GENERAL INDEMNITY AGREEMENT (GIA) ...................................................................... 29 7.1 ADD GIA ......................................................................................................................... 31
7.1.1 Principals to be associated with GIA (GIA – Details) ............................................ 32 8 FINANCIAL STATEMENTS (OPTIONAL)............................................................................ 35 9 BONDING LINE (OPTIONAL) .............................................................................................. 37 10 BUSINESS BANK LINE OF CREDIT (OPTIONAL) ......................................................... 39
10.1 NEW BANK DETAILS ......................................................................................................... 40 11 CONTRACT INFORMATION ............................................................................................ 41 12 JOB IN PROGRESS ......................................................................................................... 43 13 AGREEMENTS AND CERTIFICATIONS ......................................................................... 44 14 ANNUAL SURETY REVIEW............................................................................................. 46 15 SURETY CONTRACT REVIEW AGREEMENT ............................................................... 47 16 NEW APPLICATION......................................................................................................... 49 17 INCREASE/DECREASE (SEARCH APPLICATION)....................................................... 50
17.1 INCREASE/DECREASE LIST ........................................................................................... 51 17.1.1 Surety Contract Review Agreement (Increase/Decrease) .................................... 52

Revision Sheet
User’s Manual Page 3
18 BID TO FINAL (SEARCH APPLICATION)....................................................................... 54 18.1 BID TO FINAL LIST ........................................................................................................... 55
18.1.1 Surety Contract Review Agreement (Bid to Final)................................................. 56

Revision Sheet
User’s Manual Page 4
1.0 GENERAL INFORMATION

Revision Sheet
User’s Manual Page 5
1 General Information
1.1 System Overview
The Surety Bond Guarantee (SBG) Electronic Application (E-app) system is a web application used to apply for SBA bond guarantees. Agents can use the E-app System to enter SBG applications, completed required SBA forms, and forward information to the SBA. The system is available 7 days a week – 24 hours a day.
1.2 Authorized Use Permission
This is a Federal computer system and is the property of the United States Government. It is for authorized use only. Users (authorized or unauthorized) have no explicit or implicit expectation of privacy in anything viewed, created, downloaded, or stored on this system, including e-mail, Internet, and Intranet use. Any or all uses of this system (including all peripheral devices and output media) and all files on this system may be intercepted, monitored, read, captured, recorded, disclosed, copied, audited, and/or inspected by authorized Small Business Administration (SBA) personnel, the Office of Inspector General (OIG), and/or other law enforcement personnel, as well as authorized officials of other agencies, both domestic and foreign. Unauthorized use of, or exceeding authorized access to, this system is prohibited and may constitute a violation of 18 U.S.C. § 1030 or other Federal laws and regulations and may result in criminal, civil, and/or administrative action. By using this system, users indicate awareness of, and consent to, these terms and conditions and acknowledge that there is no reasonable expectation of privacy in the access or use of this computer system.
1.3 Points of Contact
1.3.1 Information
If you experience problems completing the application, please discuss the situation with SBA. Assistance is also available from the two Surety Bond Area directors listed below, according to the state in which you are located.
Mr. Darryl Bellamy
Area Office Director, Denver
Telephone: (303) 844-2607, Ext. 261

Revision Sheet
User’s Manual Page 6
Assigned States:
Colorado Maine New Jersey New York
Connecticut Maryland Ohio Pennsylvania
Delaware Massachusetts South Dakota Puerto Rico
District of Columbia Michigan Utah Vermont
Illinois Minnesota Wyoming Virgin Islands
Indiana Missouri North Dakota Virginia
Iowa Montana Rhode Island West Virginia
Kansas Nebraska New Hampshire Wisconsin
Mr. Tom Ewbank
Area Office Director, Seattle
Telephone: (206) 553-0961
Assigned States:
Alabama Georgia Mississippi South Carolina
Alaska Guam Nevada Tennessee
Arizona Hawaii New Mexico Texas
Arkansas Idaho North Carolina Washington
California Kentucky Oklahoma
Florida Louisiana Oregon
1.4 Terms and Abbreviations EIN – Employer Identification Number
NAICS – North American Industry Classification System
GIA – General Indemnity Agreement

Revision Sheet
User’s Manual Page 7
2.0 SYSTEM SUMMARY

Revision Sheet
User’s Manual Page 8
2 SYSTEM SUMMARY
2.1 System Configuration The application is developed for use with a minimum browser of Microsoft IE 6.0 or a compatible browser. You must use high level encryption (128 bit) when configuring your browser. You must enable support for JAVA script and applets. There is no use of client side COOKIES. In general, the font type is 9pt. Arial-style sheets are not used. The application is best viewed on an 800x 600 resolution screen. To avoid scrolling, use a minimum 15" screen.

Revision Sheet
User’s Manual Page 9
3.0 GETTING STARTED

Revision Sheet
User’s Manual Page 10
3 GETTING STARTED
The E-app system is accessed through the SBA General Login System (GLS). You must have an SBA GLS User ID and Password in order to submit applications and update information in the E-app system. You must be authorized to obligate a participating surety in the e-app system and issue bonds on its behalf.
Before SBA can issue you an Agent User ID and Password, each surety company for which you are authorized to write bonds must confirm with the Office of Surety Guarantees. After confirmation is received, OSG will send you an Electronic Data Certification to sign and return. With your signature, you are certifying that all information submitted to SBA electronically is true and accurate, and that you understand the consequences of making false statements or misrepresentations.
3.1 Request an SBA GLS User ID and Password
To request an SBA User ID and Password, you should connect to the Internet and enter https://eweb.sba.gov/gls/dsp_login.cfm as the URL. The General Log-in screen will display.
Figure 1
Click on the hotlink from the left-hand navigation tree to access the Request SBA User ID screen.
Revision Sheet
User’s Manual Page 11
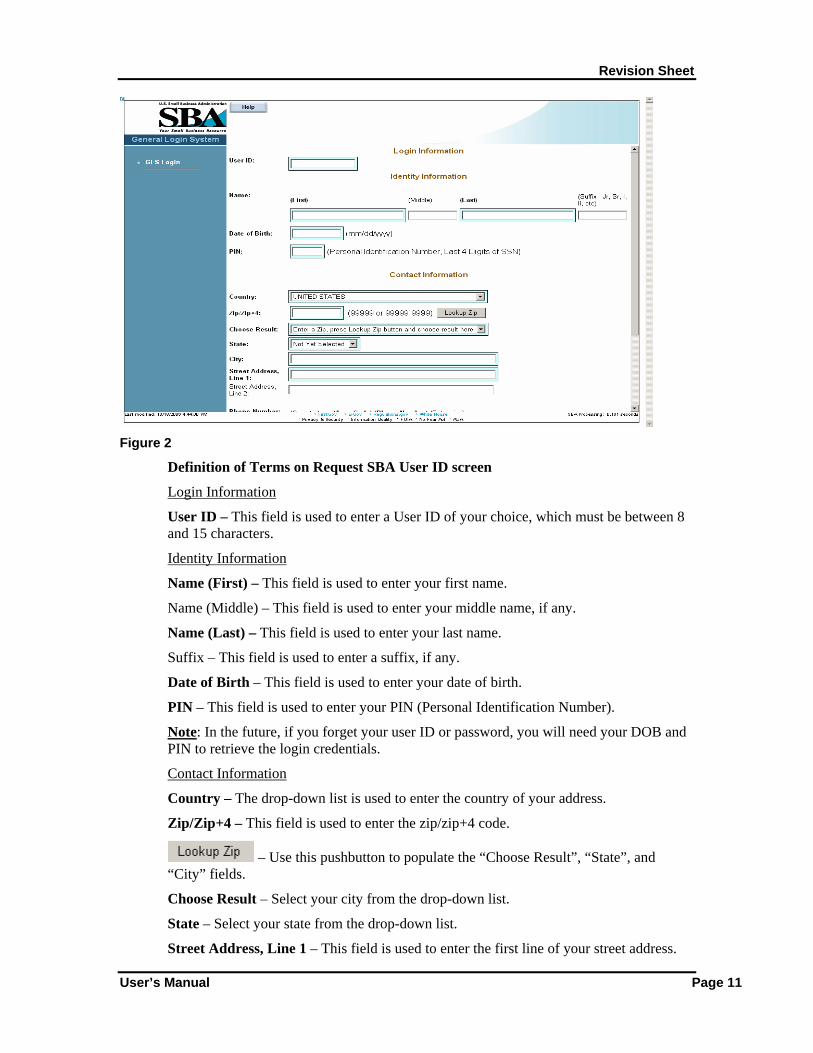
Figure 2
Definition of Terms on Request SBA User ID screen
Login Information
User ID – This field is used to enter a User ID of your choice, which must be between 8 and 15 characters.
Identity Information
Name (First) – This field is used to enter your first name.
Name (Middle) – This field is used to enter your middle name, if any.
Name (Last) – This field is used to enter your last name.
Suffix – This field is used to enter a suffix, if any.
Date of Birth – This field is used to enter your date of birth.
PIN – This field is used to enter your PIN (Personal Identification Number).
Note: In the future, if you forget your user ID or password, you will need your DOB and PIN to retrieve the login credentials.
Contact Information
Country – The drop-down list is used to enter the country of your address.
Zip/Zip+4 – This field is used to enter the zip/zip+4 code.
– Use this pushbutton to populate the “Choose Result”, “State”, and “City” fields.
Choose Result – Select your city from the drop-down list.
State – Select your state from the drop-down list.
Street Address, Line 1 – This field is used to enter the first line of your street address.
Revision Sheet
User’s Manual Page 12
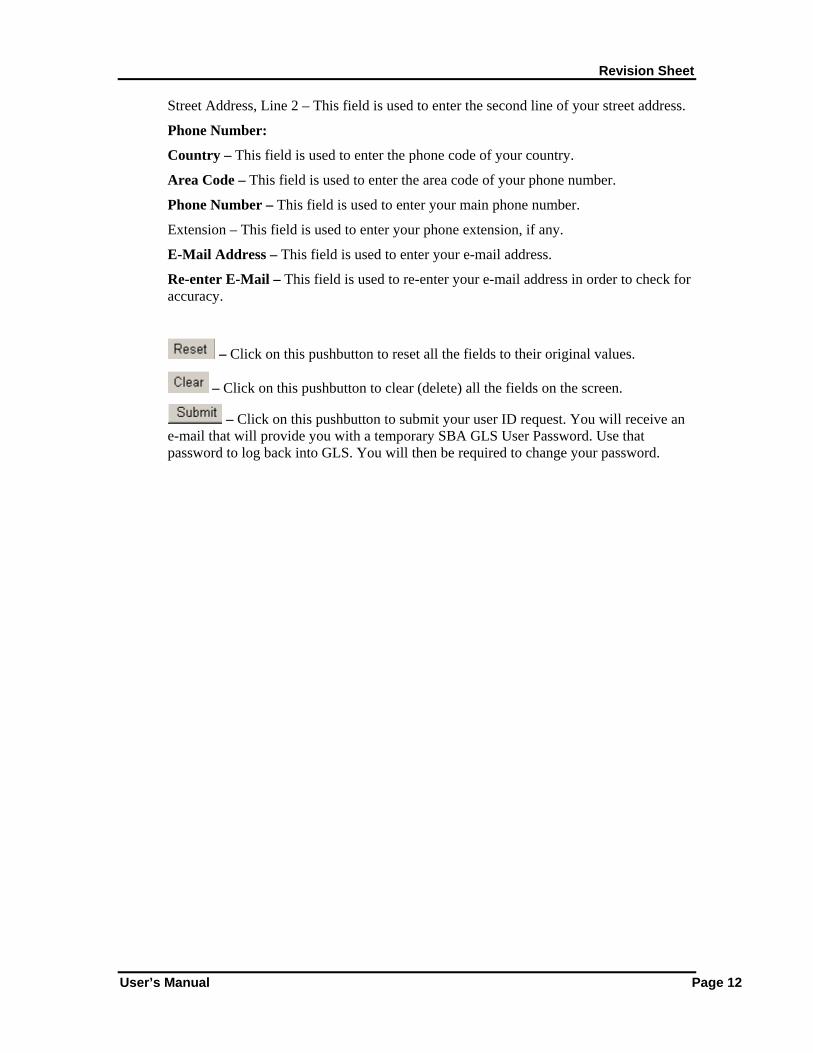
Street Address, Line 2 – This field is used to enter the second line of your street address.
Phone Number:
Country – This field is used to enter the phone code of your country.
Area Code – This field is used to enter the area code of your phone number.
Phone Number – This field is used to enter your main phone number.
Extension – This field is used to enter your phone extension, if any.
E-Mail Address – This field is used to enter your e-mail address.
Re-enter E-Mail – This field is used to re-enter your e-mail address in order to check for accuracy.
– Click on this pushbutton to reset all the fields to their original values.
– Click on this pushbutton to clear (delete) all the fields on the screen.
– Click on this pushbutton to submit your user ID request. You will receive an e-mail that will provide you with a temporary SBA GLS User Password. Use that password to log back into GLS. You will then be required to change your password.

Revision Sheet
User’s Manual Page 13
3.2 Change Password After you complete and submit the information on the Request SBA User ID screen you will receive an e-mail with your ID and a default password. Using the default password, log into the GLS system. On the General Login System - Choose Function screen, click on the
pushbutton and the following screen will appear:
Figure 3
Definition of Terms on Change Password screen
1. New Password – Enter your new password in this field. It must have a minimum of eight characters and a maximum of 16 characters. The password must also contain at least three of the following four properties:
a. At least one upper-case letter (e.g. “A”, “B”, “C”… “Z”)
b. Lower-case letters (e.g. “a”, “b”, “c”, …“z”)
c. Numericals (e.g. “0”, “1”, “2”, …“9”)
d. Special characters (e.g. “{ }”, “[ ]”, “< >”, “:”, “?”, “$”, or “%”)
2. Retype New Password – Retype the new password in this field.
3. Click on the pushbutton to change the password and advance to the Welcome screen.

Revision Sheet
User’s Manual Page 14
3.3 Profile Use the Profile screen to enter your business ID information.
Figure 4 – Agent Contractor Profile Screen showing an active Business ID
Definition of Terms on Profile screen
1. First Name – Your first name 2. Middle Initial – Your middle initial, if any 3. Last Name – Your last name 4. Suffix – The suffix, if any 5. Country – The country where you reside.
6. Zip/Zip+4 – The zip code of your address. Click on after entering the zip code to populate the location options.
7. Choose Result – The result set generated by selecting the pushbutton. 8. State – The state where you reside. 9. City – The city where you reside. 10. Street Address, Line 1 – The first line of your street address 11. Street Address, Line 2 – The second line of your street address 12. Home Phone Number – Your home phone number (First enter the country code, then
the area code, then the actual phone number, and finally the extension, if any.) 13. E-Mail Address – Your e-mail address 14. Re-enter E-Mail – Your e-mail address entered a second time. If they do not match, the
system will return an error message. 15. Default Location ID – This display-only field shows the default location ID. 16. Business Information – This display-only field indicates whether there is any business
information. 17. Add New Business? – Use these radio buttons to add a new business, if needed. Note: The following three fields will only appear if “Yes” is selected in #17 “Add New Business?”
Revision Sheet
User’s Manual Page 15
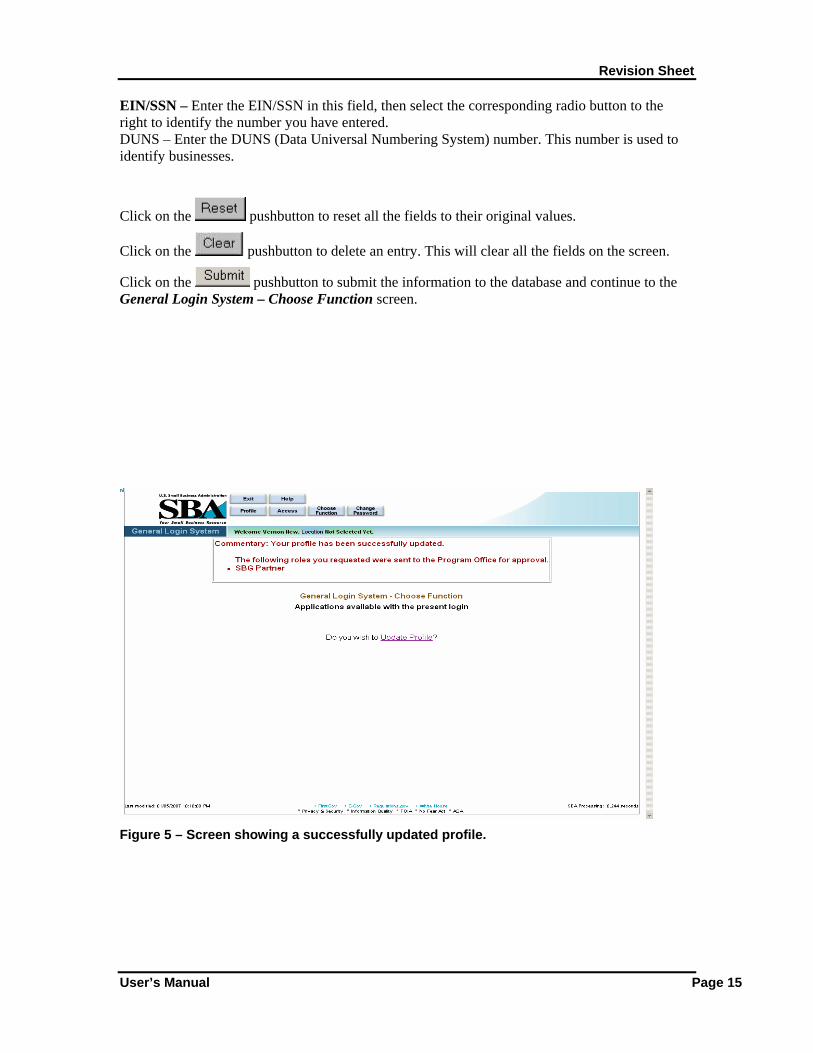
EIN/SSN – Enter the EIN/SSN in this field, then select the corresponding radio button to the right to identify the number you have entered. DUNS – Enter the DUNS (Data Universal Numbering System) number. This number is used to identify businesses.
Click on the pushbutton to reset all the fields to their original values.
Click on the pushbutton to delete an entry. This will clear all the fields on the screen.
Click on the pushbutton to submit the information to the database and continue to the General Login System – Choose Function screen.
Figure 5 – Screen showing a successfully updated profile.

Revision Sheet
User’s Manual Page 16
3.4 Access (System Selection) Click on the pushbutton (from the Profile screen) to reach the System Selection screen shown below. Use this screen to request access to the SBG E-app system in the GLS system.
To request access, click on the “Surety Bond Guarantee System” (SBG/PSB) folder and select SBG Agent Application.
Note: Once the request is submitted, it must be approved by the program office for activation.
Figure 6 – Screenshot of the SBG Agent Access request with a linked Location ID.
Click on the pushbutton to reset all the fields to their original values.
Click on the pushbutton to submit the information to the database and forward it to the approving authority.

Revision Sheet
User’s Manual Page 17
4 Logging In
Once you have your ID and password, you may log into the GLS SBG system. Connect to the Internet and enter https://eweb.sba.gov/gls/dsplogin.cfm in the URL. Input your User ID and Password and click on the “Login” pushbutton. After doing so, you will see the screen shown below:
Read the terms and conditions on the Welcome screen and either click on the
pushbutton to accept them or click on the pushbutton to exit the system.

Revision Sheet
User’s Manual Page 18
4.1 General Login System – Choose Function The General Login System – Choose Function specifies the functions that you are able to access.
Select the “Surety Bond Guarantee Applications hotlink.
The pushbuttons at the top of the screen have the following functions:
Use the pushbutton to exit this screen.
Use the pushbutton to obtain screen advice.
Use the pushbutton to examine user information.
Use the pushbutton to proceed to the screen that lists all the applications under GLS.
Use the pushbutton to return to the application list.
Use the pushbutton to proceed to the Switch Location screen where you can choose a different location ID.
Use the pushbutton to access the Change Password screen.

Revision Sheet
User’s Manual Page 19
After selecting the “Surety Bond Guarantee Applications hotlink, you will see the screen shown below:
The Agent Outstanding Application list can be sorted differently by clicking on each heading. To access an application, click on the SBG number.
4.2 General Instructions
The following are guidelines that apply throughout the Web application:
• The application includes a security process that requires prior identification and approval of users. Security routines are used to check for password aging - passwords must be changed every 90 days. Users are validated up front, to determine permission and access rights.
• The application uses redundant emphasis; color-based prompting is applied to the input/view boxes and text formatting features are applied to the labels i.e. (Color & Bold or Color & Italics). Alternative descriptions are available for images and summaries/labels for tables and input/view boxes supporting most reader software.
a) Required Data = Blue background box & Bold Arial Label
b) Optional Data = White background box & Regular Arial Label
c) View Only Data = Gray background box & Regular Arial Label
The formatting and emphasis may change for a given screen field depending upon the type of bond (bid/final) selected.

Revision Sheet
User’s Manual Page 20
• Both Browser and Application Server-side Data Validation occurs, in general:
a) At the Browser - simple validation within a screen is performed, i.e. numbers, text, and dates where required.
b) At the Server - Table lookup and Database validation, Complex Validation, and Cross editing between screens occurs.
• If you do not see any pushbuttons on the screen and you need to save information, you will need to re-enter that particular screen via
the , , or pushbuttons. • The small question mark at the upper left-hand corner of the screen can be
used to do the following:
o Get information about Template Help (“SBA Look and Feel”) o Print o Show/Hide Navigation (hotlinks on the left-hand side of the
screen) to view the full screen. o Close the menu
Left Navigation Menu The contractor is responsible for inputting data on the screens under “Business” and “Apply for a Bond Guarantee”. If the contractor does not input data in the before-mentioned screens, the Agent has to enter the data. The contractor is responsible for inputting data on the screens under “Agent Operation”.

Revision Sheet
User’s Manual Page 21
5 Pushbuttons
5.1 Search Application - Edit The Search Application (Edit) screen allows you to search for bond applications by business ID. The drop-down will only list those businesses associated with the agent.
Definition of Terms on Search Application (Edit) Screen
Business ID – Use the drop-down list to select a business ID. Click on the pushbutton to submit the information to the database and proceed to the Edit List screen, which will display a list of applications associated with that business.
Click on the pushbutton to reset values.

Revision Sheet
User’s Manual Page 22
5.2 Edit List The Edit List screen allows you to select a particular bond application that is associated with the business selected.
Definition of Terms on Edit List Screen
1. SBG# – Click on this hotlink number to access a particular surety bond guarantee.
2. Description – A description of the surety bond guarantee
3. Bond Type – The type of bond
4. App. Date – The date the application was created.
5. Office – The SBA district office that is associated with the contractor’s location.
6. City – The city where the contractor is located
7. State – The state where the contractor is located

Revision Sheet
User’s Manual Page 23
5.3 New Business
Select the pushbutton at the top of the Welcome screen in order to access it.
The New Business screen allows you to enter a new business into the system to either complete the contractor initialization process or to begin inputting a contractor’s application.
The agent must completed the contractor initialization process for those contractors that want to submit their applications electronically. The agent must associate the contractor with their agency in the system. This screen also enables the agent to enter a business or bond application, if needed.
Note: You cannot enter information for a business until the forms have been received from the contractor.
Definition of Terms on New Business screen
New Business ID – Enter a nine-digit code to identify the business. Then click on the drop-down list to specify if this code is an EIN or an SSN. Once you click on the pushbutton, the system will display the pop-up message below:

Revision Sheet
User’s Manual Page 24
– Click on this pushbutton to submit the information to the database and proceed to the Business Information screen. At this point, the contractor initialization process has been completed and the contractor can input their application.
– Click on this pushbutton to reset all the fields to their original values.
5.4 Business Information The Business Information screen allows you to enter supporting information regarding the business that is applying for the bond (if not existing) or to update existing business information.
Note: Once the contractor updates Business Info, Principal Info, or Schedule of Work in Process, you will no longer be able to update any information on these three screens.
Definition of Terms on Business Information Screen
Business Id – The business Id; either EIN or SSN (display-only)
Business Name – The name of the business that is applying for the bond.
Business Trade Name – The name under which the entity conducts business.
Business Address
1. Zip/Zip+4 – The zip code. Enter the zip code and click on the pushbutton to populate the “State” and “City” fields. For multiple locations within the same zip code, the “Choose Result” drop-down list will be populated with options. Please select the most appropriate location.
2. Choose Result – The result set generated by selecting the pushbutton. Select the most relevant option.
3. State – The state in which the business is located. 4. City – The city in which the business is located. 5. County – The county in which the business is located. 6. Street Address, Line 1 – The first line of the business street address.

Revision Sheet
User’s Manual Page 25
7. Street Address, Line 2 – The second line of the street address. 8. Phone Number – The phone number of the business. 9. Facsimile Number – The facsimile number of the business.
Business Demographic Information
10. Date Formed – The date on which the business was formed. 11. Type of Business – Use the drop-down list to indicate the type of business it is
(“Construction”, “Services”, etc.) 12. Number of Employees – The number of employees that are employed by the business. 13. Type of Organization – Use the drop-down list to indicate the legal type of organization
the business is (“Cooperative”, “Corporation”, etc.) 14. Average Annual Receipts – The Average Annual receipts over Last 3 Years, including
Affiliates, for the Business. 15. Is the Business located in a Rural or Urban area? 16. Are you currently debarred from doing business with the Federal Government? 17. Have you ever received SBA assistance under another business name? If so (Yes),
enter name and business. 18. Business Name – Enter the name of the business under which you received SBA
assistance. (Note: this field only displays if the “Yes” radio button is clicked in # 17.) 19. Have you ever defaulted on any previous surety bonds (SBA or other)? 20. Explain – Describe the circumstances surrounding prior defaults. (Note: this field only
displays if the “Yes” radio button is clicked in # 19.) 21. Have you ever failed to complete a job? 22. Explain – Describe the circumstances surrounding the failure to complete a prior job.
(Note: this field only displays if the “Yes” radio button is clicked in # 21.) 23. Is the contractor requesting SBA assistance? 24. Have you updated SBA form 994F (Schedule of incomplete work) in the last 3
months? (Note: this question will not appear on your first application.) Small Business Certifications (Display-only; for SBA use): Business 8A: Indicates whether or not the business has 8a status. HubZone Certified: Indicates whether or not the business has HubZone certification status. SBA Loan Information – This field will display any SBA loan information.

Revision Sheet
User’s Manual Page 26
6 Principal Information Use the Principal Information screen to view information on an existing principal or add a new one, if necessary. Click on the “Add New Principal” hotlink to proceed to the Add New Principal screen.
Note: Once the contractor updates Business Info, Principal Info, or Schedule of Work in Process, you will no longer be able to update any information on these three screens.

Revision Sheet
User’s Manual Page 27
6.1 Add New Principal The Add New Principal screen allows you to view/update supporting information regarding the principal of the business that is applying for the bond, as well as to enter additional principals. This information is required prior to entering GIA information.
Definition of Terms on Identification Screen
1. Business ID – This display-only field shows the Business EIN 2. Principal SSN – The social security number associated with the principal. 3. First Name – The first name of the principal 4. Middle Initial – The middle initial, if any, of the principal 5. Last Name – The last name of the principal 6. Suffix – The suffix, if any, of the principal
Principal Address
7. Principal Title – The title of the principal 8. Start Date – The date that the principal became associated with the business. 9. % of Ownership – The percentage of ownership interest the principal has in the
business. The termination date is taken into consideration for summing up all the %s. 10. Termination Date – The date on which the principal terminated his/her association with
the business. This has an effect on the % of ownership.
11. Zip/Zip+4 – The zip code of the principal’s address. Click on the pushbutton after entering the zip code to populate the location options.
12. Choose Result – The result set generated by selecting the pushbutton. 13. State – The state where the principal resides. 14. City – The city where the principal resides. 15. Street Address, Line 1 – The first line of the principal’s street address 16. Street Address, Line 2 – The second line of the principal’s street address 17. Home Phone Number – The principal’s home phone number
Revision Sheet
User’s Manual Page 28
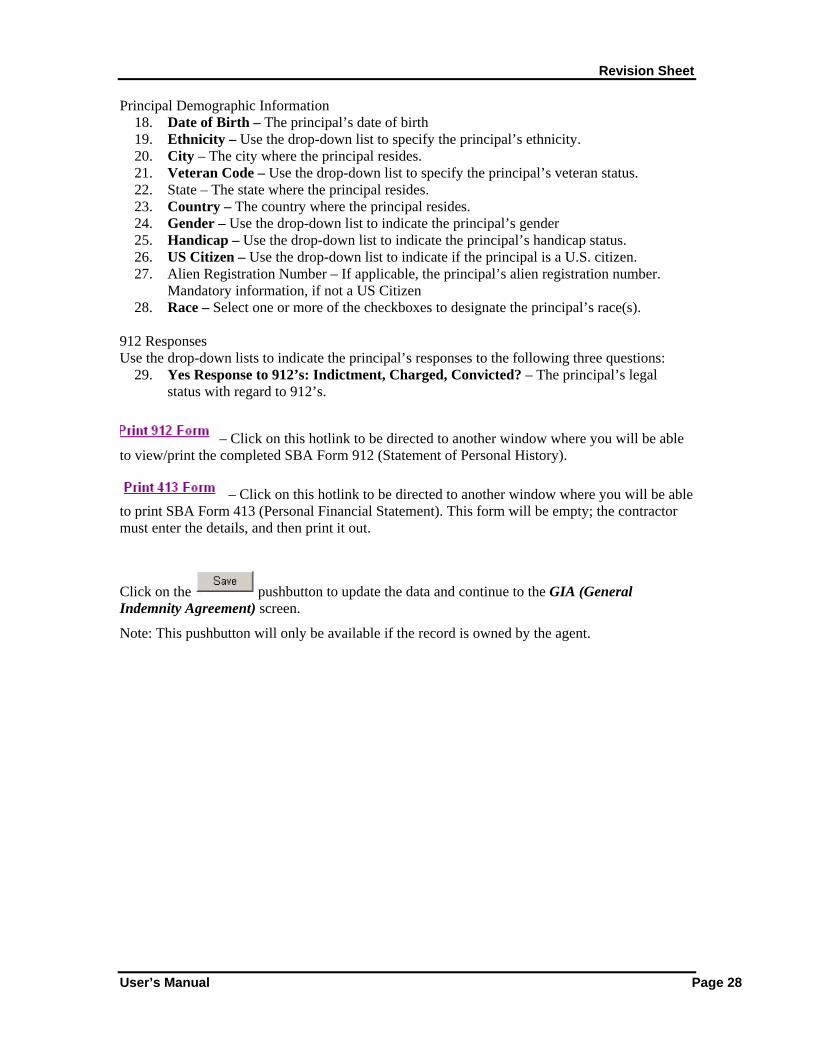
Principal Demographic Information 18. Date of Birth – The principal’s date of birth 19. Ethnicity – Use the drop-down list to specify the principal’s ethnicity. 20. City – The city where the principal resides. 21. Veteran Code – Use the drop-down list to specify the principal’s veteran status. 22. State – The state where the principal resides. 23. Country – The country where the principal resides. 24. Gender – Use the drop-down list to indicate the principal’s gender 25. Handicap – Use the drop-down list to indicate the principal’s handicap status. 26. US Citizen – Use the drop-down list to indicate if the principal is a U.S. citizen. 27. Alien Registration Number – If applicable, the principal’s alien registration number.
Mandatory information, if not a US Citizen 28. Race – Select one or more of the checkboxes to designate the principal’s race(s).
912 Responses Use the drop-down lists to indicate the principal’s responses to the following three questions:
29. Yes Response to 912’s: Indictment, Charged, Convicted? – The principal’s legal status with regard to 912’s.
– Click on this hotlink to be directed to another window where you will be able to view/print the completed SBA Form 912 (Statement of Personal History).
– Click on this hotlink to be directed to another window where you will be able to print SBA Form 413 (Personal Financial Statement). This form will be empty; the contractor must enter the details, and then print it out.
Click on the pushbutton to update the data and continue to the GIA (General Indemnity Agreement) screen.
Note: This pushbutton will only be available if the record is owned by the agent.

Revision Sheet
User’s Manual Page 29
7 General Indemnity Agreement (GIA) The GIA (General Indemnity Agreement) screen allows you to capture the GIA information needed to establish the relationship between the contractor (applicant) and the participating surety (SBA Resource Partner). It allows you to enter financial information on the principal and the principal’s spouse. The most current GIA will be listed on the main page.
If a GIA is not entered for a business, no further work can be completed on the bond application.
This screen is accessed by clicking on the “GIA” hotlink in the left-hand navigation tree.
Definition of Terms on GIA screen
Partner Name – This field displays the partner name.
You can add a new record by selecting a partner and clicking on the pushbutton. The most recent GIA (if any) will be listed in the drop-down list. Note: As the SBG agent, only those sureties to which the agency has power of attorney will appear in this drop-down list.
Click on the pushbutton to view a list of principals that have been associated with this GIA.
Principals that have been associated with this GIA (All the fields in this section are display-only, with the exception of the “Delete” checkbox and the hotlink in the “Principal SSN” column:
Delete? – Select this checkbox if you wish to delete the line record.
Principal SSN – The Principal Social Security Number
First Name – The first name of the principal
Last Name – The last name of the principal
% Ownership – The principal’s ownership percentage of the business.

Revision Sheet
User’s Manual Page 30
Indemnitor Code – The indemnitor code indicates if the principal is an individual or corporate indemnitor or both.
Financial Stmt Dt – The date of the principal’s financial statement
Net Worth – The net worth of the principal
Spouse First Name – The spouse’s first name
Spouse Last Name – The spouse’s last name
Indemnitor Code – The indemnitor code indicates if the principal is an individual or corporate indemnitor or both.
Spouse Financial Stmt Dt – The date of the spouse’s financial statement
Spouse Net Worth – The spouse’s net worth
Termination Date – The termination date
– Use this pushbutton once you have selected a line record to delete.
Principals to be associated with GIA – Please see the “GIA” section above for a list of fields and accompanying documentation.
– Use this pushbutton to proceed either to the Surety Review (994B)/Annual Surety Review screen (if this is the first bond application of the contractor for the fiscal year) or the Surety Agreement (990) screen if it is not. If this is a brand-new business, you will be directed to the Financial Statements screen.

Revision Sheet
User’s Manual Page 31
7.1 Add GIA The Add New General Indemnity Agreement screen allows you to establish a new relationship between the contractor (applicant) and an additional participating surety (SBA Resource Partner). Note: An agency may have a relationship with more than one business, but a business can have a relationship with only one agency.
This screen is accessed by selecting the pushbutton from the GIA (General Indemnity Agreement) screen.
Definition of Terms on Add New General Indemnity Agreement screen
Partner Name – Use the drop-down list to select a partner name. The most recent GIA (if any) will be listed in the drop-down list.
Note: As the SBG agent, only those sureties to which the agency has power of attorney will be listed in this drop-down list.
You can add a new record by selecting a partner and clicking on the pushbutton.
Click on the pushbutton to display older GIAs.

Revision Sheet
User’s Manual Page 32
7.1.1 Principals to be associated with GIA (GIA – Details) The GIA – Details screen is used to review the supporting details for the principals.
This screen is accessed by selecting the pushbutton from the Add New General Indemnity Agreement screen.
Definition of Terms on the GIA-Details screen (All fields on this screen are display-only with the exception of the “Principal ID” hotlink column.)
Partner Name – The partner selected in the GIA (General Indemnity Agreement) screen.
EIN/SSN – The EIN or SSN; click on a hotlink in this column to go to the GIA - (General Indemnity Agreement) Principal/Spouse Information screen to update any details.
First Name – The first name of the principal
Last Name – The last name of the principal
% Ownership – The principal’s ownership percentage of the business.
Indemnitor Code – The indemnitor code (principal) indicates if the principal is an individual or corporate indemnitor or both.
Financial Stmt Dt – The date of the financial statement
Net Worth – The principal’s net worth
Spouse First Name – The first name of the principal’s spouse
Spouse Last Name – The last name of the principal’s spouse
Indemnitor Code – The indemnitor code (spouse) indicates if the principal is an individual or corporate indemnitor or both.
Spouse Financial Stmt Dt – The date of the spouse’s financial statement
Revision Sheet
User’s Manual Page 33
Spouse Net worth – The spouse’s net worth
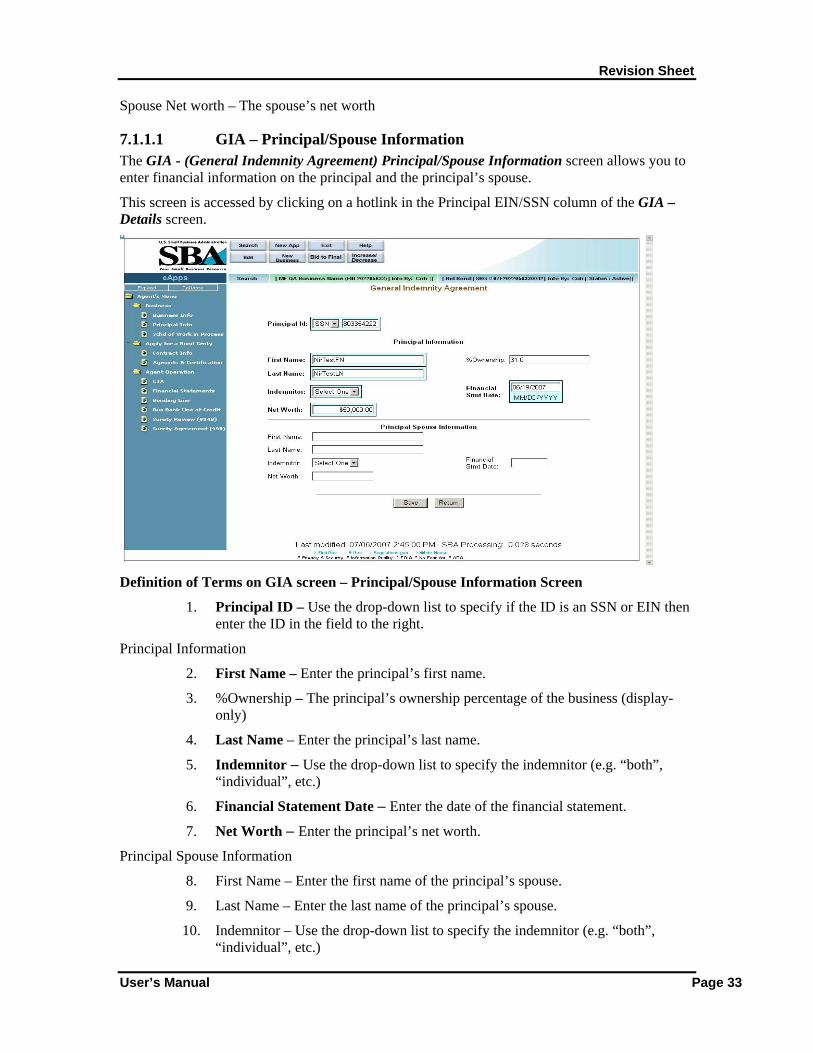
7.1.1.1 GIA – Principal/Spouse Information The GIA - (General Indemnity Agreement) Principal/Spouse Information screen allows you to enter financial information on the principal and the principal’s spouse.
This screen is accessed by clicking on a hotlink in the Principal EIN/SSN column of the GIA – Details screen.
Definition of Terms on GIA screen – Principal/Spouse Information Screen
1. Principal ID – Use the drop-down list to specify if the ID is an SSN or EIN then enter the ID in the field to the right.
Principal Information
2. First Name – Enter the principal’s first name.
3. %Ownership – The principal’s ownership percentage of the business (display-only)
4. Last Name – Enter the principal’s last name.
5. Indemnitor – Use the drop-down list to specify the indemnitor (e.g. “both”, “individual”, etc.)
6. Financial Statement Date – Enter the date of the financial statement.
7. Net Worth – Enter the principal’s net worth.
Principal Spouse Information
8. First Name – Enter the first name of the principal’s spouse.
9. Last Name – Enter the last name of the principal’s spouse.
10. Indemnitor – Use the drop-down list to specify the indemnitor (e.g. “both”, “individual”, etc.)

Revision Sheet
User’s Manual Page 34
11. Financial Stmt Date – Enter the date of the financial statement.
12. Net Worth – Enter the net worth of the principal’s spouse.
Click on the pushbutton to update the data and continue to the GIA (General Indemnity Agreement) screen.
Click on the pushbutton to go back to the initial GIA screen.

Revision Sheet
User’s Manual Page 35
8 Financial Statements (Optional)
Access this screen by selecting “Financial Statements” from the left-hand navigation tree.
The Financial Statements screen allows you to enter important financial information regarding the business that is applying for the bond, in order to gauge its financial health. The agent enters the information on the left side of the screen while the SBA enters the information on the right side. (Note: As an agent, the right-hand side of the screen will be inaccessible to you.)
Note: This screen is optional. All dollar figures should be round figures; i.e. if any cents are entered, they will either be rounded up or rounded down to the nearest dollar by the system.
Definition of Terms on Financial Statements Screen
1. Date – Use this field to enter the date of the financial statements. 2. Year End – Use the drop-down lists to indicate the last date of the period that is reflected
on the financial statement. 3. Statement Type – Use the drop-down list to indicate the type of statement prepared (e.g.
“compilation”, “audit”, etc. 4. Interim Ind – Use the drop-down list to indicate if this is an interim financial statement. 5. No of Months – Use the drop-down list to indicate the number of months included on the
financial statement. Balance Sheet
6. Cash – The amount of cash on hand 7. Adjusted Cash – The amount of adjusted cash on hand 8. Current Assets – The amount of current assets 9. Adjusted Current Assets – The amount of adjusted current assets 10. LT Assets – The amount of long-term assets 11. Adjusted LT Assets – The amount of adjusted long-term assets 12. Total Assets – The amount of total assets

Revision Sheet
User’s Manual Page 36
13. Adjusted Total Assets – The amount of adjusted total assets 14. Current Liabilities – The amount of current liabilities 15. Adjusted Current Liabilities – The amount of adjusted current liabilities 16. LT Liabilities – The amount of long-term liabilities 17. Adjusted LT Liabilities – The amount of adjusted long-term liabilities 18. Net Worth – The amount of net worth 19. Adjusted Net Worth – The amount of adjusted net worth 20. Debt to Net Worth – The amount of debt to net worth 21. Adjusted Debt to Net Worth – The amount of adjusted debt to net worth
Income Statement
22. Total Revenue – The amount of total revenue 23. Adjusted Total Revenue – The amount of adjusted total revenue 24. Cost of Revenue – The amount of cost of revenue 25. Adjusted Cost of Revenue – The adjusted amount of cost of revenue 26. Gross Profit – The amount of gross profit 27. Adjusted Gross Profit – The adjusted amount of gross profit 28. Gen. & Admin – The amount of general and administrative expense 29. Adjusted Gen. & Admin – The adjusted amount of general and administrative expense 30. Operating Income – The amount of operating income 31. Adjusted Operating Income – The adjusted amount of operating income 32. Net Income – The amount of net income 33. Adjusted Net Income – The adjusted amount of net income
Analysis Data
34. Net Quick – The amount of net quick 35. Adjusted Net Quick – The adjusted amount of net quick 36. Net Worth – The net worth 37. Adjusted Net Worth – The adjusted net worth
Other
38. Cash Flow – The amount of cash flow 39. Adjusted Cash Flow – The amount of adjusted cash flow 40. Depreciation – The amount of depreciation 41. Adjusted Depreciation – The adjusted amount of depreciation 42. Additional Entry – An additional entry, if applicable 43. Adjusted Additional Entry – An adjusted additional entry, if applicable 44. Statement prepared by – The name of the person or firm that prepared the financial
statements.
Click on the pushbutton to determine the numerical values.
Click on the pushbutton to enter additional remarks.
Click on the pushbutton to update the data.
Click on the pushbutton to return to the top of this screen.

Revision Sheet
User’s Manual Page 37
9 Bonding Line (Optional)
Access this screen by selecting “Bonding Line” from the left-hand navigation tree.
The Bonding Line screen allows you to examine the details of the bonding line amount.
Only one active bonding line is available at any given time. Either a new bonding line can be created or the expiration date on an existing bonding line can be changed. This screen defines the maximum job number, the individual Contract amount limit, and the expiration date for the Bonding Line.
Note: All dollar figures should be round figures; i.e. if any cents are entered, they will either be rounded up or rounded down to the nearest dollar by the system.
Definition of Terms on Bonding Line screen
1. Trade Name – The name under which the company is doing business. (display-only) 2. Business ID – The business ID number of the company (display-only) 3. Effective Date – The effective date of the bonding line (display-only) 4. Aggregate Bonding Line Limit – Enter the aggregate (total) amount of the bonding line. 5. Expiration Date – The expiration date of the bonding line (display-only) 6. Contract Amount Limit – Enter the maximum single contract amount. 7. Approval Date – The date on which the bonding line was approved. (display-only) 8. Maximum Job Number – The maximum jobs allowed under the bonding line. 9. Geographic Area – The geographic area in which the work can be performed. 10. Comments – Enter relevant information regarding the bonding line. 11. Balance Amount – The balance amount (amount remaining) of the bonding line (display-
only) 12. Balance Job Number – The balance job number (amount of jobs remaining) on the
bonding line (display-only) 13. Latest WIP Contract Amount – The latest work in progress contract amount (display-
only)

Revision Sheet
User’s Manual Page 38
a. Bonded – The cumulative total amount of the bonded jobs b. UnBonded – The cumulative total amount of the unbonded jobs
14. Latest WIP Jobs Number – The latest work in progress jobs number (display-only) a. Bonded – The number of jobs that are bonded b. UnBonded – The number of jobs that are unbonded
Approved Bid Bonds Outstanding (display-only)
15. Est. Contract Amt – The estimated amount of the contract 16. Jobs Number – The total number of approved but outstanding jobs
Click on the pushbutton to select a NAICS code.
17. NAICS Code – The NAICS code of the bid bond.
Click on the pushbutton to insert new NAICS code and text.
18. NAICS Text – The NAICS text of the bid bond.
Click on the pushbutton to update the data.

Revision Sheet
User’s Manual Page 39
10 Business Bank Line of Credit (Optional)
The Business Bank Line of Credit screen allows you to view the bank line of credit information of a business.
Access this screen by selecting “Business Bank Line of Credit” from the left-hand navigation tree.
Definition of terms on Business Bank Line of Credit screen
All of the fields in this screen are display-only with the exception of the “Add New Bank Line of Credit” hotlink and the hotlinks displayed in the “Bank Name” column.
1. Add New Bank Line of Credit – Click on this hotlink to add an additional line of credit. 2. Bank Name – Displays the name of the bank extending the line of credit. 3. Amount Issued – Displays the amount issued. 4. Amount of Balance – Displays the balance amount 5. Secured By – Displays the name of the entity securing the line of credit. 6. Issued Date – Displays the date the line of credit was issued. 7. Last Updated – Displays the latest date the line of credit was updated. 8. Expiration date –Displays the expiration date of the line of credit. 9. Remarks – Displays descriptive remarks on the line of credit.

Revision Sheet
User’s Manual Page 40
10.1 New Bank Details
The New Bank Details screen allows you to enter additional supporting details regarding a line of credit.
Access this screen by clicking on the hotlink in the Business Bank Line of Credit screen.
Definition of terms on New Details screen
1. Bank Name – The name of the bank 2. Amount Issued – The amount that was issued. 3. Issued Date – The date on which the credit was issued. 4. Amount of Balance – The balance amount of the line of credit 5. Last Updated Date – The last date on which the line of credit details were updated. 6. Secured By – The name of the entity that is securing the line of credit. 7. Expiration Date – The expiration date of the line of credit 8. Remarks – Any remarks containing details on the line of credit
Click on the pushbutton to update the data and return to the Business Bank Line of Credit screen.
Click on the pushbutton to discard changes and return to the Business Bank Line of Credit screen.

Revision Sheet
User’s Manual Page 41
11 Contract Information
Select the pushbutton at the top of the Welcome screen to access the New Application screen. Once in the New Application screen, use the drop-down list to select a “Business ID”. Clicking on the pushbutton will direct you to the Contract Information screen.
The Contract Information screen allows you to enter relevant contract information details.
Definition of terms on Contract Information screen
1. Bond Type – Use the drop-down list to specify the bond type (e.g. “Bid Bond”, “Payment Bond”, etc.) The field options will vary as a function of the bond type chosen.
2. Application Date – This display-only field shows the date the application was made. 3. Contract Amount – Use this field to enter the amount of the contract. 4. Start Date – Use this field to enter the start date of the contract. 5. Completion Date – Use this field to enter the date of the contract completion. Note:
The Contract Amount, Start Date, and Completion Date appear for both Bind Bonds and Final Bonds. For Bid Bonds, the field names have the word “Estimated” in front of them.
Project
6. Type – Use the drop-down list to specify the type of contract (e.g. “construction”,
“services”, etc.) 7. Contract Description – Enter a description of the contract work to be performed. 8. Zip – This field is used to enter the zip code where the contract will be performed.
9. – Click on this pushbutton to populate the “State” and “City” fields. For multiple locations within the same zip code, the “Choose Result” drop-down list will be populated with options. Please select the most appropriate location.

Revision Sheet
User’s Manual Page 42
10. County – This field indicates the county where the contract will be performed. 11. Choose Result – This field displays the result set generated by selecting the
pushbutton. Select the most relevant option. 12. City – This field indicates the city where the contract will be performed. 13. State – This field indicates the state where the contract will be performed.
Obligee/Owner
14. Name – Use this field to enter the name of the obligee/owner. 15. Type – Use the drop-down list to specify the obligee type (e.g. “Federal”, “State”, etc.) 16. Country – Use the drop-down list to specify the country of the obligee. 17. Zip/Zip+4 – Use this field to enter the zip code of the obligee.
18. – Click on this pushbutton to populate the “State” and “City” fields. For multiple locations within the same zip code, the “Choose Result” drop-down list will be populated with options. Please select the most appropriate location.
19. Choose Result: – This field displays the result set generated by selecting the
pushbutton. Use the drop-down list to select the most relevant option. 20. State – The state of the obligee 21. City – The city of the obligee 22. Street Address, Line 1 – The first line of the obligee’s street address 23. Street Suffix – The suffix of the obligee’s street address 24. Street Address, Line 2 – The second line of the obligee’s street address
Applicant
25. Applicant is – Use the radio button to specify whether the applicant is a prime contractor or a subcontractor.
26. Subcontractor’s percentage – Use this field to enter the amount of the job that the contractor is subcontracting out.
27. Project similar to previous work – Use the radio button to indicate if this project is similar to previous work performed by the contractor.
28. Pertains to an 8(a) contract? – Use the radio button to indicate if this project pertains to an 8(a) contract.
29. Liquidated Damages? – Use the radio button to indicate if there are any liquidated damages involved. If you select “Yes”, this will enable the “Timeframe” drop-down list where you will select either “Daily”, “Weekly”, etc. and the “Dollar Amount” field where you will enter the monetary amount of the damages.
30. Contractor Job Started– Use the radio buttons to indicate whether or not the contractor started the job. If “Yes” is chosen, you will be directed to the Job In Progress screen when the pushbutton is selected. If “No” is chosen, you will be directed to the Welcome screen.
Click on the pushbutton to reset values.
Click on the pushbutton to clear (delete) all the fields on the screen.
Click on the pushbutton to save the data to the database and advance to the Agreements and Certifications screen.

Revision Sheet
User’s Manual Page 43
12 Job in Progress
If you selected the “Yes” radio button in the Contract Information screen, you will be directed to the Job in Progress screen.
If you selected the “No” radio button in the Contract Information screen, you will be directed to the Agreements and Certifications screen.
The Job in Progress screen is used to enter relevant details about the job if the contractor has already started it. You must input information in all of the fields for each subcontractor or supplier that has been used on this job.
Definition of terms on Job in Progress screen
1. Job Started Info – Use this field to enter relevant comments.
2. Subcontractor/Supplier – Use the drop-down list to specify if the row pertains to a subcontractor or a supplier.
3. Name – Enter the name of the subcontractor or supplier.
4. Billed to Date –Enter the amount that the subcontractor or supplier has billed you to date.
5. Paid to Date – Enter the amount that you have paid the subcontractor or supplier to date.
6. Is there a Waiver of Lien? – Select the appropriate radio button to indicate a Waiver of Lien.
7. Remarks-Including explanation if no Waiver of Lien – Use this field to enter any relevant comments.
– Click on this hotlink and you will be directed to another window where you can view/print the completed SBA Form 991. You must print, sign, and date the SBA Form 991 (Surety Bond Guarantee Agreement Addendum) and have the obligee sign and date. Attach all lien waivers and mail the completed form to your agent.

Revision Sheet
User’s Manual Page 44
Click on the pushbutton to enter an additional Job in Progress.
The corresponding information will be placed at the bottom of this screen.
Click on the pushbutton to update the data and continue to the Agreements and Certifications screen.
13 Agreements and Certifications
The Agreements and Certifications screen allows you to input the contractor’s responses to the certifications on the SBA Form 994.
Definition of terms on Agreements and Certifications screen
Certification: I Certify:
For the following, use the radio buttons to indicate the contractor’s responses:
1. A bid, payment, or performance bond is required by the bid solicitation or the original contract for this project.
2. Applicant business has attempted and failed to obtain the required bond without SBA’s guarantee.
3. Percentage of work that applicant has subcontracted is accurate. 4. Information submitted to SBA, any agent, broker, or surety company for their
evaluation as to my bond ability is complete and accurate and that applicant’s Statement of Personal History (SBA Form 912) remains complete and accurate.
5. I authorize any agent, broker, surety company, or financial institution in possession of credit, financial, or work experience information concerning the undersigned

Revision Sheet
User’s Manual Page 45
applicant and the applicant’s business to release the information to SBA, in order that SBA may evaluate the information for the purpose of bond guarantee assistance.
Click on the pushbutton to update the data and return to the GIA (General Indemnity Agreement) screen.
Click on the pushbutton to submit the data, then return to the GIA (General Indemnity Agreement) screen. Note: You must answer “Yes” to all of the statements in order to be able to submit the application to an agent.
Click on the pushbutton to be directed to another window where you will be able to print SBA Form 994.
Revision Sheet
User’s Manual Page 46
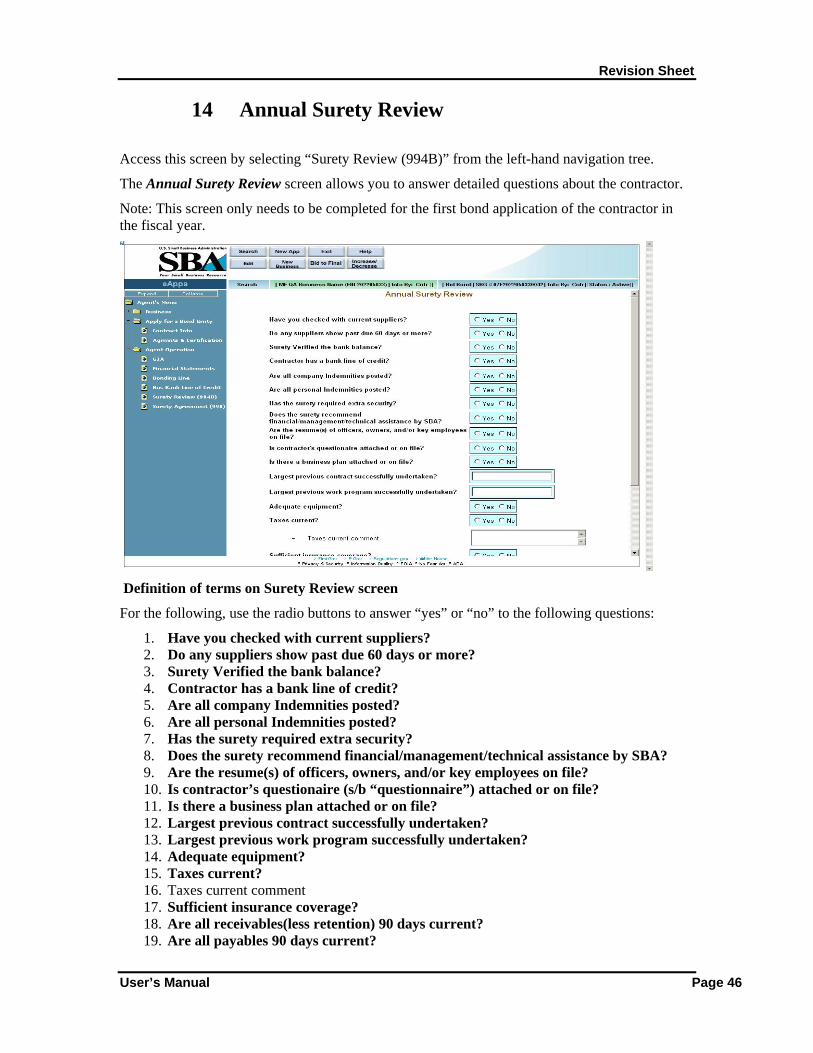
14 Annual Surety Review
Access this screen by selecting “Surety Review (994B)” from the left-hand navigation tree.
The Annual Surety Review screen allows you to answer detailed questions about the contractor.
Note: This screen only needs to be completed for the first bond application of the contractor in the fiscal year.
Definition of terms on Surety Review screen
For the following, use the radio buttons to answer “yes” or “no” to the following questions:
1. Have you checked with current suppliers? 2. Do any suppliers show past due 60 days or more? 3. Surety Verified the bank balance? 4. Contractor has a bank line of credit? 5. Are all company Indemnities posted? 6. Are all personal Indemnities posted? 7. Has the surety required extra security? 8. Does the surety recommend financial/management/technical assistance by SBA? 9. Are the resume(s) of officers, owners, and/or key employees on file? 10. Is contractor’s questionaire (s/b “questionnaire”) attached or on file? 11. Is there a business plan attached or on file? 12. Largest previous contract successfully undertaken? 13. Largest previous work program successfully undertaken? 14. Adequate equipment? 15. Taxes current? 16. Taxes current comment 17. Sufficient insurance coverage? 18. Are all receivables(less retention) 90 days current? 19. Are all payables 90 days current?

Revision Sheet
User’s Manual Page 47
Click on the pushbutton to update the data.
15 Surety Contract Review Agreement
Access this screen by selecting “Surety Agreement (990)” from the left-hand navigation tree.
The Surety Contract Review Agreement screen allows you to enter supporting details regarding the contractor’s application.
Definition of terms on Surety Agreement screen
Agent
1. Surety – The name of the surety. The most current surety with whom the contractor has a GIA will display here.
2. Agency/Branch – The name of the bonding agency to whom the business is assigned. 3. Attorney In Fact – Use the drop-down list to select the name of the attorney-in-fact.
This drop-down lists all the agents from the bonding agency who are authorized to enter applications on behalf of the surety.
4. Lead Surety Percentage – Enter the percentage coverage by the lead surety. Note: If there are no co-sureties, the value in the “Lead Surety Percentage” field will default to 100%.
5. Co-Surety? – Use this field to indicate if there is a co-surety. Note: If there are no co-sureties, the value in the “Lead Surety Pct” field will default to 100%.
6. Co-Surety Percentage – Enter the percentage coverage by the co-surety. 7. Co-Surety Name – Enter the name of the co-surety.
Questions

Revision Sheet
User’s Manual Page 48
Use the radio buttons to answer “yes” or “no” to the following questions, with the exception of the question asking “Is this bond negotiated?” In that instance, select either “Negotiated” or “Bid”.
8. Work in progress current and reviewed for accuracy? 9. Is there a current company financial statement on file? 10. Is there a Current personal financial statement on file? 11. Is this bond negotiated? 12. Is there a maintenance provision in the contract that exceeds 2 years? 13. Phased Project? 14. Is a separate maintenance bond required?
Bond
15. Bond Type – This display-only field shows the bond type. 16. Guaranty % – This display-only field shows the guaranty %. 17. Current Contract Amount – Enter the amount of the current contract. 18. Original Contract Amount – This display-only field shows the original contract amount. 19. Performance Bond Number – Enter the performance bond number. 20. Original Performance Bond Amount – This display-only field shows the original
performance bond amount. 21. Performance Bond % - Enter the performance bond percentage. 22. Current Performance Bond Amount – This display-only field shows the current
performance bond amount. 23. Premium Charged – Enter the premium that was charged. 24. SBA Share of Contract – This display-only field shows the SBA share of the contract
amount. 25. Contract Award Date – Enter the date on which the contract was awarded. 26. SBA Surety Fee Amount – This display-only field shows the amount of the SBA surety
fee. 27. Under Bonding Line? – Is this bond under the bonding line? 28. SBA Contractor Fee – This display-only field shows the amount of the SBA contractor
fee.
Click on the pushbutton to update the data.
– Select this pushbutton to return the application to the contractor for correction.
Submit Application to SBA
In my opinion the principal appears to have the financial management/technical abilities to successfully complete this contract. However, I feel this subcontractor falls below the normal underwriting standard of this surety, who will not issue this bond without SBA guarantee. – Select a radio button that reflects your decision.
Note: The two buttons below will only appear if the “I Agree” radio button is selected.

Revision Sheet
User’s Manual Page 49
– Click on this pushbutton to submit the application to the SBA. Note: once this application is submitted, it can no longer be changed.
– Click on this pushbutton to print your SBA Form 990, which will be populated with information that you inputted. Mail the signed SBA Form 990 with the contractor’s fee check (for final bonds) to SBA.
16 New Application
Use the New Application screen to enter a new application for a business. The screen below
appears when the pushbutton is selected from the top of the Welcome screen.
Once a Business ID has been entered, and the pushbutton has been selected, the system will prompt you to complete the following screens:
Contract Information (Please see the documentation in section 11.)
Job In Progress (Please see the documentation in section 12.)
Agreements & Certifications (Please see the documentation in section 13.)

Revision Sheet
User’s Manual Page 50
17 Increase/Decrease (Search Application)
Access this screen by selecting the pushbutton at the top of the screen.
Use the Search Application (Increase/Decrease) screen to select a particular Business ID.
Definition of term on Search Application (Increase/Decrease) screen
• Business ID – Use the drop-down list to select a particular Business ID.
Click on the pushbutton to submit the information to the database and proceed to the Increase/Decrease List screen.
Click on the pushbutton to reset values.

Revision Sheet
User’s Manual Page 51
17.1 Increase/Decrease List
Use the Increase/Decrease List screen to select a particular bond.
All the fields in this screen are display-only with the exception of the hotlinks in the “SBG#” column.
Definition of terms on Increase/Decrease List screen
1. SBG# - Click on a bond’s hotlink in this column to continue to the Surety Agreement (990) screen where you can modify various fields (e.g. “Current Contract Amount”, various bond amounts, etc.)
2. Description – A description of the contract
3. Bond Type – The bond type (e.g. “Bid”, “Performance”, etc.)
4. App. Date – The application date
5. Office – The SBA district office that is associated with the contractor’s location
6. City – The city where the contractor is located.
7. State – The state where the contractor is located.

Revision Sheet
User’s Manual Page 52
17.1.1 Surety Contract Review Agreement (Increase/Decrease) Access this screen by clicking on a hotlink in the “SBG#” column of the Increase/Decrease List screen.
Use this screen to modify various fields (e.g. “Current Contract Amount”, various bond amounts, etc.)
Definition of terms on Surety Agreement screen
1. Surety – The name of the surety; the most current surety with whom the contractor has a GIA agreement will display here. (display-only)
2. Agency/Branch – The name of the bonding agency to whom the business is assigned. (display-only)
3. Attorney In Fact – Use the drop-down list to select the name of the attorney-in-fact. This drop-down lists all the agents from the bonding agency who are authorized to enter applications on behalf of the surety.
4. Lead Surety Percentage – Enter the percentage coverage by the lead surety. Note: If there are no co-sureties, the value in the “Lead Surety Percentage” field will default to 100%.
5. Co-Surety? – Use this field to indicate if there is a co-surety. Note: If there are no co-sureties, the value in the “Lead Surety Pct” field will default to 100%.
6. Co-Surety Percentage – Enter the percentage coverage by the co-surety. (Note: This field will only appear if you selected “Yes” in Question #5 “Co-Surety”.)
7. Co-Surety Name – Enter the name of the co-surety. (Note: This field will only appear if you selected “Yes” in Question #5.)
Questions Use the radio buttons to answer “yes” or “no” to the following questions, with the exception of the question asking “Is this bond negotiated?” In that instance, select either “Negotiated” or “Bid”.
8. Work in progress current and reviewed for accuracy?

Revision Sheet
User’s Manual Page 53
9. Is there a current company financial statement on file? 10. Is there a Current personal financial statement on file? 11. Is this bond negotiated? 12. Is there a maintenance provision in the contract that exceeds 2 years? 13. Maintenance provision explanation – Enter an explanation of the maintenance
provision in the contract. (Note: This field will only appear if you selected “Yes” in Question #12.)
14. Phased Project? 15. Phased project explanation – (Note: This field will only appear if you selected “Yes” in
Question #14.) 16. Is a separate maintenance bond required? 17. Maintenance bond explanation – Enter an explanation of the maintenance bond
explanation. (Note: This field will only appear if you selected “Yes” in Question #16.) 18. Maintenance bond Amount – Enter the amount of the maintenance bond. (Note: This
field will only appear if you selected “Yes” in Question #16.) 19. Number of Years – Enter the number of years the maintenance bond will be in effect.
(Note: This field will only appear if you selected “Yes” in Question #16.) Bond (Note: The agent can only enter values in fields on the left-hand side of the screen; the
fields on the right-hand side of the screen are reserved for use by the SBA and are display-only.)
20. Bond Type – This display-only field shows the bond type. 21. Guaranty % – This display-only field shows the guaranty %. 22. Current Contract Amount – Enter the amount of the current contract. 23. Original Contract Amount – This display-only field shows the original contract amount. 24. Payment Bond Number – Enter the number of the payment bond. 25. Original Payment Bond Amount – Enter the original payment bond amount. 26. Current Payment Bond Amount – Enter the current payment bond amount. 27. Payment Bond % – Enter the payment bond percentage. 28. Performance Bond Number – Enter the performance bond number. 29. Original Performance Bond Amount – This display-only field shows the original
performance bond amount. 30. Current Performance Bond Amount – This display-only field shows the current
performance bond amount. 31. Performance Bond % - This display-only field shows the performance bond percentage. 32. Premium Charged – Enter the premium that was charged. 33. SBA Share of Contract – This display-only field shows the SBA share of the contract
amount. 34. Contract Award Date – Enter the date on which the contract was awarded. 35. SBA Surety Fee Amount – This display-only field shows the amount of the SBA surety
fee. 36. Under Bonding Line? – Use the appropriate radio button to indicate if this bond is under
the bonding line. 37. SBA Contractor Fee – This display-only field shows the amount of the SBA contractor
fee.
– Select this pushbutton to be directed to another window where you will be able to print SBA Form 990. This PDF will be populated with the

Revision Sheet
User’s Manual Page 54
details entered. The agent must then print it, sign it, and send it to SBA with the contractor’s fee check if additional fees associated with an increase are due.
Checks: The information below reflects the checks previously sent by the surety to SBA.
Date, Number, Serial Number, Amount, Received Date
18 Bid to Final (Search Application)
Use the Search Application (Bid to Final) screen to select a particular Business ID.
Access this screen by selecting the pushbutton at the top of the screen.
Definition of terms on Search Application (Bid to Final) screen
• Business ID – Use the drop-down list to select a particular Business ID.
Click on the pushbutton to submit the information to the database and proceed to the Bid to Final List screen.
Click on the pushbutton to reset values.

Revision Sheet
User’s Manual Page 55
18.1 Bid to Final List
Use the Bid to Final List screen to select a particular bond.
All the fields in this screen are display-only with the exception of the fields in the “SBG#” column.
Definition of terms on Bid to Final List screen
1. SBG# - Click on a bond’s hotlink in this column to continue to the Surety Agreement (990) screen. Note: Once any field in Surety Agreement (990) screen is changed and resubmitted, the bond will need to go through the approval process again (by an SBA employee).
2. Description – A description of the contract type
3. Bond Type – The bond type (e.g. “Bid”, “Performance”, etc.)
4. App. Date – The application date
5. Office – The SBA district office that is associated with the contractor’s location.
6. City – The city where the contractor is located.
7. State – The state where the contractor is located.

Revision Sheet
User’s Manual Page 56
18.1.1 Surety Contract Review Agreement (Bid to Final) Use the Surety Contract Review Agreement screen to perform the bid to final function. (Note: The actual Bid to Final function may be performed by an agent if they were the agent that submitted the bond.
Access this screen by clicking on a hotlink in the “SBG#” column of the Bid to Final List screen.
Definition of terms on Surety Agreement (990) Bid to Final screen
1. Surety – The name of the surety; the most current surety with whom the contractor has a GIA agreement will display here. (display-only)
2. Agency/Branch – The name of the bonding agency to whom the business is assigned. (display-only)
3. Attorney In Fact – Use the drop-down list to select the name of the attorney-in-fact. This drop-down lists all the agents from the bonding agency who are authorized to enter applications on behalf of the surety.
4. Lead Surety Percentage – Enter the percentage coverage by the lead surety. Note: If there are no co-sureties, the value in the “Lead Surety Percentage” field will default to 100%.
5. Co-Surety? – Use this field to indicate if there is a co-surety. Note: If there are no co-sureties, the value in the “Lead Surety Pct” field will default to 100%.
6. Co-Surety Percentage – Enter the percentage coverage by the co-surety. (Note: This field will only appear if you selected “Yes” in Question #5 “Co-Surety”.)
7. Co-Surety Name – Enter the name of the co-surety. (Note: This field will only appear if you selected “Yes” in Question #5.)
Questions Use the radio buttons to answer “yes” or “no” to the following questions, with the exception of the question asking “Is this bond negotiated?” In that instance, select either “Negotiated” or “Bid”.

Revision Sheet
8. Work in progress current and reviewed for accuracy? 9. Is there a current company financial statement on file? 10. Is there a Current personal financial statement on file? 11. Is this bond negotiated? 12. Is there a maintenance provision in the contract that exceeds 2 years? 13. Maintenance provision explanation – Enter an explanation of the maintenance
provision in the contract. (Note: This field will only appear if you selected “Yes” in Question #12.)
14. Phased Project? 15. Phased project explanation – (Note: This field will only appear if you selected “Yes” in
Question #14.) 16. Is a separate maintenance bond required? 17. Maintenance bond explanation – Enter an explanation of the maintenance bond
explanation. (Note: This field will only appear if you selected “Yes” in Question #16.) 18. Maintenance bond Amount – Enter the amount of the maintenance bond. (Note: This
field will only appear if you selected “Yes” in Question #16.) 19. Number of Years – Enter the number of years the maintenance bond will be in effect.
(Note: This field will only appear if you selected “Yes” in Question #16.) Bond (Note: The agent can only enter values in fields on the left-hand side of the screen; the
fields on the right-hand side of the screen are reserved for use by the SBA and are display-only.)
20. Bond Type – Use the drop-down list to specify the bond (e.g. “Payment Bond”, “Performance Bond”, or “Payment & Performance”).
21. Guaranty % – This display-only field shows the guaranty %. 22. Current Contract Amount – Enter the amount of the current contract. 23. Original Contract Amount – This display-only field shows the original contract amount. 24. Low Bid Amount – Enter the amount of the low bid. 25. 2nd Low Bid Amount – Enter the amount of the second lowest bid. 26. Premium Charged – Enter the premium that was charged. 27. SBA Share of Contract – This display-only field shows the SBA share of the contract
amount. 28. Contract Award Date – Enter the date on which the contract was awarded. 29. SBA Surety Fee Amount – This display-only field shows the amount of the SBA surety
fee. 30. Under Bonding Line? – This display-only field indicates if this bond is under the bonding
line. 31. SBA Contractor Fee – This display-only field shows the amount of the SBA contractor
fee.
– Select this pushbutton to be directed to another window where you will be able to print SBA Form 990. This PDF will be populated with the details entered. You must then print it, sign it, and send it to SBA with the contractor’s fee check.
User’s Manual Page 57


