Page 1
7/27/2019 Scarlett 18i6
http://slidepdf.com/reader/full/scarlett-18i6 1/21
3
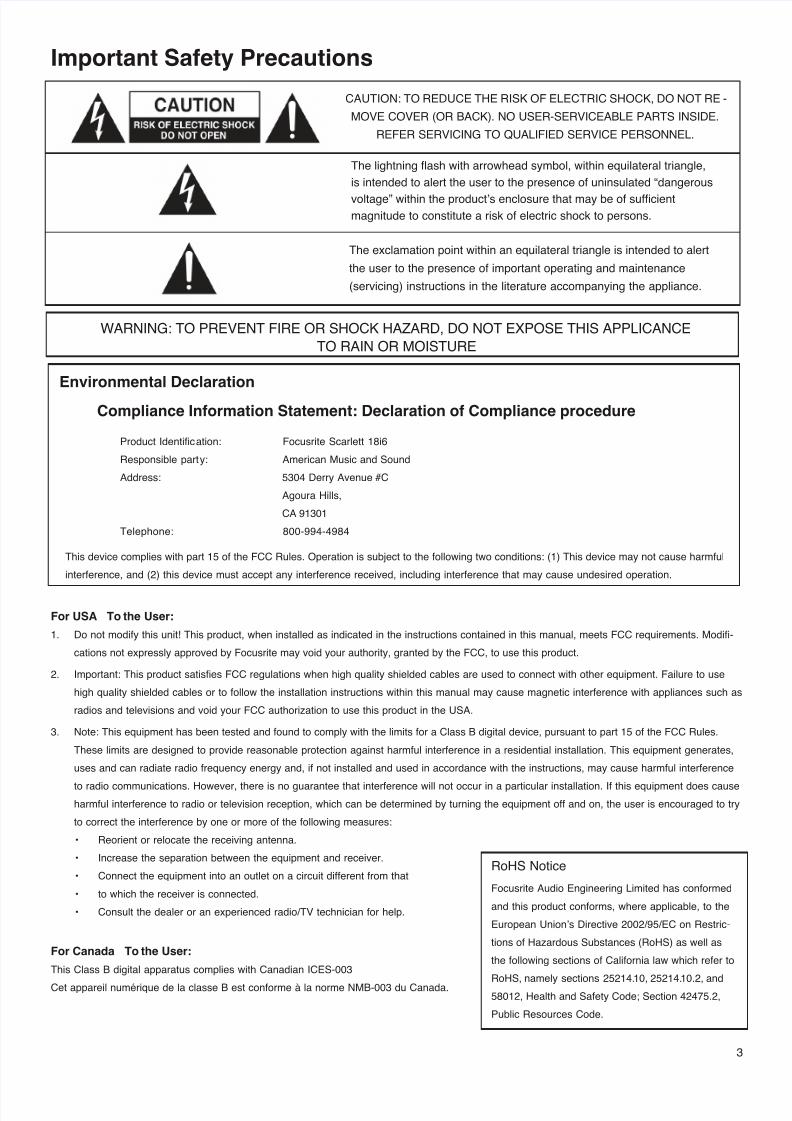
Important Safety Precautions
WARNING: TO PREVENT FIRE OR SHOCK HAZARD, DO NOT EXPOSE THIS APPLICANCE
TO RAIN OR MOISTURE
Environmental Declaration
Compliance Information Statement: Declaration of Compliance procedure
Product Identication: Focusrite Scarlett 18i6
Responsible party: American Music and Sound
Address: 5304 Derry Avenue #C
Agoura Hills,
CA 91301
Telephone: 800-994-4984
This device complies with part 15 of the FCC Rules. Operation is subject to the following two conditions: (1) This device may not cause harmful
interference, and (2) this device must accept any interference received, including interference that may cause undesired operation.
For USA To the User:
Do not modify this unit! This product, when installed as indicated in the instructions contained in this manual, meets FCC requirements. Modi -1.
cations not expressly approved by Focusrite may void your authority, granted by the FCC, to use this product.
Important: This product satises FCC regulations when high quality shielded cables are used to connect with other equipment. Failure to use2.
high quality shielded cables or to follow the installation instructions within this manual may cause magnetic interference with appliances such as
radios and televisions and void your FCC authorization to use this product in the USA.
Note: This equipment has been tested and found to comply with the limits for a Class B digital device, pursuant to part 15 of the FCC Rules.3.
These limits are designed to provide reasonable protection against harmful interference in a residential installation. This equipment generates,
uses and can radiate radio frequency energy and, if not installed and used in accordance with the instructions, may cause harmful interference
to radio communications. However, there is no guarantee that interference will not occur in a particular installation. If this equipment does cause
harmful interference to radio or television reception, which can be determined by turning the equipment off and on, the user is encouraged to try
to correct the interference by one or more of the following measures:
Reorient or relocate the receiving antenna.•
Increase the separation between the equipment and receiver.•
Connect the equipment into an outlet on a circuit different from that•
to which the receiver is connected.•
Consult the dealer or an experienced radio/TV technician for help.•
For Canada To the User:
This Class B digital apparatus complies with Canadian ICES-003
Cet appareil numérique de la classe B est conforme à la norme NMB-003 du Canada.
RoHS Notice
Focusrite Audio Engineering Limited has conformed
and this product conforms, where applicable, to the
European Union’s Directive 2002/95/EC on Restric-
tions of Hazardous Substances (RoHS) as well as
the following sections of California law which refer to
RoHS, namely sections 25214.10, 25214.10.2, and58012, Health and Safety Code; Section 42475.2,
Public Resources Code.
CAUTION: TO REDUCE THE RISK OF ELECTRIC SHOCK, DO NOT RE-
MOVE COVER (OR BACK). NO USER-SERVICEABLE PARTS INSIDE.
REFER SERVICING TO QUALIFIED SERVICE PERSONNEL.
The lightning ash with arrowhead symbol, within equilateral triangle,
is intended to alert the user to the presence of uninsulated “dangerous
voltage” within the product’s enclosure that may be of sufcientmagnitude to constitute a risk of electric shock to persons.
The exclamation point within an equilateral triangle is intended to alert
the user to the presence of important operating and maintenance
(servicing) instructions in the literature accompanying the appliance.
Page 2
7/27/2019 Scarlett 18i6
http://slidepdf.com/reader/full/scarlett-18i6 2/21
4
Contents
Important Safety Instructions ........................................................................................................2
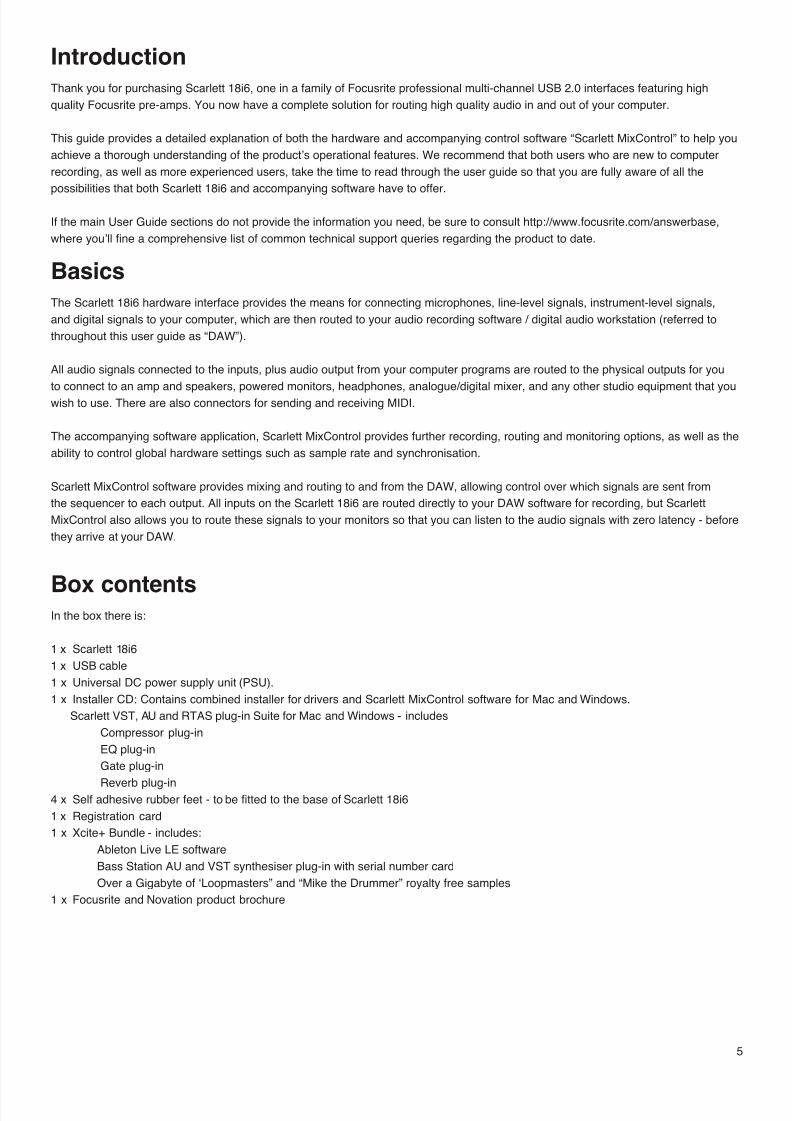
Introduction ....................................................................................................................................5
Basics .............................................................................................................................................5
Box contents ..................................................................................................................................5
Getting started ................................................................................................................................6
Note on USB hubs ...........................................................................................................................6
Powering the Scarlett 18i6 ..............................................................................................................6
Hardware ..........................................................................................................................................7
Back panel .......................................................................................................................................7
Front panel ......................................................................................................................................8
Operating System requirements ....................................................................................................9
Installation (Windows and Mac) .....................................................................................................9
Audio set-up in your DAW ............................................................................................................9
Scarlett 18i6 architecture .............................................................................................................10
Firmware Update .............................................................................................................................10
Scarlett MixControl ......................................................................................................................11
Pre amp section ...............................................................................................................................12
Mixer section ...................................................................................................................................12
Mixer tab ...........................................................................................................................................12
Input channel .................................................................................................................................13
Mix output channel ..........................................................................................................................15
Routing section .............................................................................................................................16
Routing audio to the headphones .................................................................................................16
Routing presets ...............................................................................................................................17
Monitor section ................................................................................................................................18
Device status section .....................................................................................................................20
Sample rate display .......................................................................................................................20
Sync source display .....................................................................................................................20
Sync status display .......................................................................................................................20
USB driver .....................................................................................................................................20
Settings menu (Windows only) ......................................................................................................21
ASIO buffer size .............................................................................................................................21
Streaming buffer size ......................................................................................................................21
File menu ..........................................................................................................................................21
Technical specifcations .................................................................................................................22
Troubleshooting ..............................................................................................................................23
Copyright ..........................................................................................................................................23
Page 3
7/27/2019 Scarlett 18i6
http://slidepdf.com/reader/full/scarlett-18i6 3/21
Page 4
7/27/2019 Scarlett 18i6
http://slidepdf.com/reader/full/scarlett-18i6 4/21
6
Getting startedBefore connecting Scarlett 18i6 to your computer, the software must be installed. This will ensure that the correct drivers are used,
thus preventing any unexpected behaviour.
Note on USB hubs
Scarlett 18i6 is a USB 2.0 device and must be connected to a compatible USB 2.0 port. If using a USB hub, it is essential that all other
devices connected to the hub are also USB 2.0 compatible. If any USB 1.0 / 1.1 devices are connected, the hub will be forced to run at
the legacy speed which may prevent the Scarlett 18i6 from working.
Scarlett 18i6 will use a signicant amount of USB bandwidth (the amount of data transferred via USB). If connected to a USB hub
other devices connected to the hub may affect the performance of Scarlett 18i6. For example, if using a USB 2.0 hard drive for audio
sample playback (also transferring a large amount of data) this should not be connected to the same USB hub as Scarlett 18i6.
Therefore it is recommended, when possible, to connect Scarlett 18i6 directly to your computer USB port rather than through a USB
hub.
Powering the Scarlett 18i6
You must use the included power supply to use the Scarlett 18i6, it does not power from USB alone. This is because the analogue
and digital circuitry requires more power to run than the USB standard can provide.
Page 5
7/27/2019 Scarlett 18i6
http://slidepdf.com/reader/full/scarlett-18i6 5/21
7
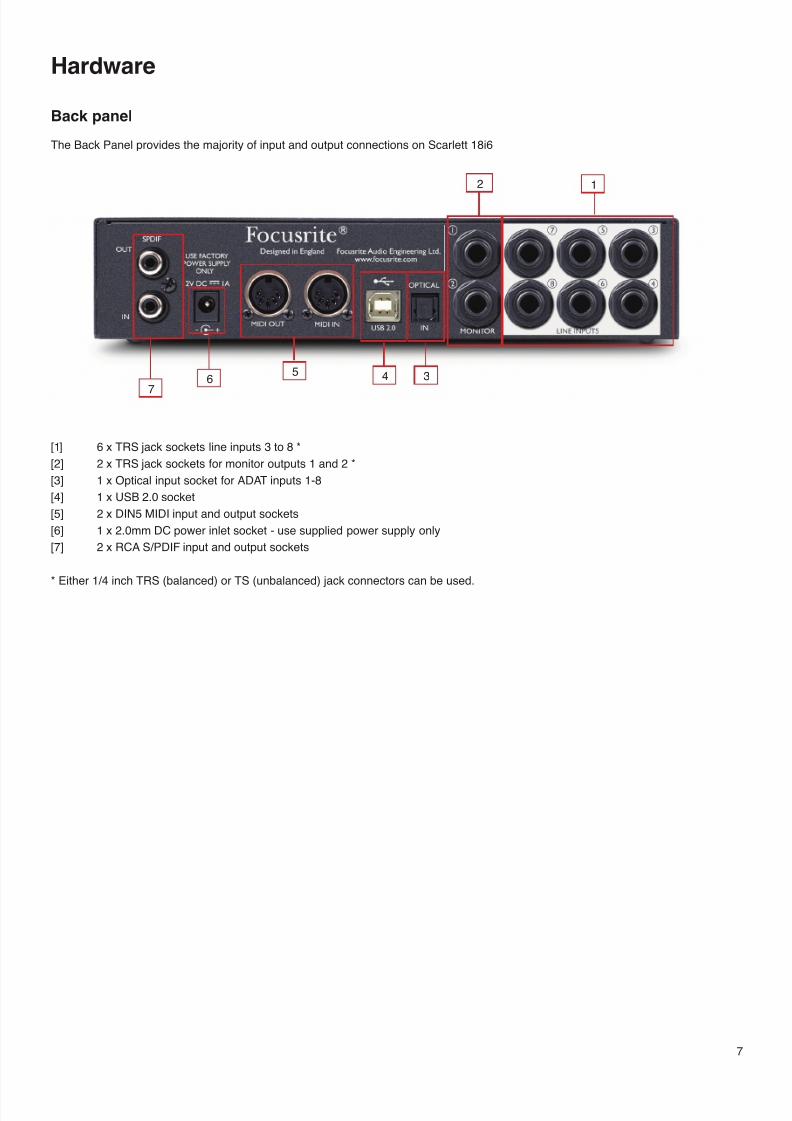
Hardware
Back panel
The Back Panel provides the majority of input and output connections on Scarlett 18i6
[1] 6 x TRS jack sockets line inputs 3 to 8 *
[2] 2 x TRS jack sockets for monitor outputs 1 and 2 *
[3] 1 x Optical input socket for ADAT inputs 1-8
[4] 1 x USB 2.0 socket
[5] 2 x DIN5 MIDI input and output sockets
[6] 1 x 2.0mm DC power inlet socket - use supplied power supply only
[7] 2 x RCA S/PDIF input and output sockets
* Either 1/4 inch TRS (balanced) or TS (unbalanced) jack connectors can be used.
2
5 4 3
1
6
7
Page 6
7/27/2019 Scarlett 18i6
http://slidepdf.com/reader/full/scarlett-18i6 6/21
8
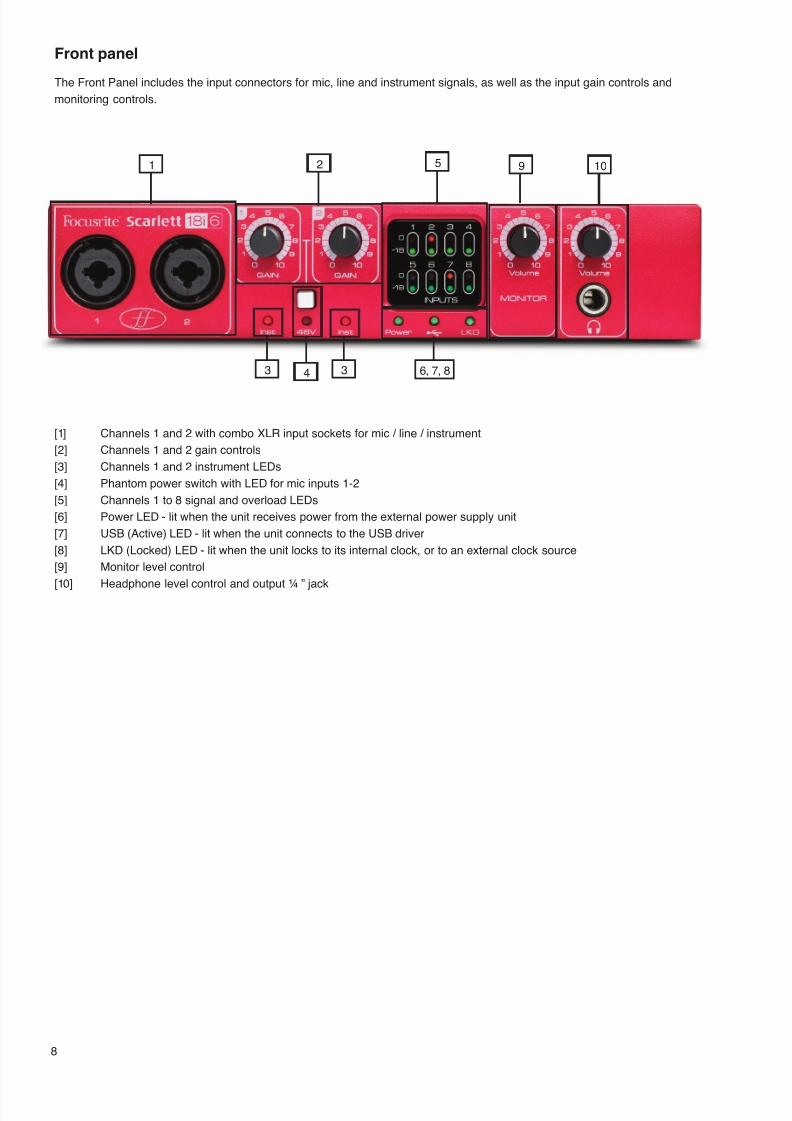
Front panel
The Front Panel includes the input connectors for mic, line and instrument signals, as well as the input gain controls and
monitoring controls.
[1] Channels 1 and 2 with combo XLR input sockets for mic / line / instrument
[2] Channels 1 and 2 gain controls
[3] Channels 1 and 2 instrument LEDs
[4] Phantom power switch with LED for mic inputs 1-2
[5] Channels 1 to 8 signal and overload LEDs
[6] Power LED - lit when the unit receives power from the external power supply unit
[7] USB (Active) LED - lit when the unit connects to the USB driver
[8] LKD (Locked) LED - lit when the unit locks to its internal clock, or to an external clock source
[9] Monitor level control
[10] Headphone level control and output ¼ ” jack
1 5
6, 7, 8
1092
4 33
Page 7
7/27/2019 Scarlett 18i6
http://slidepdf.com/reader/full/scarlett-18i6 7/21
9
Operating System requirements
Macintosh
Mac OS X 10.6.5 Snow Leopard
Windows
Windows 7 (All versions), Windows Vista (32bit version only), or Windows XP SP3 (32bit version only)
For more detailed and up to date system requirements please go to http://www.focusrite.com/scarlett_18i6
Installation (Windows and Mac)
The latest installation software should be on the disk included with your Scarlett 18i6. However it is strongly recommend that you
check for the latest version of software on the Focusrite website; http://www.focusrite.com/support/scarlett_18i6 before connecting
your Scarlett 18i6 unit.
PLEASE ENSURE THAT YOU RUN THE INSTALLER BEFORE CONNECTING THE SCARLETT 18i6 TO YOUR COMPUTER
Insert the installer disk into your computer’s CD-ROM drive.1.
A window should pop up showing the following installer icons:2.
For Windows - Scarlet t MixControl-1.0.exe For Mac - Install Scarlett MixControl.pkg
Double click on the installer icon to begin the installation process3.
Follow on screen instructions to complete the installation process4.
Connect Scarlett 18i6 to the computer USB port when instructed5.
Connect the power supply to Scarlett 18i66.
Restart the computer7.
Once the installation is complete, the computer OS should automatically select the Scarlett 18i6 as the default audio outputs.
To make sure this is the case:
On Windows 7, go to Start > Control Panel > Hardware and Sound > Sound > Manage Audio Devices > Set Default ‘Playback’ and
‘Recording’ to ‘Scarlett 18i6 Audio’
On Windows Vista, go to Start > Control Panel > Hardware and Sound > Sound > Manage Audio Devices > Set Default ‘Playback’
and ‘Recording’ to ‘Scarlett 18i6 Audio’
On Windows XP, go to Start > Control Panel > Sounds, Speech and Audio Devices > Sounds and Audio Devices > Audio tab > Set
Sound playback and recording to ‘Scarlett 18i6 Audio’
On Mac OSX, go to System Preferences > Sound > Set the input and output to ‘Scarlett’
For more detailed setup options on a Mac, go to Applications > Utilities > Audio Midi Set-up
Audio set-up in your DAWThe Scarlett 18i6 is compatible with any DAW that uses ASIO drivers on Windows, and any DAW that uses Core Audio on Mac.
It should be noted that the DAW software may not automatically switch the device it uses to input and output audio.
To enable Scarlett 18i6 in the DAW software, ensure that ‘Scarlett USB ’ is selected as the ASIO driver (Windows) or Core Audio
driver (Mac) in the DAW’s audio set-up page.Please refer to the DAW’s documentation if you are unsure where to select the ASIO / Core Audio driver.
Page 8
7/27/2019 Scarlett 18i6
http://slidepdf.com/reader/full/scarlett-18i6 8/21
10
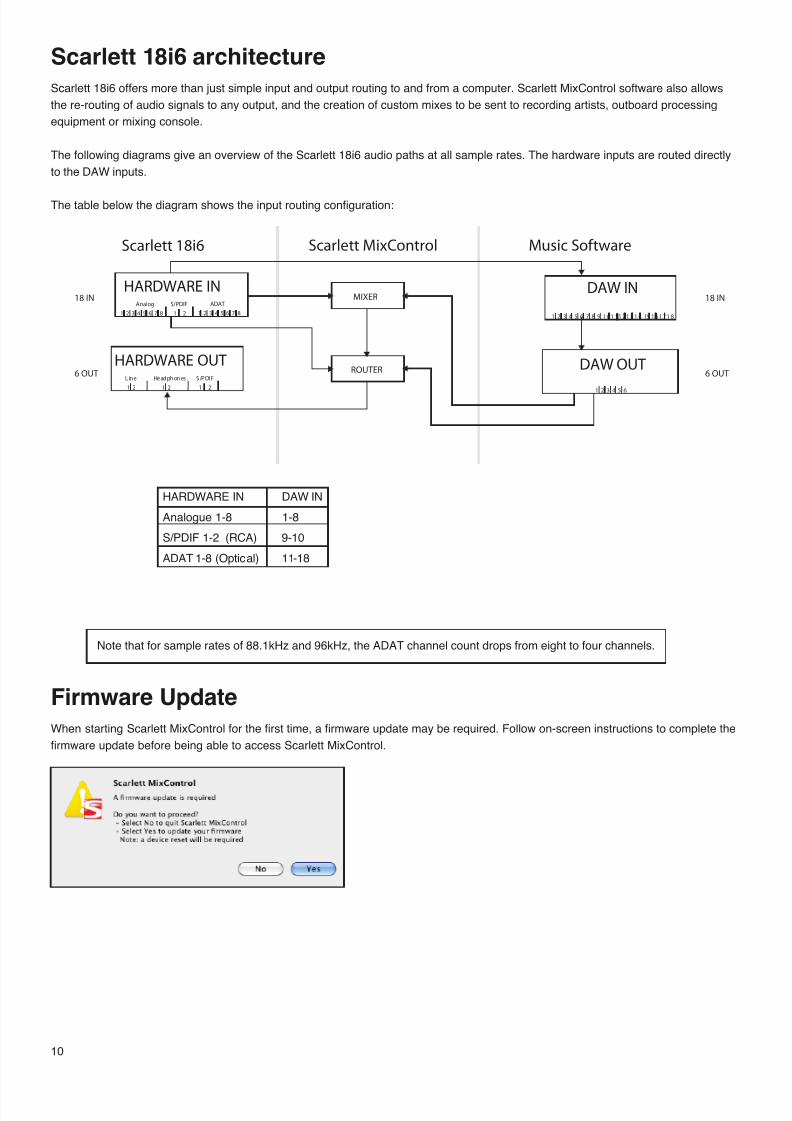
Scarlett 18i6 architectureScarlett 18i6 offers more than just simple input and output routing to and from a computer. Scarlett MixControl software also allows
the re-routing of audio signals to any output, and the creation of custom mixes to be sent to recording artists, outboard processing
equipment or mixing console.
The following diagrams give an overview of the Scarlett 18i6 audio paths at all sample rates. The hardware inputs are routed directly
to the DAW inputs.
The table below the diagram shows the input routing conguration:
HARDWARE IN DAW IN
Analogue 1-8 1-8
S/PDIF 1-2 (RCA) 9-10
ADAT 1-8 (Optical) 11-18
Note that for sample rates of 88.1kHz and 96kHz, the ADAT channel count drops from eight to four channels.
Firmware UpdateWhen starting Scarlett MixControl for the rst time, a rmware update may be required. Follow on-screen instructions to complete the
rmware update before being able to access Scarlett MixControl.
DAW OUT
Scarlett 18i6
HARDWARE INAnalog S/PDIF
1 2
HARDWARE OUT
1 2 1 2
Line Headphones S/PDIF
1 2
18 IN
6 OUT
18 IN
6 OUT
Scarlett MixControl Music Software
ROUTER
DAW INMIXER
1 2 3 4 5 6
ADAT
1 2 3 4 5 6 7 81 2 3 4 5 6 7 81 2 3 4 5 6 7 8 9 1 0 1 1 1 2 1 3 1 4 15 1 6 1 7 1 8
Page 9
7/27/2019 Scarlett 18i6
http://slidepdf.com/reader/full/scarlett-18i6 9/21
11
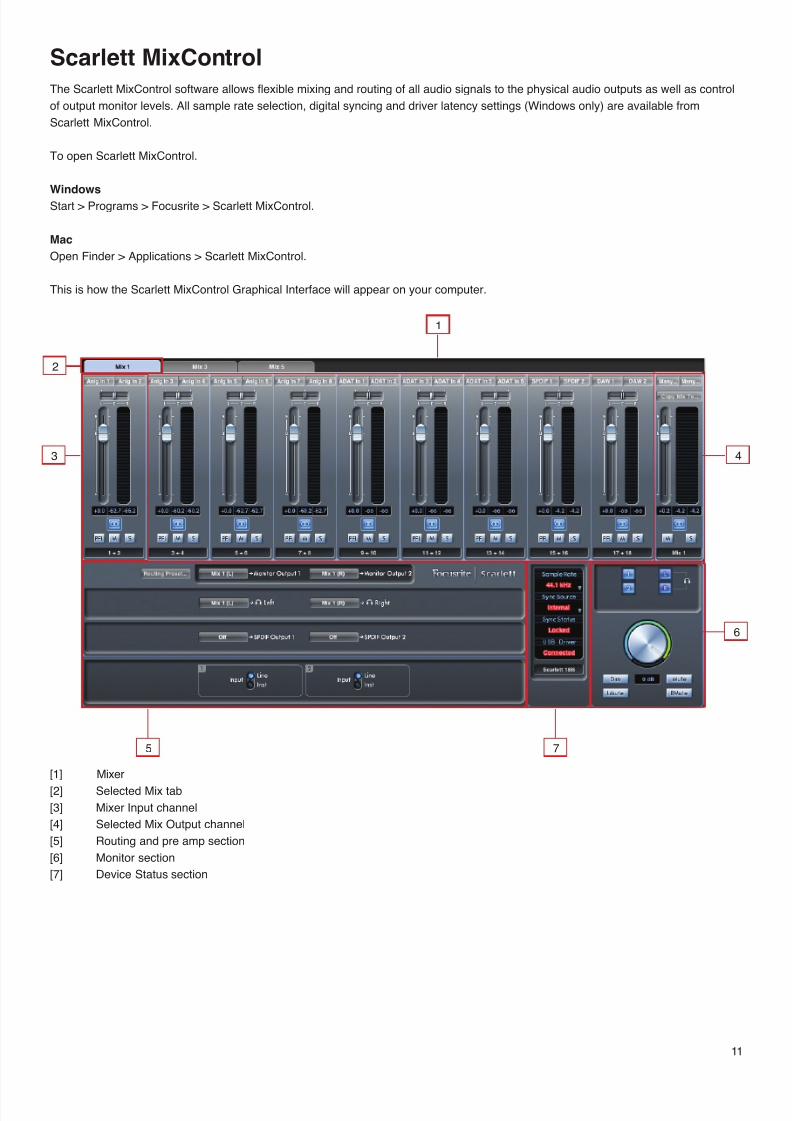
Scarlett MixControlThe Scarlett MixControl software allows exible mixing and routing of all audio signals to the physical audio outputs as well as control
of output monitor levels. All sample rate selection, digital syncing and driver latency settings (Windows only) are available from
Scarlett MixControl.
To open Scarlett MixControl.
Windows
Start > Programs > Focusrite > Scarlett MixControl.
Mac
Open Finder > Applications > Scarlett MixControl.
This is how the Scarlett MixControl Graphical Interface will appear on your computer.
[1] Mixer
[2] Selected Mix tab
[3] Mixer Input channel
[4] Selected Mix Output channel
[5] Routing and pre amp section
[6] Monitor section
[7] Device Status section
1
5 7
3
2
4
6
Page 10
7/27/2019 Scarlett 18i6
http://slidepdf.com/reader/full/scarlett-18i6 10/21
12
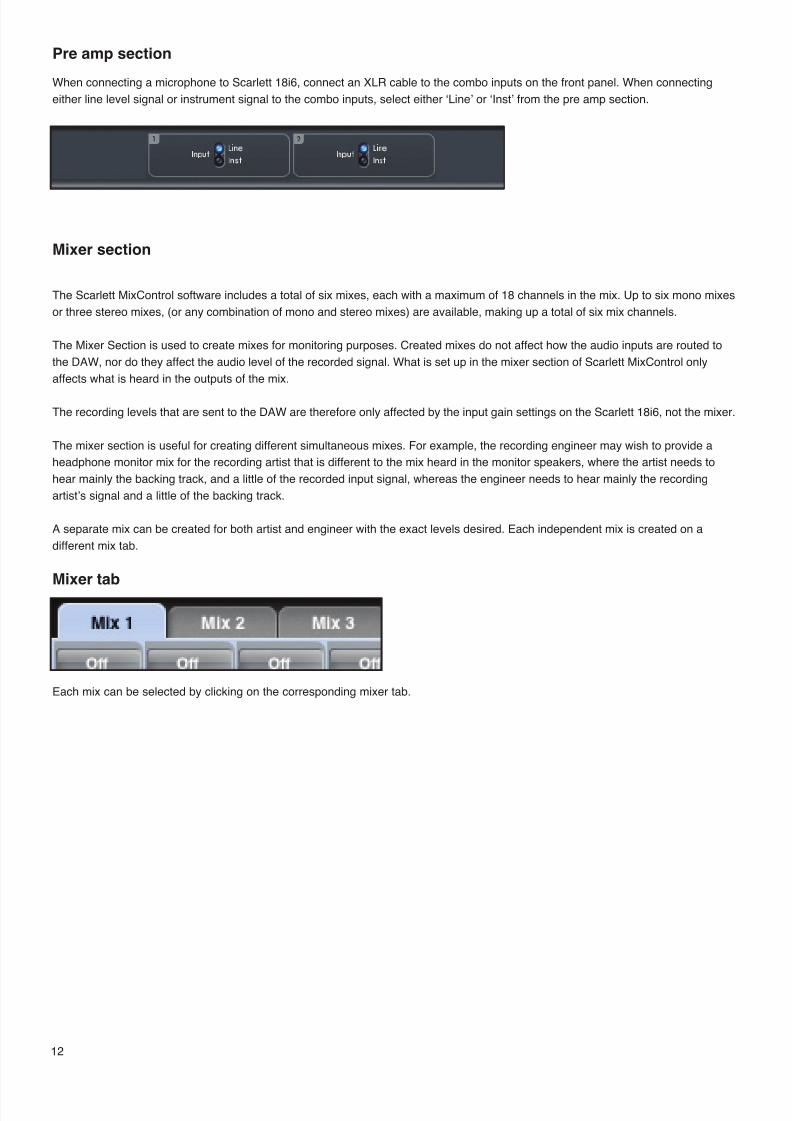
Pre amp section
When connecting a microphone to Scarlett 18i6, connect an XLR cable to the combo inputs on the front panel. When connecting
either line level signal or instrument signal to the combo inputs, select either ‘Line’ or ‘Inst’ from the pre amp section.
Mixer section
The Scarlett MixControl software includes a total of six mixes, each with a maximum of 18 channels in the mix. Up to six mono mixes
or three stereo mixes, (or any combination of mono and stereo mixes) are available, making up a total of six mix channels.
The Mixer Section is used to create mixes for monitoring purposes. Created mixes do not affect how the audio inputs are routed to
the DAW, nor do they affect the audio level of the recorded signal. What is set up in the mixer section of Scarlett MixControl only
affects what is heard in the outputs of the mix.
The recording levels that are sent to the DAW are therefore only affected by the input gain settings on the Scarlett 18i6, not the mixer.
The mixer section is useful for creating different simultaneous mixes. For example, the recording engineer may wish to provide a
headphone monitor mix for the recording artist that is different to the mix heard in the monitor speakers, where the artist needs to
hear mainly the backing track, and a little of the recorded input signal, whereas the engineer needs to hear mainly the recording
artist’s signal and a little of the backing track.
A separate mix can be created for both artist and engineer with the exact levels desired. Each independent mix is created on a
different mix tab.
Mixer tab
Each mix can be selected by clicking on the corresponding mixer tab.
Page 11
7/27/2019 Scarlett 18i6
http://slidepdf.com/reader/full/scarlett-18i6 11/21
13
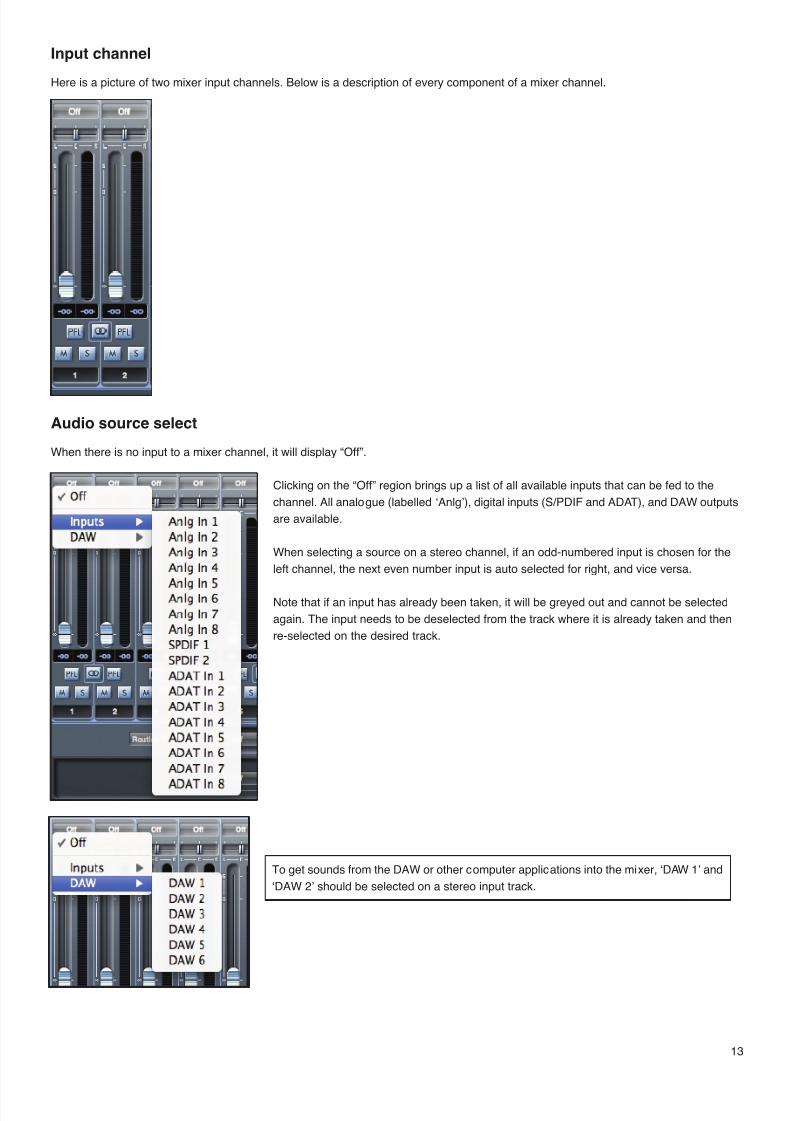
Input channel
Here is a picture of two mixer input channels. Below is a description of every component of a mixer channel.
Audio source select
When there is no input to a mixer channel, it will display “Off”.
Clicking on the “Off” region brings up a list of all available inputs that can be fed to the
channel. All analogue (labelled ‘Anlg’), digital inputs (S/PDIF and ADAT), and DAW outputs
are available.
When selecting a source on a stereo channel, if an odd-numbered input is chosen for the
left channel, the next even number input is auto selected for right, and vice versa.
Note that if an input has already been taken, it will be greyed out and cannot be selected
again. The input needs to be deselected from the track where it is already taken and then
re-selected on the desired track.
To get sounds from the DAW or other computer applications into the mixer, ‘DAW 1’ and
‘DAW 2’ should be selected on a stereo input track.
Page 12
7/27/2019 Scarlett 18i6
http://slidepdf.com/reader/full/scarlett-18i6 12/21
14
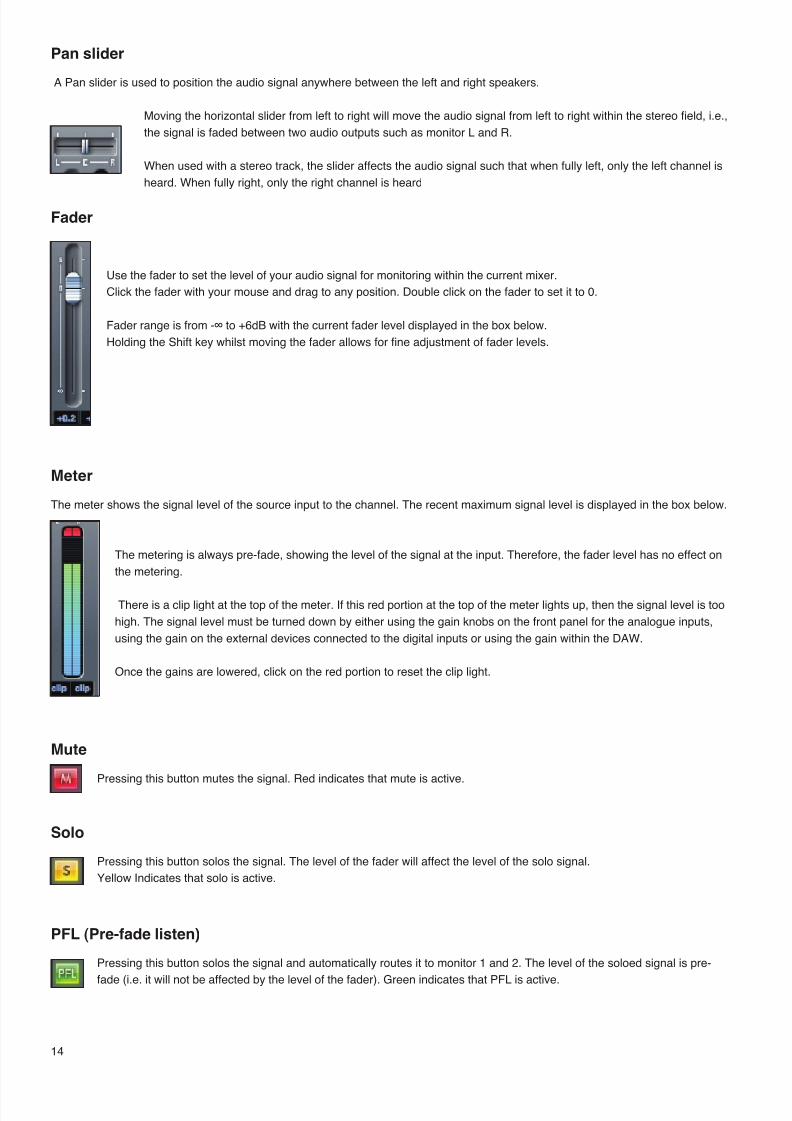
Pan slider
A Pan slider is used to position the audio signal anywhere between the left and right speakers.
Moving the horizontal slider from left to right will move the audio signal from left to right within the stereo eld, i.e.,
the signal is faded between two audio outputs such as monitor L and R.
When used with a stereo track, the slider affects the audio signal such that when fully left, only the left channel is
heard. When fully right, only the right channel is heard
Fader
Use the fader to set the level of your audio signal for monitoring within the current mixer.
Click the fader with your mouse and drag to any position. Double click on the fader to set it to 0.
Fader range is from -∞ to +6dB with the current fader level displayed in the box below.
Holding the Shift key whilst moving the fader allows for ne adjustment of fader levels.
Meter
The meter shows the signal level of the source input to the channel. The recent maximum signal level is displayed in the box below.
The metering is always pre-fade, showing the level of the signal at the input. Therefore, the fader level has no effect on
the metering.
There is a clip light at the top of the meter. If this red portion at the top of the meter lights up, then the signal level is too
high. The signal level must be turned down by either using the gain knobs on the front panel for the analogue inputs,
using the gain on the external devices connected to the digital inputs or using the gain within the DAW.
Once the gains are lowered, click on the red portion to reset the clip light.
Mute
Pressing this button mutes the signal. Red indicates that mute is active.
Solo
Pressing this button solos the signal. The level of the fader will affect the level of the solo signal.
Yellow Indicates that solo is active.
PFL (Pre-fade listen)
Pressing this button solos the signal and automatically routes it to monitor 1 and 2. The level of the soloed signal is pre-
fade (i.e. it will not be affected by the level of the fader). Green indicates that PFL is active.
Page 13
7/27/2019 Scarlett 18i6
http://slidepdf.com/reader/full/scarlett-18i6 13/21
15
Stereo
Pressing this button combines two mono channels into one stereo channel.
Track name
As a default, each track is given a corresponding number as a name. Double click to rename the track to something more useful such
as ‘Vocal Mic’.
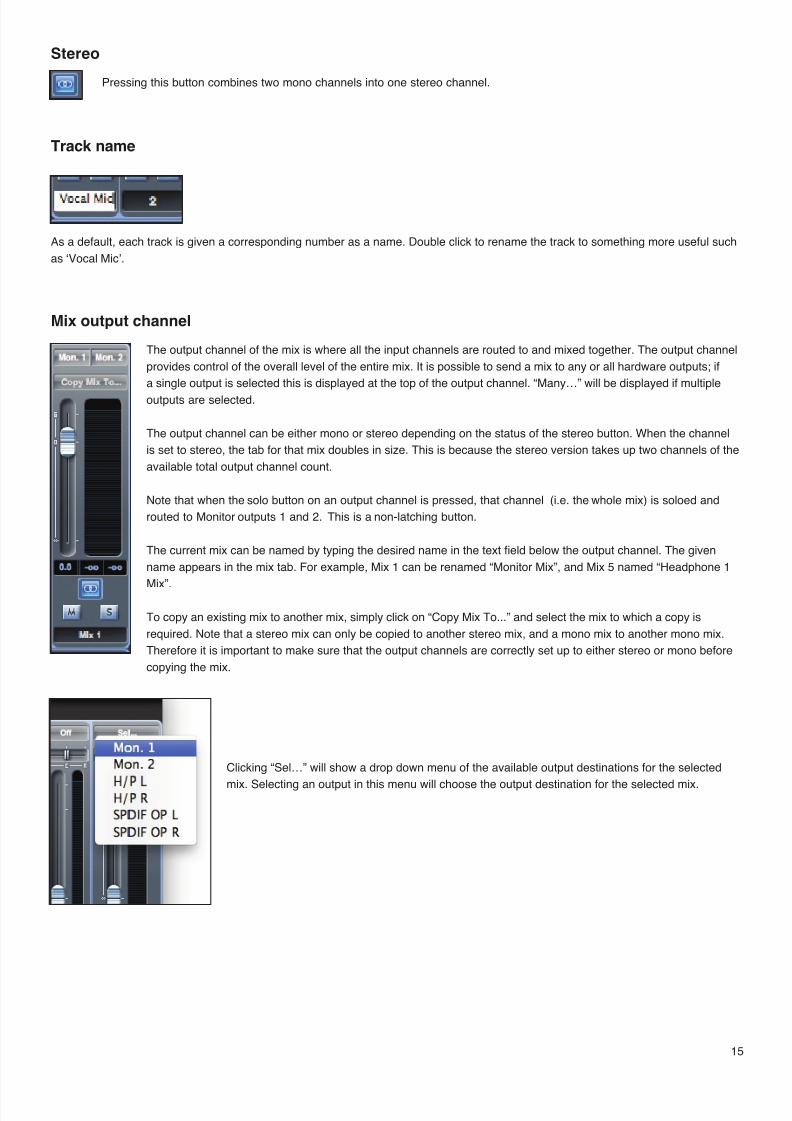
Mix output channel
The output channel of the mix is where all the input channels are routed to and mixed together. The output channel
provides control of the overall level of the entire mix. It is possible to send a mix to any or all hardware outputs; if
a single output is selected this is displayed at the top of the output channel. “Many…” will be displayed if multiple
outputs are selected.
The output channel can be either mono or stereo depending on the status of the stereo button. When the channel
is set to stereo, the tab for that mix doubles in size. This is because the stereo version takes up two channels of the
available total output channel count.
Note that when the solo button on an output channel is pressed, that channel (i.e. the whole mix) is soloed and
routed to Monitor outputs 1 and 2. This is a non-latching button.
The current mix can be named by typing the desired name in the text eld below the output channel. The given
name appears in the mix tab. For example, Mix 1 can be renamed “Monitor Mix”, and Mix 5 named “Headphone 1
Mix”.
To copy an existing mix to another mix, simply click on “Copy Mix To...” and select the mix to which a copy is
required. Note that a stereo mix can only be copied to another stereo mix, and a mono mix to another mono mix.
Therefore it is important to make sure that the output channels are correctly set up to either stereo or mono before
copying the mix.
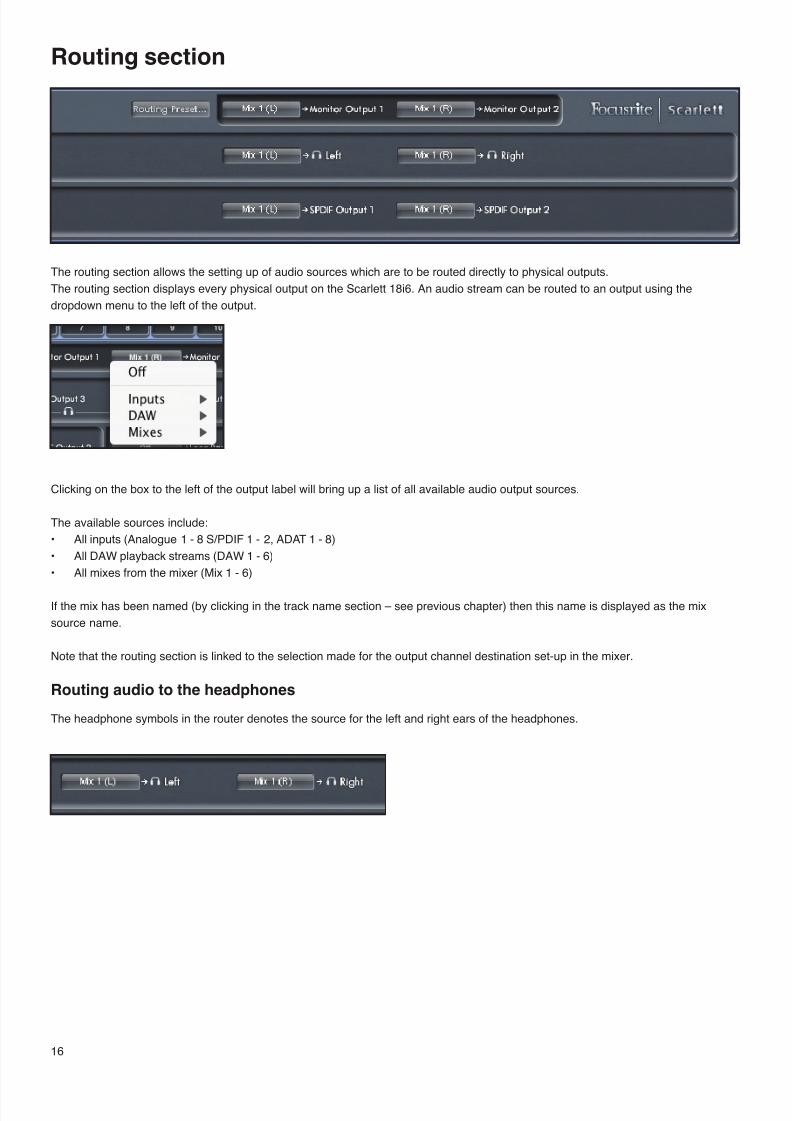
Clicking “Sel…” will show a drop down menu of the available output destinations for the selected
mix. Selecting an output in this menu will choose the output destination for the selected mix.
Page 14
7/27/2019 Scarlett 18i6
http://slidepdf.com/reader/full/scarlett-18i6 14/21
16
Routing section
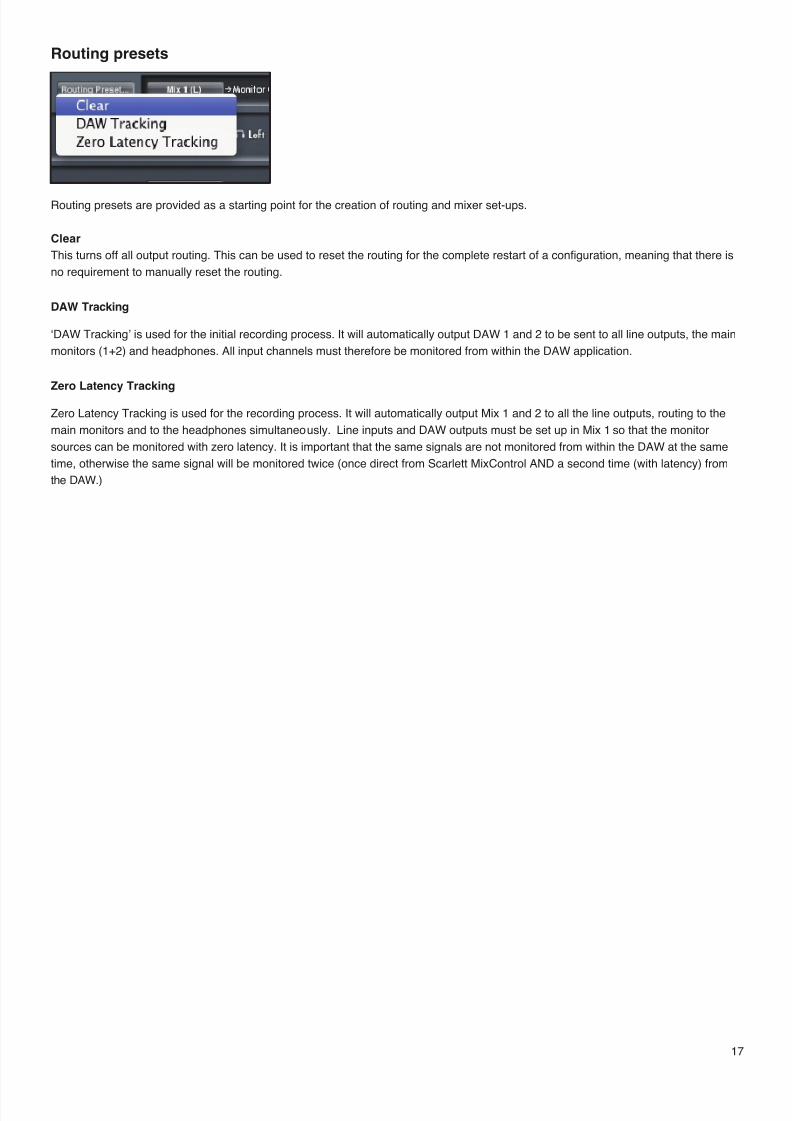
The routing section allows the setting up of audio sources which are to be routed directly to physical outputs.
The routing section displays every physical output on the Scarlett 18i6. An audio stream can be routed to an output using the
dropdown menu to the left of the output.
Clicking on the box to the left of the output label will bring up a list of all available audio output sources.
The available sources include:
All inputs (Analogue 1 - 8 S/PDIF 1 - 2, ADAT 1 - 8)•
All DAW playback streams (DAW 1 - 6)•
All mixes from the mixer (Mix 1 - 6)•
If the mix has been named (by clicking in the track name section – see previous chapter) then this name is displayed as the mix
source name.
Note that the routing section is linked to the selection made for the output channel destination set-up in the mixer.
Routing audio to the headphones
The headphone symbols in the router denotes the source for the left and right ears of the headphones.
Page 15
7/27/2019 Scarlett 18i6
http://slidepdf.com/reader/full/scarlett-18i6 15/21
17
Routing presets
Routing presets are provided as a starting point for the creation of routing and mixer set-ups.
Clear
This turns off all output routing. This can be used to reset the routing for the complete restart of a conguration, meaning that there is
no requirement to manually reset the routing.
DAW Tracking
‘DAW Tracking’ is used for the initial recording process. It will automatically output DAW 1 and 2 to be sent to all line outputs, the main
monitors (1+2) and headphones. All input channels must therefore be monitored from within the DAW application.
Zero Latency Tracking
Zero Latency Tracking is used for the recording process. It will automatically output Mix 1 and 2 to all the line outputs, routing to the
main monitors and to the headphones simultaneously. Line inputs and DAW outputs must be set up in Mix 1 so that the monitor
sources can be monitored with zero latency. It is important that the same signals are not monitored from within the DAW at the same
time, otherwise the same signal will be monitored twice (once direct from Scarlett MixControl AND a second time (with latency) from
the DAW.)
Page 16
7/27/2019 Scarlett 18i6
http://slidepdf.com/reader/full/scarlett-18i6 16/21
18
Monitor section
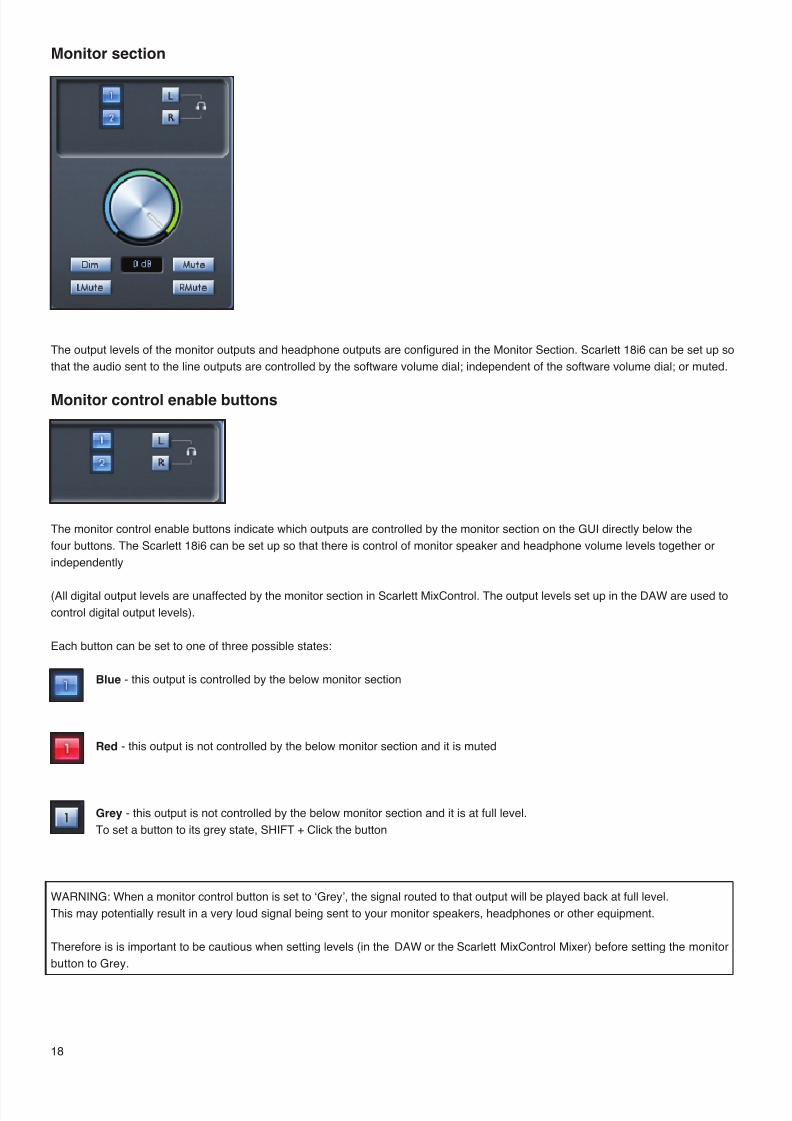
The output levels of the monitor outputs and headphone outputs are congured in the Monitor Section. Scarlett 18i6 can be set up so
that the audio sent to the line outputs are controlled by the software volume dial; independent of the software volume dial; or muted.
Monitor control enable buttons
The monitor control enable buttons indicate which outputs are controlled by the monitor section on the GUI directly below the
four buttons. The Scarlett 18i6 can be set up so that there is control of monitor speaker and headphone volume levels together or
independently
(All digital output levels are unaffected by the monitor section in Scarlett MixControl. The output levels set up in the DAW are used to
control digital output levels).
Each button can be set to one of three possible states:
Blue - this output is controlled by the below monitor section
Red - this output is not controlled by the below monitor section and it is muted
Grey - this output is not controlled by the below monitor section and it is at full level.
To set a button to its grey state, SHIFT + Click the button
WARNING: When a monitor control button is set to ‘Grey’, the signal routed to that output will be played back at full level.
This may potentially result in a very loud signal being sent to your monitor speakers, headphones or other equipment.
Therefore is is important to be cautious when setting levels (in the DAW or the Scarlett MixControl Mixer) before setting the monitor
button to Grey.
Page 17
7/27/2019 Scarlett 18i6
http://slidepdf.com/reader/full/scarlett-18i6 17/21
19
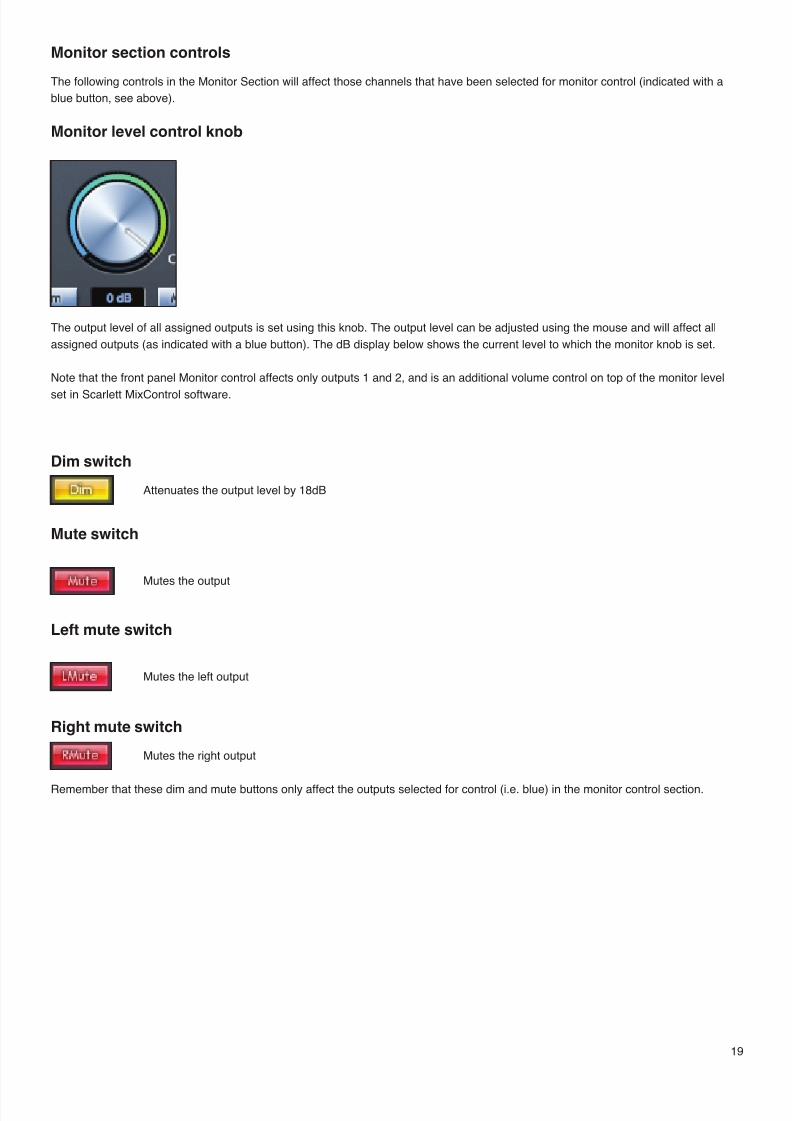
Monitor section controls
The following controls in the Monitor Section will affect those channels that have been selected for monitor control (indicated with a
blue button, see above).
Monitor level control knob
The output level of all assigned outputs is set using this knob. The output level can be adjusted using the mouse and will affect all
assigned outputs (as indicated with a blue button). The dB display below shows the current level to which the monitor knob is set.
Note that the front panel Monitor control affects only outputs 1 and 2, and is an additional volume control on top of the monitor level
set in Scarlett MixControl software.
Dim switch
Attenuates the output level by 18dB
Mute switch
Mutes the output
Left mute switch
Mutes the left output
Right mute switch
Mutes the right output
Remember that these dim and mute buttons only affect the outputs selected for control (i.e. blue) in the monitor control section.
Page 18
7/27/2019 Scarlett 18i6
http://slidepdf.com/reader/full/scarlett-18i6 18/21
20
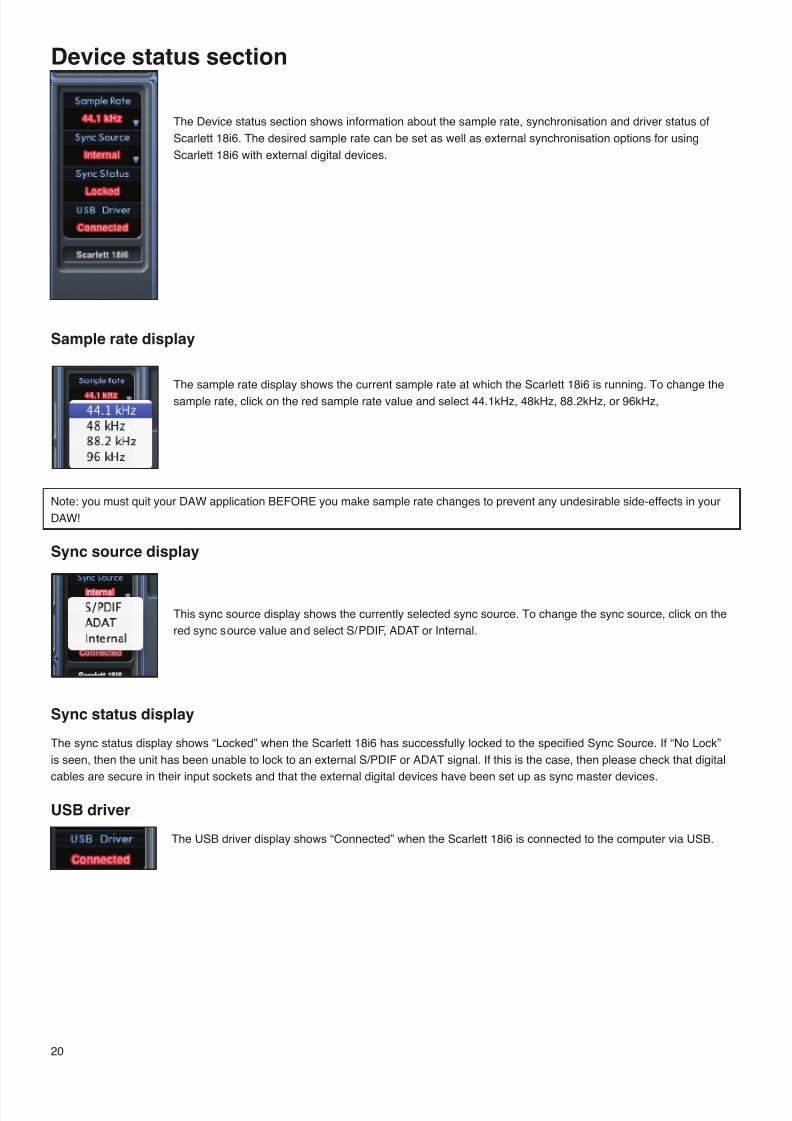
Device status section
The Device status section shows information about the sample rate, synchronisation and driver status of
Scarlett 18i6. The desired sample rate can be set as well as external synchronisation options for using
Scarlett 18i6 with external digital devices.
Sample rate display
The sample rate display shows the current sample rate at which the Scarlett 18i6 is running. To change the
sample rate, click on the red sample rate value and select 44.1kHz, 48kHz, 88.2kHz, or 96kHz,
Note: you must quit your DAW application BEFORE you make sample rate changes to prevent any undesirable side-effects in your
DAW!
Sync source display
This sync source display shows the currently selected sync source. To change the sync source, click on the
red sync source value and select S/PDIF, ADAT or Internal.
Sync status display
The sync status display shows “Locked” when the Scarlett 18i6 has successfully locked to the specied Sync Source. If “No Lock”
is seen, then the unit has been unable to lock to an external S/PDIF or ADAT signal. If this is the case, then please check that digital
cables are secure in their input sockets and that the external digital devices have been set up as sync master devices.
USB driver
The USB driver display shows “Connected” when the Scarlett 18i6 is connected to the computer via USB.
Page 19
7/27/2019 Scarlett 18i6
http://slidepdf.com/reader/full/scarlett-18i6 19/21
21
Settings menu (Windows only)The settings menu is a drop down menu containing driver latency settings. Macintosh OSX users will change driver latency from
within their chosen DAW or music software application. PC users set the latency settings here.
ASIO buffer size
The ASIO buffer size sets the driver latency for your DAW or music software application. A
small buffer size will in result in lower latency at the expense of increased CPU usage. A high
buffer size will result in a higher latency but with lower CPU usage. If you are using lots of
virtual instruments and effects processing in your DAW project and the CPU usage is high,
then increase the buffer size to permit lower CPU usage.
File menu
Mac Windows
Open - opens a ‘File Open’ window allowing selection of any pre-saved Scarlett MixControl set-ups.
Save - opens a ‘File Save’ window allowing selection of a location into which your Scarlett MixControl set-up can be saved.
Subsequent saves overwrite the original le.
Save As - opens a ‘File Save’ window allowing selection of a location into which your Scarlett MixControl set-up can be saved. Use
this option if you want to keep your original saved set-up and create a new one with a different name.
Restore Factory Defaults - causes the Scarlett 18i6 to revert to the original default state in which it left the factory.
Clear All Settings - causes the Scarlett 18i6 to reset all mixer and routing settings. This can be used to globally reset all mixer,
routing, and monitor settings, allowing creation of a new set-up from scratch.
As can be seen from the above screen shots, ‘Open’, ‘Save’ and ‘Save As’ all have keyboard shortcuts. These are standard shortcuts
for their respective functions, when regularly changing settings for various sessions, the shortcuts will reduce your set-up time.
Page 20
7/27/2019 Scarlett 18i6
http://slidepdf.com/reader/full/scarlett-18i6 20/21
22
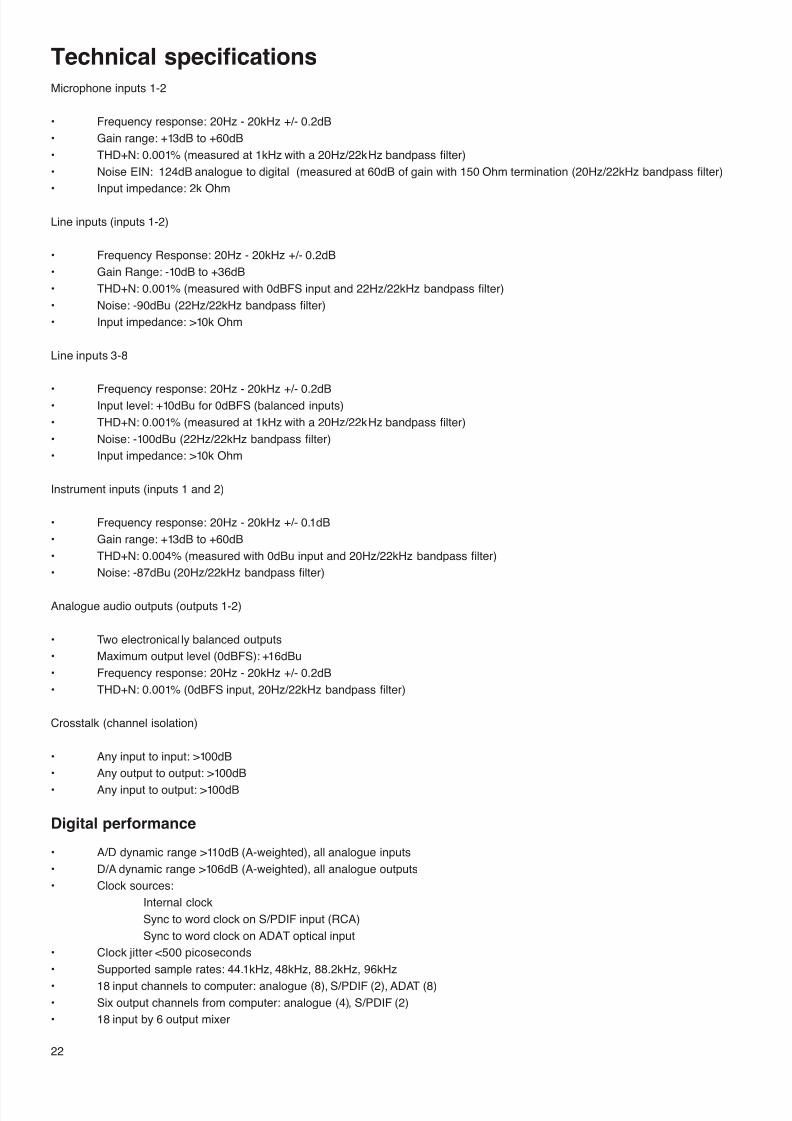
Technical specifcations
Microphone inputs 1-2
• Frequency response: 20Hz - 20kHz +/- 0.2dB
• Gain range: +13dB to +60dB
• THD+N: 0.001% (measured at 1kHz with a 20Hz/22kHz bandpass lter)
• Noise EIN: 124dB analogue to digital (measured at 60dB of gain with 150 Ohm termination (20Hz/22kHz bandpass lter)
• Input impedance: 2k Ohm
Line inputs (inputs 1-2)
• Frequency Response: 20Hz - 20kHz +/- 0.2dB
• Gain Range: -10dB to +36dB
• THD+N: 0.001% (measured with 0dBFS input and 22Hz/22kHz bandpass lter)
• Noise: -90dBu (22Hz/22kHz bandpass lter)
• Input impedance: >10k Ohm
Line inputs 3-8
• Frequency response: 20Hz - 20kHz +/- 0.2dB• Input level: +10dBu for 0dBFS (balanced inputs)
• THD+N: 0.001% (measured at 1kHz with a 20Hz/22kHz bandpass lter)
• Noise: -100dBu (22Hz/22kHz bandpass lter)
• Input impedance: >10k Ohm
Instrument inputs (inputs 1 and 2)
• Frequency response: 20Hz - 20kHz +/- 0.1dB
• Gain range: +13dB to +60dB
• THD+N: 0.004% (measured with 0dBu input and 20Hz/22kHz bandpass lter)
• Noise: -87dBu (20Hz/22kHz bandpass lter)
Analogue audio outputs (outputs 1-2)
• Two electronical ly balanced outputs
• Maximum output level (0dBFS): +16dBu
• Frequency response: 20Hz - 20kHz +/- 0.2dB
• THD+N: 0.001% (0dBFS input, 20Hz/22kHz bandpass lter)
Crosstalk (channel isolation)
• Any input to input: >100dB
• Any output to output: >100dB
• Any input to output: >100dB
Digital performance
• A/D dynamic range >110dB (A-weighted), all analogue inputs
• D/A dynamic range >106dB (A-weighted), all analogue outputs
• Clock sources:
Internal clock
Sync to word clock on S/PDIF input (RCA)
Sync to word clock on ADAT optical input
• Clock jitter <500 picoseconds
• Supported sample rates: 44.1kHz, 48kHz, 88.2kHz, 96kHz
• 18 input channels to computer: analogue (8), S/PDIF (2), ADAT (8)
• Six output channels from computer: analogue (4), S/PDIF (2)
• 18 input by 6 output mixer
Page 21
7/27/2019 Scarlett 18i6
http://slidepdf.com/reader/full/scarlett-18i6 21/21
Front and rear connectivity
Analogue channel inputs (inputs 1-8)
• Two Mic XLR combo (channels 1-2) on front panel
• Two Line ¼” TRS (channels 3-8) on rear panel
• Automatic switching between mic / line (channels 1-2)
• Switching between line / instrument inputs (channels 1-2) via Scarlett Mix Control application
Digital channel inputs (inputs 9-18) 44.1 - 96kHz
• Stereo S/PDIF input on RCA
• Eight optical ADAT channels (4 channels at 88.2 / 96kHz)
Analogue audio outputs (outputs 1-4)
• Two ¼” TRS jacks
• Output level control (analogue)
• Separate stereo headphones mix (outputs 3-4) on ¼” TRS with independent analogue volume control
Digital channel outputs (outputs 5-6) 44.1 - 96kHz
• Stereo S/PDIF output on RCA
Other I/O
• One USB Type “B” connector
• Two standard 5-pin DIN MIDI connectors: in and out
• DC power input connector (for use with supplied universal input power supply)
Front Panel Indicators
• Eight 2-segment input meters, -18 and 0dBFS
• “Power” indicator
• “LKD” lock indicator
• “USB” connected indicator
• Instrument input source selection LED for channels 1 and 2
• Phantom power (48V) switch and LED for inputs 1 and 2
Weight and dimensions
• Dimensions: approx. 215 x 45 x 220mm (W x H x D)
• Weight: 1.5kg
TroubleshootingFor all troubleshooting queries, please visit the Focusrite Answerbase where there are articles covering numerous troubleshooting
examples. www.focusrite.com/answerbase.
CopyrightFocusrite is a registered trade mark of Focusrite Audio Engineering Limited. Scarlett is a trade mark of Focusrite Audio Engineering
Limited. 2010 © Focusrite Audio Engineering Limited. All rights reserved.