1 SCENARIO BATTLE OF PEA RIDGE, 2ND DAY March 8, 1862 The Scenario The third scenario in the series on the Battle of Pea Ridge cov- ers the battle on the second day. Historically, the Confederate army had not eaten for two days and was exhausted and short on ammunition from the fighting on the previous day. Also, much of McCulloch’s Division was badly disorganized after its defeat at Leetown the day before. During the night, Van Dorn failed to bring up his supply train and left most of his more numerous artillery parked behind his lines. The next morning, in the face of a well coordinated Union cannonade and assault, he ordered a precipitous retreat. This scenario is somewhat hypothetical in assuming Van Dorn decided to stay and fight it out. It was left out of the scenario book primarily because there was not enough time to thor- oughly playtest it. It was played only once before the book was published. It was visually stunning to watch the massive Union assault unfold, but ended badly for the Confederates. Perhaps a historical outcome, but not a balanced scenario. The large forces in this battle will require a good number of players on both sides and more time to play. It can be played by three to five players on each side, takes about eight hours to play, and requires the same 6-ft. deep by 6-ft. wide, 15mm gaming area used in the Elkhorn Tavern Scenario. Terrain This scenario uses the same terrain set up used in the Elkhorn Tavern scenario. All terrain effects beginning on page 28 in the sceanrio book are the same. The only changes are an additional line of breastworks and the friendly table edge: The mile-long Union line of battle advancing across the open fields at Pea Pidge, was a scene of martial grandeur.
Transcript
1
SCENARIO
BATTLE OFPEA RIDGE,
2ND DAYMarch 8, 1862
The ScenarioThe third scenario in the series on the Battle of Pea Ridge cov-ers the battle on the second day. Historically, the Confederate army had not eaten for two days and was exhausted and short on ammunition from the fighting on the previous day. Also, much of McCulloch’s Division was badly disorganized after its defeat at Leetown the day before. During the night, Van
Dorn failed to bring up his supply train and left most of his more numerous artillery parked behind his lines. The next morning, in the face of a well coordinated Union cannonade and assault, he ordered a precipitous retreat.
This scenario is somewhat hypothetical in assuming Van Dorn decided to stay and fight it out. It was left out of the scenario book primarily because there was not enough time to thor-oughly playtest it. It was played only once before the book was published. It was visually stunning to watch the massive Union assault unfold, but ended badly for the Confederates. Perhaps a historical outcome, but not a balanced scenario.
The large forces in this battle will require a good number of players on both sides and more time to play. It can be played by three to five players on each side, takes about eight hours to play, and requires the same 6-ft. deep by 6-ft. wide, 15mm gaming area used in the Elkhorn Tavern Scenario.
TerrainThis scenario uses the same terrain set up used in the Elkhorn Tavern scenario. All terrain effects beginning on page 28 in the sceanrio book are the same. The only changes are an additional line of breastworks and the friendly table edge:
The mile-long Union line of battle advancing across the open fields at Pea Pidge, was a scene of martial grandeur.
2
Piled Rails. The fence line below Rudick’s Field is replaced by a makeshift breastwork of piled rails. The breastworks are rated broken ground for movement to cross and do not block line of sight. In a maneuver check, a unit aligned behind the breastwork receives a +1 modifier. In fire combat, the firing stands suffer a -1 modifier for partial cover when firing at a target aligned behind breastworks, or a -2 if the target is in extended line. In charge combat, a defending unit aligned behind breastworks receives a +1 for favorable ground. The piled rails provide cover in both directions. Confederate artillery fire drove the Union troops out of the breastworks before the start the sce-nario, so the works are unoccupied at the start.
Friendly Table Edge. Broken Union units must retreat toward the south or west table edge, whichever edge is closer. Broken Confederate units must retreat toward point E on the north table edge or point F on the east table edge, whichever edge is closer. If a broken unit at the table edge fails to reform in the following Maneuver Phase, its remaining stands are
removed from play and count towards heavy casualties.
Order of BattleUnit strengths and combat effectiveness ratings are reduced to account for casualties and straggling from the fighting on the previous day. The Union troops were fed overnight, so their units start the scenario rated fresh. All units in the exhausted and starving Confederate troops start worn.
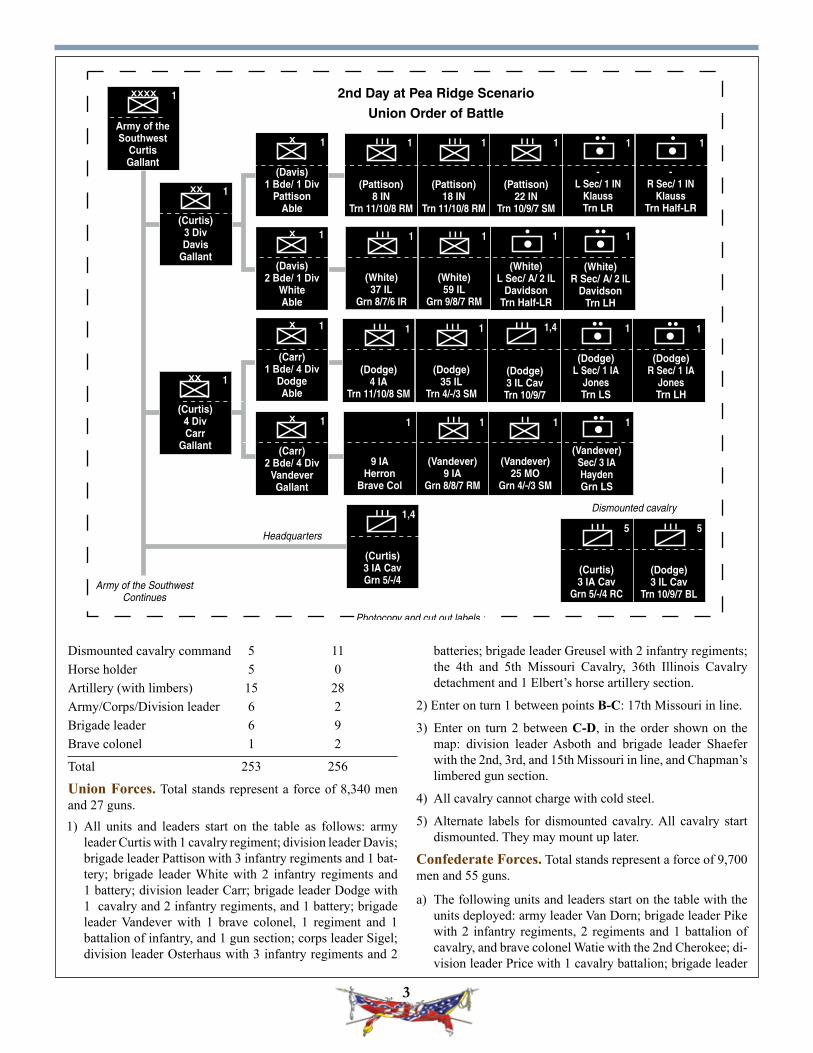
Union Forces. Total stands represent a force of 8,340 men and 27 guns. 1) All units and leaders start on the table as follows: army
leader Curtis with 1 cavalry regiment; division leader Davis; brigade leader Pattison with 3 infantry regiments and 1 bat-tery; brigade leader White with 2 infantry regiments and 1 battery; division leader Carr; brigade leader Dodge with 1 cavalry and 2 infantry regiments, and 1 battery; brigade leader Vandever with 1 brave colonel, 1 regiment and 1 battalion of infantry, and 1 gun section; corps leader Sigel; division leader Osterhaus with 3 infantry regiments and 2
batteries; brigade leader Greusel with 2 infantry regiments; the 4th and 5th Missouri Cavalry, 36th Illinois Cavalry detachment and 1 Elbert’s horse artillery section.
2) Enter on turn 1 between points B-C: 17th Missouri in line.
3) Enter on turn 2 between C-D, in the order shown on the map: division leader Asboth and brigade leader Shaefer with the 2nd, 3rd, and 15th Missouri in line, and Chapman’s limbered gun section.
4) All cavalry cannot charge with cold steel.
5) Alternate labels for dismounted cavalry. All cavalry start dismounted. They may mount up later.
Confederate Forces. Total stands represent a force of 9,700 men and 55 guns.
a) The following units and leaders start on the table with the units deployed: army leader Van Dorn; brigade leader Pike with 2 infantry regiments, 2 regiments and 1 battalion of cavalry, and brave colonel Watie with the 2nd Cherokee; di-vision leader Price with 1 cavalry battalion; brigade leader
-L Sec/ 1 IN
KlaussTrn LR
-R Sec/ 1 IN
KlaussTrn Half-LR
.. .1 1
Army of theSouthwest
CurtisGallant
XXXX 1
1
(Curtis)3 DivDavis
Gallant
XX 1
X
(Davis)1 Bde/ 1 Div
PattisonAble
1
X
(Davis)2 Bde/ 1 Div
WhiteAble
1 I I I I I I
(White)59 IL
Grn 9/8/7 RM
(White)37 IL
Grn 8/7/6 IR
(White)L Sec/ A/ 2 IL
DavidsonTrn Half-LR
...(White)
R Sec/ A/ 2 ILDavidson
Trn LH
1 1 1 1
X
(Curtis)4 DivCarr
Gallant
(Carr)1 Bde/ 4 Div
DodgeAble
XX 1
1
X
(Carr)2 Bde/ 4 Div
VandeverGallant
1
I I I
(Pattison)18 IN
Trn 11/10/8 RM
I I I
(Pattison)8 IN
Trn 11/10/8 RM
1 I I I
(Pattison)22 IN
Trn 10/9/7 SM
11
I I I I I I
(Dodge)35 IL
Trn 4/-/3 SM
(Dodge)4 IA
Trn 11/10/8 SM
..(Dodge)
L Sec/ 1 IAJonesTrn LS
..(Dodge)
R Sec/ 1 IAJonesTrn LH
(Dodge)3 IL CavTrn 10/9/7
I I I 1,4 11 1 1
(Vandever)9 IA
Grn 8/8/7 RM
(Vandever)25 MO
Grn 4/-/3 SM
9 IAHerron
Brave Col
(Vandever)Sec/ 3 IAHaydenGrn LS
I I I I I 1 1 1 1
I I I
(Curtis)3 IA CavGrn 5/-/4
1,4
Headquarters
Army of the SouthwestContinues
..
2nd Day at Pea Ridge Scenario
Union Order of Battle
Photocopy and cut out labels
Dismounted cavalry
I I I
(Curtis)3 IA Cav
Grn 5/-/4 RC
5 I I I
(Dodge)3 IL Cav
Trn 10/9/7 BL
5
4
Little with brave colonel Rives, 1 cavalry and 2 infantry regiments; brigade leader Rosser with 1 cavalry and 3 infantry battalions; 3rd Missouri State Guard (MSG) leader Clark with 2 infantry battalions; 5th MSG leader Saunders with 2 infantry battalions; 6th MSG leader Lindsey with 1 infantry battalion; 7th and 9th MSG leader Frost with 2 infantry battalions; 8th MSG leader Rains with 2 infantry battalions; Good’s, Wade’s, and Tully’s batteries.
b) The following units and leader start on the table with the units in a broken formation (see special scenario rule): bri-gade leader Greer with 4 infantry regiments, 1 dismounted cavalry regiment, and 3 regiments and 1 battalion of cavalry.
c) Clark’s and Hart’s batteries start limbered in reserve near Elkhorn Tavern. Both batteries may move on turn 2.
d) The following batteries start limbered in reserve, between the Elkhorn Tavern and Clemon’s Farm. They may move
on turn 3: Gaines, Landis, Jackson, Kelly, Gorham, Guibor, MacDonald, and Bledsoe.
e) All gun stands in six batteries are marked low on ammunition at the start of the scenario: Bledsoe, Hart, Clark, Guibor, Wade, and MacDonald.
f) All cavalry are mounted infantry, which can only maneuver and fight dismounted (see special scenario rule).
Game LengthThe game is 20 turns long starting with the Union player turn at 9:00 AM, and ends after the Confederate player turn at 1:45 PM. The first four turns (9:00 AM - 9:45 AM) have only a single fire phase (see special scenario rules for Cannonade).
Victory ConditionsOne side must achieve more victory conditions than its
(Osterhaus)L Sec/ MO Lt
WelfleyGrn LH
..
(Sigel)1 Div
OsterhausGallant
XX 11 & 2 DivSigelAble
XXX
X
(Osterhaus)2 Bde/ 1 Div
GreuselGallant
1
I I I
(Osterhaus)17 MO
Trn 12/9/6 RM
2I I I
(Osterhaus)44 IL
Grn 14/11/7 RM
1I I I
(Osterhaus)25 IL
Trn 13/11/9 RM
1
I I I I I I
(Greusel)12 MO
Trn 8/7/6 RM
(Greusel)36 IL
Grn 19/16/12 RM
1 1
1 Bde
(Osterhaus)L Sec/ 4 OH
HoffmanTrn LR
..(Osterhaus)C Sec/ 4 OH
HoffmanTrn LR
(Osterhaus)R Sec/ 4 OH
HoffmanTrn LH
(Osterhaus)C Sec/ MO Lt
WelfleyGrn Half-LH
(Osterhaus)R Sec/ MO Lt
WelfleyGrn HS
. .. ....11 1 1 1 1
Army of the SouthwestContinues
2nd Day at Pea Ridge ScenarioUnion Order of Battle
Continued
Photocopy and cut out labels
X
(Sigel)2 Div
AsbothGallant
(Asboth)1 Bde
ShaeferAble
XX 3
3 Dismounted cavalryI I I I I I
(Shaefer)15 MO
Trn 12/9/6 RM
(Shaefer)2 MO
Trn 7/6/4 SM
3 3
I I
(Asboth)Det/ 3 MO
Trn 4/3/2 SM
I I I
(Asboth)4 MO CavGrn 7/6/5
I I I
(Asboth)5 MO CavGrn 5/-/4
I I
(Asboth)Cav Det/ 36 IL
Grn 3/2/1
..(Asboth)
Sec/ 1 MO FlyElbert
Trn Hrs LR
..(Asboth)Sec/ 2 OHChapmanTrn LR
I I I
(Asboth)4 MO Cav
Grn 7/6/5 RC
I I I
(Asboth)5 MO Cav
Grn 5/-/4 RC
I I
(Asboth)Cav Det/ 36 ILGrn 3/2/1 RC
3 1
5 55
3 1,4 1,4 1,4
1
5
opponent to claim victory. Victory conditions are achieved by inflicting heavy casualties and greater losses on the enemy, and destroying or holding the key position as follows:
Heavy Casualties. Stands were removed from both sides to account for the previous-day combat losses and straggling. The Confederate player achieves one victory condition if the Union forces lose an additional 46 troop or gun stands. The Union player achieves one victory condition if the Confederate forces lose an additional 28 troop or gun stands.
After an army reaches its threshold for heavy casualties, all units receive a -1 modifier in subsequent maneuver checks.
Greater Losses. A second victory condition is achieved and the modifier increases to a -2 after an army reaches both its heavy casualties threshold and suffers greater losses than the enemy.
Key Position. The top edge of the Pea Ridge plateau be-tween points X-Y north of Elkhorn Tavern is a key position. The Union achieves one victory condition if at least one unit occupies X-Y at the end of the game. The Confederates achieve one victory condition if at the end of the game no Union units occupy the key position.
In addition to being a victory condition, each turn after a Union unit occupies the key position, all Confederate units receive a -1 modifier in subsequent maneuver checks. If the Union units are pushed out of the key position in a later turn, the modifier is reversed and all Union units suffer the -1 in subsequent checks.
The -1 modifier always applies to the last side to lose the key position.
Special Scenario RulesCannonade. The first four game turns represent an hour-long cannonade. During each turn of the cannonade, only one round fire combat is played, starting with a round of Union fire, followed by a round of Confederate fire. Both sides alternate their fire four times during the canonade. Only gun stands may fire. Apply all fire combat effects such as marking target units disordered, remove losses, marking guns silenced and dam-aged, rolling for fallen leaders, and marking firing stands low on ammunition. During these four turns, units do not perform a maneuver check, therefore they cannot rally from a disordered or silenced effect. A disordered target suffering a Galling Fire effect must lose one stand.
Broken Units. All units in Greer’s command start in a bro-ken formation with combat losses removed. The Confederate player must attempt to rally these units during their maneuver check on turn 1. A leader may attach to a broken unit. Units that fail to reform that turn must full retreat broken toward point F on the east table edge.
Mounted Infantry. All Confederate cavalry are rated as mounted infantry, but they can only maneuver and fight dis-mounted. As in the two previous Pea Ridge scenarios, horse holders are considered to be far to the rear and not represented by markers on the table. Instead, the unit strengths are already
2nd Day at Pea Ridge Scenario
Confederate Order of Battle
Army of the Westcontinues
X
(Van Dorn)BdePikePoor
a
I I I
(Greer)3 LA
Vet -/7/5 SM
I I I
(Greer)4 AR
Trn -/10/7 SM
I I I
I I II I I I I I
X
(Van Dorn)Bde
GreerPoor
I I I
(Greer)9 TX Cav
Trn -/6/4 SH
I I I
(Greer)11 TX CavTrn -/8/6 SH
I I I
-2 Cher M Rifles
WatieBrave Colonel
.. .. ..b
b b b b
a
b,f
I I I
(Pike)1 AR Mtd Rifles
DismtdTrn -/13/9 IR
a,f
b,fb,f c,e dc,e
a a,f I I I a
I I I
(Greer)3 TX Cav
Vet -/8/6 SH
I I b,f b,f
(Pike)L Sec/ TX Btry
GoodGrn HS
(Pike)C Sec/ TX Btry
GoodGrn HS
.. ..(Pike)
R Sec/ TX BtryGood
Grn LH
..a a aI I
(Pike)4 TX Cav Bn
DismtdTrn -/4/3 SH
a,f
..(Greer)
L Sec/ AR BtryHart
Grn LS
(Greer)R Sec/ AR Btry
Hart Grn LS
(Greer)L Sec/ AR Btry
GainesTrn LR
(Greer)R Sec/ AR Btry
GainesTrn LH
XXXX
Army ofthe WestVan Dorn
Poor
a
Photocopy and cut out labelsPhotocopy and cut out labels
(Greer)14 AR
Grn -/15/10 SM
(Greer)15 AR
Grn -/3/2 SM
(Greer)2 AR Mtd Rifles
DismtdTrn -/13/9 IR
(Greer)1 AR Cav Bn
Trn -/3/2 SH
(Pike)2 CherokeeMtd Rifles
Grn -/10/7 SH
(Pike)16 AR
Grn -/6/4 SM
(Pike)17 AR
Grn -/6/4 SM
d
6
(Frost)L Sec/ MO Btry
GuiborVet LS
(Frost)R Sec/ MO Btry
GuiborVet LS
(Frost)L Sec/ St Louis
MacDonaldGrn Half-LS
.. .. .(Frost)
R Sec/ St LouisMacDonald
Grn LH
..
X
(Price)3 MSG Div
ClarkAble
I I+
(Clark)Jackson &
Rucker MO InfTrn -/4/2 SM
(Clark)Hutchinson &Poindexter MOGrn -/5/3 SM
I I+
X
(Price)8 MSG Div
RainsPoor
I I+
(Rains)Bowman &
Erwin MO InfGrn -/7/4 SM
I I+
(Frost)7 Div
GreeneTrn -/8/4 IR
(Frost)9 Div
ShaverGrn -/7/4 SM
I I+
(Rains)Stammons &Pearcy MO InfGrn -/6/3 SM
I I
(Lindsey)6 Div
LindseyTrn -/3/1 RM
X
(Price)5 MSG DivSaunders
Poor
I I
(Saunders)Cundiff MO Inf
Trn -/5/3 SM
I I+
I I+
(Rains)L/ Lexington
BledsoeVet LH
(Rains)R/ Lexington
BledsoeVet LH
X
(Price)7&9 MSG Div
FrostAble
X
(Price)1 MO Bde
LittleGallant
XX
(Van Dorn)Price
Missouri DivAble
I I I I I II I I
3 MO InfRives
Brave Colonel
(Little)L Sec/ MO Btry
WadeGrn LS
(Little)C Sec/ MO Btry
WadeGrn LH
(Little)R Sec/ MO Btry
WadeGrn LH
(Little)L Sec/ MO Btry
ClarkGrn LS
.. .... .. .. ..
X
(Price)2 MO BdRosser
Able
I I
(Rosser)HughesMO Inf
Trn -/7/4 SM
I I I I
(Rosser)BevierMO Inf
Grn -/6/3 SM
(Rosser)RosserMO Inf
Trn -/7/4 SM
I I
(Price)CearnalMO Cav
Grn -/5/4 SH
(Little)R Sec/ MO Btry
ClarkGrn LS
(Saunders)Winston &
Boyd MO InfGrn -/6/3 SM
.. ..
a
a
a
a aa
a,e a,e a,e c,e c,e
a a a I I
(Rosser)L Sec/ MO Btry
LandisGrn LH
(Rosser)R Sec/ MO Btry
LandisGrn LH
(Rosser)L Sec/ MO Btry
JacksonGrn LS
(Rosser)R Sec/ MO Btry
JacksonGrn LS
.. .... .. ..d d d d
(Clark)L Sec/ MO Btry
TullyGrn LR
(Clark)R Sec/ MO Btry
TullyGrn LS
.. ..a a
(Saunders)L Sec/ MO Btry
KellyGrn HS
(Saunders)R Sec/ MO Btry
KellyGrn LS
.. ..d d
a,f
aa a
aa a
a
a a d,e d,e d,e d,e
aa d,e d,e
a
X
(Price)6 MSG DivLindsey
Able
a
a
(Lindsey)L Sec/ MO Btry
GorhamGrn LS
(Lindsey)R Sec/ MO Btry
GorhamGrn LS
.. ..d d
MissouriState Guard
Army of the Westcontinues 2nd Day at Pea Ridge Scenario
Confederate Order of Battle Continued
Photocopy and cut out labels
(Little)2 MO Inf
Trn -/8/4 SM
(Little)3 MO Inf
Trn -/7/4 SM
(Little)1 MO Cav
Trn -/6/3 SH
(Rosser)RigginsMO Cav
Grn -/6/3 SH
a,f
a,f
Headquarters
7
reduced to account for horse holders. Dismounted cavalry units can only deploy in extended line and march column. They cannot charge with cold steel.
The 1st and 2nd Arkansas Mounted Rifles and 4th Texas Cavalry Battalion did not have horses, so their strengths are not reduced by horse holders. They can maneuver and fight in any infantry formation, but cannot charge with cold steel.
Ammunition Supply. The Union forces were able to replenish their ammunition during the night. However, the Confederates suffered from an acute shortage of ammunition on the second day of the battle. Several batteries start the scenario with their gun stands marked low on ammunition. Confederate troop units or gun stands receive a low on am-munition marker on a die result of 9 or 10, and can be marked low on ammunition the first time the unit fires. Units on both sides cannot replenish ammunition after suffering a low on ammunition effect.