135
SunGard K-12 Education eSchoolPLUS™ Scheduling Student Scheduler Version: 2.4, 2.5 Compatible with Software Versions: eSchoolPLUS 2.4 eSchoolPLUS 2.5
SchedulingStudent SchedulerVersion: 2.4, 2.5Compatible with Software Versions:
eSchoolPLUS 2.4eSchoolPLUS 2.5
SunGard K-12 EducationeSchoolPLUS™

Copyright © 2013 SunGard K-12 Education. All rights reserved. No part of this publication may be reproduced without the prior written
permission of SunGard K-12 Education, with the exception of copies made for your internal office use.SunGard, the SunGard logo, PLUS 360, eSchoolPLUS, IEPPLUS, PerformancePLUS, eFinancePLUS, and BusinessPLUS are trade-marks or registered trademarks of SunGard Data Systems Inc. or its subsidiaries in the U.S. and other countries. All other trade names are trademarks or registered trademarks of their respective holders.
Contents1. System Overview.............................................................................................................. 5
Using This Guide............................................................................................................... 6
Scheduling System Features ............................................................................................ 8
Scheduling System Initial Procedures............................................................................. 12
Scheduling System Procedural Outline........................................................................... 13
Next-Year Scheduling Process Overview .................................................................. 15
Next-Year Scheduling with Multiple Bell Schedules Process Overview..................... 19
Using Staff Qualifications ........................................................................................... 24
Glossary of Scheduling Terms ........................................................................................ 25
2. Student Scheduler Options ........................................................................................... 31
Student Scheduler Error Scan......................................................................................... 32
Back Up/Restore Scheduling Run................................................................................... 38
Student Scheduler Parameters ....................................................................................... 42
Schedule Students .......................................................................................................... 47
Analyzing a Scheduling Run ...................................................................................... 53
Scheduling Status ........................................................................................................... 58
Load/Unload/Lock/Erase Scheduled Courses................................................................. 62
Recalculate Seats ........................................................................................................... 69
3. Schedule Study Halls ..................................................................................................... 71
Study Hall Scheduler....................................................................................................... 72
Erase Scheduled Study Halls.......................................................................................... 75
4. Student Scheduler Reports ........................................................................................... 79
Add/Drop By Teacher Report .......................................................................................... 80
Class Lists Report ........................................................................................................... 84
Class Matrix..................................................................................................................... 89
Free Period Analysis ....................................................................................................... 91
Free Time Detail Report .................................................................................................. 93
Load Report..................................................................................................................... 97
Student Conflict Analysis Report................................................................................... 101
Student Schedules Report ............................................................................................ 105
Teacher Schedule Matrix .............................................................................................. 116
Teacher Schedules ....................................................................................................... 119
3
Unscheduled Requests Detail Report ........................................................................... 121
Unscheduled Requests Summary Report ..................................................................... 123
A. Appendix....................................................................................................................... 125
About Multiple Bell Schedules....................................................................................... 126
Setting Up Multiple Bell Schedules .......................................................................... 128
Multiple Bell Schedules and Courses............................................................................ 130
4

1. System OverviewThe eSchoolPLUS Scheduling System is an online, interactive system designed to help school district per-sonnel with the entire scheduling process, from gathering student requests through building a master schedule to scheduling students.
There are multiple processes involved in setting up and running the Scheduling System for the current year and next-year scheduling. This chapter includes overviews of these procedures. An additional procedure is included for buildings using Multiple Bell Scheduling.
PreviewThis chapter provides information on the following topics:
Using This Guide
Scheduling System Features
Scheduling System Initial Procedures
Scheduling System Procedural Outline
Next-Year Scheduling Process Overview
Next-Year Scheduling with Multiple Bell Schedules Process Overview
Using Staff Qualifications
Glossary of Scheduling Terms
5
System Overview
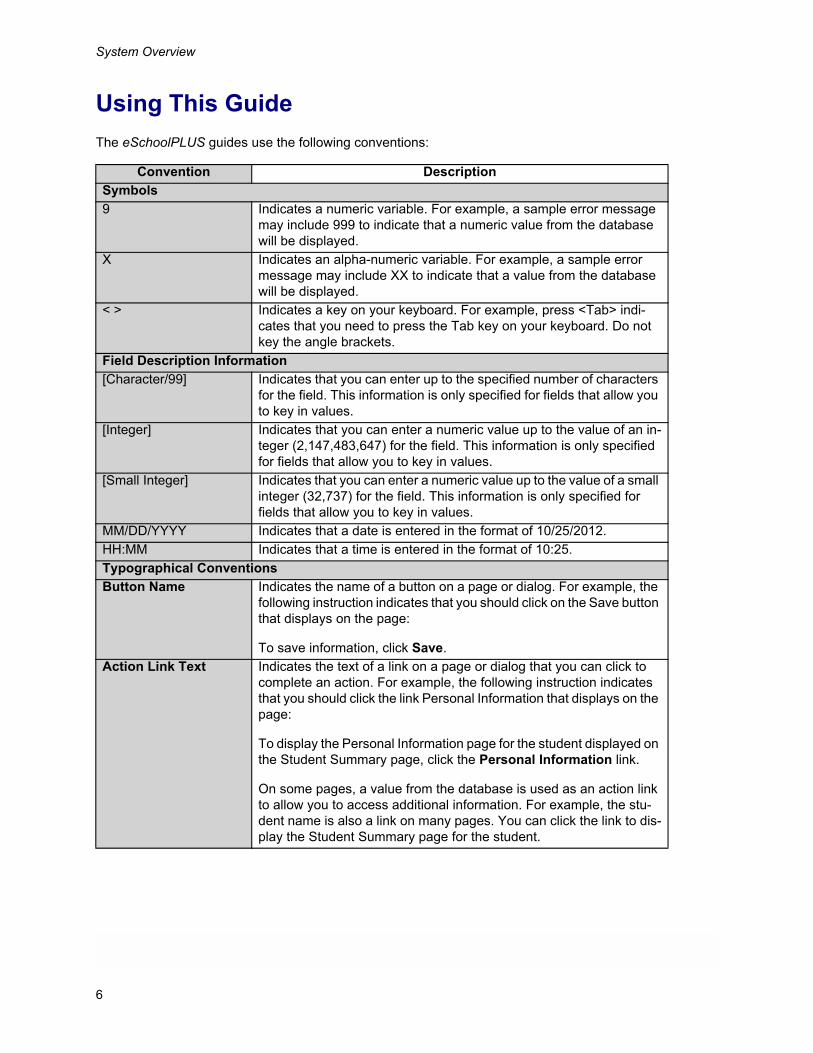
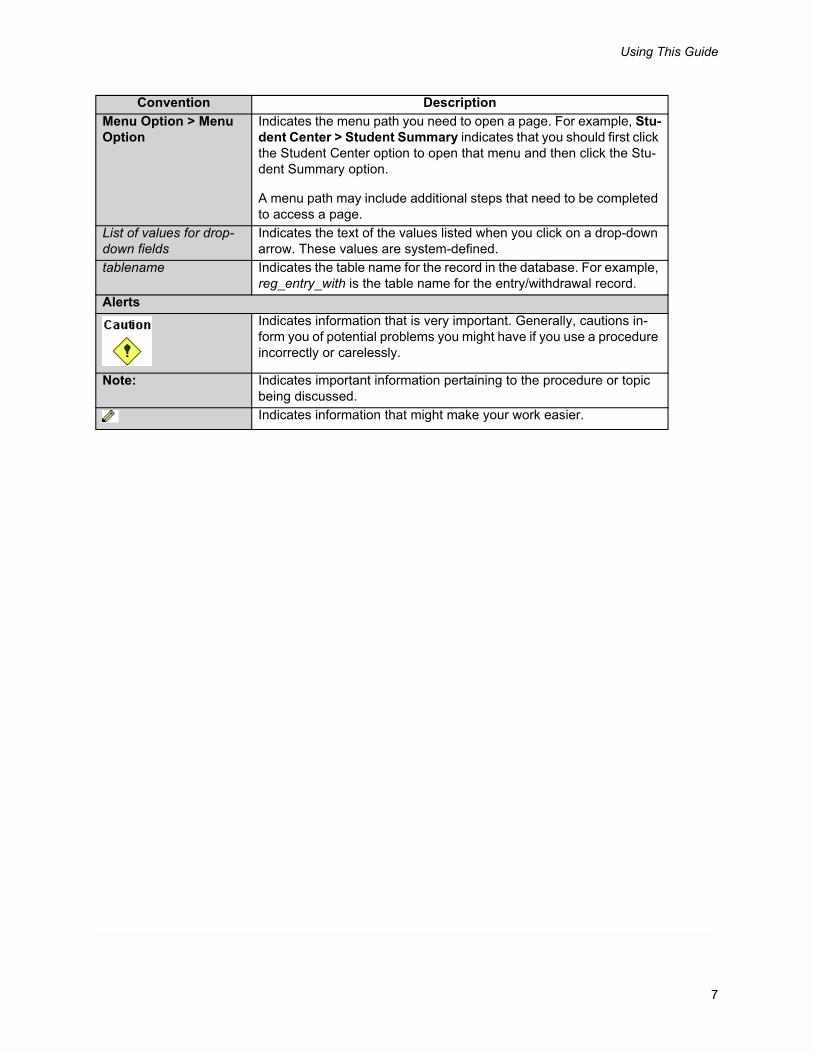
Using This GuideThe eSchoolPLUS guides use the following conventions:
Convention DescriptionSymbols9 Indicates a numeric variable. For example, a sample error message
may include 999 to indicate that a numeric value from the database will be displayed.
X Indicates an alpha-numeric variable. For example, a sample error message may include XX to indicate that a value from the database will be displayed.
< > Indicates a key on your keyboard. For example, press <Tab> indi-cates that you need to press the Tab key on your keyboard. Do not key the angle brackets.
Field Description Information[Character/99] Indicates that you can enter up to the specified number of characters
for the field. This information is only specified for fields that allow you to key in values.
[Integer] Indicates that you can enter a numeric value up to the value of an in-teger (2,147,483,647) for the field. This information is only specified for fields that allow you to key in values.
[Small Integer] Indicates that you can enter a numeric value up to the value of a small integer (32,737) for the field. This information is only specified for fields that allow you to key in values.
MM/DD/YYYY Indicates that a date is entered in the format of 10/25/2012.HH:MM Indicates that a time is entered in the format of 10:25.Typographical ConventionsButton Name Indicates the name of a button on a page or dialog. For example, the
following instruction indicates that you should click on the Save button that displays on the page:
To save information, click Save.Action Link Text Indicates the text of a link on a page or dialog that you can click to
complete an action. For example, the following instruction indicates that you should click the link Personal Information that displays on the page:
To display the Personal Information page for the student displayed on the Student Summary page, click the Personal Information link.
On some pages, a value from the database is used as an action link to allow you to access additional information. For example, the stu-dent name is also a link on many pages. You can click the link to dis-play the Student Summary page for the student.
6
Using This Guide
Menu Option > Menu Option
Indicates the menu path you need to open a page. For example, Stu-dent Center > Student Summary indicates that you should first click the Student Center option to open that menu and then click the Stu-dent Summary option.
A menu path may include additional steps that need to be completed to access a page.
List of values for drop-down fields
Indicates the text of the values listed when you click on a drop-down arrow. These values are system-defined.
tablename Indicates the table name for the record in the database. For example, reg_entry_with is the table name for the entry/withdrawal record.
AlertsIndicates information that is very important. Generally, cautions in-form you of potential problems you might have if you use a procedure incorrectly or carelessly.
Note: Indicates important information pertaining to the procedure or topic being discussed.Indicates information that might make your work easier.
Convention Description
7
System Overview
Scheduling System FeaturesThe system includes, but is not limited to, the following features:
General Features
• Supports scheduling an unlimited number of periods per day and marking periods per year.
• Supports a rolling time table.
• Supports an unlimited number of cycle days. Different buildings may use different cycles. All calendars in a building must have the same cycle day for a calendar date.
• The ability to track course prerequisites over multiple years.
• Permits students to enroll in courses in schools within the district other than the school that the student is currently registered in.
• Allows flexible scheduling by building.
• Students can be pre-scheduled into a course-section before the scheduler (Schedule Students option) is run.
• The system supports multiple bell schedules.
• The system can handle multiple time schedules within the same building.
• The system will handle multiple teams within a time schedule in a building.
• Students can be scheduled by house/team.
• Provides the ability to automatically assign students to a team based on a course selection.
• The system allows student alternate requests, student course alternates, and course alternates. Alter-nates can be automatically scheduled if requested courses are full.
Course Setup
• Allows adding courses to a building’s Course Catalog, then uploading them to the District Course Cat-alog, or adding courses to the district catalog, then downloading them to building catalogs.
• Enables sequencing courses, so that a course can be scheduled with, not with, or before another course.
• Allows setting a course alternate for all students requesting the course. A course alternate identifies the course to substitute if the scheduler is unable to schedule the primary request.
• Courses may be assigned to a department and house/team.
• Allows you to inactivate a course in a course catalog, without deleting the course.
• Provides the ability to define a block or super course that groups a number of courses for scheduling purposes.
8

Scheduling System Features
• Allows courses to be linked or blocked so that students can be scheduled in groups or with blocks of courses.
• Enables setting a course priority for scheduling purposes.
• Tracks fees associated with courses in your course catalogs.
• Allows mass updating of course catalogs.
• Provides the ability to prioritize individual students for scheduling.
• Allows restricting courses to students in specific grades or of a specific gender.
• Provides the ability to specify CurriculumCONNECTOR values for courses.
Master Schedule
• Enforces classroom maximum seating.
• Provides for variable class sizes.
• Allows mass updating of the Master Schedule.
• Supports multiple meeting time sessions per course in the Master Schedule, allowing efficient sched-uling of lab courses, double meeting time courses, and split meeting time courses.
• Provides the ability to assign secondary staff members to courses.
• Provides the ability to assign a grade requirement to a course.
• Allows for classes to meet on alternating days.
• Supports varying course durations, such as quarter, semester, trimester, and full-year courses.
• Provides the ability to track a teacher’s Highly Qualified Teacher status and alert the person responsi-ble for scheduling when an unqualified teacher is assigned to teach a class.
• In addition to the standard marking periods, the system can support an unlimited number of course du-rations that will allow the school year to be divided into different segments. For example, a school with 4 marking periods can also have an 8-segment wheel and a 3-segment exploratory.
• Allows multiple language translations to be used in Report Cards.
Student Requests
• The Course Request page allows you to enter requests, model a schedule, and enroll a student in a modeled schedule on one page.
• If your district uses Career Planner, requests for future years can be entered for the district, instead of a specific building. The requests can then be moved to the student’s next building, when you process the next year’s requests.
• Provides the option of entering student course requests via optical sheet scanner.
• Provides the ability to mass load, mass update, mass replace, and mass delete course requests from the student course request table.
9
System Overview
• Enables you to load course recommendations entered by teachers in Teacher Access Center and cre-ate requests from the recommendations in eSchoolPLUS.
• Includes the ability to set a general alternate that can be used for any course that has not been sched-uled.
Student Scheduler
• The Scheduler (Scheduling Center > Student Scheduler > Schedule Students) can schedule students selectively by grade, gender, name, or a set priority based on either the individual student or the course taught.
• Provides the ability to override maximum class enrollment.
• Provides the ability to schedule single or multiple semester classes.
• Supports "locking" a scheduling run.
• Provides the ability to schedule sub-groups of students (e.g., freshmen) after the scheduling process is complete, not affecting those schedules that are "locked."
• Supports a separate study hall scheduler. Students are optionally scheduled into study halls for any free periods in their schedules.
• Study halls can be requested by students or the system can fill any unscheduled time in a student’s schedule with a study hall.
• Student alternate requests can be scheduled if any regular request is not scheduled.
• Student course alternates can be scheduled if the associated regular request is not scheduled.
• Provides the ability to run the scheduler selectively by semester.
• Allows entering a student’s requests at any time during the school year and automatically scheduling the student into the requested classes. This eliminates hand scheduling while maintaining balance and integrity in the Master Schedule.
• During the scheduling process, a shuffle option can be utilized which will shuffle students from one sec-tion to another or reschedule students to improve the overall scheduling rate.
• The shuffling process moves students who are partially scheduled in an attempt to schedule another student; it does not touch students who have been fully scheduled.
• Provides the ability to mass update and move students from one scheduled course into another.
Student Schedules
• Marks can be trailed from a course that is dropped to one that is added.
• The system offers the option to withdraw students and preserve their schedules. The system will re-lease the seats but maintain the schedules, or you may optionally save their schedules.
• In Entry/Withdrawal, you can select to preserve a schedule for re-entry.
10
Scheduling System Features
• The Re-Enter Student option on the Entry/Withdrawal page reactivates students withdrawn with the previous option. It re-enters the student in Demographics and makes them active, and re-adds all the saved courses.
• Online schedule changes are allowed, and updated schedules can be generated immediately and printed.
• Provides the ability to quickly add courses to a student’s existing schedule.
Reports
• Provides a load report for teachers.
• Provides a current enrollment summary of each course and section via screen and report (Class Lists report).
• Provides a Simple Tally by course number at each school.
• Provides a Free Period Analysis report. This report summarizes the number of students who have a specific period free (not scheduled), tallied per marking period.
• Provides a Free Time Detail report. For each student selected, this report lists the open periods in the student’s schedule, per cycle day and marking period.
• Provides the option to enter text describing the courses offered, which may be compiled and printed to serve as a course selection booklet.
• Generates a Conflict Matrix report, which can process all courses, singletons only, doubletons only, or singletons and doubletons but no other courses.
• Provides the ability to print Teacher Schedules in a list or grid format.
• Provides a Seat Availability report. For each course, this report lists requests and seat counts, including total seats, seats needed and seats available. You can limit the report to courses that have either too few or too many seats.
• Provides the ability to print a Room Utilization report. This report lists the courses meeting in the room. It includes the course code and description, when it meets, seats used, and whether the course-section is closed (no seats left).
• Provides the ability to print Student Schedules on a full page, half page, or as a grid.
11
System Overview
Scheduling System Initial ProceduresThe initial procedures identified below are usually performed by your system administrator or building per-sonnel and include the following steps.
Prerequisites:
1. Make sure the appropriate options in the following packages have been set up:
Registration - Rooms, Registration Cycle Days, Staff Information, Durations, and Marking Periods.
Mark Reporting - If your building uses Mark Reporting, Mark Types must be set up before the Master Schedule is added. You will also need to set up Honor Roll, GPA, and Level tables.
2. Set up the following Validation Tables:
Registration - Departments and House/Teams.
Mark Reporting - Graduation Requirement Areas.
Setting up the Scheduling System:
1. Set up the Intervals (Scheduling Center > Setup > Intervals).
2. In the Scheduling Configuration page (Administration > System Setup > Building > Scheduling), set up each building that uses the Scheduling System.
3. Set up the Periods (Scheduling Center > Setup > Periods).
4. Set up the Timetables (Scheduling Center > Setup > Timetable).
5. Set up the District-Defined screens for courses (Administration > District-Defined Setup > Course).
6. Set up the security resources for the Scheduling System, designating which users may access which options (Administration > Security > User Profiles).
For more information, refer to the appropriate topics in eSchoolPLUS online help.
12

Scheduling System Procedural Outline
Scheduling System Procedural OutlineThe eSchoolPLUS Scheduling System provides options to handle all of your district’s scheduling needs, in-cluding entering student requests, setting up the Master Schedule, running the scheduler (Schedule Stu-dents option), and generating reports to verify information for each phase of the scheduling process.
Pre-Scheduler Process:
1. Create/update the following Scheduling Center > Building Course Setup options: Course Catalog, Course Groups, and Course Sequence.
If your district uses the District Course Catalog, refer to Using the District Course Catalog in eSchoolPLUS online help before running the Building Course Setup options.
2. Update the following Registration Center options: Room Information and Staff Information.
3. Enter student requests using the following options: Course Requests (Student Center > Scheduling > Course Requests) and Request Load/Unload/Erase (Scheduling Center > Student Scheduler > Re-quest Load/Unload/Erase).
Requests can also be entered through Home Access Center, Scanning, and Career Planner.
4. Analyze/verify student requests by running one or more of the following Scheduling Center > Reports > Pre-Scheduler options: Conflict Matrix Book, Conflict Matrix Grid, Pre-Assignment Class Lists, Sim-ple Tally, Student Request Detail, Student Request Summary, and Student Request Verification.
Master Schedule Process:
1. Create/update the Master Schedule (Scheduling Center > Master Schedule > Master Schedule) for the school year.
2. Analyze/verify the Master Schedule by running the Master Schedule List (Scheduling Center > Master Schedule > Master Schedule > Report).
You can also run the following Scheduling Center > Reports options.
• Pre-Scheduler reports:
Room Availability, Seat Availability, and Teacher Availability
• Post-Scheduler reports:
Class Matrix, Teacher Schedule Matrix, and Teacher Schedules
Student Scheduler Process:
1. Use the Student Schedule page (Student Center > Scheduling > Entry) to lock individual students into specific course-sections.
2. If needed, update the Student Scheduler Parameters page (Scheduling Center > Student Scheduler > Parameters) for your building.
3. Run the Error Scan option (Scheduling Center > Student Scheduler > Error Scan), then correct any errors found.
13
System Overview
4. Run the Schedule Students option (Scheduling Center > Student Scheduler > Schedule Students) to schedule students into courses based on their requests.
5. Analyze/verify student schedules by running one or more of the following Scheduling Center > Reports > Post-Scheduler options: Student Conflict Analysis, Unscheduled Request Detail, and Unscheduled Request Summary.
If the results are satisfactory, skip to Step 9. If you wish to re-run the scheduler, continue to Step 6.
6. If desired, run the Back Up/Restore option (Scheduling Center > Student Scheduler > Back Up/Re-store) to back up the results of your scheduling run.
7. If changes to the Master Schedule are needed, run the Scheduled Course Load/Unload/Lock/Erase option (Scheduling Center > Student Scheduler > Scheduled Course Load/Unload/Lock/Erase) to erase student schedules, then update the Master Schedule.
8. Return to Step 4 to re-run the Schedule Students option.
9. Resolve conflicts in students’ schedules using the following Student Center > Scheduling options: Entry and Mass Entry.
Study Hall Process:
1. If your school schedules study halls into the student’s free time, run one or both of the following Sched-uling Center > Reports > Post-Scheduler options to determine how to create your study halls: Free Pe-riod Analysis and Free Time Detail.
2. Create/update study halls in the Master Schedule option (Scheduling Center > Master Schedule > Mas-ter Schedule).
3. Run the Schedule Study Halls option (Scheduling Center > Student Scheduler > Schedule Study Halls) to assign study halls to students’ schedules.
Post-Scheduler Maintenance:
1. Generate Class Lists (Scheduling Center > Reports > Post-Scheduler > Class Lists) for distribution to teachers.
2. Generate Student Schedules (Scheduling Center > Reports > Post-Scheduler > Student Schedules) for distribution to students.
3. Once school has started and schedule changes have begun, run the Add/Drop By Teacher report (Scheduling Center > Reports > Post-Scheduler > Add-Drop By Teacher) periodically to inform teach-ers of changes in their classes.
4. As needed, modify student schedules using the following Student Center > Scheduling options: Entry and Mass Entry.
5. As needed, schedule students who move to your building. Use the Course Requests option (Student Center > Scheduling > Course Requests) to enter requests for a student, and then run the Model option in the Course Requests page to schedule the student.
14
Scheduling System Procedural Outline
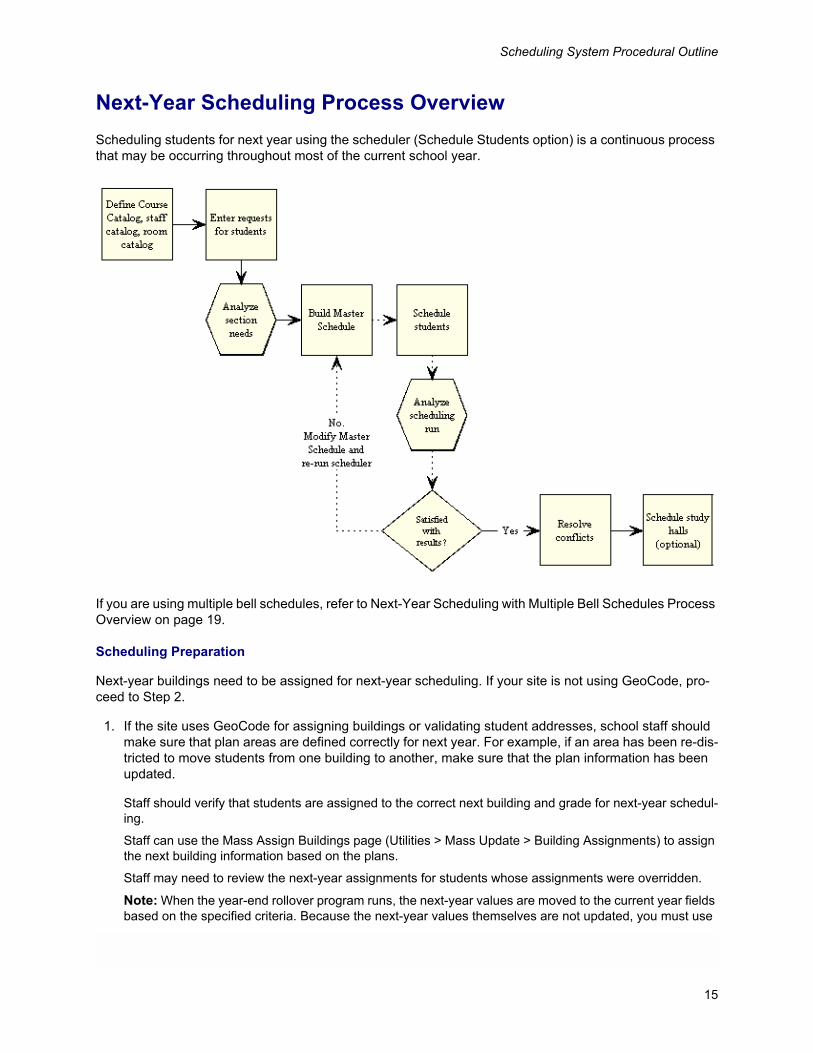
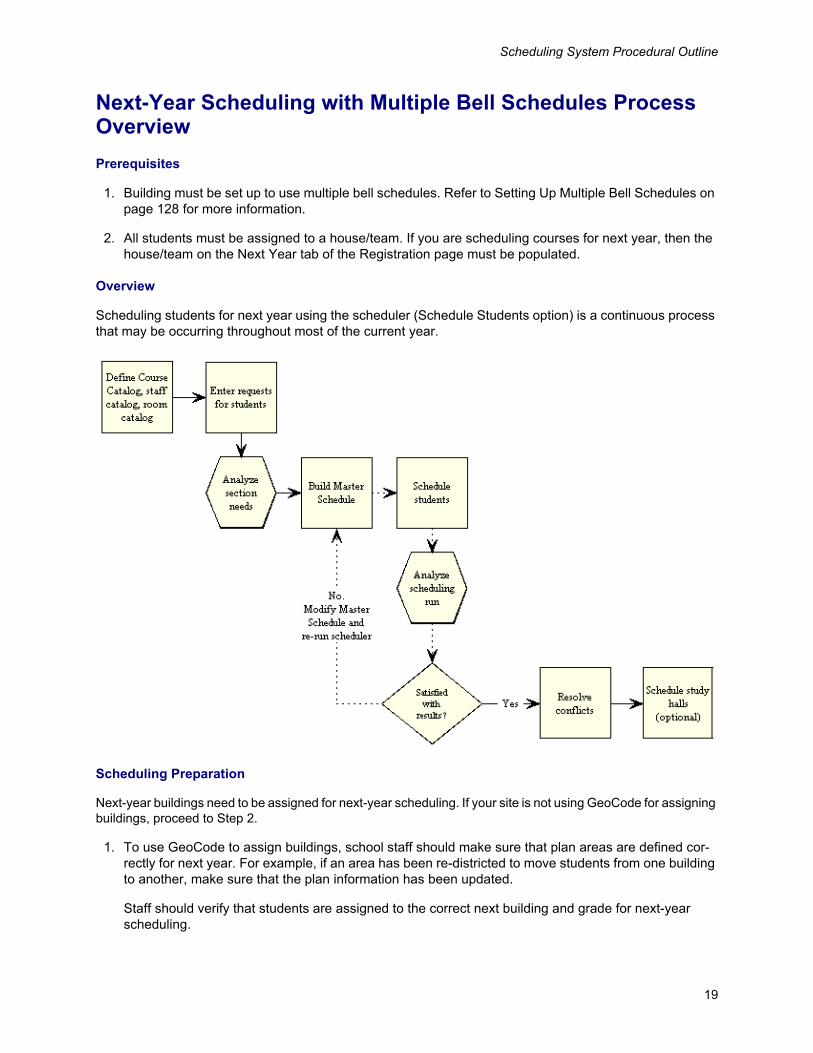
Next-Year Scheduling Process OverviewScheduling students for next year using the scheduler (Schedule Students option) is a continuous process that may be occurring throughout most of the current school year.
If you are using multiple bell schedules, refer to Next-Year Scheduling with Multiple Bell Schedules Process Overview on page 19.
Scheduling Preparation
Next-year buildings need to be assigned for next-year scheduling. If your site is not using GeoCode, pro-ceed to Step 2.
1. If the site uses GeoCode for assigning buildings or validating student addresses, school staff should make sure that plan areas are defined correctly for next year. For example, if an area has been re-dis-tricted to move students from one building to another, make sure that the plan information has been updated.
Staff should verify that students are assigned to the correct next building and grade for next-year schedul-ing.
Staff can use the Mass Assign Buildings page (Utilities > Mass Update > Building Assignments) to assign the next building information based on the plans.
Staff may need to review the next-year assignments for students whose assignments were overridden.
Note: When the year-end rollover program runs, the next-year values are moved to the current year fields based on the specified criteria. Because the next-year values themselves are not updated, you must use
15
System Overview
the Mass Assign Buildings page to make sure that students are assigned to the correct next-year building.
2. Set up the next school year. In eSchoolPLUS, some setup options are defined by school year to allow you to change how students are processed from one year to the next. Setups that are defined by year need to be created each school year. For most setups, you can copy the current year options to the next school year. Refer to the Next Year Preparation List in eSchoolPLUS online help for more infor-mation about the next-year setups that need to be defined.
3. Modify the Course Catalog (Scheduling Center > Building Course Setup > Course Catalog) based on approved curriculum changes. If a course will not be available for next year, make the course inactive in the Course Catalog.
The Course Groups and Course Sequence options may also need to be run from the Building Course Setup menu to update how courses are sequenced for the coming school year.
If your district uses the District Course Catalog, refer to Using the District Course Catalog in eSchoolPLUS online help before using the Building Course Setup options.
4. Update the following Registration Center options: Room Information and Staff Information.
Before changing staff information, you may need to analyze request information first (Step 6) to determine your building’s staffing needs.
If you will need new hires to teach course-sections but have not yet filled the positions, you can cre-ate staff records in advance using generic names, such as NewStaff1 and NewStaff2. Once you fill a staff position, you can update the staff catalog record with the new staff member’s information.
5. If your building allows teachers to enter next year course recommendations for students, teachers can enter recommendations by clicking the REC link for a course-section. Note that students must have mark reporting records for the course-section before course recommendations can be entered. After recommendations have been entered, use the Load Course Recommendations to Requests option to create the requests. For more information on the course recommendation process, refer to Using Course Recommendations to Create Requests.
6. Enter student requests using the following options: Course Requests (Student Center > Scheduling > Course Requests) and Request Load/Unload/Erase (Scheduling Center > Student Scheduler > Re-quest Load/Unload/Erase). Requests can also be entered through Home Access Center, Scanning, and Career Planner.
You may also run the Student Request Verification report (Scheduling Center > Reports > Pre-Scheduler > Student Request Verification) at this step so counselors and students can verify the request information.
7. Analyze section needs by running one or more of the following Scheduling Center > Reports > Pre-Scheduler reports: Conflict Matrix Book, Conflict Matrix Grid, Pre-Assignment Class Lists, Simple Tally, Student Request Detail, and Student Request Summary.
8. Create/update the Master Schedule (Scheduling Center > Master Schedule > Master Schedule) for the school year.
Schedule Students
9. Use the Student Schedule page (Student Center > Scheduling > Entry) to lock individual students into specific course-sections.
16
Scheduling System Procedural Outline
10. If you need to load a group of students to a particular course-section, run the Scheduled Course Load/Unload/Lock/Erase option (Scheduling Center > Student Scheduler > Scheduled Course Load/Unload/Lock/Erase).
11.Run the Error Scan (Scheduling Center > Student Scheduler > Error Scan), then correct any errors found.
12. If needed, update the Scheduling Parameters page (Scheduling Center > Student Scheduler > Param-eters) for your building.
13.Run the Schedule Students option (Scheduling Center > Student Scheduler > Schedule Students).
14.Analyze and verify student schedules by generating one or more of the following Scheduling Center > Reports > Post-Scheduler reports: Student Conflict Analysis, Unscheduled Request Detail, and Un-scheduled Request Summary.
15. If you are satisfied with the results of the scheduler, skip to Step 19. If you want to re-run the scheduler, continue to the next step.
16. If you want to be able to return to the current setups after making changes, back up the scheduling run by running the Back Up/Restore option (Scheduling Center > Student Scheduler > Back Up/Restore).
17. If you need to change Master Schedule information, run the Scheduled Course Load/Unload/Lock/Erase option (Scheduling Center > Student Scheduler > Scheduled Course Load/Unload/Lock/Erase) to erase scheduled courses that are not locked.
18.Repeat Steps 7 - 17 until satisfied with the scheduler run.
19.Resolve conflicts in student schedules using the following Student Center > Scheduling options: Entry and Mass Entry.
Schedule Study Halls (optional)
If your school schedules study halls into students’ free time, complete the following steps:
20.Run one or both of the following Scheduling Center > Reports > Post-Scheduler options to determine how to create your study halls: Free Period Analysis and Free Time Detail.
Both reports will use the timetable assigned to the student’s house/team in determining which periods are free for the student.
21.Create/update study halls in the Master Schedule option (Scheduling Center > Master Schedule > Mas-ter Schedule).
22.Run the Schedule Study Halls option (Scheduling Center > Student Scheduler > Schedule Study Halls) to assign study halls to students’ schedules.
We do not recommend using this option if you are attempting to use the scheduler in the current school year. If you restore data, you will lose changes for Scheduling and Mark Reporting made between the time that you backed up and restored data.
17
System Overview
Print Schedule Information
23.Generate Class Lists (Scheduling Center > Reports > Post-Scheduler > Class Lists) for distribution to teachers.
24.Generate Student Schedules (Scheduling Center > Reports > Post-Scheduler > Student Schedules) for distribution to students.
25.Once school has started and schedule changes have begun, periodically run the Add-Drop By Teacher report (Scheduling Center > Reports > Post-Scheduler > Add-Drop By Teacher) to inform teachers of changes in their classes.
18
Scheduling System Procedural Outline
Next-Year Scheduling with Multiple Bell Schedules Process OverviewPrerequisites
1. Building must be set up to use multiple bell schedules. Refer to Setting Up Multiple Bell Schedules on page 128 for more information.
2. All students must be assigned to a house/team. If you are scheduling courses for next year, then the house/team on the Next Year tab of the Registration page must be populated.
Overview
Scheduling students for next year using the scheduler (Schedule Students option) is a continuous process that may be occurring throughout most of the current year.
Scheduling Preparation
Next-year buildings need to be assigned for next-year scheduling. If your site is not using GeoCode for assigning buildings, proceed to Step 2.
1. To use GeoCode to assign buildings, school staff should make sure that plan areas are defined cor-rectly for next year. For example, if an area has been re-districted to move students from one building to another, make sure that the plan information has been updated.
Staff should verify that students are assigned to the correct next building and grade for next-year scheduling.
19
System Overview
Staff can use the Mass Assign Buildings page (Utilities > Mass Update > Building Assignments) to as-sign the next building information based on the plans.
Staff may need to review the next-year assignments for students whose assignments were overridden.
Note: When the year-end rollover program runs, the next-year values are moved to the current year fields based on the specified criteria. Because the next-year values themselves are not updated, you must use the Mass Assign Buildings page to make sure that students are assigned to the correct next-year building.
2. Set up the next school year. In eSchoolPLUS, some setup options are defined by school year to allow you to change how students are processed from one year to the next. Setups that are defined by year need to be created each school year. For most setups, you can copy the current year options to the next school year. Refer to the Next Year Preparation List in eSchoolPLUS online help for more infor-mation about the setups that need to be defined for the next school year.
3. Modify your building’s Course Catalog (Scheduling Center > Building Course Setup > Course Catalog) based on approved curriculum changes. If a course will not be available for next year, make the course inactive in the Course Catalog.
You can assign house/teams to the course only if specific teams will use the course code. Otherwise, you can wait to assign house/teams to individual course-sections in the Master Schedule.
The Course Groups and Course Sequence options may also need to be run from the Building Course Setup menu to update how courses are sequenced for the coming school year.
If your district uses the District Course Catalog, refer to Using the District Course Catalog in eSchoolPLUS online help before using the Building Course Setup options.
4. Update the following Registration Center options: Room Information and Staff Information.
Before updating the staff catalog, you may need to analyze request information first (Step 6) to determine your building’s staffing needs.
You may assign a teacher to a house/team, but you do not need to. You should keep in mind teacher re-sponsibilities when creating your Master Schedule and assigning teachers to course-sections.
If you will need new hires to teach course-sections but have not yet filled the positions, you can cre-ate staff records in advance using generic names, such as NewStaff1 and NewStaff2. Once you fill a staff position, you can update the staff catalog record with the new staff member’s information.
5. If your building allows teachers to enter next year course recommendations for students, teachers can enter recommendations by clicking the REC link for a course-section. Note that students must have mark reporting records for the course-section before course recommendations can be entered. After recommendations have been entered, use the Load Course Recommendations to Requests option to create the requests. For more information on the course recommendation process, refer to Using Course Recommendations to Create Requests.
6. Enter student requests using the following options: Course Requests (Student Center > Scheduling > Course Requests) and Request Load/Unload/Erase (Scheduling Center > Student Scheduler > Re-quest Load/Unload/Erase). Requests can also be entered through Home Access Center and Scanning.
You may also run the Student Request Verification report (Scheduling Center > Reports > Pre-Scheduler > Student Request Verification) at this step so counselors and students can verify the request information.
20
Scheduling System Procedural Outline
7. Analyze section needs by running one or more of the following Scheduling Center > Reports > Pre-Scheduler reports: Conflict Matrix Book, Conflict Matrix Grid, Pre-Assignment Class Lists, Simple Tally, Student Request Detail, and Student Request Summary.
8. Create/update the Master Schedule (Scheduling Center > Master Schedule > Master Schedule) for the school year.
You must consider house/teams when adding course-sections. You may assign a course-section to multi-ple house/teams, but all house/teams you select must be assigned to timetables that have the same start and end times for the selected course periods. Only students assigned to one of the selected house/teams will be scheduled for the course-section.
If the timetables assigned to the selected house/teams have any overlap between periods, you will get a warning, and you will not be able to save the course-section.
If you do not want to assign the course to a house/team, you can leave the course-section without a house/team designation. You must make sure that the start time and end time of the selected periods do not over-lap in any of the timetables.
Once a student has been enrolled in a course-section, you cannot change the house/team designation for a course.
Schedule Students
Keep in mind that you can only schedule courses that are assigned to students’ house/teams or that do not have a house/team.
9. Use the Student Schedule page (Student Center > Scheduling > Entry) to lock individual students into specific course-sections.
10. If you need to load a group of students to a particular course-section, run the Scheduled Course Load/Unload/Lock/Erase option (Scheduling Center > Student Scheduler > Scheduled Course Load/Unload/Lock/Erase).
11.Run the Error Scan (Scheduling Center > Student Scheduler > Error Scan), then correct any errors found.
• Scan Registration checks that students have a valid house/team for their building.
• Scan Master Schedule checks that course-sections with multiple house/teams are scheduled for periods that have matching times in the applicable timetables.
• Scan Master Schedule checks that course-sections with no house/team designation are sched-uled for periods that have matching times in all timetables.
12. If needed, update the Scheduling Parameters page (Scheduling Center > Student Scheduler > Param-eters) for your building.
13.Run the Schedule Students option (Scheduling Center > Student Scheduler > Schedule Students).
14.Analyze and verify student schedules by generating one or more of the following Scheduling Center > Reports > Post-Scheduler reports: Student Conflict Analysis, Unscheduled Request Detail, and Un-scheduled Request Summary.
15. If you are satisfied with the results of the scheduler, skip to Step 19. If you want to re-run the scheduler, continue to the next step.
21
System Overview
16. If you want to be able to return to the current setups after making changes, back up the scheduling run by running the Back Up/Restore option (Scheduling Center > Student Scheduler > Back Up/Restore).
17. If you need to change Master Schedule information, run the Scheduled Course Load/Unload/Lock/Erase option (Scheduling Center > Student Scheduler > Scheduled Course Load/Unload/Lock/Erase) to erase scheduled courses that are not locked.
18.Repeat Steps 7 - 17 until satisfied with the scheduler run.
19.Resolve conflicts in student schedules using the following Student Center > Scheduling options: Entry and Mass Entry.
Schedule Study Halls (optional)
20.Run one or both of the following Scheduling Center > Reports > Post-Scheduler options to determine how to create your study halls: Free Period Analysis and Free Time Detail.
Both reports will use the timetable assigned to the student’s house/team in determining which periods are free for the student.
21.Create/update study halls in the Master Schedule option (Scheduling Center > Master Schedule > Mas-ter Schedule).
You must consider house/teams when adding a study hall. You may assign a study hall to multiple house/teams, but all house/teams you select must be assigned to timetables that have the same start and end times for the course periods. Only students assigned to one of the selected house/teams will be scheduled for the study hall.
If the timetables assigned to the selected house/teams have any overlap between periods, you will get a warning, and you will not be able to save the course-section.
If you do not want to assign the study hall to a house/team, you can leave the house/team without a house/team designation. You must make sure that the start times and end times of the period do not overlap in any of the timetables.
Once a student has been enrolled in a study hall, you cannot change the house/team designation for a course.
22.Run the Schedule Study Halls option (Scheduling Center > Student Scheduler > Schedule Study Halls) to assign study halls to students’ schedules.
Only courses assigned to the student’s house/team or those with no house/team may be added to a stu-dent’s schedule. The Override House/Team field will be set to unchecked and will be disabled. The timeta-ble associated with the student’s house/team will be used when determining the student’s schedule status.
Print Schedule Information
23.Generate Class Lists (Scheduling Center > Reports > Post-Scheduler > Class Lists) for distribution to teachers.
We do not recommend using this option if you are attempting to use the scheduler in the current school year. If you restore data, you will lose changes for Scheduling and Mark Reporting made between the time that you backed up and restored data.
22
Scheduling System Procedural Outline
24.Generate Student Schedules (Scheduling Center > Reports > Post-Scheduler > Student Schedules) for distribution to students.
25.Once school has started and schedule changes have begun, periodically run the Add-Drop By Teacher report (Scheduling Center > Reports > Post-Scheduler > Add-Drop By Teacher) to inform teachers of changes in their classes.
23
System Overview
Using Staff QualificationsStaff qualifications allow you to manage the highly qualified teacher requirements of the No Child Left Be-hind Act. You can assign qualifications to teachers and define qualification requirements for courses. When you assign a teacher to a course-section, a warning will display if the teacher’s qualifications do not fill the course requirements.
To use staff qualifications to enforce highly qualified teacher requirements:
1. Define the qualifications that your district uses in the Staff Qualification validation table (Administration > System Setup > Validation Tables > click Registration > select Staff Qualification).
2. Define the qualifications and associated expiration dates for staff members on the Qualification tab of the Staff District Information page (Registration Center > Staff Information).
3. Define the qualifications required to teach the course in the Course Catalog (Scheduling Center > Building Course Setup > Course Catalog). If there are multiple qualifications for the course, enter all the qualifications that are required. If multiple qualifications are listed for a course, teachers are re-quired to meet all qualifications.
4. When you define the Master Schedule record for a course-section, you can change the staff qualifica-tions required for the course (Scheduling Center > Master Schedule > Master Schedule). When you assign a primary staff member or secondary staff member for a session, the Master Schedule option checks that the selected staff member is qualified to teach the course based on staff and course infor-mation. If the teacher does not have all the qualifications required for the course, you will get a warning message, and you must select a qualified teacher in order to save the course-section.
24
Glossary of Scheduling Terms
Glossary of Scheduling TermsThe following terms are used frequently throughout this manual in reference to scheduling.
Alternate Course (see Course Alternate)
Alternate RequestA course requested by a student that can be substituted when the regular course request cannot be scheduled. Alternate requests are processed by the Student Scheduler (Scheduling Center > Student Scheduler > Student Schedules) if a student cannot be scheduled into every regular request and there are open periods in the student’s schedule. Related term: Regular Course Request.
BlockA group of course-sections defined in the Course Catalog that can be scheduled based on a single course request. A block course allows you to schedule students together as a group for two or more courses. Blocks can also be set up so that the students do not have to attend the same sections of all courses, but must be scheduled for all of the block’s blockettes. Related terms: Blockette, Course Cat-alog, and Proxy Block.
BlocketteA course-section within a block. When a block is requested for a student, the Student Scheduler (Sched-uling Center > Student Scheduler > Student Schedules) schedules the block’s blockettes, not the block itself. In setting up the Course Catalog, blockettes should be created first, and then the block. Related terms: Block, Course Catalog, Course-Section, and Proxy Block.
ClassA session when a course is taught. Class can also refer to the body of students expected to graduate in a particular year, for example, the Class of 2012. This sense of the term is used in eSchoolPLUS in relation to class rank. Related term: Session.
Classification WeightA value used to balance course-section scheduling based on student classifications, such as Multiple Handicaps or Special Education. If your district uses classification weights for scheduling, a student cannot be scheduled into a course-section if the student’s classification weight would cause the course-section’s maximum weight to be exceeded. Related term: Course-Section.
Course(see Regular Course)
Course AlternateA course to substitute if the Student Scheduler (Scheduling Center > Student Scheduler > Student Schedules) is unable to schedule a regular course request for a student. The alternate is defined in the regular course’s Course Catalog record. If the regular course and course alternate cannot be sched-uled, then the student course alternate is scheduled. Related terms: Regular Course, Student Alternate, and Student/Course Alternate.
Course CatalogThe table used for storing course records, including both courses and blocks. In eSchoolPLUS, two types of catalogs can be set up, one for the district and the other for individual buildings. The District Course Catalog can be used to create catalogs for buildings. Similarly, new courses can be added at the building-level, then uploaded to the district catalog for downloading to other Building Course Cata-logs. Related terms: Block, Blockette, and Proxy Block.
25
System Overview
Course GroupA group of courses used in sequencing to link multiple courses. For example, a Math 9 course group might contain a set of courses, any one of which would meet a student’s requirement for Grade 09 Math. You can also create a course group to include all codes for a course when a separate code is used in each building where the course is taught. For example, if Pre-Algebra is taught in multiple middle schools within a district, a Pre-Algebra group could be set up to include all Pre-Algebra course codes used in all buildings. This group could then be used in a sequence to determine whether a student has fulfilled the prerequisite for taking Algebra I. Course groups can be set up for building-level courses and if you use the District Course Catalog, for district-level courses as well. Related term: Course Sequence.
Course Request(see Regular Course Requests )
Course SequenceA record defining the relationship between either courses or course groups. Sequences can be set up to establish prerequisites for taking a course, as described under Course Group. A sequence could also be used to link courses to determine whether a course can be scheduled with, not with, or before a sec-ond course in the same scheduling interval. Sequences can be set up for building-level courses and if you use the District Course Catalog, for district-level courses as well. Related terms: Course Group and Scheduling Interval.
Course-SectionA record in the Master Schedule that determines when, where, and by whom the section is taught. In-dividual course-sections should be set up for a course that is offered at different times and locations. Course-sections can also be set up to define the blockettes to be scheduled in place of a block. Related terms: Block, Blockette, Master Schedule, and Regular Course.
District Course RequestA future year request entered through Student Career Planner in eSchoolPLUS or Home Access Cen-ter. These requests use -1 as a generic building number, since students’ future year buildings have not yet been assigned. You can import district requests and assign students’ next-year registration build-ings using the Student Scheduler Error Scan or the Student Center’s Course Requests option. Related term: Regular Course Request.
DoubletonA regular course that will likely have only two course-sections set up. Courses are defined as double-tons in the Course Catalog. During the scheduling process, the Conflict Matrix report can be run to an-alyze singletons and doubletons since courses with fewer sections generally have a greater potential for conflicts. Related terms: Course-Section, Regular Course, and Singleton.
House/TeamA designation applied to a group of students for scheduling the students as a group. House/team codes are defined in Registration’s House/Teams table and are assigned to students in the Current Year and Next Year tabs of their Registration Information pages. If your building uses multiple bell schedules, you can also assign house/team codes to timetables. Timetables are applied to course-sections in either the Course Catalog or if overrides are allowed, in the Master Schedule. Related terms: Course Catalog, Master Schedule, Multiple Bell Schedule, and Timetable.
Interval (see Scheduling Interval)
26
Glossary of Scheduling Terms
Master ScheduleThe table used in eSchoolPLUS for storing information for the course-sections in which students can be scheduled. This can include the sessions for regular course-sections or the blockettes that should be scheduled for a block. A Master Schedule record defines general information for a course-section, such as building, maximum seating, and grade restrictions, as well as specifics, such as the class peri-od, room, marking periods, and mark types that apply to the section. The Master Schedule record for a block course can also contain the block’s blockettes. In this case, you must set up Master Schedule records for the blockettes first before creating the record for the block. Related terms: Block, Blockette, Course-Section, and Session.
ModelingThe simulation of a schedule based on student requests on the Course Requests page. Additionally, when you add and drop courses and make other changes to a student’s schedule, a model is created to enable you to cancel the changes if needed. If the model is acceptable, you can keep it as the stu-dent’s schedule. Typically, this is done in the current year for individual students, as opposed to next year scheduling for multiple students.
Multiple Bell ScheduleA schedule that uses house/teams and multiple timetables to enable different bell schedules to be used in the same building. For example, students on one house/team can be dismissed from Period 1 at 8:00 and students on another house/team at 8:10, thereby limiting hallway traffic during period changes. Un-der this form of scheduling, teams are assigned to timetables, students are assigned to teams, and teams (and their timetables) are assigned to course-sections. If teams in a building have timetables with different start and end times, a separate course-section must be set up for each team/period. Related terms: House/Team, Period, and Timetable.
Multiple Building SchedulingThe scheduling of students who also take courses in buildings other than their buildings of enrollment. In this case, you must schedule the course by running one of the Student Center options or the Sched-uling Center’s Scheduled Course Load/Unload/Lock/Erase option. Note, however, that the system does not validate for conflicts with courses already scheduled in the enrollment building. In addition, if the MBS building uses the Multiple Bell Schedule feature, then the student needs to be assigned a house/team that applies to the course being scheduled. Related terms: House/Team and Timetable.
PeriodA segment of the school day, as defined in the Periods table (Scheduling Center > Setup > Periods). A period is associated with specific times in a cycle day in the Timetable. eSchoolPLUS uses two types of periods: attendance periods and scheduling periods. Attendance periods identify when attendance may be taken. Scheduling periods determine when classes meet. Attendance and scheduling periods are often the same, but can be different. Related terms: House/Team, Multiple Bell Schedule, and Time-table.
Proxy Block (or Proxy Course)A block containing a list of courses (blockettes) that should be scheduled when the proxy is requested for a group of students. For example, you can create a Grade 06 proxy block that includes the set of courses that should be scheduled for all 6th grade students. A proxy block does not force students to take the blockette courses as a group and instead enables them to be scheduled individually into the different sections. Including a block course with a proxy block is also useful, for example, if you want to group students for some but not all courses, and you have multiple course-sections of the block course that include the blockette courses you want to group. Related terms: Block, Blockette, and Course-Sec-tion.
27
System Overview
Regular CourseA course defined as a record in the Course Catalog that will have sessions scheduled in the Master Schedule. Course records can also be created for scheduling study halls and lunch. Related terms: Course Catalog, Course-Section, and Study Hall.
Regular Course RequestA request that the Student Scheduler (Scheduling Center > Student Scheduler > Student Schedules) should attempt to schedule before trying alternates. Related terms: District Course Request, Student Alternate, and Student/Course Alternate.
Scheduling IntervalThe scheduling time period identifying when the course is scheduled, such as a full year or semester. Intervals are defined in the Intervals option (Scheduling Center > Setup > Intervals). An interval indi-cates how many times a year a building goes through the scheduling process. It also determines the requests and marking periods that will be processed in scheduling.
SessionIndicates when and where a course-section meets, as defined in the Master Schedule. Session infor-mation includes periods within the day, cycle days, marking periods, room number, primary and sec-ondary staff, and mark reporting settings. Since sessions can span multiple periods, most course-sections require only one session. Additional sessions are needed if classes meet in different periods on different days or in non-consecutive periods. Related terms: Course-Section, Master Schedule, and Period.
SingletonA regular course that will likely have only one course-section set up. Courses are defined as singletons in the Course Catalog. During the scheduling process, the Conflict Matrix report can be run to analyze singletons (and doubletons) since courses with fewer sections generally have a greater potential for producing conflicts. Related terms: Course-Section, Doubleton, and Regular Course.
State CourseA course defined by your state and identified by a state code. If your state requires these codes in print-ing transcripts or filing state reports, you must set up course equivalency information in Mark Report-ing’s State Courses table to map Course Catalog codes to the state codes. Besides descriptions and local codes, state course records can also store marks and credit information drawn from their course equivalents, although this depends on your district’s procedures.
Student AlternateAn alternate request that can be used in place of any course that cannot be scheduled. Related terms: Alternate Request, Course Alternate, and Student/Course Alternate.
Student/Course AlternateA request by a student for an alternate course if a specific regular course cannot be scheduled. For ex-ample, a student requests Psychology and indicates that if this cannot be scheduled, then schedule So-ciology. Related terms: Alternate Request, Course Alternate, and Student Alternate.
Study HallA study period scheduled during a student’s open period. eSchoolPLUS supports two types of study halls. You can use the Schedule Study Halls option (Scheduling Center > Student Scheduler > Sched-ule Study Halls) to fill in open periods with study halls. You can also set up study halls as regular course-sections in the Course Catalog, which allows them to be scheduled as course requests. Related terms: Course Catalog and Period.
28

Glossary of Scheduling Terms
TimetableA record listing the start and end times of periods, as defined in the Timetable table (Scheduling Center > Setup > Timetable). Periods determine when course-sections meet. If your building uses multiple bell schedules, you can assign timetables to house/teams and define unique start and end times for the pe-riods in each team’s timetable. Related terms: House/Team, Multiple Bell Schedule, and Period.
29

System Overview
30
2. Student Scheduler OptionsThe Student Scheduler options enable you to schedule students into courses. This section includes tools to allow you to save and restore scheduling runs; to set up default parameters for running the scheduler; to run an error scan on scheduling information to identify potential scheduling problems; to mass load or un-load scheduled courses for students; and to recalculate the number of students in course-section sessions.
PreviewThis chapter provides information on the following topics:
Student Scheduler Error Scan
Back Up/Restore Scheduling Run
Student Scheduler Parameters
Schedule Students
Analyzing a Scheduling Run
Scheduling Status
Load/Unload/Lock/Erase Scheduled Courses
Recalculate Seats
31

Student Scheduler Options
Student Scheduler Error ScanUse this option to scan scheduling data and create a report that verifies course and student request infor-mation. Run the report before the scheduler (Schedule Students option) so you can make any necessary corrections before scheduling students.
Running the Error Scan
1. Select Scheduling Center > Student Scheduler > Error Scan.
2. Indicate how you want to run the error scan by completing the appropriate sections of the page.
3. Click Run.
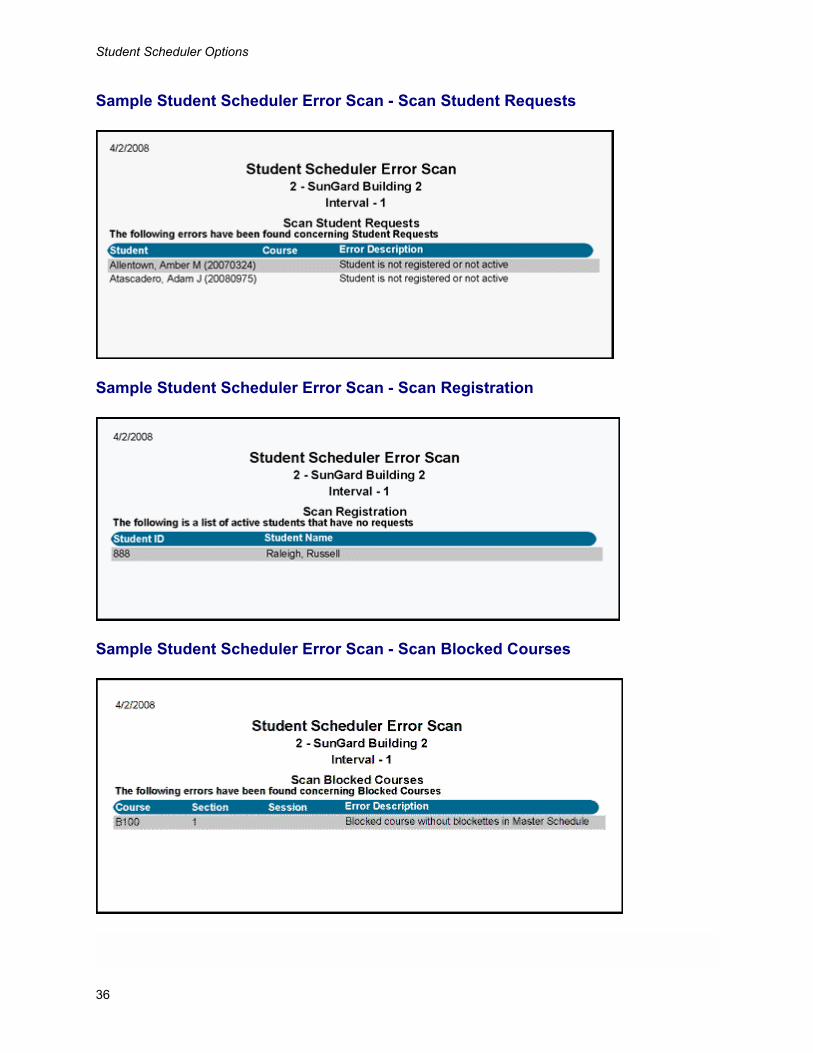
Sample Student Scheduler Error Scan Page
Fields
BuildingBuilding to scan for errors.
IntervalScheduling interval to scan for errors. The scheduling interval determines the requests and courses to scan.
32
Student Scheduler Error Scan
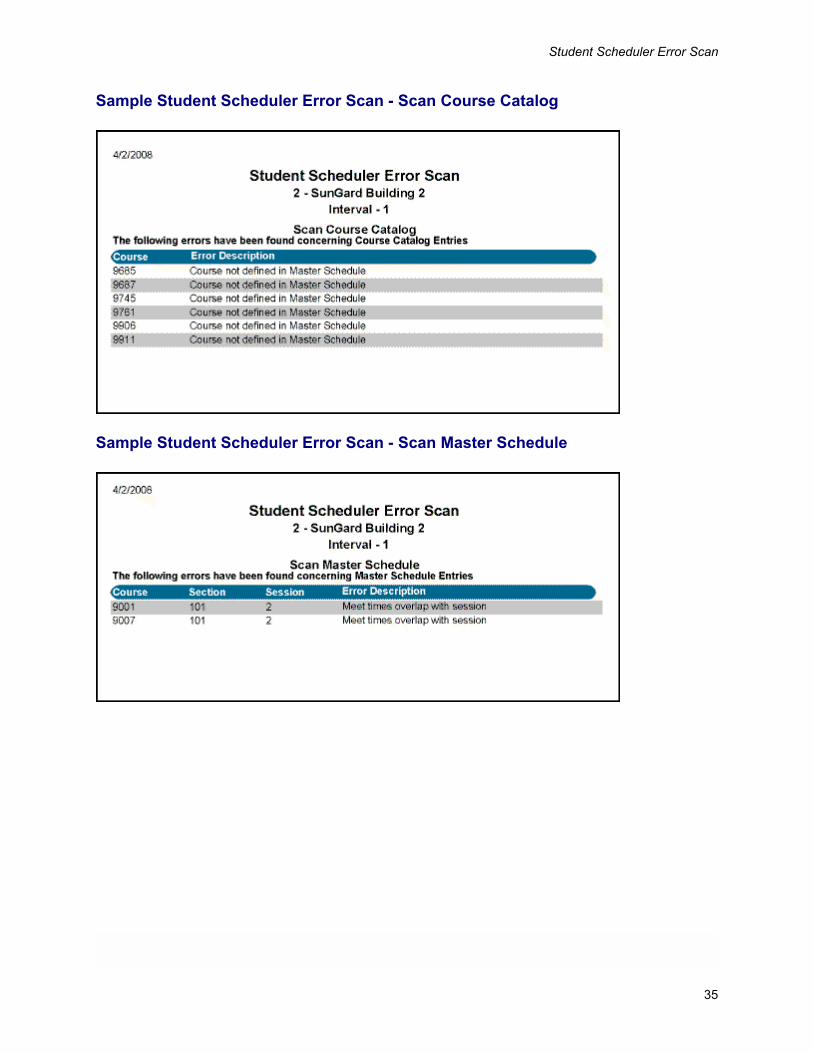
Scan Course CatalogChecked if you want to verify Course Catalog information. The error scan log prints errors if:
• Active courses in the Course Catalog do not have course-sections in the Master Schedule.
• Courses used as a course alternate in the Course Catalog do not have course-sections in the Mas-ter Schedule.
Scan Master ScheduleChecked if you want to verify Master Schedule information for the durations included in the scheduling interval. The error scan log prints errors if:
• The course code is not in the Course Catalog.
• The course-section is designated as a block, but has sessions.
• The course-section is designated as a regular course-section, but has no sessions.
• The start or end period for a session is not a valid scheduling period.
• A period is not used in the timetable.
• Sessions for a course-section conflict.
Scan Student RequestsChecked if you want to verify Student Request information. The error scan log prints errors if:
• The student ID is not found in the Registration table. The student is either not active or pre-regis-tered.
• The course does not have a course-section in the Master Schedule.
• The course has a course-section that is designated as a study hall in the Master Schedule.
• The course is designated as inactive in the Course Catalog.
• The student does not meet the grade, gender, or house/team restrictions for at least one course-section of the course.
• The student requested specific marking periods of the course, but there are no course-sections of the course that meet during the requested marking periods.
Include Sequence CheckChecked if you want to verify course sequences for student requests. The error scan log prints errors if:
• The student requested a course but has not taken or requested its prerequisite.
33
Student Scheduler Options
Import District RequestsChecked if you want to assign the appropriate next year building to student requests from the District Course Catalog. A district request is a future year request entered through Student Career Planner in eSchoolPLUS or Home Access Center. These requests use -1 as a generic building number, since stu-dents’ future year buildings have not yet been assigned.
If the Student Scheduler Error Scan finds a district request for the school year environment you are us-ing, it places that request in the student’s next-year registration building. For example, if your current school year is 2013 and you access the next-year environment, the error scan looks for district requests for 2014.
For more information on the District Course Catalog and district course requests, refer to Using the Dis-trict Course Catalog in eSchoolPLUS online help.
Scan RegistrationChecked if you want to verify that active or pre-registered students have course requests. The error scan log prints errors if:
• The student is active or pre-registered and has no course requests.
Scan Blocked CoursesChecked if you want to verify information for blocked course-sections. The error scan log prints errors if:
• The block course has no blockettes defined.
• A course that has blockettes defined is not designated as a block in the Master Schedule.
• The blockette does not have a course-section in the Master Schedule.
• The blockette course-sections conflict for a block.
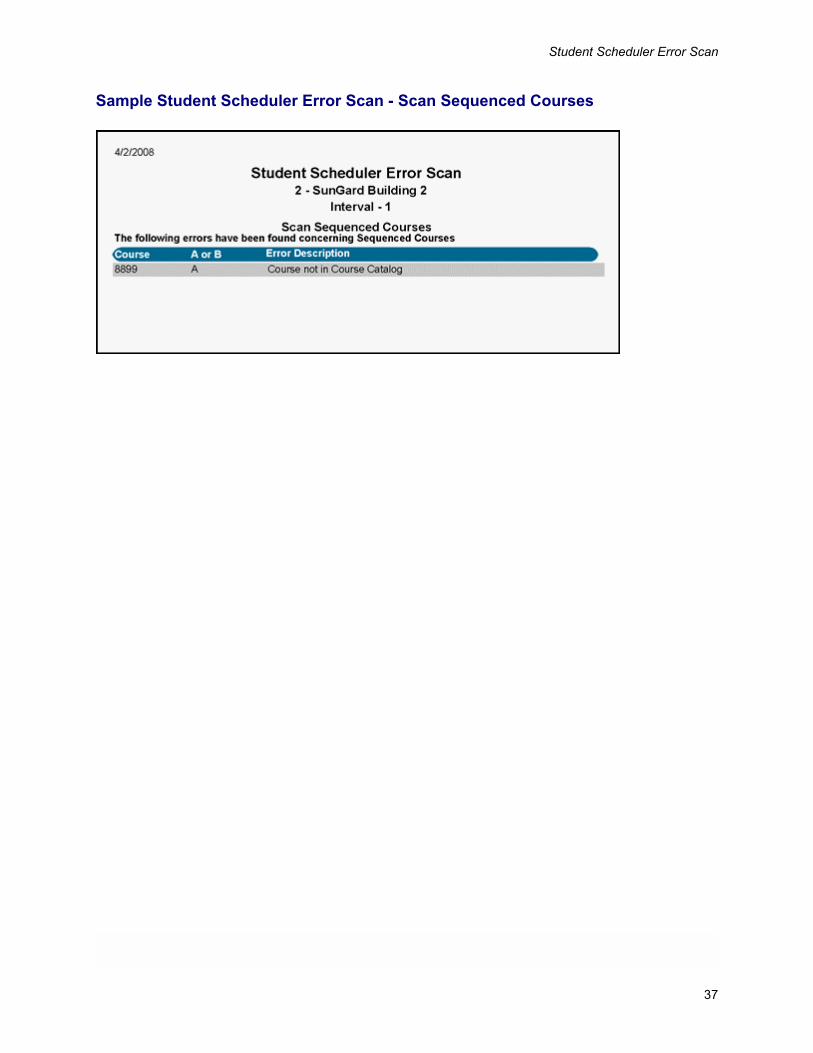
Scan Sequenced CoursesChecked if you want to verify course sequence information. The error scan log prints errors if:
• A course that is not in the Course Catalog is used as part of a sequence.
• A course that is not in the Course Catalog is used as part of a course group for a sequence.
34
Student Scheduler Error Scan
Sample Student Scheduler Error Scan - Scan Course Catalog
Sample Student Scheduler Error Scan - Scan Master Schedule
35
Student Scheduler Options
Sample Student Scheduler Error Scan - Scan Student Requests
Sample Student Scheduler Error Scan - Scan Registration
Sample Student Scheduler Error Scan - Scan Blocked Courses
36
Student Scheduler Error Scan
Sample Student Scheduler Error Scan - Scan Sequenced Courses
37
Student Scheduler Options
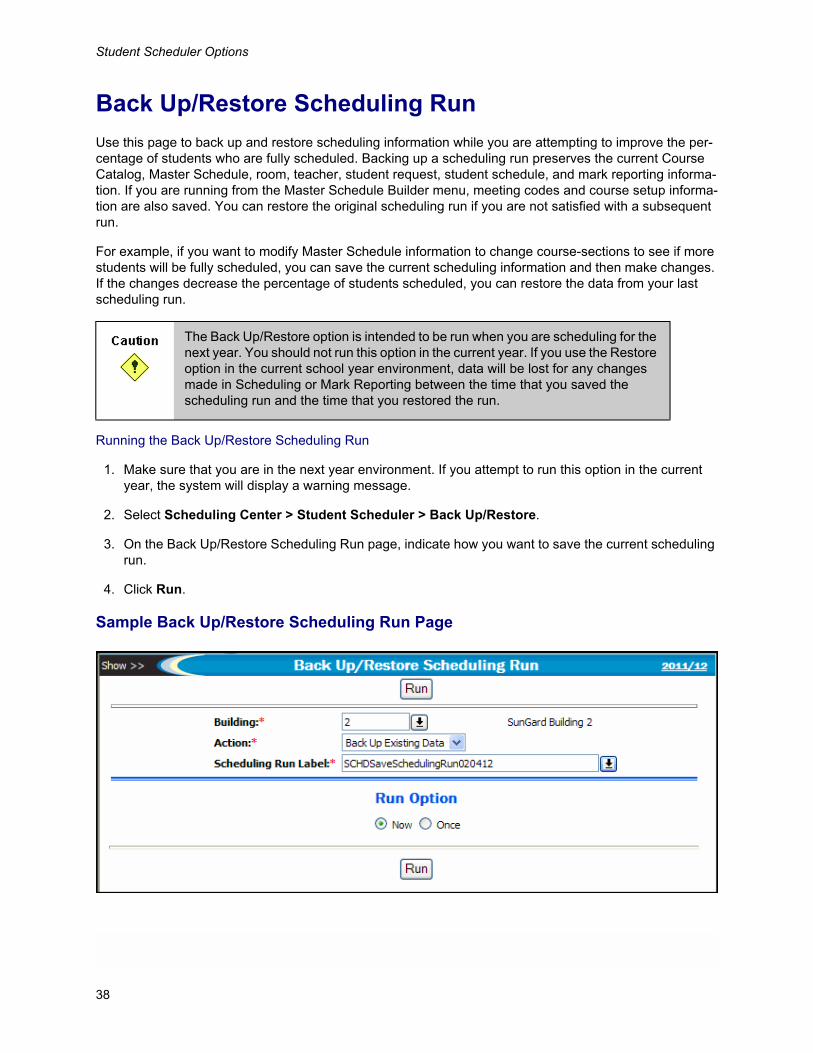
Back Up/Restore Scheduling RunUse this page to back up and restore scheduling information while you are attempting to improve the per-centage of students who are fully scheduled. Backing up a scheduling run preserves the current Course Catalog, Master Schedule, room, teacher, student request, student schedule, and mark reporting informa-tion. If you are running from the Master Schedule Builder menu, meeting codes and course setup informa-tion are also saved. You can restore the original scheduling run if you are not satisfied with a subsequent run.
For example, if you want to modify Master Schedule information to change course-sections to see if more students will be fully scheduled, you can save the current scheduling information and then make changes. If the changes decrease the percentage of students scheduled, you can restore the data from your last scheduling run.
Running the Back Up/Restore Scheduling Run
1. Make sure that you are in the next year environment. If you attempt to run this option in the current year, the system will display a warning message.
2. Select Scheduling Center > Student Scheduler > Back Up/Restore.
3. On the Back Up/Restore Scheduling Run page, indicate how you want to save the current scheduling run.
4. Click Run.
Sample Back Up/Restore Scheduling Run Page
The Back Up/Restore option is intended to be run when you are scheduling for the next year. You should not run this option in the current year. If you use the Restore option in the current school year environment, data will be lost for any changes made in Scheduling or Mark Reporting between the time that you saved the scheduling run and the time that you restored the run.
38
Back Up/Restore Scheduling Run
Fields
BuildingBuilding for which you want to back up or restore scheduling information.
ActionIndicate whether you are backing up or restoring information.
Select:
Back Up Existing Data - to back up the current scheduling information.
Restore Saved Data - to restore the scheduling information stored with the selected Scheduling Run Label.
Scheduling Run LabelLabel for the scheduling run.
• When you back up a run, you can enter text to identify the run. The label must be unique for the building and school year.
• When you restore a run, select the label for the backup run that you want to restore.
39
Student Scheduler Options
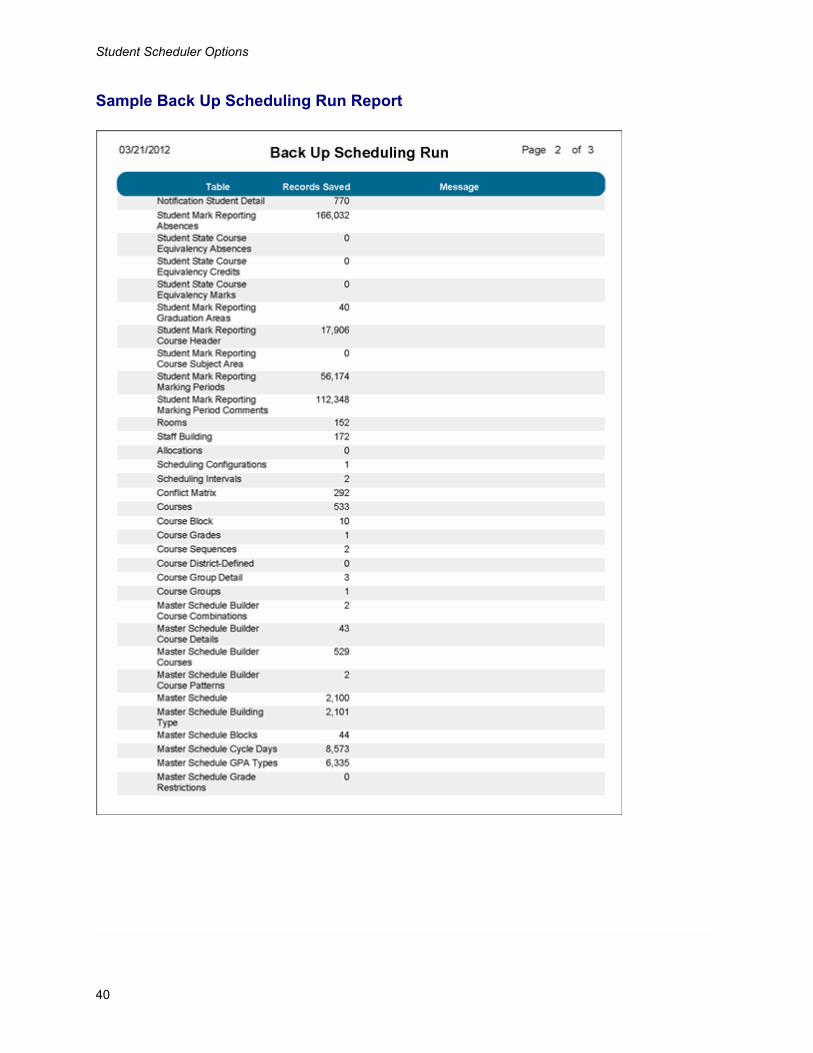
Sample Back Up Scheduling Run Report
40
Back Up/Restore Scheduling Run
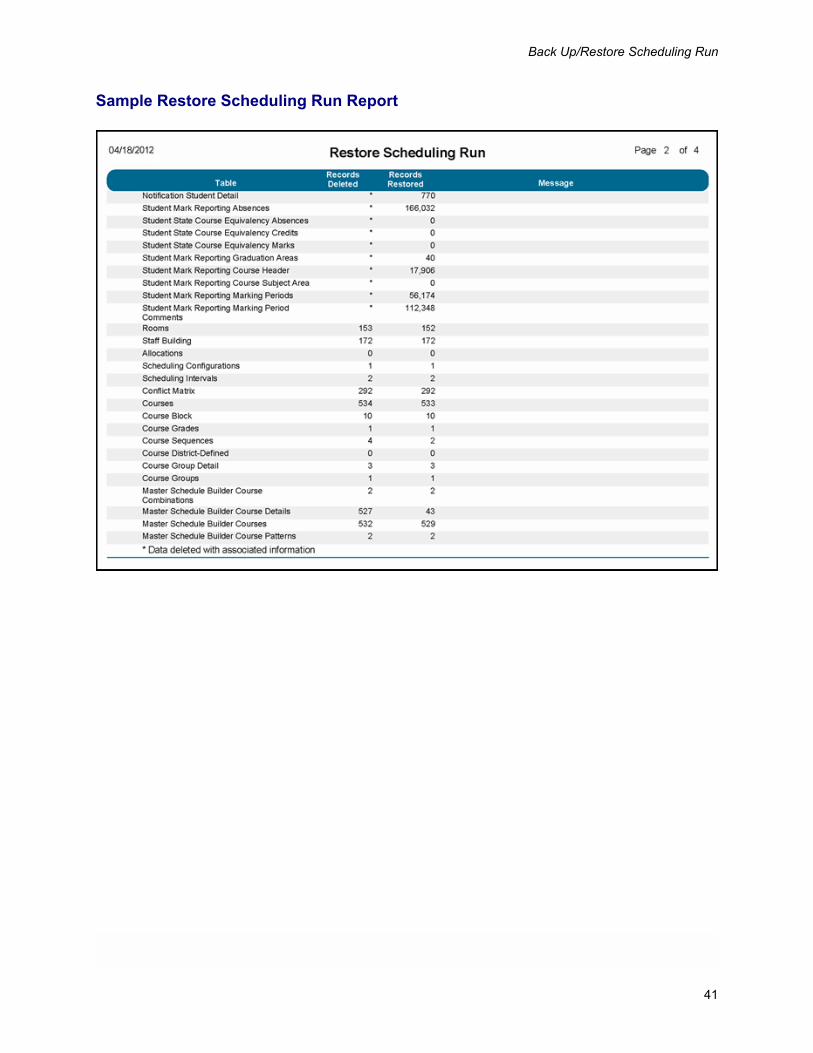
Sample Restore Scheduling Run Report
41
Student Scheduler Options
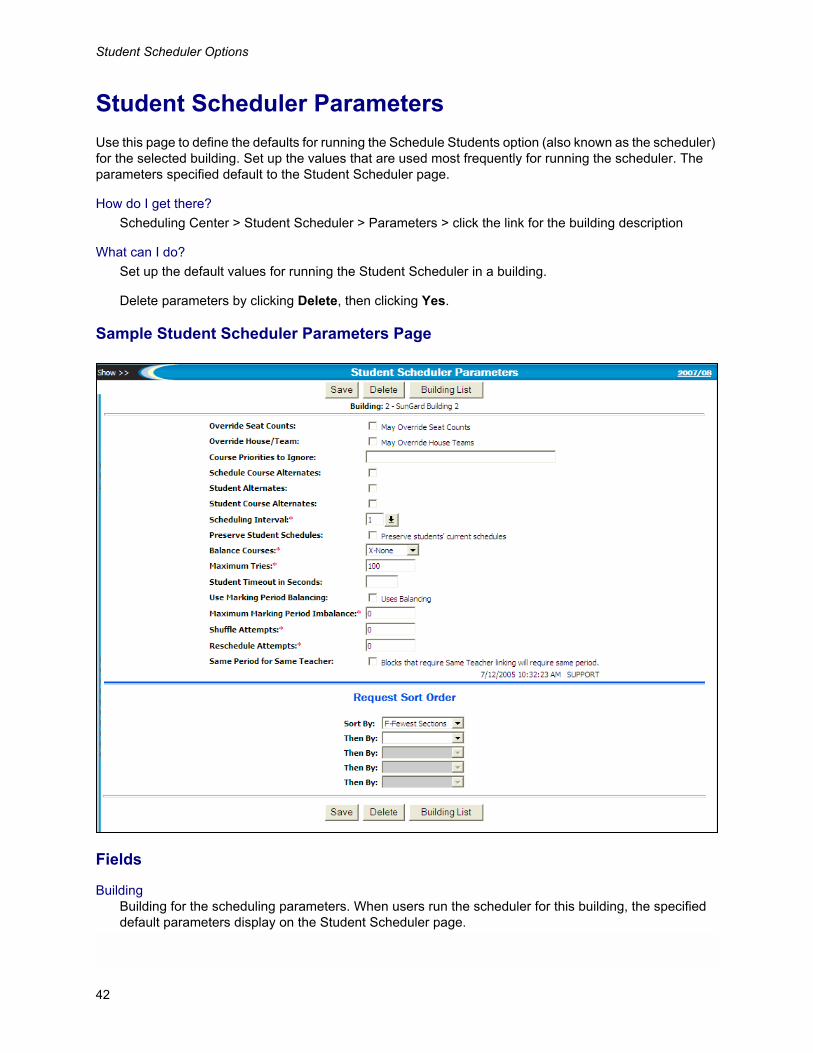
Student Scheduler ParametersUse this page to define the defaults for running the Schedule Students option (also known as the scheduler) for the selected building. Set up the values that are used most frequently for running the scheduler. The parameters specified default to the Student Scheduler page.
How do I get there?Scheduling Center > Student Scheduler > Parameters > click the link for the building description
What can I do?Set up the default values for running the Student Scheduler in a building.
Delete parameters by clicking Delete, then clicking Yes.
Sample Student Scheduler Parameters Page
Fields
BuildingBuilding for the scheduling parameters. When users run the scheduler for this building, the specified default parameters display on the Student Scheduler page.
42
Student Scheduler Parameters
Override Seat CountsChecked if the scheduler may override the maximum seats for a course-section. If this box is checked when you run the scheduler, the system will schedule students into course-sections that are full.
The scheduler overrides seat counts only if the user has security rights to override seat counts.
Override House/TeamChecked if the scheduler may schedule students into courses without considering house/teams. Check this box if you do not want to restrict courses based on house/teams.
The scheduler overrides house/teams only if the user has security rights to override house/teams.
If the building is set up for Multiple Bell Scheduling, do not check this box.
Course Priorities to IgnoreCourse priorities that the scheduler should ignore when scheduling students. Any course with a course priority matching those listed is not scheduled.
You can enter a comma-delimited list or a range of values separated by a hyphen. For example, if you are scheduling major courses with priorities in the 100-60 range, you can prevent scheduling courses with lower priorities by entering either 10,20,30,40,50 or 10-50.
Schedule Course AlternatesChecked if the scheduler should schedule the course alternate for a course as defined in the Course Catalog if the student cannot be scheduled into the regular request.
Student AlternatesChecked if the scheduler should schedule student alternate requests if the student cannot be scheduled into any regular request.
Student Course AlternatesChecked if the scheduler should schedule student course alternate requests if the student cannot be scheduled into the corresponding regular request.
Scheduling IntervalThe scheduling interval that you are scheduling. The scheduling interval determines the requests and courses that will be scheduled.
If the building has multiple intervals, you must select an interval for which students are not already scheduled. Otherwise, student schedules may be lost.
Preserve Student SchedulesChecked if you want the scheduler to preserve existing schedules for students.
43
Student Scheduler Options
Balance Courses Select how course-sections should be balanced. If you select to balance course-sections, the scheduler attempts to balance the students scheduled into course-sections using the selected criteria. For exam-ple, balancing by discipline codes minimizes the chance of scheduling several students with one or more of the specified offense codes into the same course-section.
Select:
E - Ethnicity - to balance course-sections based on the ethnicity of students.
S - Gender - to balance course-sections based on the gender of students.
G - Grade - to balance course-sections based on the grade of students.
C - Classification - to balance course-sections based on the scheduling weight of student classification codes specified in Registration’s Classifications validation table.
D - Discipline - to balance course-sections based on students with certain types of incidents. The inci-dent codes for balancing schedules are defined in your building’s Scheduling Configuration.
X - None - to not balance course-sections.
Note: The Classification and Discipline options were introduced in eSchoolPLUS version 2.5.
Maximum TriesThe maximum tries that the scheduler should attempt when scheduling a student. Enter a number from 1-100 to indicate how many times the scheduler should try to schedule a student. Each factor repre-sents 10,000 tries. For example, if you enter 2, the system makes 20,000 attempts.
A try is a successful or unsuccessful attempt to schedule a student into a single course-section. When the student has been successfully scheduled, the tries stop for that student, regardless of the maximum tries per student allowed. For example, if a student is successfully scheduled after only 20 tries, the al-gorithm stops trying to schedule that student into the course-section. If a student cannot be scheduled by the maximum tries allotted, the student is timed out.
Student Timeout in SecondsIf you want the scheduler to time out for a student after a specified number of seconds, enter the number of seconds. For example, enter 30 to time out the scheduler after 30 seconds. The number of students being scheduled determines how this setting affects performance. We recommend using no more than 60 seconds for the student timeout.
Leave this field blank if you do not want to specify a timeout.
Use Marking Period BalancingChecked if the scheduler should balance the total course weight for marking periods. Based on the Course Catalog Semester Weight value for courses, the scheduler will attempt to balance the course weights for the marking period.
For example, if you assign high values to major courses and low values to minor courses, the scheduler attempts to balance courses academically so the student is not scheduled into all major courses in one marking period and minor courses in another marking period.
If you leave this box unchecked, the algorithm still tries to balance the number of courses in each se-mester, but does not distinguish between major and minor courses.
44
Student Scheduler Parameters
Maximum Marking Period ImbalanceThe largest acceptable imbalance allowed if you are using marking period balancing. The scheduler uses this value to determine whether a student’s schedule is within the acceptable imbalance for this run.
Shuffle AttemptsThe number of students the scheduler can try to shuffle to find a section of a course for scheduling the current student. If you do not want to shuffle students, enter 0 (zero).
The shuffling process moves students who are partially scheduled in an attempt to schedule another student; it does not touch students who have been fully scheduled.
Reschedule AttemptsThe number of students the scheduler can try to completely reschedule to fit the current student into a closed course-section. If you do not want to reschedule students, enter 0 (zero).
The rescheduling process only moves students who are fully scheduled. The scheduler only resched-ules a student if the student still ends up with a full schedule. If needed, it may replace a regular request with an alternate.
Same Period for Same TeacherChecked if the scheduler should schedule blockettes in the same period if the block’s Master Schedule record has the Same Teacher field set to R - Linking Required.
If your building has no blocks defined to link blockettes to the same teacher, leave this field unchecked.
You might use this option if you have a block with blockette courses that meet for one marking period each and students should be scheduled with the same teacher in the same period for both marking pe-riods.
Using shuffle attempts can dramatically increase the amount of time that the algo-rithm processes each student. You should start with a small number of shuffle at-tempts and increase the number of attempts as needed. There are many factors that can affect the processing time for shuffling schedules so we recommend that you use 5 or fewer attempts.
Using reschedule attempts can dramatically increase the amount of time that the algorithm processes each student. You should start with a small number of re-schedule attempts and increase the number of attempts as needed. There are many factors that can affect the processing time for rescheduling so we recom-mend that you use 5 or fewer attempts.
45
Student Scheduler Options
Request Sort FieldsSelect the Request Sort Order options for setting the order for scheduling a student’s requests. For ex-ample, you can choose to schedule in order by course priority.
Select one of the following for each sort level you want to use:
B - Blocks - to schedule block courses first.
P - Priority - to schedule courses in order by course priority.
H - House - to schedule students into courses designated for their house/teams before attempting to schedule courses that do not have the corresponding teams.
F - Fewest Sections - to schedule courses in order by the number of sections of each course. For ex-ample, this option is likely to schedule students with requests for singletons (courses in the Course Cat-alog with a single section) first.
M - Multiple Sessions - to schedule courses based on the number of multiple sessions for courses.
46
Schedule Students
Schedule StudentsUse the Schedule Students option, which is also referred to as the scheduler, to schedule students into courses.
• If you want to view, add, or update scheduled courses for a single student, use the Entry option (Stu-dent Center > Scheduling > Entry).
• If you want to model a single student, use the Course Request option (Student Center > Scheduling > Course Requests).
Running the Scheduler
1. Select Scheduling Center > Student Scheduler > Schedule Students.
2. On the Building Selection page, select the appropriate building to display the Schedule Students page.
If the Schedule Students page displays, but you want to run the scheduler for a different building, click Building List.
3. Indicate how you want to schedule students by completing the appropriate sections of the page.
4. If you want to run the Back Up/Restore Schedule Run option, click Backup/Restore. The application displays the Back Up/Restore page. For more information about running this option, refer to Back Up/Restore Scheduling Run on page 38.
Otherwise, go to step 5.
5. To run the scheduler, click Run.
6. Once the scheduling process is completed, review the scheduler’s error report and warning logs in My Home page’s My Recent Reports section. If necessary, use the Back Up/Restore option to restore the schedules you backed up.
47
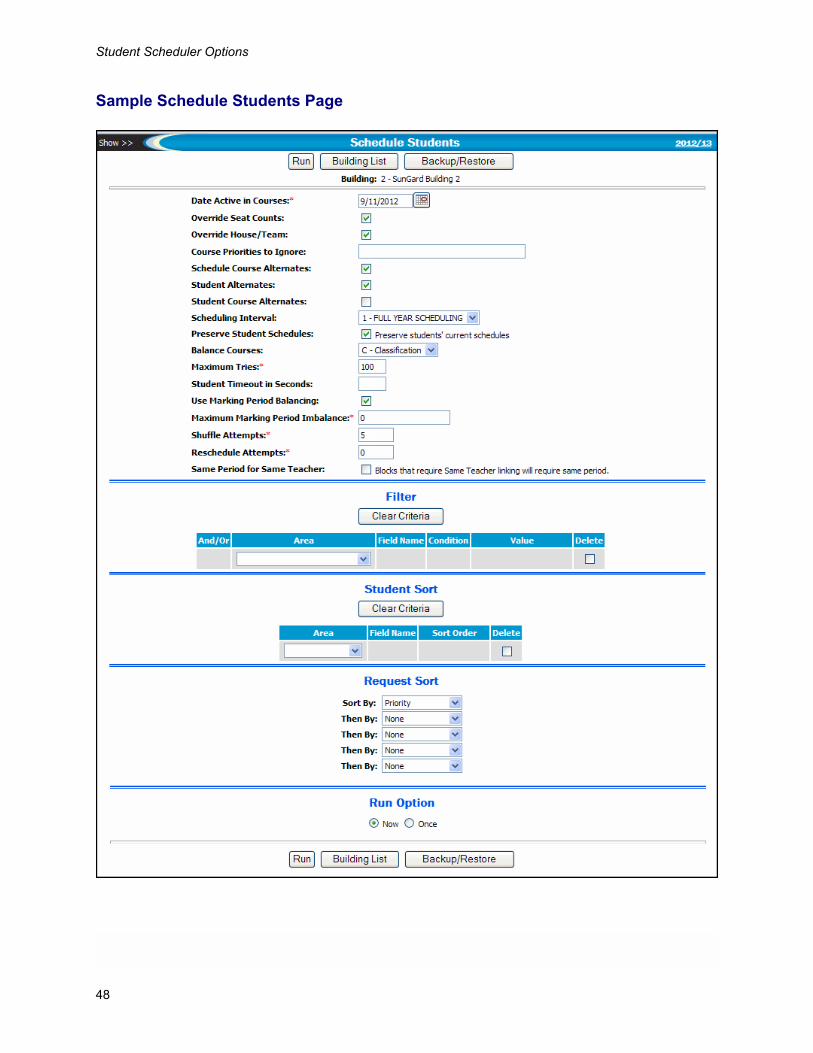
Student Scheduler Options
Sample Schedule Students Page
48
Schedule Students
Fields
BuildingBuilding you are scheduling. Click Building List to change the selected building.
Date Active in CourseThe first day that students are attending the courses. The date is used as the Date Added value for courses that are scheduled.
Make sure to enter the correct date; otherwise, attendance information may be incorrect. The system uses the date added to determine the first day a student should be attending the course.
Override Seat CountsChecked if the scheduler should override the maximum seats for a course-section. If this box is checked, the system may schedule students into course-sections that are full.
The scheduler overrides seat counts only if the user has security rights to override seat counts.
Override House/TeamChecked if the scheduler should schedule students into courses without considering house/teams. The scheduler overrides house/teams only if the user has security rights to override house/teams.
If the building uses multiple bell schedules, you cannot access this field, and you cannot override house/team designations.
Course Priorities to IgnoreCourse priorities to ignore when scheduling students. Courses with a course priority equal to a listed priority are not scheduled.
You can enter a comma-delimited list or a range of values separated by a hyphen. For example, if you are scheduling major courses with priorities in the 100-60 range, you can prevent scheduling courses with lower priorities by entering either 10,20,30,40,50 or 10-50.
Schedule Course AlternatesChecked if the scheduler should schedule the course alternate for a course as defined in the Course Catalog if the student cannot be scheduled into the regular request.
Student AlternatesChecked if the scheduler should schedule student alternate requests if the student cannot be scheduled into any regular request.
Student Course AlternatesChecked if the scheduler should schedule student course alternate requests if the student cannot be scheduled into the corresponding regular request.
Scheduling IntervalThe scheduling interval you are scheduling. The scheduling interval determines the requests and cours-es that will be scheduled.
If the building has multiple intervals, you must select an interval for which students are not already scheduled. Otherwise, student schedules may be lost.
Preserve Student SchedulesChecked if you want the scheduler to preserve existing schedules for students.
49
Student Scheduler Options
Balance Courses Select how course-sections should be balanced. If you select to balance course-sections, the scheduler attempts to balance the students scheduled into course-sections using the selected criteria. For exam-ple, balancing by discipline codes minimizes the chance of scheduling several students with one or more of the specified offense codes into the same course-section.
Select:
E - Ethnicity - to balance course-sections based on the ethnicity of students.
S - Gender - to balance course-sections based on the gender of students.
G - Grade - to balance course-sections based on the grade of students.
C - Classification - to balance course-sections based on the scheduling weight of student classification codes specified in Registration’s Classifications validation table.
D - Discipline - to balance course-sections based on students with certain types of incidents. The inci-dent codes for balancing schedules are defined in your building’s Scheduling Configuration.
X - None - to not balance course-sections.
Note: The Classification and Discipline options were introduced in eSchoolPLUS version 2.5.
Maximum TriesThe maximum tries that the scheduler should attempt when scheduling a student. Enter a number from 1-100 to indicate how many times the scheduler should try to schedule a student. Each factor repre-sents 10,000 tries. For example, if you enter 2, the system makes 20,000 attempts.
A try is a successful or unsuccessful attempt to schedule a student into a single course-section. When the student has been successfully scheduled, the tries stop for that student, regardless of the maximum tries per student allowed. For example, if a student is successfully scheduled after only 20 tries, the scheduler stops trying to schedule that student into the course-section. If a student cannot be scheduled by the maximum tries allotted, the student is timed out.
Student Timeout in SecondsIf you want the scheduler to time out for a student after a specified number of seconds, enter the number of seconds. For example, enter 30 to time out after 30 seconds. The number of students being sched-uled determines how this setting affects performance. We recommend using no more than 60 seconds for the student timeout.
Leave this field blank if you do not want to specify a timeout.
Use Marking Period BalancingChecked if the scheduler should balance the total course weight for marking periods. Based on the Course Catalog Semester Weight value for courses, the scheduler will attempt to balance the course weights for the marking period.
For example, if you assign high values to major courses and low values to minor courses, the scheduler attempts to balance courses academically so the student is not scheduled into all major courses in one marking period and minor courses in another marking period.
If you leave this box unchecked, the algorithm still tries to balance the number of courses in each se-mester, but does not distinguish between major and minor courses.
50
Schedule Students
Maximum Marking Period ImbalanceThe largest acceptable imbalance allowed if you are using marking period balancing. The scheduler uses this value to determine whether a student’s schedule is within the acceptable imbalance for this run.
Shuffle AttemptsThe number of students the scheduler can try to shuffle to find a section of a course for scheduling the current student. If you do not want to shuffle students, enter 0 (zero).
The shuffling process moves students who are partially scheduled in an attempt to schedule another student; it does not touch students who have been fully scheduled.
Reschedule AttemptsThe number of students the scheduler can try to completely reschedule to fit the current student into a closed course-section. If you do not want to reschedule students, enter 0 (zero).
The process only reschedules students who are fully scheduled and only if the students are left with full schedules. If needed, the system may replace a regular request with an alternate.
Same Period for Same TeacherChecked if the scheduler should schedule blockettes in the same period if the block’s Master Schedule record has the Same Teacher field set to R - Linking Required.
If your building has no blocks defined to link blockettes to the same teacher, leave this field unchecked.
You might use this option if you have a block with blockette courses that meet for one marking period each and students should be scheduled with the same teacher in the same period for both marking pe-riods.
Using shuffle attempts can dramatically increase the amount of time that the algo-rithm processes each student. You should start with a small number of shuffle at-tempts and increase the number of attempts as needed. There are many factors that can affect the processing time for shuffling schedules so we recommend that you use 5 or fewer attempts.
Using reschedule attempts can dramatically increase the amount of time that the algorithm processes each student. You should start with a small number of re-schedule attempts and increase the number of attempts as needed. There are many factors that can affect the processing time for rescheduling so we recom-mend that you use 5 or fewer attempts.
51
Student Scheduler Options
Request Sort Section
Sort By FieldsSelect the Request Sort options for setting the order for scheduling a student’s requests. For example, you can choose to schedule in order by course priority.
Select one of the following for each sort level you want to use:
Blocks - to schedule block courses first.
Priority - to schedule courses in order by course priority.
House - to schedule students into courses designated for their house/teams before attempting to sched-ule courses that do not have the corresponding teams.
Fewest Sections - to schedule courses in order by the number of sections of each course. For example, this option is likely to schedule students with requests for singletons (courses in the Course Catalog with a single section) first.
Multiple Sessions - to schedule courses based on the number of multiple sessions for courses.
None - to not sort.
52
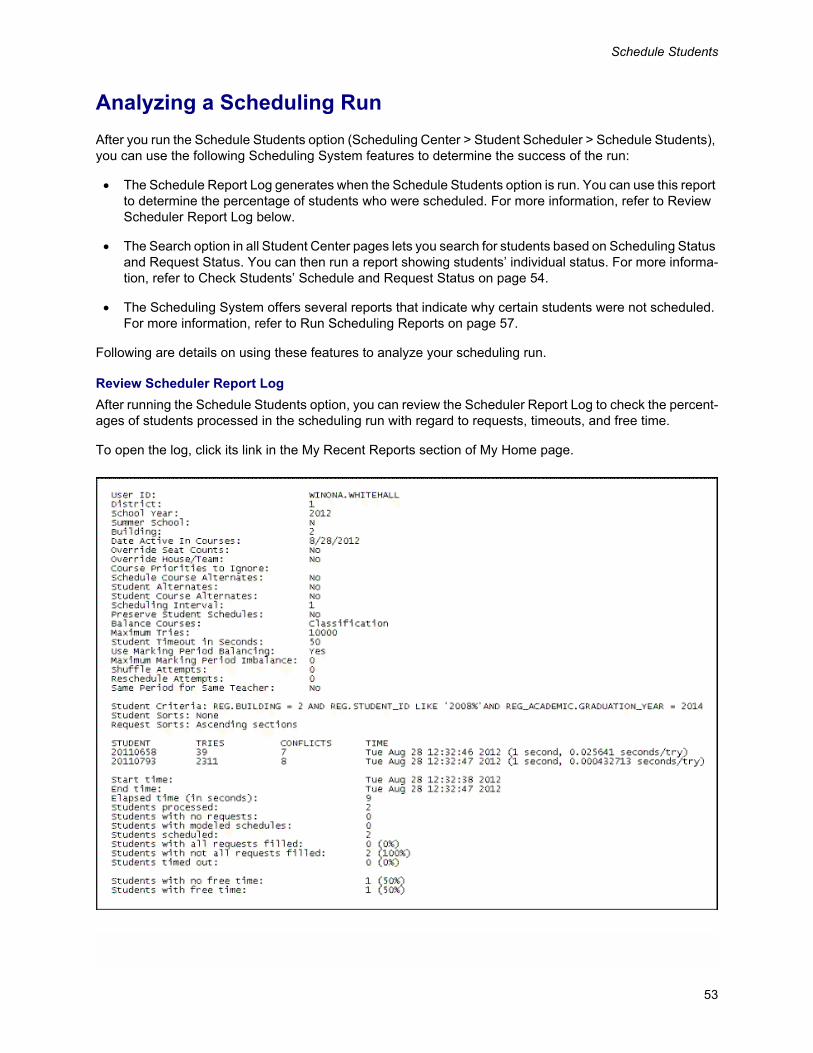
Schedule Students
Analyzing a Scheduling RunAfter you run the Schedule Students option (Scheduling Center > Student Scheduler > Schedule Students), you can use the following Scheduling System features to determine the success of the run:
• The Schedule Report Log generates when the Schedule Students option is run. You can use this report to determine the percentage of students who were scheduled. For more information, refer to Review Scheduler Report Log below.
• The Search option in all Student Center pages lets you search for students based on Scheduling Status and Request Status. You can then run a report showing students’ individual status. For more informa-tion, refer to Check Students’ Schedule and Request Status on page 54.
• The Scheduling System offers several reports that indicate why certain students were not scheduled. For more information, refer to Run Scheduling Reports on page 57.
Following are details on using these features to analyze your scheduling run.
Review Scheduler Report Log After running the Schedule Students option, you can review the Scheduler Report Log to check the percent-ages of students processed in the scheduling run with regard to requests, timeouts, and free time.
To open the log, click its link in the My Recent Reports section of My Home page.
53
Student Scheduler Options
The values at the bottom of the log indicate how many students have been successfully scheduled, as well as the reasons some students could not be scheduled.
• Students with all requests filled - includes students who have all regular requests scheduled. A stu-dent is included even if a student course alternate was scheduled in place of a regular request. Stu-dents in this count have a Request Status of A - All Used.
This number may be low if students request more courses than fit a typical schedule. For example, if a stu-dent requests 9 courses, but the schedule allows only 8 courses, then the student is not included even if 8 requests are scheduled.
• Students with not all requests filled - includes students who have regular requests that were not scheduled. Students in this count have a Request Status of N - None or S - Some Used.
• Students timed out - includes students who were not scheduled because the scheduler timed out. If this number is high, you may need to increase the number of tries per student. Students who timed out are also included in the counts for requests (Students with all requests filled and Students with not all requests filled) and for free time (Students with no free time and Students with free time).
• Students with no free time - includes students who have all standard periods filled. A schedule is full when a student has a course scheduled every standard period each day. Non-standard periods are not considered. The scheduler includes courses scheduled by hand or by a previous scheduling run. Stu-dents in this count have a Schedule Status of F - Filled.
This number may be low if your building fills study halls into most student schedules. For example, if most students have one free period every day in which the study hall scheduler fills in a study hall, then these students are not included in the total.
• Students with free time - includes students who have not had all their standard periods filled, as well as students who attend school for a partial day and do not carry a full course load. Students in this count have a Schedule Status of P - Partial or N - None.
This number may be high if your building fills study halls into most schedules. You may want to use the Request Status to further determine scheduling success.
Check Students’ Schedule and Request Status
Use the Student Search option to search for students who are not fully scheduled. The statuses indicate the success of scheduling, based on either the number of periods filled or number of requests filled.
The status that is the most appropriate indicator that students are fully scheduled in your building depends on factors such as:
• Do students need to have a course in every period, every day? If so, then search for the Schedule Sta-tus of P - Partial to find students with free time.
• Can students request more courses than there are periods? If so, the Request Status may be S - Some Used for many students because students requested too many courses.
• Does your school population have a large number of students who only attend for half the day? The Schedule Status will be P - Partial for these students.
54
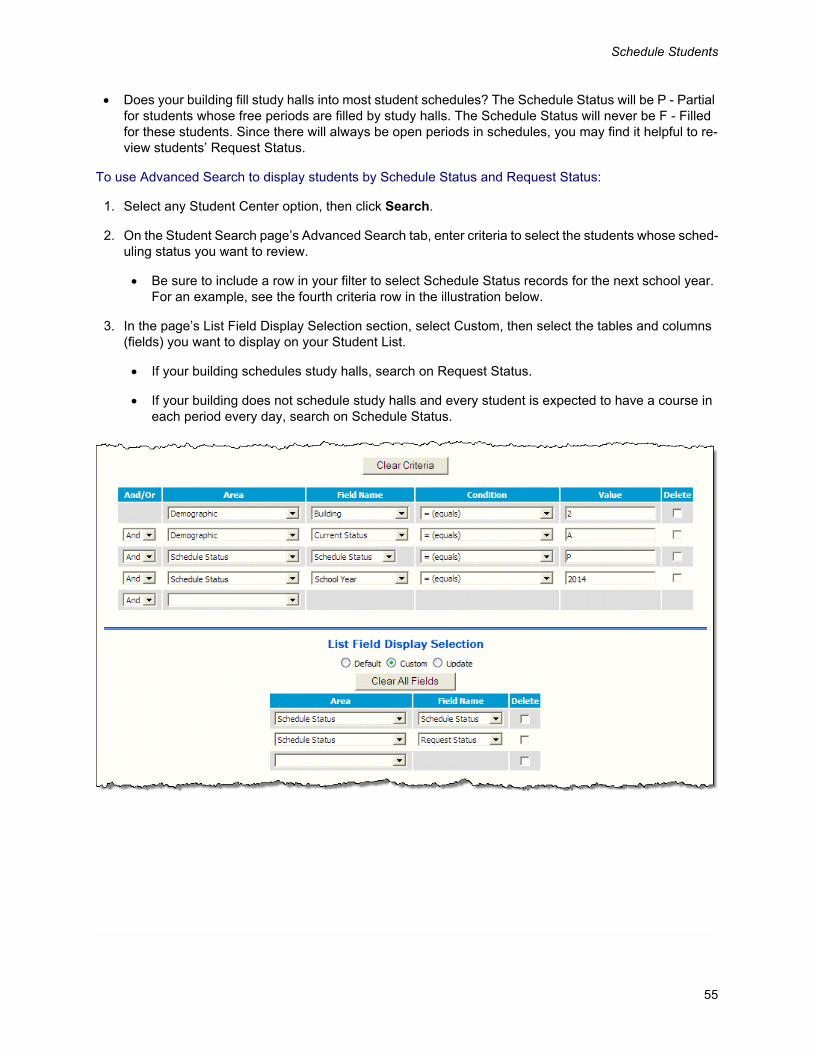
Schedule Students
• Does your building fill study halls into most student schedules? The Schedule Status will be P - Partial for students whose free periods are filled by study halls. The Schedule Status will never be F - Filled for these students. Since there will always be open periods in schedules, you may find it helpful to re-view students’ Request Status.
To use Advanced Search to display students by Schedule Status and Request Status:
1. Select any Student Center option, then click Search.
2. On the Student Search page’s Advanced Search tab, enter criteria to select the students whose sched-uling status you want to review.
• Be sure to include a row in your filter to select Schedule Status records for the next school year. For an example, see the fourth criteria row in the illustration below.
3. In the page’s List Field Display Selection section, select Custom, then select the tables and columns (fields) you want to display on your Student List.
• If your building schedules study halls, search on Request Status.
• If your building does not schedule study halls and every student is expected to have a course in each period every day, search on Schedule Status.
55
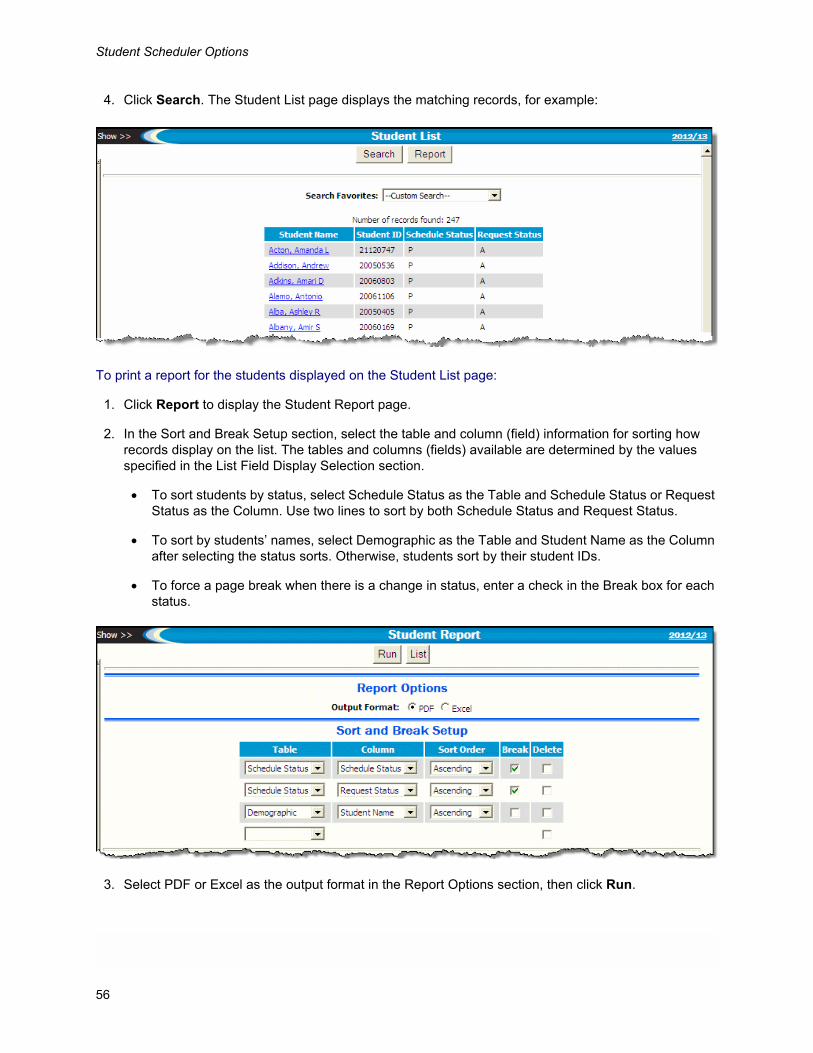
Student Scheduler Options
4. Click Search. The Student List page displays the matching records, for example:
To print a report for the students displayed on the Student List page:
1. Click Report to display the Student Report page.
2. In the Sort and Break Setup section, select the table and column (field) information for sorting how records display on the list. The tables and columns (fields) available are determined by the values specified in the List Field Display Selection section.
• To sort students by status, select Schedule Status as the Table and Schedule Status or Request Status as the Column. Use two lines to sort by both Schedule Status and Request Status.
• To sort by students’ names, select Demographic as the Table and Student Name as the Column after selecting the status sorts. Otherwise, students sort by their student IDs.
• To force a page break when there is a change in status, enter a check in the Break box for each status.
3. Select PDF or Excel as the output format in the Report Options section, then click Run.
56
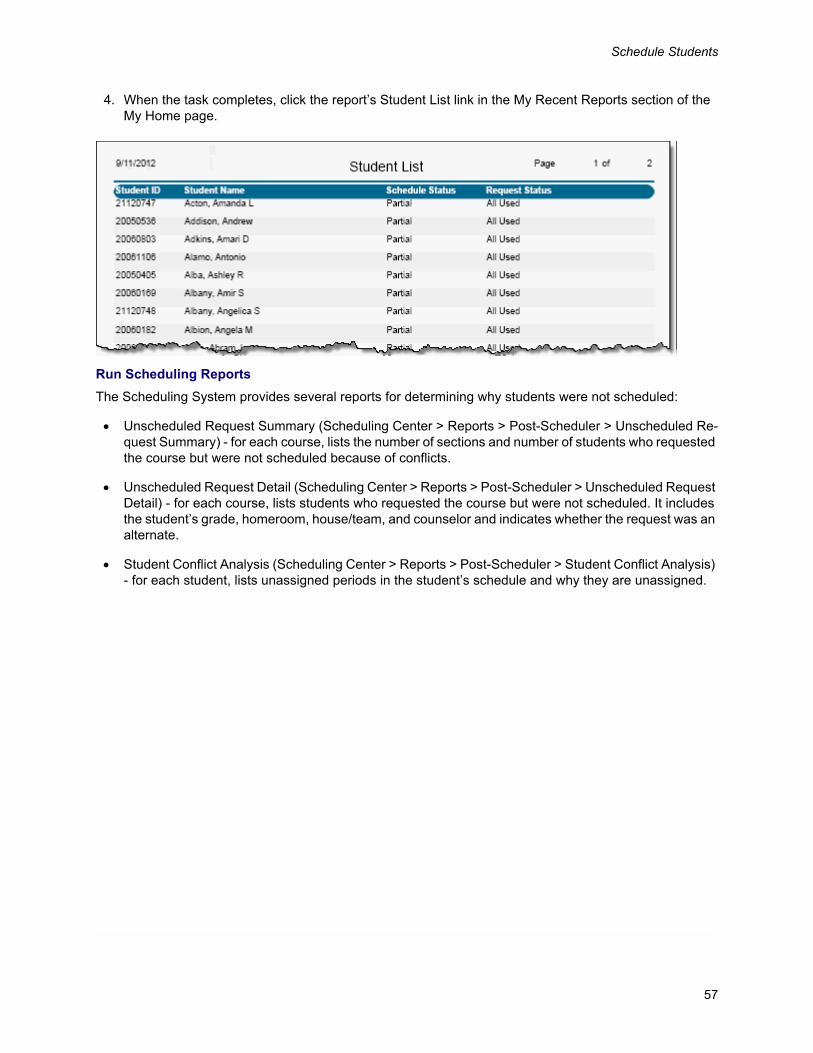
Schedule Students
4. When the task completes, click the report’s Student List link in the My Recent Reports section of the My Home page.
Run Scheduling Reports
The Scheduling System provides several reports for determining why students were not scheduled:
• Unscheduled Request Summary (Scheduling Center > Reports > Post-Scheduler > Unscheduled Re-quest Summary) - for each course, lists the number of sections and number of students who requested the course but were not scheduled because of conflicts.
• Unscheduled Request Detail (Scheduling Center > Reports > Post-Scheduler > Unscheduled Request Detail) - for each course, lists students who requested the course but were not scheduled. It includes the student’s grade, homeroom, house/team, and counselor and indicates whether the request was an alternate.
• Student Conflict Analysis (Scheduling Center > Reports > Post-Scheduler > Student Conflict Analysis) - for each student, lists unassigned periods in the student’s schedule and why they are unassigned.
57
Student Scheduler Options
Scheduling StatusUse this page to view or change a student’s scheduling status for the student’s enrollment building. The sta-tuses indicate the success of scheduling, based on either the number of periods filled or the number of re-quests filled. You can use Scheduling Status and Request Status values to search for students who are not fully scheduled.
The status that is the most appropriate indicator that students are fully scheduled in your building will de-pend on factors such as:
• Do students need to have a course in every period, every day?
• Can students request more courses than there are periods? If so, the Request Status may be S - Some Used for many students because students requested too many courses.
• Does your school population include a large number of students who only attend for half the day? The Schedule Status will be P - Partial for these students.
• Does your building fill study halls into most student schedules? The Schedule Status will be P - Partial for students who have free periods that may be filled by study halls. Since there will always be open periods in your students’ schedules, you may find it helpful to review the Request Status. The Schedule Status will never be F - Full for these students.
For a listing of students’ scheduling status, you can run a custom search from the Scheduling Status page and then generate a report from the Student List page. For details, refer to Analyzing a Scheduling Run on page 53.
How do I get there?Student Center > Scheduling > Status > select a student
What can I do?Update a student’s scheduling or request status by entering the appropriate information, then clicking Save.
Switch to view the student’s status for another scheduling interval by selecting a different value in the Interval field.
58
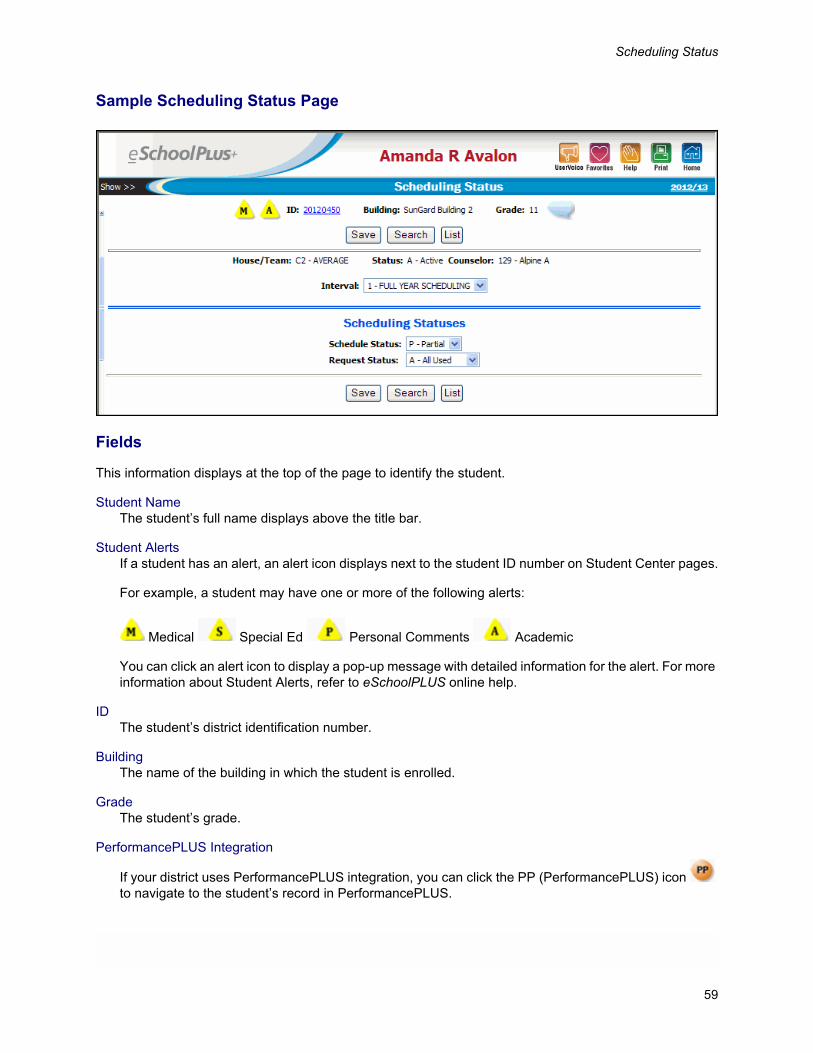
Scheduling Status
Sample Scheduling Status Page
Fields
This information displays at the top of the page to identify the student.
Student NameThe student’s full name displays above the title bar.
Student AlertsIf a student has an alert, an alert icon displays next to the student ID number on Student Center pages.
For example, a student may have one or more of the following alerts:
Medical Special Ed Personal Comments Academic
You can click an alert icon to display a pop-up message with detailed information for the alert. For more information about Student Alerts, refer to eSchoolPLUS online help.
IDThe student’s district identification number.
BuildingThe name of the building in which the student is enrolled.
GradeThe student’s grade.
PerformancePLUS Integration
If your district uses PerformancePLUS integration, you can click the PP (PerformancePLUS) icon to navigate to the student’s record in PerformancePLUS.
59
Student Scheduler Options
Notes
indicates a note already exists for the student.
indicates no notes exist for the student.
You can click the note indicator to display the Student Notes page, where you can enter or view notes for the student. For more information about Student Notes, refer to the eSchoolPLUS online help sys-tem.
House/TeamThe student’s school house/team. House/Teams are used to select students when scheduling courses.
StatusIndicates the student’s status in the current year: A - Active, I - Inactive, P - Pre-Registered, or G - Grad-uated.
CounselorThe staff ID and name of the student’s guidance counselor.
IntervalThe scheduling interval related to the schedule and request status. The Schedule Students option uses the scheduling interval to determine the course requests that will be scheduled.
Schedule StatusIndicates whether all standard periods have been scheduled for a student. When you enroll a student, the status is blank. This status is automatically updated by scheduling options.
You may want to change the system-assigned status if you use the status to search for students.
Select:
F - Filled - All periods in the student’s schedule have been filled.
P - Partial - There are free periods in the student’s schedule.
N - None Used - No courses are scheduled for the student.
Periods that are marked as non-standard are not included when determining whether the schedule is filled.
If your building fills free periods with study halls, students are likely to have a P - Partial status after you run the Schedule Students option.
60
Scheduling Status
Request StatusIndicates whether the student’s regular requests have been filled. When you enroll a student, the status is blank. The status is automatically updated by the Schedule Students option.
You may want to change the system-assigned status if you use the status to search for students.
Select:
A - All Used - All requests have been filled. This status is assigned even if alternate requests are not filled.
If a student alternate or student course alternate request is filled in place of a regular request, the re-quest is considered to be filled. For example, if all of a student’s requests are scheduled except for a regular request for 820 Foundations of Art and the student alternate request for 515 French I is sched-uled, the student’s status would be A - All Used.
S - Some Used - Some of the student’s requests have not been filled.
N - None - No requests have been filled.
Note: The Request Status is only updated by the Schedule Students option and the Course Requests page Model option. If you use another schedule entry option to schedule a student into a course that the student requested, the Request Status is not updated.
61
Student Scheduler Options
Load/Unload/Lock/Erase Scheduled CoursesUse this page to add (load), drop (unload), replace, or lock one or more courses for groups of students en-rolled in the selected building. You can also delete all courses for the selected students by running the op-tion for a date prior to the first day of school.
Security resources determine whether a user can override conflicts caused by time overlaps in Multiple Bell Scheduling.
Note: The Scheduled Course Load/Unload/Lock/Erase option will not drop a course that has been locked. You must first unlock the course on the Student Schedule page (Student Center > Scheduling > Entry).
The drop date has the following effects:
• Drop Date Before School Starts: No record will be kept of the course.
• Drop Date After School Starts: A dropped course record is kept. The Last MP To Receive Marks is set to the last marking period of the course, and the Last Mark Issued By is set to Teacher. If the students will not receive marks in all marking periods, you will need to update the dropped course records.
This page has three sections:
• Load/Unload/Lock/Erase Scheduled Courses, the top section, indicates the action to be taken and re-lated details.
• Course List or Courses, the middle section, is used to enter courses when loading, unloading, or re-placing courses.
• Students Affected, the bottom section, lists the students found in a search. You can remove students, if needed.
Mass Loading, Unloading, Replacing, Locking, or Erasing Student Schedules:
1. Select Scheduling Center > Student Scheduler > Scheduled Course Load/Unload/Lock/Erase.
2. Select the correct building.
3. Search for the students to be updated. The search will not be limited to students enrolled in your build-ing, unless you specifically identify the building in your search.
4. Enter information in the Load/Unload/Lock/Erase Scheduled Courses section of the page. Refer to the field descriptions.
5. If you are loading, unloading, replacing, or locking specific courses, enter the courses to be added or removed in the page’s Course List section.
6. Carefully review the students in the list at the bottom of the page. If a student should not be included, check the Remove box on the student’s row and then click Remove.
These options delete courses, which could invalidate your attendance data and also delete mark reporting data when other options are run. Back up your data-base or perform a Save Scheduling run before proceeding, in case you need to restore your original data.
62
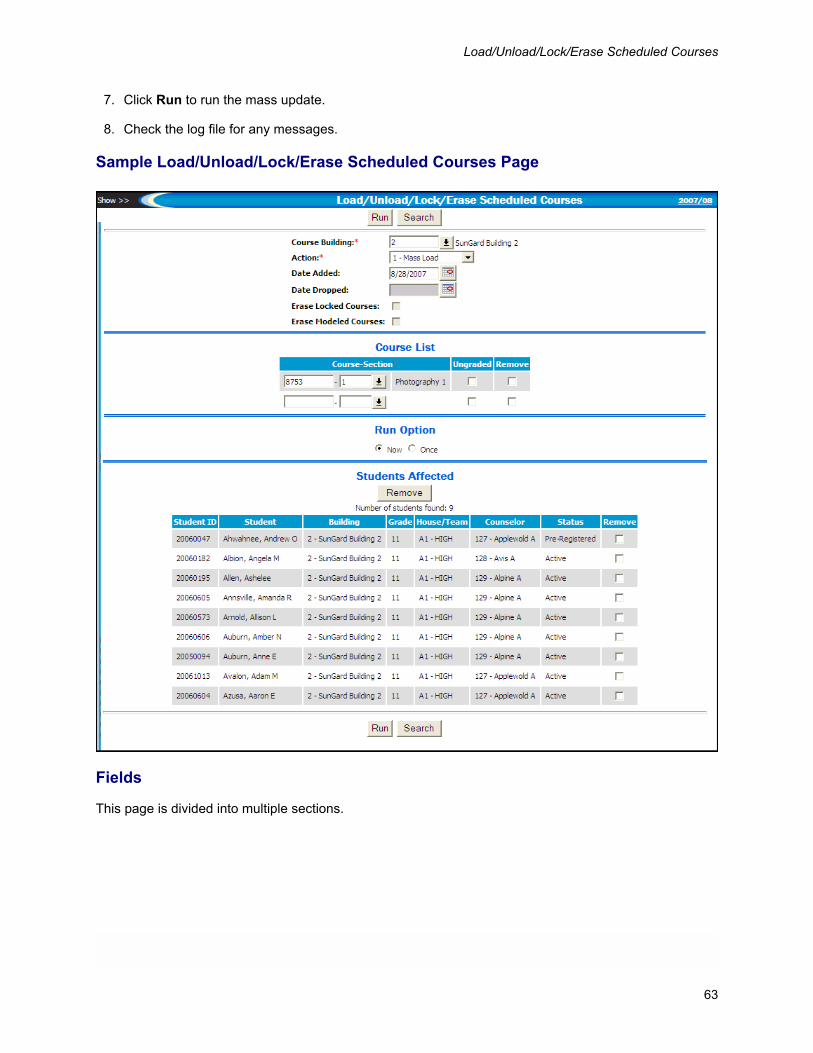
Load/Unload/Lock/Erase Scheduled Courses
7. Click Run to run the mass update.
8. Check the log file for any messages.
Sample Load/Unload/Lock/Erase Scheduled Courses Page
Fields
This page is divided into multiple sections.
63
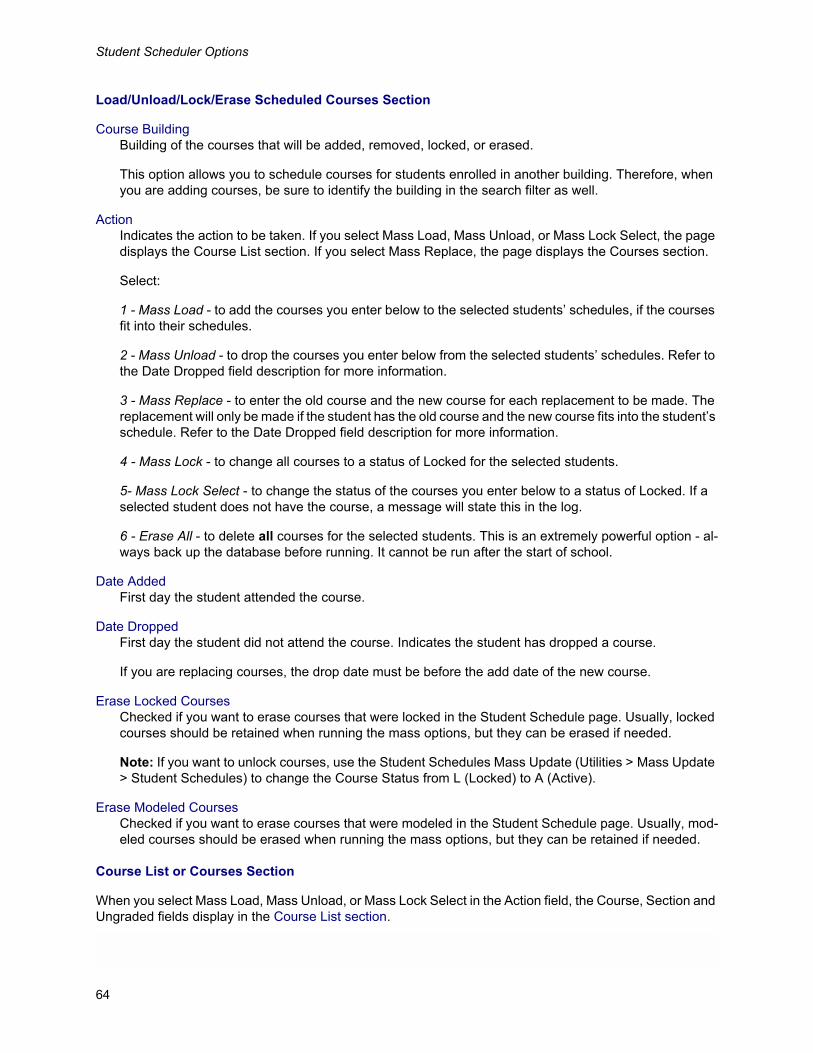
Student Scheduler Options
Load/Unload/Lock/Erase Scheduled Courses Section
Course BuildingBuilding of the courses that will be added, removed, locked, or erased.
This option allows you to schedule courses for students enrolled in another building. Therefore, when you are adding courses, be sure to identify the building in the search filter as well.
ActionIndicates the action to be taken. If you select Mass Load, Mass Unload, or Mass Lock Select, the page displays the Course List section. If you select Mass Replace, the page displays the Courses section.
Select:
1 - Mass Load - to add the courses you enter below to the selected students’ schedules, if the courses fit into their schedules.
2 - Mass Unload - to drop the courses you enter below from the selected students’ schedules. Refer to the Date Dropped field description for more information.
3 - Mass Replace - to enter the old course and the new course for each replacement to be made. The replacement will only be made if the student has the old course and the new course fits into the student’s schedule. Refer to the Date Dropped field description for more information.
4 - Mass Lock - to change all courses to a status of Locked for the selected students.
5- Mass Lock Select - to change the status of the courses you enter below to a status of Locked. If a selected student does not have the course, a message will state this in the log.
6 - Erase All - to delete all courses for the selected students. This is an extremely powerful option - al-ways back up the database before running. It cannot be run after the start of school.
Date AddedFirst day the student attended the course.
Date DroppedFirst day the student did not attend the course. Indicates the student has dropped a course.
If you are replacing courses, the drop date must be before the add date of the new course.
Erase Locked CoursesChecked if you want to erase courses that were locked in the Student Schedule page. Usually, locked courses should be retained when running the mass options, but they can be erased if needed.
Note: If you want to unlock courses, use the Student Schedules Mass Update (Utilities > Mass Update > Student Schedules) to change the Course Status from L (Locked) to A (Active).
Erase Modeled CoursesChecked if you want to erase courses that were modeled in the Student Schedule page. Usually, mod-eled courses should be erased when running the mass options, but they can be retained if needed.
Course List or Courses Section
When you select Mass Load, Mass Unload, or Mass Lock Select in the Action field, the Course, Section and Ungraded fields display in the Course List section.
64
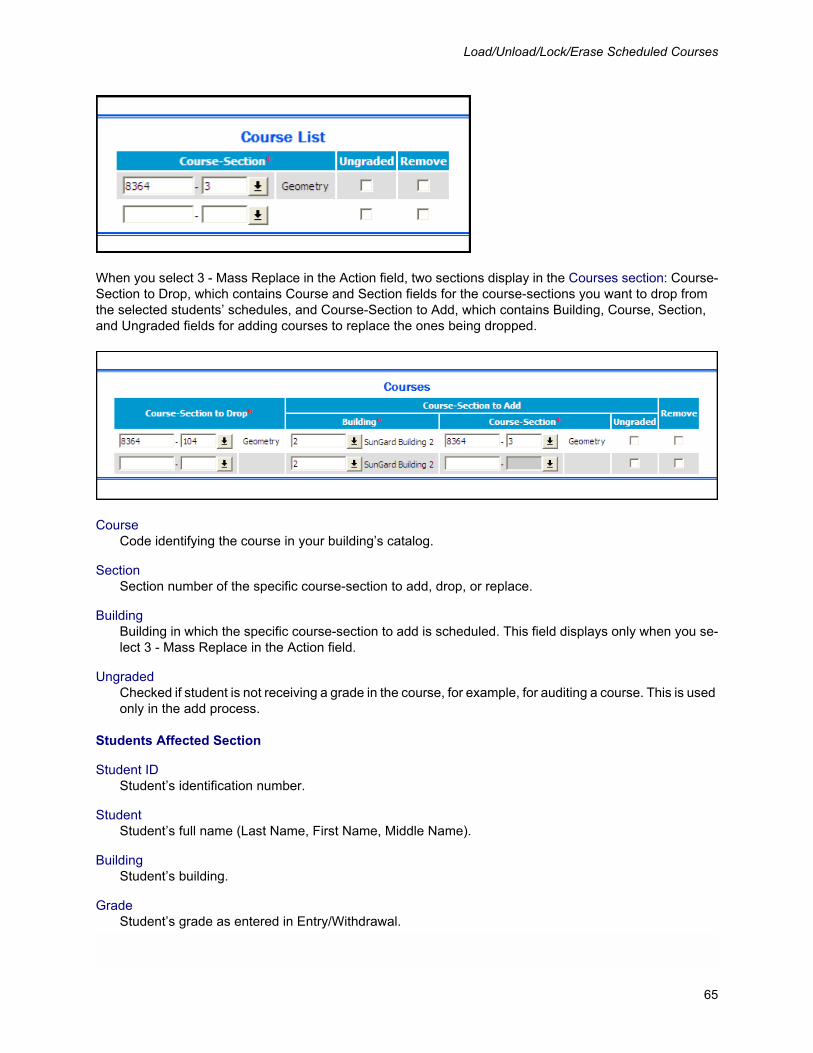
Load/Unload/Lock/Erase Scheduled Courses
When you select 3 - Mass Replace in the Action field, two sections display in the Courses section: Course-Section to Drop, which contains Course and Section fields for the course-sections you want to drop from the selected students’ schedules, and Course-Section to Add, which contains Building, Course, Section, and Ungraded fields for adding courses to replace the ones being dropped.
Course Code identifying the course in your building’s catalog.
SectionSection number of the specific course-section to add, drop, or replace.
BuildingBuilding in which the specific course-section to add is scheduled. This field displays only when you se-lect 3 - Mass Replace in the Action field.
UngradedChecked if student is not receiving a grade in the course, for example, for auditing a course. This is used only in the add process.
Students Affected Section
Student IDStudent’s identification number.
StudentStudent’s full name (Last Name, First Name, Middle Name).
BuildingStudent’s building.
GradeStudent’s grade as entered in Entry/Withdrawal.
65
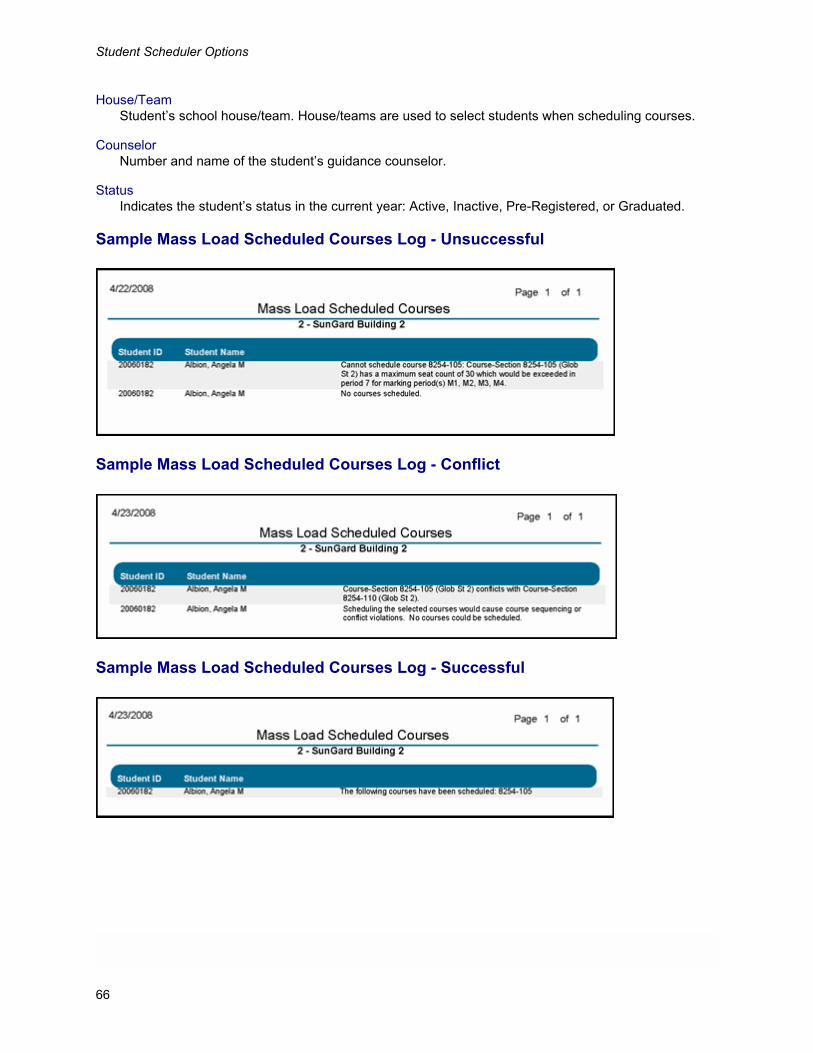
Student Scheduler Options
House/TeamStudent’s school house/team. House/teams are used to select students when scheduling courses.
CounselorNumber and name of the student’s guidance counselor.
StatusIndicates the student’s status in the current year: Active, Inactive, Pre-Registered, or Graduated.
Sample Mass Load Scheduled Courses Log - Unsuccessful
Sample Mass Load Scheduled Courses Log - Conflict
Sample Mass Load Scheduled Courses Log - Successful
66
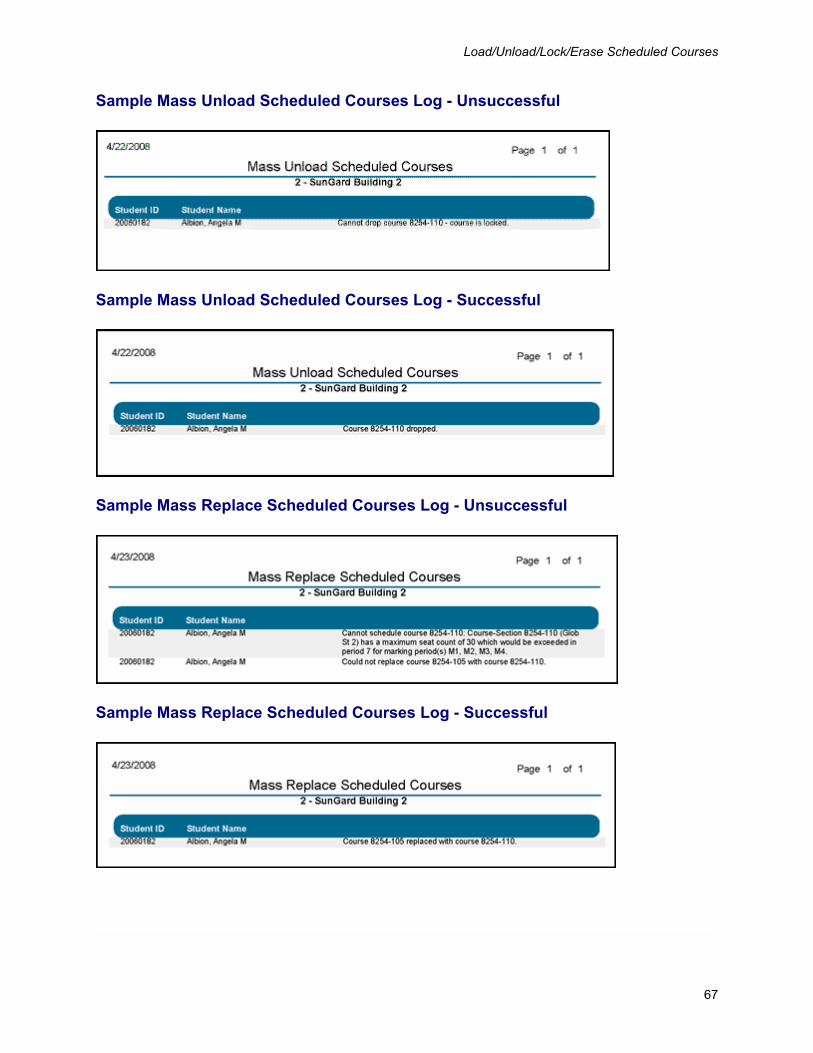
Load/Unload/Lock/Erase Scheduled Courses
Sample Mass Unload Scheduled Courses Log - Unsuccessful
Sample Mass Unload Scheduled Courses Log - Successful
Sample Mass Replace Scheduled Courses Log - Unsuccessful
Sample Mass Replace Scheduled Courses Log - Successful
67
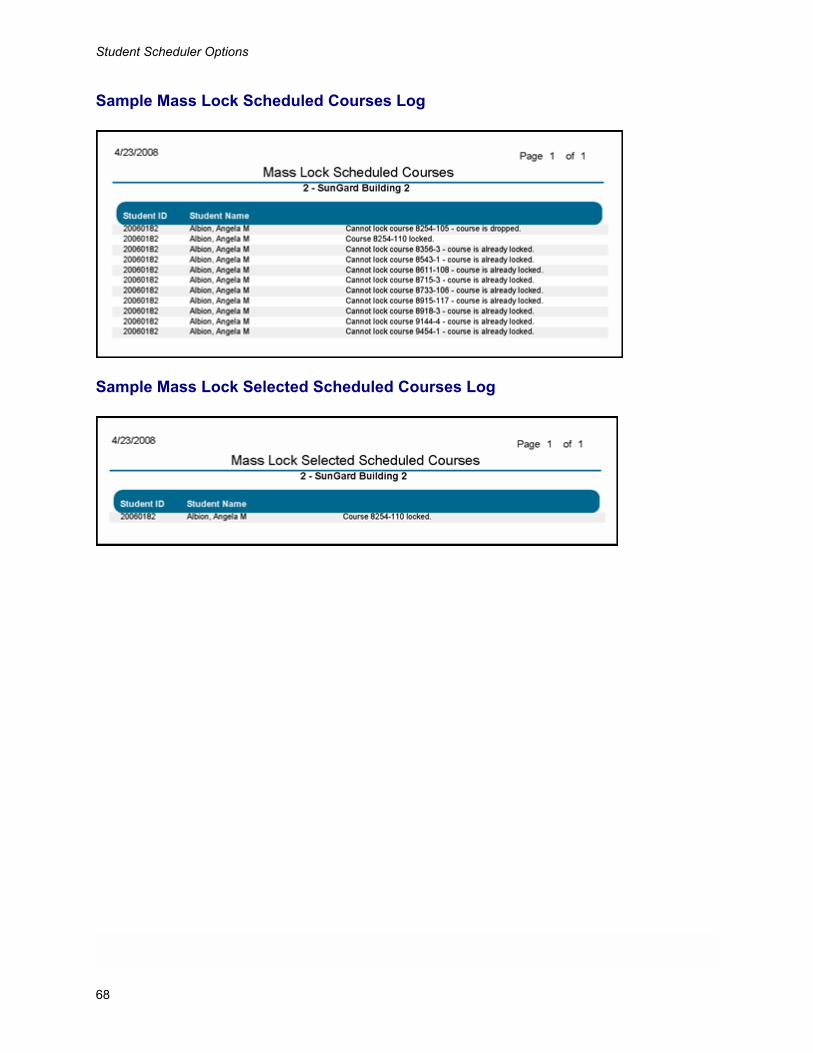
Student Scheduler Options
Sample Mass Lock Scheduled Courses Log
Sample Mass Lock Selected Scheduled Courses Log
68
Recalculate Seats
Recalculate SeatsUse the Recalculate Seats option to determine the number of students in course-sections. You can run the option for courses, study halls, or both.
In addition, the option recalculates the classification weights of scheduled students for each course-section. This calculation only applies to courses.
Running the Recalculate Seats Option
1. Select Scheduling Center > Student Scheduler > Recalculate Seats.
2. Indicate how you want to recalculate seats by completing the appropriate sections of the page.
3. Click Run.
Sample Recalculate Seats Page
Fields
BuildingBuilding for which you want to recalculate seats.
69
Student Scheduler Options
Recalculate SeatsIndicates how you want to recalculate seats.
Select:
Recalculate All Seats - to recalculate seats for all course-sections in the Master Schedule, including study halls.
Recalculate Course Seats Only - to recalculate seats for course-sections in the Master Schedule that do not have a check in the Study Hall box.
Recalculate Study Seats Only - to recalculate seats for course-sections in the Master Schedule that have a check in the Study Hall box.
Log StatisticsChecked if you want to print the statistics for the option in the report file.
70

3. Schedule Study HallsThe eSchoolPLUS Scheduling System allows you to schedule students into study halls for any free periods left in their schedules. This chapter provides information on the Study Hall Scheduler.
PreviewThis chapter provides information on the following topics:
Study Hall Scheduler
Erase Scheduled Study Halls
71
Schedule Study Halls
Study Hall SchedulerUse this option to fill open periods in students’ schedules with study halls. Study halls are defined in your Building Course Catalog by checking their Study Hall boxes. The study halls must also be set up as course-sections in the Master Schedule. When you run the Study Hall Scheduler, the system looks for free periods and automatically schedules the study halls into these periods.
One difference between Master Schedule courses and study halls is that a student does not have to be scheduled into all of the days specified. For example, if a study hall is set up to meet period 5 every day of the week and a student has this period open on Monday and Wednesday, the Study Hall Scheduler will only schedule study halls for Monday and Wednesday.
Prerequisites
1. Verify student schedules to ensure they are complete.
2. Set up study halls in your building’s course catalog. Be sure to check the Study Hall boxes when adding these course records.
3. Create course-sections for the study halls in your Master Schedule.
Running the Study Hall Scheduler
1. Select Scheduling Center > Student Scheduler > Schedule Study Halls.
2. Indicate how you want to schedule study halls by completing the appropriate sections of the page.
3. Click Run.
72
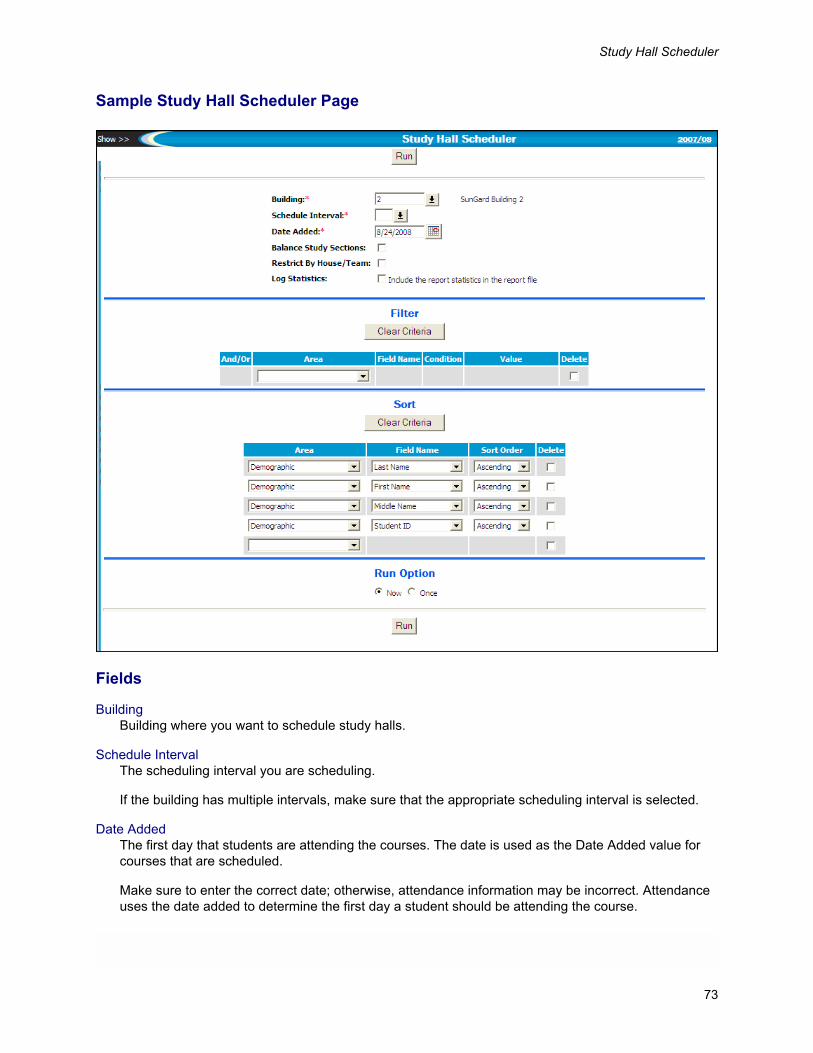
Study Hall Scheduler
Sample Study Hall Scheduler Page
Fields
BuildingBuilding where you want to schedule study halls.
Schedule IntervalThe scheduling interval you are scheduling.
If the building has multiple intervals, make sure that the appropriate scheduling interval is selected.
Date AddedThe first day that students are attending the courses. The date is used as the Date Added value for courses that are scheduled.
Make sure to enter the correct date; otherwise, attendance information may be incorrect. Attendance uses the date added to determine the first day a student should be attending the course.
73
Schedule Study Halls
Balance Study SectionsChecked if you want to balance the number of students assigned to study halls.
Unchecked if you want the Study Hall Scheduler to fill a section before beginning to schedule students in the next section.
Restrict by House/TeamChecked if you want to schedule study halls based on their house/team codes. When you restrict by house/team, students can only be scheduled into a study hall if their house/team codes in Registration match the study hall’s house/team code in the Master Schedule. However, if a study hall does not have a house/team designated, students can be scheduled into it regardless of their house/team assign-ments.
If your building is using Multiple Bell Schedules, this box is checked by default, and you cannot access it. For more information about how Multiple Bell Schedules affect scheduling, refer to Next-Year Sched-uling with Multiple Bell Schedules Process Overview on page 19.
Log StatisticsChecked if you want to print the prompts as the first page of the log. Otherwise, a log page will be created only if an error occurs.
74
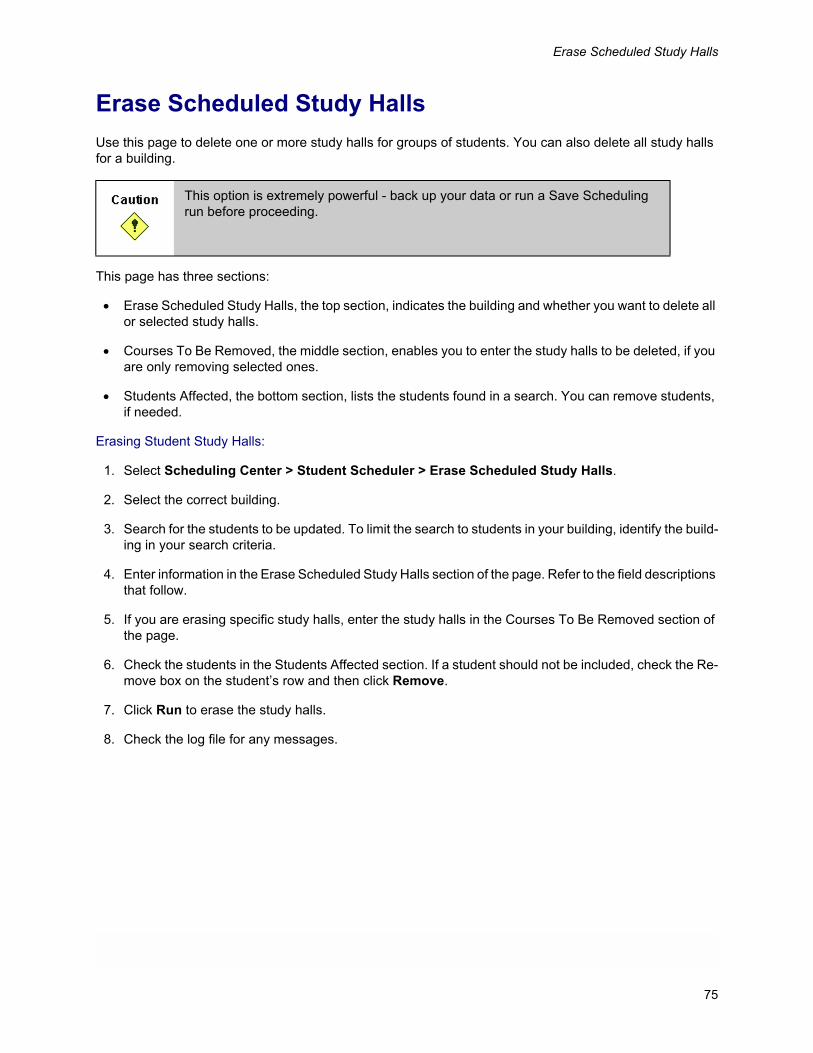
Erase Scheduled Study Halls
Erase Scheduled Study HallsUse this page to delete one or more study halls for groups of students. You can also delete all study halls for a building.
This page has three sections:
• Erase Scheduled Study Halls, the top section, indicates the building and whether you want to delete all or selected study halls.
• Courses To Be Removed, the middle section, enables you to enter the study halls to be deleted, if you are only removing selected ones.
• Students Affected, the bottom section, lists the students found in a search. You can remove students, if needed.
Erasing Student Study Halls:
1. Select Scheduling Center > Student Scheduler > Erase Scheduled Study Halls.
2. Select the correct building.
3. Search for the students to be updated. To limit the search to students in your building, identify the build-ing in your search criteria.
4. Enter information in the Erase Scheduled Study Halls section of the page. Refer to the field descriptions that follow.
5. If you are erasing specific study halls, enter the study halls in the Courses To Be Removed section of the page.
6. Check the students in the Students Affected section. If a student should not be included, check the Re-move box on the student’s row and then click Remove.
7. Click Run to erase the study halls.
8. Check the log file for any messages.
This option is extremely powerful - back up your data or run a Save Scheduling run before proceeding.
75
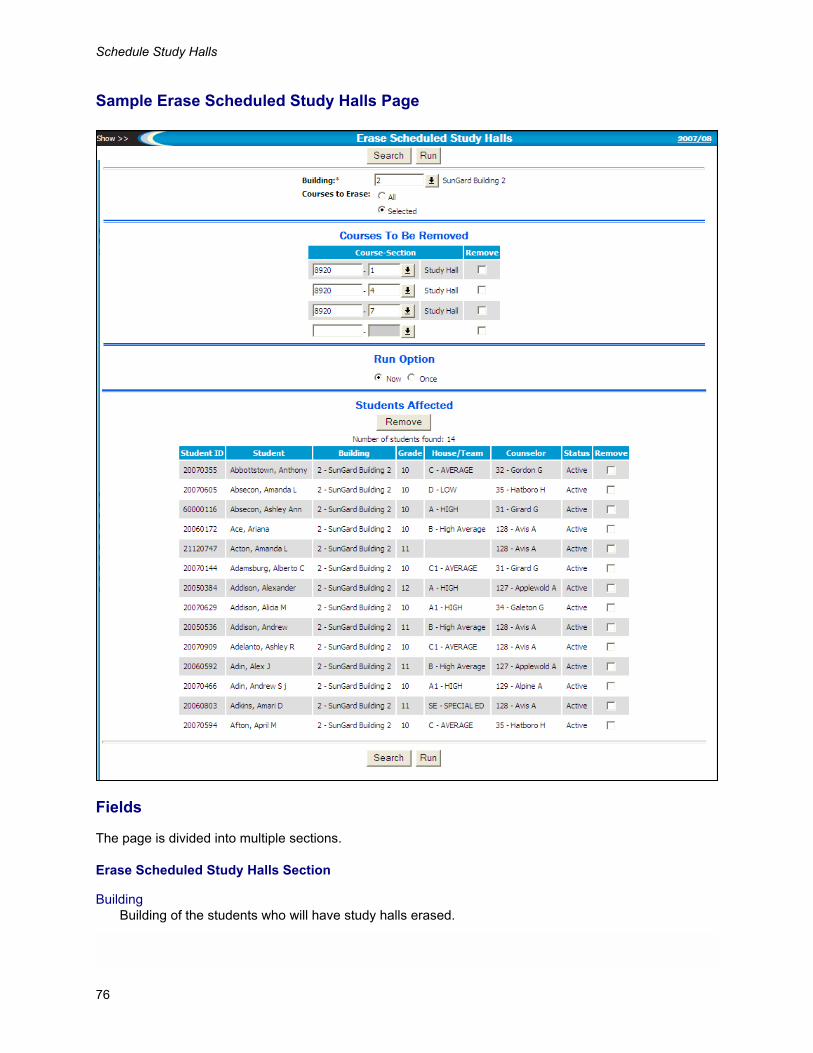
Schedule Study Halls
Sample Erase Scheduled Study Halls Page
Fields
The page is divided into multiple sections.
Erase Scheduled Study Halls Section
BuildingBuilding of the students who will have study halls erased.
76
Erase Scheduled Study Halls
Courses to EraseSelect:
All - to remove every study hall for the selected students.
Selected - to remove only specified study halls. You can then access the Courses to Be Removed sec-tion of the page.
Courses to Be Removed Section
CourseCode identifying the course in your building’s catalog.
SectionThe number of the specific course-section to erase.
Students Affected Section
Student IDStudent’s identification number.
StudentStudent’s full name.
BuildingStudent’s enrollment building as entered in Entry/Withdrawal.
GradeStudent’s grade as entered in Entry/Withdrawal.
House/TeamStudent’s school house/team. House/teams are used to select students when scheduling courses.
CounselorNumber and name of the student’s guidance counselor.
StatusIndicates the student’s status in the current year: Active, Inactive, Pre-Registered, or Graduated.
77

Schedule Study Halls
78
4. Student Scheduler ReportsThe eSchoolPLUS Scheduling System features a number of Pre-Scheduling and Post-Scheduling reports you can run to verify scheduling information before and after scheduling students.
This chapter focuses on several of the Post-Scheduling reports you can use to verify information after run-ning the Schedule Students option. In addition to being able to generate student schedules, you can review students who have not been fully scheduled or have scheduling conflicts, generate class lists, study hall lists, and teacher schedules. District-defined options and security privileges determine the reports you can generate.
PreviewThis chapter provides information on the following topics:
Add/Drop By Teacher Report
Class Lists Report
Class Matrix
Free Period Analysis
Free Time Detail Report
Load Report
Student Conflict Analysis Report
Student Schedules Report
Teacher Schedule Matrix
Teacher Schedules
Unscheduled Requests Detail Report
Unscheduled Requests Summary Report
79
Student Scheduler Reports
Add/Drop By Teacher ReportFor each course, this report includes the students who have added or dropped the course, as well as those whose course information has been updated.
Printing the Report
1. Make sure that you are in the correct environment (current year).
2. Select Scheduling Center > Reports > Post-Scheduler > Add-Drop By Teacher.
3. Indicate how you want to run the report by completing the appropriate sections of the page.
4. Click Run.
80
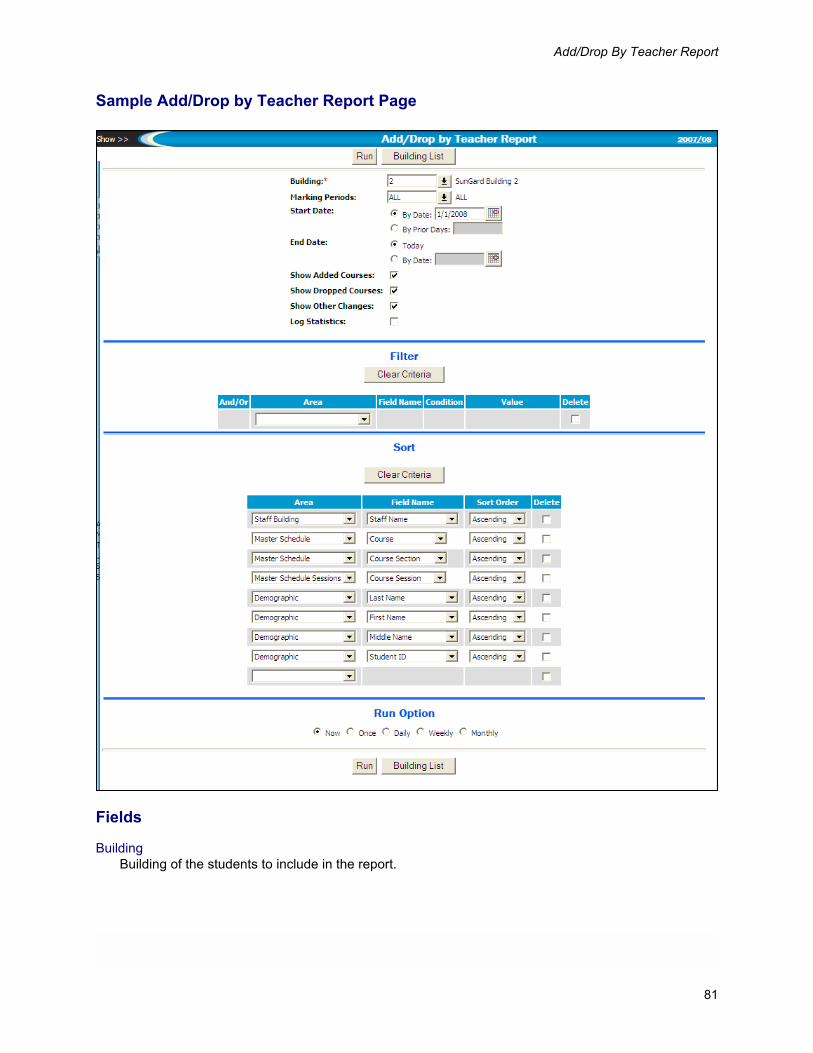
Add/Drop By Teacher Report
Sample Add/Drop by Teacher Report Page
Fields
BuildingBuilding of the students to include in the report.
81
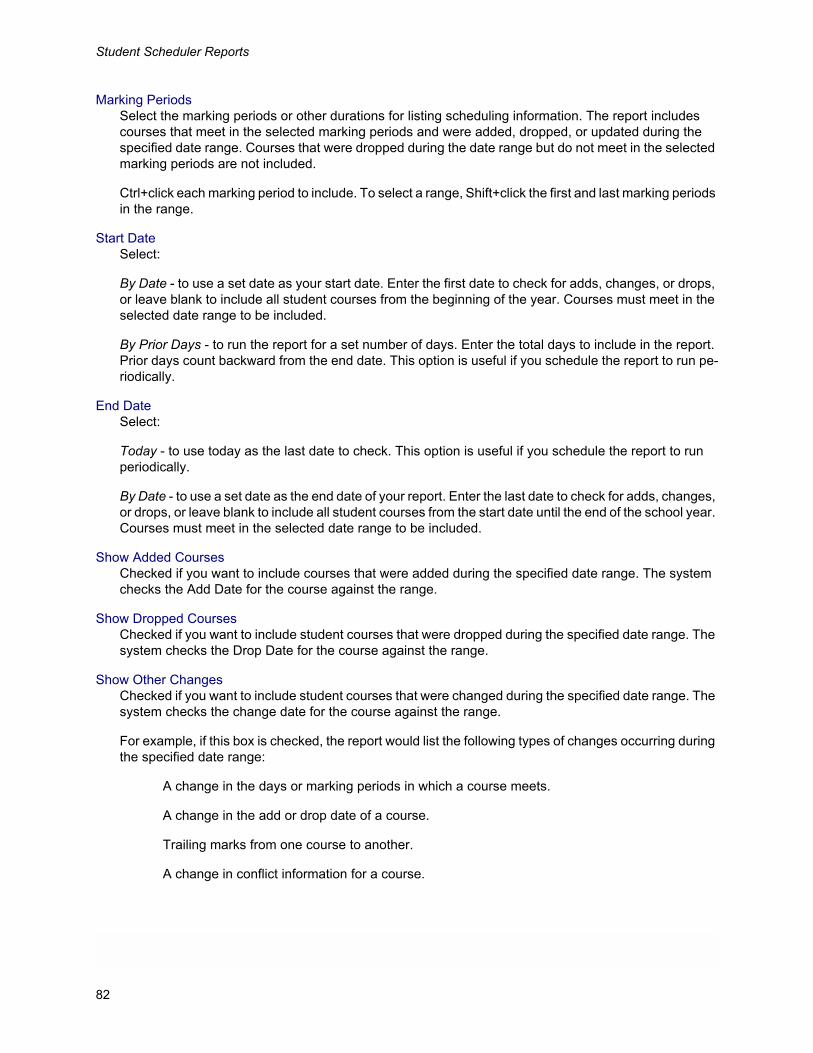
Student Scheduler Reports
Marking PeriodsSelect the marking periods or other durations for listing scheduling information. The report includes courses that meet in the selected marking periods and were added, dropped, or updated during the specified date range. Courses that were dropped during the date range but do not meet in the selected marking periods are not included.
Ctrl+click each marking period to include. To select a range, Shift+click the first and last marking periods in the range.
Start DateSelect:
By Date - to use a set date as your start date. Enter the first date to check for adds, changes, or drops, or leave blank to include all student courses from the beginning of the year. Courses must meet in the selected date range to be included.
By Prior Days - to run the report for a set number of days. Enter the total days to include in the report. Prior days count backward from the end date. This option is useful if you schedule the report to run pe-riodically.
End DateSelect:
Today - to use today as the last date to check. This option is useful if you schedule the report to run periodically.
By Date - to use a set date as the end date of your report. Enter the last date to check for adds, changes, or drops, or leave blank to include all student courses from the start date until the end of the school year. Courses must meet in the selected date range to be included.
Show Added CoursesChecked if you want to include courses that were added during the specified date range. The system checks the Add Date for the course against the range.
Show Dropped CoursesChecked if you want to include student courses that were dropped during the specified date range. The system checks the Drop Date for the course against the range.
Show Other ChangesChecked if you want to include student courses that were changed during the specified date range. The system checks the change date for the course against the range.
For example, if this box is checked, the report would list the following types of changes occurring during the specified date range:
A change in the days or marking periods in which a course meets.
A change in the add or drop date of a course.
Trailing marks from one course to another.
A change in conflict information for a course.
82
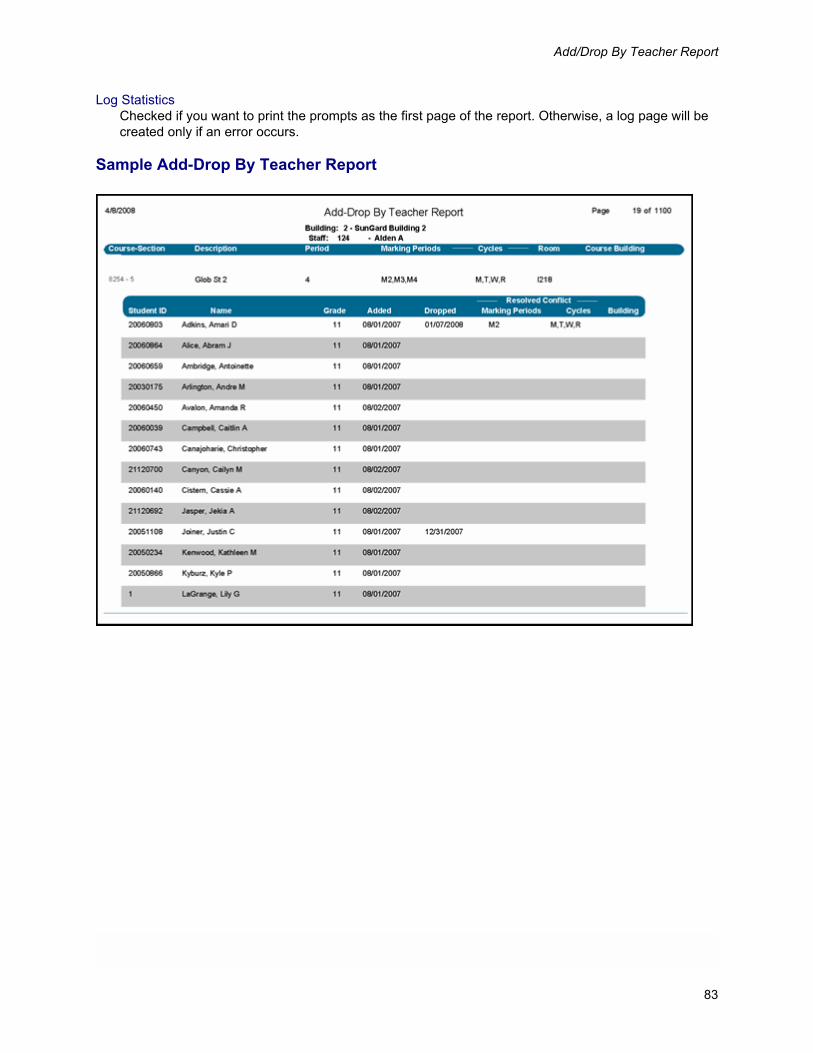
Add/Drop By Teacher Report
Log StatisticsChecked if you want to print the prompts as the first page of the report. Otherwise, a log page will be created only if an error occurs.
Sample Add-Drop By Teacher Report
83
Student Scheduler Reports
Class Lists ReportFor each course-section or session, this report lists the students enrolled on the print "as-of" date. The re-port includes each student’s grade, gender, homeroom, enrollment building, counselor, and home phone number.
Printing the Report
1. Make sure that you are in the correct environment (current year or next year).
2. Select Scheduling Center > Reports > Post-Scheduler > Class Lists.
3. Indicate how you want to run the report by completing the appropriate sections of the page.
4. Click Run.
Sample Class Lists Report Page
84
Class Lists Report
Fields
BuildingSelect the building of the students to include in the report.
Report TypeIndicates whether the report is by section or each separate session.
Select:
By Section - to list any student who is scheduled into any session of the course-section.
By Session - to print each session of a course-section separately. For each session, the report lists only students who are scheduled into that individual session.
For example, Course-Section 1600-6 is a multi-session course that spans three periods, with a break for lunch in between sessions. Session 1 meets in period 5A, Lunch is scheduled during period 5B, and Session 2 of the course-section meets in period 5C. The Class List Report by Section will list all students in Session 1 and 2. The Class List Report by Session will print the sessions separately and will only list students for each specific session.
Marking Period(s)Select the marking periods for listing class enrollment information. Ctrl+click each marking period to in-clude. To select a range, Shift+click the first and last marking periods in the range.
Period(s) To IncludeDetermines the periods to include in the report. If you select periods, class lists will print for courses that meet in the selected periods.
Select:
All - to run for all scheduling periods.
Selected Period(s) - to run for specified scheduling periods. Enter the list of periods to include. Ctrl+click the desired periods, or Shift+click to select a range of periods.
Display All CoursesChecked if you want to include course-sections that have no students scheduled into them. Unchecked to include only those course-sections with students scheduled.
Print as of Date Determines which students and courses to include in the report. Students who enrolled in courses after this date or dropped the course before this date will not be included.
Select:
Today - to run for today. If you are setting up the report to run daily or weekly, use this option.
Selected Date - to run for a specific date. Enter the date.
85
Student Scheduler Reports
Print Phone NumbersIndicates whether the student’s home phone number is included on the report.
Select:
Listed Only - to print only phone numbers with a listing status of Listed. If a student home phone number has a status of Unlisted, the phone number is not printed.
Always - to print the home phone number for a student regardless of the number’s listing status. If the user running the report does not have security to view or print unlisted phone numbers, an unlisted phone number will not print on the report even if the user selects Always.
Never - to never print students’ phone numbers.
Note: eSchoolPLUS tracks whether guardians have given permission to list the student’s phone num-ber, as required under the Family Educational Rights and Privacy Act (FERPA). If the FERPA Privacy Flags on the Personal Information page have the Student’s Phone box checked, the student’s phone number will be printed only when the Include FERPA Information box is checked.
Log StatisticsChecked if you want to print the prompts as the first page of the report. Otherwise, a log page will be created only if an error occurs.
Include FERPA InformationChecked if you want to override the FERPA Privacy Flag so you can print phone numbers for all stu-dents.
If checked, the following text prints on the report: "This report is for internal use only. Do not distribute outside of the district."
Note: If you selected Never in the Print Phone Number field, phone numbers will not be printed in the report even if the Include FERPA Information box is checked.
86
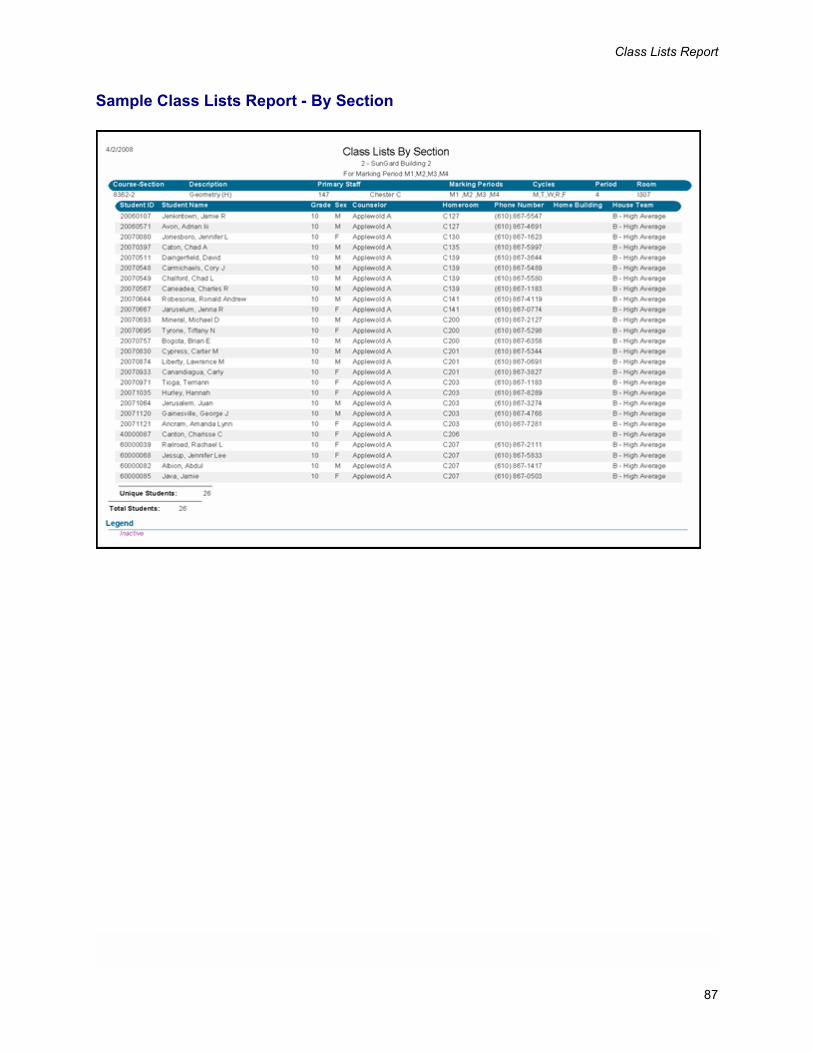
Class Lists Report
Sample Class Lists Report - By Section
87
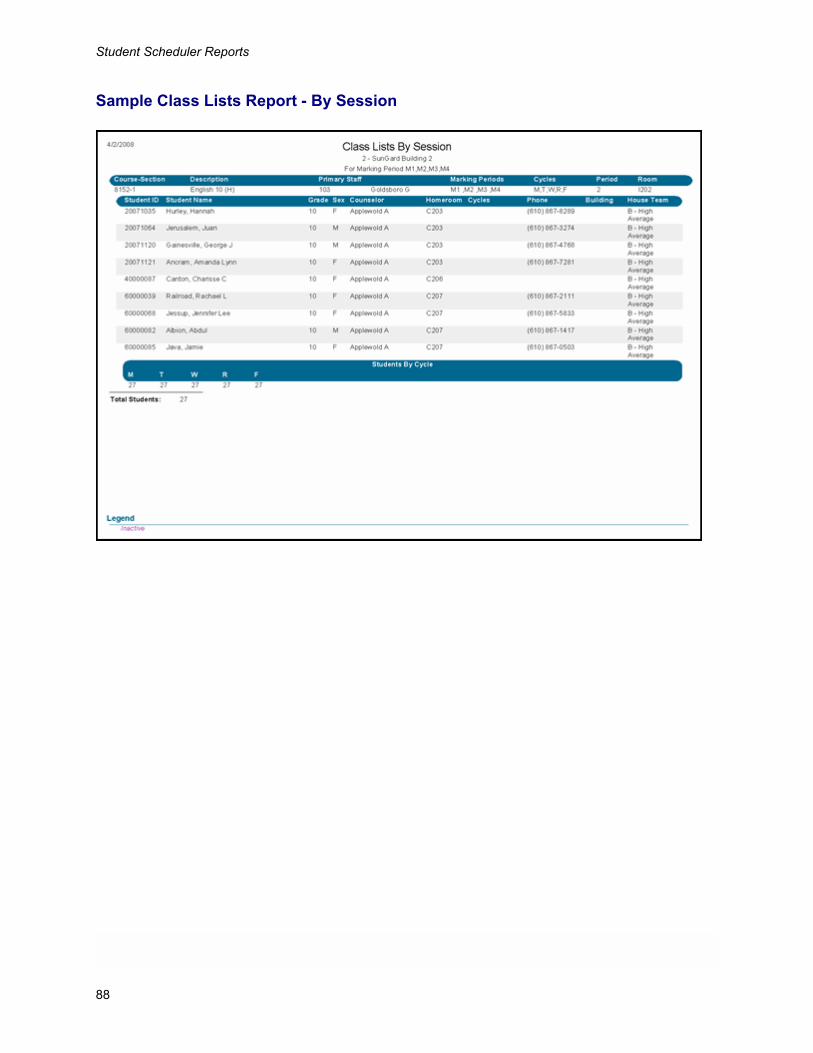
Student Scheduler Reports
Sample Class Lists Report - By Session
88
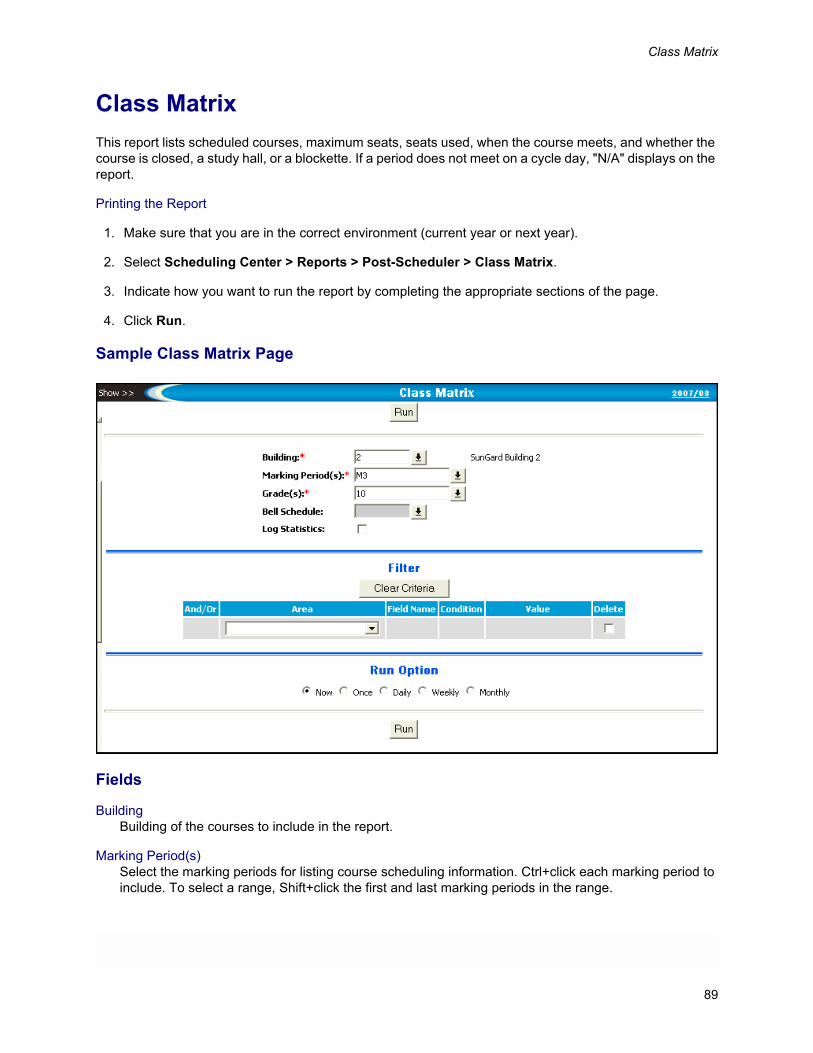
Class Matrix
Class MatrixThis report lists scheduled courses, maximum seats, seats used, when the course meets, and whether the course is closed, a study hall, or a blockette. If a period does not meet on a cycle day, "N/A" displays on the report.
Printing the Report
1. Make sure that you are in the correct environment (current year or next year).
2. Select Scheduling Center > Reports > Post-Scheduler > Class Matrix.
3. Indicate how you want to run the report by completing the appropriate sections of the page.
4. Click Run.
Sample Class Matrix Page
Fields
BuildingBuilding of the courses to include in the report.
Marking Period(s)Select the marking periods for listing course scheduling information. Ctrl+click each marking period to include. To select a range, Shift+click the first and last marking periods in the range.
89
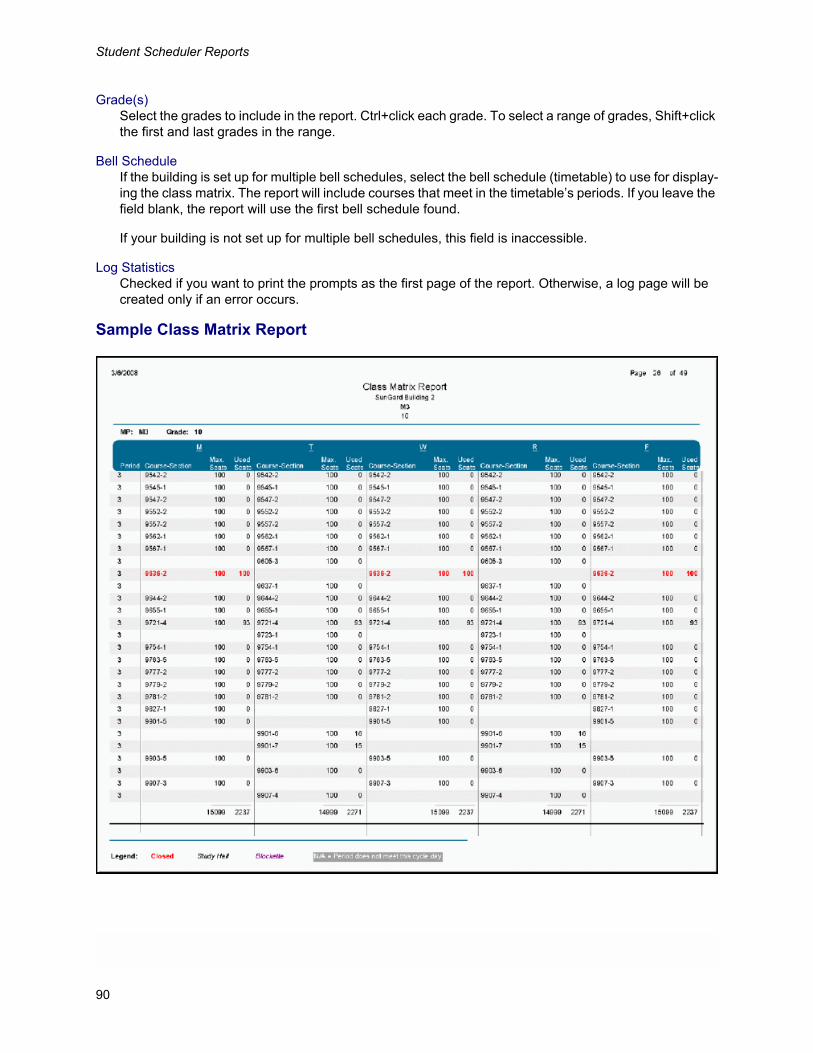
Student Scheduler Reports
Grade(s)Select the grades to include in the report. Ctrl+click each grade. To select a range of grades, Shift+click the first and last grades in the range.
Bell ScheduleIf the building is set up for multiple bell schedules, select the bell schedule (timetable) to use for display-ing the class matrix. The report will include courses that meet in the timetable’s periods. If you leave the field blank, the report will use the first bell schedule found.
If your building is not set up for multiple bell schedules, this field is inaccessible.
Log StatisticsChecked if you want to print the prompts as the first page of the report. Otherwise, a log page will be created only if an error occurs.
Sample Class Matrix Report
90
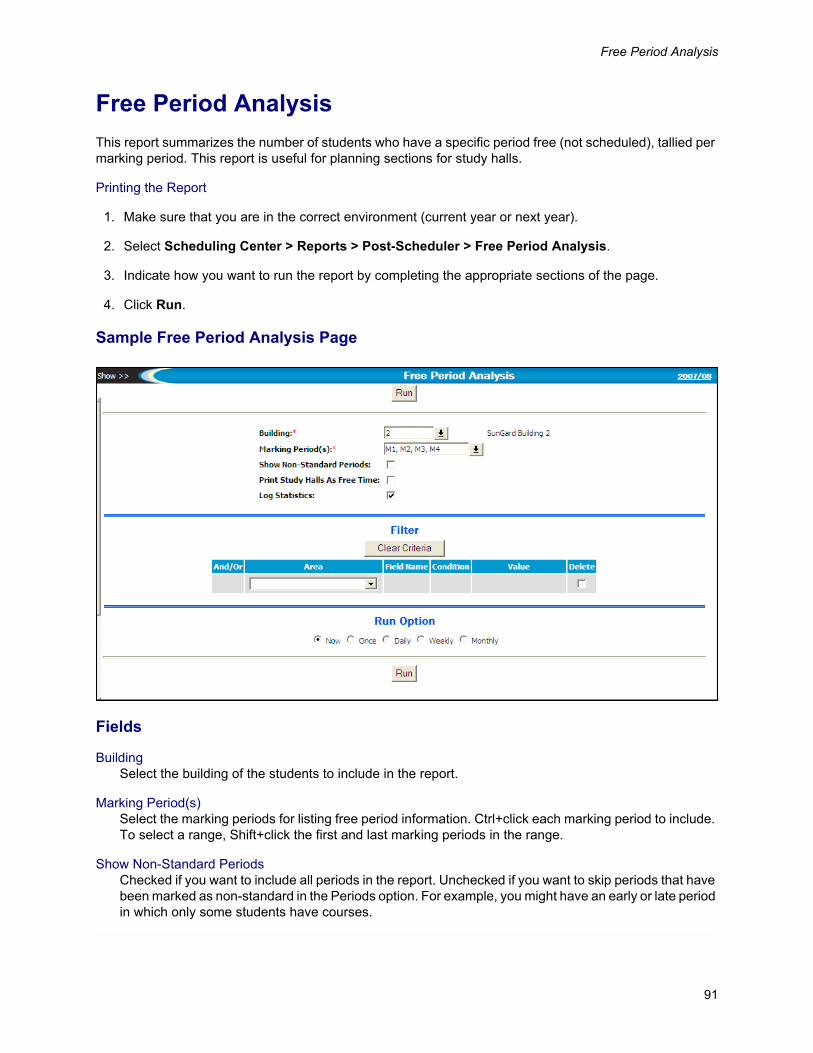
Free Period Analysis
Free Period AnalysisThis report summarizes the number of students who have a specific period free (not scheduled), tallied per marking period. This report is useful for planning sections for study halls.
Printing the Report
1. Make sure that you are in the correct environment (current year or next year).
2. Select Scheduling Center > Reports > Post-Scheduler > Free Period Analysis.
3. Indicate how you want to run the report by completing the appropriate sections of the page.
4. Click Run.
Sample Free Period Analysis Page
Fields
BuildingSelect the building of the students to include in the report.
Marking Period(s)Select the marking periods for listing free period information. Ctrl+click each marking period to include. To select a range, Shift+click the first and last marking periods in the range.
Show Non-Standard PeriodsChecked if you want to include all periods in the report. Unchecked if you want to skip periods that have been marked as non-standard in the Periods option. For example, you might have an early or late period in which only some students have courses.
91
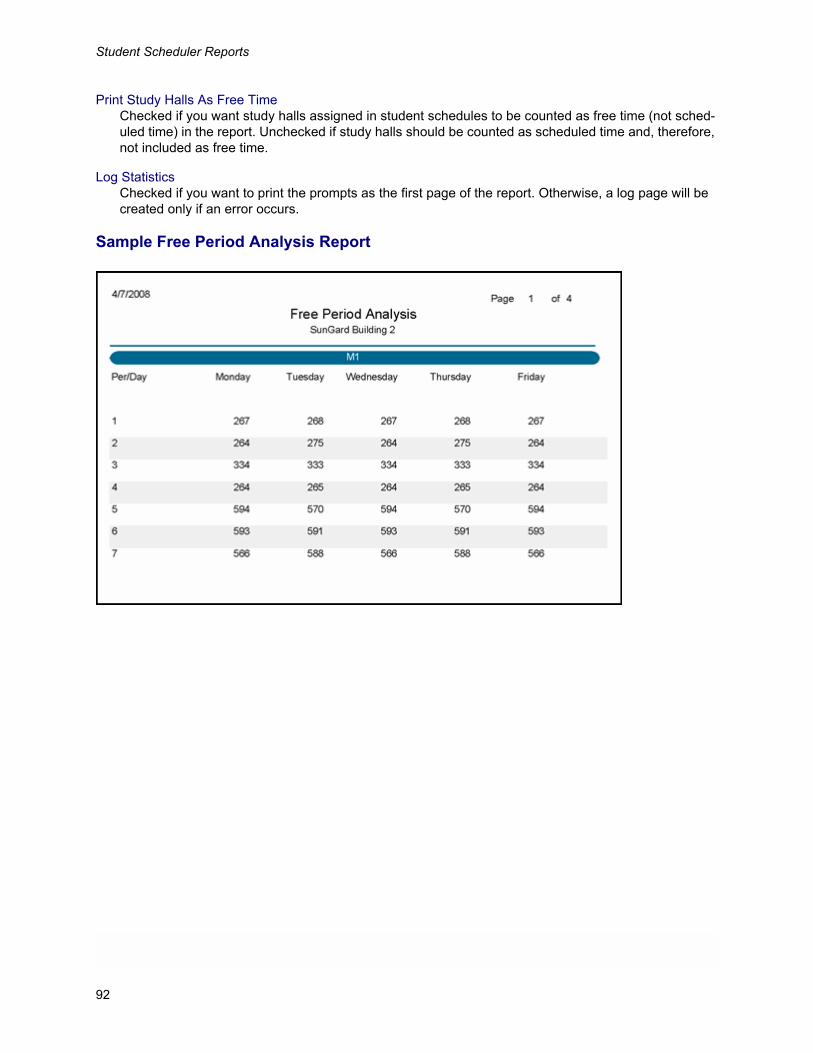
Student Scheduler Reports
Print Study Halls As Free TimeChecked if you want study halls assigned in student schedules to be counted as free time (not sched-uled time) in the report. Unchecked if study halls should be counted as scheduled time and, therefore, not included as free time.
Log StatisticsChecked if you want to print the prompts as the first page of the report. Otherwise, a log page will be created only if an error occurs.
Sample Free Period Analysis Report
92
Free Time Detail Report
Free Time Detail ReportUse this report to analyze the free time in students’ schedules. This information is useful for planning when study halls should be offered and tracking periods that need to be assigned in order to fully schedule a stu-dent.
The report includes a grid that shows column headings for each cycle day and rows for each marking period/scheduling period. The report lists the marking and scheduling periods for which students have free time on at least one cycle day. At the intersection of the cycle day column and marking period/scheduling period row, the following characters may print:
X indicates the student is scheduled at this time.
_ indicates the student has free time at this time.
S indicates the student is scheduled for a study hall at this time.
Printing the Report
1. Make sure that you are in the correct environment (current year or next year).
2. Select Scheduling Center > Reports > Post-Scheduler > Free Time Detail.
3. Indicate how you want to run the report by completing the appropriate sections of the page.
4. Click Run.
93
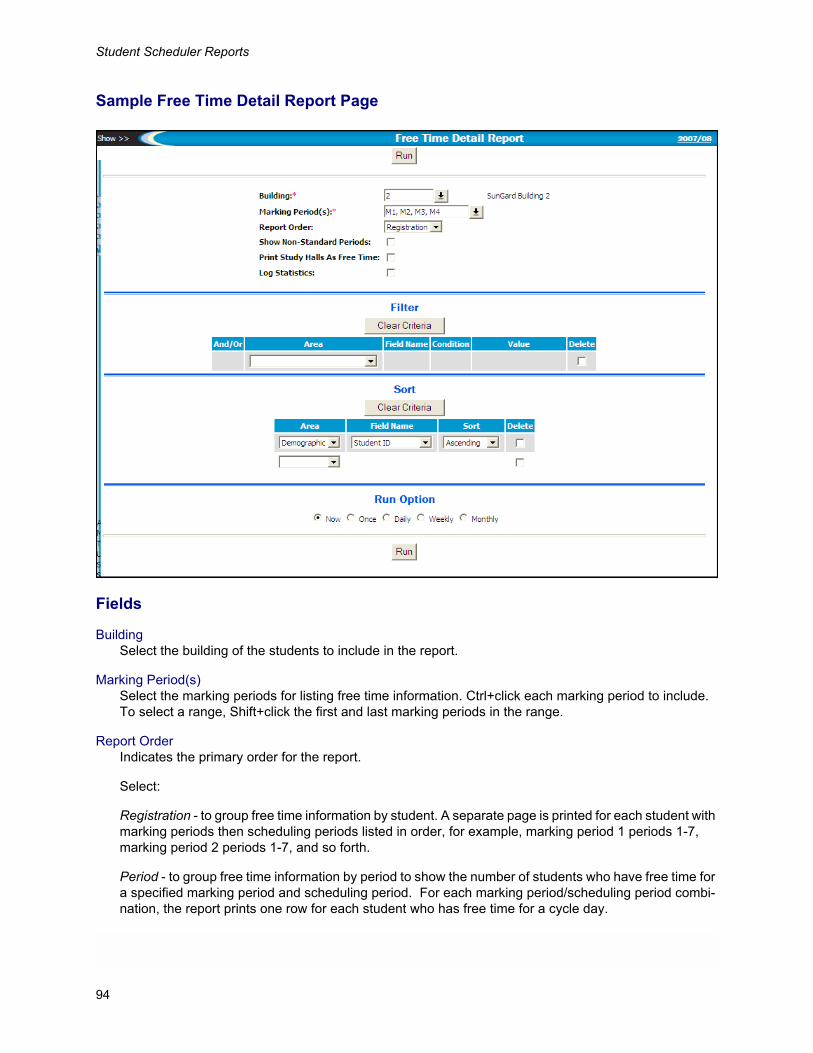
Student Scheduler Reports
Sample Free Time Detail Report Page
Fields
BuildingSelect the building of the students to include in the report.
Marking Period(s)Select the marking periods for listing free time information. Ctrl+click each marking period to include. To select a range, Shift+click the first and last marking periods in the range.
Report OrderIndicates the primary order for the report.
Select:
Registration - to group free time information by student. A separate page is printed for each student with marking periods then scheduling periods listed in order, for example, marking period 1 periods 1-7, marking period 2 periods 1-7, and so forth.
Period - to group free time information by period to show the number of students who have free time for a specified marking period and scheduling period. For each marking period/scheduling period combi-nation, the report prints one row for each student who has free time for a cycle day.
94
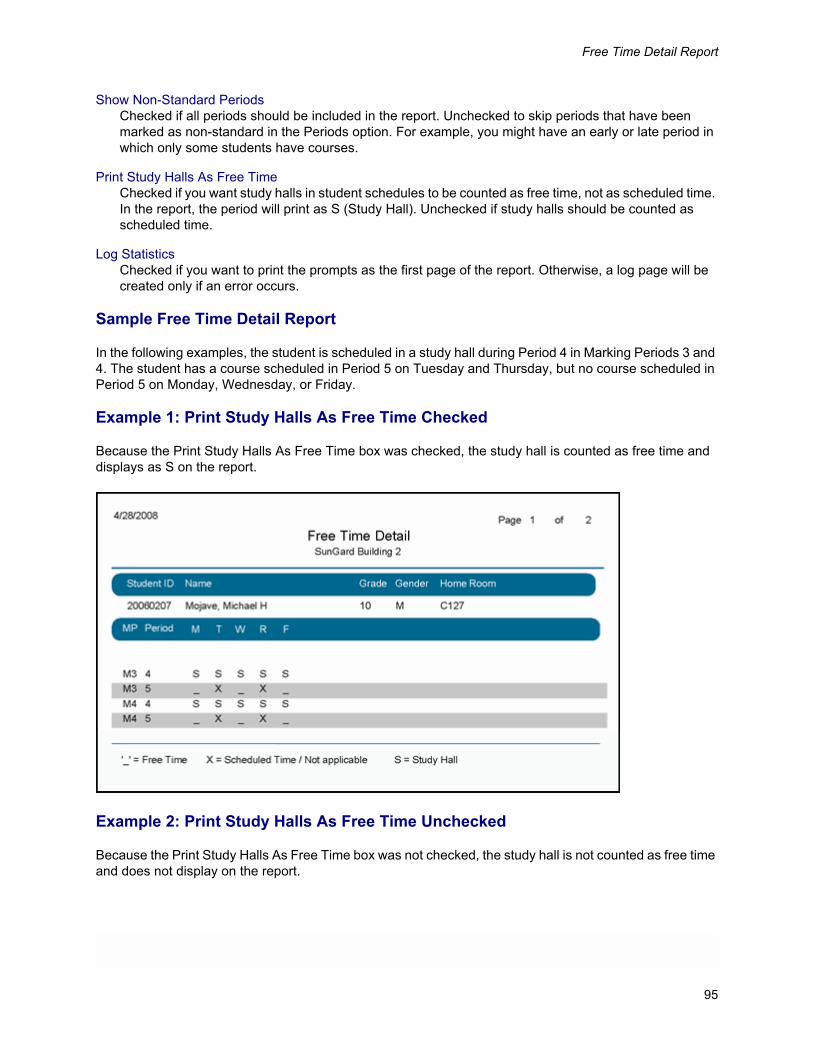
Free Time Detail Report
Show Non-Standard PeriodsChecked if all periods should be included in the report. Unchecked to skip periods that have been marked as non-standard in the Periods option. For example, you might have an early or late period in which only some students have courses.
Print Study Halls As Free TimeChecked if you want study halls in student schedules to be counted as free time, not as scheduled time. In the report, the period will print as S (Study Hall). Unchecked if study halls should be counted as scheduled time.
Log StatisticsChecked if you want to print the prompts as the first page of the report. Otherwise, a log page will be created only if an error occurs.
Sample Free Time Detail Report
In the following examples, the student is scheduled in a study hall during Period 4 in Marking Periods 3 and 4. The student has a course scheduled in Period 5 on Tuesday and Thursday, but no course scheduled in Period 5 on Monday, Wednesday, or Friday.
Example 1: Print Study Halls As Free Time Checked
Because the Print Study Halls As Free Time box was checked, the study hall is counted as free time and displays as S on the report.
Example 2: Print Study Halls As Free Time Unchecked
Because the Print Study Halls As Free Time box was not checked, the study hall is not counted as free time and does not display on the report.
95
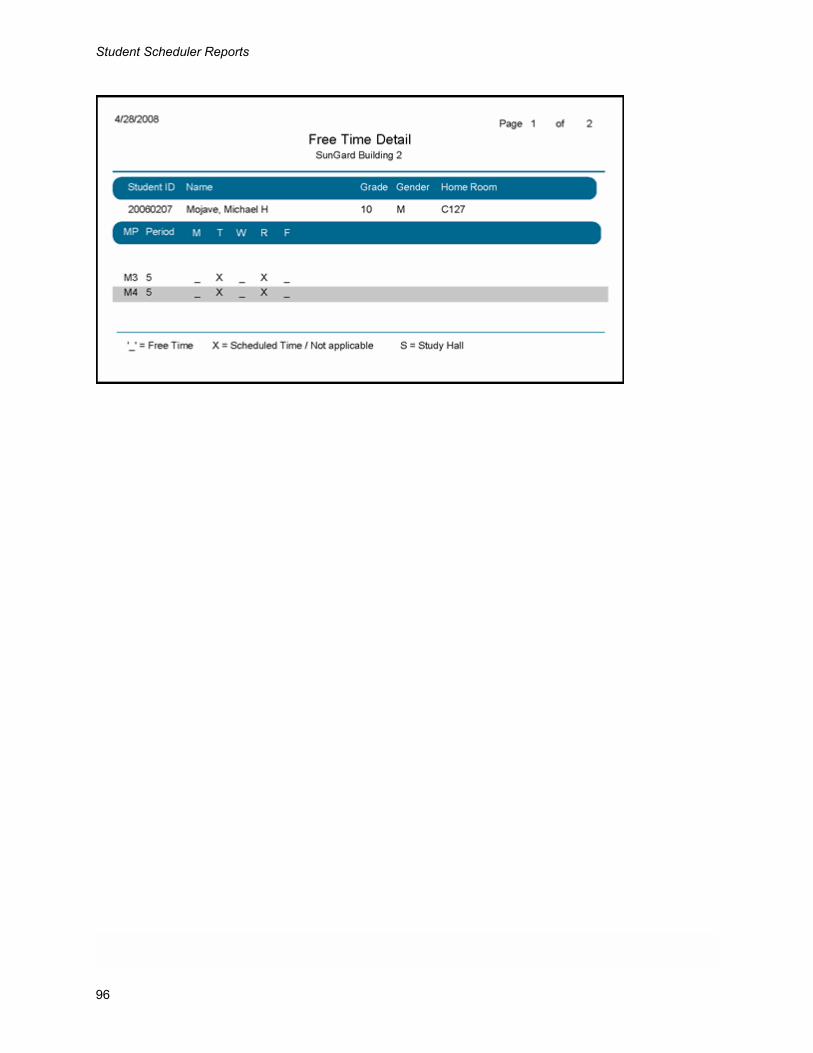
Student Scheduler Reports
96
Load Report
Load ReportUse this report to analyze the enrollment and request information for your building’s courses. For each course in the Master Schedule that meets for at least one of the marking periods selected, the report lists the following information:
• The first section for a course lists general course-section information, such as who teaches the class, where the class is held, and when the class meets. Additionally, the report lists the maximum enroll-ment allowed for the course-section, the highest enrollment for the course-section, and the enrollment count for each marking period selected.
• The footer following the course-section list includes the overall enrollment totals for all course-sections of the course.
• The second section for a course lists request and enrollment counts by students’ house/teams. For a house/team, the report lists the number of students who requested the course, the number of conflicts (students who were not scheduled for a requested course), and the number enrolled. The % Conflict value is an indicator of the percentage of students who were not enrolled into the course and is calcu-lated as the number of conflicts divided by the number of requests.
• The footer at the end of the report lists the totals for all courses processed in the report for total of re-quests, conflicts, enrollment, and % conflict.
Information for block courses is listed differently than regular course-sections.
• If the block course is a proxy course (that is, the block has no blockettes that include a section number and no blockettes are listed as mandatory), the requests for the proxy course are actually listed for the blockettes included in the proxy.
• If the block course is not a proxy course, the report lists only the number of requests for the block. These courses are listed at the end of the report.
Printing the Report
1. Select Scheduling Center > Reports > Post-Scheduler > Load.
2. Indicate how you want to run the report by completing the appropriate sections of the page.
3. Click Run.
97
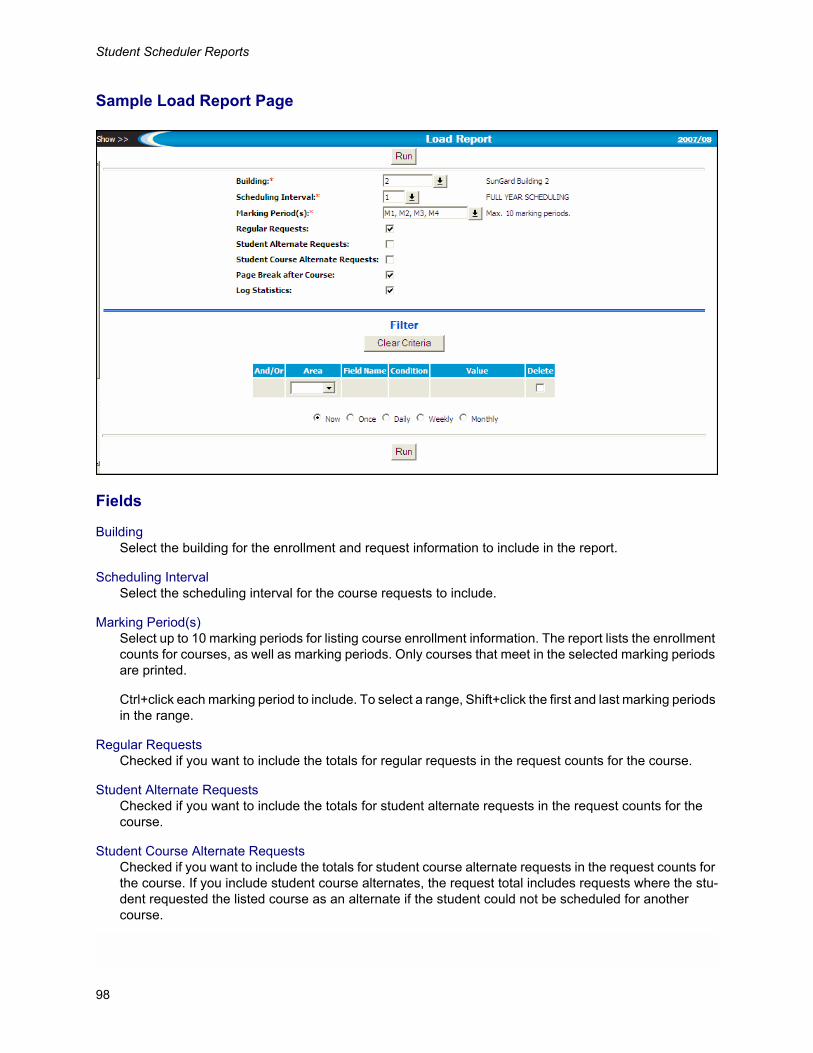
Student Scheduler Reports
Sample Load Report Page
Fields
BuildingSelect the building for the enrollment and request information to include in the report.
Scheduling IntervalSelect the scheduling interval for the course requests to include.
Marking Period(s)Select up to 10 marking periods for listing course enrollment information. The report lists the enrollment counts for courses, as well as marking periods. Only courses that meet in the selected marking periods are printed.
Ctrl+click each marking period to include. To select a range, Shift+click the first and last marking periods in the range.
Regular RequestsChecked if you want to include the totals for regular requests in the request counts for the course.
Student Alternate RequestsChecked if you want to include the totals for student alternate requests in the request counts for the course.
Student Course Alternate RequestsChecked if you want to include the totals for student course alternate requests in the request counts for the course. If you include student course alternates, the request total includes requests where the stu-dent requested the listed course as an alternate if the student could not be scheduled for another course.
98
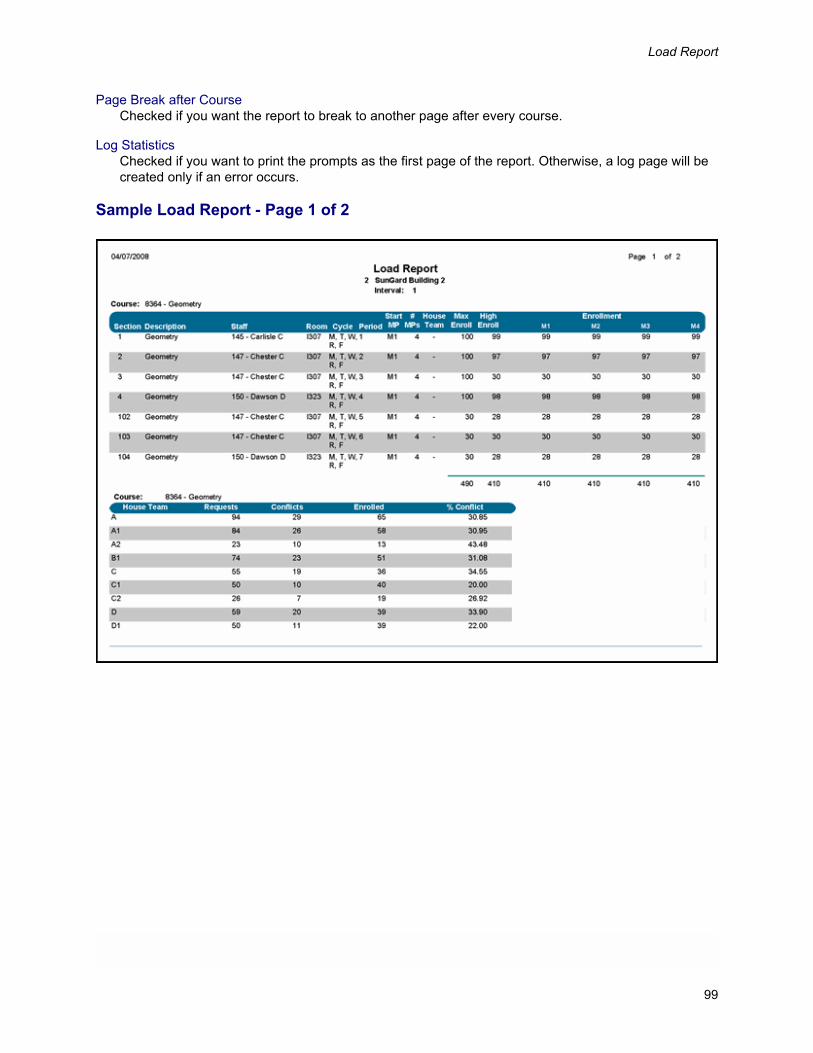
Load Report
Page Break after CourseChecked if you want the report to break to another page after every course.
Log StatisticsChecked if you want to print the prompts as the first page of the report. Otherwise, a log page will be created only if an error occurs.
Sample Load Report - Page 1 of 2
99
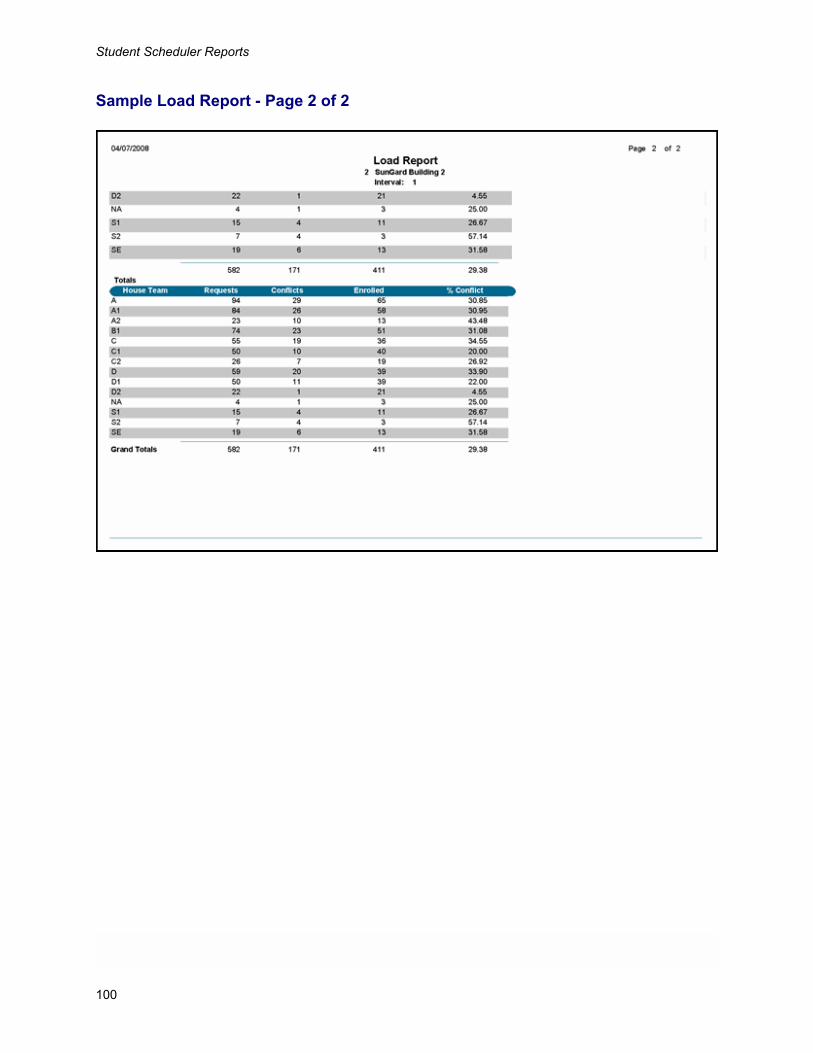
Student Scheduler Reports
Sample Load Report - Page 2 of 2
100

Student Conflict Analysis Report
Student Conflict Analysis ReportFor each student, this report indicates unassigned periods in the student’s schedule and why they are un-assigned. The report has two possible sections. The first section lists the student’s unassigned and sched-uled periods. The second section lists the course-sections corresponding to unscheduled requests, with the reason each course-section could not be scheduled, such as conflicts or grade restrictions. The second sec-tion displays only if the Print Conflicting Courses box is checked.
A conflict status of Unknown may print on the report in the following situations:
• The Master Schedule was changed between the scheduling run and conflict analysis.
• Imbalancing (gender, ethnicity, grade, or marking period) occurred.
• The student timed out before the section could be tried with the existing schedule.
Printing the Report
1. Make sure that you are in the correct environment (current year or next year).
2. Select Scheduling Center > Reports > Post-Scheduler > Student Conflict Analysis.
3. Indicate how you want to run the report by completing the appropriate sections of the page.
4. Click Run.
101
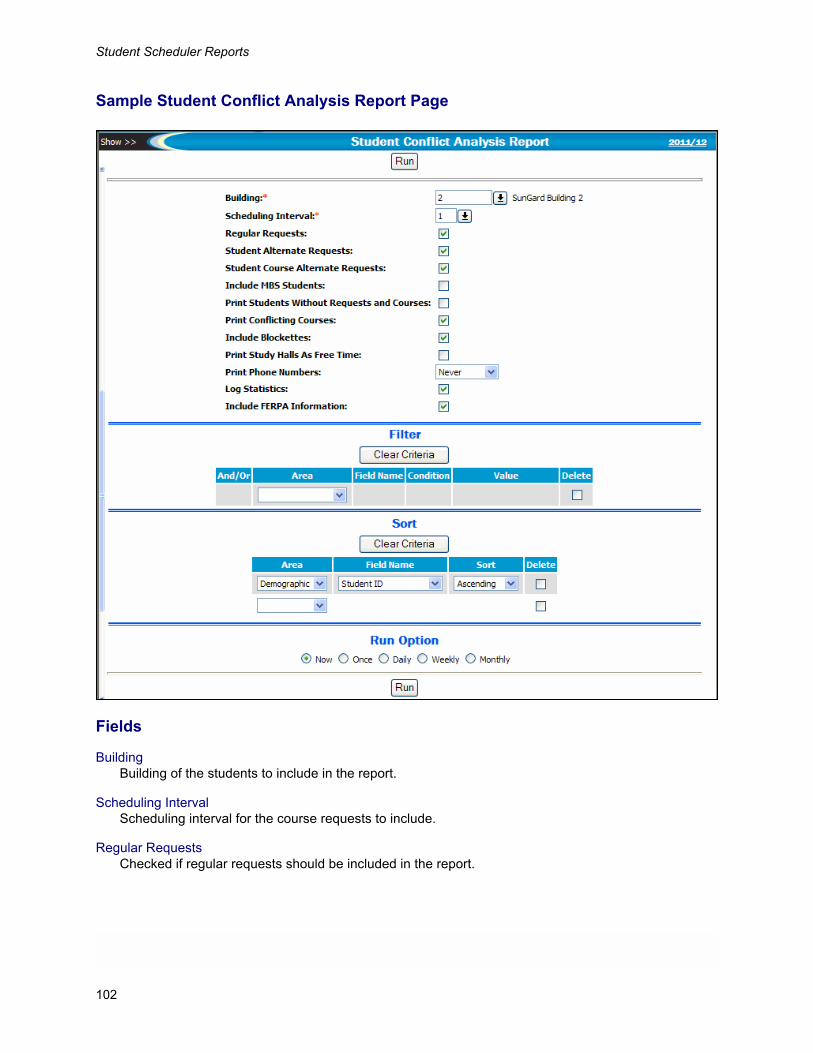
Student Scheduler Reports
Sample Student Conflict Analysis Report Page
Fields
BuildingBuilding of the students to include in the report.
Scheduling IntervalScheduling interval for the course requests to include.
Regular RequestsChecked if regular requests should be included in the report.
102
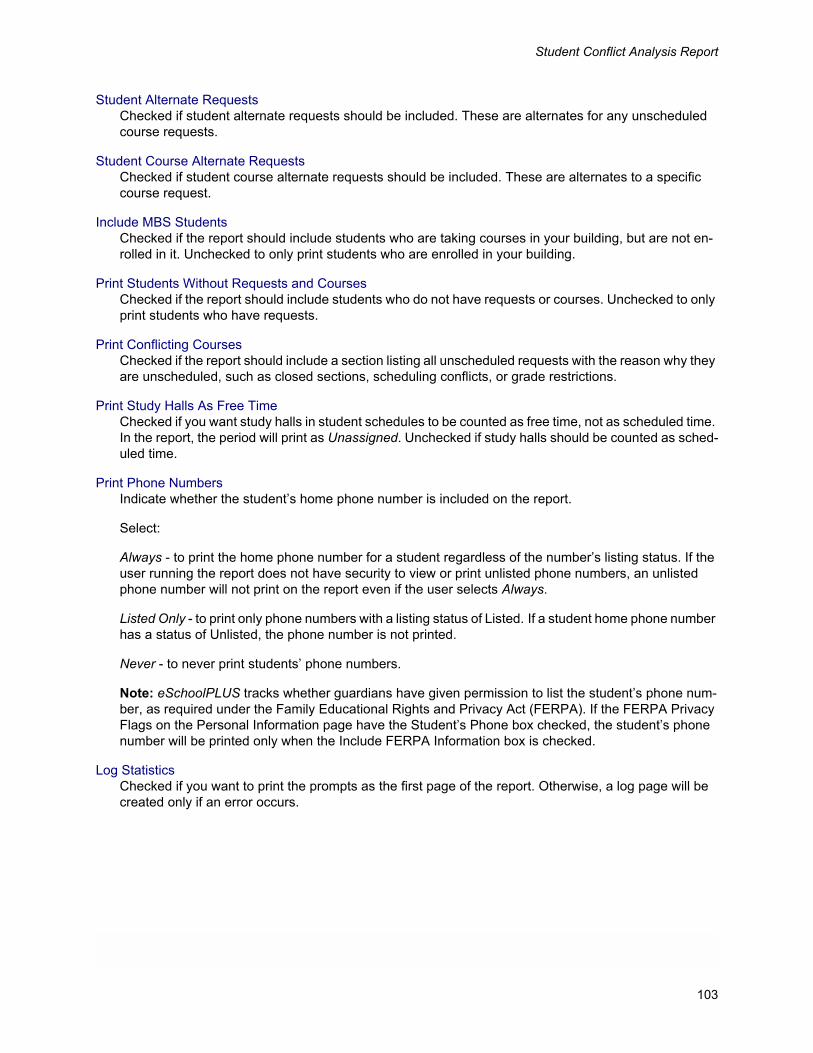
Student Conflict Analysis Report
Student Alternate RequestsChecked if student alternate requests should be included. These are alternates for any unscheduled course requests.
Student Course Alternate RequestsChecked if student course alternate requests should be included. These are alternates to a specific course request.
Include MBS StudentsChecked if the report should include students who are taking courses in your building, but are not en-rolled in it. Unchecked to only print students who are enrolled in your building.
Print Students Without Requests and CoursesChecked if the report should include students who do not have requests or courses. Unchecked to only print students who have requests.
Print Conflicting CoursesChecked if the report should include a section listing all unscheduled requests with the reason why they are unscheduled, such as closed sections, scheduling conflicts, or grade restrictions.
Print Study Halls As Free TimeChecked if you want study halls in student schedules to be counted as free time, not as scheduled time. In the report, the period will print as Unassigned. Unchecked if study halls should be counted as sched-uled time.
Print Phone NumbersIndicate whether the student’s home phone number is included on the report.
Select:
Always - to print the home phone number for a student regardless of the number’s listing status. If the user running the report does not have security to view or print unlisted phone numbers, an unlisted phone number will not print on the report even if the user selects Always.
Listed Only - to print only phone numbers with a listing status of Listed. If a student home phone number has a status of Unlisted, the phone number is not printed.
Never - to never print students’ phone numbers.
Note: eSchoolPLUS tracks whether guardians have given permission to list the student’s phone num-ber, as required under the Family Educational Rights and Privacy Act (FERPA). If the FERPA Privacy Flags on the Personal Information page have the Student’s Phone box checked, the student’s phone number will be printed only when the Include FERPA Information box is checked.
Log StatisticsChecked if you want to print the prompts as the first page of the report. Otherwise, a log page will be created only if an error occurs.
103
Student Scheduler Reports
Include FERPA InformationChecked if you want to override the FERPA Privacy Flag so you can print phone numbers for all stu-dents.
If checked, the following text prints on the report: "This report is for internal use only. Do not distribute outside of the district."
Note: If you selected Never in the Print Phone Number field, phone numbers will not be printed in the report even if the Include FERPA Information box is checked.
Sample Student Conflict Analysis Report
104
Student Schedules Report
Student Schedules ReportFor each student, this report lists the student’s scheduled courses. You can choose to print one of the fol-lowing:
• Full page or half page schedule listing course information.
• Office or mailer schedules displaying courses in a schedule matrix.
Printing the Report
1. Make sure that you are in the correct environment (current year or next year).
2. Select Scheduling Center > Reports > Post-Scheduler > Student Schedules.
3. Indicate how you want to run the report by completing the appropriate sections of the page.
4. Click Run.
105

Student Scheduler Reports
Sample Student Schedules Report Page
Fields
BuildingBuilding of the students to include in the report.
106
Student Schedules Report
Report ModeIndicates how to format the report.
Select:
Full Page - to print one student schedule per page. This option can be used for distributing schedules to students.
Half Page - to print two schedules per page, if possible, for office or teacher use.
Office - to print a schedule matrix with one student per page for office or teacher use.
Mailer - to print a schedule matrix on 8-1/2" x 14" paper for mailing to students or guardians. The ad-dress prints to fit a #10 window envelope.
You can print the matrix versions of the report if your building uses less than 10 cycle days. The report does not support more than 10 cycle days.
Print as of Date Determines the students and courses to include in the report. Student courses with a Date Added after this date or Date Dropped before this date will not be included.
• If you are running the report before school has started, use the first day of school.
• If the Print Students Without Courses box is checked, this prompt is ignored.
• Students included in the report can be further limited by the Start Date and End Date.
Select:
Today - to use today as the last date to check. This option is useful if you schedule the report to run periodically.
By Date - to use a set date as the end date of your report.
Marking PeriodsSelect the marking periods for listing student scheduling information. Ctrl+click each marking period to include. To select a range, Shift+click the first and last marking periods in the range.
For the Office and Mailer reports, you can select only one marking period.
Starting TimeslotSelect the first timeslot in the range of timeslots that you want to include in the report. Your range of timeslots cannot exceed 10 timeslots.
This field is inaccessible if you selected Full Page or Half Page for the Report Mode field.
Ending TimeslotSelect the last timeslot in the range of timeslots that you want to include in the report. Your range of timeslots cannot exceed 10 timeslots.
This field is inaccessible if you selected Full Page or Half Page for the Report Mode field.
107
Student Scheduler Reports
Include MBS StudentsChecked if you want to print Multiple Building Schedules for students who are taking courses in your building, but are enrolled in a different building. Unchecked to only print students who are enrolled in your building.
Print Students Without CoursesChecked if you want to print schedules for students who do not have scheduled courses. Unchecked to only print students who have scheduled courses.
When checked, the report ignores the values entered for the Print as of Date, Start Date, and End Date fields.
Print Locker NumberChecked if the student’s locker number should print on the schedule.
Print Locker CombinationChecked if the student’s locker combination should print on the schedule.
Print Room NumberChecked if you want to print the room number for the course.
You can only change this setting if you selected Office or Mailer for the Report Mode field.
Print Teacher NameChecked if you want to print the name of the course’s primary teacher.
You can only change this setting if you selected Office or Mailer for the Report Mode field.
Print Course FeesChecked if the student’s fees for courses should be printed at the bottom of the schedule.
This field is inaccessible if you selected Half Page or Mailer for the Report Mode field.
Schedule VersionIndicates the type of information to include on the schedule and the number of schedules to print.
Select:
Office - to add the student’s house/team and phone number fields to the header section and the course’s house/team, course status (A for Active or L for Locked), and resolved conflict indicator to the report’s course section. The office version also uses text formatting to indicate whether a course is a resolved conflict, is locked, is a blockette, is an MBS Course, or is defined as a study hall.
Student - to print a copy for each student or guardian who has the Scheduling print flag checked.
N/A - to display N/A in the field if you selected Office or Mailer for the Report Mode field.
This field is inaccessible and displays N/A if you selected Office or Mailer for the Report Mode field.
108
Student Schedules Report
AddressIndicates the address to print on the schedule.
Select:
None - to not include an address.
Student - to print the student’s address on the schedule. The report will display, "To the Parents or Guardian Of:" above the student’s address.
Guardians - to print the guardian’s name and address on the schedule.
This field is inaccessible if you selected Office for the Report Mode field.
Print Phone NumbersIf you selected to print the office version of the report, this field indicates whether the student’s home phone number is shown at the top of the schedule.
Select:
Listed Only - to print only phone numbers with a listing status of Listed. If a student home phone number has a status of Unlisted, the phone number is not printed.
Always - to print the home phone number for a student regardless of the number’s listing status. If the user running the report does not have security to view or print unlisted phone numbers, an unlisted phone number will not print on the report even if the user selects Always.
Never - to never print students’ phone numbers.
Note: eSchoolPLUS tracks whether guardians have given permission to list the student’s phone num-ber, as required under the Family Educational Rights and Privacy Act (FERPA). If the FERPA Privacy Flags on the Personal Information page have the Student’s Phone box checked, the student’s phone number will be printed only when the Include FERPA Information box is checked.
This field is inaccessible if you selected Office or Mailer for the Report Mode field.
Start DateUsed to include only students whose schedules have been changed on or after this date. Refers to the change date, rather than an add or drop date. For example, to print only students whose schedules were changed today, use today’s date as the Start Date.
Leave both this date and the End Date blank to include all schedules, based on the Print as of Date.
Select:
By Date - to use a set date as the start date of your report.
By Prior Days - to run the report for a set number of days. Enter the total days to include in the report. Prior days count backward from the end date. This option is useful if you schedule the report to run periodically.
This field is inaccessible if you selected Office or Mailer for the Report Mode field.
109
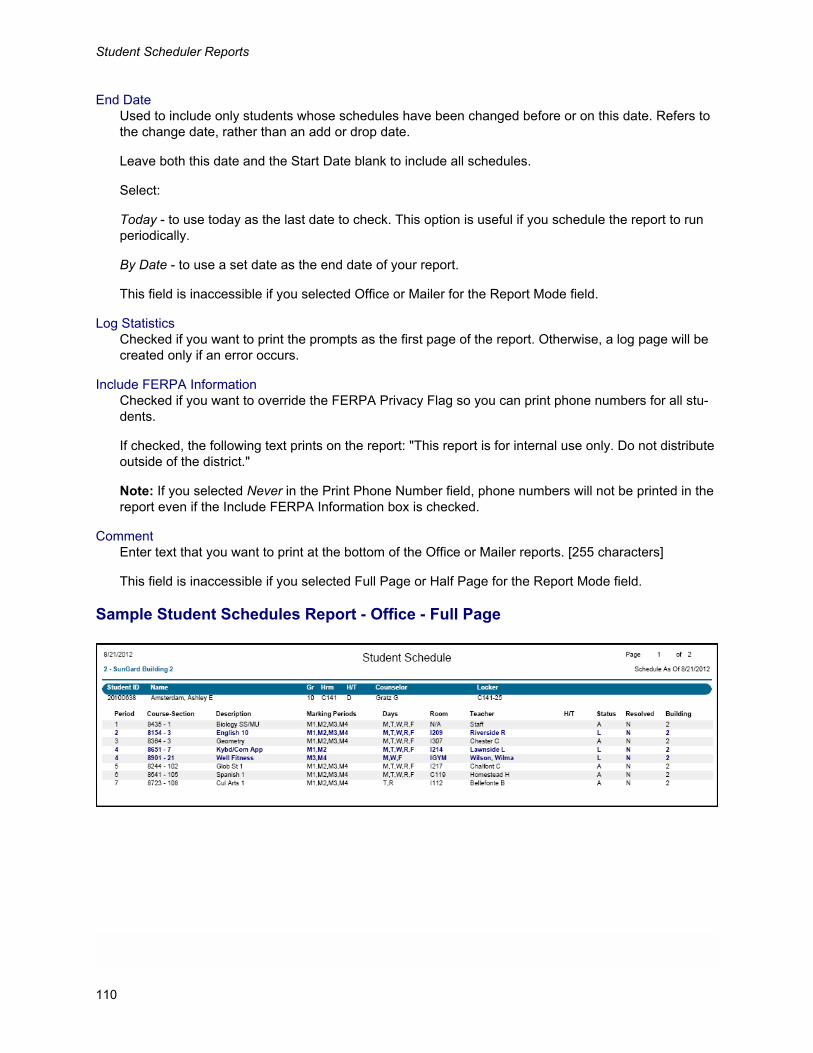
Student Scheduler Reports
End DateUsed to include only students whose schedules have been changed before or on this date. Refers to the change date, rather than an add or drop date.
Leave both this date and the Start Date blank to include all schedules.
Select:
Today - to use today as the last date to check. This option is useful if you schedule the report to run periodically.
By Date - to use a set date as the end date of your report.
This field is inaccessible if you selected Office or Mailer for the Report Mode field.
Log StatisticsChecked if you want to print the prompts as the first page of the report. Otherwise, a log page will be created only if an error occurs.
Include FERPA InformationChecked if you want to override the FERPA Privacy Flag so you can print phone numbers for all stu-dents.
If checked, the following text prints on the report: "This report is for internal use only. Do not distribute outside of the district."
Note: If you selected Never in the Print Phone Number field, phone numbers will not be printed in the report even if the Include FERPA Information box is checked.
CommentEnter text that you want to print at the bottom of the Office or Mailer reports. [255 characters]
This field is inaccessible if you selected Full Page or Half Page for the Report Mode field.
Sample Student Schedules Report - Office - Full Page
110
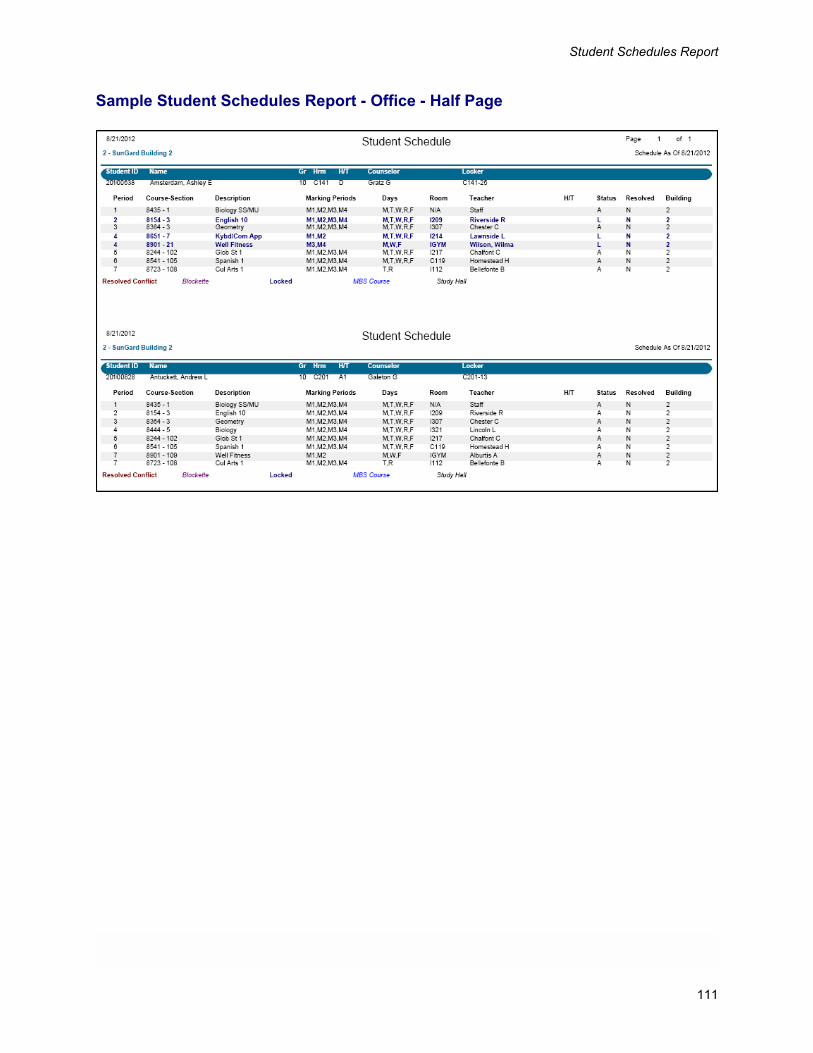
Student Schedules Report
Sample Student Schedules Report - Office - Half Page
111

Student Scheduler Reports
Sample Student Schedules Report - Student - Full Page
112
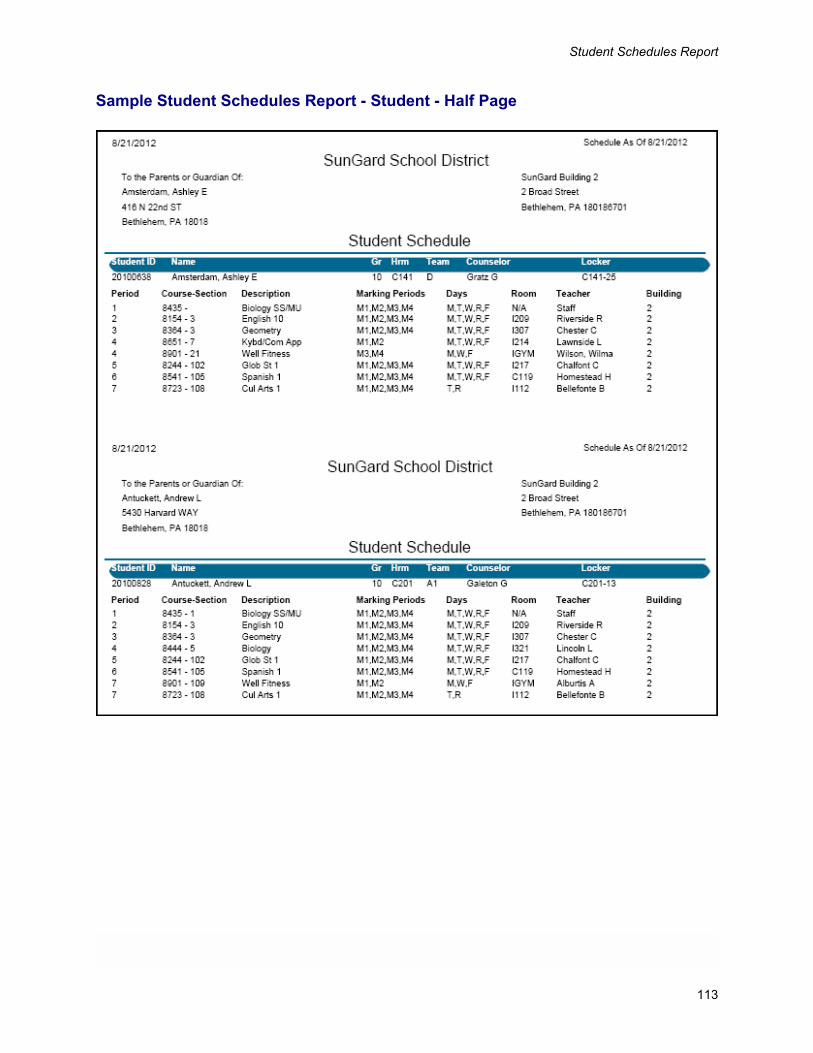
Student Schedules Report
Sample Student Schedules Report - Student - Half Page
113
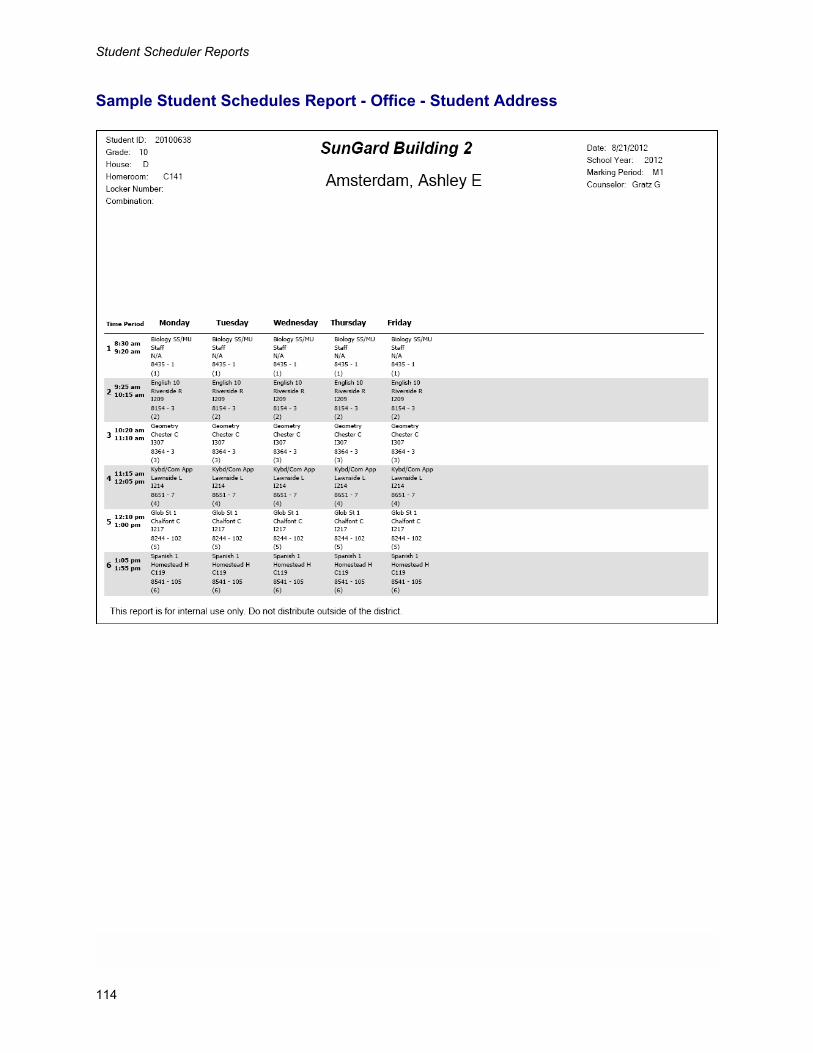
Student Scheduler Reports
Sample Student Schedules Report - Office - Student Address
114
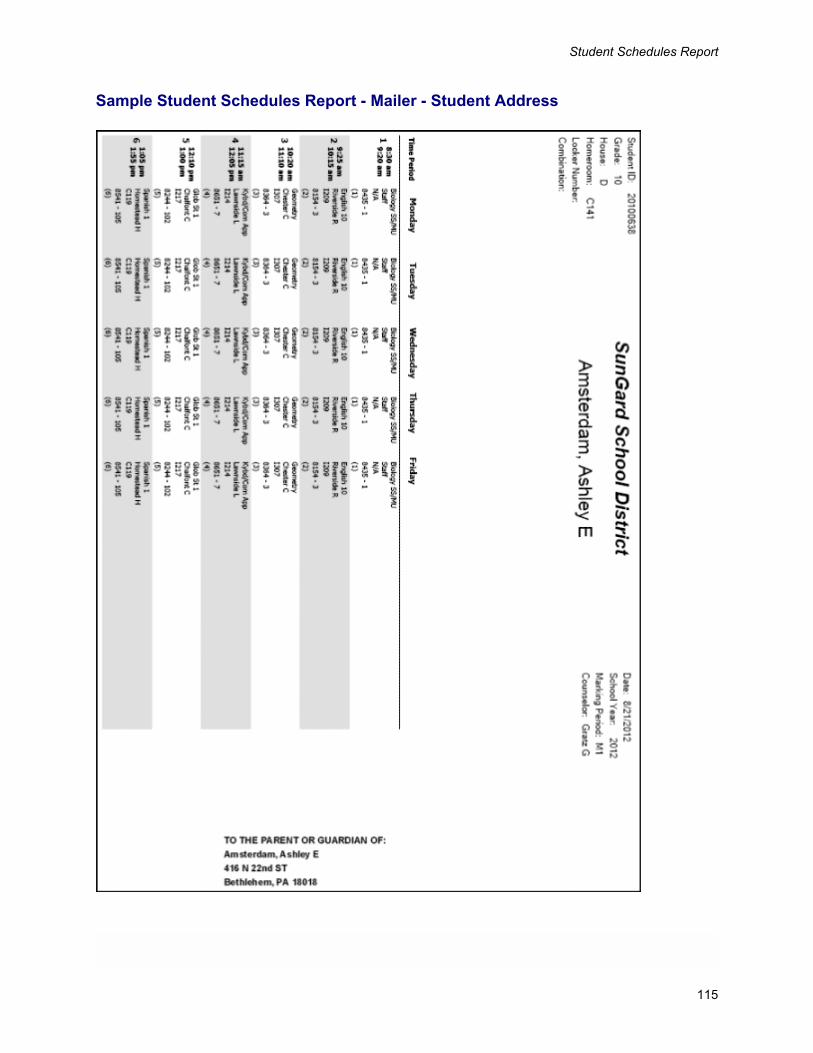
Student Schedules Report
Sample Student Schedules Report - Mailer - Student Address
115
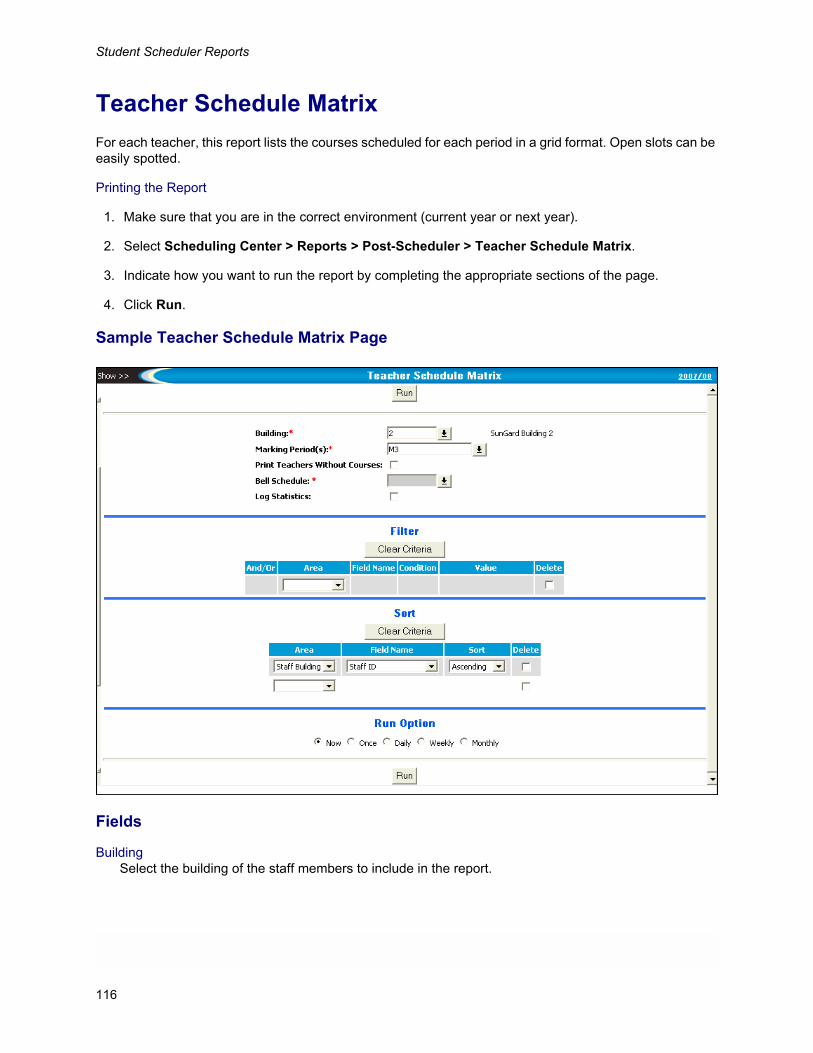
Student Scheduler Reports
Teacher Schedule Matrix For each teacher, this report lists the courses scheduled for each period in a grid format. Open slots can be easily spotted.
Printing the Report
1. Make sure that you are in the correct environment (current year or next year).
2. Select Scheduling Center > Reports > Post-Scheduler > Teacher Schedule Matrix.
3. Indicate how you want to run the report by completing the appropriate sections of the page.
4. Click Run.
Sample Teacher Schedule Matrix Page
Fields
BuildingSelect the building of the staff members to include in the report.
116
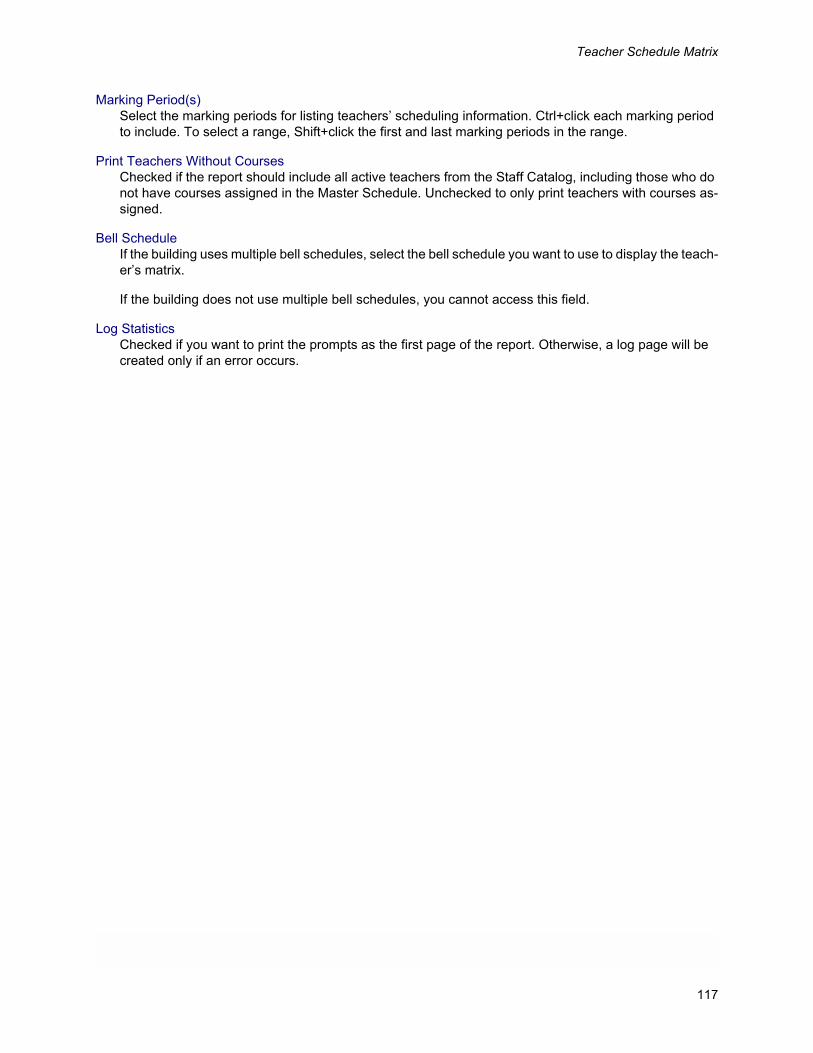
Teacher Schedule Matrix
Marking Period(s)Select the marking periods for listing teachers’ scheduling information. Ctrl+click each marking period to include. To select a range, Shift+click the first and last marking periods in the range.
Print Teachers Without CoursesChecked if the report should include all active teachers from the Staff Catalog, including those who do not have courses assigned in the Master Schedule. Unchecked to only print teachers with courses as-signed.
Bell ScheduleIf the building uses multiple bell schedules, select the bell schedule you want to use to display the teach-er’s matrix.
If the building does not use multiple bell schedules, you cannot access this field.
Log StatisticsChecked if you want to print the prompts as the first page of the report. Otherwise, a log page will be created only if an error occurs.
117
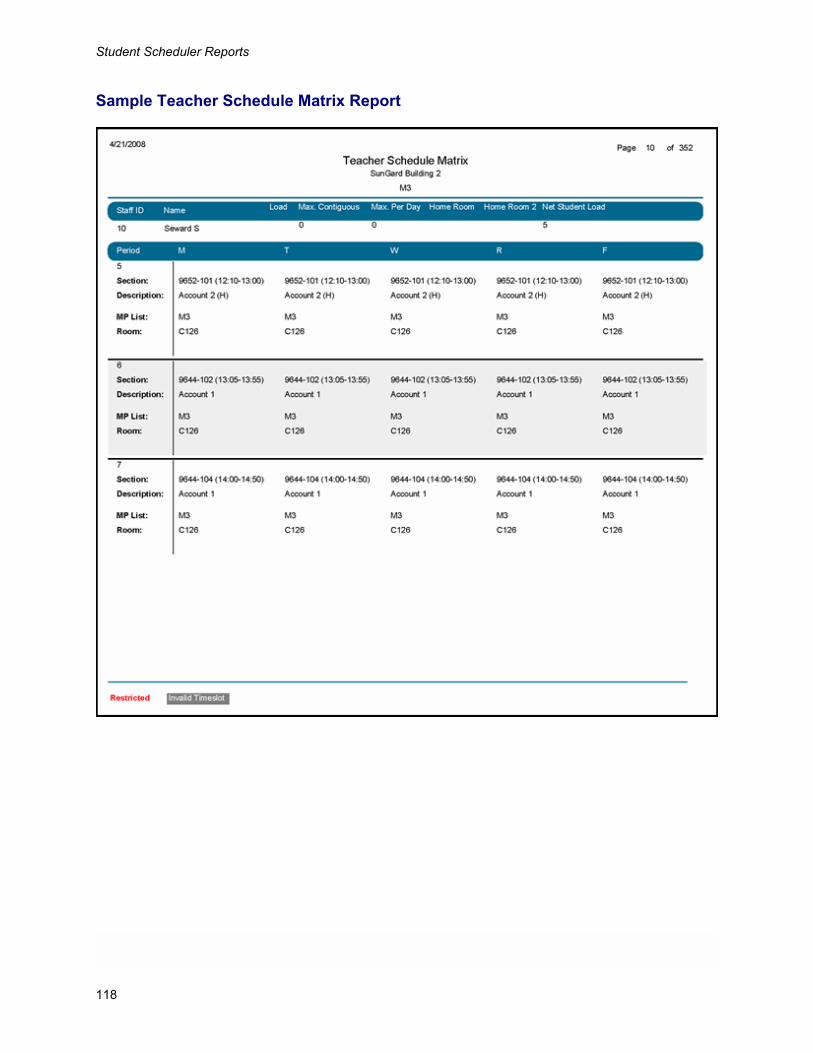
Student Scheduler Reports
Sample Teacher Schedule Matrix Report
118
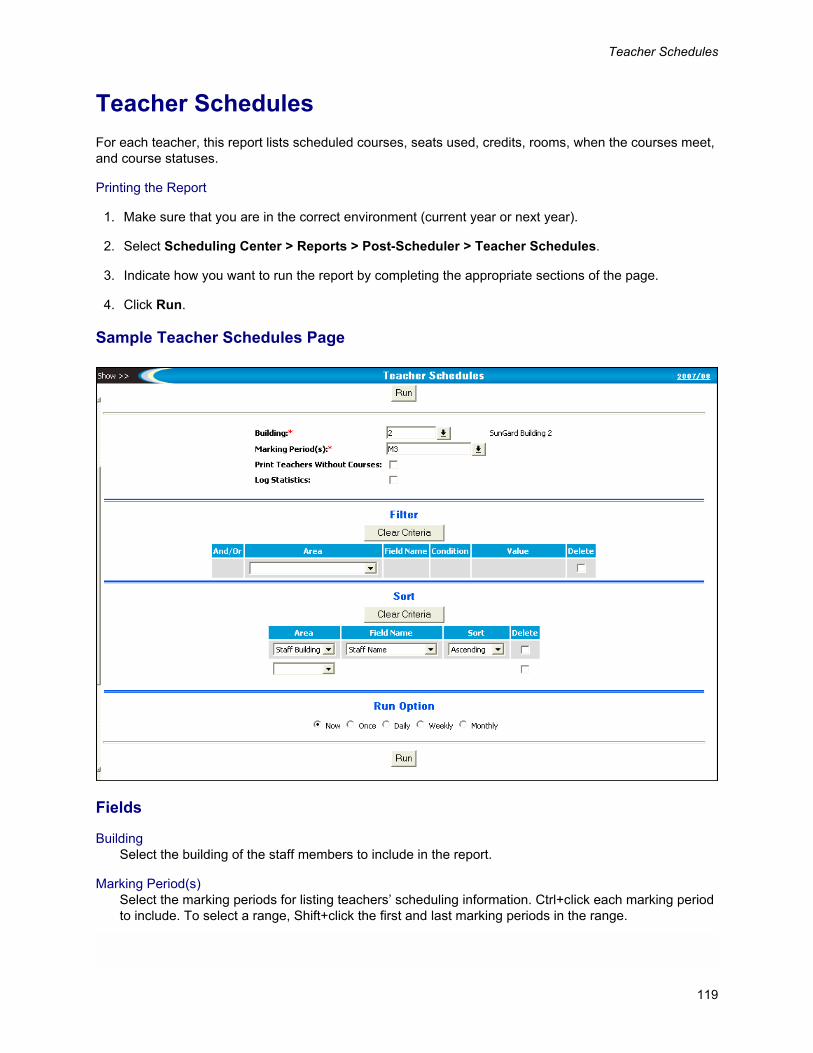
Teacher Schedules
Teacher SchedulesFor each teacher, this report lists scheduled courses, seats used, credits, rooms, when the courses meet, and course statuses.
Printing the Report
1. Make sure that you are in the correct environment (current year or next year).
2. Select Scheduling Center > Reports > Post-Scheduler > Teacher Schedules.
3. Indicate how you want to run the report by completing the appropriate sections of the page.
4. Click Run.
Sample Teacher Schedules Page
Fields
BuildingSelect the building of the staff members to include in the report.
Marking Period(s)Select the marking periods for listing teachers’ scheduling information. Ctrl+click each marking period to include. To select a range, Shift+click the first and last marking periods in the range.
119
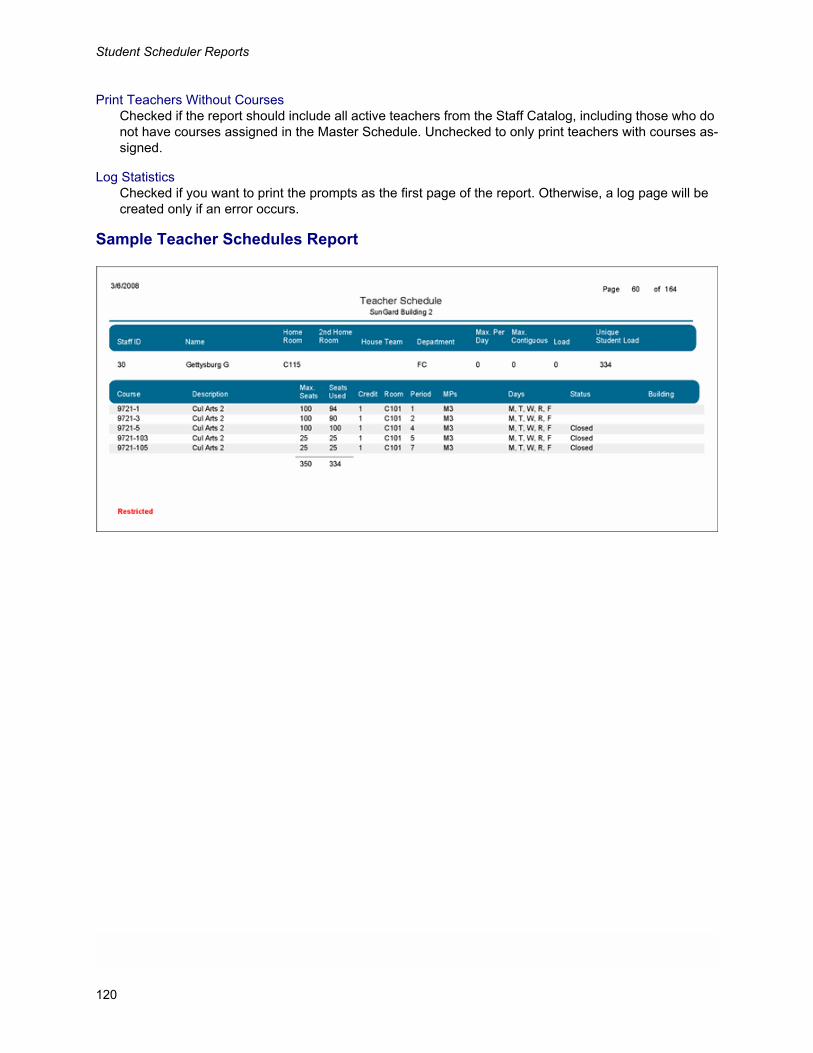
Student Scheduler Reports
Print Teachers Without CoursesChecked if the report should include all active teachers from the Staff Catalog, including those who do not have courses assigned in the Master Schedule. Unchecked to only print teachers with courses as-signed.
Log StatisticsChecked if you want to print the prompts as the first page of the report. Otherwise, a log page will be created only if an error occurs.
Sample Teacher Schedules Report
120
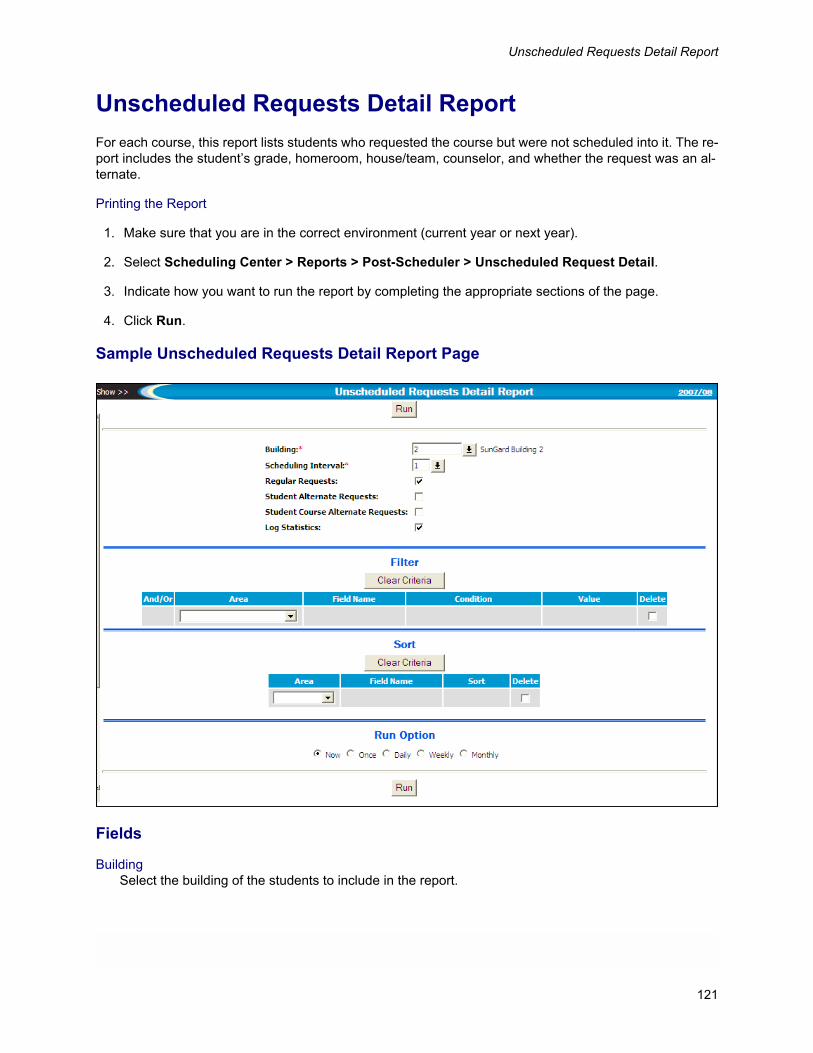
Unscheduled Requests Detail Report
Unscheduled Requests Detail ReportFor each course, this report lists students who requested the course but were not scheduled into it. The re-port includes the student’s grade, homeroom, house/team, counselor, and whether the request was an al-ternate.
Printing the Report
1. Make sure that you are in the correct environment (current year or next year).
2. Select Scheduling Center > Reports > Post-Scheduler > Unscheduled Request Detail.
3. Indicate how you want to run the report by completing the appropriate sections of the page.
4. Click Run.
Sample Unscheduled Requests Detail Report Page
Fields
BuildingSelect the building of the students to include in the report.
121

Student Scheduler Reports
Scheduling IntervalSelect the scheduling interval for the course requests to include.
Regular RequestsChecked if you want to include regular requests in the report.
Student Alternate RequestsChecked if you want to include student alternate requests. These are alternates for any unscheduled course requests.
Student Course Alternate RequestsChecked if you want to include student course alternate requests. These are alternates to a specific course request.
Log StatisticsChecked if you want to print the prompts as the first page of the report. Otherwise, a log page will be created only if an error occurs.
Sample Unscheduled Requests Detail Report
122
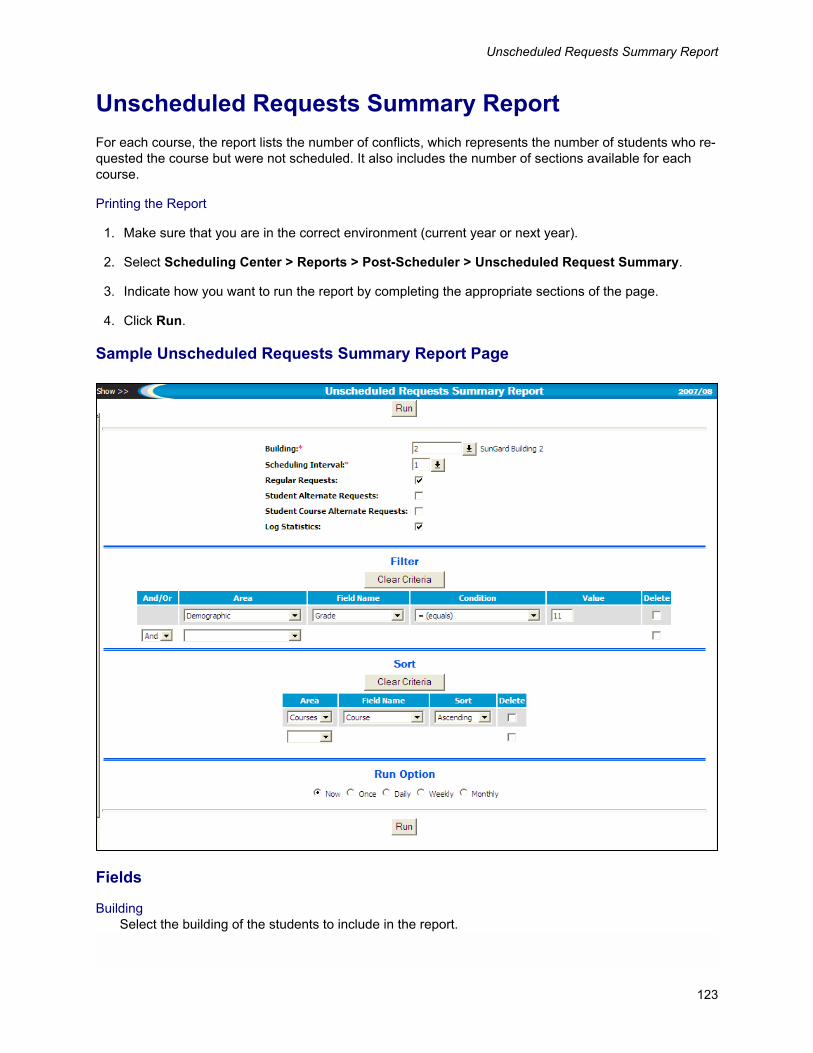
Unscheduled Requests Summary Report
Unscheduled Requests Summary ReportFor each course, the report lists the number of conflicts, which represents the number of students who re-quested the course but were not scheduled. It also includes the number of sections available for each course.
Printing the Report
1. Make sure that you are in the correct environment (current year or next year).
2. Select Scheduling Center > Reports > Post-Scheduler > Unscheduled Request Summary.
3. Indicate how you want to run the report by completing the appropriate sections of the page.
4. Click Run.
Sample Unscheduled Requests Summary Report Page
Fields
BuildingSelect the building of the students to include in the report.
123
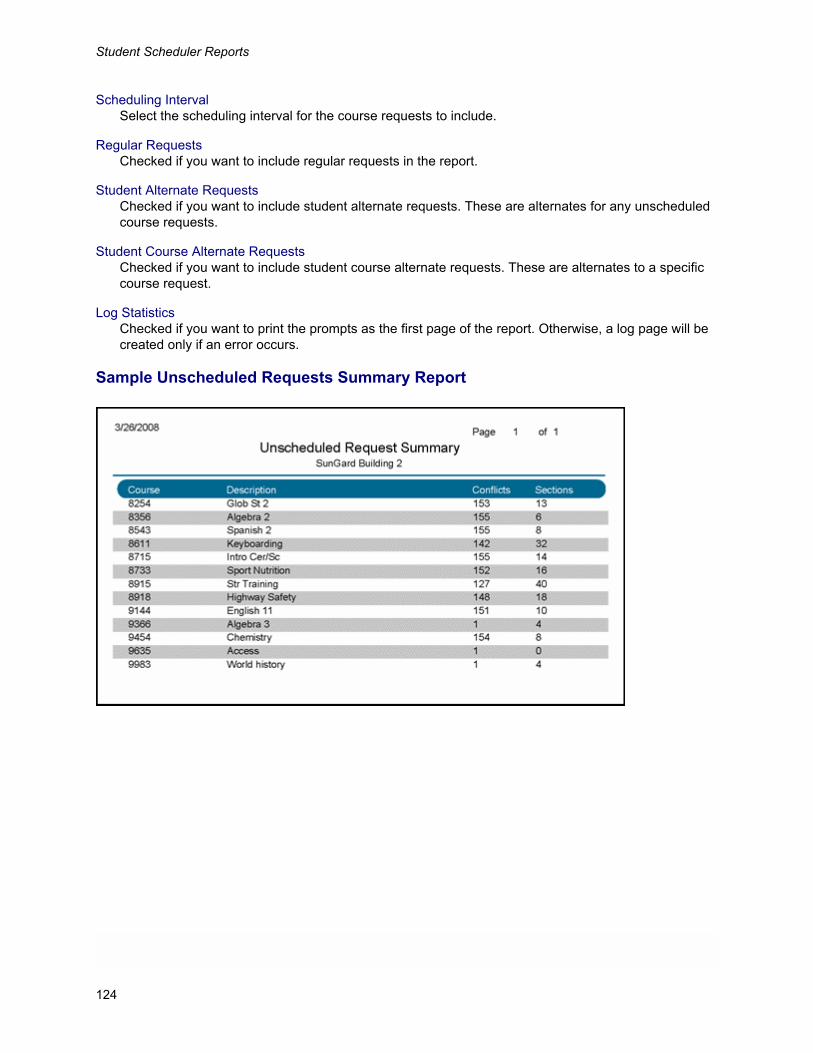
Student Scheduler Reports
Scheduling IntervalSelect the scheduling interval for the course requests to include.
Regular RequestsChecked if you want to include regular requests in the report.
Student Alternate RequestsChecked if you want to include student alternate requests. These are alternates for any unscheduled course requests.
Student Course Alternate RequestsChecked if you want to include student course alternate requests. These are alternates to a specific course request.
Log StatisticsChecked if you want to print the prompts as the first page of the report. Otherwise, a log page will be created only if an error occurs.
Sample Unscheduled Requests Summary Report
124
A. AppendixThis appendix provides information about the Scheduling Center’s Multiple Bell Schedules feature.
PreviewThis appendix includes the following topics:
About Multiple Bell Schedules
Setting up Multiple Bell Schedules
Multiple Bell Schedules and Courses
125
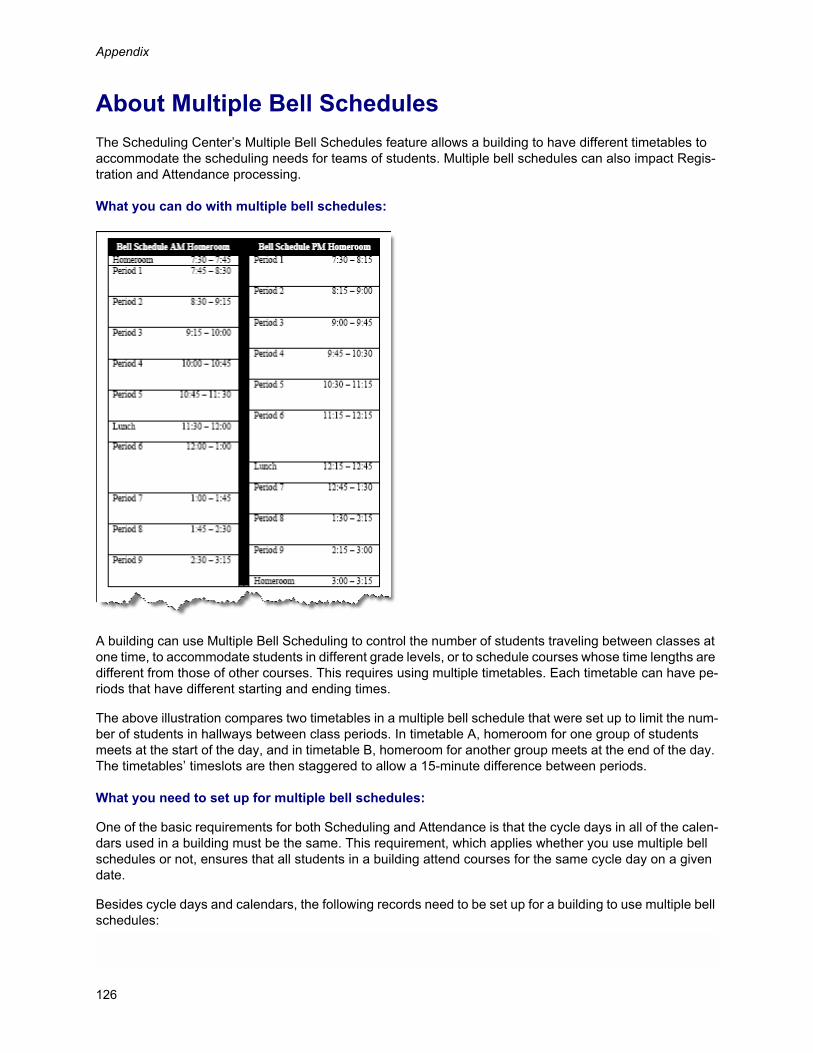
Appendix
About Multiple Bell SchedulesThe Scheduling Center’s Multiple Bell Schedules feature allows a building to have different timetables to accommodate the scheduling needs for teams of students. Multiple bell schedules can also impact Regis-tration and Attendance processing.
What you can do with multiple bell schedules:
A building can use Multiple Bell Scheduling to control the number of students traveling between classes at one time, to accommodate students in different grade levels, or to schedule courses whose time lengths are different from those of other courses. This requires using multiple timetables. Each timetable can have pe-riods that have different starting and ending times.
The above illustration compares two timetables in a multiple bell schedule that were set up to limit the num-ber of students in hallways between class periods. In timetable A, homeroom for one group of students meets at the start of the day, and in timetable B, homeroom for another group meets at the end of the day. The timetables’ timeslots are then staggered to allow a 15-minute difference between periods.
What you need to set up for multiple bell schedules:
One of the basic requirements for both Scheduling and Attendance is that the cycle days in all of the calen-dars used in a building must be the same. This requirement, which applies whether you use multiple bell schedules or not, ensures that all students in a building attend courses for the same cycle day on a given date.
Besides cycle days and calendars, the following records need to be set up for a building to use multiple bell schedules:
126
About Multiple Bell Schedules
• House/teams should be defined in the Registration Center’s House/Teams table (Administration > Sys-tem Setup > Validation Tables > Registration tab > House/Teams).
• Multiple timetables should be set up in the Scheduling Center’s Timetable option (Scheduling Center > Setup > Timetable). Timetables used in multiple bell schedules should have at least some periods that differ from those in other timetables. In addition, timetables must have at least one house/team assigned to be used in bell schedules.
• House/teams should be assigned to course-sections in the Building Course Catalog (Scheduling Cen-ter > Building Course Setup > Course Catalog). Although a course-section can have multiple teams assigned, all of the teams must have either the same timetable or ones that have periods with the same start and end times. If not, separate course-sections with different timetables must be set up.
• House/teams should be assigned to students in the Student Center’s Registration Information page (Student Center > Demographic > Registration). Under a multiple bell schedule, students can be scheduled into course-sections that have either their house/team assigned or no house/team designa-tion.
All these rules and procedures apply to the course-sections defined in the Master Schedule to determine what classes students can be scheduled for and the timetables of the bell schedules they will follow.
Additional tips for using multiple bell schedules:
• Scheduling and Attendance both require that a building’s calendars have the same cycle days, for ex-ample, cycle A on Monday, cycle B on Tuesday, and so forth. This is true whether you use multiple timetables or not.
• If your building allows Multiple Building Scheduling (MBS), students enrolled in other buildings that need to be scheduled into your building must have the same house/team designation as the one as-signed to the course-sections they are taking. If the enrollment building does not use house/teams, you can assign the student to the house/team needed for the scheduling building. However, if the enroll-ment building uses different team designations, you must add the house/teams for the students you need to schedule to the Scheduling Configuration, in addition to assigning them to the appropriate time-tables and course-sections.
• You should use timetables to determine the starting and ending times for attendance periods, rather than define attendance periods based on periods or timeslots. If you do not use the timetable to define an attendance period’s start and end times, all students in the building will have the same start and end time for periods when reporting attendance.
127

Appendix
Setting Up Multiple Bell SchedulesYou may update an existing building to use Multiple Bell Schedules in the next-year environment in prepa-ration for next-year scheduling. The following procedures can be used to change your setups.
Add House Teams
1. Select Administration > System Setup > Validation Tables > Registration.
2. Click the House/Teams link.
3. Enter each house/team code you plan to use.
This is a district-wide table. All entries made here will be visible to all buildings in the school district. In the Scheduling Configuration, you can limit which house/teams are available to buildings that use Multiple Bell Schedules.
4. Save changes.
Update the Scheduling Configuration
1. Select Administration > System Setup > Building > Scheduling.
2. Check the Multiple Bell Schedules box.
3. Enter each house/team used in the building.
If your building schedules students enrolled in other buildings and their buildings do not use the same house/team designations as yours, you must also include the house/teams from the other buildings.
4. Save changes.
Verify Scheduling Periods
1. Select Scheduling Center > Setup > Periods.
2. Review your Scheduling Periods.
3. If necessary, change the periods.
You may not need to make modifications, but if you had a scheme in place in the past to work around not having Multiple Bell Schedules, you may want to change your periods.
4. Save changes.
Add Scheduling Timetables
1. Select Scheduling Center > Setup > Timetable.
2. When viewing the building list for this page, note that all buildings that do not use Multiple Bell Sched-ules will have N/A displayed for their bell schedule descriptions.
3. Buildings configured for Multiple Bell Schedules will have an Add New link. Click this link to add a bell schedule for a house/team.
128
About Multiple Bell Schedules
4. Enter a Bell Schedule name, and select one or more House/Teams to follow this bell schedule. Note that students can only be assigned to one house/team.
5. Repeat Steps 3-4 for each bell schedule you want to add.
6. Save changes.
Verify Attendance Setups
If a building takes attendance by period and you adjusted your Scheduling Periods, you may also need to make adjustments to Attendance Periods.
1. Select Administration > System Setup > Building > Attendance to verify if the building takes atten-dance by period and if the timetable is being used.
2. Select Attendance Center > Setup > Periods, and adjust the periods as needed.
3. Review your needs for Attendance Views. Your Attendance Views may need to be adjusted to take into account students attending school for different numbers of periods in the day. For example, if 09 grade students only attend for 4 periods in a day, and 10 through 12 grade students attend for 8 periods, you may need different criteria lines to evaluate full-day and half-day absences. Calendars may be used to ensure students are evaluated by the appropriate criteria.
4. If you need to change views, select Attendance Center > Setup > Views, and adjust your views as needed.
5. Save changes.
Prepare Registration Records
1. If required by attendance views, create new calendars by selecting Registration Center > Setup > Calendars. Calendars may be assigned to students through the Registration Rollover during Year-End processing.
2. Assign students to house/teams. Select Utilities > Registration Assignment.
The Bell Schedule field may be used to limit the search to students who are following the selected bell schedule. If this is your first time assigning students to teams who are not currently assigned to a bell sched-ule, you may leave this field blank.
3. Save changes.
129
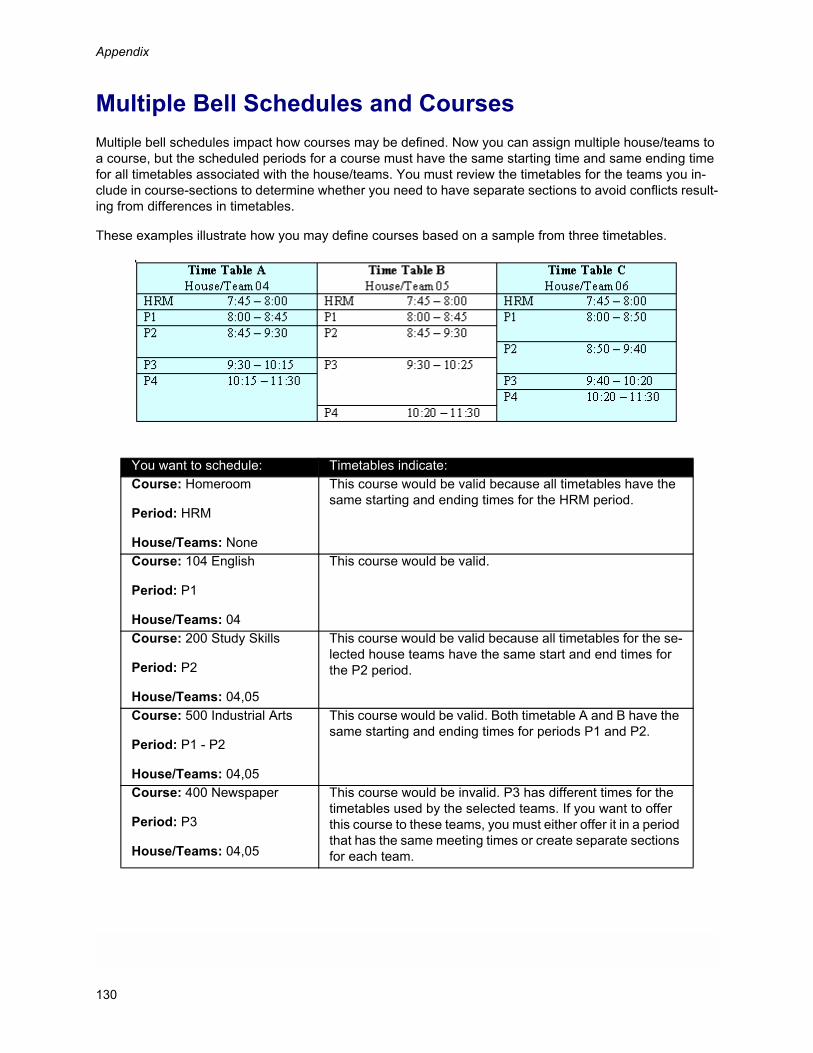
Appendix
Multiple Bell Schedules and CoursesMultiple bell schedules impact how courses may be defined. Now you can assign multiple house/teams to a course, but the scheduled periods for a course must have the same starting time and same ending time for all timetables associated with the house/teams. You must review the timetables for the teams you in-clude in course-sections to determine whether you need to have separate sections to avoid conflicts result-ing from differences in timetables.
These examples illustrate how you may define courses based on a sample from three timetables.
You want to schedule: Timetables indicate:Course: Homeroom
Period: HRM
House/Teams: None
This course would be valid because all timetables have the same starting and ending times for the HRM period.
Course: 104 English
Period: P1
House/Teams: 04
This course would be valid.
Course: 200 Study Skills
Period: P2
House/Teams: 04,05
This course would be valid because all timetables for the se-lected house teams have the same start and end times for the P2 period.
Course: 500 Industrial Arts
Period: P1 - P2
House/Teams: 04,05
This course would be valid. Both timetable A and B have the same starting and ending times for periods P1 and P2.
Course: 400 Newspaper
Period: P3
House/Teams: 04,05
This course would be invalid. P3 has different times for the timetables used by the selected teams. If you want to offer this course to these teams, you must either offer it in a period that has the same meeting times or create separate sections for each team.
130

Multiple Bell Schedules and Courses
Course: 600 Lunch
Period: P4
House/Teams: None
This course would be invalid. P4 has different times for the timetables. You must create separate sections for each team.
131

Appendix
132
IndexA Intervals 12
About Multiple Bell Schedules 126Add Drop By Teacher Report 80Alternate Requests 25
B
Back Up/Restore Scheduling Run 38Block Courses 25Blockette Courses 25
C
Class Lists Report 84Class Matrix Report 89Classification Weights 25Course Alternates 25Course Groups 26Course Requests 28Course Section 26Course Sequences 26
D
District Course Request 26Doubleton 26
F
FeaturesScheduling System Features 8
Free Period Analysis Report 91Free Time Detail Report 93
H
House/Teams 12, 26Multiple Bell Schedules 126
I
Index 133Initial Procedures 12
L
Load Report 97
M
Mark Reporting 12Master Schedule 27Modeling Requests 27Multiple Bell Schedules 27, 126
Course Setup 130Process Overview 19Setting Up 128
Multiple Building Scheduling 27
N
Next-Year Scheduling Process 15Multiple Bell Schedules 19, 126
And Courses 130Setting Up 128
P
Period 12, 27Procedural Overview
Initial Procedures 12Procedural Outline 13
Proxies and Blocks 27
Q
QualificationsStaff Qualifications 24
R
Recalculate Seats 69Registration 12Regular Course 28Regular Requests 28Reports
133

Post-SchedulerAdd Drop By Teacher 80Class Lists 84Class Matrix 89Free Period Analysis 91Free Time Detail 93Load Report 97Student Conflict Analysis 101Student Schedules 105Teacher Schedule Matrix 116Teacher Schedules 119Unscheduled Requests Detail Report 121Unscheduled Requests Summary Report 123
Student Scheduler Reports 79
S
Save/Restore Scheduling Run 38Schedule Students 47Scheduling Algorithm 47Scheduling Center
Recalculate Seats 69Student Scheduler
Schedule Students 47Scheduling Configuration 12Scheduling Interval 28Scheduling Process
Next-Year Scheduling 15Multiple Bell Schedules 19, 126
Course Setup 130Setting Up 128
Scheduling Status 58Scheduling System
Features 8Initial Procedures 12Procedural Outline 13Process Overview (Next Year) 15
Multiple Bell Schedules 19, 126Course Setup 130Setting Up 128
ReportsAdd Drop By Teacher 80Class Lists 84Class Matrix 89Free Period Analysis 91Free Time Detail 93Load Report 97Student Conflict Analysis 101Student Scheduler Reports 79Student Schedules Report 105
Teacher Schedule Matrix 116Teacher Schedules 119Unscheduled Requests Detail Report 121Unscheduled Requests Summary Report 123
Schedule Study Halls 71Scheduling Multiple Students 47Staff Qualifications 24Student Scheduler 31, 47
Back Up/Restore Scheduling Run 38Save/Restore Scheduling Run 38
System Overview 5Scheduling System Reports
Add Drop By Teacher 80Class Lists 84Class Matrix 89Free Period Analysis 91Free Time Detail 93Load Report 97Student Conflict Analysis 101Student Scheduler Reports 79Student Schedules Report 105Teacher Schedule Matrix 116Teacher Schedules 119Unscheduled Requests Detail Report 121Unscheduled Requests Summary Report 123
Security 12Sessions 28Setting Up Multiple Bell Schedules 128Singleton 28Staff Qualifications 24State Courses 28Student Alternate 28Student Conflict Analysis Report 101Student Course Alternate 28Student Scheduler 47
Back Up/Restore Scheduling Run 38Options 31Save/Restore Scheduling Run 38
Student Scheduler Reports 79Student Schedules Report 105Student Scheduling Process
Next-Year Scheduling 15Multiple Bell Schedules 19, 126
Course Setup 130Setting Up 128
Student Scheduling Status 58Study Halls 28, 71System Features
Scheduling System Features 8
134
T
Teacher Qualifications 24Teacher Schedule Matrix Report 116Teacher Schedules Report 119Timetable 12, 29
U
Understanding Next Year Scheduling 15Unscheduled Requests Detail Report 121Unscheduled Requests Summary Report 123Using This Guide 6
135


