25
SeeBeyond Proprietary and Confidential Schema Bridge User’s Guide Release 5.0.5 for Schema Run-time Environment (SRE)
SeeBeyond Proprietary and Confidential
Schema Bridge User’s Guide
Release 5.0.5 for Schema Run-time Environment (SRE)

The information contained in this document is subject to change and is updated periodically to reflect changes to the applicable software. Although every effort has been made to ensure the accuracy of this document, SeeBeyond Technology Corporation (SeeBeyond) assumes no responsibility for any errors that may appear herein. The software described in this document is furnished under a License Agreement and may be used or copied only in accordance with the terms of such License Agreement. Printing, copying, or reproducing this document in any fashion is prohibited except in accordance with the License Agreement. The contents of this document are designated as being confidential and proprietary; are considered to be trade secrets of SeeBeyond; and may be used only in accordance with the License Agreement, as protected and enforceable by law. SeeBeyond assumes no responsibility for the use or reliability of its software on platforms that are not supported by SeeBeyond.
SeeBeyond, e*Gate, e*Way, and e*Xchange are the registered trademarks of SeeBeyond Technology Corporation in the United States and/or select foreign countries. The SeeBeyond logo, SeeBeyond Integrated Composite Application Network Suite, eGate, eWay, eInsight, eVision, eXchange, eView, eIndex, eTL, ePortal, eBAM, and e*Insight are trademarks of SeeBeyond Technology Corporation. The absence of a trademark from this list does not constitute a waiver of SeeBeyond Technology Corporation's intellectual property rights concerning that trademark. This document may contain references to other company, brand, and product names. These company, brand, and product names are used herein for identification purposes only and may be the trademarks of their respective owners.
© 2005 SeeBeyond Technology Corporation. All Rights Reserved. This work is protected as an unpublished work under the copyright laws.
This work is confidential and proprietary information of SeeBeyond and must be maintained in strict confidence.
Version 20050406035545.
Schema Bridge User’s Guide 2 SeeBeyond Proprietary and Confidential
Contents
Schema Bridge User’s Guide 3 SeeBeyond Proprietary and Confidential
Contents
Chapter 1
Introduction 5Overview 5
Operational Overview 8
Intended Reader 9
Components 9
Supported Operating Systems 9
System Requirements 10
Chapter 2
Installation 11Windows Systems 11
Pre-installation 11Installation Procedure 11
UNIX Systems 12Pre-installation 12Installation Procedure 12
Files/Directories Created by the Installation 13
Chapter 3
Configuration 14e*Way Configuration Parameters 14
General Settings 14Foreign Schema Name 14Foreign Logical Name 15
Chapter 4
Implementation 16Implementation Notes 16
Contents
Schema Bridge User’s Guide 4 SeeBeyond Proprietary and Confidential
Creating a Test Implementation 16Creating a Scenario with Participating Hosts on the Same Platform 16
Schema 1 17Schema 2 20Creating Sample Data for the Schema 1 23Creating Sample Data for the Schema 2 23Debug Settings 23Additional Notes 24Running the Sample scenario 24Expected output 24
Index 25
Schema Bridge User’s Guide 5 SeeBeyond Proprietary and Confidential
Chapter 1
Introduction
This document describes how to install and configure the Schema Bridge.
1.1 OverviewWhen designing an e*Gate installation, primary concern is usually given to the interconnection of basic components (e*Ways, BOBs, IQs, and so on) within a single schema. However, additional benefits may be gained by reorganizing these components into multiple schemas. For example, grouping components by function or purpose into separate schemas increases security, reduces the amount of configuration and developmental details to be managed, and enables individual development teams to concentrate their efforts on a small portion of a larger project. Any multi-schema architecture must include a means to send data from one schema to another; the Schema Bridge provides this means.
Without a Schema Bridge, data can be exchanged between schemas using a “dual e*Way” method where two separate schemas are connected using e*Ways of the same type. For example, schema A can send data to schema B using two TCP/IP e*Ways or two database-connectivity e*Ways (or any other two supported e*Ways that can both send and receive data).
Figure 1 on the following page demonstrates the “dual e*Way” method.

Chapter 1 Section 1.1Introduction Overview
Schema Bridge User’s Guide 6 SeeBeyond Proprietary and Confidential
Figure 1 “Dual e*Way” Method
The “dual e*Way” method would require the Event to travel from the queue on Schema A to the e*Way on Schema A. Then, the Event would travel from the e*Way on Schema A to the e*Way on Schema B. Finally, the Event would travel from the e*Way on Schema B to the queue on Schema B.
The Schema Bridge provides a better solution. It acts as a simple delivery agent to allow Events to be transmitted from one schema to another via e*Gate. The Schema Bridge disburses information between schemas by sharing memory from a common Registry. However, it processes different schemas or Events on different Participating Hosts.
e*Gate Participating Host 1
Input file
Inbound e*Way
Outbound e*Way
Inbound_Collab
Outbound_Collab
Queue_A
Inbound e*Way
Outbound_IQ
Outbound e*Way
Schema A Schema B
Inbound_Collab
Outbound_Collab
Output file
e*Gate Participating Host 2
"Dual e*Way" Method
DATA

Chapter 1 Section 1.1Introduction Overview
Schema Bridge User’s Guide 7 SeeBeyond Proprietary and Confidential
The advantages in using the Schema Bridge over the “dual e*Way” method are:
Simplicity: There are no TCP/IP ports, envelopes, Acks/Nacks or other negotiations to configure. The Schema Bridge configuration parameters include only the Foreign Schema Name (the secondary schema) and the Foreign Logical Name (the logical name of the secondary schema).
Performance: Although there appears to be two “complete” schemas, (a component on A, the Primary Schema, and a component on B, the Secondary Schema) there exists only one .cfg file between both schemas.
The Event travels directly from the queue on the Primary Schema to the queue on the Secondary Schema. For more information on implementing the Schema Bridge, see “Creating a Test Implementation” on page 16.
Figure 2 on the following page demonstrates a Schema Bridge implementation.
Chapter 1 Section 1.2Introduction Operational Overview
Schema Bridge User’s Guide 8 SeeBeyond Proprietary and Confidential
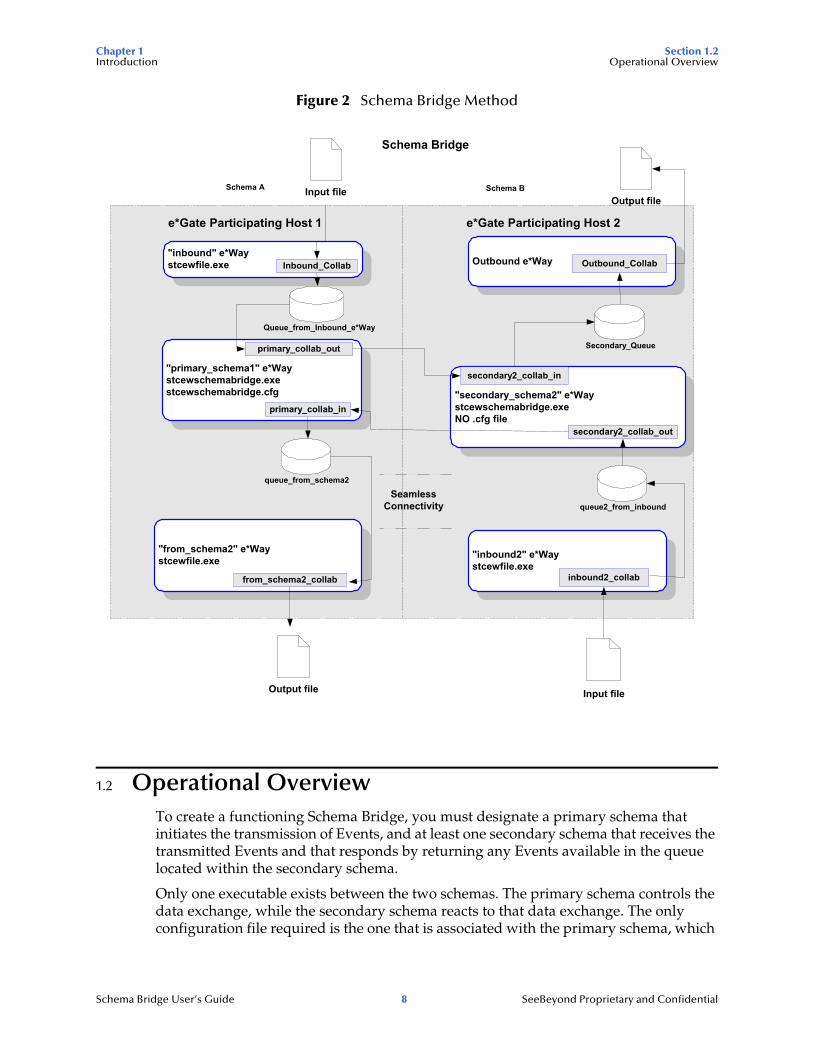
Figure 2 Schema Bridge Method
1.2 Operational OverviewTo create a functioning Schema Bridge, you must designate a primary schema that initiates the transmission of Events, and at least one secondary schema that receives the transmitted Events and that responds by returning any Events available in the queue located within the secondary schema.
Only one executable exists between the two schemas. The primary schema controls the data exchange, while the secondary schema reacts to that data exchange. The only configuration file required is the one that is associated with the primary schema, which
e*Gate Participating Host 1
Input file
"inbound" e*Waystcewfile.exe
"primary_schema1" e*Waystcewschemabridge.exestcewschemabridge.cfg
Inbound_Collab
primary_collab_in
Queue_from_Inbound_e*Way
"secondary_schema2" e*Waystcewschemabridge.exeNO .cfg file
Secondary_Queue
Outbound e*Way
Schema A Schema B
secondary2_collab_out
Outbound_Collab
Output file
e*Gate Participating Host 2
Schema Bridge
SeamlessConnectivity
queue_from_schema2
queue2_from_inbound
"from_schema2" e*Waystcewfile.exe
from_schema2_collab
"inbound2" e*Waystcewfile.exe
inbound2_collab
Input fileOutput file
primary_collab_out
secondary2_collab_in
Chapter 1 Section 1.3Introduction Intended Reader
Schema Bridge User’s Guide 9 SeeBeyond Proprietary and Confidential
defines the secondary or “Foreign” schema. There is no configuration file associated with the secondary schema.
The primary schema receives data (Events) from an inbound e*Way (configured as necessary), the data is received by the Schema Bridge and forwarded to the secondary (Foreign) schema. The secondary schema can optionally be configured to receive data from an inbound e*Way and that data will be forwarded to the primary schema via shared memory. (See Figure 2 on page 8 for a diagram of this configuration.)
If desired, additional secondary schemas can be used by creating another Schema Bridge e*Way within the primary schema that specifies the additional secondary schema as the Foreign Schema. The “master/slave” relationship exists between each primary and secondary schema. There is no relationship between the secondary schemas (other than that they are connected to a common primary schema).
1.3 Intended ReaderThe reader of this guide is presumed to be a developer or system administrator with responsibility for maintaining the e*Gate system; to have moderate to advanced-level knowledge of Windows and/or UNIX operations and administration; and to be thoroughly familiar with Windows-style GUI operations.
1.4 ComponentsThe Schema Bridge comprises the following:
stcewschemabridge.exe, the executable component
stcewschemabridge.def, the configuration file, which the e*Way Editor uses to define configuration parameters
A complete list of installed files appears in Table 1 on page 13.
1.5 Supported Operating SystemsThe Schema Bridge is supported on the following operating systems:
Windows 2000 and Windows Server 2003
HP-UX 11.0 and 11i (PA-RISC)
Sun Solaris 8
Japanese Windows 2000 and Windows Server 2003
Japanese HP-UX 11.0 and 11i (PA-RISC)
Japanese Sun Solaris 8
Chapter 1 Section 1.6Introduction System Requirements
Schema Bridge User’s Guide 10 SeeBeyond Proprietary and Confidential
1.6 System RequirementsTo use the Schema Bridge, you need the following:
An e*Gate Participating Host.
A TCP/IP network connection.
8 MB free disk space on both the Participating Host and Registry Host for e*Way executable, configuration, library, and script files.
Note: Additional disk space will be required to process and queue the data that this e*Way processes; the amount necessary will vary based on the type and size of the data being processed, and any external applications performing the processing.

Schema Bridge User’s Guide 11 SeeBeyond Proprietary and Confidential
Chapter 2
Installation
This chapter describes how to install the Schema Bridge.
2.1 Windows Systems
2.1.1 Pre-installation1 Exit all Windows programs before running the setup program, including any anti-
virus applications.
2 You must have Administrator privileges to install this e*Way.
2.1.2 Installation ProcedureTo install the Schema Bridge on a Windows system
1 Log in as an Administrator on the workstation on which you want to install the e*Way.
2 Insert the e*Way installation CD-ROM into the CD-ROM drive.
3 If the CD-ROM drive’s “Autorun” feature is enabled, the setup application should launch automatically; skip ahead to step 4. Otherwise, use the Windows Explorer or the Control Panel’s Add/Remove Applications feature to launch the file setup.exe on the CD-ROM drive.
4 The InstallShield setup application will launch. Follow the on-screen instructions to install the e*Way.
Note: Be sure to install the e*Way files in the suggested “client” installation directory. The installation utility detects and suggests the appropriate installation directory. Unless you are directed to do so by SeeBeyond support personnel, do not change the suggested “installation directory” setting.
5 After the installation is complete, exit the install utility and launch the Schema Designer.
6 In the Component editor, create a new e*Way.
7 Display the new e*Way’s properties.

Chapter 2 Section 2.2Installation UNIX Systems
Schema Bridge User’s Guide 12 SeeBeyond Proprietary and Confidential
8 On the General tab, under Executable File, click Find.
9 Select the file stcewschemabridge.exe.
10 Click OK to close the properties sheet, or continue to configure the e*Way. Configuration parameters are discussed in Chapter 3.
Note: Once you have installed and configured this e*Way, you must incorporate it into a schema by defining and associating the appropriate Collaborations, Collaboration Rules, IQs, and Event Types before this e*Way can perform its intended functions. For more information about any of these procedures, please see the online Help system.
For more information about configuring e*Ways or how to use the e*Way Editor, see the e*Gate Integrator User’s Guide.
2.2 UNIX Systems
2.2.1 Pre-installationYou do not require root privileges to install this e*Way. Log in under the user name that you wish to own the e*Way files. Be sure that this user has sufficient privilege to create files in the e*Gate directory tree.
2.2.2 Installation ProcedureTo install the Schema Bridge on a UNIX system
1 Log in on the workstation containing the CD-ROM drive, and insert the CD-ROM into the drive.
2 If necessary, mount the CD-ROM drive.
3 At the shell prompt, type
cd /cdrom
4 Start the installation script by typing:
setup.sh
5 A menu of options will appear. Select the “install e*Way” option. Then, follow any additional on-screen directions.
Note: Be sure to install the e*Way files in the suggested “client” installation directory. The installation utility detects and suggests the appropriate installation directory. Unless you are directed to do so by SeeBeyond support personnel, do not change the suggested “installation directory” setting.
6 After installation is complete, exit the installation utility and launch the Schema Designer.

Chapter 2 Section 2.3Installation Files/Directories Created by the Installation
Schema Bridge User’s Guide 13 SeeBeyond Proprietary and Confidential
7 In the Component editor, create a new e*Way.
8 Display the new e*Way’s properties.
9 On the General tab, under Executable File, click Find.
10 Select the file stcewschemabridge.exe.
11 Click OK to close the properties sheet, or continue to configure the e*Way. Configuration parameters are discussed in Chapter 3.
Note: Once you have installed and configured this e*Way, you must incorporate it into a schema by defining and associating the appropriate Collaborations, Collaboration Rules, IQs, and Event Types before this e*Way can perform its intended functions. For more information about any of these procedures, please see the online Help system.
For more information about configuring e*Ways or how to use the e*Way Editor, see the e*Gate Integrator User’s Guide.
2.3 Files/Directories Created by the InstallationThe Schema Bridge installation process will install the following files within the e*Gate directory tree. Files will be installed within the “egate\client” tree on the Participating Host and committed to the “default” schema on the Registry Host.
Table 1 Files created by the installation
e*Gate Directory File(s)
bin\ stcewschemabridge.exe
configs\stcewschemabridge\ stcewschemabridge.def
Schema Bridge User’s Guide 14 SeeBeyond Proprietary and Confidential
Chapter 3
Configuration
This chapter describes how to configure the Schema Bridge.
3.1 e*Way Configuration Parameterse*Way configuration parameters are set using the e*Way Editor.
To change e*Way configuration parameters:
1 In the Schema Designer’s Component editor, select the e*Way you want to configure and display its properties.
2 Under Configuration File, click New to create a new file, Find to select an existing configuration file, or Edit to edit the currently selected file.
3 In the Additional Command Line Arguments box, type any additional command line arguments that the e*Way may require, taking care to insert them at the end of the existing command-line string. Be careful not to change any of the default arguments unless you have a specific need to do so.
For more information about how to use the e*Way Editor, see the e*Way Editor’s online Help or the Working with e*Ways user’s guide.
The e*Way’s configuration parameters are organized into a single “General Settings” section.
3.1.1 General SettingsThe General Settings control the basic operational parameters.
Foreign Schema Name
Description
Specifies the name of the secondary schema that will receive the data sent.
Required Values
A valid schema name. This parameter is required and must not be left blank. Ensure that the Foreign Schema Name matches case with the actual schema name.
Chapter 3 Section 3.1Configuration e*Way Configuration Parameters
Schema Bridge User’s Guide 15 SeeBeyond Proprietary and Confidential
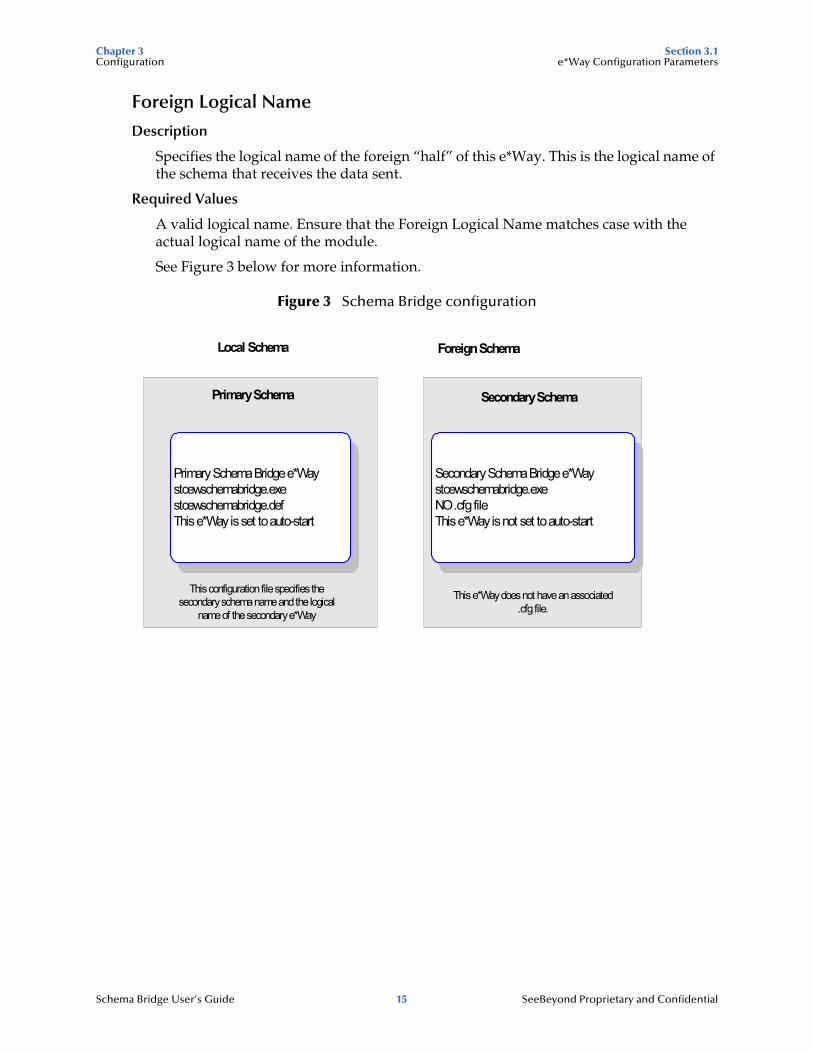
Foreign Logical Name
Description
Specifies the logical name of the foreign “half” of this e*Way. This is the logical name of the schema that receives the data sent.
Required Values
A valid logical name. Ensure that the Foreign Logical Name matches case with the actual logical name of the module.
See Figure 3 below for more information.
Figure 3 Schema Bridge configuration
Primary Schema
Secondary Schema Bridge e*Waystcewschemabridge.exeNO .cfg fileThis e*Way is not set to auto-start
Local Schema Foreign Schema
Secondary Schema
Primary Schema Bridge e*Waystcewschemabridge.exestcewschemabridge.defThis e*Way is set to auto-start
This configuration file specifies thesecondary schema name and the logical
name of the secondary e*Way
This e*Way does not have an associated.cfg file.
Schema Bridge User’s Guide 16 SeeBeyond Proprietary and Confidential
Chapter 4
Implementation
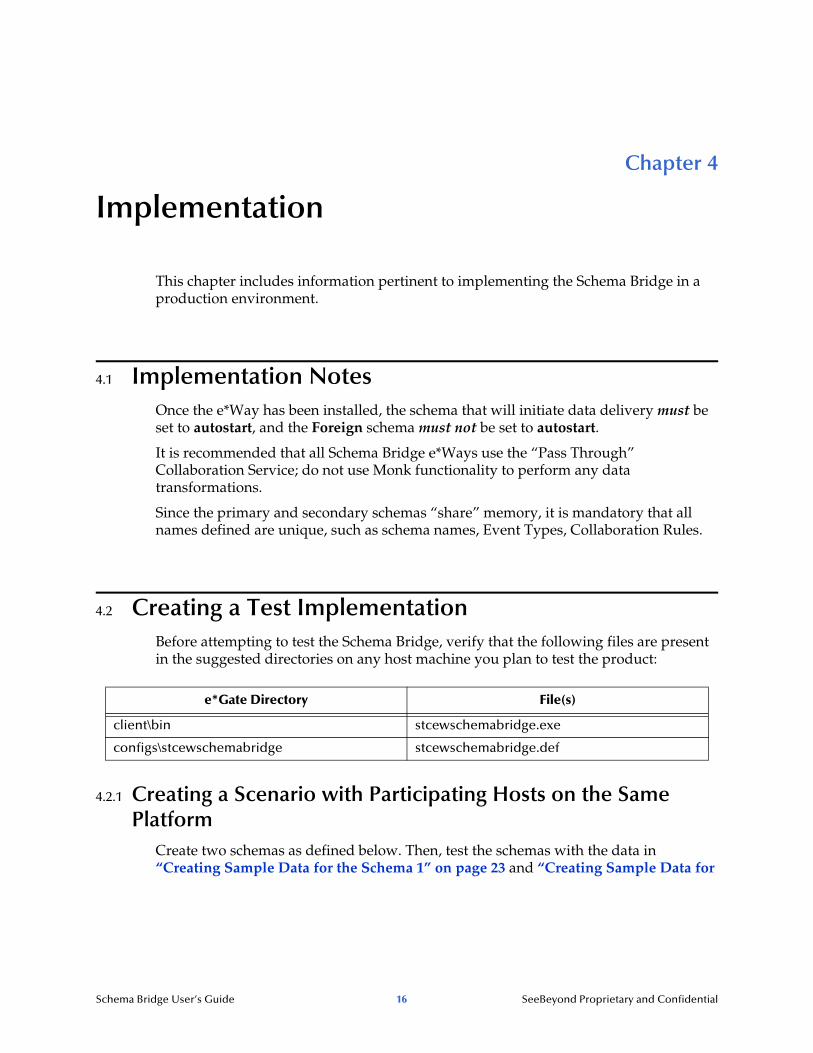
This chapter includes information pertinent to implementing the Schema Bridge in a production environment.
4.1 Implementation NotesOnce the e*Way has been installed, the schema that will initiate data delivery must be set to autostart, and the Foreign schema must not be set to autostart.
It is recommended that all Schema Bridge e*Ways use the “Pass Through” Collaboration Service; do not use Monk functionality to perform any data transformations.
Since the primary and secondary schemas “share” memory, it is mandatory that all names defined are unique, such as schema names, Event Types, Collaboration Rules.
4.2 Creating a Test ImplementationBefore attempting to test the Schema Bridge, verify that the following files are present in the suggested directories on any host machine you plan to test the product:
4.2.1 Creating a Scenario with Participating Hosts on the Same Platform
Create two schemas as defined below. Then, test the schemas with the data in “Creating Sample Data for the Schema 1” on page 23 and “Creating Sample Data for
e*Gate Directory File(s)
client\bin stcewschemabridge.exe
configs\stcewschemabridge stcewschemabridge.def

Chapter 4 Section 4.2Implementation Creating a Test Implementation
Schema Bridge User’s Guide 17 SeeBeyond Proprietary and Confidential
the Schema 2” on page 23. The instructions for Schema 1 follow immediately. See “Schema 2” on page 20 for instructions for creating the second schema.
Schema 1
Note: For more information about creating or modifying any component within the e*Gate Schema Designer, see the Schema Designer’s Help system.
1 Log into the e*Gate Schema Designer and click New to create a new schema. Name the schema “primary_schema1”.
The Schema Designer main screen appears.
2 If the Navigator’s Components tab is not selected already, select it now.
3 Rename the CB (Control Broker) “localhost_cb “ .
Note: Each component in the connected schemas must have a unique name.
4 Rename the IQ Manager “localhost_iqmgr”.
Note: The default port numbers must be unique to each “half”of the Schema Bridge.
5 Create an Event Type named “ev1”.
6 Display the properties of the ev1 Event Type. Then, use the Find button, navigate to the ”common” folder to assign the file GenericInEvent.ssc.
7 Create a Collaboration Rule named “ev1_to_ev1”.
8 Edit the Properties of this Collaboration Rule as follows:
9 Create two IQs, named “queue_from_inbound_eway” and “queue_from_schema2”.
10 Create an e*Way named “Inbound”.
11 Display the e*Way’s properties. Then, use the Find button to assign the file stcewfile.exe.
12 Select the Start Up tab, check the Start automatically box.
The next part of the procedure requires that you launch the e*Way editor and define the file-based e*Way’s properties.
1 With the e*Way’s Properties Dialog box still displayed, click New to launch the e*Way Editor.
2 Using the e*Way Editor, configure the following settings:
Service Pass Through
Subscription ev1 (the Event Type defined in Step 5 above)
Publication ev1 (Event Type defined in Step 5 above)

Chapter 4 Section 4.2Implementation Creating a Test Implementation
Schema Bridge User’s Guide 18 SeeBeyond Proprietary and Confidential
3 Save the settings, promote to run time and exit the e*Way Editor.
4 When you return to the e*Way’s Properties Dialog box, click OK to save all changes and return to the Schema Designer’s main window.
Next, create a Collaboration for the Inbound e*Way.
1 Open the Inbound e*Way and create a Collaboration named “Inbound_collab”.
2 Set the Collaboration’s properties as follows:
Now that the “Inbound” e*Way is completely configured, you must create a Schema Bridge e*Way.
1 Create a new e*Way component named “primary_schema1”.
2 Display the e*Way’s properties. Then, use the Find button to assign the file stcewschemabridge.exe.
3 Select the Start Up tab, check the Start automatically box.
4 Click New to launch the e*Way Editor.
5 Use the e*Way Editor to define the following parameters:
6 Save the settings, promote to run time and exit the e*Way Editor.
7 When you return to the e*Way’s Properties Dialog box, click OK to save all changes and return to the Schema Designer’s main window.
Next, create the Collaboration for the Schema Bridge e*Way.
1 Select the primary_to_schema2 component and create a Collaboration named “primary1_collab_out”.
2 Assign the following properties to the Collaboration:
Section Parameter and setting
General Settings AllowIncoming: YesAllowOutgoing: No
Poller (Inbound) Settings Poll Directory: C:\INDATA\schema1(or other “appropriate” directory)Input File Mask: *.dat
Collaboration Rule ev1_to_ev1 (Pass through)
Subscriptions Event: ev1 Source: <External>.
Publications Event: ev2Publish to: queue_from_inbound_eway.
Section Parameter and Settings
General Settings Foreign Schema Name: secondary_schema2Foreign Logical Name: secondary2
Chapter 4 Section 4.2Implementation Creating a Test Implementation
Schema Bridge User’s Guide 19 SeeBeyond Proprietary and Confidential
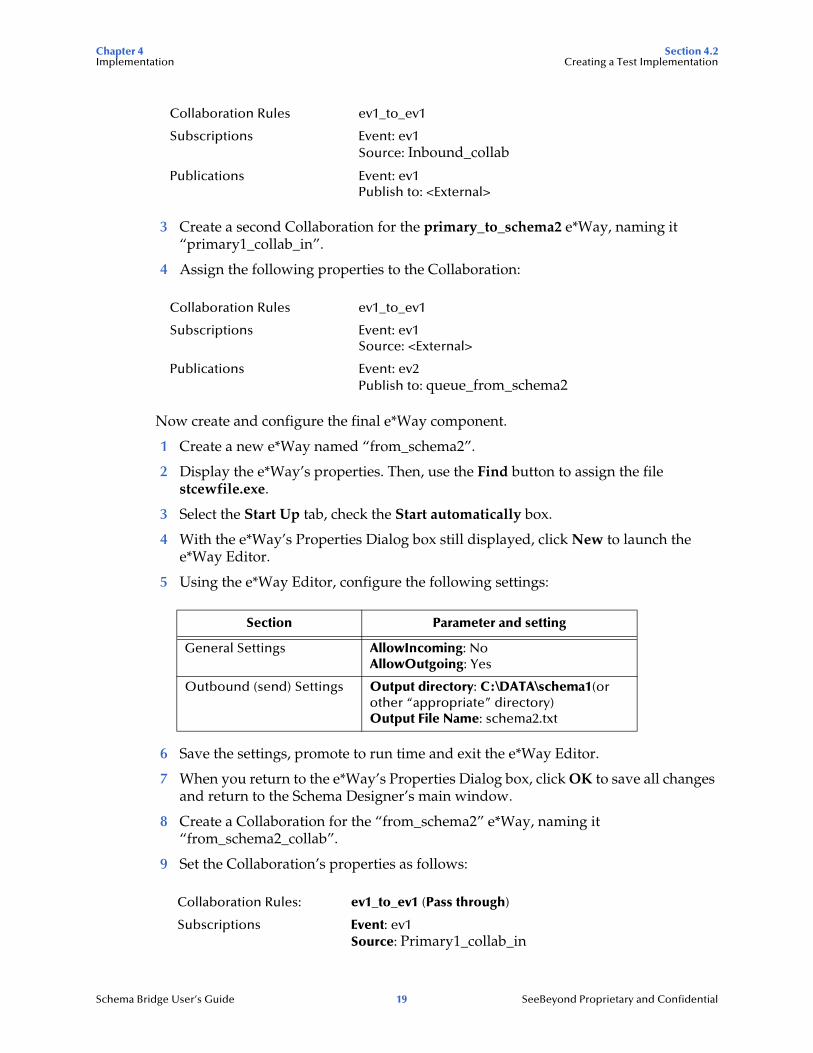
3 Create a second Collaboration for the primary_to_schema2 e*Way, naming it “primary1_collab_in”.
4 Assign the following properties to the Collaboration:
Now create and configure the final e*Way component.
1 Create a new e*Way named “from_schema2”.
2 Display the e*Way’s properties. Then, use the Find button to assign the file stcewfile.exe.
3 Select the Start Up tab, check the Start automatically box.
4 With the e*Way’s Properties Dialog box still displayed, click New to launch the e*Way Editor.
5 Using the e*Way Editor, configure the following settings:
6 Save the settings, promote to run time and exit the e*Way Editor.
7 When you return to the e*Way’s Properties Dialog box, click OK to save all changes and return to the Schema Designer’s main window.
8 Create a Collaboration for the “from_schema2” e*Way, naming it “from_schema2_collab”.
9 Set the Collaboration’s properties as follows:
Collaboration Rules ev1_to_ev1
Subscriptions Event: ev1 Source: Inbound_collab
Publications Event: ev1Publish to: <External>
Collaboration Rules ev1_to_ev1
Subscriptions Event: ev1 Source: <External>
Publications Event: ev2Publish to: queue_from_schema2
Section Parameter and setting
General Settings AllowIncoming: NoAllowOutgoing: Yes
Outbound (send) Settings Output directory: C:\DATA\schema1(or other “appropriate” directory)Output File Name: schema2.txt
Collaboration Rules: ev1_to_ev1 (Pass through)
Subscriptions Event: ev1Source: Primary1_collab_in

Chapter 4 Section 4.2Implementation Creating a Test Implementation
Schema Bridge User’s Guide 20 SeeBeyond Proprietary and Confidential
Schema 2
1 Log into the e*Gate Schema Designer and click New to create a new schema. Name the schema “secondary_schema2”.
The Schema Designer main screen appears.
2 If the Navigator’s Components tab is not selected already, select it now.
3 Rename the CB (Control Broker) “localhost2_cb“.
Note: Each component in the connected schemas must have a unique name.
4 Rename the IQ Manager “localhost2_iqmgr”.
Note: The default port numbers must be unique to each “half”of the Schema Bridge.
5 Create an Event Type named “ev2”.
6 Display the properties of the ev2 Event Type. Then, use the Find button, navigate to the ”common” folder to assign the file GenericInEvent.ssc.
7 Create a Collaboration Rule named “ev2_to_ev2”.
8 Edit the Properties of this Collaboration Rule as follows:
9 Create two IQs, named “queue2” and “queue2_from_inbound2”.
10 Create an e*Way named “inbound2”.
11 Display the e*Way’s properties. Then, use the Find button to assign the file stcewfile.exe.
12 Select the Start Up tab, check the Start automatically box.
The next part of the procedure requires that you launch the e*Way editor and define the file-based e*Way’s properties.
1 With the e*Way’s Properties Dialog box still displayed, click New to launch the e*Way Editor.
2 Using the e*Way Editor, configure the following settings:
Publications Event: ev1Publish to: <External>
Service Pass Through
Subscription ev2 (the Event Type defined in Step 5 above)
Publication ev2 (Event Type defined in Step 5 above)
Section Parameter and setting
General Settings AllowIncoming: YesAllowOutgoing: No

Chapter 4 Section 4.2Implementation Creating a Test Implementation
Schema Bridge User’s Guide 21 SeeBeyond Proprietary and Confidential
3 Save the settings, promote to run time and exit the e*Way Editor.
4 When you return to the e*Way’s Properties Dialog box, click OK to save all changes and return to the Schema Designer’s main window.
Next, create a Collaboration for the Inbound e*Way.
1 Open the inbound2 e*Way and create a Collaboration named “inbound2_collab”.
2 Set the Collaboration’s properties as follows:
Now that the “inbound2” e*Way is completely configured, you must create a Schema Bridge e*Way.
1 Create a new e*Way component named “secondary2”.
2 Display the e*Way’s properties. Then, use the Find button to assign the file stcewschemabridge.exe.
3 Do not select the Start Up tab, do not check the Start automatically box.
4 Do not click New to launch the e*Way Editor.
Note: The secondary component of the Schema Bridge does not have a .cfg file.
5 Click OK to save all changes and return to the Schema Designer’s main window.
Next, create the Collaboration for the Schema Bridge e*Way.
1 Select the secondary2 e*Way component and create a Collaboration named “secondary2_collab_in”.
2 Assign the following properties to the Collaboration:
3 Create a second Collaboration for the secondary2, naming it “secondary2_collab_out”.
Poller (Inbound) Settings Poll Directory: C:\INDATA\schema2(or other “approriate” directory)Input File Mask: *.dat
Collaboration Rule ev2_to_ev2 (Pass through)
Subscriptions Event: ev2 Source: <External>.
Publications Event: ev2Publish to: queue2_from_inbound2.
Collaboration Rule ev2_to_ev2 (Pass through)
Subscriptions Event: ev2 Source: <External>.
Publications Event: ev2Publish to: queue2.
Section Parameter and setting
Chapter 4 Section 4.2Implementation Creating a Test Implementation
Schema Bridge User’s Guide 22 SeeBeyond Proprietary and Confidential
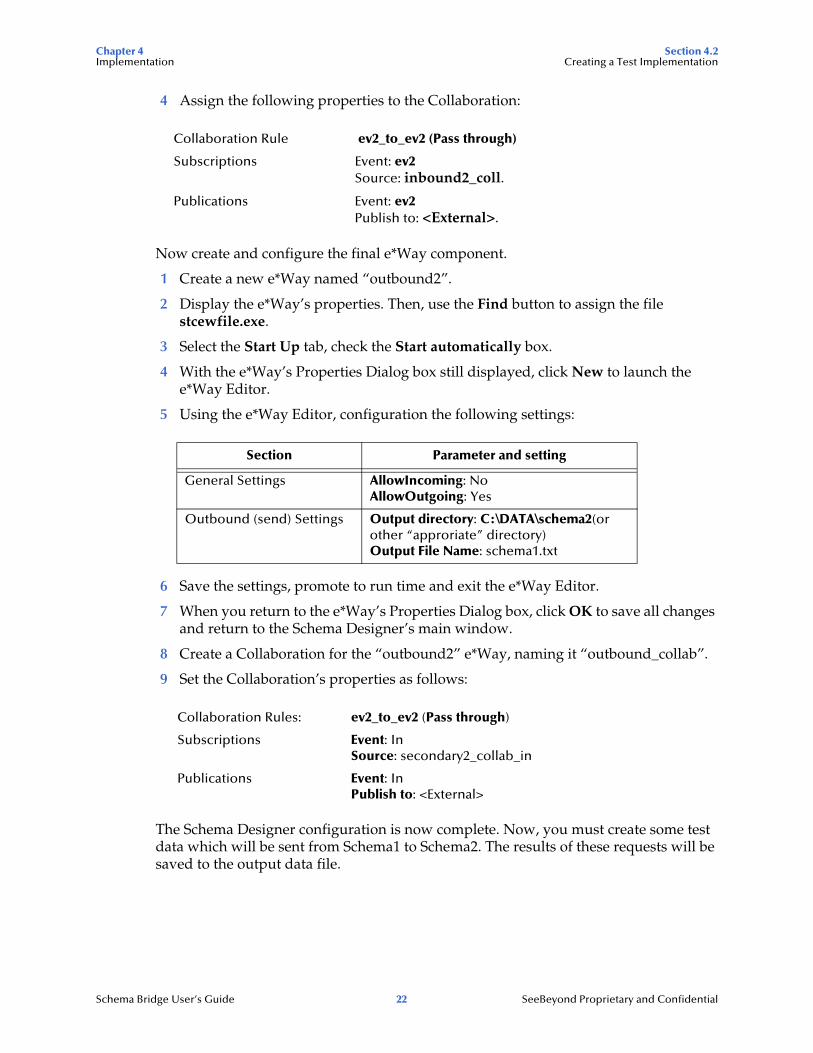
4 Assign the following properties to the Collaboration:
Now create and configure the final e*Way component.
1 Create a new e*Way named “outbound2”.
2 Display the e*Way’s properties. Then, use the Find button to assign the file stcewfile.exe.
3 Select the Start Up tab, check the Start automatically box.
4 With the e*Way’s Properties Dialog box still displayed, click New to launch the e*Way Editor.
5 Using the e*Way Editor, configuration the following settings:
6 Save the settings, promote to run time and exit the e*Way Editor.
7 When you return to the e*Way’s Properties Dialog box, click OK to save all changes and return to the Schema Designer’s main window.
8 Create a Collaboration for the “outbound2” e*Way, naming it “outbound_collab”.
9 Set the Collaboration’s properties as follows:
The Schema Designer configuration is now complete. Now, you must create some test data which will be sent from Schema1 to Schema2. The results of these requests will be saved to the output data file.
Collaboration Rule ev2_to_ev2 (Pass through)
Subscriptions Event: ev2 Source: inbound2_coll.
Publications Event: ev2Publish to: <External>.
Section Parameter and setting
General Settings AllowIncoming: NoAllowOutgoing: Yes
Outbound (send) Settings Output directory: C:\DATA\schema2(or other “approriate” directory)Output File Name: schema1.txt
Collaboration Rules: ev2_to_ev2 (Pass through)
Subscriptions Event: InSource: secondary2_collab_in
Publications Event: InPublish to: <External>
Chapter 4 Section 4.2Implementation Creating a Test Implementation
Schema Bridge User’s Guide 23 SeeBeyond Proprietary and Confidential
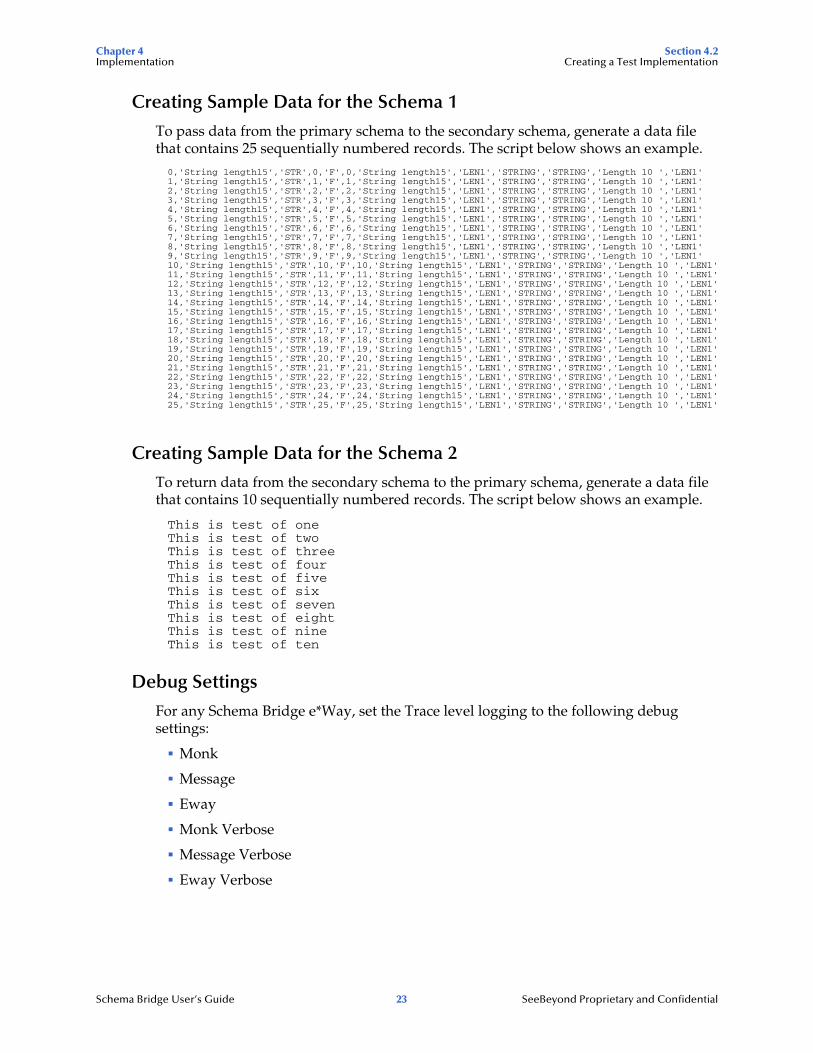
Creating Sample Data for the Schema 1
To pass data from the primary schema to the secondary schema, generate a data file that contains 25 sequentially numbered records. The script below shows an example.
0,'String length15','STR',0,'F',0,'String length15','LEN1','STRING','STRING','Length 10 ','LEN1'1,'String length15','STR',1,'F',1,'String length15','LEN1','STRING','STRING','Length 10 ','LEN1'2,'String length15','STR',2,'F',2,'String length15','LEN1','STRING','STRING','Length 10 ','LEN1'3,'String length15','STR',3,'F',3,'String length15','LEN1','STRING','STRING','Length 10 ','LEN1'4,'String length15','STR',4,'F',4,'String length15','LEN1','STRING','STRING','Length 10 ','LEN1'5,'String length15','STR',5,'F',5,'String length15','LEN1','STRING','STRING','Length 10 ','LEN1'6,'String length15','STR',6,'F',6,'String length15','LEN1','STRING','STRING','Length 10 ','LEN1'7,'String length15','STR',7,'F',7,'String length15','LEN1','STRING','STRING','Length 10 ','LEN1'8,'String length15','STR',8,'F',8,'String length15','LEN1','STRING','STRING','Length 10 ','LEN1'9,'String length15','STR',9,'F',9,'String length15','LEN1','STRING','STRING','Length 10 ','LEN1'10,'String length15','STR',10,'F',10,'String length15','LEN1','STRING','STRING','Length 10 ','LEN1'11,'String length15','STR',11,'F',11,'String length15','LEN1','STRING','STRING','Length 10 ','LEN1'12,'String length15','STR',12,'F',12,'String length15','LEN1','STRING','STRING','Length 10 ','LEN1'13,'String length15','STR',13,'F',13,'String length15','LEN1','STRING','STRING','Length 10 ','LEN1'14,'String length15','STR',14,'F',14,'String length15','LEN1','STRING','STRING','Length 10 ','LEN1'15,'String length15','STR',15,'F',15,'String length15','LEN1','STRING','STRING','Length 10 ','LEN1'16,'String length15','STR',16,'F',16,'String length15','LEN1','STRING','STRING','Length 10 ','LEN1'17,'String length15','STR',17,'F',17,'String length15','LEN1','STRING','STRING','Length 10 ','LEN1'18,'String length15','STR',18,'F',18,'String length15','LEN1','STRING','STRING','Length 10 ','LEN1'19,'String length15','STR',19,'F',19,'String length15','LEN1','STRING','STRING','Length 10 ','LEN1'20,'String length15','STR',20,'F',20,'String length15','LEN1','STRING','STRING','Length 10 ','LEN1'21,'String length15','STR',21,'F',21,'String length15','LEN1','STRING','STRING','Length 10 ','LEN1'22,'String length15','STR',22,'F',22,'String length15','LEN1','STRING','STRING','Length 10 ','LEN1'23,'String length15','STR',23,'F',23,'String length15','LEN1','STRING','STRING','Length 10 ','LEN1'24,'String length15','STR',24,'F',24,'String length15','LEN1','STRING','STRING','Length 10 ','LEN1'25,'String length15','STR',25,'F',25,'String length15','LEN1','STRING','STRING','Length 10 ','LEN1'
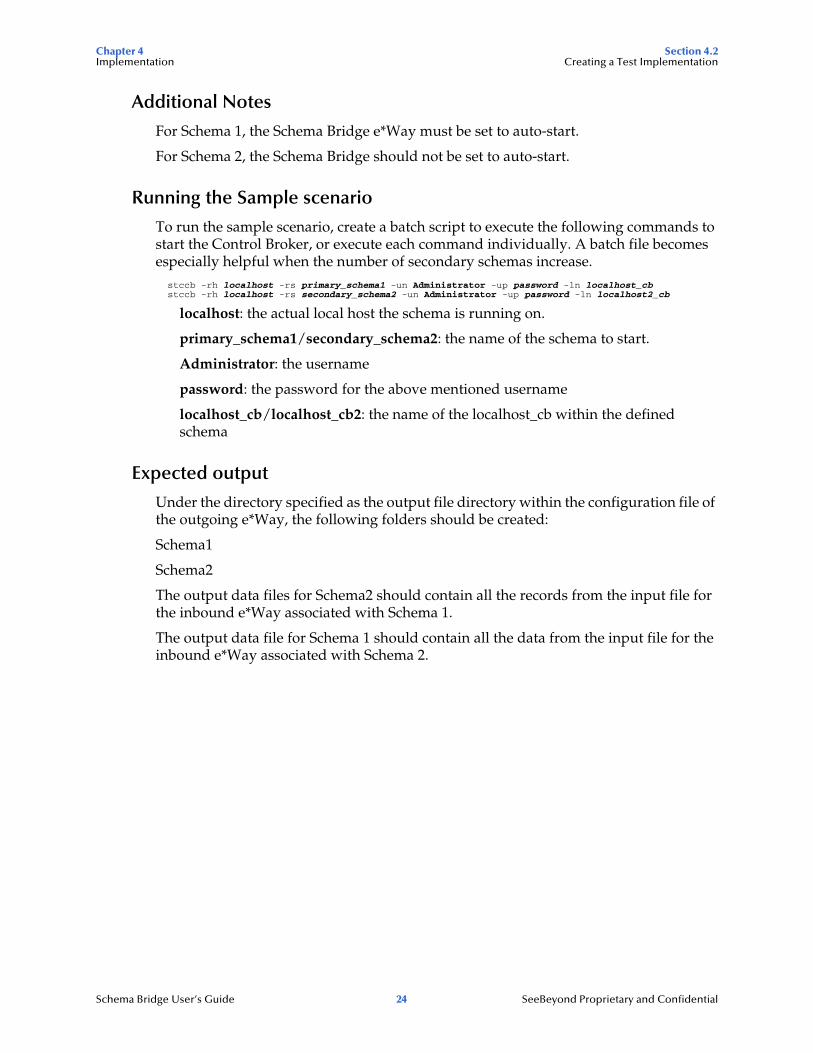
Creating Sample Data for the Schema 2
To return data from the secondary schema to the primary schema, generate a data file that contains 10 sequentially numbered records. The script below shows an example.
This is test of oneThis is test of twoThis is test of threeThis is test of fourThis is test of fiveThis is test of sixThis is test of sevenThis is test of eightThis is test of nineThis is test of ten
Debug Settings
For any Schema Bridge e*Way, set the Trace level logging to the following debug settings:
Monk
Message
Eway
Monk Verbose
Message Verbose
Eway Verbose
Chapter 4 Section 4.2Implementation Creating a Test Implementation
Schema Bridge User’s Guide 24 SeeBeyond Proprietary and Confidential
Additional Notes
For Schema 1, the Schema Bridge e*Way must be set to auto-start.
For Schema 2, the Schema Bridge should not be set to auto-start.
Running the Sample scenario
To run the sample scenario, create a batch script to execute the following commands to start the Control Broker, or execute each command individually. A batch file becomes especially helpful when the number of secondary schemas increase.
stccb -rh localhost -rs primary_schema1 -un Administrator -up password -ln localhost_cbstccb -rh localhost -rs secondary_schema2 -un Administrator -up password -ln localhost2_cb
localhost: the actual local host the schema is running on.
primary_schema1/secondary_schema2: the name of the schema to start.
Administrator: the username
password: the password for the above mentioned username
localhost_cb/localhost_cb2: the name of the localhost_cb within the defined schema
Expected output
Under the directory specified as the output file directory within the configuration file of the outgoing e*Way, the following folders should be created:
Schema1
Schema2
The output data files for Schema2 should contain all the records from the input file for the inbound e*Way associated with Schema 1.
The output data file for Schema 1 should contain all the data from the input file for the inbound e*Way associated with Schema 2.

Index
Schema Bridge User’s Guide 25 SeeBeyond Proprietary and Confidential
Index
AAdditional Notes 24
CCollaboration Rule 17Collaboration’s properties 18components 9configuration 14Create an e*Way 17Creating a Scenario 16creating a test implementation 16Creating Sample Data 23
DDebug Settings 23Dual e*Way Method 6
Ee*Way configuration parameters 14e*Way’s Properties 17Expected output 24
Ffiles/directories created by the installation 13foreign logical name 15foreign schema 14
Ggeneral settings 14
foreign logical name 15foreign schema 14
Iimplementation 16
notes 16implementation notes 16installation 11
file/directories created 13
UNIX 12Windows 11
intended reader 9introduction 5
OOperational Overview 8Overview 5
Pparameters
general settings 14
SSchema 1 17Schema 2 20Schema Bridge e*Way 18Schema Bridge Method 8stcewschemabridge.exe 16system requirements 9


