145
Science Rocks Queensland the Smart State Working together for a shared future
Science Rocks
Queensland the Smart StateWorking together for a shared future

Science Rocks
Queensland the Smart StateWorking together for a shared future
Published by:Queensland Resources CouncilDepartment of Natural Resources and Mines
Author Kathleen GordonIllustration Stephen AxelsenEditing and design Web and Publishing Services, Department of Natural Resources and Mines
Copyright © Queensland Resources Council and State of Queensland (Department of Natural Resources and Mines) 2005
We have made every effort to contact holders of copyright; however, we have not been successful in every case. We would bepleased to hear from any copyright holder who has been omitted or incorrectly acknowledged.
For copyright enquiries, contact Caroline Morrissey on 07 3295 9560.
While unlimited copies of inside pages are permitted for classroom use, no republication of this resource may occur withoutthe permission of the publishers.
For copies of this resource contact: Queensland Resources CouncilEducation AdviserQueensland Resources CouncilLevel 13, 133 Mary StreetBrisbane Qld 4000
Telephone 07 3295 9560Facsimile 07 3295 9570Email [email protected] site http://www.qrc.org.au
The Department of Natural Resources and MinesManagerStrategic Networks, Information and LiaisonDepartment of Natural Resources and MinesLevel 3, Mineral House41 George StreetBrisbane Qld 4000
Telephone 07 3237 1888Facsimile 07 3229 7770Email [email protected] site http:// www.nrm.qld.gov.au
QNRM 05296
ISBN 0 957870140
#27528
ii

Preface. . . . . . . . . . . . . . . . . . . . . . . . . . . . . . . . . . . . . . . . . . . . . . . . . . . . . . . . . . . . . . . . . . . . . . . . . . . . . . . . . . . . . . . . . . . . . . . . . . . . . . . . . . . . . . . . . . . . . . . . . . . v Acknowledgments . . . . . . . . . . . . . . . . . . . . . . . . . . . . . . . . . . . . . . . . . . . . . . . . . . . . . . . . . . . . . . . . . . . . . . . . . . . . . . . . . . . . . . . . . . . . . . . . . . . . . . . . . . . . vi Overview . . . . . . . . . . . . . . . . . . . . . . . . . . . . . . . . . . . . . . . . . . . . . . . . . . . . . . . . . . . . . . . . . . . . . . . . . . . . . . . . . . . . . . . . . . . . . . . . . . . . . . . . . . . . . . . . . . . . . . . . 1
Chapter 1 Our amazing Earth . . . . . . . . . . . . . . . . . . . . . . . . . . . . . . . . . . . . . . . . . . . . . . . . . . . . . . . . . . . . . . . . . . . . . . . . . . . . . . . . . . . . . 5Index . . . . . . . . . . . . . . . . . . . . . . . . . . . . . . . . . . . . . . . . . . . . . . . . . . . . . . . . . . . . . . . . . . . . . . . . . . . . . . . . . . . . . . . . . . . . . . . . . . . . . . . . . . . . . . . . . . . . . . . . . . . . . 6Background notes for teachers . . . . . . . . . . . . . . . . . . . . . . . . . . . . . . . . . . . . . . . . . . . . . . . . . . . . . . . . . . . . . . . . . . . . . . . . . . . . . . . . . . . . . . . . . . . . 7Teaching and learning activities . . . . . . . . . . . . . . . . . . . . . . . . . . . . . . . . . . . . . . . . . . . . . . . . . . . . . . . . . . . . . . . . . . . . . . . . . . . . . . . . . . . . . . . . . . . 9Resource 1: Science rocks map . . . . . . . . . . . . . . . . . . . . . . . . . . . . . . . . . . . . . . . . . . . . . . . . . . . . . . . . . . . . . . . . . . . . . . . . . . . . . . . . . . . . . . . . . . . 15Resource 2: What do you know about the Earth? . . . . . . . . . . . . . . . . . . . . . . . . . . . . . . . . . . . . . . . . . . . . . . . . . . . . . . . . . . . . . . . . . . . . 16Resource 3: Cross-section of the Earth . . . . . . . . . . . . . . . . . . . . . . . . . . . . . . . . . . . . . . . . . . . . . . . . . . . . . . . . . . . . . . . . . . . . . . . . . . . . . . . . . 17Resource 4: Geological timeline . . . . . . . . . . . . . . . . . . . . . . . . . . . . . . . . . . . . . . . . . . . . . . . . . . . . . . . . . . . . . . . . . . . . . . . . . . . . . . . . . . . . . . . . . . 18Resource 5: Volcano demonstration . . . . . . . . . . . . . . . . . . . . . . . . . . . . . . . . . . . . . . . . . . . . . . . . . . . . . . . . . . . . . . . . . . . . . . . . . . . . . . . . . . . . . 19Resource 6: Birth of a volcano. . . . . . . . . . . . . . . . . . . . . . . . . . . . . . . . . . . . . . . . . . . . . . . . . . . . . . . . . . . . . . . . . . . . . . . . . . . . . . . . . . . . . . . . . . . . 20Resource 7: Igneous slips . . . . . . . . . . . . . . . . . . . . . . . . . . . . . . . . . . . . . . . . . . . . . . . . . . . . . . . . . . . . . . . . . . . . . . . . . . . . . . . . . . . . . . . . . . . . . . . . . . 22Resource 8: Sedimentary experiment . . . . . . . . . . . . . . . . . . . . . . . . . . . . . . . . . . . . . . . . . . . . . . . . . . . . . . . . . . . . . . . . . . . . . . . . . . . . . . . . . . . 23Resource 9: Rocky recipes . . . . . . . . . . . . . . . . . . . . . . . . . . . . . . . . . . . . . . . . . . . . . . . . . . . . . . . . . . . . . . . . . . . . . . . . . . . . . . . . . . . . . . . . . . . . . . . . . 24Resource 10: The rock cycle . . . . . . . . . . . . . . . . . . . . . . . . . . . . . . . . . . . . . . . . . . . . . . . . . . . . . . . . . . . . . . . . . . . . . . . . . . . . . . . . . . . . . . . . . . . . . . . 26Resource 11: Rock cycle flowchart . . . . . . . . . . . . . . . . . . . . . . . . . . . . . . . . . . . . . . . . . . . . . . . . . . . . . . . . . . . . . . . . . . . . . . . . . . . . . . . . . . . . . . 27Resource 12: Rock and water experiment . . . . . . . . . . . . . . . . . . . . . . . . . . . . . . . . . . . . . . . . . . . . . . . . . . . . . . . . . . . . . . . . . . . . . . . . . . . . . . 29Resource 13: The effect of water on rocks . . . . . . . . . . . . . . . . . . . . . . . . . . . . . . . . . . . . . . . . . . . . . . . . . . . . . . . . . . . . . . . . . . . . . . . . . . . . . 30
Chapter 2 Exploring rocks and minerals . . . . . . . . . . . . . . . . . . . . . . . . . . . . . . . . . . . . . . . . . . . . . . . . . . . . . . . . . . . . . . . . . . . 33Index . . . . . . . . . . . . . . . . . . . . . . . . . . . . . . . . . . . . . . . . . . . . . . . . . . . . . . . . . . . . . . . . . . . . . . . . . . . . . . . . . . . . . . . . . . . . . . . . . . . . . . . . . . . . . . . . . . . . . . . . . . . 34Background notes for teachers . . . . . . . . . . . . . . . . . . . . . . . . . . . . . . . . . . . . . . . . . . . . . . . . . . . . . . . . . . . . . . . . . . . . . . . . . . . . . . . . . . . . . . . . . . . 35Teaching and learning activities. . . . . . . . . . . . . . . . . . . . . . . . . . . . . . . . . . . . . . . . . . . . . . . . . . . . . . . . . . . . . . . . . . . . . . . . . . . . . . . . . . . . . . . . . . 37Resource 1: Rock hound guidelines. . . . . . . . . . . . . . . . . . . . . . . . . . . . . . . . . . . . . . . . . . . . . . . . . . . . . . . . . . . . . . . . . . . . . . . . . . . . . . . . . . . . . . 41Resource 2: Mineral, petroleum and energy resources in Queensland . . . . . . . . . . . . . . . . . . . . . . . . . . . . . . . . . . . . . . . . . . . 46Resource 3: Queensland mines . . . . . . . . . . . . . . . . . . . . . . . . . . . . . . . . . . . . . . . . . . . . . . . . . . . . . . . . . . . . . . . . . . . . . . . . . . . . . . . . . . . . . . . . . . . 47Resource 4: Rock experiments . . . . . . . . . . . . . . . . . . . . . . . . . . . . . . . . . . . . . . . . . . . . . . . . . . . . . . . . . . . . . . . . . . . . . . . . . . . . . . . . . . . . . . . . . . . . 51Resource 5: Mohs’ scale of hardness . . . . . . . . . . . . . . . . . . . . . . . . . . . . . . . . . . . . . . . . . . . . . . . . . . . . . . . . . . . . . . . . . . . . . . . . . . . . . . . . . . . . 54Resource 6: Rock identification key and chart . . . . . . . . . . . . . . . . . . . . . . . . . . . . . . . . . . . . . . . . . . . . . . . . . . . . . . . . . . . . . . . . . . . . . . . . 55Resource 7: My rock . . . . . . . . . . . . . . . . . . . . . . . . . . . . . . . . . . . . . . . . . . . . . . . . . . . . . . . . . . . . . . . . . . . . . . . . . . . . . . . . . . . . . . . . . . . . . . . . . . . . . . . . 57Resource 8: Crystal experiments . . . . . . . . . . . . . . . . . . . . . . . . . . . . . . . . . . . . . . . . . . . . . . . . . . . . . . . . . . . . . . . . . . . . . . . . . . . . . . . . . . . . . . . . . 58Resource 9: Salt: up close and personal . . . . . . . . . . . . . . . . . . . . . . . . . . . . . . . . . . . . . . . . . . . . . . . . . . . . . . . . . . . . . . . . . . . . . . . . . . . . . . . . 60
iii
Science Rocks
Contents
Chapter 3 Scientists at work . . . . . . . . . . . . . . . . . . . . . . . . . . . . . . . . . . . . . . . . . . . . . . . . . . . . . . . . . . . . . . . . . . . . . . . . . . . . . . . . . . . . 61Index . . . . . . . . . . . . . . . . . . . . . . . . . . . . . . . . . . . . . . . . . . . . . . . . . . . . . . . . . . . . . . . . . . . . . . . . . . . . . . . . . . . . . . . . . . . . . . . . . . . . . . . . . . . . . . . . . . . . . . . . . . . 62Teaching and learning activities. . . . . . . . . . . . . . . . . . . . . . . . . . . . . . . . . . . . . . . . . . . . . . . . . . . . . . . . . . . . . . . . . . . . . . . . . . . . . . . . . . . . . . . . . . 63Resource 1: The story of Archimedes . . . . . . . . . . . . . . . . . . . . . . . . . . . . . . . . . . . . . . . . . . . . . . . . . . . . . . . . . . . . . . . . . . . . . . . . . . . . . . . . . . . 68Resource 2: A new metal for car engines by Colleen Bettles. . . . . . . . . . . . . . . . . . . . . . . . . . . . . . . . . . . . . . . . . . . . . . . . . . . . . . . 69Resource 3: Stimulus photograph of a car engine. . . . . . . . . . . . . . . . . . . . . . . . . . . . . . . . . . . . . . . . . . . . . . . . . . . . . . . . . . . . . . . . . . . . 70Resource 4: The biography of Mohs . . . . . . . . . . . . . . . . . . . . . . . . . . . . . . . . . . . . . . . . . . . . . . . . . . . . . . . . . . . . . . . . . . . . . . . . . . . . . . . . . . . . . 71Resource 5: Biography guidelines . . . . . . . . . . . . . . . . . . . . . . . . . . . . . . . . . . . . . . . . . . . . . . . . . . . . . . . . . . . . . . . . . . . . . . . . . . . . . . . . . . . . . . . . 73Resource 6: How do scientists find things out?. . . . . . . . . . . . . . . . . . . . . . . . . . . . . . . . . . . . . . . . . . . . . . . . . . . . . . . . . . . . . . . . . . . . . . . 75Resource 7: Rock hound’s jumbled interview . . . . . . . . . . . . . . . . . . . . . . . . . . . . . . . . . . . . . . . . . . . . . . . . . . . . . . . . . . . . . . . . . . . . . . . . . . 77Resource 8: Interviews with scientists . . . . . . . . . . . . . . . . . . . . . . . . . . . . . . . . . . . . . . . . . . . . . . . . . . . . . . . . . . . . . . . . . . . . . . . . . . . . . . . . . . 79Resource 9: Graphic organisers . . . . . . . . . . . . . . . . . . . . . . . . . . . . . . . . . . . . . . . . . . . . . . . . . . . . . . . . . . . . . . . . . . . . . . . . . . . . . . . . . . . . . . . . . . . 85Resource 10: Who has the biggest crystals?. . . . . . . . . . . . . . . . . . . . . . . . . . . . . . . . . . . . . . . . . . . . . . . . . . . . . . . . . . . . . . . . . . . . . . . . . . . 88Resource 11: Sample investigation design . . . . . . . . . . . . . . . . . . . . . . . . . . . . . . . . . . . . . . . . . . . . . . . . . . . . . . . . . . . . . . . . . . . . . . . . . . . . . 89
Chapter 4 Using minerals in our lives. . . . . . . . . . . . . . . . . . . . . . . . . . . . . . . . . . . . . . . . . . . . . . . . . . . . . . . . . . . . . . . . . . . . . . . 91Index . . . . . . . . . . . . . . . . . . . . . . . . . . . . . . . . . . . . . . . . . . . . . . . . . . . . . . . . . . . . . . . . . . . . . . . . . . . . . . . . . . . . . . . . . . . . . . . . . . . . . . . . . . . . . . . . . . . . . . . . . . . 92Background notes for teachers . . . . . . . . . . . . . . . . . . . . . . . . . . . . . . . . . . . . . . . . . . . . . . . . . . . . . . . . . . . . . . . . . . . . . . . . . . . . . . . . . . . . . . . . . . . 94Teaching and learning activities. . . . . . . . . . . . . . . . . . . . . . . . . . . . . . . . . . . . . . . . . . . . . . . . . . . . . . . . . . . . . . . . . . . . . . . . . . . . . . . . . . . . . . . . . . 97Resource 1: What are things are made from?. . . . . . . . . . . . . . . . . . . . . . . . . . . . . . . . . . . . . . . . . . . . . . . . . . . . . . . . . . . . . . . . . . . . . . . . 105Resource 2: What things are made from. . . . . . . . . . . . . . . . . . . . . . . . . . . . . . . . . . . . . . . . . . . . . . . . . . . . . . . . . . . . . . . . . . . . . . . . . . . . . . 106Resource 3: Why did they use that? . . . . . . . . . . . . . . . . . . . . . . . . . . . . . . . . . . . . . . . . . . . . . . . . . . . . . . . . . . . . . . . . . . . . . . . . . . . . . . . . . . . 108Resource 4: Toothpaste at a glance. . . . . . . . . . . . . . . . . . . . . . . . . . . . . . . . . . . . . . . . . . . . . . . . . . . . . . . . . . . . . . . . . . . . . . . . . . . . . . . . . . . . 109Resource 5: Properties of plastic . . . . . . . . . . . . . . . . . . . . . . . . . . . . . . . . . . . . . . . . . . . . . . . . . . . . . . . . . . . . . . . . . . . . . . . . . . . . . . . . . . . . . . . 110Resource 6: Plastic recycling codes . . . . . . . . . . . . . . . . . . . . . . . . . . . . . . . . . . . . . . . . . . . . . . . . . . . . . . . . . . . . . . . . . . . . . . . . . . . . . . . . . . . . 112Resource 7: Making plastic . . . . . . . . . . . . . . . . . . . . . . . . . . . . . . . . . . . . . . . . . . . . . . . . . . . . . . . . . . . . . . . . . . . . . . . . . . . . . . . . . . . . . . . . . . . . . . 113Resource 8: Recording an experiment . . . . . . . . . . . . . . . . . . . . . . . . . . . . . . . . . . . . . . . . . . . . . . . . . . . . . . . . . . . . . . . . . . . . . . . . . . . . . . . . . 114Resource 9: Made from petroleum . . . . . . . . . . . . . . . . . . . . . . . . . . . . . . . . . . . . . . . . . . . . . . . . . . . . . . . . . . . . . . . . . . . . . . . . . . . . . . . . . . . . . 115Resource 10: Properties of metals. . . . . . . . . . . . . . . . . . . . . . . . . . . . . . . . . . . . . . . . . . . . . . . . . . . . . . . . . . . . . . . . . . . . . . . . . . . . . . . . . . . . . . 116Resource 11: Metal makes many things . . . . . . . . . . . . . . . . . . . . . . . . . . . . . . . . . . . . . . . . . . . . . . . . . . . . . . . . . . . . . . . . . . . . . . . . . . . . . . 118Resource 12: Roots of rubbish . . . . . . . . . . . . . . . . . . . . . . . . . . . . . . . . . . . . . . . . . . . . . . . . . . . . . . . . . . . . . . . . . . . . . . . . . . . . . . . . . . . . . . . . . . 119Resource 13: A mountain of rubbish . . . . . . . . . . . . . . . . . . . . . . . . . . . . . . . . . . . . . . . . . . . . . . . . . . . . . . . . . . . . . . . . . . . . . . . . . . . . . . . . . . 120Resource 14: Garbage graph . . . . . . . . . . . . . . . . . . . . . . . . . . . . . . . . . . . . . . . . . . . . . . . . . . . . . . . . . . . . . . . . . . . . . . . . . . . . . . . . . . . . . . . . . . . . 121Resource 15: When packaging becomes litter . . . . . . . . . . . . . . . . . . . . . . . . . . . . . . . . . . . . . . . . . . . . . . . . . . . . . . . . . . . . . . . . . . . . . . . 122Resource 16: How aluminium cans are recycled . . . . . . . . . . . . . . . . . . . . . . . . . . . . . . . . . . . . . . . . . . . . . . . . . . . . . . . . . . . . . . . . . . . . 123Resource 17: Recycling statistics . . . . . . . . . . . . . . . . . . . . . . . . . . . . . . . . . . . . . . . . . . . . . . . . . . . . . . . . . . . . . . . . . . . . . . . . . . . . . . . . . . . . . . . 124Resource 18: Does degradable plastic really degrade? . . . . . . . . . . . . . . . . . . . . . . . . . . . . . . . . . . . . . . . . . . . . . . . . . . . . . . . . . . . . . 126Resource 19: Communities in action . . . . . . . . . . . . . . . . . . . . . . . . . . . . . . . . . . . . . . . . . . . . . . . . . . . . . . . . . . . . . . . . . . . . . . . . . . . . . . . . . . 128Resource 20: Change is possible . . . . . . . . . . . . . . . . . . . . . . . . . . . . . . . . . . . . . . . . . . . . . . . . . . . . . . . . . . . . . . . . . . . . . . . . . . . . . . . . . . . . . . . 131Resource 21: The impact of plastic in our lives. . . . . . . . . . . . . . . . . . . . . . . . . . . . . . . . . . . . . . . . . . . . . . . . . . . . . . . . . . . . . . . . . . . . . . 133Resource 22: Using resources more wisely . . . . . . . . . . . . . . . . . . . . . . . . . . . . . . . . . . . . . . . . . . . . . . . . . . . . . . . . . . . . . . . . . . . . . . . . . . . 137
iv
Contents

Mining has been vital to the development ofQueensland. It has led to the establishment ofinland towns and cities, provided jobs andgenerated billions of dollars in export earnings.Additionally, the products of mining help to makemany of the items that we use every day.
The Queensland Resources Council (QRC), throughits education program, aims to give teachers andstudents a balanced and informed understandingof our state’s mineral and energy resourcesindustry. It produces teaching materials in the Key Learning Areas of Science, SOSE, andTechnology, and it offers free in-schoolpresentations to primary and secondary studentsthroughout Queensland and professionaldevelopment opportunities for teachers. Bookingscan be made and further information obtained bycontacting the Education Adviser.
The Department of Natural Resources and Mines(NR&M) plays a central role in the miningindustry, providing a number of services such aspromoting the state’s potential, assisting in landaccess negotiations, developing geological data,managing safety and health standards, andencouraging environmental best practice.
Through Science rocks, QRC in conjunction withNR&M aims to provide teachers and studentswith a practical and enjoyable resource that willenhance their understanding of the importance ofminerals in our daily lives.
v
Science Rocks
Preface
Author
Kathleen Gordon, Education, Training and Curriculum Services
Illustrator
Stephen Axelsen
Project managers
Robert Wilson, Queensland Resources Council
Cheryl Petith, Department of Natural Resources and Mines
Claire Greer-Wilson, Department of Natural Resources and Mines
Katrina Keay, Queensland Resources Council
Nicole Worrall, Queensland Resources Council
Special thanks
David Carmichael, Department of Natural Resources and Mines
Linda Dobe, Department of Natural Resources and Mines
Chris Towsey, Citigold Corporation Ltd
Doug Young, Australian Institute of Geoscientists
Lauren Keilher, Department of Natural Resources and Mines
Andrew Mutton, GeoDiscovery Group Pty Ltd
Colleen Bettles, CSIRO Manufacturing & Infrastructure Technology
Neroli Gilmore, Wendy Jones and the students of Yarilee State School
vi
Acknowledgments

Science rocks provides middle and upper primaryschool students with opportunities to exploreearth science, particularly geology andmineralogy. The material is organised aroundstrands and outcomes from the Years 1–10 science syllabus.
Relationship with Years 1–10 science syllabusTeaching and learning activities in this resourcehave been designed to enhance studentunderstanding of six science syllabus keyconcepts. The activities provide opportunities forstudents to demonstrate the outcomes associatedwith these concepts at levels two, three and four.The strands and key concepts examined are:
StructureScience rocks is organised around a series of focusquestions about rocks and minerals. These weredeveloped from some frequently asked questionsfrom middle and upper primary school students inresponse to handling a selection of rocks andminerals. It is hoped that the activities in thisresource can be used to explore the questionsthat your students ask.
The resource kit is divided into four chapters, eachof which has the following sections:
• Index
• Background notes for teachers
• Teaching and learning activities/teachingprocedures
• Resource sheets.
The index includes focus questions, outcomestatements from the Years 1-10 science syllabusand a list of resource sheets.
The background notes for teachers provide ageneral overview of the science content coveredin each chapter. They recognise that primaryschool teachers may not have studied sciencethemselves and so provide a starting point fromwhich they may develop their knowledge of earthscience.
Following the background notes for teachers is asection with descriptions of suggested teachingand learning activities and teaching procedures.The resource kit contains 60 activities in total.Each chapter includes between six and tenteaching and learning activities. At least three ofthese activities relate directly to the outcome forthat key concept at each of the three levels. Theremainder of the activities in each section provideopportunities to further explore the concept,without limiting students to a specific level or
1
Science Rocks
OverviewScience Rocks
Strands Key concepts
Earth andbeyond
• The Earth, solar system anduniverse are dynamic systems.
• Living things use the resourcesof the Earth, solar system anduniverse to meet their needs.
Natural andprocessedmaterials
• The properties and structure ofmaterials are interrelated.
• The uses of materials aredetermined by their properties,some of which can be changed.
Science andsociety
• Science as a ‘way of knowing’is shaped by the way humansconstruct their understandings.
• Decisions about the ways thatscience is applied have shortand long term implications forthe environment, communitiesand individuals.
outcome. In some instances, there are strong linksbetween activities in different sections. As aresult, some activities are best completedfollowing others. Where relevant, this is noted inthe teaching procedure section.
The resource sheets may be copied for classroomuse. Each section has between 9 and 22 resourcesheets, some of which include multiple pages.These have been written at different levels tocater for a range of abilities.
Icons have been used to indicate when an activityis directly related to an outcome. These occur inboth the ‘Background notes for teachers’ and‘Resource sheets’ sections.
In the case when an activity requires additionalconcentration and supervision, an icon has beeninserted to alert the teacher to the need to followcertain safety considerations.
LevelsScience rocks has been written for studentsoperating at outcome levels two, three and four.These levels commonly span the range ofconceptual development of students in middleand upper primary school. Because each of the sixkey concepts is examined at three levels, teacherscan cover similar content with all students intheir class, irrespective of their level of conceptualdevelopment. In most cases, general activities canbe completed with all students. After this,teachers can provide students working at differentlevels with an appropriate activity (at level two,three or four) to demonstrate their understandingof the concept.
SAFETY ALERT
Demonstrating outcome NPM 3.1
OutcomesThe resource provides teaching and learningactivities that address 18 science outcomes. These outcomes are drawn from three of the fivescience syllabus strands. For each of the sixsyllabus key concepts examined in this resource,there is an activity at levels two, three and four.(The first numeral of each outcome indicates thelevel of that outcome. The second numeralindicates the number of the key concept.) Forexample, the activity entitled ‘Rock cycling’provides an opportunity for students todemonstrate an understanding of the Earth as adynamic system at level three. The table on pages3 and 4 lists the activities that specificallyaddress each of the 18 outcomes covered in this resource.
AssessmentIt must be stressed that the activities in thisresource do not, on their own, provide enoughinformation for teachers to make decisions aboutstudents’ demonstrations of outcomes. Activitiesstating a particular outcome at the top of anactivity/resource sheet may be used inconjunction with other assessment pieces togather information about students and makedecisions regarding their demonstrations of outcomes.
ResourcesThe resources required for each activity andexperiment are listed within activity descriptionsand on resource sheets. All activities, includingexperiments, can be completed with little or nospecialised science equipment. Although a studyof rocks and minerals could be undertaken withthose found in the local area, it is recommendedthat a basic set of rocks and minerals be obtainedeither from your school, a high school in yourarea or from a specimen supplier.
2
Overview

It would be useful to have at least one set of the following:
• igneous rocks
• sedimentary rocks
• metamorphic rocks
• minerals.
The rock and mineral sets can be purchased from:
Geological Specimen Supplies PO Box 387 Archerfield Qld 4108 Phone: (07) 3345 4253
Web site: http:// www.treasureenterprises.com
Your collection can be augmented with specimensbought from markets, gem clubs and gift shops. Ifyou have a large selection of found andunidentified specimens, invite a science teacherfrom your local high school or member of a gemclub to identify the rocks for you. Label themclearly with a number and record their names ona list to which you can add.
3
Science Rocks
Opportunities for students to demonstrate outcomes
Sciencestrand
Science outcome Chapter Activity Resource sheet
Earth andbeyond
2.1 Students identify and describe changes in theobvious features of the Earth and sky.
Chapter 1: Our amazingEarth
E Restless Earth 6 Birth of avolcano
3.1 Students identify and describe someinteractions that occur within systems onEarth and beyond.
I Rock cycling 11 Rock cycleflowchart
4.1 Students recognise and analyse someinteractions between systems of Earth and beyond.
J Interactionsbetween rocksand water
12 Rock andwaterexperiment
2.3 Students discuss how their community uses resources and features of the Earth and sky.
Chapter 4:Using mineralsin our lives
A Discovering whatthings are madefrom
1 What arethings madefrom?
3.3 Students collect information that describesways in which living things use the Earth andthe sun as resources.
B Collectinginformationabout the originsof things
4.3 Students summarise information to compareways in which different communities useresources from the Earth and beyond.
I Looking atrecycling
20 Change ispossible

4
Overview
Opportunities for students to demonstrate outcomes (continued)
Sciencestrand
Science outcome Chapter Activity Resource sheet
Natural andprocessedmaterials
2.1 Students group materials on the basisof properties (including solubility,texture and hardness).
Chapter 2:Exploring rocksand minerals
B Grouping rocks 4 Rockexperiments
3.1 Students examine and describe thesmaller visible parts of commonmaterials and relate these to theproperties of the materials.
D Examining rocksand minerals moreclosely
7 My rock
4.1 Students collect information andpropose ideas to explain the propertiesof materials in terms of each material’sunderlying structure.
F Examining thestructure of salt
9 Salt: up closeand personal
2.3 Students explain why commonmaterials are used in particularsituations.
Chapter 4:Using mineralsin our lives
C Exploring thecontents oftoothpaste
3 Why did theyuse that?
3.3 Students collect information toillustrate how combining differentmaterials influences their usefulness.
D Researching aproduct
4 Toothpaste at aglance
4.3 Students examine and assess waysthat materials can be changed to makethem more useful.
I Looking atrecycling
18 Does degradableplastic reallydegrade?
Science andsociety
2.2 Students identify some ways scientiststhink and work.
Chapter 3:Scientists atwork
E Summarisinginterviewresponses
9 Graphicorganisers
3.2 Students recognise the need forquantitative data when describingnatural phenomena.
C How do scientistsfind things out?
E Summarisinginterviewresponses
6 How doscientists findthings out?
9 Graphicorganisers
4.2 Students use the elements of a fairtest when considering the design oftheir investigations.
G Designing a fairtest
10 Sampleinvestigationdesign
2.3 Students explain some of the waysthat applications of science affecttheir community.
Chapter 4:Using mineralsin our lives
H Examiningpackaging
14 Garbage graph
3.3 Students make predictions about theimmediate impact of some applicationsof science on their community andenvironment, and consider possiblepollution and public health effects.
H Examiningpackaging
15 When packagingbecomes litter
4.3 Students present analyses of the shortand long-term effects of some of theways in which science is used.
J Exploring someissues
21 The impact ofplastic in ourlives

Science Rocks
Our amazing Earth
Strand: Earth and beyond
Key concept: The Earth, solar system and universe are dynamic systems
Chapter 1

Focus questionsHow are rocks formed?
How long do rocks take to form?
What are the different types of rocks?
What is the rock cycle?
Resource sheets
1. Science rocks map
2. What do you know about the Earth?
3. Cross-section of the Earth
4. Geological timeline
5. Volcano demonstration
6. Birth of a volcano
7. Igneous slips
8. Sedimentary experiment
9. Rocky recipes
10. The rock cycle
11. Rock cycle flowchart
12. Rock and water experiment
13. The effect of water on rocks
6
Chapter 1: Our amazing Earth
OutcomesThe following outcomes can be achieved in yourclassroom by following the activities and usingthe resource sheets provided in Science rocks. The overview at the beginning of this book alsoexplains which of the activities demonstrate each outcome.
IndexOur amazing Earth
Science outcomes: Earth and beyond
2.1Students identify and describe changes inthe obvious features of the Earth and sky.
3.1Students identify and describe someinteractions that occur within systems onEarth and beyond.
4.1Students recognise and analyse someinteractions between systems of Earth and beyond.
The EarthThe ccrruusstt of the Earth is made of rocks andminerals from the tallest mountains to the floorof the deepest ocean. It makes up less than 1% ofthe Earth’s mass. The continental crust is up to 50 km thick while the oceanic crust is, at most,15 km thick. Most of the rocky crust is covered byeither water, sand, soil or ice. The soil is a mixtureof small, inorganic particles and organic material(plant and animal remains), which supports thegrowth of plants such as grass and trees. Most ofthe crust is made from only eight elements—oxygen, magnesium, aluminium, silicon, calcium,sodium, potassium and iron. These elements alongwith others are combined to form thousands ofrocks and minerals that are very different.
The mmaannttllee is the solid casing of the Earth and isabout 2900 km thick making up almost 70% ofthe Earth’s mass. It consists of silicon, oxygen,aluminium and iron.
The ccoorree is mainly made of iron and nickel andmakes up about 30% of the Earth’s mass. Theliquid oouutteerr ccoorree is approximately 2200 km thick.The solid iinnnneerr ccoorree is about 1220 km thick.
RocksA rock is made up of minerals that have beencemented together, squeezed and heated, ormelted and cooled. Rocks are divided into threemain groups:
• igneous
• sedimentary
• metamorphic.
They are classified into these groups because ofthe way they were formed.
IIggnneeoouuss rocks are formed from melted rock thathas cooled and solidified. When rocks are burieddeep within the Earth, they melt because of thehigh pressure and temperature. If this molten rock(called magma) cools slowly, usually at depths ofthousands of metres, coarse-grained rocks formwith large crystals (for example, granite andgabbro). If the magma cools quickly, usually onthe surface after a volcano erupts, the crystals arevery small and fine-grained rocks are formed (forexample, basalt, rhyolite and obsidian). Someexamples of other igneous rocks are: pumice, tuffand andesite.
SSeeddiimmeennttaarryy rocks are formed from the cementingtogether of small pieces of rocks or shells. Theyare formed at the surface of the Earth, either inwater or on land. They are usually made up ofmany layers of sediments, which includefragments of rocks, minerals and animal or plantmaterial. Sandstone, limestone, shale, gypsum,conglomerate, coal, chert and flint are allsedimentary rocks.
Sometimes igneous and sedimentary rocks aresubjected to pressures so intense or heat so highthat they change. They become mmeettaammoorrpphhiiccrocks, which form while buried within the Earth’scrust. The process of metamorphism does not meltthe rocks, but changes them into denser, morecompact rocks. Slate, marble and gneiss aremetamorphic rocks. They are transformed fromshale, limestone and granite respectively.
shale d slate
limestone d marble
granite d gneiss
Background notes for teachersOur amazing Earth
7
Science Rocks

The rock cycleThe geological process that forms rocks is cyclical.Each type of sedimentary, igneous ormetamorphic rock can be changed into each othertype of rock. This is known as the rock cycle. Thefollowing explanation starts with igneous rocks.
Igneous rocks start as magma. When magma—molten rock under the Earth’s surface—and lava—molten rock on the Earth’s surface—cools andhardens, it forms iiggnneeoouuss rock. The igneous rock isbroken down over time through the weatheringprocess. These particles of broken rock, or soil, arewashed away by water and accumulate in lakes oroceans and harden into rock again—this time as
8
Chapter 1: Our amazing Earth
sseeddiimmeennttaarryy rock. As the sedimentary rock isburied under more and more sediment, or comesinto contact with magma, the pressure and heatcan cause metamorphism to occur. Thistransforms the sedimentary rock into ammeettaammoorrpphhiicc rock. If metamorphic rock is buriedmore deeply, temperatures and pressures continueto rise. If the temperature becomes hot enough,the metamorphic rock melts and forms the moltenrock called magma and so the cycle continues.

Activity A Outcomes, activitiesand journalStudents consider unit outcomes, decide thedirection of their investigations and begin a journal.
Purpose
To make students aware of the unit outcomes through scientific investigation andjournal writing.
Teaching procedure
• Make an OHT of the outcome/s on which youwill focus and explain the types of activitiesstudents will do to demonstrate them. You mayneed to rewrite outcomes to make themstudent-friendly.
• Decide on the activities students will do. Youcan follow the order of activities provided inthis book, make selections yourself or negotiatewith students regarding which direction to take.Here are some options for recording theactivities students complete:
– Provide students with a copy of Resource 1:Science rocks map.
– Students can write in the names of selectedactivities from this book (and any others) asthey are undertaken.
- Using Resource 1 as a model, invite studentsto design their own map of the learningactivities they do.
• In addition to mapping their journey throughthis chapter, encourage students to keep ascience journal. Vary the type, frequency andlength of entries to maintain student interest.Give students a choice about which activitiesthey respond to or how they respond to them intheir journal. Two possible formats are givenover the page.
9
Science Rocks
Teaching and learning activitiesOur amazing Earth

10
Chapter 1: Our amazing Earth
Activity B Journey to thecentre of the EarthStudents are introduced to ideas about the inside of the Earth and label a cross-section of the Earth.
PurposeTo engage students’ interest and discover theirexisting ideas about the Earth.
Teaching procedure• Provide students with an example of how some
writers/artists have imagined the inside of theEarth by reading or viewing a section from oneor more of the following:
Name of activityWhat are you ranking?Enjoyment/interest/difficulty
RankingLow High1 2 3 4 5
What did you do?ORWhat did you learn?
The thing that interested me most was ________________________________________________
________________________________________________________________________________
The thing I’m still not sure about is ___________________________________________________
________________________________________________________________________________
________________________________________________________________________________
________________________________________________________________________________
I still want to find out ______________________________________________________________
________________________________________________________________________________
– Journey to the centre of the Earth by JulesVerne (1872 novel)
– Journey to the centre of the Earth directed byHenry Levin (1959 movie) or directed by RustyLemorande (1987 movie)
– The magic school bus: inside the Earth byJoanna Cole (1987 information text)
– The core directed by Jon Amiel (2003 movie)
– Journey from the centre of the Earth by IsobelCarmody and Marc McBride (2003 picture book)
– What’s under the bed? by Mick Manning andBrita Granstrom (2004 information text)
• Facilitate a class discussion about the text thatthe students have read/heard/viewed. Consider

the factual and fictional elements of the text/sby asking students what they think might bereal and imaginary in them. Invite students toconsider how we know whether something isreal or not.
• Provide students with a copy of Resource 2:What do you know about the Earth? Invitestudents to record their ideas about the Eartharound the globe.
• Provide students with a copy of Resource 3:Cross-section of the Earth. Display the wordscrust, mantle, inner core and outer core wherestudents can clearly see them. Explain thatthese are the names of the four layers of theEarth. Either read or ask students to read thefollowing text twice. Then ask them to use theclues to label the diagram.
The Earth has four main layers. These are theccrruusstt, the mmaannttllee, the oouutteerr ccoorree and the iinnnneerrccoorree. The crust is the rock layer on which we liveand is made up of the lightest material. Themantle is made up of molten rock. The heat in themantle melts the rock. The outer core is made upof very hot molten iron and nickel. The inner coreis made up of solid iron and nickel. It is solidbecause of the extreme pressure at the centre ofthe Earth.
Activity C Rocky questionsStudents compose questions about rocks afterexamining a variety of rocks.
PurposeTo engage students’ curiosity about rocks.
Teaching procedure• Provide a variety of rocks to small groups
of students.
• Invite students to examine and write questionsabout the rocks. Encourage students to writedifferent types of questions such as what, when,where, why, who and how questions. Provideexamples for each type of question and elicit
further examples from the students. Groups may swap rocks so they can examine a greater variety.
• Ask groups to share their questions with thewhole class. These questions, reflecting studentinterest, can be used to guide students’investigations throughout the unit.
Activity D Journey throughtimeStudents participate in a visualisation exercise then contribute to a group mural ormultimedia display.
PurposeTo encourage students to explore the idea of geological time.
Teaching procedure• Prior to the lesson, collect a selection of
pictures of well-known Australian landformssuch as Uluru, Blue Mountains, Wilson’sPromontory, Mt Kosciusko, Mt Bartle Frier, MtWarning, Nullarbor Plains and the GlasshouseMountains. (Calendars and travel brochures area good source of these pictures.) Show studentsthese pictures and together mark the selectedlocations on a wall map. Ask students if theyknow how old the formations are and how theywere formed.
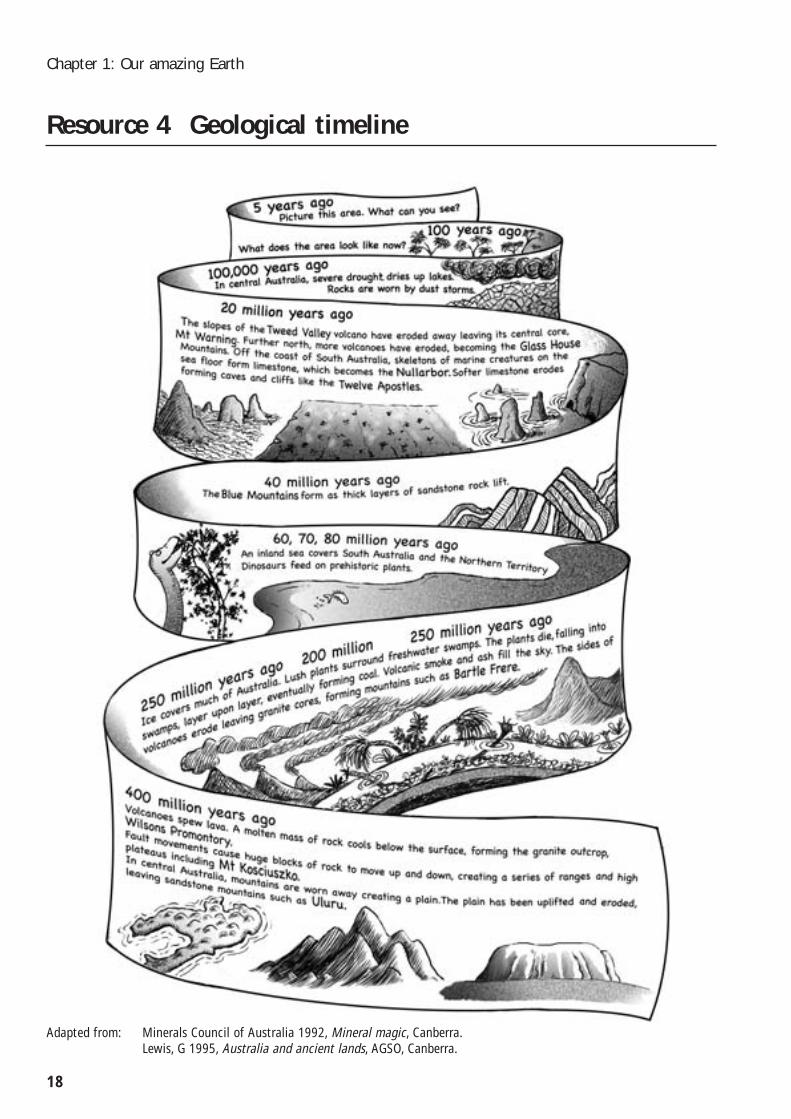
• Invite the students to come on a journeythrough time to learn about these landmarksand how the Earth has changed over time. Thisactivity can take place inside the classroom oroutside in a quiet, shady location. Read the texton Resource 4: Geological timeline. You mightlike to use a sound effect (buzzer, chime, orcomputer generated) to indicate each time youmove to another time zone.
• Invite students, working in groups, to researchone of the time periods and present theinformation in a mural or multimediapresentation. When each group has finished,their work can be combined to form a journeythrough time.
11
Science Rocks

Activity E Restless Earth
Students observe a demonstration of howvolcanoes are formed.
Take special care when using vinegar. If vinegardoes splash on skin or into eyes, wash affectedarea with water immediately. Seek medical adviceif discomfort persists..
PurposeTo show students how volcanoes change the landscape.
Teaching procedure• Before you begin the demonstration, organise a
student to record each step of thedemonstration using a digital camera. These photos could be:
– used as a display in your room
– printed, laminated and used as a stimulus fora sequencing activity or for recalling the stepsof the demonstration
– imported into a computer program such as PowerPoint to record the demonstration in sequence.
• Begin the volcano demonstration described inResource 5: Volcano demonstration. Inviteselected students to assist at each step.
• After the demonstration invite students todiscuss their observations. Students could also record their observations in their science journal.
SAFETY ALERT
Demonstrating outcome EB 2.1
12
Chapter 1: Our amazing Earth
• Show students video or internet footage oferupting volcanoes. Discuss the changes to thelandscape caused by a volcano. Some goodinternet sites include:
– Volcano world’s kids’ door at:<http://volcano.und.edu/vwdocs/kids/kids.html>
– FEMA for kids at:<http://www.fema.gov/kids/volcano.htm>
• Provide younger students with a copy ofResource 6: Birth of a volcano and ask them tocomplete it individually. Collect sheets forstudent portfolios.
Activity F Exploring igneousrocksStudents observe a cooking demonstration thatshows how some igneous rocks are formed.
PurposeTo enable students to discover how igneous rocksare formed.
Teaching procedure• Invite students to form groups of four. Provide
each student with one of the four igneous slipsfrom Resource 7: Igneous slips. Invite studentsto read the box in their groups and decide ontheir correct order. Ask one group to read theircorrectly ordered slips to the whole class.
• Explain to students that this demonstration willshow them how two kinds of igneous rocks areformed. Make the iiggnneeoouuss rroocckk lloolllliieess inResource 9: Rocky recipes.
• Before eating the lollies, ask each group toidentify which rocks the two lollies represent.They may need to refer back to their boxes for clues.
• Invite students to record what they have learntin their journals.

Activity G Exploringsedimentary rocksStudents conduct experiments that show howsedimentary rocks are formed.
PurposeTo enable students to discover how sedimentaryrocks are formed.
Teaching procedure• Explain to students that sedimentary rocks are
made in layers. These layers of mud, sand andshells are built up over a long time. They aresqueezed and cemented together to make new rocks.
• Provide students with a copy of Resource 8:Sedimentary experiment and masking tape tomake it easier for students to label their jars.Conduct the experiment.
• The next day, assist students to describe whatthey can see. (Layers have been produced by thedifferent materials.) Invite students to discusswhat they think happened. (The heaviermaterials sank to the bottom of the jar first. The lighter materials sank last. The differentmaterials formed layers according to theirweight.) Explain to students that sedimentaryrocks are made in this way when water carriessediments to lakes and oceans. There over time,pressure can force the sediments together sothey become sedimentary rocks.
• Make the sseeddiimmeennttaarryy sslliiccee in Resource 9: Rockyrecipes. Before eating the slice, ask students todescribe how the slice was made. (Layers wereplaced in the pan. The ingredients melted butyou can still see the layers.)
Activity H Exploringmetamorphic rocksStudents observe a demonstration that showshow metamorphic rocks are formed.
PurposeTo enable students to discover how metamorphicrocks are formed.
Teaching procedure• Tell students that metamorphic rocks are made
when heat and pressure sometimes change asoft rock into a much harder rock (e.g.sandstone into quartzite). This cookingdemonstration will show how metamorphicrocks can be formed.
• Use the recipe for mmeettaammoorrpphhiicc mmuunncchhiieess onResource 9: Rocky recipes. You could do the firststage of baking (up to step 7) in advance tospeed up the process.
• Invite students to feel and eat the biscuitsbefore they are baked again. After the secondbaking ask students to describe how the biscuitschanged. (The soft biscuits become muchharder.) Explain that soft rocks, such assedimentary rocks, that are squeezed andheated for a long time can change into hardermetamorphic rocks.
• Invite students to record their observations intheir journals.
13
Science Rocks

Activity I Rock cycling
Students sing a rock cycle song (in a round) andcreate a flowchart to represent the rock cycle.
Purpose To enable students to discover how rocks arecontinually cycled.
Teaching procedure• Provide students with a copy of Resource 10:
The rock cycle and sing the rock cycle song.
• As a whole group, read through the descriptionof the rock cycle in Resource 10.
• Provide students with a copy of Resource 11:Rock cycle flowchart. Read through the sheet.Ask students to cut out the cards.
• Re-read the rock cycle description in Resource10 and invite students, working in pairs, toorganise the cards to represent the rock cycle.Encourage discussion and questions while thisprocess is taking place.
• When the pairs think they have all the cards inthe right place, encourage them to read the rockcycle description again and check theirplacement. Moving around the room, invitestudents to explain their flowcharts to you.
• Invite students working in groups to plan andact out the rock cycle process. Provide studentswith the time to develop their ideas, practiseand make any props before making theirpresentation to the class. Walk among thegroups as they are creating their performancesand check that their representations fit in withthe rock cycle process.
Demonstrating outcome EB 3.1
14
Chapter 1: Our amazing Earth
Activity J Interactions betweenrocks and water
Students conduct an experiment to explore one ofthe effects of water on rocks and then summariseinformation about other effects, such astemperature, by creating a concept web.
PurposeTo enable students to explore some of theinteractions between rocks and water.
Teaching procedure• Provide students with a copy of Resource 12:
Rock and water experiment. Ask students tobring to school the items they need for theexperiment. Students can either work in pairs atschool, or conduct this experiment at home.
• When students have completed the experiment,invite them to share their findings with theclass. (They will probably find that the rocksthat have holes in them break down fastest. Thisis because the holes are gaps between thegrains of the rock or cracks. Water gets into theholes and when it freezes, it expands forcing therock apart a little. When it melts, more watergets in and when it freezes next time it expandsmore. Eventually the rocks break apart.)
• Provide students with a copy of Resource 13:The effect of water on rocks. Invite students tosummarise the information by drawing aconcept map, for example:
Demonstrating outcome EB 4.1
The effects of wateron rocks

15
Science Rocks
Resource 1 Science rocks map
As you complete each activity, record its title in the boxes on the map below.

16
Chapter 1: Our amazing Earth
Resource 2 What do you know about the Earth?

Read the following information about the Earth.Cut out the labels below and place them in thecorrect parts of the diagram.
The Earth has four main layers. These are thecrust, the mantle, the outer core and the innercore. The crust is the layer we live on and is made
up of the lightest material. The mantle is made upof molten rock. The heat in the mantle melts therock. The outer core is made up of very hotmolten iron and nickel. The inner core is made upof solid iron and nickel. It is solid because of theextreme pressure at the centre of the Earth.
17
Science Rocks
Resource 3 Cross-section of the Earth
Crust
Outer core Inner core
Mantle
18
Chapter 1: Our amazing Earth
Resource 4 Geological timeline
Adapted from: Minerals Council of Australia 1992, Mineral magic, Canberra. Lewis, G 1995, Australia and ancient lands, AGSO, Canberra.

PurposeTo enable students to understand how volcanoeschange the landscape.
Materials• modelling clay
• small plastic cup
• large tray or biscuit sheet
• 1 tablespoon flour
• 2 tablespoons baking soda
• 10cm square tissue paper
• 1/3 cup vinegar
• 1 drop of food colouring
• safety glasses
Procedure1. Using the tray as a base, build the volcano
with the modelling clay. Make sure that theopening in the top is large enough to hold thesmall plastic cup.
2. Put the flour and baking soda in the centre ofthe tissue paper and wrap it up, making surethe ends are tightly twisted.
3. Put the package in the cup.
4. Add a drop of food colouring to the vinegar.Wearing safety glasses, pour half the vinegarinto the cup. When the foaming stops, add the remaining vinegar.
ObservationsRecord your observations in your journal.
19
Science Rocks
Resource 5 Volcano demonstration

Purpose To encourage students to understand howvolcanoes change the landscape.
20
Chapter 1: Our amazing Earth
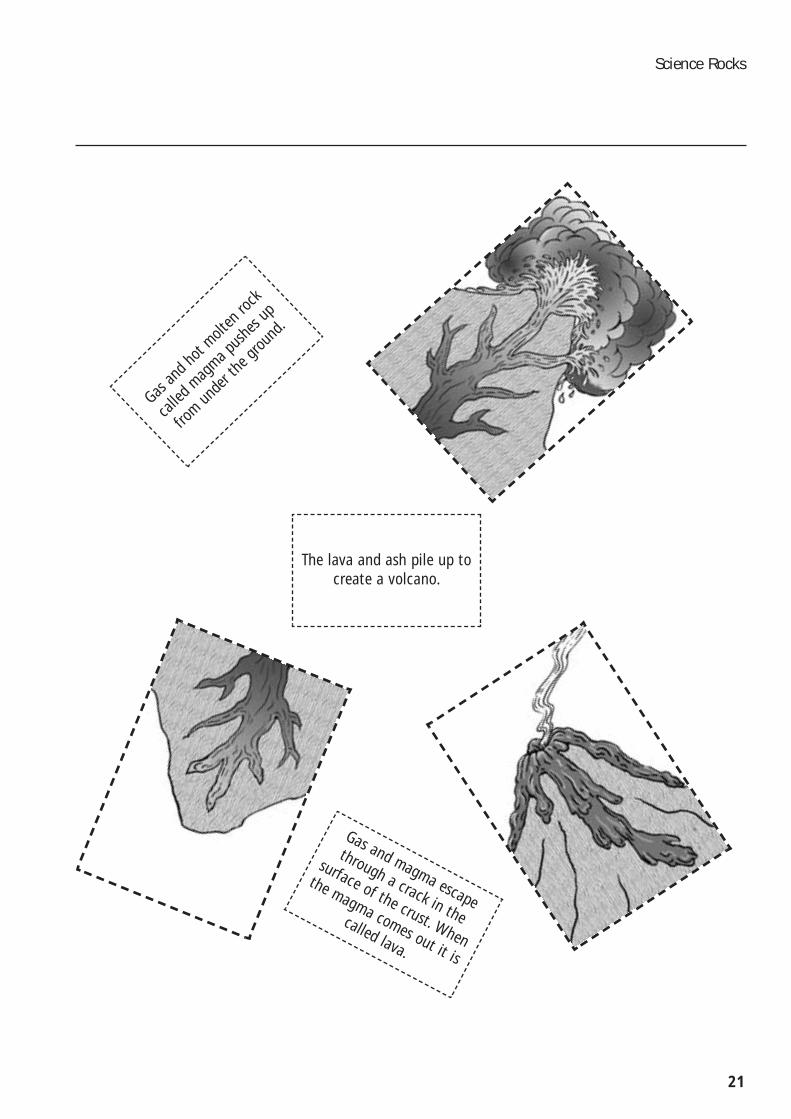
Resource 6 Birth of a volcano
Demonstrating outcome EB 2.1
Procedure1. The pictures opposite show the birth of a new
volcano. Put them in the right order.
2. Read the sentences in the text boxes andmatch them with the pictures.
3. Glue them into the boxes on this page.
21
Science Rocks
Gas an
d hot
molten
rock
calle
d mag
ma pus
hes u
p
from un
der t
he gr
ound
.
Gas and magma escape
through a crack in the
surface of the crust. When
the magma comes out it is
called lava.
The lava and ash pile up tocreate a volcano.
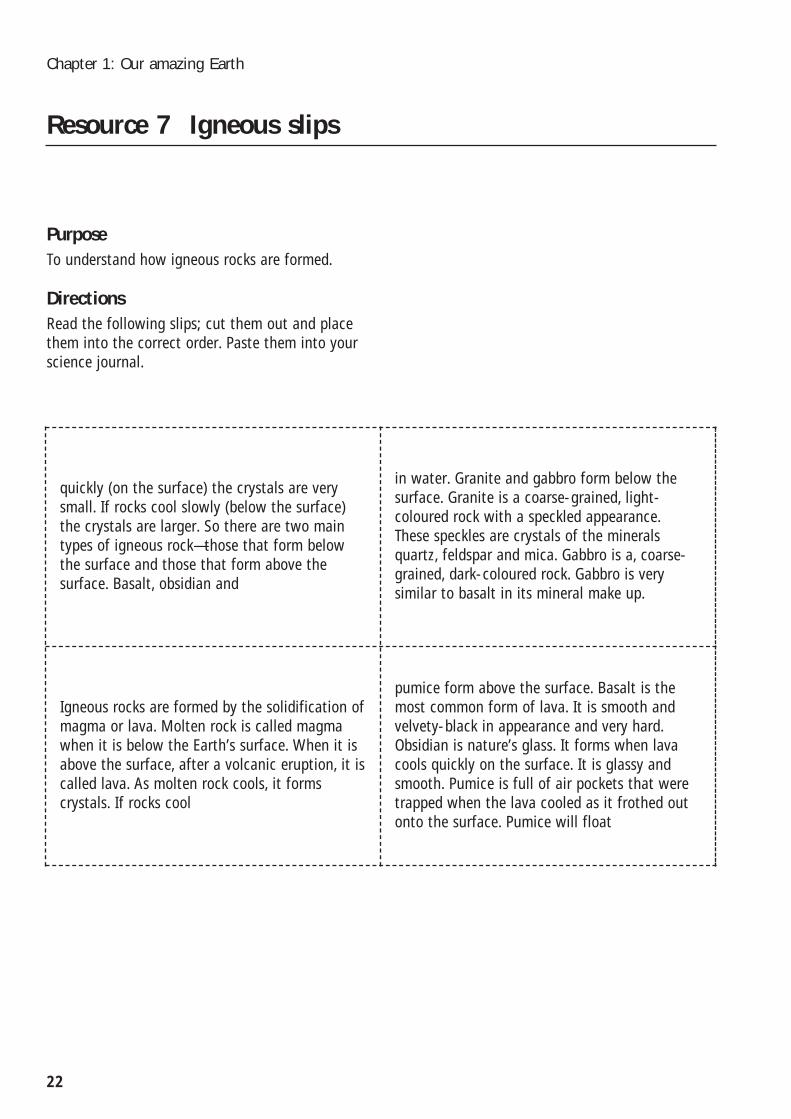
PurposeTo understand how igneous rocks are formed.
DirectionsRead the following slips; cut them out and placethem into the correct order. Paste them into yourscience journal.
22
Chapter 1: Our amazing Earth
Resource 7 Igneous slips
quickly (on the surface) the crystals are verysmall. If rocks cool slowly (below the surface)the crystals are larger. So there are two maintypes of igneous rock—those that form belowthe surface and those that form above thesurface. Basalt, obsidian and
in water. Granite and gabbro form below thesurface. Granite is a coarse-grained, light-coloured rock with a speckled appearance. These speckles are crystals of the mineralsquartz, feldspar and mica. Gabbro is a, coarse-grained, dark-coloured rock. Gabbro is verysimilar to basalt in its mineral make up.
Igneous rocks are formed by the solidification ofmagma or lava. Molten rock is called magmawhen it is below the Earth’s surface. When it isabove the surface, after a volcanic eruption, it iscalled lava. As molten rock cools, it formscrystals. If rocks cool
pumice form above the surface. Basalt is themost common form of lava. It is smooth andvelvety-black in appearance and very hard.Obsidian is nature’s glass. It forms when lavacools quickly on the surface. It is glassy andsmooth. Pumice is full of air pockets that weretrapped when the lava cooled as it frothed outonto the surface. Pumice will float

PurposeTo discover how sedimentary rocks are made.
Materials• a handful of soil
• a handful of sand
• a handful of fine gravel
• a glass jar
23
Science Rocks
Resource 8 Sedimentary experiment
Procedure1. Put your name on your jar.
2. Put a handful of soil, sand and fine gravel intoa glass jar.
3. Fill the jar with water, put the lid on tightlyand shake very well.
4. Allow the contents to settle overnight.
5. The next day look at the contents of the jarand finish these sentences.
Observationsa) Describe what you saw. Draw what you saw in
the jar below.
___________________________________
___________________________________
In the morning,
b) Describe what you think happened.
I think that
___________________________________
___________________________________
___________________________________
___________________________________
___________________________________
___________________________________

Igneous rock lollies
Purpose To demonstrate how igneous rocks are formed.
Ingredients• 1 cup sugar
• 1/2 cup liquid glucose
• 1/2 cup water
• 1 tablespoon butter
• 1 teaspoon bicarbonate of soda
Procedure1. Put sugar, liquid glucose, water and butter in
a heavy pan.
2. Heat gently until dissolved and then boil for about 6 minutes, until it all turns lightgolden brown.
3. Pour half into a cold oiled baking tray andwatch it flow and set like lava.
4. Into the remaining half, add a teaspoonful ofbicarbonate of soda. This releases carbondioxide into the mixture in lots of littlebubbles—you will need to pour it in a tinquickly before it sets. This is like pumice.
5. Both can be broken with a hammer when set,forming the similar patterns of cracks you findin rocks after earthquakes.
Source: http://www.bbc.co.uk/education/rocks/ primer.shtml
Sedimentary slice
Purpose To understand how sedimentary rocks are formed.
Ingredients• 125 g butter
• 1 1/2 cups wafer crumbs
• 400 ml tin of condensed milk
• 1 cup choc chips
• 1 1/4 cups coconut
• 1 cup chopped nuts
Procedure1. Melt the butter and pour into a greased clear
rectangular cake/loaf pan.
2. Crush wafer biscuits and sprinkle the crumbsover the butter.
3. Pour the condensed milk evenly over the crumbs.
4. Layer the nuts then the choc chips evenly andpress down gently.
5. Bake at 180° for 20–25 minutes.
6. Cool, cut into bars and serve.
Source: Moore, J E 1998, Geology, Science Works for Kids,Evan-Moor Corp., Monterey CA USA.
24
Chapter 1: Our amazing Earth
Resource 9 Rocky recipes

Metamorphic munchies
PurposeTo demonstrate how metamorphic rocks are formed.
Ingredients• 4 cups flour
• 2 teaspoons baking powder
• 1/2 teaspoon salt
• 2 cups sugar
• 4 eggs
• 3/4 cup oil
• 1 teaspoon vanilla
Procedure1. Mix flour, baking powder and salt together in
a mixing bowl.
2. Beat the eggs in a large bowl and add sugar,oil and vanilla.
3. Add the flour mixture, a little at a time, to theegg mixture. It will get very stiff.
4. Empty the mixture onto a floured surface.Shape the dough into six balls.
5. Grease two baking trays or line with oven paper.
6. Roll each ball into a ‘snake’ as long as thebaking trays and lay three snakes on eachtray. Flatten them with your fingers.
7. Bake at 180°C for 25 minutes. Remove fromoven and let them cool.
25
Science Rocks
8. Cut the long biscuits in diagonal slices so thatthere is one for everyone. Cut each of these inhalf and give one to each person.
9. Place the remaining halves back on the bakingtray and bake for an additional 10 minutes.
10. Let these biscuits cool before giving one toeach person.
Source: http://www.bbc.co.uk/education/rocks/ primer.shtml

PurposeTo help students discover how rocks arecontinually cycled.
RRoocckk ccyyccllee ssoonngg(Sing to the tune of ‘Row, Row, Row Your Boat’)
SEDIMENTARY rocks we know
In layers it has formed
Often found near water sources
With fossils of plants and spore
Then there are the IGNEOUS rocks
Here since the Earth was born
Molten lava, cooled and hardened
That’s how it is formed
These two types of rocks we’ve learnt
Can also be transformed
With pressure, heat and chemicals
METAMORPHIC they will form
Source: http://www.chariho.k12.ri.us/curriculum/MISmart/ocean/rocksong.htm
The rock cycleThe rock cycle describes geological processes thatform rocks. Igneous rock can change intosedimentary rock or into metamorphic rock.Sedimentary rock can change into metamorphicrock or into igneous rock. Metamorphic rock canchange into igneous rock or sedimentary rock.
• Let’s start with magma.
• When magma cools it forms igneous rock.
• On the Earth’s surface, wind and water canbreak the igneous rock into pieces. This processis called weathering and erosion. These piecesare called sediments.
• The sediments can be compacted to make a layer. The layer can be buried under otherlayers of sediments. After a long time thesediments can be cemented together to makesedimentary rock.
• Sedimentary rock can be weathered away toform sediments again.
• When sedimentary and igneous rocks are heatedthey change into metamorphic rock.
• Metamorphic rock can also be weathered awayto make sediment.
• Metamorphic and igneous rock can also bemelted back into magma.
• The rock cycle never stops.
Source: http://www.cotf.edu/ete/modules/msese/earthsysflr/rock.html
26
Chapter 1: Our amazing Earth
Resource 10 The rock cycle

PurposeTo identify and describe some interactions withina system—the rock cycle.
Procedure1. Read Resource 10: The rock cycle.
2. Using as many of the rock cycle cards as you can, make a flowchart to explain how the rock cycle works.
Demonstrating outcome EB 3.1
27
Science Rocks
Below is an example of a flowchart. It shows howthe elements in the water cycle interact.
3. Cut out the rock cycle cards and arrange themon an A3 sheet linking them together with thewords and arrows cards.
4. Do not glue down the cards until you are sureof where you want to put them all.
Resource 11 Rock cycle flowchart
Oceans and Rivers
Plants
transpiration evaporation
collects in
SunClouds
Rainheat

Rock cycle cards
28
Chapter 1: Our amazing Earth

Purpose To recognise and analyse an interaction betweensystems (rock and water) on Earth.
Experiment question Which type of rock falls apart most easily after ithas been frozen several times?
Materials • a plastic container (margarine, yogurt or ice
cream tub)
• smallish pieces of different sorts of rock (eg. granite, basalt, sandstone) or buildingmaterial (eg. concrete, brick, cement block)
• access to a freezer.
What do you predict will happen?Complete this sentence. I think that the
________________ will fall apart the most
because _______________________________
______________________________________
______________________________________
______________________________________
______________________________________
29
Science Rocks
Procedure 1. Put the rock pieces in a plastic container.
2. Cover them with water and put them in the freezer.
3. When the water is frozen, take the containerout and let the water melt, then put it back inagain. Do this several times.
ObservationsWhat happened? Answer these questions:
1. Which type of rock becomes most broken up?
______________________________________
______________________________________
2. Why do you think this is?
______________________________________
______________________________________
Resource 12 Rock and water experimentOur amazing Earth
Demonstrating outcome EB 4.1

Weathering and erosion
Rushing water in fast flowing rivers in themountains or strong waves on the shore can rollrocks around. This causes the sharp edges of therocks to break off. That is why river rocks aresmooth and beach pebbles look polished.
30
Chapter 1: Our amazing Earth
Resource 13 The effect of water on rocks
The action of waves on a beach causes erosion.The waves pound on rocks and over time, cliffscrumble. That is why you will often find sand andlittle pebbles on beaches. This action also createssome interesting coastal rock formations such asthe Twelve Apostles in Victoria.

Sometimes water gets into cracks in rocks. If thiswater freezes, it expands and makes the cracksbigger. Then when the cracks fill up with waterthe next time, the water gets deeper into the rockbecause the cracks are bigger. When the waterfreezes again the cracks get bigger still until therock splits apart.
31
Science Rocks
Rock formation
Water also plays a part in the formation of sometypes of rocks. Obsidian or volcanic glass isformed when lava comes into contact with water.The water causes the lava to cool very quickly.The result is a hard, glassy rock.

Most sedimentary rocks, including sandstone andconglomerate, depend on water for theirformation. Sediments (such as sand) are washedinto lakes and oceans and settle into horizontallayers called beds. Over time they are compactedand cemented together to make rocks.
Some sedimentary rocks are formed when water(full of dissolved chemicals) seeps into the tinyspaces between the sediment grains. When thewater evaporates, the chemicals are left behind ascrystals around the edges of the grains. Thesecrystals cement the grains together to form rock.
32
Chapter 1: Our amazing Earth

Science Rocks
Exploring rocks andminerals
Strand: Natural and processed materials
Key concept: The properties and structure of materials are interrelated
Chapter 2

Focus questionsWhat is the difference between a rock and a mineral?
What are these rocks and minerals called?
How can you tell them apart?
Where are they found?
Resource sheets 1. Rock hound guidelines
2. Mineral, petroleum and energy resources in Queensland
3. Queensland mines
4. Rock experiments
5. Mohs’ scale of hardness
6. Rock identification key and chart
7. My rock
8. Crystal experiments
9. Salt: up close and personal
34
Chapter 2: Exploring rocks and minerals
OutcomesThe following outcomes can be achieved in yourclassroom by following the activities and usingthe resource sheets provided in Science rocks. The overview at the beginning of this book alsoexplains which of the activities demonstrate each outcome.
Index
Exploring rocks and minerals
Science outcomes: Natural andprocessed materials
2.1Students group materials on the basis ofproperties (including solubility, textureand hardness).
3.1
Students examine and describe thesmaller visible parts of common materialsand relate these to the properties of thematerials.
4.1
Students collect information and proposeideas to explain the properties ofmaterials in terms of each material’sunderlying structure.

Rocks and mineralsRocks are made up of minerals. Some rocks canbe made up of one mineral; others can be acombination of minerals. The way that mineralgrains are arranged in rocks is a good clue totheir identification.
A mineral is an inorganic (not made from livingthings) chemical element or compound found inthe Earth. It occurs naturally and has a definitechemical composition. This means that it containsthe same elements, in the same proportions andalso has a crystalline structure (atoms arearranged so that they form a particular geometricshape). Geologists are interested in crystalsbecause they tell them about the internalstructure of minerals.
Minerals have definite physical properties, whichcan be tested. These include lustre, hardness,
35
Science Rocks
streak, colour, specific gravity (relative density),rupture (cleavage and fracture), transparency,magnetism and reaction to hydrochloric acid.
Some minerals always have the same colour whileothers have various colours depending on theimpurities they contain. For example, quartz canbe white, pink, purple or smoky.
Lustre is the degree to which light is reflected bythe surface of a mineral. Minerals such as galenaand gold display a metallic lustre. Transparentminerals such as quartz and calcite display avitreous lustre similar to china.
Types of crystalsMinerals are classified into six crystal systems.Each has a mathematical geometric form. Thesystem with the greatest symmetry (the cubic
Background notes for teachers
Exploring rocks and minerals
system) is first. The other systems are organisedso that the one with the least symmetry is last.
• Cubic—also called isometric (salt, iron pyrite)
• Tetragonal (zircon)
• Hexagonal (beryl)
• Orthorhombic (barite)
• Monoclinic (gypsum)
• Triclinic (kyanite)
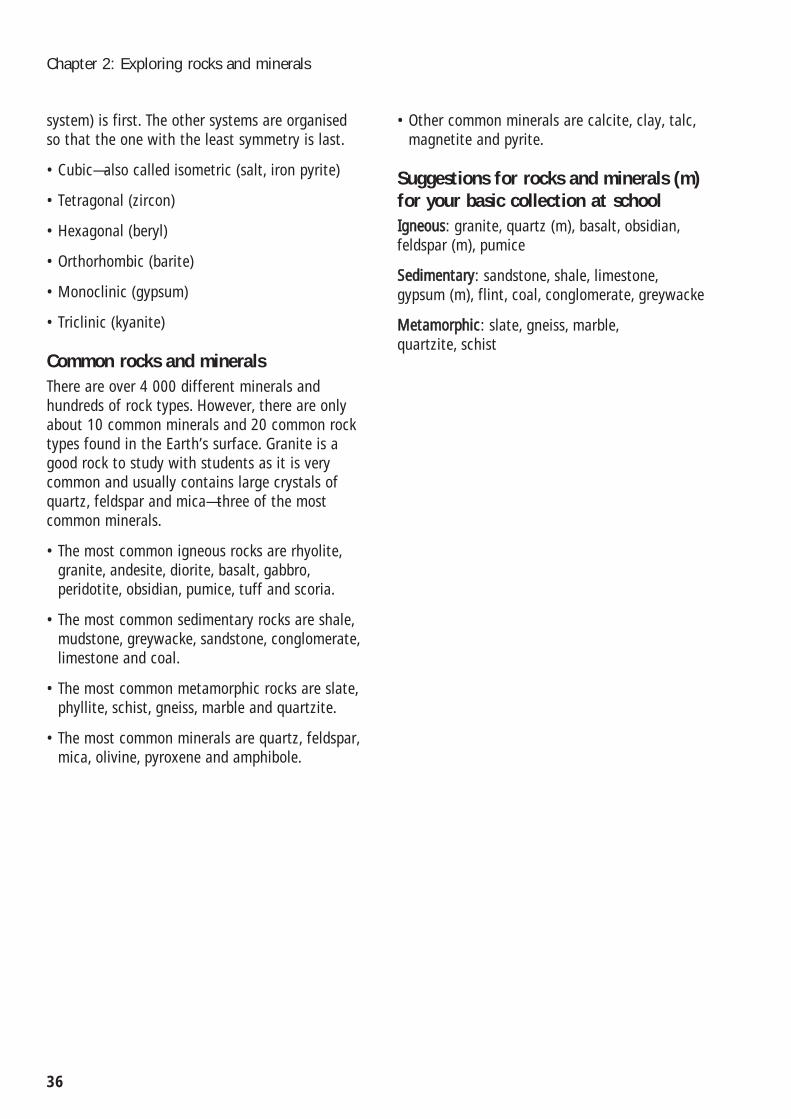
Common rocks and mineralsThere are over 4 000 different minerals andhundreds of rock types. However, there are onlyabout 10 common minerals and 20 common rocktypes found in the Earth’s surface. Granite is agood rock to study with students as it is verycommon and usually contains large crystals ofquartz, feldspar and mica—three of the mostcommon minerals.
• The most common igneous rocks are rhyolite,granite, andesite, diorite, basalt, gabbro,peridotite, obsidian, pumice, tuff and scoria.
• The most common sedimentary rocks are shale,mudstone, greywacke, sandstone, conglomerate,limestone and coal.
• The most common metamorphic rocks are slate,phyllite, schist, gneiss, marble and quartzite.
• The most common minerals are quartz, feldspar,mica, olivine, pyroxene and amphibole.
• Other common minerals are calcite, clay, talc,magnetite and pyrite.
Suggestions for rocks and minerals (m)for your basic collection at schoolIIggnneeoouuss: granite, quartz (m), basalt, obsidian,feldspar (m), pumice
SSeeddiimmeennttaarryy: sandstone, shale, limestone, gypsum (m), flint, coal, conglomerate, greywacke
MMeettaammoorrpphhiicc: slate, gneiss, marble, quartzite, schist
36
Chapter 2: Exploring rocks and minerals

Activity A Becoming a rockhound Students are introduced to rock collecting.
PurposeTo introduce students to the pleasures of rock collecting.
Teaching procedure• Provide students with a copy of Resource 1:
Rock hound guidelines. Explain tasks andawards. Copy the awards to show students. Put each one onto a different coloured card.Encourage students to do the chosen tasks overthe course of the chapter.
• Encourage students to contact friends andfamily living in other places to collect and swap rocks commonly found in their local areas. Organise a swap with students in schoolsin other parts of Queensland, Australia or the world.
• Resource 2: Mineral, petroleum and energyresources in Queensland(http://nrm.qld.gov.au/mines/publications/education_awareness.html)
and Resource 3: Queensland mines, whichshows locations of rock types and mines inQueensland, are both useful resources forstudents as they look for specimens andinformation about rocks and minerals.
• Invite a geologist, gem club enthusiast or otherperson with an interest in rocks to speak to thestudents about rocks and their properties.
37
Science Rocks
Activity B Grouping rocksStudents group rocks according to theirproperties.
PurposeTo encourage students to explore the properties ofrocks.
Teaching procedure• Provide each group of students with a selection
of rocks of various types, sizes, colours andtextures. Ask students to examine the rocks andthink of words to describe them. Record theirdescriptions on a class list. Vocabulary will varyaccording to the age and experience of studentsbut will probably include: hard, big, small, grey,brown, white, black, lumpy, scratchy, smooth,shiny, dull, mottled, speckled, grainy, crumblyand layered.
• Invite students to group the rocks according toa property. This could be big/small, light/dark,rough/smooth, solid colour/many colours,shiny/dull. Ask students to explain the divisionthey made.
• Using Resource 4: Rock experiments invitestudents to select a number of experiments tofurther explore the properties of rocks. Somethings to consider when preparing for each ofthe experiments include:
– Colours and patterns: Provide each groupwith a selection of rocks that look different.
Demonstrating outcome NPM 2.1
Teaching and learning activities
Exploring rocks and minerals

– HHaarrddnneessss ((11)):: Include at least one rock that issoft, such as talc or coal, and one that is hard,such as marble or gneiss.
– HHaarrddnneessss ((22)):: This is an experiment for olderstudents. Make sure it is appropriate to markor scratch any rocks being used for thisexperiment. This is important if they areborrowed or expensive specimens. Include softrocks such as pumice, sandstone and talc inthe selection. When students have completedrecording their results on the table, ask themto place the rocks in order of hardness. Showstudents Resource 5: Mohs’ hardness scale.How does this scale compare with the order oftheir rocks? Ask students to wipe the rockswhen they are finished.
• Following these experiments ask students torecord some of the things they have learnedabout rocks in a concept map.
Activity C Identifying rocksStudents identify common rocks using a key.
PurposeTo introduce students to identification keys andassist them to identify common rocks.
Teaching procedure• For this activity you will need one or more of
each of the following specimens: granite, basalt,obsidian, pumice, conglomerate, sandstone,shale, limestone, quartzite, marble, slate, schist,coal and gneiss.
• Provide each student with a copy of Resource 6:Rock identification key and chart.
Rocks
• Divide students into groups and place at leastone type of rock in front of each group. Guidestudents through the key.
• When you are finished, give each group a‘mystery’ rock (from the above list) and askthem to identify it.
Activity D Examining rocksand minerals more closelyStudents examine rocks with hand lenses andrecord the properties they can see.
PurposeTo enable students to learn more about theproperties of rocks and minerals.
Teaching procedure• Invite each student to choose a rock or mineral
sample. Provide each student with a copy ofResource 7: My rock.
• Give students 10 minutes to look at theirsample with a hand lens or magnifying glass.Then ask students to write a description of theirspecimen, noting the colour(s), weight, size, andshape. Ask students to draw their specimenusing coloured pencils to obtain arepresentation that is as accurate as possible.
• Collect all the specimens and put them in a pileat the front of the room.
• Students exchange their original specimendescription with another student. Using the rockor mineral descriptions, the students will thentry to find the sample.
• Check to see if each student has the correct specimens.
Demonstrating outcome NPM 3.1
38
Chapter 2: Exploring rocks and minerals

Activity E Growing crystalsStudents grow crystals in the classroom.
PurposeTo allow students to explore the structure of crystals.
Teaching procedure• Use Resource 8: Crystal experiments. Choose
between experiment (1) or (2) or do both. The crystals will take days to grow. The solutionand temperature will affect the growth as therate of cooling affects how the crystals grow.Solutions which cool slowly form large crystals while those which cool quickly willproduce smaller crystals. Experiment (2) is a faster alternative.
• Experiments can be repeated using alum(available from chemists) or sugar for different results.
• These experiments show the relation betweencrystal size and the rate of cooling in theformation of rocks. For example, the largecrystals in granite formed from a slower rate of cooling whereas basalt with smaller grainscooled quickly.
• These experiments are used as the basis forfurther exploration in Chapter 3 where studentsare asked to design their own investigations and test their ideas about how to grow thelargest crystals.
Activity F Examining thestructure of saltStudents predict, observe and explain thestructure of salt as they view it under a variety of magnifications.
Demonstrating outcome NPM 4.1
39
Science Rocks
PurposeTo develop students’ understanding that materialsmay be composed of parts that are too small tobe seen without magnification.
Teaching procedure• Before you begin you will need salt, black
construction paper, hand lenses or magnifyingglasses and a microscope, slide and cover slip.
• Pour some salt into the palm of your hand andwalk around the room allowing students to viewit without saying anything. You may use tableor sea salt for this activity. (Sea salt crystals area little larger, making it easier.)
• Once all students have observed the substance,ask the following questions:
– What do I have in my hand?
– Does this salt look different from the salt usedin your home? If so, how?
• Explain to students that salt can be processednaturally, such as sea salt, or it can beprocessed in a factory where chemicals areadded. Continue with questioning:
– Where do you find salt? How is it used? (Moststudents will say on food or in cooking, but leadthem to other uses, for example, the ocean/sea,curing meat, melting ice.)
– How would you describe salt? (Responsesshould include shape, colour, odour, taste.)
• Then ask students to think about what saltcrystals might look like when magnified.Encourage them to think about the shape andtexture. Then tell students that they will look atsalt under different magnifications and recordtheir observations.
• There are many ways to structure this activitydepending on your students’ needs, class size,and available equipment. The following model isfor small groups and work stations throughwhich students can rotate. The centres can beset up as follows:

– Centre 1: The naked eye— students examine a teaspoon of salt on a piece of blackconstruction paper.
– Centre 2: Hand lens—students examine ateaspoon of salt on a piece of blackconstruction paper with the use of a hand lens or magnifying glass.
– Centre 3: Microscope—students examine asmaller amount of salt with a slide and coverslip under a microscope.
– Centre 4: Electron microscope—students willvisit the Science Learning Network web site at<http://www.mos.org/sln/sem/ksalt.html> andlook at an image of kosher salt.
• Provide students with a copy of Resource 9:Salt: up close and personal and explain thatthey are going to look at salt using differentequipment and magnifications and then recordtheir findings. Encourage students to makedetailed observations, descriptions and drawingson this sheet. For example, they should usegeometric shapes as they make and recordobservations; so, they should describe salt in theshape of a diamond, square, etc.
• Before beginning the activity, ask students topredict what salt will look like when magnified,and record their predictions in the appropriatesection on the resource sheet. These should beas detailed and descriptive as possible.
• Invite students to make their observations andcomplete the student sheet. When all studentshave finished their observations, ask thefollowing questions:
– Why was it important for you to make aprediction? (E.g. so I could have a record ofmy thoughts and be more sure of how theychanged over time.)
– How did your predictions compare with whatyou actually observed about the structure ofsalt? (E.g. the salt really looked like littlesquares/crystals. The salt was clear rather than white.)
– How were the salt crystals the same under the magnifying glass and electron microscope?How were they different? (Students’ responsesshould focus on the details of the shape and structure.)
• Continue the discussion but shift the focus tothe record keeping. Students should recognisehow recording observations made it easier tocompare and analyse the physical details of salt.Ask:
– What was the most interesting differencenoticed with each magnification?
– How did the data sheet help you with this activity?
– Were there any other items that we could have added to the data sheet to make recording observations easier or more complete?
• Collect resource sheets for student portfolios.
• Challange students to make one or more netsbased on variations of crystals as shown here.
Source: http://www.sciencenetlinks.com/lessons.cfm?BenchmarkID=4&DocID=173
40
Chapter 2: Exploring rocks and minerals

Opal awardDo two of the following:
1. Explain the difference between a rock and amineral. Write your answer in two sentences.
2. Email a geology question you would likeanswered to a web site with an ‘ask thegeologist’ feature:<[email protected] > (note theunderscore between geological and info). Printthe page as a record.
3. Make a collection of six rocks. Label them and if possible list their origin (where theycame from).
4. Make a set of six rock identification cards.Each card must include a drawing or photo ofthe rock, the name and the type of each rock.You must include some rocks from each of thethree rock types.
41
Science Rocks
Resource 1 Rock hound guidelines
Welcomefellow rock
hounds. Are youready to learn more
about rocks and mineralsand earn awards along theway? Start with the opaland work your way up if youdare. Be as neat as you can.Scientists need to be careful.
Good luck and good rock hunting.

Sapphire awardDo three of the following:
1. What is a geologist? What does a geologistdo? Write your answers in sentences.
2. Draw up a table showing the three types ofrocks and list six examples of each.
3. Make a model of a fossil.
4. Photograph and label four to six localgeological features (for example, mountain,hill, rock wall in road or rail cutting, headland,cliff, rocky beach, quarry, rocky ground).
5. Create a game that teaches people aboutrocks and minerals.
Diamond awardDo four of the following:
1. Describe the six types of crystal systems andlist a mineral example of each.
2. Identify some geological features, includinginteresting landforms and major rock typesand mineral deposits, from your local area oran area of special interest to you.
3. List five minerals and what they are used forand why they are used for this purpose.
4. Make a model of a volcano.
5. Make a chart showing the geological eras and periods. If possible indicate in whatgeological time the rocks in your local region were formed.
6. Prepare a six ‘page’ multimedia (such asPowerPoint) presentation about a Queenslandmine. The presentation must include visualsand written text.
42
Chapter 2: Exploring rocks and minerals

43
Science Rocks

44
Chapter 2: Exploring rocks and minerals

45
Science Rocks

46
Chapter 2: Exploring rocks and minerals
Resource 2 Mineral, petroleum and energy resources in Queensland
A colour version of this map is available at:http://www.nrm.qld.gov.au/mines/publications/education_awareness.html#re
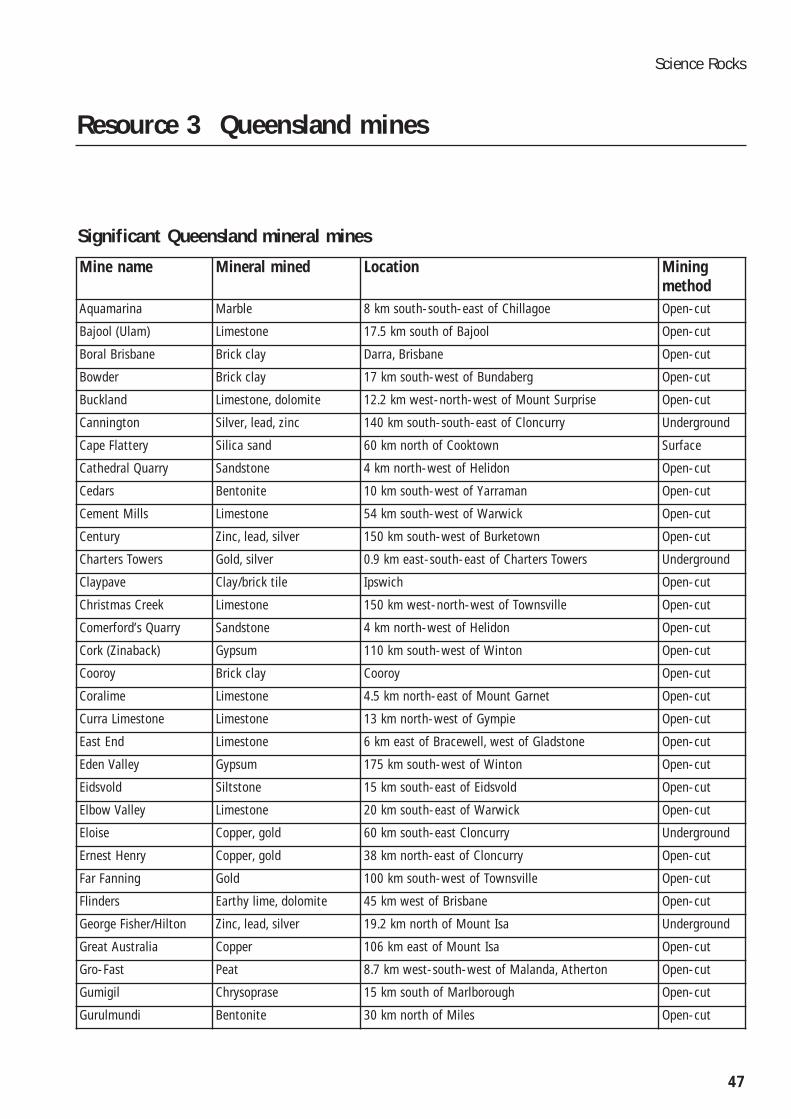
47
Science Rocks
Resource 3 Queensland mines
Mine name Mineral mined Location Miningmethod
Aquamarina Marble 8 km south-south-east of Chillagoe Open-cut
Bajool (Ulam) Limestone 17.5 km south of Bajool Open-cut
Boral Brisbane Brick clay Darra, Brisbane Open-cut
Bowder Brick clay 17 km south-west of Bundaberg Open-cut
Buckland Limestone, dolomite 12.2 km west-north-west of Mount Surprise Open-cut
Cannington Silver, lead, zinc 140 km south-south-east of Cloncurry Underground
Cape Flattery Silica sand 60 km north of Cooktown Surface
Cathedral Quarry Sandstone 4 km north-west of Helidon Open-cut
Cedars Bentonite 10 km south-west of Yarraman Open-cut
Cement Mills Limestone 54 km south-west of Warwick Open-cut
Century Zinc, lead, silver 150 km south-west of Burketown Open-cut
Charters Towers Gold, silver 0.9 km east-south-east of Charters Towers Underground
Claypave Clay/brick tile Ipswich Open-cut
Christmas Creek Limestone 150 km west-north-west of Townsville Open-cut
Comerford’s Quarry Sandstone 4 km north-west of Helidon Open-cut
Cork (Zinaback) Gypsum 110 km south-west of Winton Open-cut
Cooroy Brick clay Cooroy Open-cut
Coralime Limestone 4.5 km north-east of Mount Garnet Open-cut
Curra Limestone Limestone 13 km north-west of Gympie Open-cut
East End Limestone 6 km east of Bracewell, west of Gladstone Open-cut
Eden Valley Gypsum 175 km south-west of Winton Open-cut
Eidsvold Siltstone 15 km south-east of Eidsvold Open-cut
Elbow Valley Limestone 20 km south-east of Warwick Open-cut
Eloise Copper, gold 60 km south-east Cloncurry Underground
Ernest Henry Copper, gold 38 km north-east of Cloncurry Open-cut
Far Fanning Gold 100 km south-west of Townsville Open-cut
Flinders Earthy lime, dolomite 45 km west of Brisbane Open-cut
George Fisher/Hilton Zinc, lead, silver 19.2 km north of Mount Isa Underground
Great Australia Copper 106 km east of Mount Isa Open-cut
Gro-Fast Peat 8.7 km west-south-west of Malanda, Atherton Open-cut
Gumigil Chrysoprase 15 km south of Marlborough Open-cut
Gurulmundi Bentonite 30 km north of Miles Open-cut
Significant Queensland mineral mines

48
Chapter 2: Exploring rocks and minerals
Mine name Mineral mined Location Miningmethod
Hadleigh Castle Gold, silver 28.9 km west of Ravenswood Open-cut
Highway-Reward Copper 33 km south-south-west of Charters Towers Open-cut
Hillgrove Dolomite Dolomite 74 km north-west of Charters Towers Open-cut
Hivesville Dolomite Dolomite 20 km north-west of Wondai Open-cut
Hugenden Gypsum 8 km west of Huganden Open-cut
Ibis Rutile, ilmenite, zircon North Stradbroke Island Dredge
IMT Bentonite ProductsGurulmundi
Bentonite 32 km north of Miles Open-cut
Ingham Lime Limestone 24 km south-east of Ewan Open-cut
Inkerman Lime Limestone 24 km south of Home Hill Open-cut
Iveragh Silica sand 2 km south-east of Tannum Sands Open-cut
Jeebropilly Bentonite South-east of Rosewood Open-cut
Kirknie Limestone 27km south of Home Hill Open-cut
Kleinton Brick clay Toowoomba Open-cut
Kunwarara Magnesite 60 km north-west of Rockhampton Open-cut
Laroona Dolomite 95 km north-west of Charters Towers Open-cut
Limevale Quarry Limestone 10 km north of Texas Open-cut
Maidenwell Diatomite 5km west of Maidenwell Open-cut
Marcotta Clay tile Maryborough Open-cut
Marmor Limestone North of Marmor Open-cut
Marule Lime Limestone 21 km north-north-west of Childers Open-cut
Mayne River Gypsum 165 km south-west of Winton Open-cut
Miles Bentonite 5 km south-west of Miles Open-cut
Moffatdale Limestone 6 km south-east of Murgon Open-cut
Montgomery’s Quarry Sandstone 6 km north-west of Helidon Open-cut
Moreton Dolomite Dolomite 20 km south of Ipswich Open-cut
Mount Etna Limestone 25 km north of Rockhampton Open-cut
Mount Cuthbert Copper 13 km north-west of Kajabbi Open-cut
Mount Garnet Zinc, lead, copper, silver, gold Mount Garnet Open-cut
Mount Gordon Copper, cobalt 115 km north of Mount Isa Open-cut
Mount Isa Copper, silver, lead, zinc 1.3 km west of Mount Isa Underground
Mount Norma Copper 30 km south-west of Cloncurry Open-cut
Mount Rawdon Gold, silver 80 km west-south-west of Bundaberg Open-cut
Significant Queensland mineral mines

49
Science Rocks
Mine name Mineral mined Location Miningmethod
Mount Sylvia Diatomite 38 km south of Gatton Open-cut
Myora Silica sand 2 km north of Dunwich, North Stradbroke Island Surface
New Hope Collieries Brick clay 6 km south-east of Ipswich Open-cut
Numinbah Perlite Perlite McPherson Range, south-east of Beechmont Open-cut
Nychum Perlite 50 km north-west of Chillagoe Open-cut
Nyora Kaolin 15 km south of Kingaroy Open-cut
Osborne Copper, gold 109 km south-east of Duchess Underground
Oxley Brick clay Oxley, Brisbane Open-cut
Pajingo Vera Nancy Gold, silver 72 km south of Charters Towers Underground
Partridge Limestone 50 km south-west of Sarina Open-cut
Phoenix Lime Limestone 11 km south-southwest of Almaden, west of Cairns Open-cut
Phosphate Hill Phosphate rock 150 km south-east of Mount Isa Open-cut
Port Alma Salt Port Alma Evaporative
Ravensbourne Kaolin 5 km north-east of Ravensbourne Open-cut
River of Gold Slate Mine Slate, sandstone 62 km north of Mount Carbine Open-cut
Riverton Quarry Limestone 19.3 km east of Bonshaw Open-cut
Rochedale Brick clay Rochedale/Redland Bay Open-cut
Sarsfield Gold, silver 1.4 km south-east of Ravenswood Open-cut
Schultz Dolomite 87 km north-west of Charters Towers Open-cut
Scotsman’s Folly Sandstone 2 km south-east of Stanwell Open-cut
Skardon River Kaolin 13.5 km north-east of Mapoon, Weipa Open-cut
Southern Pacific Sands Silica Sand 12 km east of Caboolture Open-cut
Stevenson Gypsum Gypsum 125 km west of Dirranbandi Open-cut
Strathpine Brick clay Brendale, Brisbane Open-cut
Stuart Oil shale 11.2 km north-west of Gladstone Power Station Open-cut
Sugar Lime Limestone 95 km south-west of Cairns Open-cut
Sunstate Sands Silica sand 20 km south of Bundaberg Open-cut
Taragoola Limestone 10.5 km south-south-east of Calliope Open-cut
Undilla Limestone 140 km north of Mount Isa Open-cut
Wagner’s Quarry Sandstone 5 km north-east of Helidon Open-cut
Warbrick Brick clay, shale 12 km south-west of Warwick Open-cut
Weipa Bauxite 5.7 km west-north-west of Weipa airstrip Open-cut
Whitehill Earthy lime, dolomite 19 km north-west of Wondai Open-cut
Wide Bay Pits Brick clay Bundaberg region Open-cut
Willows Zeolite 2 km south of Willows, west of Emerald Open-cut
Yarraman Rutile, ilmenite, zircon North Stradbroke Island Dredge
Young Australian Copper 117 km south-east of Mount Isa Open-cut
Significant Queensland mineral mines
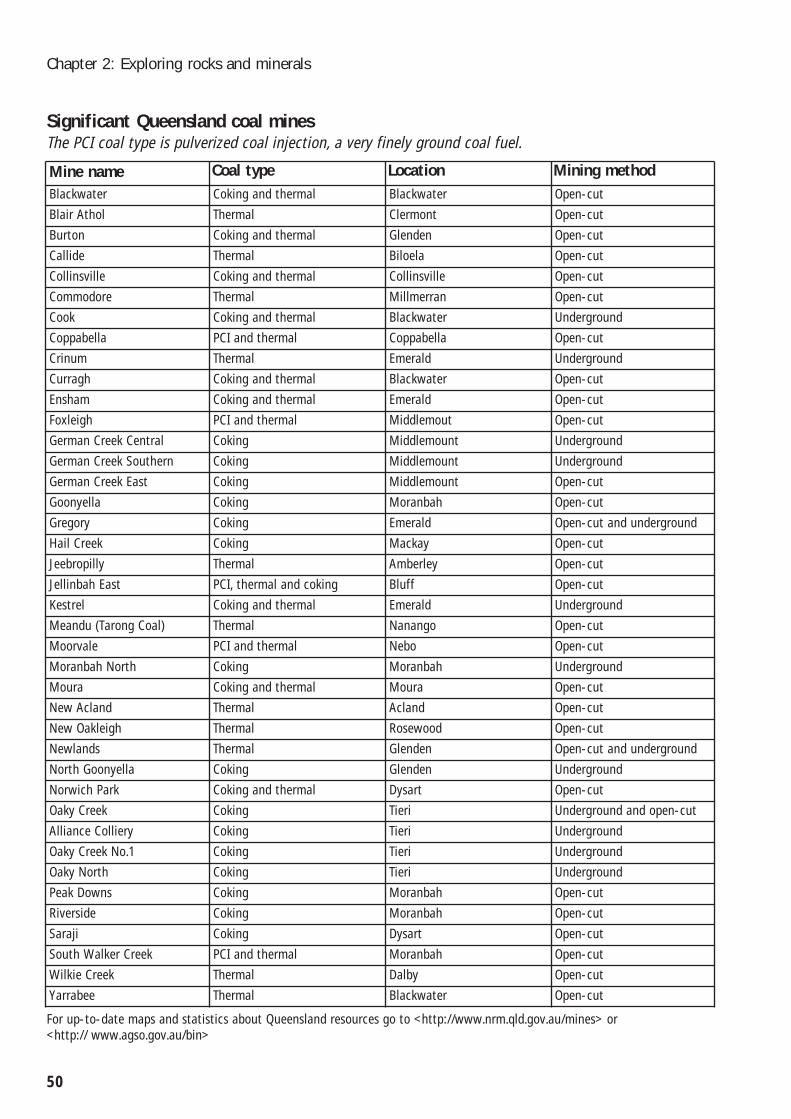
50
Chapter 2: Exploring rocks and minerals
Significant Queensland coal mines The PCI coal type is pulverized coal injection, a very finely ground coal fuel.
Mine name Coal type Location Mining methodBlackwater Coking and thermal Blackwater Open-cut
Blair Athol Thermal Clermont Open-cut
Burton Coking and thermal Glenden Open-cut
Callide Thermal Biloela Open-cut
Collinsville Coking and thermal Collinsville Open-cut
Commodore Thermal Millmerran Open-cut
Cook Coking and thermal Blackwater Underground
Coppabella PCI and thermal Coppabella Open-cut
Crinum Thermal Emerald Underground
Curragh Coking and thermal Blackwater Open-cut
Ensham Coking and thermal Emerald Open-cut
Foxleigh PCI and thermal Middlemout Open-cut
German Creek Central Coking Middlemount Underground
German Creek Southern Coking Middlemount Underground
German Creek East Coking Middlemount Open-cut
Goonyella Coking Moranbah Open-cut
Gregory Coking Emerald Open-cut and underground
Hail Creek Coking Mackay Open-cut
Jeebropilly Thermal Amberley Open-cut
Jellinbah East PCI, thermal and coking Bluff Open-cut
Kestrel Coking and thermal Emerald Underground
Meandu (Tarong Coal) Thermal Nanango Open-cut
Moorvale PCI and thermal Nebo Open-cut
Moranbah North Coking Moranbah Underground
Moura Coking and thermal Moura Open-cut
New Acland Thermal Acland Open-cut
New Oakleigh Thermal Rosewood Open-cut
Newlands Thermal Glenden Open-cut and underground
North Goonyella Coking Glenden Underground
Norwich Park Coking and thermal Dysart Open-cut
Oaky Creek Coking Tieri Underground and open-cut
Alliance Colliery Coking Tieri Underground
Oaky Creek No.1 Coking Tieri Underground
Oaky North Coking Tieri Underground
Peak Downs Coking Moranbah Open-cut
Riverside Coking Moranbah Open-cut
Saraji Coking Dysart Open-cut
South Walker Creek PCI and thermal Moranbah Open-cut
Wilkie Creek Thermal Dalby Open-cut
Yarrabee Thermal Blackwater Open-cut
For up-to-date maps and statistics about Queensland resources go to <http://www.nrm.qld.gov.au/mines> or <http:// www.agso.gov.au/bin>

51
Science Rocks
Procedure1. Look at each rock and record its colour.
2. Put one rock at a time into the water. Observeany colour or pattern changes.
3. Record your results in the table.
Experiment 1
PurposeStudents will find out if colours and patterns ofrocks change when they are wet.
Materials (per group)• 4–6 rocks
• a clear container of water
• paper towels
Demonstrating outcome NPM 2.1
Resource 4 Rock experiments
Rock Colour/pattern
Dry Wet
1
2
3
4
5
6
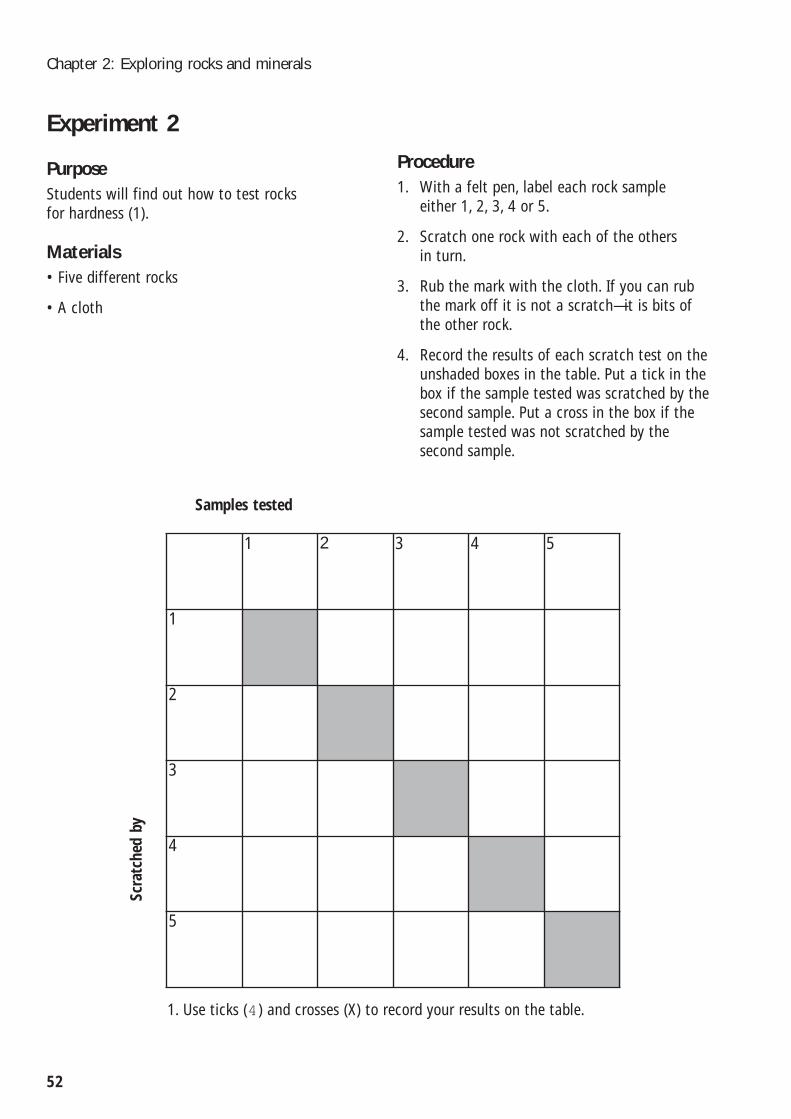
Experiment 2
PurposeStudents will find out how to test rocks for hardness (1).
Materials• Five different rocks
• A cloth
Procedure1. With a felt pen, label each rock sample
either 1, 2, 3, 4 or 5.
2. Scratch one rock with each of the others in turn.
3. Rub the mark with the cloth. If you can rubthe mark off it is not a scratch—it is bits ofthe other rock.
4. Record the results of each scratch test on theunshaded boxes in the table. Put a tick in thebox if the sample tested was scratched by thesecond sample. Put a cross in the box if thesample tested was not scratched by thesecond sample.
52
Chapter 2: Exploring rocks and minerals
1 2 3 4 5
1
2
3
4
5
Samples tested
Scra
tche
d by
1. Use ticks (4) and crosses (X) to record your results on the table.
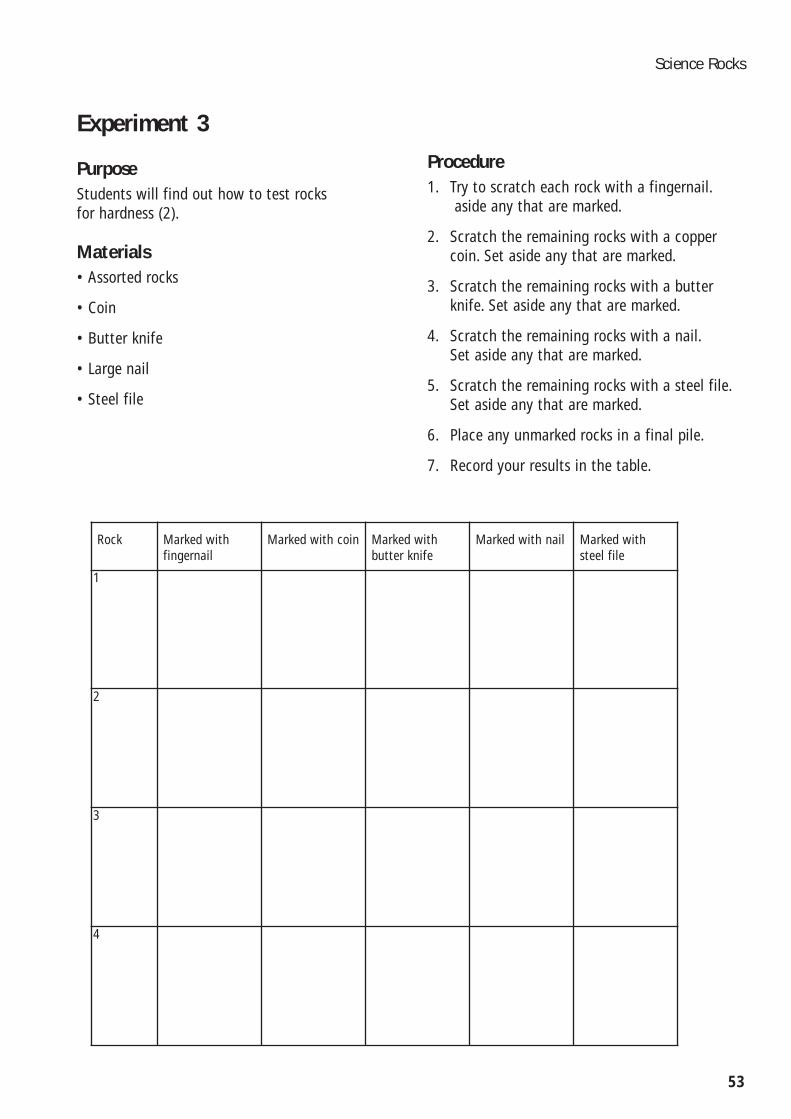
Experiment 3
PurposeStudents will find out how to test rocks for hardness (2).
Materials• Assorted rocks
• Coin
• Butter knife
• Large nail
• Steel file
53
Science Rocks
Procedure1. Try to scratch each rock with a fingernail.
aside any that are marked.
2. Scratch the remaining rocks with a coppercoin. Set aside any that are marked.
3. Scratch the remaining rocks with a butterknife. Set aside any that are marked.
4. Scratch the remaining rocks with a nail. Set aside any that are marked.
5. Scratch the remaining rocks with a steel file.Set aside any that are marked.
6. Place any unmarked rocks in a final pile.
7. Record your results in the table.
Rock Marked withfingernail
Marked with coin Marked withbutter knife
Marked with nail Marked with steel file
1
2
3
4
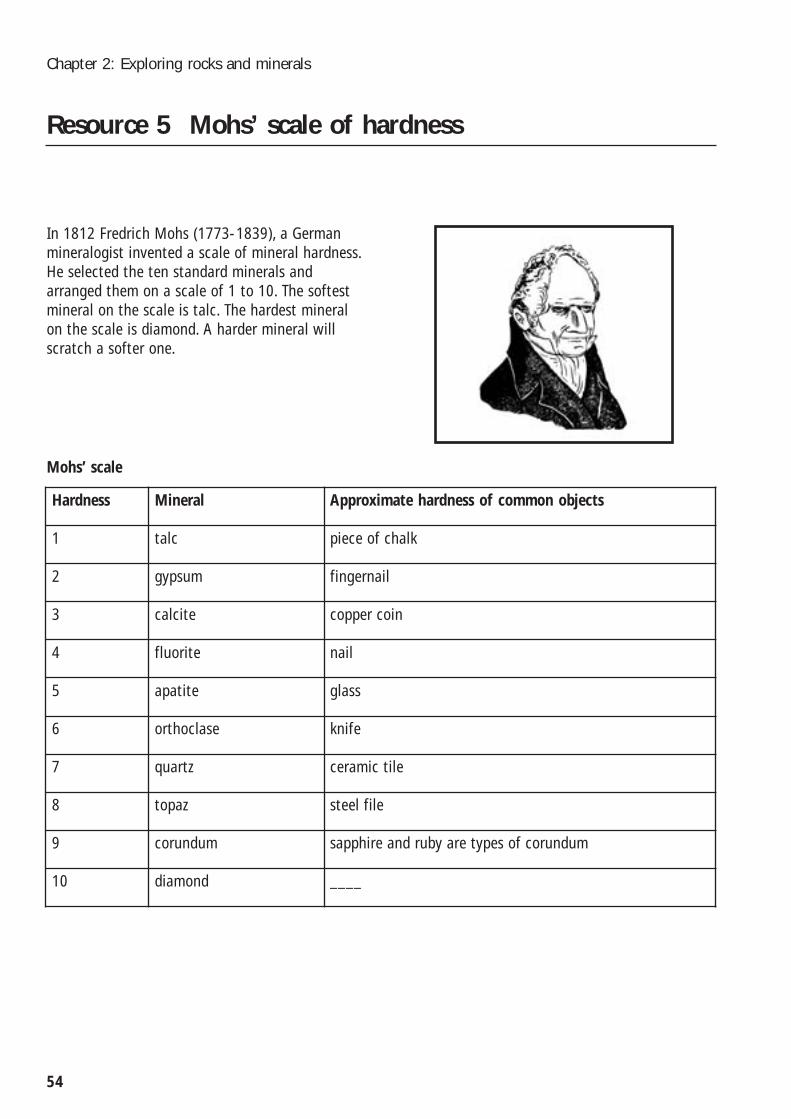
54
Chapter 2: Exploring rocks and minerals
In 1812 Fredrich Mohs (1773-1839), a Germanmineralogist invented a scale of mineral hardness.He selected the ten standard minerals andarranged them on a scale of 1 to 10. The softestmineral on the scale is talc. The hardest mineralon the scale is diamond. A harder mineral willscratch a softer one.
Resource 5 Mohs’ scale of hardness
Hardness Mineral Approximate hardness of common objects
1 talc piece of chalk
2 gypsum fingernail
3 calcite copper coin
4 fluorite nail
5 apatite glass
6 orthoclase knife
7 quartz ceramic tile
8 topaz steel file
9 corundum sapphire and ruby are types of corundum
10 diamond ____
Mohs’ scale
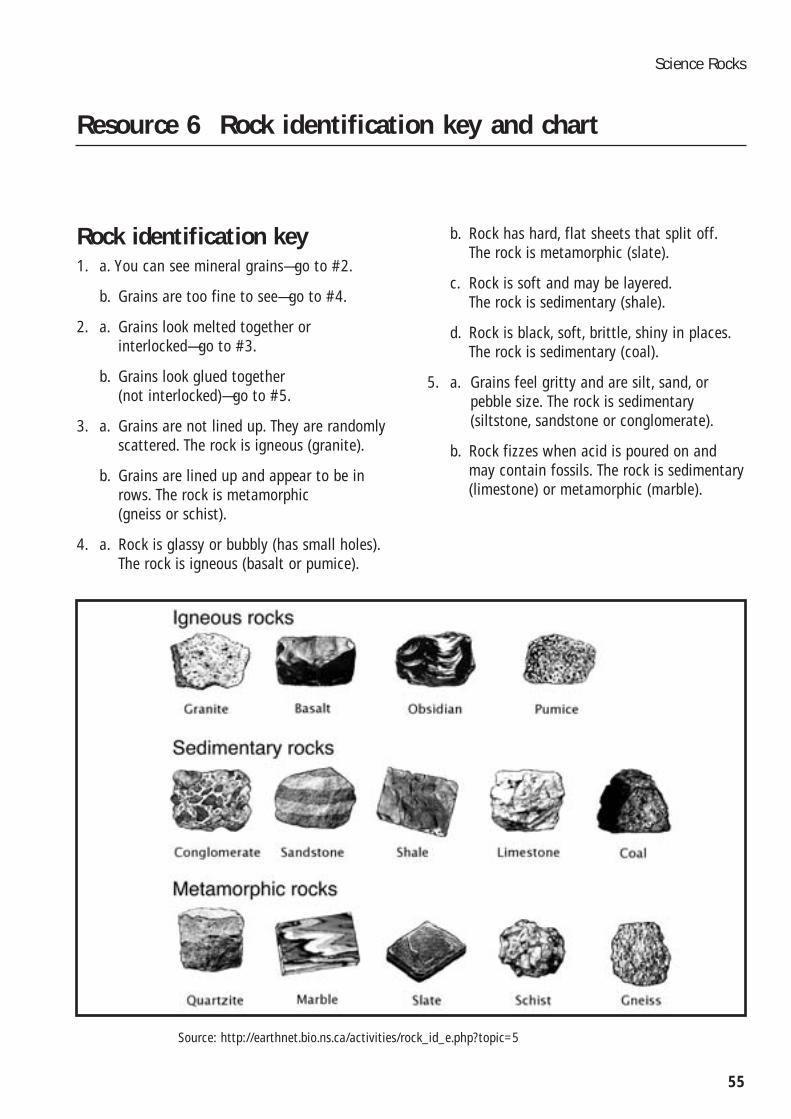
55
Science Rocks
Rock identification key1. a. You can see mineral grains—go to #2.
b. Grains are too fine to see—go to #4.
2. a. Grains look melted together or interlocked—go to #3.
b. Grains look glued together (not interlocked)—go to #5.
3. a. Grains are not lined up. They are randomly scattered. The rock is igneous (granite).
b. Grains are lined up and appear to be inrows. The rock is metamorphic (gneiss or schist).
4. a. Rock is glassy or bubbly (has small holes).The rock is igneous (basalt or pumice).
b. Rock has hard, flat sheets that split off.The rock is metamorphic (slate).
c. Rock is soft and may be layered.The rock is sedimentary (shale).
d. Rock is black, soft, brittle, shiny in places.The rock is sedimentary (coal).
5. a. Grains feel gritty and are silt, sand, or pebble size. The rock is sedimentary (siltstone, sandstone or conglomerate).
b. Rock fizzes when acid is poured on andmay contain fossils. The rock is sedimentary(limestone) or metamorphic (marble).
Resource 6 Rock identification key and chart
Source: http://earthnet.bio.ns.ca/activities/rock_id_e.php?topic=5

RRoocckk iiddeennttiiffiiccaattiioonn cchhaarrtt
56
Chapter 2: Exploring rocks and minerals
Source: http://earthnet.bio.ns.ca/activities/rock_id_e.php?topic=5

57
Science Rocks
When you complete this activity you will have examined and described the smaller visible parts of a rock specimen and related these to its properties.
Demonstrating outcome NPM 3.1
Draw your rock here. Use coloured pencils.
Resource 7 My rock
• Describe what you can see using a hand lens or magnifying glass.
__________________________________________________________________________________
__________________________________________________________________________________
__________________________________________________________________________________
__________________________________________________________________________________
• What else can you find out about your specimen? (name, type, minerals present, other properties)
__________________________________________________________________________________
__________________________________________________________________________________
__________________________________________________________________________________
__________________________________________________________________________________

58
Chapter 2: Exploring rocks and minerals
PurposeTo enable students to explore the structure of crystals.
Experiment 1 Growing crystals
Materials• Glass jar
• Hot water
• Salt
• Cardboard
• String
• Pencil or paddle pop stick
• Nail
Procedure1. Fill a glass jar with hot water. Add salt as long
as it keeps dissolving.
2. Tie string to a pencil or paddle pop stick. Makethe string just long enough to reach thebottom of the jar. Weight the end of thestring with a nail or a bolt. Drop the stringinto the solution.
3. Place the jar in a protected, warm place whereit can cool.
4. Observe the salt solution each day.
5. Record your observations by drawing a smallpicture and writing a few short sentences inyour science work book.
Resource 8 Crystal experiments

Experiment 2 Growing crystalsMaterials• Plastic bowl
• Base material: charcoal briquettes, porous brick,cement or sponge
• Water
• Salt
• Laundry blue
• Food colouring
Procedure1. In a glass or plastic bowl, put some pieces of
charcoal, porous brick, cement or sponge.
2. Over the base material, pour two tablespoonsof water, two tablespoons of table salt andtwo tablespoons of laundry blue.
3. The next day add two more tablespoons of salt.
4. On the third day, pour (not directly on thebase material) two tablespoons each of salt,water, and laundry blue into the bottom ofthe bowl and then add a few drops ofvegetable colouring or ink to each piece.
5. By this time a beautiful flower-like growthshould have appeared. If not, ask your teacherfor two tablespoons of household ammonia toaid the growth.
6. To keep it growing, add more laundry blue,salt and water from time to time.
7. Record your observations by drawing a seriesof pictures and writing a few short sentencesin your science work book.
59
Science Rocks

Demonstrating outcome NPM 4.1
60
Chapter 2: Exploring rocks and minerals
Make a predictionIn your workbook, draw a detailed picture of whatyou think a crystal of salt would look like undermagnification.
Observing salt with… Written observationDescribe what you see
DrawingDraw a picture of whatyou see
Make a comparisonDescribe how yourobservation changedwith each type ofobservation
The naked eye Since this is your firstobservation, there isnothing to compare. You don’t have to writeanything this time.
A hand lens ormagnifying glass
A microscope
An electron microscope(Use the internet)
Salt data collection table
Resource 9 Salt: up close and personal
Source: http://www.sciencenetlinks.com/lessons.cfm?BenchmarkID=4&DocID=173
Science Rocks
Scientists at work
Strand: Science and Society
Key concept: Science as a ‘way of knowing’ is shapedby the way humans construct
their understandings
Chapter 3

Focus questionsWhat jobs do scientists do in the mining industry?
How do they collect information and solve problems?
What is it like to work in the mining industry?
Resource sheets1. The story of Archimedes
2. A new metal for car engines
3. Stimulus photograph of a car engine
4. The biography of Mohs
5. Biography guidelines
6. How do scientists find things out?
7. Rock hound’s jumbled interview
8. Interviews with scientists
9. Graphic organisers
10. Who has the biggest crystals?
11. Sample investigation design
Science outcomesThe following outcomes can be achieved in yourclassroom by following the activities and usingthe resource sheets provided in Science rocks. The overview at the beginning of this book alsoexplains which of the activities demonstrate each outcome.
Note: For further information and activities about workingin the mining industry refer to Exploring mining inQueensland: Past, present and Future; available from theQueensland Resources Council web site:<http://www.qrc.org.au> or the Department of NaturalResources and Mines web site:<http://www.nrm.qld.gov.au>.
62
Chapter 3: Scientists at work
Index
Scientists at work
Science outcomes: Science and society
2.2Students identify some ways scientiststhink and work.
3.2Students recognise the need forquantitative data when describing natural phenomena.
4.2Students use the elements of a fair test when considering the design of their investigations.

Activity A Looking at howscientists workStudents read narratives about scientists whomade important discoveries.
PurposeTo introduce students to some of the ways inwhich scientists make discoveries.
Teaching procedure• Read Mr Archimedes bath by Pamela Allen
(Harper Collins) to the students.
• Read Resource 1: The story of Archimedes. This is the story that inspired Pamela Allen’sbook. To help students understand the science in the story, you may like to do this experimentin the classroom. In a container of water,submerge two objects of the same weight, but
63
Science Rocks
different volumes, and measure the amount ofwater displaced. If you’re feeling lessadventurous, simply show students two objectsof similar weight that take up different amountsof space. You could use, for example, a smallbathroom tile and a pile of styrofoam thatweighs as much as the tile.
• Using a Venn diagram on the black/whiteboard,ask students to indicate the similarities anddifferences between the stories. Whendiscussing the stories, tell students thatsometimes scientists make surprisingdiscoveries. Archimedes’ discovery wassurprising because he was having a bath whenhe thought of it.
• Resource 2: A new metal for car engines tellsthe story of an Australian scientist whoinvented a new alloy. Prepare visual clues forthe selected words from the story by going to
Teaching and learning activities
Scientists at work
Words from story Clues to assist student understanding
Samurai swords For a photo go to: http://www.dantesknife.com/V7202.jpg
Blacksmiths at forge For general brief information about blacksmithing and a diagram go to:http://homepage.tinet.ie/~ecda/blacksmiths-intro.htm For a photo go to:http://www.browncountyblacksmith.com/images/deanatwork.jpg
Alloys An alloy is a combination of two or more metals (or sometimes a metal and anon-metal mineral). For example, brass is an alloy made from copper and zinc.
Car engine For a photos of car engines (not the same one as in this story) go to:http://static.redjupiter.com/gems/globalrealty/engine.jpghttp://www.solve.csiro.au/1104/article1.htm
Electron microscope For a photo of a scientist using a large electron microscope go to:http://nanoimaging.sfu.ca/equipment/img/transmission-electron-microscope.jpgFor information and images from the device go to:http://www.sciencemuseum.org.uk/on-line/electron/section4/sem.asp
Engine testbeds For a photo go to: http://www.tokyometer.co.jp/product1/gwe80th.jpg

the web sites listed in the table and copying theimages into a file. When you read the story, youcan use these images to assist students tounderstand the text. Use Resource 3: Stimuluspicture of a car engine as a visual clue for ‘car engine’.
• At this stage you could use Resource 9: Graphicorganisers to assess what students understandabout how scientists think and work.Alternatively, you could leave this until afterstudents have read some of the interviews.
Activity B Writing thebiography of a scientistStudents research an Australian scientist of theirchoice and write a brief biography.
PurposeTo introduce students to the diverse working livesof scientists.
Teaching procedure• Invite students, working in pairs, to make three
lists as described below.
–List the books, television programs and moviesthat have scientists as characters(Frankenstein) or actual scientists (Quantum)in them.
–List types of scientists (e.g. geologist).
–List the names of actual scientists (e.g. Galileo).
• Invite pairs to share their lists and construct a class list.
• Discuss the list. What are the differencesbetween the actual and fictional scientists thatstudents have listed? Discuss stereotypes.
• Invite students to research an Australianscientist of their choice and present theinformation as a biography. Discuss presentationoptions with students and allow them to choosean appropriate form such as booklet, flowchartor PowerPoint presentation. Discuss the
biography genre with students; look atbiographies from the library; provide an exampleand discuss its textual features. A sample isprovided in Resource 4: The biography of Mohs.Blank proformas are provided in Resource 5:Biography guidelines.
Activity C Looking at howscientists observe and measurethingsStudents make observations and collectqualitative and quantitative data.
PurposeTo help students recognise the need to collectquantitative data.
Teaching procedureMake an OHT of Part A of Resource 6: How doscientists find things out? Use it as a visualprompt, uncovering each part as you lead thediscussion. The instructions and questions givenhere correspond to the numbered sections on the OHT. Some possible responses are shown in brackets.
1. Scientists make observations using their fivesenses.
• What are the five senses? (sight, sound, smell,touch and taste)
• How can we tell if a banana is ripe oroverripe? (use sight, touch, smell and taste)
2. We can improve our senses using tools.
• Which tools could help a person see better?(binoculars, braille, glasses, magnifying glass,microscope, telescope, x-rays, contact lenses)
Demonstrating outcome SS 3.2
64
Chapter 3: Scientists at work

3. We can use our senses to describe objects.
• Give a lolly to a volunteer.
• Ask him/her to describe it using their senses.
• List the descriptions on the blackboard ashe/she gives them.
4. There are different types of observations andall of these are valuable.
• Write the words ‘qualitative data’ at the topof the white/blackboard list you have recordedabout the lolly.
• Write the words ‘quantitative data’ at the topof a new empty column.
• Collect some quantitative data about the lolly(measure it, weigh it, count the ingredients).
5. Measurement systems are useful when making observations.
• Describe the length of the room. Now describethe length of the room without using astandardised unit of measurement (e.g. metres).
• How would you communicate this non-standard measurement to someone who wasbuying tiles for the room?
• Would it make things easier to usestandardised measurements? Why?
• Can you think of situations where you mightneed accurate measurements? (carpentry,cooking, nursing, scuba diving)
• Ask Level 4 students about the different typesof standardised measurement units they mayknow (e.g. hours/minutes, amps, Richter scale,Mohs’ hardness scale).
• What measuring tools can you name? (e.g.callipers, compass, clock, fuel gauge, scalesseismograph, speedometer, tape measure)
• Provide students with copies of Part B.
• Provide an interesting rock (or picture of oneif necessary) and display it so all the studentscan see it.
65
Science Rocks
• Give students time to complete their resource sheets.
• Collect completed sheets for student portfolios.
Activity D Sorting out ajumbled interviewStudents read and reorder a jumbled interview.
PurposeTo introduce students to the interview genre in afun way and to encourage them to find out whata geologist does.
Teaching procedure1. Provide each student with a copy of
Resource 7: Rock hound’s jumbled interview.
2. Invite students to read it, match up questionsand answers and cut and paste the resultsinto their science book.
Activity E Summarisinginterview responsesStudents read interviews with scientists and,using a graphic organiser, they record some waysin which scientists think and work.
PurposeTo introduce students to a range of experiences ofscientists working in the mining industry.
Teaching procedure1. Resource 8: Interviews with scientists contains
interviews with a geologist, geochemist,geophysicist and a rehabilitation scientist.Invite students to form groups of four. Provideeach group with one copy of each interview.
Demonstrating outcome SS 2.2 and SS 3.2

2. Invite each student in every group to chooseone and read through it with a partner, actingthe roles of interviewer and interviewee.
3. Resource 9: Graphic organisers contains threedifferent graphic organisers. ‘B’ and ‘C’ relatedirectly to the interviews. (‘A’ is a simpleroption that may be used by students whohave not read the interviews but have doneother activities in this chapter.) Choose anappropriate organiser and give to students.
Activity F Conducting yourown interviewsStudents conduct their own interviews.
PurposeTo provide students with opportunities to talkwith a scientist.
Teaching procedure• Invite students to send interview questions to
scientists working locally or further afield.Students could use the same questions used inResource 8: Interviews with scientists or preparetheir own. If you are located in a miningcommunity or if there is a working mine in yourarea, students may be able to interview ascientist working at a mine. Most communitieshave some scientists working locally. Medicaldoctors and vets are scientists, and localcouncils and state government departmentshave different types of scientists working forthem, including geographical informationsystems (GIS) officers, hydrographers,environmental scientists and botanists.
• Accessing family and friends for interviews iseasy. However, if students are contacting amining or business organisation, or agovernment department, it would be wise toconsider the following:
–Decide which organisation you will contactregarding the interview and nominate astudent, or small group of students, to make aphone call or send an email. A busy
organisation or department may notappreciate 30 letters, emails or phone callsfrom one group. For a list of Queenslandmines see Resource 3 in Chapter 2.
–Decide on the questions that will be asked.Students can use the questions in thisresource or can prepare their own. Advisestudents to avoid lengthy lists of questions, asthey do not want to deter prospectiveinterviewees. If students prepare their ownquestions, work with them to ensure that thequestions are appropriate and error-freebefore they are sent.
–Make phone contact or email before sendingwritten questions. This ensures that thequestions will be welcome and that they willbe directed to the right person.
–Work with students making the calls so thatthey develop and use an appropriate phonemanner. If possible stay with them when theymake the call so you can support them andgive them feedback on their telephone skills.
• Provide students with an opportunity to sharethe responses they receive. Collect and collateresponses and place them in your school libraryas a local-area resource.
Activity G Designing a fair testStudents use the elements of a fair test to designa new experiment to discover what factors coulddetermine the size of crystals.
PurposeTo provide a model for students to design aninvestigation using the elements of a fair test.
Teaching procedure• In Chapter 2 students had an opportunity to
grow crystals (Resource 8: Crystal Experiments).The Chapter 2 experiment can be used as a
Demonstrating outcome SS 4.2
66
Chapter 3: Scientists at work

starting point and this activity is designed totake students further and lead them through thesteps of designing a follow-up experiment. Referstudents back to the original experiment anddiscuss the process and outcomes.
• Make the steps of designing an investigationknown to students. These are:
– Develop a researchable question.
– Identify dependent, independent andcontrolled variables.
– Measure the change.
– Present the results.
• Ask students what the variables in the originalexperiment were. That is, what are all the thingsthat could affect the size of the crystals grown?Make a group list of these. (These are listed as the controlled variables and independentvariable in Resource 11: Sample investigation design.)
• Make an OHT of Resource 11: Sampleinvestigation design. Use it to assist students todevelop their own researchable question relatingto the size of crystals.
• Provide each student with a copy of Resource 10: Who’s got the biggest crystals?Students researching the same question maywork together though their hypotheses may be different.
• Talk with students about their investigation andprovide guidance as they carry it out. Whencomplete, invite students to share theiroutcomes and provide an opportunity for themto reflect on their learning. Keep experimentsheets for student portfolios.
67
Science Rocks

Archimedes was a Greek mathematician, physicistand inventor who lived between 287 and 212 BC.This is a famous story about how he made animportant discovery.
Hiero II was King of the Greek city of Syracuse.One day he asked Archimedes, who was a friendof the family, to help solve a problem.
Hiero II had given a goldsmith a lump of gold andasked him to make a royal crown. The king washappy with the appearance of the crown but didnot trust the craftsman. Even though the crownweighed the same as the lump of gold, the kingthought that the goldsmith may have mixed somesilver in with the crown and kept some of thegold for himself.
The king wanted Archimedes to help him discover the truth without melting the crown.Archimedes wondered how he could solve thisdifficult problem.
Later, as Archimedes was lowering himself intothe public baths, he noticed that some waterflowed over the sides of the bath. He became soexcited that he ran out of the bathhouse withouthis clothes yelling, ‘Eureka! Eureka!’ In Greek thatmeans, ‘I found it! I found it!’
What had he found? Archimedes realised thatsince gold is more dense (has more weight pervolume) than silver, a given weight of gold has asmaller volume than an equal weight of silver.Therefore a given weight of gold will displace lesswater than an equal weight of silver.
Archimedes needed to make an experiment toprove his idea. First, he weighed the crown. Thenhe took a lump of gold and a lump of silver eachweighing the same as the crown. Even though thetwo lumps weighed the same amount, the silverlump was larger because silver is lighter thangold. It took much more silver to weigh as muchas the lump of gold.
He put each lump in a tub of water. Because thelump of silver was larger, it caused more water tooverflow than the lump of gold did. Archimedesthen knew that if the crown were pure gold itwould displace the same amount of water as thelump of gold.
When Archimedes submerged the crown, it mademore water overflow than the lump of gold did.This experiment proved that the goldsmith hadadded silver to the crown. The king’s suspicionswere confirmed and the dishonest goldsmith wasbeheaded for his theft.
68
Chapter 3: Scientists at work
Resource 1 The story of Archimedes
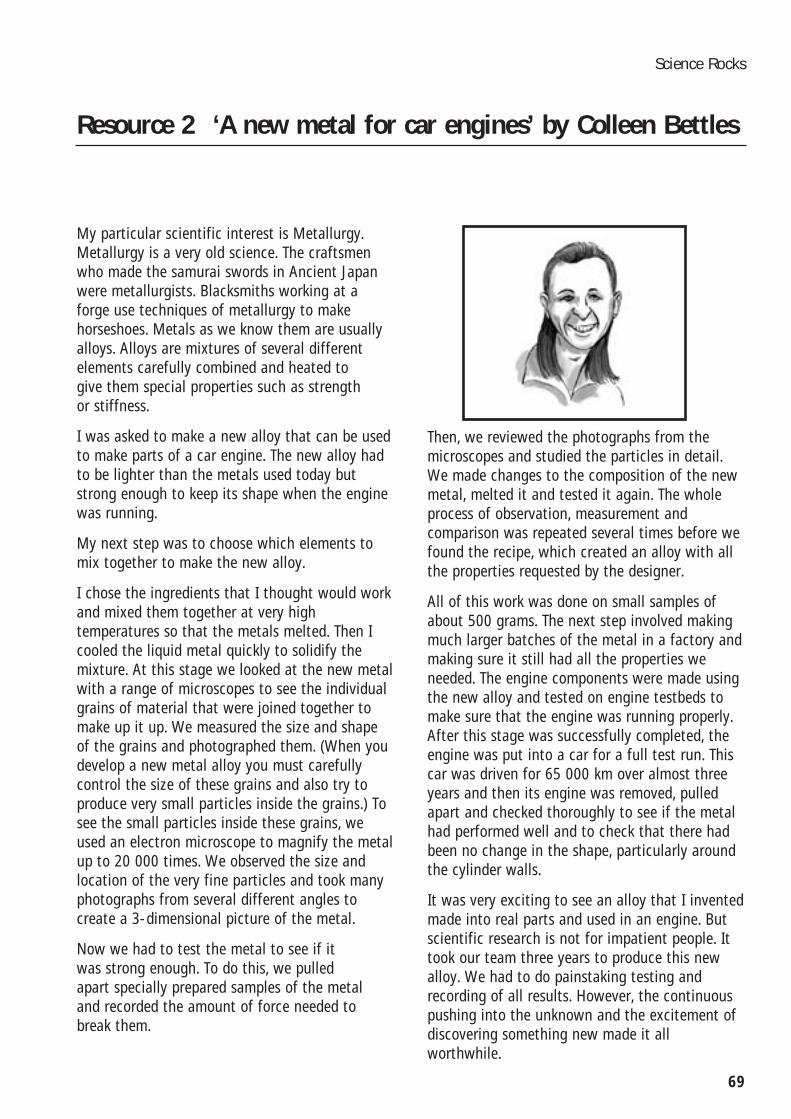
My particular scientific interest is Metallurgy.Metallurgy is a very old science. The craftsmenwho made the samurai swords in Ancient Japanwere metallurgists. Blacksmiths working at aforge use techniques of metallurgy to makehorseshoes. Metals as we know them are usuallyalloys. Alloys are mixtures of several differentelements carefully combined and heated to give them special properties such as strength or stiffness.
I was asked to make a new alloy that can be usedto make parts of a car engine. The new alloy hadto be lighter than the metals used today butstrong enough to keep its shape when the enginewas running.
My next step was to choose which elements tomix together to make the new alloy.
I chose the ingredients that I thought would workand mixed them together at very hightemperatures so that the metals melted. Then Icooled the liquid metal quickly to solidify themixture. At this stage we looked at the new metalwith a range of microscopes to see the individualgrains of material that were joined together tomake up it up. We measured the size and shapeof the grains and photographed them. (When youdevelop a new metal alloy you must carefullycontrol the size of these grains and also try toproduce very small particles inside the grains.) Tosee the small particles inside these grains, weused an electron microscope to magnify the metalup to 20 000 times. We observed the size andlocation of the very fine particles and took manyphotographs from several different angles tocreate a 3-dimensional picture of the metal.
Now we had to test the metal to see if it was strong enough. To do this, we pulled apart specially prepared samples of the metal and recorded the amount of force needed to break them.
69
Science Rocks
Then, we reviewed the photographs from themicroscopes and studied the particles in detail.We made changes to the composition of the newmetal, melted it and tested it again. The wholeprocess of observation, measurement andcomparison was repeated several times before wefound the recipe, which created an alloy with allthe properties requested by the designer.
All of this work was done on small samples ofabout 500 grams. The next step involved makingmuch larger batches of the metal in a factory andmaking sure it still had all the properties weneeded. The engine components were made usingthe new alloy and tested on engine testbeds tomake sure that the engine was running properly.After this stage was successfully completed, theengine was put into a car for a full test run. Thiscar was driven for 65 000 km over almost threeyears and then its engine was removed, pulledapart and checked thoroughly to see if the metalhad performed well and to check that there hadbeen no change in the shape, particularly aroundthe cylinder walls.
It was very exciting to see an alloy that I inventedmade into real parts and used in an engine. Butscientific research is not for impatient people. Ittook our team three years to produce this newalloy. We had to do painstaking testing andrecording of all results. However, the continuouspushing into the unknown and the excitement ofdiscovering something new made it allworthwhile.
Resource 2 ‘A new metal for car engines’ by Colleen Bettles

For further information read the related articlefrom the CSIRO at:<http://www.solve.csiro.au/1104/article1.htm>
70
Chapter 3: Scientists at work
Resource 3 Stimulus photograph of a car engine
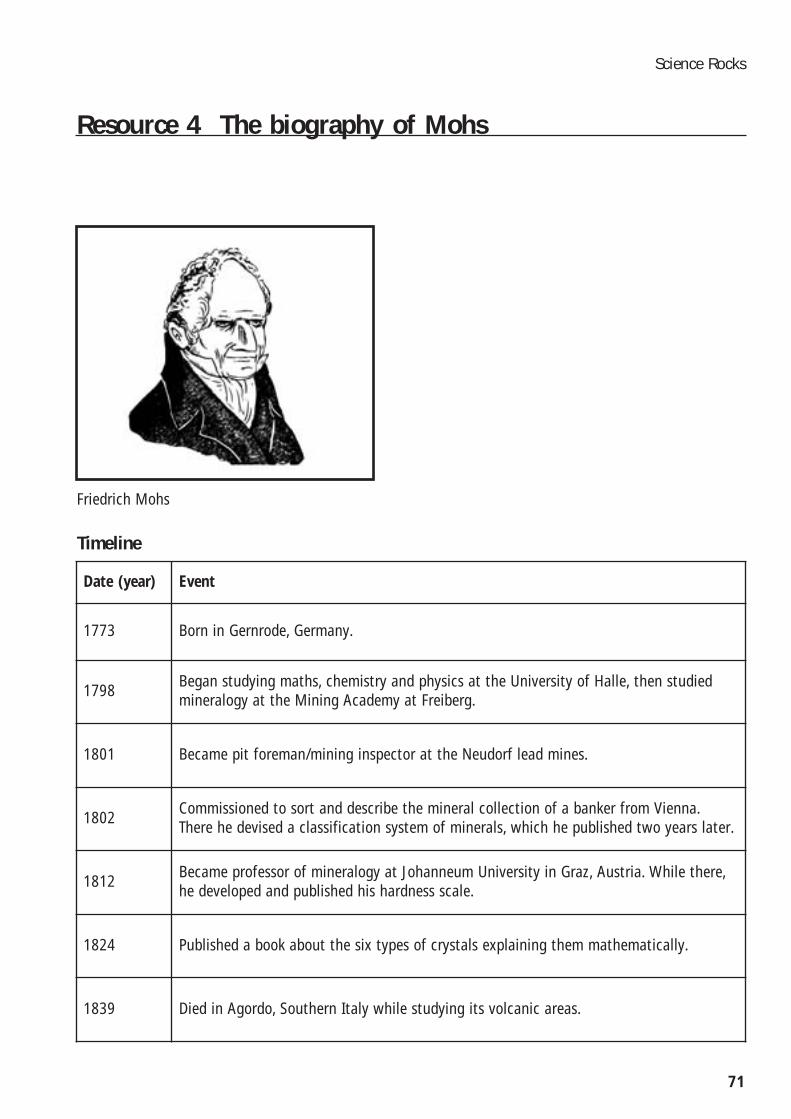
71
Science Rocks
Resource 4 The biography of Mohs
Timeline
Date (year) Event
1773 Born in Gernrode, Germany.
1798Began studying maths, chemistry and physics at the University of Halle, then studiedmineralogy at the Mining Academy at Freiberg.
1801 Became pit foreman/mining inspector at the Neudorf lead mines.
1802Commissioned to sort and describe the mineral collection of a banker from Vienna. There he devised a classification system of minerals, which he published two years later.
1812Became professor of mineralogy at Johanneum University in Graz, Austria. While there,he developed and published his hardness scale.
1824 Published a book about the six types of crystals explaining them mathematically.
1839 Died in Agordo, Southern Italy while studying its volcanic areas.
Friedrich Mohs
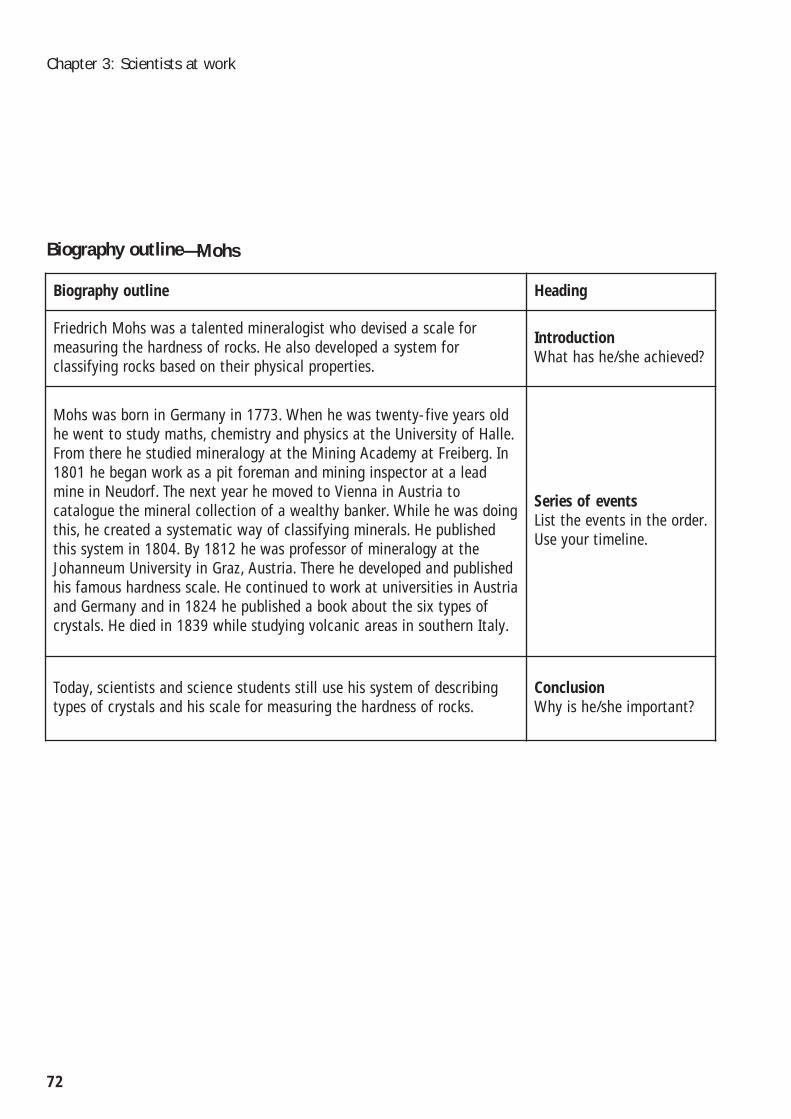
72
Chapter 3: Scientists at work
Biography outline Heading
Friedrich Mohs was a talented mineralogist who devised a scale formeasuring the hardness of rocks. He also developed a system forclassifying rocks based on their physical properties.
Introduction What has he/she achieved?
Mohs was born in Germany in 1773. When he was twenty-five years oldhe went to study maths, chemistry and physics at the University of Halle.From there he studied mineralogy at the Mining Academy at Freiberg. In1801 he began work as a pit foreman and mining inspector at a leadmine in Neudorf. The next year he moved to Vienna in Austria tocatalogue the mineral collection of a wealthy banker. While he was doingthis, he created a systematic way of classifying minerals. He publishedthis system in 1804. By 1812 he was professor of mineralogy at theJohanneum University in Graz, Austria. There he developed and publishedhis famous hardness scale. He continued to work at universities in Austriaand Germany and in 1824 he published a book about the six types ofcrystals. He died in 1839 while studying volcanic areas in southern Italy.
Series of events List the events in the order.Use your timeline.
Today, scientists and science students still use his system of describingtypes of crystals and his scale for measuring the hardness of rocks.
Conclusion Why is he/she important?
Biography outline—Mohs

73
Science Rocks
– Why is their work is important?3. Record this information on the timeline. 4. When your research is finished use the
biography outline to write the biography.
1. Choose an Australian scientist.2. Find out:
– What did this person do and in which yeardid it happen?
Resource 5 Biography guidelines
Date (year) Event
Timeline

Biography outline
74
Chapter 3: Scientists at work
Heading
IntroductionWhat has he/she achieved?
Series of events List the events in the order.Use your timeline.
Conclusion Why is he/she important?
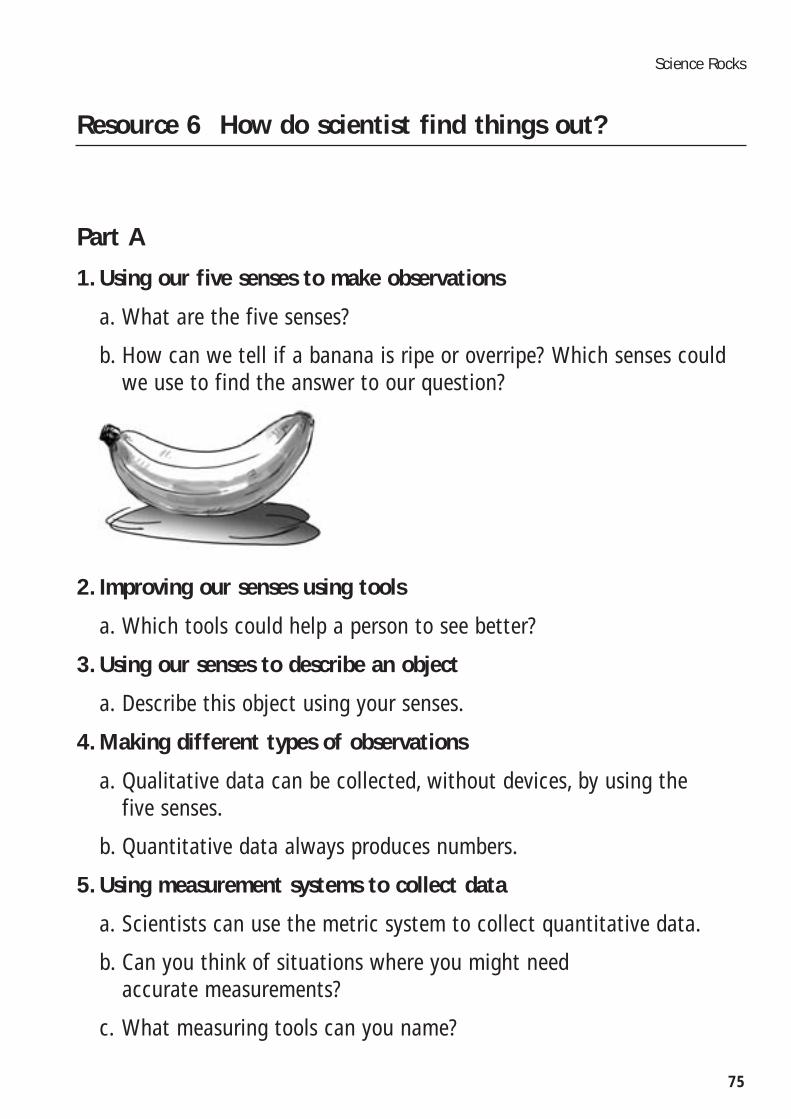
Part A
1. Using our five senses to make observations
a. What are the five senses?
b. How can we tell if a banana is ripe or overripe? Which senses couldwe use to find the answer to our question?
2. Improving our senses using tools
a. Which tools could help a person to see better?
3. Using our senses to describe an object
a. Describe this object using your senses.
4. Making different types of observations
a. Qualitative data can be collected, without devices, by using the five senses.
b. Quantitative data always produces numbers.
5. Using measurement systems to collect data
a. Scientists can use the metric system to collect quantitative data.
b. Can you think of situations where you might need accurate measurements?
c. What measuring tools can you name?
75
Science Rocks
Resource 6 How do scientist find things out?

76
Chapter 3: Scientists at work
What qualitative data could you collectabout this object?
What quantitative data could you collect about this object?
What tools could you use to measure this object?
Why could it be useful to have quantitativedata about this object?
Part B
When you complete this activity you will have recognised the need for quantitative data when describingnatural phenomena.
Look at the object your teacher has displayed. Use this page to answer the questions about the object.
Demonstrating outcome SS 3.2
What is the object?
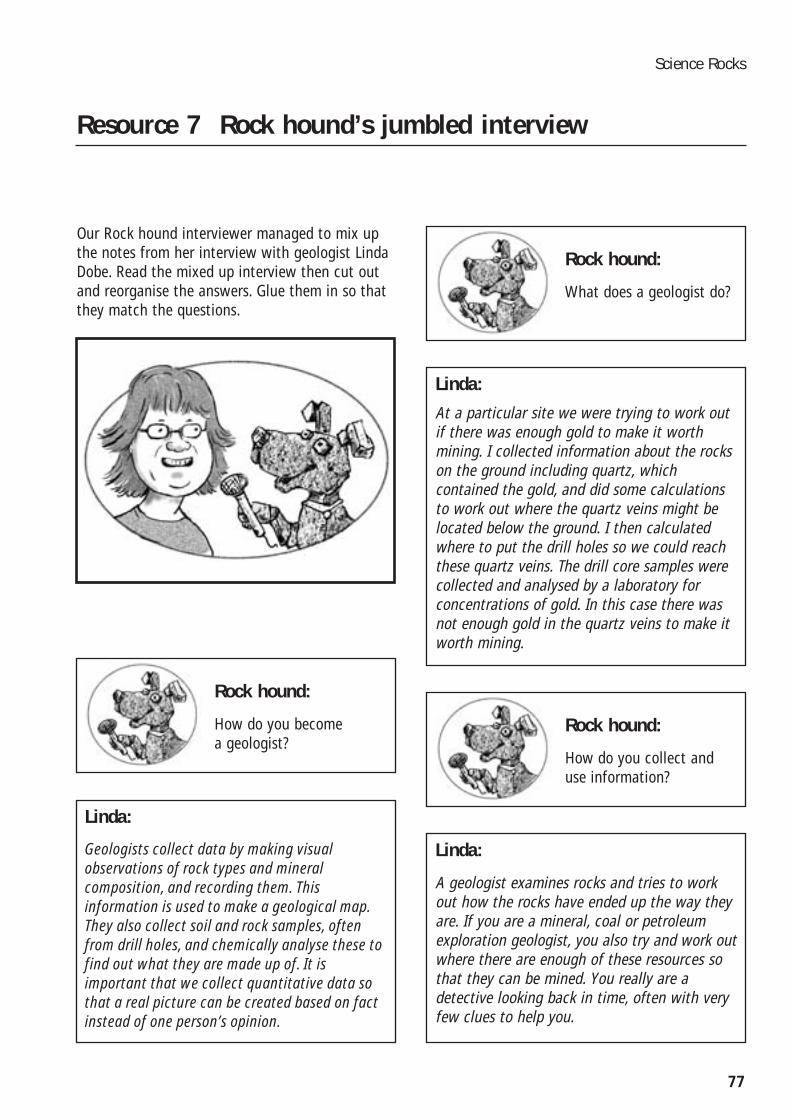
Our Rock hound interviewer managed to mix upthe notes from her interview with geologist LindaDobe. Read the mixed up interview then cut outand reorganise the answers. Glue them in so thatthey match the questions.
77
Science Rocks
Resource 7 Rock hound’s jumbled interview
Linda:
Geologists collect data by making visualobservations of rock types and mineralcomposition, and recording them. Thisinformation is used to make a geological map.They also collect soil and rock samples, oftenfrom drill holes, and chemically analyse these tofind out what they are made up of. It isimportant that we collect quantitative data sothat a real picture can be created based on factinstead of one person’s opinion.
Linda:
A geologist examines rocks and tries to workout how the rocks have ended up the way theyare. If you are a mineral, coal or petroleumexploration geologist, you also try and work outwhere there are enough of these resources sothat they can be mined. You really are adetective looking back in time, often with veryfew clues to help you.
Linda:At a particular site we were trying to work outif there was enough gold to make it worthmining. I collected information about the rockson the ground including quartz, whichcontained the gold, and did some calculationsto work out where the quartz veins might belocated below the ground. I then calculatedwhere to put the drill holes so we could reachthese quartz veins. The drill core samples werecollected and analysed by a laboratory forconcentrations of gold. In this case there wasnot enough gold in the quartz veins to make itworth mining.
Rock hound:
What does a geologist do?
Rock hound:
How do you collect and use information?
Rock hound:
How do you become a geologist?

78
Chapter 3: Scientists at work
Linda:
I wanted to do science at university, but I didn’treally know what subjects to do, so I did almostall of them! I really enjoyed first year geology, soI continued with it. I really enjoyed thefieldwork, which was getting out into remoteareas looking at rocks and trying to work outhow they were formed.
Linda:
You do a science degree majoring in geology atuniversity.
Linda:
I worked for a year as an exploration geologistin the Pilbara desert in Western Australia. Wewere exploring for gold in some of the oldestrocks on the planet. They were more than fourbillion years old! I lived in a canvas tent withwork mates in the middle of absolutely nowhere.We had a caravan as an office and a tent as akitchen. A water bore supplied water forwashing up and the shower, while a generatorsupplied electricity. We got hot water fromlighting a fire under a 44-gallon drum of water.It was an absolutely beautiful place and it waslots of fun living there. However, even thoughyou made friends with those you worked with,you couldn’t really get in touch with otherfriends or family very easily as it was half a day’sdrive to the nearest phone. Today, satellitephones make communication easy.
Rock hound:
Describe a place/s you haveworked and what it was likeworking there.
Rock hound:
What do you think makes agood scientist?
Rock hound:
Can you explain a problemyou had and how yousolved it? Rock hound:
Why did you become a geologist?
Linda:A good scientist is someone who asks questions
and can work out how to find out the answers. Agood scientist is also someone who can makeobservations, record them accurately andnotices what is ‘out of the ordinary’. A goodscientist is interested in how the world ‘works’.

1. Why did you become a geochemist?
I had a really interesting science teacher at highschool, who was very enthusiastic about chemistry.I was also given a chemistry set in Year 6 and hada lot of fun with that. After high school I joined thePort Kembla steel works (NSW) as a traineechemist, but was very disappointed in that sort ofwork. So, I went to university not really knowingwhat I wanted to do and enrolled in geology. Myfavourite subjects were geology and chemistry. Iliked geology so much that I became a geologist.
2. How do you become a geochemist?
You need a university degree in science (Bachelorof Science), specialising in chemistry or geology.Geochemists can work in the minerals industry as Ido, or in coal, oil and gas, industrial minerals, sandmining or university research areas.
79
Science Rocks
3. What does a geochemist do?
A geochemist studies the chemistry of the Earth,usually for a specific purpose, such as detectingtrace amounts of chemicals that will lead to amaterial deposit (such as copper, gold, oil or coal)that can be mined or extracted. It usually involvesa lot of work in the bush, collecting samples thatwill contain chemicals. The samples can be rockchips, sand and gravel from creeks, soil, creek orbore water, gases contained in soil, plant leavesand bark, or even animal and insect life, such assampling termite mounds or the termitesthemselves. Geochemists even sample things liketrout livers, which may contain heavy metal toxinssuch as lead, zinc, copper, uranium or mercury. Thiscan occur when water flows over, or drains from,an ore deposit.
4. How do you collect information and how do you use it?
We collect samples in the bush. These are takenback to a laboratory to be analysed by very high-tech equipment. The results are often graphed ormapped to produce contour maps or colouredimages to show the way the chemicals aredistributed. We then interpret the patterns to seewhere the chemicals may have come from.
5. Can you explain a problem you have faced and how you solved it?
I was asked to look for a gold deposit in a part ofcentral Queensland at minimum cost. I designed amethod of sampling creek sands, sieving out thefine sand, analysing it for very low levels of goldusing a special chemical process. We used a
Resource 8 Interviews with scientists
Interview 1: Meet geochemist,Chris Towsey

helicopter to cover the area quickly. From theseresults we found small areas with high gold valuesand collected soil and rock chip samples, which weanalysed for gold. Using this method we foundseven gold deposits, which were drilled to see ifthey were big enough to be mined.
6. Describe a place/s where you have worked and what it was like working there.
I have worked in twenty countries includingTaiwan and Fiji. The most exciting place was in thehighlands of Irian Jaya (West New Guinea) where Iworked with people from a mixture of cultures,including Indonesian and West Papuan at over4500 metres altitude in very steep mountains withhigh rainfall. There was even a snow-coveredglacier on top of the mountains in a tropicaljungle.
7. What do you think makes a goodscientist?
A good scientist has good attention to detail,makes careful observations, and records resultscarefully. Always test conclusions by designingcontrol tests and be prepared to change yourtheory or hypothesis if the facts do not support it.
1. Why did you become a geologist?
I became a geologist because I was interested inscience and found the outdoor life of a geologistattractive.
2. How do you become a geologist?
When I left school at grade 12 level, I went touniversity in Adelaide to study science. I had apreference for chemistry but found geology reallyinteresting so I ended up completing my degree ingeochemistry (a combination of geology andchemistry).
3. What does a geologist do?
As an exploration geologist, I spend time searchingfor minerals and coal. I particularly look for goldand base metals such as copper and zinc. Thisinvolves a great variety of tasks, not only in theoffice and in research libraries, but also followingup leads in the bush. Exploration is a bit likeforensic science—you search for clues using mapsand reports found in the library. You then propose
80
Chapter 3: Scientists at work
Interview 2: Meet geologist,Doug Young
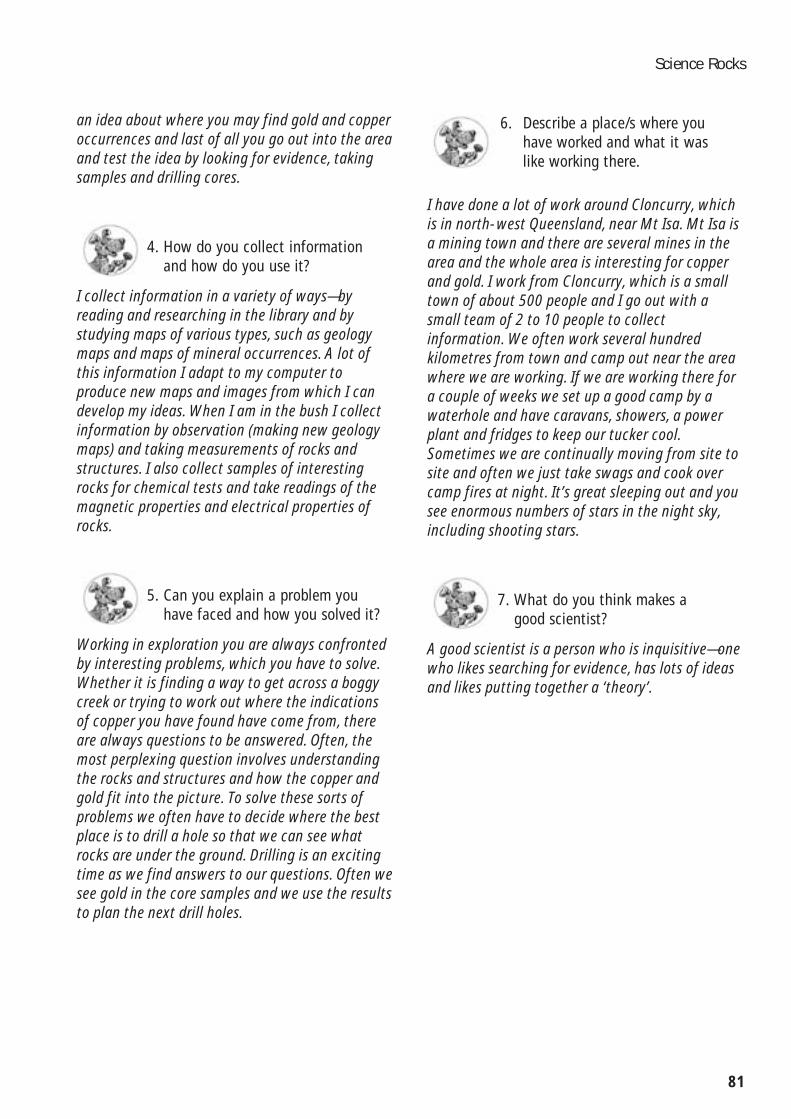
an idea about where you may find gold and copperoccurrences and last of all you go out into the areaand test the idea by looking for evidence, takingsamples and drilling cores.
4. How do you collect information and how do you use it?
I collect information in a variety of ways—byreading and researching in the library and bystudying maps of various types, such as geologymaps and maps of mineral occurrences. A lot ofthis information I adapt to my computer toproduce new maps and images from which I candevelop my ideas. When I am in the bush I collectinformation by observation (making new geologymaps) and taking measurements of rocks andstructures. I also collect samples of interestingrocks for chemical tests and take readings of themagnetic properties and electrical properties ofrocks.
5. Can you explain a problem you have faced and how you solved it?
Working in exploration you are always confrontedby interesting problems, which you have to solve.Whether it is finding a way to get across a boggycreek or trying to work out where the indicationsof copper you have found have come from, thereare always questions to be answered. Often, themost perplexing question involves understandingthe rocks and structures and how the copper andgold fit into the picture. To solve these sorts ofproblems we often have to decide where the bestplace is to drill a hole so that we can see whatrocks are under the ground. Drilling is an excitingtime as we find answers to our questions. Often wesee gold in the core samples and we use the resultsto plan the next drill holes.
81
Science Rocks
I have done a lot of work around Cloncurry, whichis in north-west Queensland, near Mt Isa. Mt Isa isa mining town and there are several mines in thearea and the whole area is interesting for copperand gold. I work from Cloncurry, which is a smalltown of about 500 people and I go out with asmall team of 2 to 10 people to collectinformation. We often work several hundredkilometres from town and camp out near the areawhere we are working. If we are working there fora couple of weeks we set up a good camp by awaterhole and have caravans, showers, a powerplant and fridges to keep our tucker cool.Sometimes we are continually moving from site tosite and often we just take swags and cook overcamp fires at night. It’s great sleeping out and yousee enormous numbers of stars in the night sky,including shooting stars.
7. What do you think makes a good scientist?
A good scientist is a person who is inquisitive—onewho likes searching for evidence, has lots of ideasand likes putting together a ‘theory’.
6. Describe a place/s where youhave worked and what it waslike working there.

1. Why did you become arehabilitation scientist?
I have always been interested in the environmentand I love animals and plants. Being arehabilitation scientist allows me to learn aboutdifferent plants and animals and what food andshelter they need so they can adapt to a minesite.
2. How do you become a rehabilitation scientist?
To become a rehabilitation scientist you need tofinish year 12 at school and go to university. Atuniversity I studied environmental science, but youcould study any course related to the environmentor mining. I concentrate on land issues, relating tovegetation, soils and fauna.
3. What does a rehabilitation scientist do?
A rehabilitation scientist looks at ways to helpplants and animals return to areas that have beendisturbed through mining. A rehabilitation scientistalso helps other people to understand the
environment so they can consider what they aredoing and how their actions may affect theenvironment, especially plants and animals.
4. How do you collect information andhow do you use it?
I collect information about the environment byreading lots of books and going out to the mine tomake observations. I record the things I see bytaking photographs and writing notes. There aremany different things to study on a minesite. Theyinclude animals, plants, water, weather, soil androcks. It is important to understand therelationships between different things. Forexample, a tree needs good soil and rain to surviveand animals need trees for food and protection. Ifan animal in the area needs a special plant forfood, it is important to make sure these plants areplanted on the minesite so it can survive.
5. Can you explain a problem you havefaced and how you solved it?
When water comes in contact with exposed rockson the old Mount Morgan minesite, the waterbecomes contaminated with sulphuric acid andheavy metals, and flows to a nearby river.Sometimes fish die from the water that runs offthe old minesite. To stop this happening we havecovered the acid-generating rocks with clean soiland vegetation in a trial area. This makes sure thatrain cannot touch the rocks and that clean waterruns off the mine into the river. This is good for thehealth of the minesite and the river.
6. Describe a place/s where you haveworked and what it was likeworking there.
I am currently working on a minesite that wasonce Australia’s largest gold and copper mine. Nomining takes place any more, but there are manyinteresting old buildings and mining areas thathave heritage value. Part of my job is to look after
82
Chapter 3: Scientists at work
Interview 3: Meetrehabilitation scientist, Lauren Keliher

the buildings and keep the minesite safe. I alsohave to study the plants and animals on site tomake sure the exposed rocks do not affect them.When the miners found dinosaur footprints insome rocks at the site, I really enjoyed learningabout the dinosaurs and making this area safe andinteresting for visitors.
7. What do you think makes a good scientist?
I think a good scientist should enjoy solvingproblems and enjoy reading and learning about the environment. It is important to ask a lot ofquestions and then work your way through eachquestion until you understand the problem. Thenyou look at ways to fix the problem. To be a goodscientist you have to be interested in what you are doing.
83
Science Rocks
Interview 4: Meet geophysicist,Andrew Mutton
1. Why did you become a geophysicist?
When I was at school, I enjoyed doingsubjects like science and maths, and was veryinterested in how things worked. I also liked tolearn about the Earth, the solar system, what theEarth and planets were made of, and how theEarth formed. I liked science subjects like physics,chemistry and geology. When I left school, Idecided to do a general science course atuniversity, where I learned about geophysics andhow it is used to study the inside of the Earth. Idecided then to become a geophysicist, as Ibelieved that this was a good way of combining myinterest in geology and physics.
2. How do you become a geophysicist?
To become a geophysicist, you have to go touniversity and study science subjects includinggeology, physics, and maths. Once you completeyour university studies, you can apply for a job as ageophysicist with a mining or oil company, or withthe government.

3. What does a geophysicist do?
A geophysicist investigates what types of rocksoccur below the Earth’s surface. To do this, thegeophysicist uses measurements of the Earth’smagnetic and gravity fields, or measures howsound waves, set off by earthquakes, move throughthe rocks. From these measurements, ageophysicist can predict what rocks are below thesurface, and if there are any deposits of minerals oroil within the rocks.
4. How do you collect information andhow do you use it?
A geophysicist uses specialised scientificinstruments to measure the Earth’s physicalproperties. These are generally measured at theEarth’s surface, but can also be measured inaeroplanes flying over the land or sea. Amagnetometer is an example of a specialinstrument used by geophysicists to measure theEarth’s magnetic field. A geophysicist can predictwhat types of rocks occur below the surface, and ifthere are any deposits of minerals such as copper,gold, diamonds, or coal in these rocks.
5. Can you explain a problem you havehad and how you solved it?
I was asked to consider a remote area of WesternAustralia and predict how far beneath the earth’ssurface we would have to dig before finding somecopper minerals. I designed a magnetometer surveyto collect the magnetic field results over this areaand was able to determine that the minerals wereabout 250 m below the surface. We tested this by
drilling a narrow hole into the rock at the pointthat I had calculated from the survey results. The rock taken out of the drill hole showed that the copper minerals did occur at about the depth I predicted.
6. Describe a place/s where you have worked and what it was like working there.
Most of the work I have done has been in outbackparts of Australia, usually where there are notowns and very few people. For example, I spentthree months in charge of a magnetometer surveyusing an aeroplane to collect the results, over theremote western desert areas of the NorthernTerritory. We had to set up our own camp near adirt airstrip to be able to do the work, because itwas hundreds of kilometres from the nearest town.The camp consisted of tents to live in, a tentkitchen and office. It was a fantastic place to work,even though it was very remote.
7. What do you think makes a good scientist?
A good scientist must firstly be able to clearlyunderstand the problem or task that you areattempting to solve, and decide what methods ortechniques will help you to solve the problem. You must then be able to collect good quality data,which will help you to solve the problem. Then youmust be able to analyse the data in a way thatproduces solutions to the problem. Finally, youmust be able to present your results in a confident way to the people who asked you to solve the problem.
84
Chapter 3: Scientists at work

Demonstrating outcome SS 2.2
85
Science Rocks
A
When you complete this activity you will havepresented information about the way somescientists think and work.
Think about the things that you have learnt abouthow scientists think and work. Choose onescientist and answer these questions.
Resource 9 Graphic organisers
Name of scientist
What was the problem they had to solve?
How did they do it? (What did they do? What tools did they use?)

B
When you complete this activity you will havepresented information about the way somescientists think and work including why they usequantitative data.
1. Read one of the interviews in Resource 8:Interviews with scientists.
86
Chapter 3: Scientists at work
What are the characteristics of a good scientistaccording to them?
How do they collect information?What do they do?
Name of scientist
Type of scientist
Why do they need/use quantitative data?
2. Use this information to complete thefollowing diagram. In each box, record an example of how this scientist thinks and works.
Demonstrating outcomes SS 2.2 and 3.2

C Whe
n yo
u co
mpl
ete
this
act
ivity
, you
will
hav
e co
mpa
red
info
rmat
ion
abou
t th
e w
ay s
ome
scie
ntis
ts t
hink
and
wor
k. Y
ou w
ill n
eed
to w
ork
with
a p
artn
er w
ho h
as r
ead
a di
ffer
ent
inte
rvie
w f
rom
the
one
tha
tyo
u ha
ve r
ead.
1.W
rite
the
nam
es o
f th
e tw
o sc
ient
ists
abo
ve e
ach
of t
he c
ircle
s.
2.Ta
lk a
bout
the
sci
entis
t yo
u re
ad a
bout
with
you
r pa
rtne
r. Is
the
rean
ythi
ng t
hat
thes
e sc
ient
ists
hav
e in
com
mon
? If
so, r
ecor
d th
ese
thin
gs in
the
mid
dle
or o
verla
ppin
g se
ctio
ns o
f th
e tw
o ci
rcle
s.
3.Re
cord
the
way
s in
whi
ch t
heir
wor
k ex
perie
nces
are
diff
eren
t at
each
end
of
the
circ
les.
87
Science Rocks
Nam
e of
sci
entis
t:__
____
____
____
____
_N
ame
of s
cien
tist:
____
____
____
____
___
Wha
t do
the
y ha
ve in
com
mon
fh
©

Demonstrating outcome SS 4.2
Purpose
To use the elements of a fair test when designingan investigation.
88
Chapter 3: Scientists at work
Resource 10 Who has the biggest crystals?
My researchable question
What happens to __________________________________________________ (dependent variable)
when we change _________________________________________________ (independent variable)?
My hypothesis
_________________________________________________________________________________
_________________________________________________________________________________
_________________________________________________________________________________.
Identifying variables
How will I measure the change?
_________________________________________________________________________________
Presenting the results
_________________________________________________________________________________
_________________________________________________________________________________
What will I keep the same? What will I change? What will I measure?
Controlled variables Independent variable (IV) Dependent variable (DV)

89
Science Rocks
My hypothesisIncreasing the length of time thecrystals have to grow (IV) will increasethe size of the crystals (DV).
How will I measure the change?I will use a ruler to carefully measurethe length (in mm) of the crystals afterone, two and three days of growth.
Resource 11 Sample investigation design
PurposeTo investigate the elements of a fair test.
My researchable questionWhat happens to crystal size(dependent variable) when I change thelength of time that they have to grow(independent variable)?
DV-dependent variable
IV-independent variable
What will I keep the same? What will I change? What will I measure?
Controlled variables Independent variable (IV) Dependent variable (DV)
• type of mineral in solution(sugar, salt, alum)
• amount of mineral andwater in solution
• environment in which the solution cools(temperature, light)
• size and shape of jar
• string put into thesolution
The length of time thecrystals have to grow
The size of the crystals
Identifying variables

Presenting the resultsI will present my results in a line graph.
90
Chapter 3: Scientists at work
1 2 3
9
8
7
6
5
4
3
2
1
Number of days
Leng
th in
mm
Source: Adapted from the Queensland Years 1-10 science syllabus

Science Rocks
Using minerals in our lives
Strand: Earth and beyond
Key concept: Living things use the resources of the Earth, solarsystem and universe to meet their needs
Strand: Natural and processed materials
Key concept: The uses of materials are determined by theirproperties, some of which can be changed
Strand: Science and society
Key concept: Decisions about the ways that science is applied have short and long-term implications for the
environment, communities and individuals
Chapter 4
Focus questionsWhat are some uses of minerals?
Can you make different things if you put minerals together?
Can these products be recycled?
How does our use of these mineral productsaffect our lives, the environment and the economy?
92
Chapter 4: Using minerals in our lives
Resource sheets1. What are things made from?
2. What things are made from
3. Why did they use that?
4. Toothpaste at a glance
5. Properties of plastics
6. Plastic recycling codes
7. Making plastic
8. Recording an experiment
9. Made from petroleum
10. Properties of metals
11. Metal makes many things
12. Roots of rubbish
13. A mountain of rubbish
14. Garbage graph
15. When packaging becomes litter
16. How aluminium cans are recycled
17. Recycling statistics
18. Does degradable plastic really degrade?
19. Communities in action
20. Change is possible
21. The impact of plastic in our lives
22. Using resources more wisely
Index
Using minerals in our lives

Science outcomesThe following outcomes can be achieved in yourclassroom by following the activities and usingthe resource sheets provided in Science rocks. The overview at the beginning of this book alsoexplains which of the activities demonstrate each outcome.
93
Science Rocks
Science outcomes: Earth and beyond
2.3Students discuss how their communityuses resources and features of the Earthand sky.
3.3Students collect information, whichdescribes ways in which living things usethe Earth and the sun as resources.
4.3
Students summarise information tocompare ways in which differentcommunities use resources from the Earthand beyond.
Science outcomes: Natural and processed materials
2.3Students explain why common materialsare used in particular situations.
3.3Students collect information to illustratehow combining different materialsinfluences their usefulness.
4.3Students examine and assess ways thatmaterials can be changed to make themmore useful.
Science outcomes: Science and society
2.3Students explain some of the ways that applications of science affect their community.
3.3
Students make predictions about theimmediate impact of some applications of science on their community andenvironment, and consider possiblepollution and public health effects.
4.3Students present analyses of the short-term and long-term effects of some of the ways in which science is used.

Our society is dependent on resources obtainedthrough mining. It is difficult to imagine livingwithout metals and plastic. These materials comefrom minerals and fossil fuels respectively, whichare finite or non-renewable resources. Thechallenge is how to use, reuse and substitutethese materials wisely.
Fossil fuelsFossil fuels, such as oil, coal and gas, areresources which can be burnt to produce energy.They are found in the earth where decomposedplant or animal remains have been compressedand experienced extreme pressure.
Oil and petrochemicalsCrude oil and natural gas formed millions of yearsago as a result of decayed plants and animals.This matter was buried deep in the crust and putunder tremendous heat and pressure. Crude oiland natural gas are extracted from the ground, bysinking an oil well. They are then transported byship and/or by pipeline to refineries.
At refineries, crude oil and natural gas arephysically and chemically changed. One of theseprocesses of change is called distillation. Thisprocess separates the heavy crude oil into lightergroups (called fractions) of hydrocarbons. Thesefractions include fuel oil (used for heating and fordiesel fuel in automotives), naphtha (used ingasoline and also as the primary source fromwhich petrochemicals are derived), butane (usedas a component of liquefied petroleum gas (LPG)and in cigarette lighters), ethane (used as acomponent of natural gas for heating and otherpurposes) and propane (used for bottled gas andas a component of natural gas).
At a petrochemical plant, these refined materialsare made into substances such as:
• ethylene
• propylene
• xylene
• toluene
• benzene.
These substances are then processed into well-known materials such as polyethylene and nylon.Some of these processes are very complicated. Ittakes only one step to make polyethylene fromethylene. However it takes five steps to makenylon from benzene.
PlasticPlastics are synthetic polymers made by joiningmany small molecules called monomers together.Mono means one and poly means many. Thechemical reaction in which the monomers join upto form polymers is called ‘polymerisation’.
Many common plastics are made fromhydrocarbon monomers such as polystyrene andpolypropylene, which contain only carbon andhydrogen. Other elements are found in plasticstoo. Polyester contains oxygen; PVC (polyvinylchloride) contains chloride; teflon containsfluorine; and nylon contains nitrogen.
Plastics are divided into two groups:
• thermoplastics
• thermosets.
Most plastics are thermoplastics, which meansthat once the plastic is formed it can be heatedand reformed over and over again. This propertymakes them easy to process and recycle. However, thermosets cannot be remelted,reformed or recycled.
94
Chapter 4: Using minerals in our lives
Background notes for teachers
Using minerals in our lives

Although each plastic has different characteristicsmost are:
• very resistant to chemicals
• thermal and electrical insulators
• usually very light in weight
• able to be processed in different ways to makethin fibres or very intricate parts.
Most plastics are blended with additives as they are processed into finished products. Somemineral additives include calcium, clay andmagnesium. Additives alter the properties ofplastics to make them suitable for specificpurposes. Additives can:
• protect plastics from the degrading effects of light, heat or bacteria
• add colour
• increase flexibility.
There are four main methods used to process plastics:
• Extrusion—molten plastic is forced out through a small opening to shape the finishedproduct. Plastic film and bags are made byextrusion processing.
• Injection moulding—molten plastic is forced intoa cooled, closed mould. Butter and yogurtcontainers are made using this process.
• Blow moulding—using compressed air, a moltentube is blown into a chilled mould. Milk bottlesare made this way.
• Rotational moulding—plastic granules are placedinside a mould and heated. As the mouldrotates, the molten plastic coats the inside ofthe mould evenly. This process is used to makehollow products like toys.
The very properties that make plastics so useful(strength, durability and convenience) are thesame properties that have made plastics a wasteproblem. Only a small amount of the plasticproduced each year is recycled. A large amount ofplastic ends up in landfill where it may take
95
Science Rocks
generations to break down. A lot of plastic alsoends up as litter where it is a hazard to wildlifeparticularly in rivers and oceans. Society can playa part in reducing this problem.
We can reduce the problem by using clothshopping bags, reusing plastic containers afterwashing them and recycling plastic productswhenever possible. Most local councils nowoperate curb-side recycling programs. Plasticcontainers have a resin identification code writtenon the side. These numbers relate to the type ofrecyclable plastic from which the container ismade (see Resource 6: Plastic recycling codes).
Because plastic packages often contain productsthat are consumed on the go, many containersare not making it into the recycling bin. Toaddress this, businesses, schools and local andstate governments place recycling bins in workspaces and public places, because it encouragespeople to recycle when they are not at home.
Once collected, recyclable plastics are sorted intotheir different types and sent to a reclamationsite. Here they are chopped into flakes, washed toremove contaminants and sold to manufacturersto make new products such as bottles, containers,clothing and carpet.
Some companies have been researching themanufacture of biodegradable andphotodegradable plastics to reduce the life ofplastics that end up in landfill. Some of theseplastics are being made from plants so that theydegrade into compost. Others are being madefrom hydrocarbons. The idea is that if the polymerchains are reduced in size, the plastic materialshould lose its strength, become brittle andeventually degrade into harmless products such ascarbon dioxide and water. The development anduse of more environmentally friendly plastics isnot progressing very quickly. The price ofdegradable plastics can be up to six times greaterthan the price of non-degradable plastics. Thehigh price is due to research costs anduncertainty about demand for the product.

CoalLike oil and natural gas, coal is formed overmillions of years from the remains of once livingthings such as plant material. Coal is a fossil fuelfound in layers or seams under the Earth’ssurface. It is burned to provide electricity andused in the production of steel. Coal is also an ingredient in fertilisers, pencils, paints and plastics.
Coal is Queensland’s most important exportcommodity, earning around $8 billion annually.Australia is the world’s largest exporter of coalwith Queensland responsible for about two thirdsof the total amount sold overseas.
MineralsMinerals are the components of rocks and theycan be divided into two groups—ore minerals(metallic and non-metallic) and rock-formingminerals.
Metallic mineralsMetallic minerals are the ores used to makemetals. They:
• are opaque
• usually make good conductors of electricity
• have a metallic lustre or sheen (are shiny).
The metals that come from metallic mineralsfound in the ground include copper, platinum,silver, mercury, iron, titanium, nickel, cobalt, gold,lead and zinc. Most of the metallic minerals arefound in combination with other minerals. Forexample, lead is extracted from galena (leadsulphide), tin comes from the ore, cassiterite, zinccomes from sphalerite, and chromium comes fromchromite. Bauxite is the main ore for aluminium,and uranium occurs in about 50 minerals, nearlyall of which are rare.
Alloys are formed when two or more metals (orsometimes a metal and a non-metal mineral) arecombined. For example, brass is made fromcombining copper and zinc. Bronze is made fromcopper, tin and zinc.
Non-metallic mineralsNon-metallic ore minerals are generallytranslucent and tend to form as crystals. Non-metallic ore minerals include sulphur, graphite,gypsum, halite (rock salt), borax, talc, asbestosand quartz. They are used extensively in theceramic and chemical industries as well as in theconstruction of roads and buildings.
Rock-forming mineralsThese are the major building materials of theearth. They are largely silicates, that is, theycontain silicon and oxygen. Silicon is a non-metallic element, always found in combinationwith something else. It is second only to oxygenas the main element found in the Earth’s crust.Other rock-forming minerals include the largefamilies of micas, feldspars, amphiboles,pyroxenes, zeolites and garnets.
96
Chapter 4: Using minerals in our lives

Activity A Discovering whatthings are made fromStudents play ‘Animal, Vegetable, Mineral’ andidentify things in their classroom that are madewith minerals.
PurposeTo engage students’ interest and discover theirexisting ideas about what things are made from.
Teaching procedure• Introduce the game of ‘Animal, vegetable,
mineral’ to students. After explaining the game,choose an item in the classroom that is madefrom a mineral. For the purpose of this exerciseinclude coal and oil as ‘minerals’. You canconsult Resource 2: What things are made fromfor extra information. Many students will beintrigued when they discover that your item ismade from a mineral. If students are stumped ordo not guess your item after a few questions,tell them what it is and what minerals are usedto make it.
• Provide students with a copy of Resource 1:What are things made from? After looking overthe resource sheet and explaining the directions,encourage students to walk around theclassroom looking for items that interest them.As directed, they should list items whosecomposition they know in the first column, anditems whose origins they are less certain aboutin the second column. You may like to extend
Demonstrating outcome EB 2.3
97
Science Rocks
the exploration outside the classroom into therest of the school.
• When students are finished exploring and fillingout their resource sheets, take time to discussand compare their findings. On thewhite/blackboard, list several correct examplesfrom each of the two categories. Help studentsto answer questions about the composition ofitems, such as whiteboards, which are madefrom a steel or aluminium frame covered withplastic sheeting made from petrochemicals (oil).Use Resource 2: What things are made from toassist you.
Activity B Collectinginformation about the origin of things Students collect information, in groups, aboutobjects in our homes that are made from mineralsincluding coal and oil.
PurposeTo encourage students to explore the origins of awide range of items made from minerals.
Teaching procedure• Invite students to form a group of two to four
students and challenge them to create:
–a model of a room in a house (bathroom,bedroom, kitchen, laundry, garage, loungeroom) with all items made using minerals,including coal and oil, labelled
Demonstrating outcome EB 3.3
Teaching and learning activities
Using minerals in our lives

–a display of household items made fromminerals (for example, sporting goods, musicalinstruments, electronic items, toys ortoiletries) including information about theminerals used to create them.
• Discuss with students the sources ofinformation they can use (books, includingencyclopaedias in the library, and web sites).The following list of web sites could be added tothe classroom computer favourites list forstudents to access.
–Department of Natural Resources and Mines‘Minerals make almost everything’ fact sheetat <http://www.nrm.qld.gov.au/education/minerals_make.html>
–Minerals Information Institute at<http://www.mii.org/>
• Let students know that each group will beexpected to present their display to the wholegroup at a negotiated time.
• To test their knowledge, introduce students tothe interactive graphic quiz called ‘Mining helpsmake your home’. Go to the QueenslandResources Council web site at<http://www.qrc.org.au>. Select ‘for schools’and follow links to ‘games’.
Activity C Exploring thecontents of toothpaste Students examine the materials used to maketoothpaste and toothpaste packaging.
PurposeTo encourage students to explore the reasonsparticular materials are chosen to make things.
Demonstrating outcome NPM 2.3
Teaching procedure• Bring a toothpaste box and tube to school for
this activity.
• Show students the toothpaste tube. Ask:
– What are the two main parts? (tube and cap)
– Are they different types of plastic? Why?(Each part has a different purpose. The capneeds to be hard and strong. The tube needsto be soft and flexible so it is able to bend.)
– What about the contents? What is toothpastefor? (To clean teeth and prevent decay.) Lookat the contents (these are usually written onthe box). This will be a bewildering list ofchemicals. However, you may be able toidentify a few familiar words that relate tosome of its mineral contents. To take thediscussion further, compare this list ofcontents with those on a herbal toothpastebox bought from a health food shop. What are the differences? What did/do people usewhen commercially produced toothpastewas/is unavailable?
• Show students a soft washing up cloth and onewith an abrasive surface. Ask:
– Which one do you think would make it easierto clean something? (The one with an abrasivesurface.) Explain that we need an abrasive (avery gentle one) in toothpaste to help cleanour teeth. Some abrasives that are used intoothpastes are silica (from sand), limestoneand aluminium oxide (also used in sandpaper).
• Tell students that fluoride is used in toothpastebecause it can help our teeth to stay strong.Fluoride is made from a mineral called fluorite.
• Ask students:
–Why do you think most toothpaste is white?(Probably because it is the colour of ourteeth.) Titanium is used because it makesthings white and does not harm us if weswallow it.
–Why do some toothpastes have sparkles inthem? (Probably because the makers think
98
Chapter 4: Using minerals in our lives

people who use the toothpaste like how itlooks.) Mica is sometimes used because it is a mineral that sparkles.
• Tell students that plastic is used to make thecontainer because it is light, waterproof andstrong. Ask:
–Why would paper not be used for the tube?(The toothpaste would seep through the tube,which would become soft and tear.) If workingwith older students, you could also say thatplastics are used because they are notreactive. That is, they will not react to thechemicals in the tube or to water. Forexample, they do not rust.
• If students do not raise it, point out that theplastic used for the tube is different from theplastic used for the lid. Ask:
–How would you describe the plastic used forthe tube? How would you describe the plasticused for the lid? (The plastic in the tube is softand bendable because we need to squeeze itto access the toothpaste.)
–The plastic in the lid is hard and strong so wesnap it shut and can open and close itrepeatedly without it breaking.
• Provide students with a copy of Resource 3:Why did they use that? Read through theresource sheet with students and ask them tocomplete it. Collect this resource sheet forstudent portfolios.
Activity D Researching aproductStudents undertake an individual researchassignment.
Demonstrating outcome NPM 3.3
99
Science Rocks
PurposeTo illustrate for students that combiningparticular minerals makes them useful in a rangeof applications.
Teaching procedure• Invite students to undertake an individual
research project on a single item made fromtwo or more minerals. Students could presenttheir research as an annotated illustration. An example is provided in Resource 4:Toothpaste at a glance. This task could bepresented on card or electronically. In order todemonstrate the outcome, students will need to provide details about the combination ofmaterials used to make the item and why those materials are chosen.
Activity E Exploring plastic Students explore the properties of plastics andmake a natural plastic.
PurposeTo encourage students to make a connectionbetween the properties of plastics and what they are used for.
Teaching procedure• Ask students to bring a range of plastic items to
school. Ensure that each group has a range ofdifferent types of plastic and a tub before youdo the experiment.
• Provide students with a copy of Resource 5:Properties of plastic. Invite students to work ingroups to carry out tests one to four only.Conduct test five yourself while studentsobserve. Use hot water from an electric jug forbest effect.
SAFETY ALERT

• Assist students to draw conclusions about theproperties of plastics and their uses. Resource 6:Plastic recycling codes will assist you to identifythe plastics that are used in the experiment.
• Prepare the materials you need to make caseinplastic (See Resource 7: Making plastic). Tellstudents you are going to make a natural kindof plastic called casein plastic. Ask students towatch carefully as they will have to record whatyou used (materials) and what you did(procedure). Provide students with a copy ofResource 8: Recording an experiment. A secondplastic recipe (gelatine shapes) is provided on Resource 7: Making plastic, for students to undertake.
• By now students will know that most plasticsare made from petrochemicals, which arederived from oil. However, oil is used to makemuch more than plastic. Provide small groupswith one of the lists in Resource 9: Made frompetroleum. Invite each group to create a rap orother song (maybe to the tune of a popularsong or rhyme) about things that are made fromoil and present it to the other groups.
Activity F Exploring metalsStudents explore the properties of metals anddiscover some of their uses.
PurposeTo enable students to make a connection betweenthe properties of metals and their uses.
Teaching procedure• To do this experiment, you will need to provide
students with samples of steel, tinplate,aluminium, copper, brass and zinc. Your localhardware store will probably have all of thesethings in easily available and inexpensive formssuch as nails, bolts and washers. Choose flat,thin samples where possible.
• Provide students with a copy of Resource 10:Properties of metals. Invite students to work ingroups to carry out the tests. Assist students to
draw conclusions about the properties of metalsand their possible uses.
• Provide students with a copy of Resource 11:Metal makes many things and provide studentswith time to access the internet to find thingsmade from the metals listed.
Activity G Exploring talcStudents explore the properties of talc.
PurposeTo encourage students to make a connectionbetween the properties of talcum powder and itsuse. The mineral talc is one of the mainingredients of talcum powder and you candiscover some of the properties of this mineral bylooking at talcum powder.
Teaching procedure• Obtain one or more containers of talcum
powder, a spray water bottle, a deck of cardsand a glass bowl.
• Ask students what they know about talcum powder.
• Invite students to rub their hands togetherbriskly as if they are very cold. Ask them:
–How do your hands feel as you do this?
• Sprinkle a little talc over the palms of students’hands and ask them to rub their hands together. Ask:
–How do your hands feel now?
• While students’ hands are still covered with thepowder, spray or sprinkle a few drops of wateron their palms. Ask:
–What happens to the powder?
–What have you discovered about talcum powder?
• Now put some more powder on the inside ofstudents’ forearms and ask them to leave itthere for a while.
100
Chapter 4: Using minerals in our lives
• Fill the glass bowl with water and sprinkle thepowder over the surface. Just like on your skin,the tiny sheet-like particles coat the surface toform a film of flat sheets, so fine that they aresuspended on the water without sinking.
• Gently disturb the water. The talcum powdercoating should appear to hold the water insideit, and yet you cannot see the individual flakes.Talcum powder is used for babies because itrepels water. When a baby wets its nappy, thepowder prevents the skin from getting wet. Themoisture is repelled from the skin and absorbedby the nappy.
• Ask a student volunteer to hold the pack ofcards and try to rub their hands together. Theslippery cards in the pack will let their handsslide smoothly and yet each card retains itsshape. The same thing happens with the flakesin talcum powder. Each tiny talc mineral ismade up of tough sheet-like layers, stackedtogether like a pack of cards. Talc is slipperybecause each sheet slides easily over the next.
• Ask students to check the talc on their forearm. Ask:
–Is it still there?
–Does your skin still feel slippery?
–Has the talcum powder held its perfume?
• Tell students that talc rock may be smooth butit can have other minerals mixed with it. Thesecan scratch skin. Only the purest talc is selectedfor bathroom use. The word to describe thissmooth characteristic is unctuous. Cosmeticmakers have to choose talc with certaincharacteristics such as one that will hold a perfume and will stay on the skin for a long time.
Source: Minerals Council of Australia (1992), Mineral magic,Canberra.
101
Science Rocks
Activity H: ExaminingpackagingStudents undertake a number of activities aboutpackaging and rubbish.
PurposeTo encourage students to consider what happensto the packaging containing our food and drinks.
Teaching procedure• Before the lesson, put a plastic milk/juice/sports
drink bottle, an aluminium soft drink can and aglass juice bottle in a plastic bag, as if they arerubbish. Place the bag in a class rubbish bin atthe front of the room.
• Begin the lesson by quietly walking over to theclassroom trash bin. Grab students’ attentionand interest by rummaging around in the bin asif you are looking for something. Then pull outthe plastic bag you placed there before teachingthis lesson. Next, ask students: What is this?(holding up the bag).
• Once they recognise that it is rubbish, dump thecontents of the bag on your desk and have theclass identify the contents. Continue theinvestigation by asking:
–Where do you think this rubbish came from?
–What kinds of things do you throw away?
–What kinds of things are in the rubbish bin inyour home?
–Where do you put your rubbish? Encourage students to think about differentkinds of rubbish by asking about the differentplaces they put it–(bathroom wastebasket,kitchen garbage, recycling bin, etc)
Demonstrating outcomes SS 2.3 and SS 3.3

• Invite students to form groups of three. Askeach group member to choose a piece ofrubbish from your desk. These three productsand the natural resources from which they aremade are:
–Plastic milk bottle—petroleum oil
–Aluminium soft drink cans—bauxite
–Glass bottle—silica sand.
• Provide students with a copy of Resource 12:Roots of rubbish. Read through the sheet tohelp students understand the task. Havebrochures about recycling from your localcouncil available in the classroom for youngerstudents in particular. Students can easily checkwhether their chosen material is recycled locallyor collected to be recycled elsewhere. The objectin this activity is to look at personal choices andactions. We enjoy the convenience thatpackaging materials provide, but are weprepared to exercise responsibility about whathappens when we have finished using them?
• Show a video about the problem of rubbishdisposal/accumulation and show students the statistics on Resource 13: A mountain of rubbish.
• Take students on a rubbish hunt around theschool. Students can then sort, measure (countnumber of bags or weigh) or estimate theamount of rubbish, record (pictograph or bargraph) and report (each group back to thewhole group or whole group to the rest of theschool on assembly) on the rubbish they havefound. Younger students can use Resource 14:Garbage graph to record their findings.
• Provide older students with a copy of Resource15: When packaging becomes litter. Discuss theadvantages of each of these products andcomplete the first column. Continue to completethe first row with students. Most students willprobably have had an experience of findingbroken glass in a park, at the beach or by theroadside. Students may need more guidancewhen suggesting solutions such as the container
deposit programs that exist in South Australia,the state with the lowest level of litter in Australia.
• Invite students to research some of theproblems and solutions associated with litteringof the other two products (plastic andaluminium). If students need some assistancewith this, direct them to:
–Australian Marine Conservation Societyhttp://www.amcs.org.au/learn/fact_sheets/facts_marine_debris.html
–Planet Arkhttp://www.planetark.com/campaignspage.cfm/newsid/7/story.htm
–Clean up Australiahttp://www.cleanup.com.au/Main.asp?RequestType=Doc&CatID=130&docID=270
–Zoos Victoria http://www.zoo.org.au/education/learningresources/mz/later/mz03-divedebris-tn.pdf
• Collect these resource sheets for studentportfolios.
102
Chapter 4: Using minerals in our lives

Activity I Looking at recyclingStudents explore information and issues about recycling.
PurposeTo encourage students to examine the wayspeople in different communities use packagingmaterials and how these materials can bechanged to meet a need.
Teaching procedure• Provide students with a number of stimuli about
recycling such as:
–inviting a speaker from your local council tospeak about recycling issues in yourcommunity
–arranging a tour of a local recycling facility
–showing students a video about recycling.
• Provide students with a copy of Resource 16:How aluminium cans are recycled. Olderstudents can take this activity further if they:
–research the process for making aluminiumcans from bauxite
– identify the steps that are not included inResource 16
– draw and write text for these extra steps andadd them to the flowchart they’ve alreadycompleted using Resource 16.
Demonstrating outcomes NPM 4.3 and EB 4.3
103
Science Rocks
–research the process for recycling glass andpresent the information as a flowchart.
• Make five or six copies of Resource 17:Recycling statistics. Invite students to formgroups of five. Provide each student with one ofthe sources about recycling in Resource 17. Askstudents to read their source and then share theinformation with the members in their group.Ask students to summarise their informationand add it to a group concept map drawn on anA3 or larger sheet.
• Invite students to monitor everything that goesinto their family recycling bin for a week orfortnight. Ask students to record the data on atable such as the one below.
• Invite older students to bring any samples ofbiodegradable plastic to school. This may be inthe form of plastic bags or other packaginglabelled as biodegradable or photodegradable.(The trays from Cadbury Milk Tray and Arnott’sIced Vo Vos are biodegradable. Source:http://www.plasticbagfamine.com/).
• Invite older students to do the experiment on Resource 18: Does degradable plastic really degrade?
• Provide students with a copy of Resource 19:Communities in action. Read through the articleand table with students. Invite students tochoose option A or B in Resource 20: Change ispossible. Both of these options involve studentsundertaking some form of independent researchin their community and comparing their findingswith another community.
Material and Item (E.g. plastic bottle,glass jar, aluminium can, cardboardcarton, newspaper)
Recycling code (for plastics only)
Tally Total

Activity J Exploring some issuesStudents decide how they can use resources more wisely.
PurposeTo provide opportunities for students to reflect onthe ways in which they use resources and theimpact of this resource use.
Teaching procedure• Provide students with a copy of Resource 21:
The impact of plastic in our lives. This researchtask asks students to consider much of whatthey have learned in this chapter. The topiccould be changed to examine the impact ofanother material such as glass or metal.Students may find parts one and two of theresource sheets useful in organising theirresearch. However, students could present theirfindings in a number of ways. Part three, theessay format, is only one option. Students couldalso present their findings as an oral ormultimedia presentation.
• As a personal call for action, ask students toconsider and complete Resource 22: Usingresources more wisely. This statement of intentprovides opportunities for students to evaluatetheir commitment to changing their behaviourfor one and two months after their originalcommitment. At this stage you could facilitate adiscussion about impediments to change.
Demonstrating outcome SS 4.3
104
Chapter 4: Using minerals in our lives
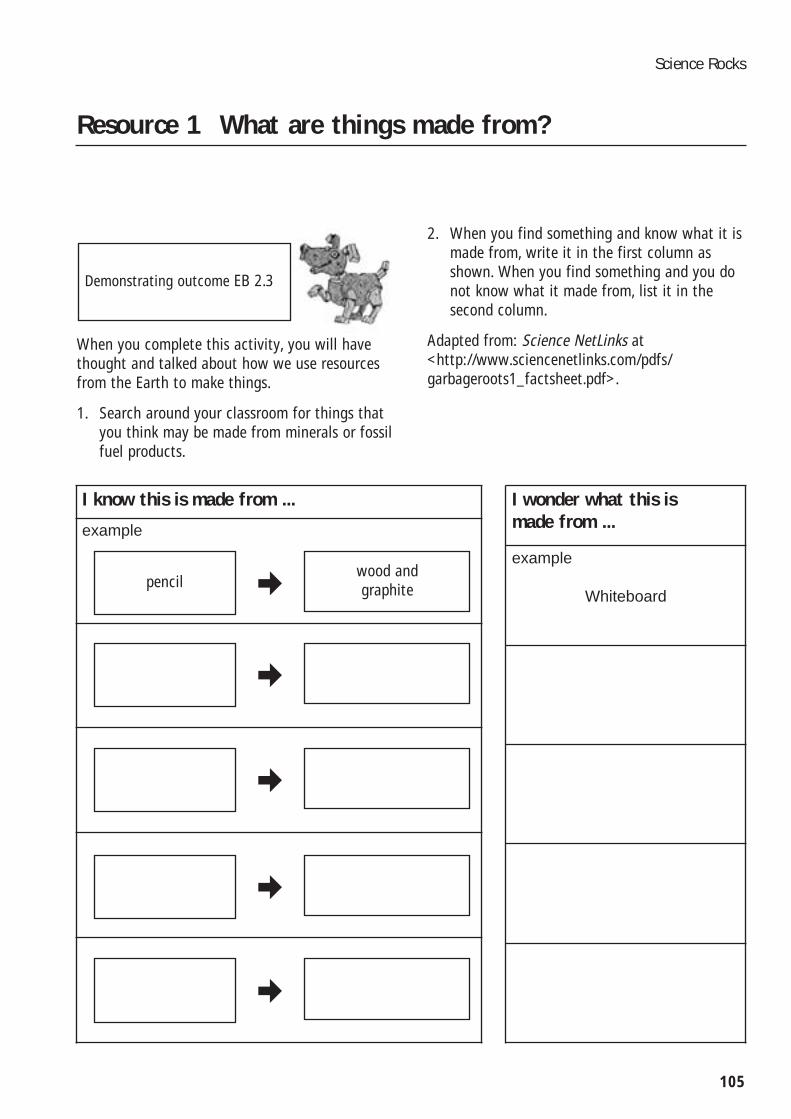
When you complete this activity, you will havethought and talked about how we use resourcesfrom the Earth to make things.
1. Search around your classroom for things thatyou think may be made from minerals or fossilfuel products.
Demonstrating outcome EB 2.3
105
Science Rocks
2. When you find something and know what it ismade from, write it in the first column asshown. When you find something and you donot know what it made from, list it in thesecond column.
Adapted from: Science NetLinks at<http://www.sciencenetlinks.com/pdfs/garbageroots1_factsheet.pdf>.
Resource 1 What are things made from?
I know this is made from ...
example
I wonder what this is made from ...
example
Whiteboardpencil
wood and graphited
d
d
d
d

106
Chapter 4: Using minerals in our lives
Resource 2 What things are made from
Classroom item What it is made from
Books Titanium, kaolin or talc minerals are added to the paper to make it white andsmooth.
Blackboard The board is made from wood covered with paint containing abrasive mineralssuch as ground pumice.
Carpets Wool carpets are cleaned with clays, soda ash, zeolite or petrochemicals.Synthetic fibres and dyes come from petrochemicals.
Cement Cement is made from clays, shale, limestone, bauxite, haematite and gypsum.
Ceramic tiles Ceramic tiles are made from clays, silica and titanium minerals. Colouring isdone using ochre, umber (iron oxides) and metallic compounds of cobalt,manganese and antimony.
Chairs Frames are often made using steel painted or galvanised with zinc. Coveringsof vinyl and synthetic fibres are made from petrochemicals.
Chalk Chalk is the dried and moulded paste of ground gypsum.
Coloured pencils Clays and petrochemicals are used in coloured pencils.
Curtains Curtains can be made from synthetic fibres made from petrochemicals.
Desks The frames are often steel which has been painted or galvanised with zinc.
Door handles Handles are usually made of steel or brass (copper and zinc).
Felt-tipped pens These pens have a plastic body (made from petrochemicals) and the colouringis made from coal, metallic minerals and petrochemicals.
Lead pencils Lead pencils do not have any lead in them. The ‘lead’ is made from graphite.
Light bulbs The bulb is made from glass. The metal fittings are made using steel, copper,lead and tungsten.
Light switches Switches are made using steel, copper, brass and plastic (from petrochemicals).
Linoleum Lino is made from petrochemicals with clays, limestone and wollastonite.
Metallic window frames Frames are made from steel or aluminium.

107
Science Rocks
Source: Minerals Council of Australia 1992, Mineral magic, Canberra. Lewis G 1995, Australia and ancient lands AGSO,Canberra.
Classroom item What it is made from
Paint Most paints are made from petrochemicals and contain minerals such ascalcium carbonate (from limestone).
Rubber Sulphur is added to the rubber. Limestone, talc, clays and pumice abrasivesare also used.
Tissues Clay is added for absorbency. Talc is used for softness.
Whiteboard Whiteboards have a steel or aluminium frame covered with plastic sheetingmade from petrochemicals.
Windows Glass is made using minerals from sand.

Demonstrating outcome NPM 2.3
When you complete this activity you will haveshown why we use certain materials for particularpurposes. Use the words at the bottom of thepage to fill in the gaps in these sentences.
108
Chapter 4: Using minerals in our lives
Resource 3 Why did they use that?
sparkle clean strong
white hard and strong soft and bendy
Silica (from sand), limestone or aluminium oxide are abrasive.They are used in toothpaste to ________________ our teeth.
Fluoride (from fluorite) helps to make our teeth _______________.
Titanium is used in toothpaste to colour it __________.
Mica is used to make the toothpaste ____________.
The plastic in the lid is _______________________so we can snap itshut and open and close it over and over without breaking it.
The plastic in the tube is ________________________because weneed to squeeze it to get the toothpaste out.
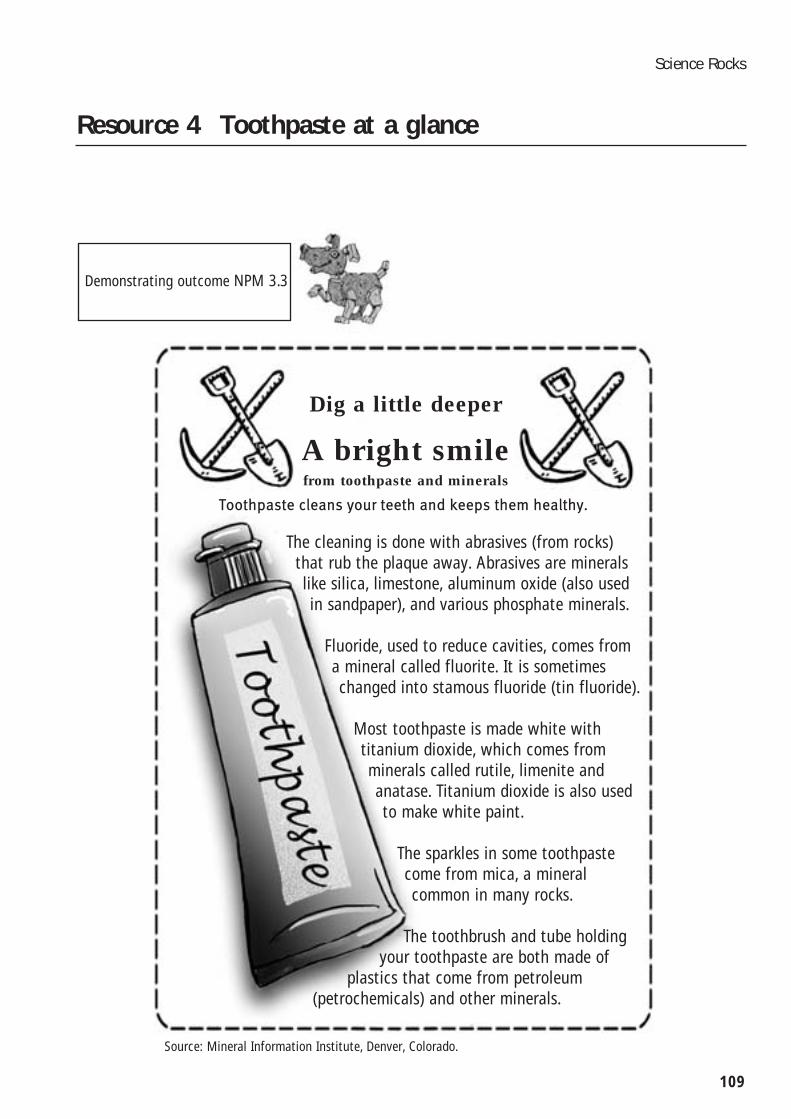
Demonstrating outcome NPM 3.3
109
Science Rocks
Source: Mineral Information Institute, Denver, Colorado.
Resource 4 Toothpaste at a glance
Dig a little deeper
A bright smilefrom toothpaste and minerals
Toothpaste cleans your teeth and keeps them healthy.
The cleaning is done with abrasives (from rocks)that rub the plaque away. Abrasives are mineralslike silica, limestone, aluminum oxide (also usedin sandpaper), and various phosphate minerals.
Fluoride, used to reduce cavities, comes froma mineral called fluorite. It is sometimeschanged into stamous fluoride (tin fluoride).
Most toothpaste is made white withtitanium dioxide, which comes fromminerals called rutile, limenite andanatase. Titanium dioxide is also usedto make white paint.
The sparkles in some toothpastecome from mica, a mineralcommon in many rocks.
The toothbrush and tube holdingyour toothpaste are both made of
plastics that come from petroleum(petrochemicals) and other minerals.

PurposeTo make a connection between the properties ofplastics and its uses.
MMaatteerriiaallss (per group)
• A collection of plastic items including ashopping bag, polystyrene cup and soft drinkbottle
• A tank or tub of water
Procedure1. Choose two more plastic items and add them
to the table. Make each piece of plasticdifferent from the others.
2. Do tests one to four with each sample.Observe test five that will be done by your teacher.
3. Record your findings on the table.
110
Chapter 4: Using minerals in our lives
Resource 5 Properties of plastic
Plastic item TEST 1 Float?
TEST 2Waterproof?
TEST 3Flexible?
TEST 4Permeable tolight?
TEST 5 Heat resistant?
Does it floatwhen full ofwater?
Does water sitON the plasticor soak IN?
Did it breakwhen youtwisted it?
Is it A. transparent,B. translucentor C. opaque?
Does hot waterstart meltingit?
Shopping bag
Polystyrene cup
Soft drinkbottle
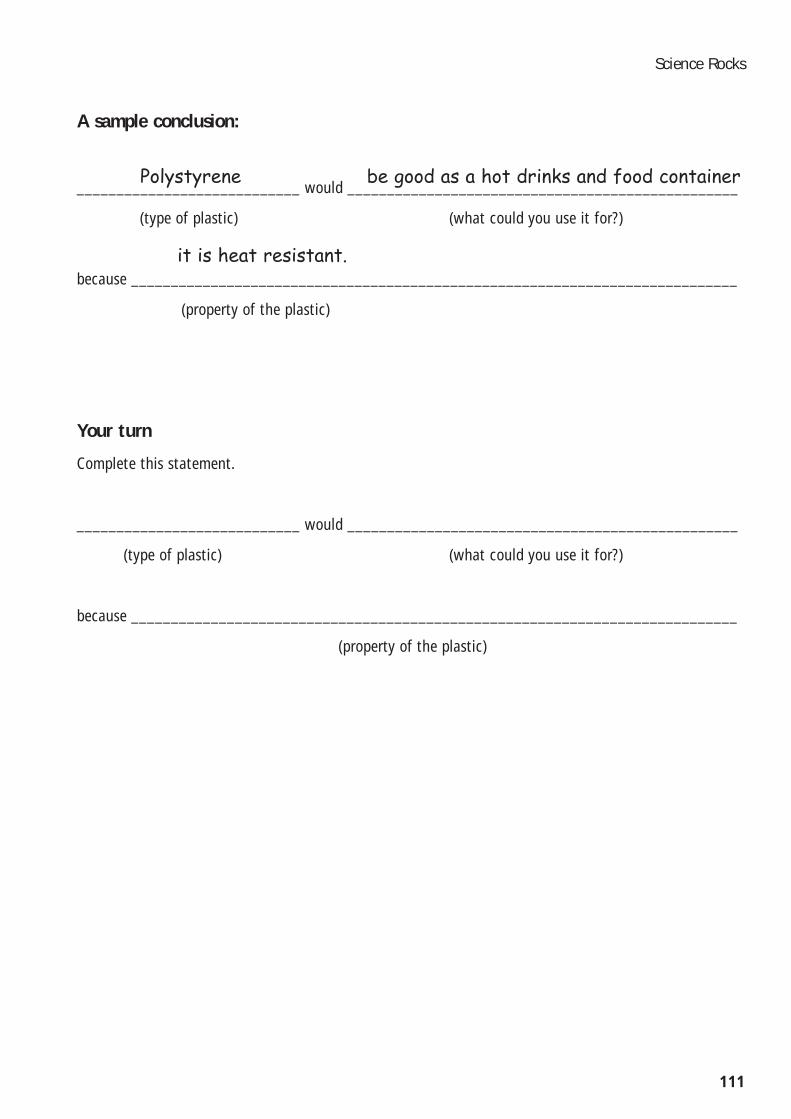
111
Science Rocks
A sample conclusion:
____________________________ would _________________________________________________
(type of plastic) (what could you use it for?)
because ____________________________________________________________________________
(property of the plastic)
Your turn
Complete this statement.
____________________________ would _________________________________________________
(type of plastic) (what could you use it for?)
because ____________________________________________________________________________
(property of the plastic)
Polystyrene be good as a hot drinks and food container
it is heat resistant.

112
Chapter 4: Using minerals in our lives
Resource 6 Plastic recycling codes
Resinidentificationcode
Plastic type Properties Common uses
1 PolyethyleneTerephthalate(PETE)
Barrier to moisture and gasClarity Heat resistance Strength and toughness
Soft drink bottles Heatable pre-prepared foodtrays Fibre for clothing and carpet
2 High DensityPolyethylene(HDPE)
Chemical resistance Ease of processing and formingPermeability to gas Stiffness and strengthToughness
Snack food packages Cereal box liners Milk bottles Grocery bags Detergent bottles Household chemical bottles
3 Polyvinyl Chloride(PVC)
Clarity Chemical, oil and greaseresistance Ease of bending Toughness Versatility
Pipes Carpet backing Insulation Synthetic leather productsShower curtains Medical tubing and bags
4 Low DensityPolyethylene(LDPE)
Barrier to moisture Ease of processing and sealingFlexible Strength and toughness
Produce bags Dry cleaning bags Flexible lids and bottles
5 Polypropylene (PP) Barrier to moisture Heat, chemical, oil and greaseresistance Strength and toughnessVersatility
Large moulded auto parts Fibre for fabric and carpetPackaging Car battery casings
6 Polystyrene (PS)ExpandablePolystyrene (EPS)
Clarity Easily formed Insulation
CD disk jackets Medical and food packagingMeat trays Hot food cups and containers
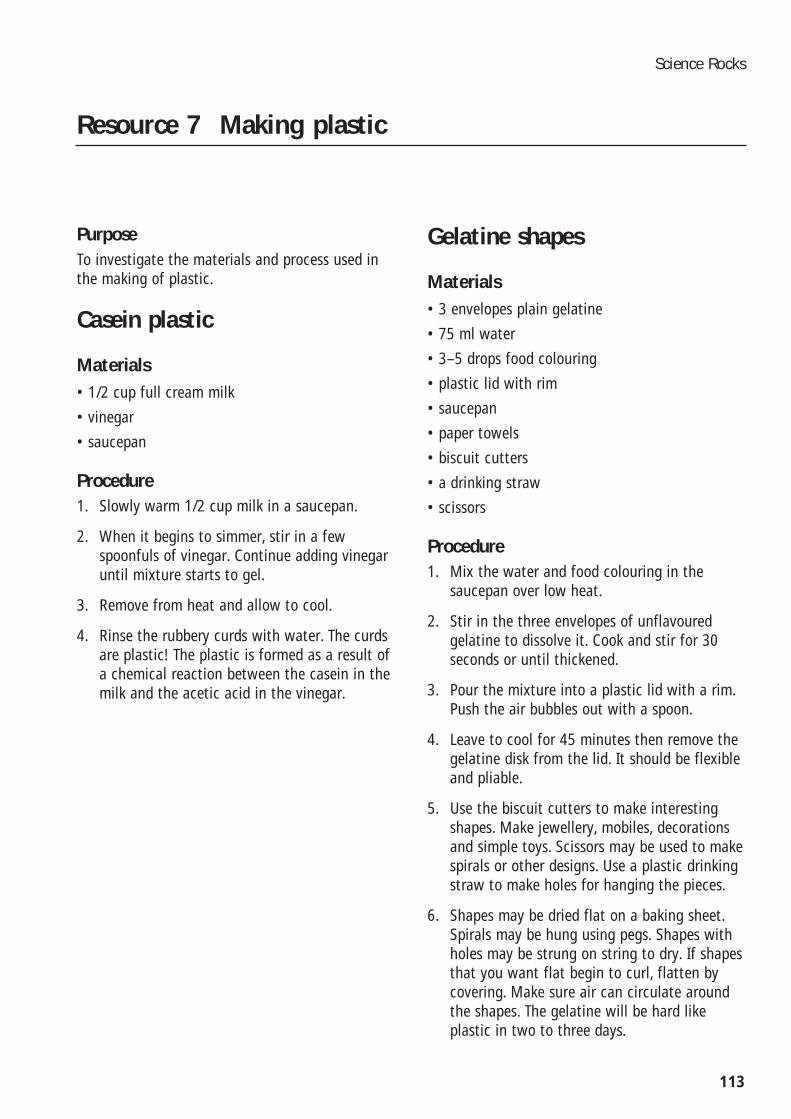
113
Science Rocks
PurposeTo investigate the materials and process used inthe making of plastic.
Casein plastic
Materials• 1/2 cup full cream milk
• vinegar
• saucepan
Procedure1. Slowly warm 1/2 cup milk in a saucepan.
2. When it begins to simmer, stir in a fewspoonfuls of vinegar. Continue adding vinegaruntil mixture starts to gel.
3. Remove from heat and allow to cool.
4. Rinse the rubbery curds with water. The curdsare plastic! The plastic is formed as a result ofa chemical reaction between the casein in themilk and the acetic acid in the vinegar.
Gelatine shapes
Materials• 3 envelopes plain gelatine
• 75 ml water
• 3–5 drops food colouring
• plastic lid with rim
• saucepan
• paper towels
• biscuit cutters
• a drinking straw
• scissors
Procedure1. Mix the water and food colouring in the
saucepan over low heat.
2. Stir in the three envelopes of unflavouredgelatine to dissolve it. Cook and stir for 30seconds or until thickened.
3. Pour the mixture into a plastic lid with a rim.Push the air bubbles out with a spoon.
4. Leave to cool for 45 minutes then remove thegelatine disk from the lid. It should be flexibleand pliable.
5. Use the biscuit cutters to make interestingshapes. Make jewellery, mobiles, decorationsand simple toys. Scissors may be used to makespirals or other designs. Use a plastic drinkingstraw to make holes for hanging the pieces.
6. Shapes may be dried flat on a baking sheet.Spirals may be hung using pegs. Shapes withholes may be strung on string to dry. If shapesthat you want flat begin to curl, flatten bycovering. Make sure air can circulate aroundthe shapes. The gelatine will be hard likeplastic in two to three days.
Resource 7 Making plastic

114
Chapter 4: Using minerals in our lives
Purpose
____________________________________________________________________________________________________
Materials
________________________________________________________________________________________
Procedure
____________________________________________________________________________________________________________________________________________________________________________________________________________________________________________________________________________________________________________
Observations
______________________________________________________________________________________________________________________________________________________
Conclusions or questions
____________________________________________________________________________________________________
Resource 8 Recording an experiment

115
Science Rocks
crayonscaulkingballoonscurtainsmilk jugsputtytool rackstrousersyarnroofingluggagefan beltscarpetinglipstickaspirinperfumeshoe polishcortisoneCD/DVDsvaporizersparachutes
inktoysdollstyrestentsshoesglueskisdyescamerascombsdicemopspursesdressespyjamaspillowscandlesboats
Resource 9 Made from petroleum
telephonesantisepticsdeodorantsweatersfloor waxmodel carssoap dishesclotheslinepanty hoseoil filtersupholsterycassetteshouse paintammoniahair curlerseyeglassesice chestsice bucketsfertilisers
water pipesfishing bootsgarden hoseumbrellasrubber cementcold creamhair colouringguitar stringstoothpastelife jacketsgolf ballsdetergentssun glassesbandagesnail polishfalse teethgolf bagsmobile phonestoilet seatssports shoesbackpacks
paint brushesinsecticidesfishing lureslinoleumpaint rollersplastic woodrubbish bagshand lotionshampoofishing rodsanaestheticsTV cabinetssalad bowlsawningssafety glassVCR tapesmovie filmloudspeakerscredit cards
dishwashing liquidsunbreakable dishescar sound insulationmotorcycle helmetsrefrigerator liningselectrician's taperoller-skate wheelspermanent press clothessoft contact lensesfood preservativestransparent tapedisposable nappiessports car bodieselectric blanketscar battery casessynthetic rubbervitamin capsulesrubbing alcoholice cube trays
insect repellentroofing shinglesshower curtainsplywood adhesivebeach umbrellastap washersantihistaminesdrinking cupspetroleum jellytennis racketswire insulationballpoint pensartificial turfartificial limbsshaving creamtoothbrushesfolding doorsshower doorsheart valveshearing aidswading pools
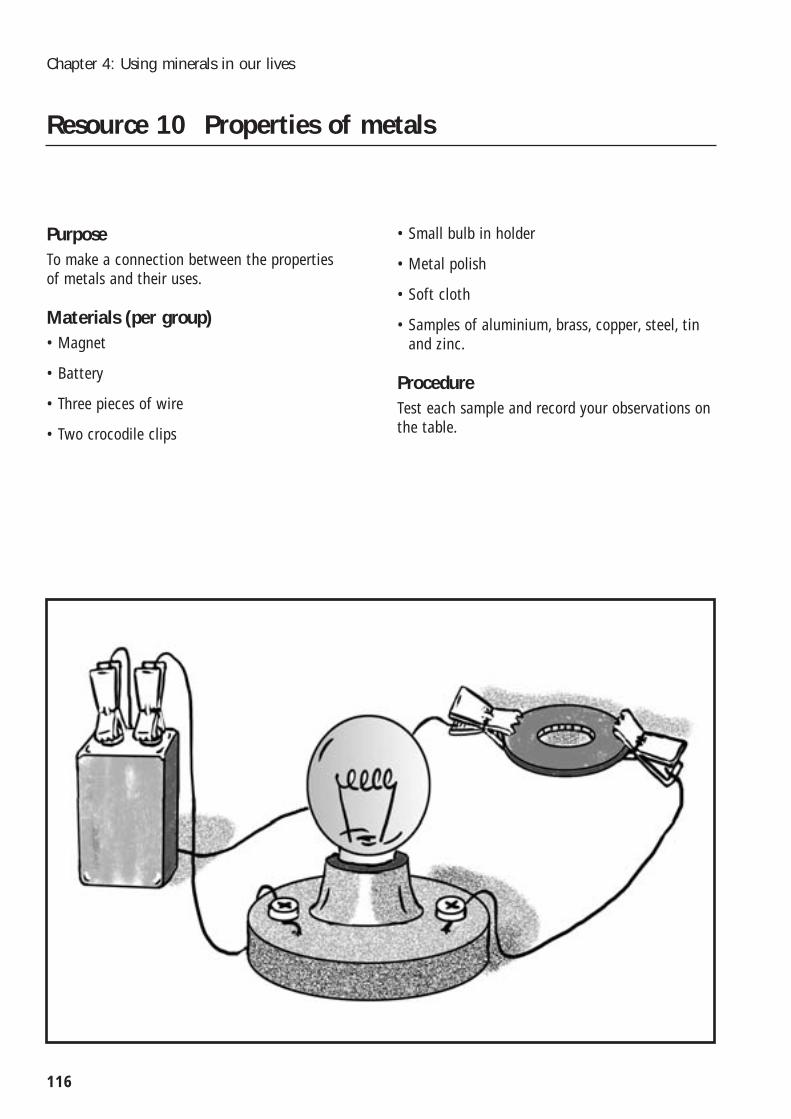
PurposeTo make a connection between the properties of metals and their uses.
Materials (per group)• Magnet
• Battery
• Three pieces of wire
• Two crocodile clips
116
Chapter 4: Using minerals in our lives
• Small bulb in holder
• Metal polish
• Soft cloth
• Samples of aluminium, brass, copper, steel, tinand zinc.
ProcedureTest each sample and record your observations onthe table.
Resource 10 Properties of metals

117
Science Rocks
Any other observations? ________________________________________________________________
Any questions?
___________________________________________________________________________________
___________________________________________________________________________________
Complete this statement.
__________________ would be good for _________________________________________________
(type of metal) (what could you use it for?)
because ____________________________________________________________________________
(property of the metal)
Metal What colour is it? Does it shinewhen polished?
Is it magnetic?(use the magnet)
Does it conductelectricity? (make a circuit)
aluminium
brass
copper
steel
tin
zinc

2. Find three things made from each of thesemetals and record them on the table.
3. Choose one other metal and list three thingsmade from it.
118
Chapter 4: Using minerals in our lives
Resource 11 Metal makes many things
1. Go to:
http://www.nrm.qld.gov.au/education/minerals_make.html
http://www.mii.org/commonminerals.html
http://www.42explore.com/ironsteel.htm
http://www.encyclopedia.com/html/b1/brass.asp
Metal Things that are made from this metal
Aluminium
Brass
Copper
Gold
Lead
Silver
Steel
Tin
Zinc

PurposeTo consider what happens to the packagingcontaining our food and drinks.
Materials
• Plastic milk bottle
• Soft drink can
119
Science Rocks
• Glass bottle
• Recycling brochures from the local council
ProcedureChoose a piece of rubbish from the teacher’s deskand complete the chart below.
Resource 12 Roots of rubbish
What is it?
What is it made from? What other things are made from thesame material?
Can this material be recycled? YES/NO
Can this material be recycled in your town/city? YES/NO
Draw the product here
g
fh

In 2003, 21 million tonnes of solid waste was putin landfills. That is equal to about 1.146 tonnesper person each year or 3.14 kilograms per personeach day.
Source: Australian Bureau of Statistics, 2003.
http://www.abs.gov.au/Ausstats/[email protected]/0/5c659730e0a80e01ca256b35007ace02?OpenDocument
In 2003, the amount of waste generated inQueensland was equal to about 1.181 tonnes per person.
Source: http://www.epa.qld.gov.au/publications/p01301aa.pdf/The_state_of_waste_and_recycling_in_Queensland_2003.pdf
Household waste makes up almost half of thesolid waste created in this country each year. The typical makeup of household waste is:
• 56% food scraps and garden waste
• 19% paper and cardboard
• 6% plastics
• 5% glass
• 3% metal
• 11% other.
Industrial waste comes from offices, factories,shops and hospitals. Every year we generate over350 kgs of industrial waste for every person inAustralia.
The building, construction and demolition industrycreates well over a quarter of all solid waste. Thisincludes concrete, timber, metals and otherassorted building materials.
Source: http://www.epa.nsw.gov.au/publications/html/downtoearth/allaboutwaste.htm
120
Chapter 4: Using minerals in our lives
Resource 13 A mountain of rubbish

Hunt for garbage in your school grounds. Sortgarbage into seperate bags of each material andcount the number of bags. Record your findingson the pictograph below.
121
Science Rocks
Resource 14 Garbage graph
Demonstrating outcome SS 2.3
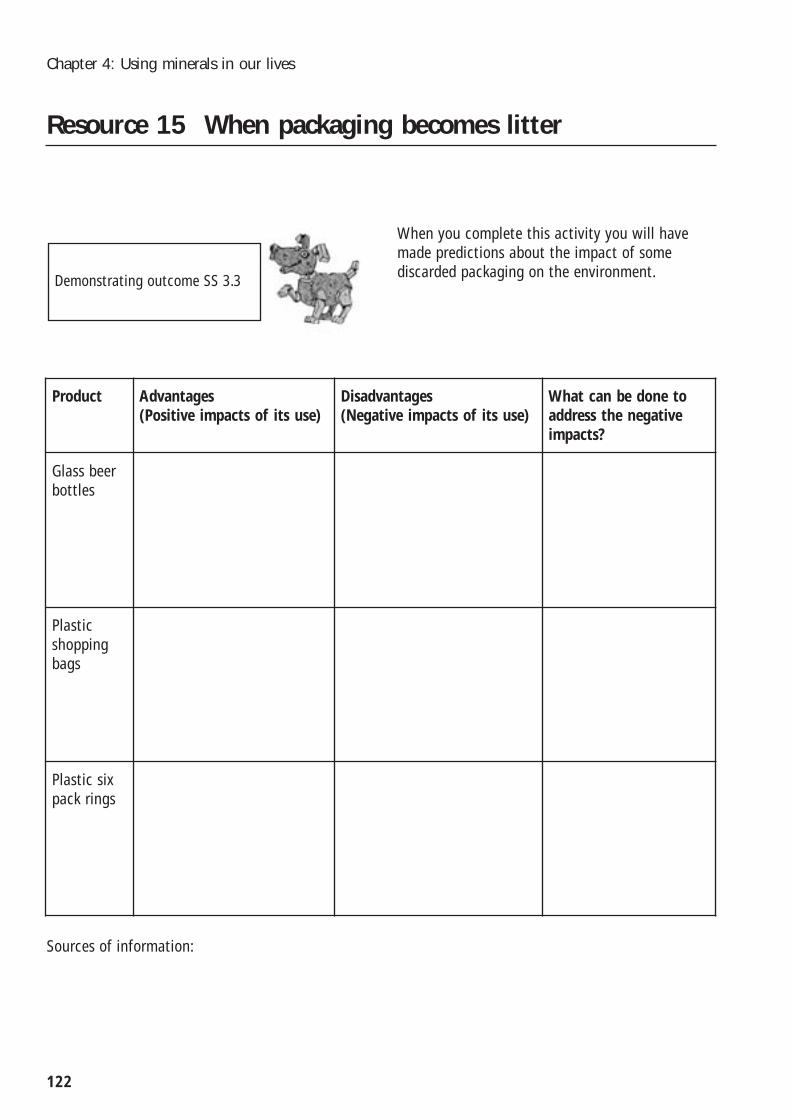
Demonstrating outcome SS 3.3
When you complete this activity you will havemade predictions about the impact of somediscarded packaging on the environment.
122
Chapter 4: Using minerals in our lives
Resource 15 When packaging becomes litter
Product Advantages (Positive impacts of its use)
Disadvantages (Negative impacts of its use)
What can be done toaddress the negativeimpacts?
Glass beerbottles
Plasticshoppingbags
Plastic sixpack rings
Sources of information:
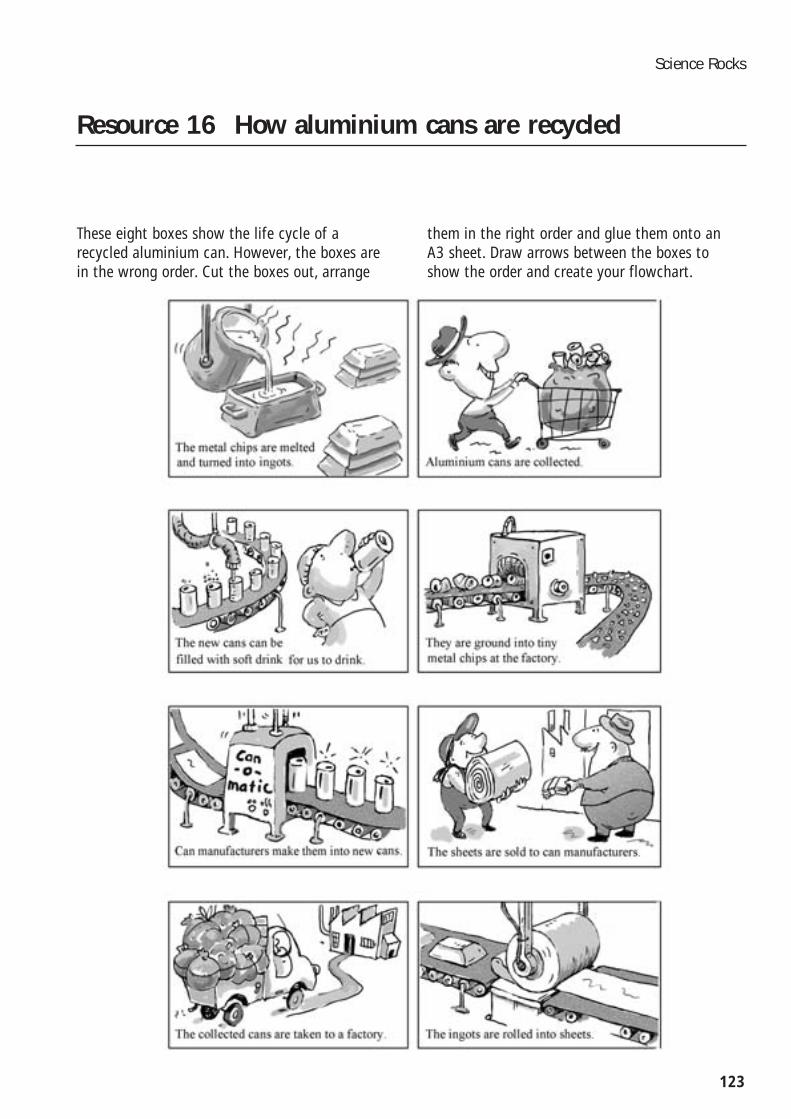
These eight boxes show the life cycle of arecycled aluminium can. However, the boxes arein the wrong order. Cut the boxes out, arrange
123
Science Rocks
them in the right order and glue them onto an A3 sheet. Draw arrows between the boxes toshow the order and create your flowchart.
Resource 16 How aluminium cans are recycled
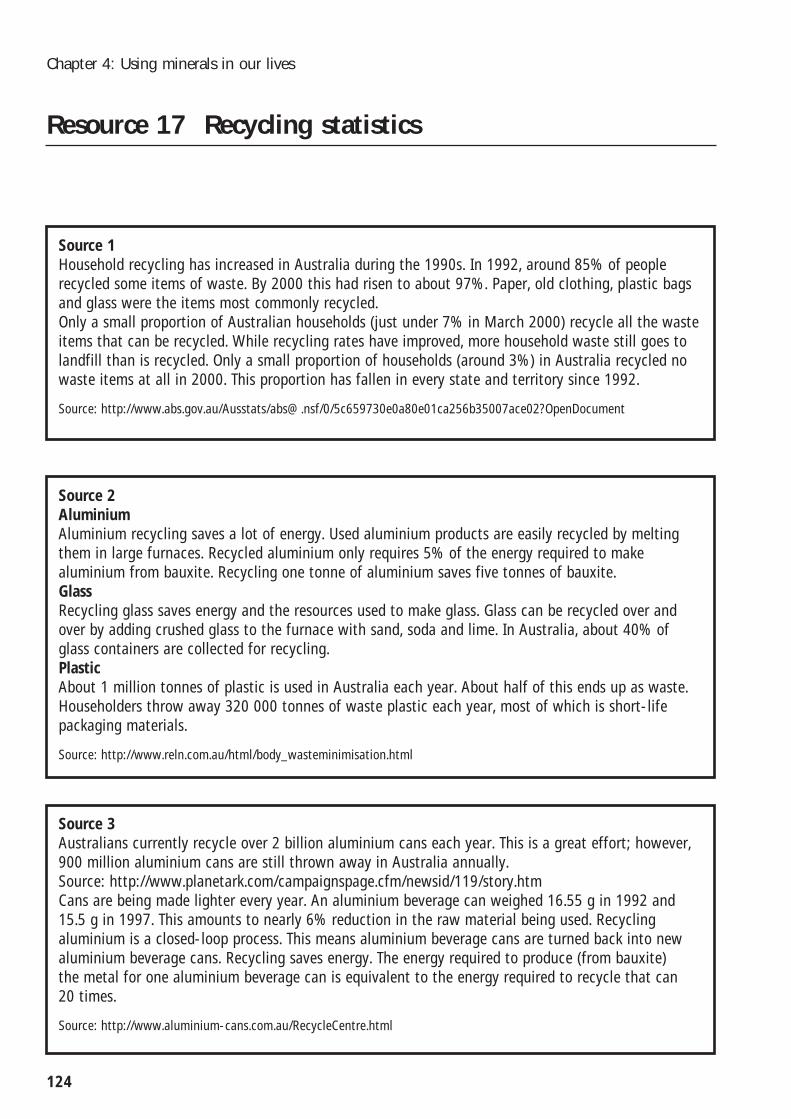
124
Chapter 4: Using minerals in our lives
Resource 17 Recycling statistics
Source 1Household recycling has increased in Australia during the 1990s. In 1992, around 85% of peoplerecycled some items of waste. By 2000 this had risen to about 97%. Paper, old clothing, plastic bagsand glass were the items most commonly recycled. Only a small proportion of Australian households (just under 7% in March 2000) recycle all the wasteitems that can be recycled. While recycling rates have improved, more household waste still goes tolandfill than is recycled. Only a small proportion of households (around 3%) in Australia recycled nowaste items at all in 2000. This proportion has fallen in every state and territory since 1992.
Source: http://www.abs.gov.au/Ausstats/[email protected]/0/5c659730e0a80e01ca256b35007ace02?OpenDocument
Source 2AluminiumAluminium recycling saves a lot of energy. Used aluminium products are easily recycled by meltingthem in large furnaces. Recycled aluminium only requires 5% of the energy required to makealuminium from bauxite. Recycling one tonne of aluminium saves five tonnes of bauxite.GlassRecycling glass saves energy and the resources used to make glass. Glass can be recycled over andover by adding crushed glass to the furnace with sand, soda and lime. In Australia, about 40% ofglass containers are collected for recycling. PlasticAbout 1 million tonnes of plastic is used in Australia each year. About half of this ends up as waste.Householders throw away 320 000 tonnes of waste plastic each year, most of which is short-lifepackaging materials.
Source: http://www.reln.com.au/html/body_wasteminimisation.html
Source 3Australians currently recycle over 2 billion aluminium cans each year. This is a great effort; however,900 million aluminium cans are still thrown away in Australia annually.Source: http://www.planetark.com/campaignspage.cfm/newsid/119/story.htmCans are being made lighter every year. An aluminium beverage can weighed 16.55 g in 1992 and15.5 g in 1997. This amounts to nearly 6% reduction in the raw material being used. Recyclingaluminium is a closed-loop process. This means aluminium beverage cans are turned back into newaluminium beverage cans. Recycling saves energy. The energy required to produce (from bauxite) the metal for one aluminium beverage can is equivalent to the energy required to recycle that can 20 times.
Source: http://www.aluminium-cans.com.au/RecycleCentre.html
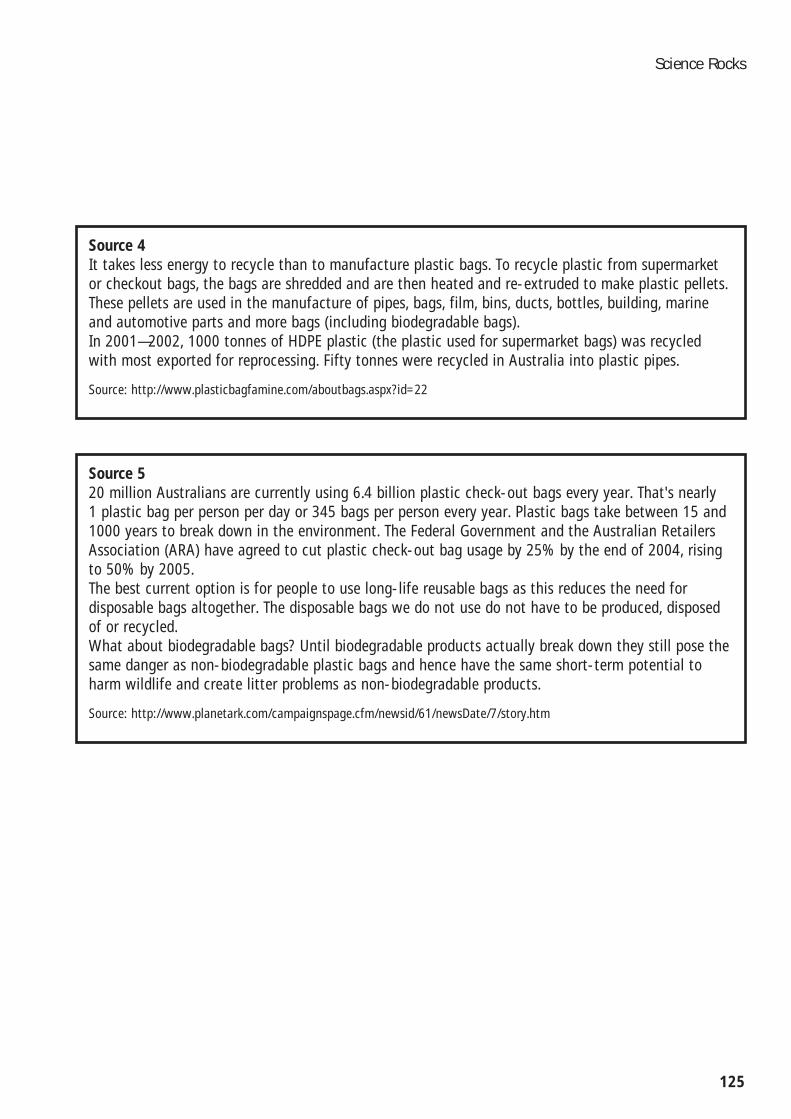
125
Science Rocks
Source 4It takes less energy to recycle than to manufacture plastic bags. To recycle plastic from supermarketor checkout bags, the bags are shredded and are then heated and re-extruded to make plastic pellets.These pellets are used in the manufacture of pipes, bags, film, bins, ducts, bottles, building, marineand automotive parts and more bags (including biodegradable bags).In 2001—2002, 1000 tonnes of HDPE plastic (the plastic used for supermarket bags) was recycledwith most exported for reprocessing. Fifty tonnes were recycled in Australia into plastic pipes.
Source: http://www.plasticbagfamine.com/aboutbags.aspx?id=22
Source 520 million Australians are currently using 6.4 billion plastic check-out bags every year. That's nearly 1 plastic bag per person per day or 345 bags per person every year. Plastic bags take between 15 and1000 years to break down in the environment. The Federal Government and the Australian RetailersAssociation (ARA) have agreed to cut plastic check-out bag usage by 25% by the end of 2004, risingto 50% by 2005. The best current option is for people to use long-life reusable bags as this reduces the need fordisposable bags altogether. The disposable bags we do not use do not have to be produced, disposedof or recycled. What about biodegradable bags? Until biodegradable products actually break down they still pose thesame danger as non-biodegradable plastic bags and hence have the same short-term potential toharm wildlife and create litter problems as non-biodegradable products.
Source: http://www.planetark.com/campaignspage.cfm/newsid/61/newsDate/7/story.htm

126
Chapter 4: Using minerals in our lives
PurposeTo examine and assess which types of plastics arebio–degradable.
Materials (per group)• a range of plastics (biodegradable,
photodegradable and non-degradable)
• two scraps of wood
• flat headed nails
Demonstrating outcome NPM 4.3
Procedure1. Cut three pieces from each type of plastic.
Make each piece the same size.
2. Label each sample e.g. 1A, 1B, 1C, 2A, 2B, 2C.Draw up a table like the one below. Recordthe brand name and product name of eachplastic on the table (e.g. Smith’s biodegradablebin liners).
3. Attach each sample (A) to one piece of woodusing nails. Attach each sample (B) to anotherpiece of wood using nails.
Resource 18 Does degradable plastic really degrade?
Month (1) Biodegradable (2) Biodegradable (3) Photodegradable (4) Non-degradable
A B C D A B C D A B C D A B C D
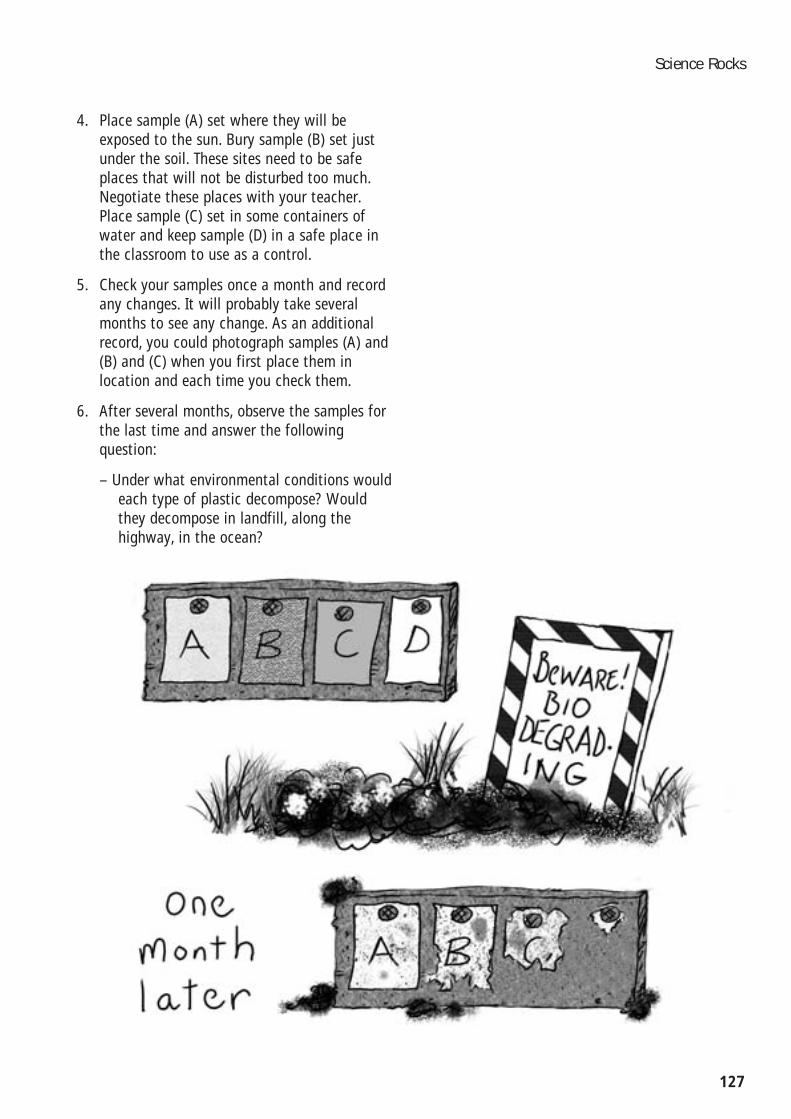
4. Place sample (A) set where they will beexposed to the sun. Bury sample (B) set justunder the soil. These sites need to be safeplaces that will not be disturbed too much.Negotiate these places with your teacher.Place sample (C) set in some containers ofwater and keep sample (D) in a safe place inthe classroom to use as a control.
5. Check your samples once a month and recordany changes. It will probably take severalmonths to see any change. As an additionalrecord, you could photograph samples (A) and(B) and (C) when you first place them inlocation and each time you check them.
6. After several months, observe the samples forthe last time and answer the followingquestion:
– Under what environmental conditions wouldeach type of plastic decompose? Wouldthey decompose in landfill, along thehighway, in the ocean?
127
Science Rocks
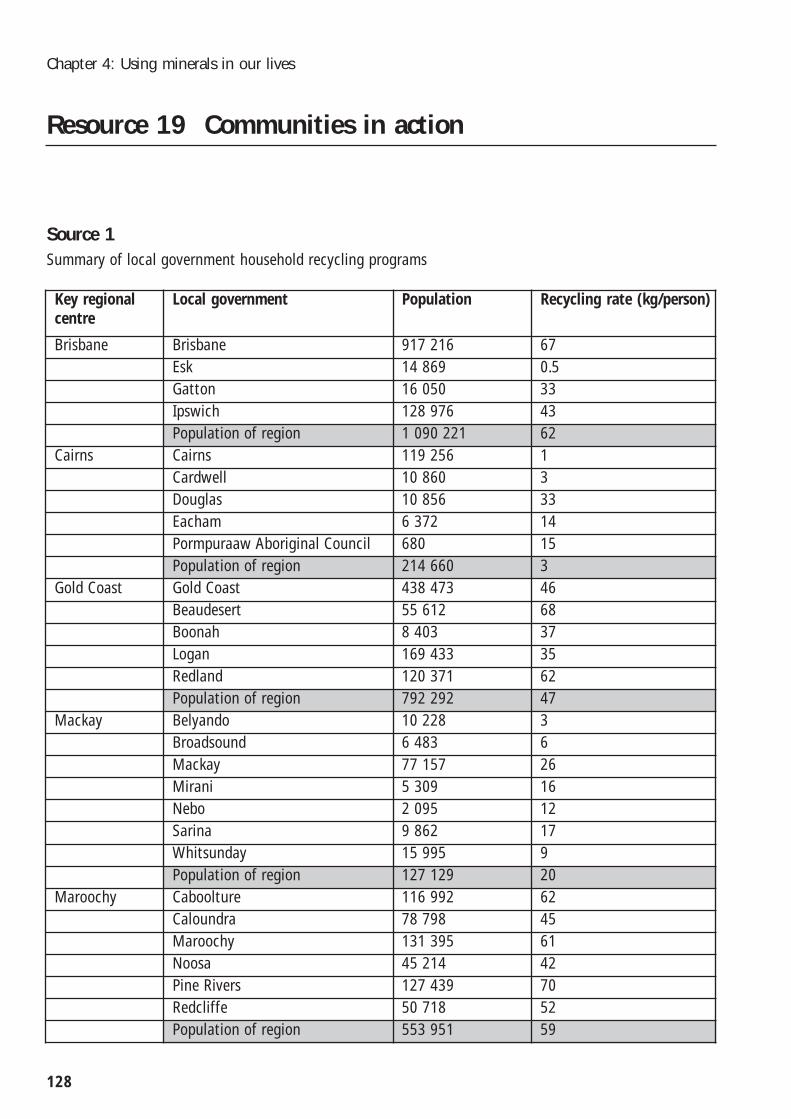
128
Chapter 4: Using minerals in our lives
Resource 19 Communities in action
Key regionalcentre
Local government Population Recycling rate (kg/person)
Brisbane Brisbane 917 216 67Esk 14 869 0.5Gatton 16 050 33Ipswich 128 976 43Population of region 1 090 221 62
Cairns Cairns 119 256 1Cardwell 10 860 3Douglas 10 856 33Eacham 6 372 14Pormpuraaw Aboriginal Council 680 15Population of region 214 660 3
Gold Coast Gold Coast 438 473 46Beaudesert 55 612 68Boonah 8 403 37Logan 169 433 35Redland 120 371 62Population of region 792 292 47
Mackay Belyando 10 228 3Broadsound 6 483 6Mackay 77 157 26Mirani 5 309 16Nebo 2 095 12Sarina 9 862 17Whitsunday 15 995 9Population of region 127 129 20
Maroochy Caboolture 116 992 62Caloundra 78 798 45Maroochy 131 395 61Noosa 45 214 42Pine Rivers 127 439 70Redcliffe 50 718 52Population of region 553 951 59
Source 1Summary of local government household recycling programs
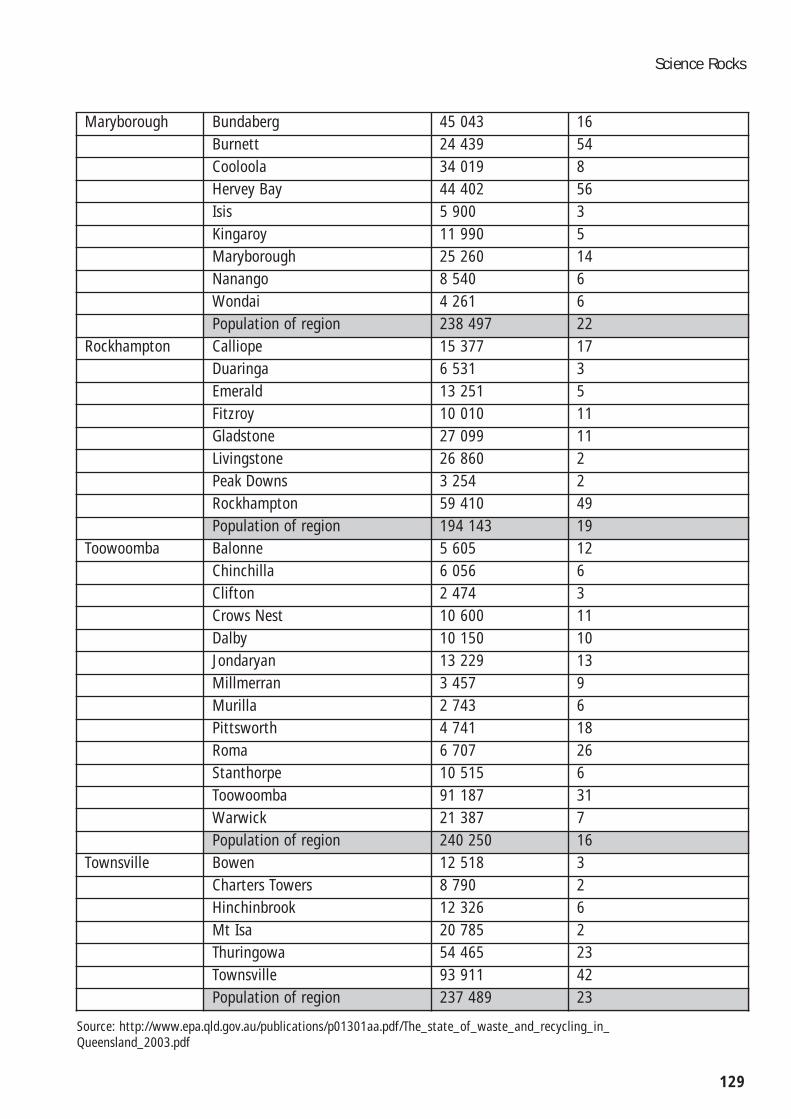
129
Science Rocks
Maryborough Bundaberg 45 043 16Burnett 24 439 54Cooloola 34 019 8Hervey Bay 44 402 56Isis 5 900 3Kingaroy 11 990 5Maryborough 25 260 14Nanango 8 540 6Wondai 4 261 6Population of region 238 497 22
Rockhampton Calliope 15 377 17Duaringa 6 531 3Emerald 13 251 5Fitzroy 10 010 11Gladstone 27 099 11Livingstone 26 860 2Peak Downs 3 254 2Rockhampton 59 410 49Population of region 194 143 19
Toowoomba Balonne 5 605 12Chinchilla 6 056 6Clifton 2 474 3Crows Nest 10 600 11Dalby 10 150 10Jondaryan 13 229 13Millmerran 3 457 9Murilla 2 743 6Pittsworth 4 741 18Roma 6 707 26Stanthorpe 10 515 6Toowoomba 91 187 31Warwick 21 387 7Population of region 240 250 16
Townsville Bowen 12 518 3Charters Towers 8 790 2Hinchinbrook 12 326 6Mt Isa 20 785 2Thuringowa 54 465 23Townsville 93 911 42Population of region 237 489 23
Source: http://www.epa.qld.gov.au/publications/p01301aa.pdf/The_state_of_waste_and_recycling_in_Queensland_2003.pdf

Source 2Extract from a newspaper report.
Since April 2003, all retail outlets in Coles Bay,including both supermarkets, have banned plasticcheck-out shopping bags. In the first twelvemonths, they stopped the use of 350 000 plasticcheck-out bags.
Planet Ark worked for some months in partnership with Coles Bay retailers who havebeen led in this endeavour by Ben Kearney, theowner of the local bakery.
Ben Kearney has inspired people right acrossAustralia and around the world by coordinatingColes Bay—Australia’s First Plastic Bag Free Town.As a result, Coles Bay was awarded theEnvironmental Excellence Award by theTasmanian Government and more recently, Ben Kearney was named national Local Hero of 2005 at the Australia Day award ceremony.
As plastic bag alternatives in Coles Bay, they areoffering a strong reusable paper bag with ahandle, for 25c. The other alternative on offer is aPlanet Ark reusable calico bag selling for $2.50.
Coles Bay plays host to whales on their annualmigration along the eastern seaboard. One of thereasons Coles Bay has gone Plastic-Check-out BagFree is to protect these whales and to stop theplastic bag littering of the adjoining FreycinetNational Park.
Source: http://www.planetark.com/campaignspage.cfm/newsid/58/newsDate/7/story.htm
130
Chapter 4: Using minerals in our lives

Demonstrating outcome EB 4.3
131
Science Rocks
When you complete this activity you will havesummarised information to compare ways inwhich different communities use resources fromthe Earth and beyond.
Resource 20 Change is possible (A)
1. Use the data on Resource 19 to graph the level of recycling in six to ten local government areas.
2. Think about what you would like to compare (areas with similar population, areas within a region,areas that share some geographical or social feature such as being coastal, urban or remote).
3. Choose the areas and plot them on a graph.
4. Write three questions that arise from the data presented on your graph.
___________________________________________________________________________________
___________________________________________________________________________________
___________________________________________________________________________________
___________________________________________________________________________________
5. Choose one of these questions to explore further.
6. How will you explore this question?
___________________________________________________________________________________
___________________________________________________________________________________
___________________________________________________________________________________
7. What did you find out?
___________________________________________________________________________________
___________________________________________________________________________________
___________________________________________________________________________________
___________________________________________________________________________________
___________________________________________________________________________________
___________________________________________________________________________________
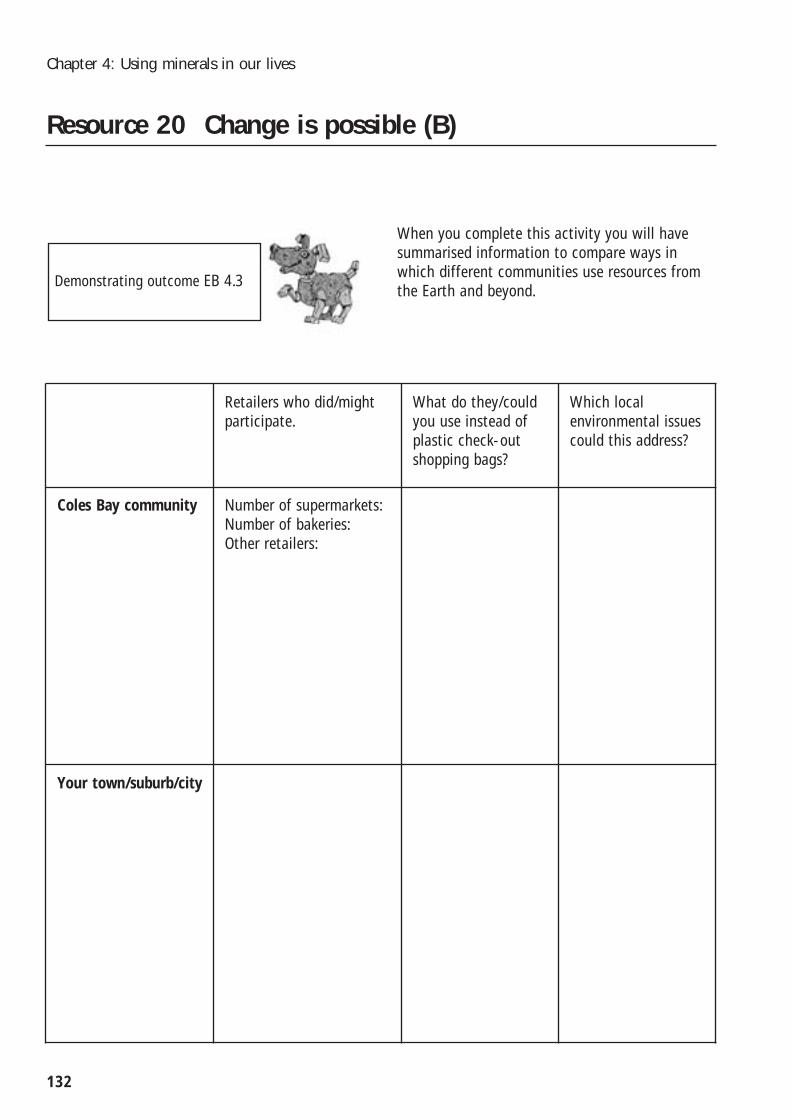
Demonstrating outcome EB 4.3
When you complete this activity you will havesummarised information to compare ways inwhich different communities use resources fromthe Earth and beyond.
132
Chapter 4: Using minerals in our lives
Retailers who did/mightparticipate.
What do they/couldyou use instead ofplastic check-outshopping bags?
Which localenvironmental issuescould this address?
Coles Bay community Number of supermarkets:Number of bakeries:Other retailers:
Your town/suburb/city
Resource 20 Change is possible (B)

Demonstrating outcome SS 4.3
133
Science Rocks
When you complete this activity you will havepresented an analysis of the short-term and long-term effects of plastic use in our society.
Resource 21 The impact of plastic in our lives
How is plastic used?Consider: range of applications
Economic impactsConsider: direct and indirect jobs,
cost of packaging
Social impacts Consider: health,safety and convenience
Environmental impacts Consider: pollution
(land, water and air) and animal wellfare
Planning your presentation (1): Things you need to know

134
Chapter 4: Using minerals in our lives
Effe
cts
of p
last
ic u
se in
our
soc
iety
SShhoorr
tt--ttee
rrmm ee
ffffeecc
ttssLLoo
nngg--tt
eerrmm
eeffff
eeccttss
posi
tive
nega
tive
posi
tive
nega
tive
Plan
ning
you
r pr
esen
tati
on (
2): O
rgan
isin
g yo
ur id
eas
and
info
rmat
ion

135
Science Rocks
Planning your presentation (3): Drafting an essay
Title
___________________________________________________________________________________
___________________________________________________________________________________
Thesis/opinion
(How has plastic affected our lives?)
Summary of analysis to follow
___________________________________________________________________________________
___________________________________________________________________________________
___________________________________________________________________________________
Short-term effects
(positive and negative)
___________________________________________________________________________________
___________________________________________________________________________________
___________________________________________________________________________________
___________________________________________________________________________________
___________________________________________________________________________________
___________________________________________________________________________________
Long-term effects
(positive and negative)
___________________________________________________________________________________
___________________________________________________________________________________
___________________________________________________________________________________
___________________________________________________________________________________
___________________________________________________________________________________
___________________________________________________________________________________
Synthesis
(Which effects are most significant? What needs to be done to address any issues? Could you include acall for action?)
___________________________________________________________________________________
___________________________________________________________________________________
___________________________________________________________________________________
___________________________________________________________________________________
___________________________________________________________________________________
___________________________________________________________________________________
Restate thesis/opinion
___________________________________________________________________________________
___________________________________________________________________________________
___________________________________________________________________________________
___________________________________________________________________________________
___________________________________________________________________________________
___________________________________________________________________________________
136
Chapter 4: Using minerals in our lives
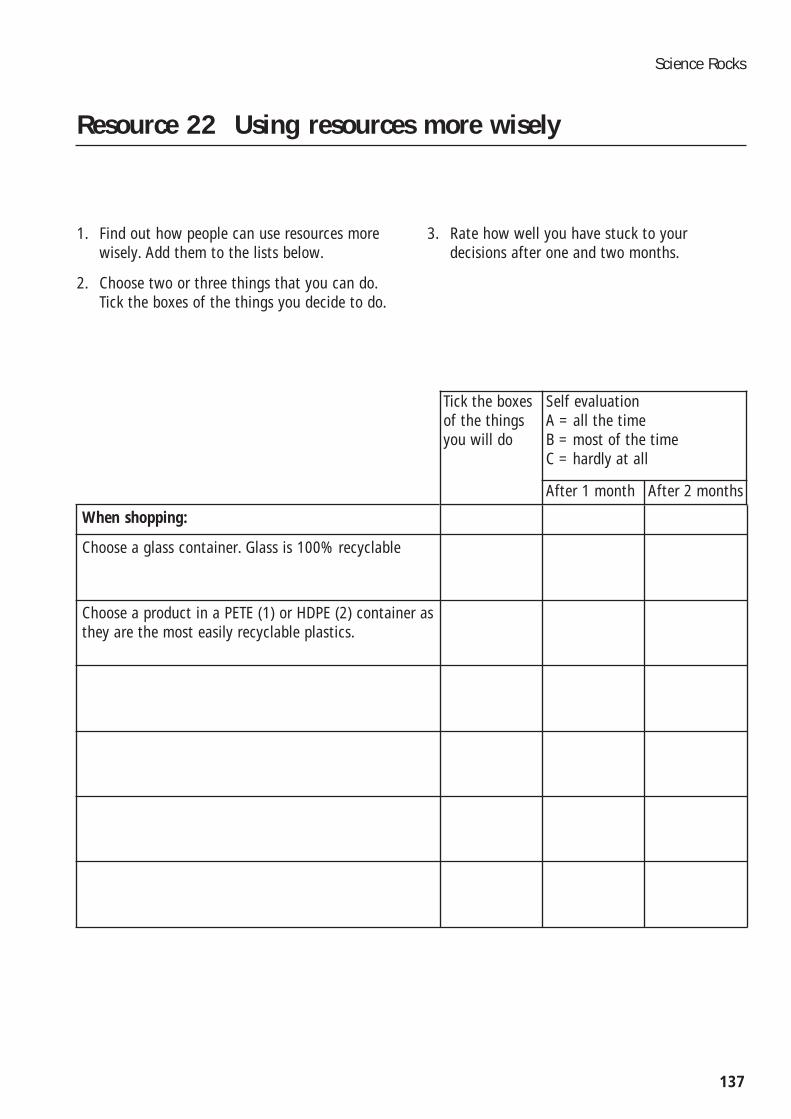
1. Find out how people can use resources morewisely. Add them to the lists below.
2. Choose two or three things that you can do.Tick the boxes of the things you decide to do.
137
Science Rocks
3. Rate how well you have stuck to yourdecisions after one and two months.
Resource 22 Using resources more wisely
When shopping:
Choose a glass container. Glass is 100% recyclable
Choose a product in a PETE (1) or HDPE (2) container asthey are the most easily recyclable plastics.
Tick the boxesof the thingsyou will do
Self evaluation A = all the timeB = most of the timeC = hardly at all
After 1 month After 2 months
138
Chapter 4: Using minerals in our lives
At home
Instead of using cling wrap, put the left overs in a re-useable plastic container with a lid.
When you are out and about:
PETE = (polyethylene terephthalate) and HDPE = (high density polyethylene). This is why the abbreviationsare commonly used. PETE is plastic that is labelled (1) for recycling purposes and HDPE is type (2). These are listed and described (along with examples of each) in Resource 6 in chapter 4.


