5
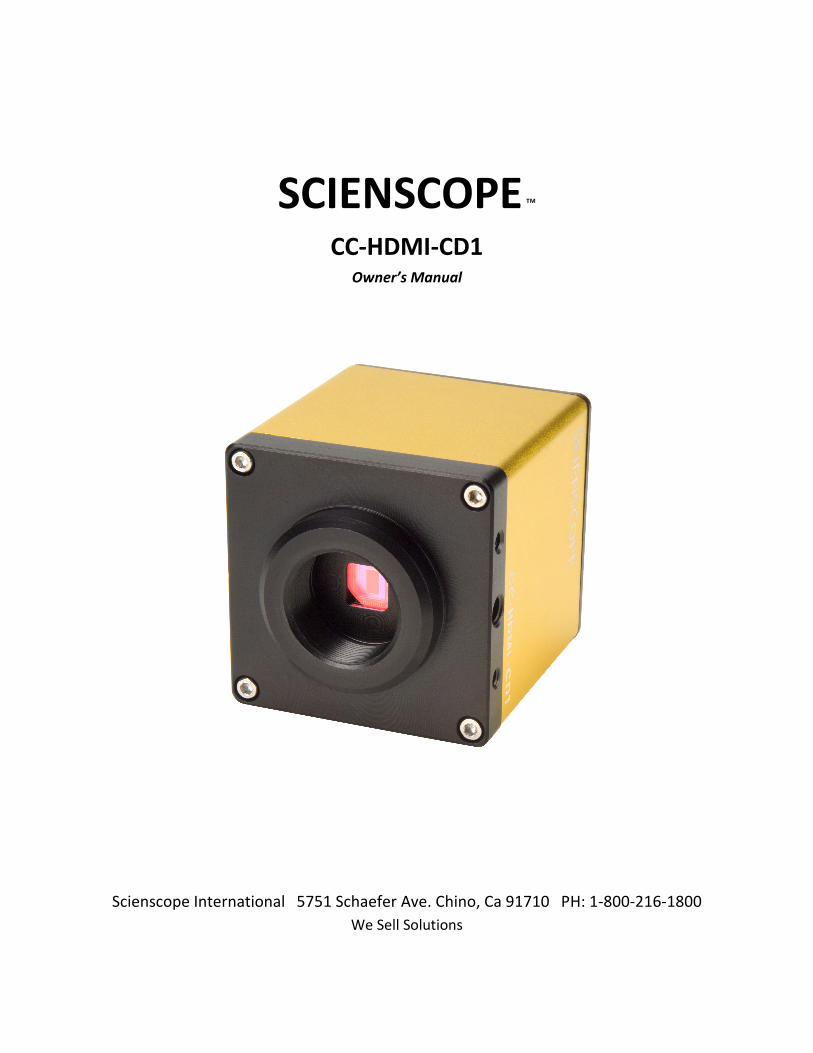
SCIENSCOPE ™ CC-HDMI-CD1 Owner’s Manual Scienscope International 5751 Schaefer Ave. Chino, Ca 91710 PH: 1-800-216-1800 We Sell Solutions
| Date post: | 26-May-2018 |
| Category: |
Documents |
| Upload: | doannguyet |
| View: | 219 times |
| Download: | 0 times |
SCIENSCOPE ™
CC-HDMI-CD1 Owner’s Manual
Scienscope International 5751 Schaefer Ave. Chino, Ca 91710 PH: 1-800-216-1800
We Sell Solutions

CC-HDMI-CD1 1080p High Definition Camera
Specifications:
Sensor: CMOS
Size: 1/2.5”
Resolution: 1080p (1920 x 1080)
Frame rate: 60fps
Pixel: 2 mega pixel (2.8 x 2.8um)
Color: RGB (individual adjustment)
White balance: auto/manual
Exposure: auto/manual
Contrast: manual
Capture mode: manual/trigger
Memory slot: SD (4G or below; Kingston or SanDisk compatible)
Memory card: SD/USB 2.0 Dual-Interface 4GB card included
Cross hair grid: Up to 4 horizontal and 4 vertical (6 color selections)
Lens mount: C-Mount
Power: 5-12VDC
Camera size: 77 x 61 x 61 mm
Camera weight: 270g
Temperature: 0-70ºC

Figure 1 (Camera)
ON-SCREEN MENU
Figure 2 (Onscreen Menu)
Remote
Trigger
Power LED
Also indicates image capture
and SD card recognition.
HDMI
Out
5-12VDC 3A
Menu Dial
Turn this dial to make
the menu appear and
to cycle through
options. Selection Keys (Left and right)
Press these keys to increase or
decrease levels or activate
video calipers.
Horizontal lines
Auto Exposure
Blue
Green
Red
Vertical lines
Contrast
Brightness
White Balance
Sharpening Capture
SD Slot
Insert card with SD side
down. Gold traces facing
the user.
High Dynamic Range
CC-HDMI-CD1 or CC-CMC-LCD10 Quick Start and trouble Shooting Guide
1) Connect the provided power supply to the wall outlet then to the camera. If you are using the
CC-HDMI-CD1 the voltage rating should be 5VDC. If you are using the CC-CMC-LCD10 the voltage
rating should be 12VDC.
2) Connect the camera to the monitor using the provided HDMI cable.
3) For the best image perform a White Balance (WB). If you are using a CC-HDMI-CD1 Turn the dial on
the back of the camera until you have highlighted menu line “P” and press the button on the right. If
you are using the CC-CMC-LCD10 press the up/down button on the wired remote until you have
highlighted menu line “P” and press the right button on the wired remote.
4) To capture images please do the following:
a) Insert SD/USB card into SD card slot with the gold SD traces facing you and facing down.
b) Watch for green LED on the back of camera to flash momentarily. This means that the card has
been recognized by the camera and is now ready to take images. If you are using the CC-CMC-
LCD10 the monitor will say SD Ready in the lower right hand corner of the screen.
c) If you are using the CC-HDMI-CD1 you can now capture images using the wired trigger or the
onscreen menu. If you are using the CC-CMC-LCD10 you can now capture images using the
wired remote control or onscreen menu.
d) To remove the SD/USB card after capturing images PUSH to eject the card from the slot. DO
NOT PULL THE CARD OUT.
e) Take the card to any computer with a SD or USB port and download your images using Windows
Explorer.
5) If your camera is not capturing images perform the following:
a) The card may have been corrupted. To fix this: insert it into a computer via the SD or USB port
and reformat the card using Windows. Right click on the card and click Format. Select FAT32 as
your file format. Click Format.
b) The DCIM file may have been accidentally deleted. If this happens the camera will not be able to
capture images. To regenerate the file: Remove the SD/USB card from the camera. Disconnect
the power from the camera. Insert the SD/USB card while the power is disconnected. Reconnect
the power to the camera. This will regenerate the DCIM file and you will be able to capture
images.
c) The camera cannot capture more images while an image is being written to the card. If the light
is flashing wait until it stops to capture another image.
d) The camera will not capture images if the card is not inserted properly. Eject the card by pushing
on it to eject it from the camera. Reinsert the card by pushing on it until you feel a click.

How to Adjust Cross-hair Grid
1. View the menu on the bottom right of the LCD for guidance (see figure 2 above).
2. Using the menu dial, select the horizontal line icon or vertical line icon and press the
two selection buttons (< & >) simultaneously to display a horizontal or vertical line on
the screen. Various colors are available (black, white, blue, green and red). You can
have up to (4) horizontal or vertical lines at one time.
3. To change the position of a line select it with the menu dial and press the selection keys
(left or right). Holding a selection key down will make it move faster.
4. Use the selection buttons to add or delete vertical and horizontal lines simply by
pressing them simultaneously.


