W W W. S C O T T- S P O R T S . C O MWWW.SCOTT-SPORTS.COMSCOTT Sports SARoute du Crochet 17, CH–1762 GivisiezPhone: +41 26 460 16 16 | Fax: +41 26 460 16 00Email: [email protected]
Distribution: SSG (Europe) Distribution Center SA, P.E.D. Zone C1, Rue du Kiell 60, 6790 Aubange, Belgium
v7.0/03072017
USER MANUALSCOTT GENIUS
WWW.SCOTT-SPORTS.COM
ENGLISHENGLISH
Genius Concept 04
Geometry/Technical Data Genius 27.5" & 29" 05
TWINLOC 06
Basic Set-Up of Shock & Forks 07
SAG 08
Rebound Shock Set-Up 09
Replaceable Rear Dropout 10
Pivot Maintenance 12
Wheels 12
Cable Routing 13
BB Standards/FD Mounting Details 17
Adjustment 17
Guarantee on SCOTT Bikes 18
•CONTENTS
The SCOTT Genius should be adjusted exactly to the individual rider to achieve maximum saftey and fun while riding.
SCOTT recommends that all adjustments be carried out by your local authorized SCOTT dealer. Some basic maintenance can be done if strictly following the manuals supplied with this bike.
Please contact your authorized SCOTT dealer for advice in order to avoid any harm and assist you with any questions or technical problems.
03 | BIKE USER MANUAL | GENIUSGENIUS | BIKE USER MANUAL | 02
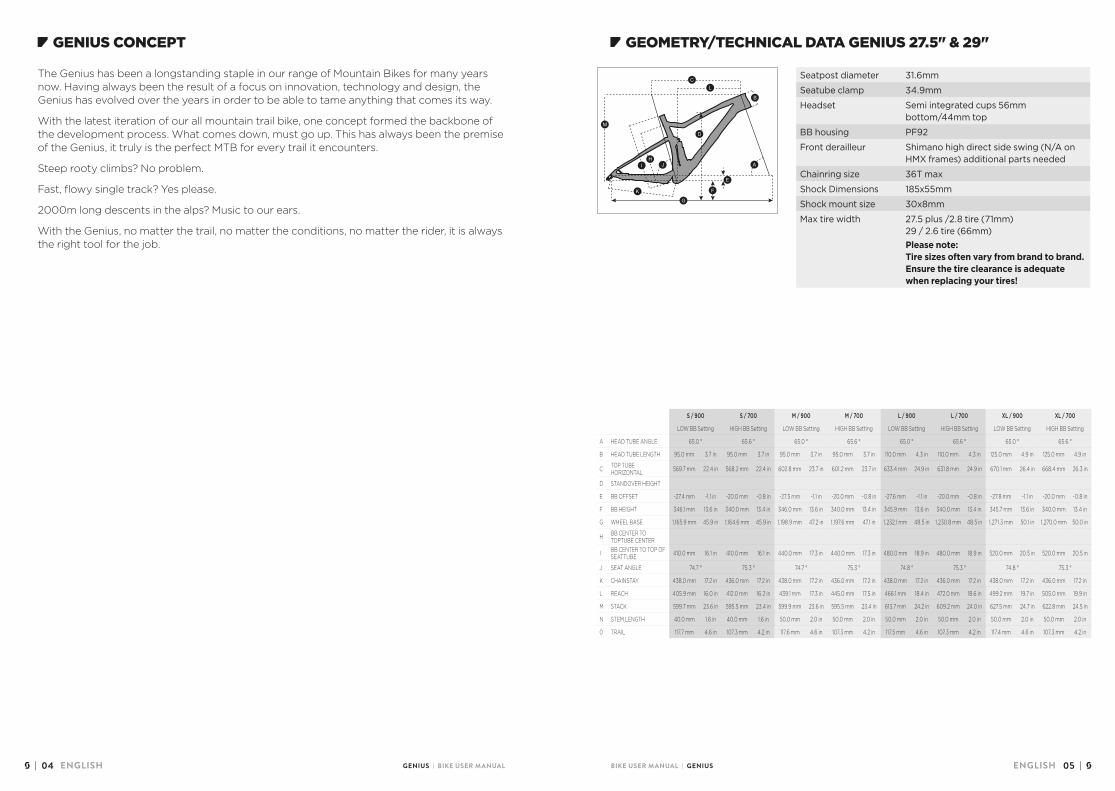
S / 900 S / 700 M / 900 M / 700 L / 900 L / 700 XL / 900 XL / 700
LOW BB Setting HIGH BB Setting LOW BB Setting HIGH BB Setting LOW BB Setting HIGH BB Setting LOW BB Setting HIGH BB Setting
A HEAD TUBE ANGLE 65.0 ° 65.6 ° 65.0 ° 65.6 ° 65.0 ° 65.6 ° 65.0 ° 65.6 °
B HEAD TUBE LENGTH 95.0 mm 3.7 in 95.0 mm 3.7 in 95.0 mm 3.7 in 95.0 mm 3.7 in 110.0 mm 4.3 in 110.0 mm 4.3 in 125.0 mm 4.9 in 125.0 mm 4.9 in
C TOP TUBE HORIZONTAL 569.7 mm 22.4 in 568.2 mm 22.4 in 602.8 mm 23.7 in 601.2 mm 23.7 in 633.4 mm 24.9 in 631.8 mm 24.9 in 670.1 mm 26.4 in 668.4 mm 26.3 in
D STANDOVER HEIGHT
E BB OFFSET -27.4 mm -1.1 in -20.0 mm -0.8 in -27.5 mm -1.1 in -20.0 mm -0.8 in -27.6 mm -1.1 in -20.0 mm -0.8 in -27.8 mm -1.1 in -20.0 mm -0.8 in
F BB HEIGHT 346.1 mm 13.6 in 340.0 mm 13.4 in 346.0 mm 13.6 in 340.0 mm 13.4 in 345.9 mm 13.6 in 340.0 mm 13.4 in 345.7 mm 13.6 in 340.0 mm 13.4 in
G WHEEL BASE 1,165.9 mm 45.9 in 1,164.6 mm 45.9 in 1,198.9 mm 47.2 in 1,197.6 mm 47.1 in 1,232.1 mm 48.5 in 1,230.8 mm 48.5 in 1,271.3 mm 50.1 in 1,270.0 mm 50.0 in
H BB CENTER TO TOPTUBE CENTER
I BB CENTER TO TOP OF SEATTUBE 410.0 mm 16.1 in 410.0 mm 16.1 in 440.0 mm 17.3 in 440.0 mm 17.3 in 480.0 mm 18.9 in 480.0 mm 18.9 in 520.0 mm 20.5 in 520.0 mm 20.5 in
K CHAINSTAY 438.0 mm 17.2 in 436.0 mm 17.2 in 438.0 mm 17.2 in 436.0 mm 17.2 in 438.0 mm 17.2 in 436.0 mm 17.2 in 438.0 mm 17.2 in 436.0 mm 17.2 in
L REACH 405.9 mm 16.0 in 412.0 mm 16.2 in 439.1 mm 17.3 in 445.0 mm 17.5 in 466.1 mm 18.4 in 472.0 mm 18.6 in 499.2 mm 19.7 in 505.0 mm 19.9 in
M STACK 599.7 mm 23.6 in 595.5 mm 23.4 in 599.9 mm 23.6 in 595.5 mm 23.4 in 613.7 mm 24.2 in 609.2 mm 24.0 in 627.5 mm 24.7 in 622.8 mm 24.5 in
N STEM LENGTH 40.0 mm 1.6 in 40.0 mm 1.6 in 50.0 mm 2.0 in 50.0 mm 2.0 in 50.0 mm 2.0 in 50.0 mm 2.0 in 50.0 mm 2.0 in 50.0 mm 2.0 in
0 TRAIL 117.7 mm 4.6 in 107.3 mm 4.2 in 117.6 mm 4.6 in 107.3 mm 4.2 in 117.5 mm 4.6 in 107.3 mm 4.2 in 117.4 mm 4.6 in 107.3 mm 4.2 in
ENGLISHENGLISH
•GENIUS CONCEPT
The Genius has been a longstanding staple in our range of Mountain Bikes for many years now. Having always been the result of a focus on innovation, technology and design, the Genius has evolved over the years in order to be able to tame anything that comes its way.
With the latest iteration of our all mountain trail bike, one concept formed the backbone of the development process. What comes down, must go up. This has always been the premise of the Genius, it truly is the perfect MTB for every trail it encounters.
Steep rooty climbs? No problem.
Fast, flowy single track? Yes please.
2000m long descents in the alps? Music to our ears.
With the Genius, no matter the trail, no matter the conditions, no matter the rider, it is always the right tool for the job.
•GEOMETRY/TECHNICAL DATA GENIUS 27.5" & 29"
Seatpost diameter 31 6mm
Seatube clamp 34 9mm
Headset Semi integrated cups 56mm bottom/44mm top
BB housing PF92
Front derailleur Shimano high direct side swing (N/A on HMX frames) additional parts needed
Chainring size 36T max
Shock Dimensions 185x55mm
Shock mount size 30x8mm
Max tire width 27 5 plus /2 8 tire (71mm) 29 / 2 6 tire (66mm)Please note: Tire sizes often vary from brand to brand. Ensure the tire clearance is adequate when replacing your tires!
05 | BIKE USER MANUAL | GENIUSGENIUS | BIKE USER MANUAL | 04
ENGLISHENGLISH
• IMPORTANT!
SCOTT Genius is designed around the BOOST platform so many of the fitted parts: cranks/wheels/dropouts/forks differ from traditional cycle parts. Always consult your authorized SCOTT dealer for advice on replacing or repairing any part of your SCOTT bike!
•TWINLOC
The TWINLOC system offers simultaneous control of the front and rear shocks with a single lever allowing the ride of the bike to be adjusted at the flick of a finger.
- Descent Mode: Full travel rear / full travel front
You can only assemble the “standard” TWINLOC remote lever in “left side upward position” on the handlebar (this is usually fitted on bikes with x2 front chainrings.)
On bikes with x1 chainring on the front the under bar TWINLOC remote lever in “left side downward” position can be fitted as standard.
It is possible to change the TWINLOC lever to the underbar option if the bikes gears have been changed to x1 system, a new alternative lever will be required for this adjustment; please consult your local SCOTT dealer for more information on obtaining the correct lever for your bike.
There are 3 positions of the TWINLOC remote lever.
1. CLIMB MODE: The shock is nearly locked; climbing on asphalt roads is now possible with little power loss. A simultaneous blow-off-system prevents the shock being damaged in case the rider does not open the system while crossing obstacles.
2. TRACTION MODE: By reducing the internal chamber volume inside the shock the travel of the shock will be reduced, the characteristic of the air spring gets harder this results in climbing with reduced “bobbing” and offers still optimum traction of the rear wheel.
3. DESCENT MODE: Full travel of the front and rear shocks.
You will find the following positions on the remote lever:
•BASIC SET-UP OF SHOCK & FORKS
Recommended tools for the shock setup:
- The SAG tool that came with your bike.
- A shock pump with a dial up to 20bars/300psi with a special air valve connector (not supplied with this bike), this will help stop air from escaping while removing the pump from the shock valve.
Please note that air will flow into the hose and indicator when counterchecking the air pressure, this will give the appearance that the shock has less air pressure then it was setup, your shock may need to be adjusted once this action is made.
Please also note that the indicators of shock pumps have a tolerance of max. 10%.
For bikes spec’d with Fox shock and forks:
You can find more specific information about Fox set up on Fox’s website, please use your fork/shock ID number to find more useful setup tips for your exact fork and shock (please visit: ridefox.com)
07 | BIKE USER MANUAL | GENIUSGENIUS | BIKE USER MANUAL | 06
Your SCOTT bike will be supplied with a SAG tool to help set up your bikes suspension, these SAG tools can be easily clipped on the shock body and fork dust seal.
For the best performance it is recommended you start with SAG of 25-30% for shocks and 15-20% for forks.
1. Make sure before any adjustment is made that your shock and forks are in the “open” position.
2. With the shock pump attached to the rear shock valve, pump your desired pressure into the shock. Once the pressure is achieved slowly compress and decompress your shock through 25% of its travel 10 times. This will equalize the positive and negative air chambers and will change the pressure on the pump gauge, if needed add or reduce pressure and repeat. Note the compression/decompression of the rear shock through the travel must also be done if the pressure is reduced! The same operation is used on the forks.
3. Once your desired pressure is reached slide the rubber O-ring on the shock and fork leg against the dust seal, clip on your SAG tool if required.
4. Sit on your bike in your usual riding position (in your riding gear: if you carry a bag/Hydration-system put it on,) don’t “bounce” the suspension while doing this, use a wall or a friend for support if needed.
5. Get off the bike gently without bouncing and check the O-ring position on the shaft or the fork stanchion, with the SAG adjuster clipped on. This makes it easy to see where your SAG is set.
• IMPORTANT!
Do not sit on your bike with the shock pump attached to the bike!
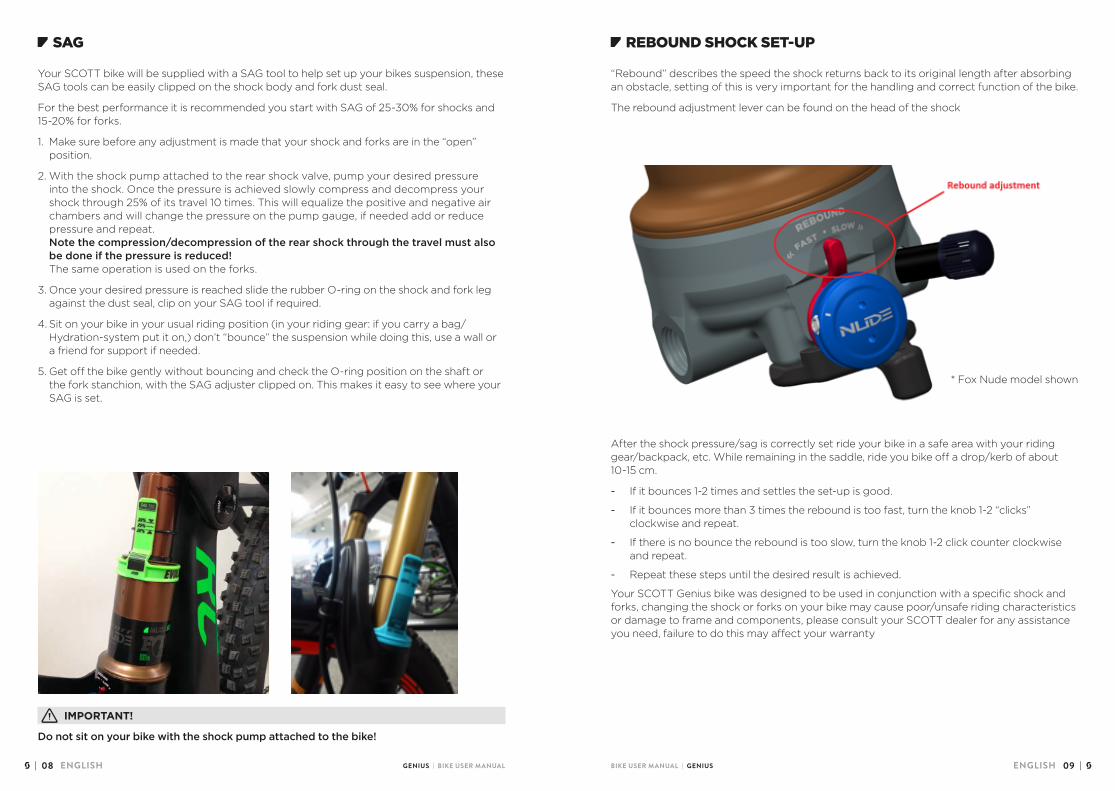
•REBOUND SHOCK SET-UP
“Rebound” describes the speed the shock returns back to its original length after absorbing an obstacle, setting of this is very important for the handling and correct function of the bike.
The rebound adjustment lever can be found on the head of the shock
After the shock pressure/sag is correctly set ride your bike in a safe area with your riding gear/backpack, etc. While remaining in the saddle, ride you bike off a drop/kerb of about 10-15 cm.
- If it bounces 1-2 times and settles the set-up is good.
- If it bounces more than 3 times the rebound is too fast, turn the knob 1-2 “clicks” clockwise and repeat.
- If there is no bounce the rebound is too slow, turn the knob 1-2 click counter clockwise and repeat.
- Repeat these steps until the desired result is achieved.
Your SCOTT Genius bike was designed to be used in conjunction with a specific shock and forks, changing the shock or forks on your bike may cause poor/unsafe riding characteristics or damage to frame and components, please consult your SCOTT dealer for any assistance you need, failure to do this may affect your warranty
* Fox Nude model shown
09 | BIKE USER MANUAL | GENIUSGENIUS | BIKE USER MANUAL | 08
ENGLISHENGLISH
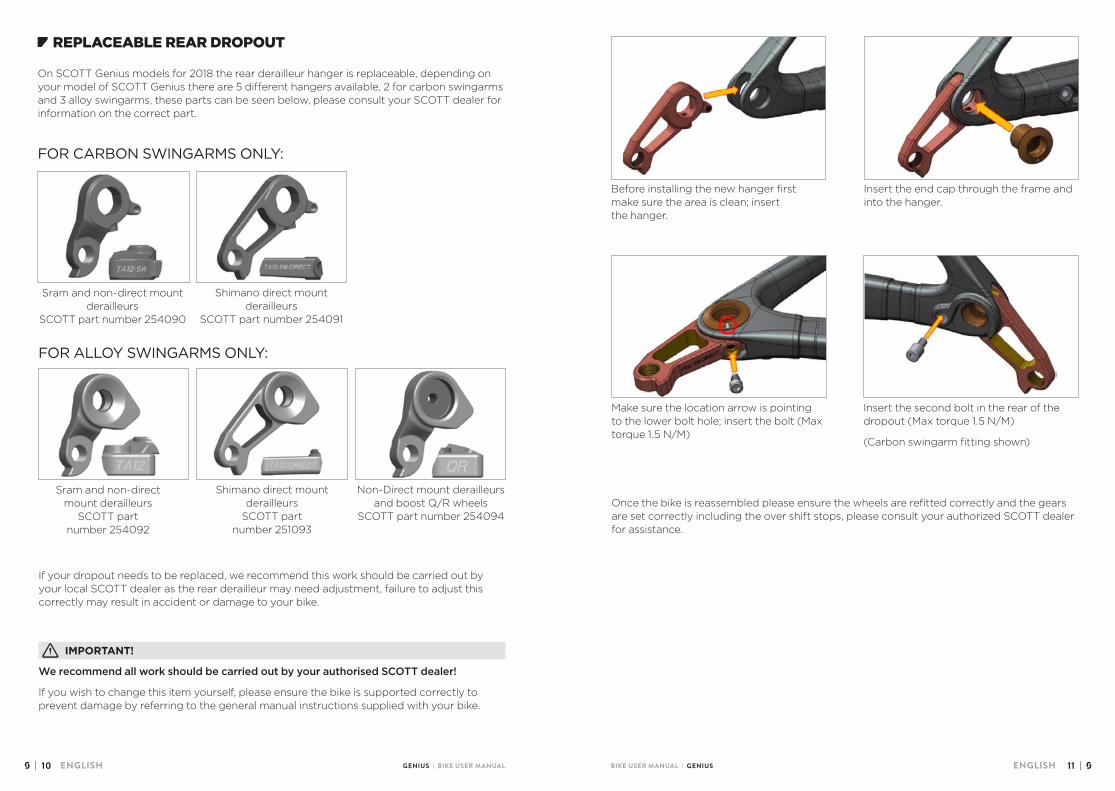
•REPLACEABLE REAR DROPOUT
On SCOTT Genius models for 2018 the rear derailleur hanger is replaceable, depending on your model of SCOTT Genius there are 5 different hangers available, 2 for carbon swingarms and 3 alloy swingarms, these parts can be seen below, please consult your SCOTT dealer for information on the correct part.
FOR CARBON SWINGARMS ONLY:
Sram and non-direct mount derailleurs
SCOTT part number 254090
Shimano direct mount derailleurs
SCOTT part number 254091
Sram and non-direct mount derailleurs
SCOTT part number 254092
Non-Direct mount derailleurs and boost Q/R wheels
SCOTT part number 254094
Shimano direct mount derailleurs
SCOTT part number 251093
FOR ALLOY SWINGARMS ONLY:
If your dropout needs to be replaced, we recommend this work should be carried out by your local SCOTT dealer as the rear derailleur may need adjustment, failure to adjust this correctly may result in accident or damage to your bike.
• IMPORTANT!
We recommend all work should be carried out by your authorised SCOTT dealer!
If you wish to change this item yourself, please ensure the bike is supported correctly to prevent damage by referring to the general manual instructions supplied with your bike.
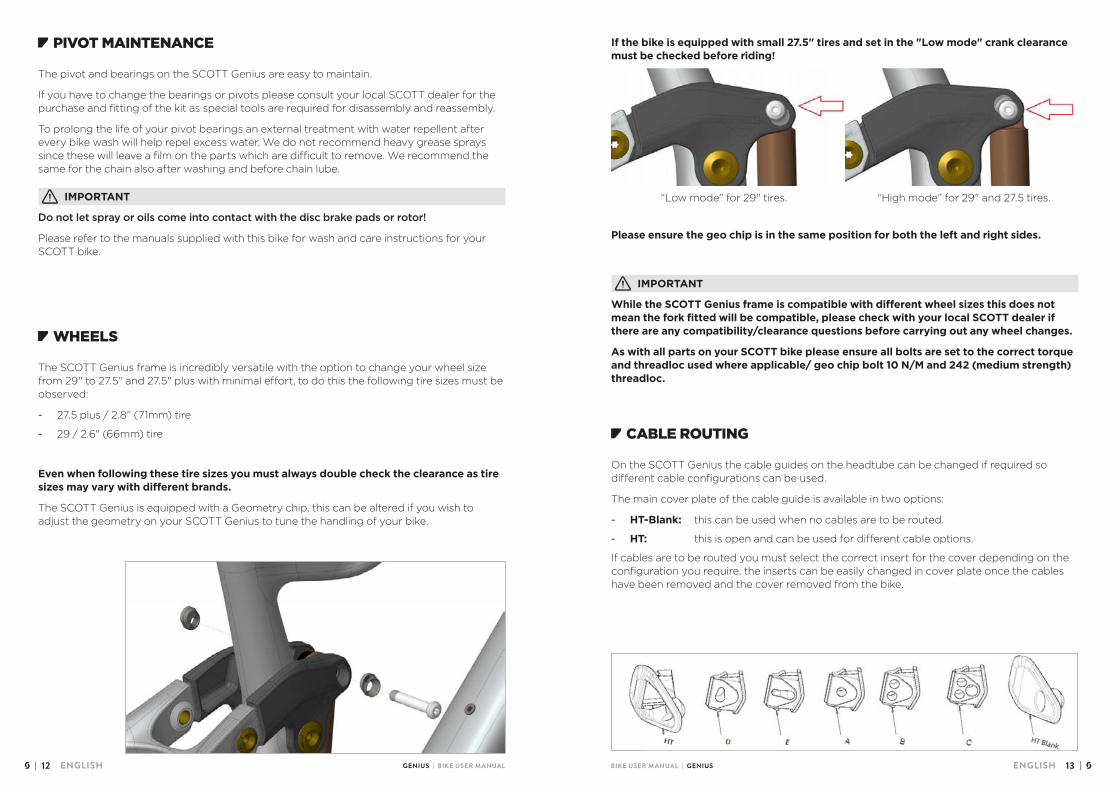
Before installing the new hanger first make sure the area is clean; insert the hanger.
Insert the end cap through the frame and into the hanger.
Make sure the location arrow is pointing to the lower bolt hole; insert the bolt (Max torque 1.5 N/M)
Insert the second bolt in the rear of the dropout (Max torque 1.5 N/M)
(Carbon swingarm fitting shown)
Once the bike is reassembled please ensure the wheels are refitted correctly and the gears are set correctly including the over shift stops, please consult your authorized SCOTT dealer for assistance.
11 | BIKE USER MANUAL | GENIUSGENIUS | BIKE USER MANUAL | 10
ENGLISHENGLISH
•PIVOT MAINTENANCE
The pivot and bearings on the SCOTT Genius are easy to maintain.
If you have to change the bearings or pivots please consult your local SCOTT dealer for the purchase and fitting of the kit as special tools are required for disassembly and reassembly.
To prolong the life of your pivot bearings an external treatment with water repellent after every bike wash will help repel excess water. We do not recommend heavy grease sprays since these will leave a film on the parts which are difficult to remove. We recommend the same for the chain also after washing and before chain lube.
• IMPORTANT
Do not let spray or oils come into contact with the disc brake pads or rotor!
Please refer to the manuals supplied with this bike for wash and care instructions for your SCOTT bike.
•WHEELS
The SCOTT Genius frame is incredibly versatile with the option to change your wheel size from 29" to 27.5" and 27.5" plus with minimal effort, to do this the following tire sizes must be observed:
- 27.5 plus / 2.8" (71mm) tire
- 29 / 2.6" (66mm) tire
Even when following these tire sizes you must always double check the clearance as tire sizes may vary with different brands.
The SCOTT Genius is equipped with a Geometry chip, this can be altered if you wish to adjust the geometry on your SCOTT Genius to tune the handling of your bike.
•CABLE ROUTING
On the SCOTT Genius the cable guides on the headtube can be changed if required so different cable configurations can be used.
The main cover plate of the cable guide is available in two options:
- HT-Blank: this can be used when no cables are to be routed.
- HT: this is open and can be used for different cable options.
If cables are to be routed you must select the correct insert for the cover depending on the configuration you require, the inserts can be easily changed in cover plate once the cables have been removed and the cover removed from the bike.
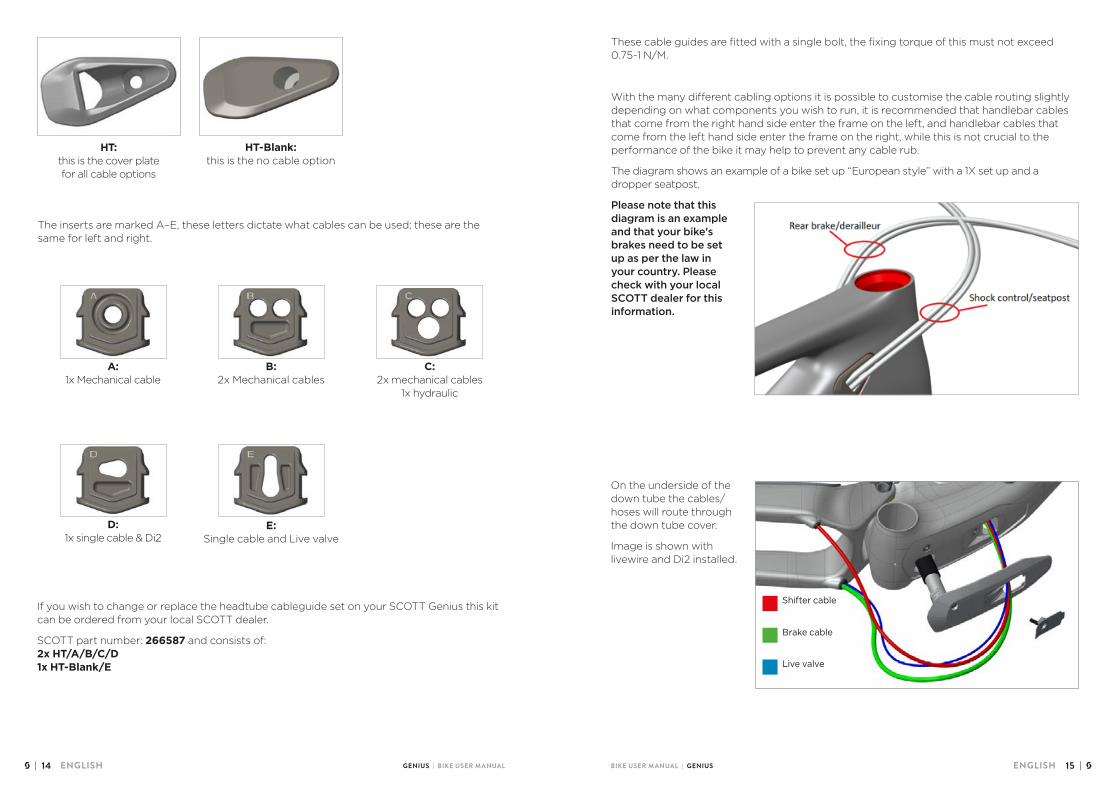
If the bike is equipped with small 27.5" tires and set in the "Low mode" crank clearance must be checked before riding!
“Low mode” for 29" tires. “High mode” for 29" and 27.5 tires.
Please ensure the geo chip is in the same position for both the left and right sides.
• IMPORTANT
While the SCOTT Genius frame is compatible with different wheel sizes this does not mean the fork fitted will be compatible, please check with your local SCOTT dealer if there are any compatibility/clearance questions before carrying out any wheel changes.
As with all parts on your SCOTT bike please ensure all bolts are set to the correct torque and threadloc used where applicable/ geo chip bolt 10 N/M and 242 (medium strength) threadloc.
13 | BIKE USER MANUAL | GENIUSGENIUS | BIKE USER MANUAL | 12
ENGLISHENGLISH
The inserts are marked A–E, these letters dictate what cables can be used; these are the same for left and right.
HT: this is the cover plate for all cable options
A: 1x Mechanical cable
D: 1x single cable & Di2
HT-Blank: this is the no cable option
B: 2x Mechanical cables
E: Single cable and Live valve
C: 2x mechanical cables
1x hydraulic
If you wish to change or replace the headtube cableguide set on your SCOTT Genius this kit can be ordered from your local SCOTT dealer.
SCOTT part number: 266587 and consists of: 2x HT/A/B/C/D 1x HT-Blank/E
These cable guides are fitted with a single bolt, the fixing torque of this must not exceed 0.75-1 N/M.
With the many different cabling options it is possible to customise the cable routing slightly depending on what components you wish to run, it is recommended that handlebar cables that come from the right hand side enter the frame on the left, and handlebar cables that come from the left hand side enter the frame on the right, while this is not crucial to the performance of the bike it may help to prevent any cable rub.
The diagram shows an example of a bike set up “European style” with a 1X set up and a dropper seatpost.
Please note that this diagram is an example and that your bike's brakes need to be set up as per the law in your country. Please check with your local SCOTT dealer for this information.
On the underside of the down tube the cables/hoses will route through the down tube cover.
Image is shown with livewire and Di2 installed.
Shifter cable
Brake cable
Live valve
15 | BIKE USER MANUAL | GENIUSGENIUS | BIKE USER MANUAL | 14
ENGLISHENGLISH
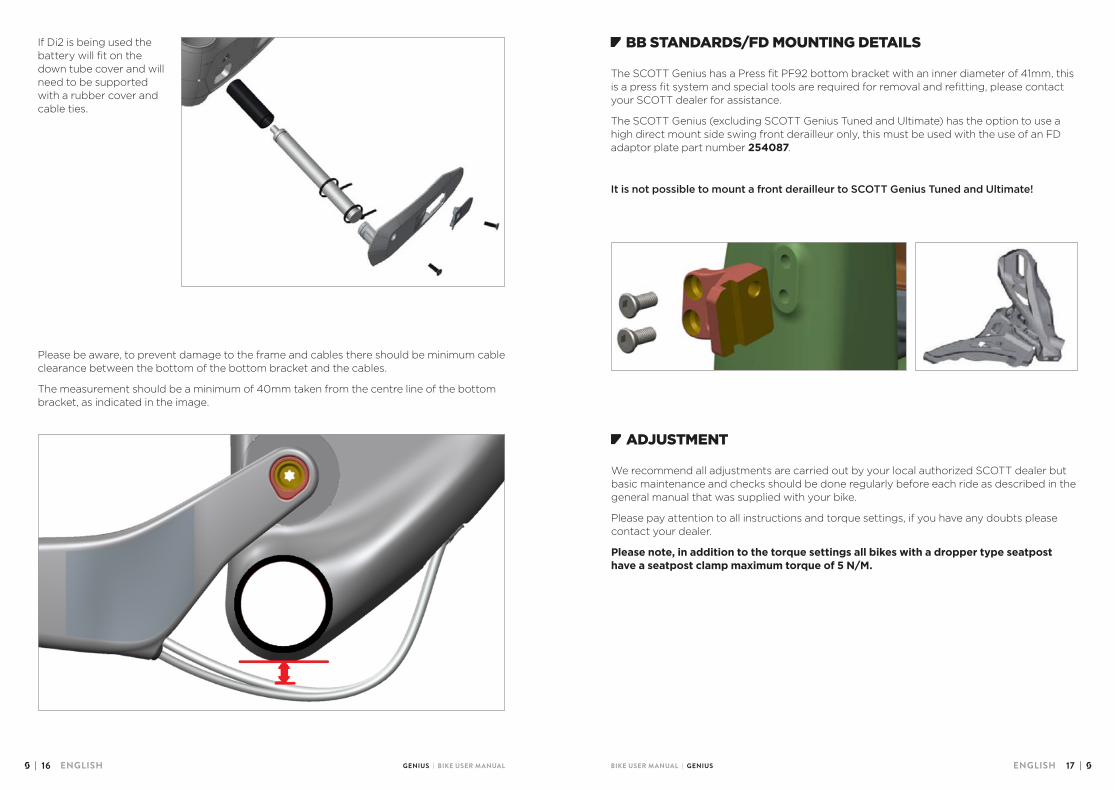
Please be aware, to prevent damage to the frame and cables there should be minimum cable clearance between the bottom of the bottom bracket and the cables.
The measurement should be a minimum of 40mm taken from the centre line of the bottom bracket, as indicated in the image.
•BB STANDARDS/FD MOUNTING DETAILS
The SCOTT Genius has a Press fit PF92 bottom bracket with an inner diameter of 41mm, this is a press fit system and special tools are required for removal and refitting, please contact your SCOTT dealer for assistance.
The SCOTT Genius (excluding SCOTT Genius Tuned and Ultimate) has the option to use a high direct mount side swing front derailleur only, this must be used with the use of an FD adaptor plate part number 254087.
It is not possible to mount a front derailleur to SCOTT Genius Tuned and Ultimate!
•ADJUSTMENT
We recommend all adjustments are carried out by your local authorized SCOTT dealer but basic maintenance and checks should be done regularly before each ride as described in the general manual that was supplied with your bike.
Please pay attention to all instructions and torque settings, if you have any doubts please contact your dealer.
Please note, in addition to the torque settings all bikes with a dropper type seatpost have a seatpost clamp maximum torque of 5 N/M.
If Di2 is being used the battery will fit on the down tube cover and will need to be supported with a rubber cover and cable ties.
17 | BIKE USER MANUAL | GENIUSGENIUS | BIKE USER MANUAL | 16
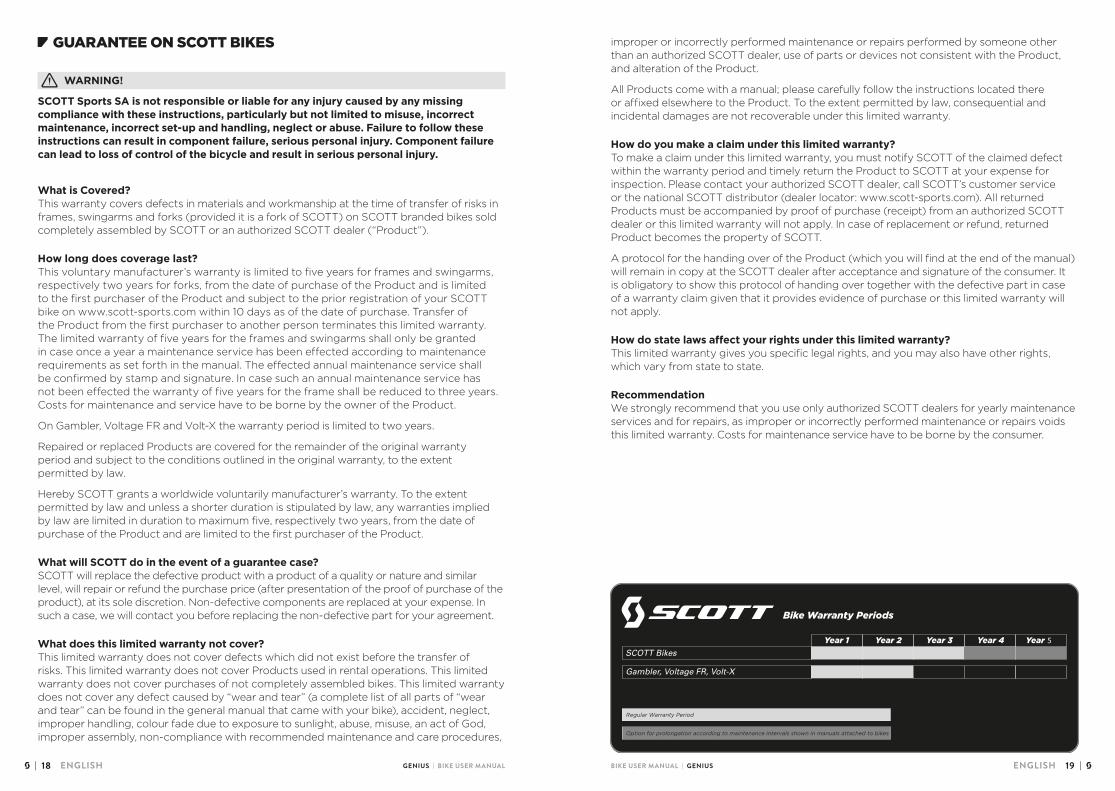
SCOTT Bikes
Gambler, Voltage FR, Volt-X
5
ENGLISHENGLISH
•GUARANTEE ON SCOTT BIKES
• WARNING!
SCOTT Sports SA is not responsible or liable for any injury caused by any missing compliance with these instructions, particularly but not limited to misuse, incorrect maintenance, incorrect set-up and handling, neglect or abuse. Failure to follow these instructions can result in component failure, serious personal injury. Component failure can lead to loss of control of the bicycle and result in serious personal injury.
What is Covered? This warranty covers defects in materials and workmanship at the time of transfer of risks in frames, swingarms and forks (provided it is a fork of SCOTT) on SCOTT branded bikes sold completely assembled by SCOTT or an authorized SCOTT dealer (“Product”).
How long does coverage last? This voluntary manufacturer’s warranty is limited to five years for frames and swingarms, respectively two years for forks, from the date of purchase of the Product and is limited to the first purchaser of the Product and subject to the prior registration of your SCOTT bike on www.scott-sports.com within 10 days as of the date of purchase. Transfer of the Product from the first purchaser to another person terminates this limited warranty. The limited warranty of five years for the frames and swingarms shall only be granted in case once a year a maintenance service has been effected according to maintenance requirements as set forth in the manual. The effected annual maintenance service shall be confirmed by stamp and signature. In case such an annual maintenance service has not been effected the warranty of five years for the frame shall be reduced to three years. Costs for maintenance and service have to be borne by the owner of the Product.
On Gambler, Voltage FR and Volt-X the warranty period is limited to two years.
Repaired or replaced Products are covered for the remainder of the original warranty period and subject to the conditions outlined in the original warranty, to the extent permitted by law.
Hereby SCOTT grants a worldwide voluntarily manufacturer’s warranty. To the extent permitted by law and unless a shorter duration is stipulated by law, any warranties implied by law are limited in duration to maximum five, respectively two years, from the date of purchase of the Product and are limited to the first purchaser of the Product.
What will SCOTT do in the event of a guarantee case? SCOTT will replace the defective product with a product of a quality or nature and similar level, will repair or refund the purchase price (after presentation of the proof of purchase of the product), at its sole discretion. Non-defective components are replaced at your expense. In such a case, we will contact you before replacing the non-defective part for your agreement.
What does this limited warranty not cover? This limited warranty does not cover defects which did not exist before the transfer of risks. This limited warranty does not cover Products used in rental operations. This limited warranty does not cover purchases of not completely assembled bikes. This limited warranty does not cover any defect caused by “wear and tear” (a complete list of all parts of “wear and tear” can be found in the general manual that came with your bike), accident, neglect, improper handling, colour fade due to exposure to sunlight, abuse, misuse, an act of God, improper assembly, non-compliance with recommended maintenance and care procedures,
improper or incorrectly performed maintenance or repairs performed by someone other than an authorized SCOTT dealer, use of parts or devices not consistent with the Product, and alteration of the Product.
All Products come with a manual; please carefully follow the instructions located there or affixed elsewhere to the Product. To the extent permitted by law, consequential and incidental damages are not recoverable under this limited warranty.
How do you make a claim under this limited warranty? To make a claim under this limited warranty, you must notify SCOTT of the claimed defect within the warranty period and timely return the Product to SCOTT at your expense for inspection. Please contact your authorized SCOTT dealer, call SCOTT’s customer service or the national SCOTT distributor (dealer locator: www.scott-sports.com). All returned Products must be accompanied by proof of purchase (receipt) from an authorized SCOTT dealer or this limited warranty will not apply. In case of replacement or refund, returned Product becomes the property of SCOTT.
A protocol for the handing over of the Product (which you will find at the end of the manual) will remain in copy at the SCOTT dealer after acceptance and signature of the consumer. It is obligatory to show this protocol of handing over together with the defective part in case of a warranty claim given that it provides evidence of purchase or this limited warranty will not apply.
How do state laws affect your rights under this limited warranty? This limited warranty gives you specific legal rights, and you may also have other rights, which vary from state to state.
Recommendation We strongly recommend that you use only authorized SCOTT dealers for yearly maintenance services and for repairs, as improper or incorrectly performed maintenance or repairs voids this limited warranty. Costs for maintenance service have to be borne by the consumer.
19 | BIKE USER MANUAL | GENIUSGENIUS | BIKE USER MANUAL | 18