25
Scout Pro Training
| Date post: | 30-Dec-2015 |
| Category: |
Documents |
| Upload: | stephen-reeves |
| View: | 215 times |
| Download: | 0 times |

Scout Pro Training

• Introducing the Scout Pro Portable Balance:
• 7 Models From 200g x 0.01g to 6000g x 1g
• 5 Application Modes
• Optional USB or RS232 Interface Accessory w/cable
• Density/Specific Gravity Determination with Below Balance Hook
• Battery or AC Power (Power Pack Included)
• Integral Security Bracket
• Programmable Energy Saving Auto Shut-off
The Ohaus Scout Pro

Unpack & Setup
• Shipping lock
• Secures load cell
• Battery Installation
• 4 AA batteries provide 40 hours of operation

Unpack & Setup
• AC plug
• Security bracket
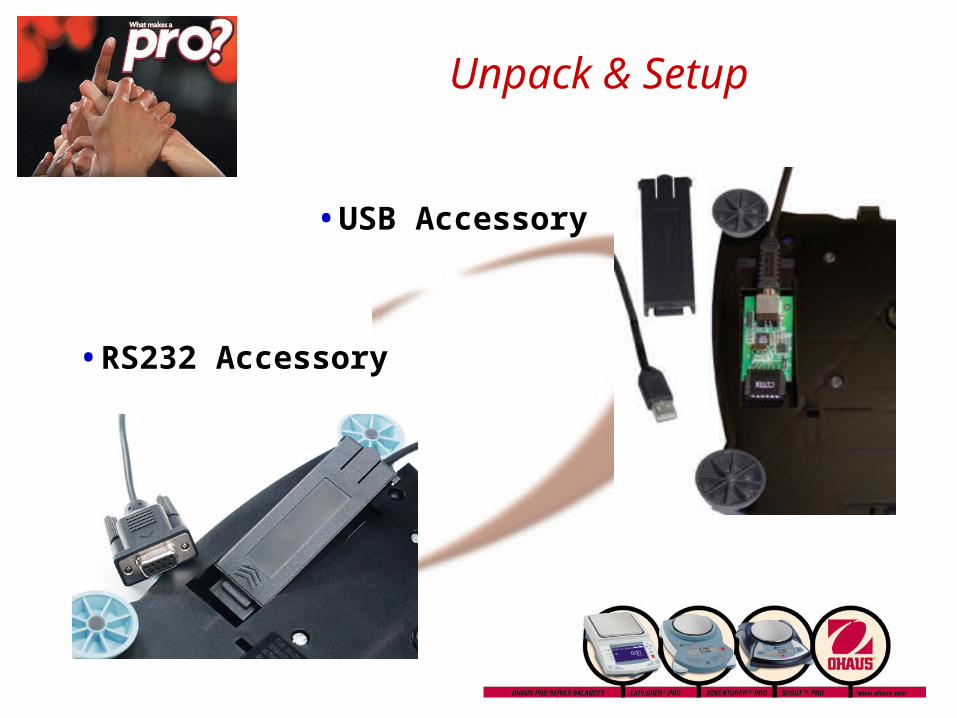
Unpack & Setup
• USB Accessory
• RS232 Accessory

Unpack & Setup
• Rotate square pans counter clockwise
• Insert round pans

Operation
• Turn balance on
• Scout Pro is shipped ready to operate in all available weighing units, parts counting and percent weighing
PRINTUnit0.00gON/ZERO
Off
• Short press to print.
• Long press to switch weighing unit.
0.00gON/ZEROOff
PRINTUnit
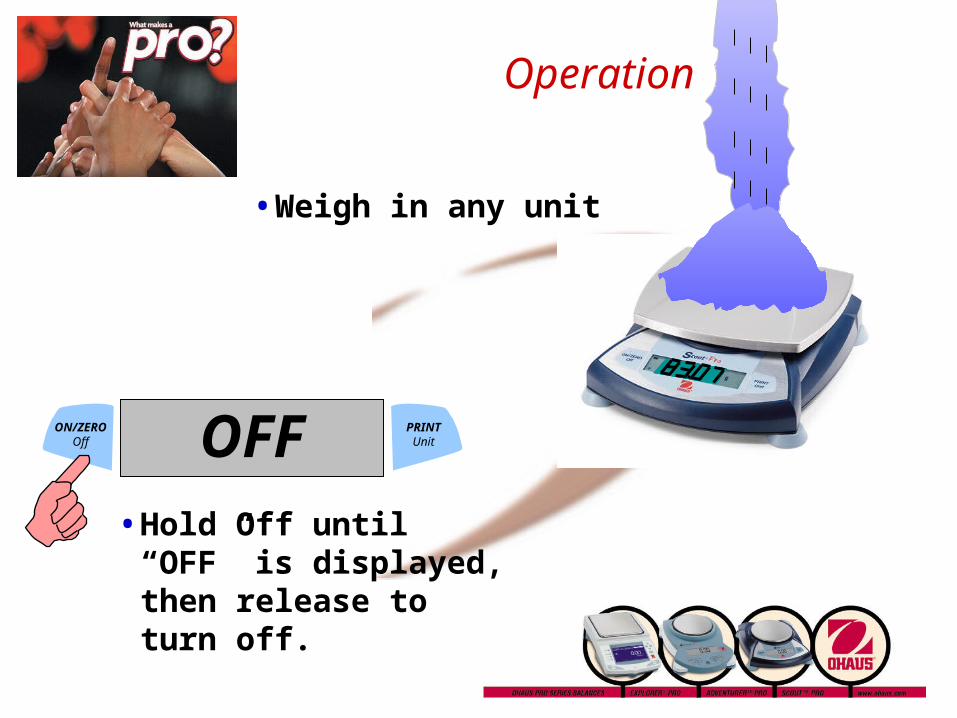
Operation
• Hold Off until “OFF” is displayed, then release to turn off.
ON/ZEROOff
PRINTUnitOFF
• Weigh in any unit

Menus and Calibration
• With balance off, hold ON/ZERO until MENU is displayed
MENUON/ZEROOff
PRINTUnit
• Release ON/ZERO to enter the menu
C.A.L.ON/ZEROOff
PRINTUnit
C.A.L. S.E.t.U.P. U.n.I.t. E.n.d.C.A.L. S.E.t.U.P. U.n.I.t. E.n.d.

Menu System
C.A.L.C.A.L.
CalibrationCalibration ggkgkgozozlblbPCPC- Count- Count- Cnt. Enh- Cnt. Enh- Off- Off%%EndEnd
PRINTUnit
PRINTUnit
PRINTUnit
Auto-OffAuto-Off
Linearity calLinearity cal
ModeMode- Display Hold- Display Hold- Totalize- Totalize- Off- Off
EndEnd
S.E.t.U.P.S.E.t.U.P. U.n.I.t.U.n.I.t. E.n.d.E.n.d.PRINT
Unit

Calibration
• Access calibration
C.A.L.C.A.L.
ON/ZEROOff
- C -- C -
C 2 0 0 gC 2 0 0 g
• Add cal weightON/ZERO
Off
- C -- C -
d o n Ed o n E

Parts Counting & Parts Counting Setup
• Mode: Parts Counting
• This mode allows the user to count based on the average weight of an original reference sample
• This mode is enabled by setting “PC” to “Count” in the “.U.n.i.t.” part of the menu
• To set-up mode:
• Enter Menu Mode, press PRINT/Unit to go to “.U.n.i.t.” and then press ON/ZERO/Off
• Press PRINT/Unit to go to “UnitS PC” and then press ON/ZERO/Off
• Press PRINT/Unit to go to “Count” and then press ON/ZERO/Off
• Press PRINT/Unit to go to “End” and then press ON/ZERO/Off
• Press PRINT/Unit to go to “.E.n.d.” and then press ON/ZERO/Off
• Sample Sizes --
• The Scout Pro allows the user to change the sample size with a press of the Print/Unit key

• Mode: Enhanced Parts Counting
• APW Enhancement --
• The Scout Pro allows the user to turn-on automatic recalculation of the average piece weight (APW Optimization) -- this is the same function as found in Trooper Count and Ranger Count
• Without Optimization, the APW is the average of the weight of the sample, divided by the number of pieces in the sample -- if the user needs a sample of 100, they have to count by hand 100 pieces!
• With Optimization, the APW is the average of the weight of the initial sample as well as any subsequent samples -- the user can reach a sample of 100 by adding parts on the pan 10 at a time, increasing accuracy!
EnhancedParts Counting

• Mode: Enhanced Parts Counting
• This mode is enabled by setting “PC” to “Cnt.Enh” in the “.U.n.i.t.” part of the menu
• To set-up mode:
• Enter Menu Mode, press PRINT/Unit to go to “.U.n.i.t.” and then press ON/ZERO/Off
• Press PRINT/Unit to go to “UnitS PC” and then press ON/ZERO/Off
• Press PRINT/Unit to go to “Cnt.Enh” and then press ON/ZERO/Off
• Press PRINT/Unit to go to “End” and then press ON/ZERO/Off
• Press PRINT/Unit to go to “.E.n.d.” and then press ON/ZERO/Off
• Sample Sizes --
• The Scout Pro allows the user to change the sample size with a press of the Print/Unit key
Enhanced PartsCounting Setup

Parts Counting Operation
CLr.APuCLr.APu ON/ZEROOff Put 5Put 5
PCPCPRINT
UnitPRINT
Unit
5 PC5 PC
• Place a container
• Press and hold PRINT/Unit key until “PC” is indicated
Display will then show “Clr.APu”• Press Print/Units to use the average piece
(APW) stored in memory (if there is one)• To re-establish a new APW, press
On/Zero/Off onceScout Pro will display “Put 10”. To select a different sample size, press Print/Unit
• Place displayed number of pieces in container and press ON/ZERO/Off
• Scout Pro will calculate APW and display total countTo reset APW, press Print/Unit until “PC” is displayed again
0 . 0 0 gON/ZERO
Off

• Mode: Percent Weighing
• This mode allows the user to display the weight of a sample as a percentage of a reference weight
• The reference weight is placed on the pan first, and equals 100%
• Each reference weight will be a percentage from 0.1% to 99,999.9%, depending on the Capacity X Readability of the scale -- most users will use 1.0% to 200.0% at the most
• Applications: Formulation and compounding, weight checking
Percent Weighing %

Percent Weighing % Setup
• Mode: Percent Weighing
• This mode is enabled by setting “%” to “On” in the “.U.n.i.t.” part of the menu
• To set-up mode:
• Enter Menu Mode, press PRINT/Unit to go to “.U.n.i.t.” and then press ON/ZERO/Off
• Press PRINT/Unit to go to “UnitS %” and then press ON/ZERO/Off
• Press PRINT/Unit to go to “On %” and then press ON/ZERO/Off
• Press PRINT/Unit to go to “End” and then press ON/ZERO/Off
• Press PRINT/Unit to go to “.E.n.d.” and then press ON/ZERO/Off
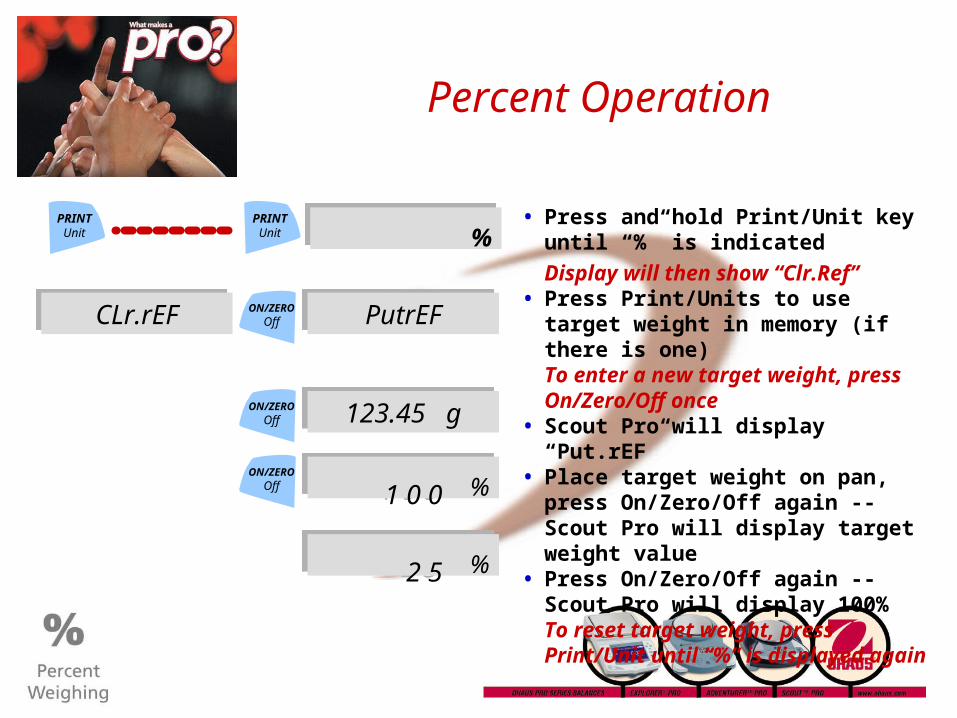
Percent Operation
• Press and hold Print/Unit key until “%” is indicated
Display will then show “Clr.Ref”• Press Print/Units to use target weight
in memory (if there is one)To enter a new target weight, press On/Zero/Off once
• Scout Pro will display “Put.rEF” • Place target weight on pan, press
On/Zero/Off again -- Scout Pro will display target weight value
• Press On/Zero/Off again -- Scout Pro will display 100%To reset target weight, press Print/Unit until “%” is displayed again
CLr.rEFCLr.rEF ON/ZEROOff PutrEFPutrEF
UnitPRINT
Unit
ON/ZEROOff 123.45 g123.45 g
ON/ZEROOff 1 0 0 %1 0 0 %
2 5 %2 5 %

• Mode: Display Hold
• This mode allows the user to hold the highest stable weight on the display until manually cleared
• Display Hold can work with any weighing unit or mode -- including % or parts counting -- except Totalization
• The Scout Pro will show the current measurement on the pan with a flashing stability indicator “*”
• Applications: Postal and shipping
0.00Display Hold
Display Hold
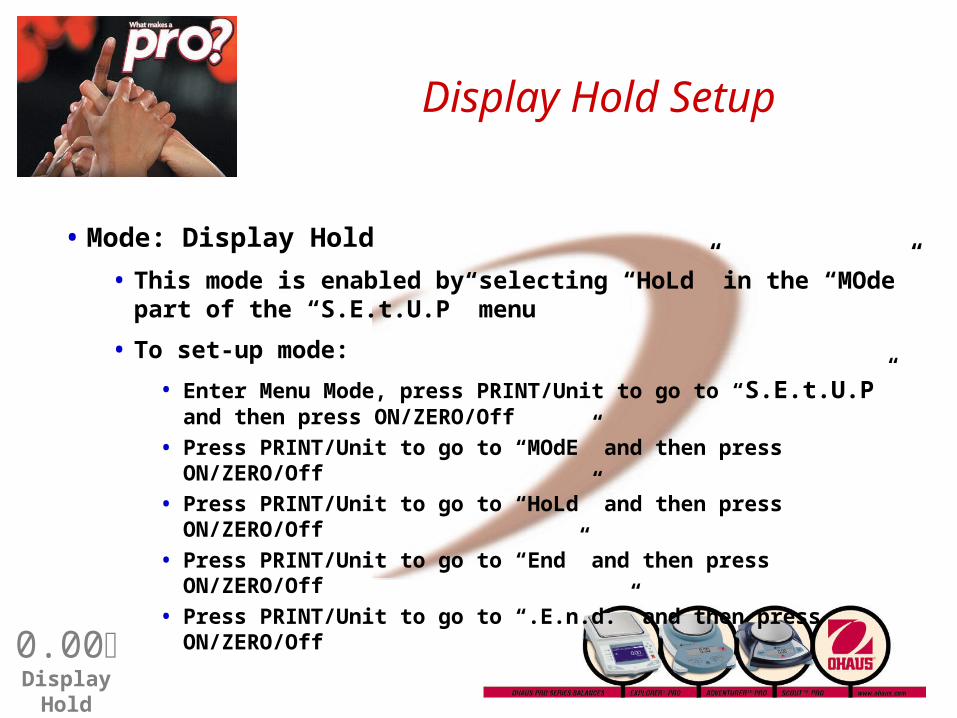
• Mode: Display Hold
• This mode is enabled by selecting “HoLd” in the “MOde” part of the “S.E.t.U.P” menu
• To set-up mode:
• Enter Menu Mode, press PRINT/Unit to go to “S.E.t.U.P” and then press ON/ZERO/Off
• Press PRINT/Unit to go to “MOdE” and then press ON/ZERO/Off
• Press PRINT/Unit to go to “HoLd” and then press ON/ZERO/Off
• Press PRINT/Unit to go to “End” and then press ON/ZERO/Off
• Press PRINT/Unit to go to “.E.n.d.” and then press ON/ZERO/Off
0.00Display Hold
Display Hold Setup

Display Hold Operation
HoldHoldPRINT
Unit
123.45 g 123.45 g
ON/ZEROOff HLd.OFFHLd.OFF
• To Use Mode:
• Press PRINT/Unit once to start Display Hold
“HoLd” will be displayed briefly indicating Display Hold is active
• Place weight on pan
“*” will flash indicating highest stable weight value will be held
• Take weight of pan
The display will change and then display the
Hold value with the flashing “*”
• To Clear Display press On/Zero/Off
To Exit Mode hold ON/ZERO/Off until “HLdOFF” is displayed
123.45 g 123.45 g
0.00Display Hold
• Mode: Totalization
• This mode allows the user to sum a series of weights -- up to the limit of the display (999,999)
• Totalization can work with any weighing unit or mode -- including % or parts counting -- except Display Hold
• Once you are in Totalization, you cannot change weighing units/modes without exiting Totalization
• The Scout Pro will show the current measurement on the pan with a solid “t”, and then the total as a flashing “t”
• Applications: Formulation and compounding, parts kitting
ΣTotalization
Totalization

• Mode: Totalization
• This mode is enabled by selecting “totAL” in the “MOde” part of the “S.E.t.U.P” menu
• To set-up mode:
• Enter Menu Mode, press PRINT/Unit to go to “S.E.t.U.P” and then press ON/ZERO/Off
• Press PRINT/Unit to go to “MOdE” and then press ON/ZERO/Off
• Press PRINT/Unit to go to “totAL” and then press ON/ZERO/Off
• Press PRINT/Unit to go to “End” and then press ON/ZERO/Off
• Press PRINT/Unit to go to “.E.n.d.” and then press ON/ZERO/Off
ΣTotalization
Totalization Setup

Totalization Operation
• Press PRINT/Unit once to start Totalization
“totAL” will be displayed briefly and “t” will be displayed indicating Totalization is active
• Place a sample on the pan and press PRINT/Unit to enter the weight into memory
“t” will flash indicating total weight.
• Remove the sample. “t” will stop flashing and the balance will return to zero
• Repeat the procedure with another sample and read the totalized weight
To exit Totalization, hold down ON/ZERO until “tot.OFF” is displayed
t o t A Lt o t A LPRINT
Unit
0.00 g t0.00 g t
ON/ZEROOff tot.OFFtot.OFF
123.45 g t123.45 g tPRINT
Unit
PREPARATION: 2 plastic cups, different colored water samples. Tare an empty cup
ΣTotalization
0.00 g t0.00 g t
The Ohaus Scout Pro
• Scout Pro USP’s
• Mechanical overload and shock load protection
Protects weighing cell 4 times better than Scout II
• Simple 2-button operation – 5 applications and 7 weighing units
• Optional USB or RS232 interfaces, simply insert the module; cable included


