18
1 Second Display Installation Guide Windows-2000 Point-of-Sale Hardware System Part No:48201030 July 2003 (V1.0)

1
Second Display Installation Guide
Windows-2000
Point-of-Sale Hardware System
Part No:48201030 July 2003 (V1.0)

2
1. Accessory
VGA Cable Serial Cable
Warranty Card Drivers Bank(V1.3 or Above) The following drivers in the folders of Driver Bank are necessary for driver installation. Folder Driver Function
Acrobat Acrobat Reader Installation BIOS Tool BIOS Update Tool CDROMDrv CDROM driver installation (for DOS) Elo_Touch Touch screen driver Installation LAN_drive LAN driver installation �Netmos Enable COM5/COM6 Smart Card Smart Card driver installation
Common
VGA SMI712 VGA Card driver installation Audio Audio driver Installation UDMA UDMA driver installation B55
VGA VGA driver installation Card Reader Card Reader Test Program Cash Drawer Cash Drawer Test Program Test Utility
VFD Customer Display Test Program

3
2. Specification Model Number P0750600 P0750500 P0750400
Size 12.1" 10.4" 8.4" Resolution 800 x 600 800 x 600 800 x 600 Brightness 180 cd/m2 150 cd/m2 150 cd/m2 View Area 246 x 185mm 211 x 158mm 170 x 128mm
LCD Display
Color 6 bit x 3 RGB (262,144) Touch Screen(Option) 5-wire resistive touch screen Interface Signal D-SUB 15 pin female
Analog RGB, Scan frequency V:60~75Hz, 800 x 600, 640 x 480
OSD Control Button Power, Menu, Up, Down & Enter Power Status LED Two-tone LED, green for active status and orange for suspend DC Power Input +12V/2A supply from VGA Connector D-SUB 15 pin 4 &11 Pole Height 137 or 167 mm for POS500
155 or 185 mm for POS600 Tilt Angle 0 ~ 40 degree Spill Proof Screen and Bezel Operation Temperature 0� ~ 40� Operation Humidity 8% ~ 90%, non-condensing Storage Temperature -20� ~ 60� Storage Humidity 5% ~ 95%, non-condensing Back-Light Life 20,000 hours System MTBF 40,000 hours
CE Safety and EMI FCC(This device complies with part 15 of the FCC rules. Operation is subject to the following two condition: (1)This device may not cause harmful interference and (2) This device must accept any interference received, including interference that may cause undesired operation. )
Accessory D-SUB 15-pin female-to-male VGA cable of 300mm long

4
2.1 I/O Connection These I/O connectors are located at the junction of the Display panel and supporter.
# Function Description 1 COM For Touch Screen connection (reserved for future models). 2 VGA For Display interface connection, support +12V/2A DC from pin 4& 11,
when mount with POS system. 3 DC Input For power Input connection (reserved for the Display stands alone use). 2.2 OSD Control Buttons Control buttons of hidden OSD are located at the back of the second display. The cover is to avoid customer changing the display setting.
# Function Description 1 Menu Starts the On-Screen-Display. 2 Enter Marks the item you select. 3 Down Moves the selection downwards 4 Up Moves the selection upwards. 5 Power Turns the power of the Second Display on or off.
1 2 3
1 2 3 4 5
I/O connector
OSD Control Buttons

5
3. 2nd display VGA Card Installation
a. Install 2nd display VGA card to B55 motherboard PCI slot
b. Take the LCD VGA cable c. Cable of 23 pin(A) connected to 2nd display VGA card
d. Cable of 5 pin(B) connected to B55 motherboard.
e. Cable of 28 pin(C) across the case of panel connected to LCD Bridge board.
A
B
C

6
f. Second display VGA cable connected to B55 motherboard JP9.
3.1 2nd display VGA card Jumper Setting
JP6 3-4 JP4 1-2 5-6
JP2 3-4 1-2
JP5 7-8 5-6
JP3 3-4 1-2
Close Open
JP2 TFT Interface Type JP6 LCD type
Close =TFT Open =STN
JP4 Display Size Pin 1-2 3-4 640*480 Close Close 800*600 Open Close 1024*768 Close Open
Pin Per 9 Bit Per 12 Bit Per 18 Per 24 2Pix 24 Bit 2Pix 24 Bit 2Pix 36 Bit Analog TFT
1-2 Close Open Close Open Close Close Open
3-4 Close Close Open Open Close Open Close
5-6 Close Close CloseClose Open Open Open
JP3 LCD Panel Display Set JP5 VGA Bios ROM
Close =On PCI Card Open =On System Bd
Pin 640*480 TFT 600*480 DSTN 800*600 TFT 800*600 DSTN 1024*768 TFT 1024*768 DSTN
1-2 Close Open Close Open Close Open
3-4 Close Close Open Open Close Close
5-6 Close Close Close Close Open Open
7-8 Close Close Close Close Close Close
No Panel ID assign= All open
7
Default jumper setting(POS 500) JP2 TFT Interface Type JP6 LCD type
Close JP4 Display Size Pin 1-2 3-4 Open Close
Pin
1-2 Close
3-4 Open
5-6 Close
JP3 LCD Panel Display Set JP5 VGA Bios ROM Close Pin
1-2 Close
3-4 Open
5-6 Close
7-8 Close
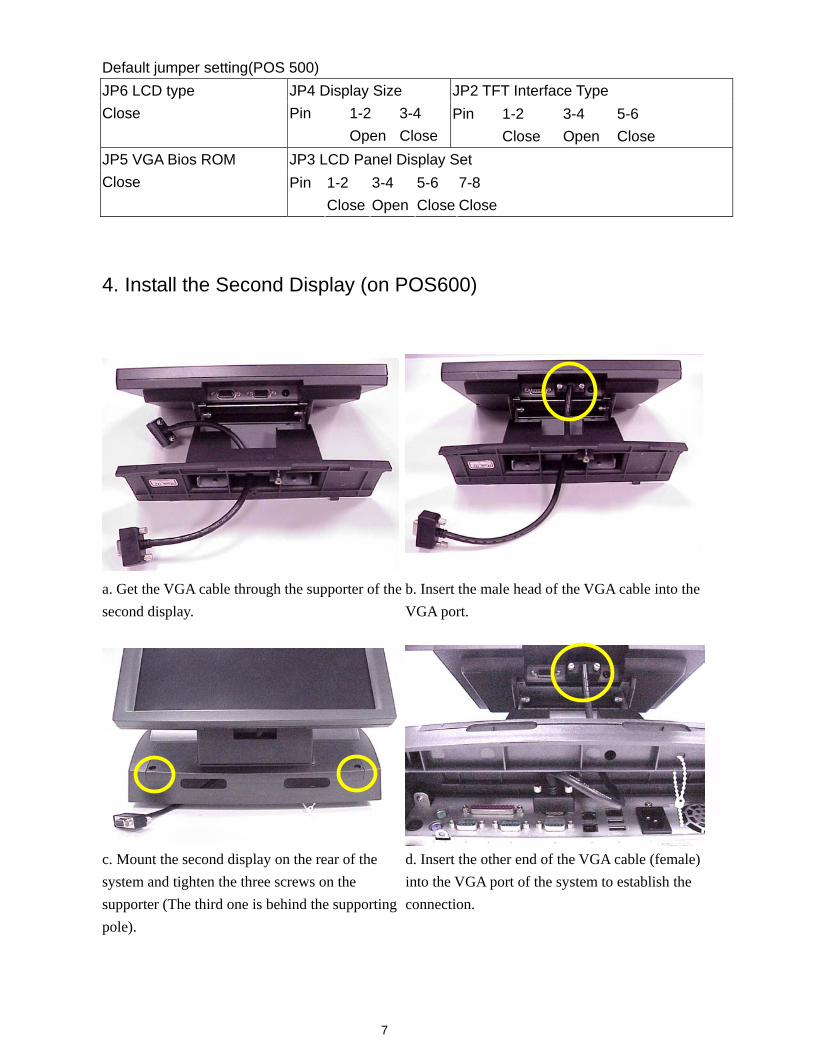
4. Install the Second Display (on POS600)
a. Get the VGA cable through the supporter of the second display.
b. Insert the male head of the VGA cable into the VGA port.
c. Mount the second display on the rear of the system and tighten the three screws on the supporter (The third one is behind the supporting pole).
d. Insert the other end of the VGA cable (female) into the VGA port of the system to establish the connection.

8
5. Driver Installation 5.1 VGA
a. Enter "Integrated Peripherals" of the Main Menu of BIOS CMOS Setup Utility.
b. Move the arrow key downward to the "Init Display First" item.
c. Use "Page Up" or "Page Down" key change to “Onboard”. Make sure you save the changes by pressing F10 key or moving to "Save & Exit Setup."
d. Click "B55" on the POS driver window.
e. Click"VGA"on the B55 window. f. Click"Win2000" on the VGA window.

9
g. Click"SETUP" on the VGA2000 window. h. Click "Next" on the Welcome window.
i. Click "Next" on the Setup Type window. j. Click "Next" on the Select Program Folder window..
k. Click "Next" on the Select Copying Files window.
l. Click "Finish" on the Setup Complete window.

10
5.2 2nd display VGA
a. Enter "Integrated Peripherals" of the Main Menu of BIOS CMOS Setup Utility.
b. Move the arrow key downward to the "Init Display First" item.
c. Use "Page Up" or "Page Down" key change to “PCI Slot”. Make sure you save the changes by pressing F10 key or moving to "Save & Exit Setup."
d. Click “Video Controller” on the Device Manger.
e. Click “Update Driver” on the Driver. f. Click “Next” on the Welcome window..

11
g. Click "Next" on the Upgrade window. h. Click "Browse" on the Upgrade window.
i. Click "Finish" on the Upgrade Complete window.
j. Now the 2nd display VGA driver is installed.

12
5.3 2nd display VGA control panel (Optional)
a. Click “COMMON” on the POS driver window
b. Click “VGA” on the common window..
c. Click “SMI712” on the VGA window. d. Click "control_panel" on the SMI712 window..
e. Click “Setup” on the control_ panel window.
f. Click “Next” on the welcome window..

13
g. Click “Next” on the Select window. h. Click "Finish" on the Setup Complete window..

14
5.3.1 Change the Primary Monitor
1-a.The default primary monitor on 2nd display VGA card. Identify is 1.
2-a.The default second monitor on SiS630 Identify is 2.
1-b. Right click of the mouse on the desktop and choose the "Properties" item.
2-b.The monitor on SiS630
1-c. Click the "Setting" button on the Display Properties window
2-c. The monitor on SiS630

15
1-d. Choose identify 2 and right click to set "Primary " then click "OK" button
2-d..The monitor on SiS630
1-e..The monitor on 2nd display VGA card .
2-e. Right click of the mouse on the desktop and choose the "Properties" item.
1-f. The monitor on 2nd display VGA card.
2-f. Click the "Setting" button on the Display Properties window

16
1-g. The monitor on 2nd display VGA card.
2-g. Choose identify 1 and disable “Extend Windows..” then click "OK" button
1-h..The monitor on 2nd display VGA card.
2-h. The monitor on SiS630.
1-i. The monitor on 2nd display VGA card
2-i. Right click of the mouse on the desktop and choose the "Properties" item.

17
1-j.The monitor on 2nd display VGA card.
2-j. Click the "Setting" button on the Display Properties window
1-k.The monitor on 2nd display VGA card.
2-k. Choose identify 1 and enable "Extend Windows.. " then click "OK" button
1-l. Now the second monitor on 2nd display VGA card.
2-l. Now the primary monitor on SiS630

18
5.3.2 Stretch the Screen (If your LCD monitor screen area setup is 640*480)
a. Right click of the mouse on the desktop and choose the "Properties" item.
b. Click the "Setting" button on the Display Properties window
c. Select “Advanced” in the setting window. d. Click stretch "ON" on the LynxEM+ window.
e. Before stretch. f. After. Note: Stretch the screen support 256 color and high color.


![[Android Codefest] Using the Second-Screen API & Intel® Wireless Display From Android* app](https://static.documents.pub/doc/80x56/5445102aafaf9fe72b8b467e/android-codefest-using-the-second-screen-api-intel-wireless-display-from-android-app.jpg)


