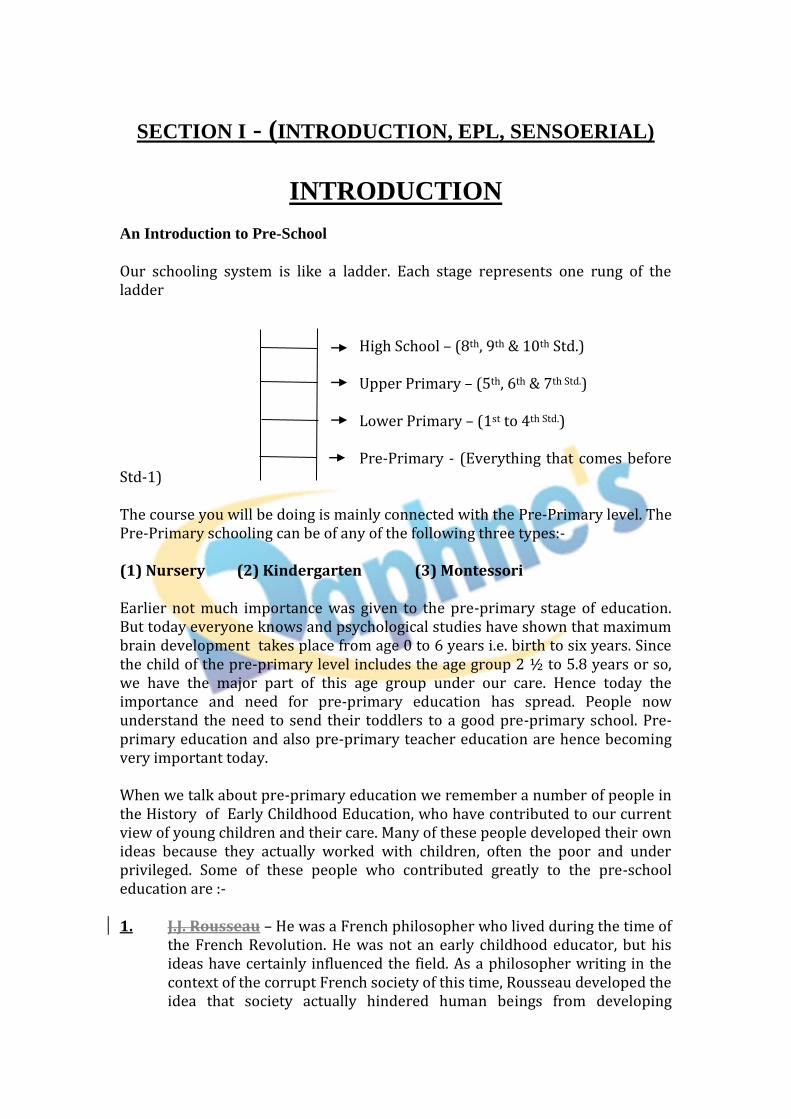
SECTION I - (INTRODUCTION, EPL, SENSOERIAL) INTRODUCTION An Introduction to Pre-School Our schooling system is like a ladder. Each stage represents one rung of the ladder High School – (8 th , 9 th & 10 th Std.) Upper Primary – (5 th , 6 th & 7 th Std. ) Lower Primary – (1 st to 4 th Std. ) Pre-Primary - (Everything that comes before Std-1) The course you will be doing is mainly connected with the Pre-Primary level. The Pre-Primary schooling can be of any of the following three types:- (1) Nursery (2) Kindergarten (3) Montessori Earlier not much importance was given to the pre-primary stage of education. But today everyone knows and psychological studies have shown that maximum brain development takes place from age 0 to 6 years i.e. birth to six years. Since the child of the pre-primary level includes the age group 2 ½ to 5.8 years or so, we have the major part of this age group under our care. Hence today the importance and need for pre-primary education has spread. People now understand the need to send their toddlers to a good pre-primary school. Pre- primary education and also pre-primary teacher education are hence becoming very important today. When we talk about pre-primary education we remember a number of people in the History of Early Childhood Education, who have contributed to our current view of young children and their care. Many of these people developed their own ideas because they actually worked with children, often the poor and under privileged. Some of these people who contributed greatly to the pre-school education are :- 1. J.J. Rousseau – He was a French philosopher who lived during the time of the French Revolution. He was not an early childhood educator, but his ideas have certainly influenced the field. As a philosopher writing in the context of the corrupt French society of this time, Rousseau developed the idea that society actually hindered human beings from developing
Transcript
SECTION I - (INTRODUCTION, EPL, SENSOERIAL)
INTRODUCTION An Introduction to Pre-School
Our schooling system is like a ladder. Each stage represents one rung of the ladder High School – (8th, 9th & 10th Std.) Upper Primary – (5th, 6th & 7th Std.) Lower Primary – (1st to 4th Std.) Pre-Primary - (Everything that comes before Std-1) The course you will be doing is mainly connected with the Pre-Primary level. The Pre-Primary schooling can be of any of the following three types:- (1) Nursery (2) Kindergarten (3) Montessori Earlier not much importance was given to the pre-primary stage of education. But today everyone knows and psychological studies have shown that maximum brain development takes place from age 0 to 6 years i.e. birth to six years. Since the child of the pre-primary level includes the age group 2 ½ to 5.8 years or so, we have the major part of this age group under our care. Hence today the importance and need for pre-primary education has spread. People now understand the need to send their toddlers to a good pre-primary school. Pre-primary education and also pre-primary teacher education are hence becoming very important today. When we talk about pre-primary education we remember a number of people in the History of Early Childhood Education, who have contributed to our current view of young children and their care. Many of these people developed their own ideas because they actually worked with children, often the poor and under privileged. Some of these people who contributed greatly to the pre-school education are :- 1. J.J. Rousseau – He was a French philosopher who lived during the time of
the French Revolution. He was not an early childhood educator, but his ideas have certainly influenced the field. As a philosopher writing in the context of the corrupt French society of this time, Rousseau developed the idea that society actually hindered human beings from developing
according to their nature. Society was made up of various hierarchies where wealth was concerned. And this only imposed misery on the masses, a state that is not natural. Rousseau infact considered anything natural to be good. Thus he said that if children were allowed to develop without the evil influence of society they would be able to achieve their true potential of being moral and good. According to Rousseau young children are innately pure and noble, but they need to be protected from the evil influence of society to maintain this goodness. It is through close contact with nature that they can develop their senses and form their personalities. Children should be made to learn from concrete experiences and not from the abstract. Learning should take place by a process of trial and error and experimentation. Such learning is natural and satisfying and leads to happiness. Rousseau recognized that a child’s mode of thinking and learning is different from that of adults and considered good education to be based on the stages of development of the child and not on adult-imposed criteria. He felt that a child –centered, uncorrupt education would eventually result in adults who are morally sound and interested in the good of society. Rousseau never worked with children – in fact, he abandoned his own children to foundling homes (orphanages). But he wrote about his philosophy of education in his novels and essays. Today we agree with Rousseau that children have a unique nature that needs to be nurtured and protected. We also recognize the need to provide an appropriate environment for young children, in which their development can be maximum. Although his highly idealistic views on childhood and human nature were never fully adopted by those who followed him, Rousseau nevertheless had a great influence on all the later Early Childhood Educators to come. Rousseau laid the foundation for the Nursery system of pre-school which was started by Early Childhood educators who came after him and were inspired by his philosophy. These Nurseries played the role of a Day Care Centre as well as a Study Centre. This was for the children whose parents were employed. It was a system where children were brought up under the care of trained staff. Children were allowed to sing songs, play by themselves and were taught rhymes, numbers, language etc. They were allowed to exercise in the open air. Outdoor game was also part of the activities like running and playing. Play material like rocking horses and ducks were also used. Children were taken to places like circus, museums, zoos, gardens, the seashore etc. Since they were allowed to mix among themselves they developed many social skills. This was the essence of the Nursery system of education.
2. Robert Owen - He was an extraordinary English businessman who lived 140 years ago. He was the most caring and compassionate employer, history has ever known. He was the owner of Cotton Mills in Scotland, when the capitalist mode of production was born in England. He was severely shaken by the exploitation of the working class and took a number of steps to deal with this in his own factory first. Women and children had to toil for 14 hours a day for a pittance. Determined to get rid of this ruthless exploitation he spent 30 years actively campaigning on behalf of the workers. His efforts were eventually crowned with success when the British Government passed the Factory Act, limiting child and female labour to humane levels.
His philosophical outlook was shaped to a great extent by Rousseau. His care and concern for children made him look into the educational aspect of his factory worker’s children.
This became his greatest achievement as the schools he started were very innovative. They had 3 sections namely:
1. The Infant School 2. The Day School 3. The Evening School
The infant school not only became famous, but was the first school of its kind in human history.
He organized the world’s first Nursery School for his factory worker’s children. The children learned reading, writing, Arithmetic, History & Geography,
as well as sewing, dancing, singing and military exercises mainly in the form of marching to music which was particularly to maintain physical fitness.
This curriculum was very different from the traditional one at that time, where children had to simply memorise in a very authoritarian atmosphere.
3. J. Pestalozzi – He was a Swiss philosopher and educationalist. He was deeply influenced by Rousseau’s educational ideals. He felt that every individual whether rich or poor had the right to education in order to develop their moral and intellectual potentials. He believed in education according to nature and said that learning for small children should be linked to concrete experiences and observations. Unlike Rousseau he stressed on the important role of the mother in the child’s earliest years. Unlike Rousseau, Pestalozzi actually worked with children and developed educational methods that are still in use today. He stressed on the need to recognize individual differences among children. He stressed on self-activity of children rather than rote memory as the basis for learning. He had a powerful personality, was dedicated and committed to the cause of education and this is what made him successful as an educator. One of the schools he established became world famous. He was the first to teach
young children of the pre-primary age and marked the beginning of the Kindergarten System.
4. Friedrich Froebel – He was a German philosopher and educationalist. He
visited Pestalozzi’s school and observed it with mixed feelings. He greatly admired Pestalozzi’s educational ideas and skill but realized that Pestalozzi was not able to systematically express his ideas and methods. Froebel was however better able to put into words his educational principles. Like his predecessors Rousseau and Pestalozzi, Froebel believed in the interrelatedness of nature and the child’s developing mind. He also advocated that education should harmonise with the child’s inner development. He looked at childhood as a stage with great intrinsic value in its own right.
He strongly stressed on the importance of play in the young child’s
natural mode of learning. He developed a carefully programmed curriculum and specific materials. They were called “Gifts”. The gifts consisted of spheres, cubes and cylinders. They suggested some form of activity and occupation. They were carefully graded. His programme was centred on play and sensory awareness. He is in fact credited with developing blocks, now a standard Early Childhood material. Art activities, games, songs, blocks, stories, crafts and other activities were included in his educational system. He was the actual founder of the Kindergarten system of pre-schooling. His classes were not held in a traditional class room, but in a garden for children – hence the German word Kindergarten which means a garden for children. He said that the teacher is like a gardener taking care of his tender plants, that is the children.
5. Maria Montessori - She was an Italian and the first woman of her times
to become a medical doctor. She was interested in psychiatry and this led her to work with retarded children. She slowly started exploring the idea of using her teaching methods on normal children. She found that children at this stage are able to learn so much. She called this capacity to learn the absorbant mind and compared it to a sponge soaking in liquid. If the children’s absorbant minds are exposed to appropriate learning experiences in the developmental stages their minds will grow. This is specially true during the sensitive period i.e. the time when the child is most receptive to learning. For example, during one sensitive period, children are especially receptive to developing sensory perception, during another, they are concerned with a sense of order in their environment and in yet another, their energies focus on coordination and control of movement.
She developed a curriculum to take advantage of these sensitive periods
by making appropriate experiences available to the child. She used the term prepared environment to describe this match of the right materials to the child’s stages of development. Her school included many learning
activities that she herself developed to help children acquire skills. Some of these are related to sensory discrimination, matching and sorting by size, shape, sound, colour, smell and other dimensions. Others helped children learn practical skills such as polishing shoes or setting a table. More advanced academic materials were aimed at teaching, reading, writing and math skills through hands-on manipulation. Her apparatus is called the Didactic Apparatus. These materials were self-correcting. She had a strong sense of respect for children and these 2 are responsible for Montessori’s strong impact on Early Childhood Education. She stressed on:- (Montessori Principles) i) Development from within ii) Self education or Auto education iii) Freedom & liberty iv) Sense training v) Motor efficiency or muscular development vi) Teacher to be a directress – who will not teach but direct vii) No fairy tales – to keep the child close to reality viii) No rewards and punishments
LIFE AND WORKS OF MARIA MONTESSORI She was born in 1870 in Italy. Her father was a military man, who was from a middle class family. The attitude of the people towards women in those days was conservative. With all this opposition Maria Montessori persuaded an education in the field of science i.e. an MBBS degree. She specialized in Pediatrics and Psychiatry. After her degree she taught at the medical school in Rome. This medical school used to organize free clinics for the poor. It was through these clinics that she came in contact with the children of the working class and poor. In 1901 she became the Director of a school attached to the University of Rome, for mentally handicapped children. She noticed that these children were confined to empty rooms. She realized that there was a need to stimulate and engage them in purposeful activity. She wanted to organize a programme to teach these handicapped children how to take care of themselves and their environment. Before this she wanted to study about all the research previously done on the education of mentally handicapped children. She read about the excellent work done by 2 French physicians – (1) Jean Itard – 18th Century (2) Edouard Seguin – 19th Century. Jean Itard is famous for his studies and work on the ‘Wild Boy of Aveyron’, a youth who had been found naked in the forest. He had spent 10 years of his life wandering alone in the forest. He could not speak and lacked all social behavioural skills. He had developed without the benefit of culture and association with his own kind. Itard found the boy to be unwilling or unable to learn most things. He hence came to the conclusion of the existence of developmental periods in the growth of normal human beings. During these sensitive periods, a child must receive stimulations for learning or he will grow up forever lacking adult skills and intellectual concepts that he missed at the stage when they could be readily learnt. Itard was hence of the view that all education would benefit from the use of careful observation and experimentation. Maria Montessori was deeply influenced by this idea and her experiments were based on this idea. The other physician i.e. Edouard Seguin is today recognized as the father of our modern techniques of special education for the retarded. Maria Montessori drew further confirmation of Itard’s work from the studies of Edouard Seguin. From these 2 predecessors, Maria Montessori took the idea of a scientific approach to education based on observation and experimentation. She evolved methods of training the mentally retarded children. After 2 years of training, these retarded children were able to pass the 6th grade tests of the Italian Public Schools. This was considered a miracle by all. And now Maria Montessori suggested that her methods be adopted in the Public Schools, where they would be able to get better results with normal children.
HOUSE OF CHILDREN – In 1907 Maria Montessori opened a day care center for
the children of the working class who were too young to attend regular Public School.
She called this “Casa de Bambini” which means in Italian, “House of Children”. It
was in a slum in Rome. The children were of a mixed age group (2 ½ to 6 years). She
observed that the children were interested in performing everyday activities which
strengthened their independence and self-respect. She provided the children with her
study material which she used on the retarded children and found that they exhibited a
great deal of concentration and deep absorption. After the school was over these
children showed a dramatic change in their behaviour. This received world wide
attention. The whole world started taking interest in the Montessori method of
education.
OBSERVATIONS OF MARIA MONTESSORI – After providing the children with the learning materials she noticed :-
i) The children showed a great deal of interest in the material ii) They showed a lot of concentration. iii) They repeatedly worked with the material a number of times. iv) They preferred to work than to play v) After working with the material they displayed a sense of dignity and
discipline.
She now developed a curriculum and methodology for the elementary school. She was recognized as the world’s leading educator. She died in Holland in 1952. Maria Montessori’s ideas and methods gradually found a receptive audience in the USA, where Montessori programmes have flourished. Today a wide range of Montessori programmes can be found. Some adhere quite rigidly to the original techniques, whereas others follow an approach that has been adapted to better fit the current social context. It is interesting to note that although Montessori devised her programme to meet the needs of impoverished children and to help them learn important life skills, Montessori programmes today are for the most part attended by children from more affluent homes.
THE MONTESSORI METHOD
After years of observing and studying children, Maria Montessori concluded that they pass through sensitive periods when they possess a unique and amazing aptitude for learning. In order to take advantage of this sensitivity period, a properly prepared environment is required to allow them to learn on their own. If the sensitive period is missed or the environment is not properly prepared, learning becomes difficult and tiresome.
THE ENVIRONMENT – If you visit a traditional Montessori classroom, you will soon observe some of the prominent features of such a programme, some similar to other types of Early Childhood settings and some unique to Montessori. You will quickly notice a sense of order in the room. Child-sized equipment and materials are clearly organized on shelves that are easily accessible to the children. There are distinct areas, each containing materials unique to promoting the tasks to be mastered in that area. The environment is also set up to be aesthetically pleasing, with plants, flowers and attractive furnishings and materials. The materials are arranged from simple to complex and concrete to abstract.
CHILDREN – You will also notice children of different ages involved in individual activities, because the essence of Montessori programme is its individualised nature. Children initiate activities and are free to work with whichever material they choose, defining a work area or space for their selected activity on a mat on the floor or on a table top. Children are self-directed, working independently or at times in twos. Younger children may be learning how to participate in specific activities by observing or imitating their older classmates. The Montessori programme is designed as a 3 year sequence for children ages 3 to 6 years or so.
THE TEACHER – The teacher is called a directress and she exhibits very little overt control. Her involvement is un-obtrusive and quiet. She is a keen observer and demonstrates to the children how to use a new material. She does not reinforce or praise children for their work since the activities are intended to be self-rewarding and hence motivating. THE MATERIALS – The Montessori materials are didactic, each designed to teach a specific concept. The materials are self-correcting too so the child is in control of his learning process. Since the materials are graded from simple to complex, the child is challenged by progressivel more difficult concepts. The materials are scientifically and attractively designed.
THE CURRICULUM – In the Montessori environment there are different areas of display for 3 distinct areas of learning.
When children first enter the Montessori House of Children they are introduced to the EPL activities i.e. the Exercise of Practical Life activities. Such activities focus on self-help and environmental care skills such as buttoning, brushing hair,
watering plants, polishing and sweeping. The materials for these activities are arranged first on the shelves.
The second set of activities and materials are sensorial, helping children develop, organize, broaden and refine sensory perceptions of sight, sound, touch, smell and taste.
The third aspect of the Montessori programme involves conceptual or academic materials. The practical and sensorial skills learnt at the first areas lay the ground work on which writing, reading and math are built.
Conceptual learning activities are concrete and actively involve the child in many ways.
Traditional Early Childhood activities are absent in the Montessori school. Because Montessori programmes are reality based rather than promoting fantasy – Hence there will not be any dramatic play area, creative art corner or other activities that invite children to freely use their imagination. There is also a restriction on how children may use materials. As the educationalist David Elkind (1983) points out, once children have mastered the use of a particular material in the established manner, they should be free to act on the material and use it freely, in a more experimental way; however the Montessori Method allows materials to be used only in the prescribed procedure.
Today Montessori schools vary considerably. Many, in fact, are a blend of the Montessori method and elements of traditional Early Childhood programmes.
Some research findings indicate that Montessori children may show greater task persistence and independence, but they appear to score lower on tests of creativity and language development.
THE METHOD INVOLVES AN INDIRECT APPROACH – The child has a non-
conscious mind, which achieves consciousness through work and experience with
objects in the environment.
From 0 to 3 years the child takes in the whole environment without effort through his non-conscious intelligence. From 3-6 years he takes it in with effort i.e. consciously using his hands to enrich his experiences and develop himself. Dr. Montessori’s approach of helping the child is indirect, as we prepare the environment for the child to learn indirectly from and not directly from the teacher. THE CHILD’S PERSONALITY – THE CENTRE AND THE PERIPHERY Regarding the learning process Dr. Montessori says that what goes on in the mind of the learner is something very wonderful, mysterious and difficult to understand. She says that the child as an individual presents 2 aspects of his personality i.e :- (1) The Centre and (2) The Periphery.
The Centre is the inner most citadel of the child’s personality from where all action proceeds. At this center the child increases his mental powers. The Periphery is that part of the child’s personality which comes in contact with the external world. It comprises of the senses and movements. Through the interaction of the center and the periphery, the mind of the child develops, unfolds and expands. Situations are perceived from outside and from the center comes the understanding or realization which is like an unfolding outwards. It is difficult for us to see what is happening at the center but easy to see what is happening at the periphery, especially when we allow the child freedom of choice to select his activities. So the child grows by the welding together of the 2 elements of his personality. Our duty is to feed the periphery by presenting the appropriate activities to meet the child’s needs. Thus we are reaching his intellect indirectly i.e. through the prepared environment. THE POINT OF CONTACT - Sometimes the teacher prepares the environment but the child does not pay attention. He is not interested. What has gone wrong in such a situation? Is it the (1) method, (2) environment, (3) teacher, (4) materials or even (5) the child, that is to be blamed? Something evidently has gone wrong. What is missing is the point of contact. This is described as the psychological bridge which puts the soul Psychological bridge Soul external reality (need) (activity) of the child (inner most need) in contact with the external reality (activity). This external reality must always be associated with movements. Once this point of contact is established the child will learn.
SENSITIVE PERIODS IN DEVELOPMENT
Maria Montessori discovered that as children grow up, there are special windows in the development of a person, that are the most suitable periods for acquiring various skills – eg. (1) development of motor skills, (2) language skills, (3) understanding of number concepts etc. During these sensitive periods, the child will express an explosion of interest, boundless enthusiasm and intense fascination for learning a particular skill and shows both a will and a desire to learn with ease. A sensitive period refers to a period of time when children get totally absorbed and focus their attention and energies on one skill. They should be given ample opportunities and scope for repetition in order to enable them to learn and perfect this skill. It is important to note that this sensitive period is something that comes and goes like a flying arrow. When it passes, to have to learn the same thing, would take a great more effort. It is hence of utmost importance to cater to these sensitive periods at the appropriate moment. The Montessori method offers the ideal environment, special materials and well trained teachers to maximize the child’s potential when the time is right i.e. when the windows of learning open up. Dr. Montessori believed that a child reflects his needs through his activities and behaviour. It is hence necessary for a teacher to observe children, to know what stage of learning or sensitive period they are in and provide them with the appropriate environment, learning materials and activities, making the most of these sensitive periods of growth. This will result in a pleasant, self-motivating atmosphere. There are various sensitive periods some of which are listed below:- i) Sensitive period for language – It is the earliest and longest sensitive
period in a child’s life. The child absorbs the spoken language in his environment, which is the language spoken by his parents and other members of his family. The child fixes his attention on the lip movements and words uttered by those around him, even before he can talk and walk. These experiences are stored up, secretly preparing him for speech. A
child by around six months starts exercising speech sounds. Thus before the earliest articulate utterances, there exists in the child a sensible interest for preparing him for speech.
ii) Sensitive period for a sense of order – Children have an in-built love for
order. This can be seen even in very small babies. Disorder disturbs them and they express this by incessant crying. This is given to them by nature and is built up by an inner sense. This can also be observed when toys are distributed to children in a pre-school. The moment they are aware that the teacher is collecting the toys or blocks, each child will get up and want to put away the toys into the tray that is used for collection. No matter how many times the teacher tells them to sit in their places, this irresistibly attractive activity forces them to disobey and move forwards to put the toys into the tray, thus restoring order to the environment.
iii) Sensitive period for sensorial development – There is an inner urge in
the child, which works almost from his birth. This urge drives the senses to gather information from the environment, which he starts doing at a$very early age. He becomes aware of the physical qroperties of matter due to this. He needs to become conscious of the sensorial impressions he has gcthered. Hence we present sensorial material to him. He gets involved in txese activities and uses both his hands and senses.
iv) Sensitive period for refinement of movement – The child at a
particular stage is performing a number of developmental tasks. A stage is reached whmn he wants to perform these tasks more perfectly and gracefully. While walking the child carries the weight of his body over his short legs which is only 32% of his whole body weight. He achieves this difficult task and he needs to master this capacity. He has to acquire proper body balance; perfect his posture etc. For this we provide activities such as walking on the line which will help him to take advantage of this sensitive period. It is up to the teacher to realize which sensitive period the child is passing through and provide him with the appropriate activity and materials to take advantage of this phase.
v) Sensitive period for learning good manners – The child by nature loves
good manners. Parents are role-models. The examples set by the parents are automatically followed by the child. Activities provided in the House of Children help to take advantage of this sensitive period and inculcate good manners in children.
PRACTICAL LIFE EXERCISES – (EPL ACTIVITIES)
A child who is admitted to the house of children comes from a protected environment, which is his family. He feels insecure in this new environment. He has to be given time to settle down. This is done through activities that do not require presentations. These are the preliminary activities or also called initial activities or entry items ex. (1) threading of beads (2) looking at picture books (3) picture cards (4) coins to post in a container with a slit like opening on top (5) puzzles etc. Once he has settled down we present the Exercise of Practical Life. What are these Practical Life Exercises and of what use are they to the children? These are simple activities carried out by adults to keep the environment in proper order. Ex. Sweeping, dusting, folding etc. The child is used to observing these movements performed around him by adults, right from birth. These exercises are very simple and clear and the child finds them irresistibly attractive. They help to satisfy his inner urge of self-development and hence they develop in the child a sense of satisfaction and achievement. When the child enters the House of Children he is presented with these activities through demonstrations, so that he gets guidance and knows the correct way of doing things. He shows a great deal of interest in these activities and picks them up quickly. He is familiar with the tools used in the EPL activities as they are used in his home. This helps the child to see a similarity between home and school. He hence accepts the House of Children as his own and chooses those
materials and activities that he likes. Performing these activities, he quickly adapts to the environment and settles down too. These activities involve a number of small movements that the child has to observe carefully and practice and since they give him satisfaction, he repeats them again and again till he perfects them. The attractive and enthusiastic invitation of the adult also plays an important role in captivating the child’s interest to perform these activities. While performing these activities both mental and physical co-ordination is required. Together the mind and the body work towards the same goal. This is called psychomotor unity. This is the first step towards a child developing an integrated personality and the achievement of the same. As the child continues to perform these activities a feeling of self-confidence and dignity develops and he becomes conscious that he is learning. While performing these activities he also develops the habit of correcting himself and thus learns to perform them perfectly and gains mastery over his movements. The adult (teacher) has a huge responsibility as she has to plan, prepare, display, maintain, present, stimulate and even give freedom to the child if these exercises are to help in the child’s development. The child is allowed to perform these activities independently and he hence learns to recognize his mistakes and develops the habit of judging himself and correcting himself. He also develops grace in his movements. The EPL activities can be divided into 4 main types-
i) Caring for the environment --- activities related to the animate and
inanimate environment- eg. – taking care of plants and animals, dusting, sweeping, polishing etc.
ii) Social Graces and Courtesies - eg. - greeting, offering, apologizing etc. iii) Caring for oneself - e.g. – combing, buttoning, dressing, tying shoe laces
etc. iv) Motor Skills – eg. – walking, sitting, pouring, carrying etc. Characteristics of the EPL - They are developmental activities which are useful to
the children in their future i.e. in their day to day activities. They involve coordination
of body and mind. They help the child to concentrate. The duration of these activities
is small but they have an everlasting effect on the child. They help him to learn to
keep his environment neat and clean and teach him how to handle things accurately
and carefully. Once he learns to perform these activities he does not need any adult
help. He now becomes capable of thinking and doing work independently. The EPL
help in the integration of his personality as while performing these activities the 3
powers i.e. intelligence, will, and voluntary movements come together. He develops
an appreciation for work and dignity of labour. He gains control over his muscles. He
becomes practical in his thinking and his will power becomes stronger as he grows.
Display of materials – This should be done in an order. There is a rule – “A place
for everything and everything in its place”
All the materials must be visible and at the hand and eye reach of the child. They should be kept in developmental succession and should look neat and pleasing. The children should not be put in a position to borrow, share or wait for the materials. To avoid this there should be multiple sets of the material. Age of presentation – Starting from 2 ½ years, it goes on till 6 years. The adult has to observe and when satisfied with the progress and development, should introduce the next activity moving gradually on to new and more complex life skills such as sewing, using computers, gardening, first aid etc. How to present Practical Life Exercises – Not only the EPL but anything you present to the children in the Montessori environment should follow the steps given below:- a) Invitation - The teacher has to invite the child for any presentation and
the child has the liberty to accept or refuse. b) Preparation – It is the teacher’s responsibility to keep all the materials in
a state of readiness at all times. c) Statement – This is done in order to get the attention of all the children to
the presentation. d) Demonstration – The activity is presented slowly so that the child
observes carefully. e) Ask the child to perform – This is done to find out if the teacher’s
presentation or demonstration was clear, rather than to see whether the child is performing well.
f) Repeat presentation – This may be done highlighting the points which
were not clear in the demonstration. g) Winding up – Putting away all the material back in its place of display. These presentations can be individual, group or collective.
Group = 4 to 5 children Collective = 10 to 12 children
ACTIVITIES INCLUDED UNDER PRACTICAL LIFE EXERCISES 1. Activities with work mat
a) How to roll a work mat b) How to unroll a work mat c) How to put the rolled mat down d) How to lift the rolled mat e) How to carry a rolled mat f) How to sit on a sitting mat g) How to get up from a sitting mat
2. Activities with chowki or chair
a) How to put a chowki or chair down b) How to lift a chowki or chair c) How to carry a chowki or chair d) How to sit on a chair e) How to get up from a chair f) How to carry a large table g) How to sit on a chair at a table
3. Activities with glasses and jugs
a) How to put a normal size glass down b) How to put a small size glass down c) How to put a normal size jug down d) How to put a small size jug down e) How to hold and lift a normal size glass f) How to hold and lift a small size glass g) How to hold and lift a normal size jug h) How to hold and lift a small size jug i) How to hold and lift a large size jug j) How to hold and lift a lota
4. Activities with Napkins
a) How to fold a napkin divided into quarters by medians b) How to unfold a napkin divided into quarters by medians c) How to fold a napkin divided into quarters by diagonals d) How to unfold a napkin divided into quarters by diagonals e) How to put a napkin down f) How to lift and carry a napkin
5. Activities with dusters
a) How to choose a particular duster from a stack b) How to fold a duster after use
6. Activities with oil cloth
a) How to roll an oil cloth b) How to unroll an oil cloth
7. Pouring activities
a) How to pour grains from jug to glass b) How to pour liquids
8. Social behaviour activities
a) How to say namaste b) How to talk in class c) About sneezing d) About coughing e) About yawning f) How to observe a presentation g) How to observe other children at work h) How to respond to a signal
9. Offering
a) How to offer a cup of tea b) How to offer a glass of water c) How to carry and offer sharp objects, scissors etc.
10. Taking care of ones self
i) Fastening frames
a) How to close press buttons b) How to open press buttons c) How to close coat buttons d) How to open coat buttons e) How to close hooks and eyes f) How to open hooks and eyes g) How to close buckles h) How to tie knots and bows i) How to lace shoes ii) How to wash hands and face iii) Walking on a line iv) Silence activities
11. Taking care of the environment
a) How to use a dust pan and brush b) How to sweep the floor c) How to dust objects d) How to polish brass
MORE PRACTICAL LIFE EXERCISES
1. Rolling and kneading dough 2. Sifting flour 3. Making mash potatoes 4. Grating carrots 5. Cutting vegetables with a blunt knife 6. Shelling peas 7. Beating and whisking eggs 8. Crushing and pounding with mortar and pestle 9. Pasting and gluing (envelopes, stamps etc.) 10. Dusting various objects with a duster, feather duster, soft brush 11. Using a dust pan and brush 12. Watering plants 13. Sprinkling, washing and dusting leaves 14. Combing hair 15. Blowing nose 16. Polishing shoes 17. How to hang clothes on a hanger 18. How to hang clothes on a clothes line
CONTROL OF ERROR Control of Error basically means keeping a check that mistakes are not committed by the child while he/she works with a particular material. Once the child has observed the teacher’s presentation the Control of Error ensures that he/she, works with the material correctly. It helps him/her to be disciplined when working on any task. He /she works in an orderly manner and learns to correct himself/herself. The Control of Error is an essential part of “auto-education”.
POINT OF INTEREST These refer to parts of the presentation which need special emphasis and should in no way be excluded during a presentation.
DETAILED PRESENTATION OF A FEW EPL ACTIVITIES
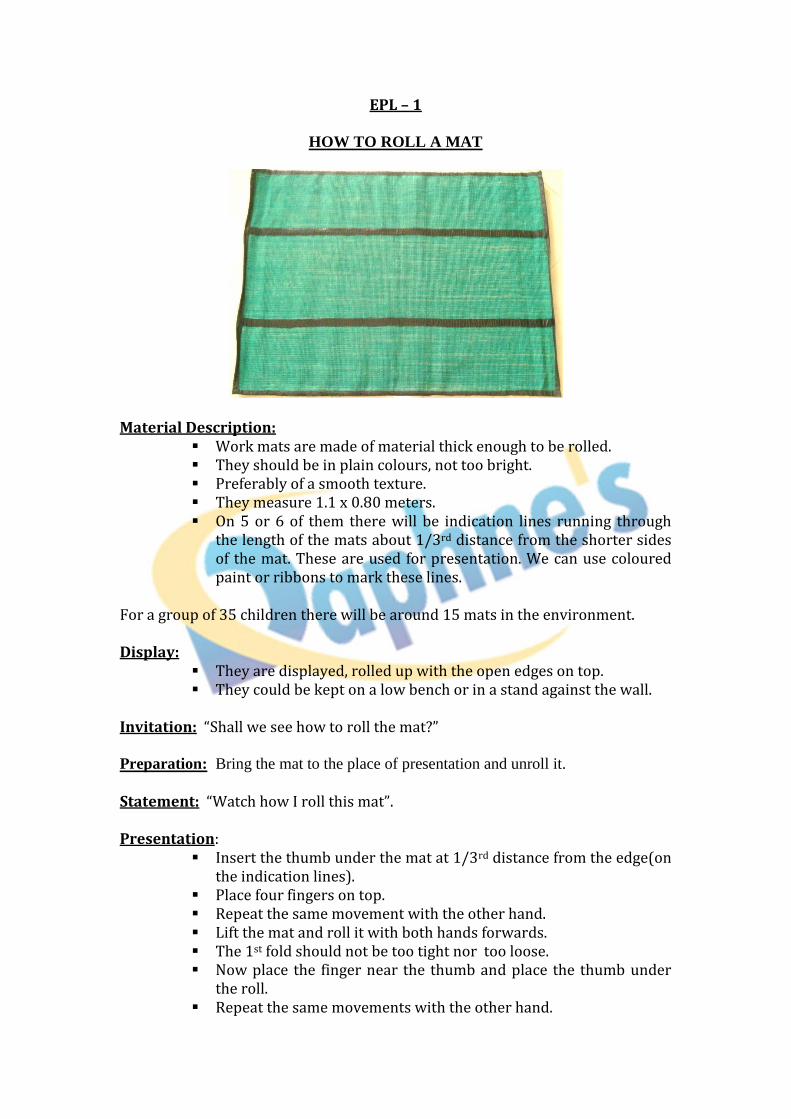
EPL – 1
HOW TO ROLL A MAT
Material Description:
Work mats are made of material thick enough to be rolled. They should be in plain colours, not too bright. Preferably of a smooth texture. They measure 1.1 x 0.80 meters. On 5 or 6 of them there will be indication lines running through
the length of the mats about 1/3rd distance from the shorter sides of the mat. These are used for presentation. We can use coloured paint or ribbons to mark these lines.
For a group of 35 children there will be around 15 mats in the environment. Display:
They are displayed, rolled up with the open edges on top. They could be kept on a low bench or in a stand against the wall.
Invitation: “Shall we see how to roll the mat?” Preparation: Bring the mat to the place of presentation and unroll it.
Statement: “Watch how I roll this mat”. Presentation:
Insert the thumb under the mat at 1/3rd distance from the edge(on the indication lines).
Place four fingers on top. Repeat the same movement with the other hand. Lift the mat and roll it with both hands forwards. The 1st fold should not be too tight nor too loose. Now place the finger near the thumb and place the thumb under
the roll. Repeat the same movements with the other hand.
While rolling the mat, move forwards on your haunches and look at both the edges for an even roll and also the children.
Tap the ends in, if required. Roll the mat completely. The open flap should come on the top. Then say, -- “See I have rolled the mat completely and this open
flap is on the top”. Invite the child to do the activity.
Type of activity: Collective, group or individual. Point of interest:
Moving forwards on your haunches. Looking at both the ends for an even roll. Tapping the ends in, if required.
Control of error: Mat should be rolled completely and the open flap should be on top.
EPL – 2
HOW TO UNROLL A MAT:
Invitation: Shall we see how to unroll the mat? Preparation: Bring a rolled mat and place it at the presentation area in such a way that the open flap is on top. Statement: “Now watch how I unroll this mat”. Presentation:
Insert the thumb under the open flap at 1/3rd the distance of the mat. Place the fingers on the top (the hand which is away from the child). Repeat the same movements with the other hand. Raise the flap and place it on the floor. Remove the thumb and fingers of the hand which is closer to the child. Repeat the same movement with the other hand. Insert the fingers under the roll and place the thumb on top. Move the hand downwards so that the thumb comes near the floor. Now place the fingers under the roll and repeat the movement.
While unrolling you have to move backwards on your haunches till the mat is completely unrolled. Then say, --“Now we have unrolled the mat completely. Do you see any wrinkles?” Point of interest: Moving backwards on your haunches. Control of error:
Mat should be unrolled completely. There should not be any wrinkles on the mat.
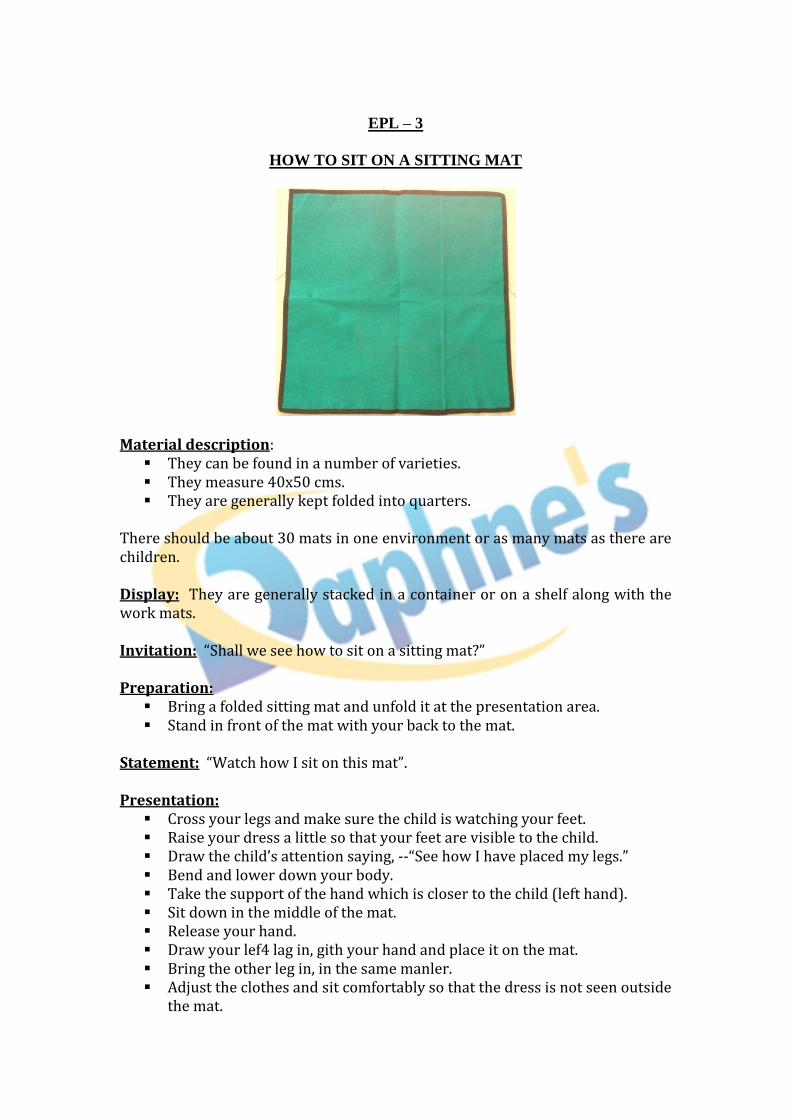
EPL – 3
HOW TO SIT ON A SITTING MAT
Material description:
They can be found in a number of varieties. They measure 40x50 cms. They are generally kept folded into quarters.
There should be about 30 mats in one environment or as many mats as there are children. Display: They are generally stacked in a container or on a shelf along with the work mats. Invitation: “Shall we see how to sit on a sitting mat?” Preparation:
Bring a folded sitting mat and unfold it at the presentation area. Stand in front of the mat with your back to the mat.
Statement: “Watch how I sit on this mat”. Presentation:
Cross your legs and make sure the child is watching your feet. Raise your dress a little so that your feet are visible to the child. Draw the child’s attention saying, --“See how I have placed my legs.” Bend and lower down your body. Take the support of the hand which is closer to the child (left hand). Sit down in the middle of the mat. Release your hand. Draw your lef4 lag in, gith your hand and place it on the mat. Bring the other leg in, in the same manler. Adjust the clothes and sit comfortably so that the dress is not seen outside
the mat.
EPL 4
HOW TO GET UP FROM A SITTING MAT Invitation: “Shall we see how to get up from a mat?” Preparation: Have a sitting mat unfolded at the place of presentapion and qit kn the mat. Statement: “Watch how I get up from this mat” Presentation:
Bring out one leg and place it in front of the mat. Next bring out the other leg also and place it near the first leg. Take the support of the palm which is closer to the child. Raise yourself, get up and stand in front of the mat. Move towards one side of the mat and adjust your clothes.
Ask the child, -- “Did I step on the mat?” “Shall we do it again?” Repeat the presentation if needed. Point of interest:
Bringing out the legs one by one. Taking support of the palm.
Control of error:
Not stepping on the mat. Mat should be without wrinkles.
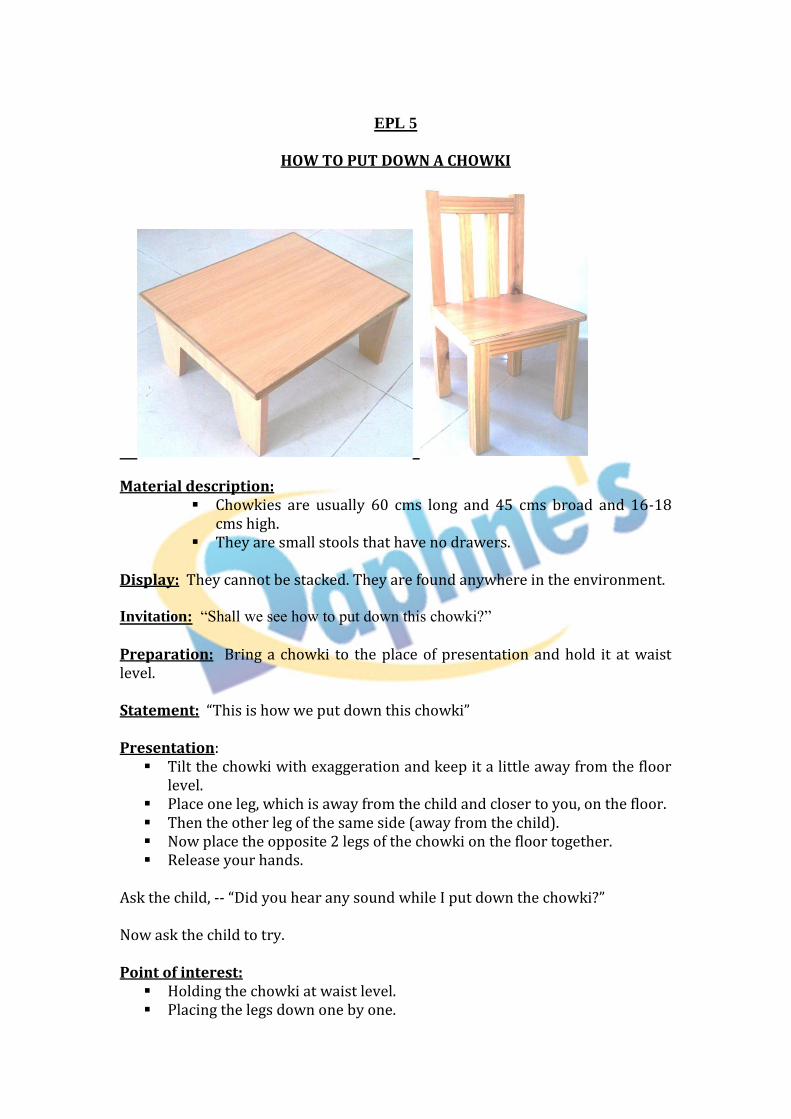
EPL 5
HOW TO PUT DOWN A CHOWKI
Material description:
Chowkies are usually 60 cms long and 45 cms broad and 16-18 cms high.
They are small stools that have no drawers. Display: They cannot be stacked. They are found anywhere in the environment. Invitation: “Shall we see how to put down this chowki?”
Preparation: Bring a chowki to the place of presentation and hold it at waist level. Statement: “This is how we put down this chowki” Presentation:
Tilt the chowki with exaggeration and keep it a little away from the floor level.
Place one leg, which is away from the child and closer to you, on the floor. Then the other leg of the same side (away from the child). Now place the opposite 2 legs of the chowki on the floor together. Release your hands.
Ask the child, -- “Did you hear any sound while I put down the chowki?” Now ask the child to try. Point of interest:
Holding the chowki at waist level. Placing the legs down one by one.
Control of error: Absence of noise. Presentation for putting down a chair is the same as for the chowki, but:- You hold the chair on both sides of the seat with the back away from you. If the chair has arms, you do not hold the seat, instead you hold by the arms.
EPL 6
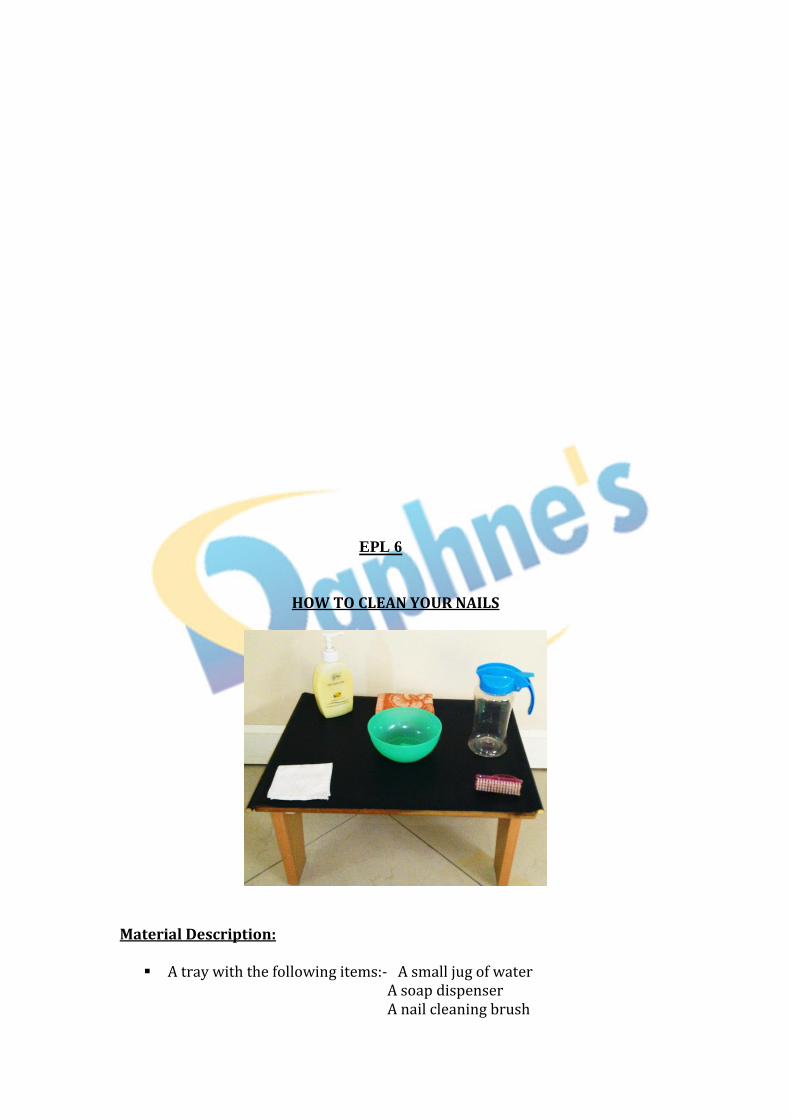
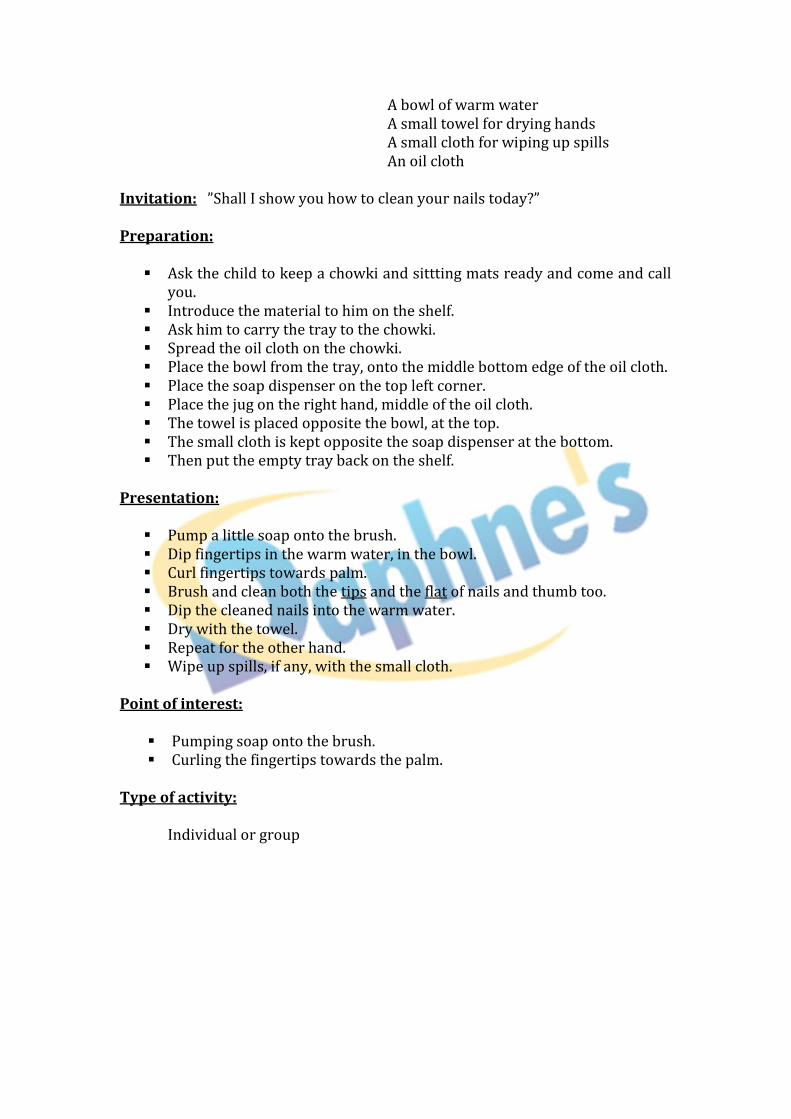
HOW TO CLEAN YOUR NAILS
Material Description:
A tray with the following items:- A small jug of water A soap dispenser A nail cleaning brush
A bowl of warm water A small towel for drying hands A small cloth for wiping up spills An oil cloth
Invitation: ”Shall I show you how to clean your nails today?” Preparation:
Ask the child to keep a chowki and sittting mats ready and come and call you.
Introduce the material to him on the shelf. Ask him to carry the tray to the chowki. Spread the oil cloth on the chowki. Place the bowl from the tray, onto the middle bottom edge of the oil cloth. Place the soap dispenser on the top left corner. Place the jug on the right hand, middle of the oil cloth. The towel is placed opposite the bowl, at the top. The small cloth is kept opposite the soap dispenser at the bottom. Then put the empty tray back on the shelf.
Presentation:
Pump a little soap onto the brush. Dip fingertips in the warm water, in the bowl. Curl fingertips towards palm. Brush and clean both the tips and the flat of nails and thumb too. Dip the cleaned nails into the warm water. Dry with the towel. Repeat for the other hand. Wipe up spills, if any, with the small cloth.
Point of interest:
Pumping soap onto the brush. Curling the fingertips towards the palm.
Type of activity: Individual or group
EPL 7
HOW TO USE A DUSTPAN AND BRUSH
Type of activity – Individual or small groups Invitation: “Would you like to see how to use a dustpan and brush?” Preparation:
Ask the children to get their sitting mats and to be seated. When the children are seated, go and get the dustpan and brush from the shelf. Statement: - “Let us see how we use this dustpan and brush” Presentation:
Introduce the material to the child saying,--“This is a dustpan and this is a brush.
Throw bits of paper on the floor. Sweep the papers into a pile. Place the dustpan close to the papers. Sweep the papers onto the dustpan with the brush. Throw the papers into the dustbin. Ask the child if he would like to repeat the activity.
Point of interest: - Sweeping the papers into a pile. Control of error:- Papers should be completely swept into the pan.
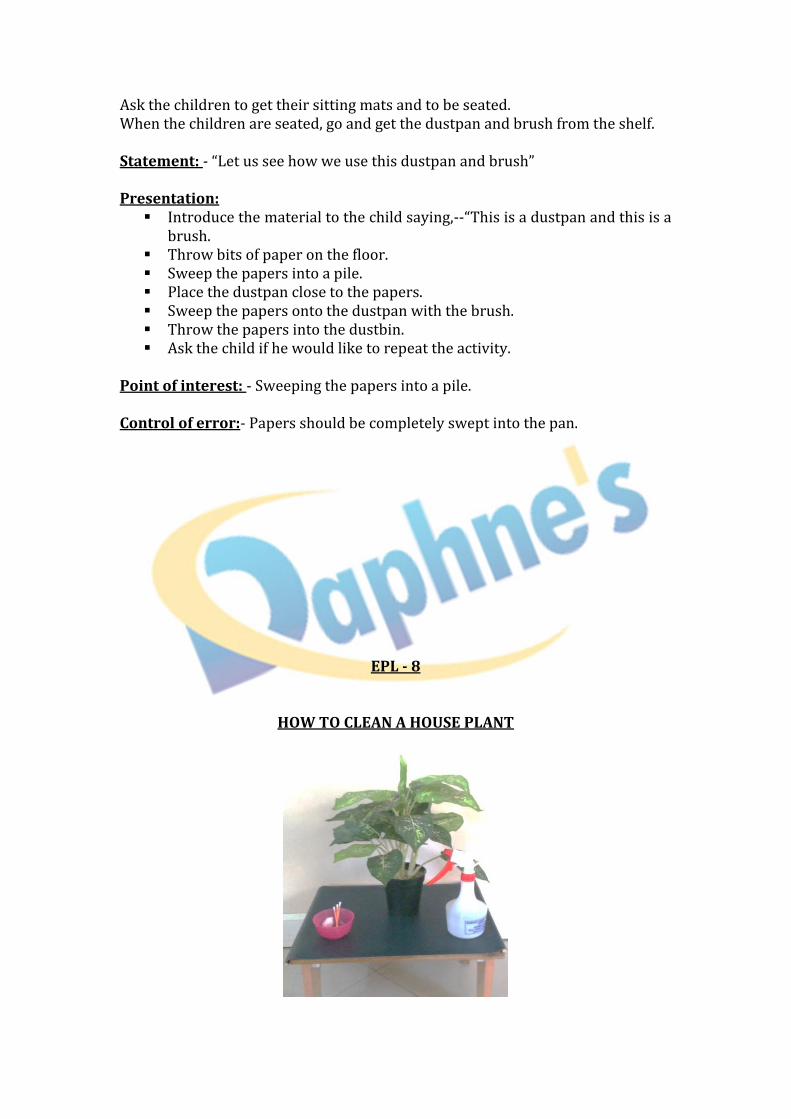
EPL - 8
HOW TO CLEAN A HOUSE PLANT
Type of activity – Individual or small groups Materials required: A tray with the following items: A spray can with water A small dish with a cotton ball and a cotton bud An oil cloth Invitation: “Would you like to see how to clean a house plant? Preparation:
Ask the child to take the tray with all the above items and keep it on the oil cloth spread on a chowki.
Bring the small potted plant and tell the child that we are going to clean this plant today.
Presentation:
Keep the plant on the chowki. Remove all the items from the tray and place them on the oil cloth. Spray the plant gently. Wipe the leaves with the cotton ball gently. Use the cotton bud to clean narrow parts which cannot be reached with
the cotton ball. Ask the child if he would like to complete the activity. Return the plant to its proper place. Throw the cotton ball into the dustbin. Carry the materials on the tray back to their proper places on the shelf.
Point of interest: - Spraying the plant gently.
EPL – 9
HOW TO DRAW THE TEACHER’S ATTENTION Type of activity – Collective Invitation: “Would you like to see how to draw your teacher’s attention when she is busy with someone else?” Preparation:
Ask the children to get their sitting mats and be seated. Invite two children to help you with this activity. Explain to them their roles in this activity.
Presentation:
The teacher and one child begin talking to each other. The second child quietly approaches them. He/she places the hand on the teacher’s shoulder and waits patiently. After a while the teacher says, -- “Excuse me”, to the child she is talking to. The teacher also says, --“Thank you for waiting” to the second child and
gives the child her attention. The role play can be repeated with other children.
Point of interest: - Placing the hand on the teacher’s shoulder without speaking. Control of error:- The teacher saying ‘excuse me’ and ‘thank you’.
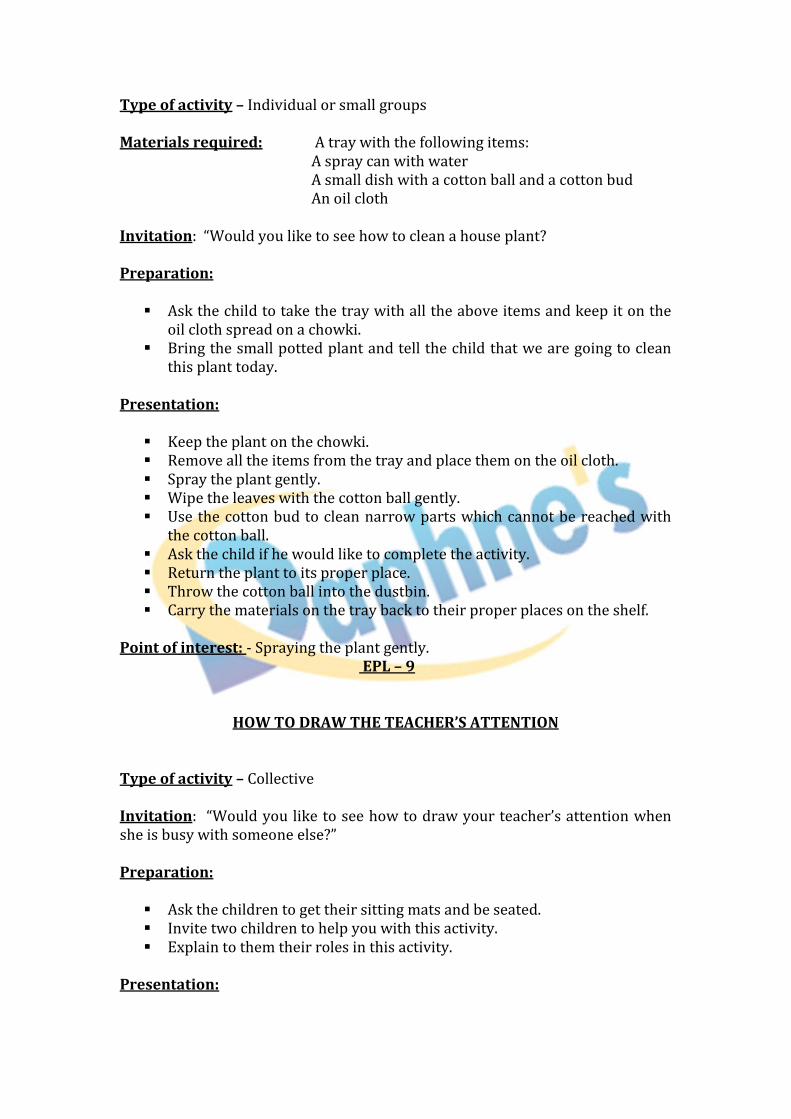
EPL - 10
HOW TO USE A ROLLING PIN AND BOARD TO MAKE CHAPPATIS
Type of activity – Individual or small group Invitation: “Would you like to see how to roll a chappati today?” Materials required: Atta dough
Atta powder Rolling pin and board An oil cloth Preparation:
Ask the child to spread the oil cloth on a chowki. Ask him to carry the tray with the materials to the chowki.
Presentation:
Make a small ball with the dough. Press it down on the board with your fingers to flatten it. Start to roll out the flattened atta with the rolling pin. If it sticks apply a little atta powder. Roll till chappati is fine. Ask the child if he would like to try.
Point of interest: - Applying dry atta whenever needed. Control of error:- Rolling the chappati fine. Note: Use a wet cloth to wipe up and clean the oil cloth.
EPL - 11
POURING ACTIVITIES
Material description:
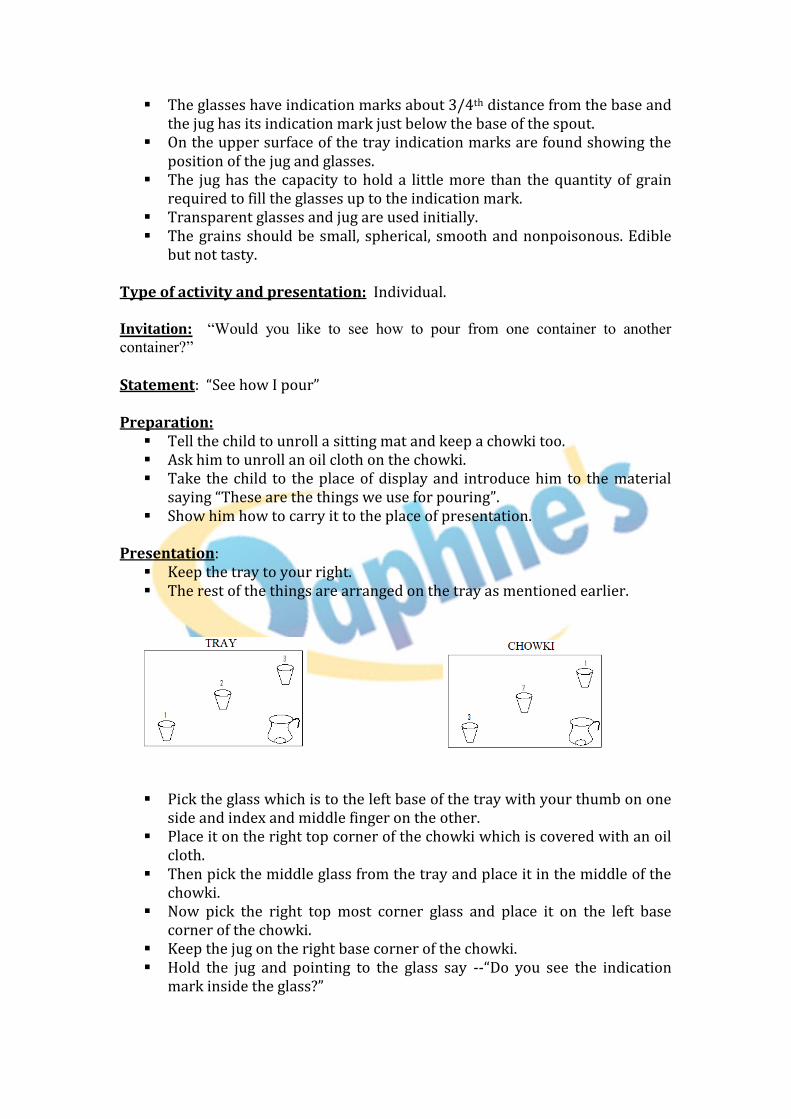
A tray on which there is an oil cloth. At the right base of the tray is placed a jug. 3 to 5 glasses are arranged diagonally across from the left base of the tray.
The glasses have indication marks about 3/4th distance from the base and the jug has its indication mark just below the base of the spout.
On the upper surface of the tray indication marks are found showing the position of the jug and glasses.
The jug has the capacity to hold a little more than the quantity of grain required to fill the glasses up to the indication mark.
Transparent glasses and jug are used initially. The grains should be small, spherical, smooth and nonpoisonous. Edible
but not tasty. Type of activity and presentation: Individual. Invitation: “Would you like to see how to pour from one container to another
container?”
Statement: “See how I pour” Preparation:
Tell the child to unroll a sitting mat and keep a chowki too. Ask him to unroll an oil cloth on the chowki. Take the child to the place of display and introduce him to the material
saying “These are the things we use for pouring”. Show him how to carry it to the place of presentation.
Presentation:
Keep the tray to your right. The rest of the things are arranged on the tray as mentioned earlier.
Pick the glass which is to the left base of the tray with your thumb on one side and index and middle finger on the other.
Place it on the right top corner of the chowki which is covered with an oil cloth.
Then pick the middle glass from the tray and place it in the middle of the chowki.
Now pick the right top most corner glass and place it on the left base corner of the chowki.
Keep the jug on the right base corner of the chowki. Hold the jug and pointing to the glass say --“Do you see the indication
mark inside the glass?”
“We have to pour up to that mark. When I reach this mark, ask me to stop”.
Start pouring the grains slowly in a circular motion so that the grains will be even inside the glass.
Pour upto the indication mark. (Start pouring into the right top corner of the glass first). Repeat the same for the other 2 glasses.
Then keep the jug back on the chowki where it was before. Then say --“Did I spill anything? Shall we check?” Start inspecting the cloth to see if the grains have spilt and if so put into
the glass (with pincer movements). Then say --“Shall we empty these glasses so that we can pour again?” Start emptying the top right glass first then the middle and then the last,
one by one. Again inspect if you have spilt while pouring back to the jug. Then put the jug back on the tray as it was in the beginning and the
glasses too. Ask the child if he would like to do it again.
Point of interest:
Pouring upto the indication mark. Keeping the glasses diagonally. Circular movements while pouring to ensure the horizontal level of the
grain. Control of error: Not to spill while pouring.
EPL – 12
ACTIVITIES WITH NAPKINS
Material description:
The napkins are made of good quality (cotton material), plain colours.
They are square in shape and measure 28 cms. The edges should be hemmed in attractive and contrasting colours so that
the stitches stand out on the napkins. The guidelines for folding should be made in running stitch and look the
same on both sides. There are 4 types of napkins.
1. Napkins divided into quarters by medians 2. Napkins divided into quarters by diagonals 3. Napkins divided into eights by medians 4. Napkins divided into eights by diagonals
Each type of napkins has its own container. The size and shape of the container will correspond to the shape and size
of the folded napkins. They are made of wood and should be 2 cms larger on each side of the
folded napkins. All the containers are kept next to each other on the shelf. How to fold a napkin divided into quarters by medians:
Type of activity: Individual Type of presentation: Group Invitation: “Would you like to see how a napkin is folded?” Preparation:
Keep a chowki at the place of presentation. When the children are seated, bring the napkin and keep it on the chowki. Show the children the guidelines on the napkin.
Statement:
“Let us see how to fold this napkin”. “We always fold along these lines”, pointing to the guidelines once again.
Presentation:
Hold the right hand corner of the napkin with thumb above and right index finger below the edge of the napkin.
Then hold the right base corner with the thumb below and the left index finger above. Raise the edges a little and turn them towards the left, keeping the edges parallel to the guidelines.
Now tell the child when this edge reaches this (other) edge (point with your hand) ask me to stop.
Continue moving the same edge slowly with exaggerated movements till it reaches the opposite edge.
Place the corner of the edges exactly over the corners of the opposite edge.
Release the fingers of both the hands one by one. Now smoothen the partly folded napkin towards the fold using the side of
your palm and holding the napkin with the other hand using only thumb and index finger.
Then place the right hand index finger below and thumb above, at the right top corner of the napkin.
Left thumb above and index finger below on the left side. Lift both the top edges together and move it towards you. Tell the child to stop you when the edges reach the edge at the base. When this happens release your fingers one at a time. Smoothen the completely folded napkin towards the fold. Ask the child --“Would you like to do it?”
Point of interest:
Keeping the edges of napkin parallel to the guidelines. Bringing one edge of the napkin on top of the other. Smoothening the napkin.
Control of error:
Edges of the napkin should be placed exactly on top of the other. The napkin should be folded without wrinkles.
EPL – 13
FASTENING FRAMES
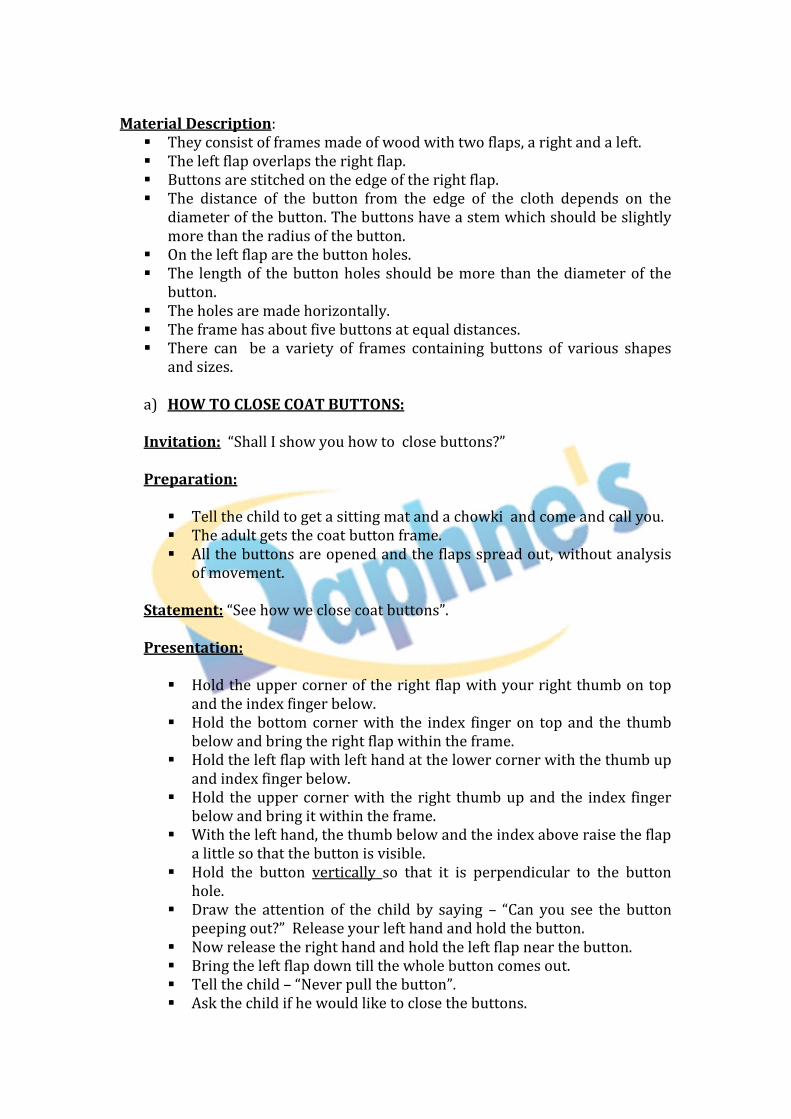
Material Description:
They consist of frames made of wood with two flaps, a right and a left. The left flap overlaps the right flap. Buttons are stitched on the edge of the right flap. The distance of the button from the edge of the cloth depends on the
diameter of the button. The buttons have a stem which should be slightly more than the radius of the button.
On the left flap are the button holes. The length of the button holes should be more than the diameter of the
button. The holes are made horizontally. The frame has about five buttons at equal distances. There can be a variety of frames containing buttons of various shapes
and sizes.
a) HOW TO CLOSE COAT BUTTONS: Invitation: “Shall I show you how to close buttons?” Preparation:
Tell the child to get a sitting mat and a chowki and come and call you. The adult gets the coat button frame. All the buttons are opened and the flaps spread out, without analysis
of movement. Statement: “See how we close coat buttons”. Presentation:
Hold the upper corner of the right flap with your right thumb on top and the index finger below.
Hold the bottom corner with the index finger on top and the thumb below and bring the right flap within the frame.
Hold the left flap with left hand at the lower corner with the thumb up and index finger below.
Hold the upper corner with the right thumb up and the index finger below and bring it within the frame.
With the left hand, the thumb below and the index above raise the flap a little so that the button is visible.
Hold the button vertically so that it is perpendicular to the button hole.
Draw the attention of the child by saying – “Can you see the button peeping out?” Release your left hand and hold the button.
Now release the right hand and hold the left flap near the button. Bring the left flap down till the whole button comes out. Tell the child – “Never pull the button”. Ask the child if he would like to close the buttons.
Point of interest:
Holding the buttons vertically. Pushing the flap down till the button comes out.
Control of error: Not pulling the buttons.
EPL – 14
b) HOW TO OPEN COAT BUTTONS Invitation: “You know how to close coat buttons, would you like to see how to open coat buttons?” Preparation: Tell the child to get a sitting mat and a chowki and the coat button frame ready and then come and call you. Statement: “See how we open coat buttons.” Presentation:
Hold the left flap with the right index finger below and thumb above at the top corner of the left flap.
With the left index finger and thumb hold the button vertically. Raise the flap over the button towards the left until the button comes out
of the hole fully. Release your left hand and place the left flap with the button holes over
the right flap with the buttons. Draw the attention of the child to the fact that we should not pull the
buttons. Point of interest: Pulling the left flap till the button comes out of the button hole.
EPL – 15
WALKING ON THE LINE
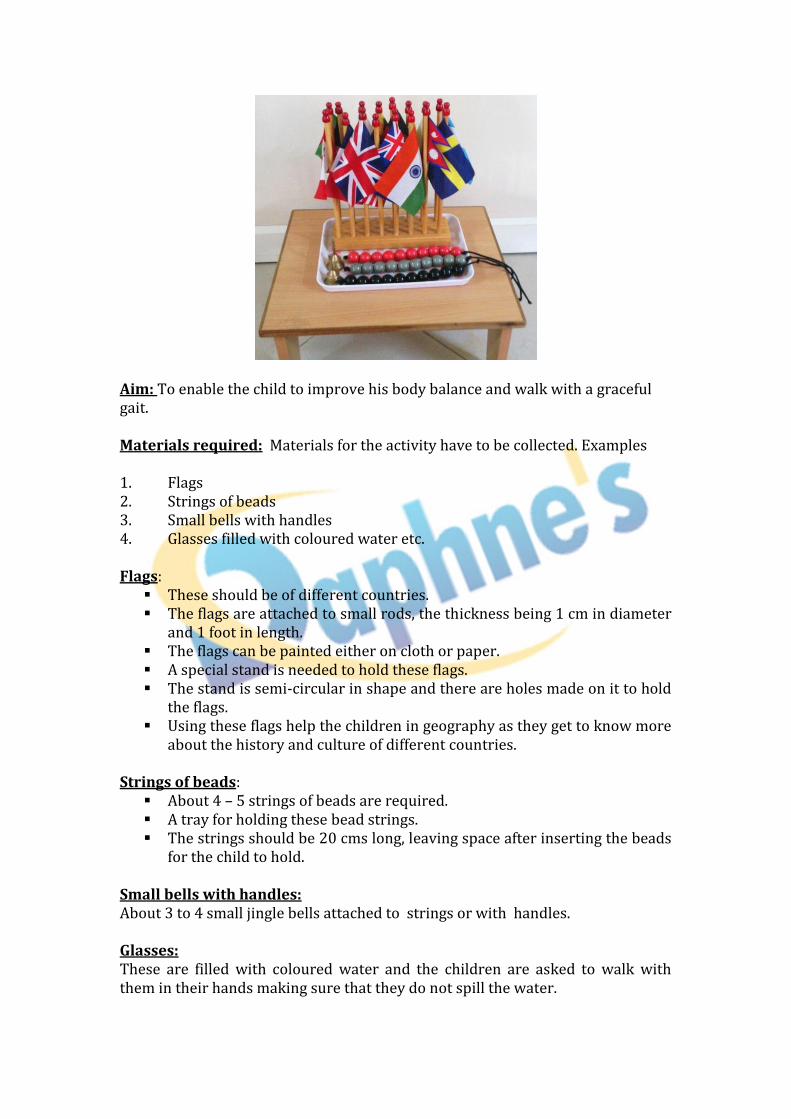
Aim: To enable the child to improve his body balance and walk with a graceful gait. Materials required: Materials for the activity have to be collected. Examples 1. Flags 2. Strings of beads 3. Small bells with handles 4. Glasses filled with coloured water etc. Flags:
These should be of different countries. The flags are attached to small rods, the thickness being 1 cm in diameter
and 1 foot in length. The flags can be painted either on cloth or paper. A special stand is needed to hold these flags. The stand is semi-circular in shape and there are holes made on it to hold
the flags. Using these flags help the children in geography as they get to know more
about the history and culture of different countries. Strings of beads:
About 4 – 5 strings of beads are required. A tray for holding these bead strings. The strings should be 20 cms long, leaving space after inserting the beads
for the child to hold. Small bells with handles: About 3 to 4 small jingle bells attached to strings or with handles. Glasses: These are filled with coloured water and the children are asked to walk with them in their hands making sure that they do not spill the water.
Trays, baskets, books etc. can be placed on the head and the child is asked to walk without dropping them.
All these are challenges to keep the child interested in the activity. These activities are repeated frequently. At every repetition a fresh challenge is added.
Type of activity and presentation: Group Invitation: Ring the bell, draw the attention of the children and announce “After you wind up, come, I will show you how to walk on the line”. Preparation:
Put a bench in the middle of the ellipse drawn on the classroom floor. Arrange these things on them. (flags, bells, beads etc.). See that the children are barefooted and tell them “You have all noticed
this line. Now let us see how to walk on this line”. For those who don’t want to participate tell them “If you don’t want to
take part, you may sit and watch”. Statement: “Let me show you how to walk on the line”. Presentation:
Ask the children to stand in a line one behind the other all facing one direction and at one arms distance from one another.
Tell them that they have to maintain the same distance as they walk and that they cannot change their places.
The toe and heels should be on the line. Demonstrate how to walk by placing your feet in such a manner that the
toes and heels are on the line. Introduce other activities as challenges like something else to do while
walking on the line. Allow them to master this for sometime. You can also show them how to walk on the line with toes touching the
heels. You can also play soft instrumental music. You can ask them to hold a flag in their hands and stretch their arms and
keep an eye on the flag. Hold strings of beads and walk in such a manner that the beads do not
move. They can also be made to walk with glasses in their hands. Baskets can be kept on their heads while walking.
Note:
During the activity if one of the children wants to leave he can do so by just stepping aside and moving out of the way of others.
If another child who is watching, wants to join, stop the activity and let him join in.
Point of interest:
To watch for the step being placed on the line. Walking at the same pace. Walking with things in their hands and balancing things on their heads
also. Walking to the tune of music.
Control of error:
The toes and heel are placed on the line. The distance between any two children is maintained.
Age:
After the child has settled down. After he has sufficiently worked with EPL activities (3 to 3 ½ years)
EPL – 16
SILENCE ACTIVITIES Introduction:
If we have to maintain an environment devoid of noise, there should not be any movement.
It is impossible to maintain absolute silence. It is however possible to inhibit our voluntary movements, thus creating
an atmosphere for silence. Silence comes to those who have practiced self-control, or have done
meditation, yoga etc. This activity is introduced, after the children have settled down and have
control over their voluntary movements i.e. after walking on the line. This activity can be given soon after the school has reopened, after the
holidays. It gives the teacher an opportunity to check the child’s hearing ability and
develops listening skills in children.
What time of day should it be given?
After the child has performed a few activities and before he goes home.
When can you introduce this activity?
When the child has gained control over his/her voluntary
movements.
He/she should have acquired the capacity to listen to and recognize various acoustic impressions i.e. should have worked with the sound boxes.
Should have developed a certain level of intelligence to understand
what is being expected of him/her, while participating in the activity.
They should have developed a strong will power and should
participate willingly.
They should have developed a certain level of social awareness and should be willing to co-operate in the group activity.
Type of activity and presentation: Small groups. Invitation: Draw the attention of the children by ringing a bell and say “We are going to perform a new activity for which the co-operation of all of you is necessary.
Preparation:
Ask the children to draw the curtains as bright light is not conducive in keeping silence.
Those who don’t want to participate in the activity can be asked to go to another environment and not to make noise.
Presentation: This is done in stages:- First Stage – Tell the children --“Sit on your sitting mats and stretch your legs but don’t touch the other person. Watch your feet and see that they don’t move”. Second Stage – Tell the children – “Keep your legs and knees without moving”. Third Stage – Then tell them -- “Don’t move your hands and arms. Don’t droop your shoulders or move them. Your entire body should not move”. Fourth State – Tell them – “Don’t move your heads. Now don’t move your eye balls too. Even your lips should not move”. All the voluntary movements are inhibited. Ask them to close their eyes and enjoy the silence. Exercises:
As a challenge you can drop something and ask the children to
recognize the sound.eg. Coins, marbles
You can ask them to listen to the sound of a ticking clock.
Walk with the clock in different directions and ask the children to point with their eyes closed, to the direction where the sound is moving.
You can tear a paper and ask them to identify the sound.
Tell them you are going to call them by name individually. Whisper
their names and the child called has to tip toe and come to you.
Play a few notes on a musical instrument (mouth organ, flute etc.) and say “All of you listen and when I call you by name you should mention which instrument is being played”. They should have their eyes closed.
Point of interest: Listening to different sounds. Not moving
Control of Error: Absence of noise.
Inhibition of movement. Social control of error (i.e. the group).
Aim:
To foster emotional development through practicing self control. To develop independence and co-operation. Helps the child to gain further control and grace over his voluntary
movements. To help the child experience the joy of silence. To help him to obtain the capacity to concentrate. To lay a firm foundation for spiritual development.
THE THREE PERIOD NAME LESSON
Maria Montessori introduced the Three Period Name Lesson into her system of education due to the influence of Edouard Seguin. Seguin had found that while dealing with retarded children, using a Three Period Name Lesson help them to a great extend in the learning process. The Three Period Name Lesson is introduced when the child begins to work with the Sensorial materials and thereafter, to teach concepts like size, geometric names, botanical names, phonetic sounds etc. Name lessons are given after the child has learnt/understood a concept and is familiar with the material. THE THREE PERIODS: First period: Here the teacher introduces the names of the terms under consideration. Example: In the Cylinder Blocks, the terms introduced are --- ‘tall’ and ‘short’ or ‘thick’ and ‘thin’ depending on which block is being used. Second period: In this period the teacher makes the child recognize what has been taught and point out to the names she is asking for. She generally gives commands. Example: “Show me a cylinder that is tall”. “Show me a cylinder that is short”. Third period: Here the child has to recall and give the name learnt by him. Example: The teacher points out and says – “So this cylinder is -----?” The child gives the name --- “tall”. The Three Period Name Lesson can be used for Language, Math, Geography, Botany, Sensorial etc.
Purpose of the Name Lesson: A name lesson is a conscious experience for the child and creates an impression in him. The child experiences a social need. In order to enjoy what he has learnt he needs to talk about it with others. Nature urges the child to consolidate what he has achieved by making him share his consciousness with others. Hence learning precise (definite) terms is important as they help him to understand and use a precise name while handling a concept. Name lesson are given when the need arises or when a child expresses a need for it and when he wants to talk about his awareness to others. 1. We generally offer two names or three at a time. 2. We can offer more than one name lesson a day. 3. In a name lesson there is an association of a concept or object with its name. 4. Generally objects with maximum contrast are offered in the same lesson.
– ex. big & small 5. Objects named should belong to the same category. Ex. colour, size, sound etc. 6. The entire set of objects of a particular (set) material are brought for the
name lesson. 7. A name lesson will have the following steps:
a) Invitation b) Preparation c) Presentation
SPECIAL NAME LESSONS
Here the technique used is the same as in the ordinary name lesson. We offer special name lessons to avoid possible confusion of names that sound the same or material or objects that look the same. The names given in a special name lesson should have been already given through an ordinary name lesson. The name should belong to the same category of materials. Example – (1) 6 & 9 – numbers. (2) b & d – letters Special name lesson for numbers 6 & 9
Invitation: Shall we repeat some of the sand paper numbers. Preparation: Ask the child to get a mat and a chowki ready. Ask him to bring the particular sand paper figures for which a special name lesson is to be given (i.e. 6 & 9) Presentation
Period 1: Bring one sand paper figure in front of the child and ask him for the name. If he hesitates given him the name and emphasise it. Then show the second one. The emphasis should be - “This is six and that is nine”. Period 2: A series of commands are given to the child. “Put the 9 here, hide the nine, show me the 6, keep the 6 here etc.” Command should be given using only 2 materials and the interest of the child is to be kept alive. Period 3: Point to one sand paper figure and say “So this is? ……” Allow the child to name the figure (i.e. 6 & 9).
BLINDFOLDS There should be about 5 to 6 blindfolds provided in an environment. They should fit the child well i.e. covering his eyes up to the temple and bridge of the nose. They should be made of soft, dark, padded fabric. The child should be able to fasten it independently. For this we can use elastic, press buttons, Velcro etc. Make, up to 3 sizes of blindfolds.
SENSORIAL LEARNING
INTRODUCTION
Sensorial activities are those activities that help the child to gather information about his surroundings using his senses. They aim at refining the senses. They also help to organize and categorize his sense perceptions into mental order. The child is helped by these activities to become conscious of the physical properties of matter. The sensorial activities are offered in the House of Children at the age of 2 ½ years and after they have settled down and have performed a few Practical Life Exercises . Sensorial activities help to satisfy certain developmental needs and urges. The sense organs are used as instruments for receiving various impressions and they help establish contact with the environment and also in developing the intellect. Experiences would be impossible without some way of knowing about the world around us. It is through our senses that we know about the world around us. Vision, hearing, taste, smell and touch are five senses, but the number of human senses is close to ten. Example – in addition to touch, the skin is able to distinguish heat, cold and pain. Further, sensations in the muscles and tendons give us an idea about the position of our limbs. This is called the kinesthetic sense. The ten senses are:- 1. The visual sense – sense of sight - eyes 2. Acoustic sense or Auditory sense – sense of hearing - ears 3. Tactile sense – sense of touch - skin 4. Olfactory sense – sense of smell - nose 5. Gustatory sense – sense of taste - tongue 6. Thermic sense – degree of hot or cold - skin 7. Kinesthetic sense or Muscular sense – refers to the muscles in our body –
regulates the sense of direction and movements. 8. Baric sense – sense of weight 9. Stereognostic sense – also called the blind man’s sense. Is the combination of the tactile and muscular senses. 10. Pain - felt on the skin due to piercing and pressure
The child’s intellect slowly develops, gathering knowledge through the sense organs. Hence the sense organs are called “the gateways to knowledge or the Scouts of Information”. Sensorial activities help the child to retain knowledge gained in a clearer manner and for a longer period of time. The sensorial materials are scientifically prepared and designed by Maria Montessori. They constitute the didactic apparatus and are kept on low shelves within the hand and eye reach of the child. They come in boxes which are kept open with the lids underneath. How does the sensorial material help the child
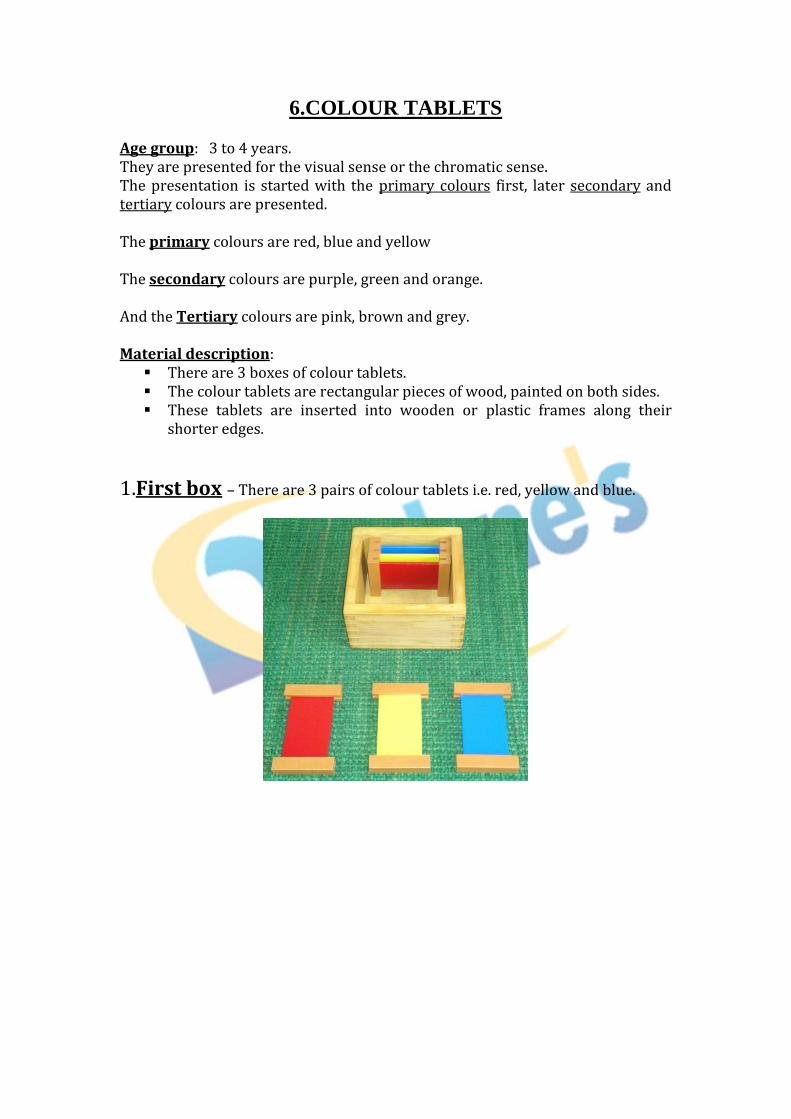
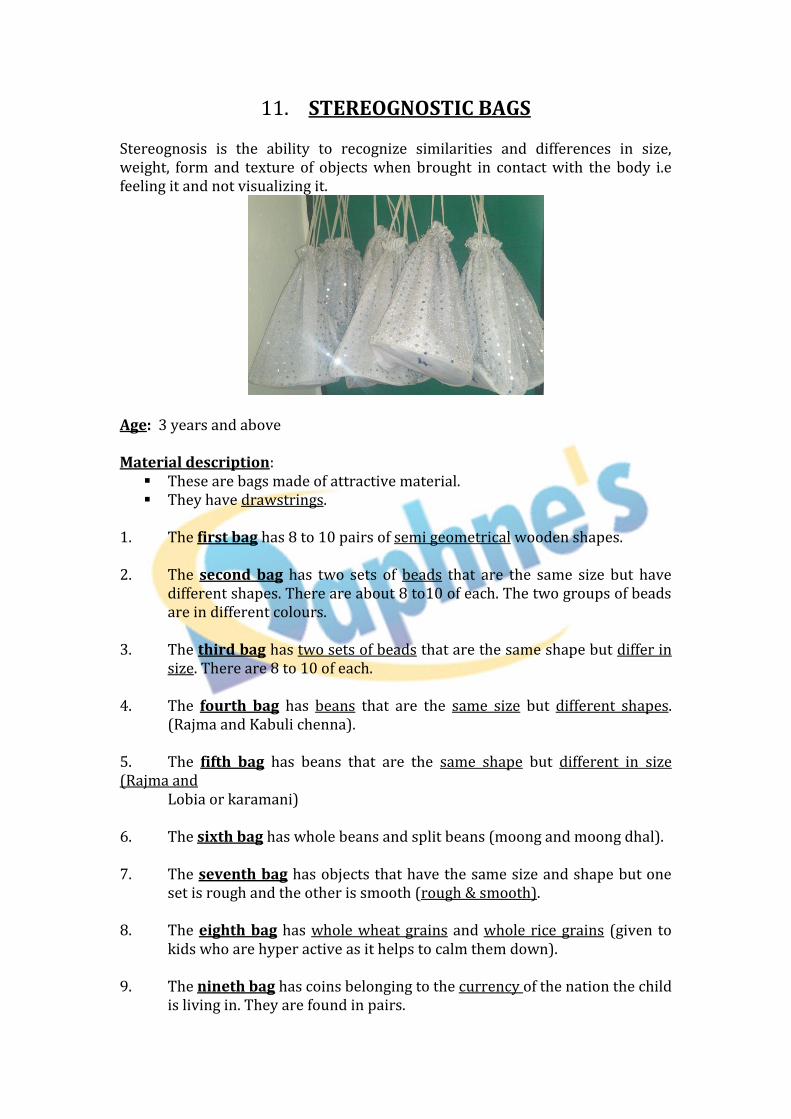
1. In motor coordination. 2. Makes the senses sharper and intellect too. 3. Creates a scientific approach in the child. 4. Makes him aware of the physical properties of nature. 5. Forms the base for creative works of art. 6. Prepares him for higher learning. When sensorial activities are presented they are done so individually, through demonstrations. Verbal instructions are not given. The presentation helps the child to achieve what has been planned out by the end of these activities. Thus the child develops the habit of looking for a purpose in the activities he performs. In order to understand the technique of performing the sensorial activities and to achieve the expected results, the child has to sit close to the adult (teacher) at the time of presentation. Since these are individual presentations, the other children must be occupied too. This can be done by having a collective presentation of EPL activities on the other side of the environment (class rooms) by another adult. The various sensorial materials are as follows: 1. Cylinder blocks 2. Pink tower 3. Brown stairs or broad stairs 4. Long stairs or long rods or red rods 5. Tactile materials – (a) touch boards (b) touch fabrics (c) touch tablets. 6. Colour tablets – primary, secondary and tertiary box 7. Sound boxes or noise boxes 8. Geometrical cabinet 9. Geometrical cards 10. Geometrical solids 11. Stereognostic bags 12. Knobless cylinders or coloured cylinders 13. Baric tablets 14. Drawing insets or metal insets 15. Olfactory bottles 16. Gustatory bottles 17. Thermic sense bottles and slabs
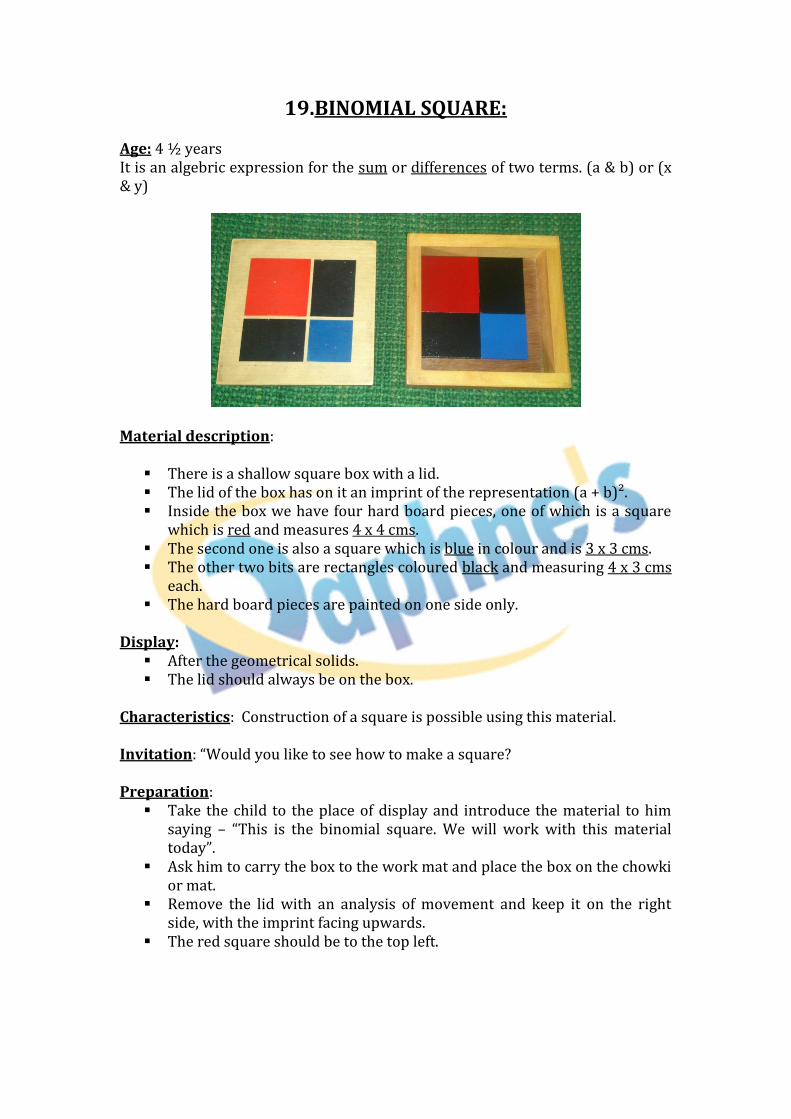
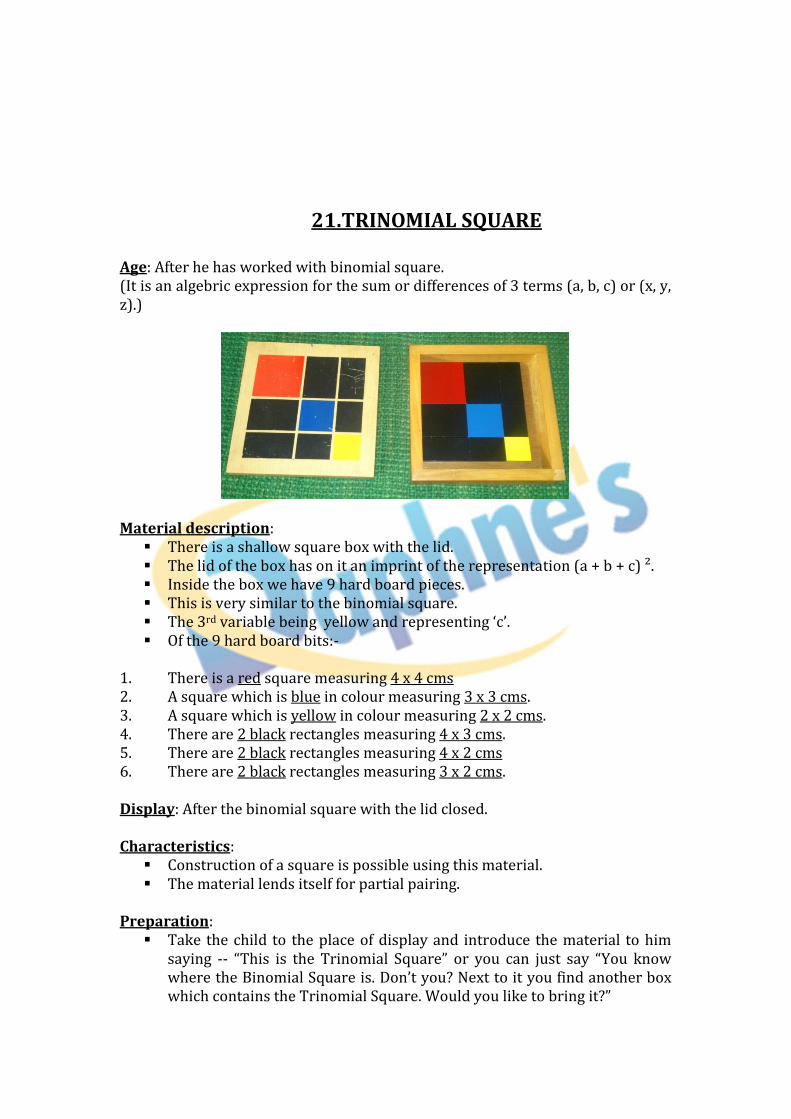
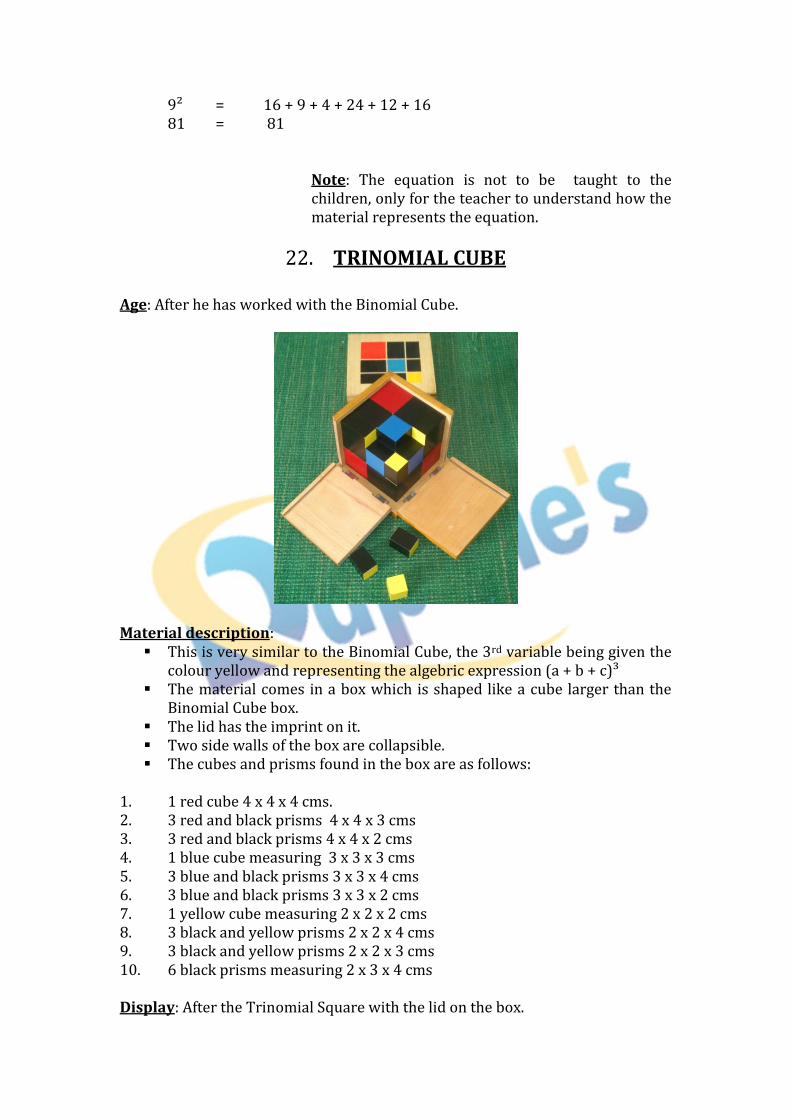
18. Constructive triangles 19. Binomial square 20. Binomial cube 21. Trinomial square 22. Trinomial cube 23. Decanomial Square 24. Bell material TYPES OF ACTIVITIES THAT CAN BE DONE WITH SENSORIAL MATERIALS: 1.Pairing : a. Identical Pairing – Ex: - colour tablets b. Complimentary Pairing – Cylinder with socket c. Partial Pairing – Coloured cylinders d. Reverse Pairing (opposite of Complimentary pairing) – Socket with cylinder 2.Grading: Arranging from one extreme to the other – Examples: a. Thick to thin b. Tall to short c. Dark to light d. Rough to smooth 3.Sorting: Scattering all the objects and sorting into various groups 4. Memory Exercises: Keeping the objects at a distance from the child and asking the child to remember and bring the objects required. 5. Exploratory Activities: How the concept learnt can be used without the help of Montessori materials.
SENSORIAL MATERIAL
1. CYLINDER BLOCKS Age: - 2.5 to 3 years
Material description
There are four blocks of wood in brown colour. There are 10 sockets in each of the blocks into which 10 cylinders can be
inserted. The cylinders have knobs on the top to facilitate handling. The thickness of the knob is that of a writing instrument. This is the 1st indirect preparation for writing. The blocks and the top of the cylinders are highly polished. The curved surfaces of the cylinders and the sockets are not polished. The 4 blocks are A, B, C and D.
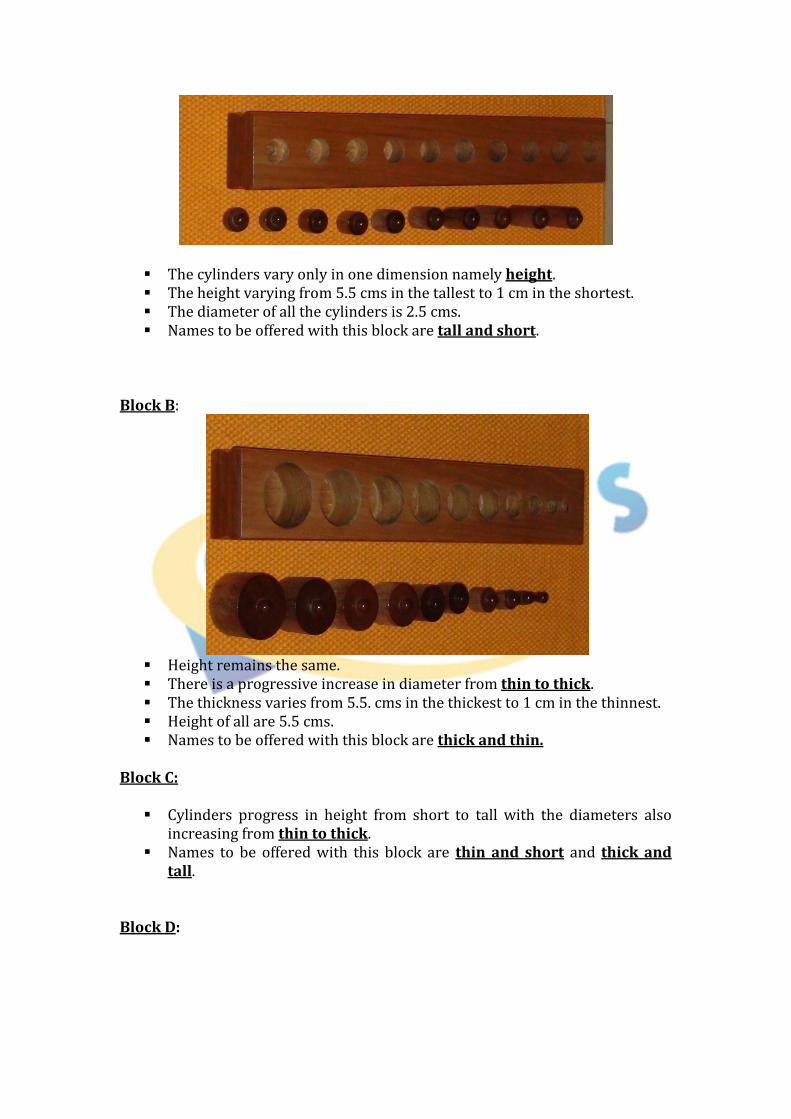
Block A :
The cylinders vary only in one dimension namely height. The height varying from 5.5 cms in the tallest to 1 cm in the shortest. The diameter of all the cylinders is 2.5 cms. Names to be offered with this block are tall and short.
Block B:
Height remains the same. There is a progressive increase in diameter from thin to thick. The thickness varies from 5.5. cms in the thickest to 1 cm in the thinnest. Height of all are 5.5 cms. Names to be offered with this block are thick and thin.
Block C:
Cylinders progress in height from short to tall with the diameters also increasing from thin to thick.
Names to be offered with this block are thin and short and thick and tall.
Block D:
Cylinders diminish in height. They increases in diameter from tall and thin to short and thick. Names to be offered with this block are thick and short and thin and
tall. Display: It is displayed on a shelf which is within the reach of the child. Block B is placed in front because the child works with this first. Invitation: “Shall I show you how to work with the Cylinder Blocks today?” Preparation:
Ask the child to get a work mat and unroll it and get ready and then come and call you. (Teacher)
Take the child to the display area and introduce the material to him saying – “These are cylinder blocks. Today we work with this block”.
Allow the child to carry Cylinder Block - B to the work mat. Show him how to hold the Block with thumb and 3 fingers on either side
and carry it to the work mat. Presentation:
Place all the cylinders one by one on the mat removing them from left to right.
Keep them all mixed up, in a straight line parallel to the Block, between the child and the Block.
While removing the cylinders, place index finger first on the knob and then the thumb and middle finger and tell the child --“see how I hold the cylinder knob”.
Pick up a cylinder on the extreme left among the mixed cylinders. Analyze the cylinder by turning it over and look at its diameter. Then keep it close to the likely socket and keep checking. Nod your head to indicate to the child that this is the correct socket. The child becomes curious. Slowly place it in the socket after holding it above the socket for a while. Then say “See I don’t let go of the cylinder knob till the cylinder is placed
down”.
You can ask if the child heard any sound. When all the cylinders have been placed back in their sockets, keep your
index finger flat and run it along the top of the Block, touching all the cylinders, on the other side of the knobs, to verify that all the cylinders are the same height as the Block.
Take another cylinder and do the same. Ask the child to take over the activity if he likes. Give him the name lesson – ‘thick’ and ‘thin.’ This is called Reverse Pairing at Random. -- R1 (Finding sockets for
the cylinders).
Ask the child to work with the other 3 Cylinder Blocks in the same way. Point of interest:
Holding the cylinder knobs correctly with thumb and two fingers. Holding the cylinders above the sockets. Keeping the cylinders all mixed up in a horizontal row. Not making any noise while keeping the cylinders in the sockets.
Control of Error: When the activity is over all the cylinders should be in level with the block. (i.e. not sticking up or sunk in)
Aim:
Helps the child become conscious of the fact that objects can differ in 4 ways (4 blocks) using his visual sense.
Helps him gain control over his movements and thus helping him in holding a writing material or instrument.
Helps to develop concentration and independence.
Exercises: 1. Reverse Pairing in succession – R2 (Finding cylinders for sockets)
Mix all the cylinders on the mat, keeping them in a line parallel to the block.
Place an indicator in the socket to the extreme left and ask the child to find the cylinder that exactly fits this socket.
Repeat by placing the indicator in each socket, in succession.
2.Memory Exercise 1 – M1 Keep all the cylinders on a tray in a mixed up manner and place this tray
at a little distance. The Cylinder Block is kept on the work mat. Put an indicator into any one of the socket and ask the child to go and find
a cylinder from the tray, to match this socket.
He has to keep the size of the socket in his memory and has to compare it with the cylinders on the tray. (M1 memory close by)
3.Memory Exercise 2 – M2
Keep all the cylinders scattered in the environment and the Cylinder Block on the work mat.
Ask the child to find a cylinder to match the socket in which you put the indicator. (M2 memory far away).
4. Grading Exercise 1 -- G1:
Remove all the cylinders and place them on the mat, in a mixed up manner.
Place the empty block nearby and ask the child to grade the cylinders from thick to thin or tall to short depending on which cylinder the child has brought.
Once he/she has done this, ask him/her to check it with the block, by placing the block close to the cylinders that have been graded and then inserting the cylinders into their respective sockets. (This is called grading with the block).
5. Grading Exercise 2 – G2
Ask the child to bring a cylinder block. Remove the cylinders and keep them on the mat in a mixed up manner
and go and put the block back at the place of display. Now depending on the block the child has brought, ask the child to
arrange the cylinders from thick to thin or tall to short. Now ask the child to bring the Block back and check by inserting the
cylinders in order into the respective sockets. (This is called grading without the block)
6. Activity using 2 Cylinder Blocks:
Show the child how to place 2 Cylinder Blocks on the mat. Place the Blocks in the form of an “A”. Scatter all the cylinders in a mixed up manner, in the space
between the 2 blocks. Ask the child to place the cylinders in their corresponding sockets
in the 2 blocks. 7. Activity using 3 Cylinder Blocks:
Show the child how to place 3 Cylinder Blocks in the shape of a triangle on the mat.
Scatter all the cylinders within this triangle formed. Ask the child to match the cylinders with their respective sockets.
8. Activity using 4 Cylinder Blocks:
Show the child how to place 4 Cylinder Blocks in the shape of a square on the mat.
Scatter all the cylinders inside this shape.
Ask the child to match the cylinders with their respective sockets.
2. THE PINK TOWER
Age: 2.5 to 3 years. Material description:
It consists of a series of 10 wooden cubes which are pink in colour.
The dimensions go on varying from 1 cm in the smallest to 10 cms in the biggest.
Display:
On a small stool which is 15 cms in height. It is displayed in the form of a tower.
Characteristics:
The material is available for grading. It represents the mathematical succession of natural numbers from 1
to10. Invitation: “Would you like to work with the Pink Tower today?” Preparation:
Ask the child to keep his work mat ready and come and call you. Then introduce the material to the child and show him how to carry the
blocks to the work mat. The first 4 cubes can be carried using one hand. The remaining cubes have to be carried using two hands. They should be carried individually, grasping them across on top with one
hand and placing the other hand under each cube as a support. Keep the cubes all mixed up on the mat.
Presentation:
Start with the smallest, holding it with thumb and index finger to make the child conscious of it.
Then start building the tower, looking at all the cubes in as exaggerated manner.
Isolate the biggest and place it in front of the child. Then the next biggest and place it on top of the biggest cube. Continue in this manner till the tower is built completely. Each cube must be placed exactly in the center of the preceding cube, in
one single movement. Aim:
Helps the child become conscious of the 3 linear dimensions (height, width and length).
Acquire control over intentional movements. Develops prehensile coordination.
Name lesson:
Big/large and small Comparative and superlative forms of these two words i.e (big, bigger,
biggest / large, larger, largest and small, smaller, smallest).
1.Grading Exercise 1 -- G1
Ask the child to close his eyes.
Dismantle the tower one cube at a time. Take out one cube and keep it in front of the child. Then build the tower. Ask the child to open his eyes and indicate from where the cube in front of
him has been removed. The child has to point to that particular place on the tower. He has to then keep the block in the place where he had indicated. If it is the wrong position, he has to guess again.
2.Grading Exercise 2 – G2
Repeat G1, except this time hide the cube removed, behind you.
3.Group activity: Invite 10 children and give one cube to each. If there are lesser number of children, a few can be given two cubes each. The child with the biggest cube has to place it in the center of the mat. The one with the next biggest has to place it on top of the first one and so
on till the tower is built. 4.Memory Exercise 1 – M1
Place 2 mats a little far away from each other. Scatter the cubes on one mat. Ask the child to build the tower on the other mat. If the child brings the wrong cube, he/she has to return it and try to find
the correct one. 5.Memory Exercise 2 – M2
Scatter the cubes in the environment, but do not hide them. Ask the child to build the tower as in M1.
3. BROWN STAIRS OR BROAD STAIRS
Age: 3 to 3.5 years Material description:
It consists of 10 brown wooden prisms all of which are 20 cms long. The other dimension varies from 10 cms in the thickest to 1 cm in the
thinnest. Display: After the pink tower. Characteristics:
The prisms represent the differences in 2 dimensions i.e. thickness and height.
They also represent the mathematical succession of natural numbers from 1 to 10.
Invitation: “Shall I show you how to work with the Brown Stairs today?” Preparation:
Take the child to the place of display and introduce the material to him. Show him how to carry the prisms to the work mat with one hand at each
end and little fingers below. Ask him to keep the prisms mixed up on the mat.
Presentation:
Clearly view the square faces of all the prisms one at a time, by turning them towards you in an exaggerated manner.
Hold each prism in the middle with both hands.
Now isolate the thickest prism and place it at one arms distance away from you, horizontally.
Then look for the 2nd thickest and place it in front of the first without leaving any gap.
Continue in the same manner until the stairs are completed towards you. Align the prisms with your left palm.
Aim:
Helps to acquire control over his intentional movements. Refines his prehensile (grasping) coordination.
Name lesson:
Thick and thin. Comparative and superlative forms of the words – ( thick, thicker, thickest
and Thin, thinner, thinnest).
1.Grading Exercise 1: -- G1
After the child has built the Brown Stairs, ask him to close his eyes. Remove one of the prisms. Place this in front of the child. Ask the child to open his eyes and indicate from where the prism has been
removed. Place it where he has indicated.
2.Grading Exercise 2: – G2
Repeat G1, except this time hide the prism removed, behind you. 3.Memory Exercise 1 – M1
Place 2 mats a little far away from each other. Scatter the prisms on one mat. Ask the child to build the Brown Stairs on the other mat. If the child brings the wrong prism, he/she has to return it and try to find
the correct one. 4.Memory Exercise 2 – M2
Scatter the prisms in the environment, but do not hide them. Ask the child to build the stairs
5.Exercise using Pink Tower and Brown Stairs horizontally:
Ask the child to bring the Brown Stairs and place it all mixed up on the mat.
Ask him to build the Brown Stairs on the mat as usual. Now ask the child to bring the Pink Tower and place it all mixed up on the
mat. Starting with the biggest cube, place it adjacent to the thickest prism of
the Brown Stairs to the left. Now take the second biggest cube and place it adjacent to the second
prism of the Brown Stairs and touching the first cube of the Pink Tower. In this manner, continue building the pink Tower towards you. Allow the child to view and compare the two materials.
6.Exercise using Pink Tower and Brown Stairs vertically:
Bring the Brown Stairs and build it vertically on the mat. Bring the Pink Tower and also build it vertically to the left of the Brown
Stairs, touching the Brown Stairs. Allow the child to observe carefully.
7. Exercise using Pink Tower and Brown Stairs together:
Build the Brown Stairs horizontally on the mat to your left starting with the thickest prism.
Build the Pink Tower to your right horizontally, starting with the biggest cube close to you.
Refer to the picture for the above arrangement. Now take the thickest prism of the Brown Stairs and place it in the centre
of the mat. Take the biggest cube from the Pink Tower and place it adjacent to the
Brown Stairs prism that you have isolated, to the right. Now take the second thickest prism of the Brown Stairs and place it above
the Pink Tower and Brown Stairs that you have isolated, to the right. Fill up the gap with the next biggest cube of the Pink Tower. Place the third thickest Brown Stairs to the left above the previous layer
of Brown Stair prism and Pink Tower cube. Repeat this procedure, alternating the position of each Brown Stair prism
to the left and right, till the activity is completed. Refer to the picture. Now slowly remove the Pink Tower cubes, starting from the bottom and
place each cube on the same side from where it has been removed, Cube should be removed one at a time, pulling them out horizontally,
holding the Brown Stair prism just above the respective cube.
4. LONG STAIRS OR LONG RODS OR RED RODS
Age: 3 to 3 ½ years
Material description:
It consists of 10 red wooden rods, the cross section of which is a square measuring 2.5 cms.
The lengths of the rods vary from 10 cms in the shortest to 1 meter or 100 cms in the longest.
The difference between each successive rod is 10 cms. Display: They are displayed on an open shelf in the form they take, when the activity is correctly completed i.e. with the left ends coinciding (straight line). Characteristics:
They represent the mathematical succession of natural numbers 1 to 10. The standard unit of length i.e.1 meter is materialized and the child can
visualize this in the longest rod.
Preparation: Ask the child to unroll his/her work mat and come and call you. Then take the child to the place of display and introduce the material to
him/her, saying, -- “These are the Long Rods. We will work with this material today.”
Show the child how to hold the rods in the middle, being sure to carry each one in a vertical position.
Keep all the rods in a mixed up manner on the mat, but horizontal to one another.
Presentation: The teacher starts observing each rod slowly one by one and then selects
the shortest rod. The index and middle finger are placed on the rod and passed over it
through the entire length. She isolates and keeps it on the left bottom corner of the mat. Then finds the next longest one and so on till the stair is completed. Aligns them with the left palm.
Name lesson:
Long and short. Comparative and superlative forms of the two words (long, longer,
longest and short, shorter, shortest).
Aim:
Helps to develop visual discrimination of length while height and width remain constant.
Helps to gain coordination of large muscular movements. Helps him to work with the number rods and other mathematical
concepts. Exercises 1:
Ask the child to build the Long Stairs. Blindfold the child and remove one of the rods. Place the rod which has been removed in front of the child. Close in the gap caused due to removal. Remove the blindfold and ask the child to indicate from where the rod
has been removed. Rebuild the stair by placing the rod where the child has indicated, and
check. Exercise 2:
Repeat Exercise 1, except this time, hide the rod which has been removed behind you.
Exercise 3: M1
Ask the child to keep two mats ready, a little away from each other. Scatter the rods on one mat. Ask the child to build the stair starting with the shortest.
Exercise 4: M2
Place the 10 rods at 10 different spots in the environment. (Do not hide any rod)
Ask the child to bring the shortest first and place it on the mat and in this way go on building the stairs till it is completed.
Exercise 5: The maze
Show the child how to make a maze on the mat using the Long Rods. Start with the shortest rod in the centre of the mat. Each successive rod should be placed on the inner edge of the previous
rod as shown in the picture. Ask the child to carefully walk around, inside the maze.
6.Special exercises: a. Family 1:
Rods are kept in succession as the child builds the long stairs. Ask the child to isolate the longest rod by shifting it a few cms away. Then shift the next longest rod close to the first rod. Indicate to the child the gap present between the 9th and 10th rods. Ask the child --“Can you find a rod that fits exactly into this gap” pointing
with your finger to the space between the end of the 9th and 10th rod. Wait for the child to find the rod and fill the gap. Then shift the 8th rod above and ask the child to find the rod that fits the
gap (between 8 & 10) Continue in the similar manner until he finds that there is one rod which
does not have another one to fill the gap. So the help we offer the child here is to turn the rod vertically and place it
down again filling the gap, at the same time keeping the position of the right end unchanged.
b. Family 2:
Here also the activity is to fill the gaps.
But we ask the child to isolate the longest rod first. Then we ask him to take any other rod and place it under the longest rod. Now ask the child to find the rod that fits the gap. The difference between the Family 1 and 2 is that the activity is not done
in succession. The activity goes on until the child discovers that the 5th rod does not
have a pair. Hence we ask him to double it.
c. Family 3: Here the same activity is done except that the child takes any rod other than the longest rod first.
5. TACTILE MATERIAL
Age: 2 ½ to 3 years i.e. after he has finished working with the cylinder blocks. The tactile material is of 3 types 1. Touch boards 2. Touch fabrics 3. Touch tablets Before working with this material we have to prepare the finger tips for this activity. So we carry out what is called bathing the finger tips or sensitizing the finger tips.
The material for bathing the finger tips lies near the sensorial material. It consists of a large tray with an oil cloth on it. On the tray (right top corner) is a pink container with hot water. On the tray (right bottom corner) is a blue container for cold water. In the middle of the tray is a wide bowl for the child to dip his fingers. There is a Turkish towel 14 x 14 cms at the top left hand corner and a
small cotton cloth 7 x 7 cms at the bottom left hand corner. The Turkish towel is for the child to wipe his fingers on and the small
cloth to mop up the water that may fall on the tray.
Tell the child before working with the touch boards we have to bathe our fingers.
Take cold water in the center bowl and add hot water to it. Ask the child to dip his fingers till the first phalanges. Ask if it is warm. If not add some more hot water. Let him soak his fingers for as long as he wants. Wipe on the Turkish towel. Then go to work with the Touch Boards.
i). TOUCH BOARDS:
Material description:
There are 4 boards that offer 2 different textures to the child i.e. rough and smooth.
The boards have slanting edges to facilitate handling them without touching the top surface.
The first Touch Board has 2 patches. One is rough and the other is smooth. The rough surface is made of sand paper while the smooth is made of
enamel paint.
The second board has narrow alternating patches of rough and smooth surfaces.
The third board has 5 different patches with varying intensities of
roughness.
The fourth board has 5 patches with varying intensities of smoothness. Characteristics:
Touch boards are presented to the child so that he can learn to acquire tactile impressions. He learns the lightness of touch required to receive these tactile impressions.
Display: They are placed in a box which is found at the beginning of the sensorial material presented to the child. Invitation: “Can I show you new material to trace”. Preparation:
Ask the child to keep sitting mats and a chowki and come and call you.
Take him to the place of display and show him the material and say -- “These are tactile materials”.
“These are the Touch Boards”. “Today we will work with this material” – pointing to the Touch Boards.
Presentation: Board 1
Place the Touch Board on the chowki horizontally, with the rough side closer to the child.
Begin tracing with all the fingers, lightly tracing the rough part first from top to bottom with right hand.
Trace 3 to 4 times saying rough. Close your eyes and repeat a few more times. Then move to the smooth strip. First trace and get the impression and then give the name smooth. Once both are traced sufficiently say -- “Do you want to try?” Ask him to trace lightly and still more lightly. Hold his hand and trace very lightly on his fore arm or lift his/her wrist
while he is tracing.. When he has worked sufficiently with this board, introduce the next
board. Board 2
When he is working with Board 2, tell him tracing is done with 2 fingers while the other fingers are spread out.
Keep the board horizontally on the choki. Show the child how to stroke the board repeating ‘rough’ and ‘smooth’ for
the respective strips. Board 3
Place the board horizontally on the chowki.
Trace the strips from left to right, using the words --- „rough, rougher, rougher,
rougher, roughest,‟ placing your palm horizontally while tracing.
Board 4
Trace the strips on the 4th
board, using the words --- „smooth, smoother,
smoother, smoother, smoothest‟.
Place the board and palms as when working with Board 3
Point of interest:
Bathing the finger tips. Tracing lightly. Closing the eyes and tracing.
Aim:
Helps him to acquire lightness of touch. Helps in future writing.
Gains control over vertical and horizontal movements. Helps him to prepare for future activities. To inculcate the concept of spacing between letters and lines. Helping his hand to move easily while writing. Helps him to become conscious of textures.
ii) TOUCH TABLETS:
Material description:
There are two boxes of touch tablets. The first box contains 5 pairs of tablets offering gradations in roughness. They correspond to the 3rd board of the fixed material. The second box contains 5 pairs of tablets offering gradation in
smoothness corresponding to the 4th board in the fixed material. Display: In boxes, on open shelves next to the touch boards and fabrics. The lids are removed and kept below the box. Characteristics: The material is available for pairing and grading. Invitation: “Shall I show you a different material to trace?” Presentation:
Take out one tablet, holding it with the thumb and index finger of both hands.
Keep it on the chowki. Then trace with all fingers, 3 times, with the eyes closed. Ask the child to trace. Take another tablet and trace in the same manner. The tablets should be given in the sequence of ABBA, which should have
been already arranged during the preparation stage – (Where A is the roughest and B is the least rough). Allow the child to also trace the tablets, every time you do so.
Now mix up the tablets, spread on the chowki and do the pairing with the eyes open.
Keep the paired tablets side by side to the top left of the chowki. Ask the child to repeat. The same activity should be done with the eyes closed.
When he masters this introduce another pair.
Grading is done by closing the eyes, using only one set i.e. 5 tablets.
Tablets are arranged from roughest to least rough.. Tablets are arranged from smoothest to least smooth. Place the palm horizontally while finally checking.
Aim:
To help the child to be able to differentiate between various sensations of touch and thus sharpen his tactile sense.
To help him to develop the lightness of touch which is needed for writing. To prepare the child for activities with Sand Paper Letters and Numbers.
iii) TOUCH FABRICS
Material description: The box ideally contains 10 pairs of natural fabrics in different colours i.e. 1. Jute 2. Silk 3. Cotton 4. Woolen 5. Flannel 6 Satin 7. Velvet 8 Linen 9. Gauze (net) 10. Denim or drill
The size of the fabrics are the same i.e. 14/14 cms Display: In a wooden box. Invitation: “Shall I show you some cloth to trace”. Preparation:
Tell the child to keep sitting mats and chowki ready and then come and call you.
Take the child to the place of display and pointing to the material say, --- “These are Touch Fabrics”.
Before we work with them we have to prepare our finger tips. The adult sits on the child’s right and keeps the box on the chowki.
Presentation:
Present the fabrics in the following manner – ABBA (where A is the roughest fabric and B is the smoothest).
Take out one of the roughest fabrics (Jute) from the box with the right hand, holding it with your thumb and index finger on the right top corner of the fabric.
Place your left palm under the fabric. Now place it on the chowki. Hold the fabric at the top left with the left thumb and index finger and
trace it from top to bottom. Let the child repeat. Now remove the smoothest fabric (Silk) and do the same. Repeat for another B and A.
Pairing Activity:
Mix all four fabrics and let the child pair them with the eyes open and later with the eyes closed. (pair as in the touch tablets)
Keep adding one pair every time the child is able to work correctly.
Name Lesson: Jute and silk. (or any other material you are introducing.)
6.COLOUR TABLETS Age group: 3 to 4 years. They are presented for the visual sense or the chromatic sense. The presentation is started with the primary colours first, later secondary and tertiary colours are presented. The primary colours are red, blue and yellow The secondary colours are purple, green and orange. And the Tertiary colours are pink, brown and grey. Material description:
There are 3 boxes of colour tablets. The colour tablets are rectangular pieces of wood, painted on both sides. These tablets are inserted into wooden or plastic frames along their
shorter edges.
1.First box – There are 3 pairs of colour tablets i.e. red, yellow and blue.
2.Second box –
There are 11 pairs of colour tablets in this box. In addition to the primary colours, orange, purple and green tablets are
also present.. The tertiary colours pink, brown and grey are also found. The box also has a pair each of black and white tablets, which are the two
extremities of grey.
3.Third box:
It has 9 compartments each of which has 7 tablets of one colour arranged in gradation.
The top row has red, yellow and blue. The middle row has orange, purple and green. The last row has pink, brown and grey. (Black and white are the extremities of grey). The 4th tablet in each compartment is identical to the colour tablets in the
2nd box i.e. the original colour. They are arranged from dark to light, in the same direction, in all the
compartments.
FIRST BOX OF COLOUR TABLETS Invitation: “Shall I show you how to work with Colour Tablets?” Preparation:
Ask the child to keep the work mat ready, close to the window if possible, where there is sufficient light.
Ask the child to call you when he has spread the mat. Take him to the place of display and point out to the material and say --
“These are 3 boxes of colour tablets”. “Shall we work with this one?” pointing to the 1st box i.e. primary colours. Hold the box in your hand, forefingers below and the thumb above and
say -- This is how you hold the box”. Keep the box back and ask the child if he would like to take the box to the
work mat. Say – “While carrying it, there should be no noise”. Keep the box to your right side on the mat.
Presentation:
Take out one tablet slowly and say – “Hold the tablet by the frame, never touch the colour part”.
Hold it with your index finger and thumb and place it close to the child. Take out all the tablets and keep them all mixed up on the mat. Now take out one tablet (red) and place it on the left corner of the mat
with the frame close to the child i.e. vertically. Search for the corresponding colour tablet among the rest and place it
next to the first one. Take out another colour tablet (yellow) and keep it below the red pair. Ask the child if he/she can find its pair? Do the same for the blue colour tablet also. Mix them up and ask the child, if he/she would like to pair them again. Now you give the name lesson on the colours introduced.
Point of interest: Holding the colour tablet and handling it without touching the colour. Control of error: Lies in the chromatic sense of the child. Direct aim: To help the child become conscious of various colours with the help of the chromatic sense that he possesses. Indirect aim:
To prepare him for different types of art expression, painting and designing.
To help the child use his awareness of colours in his daily life. To make him aware of the symbolic use of colours (national flag).
Then introduce the secondary and tertiary box of colours.. Exploratory activities
1. Giving the child a colour and asking him to bring objects of that colour. 2. Collect cloth bits from a tailor and cut them into the same size and shape. Ask him to sort according to colour and intensity. 3. Introduce him to water colours and paints. Show him to use a brush,
pallet, mop cloth and a dish. Note: Only the primary colours should be used for the above exploratory activities.
SECOND BOX OF COLOUR TABLETS
Usually there is no presentation for the second box of colours.
This is done in the same manner as the first box, the only difference being that now he has 11 pairs to match.
Revise the names of the primary colours first.
The child has to take out all the colours and keep them on the mat in a mixed up manner in a straight line, in two rows.
Now ask him to pair the colours that he has worked with. Then choose the other colours in any order and pair them.
Now give the name lesson for the new colours, three at a time – secondary colours and then tertiary colours, after isolating them.
White and black names can be given last. Point of interest: Isolating each tablet and finding its pair. Exercise 1 – M1 –
The child has to pair the colour tablets first and then remove one of each colour and place it on a tray.
The tray has to be taken to a particular place a little far away and kept there..
The child now picks up one tablet from the mat and isolates it, and finds its pair from those kept at a distance.
Exercise 2 -- M2 –
Same as M1, except this time one set of colour tablets is scattered around the
classroom.
Exploratory Activities: 1. Pairing flowers according to their colours. 2. Giving the child a colour and asking him to bring objects of that colour. 3. Collect cloth bits from a tailor and cut them into the same size and shape.
Ask him to sort according to the colour. 4. Introduce him to water colours and paints of all colours. 5. Keep small objects like beads, buttons etc. of the same size but different
colours so that he can sort them. 6. Show him Newton’s disc. Rotate it and let him see the merging of colours. 7. Point out to the rainbow or if there is no rainbow, show him how a rainbow can be created in the class, placing a prism in sunlight. Note: All the eleven colours are to be used for these exploratory activities.
THIRD BOX OF COLOUR TABLETS Display:
This box draws the attention to dark and light shades. The box is found along with the other two colour boxes on the shelf. In each compartment of this box the tablets are found in gradation from
light to dark, going in the same direction in all the compartments. Invitation: “There is one more box of colour tablets, would you like to see how we can work with this?” Preparation:
Ask the child to keep the work mat and come and call you. Take him to the place of display and introduce the material to him saying
-- “This is the third box or tertiary box of colour tablets, which colour would you like to work with?”
Allow him to select the colour of his choice. If by chance he selects grey, we suggest to him to choose another colour. But if he still insists then we leave the extremities (white and black)
behind. Ask him to place the material on a tray and take it to the work mat.
This activity is presented to the child after he has worked with the second
box sufficiently and knows the names of all the colours. Presentation:
The tray should be kept to the right. We offer the 4th tablet first to the child and ask him --“What colour is
this?” He will be familiar with this colour as he has dealt with it in the second
box. After he has mentioned the name of the colour, we take out one of the
extreme, preferably the darker one and say -- “This is also red” (if he has selected the red set of colour tablets).
But this is dark red. Wait for the child to observe and when he is ready for another one, offer
him the other extremity and say --“This is also red, but it is light red. Proceed to arrange the tablets from dark to light. Slowly make the child understand that we are arranging the tablets in
gradation. When we have finished we say --“We have now arranged them from dark
red to light red”, indicating with your finger the direction. Now ask the child --“Shall we do it again?” and mix them all up and start
doing it again. Wait for the child to take over. Once we are sure that he has understood the nature of the activity leave
him and let him continue. When he is able to do the grading, ask the child to work with the other tablets of the other compartments in a similar manner. Point of interest:
Freedom to choose the colour Carrying the tablets on a tray.
Aim:
Helps the child to become conscious of different shades and their intensities.
Prepare him for art work which includes colouring. Understand the symbolic use of colours.
Exercise - 1: M1 is possible. M2 is possible.
Exercise - 2: -- Sunburst:
Arrange all the colours from the third box in gradation (dark to light) in 9 rows.
Take the darkest tablet from each row, and arrange them in the form of a circle.
Behind each darkest tablet, grade the other 6 tablets of the same colour, ending with the lightest.
The Sunburst is formed. Exploratory activities: i) Finding different leaves and grading them according to their intensities (green). ii) Mixing of colours – method – take a small brush and pallet and small
bottles of colour, paint. Ask the child to mix these colours and find out the results of the following:
a) Mixing two colours b) Mixing three colours c) Mixing white with a colour d) Mixing black with a colour.
7. SOUND BOXES OR SOUND CYLINDERS
Age: 3 years and after the child has worked with colour tablets. Material description:
There are 2 wooden containers with six sound boxes in each. The sound boxes are cylindrical in shape and sealed at both ends. The sound boxes in the 1st wooden container have their top and base
coloured blue or completely blue in colour. The sound boxes in the 2nd container are coloured red. The sound boxes in one container have their identical pair in the other
container. The sound boxes in each container present sounds which are graded in
intensity (soft to loud). Display: After the colour tablets and tactile material i.e. in developmental succession. Characteristics: They lend themselves for pairing and grading. Invitation: “Shall I show you some new material you can listen to”. Preparation:
Ask the child to keep the work mat and come and call you. Meanwhile the adult should arrange the materials from loud to soft or soft
to loud. Both the containers should have the same order. Take the child to the display area and say – “These are the sound boxes”. Ask him to carry it to the work mat.
Presentation:
Lift the sound box from the container. Hold with thumb and three fingers of the right hand and say --“This is
how we hold the sound boxes. We do not touch the bottom and the top”. Then show how to listen to the sound boxes.
Place the elbow at the shoulder level and shake the box downwards (close to your right ear) with the wrist movements only.
After taking the impression of the loudest sound box near the right ear, repeat the same, picking the cylinder with the left hand and shaking it near the left ear.
Now offer it to the child. Repeat the same procedure this time using the softest cylinder. We can show him how to compare the sound. Never hold them in both hands as you should hear them one at a time. Offer the sound boxes in the order R1, R6, B6 and B1 (where B = blue, R
Mix up the cylinders and keep them all on the mat. Take one from either group (B or R) and ask the child to listen to it. Now tell him/her to find another one that sounds exactly the same (from
the other colour) and pair them. If it is not a pair discard it. Pair the other cylinders in the same manner. Once the child is able to pair the first two pairs, add another pair and
repeat the activity. Keep adding a fresh pair every time the child is thorough with his work
Point of interest:
Shaking the box vigorously with the wrist in order to get the pure sound. Listening to the loud box first and soft next.
Aim:
Helps the child become conscious of differences in sound intensities. To help him get used to other types of sound impressions. To help him acquire agility of wrist which is the preparation for future
writing. To help the child get interested in language activities.(Phonetics)
Name lesson:
Loud & Soft. Comparative and superlative forms of the 2 words.
Grading Exercises
Exercise 1 Take the impressions of 3 boxes and arrange them from loudest to softest. Then say – “Now we have arranged them from loud to soft”. Ask the child – “Shall we check?” Then check and express happiness at it being right. Then tell the child to
repeat. Exercise 2
Ask the child to bring only one of the containers of the noise boxes and keep it on the mat all mixed up.
Ask him to find the loudest noise box indicating to all the six of them. When he finds it ask him to isolate it. Then ask him to find the next loudest noise box. When he finds it ask him to place it next to the one already isolated. The child can check and see if he has graded it correctly. The activity goes on till he has graded all the six boxes. Then ask him to check if he has arranged them correctly.
Exercise 3
Ask the child to remove all the boxes from the container and keep them all mixed up.
Ask him to take any one of the boxes and listen to it, and isolate it. Now ask him to take another and listen to it. Ask him – “Does it sound more loud or less loud than this?” (pointing to
the isolated box). Allow the child to find out . If found less loud then we ask him to place it to the left of the isolated box. Now ask him to take another box and listen to it. Ask him to compare it with the separated boxes and place it in such a way
that the loud boxes are kept on the right and soft boxes on the left. After completing this he has to check if he has arranged them correctly i.e.
from soft to loud – indicating with the finger, the direction in which they are arranged.
Exploratory activities: 1. Let the children sit around in a circle. Make different kinds of noises. Ask the
children to keep their eyes closed and let them identify the sounds . Example: Blowing a whistle, dropping coins, tearing paper, clapping hands etc.
2. One could be blind folded and adult moves around with the bell. The child has
to follow the bell and catch the adult. 3. Children sit with their eyes closed, the adult moves around with the ticking
clock in hand. The children must point where the adult is.
8. GEOMETRICAL CABINET
Material description:
It is a cabinet which has 6 drawers. The first four drawers have 6 geometrical shapes. The fifth and sixth drawers have four geometrical shapes each. The insets are made in hard board and are painted blue. Each inset has a knob. The knob is the size of a writing instrument. The blue insets are inserted into frames that are yellow. The floor of all the drawers are painted in the same blue as the insets. There is a Presentation tray which has same dimension as the drawers of
the cabinet. It has only 3 shapes : square, triangle and circle.
1. The first drawer has six triangles, three classified according to angles
and three according to their sides. 2. The second drawer has one square and 5 rectangles which are all 10
cms on one side but the other side varies. 3. The third drawer has 6 regular polygons from 5 sided to 10 sided. 4. The fourth drawer has 6 circles, diameters varying from 5 to 10 cms. 5. The fifth drawer has 4 non rectangular figures (rectilinear figure) i.e. figures
whose outlines are made up of straight lines. They are :- Parallelogram (opp. sides equal). Rhombus (All four sides equal and opposite sides parallel but angles not equal to 90°) Quadrilateral (any four sided closed figure or an area covered by 4 sides) and Trapezium (only two sides are parallel).
6. The sixth drawer has 4 curvilinear figure i.e. ellipse, oval, quatrefoil (a
four-leafed figure) and curvilinear triangle. There is a Presentation Tray which has the same dimension as the
drawers of the geometrical cabinet. Some trays lend themselves for pairing and some for grading. Insets are to be traced in a clockwise direction and frames in an anti-
clockwise direction. Characteristics: The material lends itself to pairing and grading in some ways. Invitation: “There are some geometrical shapes, would you like to see how to work with them today?” Preparation: Take the child to the place of display and introduce the material to him. Ask him to carry the Presentation tray to the work mat. Presentation: Introduce the presentation tray first and then suggest that he can work with the drawers also.
Place the Presentation Tray between the child and you on the mat. Lift out the square inset and place it below on the empty square in the
tray. Do the same with the circle and the triangle. Pick up the circle and trace it with your index and middle finger in a
clockwise direction. Trace the corresponding frame in an anti-clockwise direction. Place the inset back into the frame. Allow the child to repeat. Give the name lesson.
Presentation of drawers 1 – 6:
Place the tray in the middle of the work mat between you and the child. Remove the insets from the frames holding the knobs and keep them
mixed up in a line, to the right and bottom of the tray. Pick up one inset, turn it and hold it in such a way that the child can see
the reverse side of the inset. Hold it with your left hand. We use the right hand index and middle finger for tracing the insets and
frames. Start tracing the outline from the base and move in a clock-wise direction
and stop where you started. Bring the attention of the child while presenting, to the following: Elbows are unsupported Tell the child “see where I start and finish”. The inset should not move. The inset should not fall down. Tracing has to be continuous.
Now look around in an exaggerated manner and find the frames
corresponding to the insets. Having found the frame we tell the child let us feel and see if it is the same
and we trace the same in an anti-clockwise direction starting from the top.
After this, we place the inset into the frame and make him realize that the insets will not fit into the frame until they are held in the right orientation.
Aim:
Helps him to be conscious of the various geometrical shapes. Helps to prepare him for writing. Develops wrist movement in the clockwise and anti-clockwise direction. Develops a memory for shapes and thus prepares him for reading by
exercising his visual memory for shapes. Name lesson: The names of the shapes he is using Exercises: 1. Grading is possible with drawers 2, 3 and 4.
2. Pairing is possible for all the drawers. (insets with frames) 3. M1 & M2 are possible with all the drawers.
9 a. GEOMETRICAL CARDS
Age: 4 years. The child should have worked sufficiently with the geometrical cabinet before you can introduce him to the geometrical cards. Material description:
These cards are kept either in wooden boxes or on wooden racks. Each wooden rack has six compartments. Each is meant for one set of cards. The surface of the cards are painted white and the geometrical shapes are
painted blue. The cards are stacked on the rack as on a shelf. 1. The first set has a full blue imprint of the entire set. 2. The second set has the shape shown with thick outlines measuring 1 cm. 3. The third set has the shapes represented by a thin outline measuring 1
mm. The cards have all the geometric shapes corresponding to the 6 drawers of the cabinet. Display:
According to developmental succession i.e. after the geometrical cabinet. The order of cards should correspond to the drawers of the geometric
cabinet. Characteristics: The cards are 2D (dimensional representations) of the 3 D shapes and they lend themselves for pairing.
b. PRESENTATION OF GEOMETRICAL CARDS &
INSETS
Invitation: “Shall I show you how to work with cards and insets?” Preparation:
Tell the child to unroll a work mat and then come and call you. Take the child to the place of display and introduce him to the
material saying --“These are the geometrical cards”. Tell the child to pick a set of cards from the first rack. (Full blue
imprint). Show him how to hold the cards with both hands in such a manner
that the cards are horizontal to the floor and they are not held loosely so that they shift.
Presentation:
Start arranging the cards on the middle of the mat in two rows, without leaving gaps between the cards.
Ask the child to bring the draw from the geometrical cabinet which has the same shapes as the cards.
Once he has brought the draw, ask him to remove all the insets and place them on the mat in a mixed up manner.
Then put back the draw into the cabinet. Take any one inset from the mat in your hand, then look at the
cards and see which of them exactly fits the shape of the inset. Let the child understand that you are comparing the shapes with
mental analysis. When you find the correct one, nod your head and bring the inset
over the card and place it on that card in one single movement. Do not drag it on the card. Then look all around the inset which has been placed on the card
and say --“Do we see any blue lines?” Then ask the child if he would like to do it. If yes allow him to continue the activity.
When you find he has understood the activity tell him to work with the other shapes and geometrical cards and leave.
Point of interest:
Arranging the cards in two rows without gaps. Finding the corresponding tray from the geometrical cabinet. Changing the orientation of the inset in your hand so that it fits exactly on
the card. Control of error: No blue line should be seen on the card once the inset is placed on top. Exercise
Mix the cards and turn them upside down and place them on the mat.
Pick one card and invert it and ask the child to find the exact inset that fits on the card.
Then pick another and do the same.
c. CARDS AND CARDS
Invitation: “Would you like to see how to work with the cards in another way?” Preparation:
Ask the child to keep his work mat and come and call you. Ask him to bring one series of cards from any one of the sets.(full
imprint) Presentation:
Ask him to arrange the cards on the top left corner of the mat without leaving gaps in 1 row.
Now ask the child to get the same shapes from another set of cards (thick outline)
Mix up the cards and keep them upside down. Take the topmost card turn it over and observe its shape. Let the child understand that we are comparing the two sets of cards. When we find a match for the card we have picked, we place it below the
corresponding card. Now pick another card and do the same. If the child has understood and wants to take over allow him to do so and
find the pairs. After he has completed this check if he has paired correctly.
For this we need the insets from the geometrical cabinet which have the same shapes as these cards.
Ask him to get the drawer which has the same shapes as the cards. Now pick one inset from the drawer and place it on the corresponding
card. Then tell the child – “See it fits exactly on this card, then it should fit on
this card also” (indicating to its pair). Place the inset on this card and leave it there. Pick another inset and do the same. Let the child take over. Once all the insets are matched we ask the child to put back the insets into
the drawer and the drawer back into the cabinet.
Later we suggest to the child that he can work with 3 sets (i.e including the thin outline cards) at a time and the insets too.
Point of interest: Changing the orientation of the inset while pairing. Exercise - 1:
Here 3 children work on one exercise at the same time. Ask them to get 3 chowkies. Place them in the form of a triangle. Let them get the same set of cards from the first, second and third rack
and arrange one set each on their chowkies. Then ask them to bring the tray from the geometrical cabinet which has
the same shapes. Tell the first child to pair the insets and the cards. While he is doing this ask the second child to take the insets from the first
chowki and pair it with his cards. When he has started ask the third child to take the insets from the second
chowki and do the same. Let them continue around 3 to 5 times. Then tell them “Let me see who will have the most insets on their
chowki?” The children start pairing faster.
Exercise - 2
Take one set of cards from any one rack, and distribute among six children.
Let the children remember their card and keep it face down. The teacher brings another set of the same shape and keeps it with her. She shows one card from her set to the children. The child with the matching card has to turn his card over. Continue till all the cards are paired.
Aim:
Helps the child to associate the 3 D representations of the geometrical insets with the 2D representations of the geometrical cards.
Helps the child to acquire consciousness with regard to geometrical
shapes and apply this consciousness later in various fields like architecture and sculpture.
Helps him to understand geometry.
Helps the child to learn language by using his consciousness of shapes in
associating the letters and sounds they represent.
Improve his intentional movements.
10. GEOMETRICAL SOLIDS
Age: 3 ½ years and after the child has worked sufficiently with geometrical insets and cards. Material description:
There are 10 wooden solids painted powder blue. The dimension is generally 10 cms by 6 cms. The solids are:-
1. A cylinder 2. A cube 3. An Ellipsoid 4. An Ovoid 5. A cone 6. A sphere 7. A Square based pyramid 8 A Triangular based pyramid 9. A Rectangular prism 10. A Triangular prism
The curvilinear solids are made to rest on wooden rings. Along with the solids we have five cards. These have a white background with edges painted in the same blue as
the solids. These cards correspond to the dimensions of the faces of the solids.
Display: The curvilinear solids are displayed on rings. Characteristics:
Some of the faces of the solids are identical and therefore we call them partial pairs.
The material gives opportunities for pairing activities and helps to exercise the Stereognostic sense.
Invitation: “Would you like to see how to work with geometrical solids?” Preparation:
Ask the child to get the work mat ready and then come and call you.
Take the child to the place of display. Introduce the material to him saying -- “These are geometrical solids”. Then ask him to get a tray and place the solids on the tray and take them
to the work mat. Place the solids on the work mat and ask him to keep the tray back.
Presentation: 1. Stereognostic Experience
Place all the solids on the mat. Show the child how to experience stereognostically, 3 contrasting shapes
as follows.
Lift the cube and hold it with both the hands and make your palms and fingers conform to the surfaces, edges and corners, until you have fully perceived the cube’s shape.
Place the cube on the mat and invite the child to do the same. Repeat this activity with the cone curving your palms and fingers around
it. Trace your fingers around and putting your palm flat against the base. Place the cone on the mat and ask the child to do the same. Repeat the activity with the sphere. Emphasize with rolling palms the continuity of the curve. Place the sphere on a stand on the mat and ask the child to feel it too. Let him feel all the other solids in the same way as long as he is interested. Then make him realize that the sphere resembles a ball. Invite him to explore such comparisons with other things around him –
e.g. tiffin boxes, glass, ice cream cone etc. 2.Families of shapes:
Ask the child to spread his work mat and bring the geometrical solids. Tell him you will do something new with the solids. Show him that by feeling the shapes stereognostically, they can be divided
into 3 families.
a) Those with only flat or plane surfaces e.g. cube, rectangular prism, triangular prism and pyramids.
b) Those with some flat and some curved surfaces – e.g. cone, cylinder c) Those which have only curved surfaces e.g. ovoid, ellipsoid, sphere
Place all the solids on the mat and feel each one to know which family it belongs to.
Now place them in different groups according to the family they come under.
Let the child repeat after you have put them back in the box.
3.Partial Pairing:
First take the rectangular solid and place it in front of the child and ask him “Can you find another solid which will fit on this face?”
After the child finds the solid that has one similar face, isolate another solid and say there is another solid, can you find the solid that can fit exactly on this face”.
Continue like this for the rest of the solids i.e. finding the pairs. When he is able to work independently leave the place.
Point of interest:
The shape and colour of the solids. Placing the solids exactly on top of one another.
Control of error: Lies in the visual sense of the child for partial pairing. Aim:
To be able to recognize all the shapes. To help him to become conscious of the 3 D Shapes with the help of his
visual, muscular and Stereognostic sense. Name lesson:
Make the child feel each solid with his hands and the names of these solids
should be given.
Exercises: 1. The child is asked to find all solids that fit on one particular face. 2. To find all solids that fit on all the faces of that particular solid. 3. Stereognostic exercises with geometrical solids
a) Blindfold the child. Then say “I am going to give the name of a solid, can you find it?” The child has to feel and find the solid. (Can also be a group activity).
b) Here the child is blindfolded and he has to feel each solid and give
its name.
Note: He should have been given name lessons for the solids. Re-arrange the shapes after he has closed his eyes so that he does not have the visual memory of placement of the solids.
Name lesson: Make the child feel each solid with his hands and names of these solids should be given. Note:
Rings are used to make him realize that 3 solids (ovoid, ellipsoid, and sphere) are unstable.
Some solids slide, some solids roll, some solids slide and roll.
GEOMETRICAL SOLIDS AND CARDS ……….(5 CARDS)
Material description: 5 cards in a box. They are made of hard board and painted white with a thin border in powder blue. The cards are:- 1. Square – 6 cms. 2. Rectangle – 6 cms x 10 cms 3. Equilateral triangle – 6 cms sides 4. Isosceles triangle – 6 cms base & 10 cms sides 5. Circle – 6 cms diameter. Display: Along with the geometrical solids. I n v i t a t i o n : “Would you like to work with geometrical solids and some cards?” Preparation:
Ask the child to get the work mat ready and get the solids to the place of preparation on a tray and then come and call you.
Take the child to the place of display and introduce the material to him saying-- “These are the cards we use along with the solids”.
The child carries the cards and keeps them on the mat. Presentation:
Keep the solids all mixed up on the mat. Place the cards in a row leaving some space in between. Indicate one card and ask the child to find a solid that fits exactly on the
card. Then point to another card and ask the child to find the solid for that too. Continue to do this one card at a time. Then say --“We don’t have cards for the other solids. So let’s dismantle”.
Ask the child if he wants to repeat the activity. You can suggest that all the solids be mixed up and then he should find
the pairs. Leave after he has understood the activity well.
Name lesson: Repeat names of all the solids. Exercises 1:
Isolate one card and ask the child – “Can you find all solids that can be placed on this card?”
Once this is done the card is discarded and the solids come back for circulation.
Take another card and repeat the same procedure. Exercise 2:
Isolate one solid and ask the child – “Can you find cards that can be placed on top, below and at the sides of this solid?”
Once the child is able to find the cards, the cards come back for circulation and another solid is taken.
The same procedure is followed Exploratory activities: 1. Give the child clay and ask him to make models of the geometrical solids. 2. On the work mat roll the solids and see how they move i.e. whether they
wobble or go smoothly. 3. Take a tray full of sand. Flatten the sand and move the solids over it and
observe the different types of lines and impressions they create.
11. STEREOGNOSTIC BAGS Stereognosis is the ability to recognize similarities and differences in size, weight, form and texture of objects when brought in contact with the body i.e feeling it and not visualizing it.
Age: 3 years and above Material description:
These are bags made of attractive material. They have drawstrings.
1. The first bag has 8 to 10 pairs of semi geometrical wooden shapes. 2. The second bag has two sets of beads that are the same size but have
different shapes. There are about 8 to10 of each. The two groups of beads are in different colours.
3. The third bag has two sets of beads that are the same shape but differ in
size. There are 8 to 10 of each. 4. The fourth bag has beans that are the same size but different shapes.
(Rajma and Kabuli chenna). 5. The fifth bag has beans that are the same shape but different in size (Rajma and Lobia or karamani) 6. The sixth bag has whole beans and split beans (moong and moong dhal). 7. The seventh bag has objects that have the same size and shape but one
set is rough and the other is smooth (rough & smooth). 8. The eighth bag has whole wheat grains and whole rice grains (given to
kids who are hyper active as it helps to calm them down). 9. The nineth bag has coins belonging to the currency of the nation the child
is living in. They are found in pairs.
10. The tenth bag is a mystery bag and has several small familiar objects in it.
Care is taken that none of them have sharp edges or points. You should change these objects from time to time (these objects are geometrical solids).
Summarising: i)Semi geometrical shapes ii) Beads – same size, different
shape iii) Beads – same shape, different size iv) Beans - same size, different shape
v)Beans – same shape, different size vi) Whole dhal / split vii) Rough and smooth viii) Rice & wheat
ix)Currency x) Mystery bags
Display: After the geometrical solids. They may be kept hanging from a stand.
Characteristics:
The first and the nineth bags lend themselves for pairing. The second to eighth bags lend themselves for sorting activity. The seventh bag mobilizes the tactile sense and lends itself to sorting. The tenth bag mobilizes the stereognostic ability.
i) Presentation of Bag 1: Invitation: “You see all those bags hanging there? Shall I show you how to work with them?’ Preparation:
Tell the child to put the work mat and get a tray. Take him to the display area and introduce the material to him saying --
“These are the sterogenostic bags”. Take the presentation bag and put it on the tray and tell the child to take
it to the work mat. Keep the bag on the mat and tell him to put back the tray.
Presentation:
Hold the bag with both hands, forefingers on the further side and thumbs towards you. Then tell him - “See how I hold the bag?”
Slowly insert the index finger of both hands near the mouth of the bag and gently open it.
Then tell him - “Can you see how I open the bag?”
Then hold the strings and pull them gently and then say – “See how I close it”.
Ask the child “can you open this?” Give the bag to the child. Let him open and close it. After this tell him to open the bag again and keep all the objects on the
mat . Once all the objects are placed on the mat, isolate one to the left side of
the mat and ask the child --“Can you find a pair for this?” pointing to the rest of the objects.
Let the child find the identical object and pair it. Let him do the same for all the objects. When he has finished tell him to put them all into the bag. Now ask him to put his hand inside the bag and take out only one object. Close the bag a little so that only his hand goes in and the objects in the
bag are not visible. Then ask him to put his hand in again and feel and remove an object
similar to the one he took out. Continue this activity till all the objects have been paired.
Point of interest:
Opening and closing the bag Finding the pairs. Shapes of the objects.
Control of error:
Lies in the visual sense when the eyes are open. Lies in the stereognostic sense when the eyes are closed.
Aim:
To help the child enjoy his newly discovered capacity to see with his hands.
To relate the 3 D objects to the geometrical shape
ii) Presentation of Bag 8: -- (cereals) Preparation:
Tell the child to get a tray with one large and 2 small bowls on it. Take the 8th bag to the place of presentation. Tell the child to place all the bowls on the mat and keep back the tray. Empty the contents (2 different cereals) of the bag into the large bowl.
Presentation:
Pick up any one of the grains of the cereals, feel it with your thumb and fore finger.
Place it into one of the empty bowls. Now pick a few more of the same cereal, one grain at a time, and repeat
the above procedure. Then pick up the grain of the other cereal, feel it and place it in the other
empty bowl. Ask the child to follow the above procedure. After he has done this for sometime, blindfold him and ask him to
continue the activity. Point of interest: Feeling the small objects. Aim:
To help him use his stereognostic sense to discriminate between small objects.
To introduce him to cereals.
iii) Presentation of Bag 9– (Currency)
Before giving the presentation introduce the coins to the child. Show him 50 paise, 25 paise, 1 rupee, 2 and 5 rupees. Take the coin bag, empty it on the mat and ask him to do the pairing with
the eyes open. When he is thorough blindfold him and ask him to pair now.
Aim: To help him to have a knowledge of the currency of his country.
iv) Presentation of bag 10– (Mystery bag) Invitation: There is another bag but I won’t tell you what contains. Shall we see what is inside. Preparation: Tell the child to put the work mat and call you. Presentation:
Bring the mystery bag and tell the child to open the bag just a little so that his hand can go in.
Tell him to put his hand inside and hold an object, feel it and name it. Tell him to take out the object and look at it and check if the name given
by him is correct.
Keep doing this till all the objects are over. Here there is no pairing. All are single objects.
Aim: To help the child use several senses in combination to identify familiar objects.
12. COLOURED CYLINDERS OR KNOBLESS CYLINDERS
Age: After working with the geometrical solids and stereognostic bags.(3 ½
years)
Material description:
There are 4 boxes of coloured cylinders, each box has 10 cylinders. These cylinders correspond to the cylinders in the Cylinder Blocks, except
that they have no knobs and are coloured. The boxes are shaped according to the shapes the cylinders take when
kept in a row in gradation. The cylinders corresponding to those in:- 1. Block A are blue 2. Block B are red 3. Block C are yellow 4. Block D are green. Display: After the geometrical solids. Invitation: “There is another set of cylinders. But these are coloured cylinders. Would you like to see how to work with them today?” Preparation :
Ask the child to get the work mat ready and come and call you. Take the child to the place of display and introduce the material to him
saying - “These are coloured cylinders, which colour would you like to work with?”
The child then chooses a colour, say red. Ask him to bring the box to the place of presentation without making any
noise. Presentation:
Ask the child to remove the cylinders from the box and place them on the mat.
Now blindfold the child and ask him to arrange the cylinders from thick to thin as he has chosen the red cylinders
If he has chosen the blue cylinders ask him to arrange them from tallest to the shortest.
Ask him to open his eyes and check if the order of arrangement is correct. Suggest to him that he can work with the other boxes in the same way.
Aim: To further refine the child’s motor capacity. Grading and Partial Pairing are the activities done with this material. Exercise –1
Invitation: “There is one more method of working with the coloured cylinders. Would you like to do this?” Preparation: Ask the child to unroll his work mat and get any one box of coloured cylinders. Presentation:
Ask the child to remove all the cylinders from the box and keep them all mixed up on the mat.
Now tell the child – “Shall we build it differently? First with the eyes open and later with the eyes closed”.
Show the child how to build the cylinders vertically by isolating the biggest i.e. the cylinder with the largest circumference.
Now place the cylinder with the next maximum circumference on top of the first one. Repeat in the same manner and stack all the cylinders one on top of the other.
(The circumferences keep on diminishing). Now tell the child “Shall we repeat it again? But this time you have to keep
your eyes closed while doing this activity”. Suggest to the child after he has worked with one box, he may work in the same manner with the other boxes too. Point of interest: Stacking the material vertically i.e. grading the material. Control of error: Lies in the visual sense when his eyes are open and in the stereognostic sense when his eyes are closed. Exercise – 2
Invitation: “There is yet another way of working with the coloured cylinders, would you like to see how this is done?”
Preparation: Ask the child to unroll his work mat and bring any two boxes of coloured cylinders. Presentation:
Ask the child to remove all the cylinders from both the boxes and place them on the mat in two different groups but all mixed up.
(Not in the graded fashion). Take one cylinder from one group (colour) and ask the child to find
another cylinder as tall, thick or thin or short as this cylinder from the other group (colour).
Now keep it exactly on top of the first cylinder. This should be done with the eyes closed. Continue the activity by isolating different cylinders from both groups
and pairing them. After he does this ask him to open his eyes and check if it is correct.
Note: (i) When the child does this activity with blue cylinders, he can compare only
the height (ii) At times only partial pairing is possible. (iii) When he is able to find the pairs using two coloured cylinders suggest
that he uses red, green and yellow cylinders together making a pattern repeating the colours in succession.
Point of interest:
Working with two boxes. Placing one cylinder on top of the other (two different colours).
Control of error : Lies in the tactile and stereognostic sense. Exercise – 3
M1 and M 2 are possible with the eyes open. Aim:
To help the child utilize and enjoy his capacity to see with his hands. To help him refine his prehensile movements.
13. BARIC TABLETS Age: After the child has achieved sufficient maturity to detect objects that are very slightly different from one another.
Material description:
There are 3 boxes of baric tablets. The tablets are rectangular pieces of wood in their natural colour. They are highly polished and varnished. Each box has ten tablets. Each tablet in the first box weighs 12 gms. In the second box 18 gms and in the third box 24 gms.
Display: This is found along with the later sensorial materials, with their lids open. Preparation:
Tell the child to keep the work mat ready and call you. Take him to the place of display and point to the material and say - “These
are Baric Tablets”. “We will work with these two boxes today. (1st and 3rd box). Let us carry
them to the mat”. Presentation:
Technique of taking the impression: Ask the child - “Put your hands out, palms open and facing upwards and
do not rest your hands on your lap”. Show the child how to move the hands up and down together. Shoulders should not move. Movement should be only from the elbows. Tell him to move both the hands to the same level. This is the technique of taking the impression of objects with different
weights.
Now place one of the tablets from the first box on one of his palms ( it
should not be on the palm but on top of the fingers). Let him feel it. After a while place a tablet from the 3rd box on the other hand. Let him take the impression and feel the difference. Let him do this for as long as he wishes. Point to the first object and ask him to put it down. Give him another tablet from the 3rd box and let him take the impression. Use a blindfold and let him now take the impression again. If he says they are the same, ask him to switch the tablets from one hand
to another and take the impression again and pair them. Now give him 2 tablets of the 1st box on both hands, compare and take the
impression. If they are the same switch the tablets from one hand to the other and
compare. If he still finds them the same stack them together, otherwise discard one
of the tablets. Take another tablet, compare, switch, compare & stack or discard. Watch him doing it and leave, once he has understood the nature of the
activity. Suggest to him “You can also work with the other tablets in the 3rd box”.
Point of interest: Technique of taking impressions Aim:
To help him become conscious of the impressions of heavy and light with the help of his baric sense.
To help him use this baric sense in everyday life and in his future studies of Physics and Chemistry.
Exercises: (i) Sorting. (ii) Pairing. Name lessons:
Heavy and light When using 3 boxes – light, lighter, lightest/ heavy, heavier, heaviest.
Exploratory activities: 1. Other materials of same dimension as that of the baric tablets can be used
to do the same activity. E.g. (a) marble, (b) cork, (c) thermocol 2. Introduce him to the weighing scale and standard weights and measures.
14. DRAWING INSETS OR METAL INSETS Age: 3½ to 6 years.
Material description:
The drawing insets are kept on wooden stands with inclined surfaces. A beading at the lower edge keeps the frames from sliding down. The drawing insets and frames are made of metal. They resemble the geometrical insets except that the frames are pink in
colour. The insets are blue. One of the stands has 5 rectilinear figures i.e. all bounded by straight
lines. These figures are:-
a) Equilateral triangle b) Square c) Rectangle d) Pentagon e) Trapezium
The other stand has 5 curvilinear figures i.e. figures with curved outlines.
These figures are:- a) Ellipse b) Oval c) Circle d) Quatrefoil e) Curvilinear triangle Paper:
A stack of good quality paper of dimensions 14 cms square is provided in a variety of colours.
It should be smooth and capable of being used on both sides. Pencil:
Provide coloured pencils of a good quality. They should be long enough so that the child can hold them comfortably.
They should be placed in a stand with their pointed ends facing upwards. They should be sharpened.
Pad:
Pads should be firm but not too hard. This is to keep the paper on. This should be slightly larger than the paper. There should be around 8 – 10 pads, preferably made out of cardboard
covered with smooth and thick paper. Display: Towards the end of the sensorial materials. Invitation: “Shall I show you how to work with a paper and pencil?” Preparation:
Ask the child to get a chowki and a sitting mat ready and then call you. Take the child to the place of display and point to the material and say --
“These are Drawing Insets”. Show the child where the stationery required is kept, like pencil, stand,
paper, pad etc.. Ask “Which colour paper do you want to use?”. He selects the colour of his choice. “Which coloured pencils (3 colours) would you like to use”. Make him place the 3 pencils in a stand. “What would you like to work with? An oval or an ellipse, a triangle or a
square?”. Then place the drawing insets also on the pad. Take them all to the work mat. Place the pad on the center of the chowki, inset on the top left corner of
the chowki and pencils and stand on the top right corner of the chowki. Presentation:
Take the frame out and keep it exactly on the paper. Ask the child --“Which coloured pencil would you like to use first?” Hold the pencil he selects with your 3 writing fingers i.e thumb and index
on top and middle finger below. Tell the child -- “Watch how I hold the pencil”. Then hold the frame of the inset with your left hand at the bottom of the
frame with the palm flat and horizontal. Then say -“See where I start”. Start drawing from the farthest top point moving anti-clockwise as in the
geometrical cabinet. Then tell the child - “See how lightly I am drawing. See how the pencil is
straight up”. After reaching the point where you started say - “See I stopped where I
started”. Remove the frame from the paper. Let the child look at the drawing. Now ask the child to select another coloured pencil.
Fill the picture/shape with the horizontal lines, (starting from the top of the figure and proceeding to the bottom) drawing from left to right, and never in the reverse direction.
Ask the child to repeat this activity on a new sheet of paper.
Now ask the child to select another coloured paper and keep it on the pad. This time take the inset and place it on the paper. Let the child choose another coloured pencil. Keep your left index finger pressed on the knob of the inset, then start
drawing from the bottom of the inset in a clockwise direction. When this is done put back the pencil and the inset. Ask the child --“Now shall we take the another coloured pencil?” Fill the inner part of the figure starting from the upper outline to the
lower outline with horizontal strokes. Note: Initially the strokes will be far apart and later closer to each other and gradually proceeds to colouring the entire shape/figure. Point of interest:
Technique of holding the pencil. Colouring from top to bottom. Tracing frames in an anti-clockwise manner and insets in clockwise
manner. Aim:
To help the child to have further opportunities to apply his consciousness with regard to shapes and colours.
To prepare him for writing, drawing and colouring. To prepare him for the study of plane geometry and different forms of art.
Exercises: 1. To place the inset in different orientations and create different patterns. 2. To use more than one inset while drawing. 3. To provide larger sized paper to stimulate the child to create larger designs. 4. To fill in the drawn shapes with different types of lines. Ex: vertical,
diagonal and wavy lines. Possibilities:
The child can use all 10 insets one after the other to create a pattern. The child can use more than 3 colours.
Exploratory activities:
The child can create geometrical patterns or designs on the floor using chalk.
A large tray of sand can be given to the child in which he can draw patterns using his finger.
15.OLFACTORY BOTTLES--(SMELLING BOTTLES) Age: 3 ½ years. Material description: There are two wooden boxes, each containing 6 smelling bottles.
Each bottle has a lid with a screw under which is a mesh. The materials in the bottle should ideally be in a powdered form or a
small bit of cotton dipped in the material. The materials in the smelling bottles should be replaced as and when
needed. All the bottles in one wooden box have the same colour - blue and those in
the other box - red. There are numbers on the base of the bottles to help the teacher to
identify. The bottles are prepared by putting a little of each substance in each pair
of bottles. Classification of odours: 1. Camphor 2. Vanilla 3. Fragrant – floral / fruity(rose, jasmine, sandalwood / lemon,orange,mango) 4. Mint 5. Spicy – pepper, cloves, cardamom 6. Incense 7. Beverages – tea, coffee, cocoa 8. Cosmetics – nail polish, lipstick, creams etc. 9. Cooking medium – ghee, butter, oil. Presentation: 1. Fragrant 2. Spicy 3. Beverages 4. Camphor.
Display: With the other sensorial materials. Characteristics: The material lends itself to pairing. Preparation: Of the 4 pairs of bottles, you take only two pairs and present them in the following manner- ABBA Where A is the fragrant odour and B the pungent odour. (pepper) Presentation:
The technique of taking the smell impression:- Hold the bottle a little below the nose and show the child how to smell the
contents, with the mouth closed, waving the bottle to the right and left. Then ask the child if he would like to smell the bottle i.e. A (fragrant –
sandalwood) Then present B i.e. pungent-pepper. Now present B again, the pair from the other colour. Lastly we present A from the other pair (fragrant). Now group the bottles with the same colour together. Take the impression (smell) of one of the bottles and isolate it for pairing. Now take the impression of the other colour and check if it is a pair. If not discard and smell another one and pair it on the left, top corner of
the work mat. Continue this and ask the child to check the pairs. Now mix it up and ask him to work with the other pairs in the similar
manner. Point of interest: The techniques of sniffing. Aim:
To help the child become conscious of various smells and differences between them using his olfactory sense.
To prepare him for the future activities in his life – dealing with chemicals, beverages, juices, fruits etc.
Name lesson: Names of the substance he is smelling e.g. sandal wood, pepper etc. Exploratory activities: 1. Ask the child to smell different flowers and leaves. 2. Have a herb patch. The child can be offered these to smell e.g. mint, tulsi,
curry leaves, coriander leaves etc. 3. Have a few objects in a tray. Blindfold the child and ask him to smell and
identify each.
16. GUSTATORY BOTTLES - (TASTING BOTTLES) Sweet – Sugar water Sour - Vinegar in water Bitter – Quinine in water Salty – Table salt in water
The above should be diluted to a point where they taste distinct but not strong.
Allergies will develop if the gustatory bottles are not washed regularly and the various preparations are not done in boiled water.
Material description:
There are four pairs of identical bottles. The bottles could have nozzles or they could be wide mouthed with a
spoon or a dropper. The lids of each set are in one colour. Under the bottles you can have some markings to be able to identify the
taste. The contents of the bottles correspond to the 4 different types of tastes
that our tongue can distinguish i.e :- Sweet – Tip of the tongue Sour - Sides of the tongue Bitter – Back of the tongue Salty – All over the tongue
There is a large tray on which is placed an oil cloth. On this is kept a small jug and a glass. In the jug there is water. There is a napkin for wiping the mouth. A mop cloth is also found on the tray.
Display: Next to the other sensorial materials. Characteristics: For pairing and grading Invitation: “Shall I show you how to taste different things?” Preparation:
Ask the child to get a chowki, oil cloth and a sitting mat. Take the child to the place of display and introduce the material to him. Carry the tray with the jug and glass on it and make sure there is water in
the jug. Pour some water into the glass from the jug. Take the gustatory bottles and keep them on the chowki.
Presentation:
Depress your tongue and hold it out, in the form of a cup. Take a little sweet liquid with a spoon or dropper and drop a little on your
tongue. Show the child how to take in the taste by placing the tongue against the
palate. You can show him the technique of tasting even before you actually do the
activity. Once you show him the technique, offer the sweet bottle to him and let
him taste a few drops. When he is doing this tell him - “It is sweet”. Then tell him to drink a little water from the glass. Next offer him the salty water (complete contrast). Do the same. Then repeat salty and then sweet (ABBA where A is sweet and B is salty). Every time he has to drink a little water after tasting. After offering him all the four bottles separate them according to the
colour of the lid and then do the pairing activity. Tell the child there are more bottles to work with, in the same manner.
Point of interest:
Putting out the tongue like a cup. Pressing the tongue against the palate. Drinking water after tasting the contents of each bottle.
Aim: To help the child become conscious of various tastes and their differences using his gustatory sense. Name lesson:
(i) Sweet (ii) Sour (iii) Salty (iv) Bitter Grading: With specially prepared materials, with 3 different contrasts of the same solution, the child is made aware of the different intensities of the same solution. E.g. Sour – more sour – most sour Bitter – more bitter – most bitter Sweet – sweeter – sweetest Salt – saltier – saltiest. Exploratory activities: Tasting different types of food stuffs e.g. cake, chips, bitter gourd, tamarind etc.
17. THERMIC SENSE
Age: 3 ½ years
This sense is located all over our skin but usually when we want to feel
the temperature of something we use only certain parts of our body to test the temperature i.e. the palm.
Two types of materials are available. They are – (i) Thermic bottles. (ii) Thermic slabs.
1. THERMIC BOTTLES
Material description:
There are 5 pairs of metal bottles. They have cork lids. The bottles are 10 cms high with the base measuring 2.5 cms. The length of the neck of the bottle is 3 cms. The length of the bottle below the neck is 7 cms. You can have 3 types of bottles:-
(i) Where the neck is covered with rattan i.e. palm leaves so that they can be
handled by the neck without upsetting the temperature of the contents of the bottle or
(ii) They have handles so that we need not touch the bottle while holding them or (iii) They have thread wound round the neck through which beads are strung
for handling.
One series of bottles - five in number, have their bases painted in red colour and the other five bottles of the 2nd series have their base painted blue.
In each series, the walls and the floor of the containers are lined with felt in order to retain the temperature of the contents of each bottle.
The contents should be changed from time to time, as they will lose their heat or coldness.
In the bottles we have water of 5 different temperatures. There is also a thermometer along with this material. There is also a bottle with water at room temperature – the standard
bottle. The temperature of water in the bottles is as follows:-
1st pair 15°C – Cold water 2nd pair 30°C – Luke warm 3rd pair 45°C – Tepid 4th pair 60°C – Warm 5th pair 75°C – Hot 11th bottle Room temperature – standard bottle Display: After the colour tablets and in a place protected from direct sunlight and breeze. Characteristics: This material lends itself for pairing and grading activities. Invitation: “There is a new activity which I would like to show you. Would you like to see it?” Preparation: Prepare the bottles with the temperatures 15°C, 30°C, 45°C, 60°C, 75°C. Presentation:
The bottles are placed in gradation. We show the child how to hold the bottle by its neck or handle. We first offer him the bottle with cold water. We show him how to bring our right palm in contact with the body of the
bottle. Thus we show him the technique of establishing contact without grasping. We present 2 pairs in the following sequence i.e. ABBA where A is cold &
B is hot. After this we mix up the pairs and ask him to do the pairing activity.
After he feels every bottle he has to feel the standard bottle before he goes back to feel the bottle with the next temperature. Point of interest: Feeling the standard bottle alternatively. Name lesson:
Introduce the names cold and hot. We give the other names i.e. tepid, lukewarm and warm if the child asks
for them. Later we suggest the grading activities.
Grading activities:-
Age: After the child has sufficiently worked with the pairing activities of the Thermic Bottles. Invitation: “Shall I show you how to do another activity with the Thermic Bottles today?” Preparation:
Ask the child to keep sitting mats and a chowki. Spread an oil cloth on the chowki and bring one set of Thermic Bottles
and keep them on the chowki and then come and call you. Presentation:
Ask the child to feel any bottle and isolate it. Then ask him to feel another bottle after feeling the standard bottle. After he does this tell him that if he finds that the bottle is hotter than the
1st one he felt, he should keep it to the right of the 1st bottle. If he finds it colder, he should keep it to the left of the 1st bottle.
In this manner ask him to grade all the bottles. Aim: Helps the child to become conscious of the different impressions of heat and cold with the help of his thermic sense. Name lesson: All the five names and comparative and superlative degrees of cold and hot i.e. (cold, colder, coldest); (hot, hotter, hottest).
2.THERMIC SLABS/ TABLETS: Age: After the child has worked sufficiently with the Thermic Bottles. We have another material for thermic sense called the Thermic Slabs.
Material description:
There are 6 pairs of thermic slabs in a wooden container. The slabs are rectangular. They are made of:- Steel, (2) Slate, (3) Glass, (4) Wood covered with cork, (5) Wood, (6)
Wood covered with felt.
There is a standard board – made of hard board. This also has the same dimension as the other slabs. Each pair offers different thermic sensations without us having to heat or
cool them. Display: They are displayed next to the Thermic Bottles in pairs and are placed vertically and not kept one over the other. Characteristics: They lend themselves for pairing, grading and sorting activities. Invitation: “Shall we see how to feel objects which are cold and hot?” Preparation:
Take the child to the place of display and introduce the material to him saying—“These are Thermic Slabs”.
Ask him to carry the slabs on a tray to the work mat.
We need a chowki for this activity. Presentation:
Keep the box or tray on your right and offer the steel slab (A). Ask the child to feel the slab by placing his hand (palm flat) on it. After this the standard slab is used. Then we offer the next slab (felt) -B. Each time we offer a slab we ask the child to touch the standard slab first
and then feel the next slab. Now we offer him only 2 pairs i.e. steel, and felt (ABBA). We blindfold the child and ask him to pair them. When he is able to do this, introduce the other pairs one at a time. Pairing can be done with all the pairs in the same manner.
Note:
Due to the difference in conductivity, the slabs offer different thermic sensations, which depend upon the season too.
This activity promotes the child exploring the environment from the point of view of the thermic sense.
Aims:
To help the child become conscious of different temperatures. To help the child utilize this consciousness of temperature in his everyday
life. Name lesson: The names of the materials ex: Glass, wood, steel etc. Exercises: 1. Put all the slabs out in the sun and ask the child to find out which is very
hot, less hot and so on. Ask the child – (a) which gets heated the fastest --- steel (b) which gets cool the fastest (c) which does not get heated. --- felt
2. Pairing, grading and sorting activities can be done.
18. CONSTRUCTIVE TRIANGLES
Age: After the child has worked with the Geometrical Cabinet.
Material description:
It comes in 4 boxes. The first box is rectangular in shape. The second box is triangular in shape. The third box is a large hexagonal shaped box. The fourth box is a small hexagonal shaped box. The triangles are all cut out of hard board and painted with enamel paint.
FIRST BOX
There are 7 pairs of triangles. Each one of the triangles has a black line along one of the sides to help
construct different figures. The first pair of triangles is isosceles, right angled, green triangles with a
black line along the hypotenuse. The second pair is again right angled, isosceles, yellow triangle with black
lines on one of the sides other than the hypotenuse. When these are joined a parallelogram is formed.
The third pair is yellow equilateral triangles with black lines on one of the sides close to the hypotenuse. When joined, they form a parallelogram.
The fourth pair is right angled, scalene, yellow triangles with a black line on the shorter side, close to the hypotenuse.
The fifth pair is right angled, scalene, green triangles, with a black line on the longer side near the hypotenuse.
The sixth pair is right angled, scalene, grey triangles, with a black line on the hypotenuse.
The seventh pair is two red triangles which are non identical. One is scalene triangle and the other an obtuse angled triangle.
B. There are four more pairs of triangles which are all blue in colour. None of them have got black lines printed on them. 1. One pair is made up of equilateral triangles. 2. Another pair of right angled isosceles triangles. 3. One pair of right angled scalene triangles. 4. An odd pair of which one is a scalene triangle and the other is an obtuse
angled triangle.
All these blue triangles correspond to the other coloured triangles in the box.
On the lid of the box there is a green dot marked. On the reverse side of all the triangles in the first box, there are green dots
or circles marked or drawn.
SECOND BOX
The second box is triangular in shape.
We have one grey, equilateral triangle. Two green right angled, scalene triangles with black lines on the longer
edges. Three yellow obtuse angled, isosceles triangles with black lines on two
sides. Four equilateral red triangles, three of them having black lines on one
side and one having black line on all sides.
On the lid of the box there is a yellow dot and on the reverse side of all the triangles in this box there are yellow circles or dots.
THIRD BOX
The third box is a large hexagonal box. There is one large yellow coloured hexagon. One yellow equilateral triangle which is of the same dimension as the
grey triangle in the second box. This triangle is half the size of the hexagon. Six yellow obtuse angled, isosceles triangles, three of them having black
lines along the side opposite the obtuse angle and the other three having black lines on all the 3 sides. Two red obtuse angled, isosceles triangles with black lines opposite the obtuse angle. Two grey obtuse angled isosceles triangles with black lines on one side in such a way so that when we bring the black lines together they make a parallelogram.
On the outer lid of the box there is a red dot or circle and also on the reverse side of all the triangles in this box.
FOURTH BOX
It is a small hexagonal box having one equilateral yellow triangle. Six smaller isosceles, red triangles. Three of them having black lines on all the 3 sides. Another three of them having black lines opposite to the obtuse angles. We can make a hexagon twice the size of the entire triangle. We have six grey equilateral triangles with black lines on 2 sides. They make the same hexagon as the red triangles. There are two red, equilateral triangles which are the same dimensions as
that of the grey triangles. They have black lines on one side. There are 3 green equilateral triangles which are also of the same
dimensions as the grey triangles. Two of them have black lines on one side and one of them has black lines
on 2 sides, touching each other. The outer wall of the lid of the box has a blue circle or dot. The reverse side of all the triangles in this box also have blue circles or
dots on them. Display: In developmental succession. After the geometrical cabinet. Characteristics: It lends itself to intellectual activities i.e. new discoveries being made using the shapes in the boxes.
1. Presenting the Rectangular Box
Preparation: Ask the child to unroll his mat and come and call you. Take the child to the place of display and introduce the material to him
saying – “These are the constructive triangles. We will work with this box today”, pointing to the first box.
Help the child to carry the 1st box to the mat. Presentation:
Take the triangles out (except the blue ones). Show the child how to hold the triangles along the edges. All the triangles are taken out and kept mixed up on the mat.
1.Pairing the triangles:
Indicate to one of the grey triangles and ask the child “Can you find
another triangle having the same shape, size and colour as this one?”
Wait for the child to find the triangle and when he does so, show him
how to place them one on top of the other (both the grey triangles).
In the same manner the other triangles are also paired.
When it comes to the red triangles the child will say that they are not
of the same size and shape.
Then we have to tell the child “Since they are of the same colour we
place them one on top of the other”.
2.Mapping: (Tracing the black lines with the index and middle finger)
Take one pair of triangle (green) and place them with their black lines vertical, parallel and facing each other.
Now indicate to the child the black lines and say “we will put these black lines together in such a manner that they lie close to each other”.
Hold one of the triangles with your left hand thumb and index finger.
Place your right palm flat on the other triangle. Slide the right figure along the black lines until the vertices meet. Once this is done the child will say that the two triangles have
formed a square. Allow him to observe the shape carefully. Now bring the black lines of all the paired triangles together, after
mapping as above. Let him observe and name all the new shapes formed thus. Then say “Let’s do it again” and mix them all up. Start repeating the activity and wait for the child to take over. You may leave him when you are sure that he has understood the
activity. 3.Working with the blue triangles:
After the child has sufficient experience working with the coloured triangles you can suggest that he works with the blue triangles in a similar manner.
The suggestions that could be made are:--
“Remember you have made many shapes with the coloured triangles. Now why don’t you try it out with the blue triangles?”
First ask the child to take out all the triangles and pair them. After this ask him to construct the shapes. Give him the following help.
1.Ask him to construct the coloured triangles (by putting the black lines together) and keep that as his reference to work with the blue triangles. 2.Ask the child to use the lid with the imprints to remember all the shapes possible. 3.When he has used up all the triangles to make shapes, ask him to dismantle and make different shapes again. Point of interest:
Pairing the triangles. Holding the triangles correctly. Sliding the triangles. Putting the black lines together.
Control of error: There is no control of error. It is only learning by discovery. Aim:
To help the child realize the function of the triangles as constructor and divider of quadrilaterals and hexagons eventually.
He becomes aware that with the help of triangles many rectilinear figures can be constructed.
To help the child get an idea of fractions. To help the child prepare himself for the systematic study of plane
geometry by coming across a variety of geometrical phenomena such as equal value, similar and identical shapes.
To help him to view the geometrical figures from the point of view of area. Exercise
Invitation: “There is yet another way of working with the blue triangles. Would you like me to show you how to do this?”
Preparation: Ask the child to pair the blue triangles and then come and call you. Presentation:
Take one paired triangle and invert one of them. Slide it along the sides until the 2 vertices meet. Let the child observe the various shapes formed. Now hold one of the vertices and rotate the other triangle so that the two
equal sides coincide. Do the same for all the pairs. Let the child get interested in the new discoveries.
Point of interest:
Holding one triangle. Sliding the other triangle along the sides. Inverting one of the triangles. Rotating the inverted triangle.
Note: The triangles can be classified either according to their angles or sides. 1. According to angles: 1. Acute angled triangle = less than 90 degrees
2. Right angled triangle = 90 3. Obtuse angled triangle = more than 90
2. According to sides: 1. Equilateral triangle = all sides equal 2. Isosceles triangle = two sides equal 3. Scalene triangle = all sides unequal
2.Presenting the Triangular Box
Preparation: Carry the triangular box with both hands to the work mat. Place it on the left side of the mat.
Presentation: Take out the grey triangle and place it towards the top of the mat. Take the 2 green triangles, map the black lines with your index and
middle finger. Slide the triangles together to form a large equilateral triangle. This will be the size of the single grey triangle. Place the grey triangle on top of the green triangles thus formed to make
the child aware that they are the same size. Keep the green triangles to the right side of the mat. Take out the 3 yellow triangles, map the black outlines, one side at a time
and put the triangles together to form a large equilateral triangle, the size as the grey triangle.
Place the grey triangle on top of the yellow triangles thus formed to make the child understand that they are the same size.
Keep the yellow triangles next to the green triangles. Now take out the 4 red triangles and similarly make the same equilateral
triangle as above. Check it by placing the grey triangle on top.
Formation of very large equilateral triangle using all 4 colours of triangles:
Place the grey triangle in the centre of the mat, towards the top, with one of its apexes of the triangle facing upwards.
Now to the left apex of the grey triangle, touching it place one of the apexes of the green triangles with the black line facing the right.
Slide the other green triangle till the vertices meet. Now take one of the yellow triangles and place the side without a black
line in such a way that this side touches the base of the grey triangle. Fill in the other 2 yellow triangles mapping the black lines. Next one of the red triangles, with the black line facing downwards, in
such a way that it touches the top right vertex of the large yellow triangle. Take the red triangles with black lines on all the sides and place it under
the first red triangle, so that their black lines coincide. Complete the large red triangle, mapping the lines.
Allow the child to observe the large colourful equilateral triangle thus
formed.
Note: Allow the child to work with the other Constructive Triangle Boxes using his own imagination and creativity.
19.BINOMIAL SQUARE:
Age: 4 ½ years It is an algebric expression for the sum or differences of two terms. (a & b) or (x & y)
Material description:
There is a shallow square box with a lid. The lid of the box has on it an imprint of the representation (a + b)². Inside the box we have four hard board pieces, one of which is a square
which is red and measures 4 x 4 cms. The second one is also a square which is blue in colour and is 3 x 3 cms. The other two bits are rectangles coloured black and measuring 4 x 3 cms
each. The hard board pieces are painted on one side only.
Display:
After the geometrical solids. The lid should always be on the box.
Characteristics: Construction of a square is possible using this material. Invitation: “Would you like to see how to make a square? Preparation:
Take the child to the place of display and introduce the material to him saying – “This is the binomial square. We will work with this material today”.
Ask him to carry the box to the work mat and place the box on the chowki or mat.
Remove the lid with an analysis of movement and keep it on the right side, with the imprint facing upwards.
The red square should be to the top left.
Presentation:
Remove the 4 pieces from the box and keep them in a mixed up manner on the mat.
Start with the red square, placing it below the lid of the box. Now take the black rectangle and say -- “Since this side and this side
are the same, we will put them together”, (pointing to the longer side of the rectangle and the underside of the red square).
While saying this, slowly push the rectangle, with your index finger, so that it fits below the square.
Now take the next rectangle, find the side that fits exactly on the other side of the red square.
Now with your index finger, slowly push it so that it lies close the red square.
While doing so repeat the highlighted statement given above. Now take the last bit which is the blue square and place it in such a way
that the square is completed. After this draw the attention of the child to the imprint on the lid and ask
him whether what has been constructed matches with the lid. Ask him - “Shall we do it again?” Tell him he has to take out all the pieces and make the square, so that it
matches with the lid. Point of interest: The pattern on the lid. Control of error: The pattern on the lid. Aim:
To help the child to construct the binomial square with the help of different shapes, colours and sizes.
By working with this material he is prepared for further related information in Math.
He gains control over his finger movements. (a + b)² = a² + b² + 2ab
Note: The equation is not to be taught to the children, only for the teacher to
understand how the material represents the equation.
20.BINOMIAL CUBE
Material description:
There is a box, shaped like a cube. Two of the walls of this box are collapsible. The lid of the box has on it an imprint of the representation of (a + b)³. Inside the box we have 2 cubes and 6 prisms.
a) One red cube with sides equal to 4 cms. b) One blue cube with sides equal to 3 cms. c) Three black and red rectangular prisms with 2 red opposite faces,
measuring 4 x 4 cms and thickness equal to 3 cms. The other four faces are black.
d) Three black and blue rectangular prisms, with 2 opposite faces in blue colour, measuring 3 x 3 cms. The other 4 faces are black and measure 4 x 3 cms.
Display: After the geometrical solids. The lid should be on the box. Characteristics: Construction of a cube utilizing colours, shapes and dimensions (size). Invitation: “Would you like to see how to build the cube?” Preparation:
Take the child to the place of display and introduce the material to him. Help him to carry the box along with the lid to the place of presentation. The box is held with forefingers and thumb of both the hands, along the
sides. Place the box on the chowki or work mat at an angle. Remove the lid with an analysis of movement and keep it to the right side
where the child can see it, with the red square to the top.
Presentation: Draw the child’s attention to the opening of the walls of the box. Show him how to open the 2 collapsible walls with analysis of
movements. Remove the prisms and the cubes of the 1st level. Do not change the orientation of the cubes. Keep the 2 groups of cubes (2 levels) i.e. level 1 & 2 separately.
Start with the biggest red cube from the 1st level (lower level) and place it
inside the box. Push it to the corner with your index finger. Make deliberate movements and scrutinize its colour, shape and size
before placing it in the box. Now take one of the black and red prisms and push it to its place with the
index finger and say - “Since this has the same colour, size and shape of this face of the cube, we will place it here”(pointing to the red cube and the red face of the prism).
Now place the other prisms and cubes with similar analysis of movements.
After the first level is built compare the imprint on the lid and the first level of the cube in the box with an exaggerated analysis of movements.
Draw the child’s attention to the lid and the first level of the cube. Ask the child “Does it look the same as it is here?”
Repeat the same and build the 2nd level of the cube. After this draw the child’s attention to the pattern on the 2 faces and the
top, matching with the lid. Ask him – “Shall we do it again?” Tell him that he has to take out all the cubes and prisms and again build
them inside the box, to match the pattern on the lid. Point of interest:
Pattern on the lid. Opening the side walls. Pushing the prisms with the index finger.
Control of error: The pattern on the lid. Aim:
Helps the child to construct the binomial cube with the help of shapes, colours and size.
By working with this material he is prepared for further related information in Math.
Helps the child gain control over small movements. To know the inter-relation of geometry and algebra.
Exercise
1. Make him build the cube outside the box. 2. To build in 2 separate levels and then superimpose. 3. Take all the prisms and cubes, sort them out according to their colour,
shape and size and then build the cube. Note:
Show the child how the pattern repeats itself when the cube is viewed from all 6 sides and its horizontal and vertical cross sections too.
The child should be allowed to view the bottom of the cube too, by lifting the entire cube in the air.
(a + b)³ = a³ + b³ + 3a²b + 3ab² (4 + 3) ³ = 4³ + 3³ + (3 x 4² x 3) +( 3 x 4 x 3²) 7³ = 64 + 27 + (3 x 48) + (12 x 9) 343 = 64 + 27 + 144 + 108 343 = 343 Note: The equation is not to be taught to the children, only for the teacher to understand how the material represents the equation.
21.TRINOMIAL SQUARE
Age: After he has worked with binomial square. (It is an algebric expression for the sum or differences of 3 terms (a, b, c) or (x, y, z).)
Material description:
There is a shallow square box with the lid. The lid of the box has on it an imprint of the representation (a + b + c) ². Inside the box we have 9 hard board pieces. This is very similar to the binomial square. The 3rd variable being yellow and representing ‘c’. Of the 9 hard board bits:-
1. There is a red square measuring 4 x 4 cms 2. A square which is blue in colour measuring 3 x 3 cms. 3. A square which is yellow in colour measuring 2 x 2 cms. 4. There are 2 black rectangles measuring 4 x 3 cms. 5. There are 2 black rectangles measuring 4 x 2 cms 6. There are 2 black rectangles measuring 3 x 2 cms. Display: After the binomial square with the lid closed. Characteristics:
Construction of a square is possible using this material. The material lends itself for partial pairing.
Preparation:
Take the child to the place of display and introduce the material to him saying -- “This is the Trinomial Square” or you can just say “You know where the Binomial Square is. Don’t you? Next to it you find another box which contains the Trinomial Square. Would you like to bring it?”
After the child has brought the material to the work mat, place it in the center of the work mat.
Presentation:
Remove the lid with an analysis of movement and keep it to the right side, where the child can see it, with the red square to the top left.
Remove the 9 pieces from the box and mix them up. Now start with the red square. Place it below the lid of the box. Always begin with the largest square and then the largest rectangles. Now take the black rectangle measuring 4 x 3 cms and tell the child --
“Since these 2 sides are of the same size” (pointing to the red square edge and the black rectangle, larger edge) “we will put them near each other”.
Place that rectangle either to the side or below the red square. Take the similar rectangle and using the same words (underlined words),
place it either to the side or bottom whichever remains. Now take the blue square and place it in the gap made between the 2
rectangles saying the same words. Make the child aware that he has now constructed a binomial square. Now take one of the rectangles measuring 4 x 2 cms and place it by the
side of the other rectangle which is already forming the binomial square and repeat the same words.
Similarly take the other rectangle with the same dimension and place it next to the other rectangle forming the binomial square.
Next take the next rectangle measuring 3 x 2 cms and saying the same words place it close to the blue square on one side.
Take the next rectangle with the similar dimension and saying the same words place it next to the other side of blue square.
The last piece which is the yellow square is placed in the gap remaining. Now draw the child’s attention to the imprint on the lid and ask him
whether what you have constructed is same as what is there on the lid. Ask him “Shall we do it again?” Tell him that he has to take all the pieces and make a square so that it
matches the lid. Control of error: The pattern on the lid. Aim:
To help the child to construct the trinomial square with the help of different shapes, colours and sizes.
By working with this material he is prepared for further related information in Math.
He gains control over his finer movements. Age: After he has worked with binomial square. (a+b+c)² = a² + b² + c² + 2ab + 2bc + 2ca (4+3+2) ² = 4² + 3² + 2² + (2 x 4 x 3) + (2 x 3 x 2) + (2 x 2 x 4)
9² = 16 + 9 + 4 + 24 + 12 + 16 81 = 81
Note: The equation is not to be taught to the children, only for the teacher to understand how the material represents the equation.
22. TRINOMIAL CUBE
Age: After he has worked with the Binomial Cube.
Material description:
This is very similar to the Binomial Cube, the 3rd variable being given the colour yellow and representing the algebric expression (a + b + c)³
The material comes in a box which is shaped like a cube larger than the Binomial Cube box.
The lid has the imprint on it. Two side walls of the box are collapsible. The cubes and prisms found in the box are as follows:
1. 1 red cube 4 x 4 x 4 cms. 2. 3 red and black prisms 4 x 4 x 3 cms 3. 3 red and black prisms 4 x 4 x 2 cms 4. 1 blue cube measuring 3 x 3 x 3 cms 5. 3 blue and black prisms 3 x 3 x 4 cms 6. 3 blue and black prisms 3 x 3 x 2 cms 7. 1 yellow cube measuring 2 x 2 x 2 cms 8. 3 black and yellow prisms 2 x 2 x 4 cms 9. 3 black and yellow prisms 2 x 2 x 3 cms 10. 6 black prisms measuring 2 x 3 x 4 cms Display: After the Trinomial Square with the lid on the box.
Characteristics: It lends itself to partial pairing. Invitation: “There is yet another material with which you can build the cube. Would you like to work with it today?” Preparation:
Take the child to the place of display and introduce the material to him or since the child has worked with the Binomial Cube, you just say -- “You know where the Trinomial Square is. Don’t you? Next to it you will find another box which is the Trinomial Cube. Would you like to bring it?”
After the child has brought the material to the work mat, place it in the center of the mat, at an angle.
Presentation:
Remove the lid and place it at an angle. We can ask the child to open the walls of the box. Remove the 1st layer of the cube, then the 2nd and finally the 3rd layer and
place them all separately side by side. Then say -- “Now let us see how to build this cube”. Start with the red cube and place it in the furtherest corner of the box. Draw the attention of the box to match the colour, size and shape of the
different faces by picking up the right prism or the cube. We can say - “This is the same as this, same colour, same size and same
shape” indicating to the corresponding face of the prism or cube.
In this way the 1st layer is built.
Draw the child’s attention to the fact that the pattern on the 1st layer matches the pattern on the lid by saying -- “This is the same as this”.
Indicate to the lines made in the first layer and say -- “See these lines. They are straight and continuous”.
Continue with the activity until the child takes over. Draw the child’s attention to the formation of straight lines and the
pattern each time the layer is built. After the whole cube is built the child’s attention is drawn to the matching
with the top of the lid. Control of error:
Pattern on the lid. The lines must be continuous and straight.
Aim:
To help the child build the Trinomial Cube using his already acquired consciousness with regard to colour, size and shape.
Gain control over finer movements. Know more about algebra and geometry.
Exercise
1. Build the cube outside the box. 2. To build the cube in 3 layers separately in the same orientation and then
superimpose. 3. Sorting according to their colour, size and shape and then building the cube. 4. Dividing the cube vertically or horizontally to show the different cross sections. Note: The bottom of the cube can be shown to the child just as we did in the Binomial Cube.
(a + b+c)³ = a³ + b³ + c³+3a²(b+c)+ 3b²(c+a)+3c²(a+b)+6abc
(4 +3+2) ³ = 4³ + 3³+2³ + 3 x 4²(3+2)+ 3 x 3²(2+4)+3x
2²(4+3)+6x4x3x2
9³ = 64 + 27 +8+48 (5)+27(6)+12(7)+144
= 64 + 27 + 8 + 240 + 162 + 84 + 144
729 = 729
Note: The equation is not to be taught to the children, only for the teacher to understand how the material represents the equation.
23. DECANOMIAL SQUARE Age: 5 years
Material Description:
There is a box in which there are 10 compartments. In each compartment we find several squares and rectangles. The squares and rectangles in each one of the compartments are of the
same colour. The various colours are:-
(1) Red (2) Green (3) Pink (4) Yellow (5) Light blue (6) Grey (7) White (8) Purple (9) Dark blue (10) Golden Yellow or Orange
The colours are the same in the bead chain. The floor of different compartments is the same colour as the squares and
the rectangles which are placed in them. The first compartment has one red square measuring 1 cm. The second compartment has one green square measuring 2 cms and two
green rectangles measuring 2 x 1 cms. These along with the red square will make a larger square. The squares and rectangles in the subsequent compartments make larger
and larger squares. Display: After the Trinomial Cube. Characteristics: Constructing a large decanomial square is possible with this material i.e. using different shapes, sizes and colours. Invitation: “Shall we see how to make a large square today?” Preparation:
Ask the child to keep his work mat ready and come and call you.
Then take him to the place of display and introduce the material to him saying – “This is the Decanomial Square. Today we will work with this material”.
Ask him to carry the box with the forefingers below and thumbs above, to the place of presentation.
Presentation:
Take the red square out and place it at the extreme top left corner of the mat.
Then take the green square from the next compartment and place it in such a way that it lies diagonal to the red square.
Ask the child – “Can we make a square with these?” (indicating to the green rectangles).
Allow the child to complete the square and if he cannot, complete it yourself.
Then take the square and the rectangles from the next compartment (pink) and make a large square in the same manner as above.
Always place the square diagonally 1st and then begin working with the largest rectangles to the smallest ones.
Then indicate to the lines and tell the child – “The lines have to be continuous and straight”.
Complete the square by using all the colours from the compartments to make one large square.
Once the square is complete ask the child – “Shall we do it again?” Then allow the child to work on his own.
Point of interest: Placing the squares diagonal to one another and then the rectangles to complete the square. Control of error: The lines have to be continuous. Aim:
To help the child utilize his consciousness with regard to shapes, colours and sizes while building the square.
To help him gain control over his fine movements. To prepare him for further studies in Mathematics.
Exercise 1 :
Invite the child and ask him to make the decanomial square and then come and call you. Once he has done this remove the square and rectangles of any one colour.
Then fill the gap with the next colour by pushing all the squares and rectangles down. Then tell the child – “See there is a gap here, shall we fill it?”
Now use the removed square and rectangles to fill the gap, placing the square diagonal to the top square.
While placing the rectangles, the lines should be straight and continuous.
Exercise 2:
Invite the child and ask him to build the square and then come and call you.
Now remove the square and rectangles of one colour. Then tell the child – “Remove the square out of these.” (indicating to the
isolated colour of the square and rectangles). Then ask the child to make squares out of the remaining rectangles (the
same size as the square removed). Exercise 3:
Invite the child and ask him to build the square and then call you. Now take out the largest square and the smallest square. Place the small square on the top of the large one so that one corner
coincides. Then tell the child – “Can you find another square that will fit in this gap
diagonally?” Repeat the same movements with the other squares, taking the next largest and the next smallest each time.
LESSON PLAN
1. Area: (Subject) - i.e. what is being taught, e.g. Math, Language,
Sensorial, EPL, etc. 2. Name of the Lesson: e.g. Pink Tower, Addition Strip Board etc. 3. Materials required : 4. Teacher’s activities: - In detail 5. Student’s activities: i.e. corresponding to your activity. 6. Exploratory activities: i.e. all the exercises that can be done using the material. 7. Child’s creativeness : How the child can put the material to different uses. 8. Skills developed or intelligence outcomes: