9
Securely deploy ADSelfService Plus for remote users C 2017 ManageEngine. All rights reserved. www.adselfserviceplus.com

Securely deploy
ADSelfService Plus
for remote users
C 2017 ManageEngine. All rights reserved. www.adselfserviceplus.com

www.adselfserviceplus.com
Document Summary
Step 1: Enable SSL
Step 2: Host ADSelfService Plus on the internet
Scenario 1: ADSelfService Plus is installed in LAN
Scenario 2: ADSelfService Plus is installed in DMZ
Step 3: Reverse proxy setup
Sample Configuration – Apache server
Scenario 1: Both ADSelfService Plus and the Apache server are in HTTPS mode
Scenario 2: ADSelfService Plus is in HTTP and the Apache server is in HTTPS mode
1
1
1
1
2
3
4
5
6
Table of Contents
www.adselfserviceplus.com
Document Summary
The purpose of this document is to guide you through the process of securely deploying ADSelfService Plus for remote users (laptop and mobile users who will access ADSelfService Plus through the internet). The document is written with the assumption that you are a system administrator who has basic knowledge of SSL certificates and knows how to set up a reverse proxy server.
Step 1: Enable SSLIt’s paramount that you enable SSL when deploying ADSelfService Plus over the internet. See, guide to install SSL certificate in ADSelfService Plus for more information.
Step 2: Host ADSelfService Plus on the internet
Scenario 1: ADSelfService Plus is installed in LAN
Assume ADSelfService Plus is installed on a server in the LAN with IP address
192.168.200.254 on port 9251, and the hostname of the server is "adselfserviceplus-lan".
For users within the LAN, the URL will be https://adselfserviceplus-lan:9251/ or (https://192.168.200.254:9251)
If ADSelfService Plus has to be accessed over the internet, you should do the following:
Register an IP address (say 64.12.13.11) and a public hostname (say ADSelfService.yourdo-main.com) with your service provider.
The IP address for "ADSelfService.yourdomain.com" should resolve to "64.12.13.11". (This will be predominantly handled by the service provider)
Configure firewall rules (or access-list in router) redirecting "https" requests for IP address "64.12.13.11" to the LAN IP address "192.168.200.254".
Configure the Access URL settings in ADSelfService Plus. Go to Admin > Product Settings > Connection and click Configure Access URL. [One point to note is that all notifications will now be sent with the Public URL. It is understood that the Public URL will also be reachable within the LAN].
1

Scenario 2: ADSelfService Plus is installed in DMZ
Installing ADSelfService Plus on a server within the DMZ should help prevent the security risks involved in installing the solution in LAN.
Assume ADSelfService Plus is installed on a server within DMZ with an IP address 192.168.225.254 and the hostname is "adselfserviceplus-dmz" on port 9251.
MS SQL is the database and the database server is in LAN: You have to configure firewall rules in such a way that the application can reach the database server in LAN on the MS SQL port (Default port: 1433)
MS SQL is the database and the database server is in DMZ: Port 1433 should be reachable from the ADSelfService Plus server in DMZ.
pgSQL is the database : It is recommended that you use the pgSQL bundled with the software. In such a case, there are no additional configurations required.
You have to configure firewall rules in such a way that users in LAN are able to access the application as https://adselfserviceplus-dmz:443/ [Note that the application is installed on port 9251, but users have to access it through port 443]. In such a case, you have to redirect "https" requests on port 443 to port 9251 on the IP address 192.168.225.254.
Register an IP address (say, 64.12.13.11) and a public hostname (say servicedesk.yourdomain.com) with your service provider.
The IP address for "ADSelfService.yourdomain.com" should resolve to "64.12.13.11". (This will be predominantly handled by the service provider).
Configure firewall rules (or access-list in router) redirecting "https" requests on IP address "64.12.13.11" on port 443 to the LAN IP address "192.168.225.254" on port 9251.
Configure the Access URL settings in ADSelfService Plus. Go to Admin > Product Settings > Connection and click Configure Access URL. [One point to note is that all notifications will now be sent with the Public URL. It is understood that the Public URL will also be reachable within the LAN].
Now, users should be able to access ADSelfService Plus over the internet with the public hostname you have created.
www.adselfserviceplus.com2

Step 3: Reverse proxy setup
In computer networks, a reverse proxy is a type of proxy server that retrieves resources on behalf of a client (user) from one or more servers (ADSelfService Plus). These resources are then returned to the client as though it originated from the reverse proxy itself. Reverse proxies are used as a strategic point in the network to enforce web application security through web application firewalls, application delivery firewalls, and deep content inspection to mitigate data leaks.
Figure 1: Reverse proxy server in the DMZ and ADSelfService Plus server in the intranet.
As shown in the above figure, ADSelfService Plus can be made to work with a reverse proxy server. The requests from the clients (users) are received by the reverse proxy server, which stands in the DMZ. It then forwards those requests to the ADSelfService Plus server, which is in the production network (or if needed, can be placed in the DMZ). External machines never make a direct connection to the ADSelfService Plus server. Your firewall will only permit the proxy server to access the ADSelfService Plus server, and only over the required port.
You can set up reverse proxy for ADSelfService Plus using:
IIS NGINX F5 Apache server
Note: The above list is not an o�cial list of supported reverse proxies by ADSelfService Plus. It’s just a list of servers that our customers have had success configuring reverse proxies for ADSelfService Plus.
www.adselfserviceplus.com3

Sample Configuration – Apache server
The below steps show how to configure reverse proxy for ADSelfService Plus using Apache server. We've used the Apache HTTP Server version 2.2 for this configuration.
IMPORTANT:
This configuration assumes that the reverse proxy server is placed in the DMZ, and the ADSelfService Plus server and the domain controllers are in the internal LAN.
We’ve used only the default values for IP addresses, port numbers, file locations, etc., in the steps. If you have changed any default settings in ADSelfService Plus or the Apache server, make sure that they are reflected in these steps.
Also, make sure you have opened the port that will be used in Apache Server configuration (by default: 80 for http, 443 for https) for TCP access in Windows Firewall.
www.adselfserviceplus.com4
www.adselfserviceplus.com
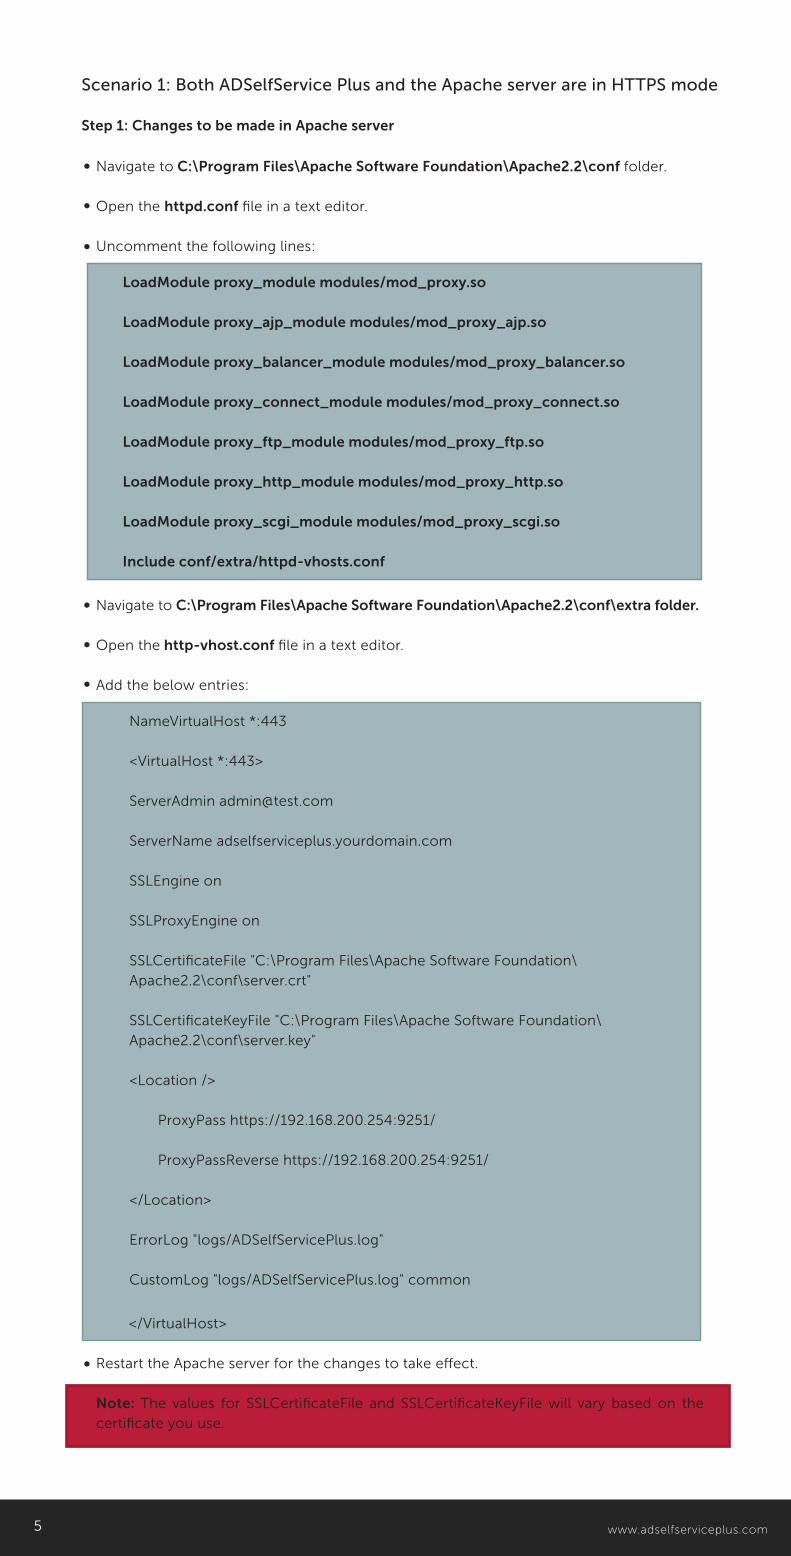
Navigate to C:\Program Files\Apache Software Foundation\Apache2.2\conf folder.
Open the httpd.conf file in a text editor.
Uncomment the following lines:
Navigate to C:\Program Files\Apache Software Foundation\Apache2.2\conf\extra folder.
Open the http-vhost.conf file in a text editor.
Add the below entries:
</VirtualHost>
Restart the Apache server for the changes to take e�ect.
Note: The values for SSLCertificateFile and SSLCertificateKeyFile will vary based on the certificate you use.
LoadModule proxy_module modules/mod_proxy.so
LoadModule proxy_ajp_module modules/mod_proxy_ajp.so
LoadModule proxy_balancer_module modules/mod_proxy_balancer.so
LoadModule proxy_connect_module modules/mod_proxy_connect.so
LoadModule proxy_ftp_module modules/mod_proxy_ftp.so
LoadModule proxy_http_module modules/mod_proxy_http.so
LoadModule proxy_scgi_module modules/mod_proxy_scgi.so
Include conf/extra/httpd-vhosts.conf
NameVirtualHost *:443
<VirtualHost *:443>
ServerAdmin [email protected]
ServerName adselfserviceplus.yourdomain.com
SSLEngine on
SSLProxyEngine on
SSLCertificateFile "C:\Program Files\Apache Software Foundation\Apache2.2\conf\server.crt"
SSLCertificateKeyFile "C:\Program Files\Apache Software Foundation\Apache2.2\conf\server.key"
<Location />
ProxyPass https://192.168.200.254:9251/
ProxyPassReverse https://192.168.200.254:9251/
</Location>
ErrorLog "logs/ADSelfServicePlus.log"
CustomLog "logs/ADSelfServicePlus.log" common
Scenario 1: Both ADSelfService Plus and the Apache server are in HTTPS mode
Step 1: Changes to be made in Apache server
5
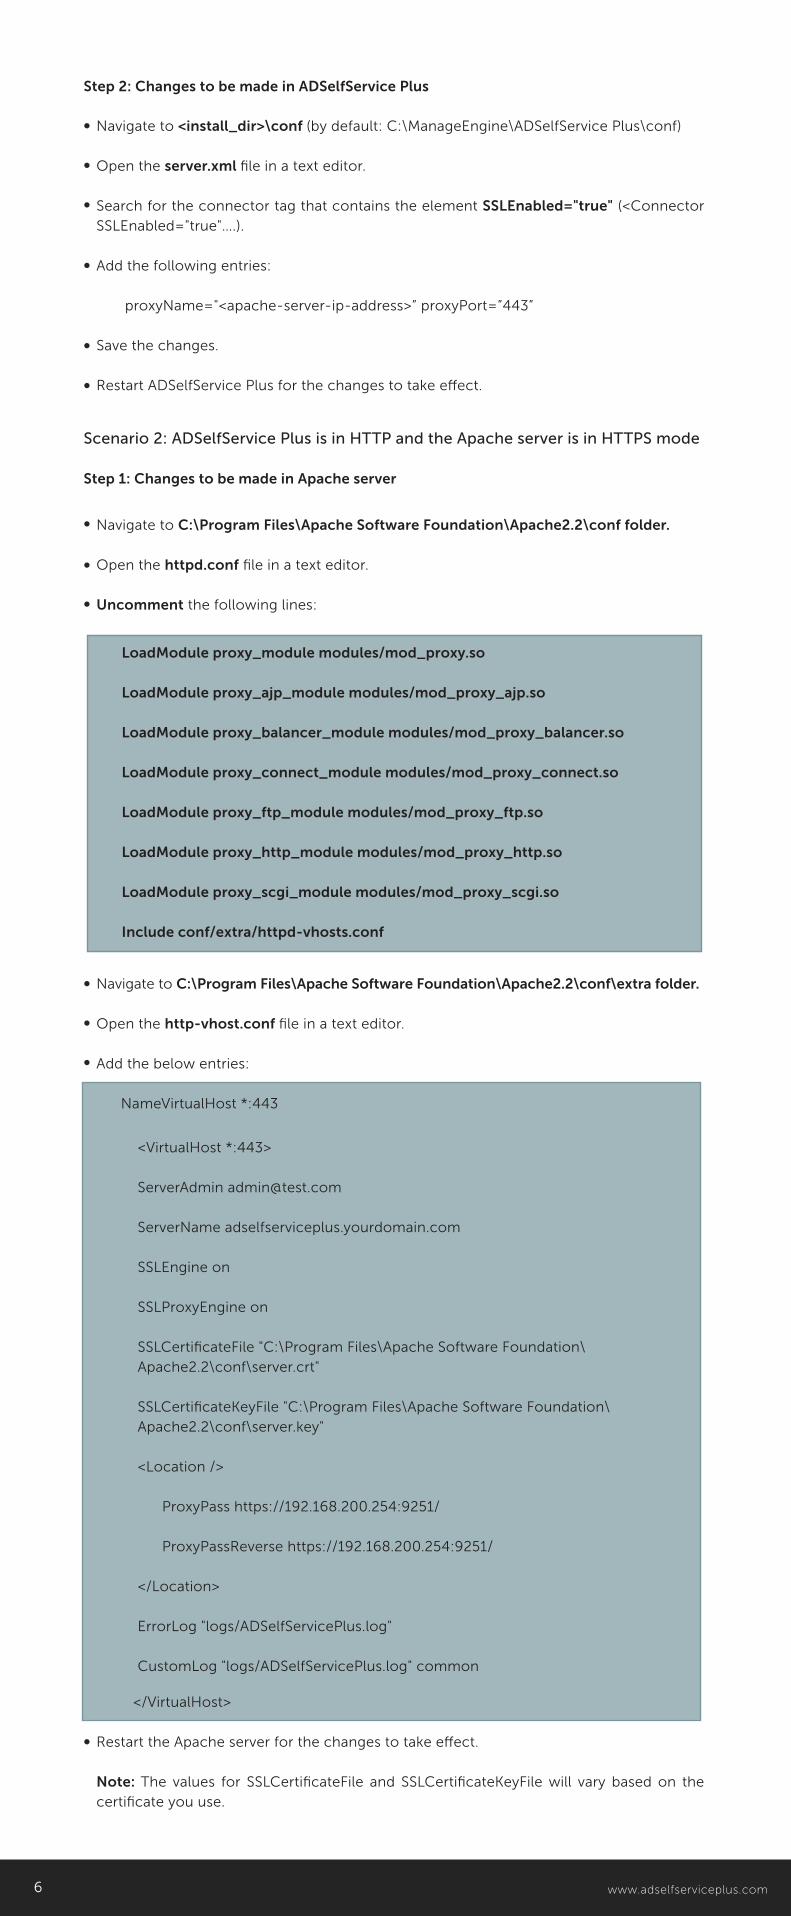
Navigate to <install_dir>\conf (by default: C:\ManageEngine\ADSelfService Plus\conf)
Open the server.xml file in a text editor.
Search for the connector tag that contains the element SSLEnabled="true" (<Connector SSLEnabled="true"….).
Add the following entries:
proxyName="<apache-server-ip-address>” proxyPort=”443”
Save the changes.
Restart ADSelfService Plus for the changes to take e�ect.
Navigate to C:\Program Files\Apache Software Foundation\Apache2.2\conf folder.
Open the httpd.conf file in a text editor.
Uncomment the following lines:
Navigate to C:\Program Files\Apache Software Foundation\Apache2.2\conf\extra folder.
Open the http-vhost.conf file in a text editor.
Add the below entries:
NameVirtualHost *:443
</VirtualHost>
Restart the Apache server for the changes to take e�ect.
Note: The values for SSLCertificateFile and SSLCertificateKeyFile will vary based on the certificate you use.
LoadModule proxy_module modules/mod_proxy.so
LoadModule proxy_ajp_module modules/mod_proxy_ajp.so
LoadModule proxy_balancer_module modules/mod_proxy_balancer.so
LoadModule proxy_connect_module modules/mod_proxy_connect.so
LoadModule proxy_ftp_module modules/mod_proxy_ftp.so
LoadModule proxy_http_module modules/mod_proxy_http.so
LoadModule proxy_scgi_module modules/mod_proxy_scgi.so
Include conf/extra/httpd-vhosts.conf
<VirtualHost *:443>
ServerAdmin [email protected]
ServerName adselfserviceplus.yourdomain.com
SSLEngine on
SSLProxyEngine on
SSLCertificateFile "C:\Program Files\Apache Software Foundation\Apache2.2\conf\server.crt"
SSLCertificateKeyFile "C:\Program Files\Apache Software Foundation\Apache2.2\conf\server.key"
<Location />
ProxyPass https://192.168.200.254:9251/
ProxyPassReverse https://192.168.200.254:9251/
</Location>
ErrorLog "logs/ADSelfServicePlus.log"
CustomLog "logs/ADSelfServicePlus.log" common
www.adselfserviceplus.com
Scenario 2: ADSelfService Plus is in HTTP and the Apache server is in HTTPS mode
Step 1: Changes to be made in Apache server
Step 2: Changes to be made in ADSelfService Plus
6

Navigate to <install_dir>\conf (by default: C:\ManageEngine\ADSelfService Plus\conf)
Open the server.xml file in a text editor.
Search for the connector tag that contains the name="WebServer" element (<Connector name="WebServer"..).
Add the following entries:scheme="https" proxyName="<apache-server-ip-address>” proxyPort=”443”
Save the changes.
Restart ADSelfService Plus for the changes to take e�ect.
Website
www.adselfserviceplus.com Tech Support
[email protected] Free
+1-408-916-9890
About ADSelfService PlusADSelfService Plus is an integrated Active Directory self-service password management and single sign-on solution. It
o�ers password self-service, password expiration reminders, a self-service directory updater, a multi-platform
password synchronizer, and single sign-on for cloud applications. Use ADSelfService Plus' Android and iPhone mobile
apps to facilitate self-service for end users anywhere at anytime. ADSelfService Plus helps the IT help desk by reducing
password reset tickets and spares end users the frustration caused by computer downtime.
About ManageEngineManageEngine delivers the real-time IT management tools that empower an IT team to meet an organization’s need
for real-timeservices and support. Worldwide, more than 60,000 established and emerging enterprises— including
more than 60 percent of the Fortune 500— rely on ManageEngine products to ensure the optimal performance of
their critical IT infrastructure, including networks, servers, applications, desktops and more. ManageEngine is a division
of Zoho Corp. with o�ces worldwide, including the United States, United Kingdom, India, Japan and China.
Step 2: Changes to be made in ADSelfService Plus


