45
The Pentaho BI Platform Security Guide
| Date post: | 23-Aug-2014 |
| Category: |
Documents |
| Upload: | praveen-kumar-kodur |
| View: | 161 times |
| Download: | 1 times |

The Pentaho BI Platform Security Guide

This document is copyright © 2011 Pentaho Corporation. No part may be reprinted without written permission fromPentaho Corporation. All trademarks are the property of their respective owners.
Help and Support ResourcesIf you have questions that are not covered in this guide, or if you would like to report errors in the documentation,please contact your Pentaho technical support representative.
Support-related questions should be submitted through the Pentaho Customer Support Portal athttp://support.pentaho.com.
For information about how to purchase support or enable an additional named support contact, please contact yoursales representative, or send an email to [email protected].
For information about instructor-led training on the topics covered in this guide, visithttp://www.pentaho.com/training.
Limits of Liability and Disclaimer of WarrantyThe author(s) of this document have used their best efforts in preparing the content and the programs containedin it. These efforts include the development, research, and testing of the theories and programs to determine theireffectiveness. The author and publisher make no warranty of any kind, express or implied, with regard to theseprograms or the documentation contained in this book.
The author(s) and Pentaho shall not be liable in the event of incidental or consequential damages in connectionwith, or arising out of, the furnishing, performance, or use of the programs, associated instructions, and/or claims.
TrademarksPentaho (TM) and the Pentaho logo are registered trademarks of Pentaho Corporation. All other trademarks are theproperty of their respective owners. Trademarked names may appear throughout this document. Rather than listthe names and entities that own the trademarks or insert a trademark symbol with each mention of the trademarkedname, Pentaho states that it is using the names for editorial purposes only and to the benefit of the trademarkowner, with no intention of infringing upon that trademark.
Company InformationPentaho CorporationCitadel International, Suite 3405950 Hazeltine National DriveOrlando, FL 32822Phone: +1 407 812-OPEN (6736)Fax: +1 407 517-4575http://www.pentaho.com
E-mail: [email protected]
Sales Inquiries: [email protected]
Documentation Suggestions: [email protected]
Sign-up for our newsletter: http://community.pentaho.com/newsletter/

| TOC | 3
Contents
Configuring Security.................................................................................................................. 5Supported Technologies...............................................................................................................................5
Security Implementation Checklist.............................................................................................6Authentication............................................................................................................................7
Pentaho (Default)..........................................................................................................................................7Switching to LDAP........................................................................................................................................ 7
Microsoft Active Directory Configuration............................................................................................7LDAP Configuration in the Pentaho Enterprise Console................................................................... 9Configuring LDAP for the Pentaho Data Integration Server............................................................ 10Setting LDAP Property Values for the Pentaho Data Integration Server......................................... 10
Switching to JDBC...................................................................................................................................... 11Implementing Single Sign-On..................................................................................................................... 12
Switching to Central Authentication Service (CAS)......................................................................... 12Switching to Integrated Windows Authentication (IWA)...................................................................13
Assigning Permissions in the Pentaho User Console.................................................................................14Permissions Settings....................................................................................................................... 15
Authorization............................................................................................................................16Managing Users and Roles in the Pentaho Enterprise Console.................................................................16
Adding Users................................................................................................................................... 16Editing User Information.................................................................................................................. 16Deleting Users................................................................................................................................. 16Adding Roles....................................................................................................................................17Editing Roles....................................................................................................................................17Deleting Roles..................................................................................................................................17Assigning Users to Roles.................................................................................................................17How to Change the Administrator Role............................................................................................18Implementing Nested Roles in LDAP...............................................................................................18Resetting or Creating a new Pentaho Enterprise Console User......................................................19
Adding Web Resource Authentication........................................................................................................ 20Domain Object Authorization...................................................................................................................... 20Reapplying the Default Access Control Lists..............................................................................................21Configuring SQL Filters for Dashboards.....................................................................................................22Assigning Data Source Permissions for the Pentaho User Console.......................................................... 23
Securing the Pentaho Enterprise Console and BI Server........................................................24Configuring SSL (HTTPS) in the Pentaho Enterprise Console and BI Server............................................24
Enabling SSL in the BI Server With a Certificate Authority..............................................................24Enabling SSL in the BI Server With a Self-Signed Certificate......................................................... 24Changing the BI Server Base URL.................................................................................................. 25Enabling SSL in the Pentaho Enterprise Console........................................................................... 25
Changing Default Enterprise Console Security Settings............................................................................ 26Changing the Admin Credentials for the Pentaho Enterprise Console............................................ 28Creating a Custom Login Module.................................................................................................... 28
Using the Apache Web Server (httpd) For Socket Handling...................................................................... 29httpd Configuration With Tomcat..................................................................................................... 29
Metadata Security....................................................................................................................32Configuring the Security Service................................................................................................................ 32Adding Column-Level Security Constraints................................................................................................ 32Adding Global Row-Level Security Constraints.......................................................................................... 33
MQL Formula Syntax For Global Constraints.................................................................................. 33Adding User or Role Row-Level Security Constraints................................................................................ 34
MQL Formula Syntax For User and Role Row-Level Constraints................................................... 35Restricting Metadata Models to Specific Client Tools.................................................................................35
Using Security Information In Action Sequences.....................................................................37Mondrian Role Mapping in the BI Server.................................................................................38

4 | | TOC
The Mondrian-One-To-One-UserRoleMapper............................................................................................38The Mondrian-SampleLookupMap-UserRoleMapper................................................................................. 38The Mondrian-SampleUserSession-UserRoleMapper............................................................................... 38
Removing Security...................................................................................................................39Switching the Metadata Domain Repository...............................................................................................40Switching to a File-Based Solution Repository........................................................................................... 40
Troubleshooting.......................................................................................................................42Increasing Security Log Levels in the BI Platform...................................................................................... 42
Enabling Extra LDAP Security Logging........................................................................................... 43Log Output Analysis....................................................................................................................................44Miscellaneous Troubleshooting Tips.......................................................................................................... 45
Pentaho BI Suite Official Documentation | Configuring Security | 5
Configuring Security
This guide helps system administrators configure the Pentaho BI Platform to work with their existing security systems.
The Pentaho BI Platform supports common user authentication and access/authorization technologies. All Pentahoadministrators will have to establish users and roles that match their organizational hierarchy, but few will need tochange the method of user authentication.
To fully grasp the concepts and tasks involved in configuring security, you should be aware of a few technical terms:
• Authentication: The process of confirming that the user requesting access is the user that they claim to be. This isoften done by presenting a user identifier (a username) paired with a secret known only to that user (a password),but can sometimes involve certificates or other means of establishing identity. In this documentation, authenticationis synonymous with login.
• Authorization: The process of deciding if the authenticated user is allowed to access the information or functionalityhe is requesting. A software system can protect itself at multiple levels. In the Pentaho BI Platform, pages in theWeb-based user interface can be protected. In addition, objects within the Pentaho solution repository, such asfolders and action sequences, can be protected using access control lists (ACLs).
• Security backend: A repository of usernames, passwords, and roles. The repository can be a flat file, an RDBMSaccessed via JDBC, or a directory server accessed via JNDI.
• Security data access object (DAO): A method of accessing the security backend. Examples of a security dataaccess object are JDBC, Pentaho (Hibernate-based), and LDAP. (Both JDBC and Pentaho security data accessobjects talk to an RDMBS security backend, although they go about it in slightly different ways.)
Refer only to the sections below that apply to your situation.
Supported TechnologiesThe Pentaho BI Platform uses the Spring Security infrastructure, which can work with several common securitybackends:
• Flat file• Active Directory, LDAP, or other directory server• RDBMS (security tables in an existing database)
Pentaho's default security backend is an RDBMS, and its Hibernate-based security data access object is referred toas Pentaho. The security tables and access control lists are installed by default with the BI Platform, and can be easilyconfigured through the Pentaho Enterprise Console's graphical user interface. This is a tested, reasonably securemethod of managing resource authorization and user authentication, so there should be no reason to change to anothersecurity backend unless you've already deployed one.
Note: Switching to a non-default security backend means that you will have to hand-edit some BI Platformconfiguration files in order to change the security data access object. It also means that you will be unable to usethe Pentaho Enterprise Console to manage users and roles.
6 | Pentaho BI Suite Official Documentation | Security Implementation Checklist
Security Implementation Checklist
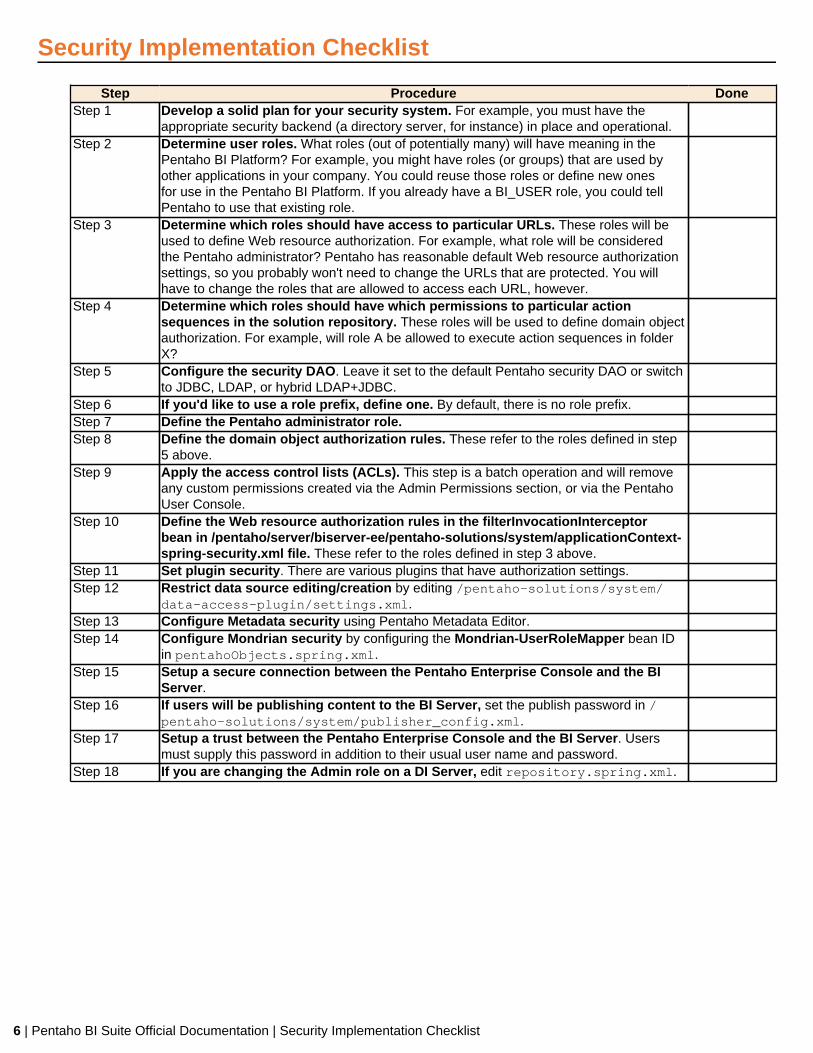
Step Procedure DoneStep 1 Develop a solid plan for your security system. For example, you must have the
appropriate security backend (a directory server, for instance) in place and operational.
Step 2 Determine user roles. What roles (out of potentially many) will have meaning in thePentaho BI Platform? For example, you might have roles (or groups) that are used byother applications in your company. You could reuse those roles or define new onesfor use in the Pentaho BI Platform. If you already have a BI_USER role, you could tellPentaho to use that existing role.
Step 3 Determine which roles should have access to particular URLs. These roles will beused to define Web resource authorization. For example, what role will be consideredthe Pentaho administrator? Pentaho has reasonable default Web resource authorizationsettings, so you probably won't need to change the URLs that are protected. You willhave to change the roles that are allowed to access each URL, however.
Step 4 Determine which roles should have which permissions to particular actionsequences in the solution repository. These roles will be used to define domain objectauthorization. For example, will role A be allowed to execute action sequences in folderX?
Step 5 Configure the security DAO. Leave it set to the default Pentaho security DAO or switchto JDBC, LDAP, or hybrid LDAP+JDBC.
Step 6 If you'd like to use a role prefix, define one. By default, there is no role prefix. Step 7 Define the Pentaho administrator role. Step 8 Define the domain object authorization rules. These refer to the roles defined in step
5 above.
Step 9 Apply the access control lists (ACLs). This step is a batch operation and will removeany custom permissions created via the Admin Permissions section, or via the PentahoUser Console.
Step 10 Define the Web resource authorization rules in the filterInvocationInterceptorbean in /pentaho/server/biserver-ee/pentaho-solutions/system/applicationContext-spring-security.xml file. These refer to the roles defined in step 3 above.
Step 11 Set plugin security. There are various plugins that have authorization settings. Step 12 Restrict data source editing/creation by editing /pentaho-solutions/system/
data-access-plugin/settings.xml.
Step 13 Configure Metadata security using Pentaho Metadata Editor. Step 14 Configure Mondrian security by configuring the Mondrian-UserRoleMapper bean ID
in pentahoObjects.spring.xml.
Step 15 Setup a secure connection between the Pentaho Enterprise Console and the BIServer.
Step 16 If users will be publishing content to the BI Server, set the publish password in /pentaho-solutions/system/publisher_config.xml.
Step 17 Setup a trust between the Pentaho Enterprise Console and the BI Server. Usersmust supply this password in addition to their usual user name and password.
Step 18 If you are changing the Admin role on a DI Server, edit repository.spring.xml.

Pentaho BI Suite Official Documentation | Authentication | 7
Authentication
By default, the BI Platform establishes roles, users, and initializes a basic configuration for the built-in Pentaho securitydata access object. You will almost certainly want to customize the roles and delete or modify the default users and addyour own; at most, you will want to use your own LDAP, JDBC, or CAS (single sign-on) authentication mechanism withthe BI Platform. This section explains these tasks in detail.
Note: Before you proceed with any instructions in this section, you should ensure that your BI Platform instanceis working on a basic level. This initial verification will make it easier for you to retrace your steps later if youend up with a non-working configuration. You should also back up your BI Suite or BI Server directory (if youinstalled via the graphical installation utility, or unpacked pre-configured archive packages), or your PentahoWAR, and your pentaho-solutions, and enterprise-console directories (if you built the Pentaho WAR andperformed a manual deployment to an existing application server).
Pentaho (Default)The Pentaho security data access object is a custom Hibernate-based user/password DAO that reads and writesusernames, passwords, and roles to a relational database via Hibernate object-relational mapping.
You do not have to do anything to initialize the Pentaho data access object; it is enabled by default. However, you willalmost certainly need to establish roles and users to match your organizational structure. Instructions for creating andmodifying roles and users are in the Authorization subsection below.
Switching to LDAPYou must have a working directory server before continuing.
Follow the below instructions to switch from the Pentaho data access object to LDAP.
1. Log onto the Pentaho Enterprise Console.
2. Configure the Pentaho LDAP connection by following the directions in the LDAP Configuration in the PentahoEnterprise Console Utilities section.
3. Go to Configuration > Web Settings.
4. Under Authentication select LDAP Based from the drop-down list and click Submit.The BI Platform should restart automatically.
The BI Platform is now configured to authenticate users against your directory server.
Microsoft Active Directory Configuration
The Pentaho BI Platform does not recognize any difference among LDAP-based directory servers, including ActiveDirectory. However, the way that you modify certain LDAP-specific files will probably be different for Microsoft ActiveDirectory (MSAD) than for more traditional LDAP implementations. Below are some tips for specific MSAD-specificconfigurations that you might find helpful.
Note: The information in this section also applies to configuring Active Directory for Pentaho Data Integration.
Binding
MSAD allows you to uniquely specify users in two ways, in addition to the standard DN. If you're not having luck withthe standard DN, try one of the two below. Each of the following examples is shown in the context of the userDnproperty of the Spring Security DefaultSpringSecurityContextSource bean.
Note: The examples in this section use DefaultSpringSecurityContextSource. Be aware that you may needto use the same notation (Kerberos or Windows domain) in all of your DN patterns.
Kerberos notation example for [email protected]:

8 | Pentaho BI Suite Official Documentation | Authentication
File: applicationContext-security-ldap.properties
contextSource.providerUrl=ldap\://mycompany\:389contextSource.userDn=pentahoadmin@mycompany.comcontextSource.password=omitted
Windows domain notation example for MYCOMPANY\pentahoadmin:
File: applicationContext-security-ldap.properties
contextSource.providerUrl=ldap\://mycompany\:389contextSource.userDn=MYCOMPANY\pentahoadmincontextSource.password=omitted
Referrals
If more than one Active Directory instance is serving directory information, it may be necessary to enable referralfollowing. This is accomplished by modifying the DefaultSpringSecurityContextSource bean.
<bean id="contextSource" class="org.springframework.security.ldap.DefaultSpringSecurityContextSource"> <constructor-arg value="${contextSource.providerUrl}"/> <property name="userDn" value="${contextSource.userDn}"/> <property name="password" value="${contextSource.password}"/> <property name="referral" value="follow" /></bean>
User DN Patterns vs. User Searches
In the LdapAuthenticator implementations provided by Spring Security (BindAuthenticator for instance), you musteither specify a userDnPatterns, or a userSearch, or both. If you're using the Kerberos or Windows domain notation,you should use userDnPatterns exclusively in your LdapAuthenticator.
Note: The reason for suggesting userDnPatterns when using Kerberos or Windows domain notation is thatthe LdapUserSearch implementations do not give the control over the DN that userDnPatterns does. (TheLdapUserSearch implementations try to derive the DN in the standard format, which might not work in ActiveDirectory.)
Note, however, that LdapUserDetailsService requires an LdapUserSearch for its constructor.
User DN Pattern example:
<bean id="authenticator"class="org.springframework.security.providers.ldap.authenticator.BindAuthenticator"><constructor-arg> <ref local="contextSource"/> </constructor-arg> <propertyname="userDnPatterns"> <list> <value>{0}@mycompany.com </value> <!-- and/or --> <value>domain\{0}</value> </list> </property> </bean>
In user searches, the sAMAccountName attribute should be used as the username. The searchSubtree property(which influences the SearchControls) should most likely be true. Otherwise, it searches the specified base plus onelevel down.
User Search example:
<bean id="userSearch"class="org.springframework.security.ldap.search.FilterBasedLdapUserSearch"> <constructor-arg index="0" value="DC=mycompany,DC=com" /> <constructor-arg index="1"> <value>(sAMAccountName={0})</value> </constructor-arg> <constructor-arg index="2"> <ref local="contextSource" /> </constructor-arg> <property name="searchSubtree" value="true"/>

Pentaho BI Suite Official Documentation | Authentication | 9
</bean>
LDAP Configuration in the Pentaho Enterprise Console
The Pentaho Enterprise Console has an LDAP section in the Utilities category. The fields in this screen should berelatively intuitive, but are explained below in more detail in case there are options that you are not familiar with.
You can view property values and operate on them; specific operations are exposed that allow you execute a "dry run"of a proposed security configuration. For each of the four property groups, there are two operations provided: test andsave. Test allows you to test the property values in a property group without saving them. Save writes the propertyvalues in a property group to permanent storage.
Test and Save Operations
Testing does not rely on the BI Server; however, even though test operations do not test "live" objects, the testenvironment mimics the runtime environment as closely as possible. While save operations write property values topermanent storage, those property values are not visible to a running BI Server, so you must restart it after each save.
A successful test operation should produce a small dialogue with the query results in it:
Directory Connection
Property Name Description Example ValueUser DN Distinguished name of user with read
access to directoryuid=admin,ou=system
Password User password secretProvider URL URL used to connect to directory ldap://localhost: 10389/ou=system
User Search
Property Name Description Example ValueSearch Base Base for user (by user name) searches ou=usersSearch Filter Filter for user (by user name)
searches; the token {0} is replaced withthe user name given at logon
(cn={0})

10 | Pentaho BI Suite Official Documentation | Authentication
Authorities Search
Property Name Description Example ValueRole Attribute The name of the attribute whose value
is used as the role name.cn
Roles Search Base Base for roles (all roles) search. ou=rolesRoles Search Filter Filter for roles (all roles) search. (objectClass= organizationalRole)
Populator
Property Name Description Example ValueConvert to Upper Case Yes indicates that any retrieved role
names are converted to uppercase; Noindicates no conversion
No
Group Role Attribute The name of the attribute whose valueis used as the role name
cn
Group Search Base Base for roles granted to a user (byuser DN or user name) searches.
ou=roles
Group Search Filter Filter for roles granted to a user (byuser DN or user name) searches. Thetoken {0} is replaced with the user DNfound during user search and the token{1} is replaced with the user namegiven at logon
(roleOccupant={0})
Role Prefix A prefix to concatenate to thebeginning of the role name found in thegroup role attribute; the value can bean empty string.
n/a
Search Subtree Yes indicates that the search mustinclude the current object and allchildren; No indicates that the searchmust include the current object only.
No
Configuring LDAP for the Pentaho Data Integration Server
You must have a working directory server before continuing.
Follow the instructions below if you are using LDAP security for Pentaho Data Integration.
Note: Important! LDAP-related configuration options in the Pentaho Enterprise Console are strictly for BIserver support and cannot be used to manage LDAP for the Pentaho Data Integration server.
1. Open the file, pentaho-spring-beans.xml, located at /pentaho/server/data-integration-server/pentaho-solutions/system/.
2. Locate the following lines:
<import resource="applicationContext-spring-security-hibernate.xml" /><import resource="applicationContext-pentaho-security-hibernate.xml" />
3. Edit the lines are follows:
<import resource="applicationContext-spring-security-ldap.xml" /><import resource="applicationContext-pentaho-security-ldap.xml" />
4. Save the file.
5. Restart the Data Integration server.
You are now running the Pentaho Data Integration server in LDAP mode..
Setting LDAP Property Values for the Pentaho Data Integration Server
Follow the instructions below to set LDAP-related property values for Pentaho Data Integration.
Note: Important! LDAP-related property value settings in the Pentaho Enterprise Console are strictly for BIserver support and cannot be used to manage LDAP for the Pentaho Data Integration server.

Pentaho BI Suite Official Documentation | Authentication | 11
1. Open the file, applicationContext-security-ldap.properties, located at ...\data-integration-server\pentaho-solutions\system.
2. Edit the file as needed. The property tables below provide you with sample values.
Directory Connection
Property Name Description Example ValuecontextSource.userDn Distinguished name of user with read
access to directoryuid=admin,ou=system
contextSource. password User password secretcontextSource. providerUrl URL used to connect to directory ldap://localhost: 10389/ou=system
User Search
Property Name Description Example ValueuserSearch. searchBase Base for user (by user name)
searchesou=users
userSearch. searchFilter Filter for user (by user name)searches; the token {0} is replacedwith the user name given at logon
(cn={0})
Authorities Search
Property Name Description Example ValueallAuthoritiesSearch. roleAttribute The name of the attribute whose
value is used as the role name.cn
allAuthoritiesSearch. searchBase Base for roles (all roles) search. ou=rolesallAuthoritiesSearch. searchFilter Filter for roles (all roles) search. (objectClass= organizationalRole)
Populator
Property Name Description Example Valuepopulator.convertTo UpperCase True indicates that any retrieved role
names are converted to uppercase;False indicates no conversion
False
populator.groupRole Attribute The name of the attribute whosevalue is used as the role name
cn
populator.group Search Base Base for roles granted to a user (byuser DN or user name) searches.
ou=roles
populator.group Search Filter Filter for roles granted to a user (byuser DN or user name) searches. Thetoken {0} is replaced with the userDN found during user search and thetoken {1} is replaced with the username given at logon
(roleOccupant={0})
populator.rolePrefix A prefix to concatenate to thebeginning of the role name found inthe group role attribute; the value canbe an empty string.
n/a
populator.search Subtree True indicates that the search mustinclude the current object and allchildren; False indicates that thesearch must include the current objectonly.
False
3. Save the file.
4. Restart the Data Integration server.
Switching to JDBCYou must have existing security tables in a relational database in order to proceed with this task.
12 | Pentaho BI Suite Official Documentation | Authentication
Follow the below process to switch from the Pentaho data access object to the JDBC DAO that will allow you to useyour own security tables.
Note: If you choose to switch to a JDBC security data access object, you will no longer be able to use the roleand user administration settings in the Pentaho Enterprise Console.
1. Stop the BI Platform server by running the stop-pentaho script.
2. Open the /pentaho-solutions/system/pentaho-spring-beans.xml file with a text editor.
3. Find the following two adjacent lines, and change the hibernate to JDBC in each:
<import resource="applicationContext-spring-security-jdbc.xml" /><import resource="applicationContext-pentaho-security-jdbc.xml" />
4. Save the file and close the editor.
5. Open both of the above-mentioned files and verify that the SQL statements are the correct syntax for your database,and that they reference the correct tables, roles, and actions.
6. Start the BI Platform server by running the start-pentaho script.
The BI Platform is now configured to authenticate users against the specified database.
Implementing Single Sign-OnThis section contains instructions for configuring the BI Server to work with a single sign-on (SSO) framework. At thistime, only Central Authentication Service (CAS) and Integrated Windows Authentication (IWA) are supported. Referonly to the instructions below that apply to the framework you are using.
Switching to Central Authentication Service (CAS)
Pentaho can integrate with Central Authentication Service (CAS). Pentaho only supports CAS integration from a manualbuild and deployment of a Pentaho WAR or EAR file. If you did not perform a manual deployment of the PentahoWAR or EAR, or if you deleted your biserver-manual-ee directory, you must retrieve the biserver-manual-eepackage from the Pentaho Subscription FTP site or the Pentaho Knowledge Base. You must have a CAS serverinstalled and running before you continue. You will also need Apache Ant installed on your system in order to executethe single sign-on script.
Follow the directions below to add single sign-on support (using CAS) to the BI Platform.
Important: This process is irreversible, so you should back up your Pentaho WAR or EAR and the pentaho-solutions directory before continuing.
1. After the Pentaho WAR or EAR has been built and deployed, navigate to the /biserver-manual-ee/ build-resources/pentaho-sso/ directory.
2. If your BI Platform or Pentaho Enterprise Console servers are currently running, stop them with the stop-pentahoand stop-pec scripts, respectively.
3. Edit the sso-replacements.properties file and change the default options to match your CAS configuration.
Refer to the CAS properties reference below if you have any trouble figuring out what each propery does.
4. Use Ant to run the sso-replacements script with the sso-pentaho switch, as in the following example:
ant -f sso-replacements.xml sso-pentaho
5. Start the BI Platform and Pentaho Enterprise Console servers with the start-pentaho and start-pec scripts,respectively.
The BI Platform is now configured to authenticate users against your central authentication server.
CAS Property Reference
CAS Properties
These properties mostly refer to CAS services:

Pentaho BI Suite Official Documentation | Authentication | 13
Property Description Examplecas.authn.provider Required. Security back-end that CAS
should use. Valid values are memory,jdbc, or ldap
ldap
cas.login.url Required. CAS login URL. ${cas.base.url}/logincas.ticket.validator.url Required. CAS ticket validator URL. ${cas.base.url}cas.logout.url Required. CAS logout URL. A
service.logout.url will be appended tothis URL.
${cas.base.url}/logout?url=
cas.base.url URL under which all CAS servicesreside.
https://localhost:8443/cas
Pentaho Properties
These are service URLs that serve as callbacks from the CAS server into the BI Platform:
Property Description Examplepentaho.service.url Required. Processes CAS callback. ${_pentaho.service.base.url}/
j_spring_cas_security_checkpentaho.service.logout.url Required. URL to go to after CAS
logout.${_pentaho.service.base.url}/Home
pentaho.service.solutions.system.dir Path to pentaho-solutions/system. /usr/local/pentaho/server/biserver-ee/pentaho-solutions/system/
pentaho.service.lib.dir Path to webapp lib directory. /usr/local/tomcat/common/lib/pentaho.service.web.xml Path (including filename) of webapp's
web.xml./usr/local/tomcat/conf/web.xml
pentaho.service.appctx.cas.xml Path (including filename) of newapplicationContext-spring-security-cas.xml.
/usr/local/pentaho/server/biserver-ee/pentaho-solutions/system/applicationContext-spring-security-cas.xml
pentaho.service.jsp.dir Path to directory containing webapp'sJSPs.
/usr/local/tomcat/webapps/pentaho/jsp/
pentaho.service.spring.beans.xml Path (including filename) of pentaho-spring-beans.xml.
/usr/local/pentaho/server/biserver-ee/pentaho-solutions/system/pentaho-sping-beans.xml
pentaho.service.base.url Service base URL. http://localhost:8080/pentahopentaho.service.pentaho.war.dir Webapp exploded WAR directory. /usr/local/tomcat/webapps/pentaho/pentaho.service.webinf.dir Path to webapp's WEB-INF directory. /usr/local/tomcat/webapps/pentaho/
WEB-INF/
Switching to Integrated Windows Authentication (IWA)
You must contact Pentaho support and receive a patch JAR before this procedure will work. This procedurerequires Microsoft Windows Server 2008 R2, IIS 7.5, and Internet Explorer 8. If you are using different versions of anyof this software, you will have to figure out how to adjust the instructions on your own.
Additionally, you will need to ensure that the following components of IIS are installed before continuing:
• Windows Authentication• ISAPI Extensions• ISAPI Filters• JK 1.2 Connector (isapi_redirect.dll)
Follow the directions below to switch to Integrated Windows Authentication in the BI Server.
1. Stop the BI Server, DI Server, and Pentaho Enterprise Console processes.
2. In the IIS configuration, disable anonymous authentication and enable Windows authentication for the site you areserving.
3. Edit the /WEB-INF/web.xml file inside of the deployed Pentaho WAR, and change the value of fully-qualified-server-url to the URL served by IIS, then save and close the file.
14 | Pentaho BI Suite Official Documentation | Authentication
4. Edit the /tomcat/conf/server.xml file and set tomcatAuthentication to false in the Connector element.
tomcatAuthentication="false"
5. Change the filterChainProxy filters to this:
httpSessionContextIntegrationFilter,httpSessionReuseDetectionFilter,logoutFilter,preAuthenticatedProcessingFilter,authenticationProcessingFilter,basicProcessingFilter,requestParameterProcessingFilter,anonymousProcessingFilter,securityContextHolderAwareRequestFilter,pentahoSecurityStartupFilter,exceptionTranslationFilter,filterInvocationInterceptor
6. Add the following two bean definitions:
<bean id="preAuthenticatedProcessingFilter" class="org.pentaho.platform.web.http.security.UsernameSubstringPreAuthenticatedProcessingFilter"> <property name="authenticationManager"> <ref local="authenticationManager" /> </property> <property name="regex" value=".+\\(.+)" /></bean><bean id="preAuthAuthenticationProvider" class=org.springframework.security.providers.preauth.PreAuthenticatedAuthenticationProvider"> <property name="preAuthenticatedUserDetailsService"> <bean id="userDetailsServiceWrapper" class="org.springframework.security.userdetails.UserDetailsByNameServiceWrapper"> <property name="userDetailsService" ref="userDetailsService"/> </bean> </property></bean>
7. Find the authenticationManager providers list and add this line to the beginning of it:
<ref bean="preAuthAuthenticationProvider" />
8. Replace the authenticationProcessingFilterEntryPoint bean definition with the following:
<bean id="preAuthenticatedProcessingFilterEntryPoint" class="org.springframework.security.ui.preauth.PreAuthenticatedProcessingFilterEntryPoint" />
9. Find the exceptionTranslationFilter bean and replace its authenticationEntryPoint ref with:
<ref local="preAuthenticatedProcessingFilterEntryPoint" />
10.Ensure that you have configured Active Directory integration properly. Refer to your Active Directory documentationand Microsoft Active Directory Configuration on page 7 for more information.
11.Save and close the server.xml file.
12.Configure Internet Explorer such that your IIS server is in the local intranet security zone.
13.Start the BI Server.
14.Access the BI Server through Internet Explorer and ensure that it automatically logs in with the local user account.
Your system should now be configured to sign into the BI Server using local user account credentials.
Assigning Permissions in the Pentaho User ConsoleFollow the instructions below to set user role or user account permissions for controlling reports, schedules,subscriptions, and any other content accessible through the Pentaho User Console:
1. In the upper left pane, navigate to the location of the content you want to set permissions on. It should appear in thelower left list when you've selected the proper directory.
2. In the lower left pane, right-click the item, then click Properties in the popup menu.
A Properties window appears.
3. In the Properties window, click the Advanced tab.
4. Click Add... to add a user account or role.
A new Select User or Role window appears.

Pentaho BI Suite Official Documentation | Authentication | 15
5. In the Select User or Role window, click on the user or role you want to set permissions for, then click OK
6. In the Users and Roles list, click the user or role you want to set permissions for, then click the checkboxes in thePermissions list that you want to adjust.
7. Repeat the above steps as necessary for other users or roles. When you're finished, click OK
The permissions actions you just performed will take effect the next time the specified users log into the Pentaho UserConsole. See also Domain Object Authorization.
Permissions Settings
Permission EffectAll Permissions Assigns all permissions (explained
below) to the specified user or roleCreate Allows a user or role to create reports,
analysis views, and dashboardsUpdate Allows a user or role to modify an
existing report, analysis view, ordashboard
Execute Allows a user or role to execute or runany content in the solution repository(reports, analysis views, dashboards,but may also include links or otherexecutable content)
Delete Allows a user or role to delete contentfrom the solution repository
Grant Permission Allows a user or role to share contentwith other Pentaho User Consoleusers; essentially, this enables theShare tab in the Properties dialogue asshown in the screen shot below
Schedule If a user or role has been given accessto scheduling functions through thePentaho Enterprise Console, then thissetting in the Pentaho User Consolewill enable that user or role to arrangefor reports or analysis views to beexecuted at given intervals
Inheritance
When assigned to a directory, all of the properties listed above will apply to files contained in that directory, includingany subdirectories.

16 | Pentaho BI Suite Official Documentation | Authorization
Authorization
The BI Platform regulates user- and role-level access to two types of resources: Web Resources and Domain Objects.Web Resources are URLs accessible from the Pentaho User Console; Domain Objects refer to files in the solutionrepository that make up your BI artifacts (reports, analysis views, dashboards, etc.). This section explains how to modifythese access controls according to your preferences.
Managing Users in the Pentaho Enterprise ConsoleIf you are using the Pentaho security data access object, you can use the Pentaho Enterprise Console to manageusers and roles. The subsections below explain how to add, edit, assign, and delete users and roles. Fine-grainedpermissions are set on file or directory level in the Pentaho User Console.
Adding Users
You must be logged into the Pentaho Enterprise Console as an administrator user.
To add users in the Pentaho Enterprise Console, follow the directions below.
1. In the Pentaho Enterprise Console, go to the Administration section, then click the Users & Roles tab.
2. Click the Users icon to switch to Users mode.
3. Click the plus sign (+) next to Users.The Add Users dialog box appears.
4. In the Add Users dialog box, enter the new user's User Name, Password, Password Confirmation (the samepassword typed in a second time), and Description.
5. Click OK
The specified user account is active, and will appear in the user list.
Editing User Information
You must be logged into the Pentaho Enterprise Console as an administrator user.
To edit a user account in the Pentaho Enterprise Console, follow the directions below.
1. In the Pentaho Enterprise Console go to the Administration section, then click the Users & Roles tab.
2. Select the user whose information you want to edit.
Note: The user list Filter allows you to find specific users in the list. To find a user, type in the first few lettersof the user's name in the text box, and a list of names matching your entry appears.
3. In the Details pane, edit the user details as needed.
4. Click Update.
The changes to the specified user account are immediately applied.
Deleting Users
You must be logged into the Pentaho Enterprise Console as an administrator user.
To delete in the Pentaho Enterprise Console, follow the directions below.
1. In the Pentaho Enterprise Console, go to the Administration section, then click on the Users & Roles tab.
2. Select the user or users you want to delete from the Users list.
Note: The user list Filter allows you to find specific users in the list. To find a user, type in the first few lettersof the user's name in the text box, and a list of names matching your entry appears.
3. Click (Remove) next to Users.The Delete Users confirmation dialog box appears.
4. Click OK to delete the user(s) and refresh the user list

Pentaho BI Suite Official Documentation | Authorization | 17
The specified user accounts are now deleted.
Adding Roles
You must be logged into the Pentaho Enterprise Console as an administrator user.
To add roles in the Pentaho Enterprise Console, follow the directions below.
1. In the Pentaho Enterprise Console, go to the Administration section, then click the Users & Roles tab.
2. Click the Roles icon to switch to Roles mode.
3. Click the plus sign (+) next to Roles.The Add Role dialog box appears.
4. In the Add Role dialog box, enter the Role Name and Description.
5. Click OKThe new role name appears in the list of roles.
The specified role has been created and is ready to be associated with user accounts.
Editing Roles
You must be logged into the Pentaho Enterprise Console as an administrator user.
To edit roles in the Pentaho Enterprise Console, follow the directions below.
1. In the Pentaho Enterprise Console, go to the Administration section, then click the Users & Roles tab.
2. Select the role you want to edit.
Note: The user list Filter allows you to find specific users in the list. To find a user, type in the first few lettersof the user's name in the text box, and a list of names matching your entry appears.
3. In the right pane of the Roles page, edit the role Description as needed.
4. Click Update.
The changes have been applied to the specified role, and will be applied to each user in the group upon their next login.
Deleting Roles
You must be logged into the Pentaho Enterprise Console as an administrator user.
To delete roles in the Pentaho Enterprise Console, follow the directions below.
1. In the Pentaho Enterprise Console, go to the Administration section, then click the Users & Roles tab.
2. Click the Roles icon if you are not in Roles mode.
3. Select the role or roles you want to delete from the Users list.
Note: The user list Filter allows you to find specific users in the list. To find a user, type in the first few lettersof the user's name in the text box, and a list of names matching your entry appears.
4. Click (Remove) next to Roles.The Delete Roles confirmation dialog box appears.
5. Click OK to delete the role(s) and refresh the roles list.
The specified role has been deleted, and any user accounts that had been associated with it will no longer list this role.
Assigning Users to Roles
You must be logged into the Pentaho Enterprise Console as an administrator user.
To assign users to roles in the Pentaho Enterprise Console, follow the directions below.
1. In the Pentaho Enterprise Console, go to the Administration section, then click the Users & Roles tab.
2. Click the Roles icon to switch to Roles mode.
3. Under Roles, select the role that you want to add users to.
4. Click the plus sign (+) next to Assigned Users.

18 | Pentaho BI Suite Official Documentation | Authorization
The Assigned Users dialog box appears.
5. In the Assigned Users dialog box, click the arrows to move users in the list under Available to (and from) theAssigned list.
6. Click OKUsers that have been assigned roles appear in Assigned Users box.
The specified users are now applied to the specified roles. Alternatively, you can assign roles to users in Users modeusing a similar process to the one documented above.
How to Change the Administrator Role
The default administrator role in the BI Platform is Admin. If you need to give this privilege level to a different rolename, follow the instructions below.
Note: Role names are case sensitive, so take special care when typing in the new role name.
1. Open the /pentaho/server/biserver-ee/pentaho-solutions/system/pentaho.xml file with a texteditor.
2. Find the <acl-voter> element, and replace its <admin-role> property with the new administrator role (NewAdmin inthe examples in this procedure).
<admin-role>NewAdmin</admin-role>
3. Find the <acl-publisher> element, and appropriately replace all instances of Admin in the properties inside of the<default-acls> and <overrides> elements.
<acl-entry role="NewAdmin" acl="ADMIN_ALL" />
4. Save the file, then open applicationContext-spring-security.xml
5. Find the filterInvocationInterceptor bean, and modify its objectDefinitionSource property accordingly.
You may need to consult the Spring Security documentation to complete this step. The appropriate documentation isat http://static.springsource.org/spring-security/site/reference.html
<property name="objectDefinitionSource"> <value> <![CDATA[ CONVERT_URL_TO_LOWERCASE_BEFORE_COMPARISON ... \A/admin.*\Z=NewAdmin ... ]]> </value></property>
You have successfully changed the administrator role.
In order for this change to take effect, you will have to Reapplying the Default Access Control Lists on page 21. Thiswill also reset any administrator permissions you may have set in the Pentaho Enterprise Console.
Implementing Nested Roles in LDAP
It is possible to nest user roles such that one role includes all of the users of another role. Doing this external to the coreLDAP structure prevents recursive directory queries to find all parents of a given child role. Follow the directions belowto modify the BI Platform to support nested roles for LDAP and MSAD authentication types.
1. Stop the BI Platform server or service.
sh /usr/local/pentaho/server/biserver-ee/stop-pentaho.sh
2. Open the /pentaho/server/biserver-ee/pentaho-solutions/system/applicationContext-spring-security-ldap.xml file with a text editor.
3. In the populator bean definition, replace DefaultLdapAuthoritiesPopulator withNestedLdapAuthoritiesPopulator
<bean id="populator" class="org.pentaho.platform.plugin.services.security.userrole.ldap.NestedLdapAuthoritiesPopulator">
4. Save the file, then edit /pentaho/server/biserver-ee/pentaho-solutions/system/applicationContext-pentaho-security-ldap.xml.

Pentaho BI Suite Official Documentation | Authorization | 19
This and the next step are only necessary if the roles that serve as "parents" to nested roles cannot be returned by atraditional all authorities search.
5. Add an extraRoles bean to the list of transformers in the ChainedTransformers bean, and set properties for eachparent role (represented by example_role below).
<bean id="allAuthoritiesSearch" class="org.pentaho.platform.plugin.services.security.userrole.ldap.search.GenericLdapSearch"> <!-- omitted --> <constructor-arg index="2"> <bean class="org.apache.commons.collections.functors.ChainedTransformer"> <constructor-arg index="0"> <list> <bean class="org.pentaho.platform.plugin.services.security.userrole.ldap.transform.SearchResultToAttrValueList"> <!-- omitted --> </bean> <bean class="org.pentaho.platform.plugin.services.security.userrole.ldap.transform.ExtraRoles"> <property name="extraRoles"> <set> <value>example_role</value> </set> </property> </bean> <bean class="org.pentaho.platform.plugin.services.security.userrole.ldap.transform.StringToGrantedAuthority"> <!-- omitted --> </bean> </list> </constructor-arg> </bean> </constructor-arg></bean>
6. Save the file, close your text editor, and start the BI Platform server or service.
sh /usr/local/pentaho/server/biserver-ee/start-pentaho.sh
The BI Platform can now efficiently handle nested roles with LDAP or Active Directory authentication.
Resetting or Creating a new Pentaho Enterprise Console User
The instructions in this section apply to the following situations: (a) You have forgotten the password for accessing thePentaho Enterprise Console, or, (b) You want to add a new user who will have access the Pentaho Enterprise Console.Follow the instructions below to address either scenario.
1. In Windows, (or Linux), open a command window and go to .\pentaho\server\enterprise-console.
2. Run the pec-passwd.bat file using the parameters below.
Windows pec-passwd.bat {username} {password}Linux pec-passwd.sh {username} {password}
This password utility takes a plain text password as input and returns obfuscated and encrypted versions of thepassword using various algorithms.
3. Replace {username} with the user name you want to create or change.
4. Replace {password} with the password you want to generate for the user name that was just created or changed
In the example below the user name is admin and the password that is being generated is password. Notice thatthe utility provides you with three different types of encrypted password options: OBF, MD5 and CRYPT. Use one ofthe options in the next step.

20 | Pentaho BI Suite Official Documentation | Authorization
5. Edit the .\pentaho\server\enterprise-console\resource\config\login.properties file using theinformation generated by the password encryption utility:
Below is a description of the line in the login.properties file ({username}: {Encryption Type}:{password},{role1}):
• {username}: the user name used in the password utility in Step 2• {Encryption Type}: the encryption type you are using for your password (OBF, MD5 or CRYPT}• {password}: the encrypted password that was generated using the utlity• {role}: the role you want the user to have; there is single role, admin, and all users must be granted the admin
role.
Adding Web Resource AuthenticationTo configure Web resource authentication in the BI Platform to correspond with your user roles, follow the belowinstructions.
Note: These instructions are valid across all security DAOs.
1. Ensure that the BI Platform is not currently running; if it is, run the stop-pentaho script.
2. Open a terminal or command prompt window and navigate to the .../pentaho-solutions/system/ directory.
3. Edit the applicationContext-spring-security.xml file with a text editor.
4. Find and examine the following property: <property name="objectDefinitionSource">
5. Modify the regex patterns to include your roles.
The objectDefinitionSource property associates URL patterns with roles. RoleVoter specifies that if any role onthe right hand side of the equals sign is granted to the user, the user may view any page that matches that URLpattern. The default roles in this file are not required; you can replace, delete, or change them in any way that suitsyou.
You should now have coarse-grained permissions established for user roles.
Domain Object AuthorizationDomain objects, which are defined in this context as any file in the Pentaho solution repository with a .url or .xactionextension, can be assigned fine-grained authorization through access control lists (ACLs). Each domain object has one(and only one) ACL, which is created automatically by functions in the Pentaho BI Platform, and may be modified on auser level through the Pentaho User Console.
To establish ACLs, you need to have either created roles and users in the Pentaho Enterprise Console, or successfullyconnected to your existing security backend. Once a role is established, you can set its permissions in the PentahoUser Console by right-clicking on any file or directory in the file browser, selecting Properties from the context menu,then working with the permissions interface, shown below:

Pentaho BI Suite Official Documentation | Authorization | 21
Note: Domain object authorization is only available for database-based solution repositories; file-based solutionrepositories (an uncommon situation among Pentaho BI Platform 2.x and 3.x deployments) cannot have thislevel of fine-grained authorization control.
Note: ACLs are stored in the PRO_ACL_FILES table in the solution database, and have no presence in thefilesystem. There is, however, a third type of domain object that does not store ACLs in that table -- a metadatamodel. Metadata models store access controls inline in the metadata model's XMI file. You can define other fileextensions to control with access lists by editing the <acl-files> entry in the /pentaho-solutions/system/pentaho.xml configuration file. See also, Assigning Permissions in the Pentaho User Console.
Reapplying the Default Access Control ListsA default ACL (labeled Default Permissions in the Pentaho Enterprise Console) is a single access control list (ACL)that is applied to all directories in a Pentaho solution repository at the first startup of the BI Server. (The default ACL iscopied to each directory — it is not shared among all directories.) After the default ACL has been applied (by startingthe server at least once), it can be managed in the Pentaho User Console.
As you examine the image below, notice that users in the dev role have execute and scheduling permissions but theycannot create, update, or delete data, nor can they grant permissions to other users. Roles are a way to reference agroup of users with a single name. For example, the Admin role represents all users who are administrators.

22 | Pentaho BI Suite Official Documentation | Authorization
The default ACL will likely not meet your needs, so you may choose to reapply a different default ACL to solutionrepository objects. To do this, follow the steps below but understand that these steps will remove any ACL managementthat has been applied in the Pentaho User Console (image on the right).
Follow the process below to reapply the default ACL in the Pentaho Enterprise Console.
1. Log into the Pentaho Enterprise Console.
2. Go to the Administration tab.
3. Click Services.
4. In the Solution Repository tab, click Restore.
The access control list will be reapplied with default values you specified.
Configuring SQL Filters for DashboardsThe Pentaho Dashboard Designer has an SQL filter that allows greater control over a database query. By default, thisfeature is restricted to administrative users. To change these settings, follow the instructions below:
1. Ensure that the BI server is not currently running; if it is, run the stop-pentaho script.
2. Open the /pentaho-solutions/system/dashboards/settings.xml file with a text editor.
3. Locate the following line and modify it accordingly:
<!-- roles with sql execute permissions --><sql-execute-roles>Admin,DBA</sql-execute-roles>
Note: Values are separated by commas, with no spaces between roles.
4. Locate the following line and modify it accordingly:
<!-- users with sql execute permissions --><sql-execute-users>Joe,Suzy</sql-execute-users>
Note: Values are separated by commas, with no spaces between user names.
5. Save and close the text editor.
6. Restart the BI server with the start-pentaho script.
The SQL filter function is now available in Dashboard Designer to the users and roles you specified.

Pentaho BI Suite Official Documentation | Authorization | 23
Assigning Data Source Permissions for the Pentaho User ConsoleBy default, authenticated users have view-only permissions to data sources in the Pentaho User Console. Users withadministrative permissions can create, delete, and view data sources. If you want to fine tune permissions associatedwith data sources, you must edit the appropriate settings.xml file. Follow the instructions below to edit the file.
1. Go to ...\biserver-ee\pentaho-solutions\system\data-access and open settings.xml.
2. Edit the settings.xml file as needed. The default values are shown in the sample below. You can assign permissionsby individual user or by user role. If you are using LDAP, you can define the correct ACLs value for viewpermissions; the default value is "31."
3. Save your changes to the settings.xml file.
4. Restart the Pentaho User Console.

24 | Pentaho BI Suite Official Documentation | Securing the Pentaho Enterprise Console and BI Server
Securing the Pentaho Enterprise Console and BI Server
This section contains instructions and guidance for enhancing the security of the BI Server and Pentaho Enterpriseconsole on an application server level via Secure Sockets Layer (SSL). SSL provides verification of server identity andencryption of data between clients and the BI Server and/or Pentaho Enterprise Console.
Configuring SSL (HTTPS) in the Pentaho Enterprise Console and BI ServerBy default, the BI Server and Pentaho Enterprise Console are configured to communicate over HTTP. To switch toHTTPS, follow the instructions below that apply to your scenario.
Enabling SSL in the BI Server With a Certificate Authority
If you already have an SSL certificate through a certificate authority such as Thawte or Verisign, all you have to do touse it with the Pentaho BI Server and Pentaho Enterprise Console is configure your application server to use it. Apacheprovides documentation for configuring Tomcat for CA-signed certificates: http://tomcat.apache.org/tomcat-6.0-doc/ssl-howto.html. Just follow those procedures, and skip the sections below that deal with self-signed SSL certificates.
After the application server is configured to use your certificate, you must modify the base URL tokens for both the BIServer and the Pentaho Enterprise Console. Make sure you follow the directions for changing the BI Server base URL;without executing those changes, your server will not work over HTTPS.
Enabling SSL in the BI Server With a Self-Signed Certificate
This process explains how to enable SSL in the BI Server with a self-signed certificate. These steps don't show howto generate a self-signed certificate, or how to configure Tomcat to use it. For more information on SSL certificates inTomcat, consult the Tomcat documentation, beginning with the Quick Start section.
Trusting a Self-Signed Certificate
The procedure below assumes that an SSL certificate is generated and Tomcat is configured to use it.
The instructions below explain how to complete the trust relationship between the BI Server (when it is configured forSSL) and the Pentaho Enterprise Console.
1. Change to the home directory of the user account that starts the BI Server and Pentaho Enterprise Consoleprocesses or services.
cd ~
Using the default settings suggested by Pentaho, this will be /home/pentaho/.
2. Execute the following command, changing the storepass (pass in the example) and keypass (pass2 in the example)accordingly:
keytool -export -alias tomcat -file tomcat.cer -storepass pass -keypass pass2 -keystore .keystore
3. Change to the $PENTAHO_JAVA_HOME/jre/lib/security/ directory.
cd $PENTAHO_JAVA_HOME/jre/lib/security/
The PENTAHO_JAVA_HOME variable was established during your production installation procedure. If youare on Windows, environment variables are surrounded by percent signs, as in: cd %PENTAHO_JAVA_HOME%\jre\lib\security\. If you get an error about this path not being valid, then use JAVA_HOME instead ofPENTAHO_JAVA_HOME.
4. Execute the following command, changing the alias (tomcat in the example), the file path to the certificate (thecurrent user's home directory in the example), and the storepass (pass in the example) accordingly:
keytool -import -alias tomcat -file ~/tomcat.cer -keystore cacerts -storepass pass
Note: If the path to your certificate involves spaces, you must either escape the spaces (on Linux, Unix, andOS X), or put double quotes around the path (on Windows) in order for the command to work properly.
5. Execute the following command and make note of the MD5 sum for the tomcat entry:
keytool -list -keystore cacerts

Pentaho BI Suite Official Documentation | Securing the Pentaho Enterprise Console and BI Server | 25
6. Change back to the home directory of the user account that starts the BI Server and Pentaho Enterprise Console,and run this command:
keytool -list -keystore .keystore
7. Compare the tomcat entry's MD5 sum to the one you generated previously and ensure that they match.
If these sums do not match, you've made a mistake someplace in the certificate trust process. Go through the stepsagain and ensure that you're working with the right user accounts and directories.
The BI Server is now configured to allow access via SSL.
If you'd like to also enable SSL in the Pentaho Enterprise Console, continue on to Enabling SSL in the PentahoEnterprise Console on page 25.
Changing the BI Server Base URL
If you switch from HTTP to HTTPS, you must also change the BI Server's tokenized base URL value to accommodatefor the new port number. Follow the directions below to change the base URL.
1. Stop the BI Server if it is currently running.
/etc/init.d/pentaho stop
2. Navigate to the WEB-INF directory inside of the pentaho.war.cd /home/pentaho/pentaho/server/biserver-ee/tomcat/webapps/pentaho/WEB-INF/
3. Edit the web.xml file.
vim ./web.xml
4. Locate the element and replace its value to match your new SSL-enabled port number.
<context-param> <param-name>base-url</param-name> <param-value>http://localhost:18443/pentaho/</param-value></context-param>
Modify the port number in the example to match your configuration.
5. Save and close the file.
6. Start the BI Server and ensure that it is available through HTTPS on the specified port.
/etc/init.d/pentaho start
The BI Server is now configured to communicate on an SSL-aware port.
Enabling SSL in the Pentaho Enterprise Console
The information in this section allows you to enable SSL mode in the Pentaho Enterprise Console.
Note: This procedure is optional. You can enable SSL in the BI Server alone, or the Pentaho EnterpriseConsole alone, or both of them together.
1. Open the /pentaho/server/enterprise-console-server/resource/config/console.propertiesfile.
# Management Server Enterprise Console's Jetty Server Settingsconsole.start.port.number=8088console.hostname=localhostconsole.stop.port.number=8033# SSL Section for Enterprise Consoleconsole.ssl.enabled=falseconsole.ssl.port.number=8143keyAlias=jettykeyPassword=changeitkeyStore=resource/config/keystorekeyStorePassword=changeittrustStore=resource/config/keystoretrustStorePassword=changeitwantClientAuth=falseneedClientAuth=false# Security Authentication Section for Enterprise Consoleconsole.security.enabled=trueconsole.security.roles.allowed=admin

26 | Pentaho BI Suite Official Documentation | Securing the Pentaho Enterprise Console and BI Server
console.security.roles.delimeter=,console.security.realm.name=EnterpriseEditionconsole.security.login.module.name=PropertiesFileLoginModuleconsole.security.auth.config.path=resource/config/login.conf
2. Set console.ssl.enabled to true.
3. Change the values of keystore and trustore appropriately.
4. Change all of the passwords from the example value of changeit to the appropriate values.
5. Change any other values to match your configuration.
The Pentaho Enterprise Console is configured to allow SSL connections.
Starting the Pentaho Enterprise Console using SSL
To start the console using SSL...
1. Make sure the server is up and running, then open a browser window and type: https://localhost:8143.If you are starting the Pentaho Enterprise Console in secure mode for the first time and you have a self-signedcertificate, an error message appears.
2. Click the link labeled Or you can add an exception...
3. Click Add Exception.
4. Click Get Certificate.
5. Click View if you want to see the details of the certificate.
6. Click Confirm Security Exception if you are satisfied with the details of the certificate.You are now using an SSL-enabled console.
Changing Default Enterprise Console Security SettingsThe information in this section is based on the Jetty 6.12 and JettyPlus 6.12 release because the Pentaho EnterpriseConsole uses an embedded Jetty server. Out of the box, the Pentaho Enterprise Console uses a properties based loginmodule but you can plug in any of the login modules listed below or write your own.
• org.mortbay.jetty.plus.jaas.spi.JDBCLoginModule• org.mortbay.jetty.plus.jaas.spi.PropertyFileLoginModule
An example of each module is described in the sections that follow but first you must understand the relationshipbetween password handling and LoginModules in the Pentaho Enterprise Console.
Passwords can be stored in clear text, obfuscated, or checksummed. The class, org.mortbay.util.Password, must beused to generate all varieties of passwords, the output from which can be cut and pasted into property files or enteredinto database tables.
Important: Before running org.mortbay.jetty.security.Password, you must change directory to enterprise-console. If you do not do a change directory the Jetty JARs will not be found.
> cd enterprise-console> java -cp lib/jetty.jar org.mortbay.jetty.security.PasswordUsage - java org.mortbay.util.Password [<user>] <password>> java -cp lib/jetty.jar org.mortbay.jetty.security.Password me youyouOBF:20771x1b206zMD5:639bae9ac6b3e1a84cebb7b403297b79CRYPT:me/ks90E221EY
JDBCLoginModule
The JDBCLoginModule stores user passwords and roles in a database that are accessed through JDBC calls. You canconfigure the JDBC connection information, as well as the names of the table and columns storing the user name andcredentials, and the name of the table and columns storing the roles.
Below is an example login module configuration file entry for an HSQLDB driver:
jdbc { org.mortbay.jetty.plus.jaas.spi.JDBCLoginModule required debug="true"

Pentaho BI Suite Official Documentation | Securing the Pentaho Enterprise Console and BI Server | 27
dbUrl="jdbc:hsqldb:." dbUserName="sa" dbDriver="org.hsqldb.jdbcDriver" userTable="myusers" userField="myuser" credentialField="mypassword" userRoleTable="myuserroles" userRoleUserField="myuser" userRoleRoleField="myrole"; };
There is no particular schema required for the database tables storing the authentication and role information. Theproperties userTable, userField, credentialField, userRoleTable, userRoleUserField, userRoleRoleField configure thenames of the tables and the columns within them that are used to format the following queries:
select <credentialField> from <userTable> where <userField> =? select <userRoleRoleField> from <userRoleTable> where <userRoleUserField> =?
Credential and role information is read from the database when a previously unauthenticated user requestsauthentication. Note that this information is only cached for the length of the authenticated session. When the user logsout or the session expires, the information is flushed from memory.
Note: Passwords can be stored in the database in plain text or encoded formats, using theorg.mortbay.jetty.security.Password class.
PropertyFileLoginModule
With this login module implementation, the authentication and role information is read from a property file:
props { org.mortbay.jetty.plus.jaas.spi.PropertyFileLoginModule required debug="true" file="/somewhere/somefile.props"; };
The file parameter is the location of a properties file of the same format as the etc/realm.properties example file asshown below:
<username>: <password>[<rolename> ...]
Below is an example:
admin: OBF:1xmk1w261u9r1w1c1xmq,user,adminsuperadmin: changeme,user,developermaster: MD5:164c88b302622e17050af52c89945d44,user: CRYPT:adpexzg3FUZAk,admin
The contents of the file are read and cached in memory the first time a user requests authentication.
Editing Security Settings
Security settings configuration are stored in the security section of console.properties file:
# Management Server Enterprise Console's Jetty Server Settingsconsole.start.port.number=8088console.hostname=localhostconsole.stop.port.number=8033 # SSL Section for Enterprise Consoleconsole.ssl.enabled=falseconsole.ssl.port.number=8143keyAlias=jettykeyPassword=changeitkeyStore=resource/config/keystorekeyStorePassword=changeittrustStore=resource/config/keystoretrustStorePassword=changeitwantClientAuth=falseneedClientAuth=false

28 | Pentaho BI Suite Official Documentation | Securing the Pentaho Enterprise Console and BI Server
# Security Authentication Section for Enterprise Consoleconsole.security.enabled=trueconsole.security.roles.allowed=adminconsole.security.roles.delimiter=,console.security.realm.name=EnterpriseEditionconsole.security.login.module.name=PropertiesFileLoginModuleconsole.security.auth.config.path=resource/config/login.conf
Security is enabled by default.
• To change the roles you want to allow the application to access you must provide your list of roles inconsole.security.roles.allowed property.
• Roles are comma separated by default; you can change that configuration by providing your delimiter inconsole.security.roles.delimiter property.
• The login module name must be provided for the property name, console.security.login.module.name. This is thename you gave your login module in the login.conf file.
• You must provide the location of your login.conf file in console.security.auth.config.path property.
Changing the Admin Credentials for the Pentaho Enterprise Console
The default user name and password for the Pentaho Enterprise Console are admin and password, respectively. Youmust change these credentials if you are deploying Pentaho in a production environment. Follow the instructions belowto change credentials.
Important: Before running org.mortbay.jetty.security.Password, you must change directory to enterprise-console. If you do not do a change directory the Jetty JARs will not be found.
1. Generate the password from the command line.
Note: You may need to change version numbers in the file names. The example below is for Linux:
$ cd enterprise-console$ java -cp lib/jetty-6.1.2rc1.jar:lib/jetty-util-6.1.2rc1.jar org.mortbay.jetty.security.Password username passwordpasswordOBF:1v2j1uum1xtv1zej1zer1xtn1uvk1v1vMD5:5f4dcc3b5aa765d61d8327deb882cf99CRYPT:usjRS48E8ZADM
For Windows use:
$ cd enterprise-console$ java -cp lib/jetty-6.1.2rc1.jar;lib/jetty-util-6.1.2rc1.jar org.mortbay.jetty.security.Password username password
2. Go to ...\enterprise-console\resource\config and open the login.properties file.
3. Edit the file using the following format:
<username>: OBF:<obfuscated_password>,<role1>,<role2>,<role3>,...
Creating a Custom Login Module
To create a custom login module you must be familiar with the following java classes, AbstractLoginModule.java andUserInfo.java, shown below:
package org.mortbay.jetty.plus.jaas.spi; public abstract class AbstractLoginModule implements LoginModule { ... public abstract UserInfo getUserInfo (String username) throws Exception; }
package org.mortbay.jetty.plus.jaas.spi; public class UserInfo { public UserInfo (String userName, Credential credential, List roleNames) { ... } public String getUserName() { ... } public List getRoleNames () { ... } public boolean checkCredential (Object suppliedCredential) { ... } }

Pentaho BI Suite Official Documentation | Securing the Pentaho Enterprise Console and BI Server | 29
The org.mortbay.jetty.plus.jaas.spi.AbstractLoginModule implements all of thejavax.security.auth.spi.LoginModule methods. All you must do is implement the getUserInfo method to returna org.mortbay.jetty.plus.jaas.UserInfo instance that encapsulates the user name, password and role names (as{{java.lang.String}}s) for a user.
Note: The AbstractLoginModule does not support caching. If you want to cache UserInfo (for example, asdoes the org.mortbay.jetty.plus.jaas.spi.PropertyFileLoginModule) you must provide it yourself.
Using the Apache Web Server (httpd) For Socket HandlingTomcat's socket handling abilities are not quite as robust as Apache httpd's are, especially when it comes to systemerror handling because Tomcat performs all its socket handling through the Java VM. Since Java is designed to becross-platform, it lacks some system-specific optimizations; socket optimization is one such deficiency. In situationswhere the BI Server is hit with a large number of dropped connections, invalid packets, or invalid requests from invalidIP addresses, httpd would do a much better job of dropping these error conditions than Tomcat would. Therefore, youcan improve BI Server security by fronting Tomcat with httpd.
A side-effect of this configuration is increased performance when delivering static content from the BI Server. For thisreason, the same procedure below is covered in the Pentaho Performance-Tuning Guide. If you have already followedthe Apache httpd procedure in that guide, there is no need to perform it again with the instructions below.
Using Apache httpd With SSL For Delivering Static Content
You can use the Apache httpd Web server to handle delivery of static content and facilitation of socket connections,neither of which is done efficiently through Tomcat alone, especially under heavy traffic or when accepting connectionsfrom the Internet.
1. Install Apache 2.2.x -- with SSL support -- through your operating system's preferred installation method. Formost people, this will be through a package manager. It's also perfectly valid to download and install the referenceimplementation from http://www.apache.org.
It is possible to use Apache 1.3, but you will have to modify the instructions on your own from this point onward.
2. If it has started as a consequence of installing, stop the Apache server or service.
3. Retrieve or create your SSL keys.
If you do not know how to generate self-signed certificates, refer to the OpenSSL documentation. Most productionenvironments have SSL certificates issued by a certificate authority such as Thawte or Verisign.
4. Check to see if you already have the Tomcat Connector installed on your system. You can generally accomplish thisby searching your filesystem for mod_jk, though you can also search your http.conf file for mod_jk. If it is present,then you only need to be concerned with the Apache httpd configuration details and can skip this step. If it is notthere, then the Tomcat Connector module needs to be installed. If you are using Linux or BSD, use your packagemanager or the Ports system to install mod_jk. For all other platforms, visit the http://www.apache.org/dist/tomcat/tomcat-connectors/jk/binaries/, then click on the directory for your operating system. The module will be either an.so (for Linux, BSD, OS X, and Solaris) or .dll (for Windows) file. Save it to your Apache modules directory, which isgenerally C:\Program Files\Apache Group\Apache2\modules\ on Windows, and /usr/lib/apache2/modules/ on Unix-like operating systems, though this can vary depending on your Apache configuration.
5. Edit your httpd.conf file with a text editor and add the following text to the end of the file, modifying the paths andfilenames as instructed in the comments:
Note: Some operating systems use modular httpd configuration files and have unique methods of includingeach separate piece into one central file. Ensure that you are not accidentally interfering with an auto-generated mod_jk configuration before you continue. In many cases, some of the configuration examplebelow will have to be cut out (such as the LoadModule statement). In some cases (such as with UbuntuLinux), httpd.conf may be completely empty, in which case you should still be able to add the below lines to it.Replace example.com with your hostname or domain name.
# Load mod_jk module# Update this path to match your mod_jk location; Windows users should change the .so to .dllLoadModule jk_module /usr/lib/apache/modules/mod_jk.so# Where to find workers.properties# Update this path to match your conf directory locationJkWorkersFile /etc/httpd/conf/workers.properties

30 | Pentaho BI Suite Official Documentation | Securing the Pentaho Enterprise Console and BI Server
# Should mod_jk send SSL information to Tomcat (default is On)JkExtractSSL On# What is the indicator for SSL (default is HTTPS)JkHTTPSIndicator HTTPS# What is the indicator for SSL session (default is SSL_SESSION_ID)JkSESSIONIndicator SSL_SESSION_ID# What is the indicator for client SSL cipher suit (default is SSL_CIPHER)JkCIPHERIndicator SSL_CIPHER# What is the indicator for the client SSL certificated (default is SSL_CLIENT_CERT)JkCERTSIndicator SSL_CLIENT_CERT# Where to put jk shared memory# Update this path to match your local state directory or logs directoryJkShmFile /var/log/httpd/mod_jk.shm# Where to put jk logs# Update this path to match your logs directory location (put mod_jk.log next to access_log)JkLogFile /var/log/httpd/mod_jk.log# Set the jk log level [debug/error/info]JkLogLevel info# Select the timestamp log formatJkLogStampFormat "[%a %b %d %H:%M:%S %Y] "# Send everything for context /examples to worker named worker1 (ajp13)# JkOptions indicates to send SSK KEY SIZEJkOptions +ForwardKeySize +ForwardURICompat -ForwardDirectories# JkRequestLogFormatJkRequestLogFormat "%w %V %T"# Mount your applicationsJkMount /pentaho/* tomcat_pentaho# Add shared memory.# This directive is present with 1.2.10 and# later versions of mod_jk, and is needed for# for load balancing to work properlyJkShmFile logs/jk.shm<VirtualHost example.comServerName example.comJkMount /pentaho defaultJkMount /pentaho/* defaultJkMount /sw-style defaultJkMount /sw-style/* defaultJkMount /pentaho-style defaultJkMount /pentaho-style/* default</VirtualHost>
6. In your Apache configuration, ensure that SSL is enabled by uncommenting or adding and modifying the followinglines:
LoadModule ssl_module modules/mod_ssl.soInclude conf/extra/httpd-ssl.conf
7. Save and close the file, then edit /conf/extra/httpd-ssl.conf and properly define the locations for your SSLcertificate and key:
SSLCertificateFile "conf/ssl/mycert.cert"SSLCertificateKeyFile "conf/ssl/mycert.key"
8. Ensure that your SSL engine options contain these entries:
SSLOptions +StdEnvVars +ExportCertData
9. Add these lines to the end of the VirtualHost section:
JkMount /pentaho defaultJkMount /pentaho/* defaultJkMount /sw-style defaultJkMount /sw-style/* defaultJkMount /pentaho-style defaultJkMount /pentaho-style/* default
10.Save and close the file, then create a workers.properties file in your Apache conf directory. If it already exists,merge it with the example configuration in the next step.
11.Copy the following text into the new workers.properties file, changing the location of Tomcat and Java, and the portnumbers and IP addresses to match your configuration:

Pentaho BI Suite Official Documentation | Securing the Pentaho Enterprise Console and BI Server | 31
Note: Remove the workers.tomcat_home setting if you are using JBoss.
workers.tomcat_home=/home/pentaho/pentaho/server/biserver-ee/tomcat/workers.java_home=/home/pentaho/pentaho/java/worker.list=tomcat_pentahoworker.tomcat_pentaho.type=ajp13
Apache httpd is now configured to securely and efficiently handle static content for Tomcat. You should now startTomcat and httpd, then navigate to your domain name or hostname and verify that you can access the Pentaho Webapplication.

32 | Pentaho BI Suite Official Documentation | Metadata Security
Metadata Security
Most of the security configuration explained thus far has involved using features that are built into the Pentaho UserConsole or Pentaho Enterprise Console, or involve configuration changes of some kind. However, if you need to restrictaccess to certain portions of data, the only way to do it is to modify your metadata. The Pentaho metadata model offerstable-, column-, and row-level authorization control, so if you need to prevent certain users or roles from accessing it,you can edit the metadata model accordingly.
Configuring the Security ServiceYou must know the base URL for the Pentaho BI Platform (the default URL is http://localhost:8080/pentaho as well asthe name of the service to execute security information retrieval (the service is ServiceAction).
The Pentaho Metadata Editor must be configured to connect to your BI Platform server so that it can retrieveusernames, roles, and access control lists. Follow the below directions to set up Metadata Editor.
1. Start the Pentaho Metadata Editor.
sh /pentaho/design-tools/metadata-editor/metaeditor.sh
2. Go to the Tools menu, then select Security....
The Security Service dialogue will appear.
3. In the Service URL field, type in the base URL for the BI Platform plus the security service.
http://localhost:8080/pentaho/ServiceAction
4. Next, select the level of detailed security information you want: All, Users or Roles.
If you have hundreds of users in your system, you probably only want to return the roles, and use roles for securityinformation properties. The access control lists are returned with all three options.
5. In the Username and Password fields, type in the login credentials for an administrator-level account.
6. Click Test.
A popup window with the returned XML should appear. If it does not, check that the information you typed into the fieldsmentioned above is correct.
Adding Column-Level Security ConstraintsYou need to have established a connection to a data source in Metadata Editor and selected one or more tables tocreate metadata for.
Follow the below instructions to add user- or role-based restrictions to your data source.
1. In the left pane, right-click the table or column you want to modify, then click Edit.. from the context menu.
The Physical Table Properties dialogue will appear.
2. Click the green + icon above the Available field in the middle of the screen.
The Add New Property dialogue will appear.
3. Select Metadata Security, then click OK.
4. Click the new Metadata Security item in the General category.
5. Click the green + icon next to the Selected Users/Groups field in the right pane.
A list of users and/or roles (depending on what you selected when configuring the security service earlier) willappear.
6. Click the user or role in the left pane that you want to assign permissions to, then click the right arrow button in themiddle of the window.
The user or role will move from the Available list on the left to the Assigned list on the right.
7. Click the checkboxes for the permissions that you want to assign to the selected user or role.
8. Repeat this process for other users or roles you want to assign metadata permissions to, then click OK.
9. Change any other relevant metadata options, then click OK to return to the Metadata Editor main window.
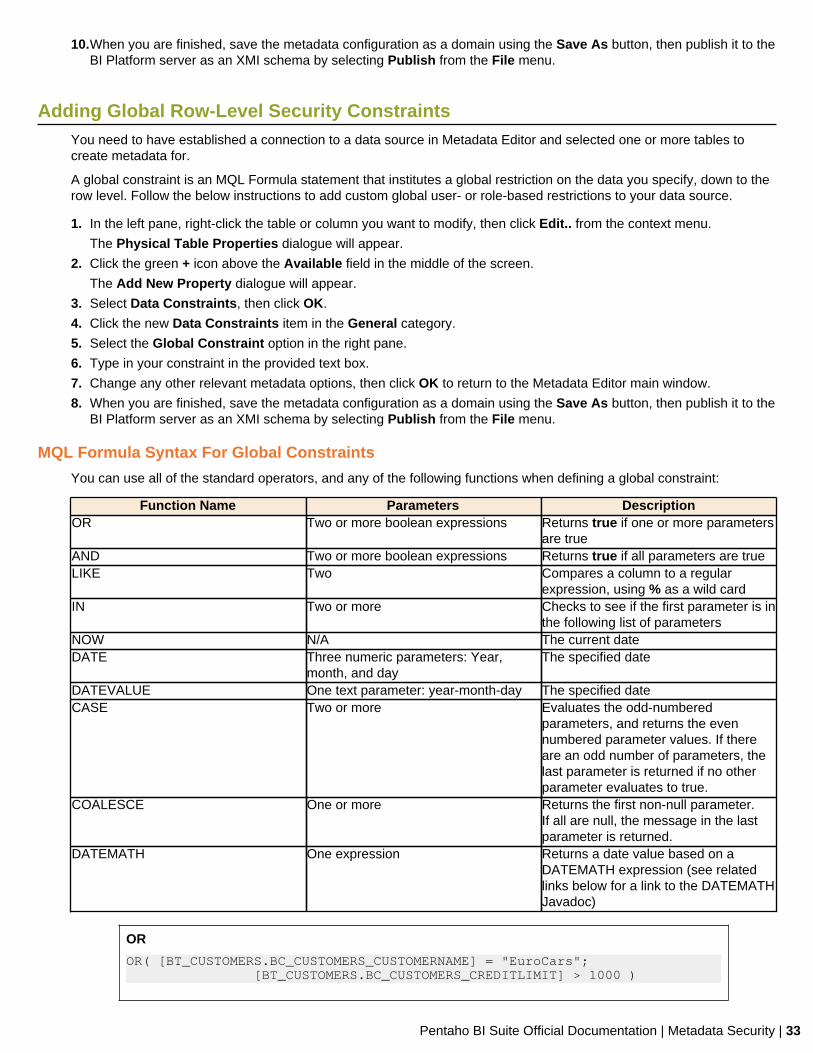
Pentaho BI Suite Official Documentation | Metadata Security | 33
10.When you are finished, save the metadata configuration as a domain using the Save As button, then publish it to theBI Platform server as an XMI schema by selecting Publish from the File menu.
Adding Global Row-Level Security ConstraintsYou need to have established a connection to a data source in Metadata Editor and selected one or more tables tocreate metadata for.
A global constraint is an MQL Formula statement that institutes a global restriction on the data you specify, down to therow level. Follow the below instructions to add custom global user- or role-based restrictions to your data source.
1. In the left pane, right-click the table or column you want to modify, then click Edit.. from the context menu.
The Physical Table Properties dialogue will appear.
2. Click the green + icon above the Available field in the middle of the screen.
The Add New Property dialogue will appear.
3. Select Data Constraints, then click OK.
4. Click the new Data Constraints item in the General category.
5. Select the Global Constraint option in the right pane.
6. Type in your constraint in the provided text box.
7. Change any other relevant metadata options, then click OK to return to the Metadata Editor main window.
8. When you are finished, save the metadata configuration as a domain using the Save As button, then publish it to theBI Platform server as an XMI schema by selecting Publish from the File menu.
MQL Formula Syntax For Global Constraints
You can use all of the standard operators, and any of the following functions when defining a global constraint:
Function Name Parameters DescriptionOR Two or more boolean expressions Returns true if one or more parameters
are trueAND Two or more boolean expressions Returns true if all parameters are trueLIKE Two Compares a column to a regular
expression, using % as a wild cardIN Two or more Checks to see if the first parameter is in
the following list of parametersNOW N/A The current dateDATE Three numeric parameters: Year,
month, and dayThe specified date
DATEVALUE One text parameter: year-month-day The specified dateCASE Two or more Evaluates the odd-numbered
parameters, and returns the evennumbered parameter values. If thereare an odd number of parameters, thelast parameter is returned if no otherparameter evaluates to true.
COALESCE One or more Returns the first non-null parameter.If all are null, the message in the lastparameter is returned.
DATEMATH One expression Returns a date value based on aDATEMATH expression (see relatedlinks below for a link to the DATEMATHJavadoc)
OR
OR( [BT_CUSTOMERS.BC_CUSTOMERS_CUSTOMERNAME] = "EuroCars"; [BT_CUSTOMERS.BC_CUSTOMERS_CREDITLIMIT] > 1000 )

34 | Pentaho BI Suite Official Documentation | Metadata Security
AND
AND( [BT_CUSTOMERS.BC_CUSTOMERS_CUSTOMERNAME] = "EuroCars"; [BT_CUSTOMERS.BC_CUSTOMERS_CREDITLIMIT] > 1000 )
LIKE
LIKE([BT_CUSTOMERS.BC_CUSTOMERS_CUSTOMERNAME]; "%SMITH%")
IN
IN([BT_CUSTOMERS.BC_CUSTOMERS_CUSTOMERNAME]; "Adam Smith"; "Brian Jones")
NOW
NOW()
DATE
DATE(2008;4;15)
DATEVALUE
DATEVALUE("2008-04-15")
CASE
CASE( [BT_CUSTOMERS.BC_CUSTOMERS_CUSTOMERNAME] = "EuroCars"; "European Cars"; [BT_CUSTOMERS.BC_CUSTOMERS_CUSTOMERNAME] = "AsiaCars"; "Asian Cars"; "Unknown Cars" )
COALESCE
COALESCE( [BT_CUSTOMERS.BC_CUSTOMERS_CUSTOMERNAME]; [BT_CUSTOMERS.BC_CUSTOMERS_CUSTOMERID]; "Customer is Null" )
DATEMATH
DATEMATH("0:ME -1:DS")
This expression represents 00:00:00.000 on the day before the last day of the current month.
Adding User or Role Row-Level Security ConstraintsYou need to have established a connection to a data source in Metadata Editor and selected one or more tables tocreate metadata for.
A role-based constraint is an MQL Formula statement that restricts access (on the row level) only to certain users orroles. Follow the below instructions to add fine-grained user- or role-based restrictions to your data source.
1. In the left pane, right-click the table or column you want to modify, then click Edit.. from the context menu.
The Physical Table Properties dialogue will appear.
2. Click the green + icon above the Available field in the middle of the screen.

Pentaho BI Suite Official Documentation | Metadata Security | 35
The Add New Property dialogue will appear.
3. Select Data Constraints, then click OK.
4. Click the new Data Constraints item in the General category.
5. Select Role-Based Constraints option in the right pane.
6. Click the green + icon next to the Selected Users/Groups field in the right pane.
A list of users and/or roles (depending on what you selected when configuring the security service earlier) willappear.
7. Click the user or role in the left pane that you want to assign permissions to, then click the right arrow button in themiddle of the window.
The user or role will move from the Available list on the left to the Assigned list on the right.
8. Click the checkboxes for the permissions that you want to assign to the selected user or role.
9. Repeat this process for other users or roles you want to assign metadata permissions to, then click OK.
10.Change any other relevant metadata options, then click OK to return to the Metadata Editor main window.
11.When you are finished, save the metadata configuration as a domain using the Save As button, then publish it to theBI Platform server as an XMI schema by selecting Publish from the File menu.
MQL Formula Syntax For User and Role Row-Level Constraints
The MQL Formula syntax for defining a user or role row constraint is:
[table.column] = "row"
The table and column are defined as part of a metadata business model. Here is an example that isolates access todata from the Sales department:
[BT_OFFICE.BC_DEPARTMENT]="Sales"
It's also possible to give or deny access to an entire role, or a single user, by selecting that user or role, then using aboolean for a constraint:
TRUE()
Or:
FALSE()
Restricting Metadata Models to Specific Client ToolsTo prevent a published metadata model from being displayed in the data source lists of one or more Pentaho UserConsole client tools (Dashboard Designer, Interactive Reporting, and ad hoc reporting), follow this process:
Note: ROLAP data sources for Analyzer and JPivot are not affected by this configuration.
1. Start Metadata Editor and open the metadata model you want to restrict.
2. Right-click on the business model, then select Edit from the context menu.
The Business Model Properties window will appear.
3. Click the round green + icon to add a new custom property.
The Add New Property window will appear.
4. Click Add a custom property, then type visible in the ID field and select String from the Type drop-down box, thenclick OK.
You'll return to the Business Model Properties window.
5. Scroll down to the bottom of the window to see the Value field. Type in one or more of the following restrictionvalues, separated by commas, then click OK:
• adhoc: removes the model from the list in ad hoc reporting• dashboard-filters: prevents this model from appearing in dashboard filters that use metadata queries• dashboard-content: prevents this model from being used in dashboard panels• interactive-reporting: removes the model from the list in Interactive Reporting

36 | Pentaho BI Suite Official Documentation | Metadata Security
• manage: removes this model from the "manage data sources" feature of the Pentaho User Console
Note: If you leave the Value field blank, the published model will not appear in any Pentaho User Consoletools.
6. Re-publish this model to the BI Server.
7. If the BI Server is currently running, restart it.
The restrictions you defined should now be in place.

Pentaho BI Suite Official Documentation | Using Security Information In Action Sequences | 37
Using Security Information In Action Sequences
In addition to providing access to security information within the Web application code, the BI Platform's security systemalso provides access to security information within action sequences. That security information then can be used inJavaScript rules, presented in reporting prompts, provided as input to SQL lookup rules, etc.
A typical action sequence inputs section is defined like this:
<inputs> <someInput type="string"> <sources> <request>someInput</request> </sources> </someInput></inputs>
In the above example, the input (called someInput) can be found by looking at the request (HttpServletRequest,PortletRequest, etc.) for a variable called someInput. Then, throughout the rest of the action sequence, specific actionscan reference that input. The Pentaho BI Platform extends the inputs to provide a unique type of input: The securityinput. This input presently supports the following input names:
Input Name Type DescriptionprincipalName string The name of the currently
authenticated user.principalRoles string-list The roles that the currently
authenticated user is a member of.principalAuthenticated string true if the user is authenticated, false
otherwise.principalAdministrator string true if the user is considered a Pentaho
Administrator, false otherwise.systemRoleNames string-list All the known roles in the system. Use
caution since this list could be quitelong.
systemUserNames string-list All the users known to the system. Usecaution since this list could be quitelong.
The following input section will get the list of the user's roles, and make it available to all the actionsin the action sequence:
<inputs> <principalRoles type="string-list"> <sources> <security>principalRoles</security> </sources> </principalRoles></inputs>

38 | Pentaho BI Suite Official Documentation | Mondrian Role Mapping in the BI Server
Mondrian Role Mapping in the BI Server
The purpose of the role mapper feature is to map roles defined in a Mondrian schema to user roles in the Pentaho BIServer. You can edit the mapper configuration as needed to meet the needs of your organization.
The role mapper exists and is enabled in the Pentaho BI Server by adding a new bean to the file,pentahoObjects.spring.xml, located at ...\pentaho-solutions\system. There are currently three differentmapper implementations to choose from, and each is described below. The pentahoObjects.spring.xml file alsohas example configurations for each of these mappers commented out. The end result of each mapper is to pass thegranted roles for users who are logged on to the BI server to Mondrian.
In instances in which a role is passed to Mondrian through the definition in an action sequence, (this is the originalmethod; see Using Security Information In Action Sequences on page 37 ), the role-related data in the action sequenceoverrides any and all mappers. If you do not use a mapper, none of the roles defined in Mondrian are honored and theschema is left wide open.
The Mondrian-One-To-One-UserRoleMapperThis Mondrian user/role mapper assumes that roles in the BI platform also exist in Mondrian; for example if you have arole called "CTO" in Mondrian and in the BI platform. The Mondrian-One-To-One-UserRoleMapper maps each role inthe platform to roles defined in the Mondrian schema by name.
<bean id="Mondrian-UserRoleMapper"name="Mondrian-One-To-One-UserRoleMapper"class="org.pentaho.platform.plugin.action.mondrian.mapper.MondrianOneToOneUserRoleListMapper"scope="singleton" />
The Mondrian-SampleLookupMap-UserRoleMapperThis sample mapper assumes that a translator is needed (in the form of a map) to map a BI platform role to a Mondrianrole. So the map provides the lookups needed for each role. The lookups take the form of Key = BI platform role, Value= mondrian role. In the sample below, there is a "ceo" role in the BI platform which maps to the "California manager"role in Mondrian.
<bean id="Mondrian-UserRoleMapper" name="Mondrian-SampleLookupMap-UserRoleMapper" class="org.pentaho.platform.plugin.action.mondrian.mapper. MondrianLookupMapUserRoleListMapper" scope="singleton"><property name="lookupMap"> <map> <entry key="ceo" value="California manager" /> <entry key="cto" value="M_CTO" /> <entry key="dev" value="M_DEV" /> </map> </property></bean>
The Mondrian-SampleUserSession-UserRoleMapperThis sample mapper assumes that all users have Mondrian roles in their session under a named session variable.
<bean id="Mondrian-UserRoleMapper" name="Mondrian-SampleUserSession-UserRoleMapper" class="org.pentaho.platform.plugin.action.mondrian.mapper. MondrianUserSessionUserRoleListMapper" scope="singleton"><property name="sessionProperty" value="MondrianUserRoles" /></bean>

Pentaho BI Suite Official Documentation | Removing Security | 39
Removing Security
You cannot remove the security mechanisms built into the BI Platform, but you can bypass them by givingall permissions to anonymous users. The BI Server automatically assigns all unauthenticated users to theanonymousUser account and the Anonymous role. The procedure below will grant full BI Server access to theAnonymous role, thereby never requiring a login.
Danger: This process is irreversible! While you can simply back out any configuration file changes youmay make, you cannot restore custom ACLs once they've been wiped out; the best you can do is restore thedefault ACLs and make all of your custom authorization changes by hand again. Before performing the belowprocedure, you should have a very good reason for bypassing security.
1. Stop the BI Server.
sudo /etc/init.d/pentaho stop
2. Open the /pentaho/server/biserver-ee/pentaho-solutions/system/applicationContext-spring-security.xml file with a text editor and ensure that a default anonymous role is defined.
You may have changed this role, or it may not be properly defined for some other reason. Match your bean definitionand property value to the example below. The username does not matter in this particular bean; only the role name.
<bean id="anonymousProcessingFilter" class="org.springframework.security.providers.anonymous.AnonymousProcessingFilter"><!-- omitted --> <property name="userAttribute" value="anonymousUser,Anonymous" /></bean>
3. Now find the filterSecurityInterceptor bean in the same file, and the objectDefinitionSource property inside of it,and match its contents to the example below:
This step allows Pentaho client tools to publish to the BI Platform without having to supply a username andpassword.
<bean id="filterInvocationInterceptor" class="org.springframework.security.intercept.web.FilterSecurityInterceptor"> <property name="authenticationManager"> <ref local="authenticationManager" /> </property> <property name="accessDecisionManager"> <ref local="httpRequestAccessDecisionManager" /> </property> <property name="objectDefinitionSource"> <value> <![CDATA[ CONVERT_URL_TO_LOWERCASE_BEFORE_COMPARISON\A/.*\Z=Anonymous,Authenticated ]]> </value> </property></bean>
4. Save the file, then open pentahoObjects-spring.xml in the same directory.
5. Change the IAclVoter class to PentahoAllowAnonymousAclVoter
<beans><!-- omitted --> <bean id="IAclVoter" class="org.pentaho.platform.engine.security.acls.voter.PentahoAllowAnonymousAclVoter" scope="singleton" /><!-- omitted --></beans>
6. Save the file, then open pentaho.xml in the same directory.
7. In the <anonymous-authentication> part of the <pentaho-system> section, define the anonymous user and role.
This is the same user and role you will use when assigning ACLs in the next step.
<pentaho-system><!-- omitted --> <anonymous-authentication> <anonymous-user>anonymousUser</anonymous-user> <anonymous-role>Anonymous</anonymous-role> </anonymous-authentication> <!-- omitted --></pentaho-system>

40 | Pentaho BI Suite Official Documentation | Removing Security
8. Using the same anonymous user and role from before, adjust the ACLs accordingly and remove all ACL overrides.
<pentaho-system><!-- omitted --> <acl-publisher> <default-acls> <acl-entry role="Anonymous" acl="ADMIN_ALL" /> <acl-entry role="Authenticated" acl="ADMIN_ALL" /> </default-acls> <!-- remove any active overrides entries --> </acl-publisher><!-- omitted --></pentaho-system>
9. Adjust the <acl-voter> properties such that the new anonymous user has administrator privileges.
<pentaho-system> <!-- omitted --> <acl-voter> <admin-role>Anonymous</admin-role> </acl-voter> <!-- omitted --></pentaho-system>
10.Save the file and close the text editor.
You've now effectively worked around the security features of the BI Platform.
You should now follow the procedures below to remove the security awareness from the metadata domain repository,and switch from a database repository to a file repository; database repositories are only advantageous when you needto assign ACLs to certain resources. Since you no longer need to do that, you can eliminate your solution database toremove the last piece of BI Platform authorization security.
Switching the Metadata Domain RepositoryThe Pentaho BI Server and Pentaho Enterprise Console must be stopped before executing these instructions.
This procedure changes your default metadata domain repository so that it is no longer security-aware. It is a necessarystep in completely removing security from the BI Platform; however, this procedure does not, in itself, remove allsecurity. To do that, start with Removing Security on page 39.
1. Edit the /pentaho-solutions/system/pentahoObjects.spring.xml file.
2. Comment out the IMetadataDomainRepository line, and uncomment the similar line below it.
Alternatively, you can switch the value of IMetadataDomainRepository fromorg.pentaho.platform.plugin.services.metadata.SecurityAwareMetadataDomainRepository toorg.pentaho.platform.plugin.services.metadata.MetadataDomainRepository.
<!-- <bean id="IMetadataDomainRepository" class="org.pentaho.platform.plugin.services.metadata.SecurityAwareMetadataDomainRepository" scope="singleton"/> --><!-- Use this schema factory to disable PMD security --><bean id="IMetadataDomainRepository" class="org.pentaho.platform.plugin.services.metadata.MetadataDomainRepository" scope="singleton"/>
3. Save and close the file.
You've now switched the metadata domain repository to one that is not security-aware. Access controls will no longerbe enforced on various metadata objects.
You should now continue on to Switching to a File-Based Solution Repository on page 40.
Switching to a File-Based Solution RepositoryThe Pentaho BI Server and Pentaho Enterprise Console must be stopped before executing these instructions.
This procedure changes your default database solution repository into a strictly file-based repository. There will nolonger be a database mirroring the content in your pentaho-solutions directory, and there will be no way of isolatingor securing BI content within the BI Server. However, removing the database overhead means that there will be asubstantial performance increase in many instances. This procedure does not, in itself, remove security from the BIPlatform, but it does remove access control lists from all content.

Pentaho BI Suite Official Documentation | Removing Security | 41
1. Edit the /pentaho-solutions/system/pentahoObjects.spring.xml file.
2. Comment out the current ISolutionRepository line, and uncomment the similar line above it.
Alternatively, you can switch the value of ISolutionRepository fromorg.pentaho.platform.repository.solution.dbbased.DbBasedSolutionRepository toorg.pentaho.platform.repository.solution.filebased.FileBasedSolutionRepository.
<!-- Uncomment the following line to use a filesystem-based repository. Note: does not support ACLs. --><bean id="ISolutionRepository" class="org.pentaho.platform.repository.solution.filebased.FileBasedSolutionRepository" scope="session" /><!-- Uncomment the following line to use a filesystem/db-based repository with meta information stored in a db --><!-- <bean id="ISolutionRepository" class="org.pentaho.platform.repository.solution.dbbased.DbBasedSolutionRepository" scope="session" /> -->
3. Comment out the IMetadataDomainRepository line, and uncomment the similar line below it.
Alternatively, you can switch the value of IMetadataDomainRepository fromorg.pentaho.platform.plugin.services.metadata.SecurityAwareMetadataDomainRepository toorg.pentaho.platform.plugin.services.metadata.MetadataDomainRepository.
<!-- <bean id="IMetadataDomainRepository" class="org.pentaho.platform.plugin.services.metadata.SecurityAwareMetadataDomainRepository" scope="singleton"/> --><!-- Use this schema factory to disable PMD security --><bean id="IMetadataDomainRepository" class="org.pentaho.platform.plugin.services.metadata.MetadataDomainRepository" scope="singleton"/>
4. Save and close the file.
You've now switched over to a file-based solution repository. You can safely restart your BI Server and PentahoEnterprise Console server.

42 | Pentaho BI Suite Official Documentation | Troubleshooting
Troubleshooting
Adjusting authorization and authentication settings will often involve making multiple configuration changes without thebenefit of testing each of them individually. Your first attempt at implementing a different security DAO or performingintensive user and role modifications will probably not work perfectly. Below are some tips for adjusting log file output,and examining logs for signs of configuration errors.
Increasing Security Log Levels in the BI PlatformThe security logging facilities of the BI Platform are set to ERROR by default, which is not always verbose enough fortroubleshooting and testing. The below procedure explains how to increase the level of detail in the BI Platform logs thatdeal with security-related messages.
1. Stop the BI Platform server or service.
sh /usr/local/pentaho/server/biserver-ee/stop-pentaho.sh
2. Open the /pentaho/server/biserver-ee/tomcat/webapps/pentaho/WEB-INF/classes/log4j.xml filewith a text editor.
3. Use XML comments (<!-- -->) to disable all of the Threshold parameters in all of the appender elements.
4. Change the priority value in the <root> section to one of: WARN, ERROR, FATAL, or DEBUG, depending on whichlevel you prefer.
<root> <priority value="DEBUG" /> <appender-ref ref="PENTAHOCONSOLE"/> <appender-ref ref="PENTAHOFILE"/></root>
5. Add the following loggers directly above the root element:
<!-- all Spring Security classes will be set to DEBUG --><category name="org.springframework.security"> <priority value="DEBUG" /></category>
<!-- all Pentaho security-related classes will be set to DEBUG --><category name="org.pentaho.platform.engine.security"> <priority value="DEBUG" /></category><category name="org.pentaho.platform.plugin.services.security"> <priority value="DEBUG" /></category>
6. Save and close the file, then edit the Spring Security configuration file that corresponds with your security backend inthe /pentaho/server/biserver-ee/pentaho-solutions/system/ directory.
The file will be one of:
• applicationContext-spring-security-memory.xml• applicationContext-spring-security-jdbc.xml• applicationContext-spring-security-ldap.xml
7. Find the daoAuthenticationProvider bean definition, and add the following property anywhere inside of it (beforethe </bean> tag):
<property name="hideUserNotFoundExceptions" value="false" />
8. Save the file and close the text editor.
9. Start the BI Platform server or service.
sh /usr/local/pentaho/server/biserver-ee/start-pentaho.sh
BI Platform security logging is now globally set to DEBUG, which is sufficiently verbose for debugging securityconfiguration problems. All BI Platform messages will be collected in the /pentaho/server/biserver-ee/logs/pentaho.log file.
Note: When you are finished configuring and testing the BI Platform, you should adjust the log levels down to aless verbose level, such as ERROR, to prevent pentaho.log from growing too large.

Pentaho BI Suite Official Documentation | Troubleshooting | 43
Enabling Extra LDAP Security Logging
If you need yet more LDAP-related security details in pentaho.log, or if you are specifically having difficulty with LDAPauthentication configuration, follow the below process.
Note: These instructions are for testing and pre-production only. Usernames and passwords will be displayed inthe log file in plain text.
1. Stop the BI Platform server or service.
sh /usr/local/pentaho/server/biserver-ee/stop-pentaho.sh
2. Open the /pentaho/server/biserver-ee/pentaho-solutions/system/applicationContext-spring-security-ldap.xml file with a text editor.
3. Change the reference in the first constructor-arg property of the daoAuthenticationProvider element toldapAuthenticatorProxy
<constructor-arg> <ref bean="ldapAuthenticatorProxy" /></constructor-arg>
4. Save the file, then create a new file called applicationContext-logging.xml in the same directory.
5. Copy the following text into the new file:
<?xml version="1.0" encoding="UTF-8"?><!DOCTYPE beans PUBLIC "-//SPRING//DTD BEAN//EN" "http://www.springframework.org/dtd/spring-beans.dtd"><beans> <bean id="ldapAuthenticatorProxy" class="org.springframework.aop.framework.ProxyFactoryBean"> <property name="proxyInterfaces"> <value>org.org.springframework.security.providers.ldap.LdapAuthenticator</value> </property> <property name="target"> <ref bean="authenticator" /> </property> <property name="interceptorNames"> <list> <value>loggingAdvisor</value> </list> </property> </bean> <bean id="loggingAdvisor" class="org.springframework.aop.support.RegexpMethodPointcutAdvisor"> <property name="advice"> <ref local="loggingInterceptor" /> </property> <property name="pattern"> <value>.*</value> </property> </bean> <bean id="loggingInterceptor" class="org.pentaho.platform.engine.security.LoggingInterceptor" /></beans>
6. Save the file, then open pentaho-spring-beans.xml.
7. Add the following import line to the list of files:
<import resource="applicationContext-logging.xml" />
8. Save and close the file, then start the BI Platform server or service.
sh /usr/local/pentaho/server/biserver-ee/start-pentaho.sh
You will now have verbose LDAP-specific log messages in pentaho.log that include login credentials for every userthat tries to log in.

44 | Pentaho BI Suite Official Documentation | Troubleshooting
Log Output AnalysisThe information you need to look for in pentaho.log in order to troubleshoot security configuration problems should befairly self-evident. If you are having trouble, consult the examples below.
When you request a page that is protected but you are not yet logged in, you should see an exception in the log whichlooks like this:
DEBUG [ExceptionTranslationFilter] Access is denied (user is anonymous); redirecting to authentication entry point org.springframework.security.AccessDeniedException: Access is denied
When the username and/or password doesn't match what's stored in the backend, you should see a log message likethis:
WARN [LoggerListener] Authentication event AuthenticationFailureBadCredentialsEvent: suzy; details: org.springframework.security.ui.WebAuthenticationDetails@fffd148a: RemoteIpAddress: 127.0.0.1; SessionId: 976C95033136070E0200D6DA26CB0277; exception: Bad credentials
When the username and password match, you should see a log message that looks like the following example. Afterthe InteractiveAuthenticationSuccessEvent, one of the filters will show the roles fetched for the authenticated user.Compare these roles to the page-role mapping found in the filterInvocationInterceptor bean in applicationContext-spring-security.xml.
WARN [LoggerListener] Authentication event InteractiveAuthenticationSuccessEvent: suzy; details: org.springframework.security.ui.WebAuthenticationDetails@fffd148a: RemoteIpAddress: 127.0.0.1; SessionId: 976C95033136070E0200D6DA26CB0277 DEBUG [HttpSessionContextIntegrationFilter] SecurityContext stored to HttpSession: 'org.springframework.security.context.SecurityContextImpl@2b86afeb: Authentication: org.springframework.security.providers.UsernamePasswordAuthenticationToken@2b86afeb: Username: org.springframework.security.userdetails.ldap.LdapUserDetailsImpl@d7f51e; Password: [PROTECTED]; Authenticated: true; Details: org.springframework.security.ui.WebAuthenticationDetails@fffd148a: RemoteIpAddress: 127.0.0.1; SessionId: 976C95033136070E0200D6DA26CB0277; Granted Authorities: ROLE_CTO, ROLE_IS, ROLE_AUTHENTICATED'
If you are troubleshooting LDAP problems, look for log output similar to this:
DEBUG [DirMgrBindAuthenticator] (LoggingInterceptor) Return value: LdapUserInfo: org.springframework.security.providers.ldap.LdapUserInfo@1f31c64[dn=uid=suzy,ou=users,ou=system,attributes={mail=mail: [email protected], uid=uid: suzy, userpassword=userpassword: [B@e17c9c, businesscategory=businesscategory: cn=cto,ou=roles,ou=system, cn=is,ou=roles,ou=system, objectclass=objectClass: organizationalPerson, person, groupOfUniqueNames, inetOrgPerson, top, uniquemember=uniquemember: cn=cto, ou=roles, cn = is , ou = roles, sn=sn: Pentaho, cn=cn: suzy}]

Pentaho BI Suite Official Documentation | Troubleshooting | 45
Miscellaneous Troubleshooting Tips
sun.security.validator.ValidatorException: No trusted certificate found
This error occurs when you are trying to enable SSL to securely connect to the Pentaho Enterprise Console, andhave not executed the procedure to trust your SSL certificate. Follow these instructions: Enabling SSL in the PentahoEnterprise Console on page 25


