Security Manager in Cisco IOS Intrusion Prevention System Configuration Example Document ID: 105626 Contents Introduction Prerequisites Requirements Components Used Conventions Configure Related Information Introduction Cisco Security Manager is part of the Cisco Security Management Suite, which delivers comprehensive policy administration and enforcement for the Cisco Self-Defending Network. Cisco Security Manager is an industry-leading enterprise-class application for managing security. Cisco Security Manager addresses configuration management of firewall, VPN, and Intrusion Prevention System (IPS) security services across Cisco routers, security appliances, and security services modules. For a summary of Cisco Security Manager Features and benefits, as well as new features in version 3.1, refer to the Cisco Security Manager 3.1 data sheet at http://www.cisco.com/en/US/prod/collateral/vpndevc/ps5739/ps6498/product_data_sheet0900aecd8062bf6e.html. You can download Cisco Security Manager 3.1 from Cisco.com at http://www.cisco.com/cgi-bin/tablebuild.pl/csm-app (registered customers only) . This document describes how to use Cisco Security Manager 3.1 in order to perform initial configuration of IOS IPS. For routers already configured with IOS IPS, customers can directly use Cisco Security Manager 3.1 for provisioning tasks. Note: Cisco Security Manager 3.1 supports only IOS 12.4(11)T2 and later IOS images in order to configure IOS IPS. Prerequisites Requirements There are no specific requirements for this document. Components Used The information in this document is based on these software and hardware versions: Cisco Security Manager 3.1 • Cisco IOS 12.4(11)T2 • The information in this document was created from the devices in a specific lab environment. All of the devices used in this document started with a cleared (default) configuration. If your network is live, make sure
Transcript
Security Manager in Cisco IOS IntrusionPrevention System Configuration Example
Document ID: 105626
Contents
Introduction Prerequisites Requirements Components Used Conventions Configure Related Information
Introduction
Cisco Security Manager is part of the Cisco Security Management Suite, which delivers comprehensive policyadministration and enforcement for the Cisco Self−Defending Network. Cisco Security Manager is anindustry−leading enterprise−class application for managing security. Cisco Security Manager addressesconfiguration management of firewall, VPN, and Intrusion Prevention System (IPS) security services acrossCisco routers, security appliances, and security services modules.
For a summary of Cisco Security Manager Features and benefits, as well as new features in version 3.1, referto the Cisco Security Manager 3.1 data sheet athttp://www.cisco.com/en/US/prod/collateral/vpndevc/ps5739/ps6498/product_data_sheet0900aecd8062bf6e.html.You can download Cisco Security Manager 3.1 from Cisco.com athttp://www.cisco.com/cgi−bin/tablebuild.pl/csm−app (registered customers only) .
This document describes how to use Cisco Security Manager 3.1 in order to perform initial configuration ofIOS IPS. For routers already configured with IOS IPS, customers can directly use Cisco Security Manager 3.1for provisioning tasks.
Note: Cisco Security Manager 3.1 supports only IOS 12.4(11)T2 and later IOS images in order to configureIOS IPS.
Prerequisites
Requirements
There are no specific requirements for this document.
Components Used
The information in this document is based on these software and hardware versions:
Cisco Security Manager 3.1• Cisco IOS 12.4(11)T2•
The information in this document was created from the devices in a specific lab environment. All of thedevices used in this document started with a cleared (default) configuration. If your network is live, make sure
that you understand the potential impact of any command.
Conventions
Refer to the Cisco Technical Tips Conventions for more information on document conventions.
Configure
Complete these steps in order to configure IOS IPS:
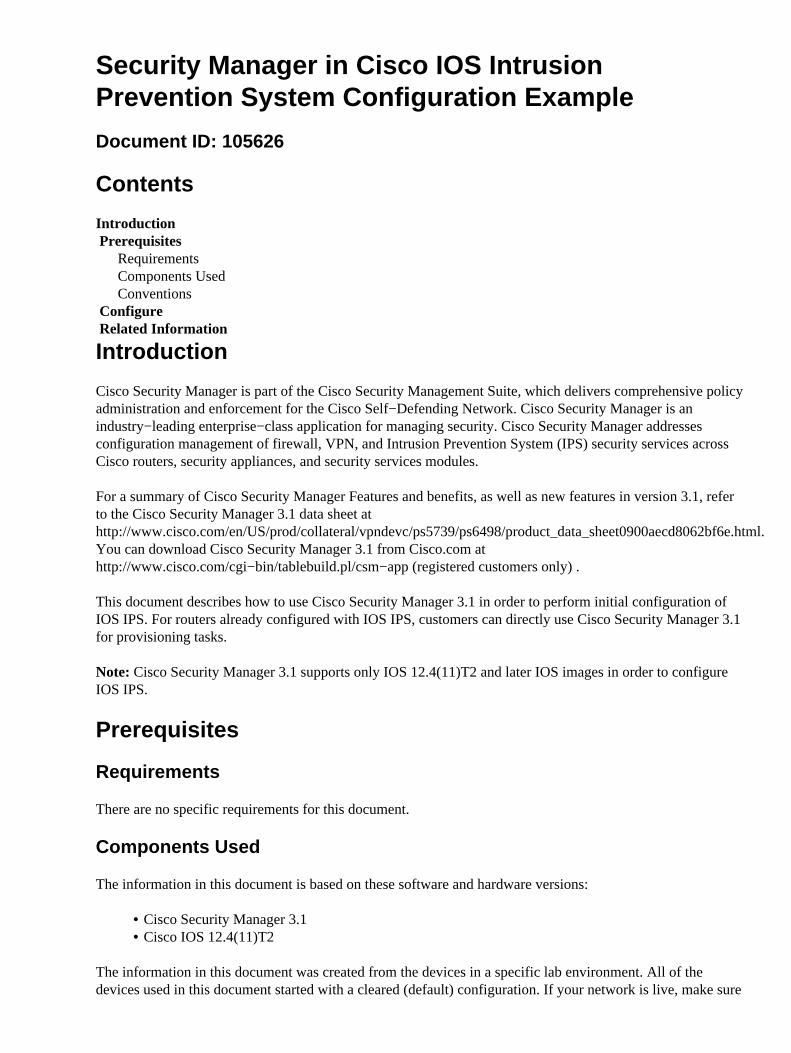
Run the Cisco Security Manager 3.1 client from your local PC.1. Choose New Device from the File menu in order to add a device onto the Cisco Security Manager 3.1.2.
In the New Device window, choose how you would like to add the device. This example adds thedevice from the network.
3.
Click Next.4. Enter the Identity details for the device that you want to add. For example, host name and IP address.5.
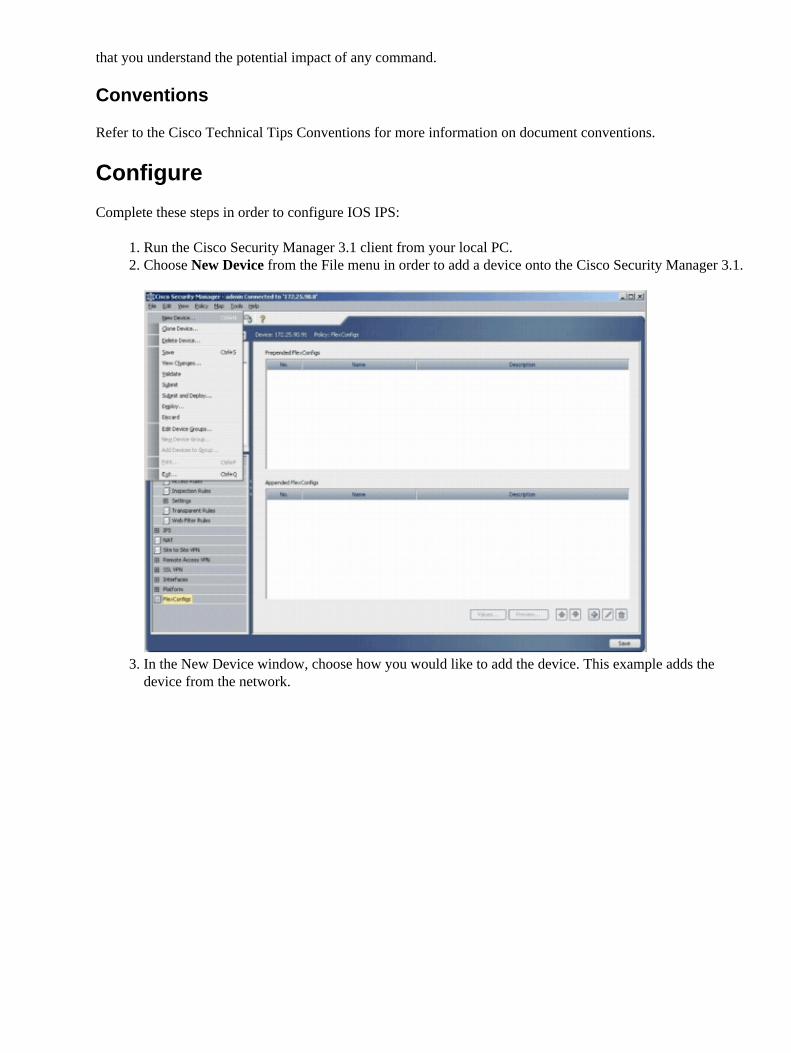
Click Next.6. Enter the primary credentials, such as user name, password, Enable password for the IOS Routerwhich you want to add.
7.
Click Finish in order to add the device onto Cisco Security Manager.
Note: This example assume that the user already has a preconfigured router and can log in to therouter with the proper credentials.
8.
When "Discovery completed" appears in the Discovery Status window, you have successfully added adevice onto the Cisco Security Manager. Once you have successfully added a device onto the CiscoSecurity Manager, you must assign a public key in order to enable IPS.
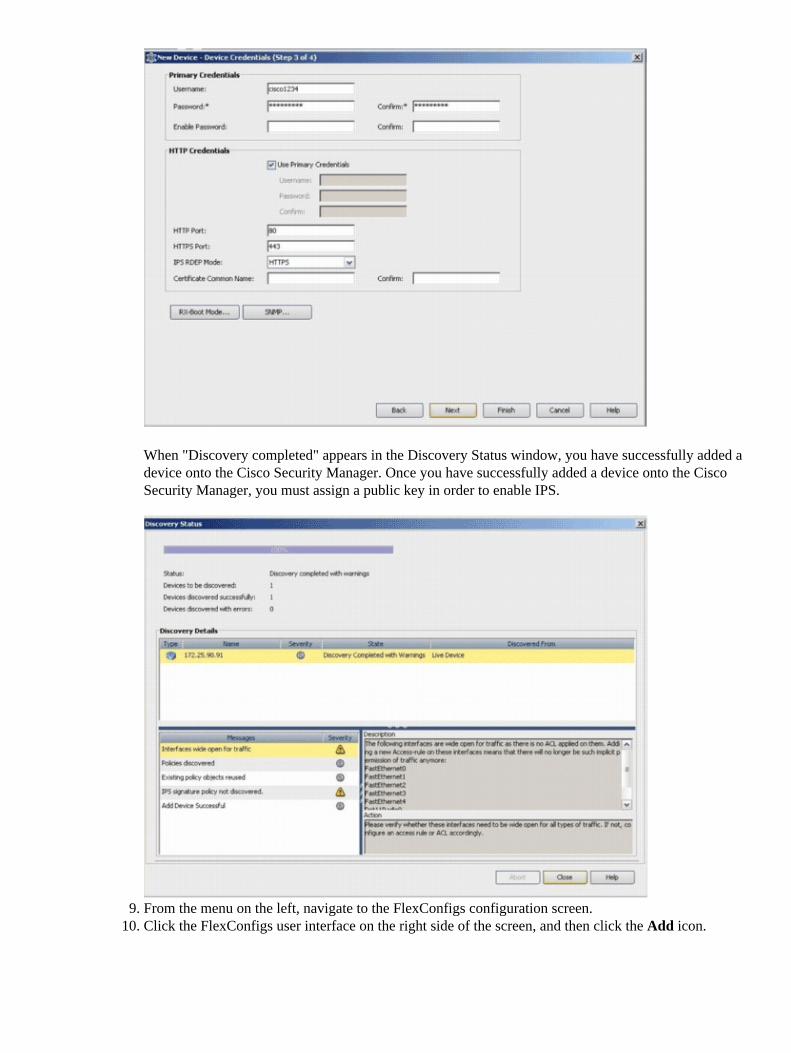
From the menu on the left, navigate to the FlexConfigs configuration screen.9. Click the FlexConfigs user interface on the right side of the screen, and then click the Add icon.10.
In the Selected FlexConfigs list, choose IOS_IPS_PUBLIC_KEY, and click OK.11.
Click Save in order to save the changes.
Note: The IOS_IPS_PUBLIC_KEY FlexConfig holds the configuration for the public key.
12.
From the menu on the left, choose General Settings located beneath the IPS heading.13. Enter the IPS configuration location on the flash. This is the location in which the IPS configurationsare placed.
14.
Click Save in order to save the changes.15.
Note: Make sure the location directory has already been created on router flash. If not, use the mkdir<directory_name> command in order to create the location directory.In order to enable IPS, navigate to Interface Rules, check the Enable IPS check box, and then clickAdd Row.
16.
In the Add IPS Rule dialog box, enter a name for the IPS rule in the Rule Name field, and then clickAdd Row in order to include the interfaces on which IPS must be applied.
17.
Click the radio button that indicates in which direction the IPS rule must be applied, and then clickSelect in order to choose the appropriate interfaces.
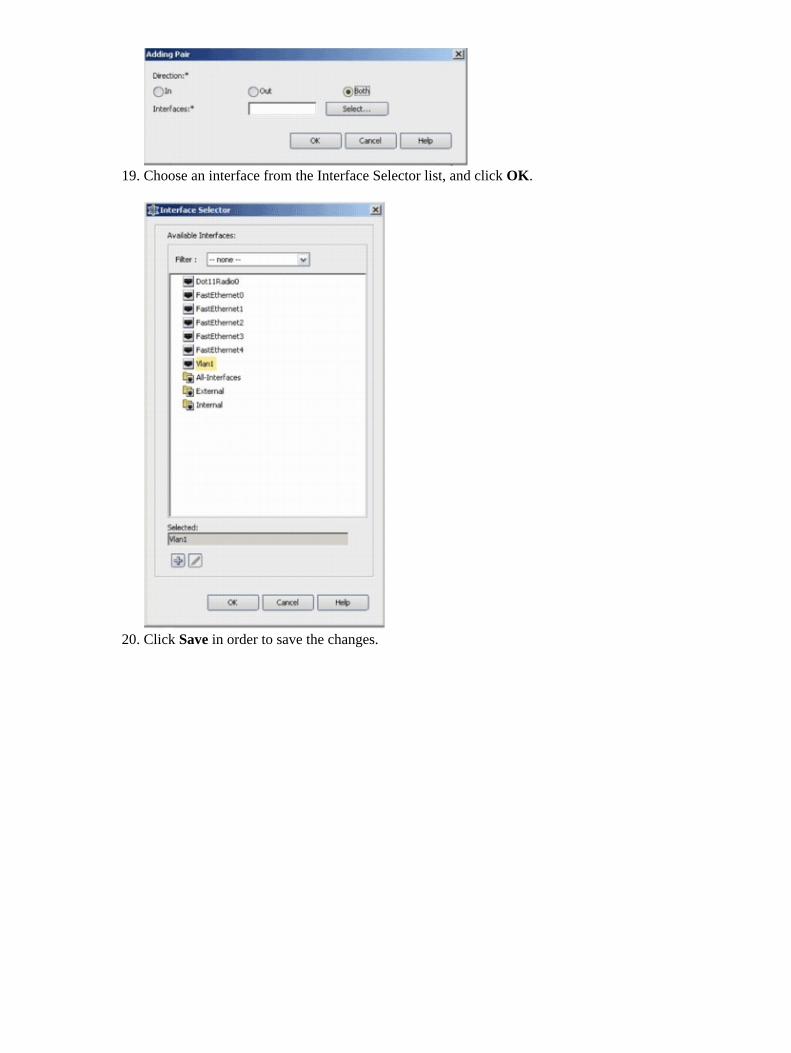
18.
Choose an interface from the Interface Selector list, and click OK.19.
Click Save in order to save the changes.20.
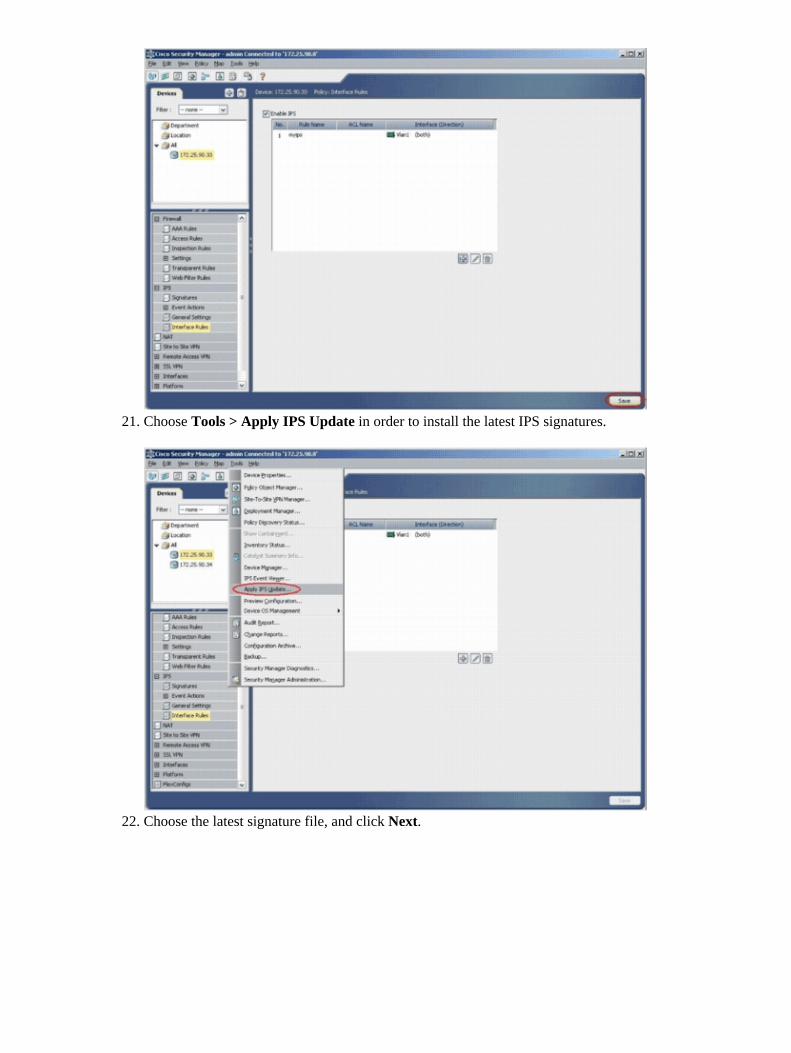
Choose Tools > Apply IPS Update in order to install the latest IPS signatures.21.
Choose the latest signature file, and click Next.22.
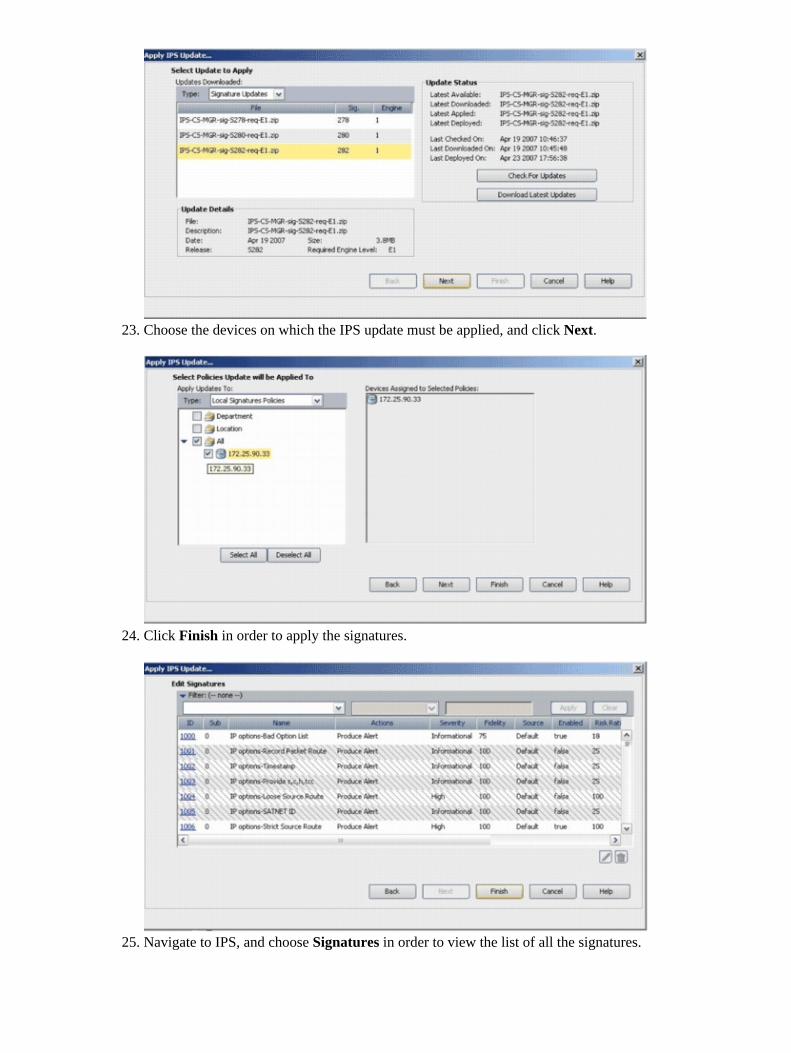
Choose the devices on which the IPS update must be applied, and click Next.23.
Click Finish in order to apply the signatures.24.
Navigate to IPS, and choose Signatures in order to view the list of all the signatures.25.
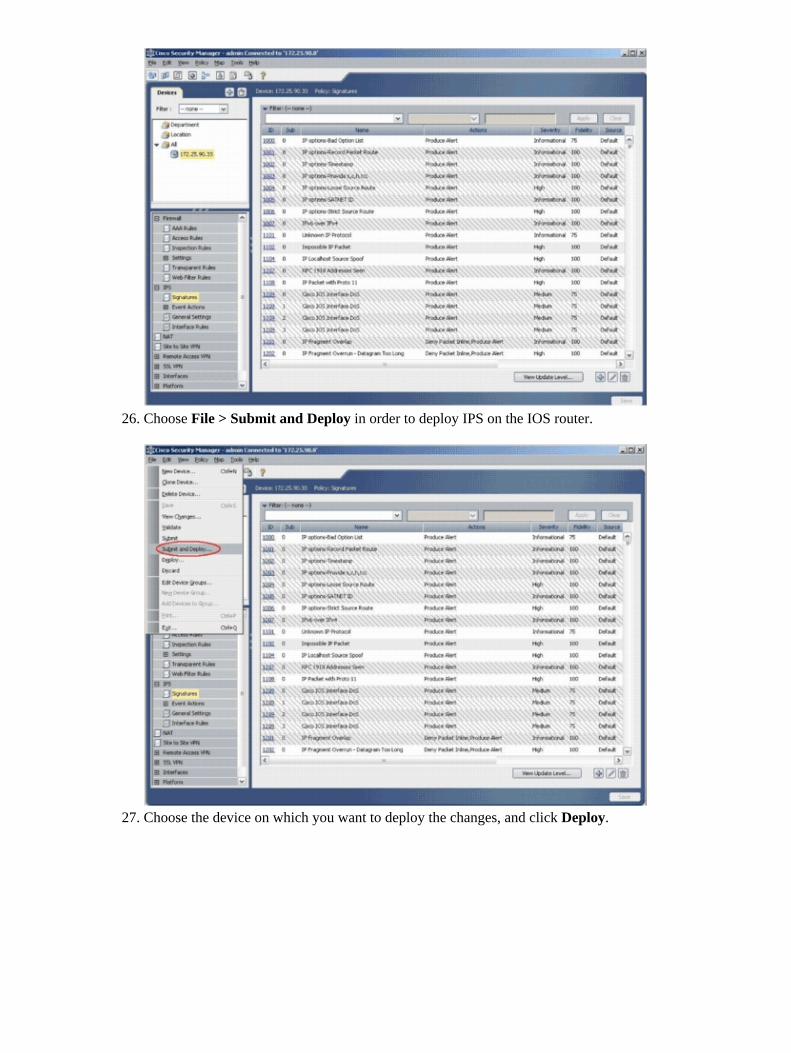
Choose File > Submit and Deploy in order to deploy IPS on the IOS router.26.
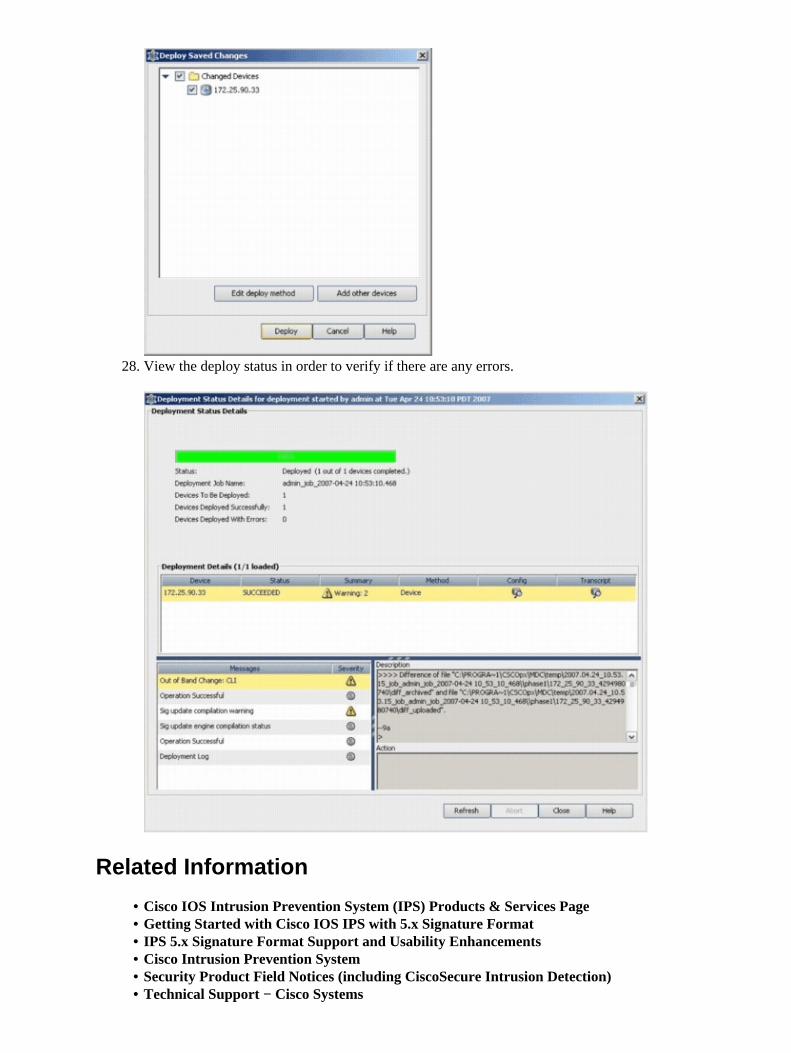
Choose the device on which you want to deploy the changes, and click Deploy.27.
View the deploy status in order to verify if there are any errors.28.
Related Information
Cisco IOS Intrusion Prevention System (IPS) Products & Services Page• Getting Started with Cisco IOS IPS with 5.x Signature Format• IPS 5.x Signature Format Support and Usability Enhancements• Cisco Intrusion Prevention System• Security Product Field Notices (including CiscoSecure Intrusion Detection)• Technical Support − Cisco Systems•