Installation Instructions Seismic Sealtite TM Recommended Tools Tape Measure Sharp Knife Miter Saw Blue Painters Tape Mineral Spirits Clean Cloth Isopropyl Alcohol Caulking Tool Wood Wedges Material Sizing 1. Joints must be sized every 5-7 feet (1.524-2.137 meters) to ensure gap opening is uniform and depth is sufficient for the supplied material. Note: Allow sufficient depth for the material to be recessed 1/8”-1/4” in the joint. Material Preparation Tip: Material will expand faster when hot and slower when cold. In cold temperatures, store material in a heated area 24 hours prior to installation. In hot temperatures, store material out of direct sunlight and not in an enclosed storage container where temperatures may exceed 100°F. Note: Refer to the SEAMS section for further instructions on preparing the material for proper seam installation procedure. Tip: Apply mineral spirits to the knife for a smoother cut. Warning: Install the material directly after removing the shrink packaging to ensure the material does not expand past the joint. 1. Store material at a minimum of 68°F (20°C) for a minimum of 24 hours prior to installation, regardless of temperature at location of installation. 2. Store materials in a dry, enclosed area. Make sure materials are off the ground and out of direct sunlight. 3. Use a miter saw to make any cuts to the Seismic Sealtite™ before removing the clear shrink packaging. All starting and ending pieces must be square to the termination point. 4. Use a sharp knife to make any cuts after the clear shrink packaging and wooden boards have been removed. SIC-SII-0024 REV. B PAGE 1 OF 5 SCHUL INTERNATIONAL COMPANY, LLC ONE INDUSTRIAL DRIVE, PELHAM, NH 03076 TELEPHONE: 800.848.1120 • FAX: 800.998.9105 • WEB ADDRESS: www.schul.com Important: These instructions are intended as recommended guidelines. Due to the variability of field conditions, selection of the proper material for the intended application and installation are the sole responsibility of the applicator. The manufacturer’s published installation procedures shall be followed at all times.
Transcript
Installation Instructions
Seismic SealtiteTM
Recommended ToolsTape Measure Sharp Knife Miter Saw Blue Painters Tape Mineral Spirits Clean Cloth Isopropyl Alcohol Caulking Tool Wood Wedges
Material Sizing
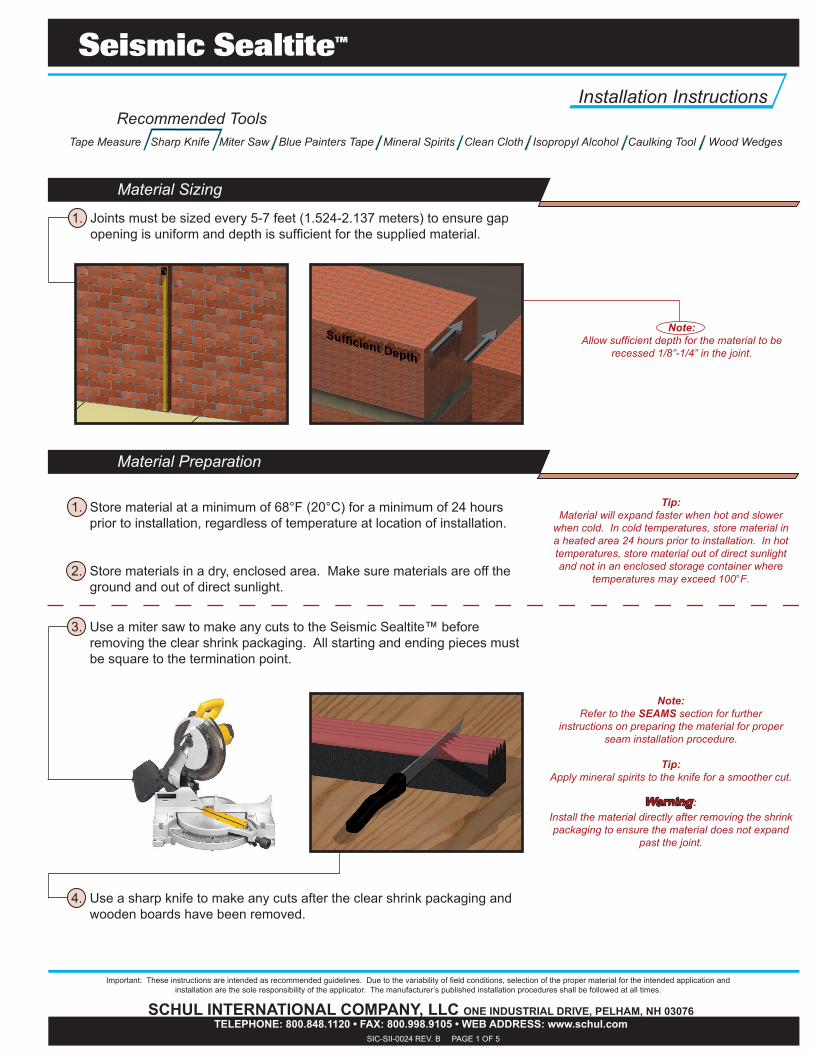
1. Joints must be sized every 5-7 feet (1.524-2.137 meters) to ensure gap opening is uniform and depth is sufficient for the supplied material.
Note:Allow sufficient depth for the material to be
recessed 1/8”-1/4” in the joint.
Material Preparation
Tip:Material will expand faster when hot and slower
when cold. In cold temperatures, store material in a heated area 24 hours prior to installation. In hot temperatures, store material out of direct sunlight and not in an enclosed storage container where
temperatures may exceed 100°F.
Note:Refer to the SEAMS section for further
instructions on preparing the material for proper seam installation procedure.
Tip:Apply mineral spirits to the knife for a smoother cut.
Warning:Install the material directly after removing the shrink packaging to ensure the material does not expand
past the joint.
1. Store material at a minimum of 68°F (20°C) for a minimum of 24 hours prior to installation, regardless of temperature at location of installation.
2. Store materials in a dry, enclosed area. Make sure materials are off the ground and out of direct sunlight.
3. Use a miter saw to make any cuts to the Seismic Sealtite™ before removing the clear shrink packaging. All starting and ending pieces must be square to the termination point.
4. Use a sharp knife to make any cuts after the clear shrink packaging and wooden boards have been removed.
SIC-SII-0024 REV. B PAGE 1 OF 5
SCHUL INTERNATIONAL COMPANY, LLC ONE INDUSTRIAL DRIVE, PELHAM, NH 03076TELEPHONE: 800.848.1120 • FAX: 800.998.9105 • WEB ADDRESS: www.schul.com
Important: These instructions are intended as recommended guidelines. Due to the variability of field conditions, selection of the proper material for the intended application and installation are the sole responsibility of the applicator. The manufacturer’s published installation procedures shall be followed at all times.
Joint Preparation
1. Verify that the joint is clean, sound, and will provide an appropriate surface for installation of the joint sealant. • Use compressed air to clean any loose debris from the joint. • Apply water or alcohol to a clean cloth and wipe the joint walls to the depth of the sealant material plus 1”.
2. Verify that the joint is uniform and repair any spalls prior to installation.
3. Smaller than 6” nominal joint size - Apply blue painters tape to both edges of the substrate face to prevent the silicone from contacting the deck surface. Larger than 6” nominal joint size - Apply duct tape to both edges of the substrate face to prevent the epoxy from contacting the deck surface.
4. Check the material for appropriate length, width, and depth. • Supplied material should be pre-compressed to a size smaller than the intended joint
opening. • Joint depth must allow for the installed material to be recessed 1/8”-1/4” from the joint face.
Epoxy Preparation - For Nominal Joint Widths Greater than 6”
1. Mix Part A and Part B separately.
2. Transfer the entire contents of Part A (resin) and then Part B (hardener) into a clean, empty container. Mix the material thoroughly with a low speed (approximately 300 rpm) drill or jiffy mixer.
3. Mix until the black and white is evenly blended leaving no streaks of either color.
4. Transfer the mixture to another clean container to avoid any leftover residue from streaking the final mixture.
Warning:Part B must ALWAYS be added to part A, and mixed
in a 1:1 ratio.
Tip:Mix only the required amount of epoxy that will be used within a 30 minute timeframe to prevent the epoxy from
curing prematurely.
Epoxy Tips:
• The epoxy will not cure when the temperature is below 40°F. • For every +17°F, the epoxy cures twice as fast. • For every -17°F, the epoxy takes twice as long to cure. • Greater volume = less time to cure • Smaller volume = more time to cure • A technique to increase the pot life of the epoxy is to split up the mixed material into smaller units.
Installation Instructions
Seismic SealtiteTM
SIC-SII-0024 REV. B PAGE 2 OF 5
SCHUL INTERNATIONAL COMPANY, LLC ONE INDUSTRIAL DRIVE, PELHAM, NH 03076TELEPHONE: 800.848.1120 • FAX: 800.998.9105 • WEB ADDRESS: www.schul.com
Important: These instructions are intended as recommended guidelines. Due to the variability of field conditions, selection of the proper material for the intended application and installation are the sole responsibility of the applicator. The manufacturer’s published installation procedures shall be followed at all times.
Sealant Installation
Note:To ensure an aesthetic finish, verify that the silicone adhesive matches the color on the face of the joint
sealant material.
Note:When a continuous joint cannot be finished, the
silicone or epoxy on the substrate should stop at the last stick installed and silicone should not be applied to the end of the installed material until the next piece
of material is ready to be installed.
1. For joints that run horizontal, begin installing the material at one side of the joint (either side) and continue to install the material working towards the opposite end. For vertical joints, begin installation at the bottom of the joint and work upward. • The installed sticks will support the subsequent sticks until the material fully expands.
2. a. Smaller than 6” nominal joint size - run a 1/4” bead of the supplied silicone adhesive along both joint walls approximately 1/2”- 3/4” back from the surface of the joint substrate.
b. Larger than 6” nominal joint size - Refer to the Epoxy Preparation section. When fully prepared to install, apply a 1/16” - 1/8” coating of the epoxy mixture to both joint walls using a 1” margin trowel to a depth of the sealant material plus 1/2”. • The epoxy must still be wet upon installation of Seismic Sealtite™; The working
time for epoxy is approximately 30 minutes depending on the temperature.
• If the epoxy hardens on the surface of the substrate before installation, another coat
of epoxy can be applied within 8 hours. After 8 hours, the substrate surface must be
abraded to eliminate the amine blush that occurs during the final cure.
Installation Instructions
Seismic SealtiteTM
SIC-SII-0024 REV. B PAGE 3 OF 4
SCHUL INTERNATIONAL COMPANY, LLC ONE INDUSTRIAL DRIVE, PELHAM, NH 03076TELEPHONE: 800.848.1120 • FAX: 800.998.9105 • WEB ADDRESS: www.schul.com
Important: These instructions are intended as recommended guidelines. Due to the variability of field conditions, selection of the proper material for the intended application and installation are the sole responsibility of the applicator. The manufacturer’s published installation procedures shall be followed at all times.
Important: These instructions are intended as recommended guidelines. Due to the variability of field conditions, selection of the proper material for the intended application and installation are the sole responsibility of the applicator. The manufacturer’s published installation procedures shall be followed at all times.
Seismic SealtiteTM
Sealant Installation (Cont.)
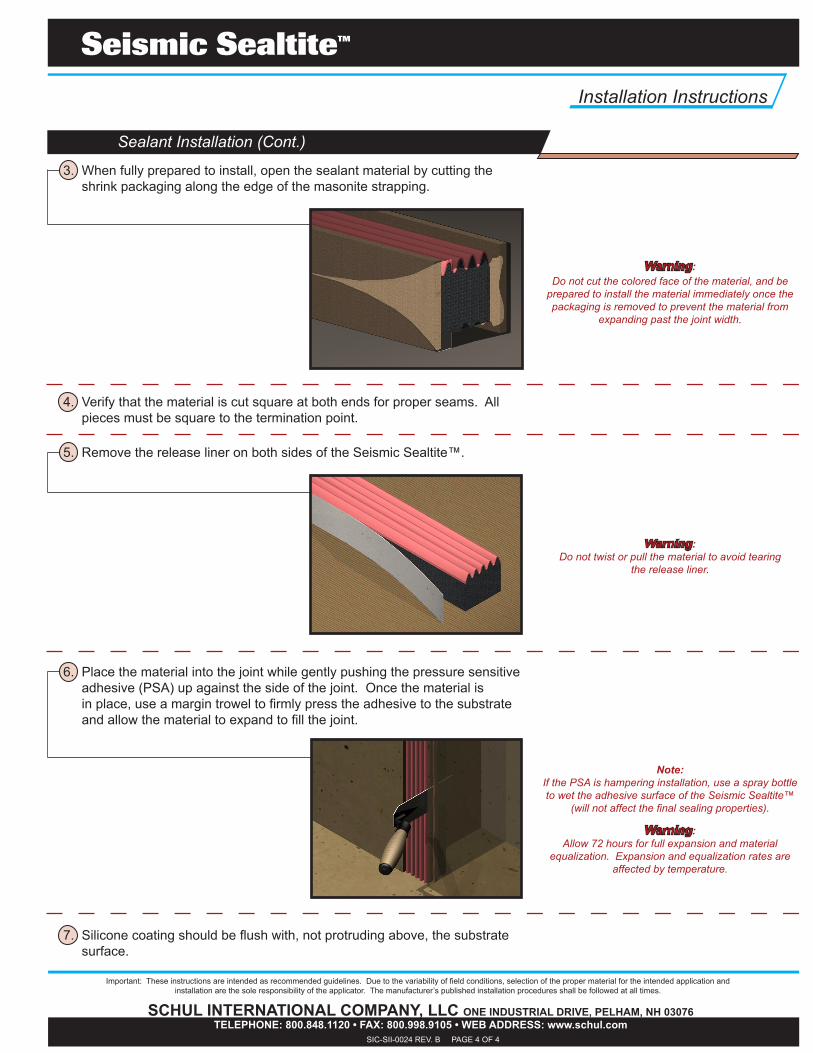
3. When fully prepared to install, open the sealant material by cutting the shrink packaging along the edge of the masonite strapping.
4. Verify that the material is cut square at both ends for proper seams. All pieces must be square to the termination point.
5. Remove the release liner on both sides of the Seismic Sealtite™.
6. Place the material into the joint while gently pushing the pressure sensitive adhesive (PSA) up against the side of the joint. Once the material is in place, use a margin trowel to firmly press the adhesive to the substrate and allow the material to expand to fill the joint.
7. Silicone coating should be flush with, not protruding above, the substrate surface.
Warning:Do not cut the colored face of the material, and be
prepared to install the material immediately once the packaging is removed to prevent the material from
expanding past the joint width.
Warning:Do not twist or pull the material to avoid tearing
the release liner.
Note:If the PSA is hampering installation, use a spray bottle to wet the adhesive surface of the Seismic Sealtite™
(will not affect the final sealing properties).
Warning:Allow 72 hours for full expansion and material
equalization. Expansion and equalization rates are affected by temperature.
SIC-SII-0024 REV. B PAGE 4 OF 4
SCHUL INTERNATIONAL COMPANY, LLC ONE INDUSTRIAL DRIVE, PELHAM, NH 03076TELEPHONE: 800.848.1120 • FAX: 800.998.9105 • WEB ADDRESS: www.schul.com
Installation Instructions
SIC-SII-0024 REV. B PAGE 5 OF 5
SCHUL INTERNATIONAL COMPANY, LLC ONE INDUSTRIAL DRIVE, PELHAM, NH 03076TELEPHONE: 800.848.1120 • FAX: 800.998.9105 • WEB ADDRESS: www.schul.com
Important: These instructions are intended as recommended guidelines. Due to the variability of field conditions, selection of the proper material for the intended application and installation are the sole responsibility of the applicator. The manufacturer’s published installation procedures shall be followed at all times.
Installation Instructions
Seismic SealtiteTM
Seams
1. Verify that the new piece of material is cut square and not at an angle to the previous material installed.2. Apply silicone to the butt end of the new piece of material as well as a 1/4” bead on both joint walls, inset 1/2”-3/4” as described in the Sealant Installation section.3. Overlap extra material (approximately 1/2”-1”) at seams and splices to ensure that the seam is in compression after installation.
4. “T” and “+” Intersections • Install horizontal material first • Butt the vertical material up to the horizontal material following steps 1+2
5. Use the matching silicone to run a bead along each edge of the joint to fill any irregularities in the substrate.
Note:After installation, if there are any mitered joints with a hole or a void, use the supplied silicone to fill and seal
the joint.
Note:Seismic Sealtite™ does not require an external fillet
bead to provide a watertight seal.
Finish
1. Tool the silicone over all seams and transitions using a small caulking tool.
2. Evenly spread the silicone on exposed seams to allow for a clean, aesthetic finish.
3. Remove any excess silicone left on the surface of the material or substrate.
4. Remove the blue painters tape from the substrate surface.
Warning:Do not allow the silicone to cure before removal.


![Schul the psychic power of pyramids [first run]](https://static.documents.pub/doc/80x56/579071ec1a28ab6874a46407/schul-the-psychic-power-of-pyramids-first-run.jpg)


