15
1 SELECT ELECTRONICS CORPORATION Kitchen Display Systems for the Hospitality Industry Chef Tab Illustrated Users Guide Release 2
| Date post: | 09-Sep-2018 |
| Category: |
Documents |
| Upload: | truongkien |
| View: | 217 times |
| Download: | 0 times |
1
SELECT ELECTRONICS CORPORATION
Kitchen Display Systems for the Hospitality Industry
ChefTab Illustrated Users Guide
Release
2

2
Table of Contents
Introduction i
C H A P T E R 1 – I N I T I A L S E T U P
C H A P T E R 2 – D E M O A N D T R A I N
C H A P T E R 3 – E T H E R N E T S E T U P
C H A P T E R 4 – S E T P R E F E R E N C E S
C H A P T E R 5 – T I C K E T G E N I E
C H A P T E R 6 – S O F T W A R E U P D A T E S
C H A P T E R 7 – H E L P / A B O U T
A P P E N D I X – P O S S E T U P

3
Introduction
ChefTab is the most powerful and simplest kitchen display system on the market today. Based on tablet technology, the ChefTab offers such powerful features as internet connectivity, wireless or wired communications, audio feedback, touch technology with gestures, etc. The goal of the ChefTab product is to provide as many plug and play features as possible to make the installation process a snap.
The basic design behind the ChefTab is to serve as an electronic
ticket wheel similar to what had been traditionally used in restaurants for generations. Of course due to the very nature of the ChefTab, a highly intelligent computer, features previously unavailable to restaurant owners is now a reality.
The initial release of the ChefTab will provide plug and play
compatibility with ANY standard network printer. In other words, any POS or ECR that currently supports a network printer will immediately support the ChefTab.
4
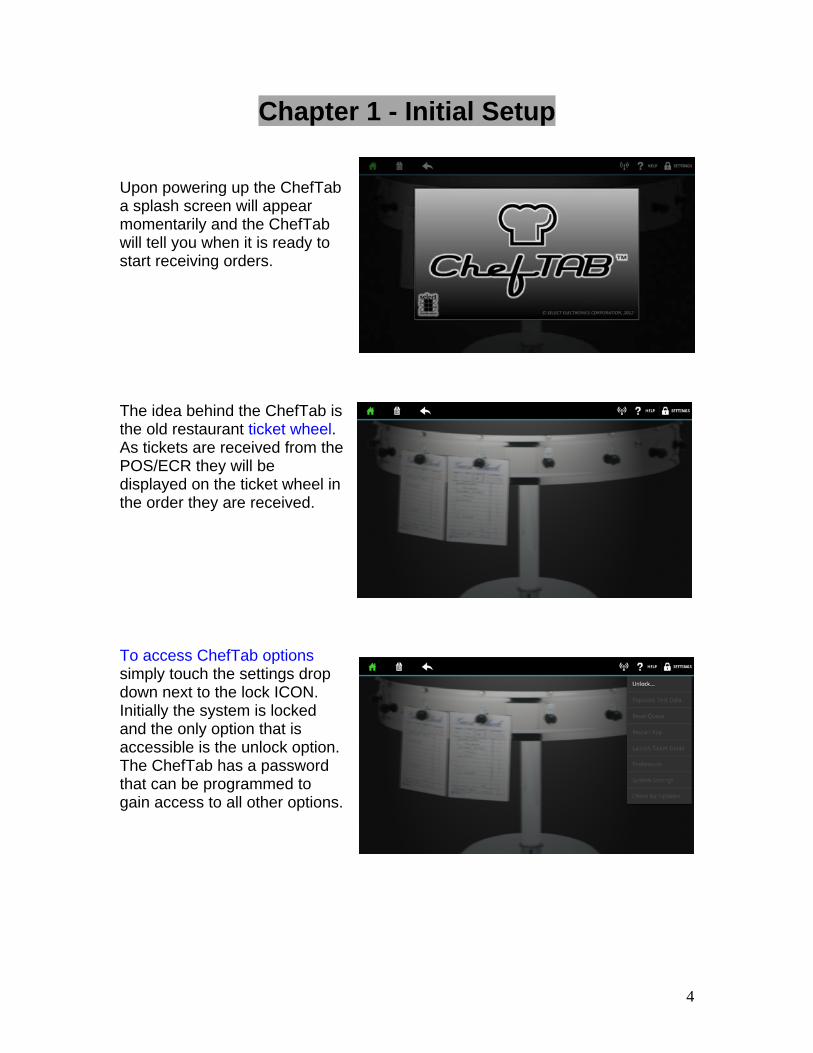
Chapter 1 - Initial Setup
Upon powering up the ChefTab a splash screen will appear momentarily and the ChefTab will tell you when it is ready to start receiving orders.
The idea behind the ChefTab is the old restaurant ticket wheel. As tickets are received from the POS/ECR they will be displayed on the ticket wheel in the order they are received.
To access ChefTab options simply touch the settings drop down next to the lock ICON. Initially the system is locked and the only option that is accessible is the unlock option. The ChefTab has a password that can be programmed to gain access to all other options.

5
Select unlock and enter the programmed password from the password screen to gain access to all options. Initially the unit is shipped with a default password of “3774566”. It is recommended that one of the first things you do is customize the password to prevent unauthorized access. See “Set preferences” section.
Once unlocked the entire options menu will be enabled and you are ready to start using the ChefTab. Don’t forget to lock the ChefTab after making changes to prevent unauthorized access. Just in case you do the ChefTab will lock itself after several minutes. This only prevents access to the drop down menu options and does not prevent normal operation of the ChefTab.

6
Chapter 2 - Demo and Train The first thing you should do is use the “Populate test data” option to send some pre-configured orders to the screen. This will allow you to test the various functions even prior to interfacing the POS to the ChefTab. This comes in handy for training and demo of the ChefTab unit.
Scrolling of orders can be accomplished with a simple horizontal swipe gesture across the screen. If you come across a ticket that extends past the bottom of the screen, as is in sample order #106, you can touch the ticket and slide your finger vertically to move the ticket up and down. Don’t tap the ticket as that will delete the ticket.
Don’t worry though, if you delete a ticket by accident you can always look in the trash bin for it. To access the trash bin simply touch the trash bin ICON at the top of the screen. To return to the active order queue touch the home ICON.

7
If you want to pull a ticket out of the trash bin (recall a ticket) and put it back into the active queue you can do that simply by tapping the ticket in the trash bin and it will restore it to the front of the active queue and display it in red indicating that it is a “hot ticket”.

8
Chapter 3 - Ethernet Setup
Prior to sending tickets to the ChefTab from any POS you will have to configure the Ethernet adapter on the ChefTab so that it is ready to receive these tickets. To do that select System Settings on the options menu. Once in system settings select “Ethernet Configuration”.
Once in the Ethernet Configuration screen make sure the Ethernet is turned on within the checkbox. Next you can select Ethernet Configuration to gain access to the Ethernet options menu.
From the Ethernet options menu you can program the Ethernet options such as IP Address, DHCP/Static IP, netmask, gateway, etc. At this point you a ready to send real tickets to the ChefTab.

9
Chapter 4 - Set preferences Of course there are many custom options associated with the ChefTab. All of these options have factory default settings but you may want to make some changes. All of the options can be found in “Preferences” and are categorized and come with a brief explanation of each on the screen. Rather than provide each screen view associated with Preferences a brief list is provided below.
Preference list
General Ticket Marking – ticket marking provides a method for multiple users. When a ticket is being processed it can be marked with the first touch. The background color of the ticket will be shaded to indicate that it has been marked. Touch the ticket again to delete it. Bump To IP Address – Tickets can be forwarded to another ChefTab unit or to a network printer once it is bumped. Enter the IP address of the device being forwarded to or leave this field blank to do nothing.
Sound
ChefTab Ready Sound – the ChefTab has the ability to play a sound once it is ready to receive orders. As with all sounds it can be silenced as well.
Ticket Arrival Sound – this is the sound that will play when a new ticket arrives.

10
Error Sound – this sound will play when an error occurs.
Printer Error Sound – this sound will play if a ticket is being sent to a BumpToPrinter that cannot be reached. Volume – this option allows you to select the volume at which all sounds are to be played.
Time Clocks
Priority Delay – this is the time delay, in seconds, before a ticket is flagged as a priority and highlighted. Tickets are highlighted by changing the color of the header. Priority Color Preference – this is the color that the header will be changed to when the ticket reaches priority status. Rush Delay – this is the time delay, in seconds, before a ticket is flagged as a rush and highlighted. Typically this is a larger number than Priority Delay. Rush Color Preference - this is the color that the header will be changed to when the ticket reaches rush status.
Debug (Debug options should be turned off when done using)
Debug Mode – provides the ability to view the hexadecimal equivalent of any non printable characters on the tickets. This may come in handy if tickets are not being displayed as expected. Logging – provides the ability to capture raw ticket data for further diagnosis if there are problems.
Security
Super User Password – this allows the dealer / manger to enter a password to prevent general access to the ChefTab options menu. It is highly recommended that a password be entered to prevent unauthorized access to system settings that could prevent the system from operating properly.

11
Chapter 5 - Ticket Genie Generally network printer data is pretty plain and black and white. You are probably going to want to spruce up the look of your tickets for the ChefTab and you may want to filter out some of the data. The Ticket Genie is a very nice tool for doing this and it is quick and easy. This is not a requirement if you just want to display the data as it comes in but it will help you format your tickets similar to the sample tickets the ChefTab ships with.
The first time through you are going to want to “Capture a New Ticket” from the POS so you can use it for formatting. You will probably want to enter a variety of lines, such as item lines, modifiers, etc. so that we can get a good sampling. Once you send a ticket the Ticket Genie will jump into the setup screen.
The setup screen is a recreation of the ticket and allows you to provide a definition for each line. The definition will dictate how the line displays on the ChefTab. Each line should be defined and each ticket should begin with a series of headers and end with footers. If a mistake is made the Ticket Genie will let you know.

12
By touching the drop down list to the right of each line you will be prompted to select a line type for that line. The Ticket Genie leads you through this process and provides you with the acceptable responses.
When you are done defining all of the lines you can exit the Ticket Genie and save your changes. Upon exiting your newly formatted ticket will be displayed. If you want to go back in at any point to modify your setting just reenter the Ticket Genie and select Modify Existing Ticket. If you did not send the Ticket Genie enough line samples in the very beginning you can resend a new ticket by selecting Capture New Ticket at any time.

13
Chapter 6 - Software updates One of the really great features about the ChefTab is it’s ability to update the software to the latest and greatest version without any headaches. Just touch a few buttons and you are done. The ChefTab will lead you through the process and will go to our web site to download the latest versions as long as there is an internet connection. It will tell you what version you have installed as well as what version is available on our web site. As Select Electronics releases new features and posts them to the web site they are immediately available to our customers.

14
Chapter 7 – Help / About The About window is accessible via the Help ICON and will display the current software version level running on your ChefTab and also displays the IP address. It is always a good idea to check the IP address that the ChefTab is reporting even after you have programmed it in Ethernet settings just to verify a correct IP address.

15
Appendix - POS Setup PIXELPOINT POS 1.) Using the windows “Printers and Faxes” feature add a new network printer and provide it with a unique name (***ChefTab1). Configure the printer as a Generic / Text Only printer. Protocol RAW. IP address is that of the actual ChefTab device. Port needs to be 9100 (that is the port the ChefTab listens on). 2.) Once you set up the windows printer you could do a "Print Test Page" even before having the Pixepoint software configured just to do an initial test. If the ChefTab is on the network and ready to receive you should see the test page appear on a ticket. If you do not see a ticket appear on the ChefTab you probably should resolve the issue before proceeding. 3.) Within the PixelPoint BackOffice go to Administrator - Network Printer Setup and add a printer called ***ChefTab1 and configured it as Printer Type: Epson TM-88IIIP, on port LPT1:. The timeout is set to 45 seconds. 4.) Configure some items to be sent to ***ChefTab1 and you should be up and running. ***This name can be any name you select


