42
Sensor eValuator USER GUIDE Testing and diagnostics. Error Reporting. Sensor Validation. Training and Technology for Injection Molders

Sensor eValuator
USER GUIDE
Testing and diagnostics.Error Reporting.Sensor Validation.
Training and Technology for Injection Molders

PRINT DATE 03.02.2020
REVISION NO. 3
USER GUIDE | RJG, INC. SENSOR eVALUATOR i
USER GUIDE Sensor eValuator
USER GUIDE INTRODUCTION III
DISCLAIMER III
PRIVACY III
ALERTS III
PRODUCT OVERVIEW IV
QUICK START GUIDE 1
START EQUIPMENT AND APPLICATION 2
RUN AN AUTOMATED SENSOR TEST 3
RUN A MANUAL SENSOR FORCE TEST 4
STRAIN GAGE SENSORS 4
PIEZOELECTRIC SENSORS 5
GENERATE AND DISTRIBUTE REPORTS 6
OVERVIEW 7
SENSOR EVALUATOR HARDWARE 8
AP 32C 8
LYNX SENSOR CABLE 9
TABLET 9
SENSOR EVALUATOR APPLICATION 10
AUTOMATED SENSOR TEST 11
MANUAL STRAIN GAGE SENSOR FORCE TEST 12
MANUAL PIEZOELECTRIC SENSOR FORCE TEST 13
SENSOR TEST RESULTS 14
SENSOR TEST REPORTS 15

RJG, INC. SENSOR eVALUATOR | USER GUIDEii
USER TOOLS 17
AUTOMATED SENSOR TESTS 18
MULTIPLE SENSORS 18
MANUAL SENSOR FORCE TESTS 19
STRAIN GAGE SENSORS 19
PIEZOELECTRIC SENSORS 20
SENSOR TEST REPORTS 21
SETTINGS 23
INSTALLATION AND SETUP 24
APPLICATION DOWNLOAD AND INSTALL FROM TABLET 24
REFRESH APPLICATION 25
REFRESH SENSOR EVALUATOR LIST 25
REFRESH SENSOR LIST 26
UPDATES 27
APPLICATION 27
FIRMWARE 27
TROUBLESHOOTING 29
STRAIN GAGE SENSORS 30
COMMUNICATION FAILURE 30
GAGE/WIRE TEST FAILURE 30
ZERO SHIFT FAILURE 30
FORCE TEST FAILURE 30
PIEZOELECTRIC SENSORS 31
COMMUNICATION FAILURE 31
FORCE TEST FAILURE 31
FORCE TEST PASS WITHOUT APPLICATION OF FORCE 31
DRIFT FAILURE 32
KNOWLEDGE BASE 33
CUSTOMER SUPPORT 34

USER GUIDE | RJG, INC. SENSOR eVALUATOR iii
USER GUIDE INTRODUCTIONRead, understand, and comply with all following instructions. These instructions must be kept available for reference at all times.
PRIVACYDesigned and developed by RJG, Inc. Manual design, format and structure copyright 2020 RJG, Inc. content documentation copyright 2020 RJG, Inc. All rights reserved. Material contained herein may not be copied by hand, mechanical, or electronic means, either whole or in part, without the express written consent of RJG, Inc. Permission will normally be granted for use in conjunction with inter‑company use not in conflict with RJG’s best interests.
ALERTS
The following three alert types are used as needed to further clarify or highlight information presented in the manual:
Term
A definition of a term or terms used in the text.
NOTE A note provides additional information about a discussion topic.
CAUTION A caution is used to make the operator aware of conditions that can cause damage to equipment and/or injury to personnel.
DISCLAIMERInasmuch as RJG, Inc. has no control over the use to which others may put this material, it does not guarantee that the same results as those described herein will be obtained. Nor does RJG, Inc. guarantee the effectiveness or safety of any possible or suggested design for articles of manufacture as il lustrated herein by any photographs, technical drawings, and the like. Each user of the material or design or both should make his own tests to determine the suitability of the material or any material for the design as well as the suitability of the material, process, and/or design for his own particular use. Statements concerning possible or suggested uses of the material or designs described herein are not to be construed as constituting a license under any RJG, Inc. patent covering such use or as recommendations for use of such material or designs in the infringement of any patent.
COMPLIANCEThe CoPilot™ System (including Sensor eValuator Version 2.0)” has been designed and tested in accordance with the following standards:
EN 61326‑1:2013
EMC Requirements for electrical equipment for measurement, control, and laboratory use. Intended for use in industrial locations.
IEC 61010‑1:2010
Safety requirements for electrical equipment for measurement, control, and laboratory use.
The Sensor eValuator system conforms to European Conformity (CE) requirements and is eligible for sale in the European Union (EU).

RJG, INC. SENSOR eVALUATOR | USER GUIDEiv
PRODUCT OVERVIEW
The Sensor eValuator provides testing of up to 30 Lynx cavity pressure sensors simultaneously, including the following:
Automatic Testing
• Strain Gage SensorsLynx Communication, Zero Offset, and Broken Wire/Failed Gage Tests
• Piezoelectric SensorsLynx Communication and Drift Tests
Manual Testing
• Strain Gage Sensors Basic Force Test• Piezoelectric Sensors Basic Force Test
Specifications
Compatible Sensor Models
• Strain Gage
LS‑B‑127‑50/125/500/2000, LS‑B‑159‑4000, LES‑B‑127‑50/125/500/2000, LES‑B‑159‑4000, MCSG‑B‑60‑50, MCSG‑B‑127‑125/500/2000, & MCSG‑B‑159‑4000
• Piezoelectric6157, 6159, 9204, 9210, & 9211
Hardware
• Power Requirements 12 V DC• Max Lynx Sensors 30
Application
• Tablet Samsung Galaxy Tab 4• OS Requirements Android 4.4 KitKat or Later• Memory Required 10 MB
This Product Includes:
• 1 RJG, Inc. AP 32C with USB WiFi Adapter (TP Link TL‑WN7225N v3.8)
• 1 7" Samsung Tablet with USB cable• 1 OtterBox Tablet Case• 1 12 V DC Power Supply Cable• 1 Lynx Cable

1RJG, INC. SENSOR eVALUATOR | QUICK START GUIDE
START EQUIPMENT AND APPLICATION 2
RUN AN AUTOMATED SENSOR TEST 3
RUN A MANUAL SENSOR FORCE TEST 4
STRAIN GAGE SENSORS 4
PIEZOELECTRIC SENSORS 5
GENERATE AND DISTRIBUTE REPORTS 6
QUICK START GUIDE

QUICK START GUIDE | RJG, INC. SENSOR eVALUATOR2
START EQUIPMENT AND APPLICATION
Connect the power supply cable to the AP 32C 1 power port and a power source. The green 2 power indication light will indicate that the AP 32C is on; if no green light is visible the AP 32C is off.
Connect the Lynx cable to the AP 32C 3 Lynx input, and the sensor(s) to be tested; ensure the provided USB WiFi adapter is inserted in the AP 32C USB port.
Select the RJG Sensor eValuator 4 application icon on the tablet home page to start the application.
NOTE WiFi must be enabled on the tablet to connect to the Sensor eValuator.
NOTE For optimal performance the tablet should be physically near the Sensor eValuator and the sensors being tested.
2
1
3
4

RJG, INC. SENSOR eVALUATOR | QUICK START GUIDE 3
RUN AN AUTOMATED SENSOR TESTSelect a 1 Sensor eValuator icon from the application home page with which to connect. The Sensor eValuator icon will be grey until selected, and will turn green after selection. If multiple sensors are attached for testing, a pop‑up window will appear to determine if each connected sensor is the same or different model(s). Select the appropriate response for the connected sensor(s) to continue.
Enter the 2 Mold Number in the provided field. Select 3 Begin Automated Test to test the sensor(s). The 4
Progress Bar will indicate the test progress. Wait for the test to complete.
The 5 automated test complete page will indicate any alerts, warnings, and the number of sensors that passed the test. Select a 6 sensor to enter the sensor information, including Location, Cavity Name, Pin Size, Sensitivity, Sensor Model, and Sensor Serial Number. Complete the testing by running a force test (page 4).
1
5
6
4
3
2

QUICK START GUIDE | RJG, INC. SENSOR eVALUATOR4
RUN A MANUAL SENSOR FORCE TEST
Sensor force tests require the operator to physically press on the sensor(s) being tested in order for the Sensor eValuator to evaluate if the sensor is detecting force.
NOTE The application will time out if no signal is received from the sensor in a specified length of time; be ready to apply force to the sensor(s).
STRAIN GAGE SENSORS
After completing an automated test, select 1 Test Basic and Device Force OR 2 Touch to Begin Force Test to force test a single sensor, OR 3 Force Test All to force test all sensors.
Select 4 End Force Test to return to the test results screen when the force test is complete.
32
1
4
4

RJG, INC. SENSOR eVALUATOR | QUICK START GUIDE 5
PIEZOELECTRIC SENSORS
NOTE Do not move the sensor adapter cable during multi‑channel piezoelectric sensor testing. Moving the sensor adapter cable during multi‑channel piezoelectric sensor testing will create false test results.
After completing an automated test, select 1 Test Basic and Device Force OR 2 Touch to Begin Force Test to force test a single sensor, OR 3 Force Test All to force test all sensors.
Select 4 End Force Test to return to the test results screen when the force test is complete.
3
1
4
4
2

QUICK START GUIDE | RJG, INC. SENSOR eVALUATOR6
GENERATE AND DISTRIBUTE REPORTS
The Sensor eValuator application generates a report fi le for tested sensors.
Select the 1 share button located at the top right‑hand corner of the 2 completed test screen. The 3 report screen will display.
Select the 4 email function from the 3 report screen.
Select 5 YES to disconnect from the Sensor eValuator hardware and connect to a WiFi network.
Email the report to the desired email address.
12
4
5
3

7RJG, INC. SENSOR eVALUATOR | OVERVIEW
OVERVIEW
SENSOR EVALUATOR HARDWARE 8
AP 32C 8
LYNX SENSOR CABLE 9
TABLET 9
SENSOR EVALUATOR APPLICATION 10
AUTOMATED SENSOR TEST 11
MANUAL STRAIN GAGE SENSOR FORCE TEST 12
MANUAL PIEZOELECTRIC SENSOR FORCE TEST 13
SENSOR TEST RESULTS 14
SENSOR TEST REPORTS 15
OVERVIEW | RJG, INC. SENSOR eVALUATOR8
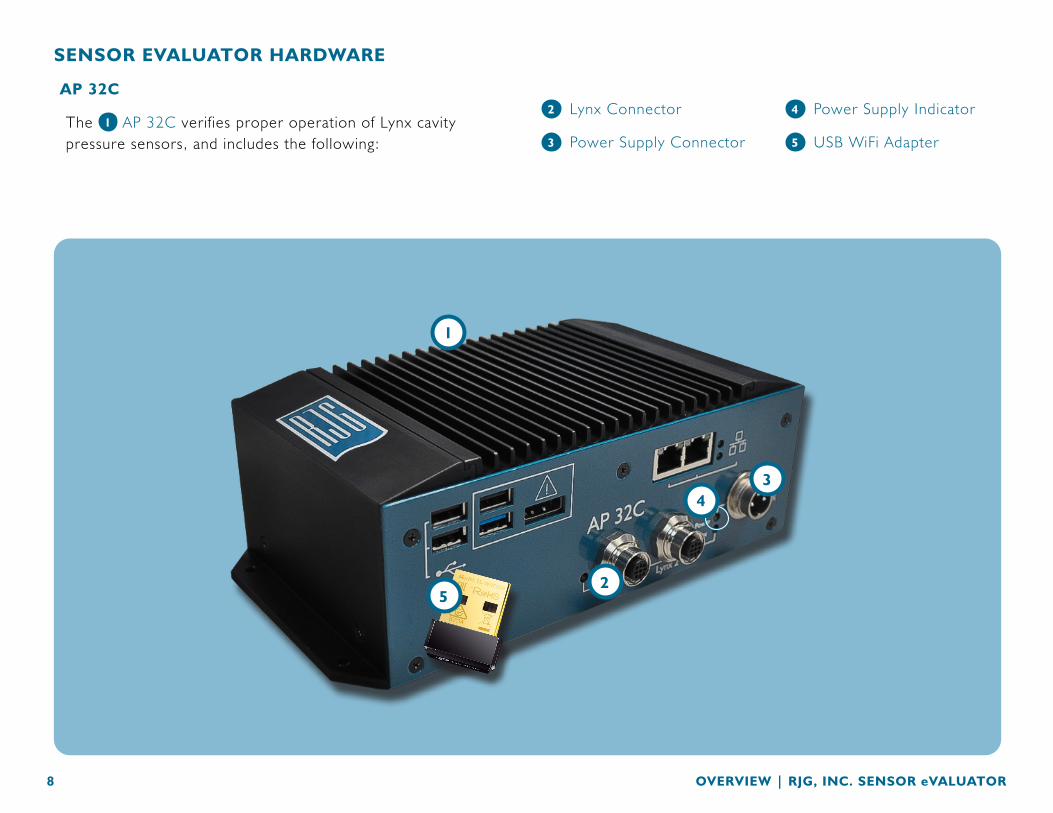
SENSOR EVALUATOR HARDWARE
AP 32C
The 1 AP 32C verifies proper operation of Lynx cavity pressure sensors, and includes the following:
• 2 Lynx Connector
• 3 Power Supply Connector
• 4 Power Supply Indicator
• 5 USB WiFi Adapter
2
4
1
3
5

RJG, INC. SENSOR eVALUATOR | OVERVIEW 9
LYNX SENSOR CABLE
The Lynx sensor cable provided with the AP 32C provides a physical connection between the AP 32C and strain gage or piezoelectric sensors for testing.
TABLET
The tablet provided with the AP 32C is preloaded with the Sensor eValuator application, and provides a user interface for testing sensors and generating sensor test reports. Refer to the tablet manufacturer's manual for operating and troubleshooting instructions.
NOTE For optimal performance the tablet should be physically near the Sensor eValuator and the sensors being tested.

OVERVIEW | RJG, INC. SENSOR eVALUATOR10
SENSOR EVALUATOR APPLICATION
The Sensor eValuator application tests, labels, and generates a report for up to 30 sensors simultaneously.
The application provides the following tests:
• 1 Automated Sensor Tests (Multiple or Single Sensor)
• Manual2 Strain Gage Sensor Force Tests
• 3 Manual Piezoelectric Sensor Force Tests
1
23

RJG, INC. SENSOR eVALUATOR | OVERVIEW 11
AUTOMATED SENSOR TEST
The automated sensor test will test each sensor connected to the Sensor eValuator simultaneously for the following:
• 3 Zero Shift (for Strain Gage only)
• 4 Drift (for Piezoelectric Sensors only)
• 1 Communication
• 2 Gage/Wire Test (for Strain Gage only)
1 2
3
1 4

OVERVIEW | RJG, INC. SENSOR eVALUATOR12
MANUAL STRAIN GAGE SENSOR FORCE TEST
The manual strain gage sensor force test tests for 1 Basic and Device Force. The operator must physically press on the sensor(s) being tested in order for the Sensor eValuator to evaluate if the sensor is detecting force.
NOTE The application will time out if no signal is received from the sensor within a specified length of time; be ready to apply force to the sensor(s).
The manual strain gage sensor force test will display a 2 test in progress page, then a 3 Signal Detected OR 4 No Signal Detected screen to indicate if a sensor signal is or is not detected.
1
4
3
2

RJG, INC. SENSOR eVALUATOR | OVERVIEW 13
MANUAL PIEZOELECTRIC SENSOR FORCE TEST
The manual piezoelectric sensor force test tests for 1 Basic and Device Force. The operator must physically press on the sensor(s) being tested in order for the Sensor Tester to evaluate if the sensor is detecting force.
NOTE The application will time out if no signal is received from the sensor within a specified length of time; be ready to apply force to the sensor(s).
The manual piezoelectric sensor force test will display a 2 test in progress page, then a 3 Signal Detected OR 4 No
Signal Detected screen to indicate if a sensor signal is or is not detected.
NOTE Do not move the sensor adapter cable during multi‑channel piezoelectric sensor testing. Moving the sensor adapter cable during multi‑channel piezoelectric sensor testing will create false test results.
1
4
3
2

OVERVIEW | RJG, INC. SENSOR eVALUATOR14
SENSOR TEST RESULTS
The 1 multiple sensor test results page indicates any 2 incomplete tests, 3 alerts, 4 warnings, and the 5
number of sensors that passed testing.
2 Incomplete tests indicates sensors that have not been force tested. Sensor names will be grey until force tested.
3 Alerts indicate a sensor is outside ±5% (strain gage) or ±40 picocoulombs/min (piezoelectric) normal.
4 Warnings indicate a sensor is outside ±2% (strain gage) or ±20 picocoulombs/min (piezoelectric) normal.
The 6 single sensor test results page indicates if the tested sensor has passed communication, gage/wire, zero shift (strain gage only), drift (piezoelectric only), and basic force testing successfully.
Successful tests are indicated by 7 green check marks. If a box is red the sensor is in the 3 alerts state. If a box is yellow, the sensor is in 4 warnings state.
Select the 8 help icon for information on an 3 alert or 4 warning, or to retest the sensor.
1
2 43 5
6
7
8

RJG, INC. SENSOR eVALUATOR | OVERVIEW 15
SENSOR TEST REPORTS
Sensor test reports are generated automatically and stored in the tablet's Device Storage/Downloads folder. The reports can be viewed while in the Sensor eValuator application, or opened or emailed from the tablet's fi le directory.
Select the 1 share button to view a sensor test report after completing sensor testing.
Reports detail 2 incomplete tests, 3 alerts, 4 warnings, and the 5 number of sensors that passed testing. The reports also show if the tested sensor has passed 6 communication, 7 gage/wire (strain gage only), 8 zero shift (strain gage only), 9 drift (piezoelectric only), and 10 basic force testing successfully. The report will include any entered 11 sensor information, such as Location, Pin Type, and Pin Size.
2 3 45
6
8
9
10
1
1
11
7

OVERVIEW | RJG, INC. SENSOR eVALUATOR16

17RJG, INC. SENSOR eVALUATOR | USER TOOLS
USER TOOLS
AUTOMATED SENSOR TESTS 18
MULTIPLE SENSORS 18
MANUAL SENSOR FORCE TESTS 19
STRAIN GAGE SENSORS 19
PIEZOELECTRIC SENSORS 20
SENSOR TEST REPORTS 21

USER TOOLS | RJG, INC. SENSOR eVALUATOR18
AUTOMATED SENSOR TESTS
MULTIPLE SENSORS
Select a 1 Sensor eValuator from the application home page with which to connect. The Sensor eValuator will be grey until selected and will turn green after selection.
If desired, enter the mold number in the 2 Mold Number field.
Select 3 Begin Automated Test to test all sensors.
The 4 Progress Bar will indicate the test progress. Wait for the test to complete.
Select a 5 sensor to enter the sensor information including Location, Cavity Name, Pin Size, Sensitivity, Sensor Model, and Sensor Serial Number in the provided 6 f ields. Run a manual force test to complete testing.
3
2
4
5
11
6
6

RJG, INC. SENSOR eVALUATOR | USER TOOLS 19
2 3
5
5
4
4
1
6
MANUAL SENSOR FORCE TESTS
STRAIN GAGE SENSORS
After running an automated test, select one of the following:
• 1 Test Basic and Device Force
• 2 Touch to Begin Force Test
• 3 Force Test All
NOTE The application will time out if no signal is received from the sensor in a specified length of time; be ready to apply force to the sensor(s).
Select 4 End Force Test after the 5 Signal Detected screen is displayed.
The 6 No Signal Detected screen will be displayed if the test was unsuccessful. Refer to PAGE 30 for troubleshooting.

USER TOOLS | RJG, INC. SENSOR eVALUATOR20
3
5
1
6
PIEZOELECTRIC SENSORS
NOTE Do not move the Lynx cable during piezoelectric sensor testing, as it will create false test results.
After running an automated test, select one of the following:
• 1 Test Basic and Device Force
• 2 Touch to Begin Force Test
• 3 Force Test All
NOTE The application will time out if no signal is received from the sensor in a specified length of time; be ready to apply force to the sensor(s).
Select 4 End Force Test after the 5 Signal Detected screen is displayed.
The 6 No Signal Detected screen will be displayed if the test was unsuccessful. Refer to PAGE 31 for troubleshooting.
4
4
5
2

RJG, INC. SENSOR eVALUATOR | USER TOOLS 21
SENSOR TEST REPORTS
Sensor reports are stored in the tablet's Device Storage/Downloads folder after the report is generated.
Select the 1 Email button, then select either 2 NO to remain connected, or YES to disconnect from the Sensor eValuator and email the report.
NOTE The email button must be selected to generate the report; if the email button is not selected, the report will not be generated.
Select the 3 Applications icon from the tablet home page.
Select 4 My Files.
Select 5 Device Storage.
Select 6 Downloads.
Select the desired 7 report.
3
56
7
41
2

USER TOOLS | RJG, INC. SENSOR eVALUATOR22

23RJG, INC. SENSOR eVALUATOR | SETTINGS
SETTINGS
INSTALLATION AND SETUP 24
APPLICATION DOWNLOAD AND INSTALL FROM TABLET 24
REFRESH APPLICATION 25
REFRESH SENSOR EVALUATOR LIST 25
REFRESH SENSOR LIST 26
UPDATES 27
APPLICATION 27
FIRMWARE 27

SETTINGS | RJG, INC. SENSOR eVALUATOR24
INSTALLATION AND SETUP
APPLICATION DOWNLOAD AND INSTALL FROM TABLET
Select the 1 Applications icon from the tablet home page.
Select the 2 Play Store from the list of Apps.
Enter 3 sensor evaluator in the search bar.
Select the 4 Sensor eValuator application.
Select 5 Install from the application page.
Select 6 Accept from the permissions pop‑up window.
1
2
3
4
5
SENSOR EVALUATOR
6

RJG, INC. SENSOR eVALUATOR | SETTINGS 25
REFRESH APPLICATION
REFRESH SENSOR EVALUATOR LIST
If no Sensor eValuators appear upon application start‑up, or if a recently connected Sensor eValuator does not appear on the list of Sensor eValuators, swipe the tablet screen in a downward motion to 1 refresh the application for any recently added or removed Sensor eValuators.
Any 2 connected Sensor eValuators will display in the window.
NOTE WiFi must be enabled on the tablet to connect to the Sensor eValuator.
1
2
SETTINGS | RJG, INC. SENSOR eVALUATOR26
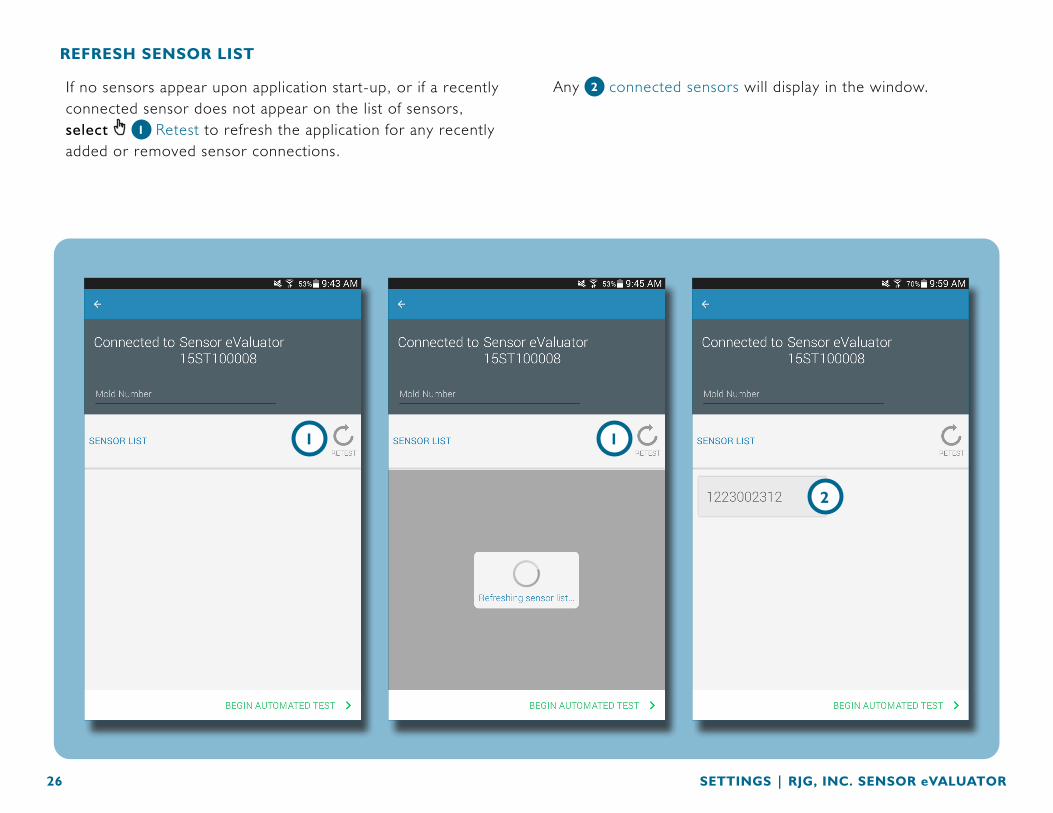
REFRESH SENSOR LIST
If no sensors appear upon application start‑up, or if a recently connected sensor does not appear on the list of sensors, select 1 Retest to refresh the application for any recently added or removed sensor connections.
Any 2 connected sensors will display in the window.
1 1
2

RJG, INC. SENSOR eVALUATOR | SETTINGS 27
UPDATES
APPLICATION
Check for application updates in the 1 Google Play store. Refer to APPLICATION DOWNLOAD AND INSTALL FROM TABLET ON PAGE 24.
FIRMWARE
Firmware updates for the Sensor eValuator are installed from the tablet. Open and connect to the Sensor eValuator. Select the 2 UPDATE FIRMWARE button. Any firmware updates will be pushed to the Sensor eValuator from the tablet. Once the firmware is updated, a 3 success message is displayed. Restart the Sensor eValuator to complete the update.
1
2
3

SETTINGS | RJG, INC. SENSOR eVALUATOR28
29RJG, INC. SENSOR eVALUATOR | TROUBLESHOOTING
TROUBLESHOOTING
STRAIN GAGE SENSORS 30
COMMUNICATION FAILURE 30
GAGE/WIRE TEST FAILURE 30
ZERO SHIFT FAILURE 30
FORCE TEST FAILURE 30
PIEZOELECTRIC SENSORS 31
COMMUNICATION FAILURE 31
FORCE TEST FAILURE 31
FORCE TEST PASS WITHOUT APPLICATION OF FORCE 31
DRIFT FAILURE 32
KNOWLEDGE BASE 33
CUSTOMER SUPPORT 34

TROUBLESHOOTING | RJG, INC. SENSOR eVALUATOR30
STRAIN GAGE SENSORS
COMMUNICATION FAILURE
The Sensor eValuator lost connection to the sensor electronics:
• Replace the Lynx cable and try again.
• If a new cable does not correct the issue, the problem is most likely the sensor electronics.
• If the test fails again, replace the strain gage adapter (SG/LX….) and retest.
• If the test fails again, request an RMA for return from RJG.
GAGE/WIRE TEST FAILURE
There may be a broken wire:
• Perform a visual inspection of the sensor cable.
• If cable is okay the gage may be damaged or overloaded.
• Remove the sensor form the tool and retest the sensor. If the sensor now passes the test, check the sensor pocket installation dimensions.
• If the sensor fails again, request an RMA for return from RJG.
ZERO SHIFT FAILURE
Remove sensor from tool and retest. Failure could be caused by preload due to installation. Common causes of preload are:
• Radius in the corners of the sensor pocket.
• Improper sensor pocket depth.
• Not enough clearance above the ejector pin head.
If the sensor fails after removal from the tool, the sensor needs to be re‑calibrated or replaced.
• Request an RMA from RJG.
FORCE TEST FAILURE
Tester did not detect any force being applied;
• apply pressure on pin or directly on sensor head.
• Remove the sensor from the tool and retest the sensor.
If the sensor passes, check that the pin moves freely. The pin should slide forward and backward easily. The pin should also spin easily.
• If the sensor fails again, request an RMA from RJG.

RJG, INC. SENSOR eVALUATOR | TROUBLESHOOTING 31
PIEZOELECTRIC SENSORS
COMMUNICATION FAILURE
The Sensor eValuator lost connection to the sensor electronics:
• Replace the Lynx cable and try again.
• If a new cable does not correct the issue, the problem is most likely the sensor electronics.
• If the test fails again, replace the strain gage adapter (SG/LX….) and retest.
• If the test fails again, request an RMA for return from RJG.
FORCE TEST FAILURE
1. Single Channel
Tester did not detect any force being applied;
• apply pressure on pin or directly on sensor head.
• Remove the sensor from the tool and retest the sensor.
• If the test fails again, remove the sensor from the tool and retest the sensor.
If the sensor passes, check that the pin moves freely. The pin should slide forward and backward easily. The pin should also spin easily.
• If the sensor fails again, request an RMA from RJG.
2. Multi Channel
Tester did not detect any force being applied;
• apply pressure on pin or directly on sensor head.
• Remove the sensor from the tool and retest the sensor.
If the sensor passes, check that the pin moves freely. The pin should slide forward and backward easily. The pin should also spin easily.
• If the sensor fails again, request an RMA from RJG.
FORCE TEST PASS WITHOUT APPLICATION OF FORCE
If force was not applied, but the test was passed, be aware that moving the piezoelectric sensor cable during the test can cause false readings. Check the sensor again without moving any of the components.

TROUBLESHOOTING | RJG, INC. SENSOR eVALUATOR32
DRIFT FAILURE
1. Multi-channel
Something happened to cause a change in reading during the test. Be aware that moving the piezoelectric sensor cable during the test can cause false readings. Check the sensor again without moving any of the components.
• If the test fails a second time, start testing backwards from the mold to the electronics until drift passes.
Disconnect sensor head from 1645 cable and Retest.
• If the test passes the problem is in the sensor head.
Disconnect 1645 cable from PZ plate and Retest.
• If the test passes the problem is in the 1645 cable.
Disconnect PZ Plate and Retest.
• If the test passes the problem is in the PZ Plate.
Disconnect piezoelectric sensor adapter cable (C‑PZ/LX… ) and Retest
• If the test passes the problem is in the piezoelectric sensor adapter cable (C‑PZ/LX…)
• If the test fails, the problem is in the piezoelectric sensor adapter electronics (PZ/LX…)
Clean the sensor can cable connection points with an approved cleaner. Follow instructions at: https://rjginc.com/paperclip/product_downloads/547/cleaning‑connectors_cables.pdf. Retest after cleaning.
• If the test fails after cleaning, request an RMA from RJG.
2. Single Channel
Something happened to cause a change in reading during the test. Be aware that moving the piezoelectric sensor cable during the test can cause false readings. Check the sensor again without moving any of the components.
• If the test fails a second time, start testing backwards from the mold to the electronics until drift passes.
Disconnect sensor head from 1645 cable
• If the test passes the problem is in the sensor head.
Disconnect 1645 cable from the piezoelectric sensor adapter (PZ/LX1‑M) and Retest.
• If the test passes the problem is in piezoelectric sensor adapter.
Disconnect 1661 cable from piezoelectric sensor adapter (PZ/LX‑S) and Retest.
• If the test passes the problem is in the piezoelectric sensor adapter.
Clean the sensor can cable connection points with an approved cleaner. Follow instructions at: https://rjginc.com/paperclip/product_downloads/547/cleaning‑connectors_cables.pdf. Retest after cleaning.
• If the test fails after cleaning, request an RMA from RJG.
RJG, INC. SENSOR eVALUATOR | TROUBLESHOOTING 33
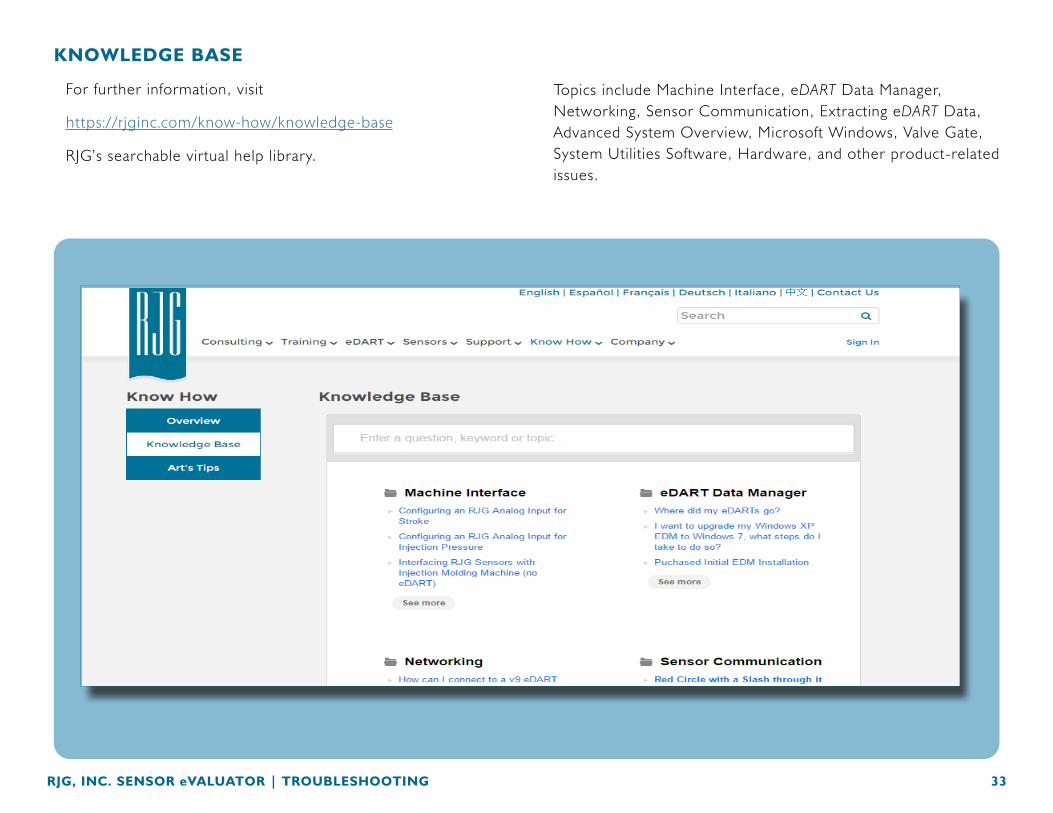
KNOWLEDGE BASE
For further information, visit
https://rjginc.com/know-how/knowledge-base
RJG’s searchable virtual help library.
Topics include Machine Interface, eDART Data Manager, Networking, Sensor Communication, Extracting eDART Data, Advanced System Overview, Microsoft Windows, Valve Gate, System Utilities Software, Hardware, and other product‑related issues.

TROUBLESHOOTING | RJG, INC. SENSOR eVALUATOR34
CUSTOMER SUPPORT
Contact RJG's Customer Support team by phone or email.
RJG, Inc. Customer Support
P: 800.472.0566 (Toll Free)
P: +1.231.933.8170
https://rjginc.com/support


LOCATIONS / OFFICES
USA RJG USA (HEADQUARTERS)3111 Park Drive Traverse City, MI 49686 P +01 231 947-3111 F +01 231 947-6403 [email protected] www.rjginc.com
ITALY NEXT INNOVATION SRL Milano, Italy P +39 335 178 4035 [email protected] it.rjginc.com
MEXICO RJG MEXICOChihuahua, Mexico P +52 614 4242281 [email protected] es.rjginc.com
SINGAPORE RJG (S.E.A.) PTE LTD Singapore, Republic of Singapore P +65 6846 1518 [email protected] en.rjginc.com
FRANCE RJG FRANCEArnithod, France P +33 384 442 992 [email protected] fr.rjginc.com
CHINA RJG CHINA Chengdu, China P +86 28 6201 6816 [email protected] zh.rjginc.com
GERMANY RJG GERMANYKarlstein, Germany P +49 (0) 6188 44606 11 [email protected] de.rjginc.com
KOREA CAEPRO Seoul, Korea P +82 02-2113-1870 [email protected] www.caepro.co.kr
IRELAND/UK
RJG TECHNOLOGIES, LTD. Peterborough, England P +44(0) 1733-232211 [email protected] www.rjginc.co.uk


![Controller/Evaluator Handbook Template · Web viewHomeland Security Exercise and Evaluation Program (HSEEP) [Exercise Name] Controller/Evaluator Handbook [Date] The Controller/Evaluator](https://static.documents.pub/doc/80x56/613ca9d64c23507cb6358754/controllerevaluator-handbook-template-web-view-homeland-security-exercise-and-evaluation.jpg)


