74
1 September 2012
1
September 2012

Issue #1
2
Page intentionally left blank

3
September 2012
Calling all Fellow LuthiersA new adventure begins: a shared enterprise called SUSTAIN—a magazine for luthiers, designers, suppliers, and lovers of stringed musical instruments.
Following the example of excellence provided by other specialized media (like American Lutherie magazine in the U.S.) we will contribute from this side of the Atlantic to the div-ulgation of the arcane art of building musical instruments.
The digital version of this first issue is free. Share it, e-mail it to your fellow lu-thiers, or link it from your website.
And then help us build the future of this new space. Participate!
• Become an author: submit an article (don’t worry about grammar or typos—we will take care of those).
• Share your experience: workshop tips, new techniques, jigs you have invented.
• Show us the pictures and stories of your creations.
• Help us improve by sending your suggestions, questions, or critiques.
• Advertise your school, instruments, books, shop, wood, parts, or any other lutherie and music-related products and services.
And especially, subscribe! Issue 1/2013 comes out on time for Christmas (a great gift for a fellow luthier or for yourself) and will continue every quarter. Order your subscrip-tion on www.FellowLuthiers.com.
Leo Lospennato is luthier, author of books on lutherie and editor of SUSTAIN Magazine. He lives in Berlin, Germany. (www.lospennato.com)
EDITORIAL
Issue #1
4
CONTENTS
Interview
Bach, Motörhead And Ukes
Electronics
Wiring Double-Neck Guitarsby Helmuth Lemme
Design
Generating the Strad’s OutlineBy Leo Lospennato
Techniques
A Universal Neck Pocket JigBy Martin Koch
Research
Player Preferences Among Old And New Violins
Fellows
Lutherie With A Woman’s TouchInterview with Maru Grünthal
The Ukulele Orchestra of Great Britain
5
September 2012
Fellows
Guitar Design As An Artistic SearchInterview with Bertram Dhellemmes
The Guitar Finishing Series - Part I
Choosing a Finishing MethodBy Wim Stout
Lutherie schools
A Smell Of Varnish And TraditionThe Zwickau University’s School Of Lutherie
Part I - Camera settings/ instrument prepping
How To Photograph Guitars(For Non Photographers)
Retro/vintage
Oddities
DVD Reviews
Book Reviews
CONTENTS

Issue #1
6
Sustain Magazine is produced with the collaboration of luthiers, and edited and published by the Fellowship of european Luthiers. The contents in this magazine are either original or re-produced with authorization of the copyright holders. Any eventual contents without identification of copyright are reproduced as with “no known copyright restrictions” when the editor is unaware of any copyright restrictions on its use. We endeavor to provide information that we possess about the copyright status of the Content and to identify any other terms and conditions that may apply (such as trademarks, rights of privacy or publicity, donor restrictions, etc.); however, the editor can offer no guarantee or assurance that all pertinent information is provided or that the information is correct in each circumstance. It is the reader’s responsibility to determine what permission(s) you need in order to use the content and, if necessary, to obtain such
permission. If you are, or know, the author or rights holder of any content in this magazine please write us an email and we will gladly include the corresponding credit in future editions.All rights reserved. No part of this magazine covered by copyrights hereon may be reproduced or copied without written permission, except in the case of brief quotations embodied in articles and reviews, citing the source. Please address all requests to [email protected]. Exclusive for Issue #1: This issue can be distributed in PDF format, free of charge. Copyrights apply for the contents. Printing a copy of this issue is allowed only for personal use. Reselling this magazine issue in any format is not authorized to third parties. ISBN-13: 978-1479127016
For French born Bertram Dhellemmes, 45, being an amateur luthier is only part of a true Renaissance-inspired personality: he directs artistic projects that combine perfor-mance and visual arts, “free noise” music, literature, dance, and only God knows what’s next. And then, he designs and builds electric guitars.http://guitarren.blogspot.com
Martin Koch, born in Austria, defines him-self as a luthier that builds guitars in order to write books about it; indeed, he is the author of “Building Electric Guitars” and “E-Gitarrenbau”. Martin also leads a website full or resources for luthiers: http://www.buildyourguitar.comMaru Grüntahl, from Buenos Aires,
Argentina, designs and produces laser cut parts for musical instruments. She is
currently taking her first steps as luthière, a passion that shares her agenda with an
academic career in industrial design. http://www.marugruntahl.com.ar
Helmuth Lemme, born in Germany, was already building phones and
electric motors at 11, and started developing his own pickups in
1975. He is an expert in industrial electronics, a guitar collector, and
author of several books on electronics of guitars and amplifiers.
http://www.gitarrenelektronik.de
Wim Stout, born in The Netherlands, has 20 years of experience as a paint chemist. He lives with his wife and kids in a 100 year old house where he builds beautiful electric guitars that end up finished with lacquers of his own formula. http://www.DutchHandmadeGuitars.com
IMPRINT
EditorAdvisory Council
Published byPublisherWebsite
Leo LospennatoWim StoutHelmut LemmeThe Fellowship of European LuthiersUmlaut Publishing - Germanywww.FellowLuthiers.com
Collaborators on this issue:

7
September 2012
Bach, Motörhead and Ukes
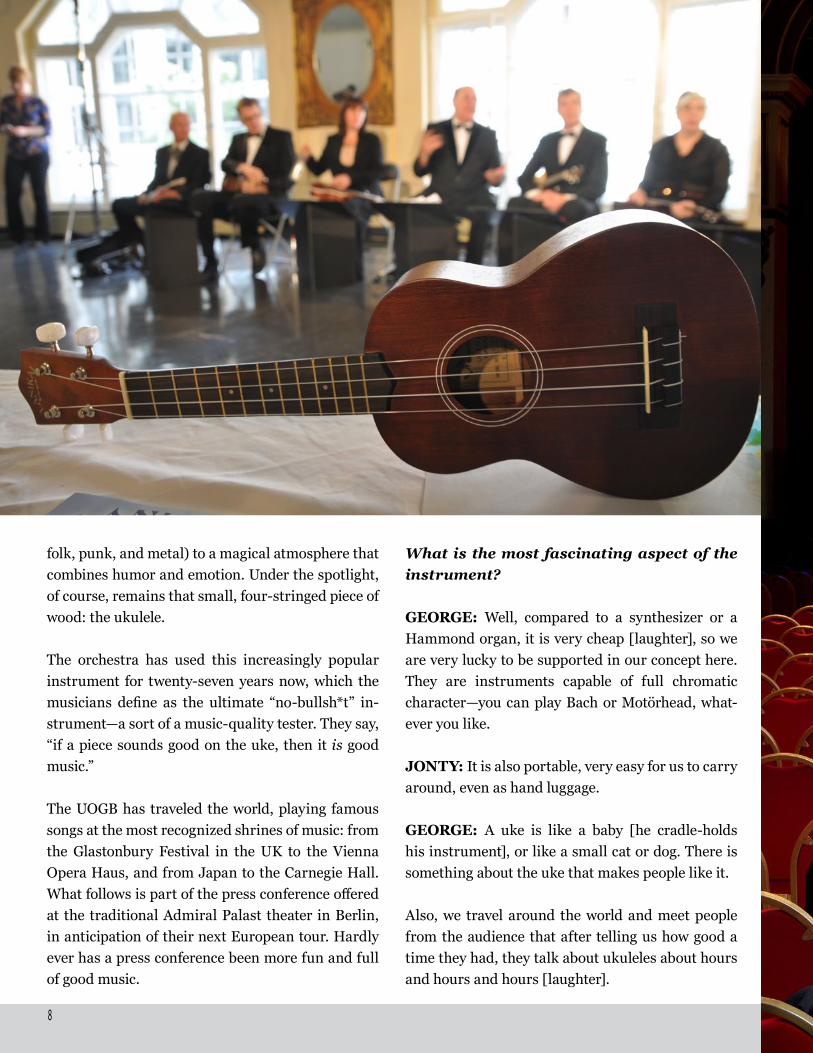
T he Ukulele Orchestra of Great Britain (UOGB) is an octet of extremely talented musicians who have a unique proposition:
to use only four-stringed instruments that come
from Hawaii. Formal jackets and the funny little chordophones mark a harmonic contrast that mir-rors that of the ensemble as a whole: from the ex-tremely diverse repertoire (which includes classical,
Eclectic repertoire, high quality performances and humor, all mixed in a recipe for enjoyment.
Absolute protagonist: the ukulele.
UOGB
The Ukulele Orchestra of Great Britain
INTERVIEW
Issue #1
8
folk, punk, and metal) to a magical atmosphere that combines humor and emotion. Under the spotlight, of course, remains that small, four-stringed piece of wood: the ukulele.
The orchestra has used this increasingly popular instrument for twenty-seven years now, which the musicians define as the ultimate “no-bullsh*t” in-strument—a sort of a music-quality tester. They say, “if a piece sounds good on the uke, then it is good music.”
The UOGB has traveled the world, playing famous songs at the most recognized shrines of music: from the Glastonbury Festival in the UK to the Vienna Opera Haus, and from Japan to the Carnegie Hall. What follows is part of the press conference offered at the traditional Admiral Palast theater in Berlin, in anticipation of their next European tour. Hardly ever has a press conference been more fun and full of good music.
What is the most fascinating aspect of the instrument?
GEORGE: Well, compared to a synthesizer or a Hammond organ, it is very cheap [laughter], so we are very lucky to be supported in our concept here. They are instruments capable of full chromatic character—you can play Bach or Motörhead, what-ever you like.
JONTY: It is also portable, very easy for us to carry around, even as hand luggage.
GEORGE: A uke is like a baby [he cradle-holds his instrument], or like a small cat or dog. There is something about the uke that makes people like it.
Also, we travel around the world and meet people from the audience that after telling us how good a time they had, they talk about ukuleles about hours and hours and hours [laughter].
9
September 2012
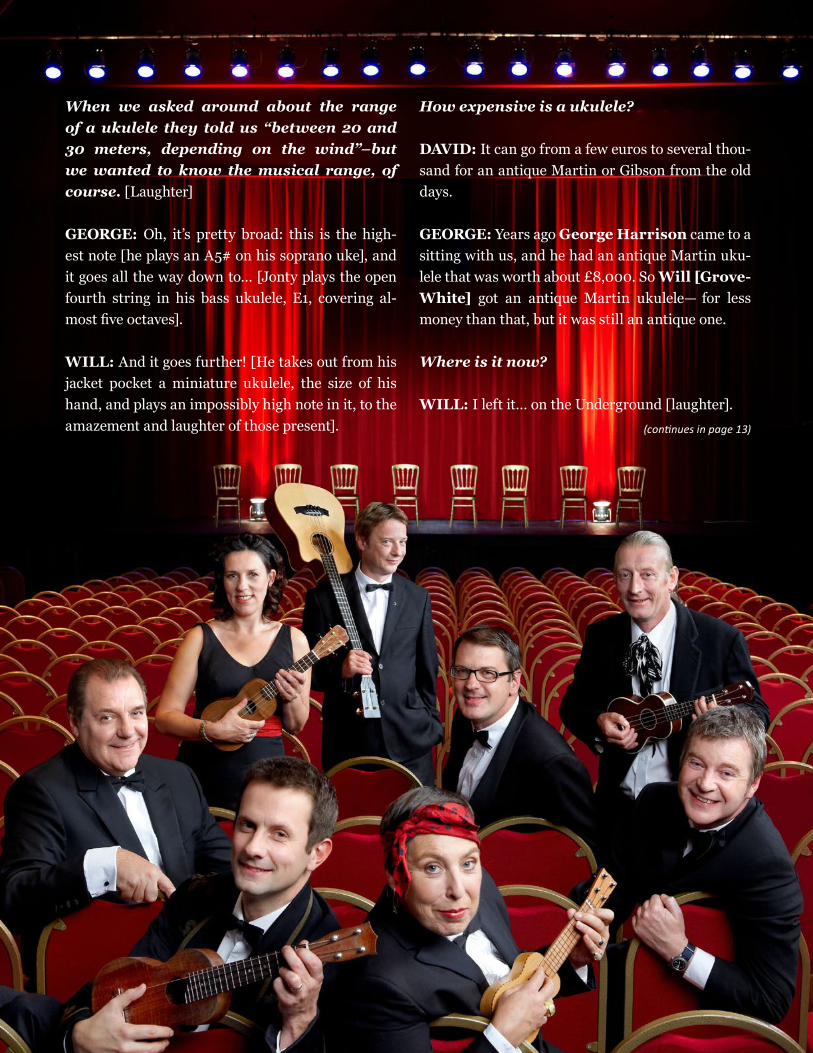
When we asked around about the range of a ukulele they told us “between 20 and 30 meters, depending on the wind”–but we wanted to know the musical range, of course. [Laughter]
GEORGE: Oh, it’s pretty broad: this is the high-est note [he plays an A5# on his soprano uke], and it goes all the way down to… [Jonty plays the open
fourth string in his bass ukulele, E1, covering al-most five octaves].
WILL: And it goes further! [He takes out from his jacket pocket a miniature ukulele, the size of his hand, and plays an impossibly high note in it, to the amazement and laughter of those present].
How expensive is a ukulele?
DAVID: It can go from a few euros to several thou-sand for an antique Martin or Gibson from the old days.
GEORGE: Years ago George Harrison came to a sitting with us, and he had an antique Martin uku-lele that was worth about £8,000. So Will [Grove-White] got an antique Martin ukulele— for less money than that, but it was still an antique one.
Where is it now?
WILL: I left it… on the Underground [laughter].
(continues in page 13)
Issue #1
10
Ten facts
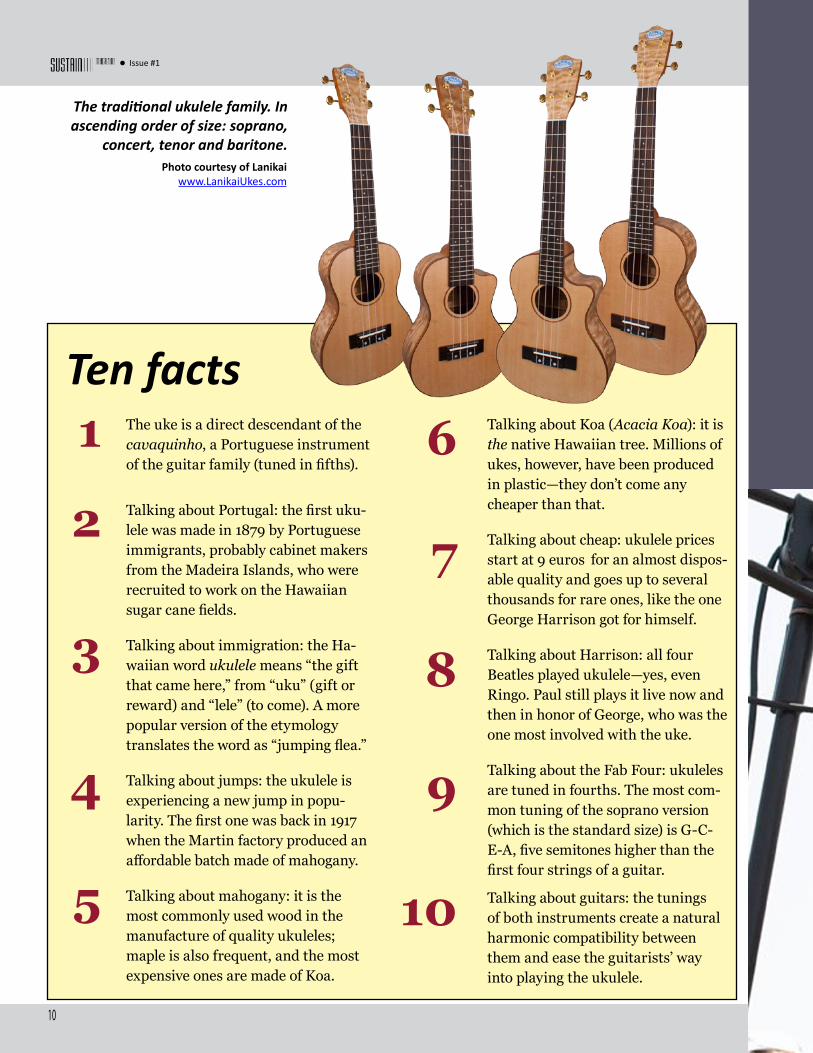
The traditional ukulele family. In ascending order of size: soprano,
concert, tenor and baritone.
The uke is a direct descendant of the cavaquinho, a Portuguese instrument of the guitar family (tuned in fifths).
Talking about Portugal: the first uku-lele was made in 1879 by Portuguese immigrants, probably cabinet makers from the Madeira Islands, who were recruited to work on the Hawaiian sugar cane fields.
Talking about immigration: the Ha-waiian word ukulele means “the gift that came here,” from “uku” (gift or reward) and “lele” (to come). A more popular version of the etymology translates the word as “jumping flea.”
Talking about jumps: the ukulele is experiencing a new jump in popu-larity. The first one was back in 1917 when the Martin factory produced an affordable batch made of mahogany.
Talking about mahogany: it is the most commonly used wood in the manufacture of quality ukuleles; maple is also frequent, and the most expensive ones are made of Koa.
Talking about Koa (Acacia Koa): it is the native Hawaiian tree. Millions of ukes, however, have been produced in plastic—they don’t come any cheaper than that.
Talking about cheap: ukulele prices start at 9 euros for an almost dispos-able quality and goes up to several thousands for rare ones, like the one George Harrison got for himself.
Talking about Harrison: all four Beatles played ukulele—yes, even Ringo. Paul still plays it live now and then in honor of George, who was the one most involved with the uke.
Talking about the Fab Four: ukuleles are tuned in fourths. The most com-mon tuning of the soprano version (which is the standard size) is G-C-E-A, five semitones higher than the first four strings of a guitar.
Talking about guitars: the tunings of both instruments create a natural harmonic compatibility between them and ease the guitarists’ way into playing the ukulele.
1
2
3
4
5
6
7
8
9
10
Photo courtesy of Lanikai www.LanikaiUkes.com

11
September 2012
Ukuleles for PeaceThe UOGB officially supports a beautiful project called “Ukuleles for Peace”: musician Paul Moore brings together Arab and Jewish kids to play the uke —kids who through the communion of music offer an incredible counterpoint to the complex and frequently terrible disputes between Israel and the Palestinian Arabs in the Middle East.
The kids form an orchestra in which they (accom-panied by kazoos and other fun instruments) get to know each other and share their music with an audience that (inevitably) comes from both sides of the conflict. The children sing in Hebrew, Arabic, and English, and by playing together, they create further opportunities for communal activi-ties involving their parents and other members of both communities.
(Visit www.UkelelesForPeace.com)
Ukuleles for Peace has grown since its inception to involve classes at schools in Hod Hasharon and Tira, two cities separated by an incredibly ancient and difficult geopolitical frontier; they are now a bit closer to each other thanks to a small Hawaiian instrument and the hope of harmony—of the music and of the souls, too.
“I would love to turn up at the United Nations and just simply play our music to them as a statement of what is possible. Words seem to divide, whereas music unites us all,” says Moore.
In the meantime, the parents of the children and all other grownups, divided by centuries of dis-agreements, get closer to each other by the example given by a group of kids playing together, celebrat-ing life with music and joy.

Issue #1
12
(Pho
to: P
aul C
ampb
ell)
It is a small, four-courses, re-entrant tuned, plucked chordophone. In other words, it has four strings, and if you play it right handed, the string nearest your nose is tuned high. A ukulele is a bit like a small guitar, but the construction details are different and give it a distinctive tone. The ukulele is not related to the banjo, al-though the ukulele–banjo is often referred to as a “uke.” The ukulele is arguably re-lated to the cavaquinho, the braguina, the cuatro, the mandora, the chittarino, and the requinto. Curiously, as the early guitar had four strings, a modern guitar can be thought of as a “genetically modi-
fied” ukulele. A ukulele can be thought of as a “bonsai” guitar. Some ukulele-style instruments have more than four strings, such as the taro-patch , which has up to four courses (that is, some of the strings are double, tuned in unison or octaves). Distinctions between guitar-like, man-dolin-like, and other fretted, plucked stringed instruments are sometimes dif-ficult to make. There is even a mando-uke. The instrument called the “ukeline” is actually a cross between a zither and a bowed psaltery, and is not related to either the ukulele or the mandolin. But that’s another story. (Source: UOGB)
What is a ukulele, exactly?

13
September 2012
(Pho
to: P
aul C
ampb
ell)
If you had to select an instrument by choos-ing among beauty, sound, or playability, what would you prioritize?
HESTER: Playability, no doubt about it. The con-tinued use of an instrument demands it. The sound is also important, of course. Beauty is not much of a hugely important parameter—well, for me at the beginning, maybe—but not anymore.
George, in a live show you presented the ukulele bass with the words: “This is the fu-ture; you can’t fight it” [laughter]. Has that prophecy come true?
GEORGE: Well, if you read the historic literature you will find that when Leo Fender invented the electric bass he didn’t called it a “bass guitar,” he called it an “electric bass”: it is not a guitar, and it has four strings! [He says it tongue-in-cheek, im-plying that basses actually form part of the ukulele family.]
You all come from several different musical styles (classical, jazz, and even punk). How does such mix work?
GEORGE: We feel that any music is good music—especially if it played on the ukulele—so we some-times make fun of classical music and take the most
abject rock and roll very seriously. One of our mes-sages is that the difference between “high culture” and “low culture” is a perhaps a fictitious one; after all, Mozart was very playful, and Motörhead is very serious.
At the end of the interview, David—not with-out a little guilt—approached the SUSTAIN magazine’s journalist and shared in low voice: “Let me tell you another pretty popu-lar ukulele joke: What’s the difference be-tween a ukulele and a trampoline? You take off your shoes before jumping on a trampo-line.”
Related links:http://www.ukuleleorchestra.comhttp://www.ukulelesforpeace.comhttp://www.admiralspalast.de
This minuscule ukulele (barely longer than a pen) is the smallest instrument actually used on stage by the UOGB. It is neither plastic nor a toy: it is a real ukulele with a nicely figured top and sides; it has real strings (not just a nylon fishing line); and it produces a real—although extra high pitched—ukulele sound. The scale is about 160 mm (just over six inches), and tuning the little thing is a mission only for the brave. The question that remains is: does it have a truss-rod in there?
No
way

Issue #1
14
Wiring Double-Neck Electric GuitarsBy Helmuth Lemme
T he idea of building stringed instru-ments that have two or more necks is already very old; such models existed in the 19th century or perhaps earlier.
Of course, these instruments were purely acoustic, a tradition that persists in the many double-neck acoustic guitars built in our days, but most of them are equipped with built-in pickups, though.
A one of a kind instrument by luthier Philipp Neu-mann, from Leipzig, Germany, is shown in Fig. 1, above. It has a normal fretted fingerboard with six nylon strings , a fretless fingerboard with five ny-lon strings, and twelve diagonal resonating steel strings. Each group is picked up separately and then mixed.
The first purely electric instruments with multiple necks were Hawaiian guitars and had up to four fin-gerboards. Double-neck guitars for normal playing
Fig. 1
ELECTRONICS
position showed up in the 1950s, e.g. by Gibson. The best known model is the EDS-1275, a double-neck version of the SG model. Several other manufactur-ers offer stock models today; furthermore, there are innumerable single items that are completely made by luthiers according to the musician’s specifica-tions. Nearly all have solid bodies. A very uncon-ventional construction was the Guild “Crossroads,” a connection of a twelve-string acoustic and a six-string solid-body guitar (Fig. 2 - on next page).
The most frequent combination is six- and twelve-string guitars. Less frequently, one finds a six-string guitar and four-string bass (like the headless gui-tar/bass on the cover of this magazine). Since the only limit is the imagination, many other configu-rations occur: twelve-string guitar and four-string bass; two six-string guitars (with different tunings); six-string guitar and a mandolin’s neck with four, six, or eight strings; fretted and fretless bass (four, five, or six strings each), etc.

15
September 2012
Three necks are rare; however, a three-neck model was produced in series by the Korean manufacturer Career. The Hamer company built a one-of-a-kind, five-neck guitar for the guitarist Rick Nielsen from the rock band Cheap Trick. This monster has a very high weight and is hard to play, but it undoubt-edly accomplishes its “show effect” objective.
Standard Wiring
Most models have only one jack output and are con-nected to the amplifier by a single-core shielded cable. They have the usual controls (volume and/or tone) plus a neck selector switch to select each neck separately or both at the same time.
However, the latter possibility proves itself prob-lematic for two reasons: 1) While one is playing on one neck, the unplayed strings of the other neck vi-brate and can be heard, and 2) The pickups of the unplayed neck are connected in parallel to those of the played neck, acting as an electrical load. The output voltage sinks to half as is the effective induc-tance: the sound becomes quieter and brighter.
Therefore, it is better to have a neck selector switch with only two positions (fig. 3) to activate one neck or the other but never both at the same time.
Fig. 3
Fig. 2
Fig. 4
A single-pole/double-throw switch is needed for this—a component that is not available as a guitar spare part but rather in the electronic trade. Fig. 4 shows two models of stable, high-quality switches.
The sound settings on the amplifier, however, may satisfy one neck but not the other. Thus, one has to adjust the amp controls when changing necks.

Issue #1
16
This is, of course, inconvenient. A solution would be to have an amplifier with preset configurations, changeable with a foot switch: for example, having a lead or crunch sound for a six-string guitar neck and a clean sound for a twelve-string guitar neck or a bass neck (a distorted twelve-string sounds terri-ble!) One only would have to flip the neck switch on the instrument and the foot switch of the amplifier simultaneously.
Separate wirings and two cables
If the sound qualities required for both necks can-not be achieved with one amplifier then we need two amps and a so-called A/B switch. But there is a prob-lem: most A/B-switches alternate between the sig-nal paths, but the ground contacts are always firmly connected to each other (fig. 5a). If the grounds of two amplifiers are connected to each other, then a “ground loop” is formed: a loud hum comes out from both amplifiers.
Some musicians don’t want to have a foot switch but only want to flip one single switch on the instru-ment. This wish can be fulfilled rather easily if one uses an amplifier with two input channels. One then needs a stereo jack in the instrument and a Y cable, which has a stereo jack plug at one end and is split up into two individual cables at the other end with separate mono jack plugs each (Fig. 6).
These plugs go from the instrument to the two dif-ferent input channels of the amplifier (fig. 7a). It does not make sense to insert both into the two in-put jacks of the same channel (“High” and “Low” or “1” and “2”; fig. 7b) because this would be the same as having a mono cable, going back to the hum prob-lem.
Fig. 5a: A/B-box for using one guitar with two amps. The cheap solution: the ground line is not switched, risking a ground loop and the consequent hum.
Fig. 5b: This is the correct solution: the ground line is switched, too. No ground loop, no hum.
Fig. 6: A “Y” cable, with two mono plugs in one end, and a stereo plug in the other.
To avoid this, some people put isolating tape on the protective ground contact of the main’s plug of one amplifier. This is extremely dangerous and not recommended. A better solution is an A/B-switch of higher quality that switches not only the signal line but also the ground lines (fig. 5b).
17
September 2012
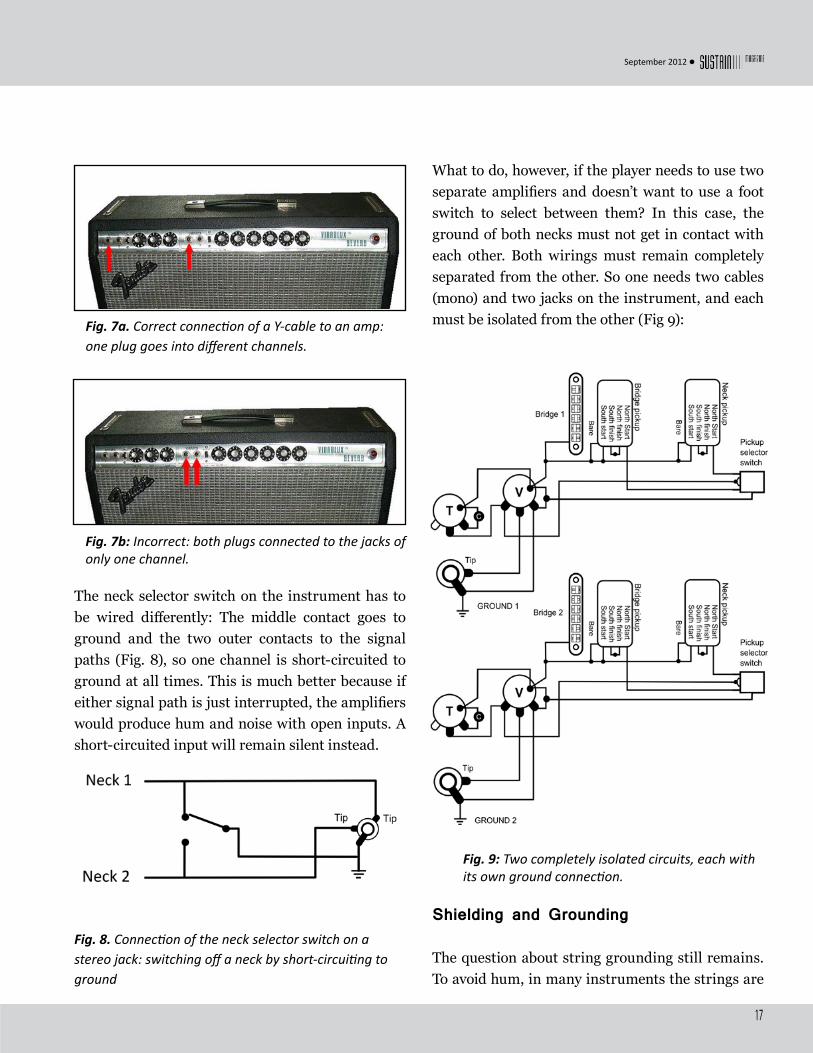
Fig. 9: Two completely isolated circuits, each with its own ground connection.
The neck selector switch on the instrument has to be wired differently: The middle contact goes to ground and the two outer contacts to the signal paths (Fig. 8), so one channel is short-circuited to ground at all times. This is much better because if either signal path is just interrupted, the amplifiers would produce hum and noise with open inputs. A short-circuited input will remain silent instead.
What to do, however, if the player needs to use two separate amplifiers and doesn’t want to use a foot switch to select between them? In this case, the ground of both necks must not get in contact with each other. Both wirings must remain completely separated from the other. So one needs two cables (mono) and two jacks on the instrument, and each must be isolated from the other (Fig 9):Fig. 7a. Correct connection of a Y-cable to an amp:
one plug goes into different channels.
Fig. 7b: Incorrect: both plugs connected to the jacks of only one channel.
Fig. 8. Connection of the neck selector switch on a stereo jack: switching off a neck by short-circuiting to ground
Shielding and Grounding
The question about string grounding still remains. To avoid hum, in many instruments the strings are
Issue #1
18
connected to the wiring’s ground using the bridge. But there is a misconception here. If the electrical parts of the instrument are not correctly shielded, there will always be an audible hum, as unfortu-nately very often happens. In such case, if the player does not touch the strings, they are subject to an alternate electric field emanating from power lines and electric devices in the proximity.
If the player touches the strings and they are grounded, then the player’s whole body gets ground-ed, which works as shielding (at least for electric fields coming from his/her rear). The amplifier then hums no more, or at least much less. This of course is not an elegant method to remove hum. Careful, inner shielding is by far superior. Copper foil works best because one can solder it. Aluminum foil is cheaper and easier to get, but it cannot be soldered. The shielding has to be grounded by contact with the pots, the switches, or the jack. If the shielding is formed by several foils, all must have a good contact with each other; otherwise, the shielding will be in-complete and ineffective.
Conductive spray paints are not as good as metal foils. Those that contain copper are quite useful if one sprays on at least three layers. Each layer has to be totally dry before the next layer is applied. Carbon-containing sprays have still less effect. Zinc spray is completely useless.
If a hum remains despite having inner shielding (a hum that stops when you touch the strings), the cul-prits are the pickups, which probably are unshield-
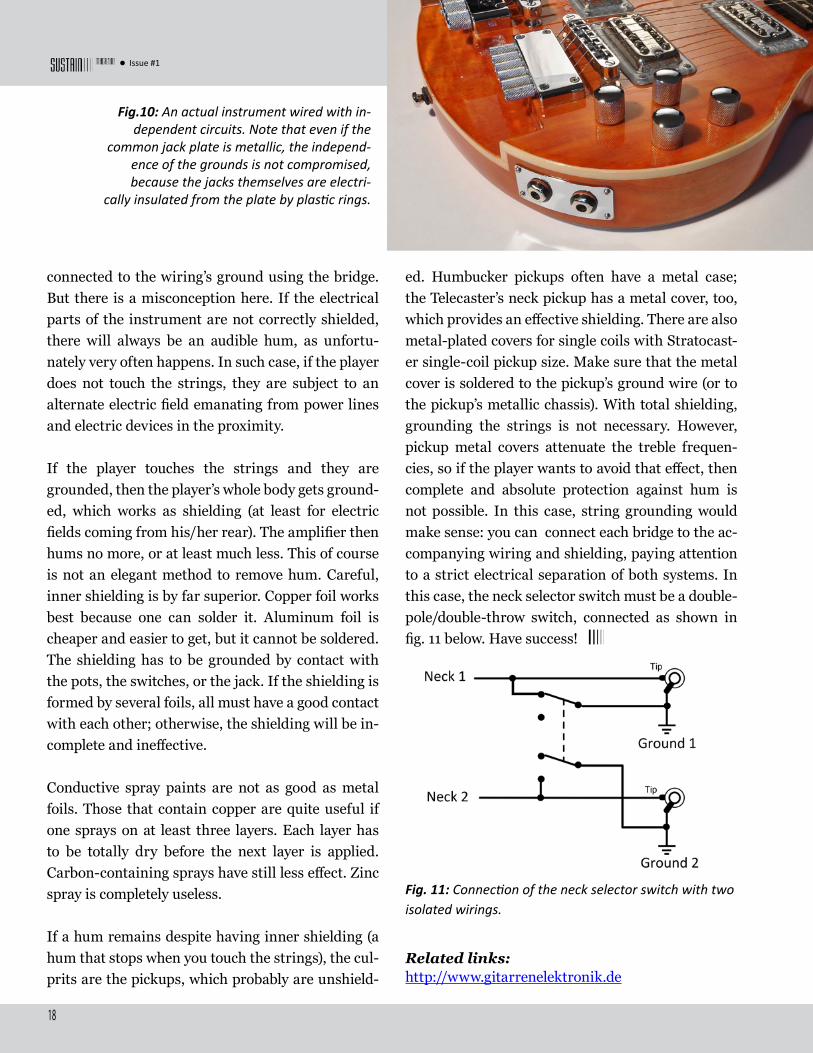
Fig.10: An actual instrument wired with in-dependent circuits. Note that even if the
common jack plate is metallic, the independ-ence of the grounds is not compromised, because the jacks themselves are electri-
cally insulated from the plate by plastic rings.
Fig. 11: Connection of the neck selector switch with two isolated wirings.
ed. Humbucker pickups often have a metal case; the Telecaster’s neck pickup has a metal cover, too, which provides an effective shielding. There are also metal-plated covers for single coils with Stratocast-er single-coil pickup size. Make sure that the metal cover is soldered to the pickup’s ground wire (or to the pickup’s metallic chassis). With total shielding, grounding the strings is not necessary. However, pickup metal covers attenuate the treble frequen-cies, so if the player wants to avoid that effect, then complete and absolute protection against hum is not possible. In this case, string grounding would make sense: you can connect each bridge to the ac-companying wiring and shielding, paying attention to a strict electrical separation of both systems. In this case, the neck selector switch must be a double-pole/double-throw switch, connected as shown in fig. 11 below. Have success!
Related links:http://www.gitarrenelektronik.de
19
September 2012
D esign in ancient and medieval times was strongly influenced by geometrical resources not devoid of a magical or otherwise transcendental
meaning. Examples are the golden ratio and “mys-tical numbers,” such as three or seven, which were commonly used in architecture, painting, and other
artistic expressions. This influence extended into the later centuries and even to the present day.
Did Stradivari (or his masters before him) use such geometrical resources in order to develop the out-lines of their violins? Several procedures that I have analyzed (including that of Simone Sacconi in
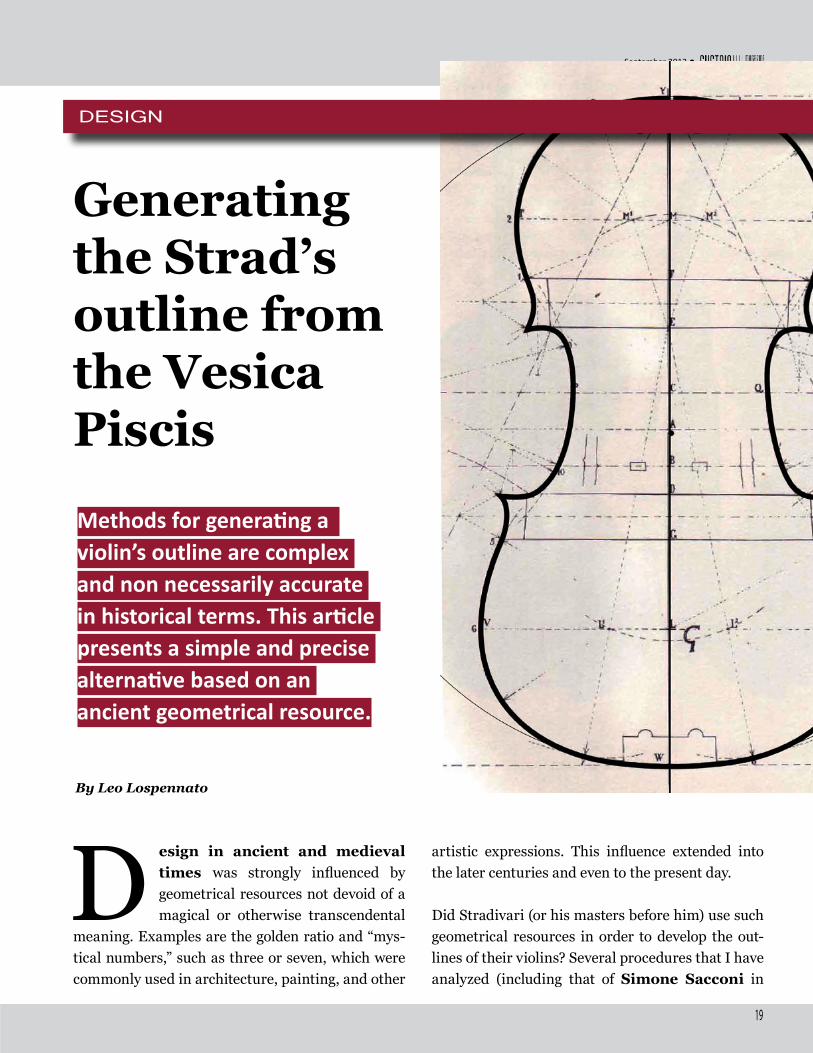
Generating the Strad’s outline from the Vesica Piscis
Methods for generating a violin’s outline are complex and non necessarily accurate in historical terms. This article presents a simple and precise alternative based on an ancient geometrical resource.
By Leo Lospennato
DESIGN
Issue #1
20
The ‘Secrets’ of Stradivari) presented the following characteristics:
1) The procedure had several dozens of steps.
2) The steps themselves were not easy to follow and required different geometrical resources (segments, arcs, lines, points, triangles, etc.) that were not part of the outline at all.
3) The procedures appeared to me to be arbitrary and somehow “forced” as opposed to a more natural and elegant development of a violin’s outline.
In this article I present a simple and precise way to accomplish that end, recurring to practically only one graphical resource: circle arcs and, particularly, a configuration of them called the “vesica piscis.”
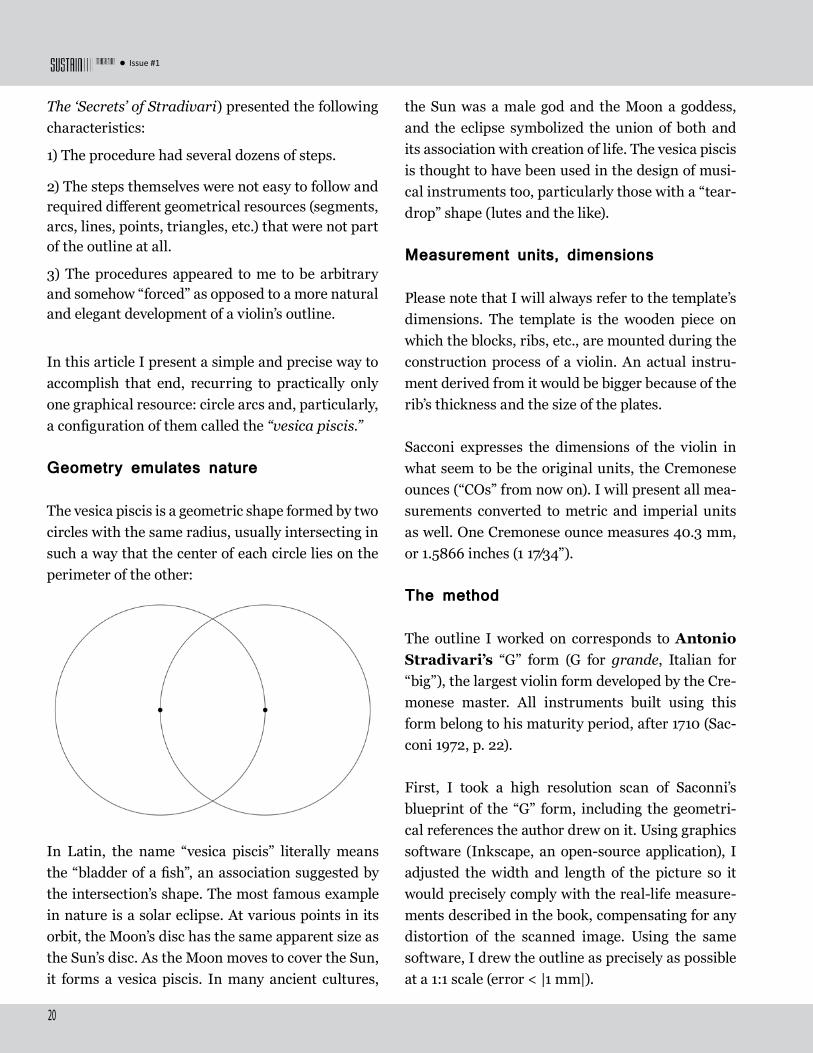
Geometry emulates nature
The vesica piscis is a geometric shape formed by two circles with the same radius, usually intersecting in such a way that the center of each circle lies on the perimeter of the other:
the Sun was a male god and the Moon a goddess, and the eclipse symbolized the union of both and its association with creation of life. The vesica piscis is thought to have been used in the design of musi-cal instruments too, particularly those with a “tear-drop” shape (lutes and the like).
Measurement units, dimensions
Please note that I will always refer to the template’s dimensions. The template is the wooden piece on which the blocks, ribs, etc., are mounted during the construction process of a violin. An actual instru-ment derived from it would be bigger because of the rib’s thickness and the size of the plates.
Sacconi expresses the dimensions of the violin in what seem to be the original units, the Cremonese ounces (“COs” from now on). I will present all mea-surements converted to metric and imperial units as well. One Cremonese ounce measures 40.3 mm, or 1.5866 inches (1 17⁄34”).
The method
The outline I worked on corresponds to Antonio Stradivari’s “G” form (G for grande, Italian for “big”), the largest violin form developed by the Cre-monese master. All instruments built using this form belong to his maturity period, after 1710 (Sac-coni 1972, p. 22).
First, I took a high resolution scan of Saconni’s blueprint of the “G” form, including the geometri-cal references the author drew on it. Using graphics software (Inkscape, an open-source application), I adjusted the width and length of the picture so it would precisely comply with the real-life measure-ments described in the book, compensating for any distortion of the scanned image. Using the same software, I drew the outline as precisely as possible at a 1:1 scale (error < |1 mm|).
In Latin, the name “vesica piscis” literally means the “bladder of a fish”, an association suggested by the intersection’s shape. The most famous example in nature is a solar eclipse. At various points in its orbit, the Moon’s disc has the same apparent size as the Sun’s disc. As the Moon moves to cover the Sun, it forms a vesica piscis. In many ancient cultures,
21
September 2012
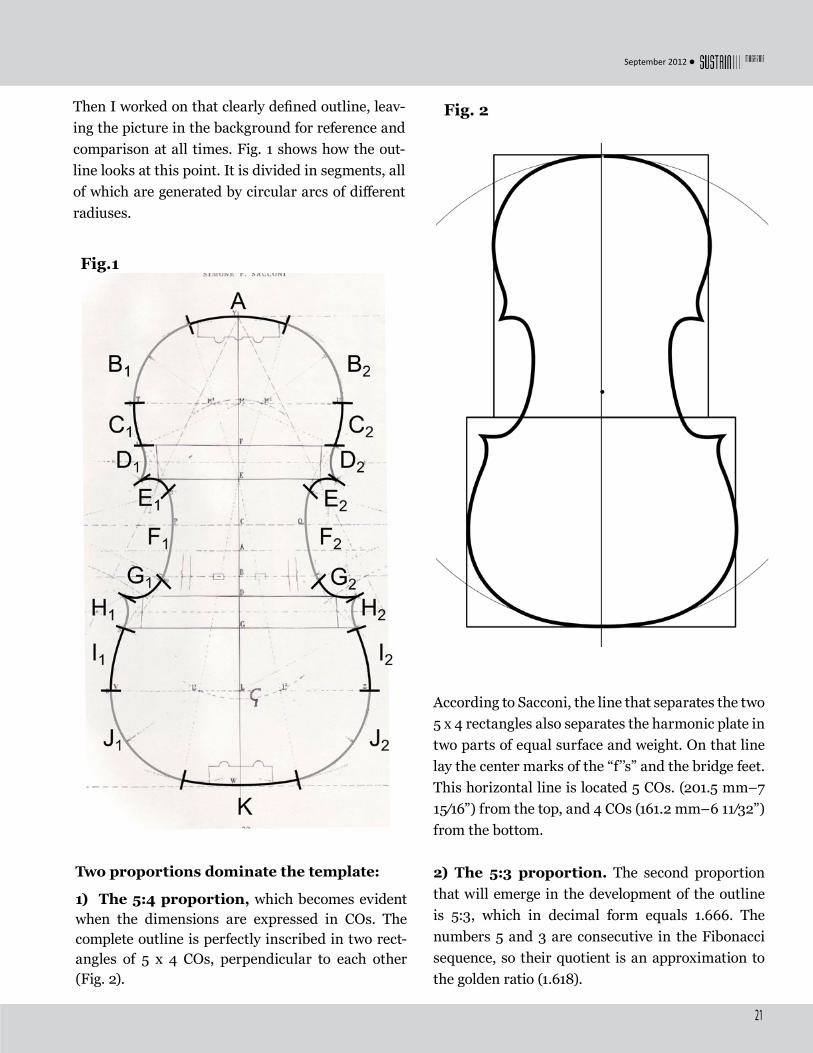
Then I worked on that clearly defined outline, leav-ing the picture in the background for reference and comparison at all times. Fig. 1 shows how the out-line looks at this point. It is divided in segments, all of which are generated by circular arcs of different radiuses.
Fig.1
Fig. 2
According to Sacconi, the line that separates the two 5 x 4 rectangles also separates the harmonic plate in two parts of equal surface and weight. On that line lay the center marks of the “f’’s” and the bridge feet. This horizontal line is located 5 COs. (201.5 mm–7 15 ⁄16”) from the top, and 4 COs (161.2 mm–6 11 ⁄32”) from the bottom.
2) The 5:3 proportion. The second proportion that will emerge in the development of the outline is 5:3, which in decimal form equals 1.666. The numbers 5 and 3 are consecutive in the Fibonacci sequence, so their quotient is an approximation to the golden ratio (1.618).
Two proportions dominate the template:
1) The 5:4 proportion, which becomes evident when the dimensions are expressed in COs. The complete outline is perfectly inscribed in two rect-angles of 5 x 4 COs, perpendicular to each other (Fig. 2).
Issue #1
22
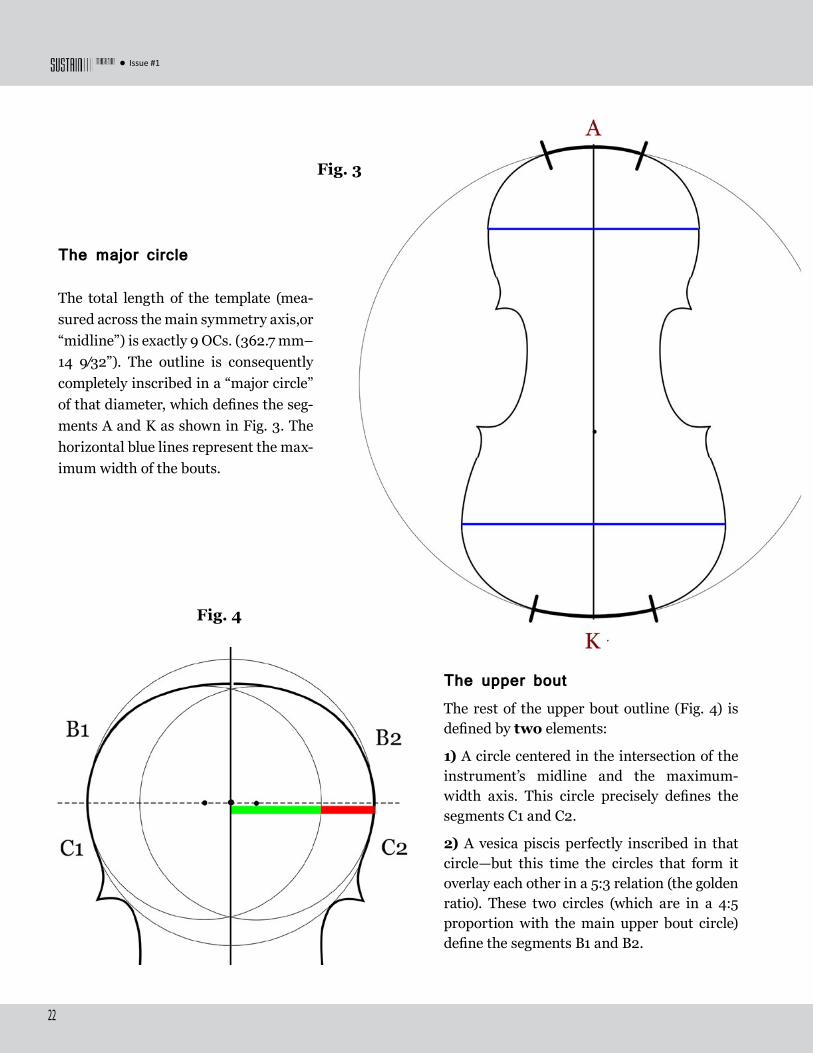
The major circle
The total length of the template (mea-sured across the main symmetry axis,or “midline”) is exactly 9 OCs. (362.7 mm–14 9⁄32”). The outline is consequently completely inscribed in a “major circle” of that diameter, which defines the seg-ments A and K as shown in Fig. 3. The horizontal blue lines represent the max-imum width of the bouts.
The upper boutThe rest of the upper bout outline (Fig. 4) is defined by two elements:
1) A circle centered in the intersection of the instrument’s midline and the maximum-width axis. This circle precisely defines the segments C1 and C2.
2) A vesica piscis perfectly inscribed in that circle—but this time the circles that form it overlay each other in a 5:3 relation (the golden ratio). These two circles (which are in a 4:5 proportion with the main upper bout circle) define the segments B1 and B2.
Fig. 3
Fig. 4

23
September 2012
The lower bout
The lower bout (figure 5) follows the same methodology. A main circle (in proportion 5:4 in relation to the upper bout and again centered on the intersection of the midline and the line of maximum-width line) defines segments I1 and I2. Perfectly inscribed in-side that circle is a new vesica piscis. Its cir-cles overlay each other, in this case on a 3:5 relation (the inverse of the upper bout and, again, relating two consecutive Fibonacci numbers). That vesica piscis defines the seg-ments J1 and J2.
The C-boutsThe C-bouts (Fig. 6) are defined by a double vesica piscis that is formed by four circles, 5 OCs in diam-eter (201.5 mm–7 15 ⁄16”).
This “chained” vesica piscis follows a horizontal line that divides the instrument (again) in a 5:4 propor-
tion. Such arcs perfectly define segments F1 and F2 (the widest arcs in the C-bouts).
Note that the curvature of segments F1 and F2 is the same as that of segments I1 and I2, but in a concave fashion.
Fig. 5
Fig. 6
Issue #1
24
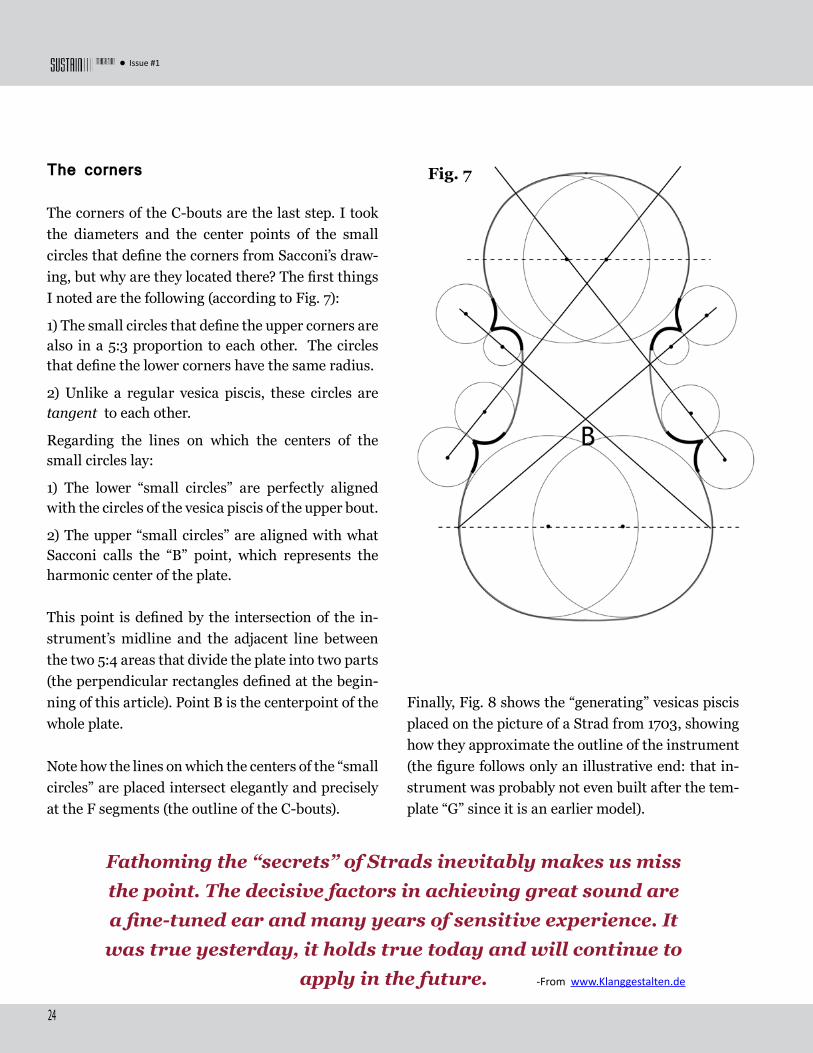
The corners
The corners of the C-bouts are the last step. I took the diameters and the center points of the small circles that define the corners from Sacconi’s draw-ing, but why are they located there? The first things I noted are the following (according to Fig. 7):
1) The small circles that define the upper corners are also in a 5:3 proportion to each other. The circles that define the lower corners have the same radius.
2) Unlike a regular vesica piscis, these circles are tangent to each other.
Regarding the lines on which the centers of the small circles lay:
1) The lower “small circles” are perfectly aligned with the circles of the vesica piscis of the upper bout.
2) The upper “small circles” are aligned with what Sacconi calls the “B” point, which represents the harmonic center of the plate.
This point is defined by the intersection of the in-strument’s midline and the adjacent line between the two 5:4 areas that divide the plate into two parts (the perpendicular rectangles defined at the begin-ning of this article). Point B is the centerpoint of the whole plate.
Note how the lines on which the centers of the “small circles” are placed intersect elegantly and precisely at the F segments (the outline of the C-bouts).
Fig. 7
Fathoming the “secrets” of Strads inevitably makes us miss the point. The decisive factors in achieving great sound are a fine-tuned ear and many years of sensitive experience. It was true yesterday, it holds true today and will continue to
apply in the future. -From www.Klanggestalten.de
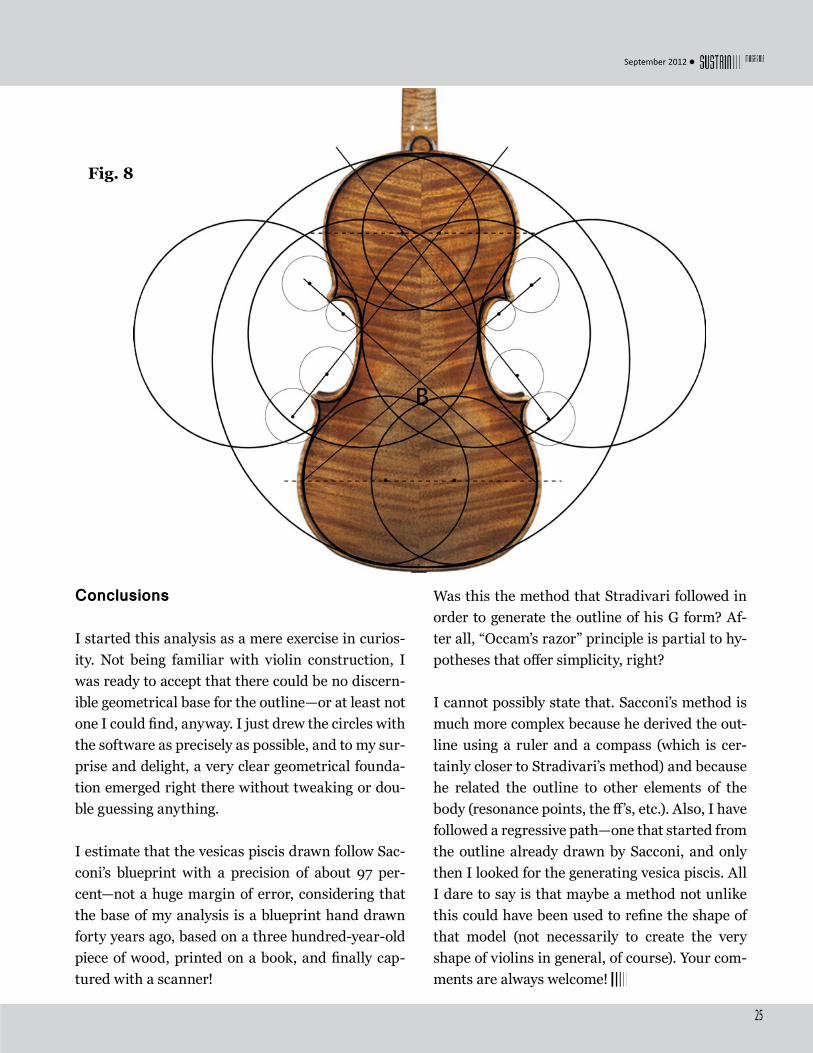
Finally, Fig. 8 shows the “generating” vesicas piscis placed on the picture of a Strad from 1703, showing how they approximate the outline of the instrument (the figure follows only an illustrative end: that in-strument was probably not even built after the tem-plate “G” since it is an earlier model).
25
September 2012
Conclusions
I started this analysis as a mere exercise in curios-ity. Not being familiar with violin construction, I was ready to accept that there could be no discern-ible geometrical base for the outline—or at least not one I could find, anyway. I just drew the circles with the software as precisely as possible, and to my sur-prise and delight, a very clear geometrical founda-tion emerged right there without tweaking or dou-ble guessing anything.
I estimate that the vesicas piscis drawn follow Sac-coni’s blueprint with a precision of about 97 per-cent—not a huge margin of error, considering that the base of my analysis is a blueprint hand drawn forty years ago, based on a three hundred-year-old piece of wood, printed on a book, and finally cap-tured with a scanner!
Was this the method that Stradivari followed in order to generate the outline of his G form? Af-ter all, “Occam’s razor” principle is partial to hy-potheses that offer simplicity, right?
I cannot possibly state that. Sacconi’s method is much more complex because he derived the out-line using a ruler and a compass (which is cer-tainly closer to Stradivari’s method) and because he related the outline to other elements of the body (resonance points, the ff’s, etc.). Also, I have followed a regressive path—one that started from the outline already drawn by Sacconi, and only then I looked for the generating vesica piscis. All I dare to say is that maybe a method not unlike this could have been used to refine the shape of that model (not necessarily to create the very shape of violins in general, of course). Your com-ments are always welcome!
Fig. 8
Issue #1
26
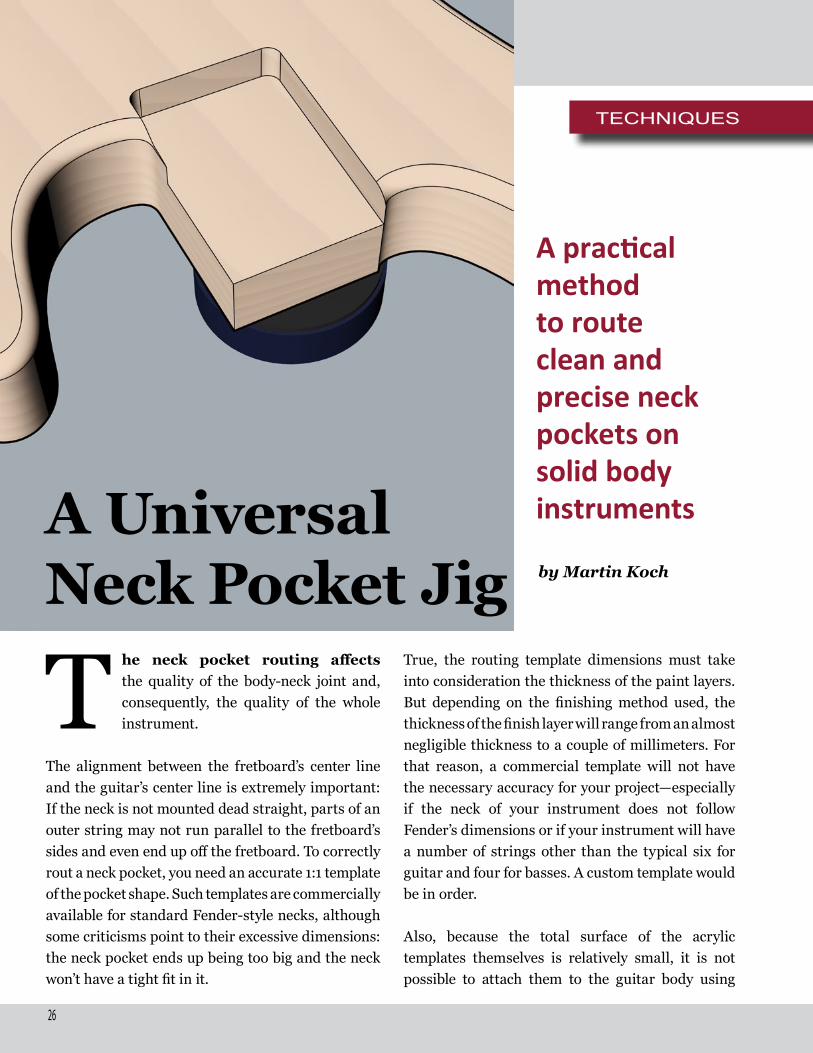
T he neck pocket routing affects the quality of the body-neck joint and, consequently, the quality of the whole instrument.
The alignment between the fretboard’s center line and the guitar’s center line is extremely important: If the neck is not mounted dead straight, parts of an outer string may not run parallel to the fretboard’s sides and even end up off the fretboard. To correctly rout a neck pocket, you need an accurate 1:1 template of the pocket shape. Such templates are commercially available for standard Fender-style necks, although some criticisms point to their excessive dimensions: the neck pocket ends up being too big and the neck won’t have a tight fit in it.
by Martin Koch
A Universal Neck Pocket Jig
A practical method to route clean and precise neck pockets on solid body instruments
True, the routing template dimensions must take into consideration the thickness of the paint layers. But depending on the finishing method used, the thickness of the finish layer will range from an almost negligible thickness to a couple of millimeters. For that reason, a commercial template will not have the necessary accuracy for your project—especially if the neck of your instrument does not follow Fender’s dimensions or if your instrument will have a number of strings other than the typical six for guitar and four for basses. A custom template would be in order.
Also, because the total surface of the acrylic templates themselves is relatively small, it is not possible to attach them to the guitar body using
TECHNIQUES

27
September 2012
clamps: no room would be left to operate the router. For that reason, they are usually stuck to the guitar’s body by using double-stick tape, a less stable fixing method. Those setbacks are addressed by the universal neck pocket jig described in here.
Router bit
To cut the neck pocket using this method, we need a flush-trimming router bit, one with a shank-mounted ball bearing. The diameter of the router bit should match the radius at the corners of the neck’s heel.
The jig
This simple jig will fit all necks because it is adjustable in taper and width. The two 500-mm hardwood boards have straight-planed edges that face each other.

Issue #1
28
Procedure:
Place the neck in its exact position and provisionally fasten it on the body using two clamps, as shown. You will need clamps with a reach of at least 150 mm. I prefer wooden cam clamps because they are cork padded and there is no need for extra clamping cauls. Don’t fully tighten the clamps yet.
Put the neck pocket jig in place, press both boards against the sides of the neck (1) and tighten the star grips (2). Continue to press both boards against the side of the neck; grab the neck and pivot it until the guitar center line lies exactly in the middle between the two boards (3).
29
September 2012
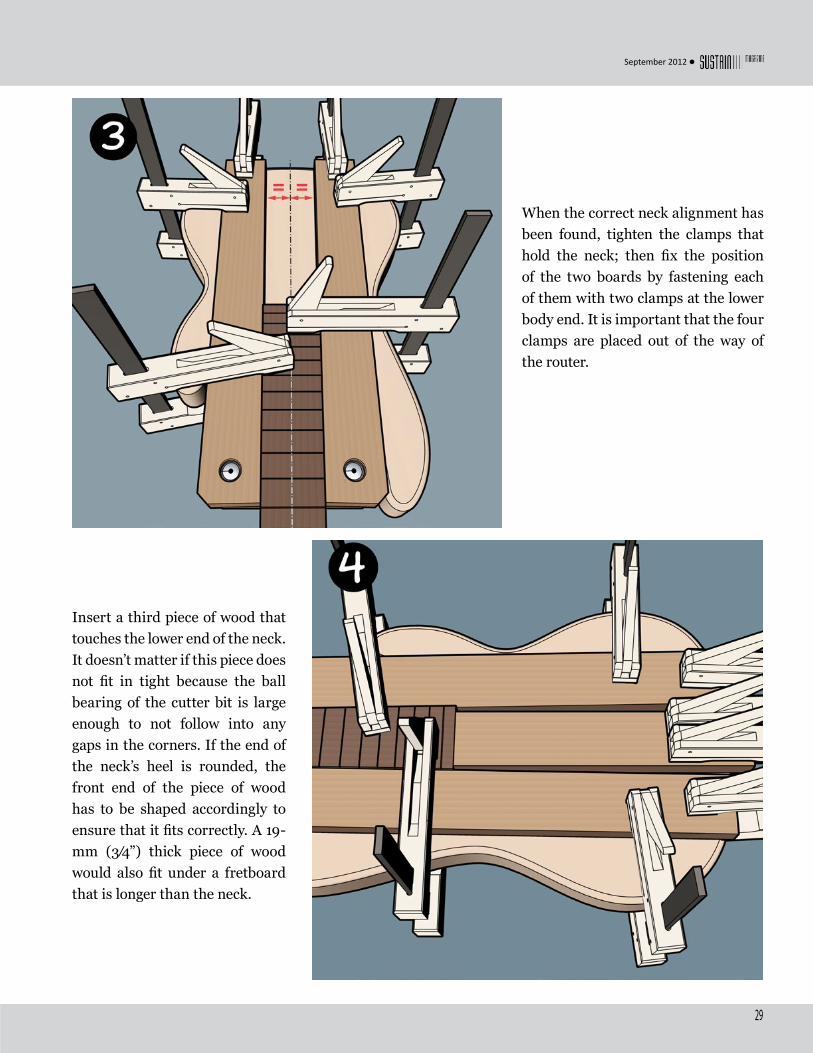
When the correct neck alignment has been found, tighten the clamps that hold the neck; then fix the position of the two boards by fastening each of them with two clamps at the lower body end. It is important that the four clamps are placed out of the way of the router.
Insert a third piece of wood that touches the lower end of the neck. It doesn’t matter if this piece does not fit in tight because the ball bearing of the cutter bit is large enough to not follow into any gaps in the corners. If the end of the neck’s heel is rounded, the front end of the piece of wood has to be shaped accordingly to ensure that it fits correctly. A 19-mm (3 ⁄4”) thick piece of wood would also fit under a fretboard that is longer than the neck.

Issue #1
30
After removing the neck, the three boards form an accurate neck pocket template. You can pre-drill the pocket about 12-mm (1/2”) deep using a 25-mm (1”) Forstner bit to keep stress on the router bit to a minimum.
The 20-mm thick template material requires a 25-mm (1”) long router bit in order to reach the usual neck pocket depth of about 16 mm (5 ⁄8”). Make sure to lower the bit enough so that its ball bearing rides against the template on the very first pass. Unfortunately, this results in a rather heavy cut. Keep this in mind, start in the middle of the pre-drilled area and move the router slowly and carefully in a counterclockwise spiral motion, shaving away only a few millimeters at a time. Subsequent passes can then have an ideal (and easy-to-manage) cutting depth of 3 mm (1/8”) at most, until the required pocket depth is reached.
31
September 2012
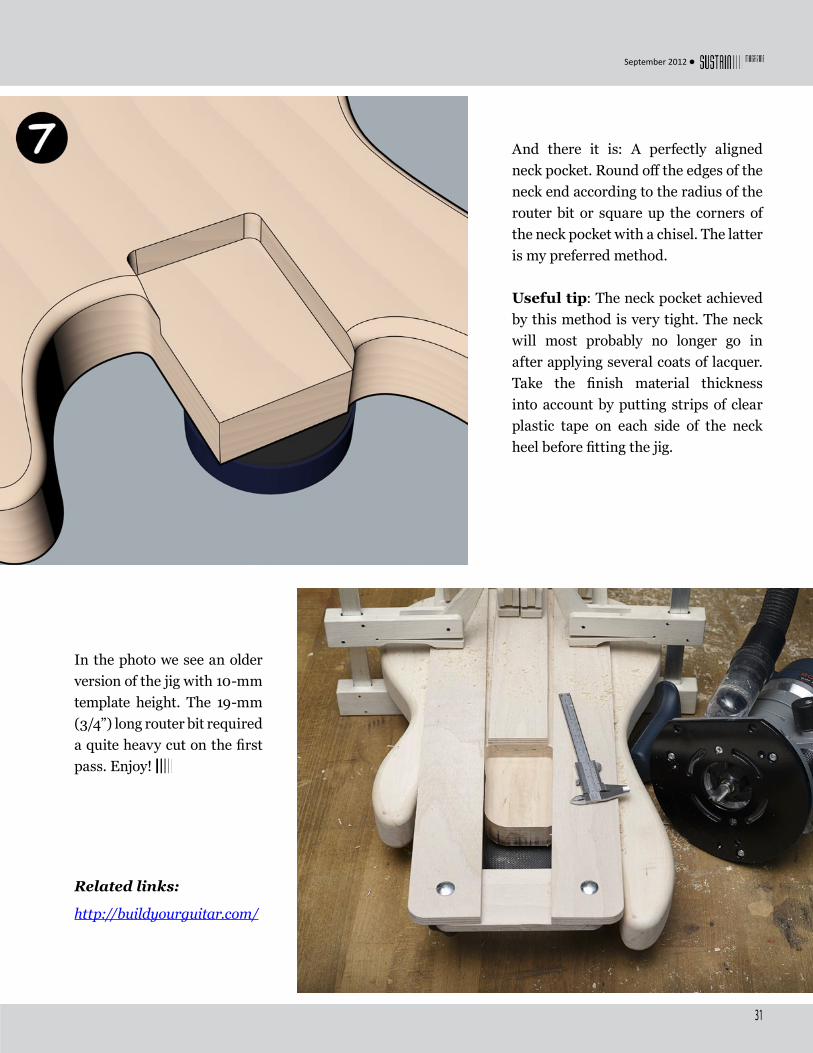
And there it is: A perfectly aligned neck pocket. Round off the edges of the neck end according to the radius of the router bit or square up the corners of the neck pocket with a chisel. The latter is my preferred method.
Useful tip: The neck pocket achieved by this method is very tight. The neck will most probably no longer go in after applying several coats of lacquer. Take the finish material thickness into account by putting strips of clear plastic tape on each side of the neck heel before fitting the jig.
In the photo we see an older version of the jig with 10-mm template height. The 19-mm (3/4”) long router bit required a quite heavy cut on the first pass. Enjoy!
Related links:
http://buildyourguitar.com/

Issue #1
32
BuildYourGuitar.com
GUITARBUILDING BOOKS AND RESOURCES
33
September 2012
A lmost all well-known violin solo-ists since the early 1800s have chosen to play instruments by Antonio Stradi-vari or Giuseppe Guarneri “del Gesù,”
the two most celebrated craftsmen of the so-called Golden Age of violin-making (ca. 1550 to ca. 1750).
Are the qualities of their instruments really so dis-tinctive? Some opinions1 say that any experienced player can in less than 30 seconds classify a violin as a “student,” “decent professional,” or “fine solo” instrument, and precisely identify the violin as an antique or a modern violin.2 Neither of these hypo-
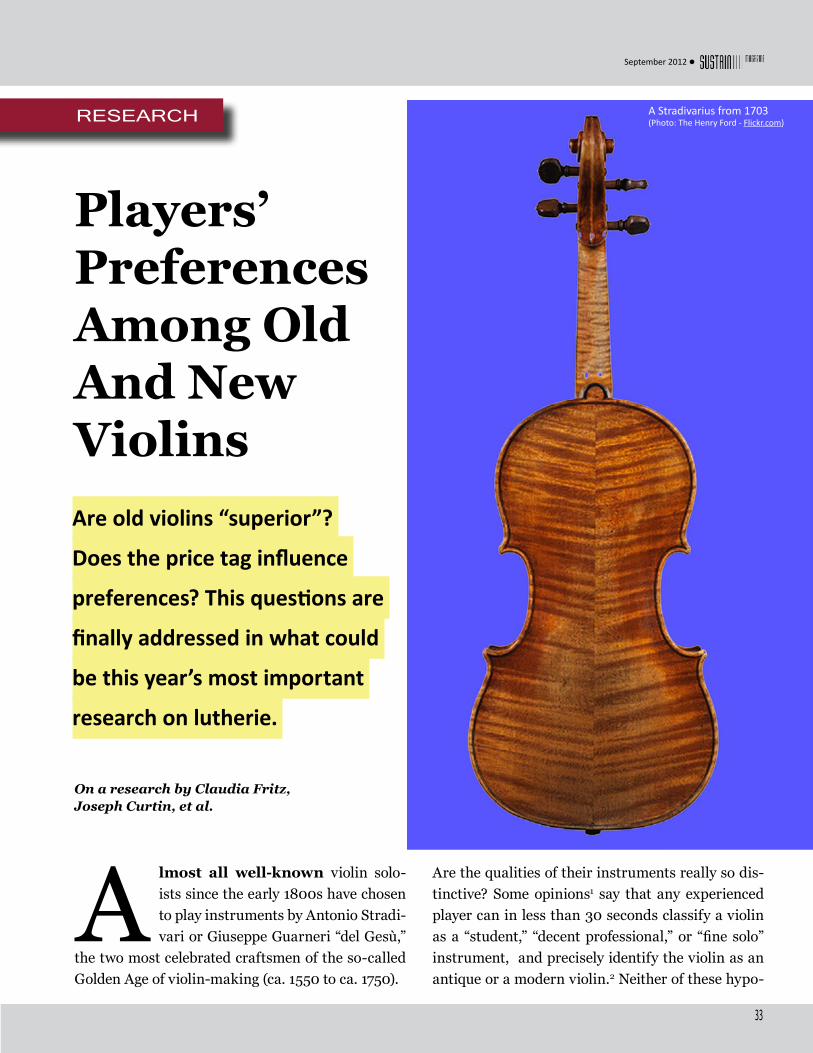
Players’ Preferences Among Old And New ViolinsAre old violins “superior”?
Does the price tag influence
preferences? This questions are
finally addressed in what could
be this year’s most important
research on lutherie.
RESEARCH
On a research by Claudia Fritz, Joseph Curtin, et al.
A Stradivarius from 1703 (Photo: The Henry Ford - Flickr.com)

Issue #1
34
thetical statements has been tested, though, until now. In a benchmark scientific study titled “Player Preferences among New and Old Violins,” Claudia Fritz and Joseph Curtin (et al.) analyzed the re-actions of a group of high-level players in front of six top-quality instruments (three new and three old) in the context of a double-blind experiment.
Where does sound quality come from?
A longstanding goal of violin research has been to correlate the playing qualities of instruments with specific attributes of their physical structure and dynamic behavior , and yet no objective categoriza-tions in instrument quality have been made.
Many factors have been proposed to account for old violins’ alleged superiority, including the following:
• Properties of the varnish.3,4
• Effects of the “Little Ice Age” on violin wood.5
• Differences in the relative densities of early- and late-growth layers in wood.6
• Chemical treatments of the wood.7,8
• Plate-tuning methods.9
• The spectral balance of the radiated sound.10,12
But authentication of old violins is a process that is
based on visual and historical evidence—not tonal qualities, which depend on many circumstantial factors. So there must be other reasons why famous, old Italian instruments are preferred.
Price and perception
In a recent wine-tasting experiment,16 subjects were given samples to taste while an MRI machine moni-tored their brain activity. The results showed that increasing the stated price of a wine increased the level of “flavor pleasantness” reported by subjects. Could a violinist’s preference for a Stradivari vio-lin—and, indeed, the pleasure he or she experiences in playing it—be in part attributable to an aware-ness of its multimillion-dollar price tag and histori-cal importance? Conversely, could the experience of playing a new violin be negatively affected by the belief that it is still centuries away from acquiring tonal maturity?
The instruments
The new violins (tagged N1, N2, and N3) were each by different, nondisclosed makers and were be-tween several days and several years old. They were chosen from a pool of violins assembled by the re-searchers, who then selected the three that they
A Stradivarius from 1703. In the previous page, a view if the back of the same violin. (Photo: The Henry Ford - Flickr.com)

35
September 2012
felt had the most impressive playing qualities and contrasted with each other in terms of character of sound. The first old violin chosen was an instru-ment by Guarneri del Gesù (tagged as O2), made during the Guarneri’s late period (ca. 1740) in which he built some of his most celebrated violins.
The other two were made by Antonio Stradivari (ca. 1700 and ca. 1715). The earlier Stradivari (O1) was once the principal instrument of a well-known 20th century violinist and currently belongs to an institution that loans it to gifted violinists. The later Stradivari (O3) is from the maker’s “golden period” and has been used by a number of well-known vio-linists for concerts and recordings.
The combined value of the old violins was approxi-mately $10 million—roughly 100 times that of the new violins combined.
The players
Twenty-one experienced violinists took part in the test. They gathered in September 2010 for the Eighth International Violin Competition of India-napolis (IVCI), one of the most important interna-tional violin-playing events.
Nineteen subjects described themselves as profes-sionals, ten had advanced degrees in music, and two were later chosen as competition laureates. The sub-jects ranged in age from 20 to 65, had played violin for 15–61 years, and owned violins between 3 and 328 years old and with approximate values ranging from $1,800 (US) to several millions.
When trying out instruments, most violinists used their own bows, which through constant use have become, in effect, extensions of their own arms. Throughout the sessions, subjects wore modified
welders’ goggles, which, together with much-re-duced ambient lighting, made it impossible to iden-tify instruments by eye. To mask any distinctive smells, a dab of scent was put under the chinrest of each violin. The testing room was divided into two areas by a cloth screen. To preserve double-blind conditions, violins were passed from behind the screen to a researcher wearing goggles, who laid them on a bed in the order received.
The experiment
In the first part of the experiment, the test sub-jects were presented with a series of 10 pairs of vio-lins. For each pair, subjects were given 1 minute to play each instrument and then were to state which violin they preferred. Unbeknownst to them, each pair consisted of a new and an old violin. The set of three old and three new violins allowed for nine possible pairings; as a rudimentary test for consis-tency, one of the pairs was presented twice.
In the second part of the experiment, the test subjects were given twenty minutes to choose the instruments they considered best and worst in each of four categories:
• Range of tone colors.• Projection.• Playability.• Response.
They were also asked to choose the single instru-ment they would “most like to take home.” Subjects were free to play the six instruments in any order and in any manner they saw fit. At the end of the session, subjects were invited to guess the “making school” of their take-home instruments—an indi-rect way of assessing their ability to distinguish new instruments from old ones.

Issue #1
36
Results and Discussion
Of the nine old/new pairs, old violins were chosen as favorites only 3.7 times (in average; see Fig.1 for details). In particular, whenever O1 was paired with a new violin, it was chosen markedly less often; it got chosen only once as take home, six times as least favorite, and sixteen times as worst in a cat-egory. That violin happened to be the Strad from 1700, and its consistent rejection appears to drive the overall preference for new violins. At the same time, a single new instrument, N2, stood out as the most preferred—in fact, all other instruments were chosen worst at least once in each category, with the exception of N2.
Just eight of twenty-one subjects (38 percent) chose an old violin to take home. Given the small sample size, this disinclination toward the older instru-ments cannot be confidently inferred to experi-enced violinists in general; however, the fact that a
new violin was chosen over examples by Stradivari and Guarneri stands as a bracing counterexample to conventional wisdom.
Can violinists tell new violins from old?
Asked about the making school of their take-home instruments, seventeen subjects responded. Of them, seven said they had no idea, seven guessed incorrectly (i.e., that a new violin was old or vice-versa), and just three guessed correctly. So it seems that we are in front of another myth: that of the “un-mistakable sound” of old violins.
Conclusions
This research showed the following within signifi-cant margins of confidence:
1) The most-preferred violin was new.
2) The least-preferred violin was a Stradivarius.
Fig. 1: Number of times each violin was selected as take-home and then as best or worst in four categories.

37
September 2012
Fig.2 Averaged scores of the six violins on the different criteria of evaluation.
3) Under blind conditions, there was scarce corre-lation between an instrument’s age and monetary value and its perceived quality.
4) Most players seemed unable to tell whether their most-preferred instrument was new or old.
Notwithstanding all of the above, the particular visual beauty and historical importance of old Italian violins will no doubt maintain their hold on the imagination of violinists and their audi-ences for a long time to come. This prospect comes through nicely in a comment by one of our subjects, an eventual competition laureate. When asked the making-school of the new instrument he had just chosen to take home, he smiled and said only, “I hope it’s an [old] Italian.”
References:1. Langhoff A. (1994), Measurement of acoustic violin spectra and their inter-pretation using a 3D representation. Acustica 80:505–515.2. Weinreich G (1993), What science knows about violins—and what it does not know. Am J Phys 61:1067–1077. 3. Hill W.H., Hill A.F., Hill A.E. (1902), Antonio Stradivari, His Life and Work (Dover Publications, New York).4. Schelleng J. (1968), Acoustical Effects of Violin Varnish. J Acoust Soc Am 44:1175–1183.5. Burckle L, Grissino-Mayer H.D. (2003) Stradivari, violins, tree rings, and the Maunder Minimum: A hypothesis. Dendrochronologia 21:41–45.6. Stoel BC, Borman TM (2008), A comparison of wood density between clas-sical Cremonese and modern violins. PLoS ONE 3:e2554.7. Barlow C.Y., Edwards P.P., Millward G.R., Raphael R.A., Rubio D.J. (1988) Wood treatment used in Cremonese instruments. Nature 332:313.8. Nagyvary J. et.al. (2006), Wood used by Stradivari and Guarneri. Nature 444:565.9. Hutchins C.M., Hopping A.S., Saunders F.A. (1960) Subharmonics and plate tap tones in violin acoustics. J Acoust Soc Am 32:1443–1449.10. Saunders F.A. (1953) Recent work on violins. J Acoust Soc Am 25:491–498.11. Duennwald H. (1990), Ein erweitertes Verfahren zur objektiven Bestim-mung der Klangqualität von Violinen. Acustica 71:269–276.12. Bissinger G. (2008) Structural acoustics of good and bad violins. J Acoust Soc Am 124:1764–1773.13. Fritz C, et al. (2010) Perceptual studies of violin body damping and vi-brato. J Acoust Soc Am 127:513–524.14. Saitis C, et.al. (2010) Evaluating violin quality: How consistent are skilled players? J Acoust Soc Am 128:2284.15. Plassmann et. al. (2008) Marketing actions can modulate neural repre-sentations of experienced pleasantness. PNAS 105:1050–1054.These contents are reproduced with authorization of the PNAS (Proceedings of the National Academy of Sciences, USA) - Original paper on: www.pnas org/cgi/doi/10.1073/pnas.1114999109 .Pictures reproduced under CreativeCommons Licence -http://www.flickr.com/photos/thehenryford/6218122030/in/set-72157627708595975.
Issue #1
38
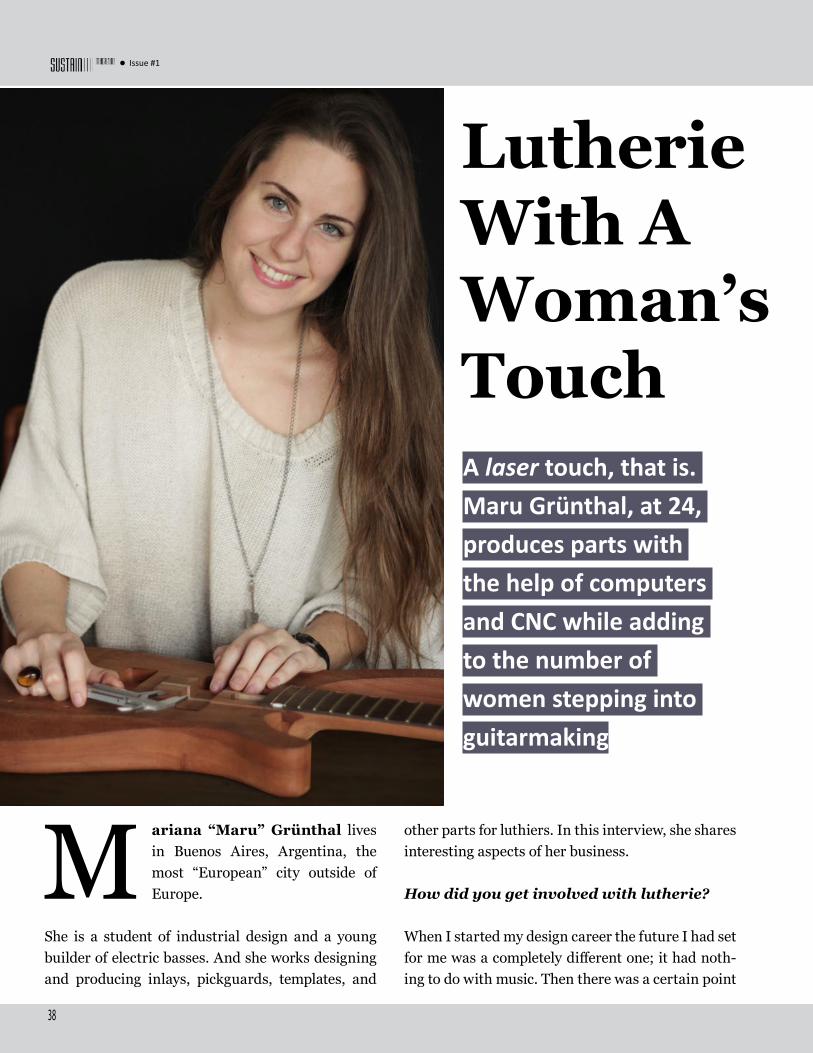
Lutherie With A Woman’s Touch
M ariana “Maru” Grünthal lives in Buenos Aires, Argentina, the most “European” city outside of Europe.
She is a student of industrial design and a young builder of electric basses. And she works designing and producing inlays, pickguards, templates, and
other parts for luthiers. In this interview, she shares interesting aspects of her business.
How did you get involved with lutherie?
When I started my design career the future I had set for me was a completely different one; it had noth-ing to do with music. Then there was a certain point
A laser touch, that is. Maru Grünthal, at 24, produces parts with the help of computers and CNC while adding to the number of women stepping into guitarmaking
39
September 2012
late in my career, in the middle of a big professional disorientation and personal chaos, when I decided to return to the roots of my family that were con-nected with music, so I started taking bass lessons.
That’s how the idea of designing instruments came to my head—well, more than idea it was a dream. I knew that I had to sweat climb my way up, and when I was ready to make the first step I met an amaz-ing luthier (who I care very much for, and to whom I owe everything I know about this craft) who got excited about this crazy idea of mine and offered the possibility to draw and produce the inlays of his in-struments.
What kind of parts do you produce?
I don’t have a catalog, since no item is equal to the other, exception made of the routing templates. I create new designs for all my products: inlays for fretboards, bodies and headstocks, truss-rod cov-
FELLOWS
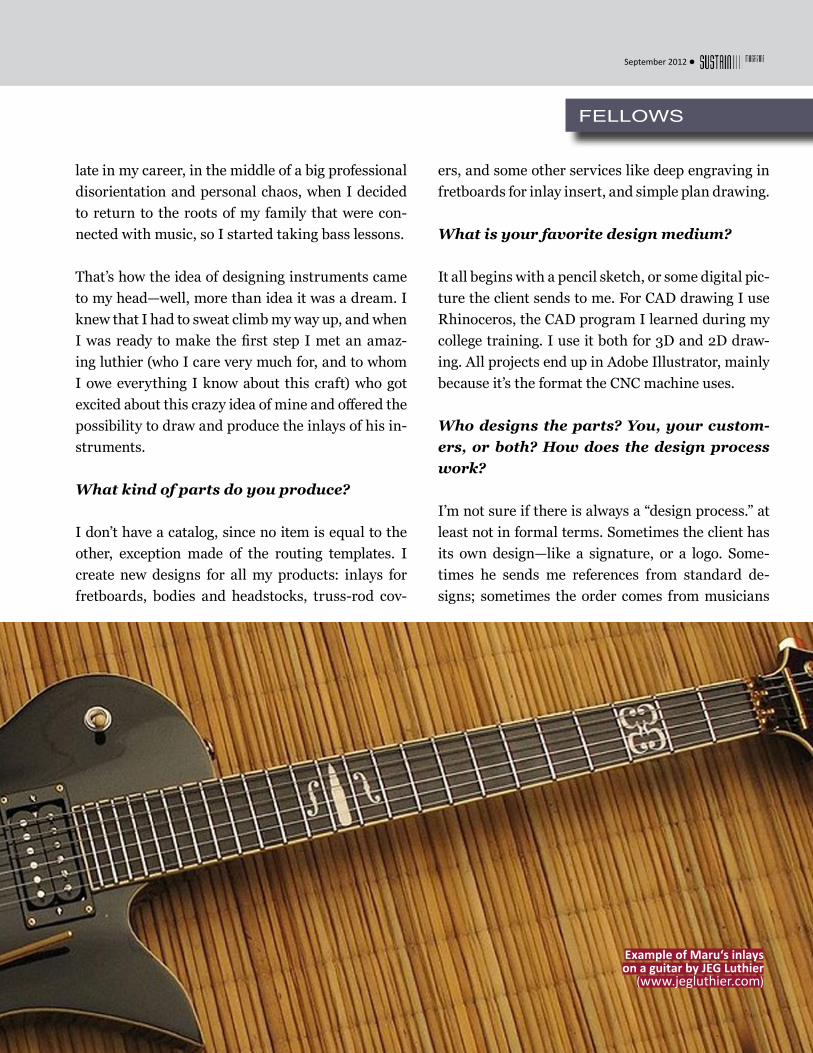
Example of Maru‘s inlays on a guitar by JEG Luthier
(www.jegluthier.com)
ers, and some other services like deep engraving in fretboards for inlay insert, and simple plan drawing.
What is your favorite design medium?
It all begins with a pencil sketch, or some digital pic-ture the client sends to me. For CAD drawing I use Rhinoceros, the CAD program I learned during my college training. I use it both for 3D and 2D draw-ing. All projects end up in Adobe Illustrator, mainly because it’s the format the CNC machine uses.
Who designs the parts? You, your custom-ers, or both? How does the design process work?
I’m not sure if there is always a “design process.” at least not in formal terms. Sometimes the client has its own design—like a signature, or a logo. Some-times he sends me references from standard de-signs; sometimes the order comes from musicians
Issue #1
40
who knows exactly what he wants even before send-ing it all to his luthier; some other times, the cus-tomer has no idea what they really want, or how to do it. And that’s mainly why I’m here for. I love to be able to contribute something from what I’ve learned in design, from my passion for art, and my humble experience in this matter. I try to find the best, nic-est solution with the help of laser technology.
How do you reach your potential clients?
I never promoted my work publically until now. It was always spread by word of mouth. I work with recognized luthiers from my country—JEG Luthier, Versace Luthier, Orsi Luthier, Salzmann Luthier, Pinto Luthier, and others. Lately I have some pic-tures of projects on line and my work spreads via social networks, and I have setup a website showing my work.
Where do you draw inspiration for you de-signs?
It’s weird to think of them as they’re “my” designs, because they are a part of a brotherhood with the instrument. My main inspiration will always be the instrument itself. Each instrument moves me in a very different way. I’m inspired not only by other luthiers, but by photographers, painters, writers, dancers, musicians.
What kind of materials do you use?
For inlays: acrylic (colored and transparent), natural wood, and some special works with a combination of wood and acrylic. For truss-rod covers, high-impact polystyrene and acrylic. For pickguards, acrylic. For routing templates, MDF [Medium-dense Fiber-board] and transparent acrylic.
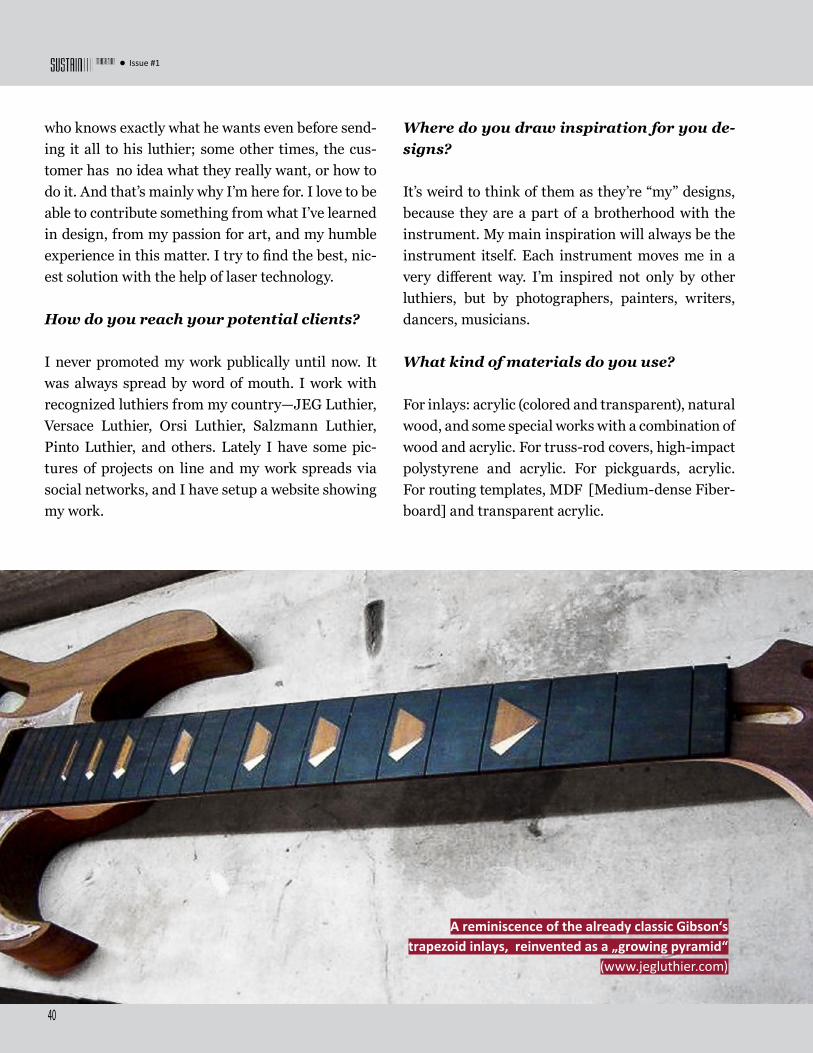
A reminiscence of the already classic Gibson‘s trapezoid inlays, reinvented as a „growing pyramid“
(www.jegluthier.com)
41
September 2012
My main connection with the community of luthiers is by attending to local events—fairs and exhibi-tions,—where I get to know some local luthiers and their work. I make connections through the activi-ties related to my training as luthier, also. Beyond that, I deepen my knowledge of lutherie by reading books on the subject. Sadly there are no magazines on lutherie published in my country.
How do you see lutherie as a profession for a woman?
Do you have any warranty policies?
No, because my products are almost always modi-fied later by a luthier. Many times the customer picks up the product directly from me, so I just make sure it’s in perfect conditions when it reaches the hands of the client (the luthier).
How are the custom parts you produce dif-ferent from those of your competitors (es-pecially mainstream brands)?
I don’t think I have any direct competitors, at least not local ones. Maybe for some standard pieces there are other options, but most of my products/services are custom works. The added value of my work is that it represents a huge time saving for lu-thiers who otherwise would have to make this sort of things by themselves. And for those who don’t have the tools I provide complete counseling from the first idea to the finished product. And the value of their instruments increases, because of the origi-nality, quality and precision put into the process.
In which ways are you connected with your local community of luthiers?
Acrylic templates for different tremolo systems.
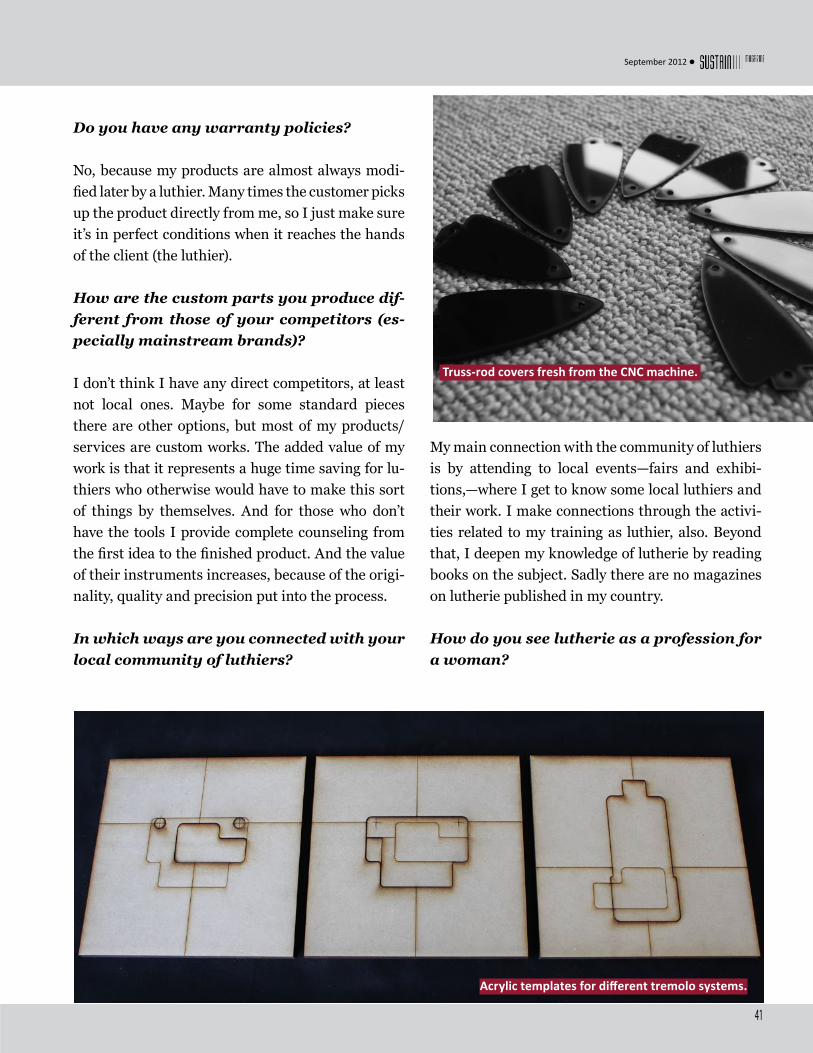
Truss-rod covers fresh from the CNC machine.

Issue #1
42
I would love to have a company that is dedicated specifically to design and manufacture all kinds of parts and accessories for musical instrument man-ufacturers, incorporating new technologies and ma-terials. But I would also like to fulfill my dream of designing my own instruments from beginning to end, including the bridge, the tuners, everything.
What do you do when you are not laser-cutting guitar parts?
I practice photography quite regularly. Sometimes I even photograph shows and events of my friends. My second extra-professional activity is yoga, which I also practice regularly; I am very connected to the energetic side of my life. On weekends I get together with friends to share some mates, or coffee. I also like reading, cooking, sailing, and going out at night to hear live music and having a beer. And then I get back to think about designing beautiful pieces of wood with strings attached to them.
Related links: http://marugrunthal.com.ar
http://www.jegluthier.com.ar
I don’t think being a woman is an obstacle for be-ing a luthier today. In my personal experience I have been received with open arms, respected and val-ued both in my role as an apprentice luthière and regarding my work.
What does your family think about your ca-reer choice?
My family is amazing. Not only they supported me in the choice of profession but they are constantly encouraging me to take my work to the next level. Although I’m sure at first they thought it was an-other passing whim of mine!
What is your professional objective? How do you see yourself in five years?
“Luthière”: a new wordTimes are a-changin’, indeed. Women now succeed in professions traditionally reserved for men; professions that don’t even have a feminine version of the name, yet. That is not the case with Lutherie, anymore: at SUSTAIN we will use the word “luthière” (or “luthiere”—without the funny acute accent) as opposed to the masculine “luthier”. The word was inspired by Charlotte Jaccoud, a young luthière based in Switzerland (http://charlottejaccoud.wix.com/luthiere). We believe that this beautiful word deserves to catch on.

43
September 2012
T ell us about your very first steps into guitar making.
I began with tearing apart my Kawai Aquarius electric guitar, damaged after be-
ing flown across the stage in a performance. It was the first time ever that I looked inside a guitar. I removed the heavy original polyurethane finish to reveal its beautiful blond maple wood. I oiled it, in-stalled a laser-cut aluminum pickguard, had it re-
Guitar Design As An Artistic SearchArtist Bertram Dhellemmes designs the most unusual guitars, upstream of the stagnation of both the traditional and the commercial approaches to an instrument that once was a symbol of rebelliousness
FELLOWS

Issue #1
44
wired (at the time I had no clue of how to do that), filed the nut slots in order to install some heavy-gauge strings, and turned it into a magnificent semi-baritone guitar that I still love very much. Then I realized than if I wanted to understand guitars, I had to build one.
You have an online blog full of guitar de-signs. How many sketches are there?
I have filled many sketchbooks with thousands of drawings, in very different styles. I would draw ev-ery day for a couple of hours. I‘d go to one of those kid-friendly cafés, with play-rooms filled with toys where my kid could play, and I’d sip espressos and draw guitars while he was building Lego machines. My blog reached 3000 guitar sketches. But a point in time came in which no single guitar was built, yet. So I got angry with myself and decided to build the quickest guitar ever—and that’s the story of the Plankaster [see article on page 45].
From where do you draw inspiration for your designs? (historic styles, spontaneous inspiration, work from other luthiers, etc.)
In the last years I’ve made a lot of research about electric guitars history, and still do. Like many gui-tar lovers, I enjoy guitars from the 1960s, when lu-thiers were visionary pioneers and electric guitar making was an experimental and creative field, not just business. I love Italian guitars from that time—I particularly have a soft spot for Wandrè Pioli. I love also East-European guitars from the commu-nist era. I have a couple of East-German guitars. West-Germany produced wonderful Schlaggitar-ren, these big hollow-body jazz guitars from the 1950s with radical designs that most people never heard of outside of Germany. It’s incredible that they have absolutely no legacy in contemporary lutherie. My late 1970s Ovation Breadwinner is a great source of inspiration too; it has all what I’m looking for in
guitar design, for it is the perfect combination of er-gonomics and coolness. And thanks to the Internet you always discover new luthiers from all over the world who have brilliant and inspiring ideas—you cannot rely on major guitar companies to provide creative incentive anymore.
Some of Bertram‘s sketches.
45
September 2012
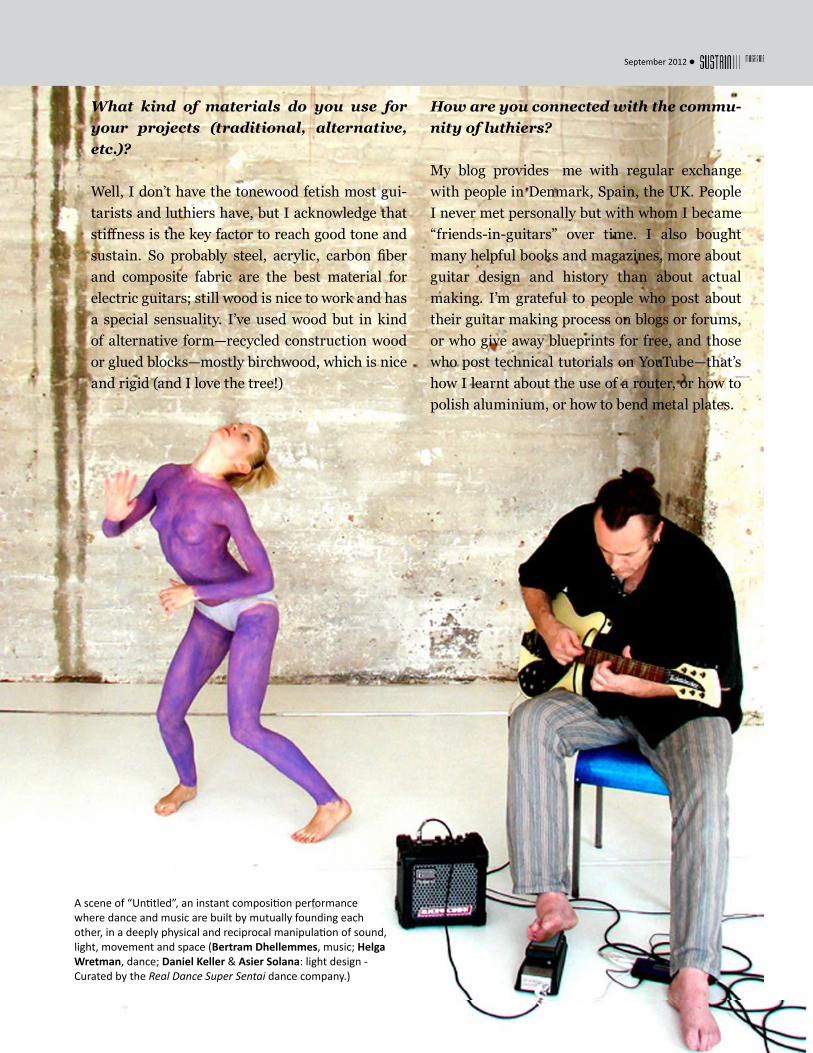
A scene of “Untitled”, an instant composition performance where dance and music are built by mutually founding each other, in a deeply physical and reciprocal manipulation of sound, light, movement and space (Bertram Dhellemmes, music; Helga Wretman, dance; Daniel Keller & Asier Solana: light design - Curated by the Real Dance Super Sentai dance company.)
What kind of materials do you use for your projects (traditional, alternative, etc.)?
Well, I don’t have the tonewood fetish most gui-tarists and luthiers have, but I acknowledge that stiffness is the key factor to reach good tone and sustain. So probably steel, acrylic, carbon fiber and composite fabric are the best material for electric guitars; still wood is nice to work and has a special sensuality. I’ve used wood but in kind of alternative form—recycled construction wood or glued blocks—mostly birchwood, which is nice and rigid (and I love the tree!)
How are you connected with the commu-nity of luthiers?
My blog provides me with regular exchange with people in Denmark, Spain, the UK. People I never met personally but with whom I became “friends-in-guitars” over time. I also bought many helpful books and magazines, more about guitar design and history than about actual making. I’m grateful to people who post about their guitar making process on blogs or forums, or who give away blueprints for free, and those who post technical tutorials on YouTube—that’s how I learnt about the use of a router, or how to polish aluminium, or how to bend metal plates.

Issue #1
46
What is your objective regarding lutherie? Where do you see yourself in, say, five years from now?
Even though I’m really passionate about guitar making, I don’t see myself becoming ever a pro-fessional luthier; it requires too many skills that I won’t be able to acquire unless I give up my other professional activities—something I don’t intend to do. More realistic for me would be to collaborate as a designer with a genuine guitar maker; so if any guitar maker looks for new designs combining cre-ativity, ergonomics and sexiness, I wouldn’t say no to joining, or even creating a guitar company!
Anyway, now I would like to build myself some models I have in mind, in order to prove that my ideas are viable. So I plan to take some lutherie workshops to accelerate the process and be able to put more time into concrete building. But I have another purpose with lutherie: I plan to use it as a pedagogic tool to teach my kid. It is a real multidis-ciplinary practice and when you managed to build a guitar, you’ve learned many different things in tech-nical, traditional and high-tech fields: mathemat-ics, geometry, acoustics, electronics, design, music, woodwork, metalwork. It requires self-discipline and confidence, but also humility, creativity… and even a free spirit, because you start to explore new paths in what has become a quite conservative prac-tice. And what could be more rewarding for a teen-ager than to play on a guitar that he’s built himself?
What is your preferred media for design (pencil, computer, etc.)?
I love color pencils, because their imprecision can generate unexpected forms. I carry sketchbooks and my pencil box with me all the time. Also I
noticed that many guitars conceived by computer have a high-tech coldness that I don’t dislike but that I don’t want for my own work. When I have an idea I will draw it again and again with slight variations, until I fully understand what works and what doesn’t. Then I redo the drawing on large cardboard on a real-size scale, so I can build a cardboard model [see photo above]. Lately I started to use foam, to have a better feeling of the shape and volume.
What does your family think about lutherie as your choice for a hobby or career?
Turning to lutherie is just another side of my mul-tifaceted artistic activities. I have a deal with my girlfriend: she can tell me about her last yoga class or translate out loud bits of the book she currently writes, and I can show her the last guitar I fell in love with, or my favorite design of the week—and we try to give each other objective feedback.
Please describe your music-related job.
I’ve been a musician forever. When I was sixteen, I dropped my classical piano lessons and invented my own way of playing guitar. Then I went to art school and got split between music and visual arts. I cre-ated a dance company and became myself a stage and video director—but my work was still mostly in-volving guitars as dance props as much as musical
Cardboard or plywood models built at a 1:1 scale are rudimentary but useful prototypes that allow to test how the guitar will interact
with the player’s body -and with cases and guitar stands, too.
(Continues in page 48)

47
September 2012
Quick, cheap, and minimalist: the “Plankaster”
How did you conceive that instrument? Please de-scribe the construction process.You must know that West Berlin, because of its past, is champion when it comes to saving and recycling material. As it was surrounded by East Germany, it couldn’t afford wasting anything the way the rest of the capitalist world does, and that shaped the spirit of the city. Event oday they use pavement and not asphalt in the streets, so when they have to dig they can put the pavement back. You have very few street lamps that keep the city mysterious at night, and recy-cling bins for everything in every courtyard. And when they dig the streets, they use big wooden planks to build fences, and re-use then again and again for years, reshaping them according to the needs—and often there are leftovers piled in the street, stuck in ice for weeks after a sudden temperature drop in-terrupts construction like it often happens in Berlin. So when I decided to make a guitar as cheap and quick as possible, I found a use for this wood. It had the proper size and shape, and it was just lying there. I got a neck on eBay from a guy in Germany who regularly sells brandless necks with (too dry) rosewood fret-boards, super flat radius, and cheap tuners.Building the “quickest” guitar meant also building the “simplest”: a non-tremolo strat bridge, one pickup, one volume knob and that was it. I never use tone knobs when I play, anyway. To stick to my minimalistic program, I decided that I’d cut the pickguard with only one straight jigsaw cut, out of a piece of aluminum sheet I picked somewhere, all stained and scratched, too thick anyway for com-plicated shapes. I could have chosen a rectangle but I still wanted a well-designed object so I settled for a trapeze: then the shape and the proportions came easily as they felt right. The small sound holes are also the right combination of easy drilling and looking cool.The plank was too thick for standard neck screws, so I made a cavity (with chisel and hammer) to insert the neck plate. I sanded the wood to remove the dirt and the splinters, but just enough to keep the marks of the rough circular saw that cut the plank out of a tree trunk, and the traces of time at work, and then I oiled it. I sanded the aluminum pickguard but didn’t polish it to keep it rough and quick. The centered pickup idea [not in the guitar of the the photo, but in another one]comes from Japanese plywood guitars from the 1960s à la Teisco—but I saw that also on early Gibson arch tops. The chicken head knob was lying around in my toolbox. I had already decided that I wouldn’t use it for a guitar project, but here it worked just fine.
From “naught” to “hot”: an old piece of wood found on the streets of West Berlin becomes the guitar with the better cost/coolness relationship that we ever saw. And it only took a couple of weekends to build. Note the small soundhole on the aluminium and the geometrical harmony between the rectangular body and the trapezoidal pickguard.

Issue #1
48
instruments. Then, when I got into guitar making, my visual artist background stroke back, and I fig-ured out that even though I might never become an achieved luthier, there was a potential into guitars that exceeded the music alone.
Tell us about your current art projects.
My last big-scale transmedia project, which I devel-oped with my partner, writer and performer Ines Birkhan, led to some ideas in unexpected direc-tions—such as a performance for self-playing in-struments, in which you had to read a narrative text projected on stage while listening to random music played by fan-activated propellers on guitar and pi-ano. Also, I exhibited my “Doppelcaster” self-play-ing hypnotic soundscapes. In the same conceptual frame I also performed—together with projected narrative text as well—intense quadraphonic drone music, plugging a Theremin into a dozen guitar ped-al effects and playing it not with my hands but with the mere proximity of my body while manipulating the pedals. It sounds like being at the heart of a hur-ricane!
And what about guitar building projects?
Bertram fell in love with lutherie when he was co-directing a performance project to be presented in a castle near Berlin, which involved naked dancers, Butoh aesthetics, AK-47 rifles, sheep latex masks, and free music improvisation. The musicians arrived in a car full of drums, amps, and guitars, and for some reason, the guitarist (David Bausseron)brought a pile of guitar magazines. Those magazines, read in the middle of the night, caused an epiphany, one that took Bertram from noise improvisation (where guitars were used more as “noise generators” than as musical instruments) to buying books, parts, and wood and to start developing and building his own guitar designs, such as this double-neck version of a Telecaster, shown in the picture during the wiring process (note the pickguard shapes, a modern touch for such a classic model).
No
way
I have at least five unfinished projects: a “neckless guitar,” an “aluminum tube neck baritone melobar,” the “crackle guitar” (based on the legendary Crackle Box–covered with metal sensors that could elec-tronically alter the sound of the guitar with simple contact of the fingers), an electric mountain dulci-mer /slide-guitar hybrid. As I said before, I need to take lutherie workshops in the near future to reach the next level before I can finish those projects. Also lately I’ve been quite interested in electronics and I’m learning about that too—I’m even less savvy in electronics than I was about guitars, but I managed to build basic fuzz pedals and noise boxes. And of course I intend to perform with all these instru-ments and pedals!
Related links:
Bertram’s guitar blog: guitarren.blogspot.com
Angel Meat website: www.angelmeat.com
David Bausseron:
www.facebook.com/david.bausseron
Real Dance Super Sentai Dance Company:
unterhalt.blogspot.de/

49
September 2012

By Wim Stout
50
Choosing a finishing methodfor your guitars
The Guitar Finishing Series
Part IComparison of finishing methods.
Pore filling, and surface sealing.
Part IIColours and stains
Part IIILacquers (Nitro and others)
Part IVOther methods (Alkyds & 2K)
Part VApplication and buffing
An in-depth view at the available finishing options for our instruments; their advantages and drawbacks. In this first part, a comparative overview.
by Wim Stout

51
F inishing your guitar is one of the most important steps during the building process. It defines the final “look” of the instrument, and it is the
most immediate parameter to evaluate the beau-ty (and, consequently, the perceived quality) of a musical instrument.
In selecting a finishing method, several factors enter into play. Available equipment, climate, and other factors have a role in our decision. But at the end is the result we expect to achieve what defines the choice. Colors , patterns, glossy or semi-gloss finish (or dull, for the gothic amongst us) are the ultimate business card, the one that defines the visual impact your guitar or bass. The results achieved, however, depend on our personal knowledge and expertise. This series of articles aims at expanding your knowledge, presenting the professional and amateur luthier with the different alternatives and the results you can expect by using each of them. If we intend to accomplish a crystal, high-gloss finish (like in the instrument in the background photo), no amount of oil will suffice: we need a lacquer (ni-trocellulose, 2-components, polyester, etc.). An oil finish would be preferred when we are looking for a natural look and feel on an instrument with nicely figured wood, for example.
So the main variables that influence the selec-tion of a finishing method from the standpoint of both the result we want to achieve and the pro-cess are as follows:
• Glossiness level (high gloss, semi-gloss, or matte).
• Hardness of the finishing (lacquers have a vitreous touch; varnishes are much softer).
• Wood-grain enhancement (or masking).
• “Touch and feel.”
• The finishing steps implied (buffing, polish-ing, application method, etc.).
• Health and environmental concerns (toxic-ity).
What do we mean, “a finishing method”?
There are different concepts related to what we call “finishing”. To clarify the terminology, we must dis-tinguish among the following:
• Finishing products. Lacquers, oils, alkyds, etc.
• Finishing tools. Spray guns, spray cans, brushes, etc.
• Finishing techniques. The succession of steps we follow to accomplish the task (sand-ing, filling, sealing, re-sanding, spraying, pol-ishing, etc.).
A finishing “method”, then, is the use of a particular product, which is applied using the adequate tools, following a particular technique.
Finishing phases
It all starts, of course, with the wood. The process we call “finishing” is actually composed of four phases (not all of them apply for all methods, though):
1) Pore filling. Many wood species used in luthe-rie have open pores, which must be filled flush with the wood’s surface in order to achieve a level finish (free of imperfections). Before filling the wood, the piece has to have its definitive shape and has to be sanded down to a smooth surface.
2) Staining. Is the application of a coloring prod-uct to the wood, if any.
3) Surface sealing. Sealer products prevent the finishing coats from penetrating the wood; this way we save costs and protect the wood from other ele-ments (water, etc.). Sometimes the sealing function is accomplished by the pore filling product used,
Issue #1
52
which fills the pores and seals in one operation.
4) Coating. Is the application of the product of choice (lacquer, etc.) on the wood.
Formulation of finishing products
The formulation of the different coating products boils down to the same basics:
• A resin, which ultimately will form the coat
• A medium, which is a carrier material to transport the diluted resin to the object
• Additives, which are necessary for several other functions such as like pore penetration, scratch resistance, thickening, and wetting (es-tablishing a good contact with the wood).
Finishing methods available
The following four finishing methods can be ap-plied to virtually all instruments. They are iden-tified by the name of the finishing product used (shellac, nitro cellulose, acrylic , and others). The reason is that the materials, tools, and the tech-niques we must use are strongly dependent of the product we choose.
Lacquers: Lacquers dry by liquid evaporation. No chemistry is involved for curing, and their state after drying is reversible—meaning that if you put the correct solvent on the hard lacquer, it becomes wet lacquer again. Lacquers include shellac, nitro cellulose and most water-borne coatings (in which the solvent is the water itself).
Two-component coatings: Known simply as “2k” finishes (or sometimes polyester finishes), they are formed by a resin and a hardener. They cure by means of a chemical reaction (as opposed to evaporation) that takes place when both com-ponents are mixed. The mix has to be either used or discarded after a matter of hours. Water-borne
2k’s, however, have no limiting “pot life” because they are emulsified into water. In comparison to lacquers, 2k’s build-up thickness quickly and are very resistant against all types of environmental attack (sweat, water, alcohol, solvents etc.). They are sticky when touched by sweaty hands, however, which affects playability. The most common type used is the so-called 2k polyester-Iso-cyanate. This is used as opposed to 2k Epoxy coatings, which are generally not used because they do not retain their gloss when exposed to direct sunlight.
Oils: Oils cure by contact with the oxygen in the air. Oils require a catalyst (a siccative) to quicken the drying process; non-catalysed oils may take up to three years before they are finally hardened; non-catalysed cooked oils can take months. Oils cannot be buffed because they are too soft. Oils generally penetrate the wood pores and close the pore from external influences such as dirt and sweat (acting as sealers of sorts).
Alkyds (enamels and varnishes): Alkyds take on the more familiar names enamels when pigmented and varnishes when kept transpar-ent. Alkyds cure just like oils (by reaction with the oxygen in the air) but become much harder, more quickly than regular oils. We include them in this classification for illustrative ends, but alkyd coat-ings are generally not used on guitar finishing due to their softness–even when they exhibit a very high gloss when freshly polished.
Comparison
The following table shows the different methods—remember, we are naming the finishing methods according to the products used. In each case, we include the medium (solvent or water), the benefits and drawbacks of each method, and which finish-ing phases (filling, sealing, etc.) are required in each method.

(Continues in page 56)
53
September 2012
A word of caution
If you plan to use one of the water-borne versions of the products listed above (that is, using water as medium), an important rule of thumb applies: if you start with water borne, stay with water borne. The reason for this is that water has a high surface ten-sion, higher than most substrates, especially when treated with a pore filler or sealer. Surface tension is the force required to make a molecule leave its surrounding liquid (usually composed of the same molecules). Water requires a force of 72 mN/m (milinewtons per meter). Oil has a surface tension of only 28 mN/m. If the numbers do not match, the material with the higher surface tension gets re-pelled by the other, like a water drop from a waxed car’s surface. The surface tension of water can be lowered with the use of additives (technically: ad-ditives with soap structures or silicone surfactants) that move to the water interface and lower the sur-face tension. After drying, the additives lay on top of the applied coat: consequently, solvent-borne coatings cannot adhere on these products as they block direct access to the resin underneath. Ad-ditional water-borne coatings will solubilise these products, though, and free the resin surface in order to provide adhesion to the new layer of water-based product.
So, if you go for a water based product, make sure that all products you will use along the process are water based as well.
Finishing phase 1: pore filling
A pore filler product works in one of two ways: 1) as a solid component filling the pores directly with a solid component or 2) as an abrasive liquid, push-ing sanded wood fibres into the pores. Furthermore, pore fillers come in three types, described below. The type that is best for you depends on how porous your wood is and how dark- or light-colored it is:
1) Clear formulations for semi-porous to non-porous wood. These are suitable for dark wood types. They are based on oil. Just wipe the oil on, wipe excess off, leave for an hour, and repeat when necessary (no more than three layers every twenty-four hours). Keep the wiping cloth well ven-tilated in a non-combustible area.
2) Pumice filled, for semi-porous to highly-porous, light-colored woods. Pumice is ground lava rock. The pores are not filled by the pumice: it only acts as an abrasive that grinds the wood gen-tly and pushes the loose wood fibres into the pores.
Example of a satin oil finish on a Parker Fly. Photo: Anders Pearson (reproduced under CC license).

Issue #1
54
Product Medium Benefits Drawbacks Filler Sealer Stain Top coat
Shellac
Solvent Quick drying, universal, high gloss buffing, adheres on all solvent and water borne pre treatments. Can be sprayed, brushed and wiped. Enhances wood grain texture.
Not stable against alkaline cleaners, highly flammable, solvent smell, alcohol solvent is intoxicating. French polishing is labour intensive.
√ √ √ √
Water Quick drying, universal, high gloss buffing, adheres on all solvent and water borne pre treatments. Can be sprayed, brushed and wiped. Enhances wood grain texture.
More water sensitive than solvent based. Contains borax to make water soluble. Borax is a strong skin sensitizer, more than alcohol. May have negative effects on small hide glue joints.
√ √ √ √
Nitro cellulose
Solvent Quick drying, universal, high gloss buffing, adheres on all solvent and most water borne pre treatments. Can be sprayed, brushed and wiped. Enhances wood grain texture.
Highly flammable, most types show quick yellowing and cracks in time. High shrinkage, low solids. √ √ √ √
Acrylic
Solvent Quick drying, universal, high gloss polishing, adheres on all solvent pre treatments. Can be sprayed, brushed and wiped. Non-yellowing.
Highly flammable, poor adhesion on water borne pre treatments. High shrinkage, low solids when sprayed. Poor wood grain texture enhancement.
X X √ √
Water Non flammable, quick drying, universal, high gloss polishing, adheres on all solvent and water based pre treatments. Can be sprayed, brushed and wiped. Non-yellowing.
Poor adhesion on solvent borne pre treatments. High shrinkage, low solids when sprayed. Poor wood grain texture enhancement. Low resistance against water vapour. Instruments need to be conditioned during storage.
X X √ √
Poly Urethane
Solvent Quick drying, universal, high gloss polishing, adheres on all solvent pre treatments. Can be sprayed, brushed and wiped. Non-yellowing.
Highly flammable, poor adhesion on water borne pre treatments. High shrinkage, low solids when sprayed. Poor wood grain texture enhancement.
√ √ √ √
Water Non flammable, quick drying, universal, high gloss polishing, adheres on all solvent and water based pre treatments. Good chemical resistance. Can be sprayed, brushed and wiped. Non-yellowing.
Poor adhesion on solvent borne pre treatments. High shrinkage, low solids when sprayed. Poor grain enhancement. Low resistance against vapor. Instruments need to be conditioned during storage.
√ √ √ √
LA
CQ
UE
RS

55
September 2012
PProduct Medium Benefits Drawbacks Filler Sealer Stain Top coat
2k Polyester Iso Cyanate
Solvent High gloss polishing, adheres on all solvent pre treatments. Can be sprayed, brushed and wiped. Non-yellowing. High film thickness, very durable and chemical resistance.
Flammable, hardener is toxic, solvents harmful. May form bubbles when applied in humid conditions (reacts with water from the air). Medium adhesion directly on wood.
X X X √
Water Non flammable, high gloss polishing, adheres on all solvent and water based pre treatments. Good chemical resistance. Can be sprayed, brushed and wiped. Non-yellowing.
Hardener is toxic; it may form bubbles when applied in humid conditions (reacts with water from the air and the coating when drying is slow). Medium adhesion directly on wood.
X X X √
Oil
Solvent Thin films with wood feel. Natural sheen. Durable finish and easy to refinish with oil. Can be sprayed, brushed and wiped. Last wax treatment provides water resistant properties.
Flammable, slow drying (needs catalyst), rags when wiped need to be disposed to in well ventilated areas to prevent self combustion. Cannot be buffed, only polished.
√ √ √ √
Modified oil
Solvent Thin films with wood feel. Natural sheen. Can be buffed to high gloss. Durable finish and easy to refinish with oil. Can be sprayed, brushed and wiped.
Flammable, slow drying (needs catalyst), rags when wiped need to be disposed to in well ventilated areas to prevent self combustion. X √ √ √
Enamelsand varnishes
Solvent High gloss polishing, adheres on all solvent pre treatments. Can be sprayed, brushed and wiped. Medium yellowing. Medium film thickness, durable and chemical resistance.
Flammable, mostly available in medium oil version which is not suitable for musical instruments, short oil types are suitable for soft flexible woods. Solvents are harmful.
√ X X √
Water Non flammable, high gloss polishing, adheres on all solvent and water based pre treatments. Good chemical resistance. Can be sprayed, brushed and wiped. Durable and chemical resistance.
Mostly available in medium oil version which is not suitable for musical instruments, short oil types are suitable for soft flexible woods. Solvents are harmful.
X X X √
2K
‘s
OIL
SA
LKY
DS

Issue #1
56
Granulated hide glue(Photo: Simon Eugster (CreativeCommons lic.)
Large open pores may contain pumice, however, and would show white spots in dark-colored wood.
3) Fumed silica filled. Silica comes in two forms: hydrophilic and hydrophobic; however hydrophilic silica increases the viscosity of the paint applied on top, preventing it from penetrating the pores. The hydrophobic form is used to flatten (that is, to low-er the gloss) of paint formulations and are ideal in the hydrophobic oils for filling. Silica does not have any abrasive properties and must be further diluted with turpentine to achieve an adequate viscosity for proper pore penetration. Silica requires multiple attempts for complete filling in very porous wood types, but it is suitable for all wood types including light and dark colored types.
Pore filling with hide glue
Any crystalline glue forms a solid film just like a res-in and can therefore be used for pore filling. For ex-ample, cyanoacrylate glues (called “instant glues,” or “CA glues” for industrial grades) are used to fill and repair finish damages.
Hide glue is crystalline glue of animal origin. It can come from cattle, rabbit, horse, or fish. Its origin is the swim bladder or connecting tissue such as skin and bones. It can be acquired in granulated or pow-der form.
Water-borne emulsion glues (such as white acrylic wood glue or other synthetic glues) are not crystal-line and therefore are not suitable for this purpose.
Finishing phase 2: Surface sealing
The wood can be stained for coloring (to be dis-cussed in the next article), and a sealer “seals” all in place, ensuring that anything on top of the sealer does not harm what is underneath, such as stain leaching/bleeding.
In the case of shellac, it is also possible to have an-other layer before the sealer is applied to obtain a better wood grain enhancement, but generally, the oil or resins used in stains produce that effect.
Only for the brave: fillers/sealers recipes
For the experimenting luthier, here are some reci-pes for pore fillers and sealers.
IMPORTANT: Please mind that adding solids, such as pumice or fumed silica, to a resin requires stirring up to 2000 rpm. Solvents will evaporate and reach your electric tools. There is a great risk of combustion and explosions. Please only use air operated stirrers attached to a compres-sor placed at a safe distance, and always use in well ventilated areas.
An easier approach is to get a paint can with a solid-closing lid (the can has a U-shaped top where the lid falls inside) or a glass jar; get some glass pearls with a diameter of 1 mm to 3 mm; add the formulation and add an equal amount of glass pearls. The total filling should not exceed a 60 percent of the jar’s volume. Close the lid, tape seal the lid (using electri-cal insulating tape, for example), and start shaking by hand as vigorously as possible for fifteen minutes
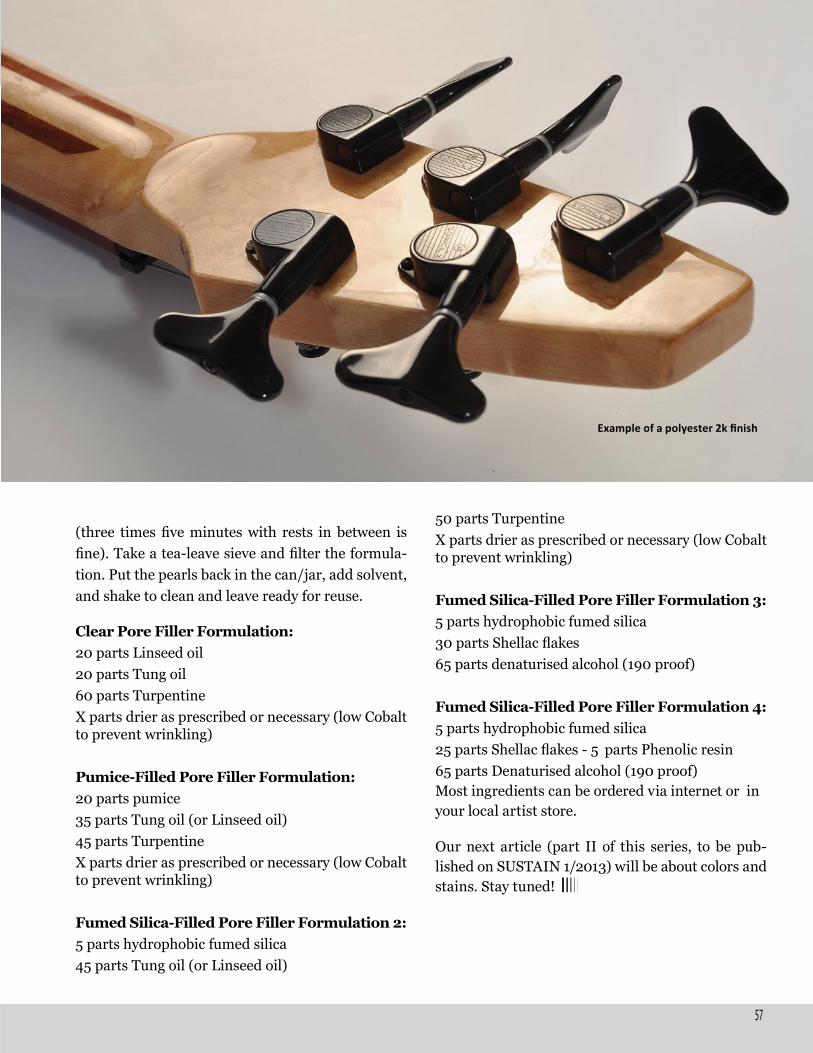
57
September 2012
Example of a polyester 2k finish
(three times five minutes with rests in between is fine). Take a tea-leave sieve and filter the formula-tion. Put the pearls back in the can/jar, add solvent, and shake to clean and leave ready for reuse.
Clear Pore Filler Formulation:20 parts Linseed oil20 parts Tung oil60 parts TurpentineX parts drier as prescribed or necessary (low Cobalt to prevent wrinkling)
Pumice-Filled Pore Filler Formulation:20 parts pumice
35 parts Tung oil (or Linseed oil)45 parts TurpentineX parts drier as prescribed or necessary (low Cobalt to prevent wrinkling)
Fumed Silica-Filled Pore Filler Formulation 2:5 parts hydrophobic fumed silica45 parts Tung oil (or Linseed oil)
50 parts TurpentineX parts drier as prescribed or necessary (low Cobalt to prevent wrinkling)
Fumed Silica-Filled Pore Filler Formulation 3:5 parts hydrophobic fumed silica30 parts Shellac flakes65 parts denaturised alcohol (190 proof)
Fumed Silica-Filled Pore Filler Formulation 4:5 parts hydrophobic fumed silica25 parts Shellac flakes - 5 parts Phenolic resin65 parts Denaturised alcohol (190 proof)Most ingredients can be ordered via internet or in your local artist store.
Our next article (part II of this series, to be pub-lished on SUSTAIN 1/2013) will be about colors and stains. Stay tuned!
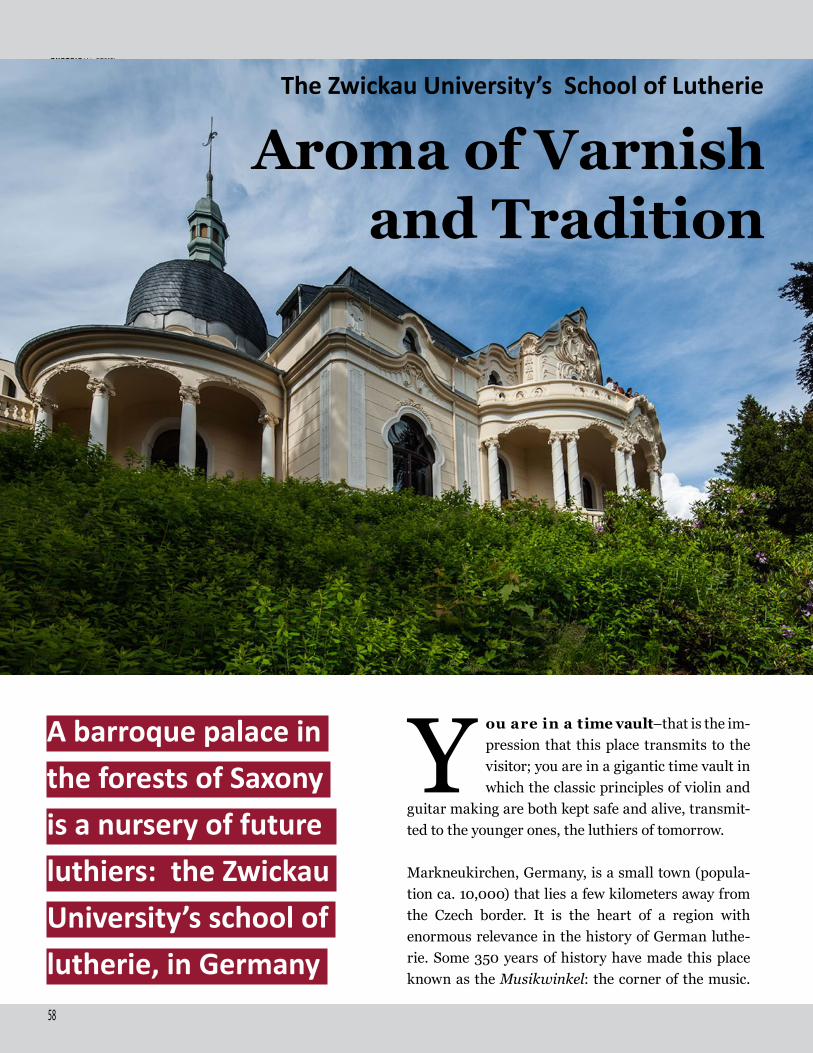
Issue #1
58
Aroma of Varnish and Tradition
A barroque palace in the forests of Saxony is a nursery of future luthiers: the Zwickau University’s school of lutherie, in Germany
Y ou are in a time vault–that is the im-pression that this place transmits to the visitor; you are in a gigantic time vault in which the classic principles of violin and
guitar making are both kept safe and alive, transmit-ted to the younger ones, the luthiers of tomorrow.
Markneukirchen, Germany, is a small town (popula-tion ca. 10,000) that lies a few kilometers away from the Czech border. It is the heart of a region with enormous relevance in the history of German luthe-rie. Some 350 years of history have made this place known as the Musikwinkel: the corner of the music.
The Zwickau University’s School of Lutherie
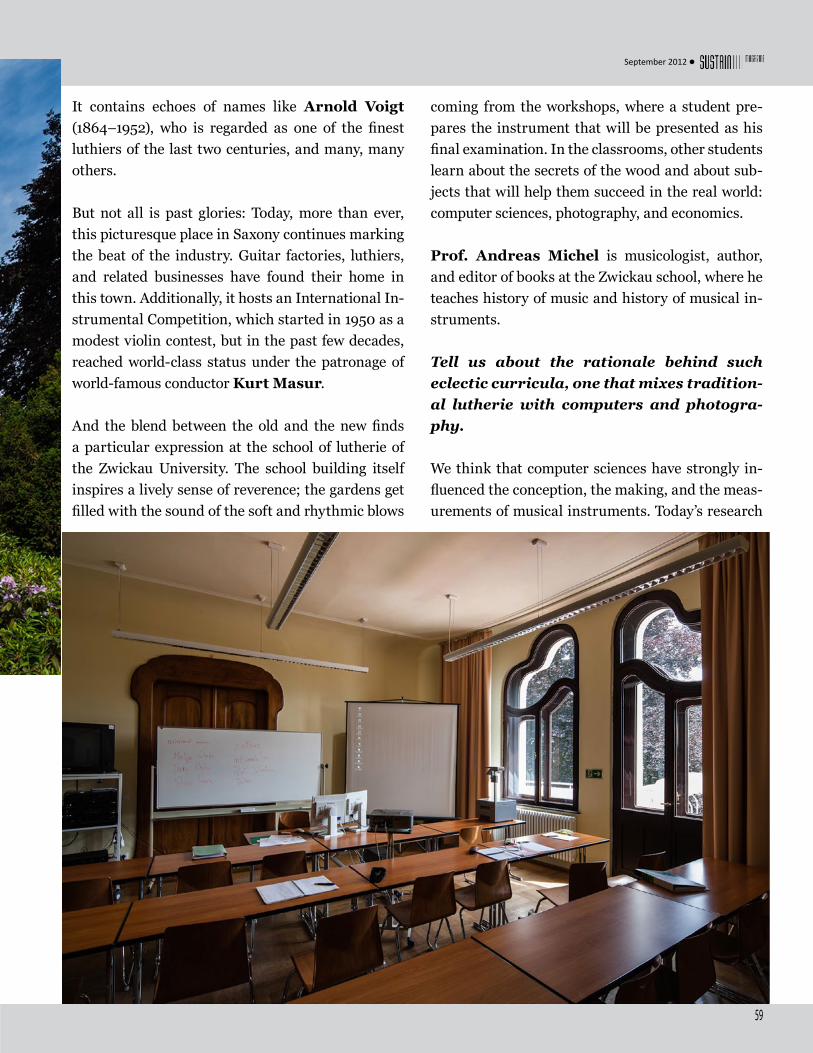
59
September 2012
It contains echoes of names like Arnold Voigt (1864–1952), who is regarded as one of the finest luthiers of the last two centuries, and many, many others.
But not all is past glories: Today, more than ever, this picturesque place in Saxony continues marking the beat of the industry. Guitar factories, luthiers, and related businesses have found their home in this town. Additionally, it hosts an International In-strumental Competition, which started in 1950 as a modest violin contest, but in the past few decades, reached world-class status under the patronage of world-famous conductor Kurt Masur.
And the blend between the old and the new finds a particular expression at the school of lutherie of the Zwickau University. The school building itself inspires a lively sense of reverence; the gardens get filled with the sound of the soft and rhythmic blows
coming from the workshops, where a student pre-pares the instrument that will be presented as his final examination. In the classrooms, other students learn about the secrets of the wood and about sub-jects that will help them succeed in the real world: computer sciences, photography, and economics.
Prof. Andreas Michel is musicologist, author, and editor of books at the Zwickau school, where he teaches history of music and history of musical in-struments.
Tell us about the rationale behind such eclectic curricula, one that mixes tradition-al lutherie with computers and photogra-phy.
We think that computer sciences have strongly in-fluenced the conception, the making, and the meas-urements of musical instruments. Today’s research

Issue #1
60
The school currently has thirty-six students (85 percent are male). Eight to ten new luthiers graduate each year. About 60 percent of them train to build bow instruments, and the rest specialize in plucked chordo-phones. Most of the new graduates establish their own workshops to work independently as luthiers. About a 20 percent of the students come from other countries, and two-thirds of them choose to stay in Germany after they graduate.
The Students
cannot be conducted without the help of a tool like a computer, especially in relation to areas as acoustics and physics. Regarding the teaching of photogra-phy, the intention is to provide the students with the ability to produce by themselves the photos of their own instruments in a professional quality, both for documentation and for marketing purposes.
Who are the teachers?
The trainers in practical subjects are high qualified luthiers, with a long experience in instrument mak-ing: among them Prof. Dr. Günter Mark, Haiko Siefert, Rüdiger Pfau, and Armin Gropp. The rest of the subjects are taught by academics special-ized on each particular area (aesthetics, etc.)
Does the course contemplate any contents related to marketing or business adminis-tration?
The seventh semester includes a module called “Business planning and Marketing,” with contents especially adapted to the student’s future endeav-ours as professional builders of musical instru-ments. It contains topics relevant to a real business
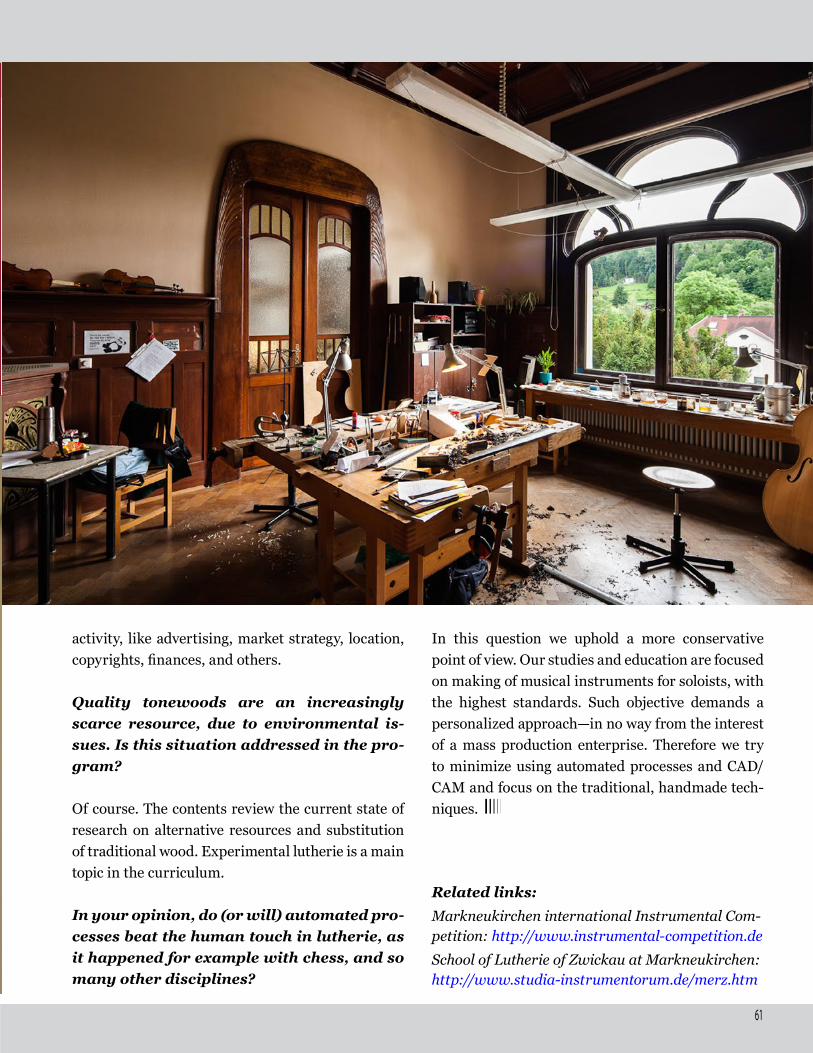
61
September 2012
activity, like advertising, market strategy, location, copyrights, finances, and others.
Quality tonewoods are an increasingly scarce resource, due to environmental is-sues. Is this situation addressed in the pro-gram?
Of course. The contents review the current state of research on alternative resources and substitution of traditional wood. Experimental lutherie is a main topic in the curriculum.
In your opinion, do (or will) automated pro-cesses beat the human touch in lutherie, as it happened for example with chess, and so many other disciplines?
In this question we uphold a more conservative point of view. Our studies and education are focused on making of musical instruments for soloists, with the highest standards. Such objective demands a personalized approach—in no way from the interest of a mass production enterprise. Therefore we try to minimize using automated processes and CAD/CAM and focus on the traditional, handmade tech-niques.
Related links:
Markneukirchen international Instrumental Com-petition: http://www.instrumental-competition.de
School of Lutherie of Zwickau at Markneukirchen: http://www.studia-instrumentorum.de/merz.htm
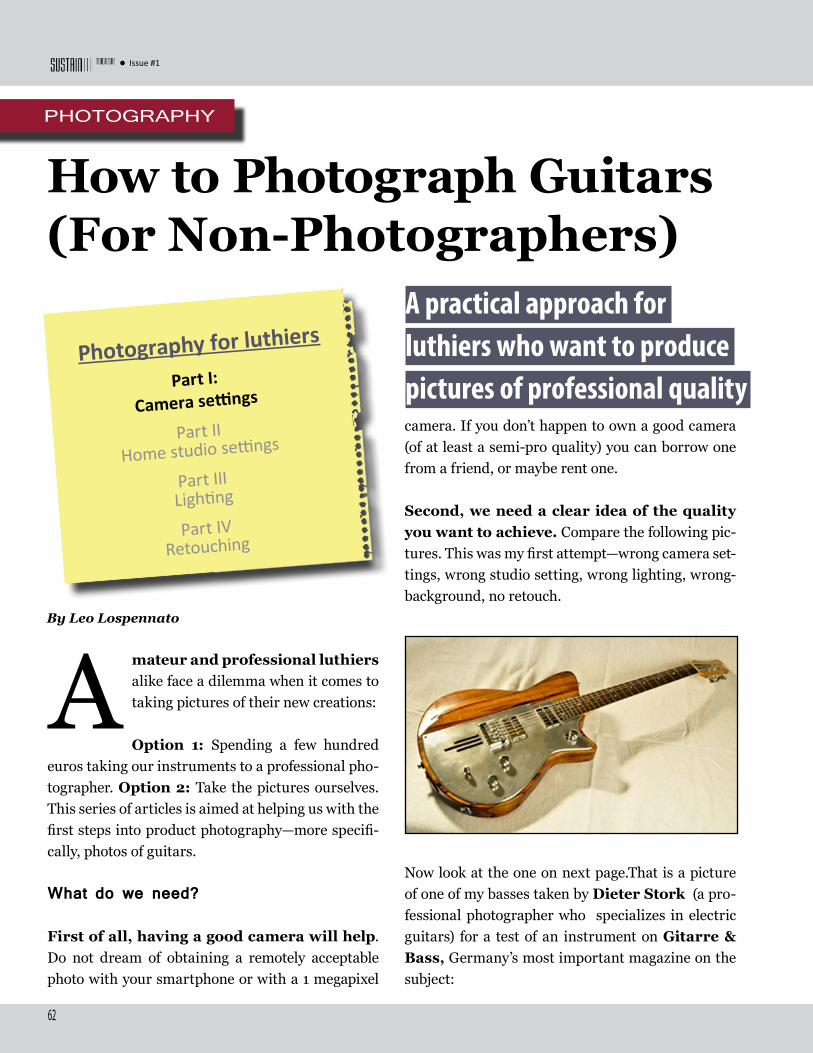
Issue #1
62
A mateur and professional luthiers alike face a dilemma when it comes to taking pictures of their new creations:
Option 1: Spending a few hundred euros taking our instruments to a professional pho-tographer. Option 2: Take the pictures ourselves. This series of articles is aimed at helping us with the first steps into product photography—more specifi-cally, photos of guitars.
What do we need?
First of all, having a good camera will help. Do not dream of obtaining a remotely acceptable photo with your smartphone or with a 1 megapixel
camera. If you don’t happen to own a good camera (of at least a semi-pro quality) you can borrow one from a friend, or maybe rent one.
Second, we need a clear idea of the quality you want to achieve. Compare the following pic-tures. This was my first attempt—wrong camera set-tings, wrong studio setting, wrong lighting, wrong-background, no retouch.
Now look at the one on next page.That is a picture of one of my basses taken by Dieter Stork (a pro-fessional photographer who specializes in electric guitars) for a test of an instrument on Gitarre & Bass, Germany’s most important magazine on the subject:
PHOTOGRAPHY
How to Photograph Guitars (For Non-Photographers)
Photography for luthiers
Part I:Camera settings
Part IIHome studio settings
Part IIILighting
Part IVRetouching
A practical approach for luthiers who want to produce pictures of professional quality
By Leo Lospennato
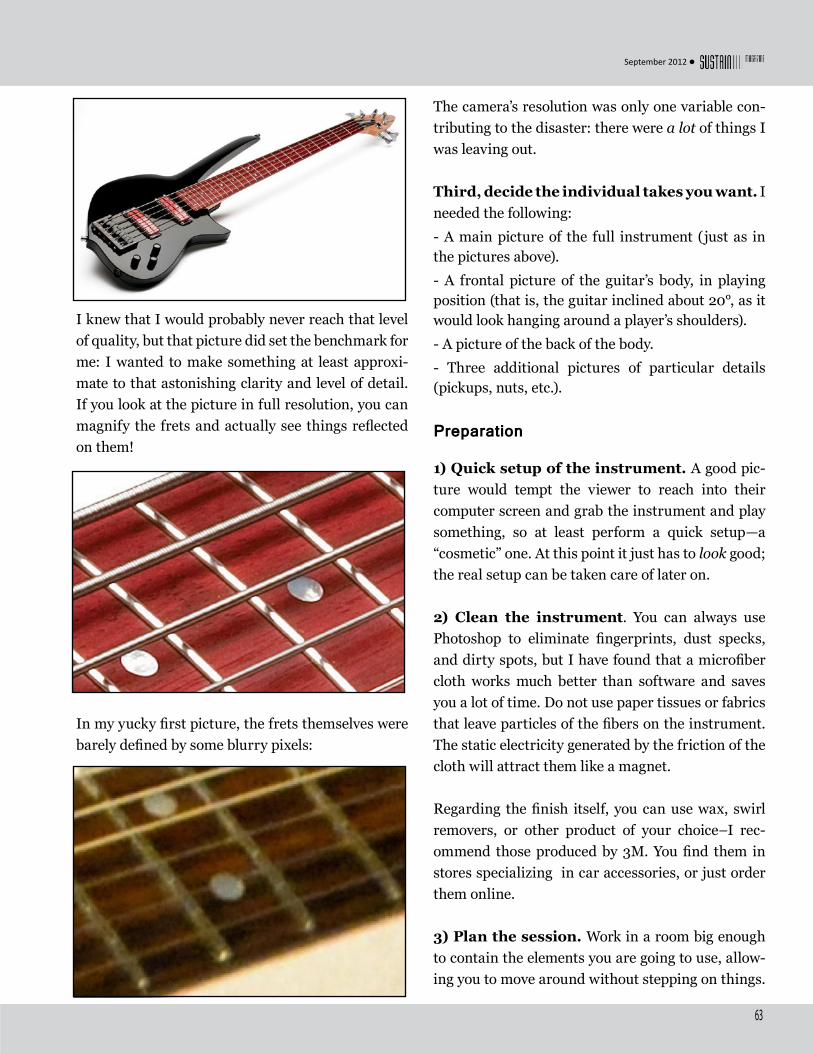
63
September 2012
I knew that I would probably never reach that level of quality, but that picture did set the benchmark for me: I wanted to make something at least approxi-mate to that astonishing clarity and level of detail. If you look at the picture in full resolution, you can magnify the frets and actually see things reflected on them!
In my yucky first picture, the frets themselves were barely defined by some blurry pixels:
The camera’s resolution was only one variable con-tributing to the disaster: there were a lot of things I was leaving out.
Third, decide the individual takes you want. I needed the following:
- A main picture of the full instrument (just as in the pictures above).
- A frontal picture of the guitar’s body, in playing position (that is, the guitar inclined about 20°, as it would look hanging around a player’s shoulders).
- A picture of the back of the body.
- Three additional pictures of particular details (pickups, nuts, etc.).
Preparation
1) Quick setup of the instrument. A good pic-ture would tempt the viewer to reach into their computer screen and grab the instrument and play something, so at least perform a quick setup—a “cosmetic” one. At this point it just has to look good; the real setup can be taken care of later on.
2) Clean the instrument. You can always use Photoshop to eliminate fingerprints, dust specks, and dirty spots, but I have found that a microfiber cloth works much better than software and saves you a lot of time. Do not use paper tissues or fabrics that leave particles of the fibers on the instrument. The static electricity generated by the friction of the cloth will attract them like a magnet.
Regarding the finish itself, you can use wax, swirl removers, or other product of your choice–I rec-ommend those produced by 3M. You find them in stores specializing in car accessories, or just order them online.
3) Plan the session. Work in a room big enough to contain the elements you are going to use, allow-ing you to move around without stepping on things.
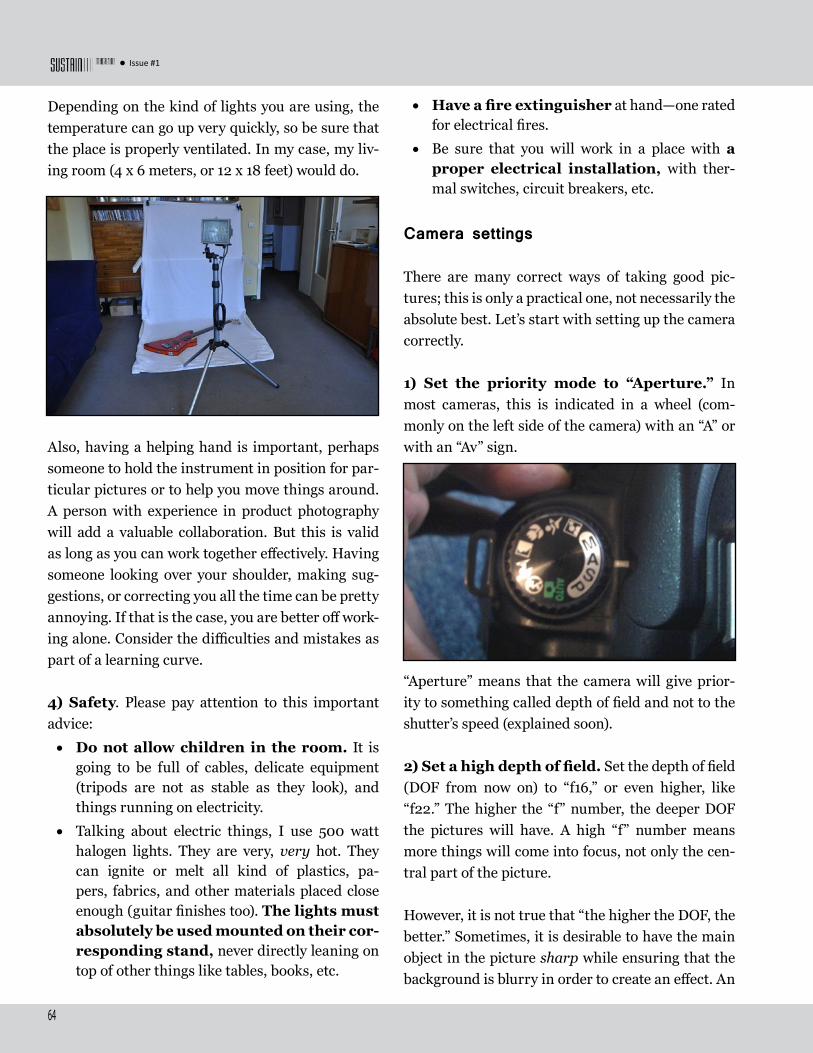
Issue #1
64
Depending on the kind of lights you are using, the temperature can go up very quickly, so be sure that the place is properly ventilated. In my case, my liv-ing room (4 x 6 meters, or 12 x 18 feet) would do.
Also, having a helping hand is important, perhaps someone to hold the instrument in position for par-ticular pictures or to help you move things around. A person with experience in product photography will add a valuable collaboration. But this is valid as long as you can work together effectively. Having someone looking over your shoulder, making sug-gestions, or correcting you all the time can be pretty annoying. If that is the case, you are better off work-ing alone. Consider the difficulties and mistakes as part of a learning curve.
4) Safety. Please pay attention to this important advice:
• Do not allow children in the room. It is going to be full of cables, delicate equipment (tripods are not as stable as they look), and things running on electricity.
• Talking about electric things, I use 500 watt halogen lights. They are very, very hot. They can ignite or melt all kind of plastics, pa-pers, fabrics, and other materials placed close enough (guitar finishes too). The lights must absolutely be used mounted on their cor-responding stand, never directly leaning on top of other things like tables, books, etc.
• Have a fire extinguisher at hand—one rated for electrical fires.
• Be sure that you will work in a place with a proper electrical installation, with ther-mal switches, circuit breakers, etc.
Camera settings
There are many correct ways of taking good pic-tures; this is only a practical one, not necessarily the absolute best. Let’s start with setting up the camera correctly.
1) Set the priority mode to “Aperture.” In most cameras, this is indicated in a wheel (com-monly on the left side of the camera) with an “A” or with an “Av” sign.
“Aperture” means that the camera will give prior-ity to something called depth of field and not to the shutter’s speed (explained soon).
2) Set a high depth of field. Set the depth of field (DOF from now on) to “f16,” or even higher, like “f22.” The higher the “f” number, the deeper DOF the pictures will have. A high “f” number means more things will come into focus, not only the cen-tral part of the picture.
However, it is not true that “the higher the DOF, the better.” Sometimes, it is desirable to have the main object in the picture sharp while ensuring that the background is blurry in order to create an effect. An

65
September 2012
example of this is portraits: you set a low number of DOF (like f 2.8) so you can isolate the subject by putting it into focus (or even just their eyes, for ex-ample) against the surrounding objects, which will appear slightly blurred. A high DOF number (f22 or more) will put virtually everything into focus no matter how far away they are, which, for example, is useful when you want to take pictures of landscapes, keeping in focus both your dog and the mountains in the background, too. Granted, a guitar is a rela-tively small object, but nonetheless, you want to set a high f-number; otherwise, one part of it would be in focus but not the rest.
If you want to learn more about DOF, check out the web. For practical terms, suffice to say:
More DOF = higher “f” number = more things come into focus = whole objects look sharp (maybe including a background in focus as well).
Less DOF =lLower “f” number = less things into focus = only the central detail looks sharp = the far-ther the other details are from the primary subject of the photo, the more blurred they come up.
3) Set the ISO to 100. The “ISO” (formerly known as “ASA ”) tells you about the camera’s degree of sen-sitivity to light. In the old days of photography on film, a 100 ISOs film would take clear and detailed pictures, but it needed better lighting conditions. If you wanted to take photos in a darker environment (an indoor party at night, for example) you would choose a 400 ISOs film. To photograph a night star-ry sky, for example (incredibly low amounts of light), you would use a film with an ISO in the thousands. High ISO films would work much better in the dark, but the “grain” of the picture would be much coars-er: the higher sensitivity of the film was achieved by means of larger photo-reactive particles on it, implying a lower resolution. In modern digital cam-eras, something analogous happens. All you have to do is to set the ISOs to 100. In fact, some cam-eras have the chance of setting an even lower ISO. As seen in the picture, I set the ISO to something called “L 0.3,” the lowest available. The units are not expressed in ISO any longer because this set-ting is “artificial.” It is not native to the sensor (the “L 0.3” tag indicates that the low ISO is achieved by means of the camera’s firmware), but still, it should it should increase the picture’s quality.With a DOF = f8 the bridge looks in focus...
...but the headstock (located in the periphery of the composi-tion) looks totally blurred.
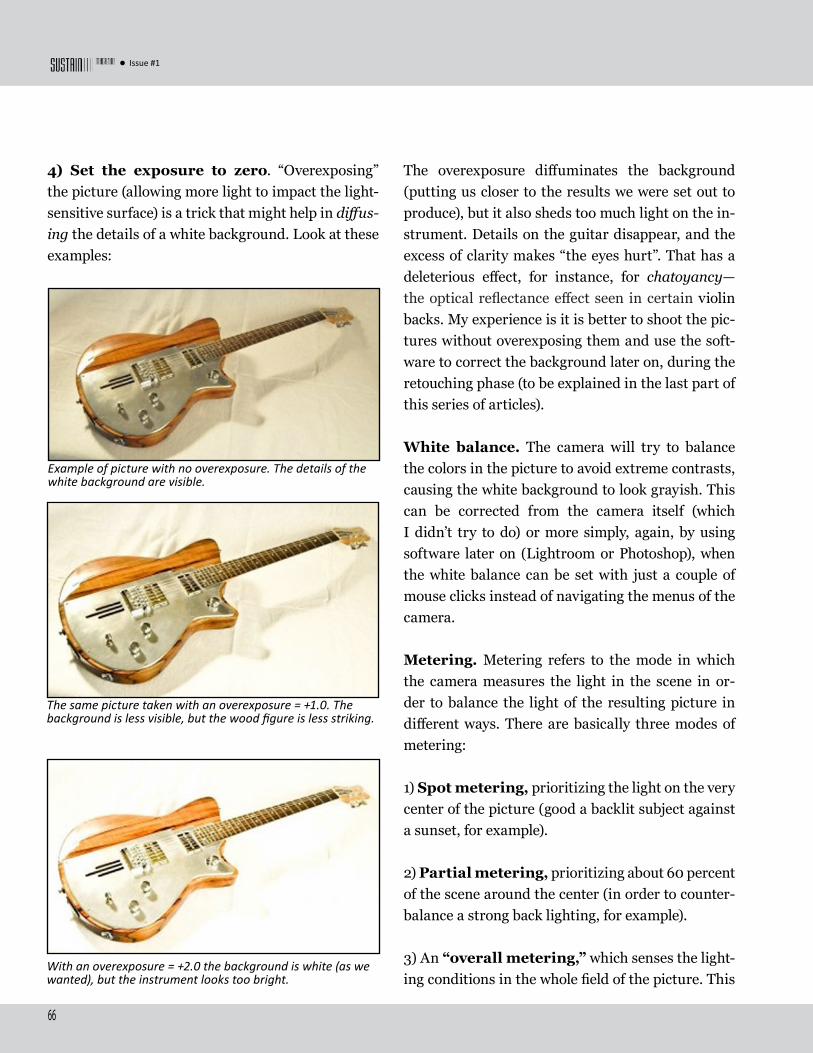
Issue #1
66
4) Set the exposure to zero. “Overexposing” the picture (allowing more light to impact the light-sensitive surface) is a trick that might help in diffus-ing the details of a white background. Look at these examples:
The overexposure diffuminates the background (putting us closer to the results we were set out to produce), but it also sheds too much light on the in-strument. Details on the guitar disappear, and the excess of clarity makes “the eyes hurt”. That has a deleterious effect, for instance, for chatoyancy—the optical reflectance effect seen in certain violin backs. My experience is it is better to shoot the pic-tures without overexposing them and use the soft-ware to correct the background later on, during the retouching phase (to be explained in the last part of this series of articles).
White balance. The camera will try to balance the colors in the picture to avoid extreme contrasts, causing the white background to look grayish. This can be corrected from the camera itself (which I didn’t try to do) or more simply, again, by using software later on (Lightroom or Photoshop), when the white balance can be set with just a couple of mouse clicks instead of navigating the menus of the camera.
Metering. Metering refers to the mode in which the camera measures the light in the scene in or-der to balance the light of the resulting picture in different ways. There are basically three modes of metering:
1) Spot metering, prioritizing the light on the very center of the picture (good a backlit subject against a sunset, for example).
2) Partial metering, prioritizing about 60 percent of the scene around the center (in order to counter-balance a strong back lighting, for example).
3) An “overall metering,” which senses the light-ing conditions in the whole field of the picture. This
Example of picture with no overexposure. The details of the white background are visible.
The same picture taken with an overexposure = +1.0. The background is less visible, but the wood figure is less striking.
With an overexposure = +2.0 the background is white (as we wanted), but the instrument looks too bright.
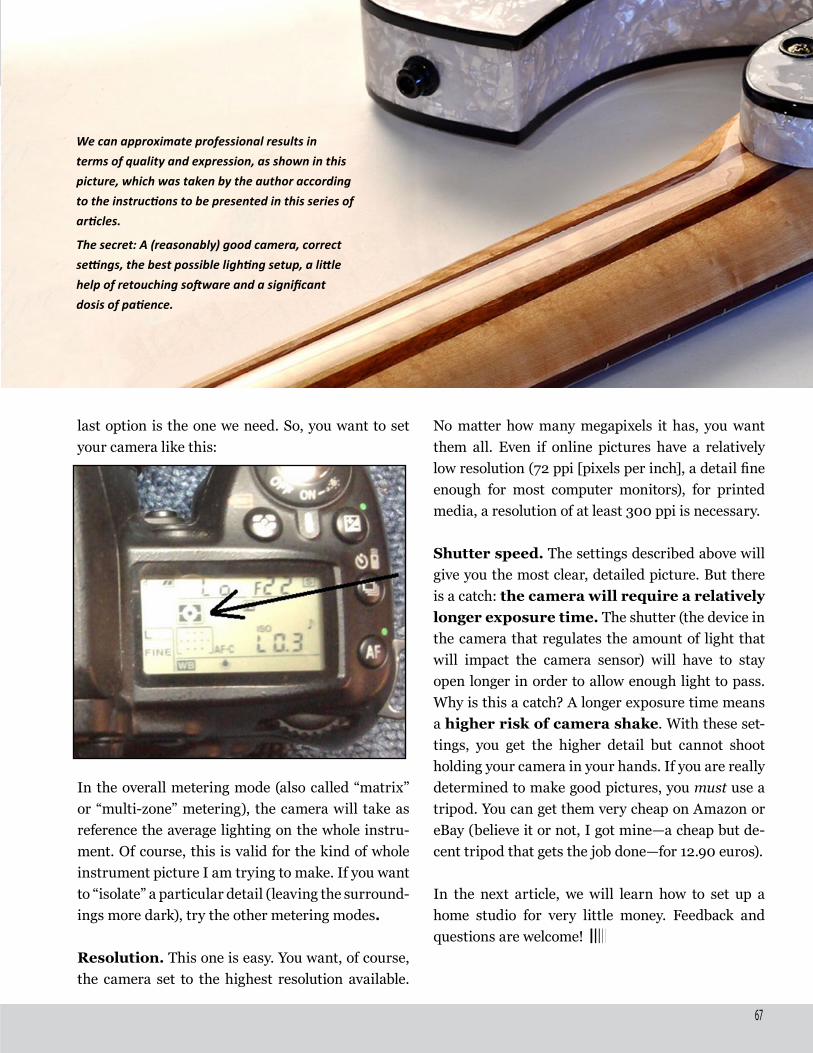
67
September 2012
last option is the one we need. So, you want to set your camera like this:
In the overall metering mode (also called “matrix” or “multi-zone” metering), the camera will take as reference the average lighting on the whole instru-ment. Of course, this is valid for the kind of whole instrument picture I am trying to make. If you want to “isolate” a particular detail (leaving the surround-ings more dark), try the other metering modes.
Resolution. This one is easy. You want, of course, the camera set to the highest resolution available.
No matter how many megapixels it has, you want them all. Even if online pictures have a relatively low resolution (72 ppi [pixels per inch], a detail fine enough for most computer monitors), for printed media, a resolution of at least 300 ppi is necessary.
Shutter speed. The settings described above will give you the most clear, detailed picture. But there is a catch: the camera will require a relatively longer exposure time. The shutter (the device in the camera that regulates the amount of light that will impact the camera sensor) will have to stay open longer in order to allow enough light to pass. Why is this a catch? A longer exposure time means a higher risk of camera shake. With these set-tings, you get the higher detail but cannot shoot holding your camera in your hands. If you are really determined to make good pictures, you must use a tripod. You can get them very cheap on Amazon or eBay (believe it or not, I got mine—a cheap but de-cent tripod that gets the job done—for 12.90 euros).
In the next article, we will learn how to set up a home studio for very little money. Feedback and questions are welcome!
We can approximate professional results in terms of quality and expression, as shown in this picture, which was taken by the author according to the instructions to be presented in this series of articles.
The secret: A (reasonably) good camera, correct settings, the best possible lighting setup, a little help of retouching software and a significant dosis of patience.

Issue #1
68

69
September 2012
Welson was a brand of guitars produced by the Quagliar-di company—an accordion factory out of Castelfidardo,a small town of on the east coast of Italy—which around 1962 made its first electric solid bodies. An Anglophone name like “Welson” (that sounds similar to “Gibson”) is not the only thing that the Italian enterprise borrowed from the American company. In the picture on the facing page we see an ES-335-inspired thinline, aimed at pro-fessional musicians, a fructiferous imitation that contin-ued with Les Paul and SG copies. Fortunately, the com-pany also followed Gibson’s example regarding quality, sometimes. For example, the Welson humbucker pick-ups, produced from 1967 on, were of exceptional quality and produced virtually no noise and a high signal output.
The guitar in the picture shows an unusually high num-
ber of controls: at least nine devic-es, between pots and switches, to control two pickups.
The ad itself is a beautiful display of the 1960s aesthetics. The color palette, full of “buttery” tones, combined with two already classic typographies: the fonts used are the “Sweet Sans”—a sober, grotesque type—and on the bottom (in yellow letters), the “Euros-tile” font, designed in 1951 and ubiquitous since then on a thousand science-fiction films and ads that attempted to convey a futuristic quality for their products. Nowa-days, Welson guitars are not hard to find in France, Bel-gium, Holland, and in the rest of the Western world, with the ironic exception of Italy, where they are virtually ig-nored. Quagliardi ceased activity in 1981.
RETRO / VINTAGE
ODDITIES
In collaboration with:
In collaboration with:
This... „instrument“ is a five-neck electric bass/guitar/banjo/mandolin/fiddle. It also has a harmomica at-tached at the top, just in case 23 strings are not enough to musically express yourself.
The guitar belongs to Canadian country-musician Steve Puto, a living legend with 65 years of musical career. He bought it from a friend that owned a music store, and he paid $400 (CAD) back in 1973.
It is fairly austere in terms of controls, though: just one pot per neck (a volume control, presumably).
This multi-neck contraption is no longer in playing condition, and stays currently on exhibit at the Cantos Music Foundation in Calgary, Canada, where it enjoys the status of being one of the most curious object in display among a collection of over 700 historical music instruments.
Just imagine: what kind of case do you need to carry this artifact around? For once, the drummer of the band may feel less lonely in terms of overweight bagga-ge.
Photo: Steve Puto
guitarz.blogspot.com
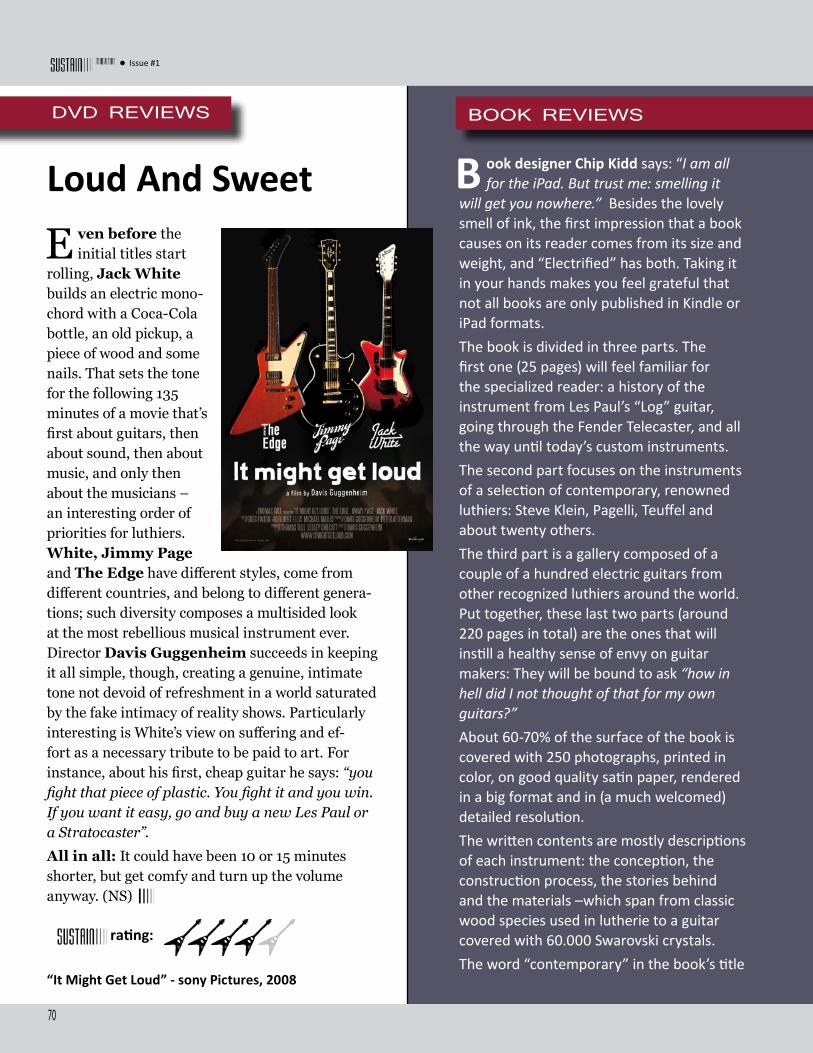
Issue #1
70
B ook designer Chip Kidd says: “I am all for the iPad. But trust me: smelling it
will get you nowhere.” Besides the lovely smell of ink, the first impression that a book causes on its reader comes from its size and weight, and “Electrified” has both. Taking it in your hands makes you feel grateful that not all books are only published in Kindle or iPad formats. The book is divided in three parts. The first one (25 pages) will feel familiar for the specialized reader: a history of the instrument from Les Paul’s “Log” guitar, going through the Fender Telecaster, and all the way until today’s custom instruments.The second part focuses on the instruments of a selection of contemporary, renowned luthiers: Steve Klein, Pagelli, Teuffel and about twenty others. The third part is a gallery composed of a couple of a hundred electric guitars from other recognized luthiers around the world. Put together, these last two parts (around 220 pages in total) are the ones that will instill a healthy sense of envy on guitar makers: They will be bound to ask “how in hell did I not thought of that for my own guitars?” About 60-70% of the surface of the book is covered with 250 photographs, printed in color, on good quality satin paper, rendered in a big format and in (a much welcomed) detailed resolution.The written contents are mostly descriptions of each instrument: the conception, the construction process, the stories behind and the materials –which span from classic wood species used in lutherie to a guitar covered with 60.000 Swarovski crystals.The word “contemporary” in the book’s title
DVD REVIEWS
Loud And Sweet
E ven before the initial titles start
rolling, Jack White builds an electric mono-chord with a Coca-Cola bottle, an old pickup, a piece of wood and some nails. That sets the tone for the following 135 minutes of a movie that’s first about guitars, then about sound, then about music, and only then about the musicians –an interesting order of priorities for luthiers. White, Jimmy Page and The Edge have different styles, come from different countries, and belong to different genera-tions; such diversity composes a multisided look at the most rebellious musical instrument ever. Director Davis Guggenheim succeeds in keeping it all simple, though, creating a genuine, intimate tone not devoid of refreshment in a world saturated by the fake intimacy of reality shows. Particularly interesting is White’s view on suffering and ef-fort as a necessary tribute to be paid to art. For instance, about his first, cheap guitar he says: “you fight that piece of plastic. You fight it and you win. If you want it easy, go and buy a new Les Paul or a Stratocaster”.
All in all: It could have been 10 or 15 minutes shorter, but get comfy and turn up the volume anyway. (NS)
“It Might Get Loud” - sony Pictures, 2008
rating:
BOOK REVIEWS
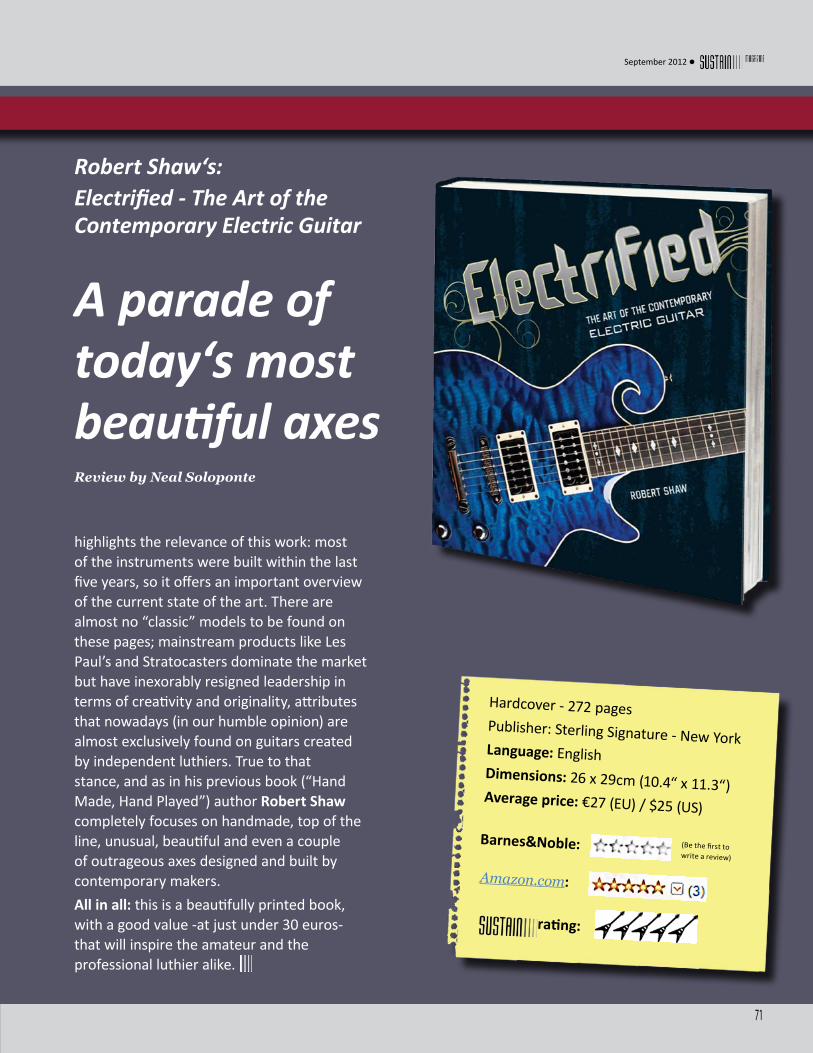
71
September 2012
Barnes&Noble:
Amazon.com:
rating:
(Be the first to write a review)
Hardcover - 272 pagesPublisher: Sterling Signature - New YorkLanguage: EnglishDimensions: 26 x 29cm (10.4“ x 11.3“)Average price: €27 (EU) / $25 (US)
highlights the relevance of this work: most of the instruments were built within the last five years, so it offers an important overview of the current state of the art. There are almost no “classic” models to be found on these pages; mainstream products like Les Paul’s and Stratocasters dominate the market but have inexorably resigned leadership in terms of creativity and originality, attributes that nowadays (in our humble opinion) are almost exclusively found on guitars created by independent luthiers. True to that stance, and as in his previous book (“Hand Made, Hand Played”) author Robert Shaw completely focuses on handmade, top of the line, unusual, beautiful and even a couple of outrageous axes designed and built by contemporary makers.All in all: this is a beautifully printed book, with a good value -at just under 30 euros- that will inspire the amateur and the professional luthier alike.
A parade of today‘s most beautiful axesReview by Neal Soloponte
Robert Shaw‘s: Electrified - The Art of the Contemporary Electric Guitar

Next issue (December 15th, 2012):l Interview with Pagelli Guitars: a visit to the workshop with special focus on their jazz guitarsl Warwick basses factory: a view in depth on how they build instruments on the „big leagues“. l The Finishing series: Lacquers l How to photograph guitars, 2nd. (and final) part. l Reviews l Technology l Techniques l Research l Interviews with makers and artists l Instrument‘s design l Electric guitar design contest 2013 - Participate!
So, where do you live?The subscription fees for one full year (four quarterly issues of SUSTAIN), including shipping and handling, are:
l From the USA: U$S 59
l From all other countries: € 59
All payments are made via PayPal.However, a PayPal account is NOT necessary –just a credit card, or a bank account.
Subscribe now! FellowLuthiers.com
Questions? Contact [email protected]
Keep in touch with the world of lutherie!
Issue #1
72

73
September 2012
Page intentionally left blank
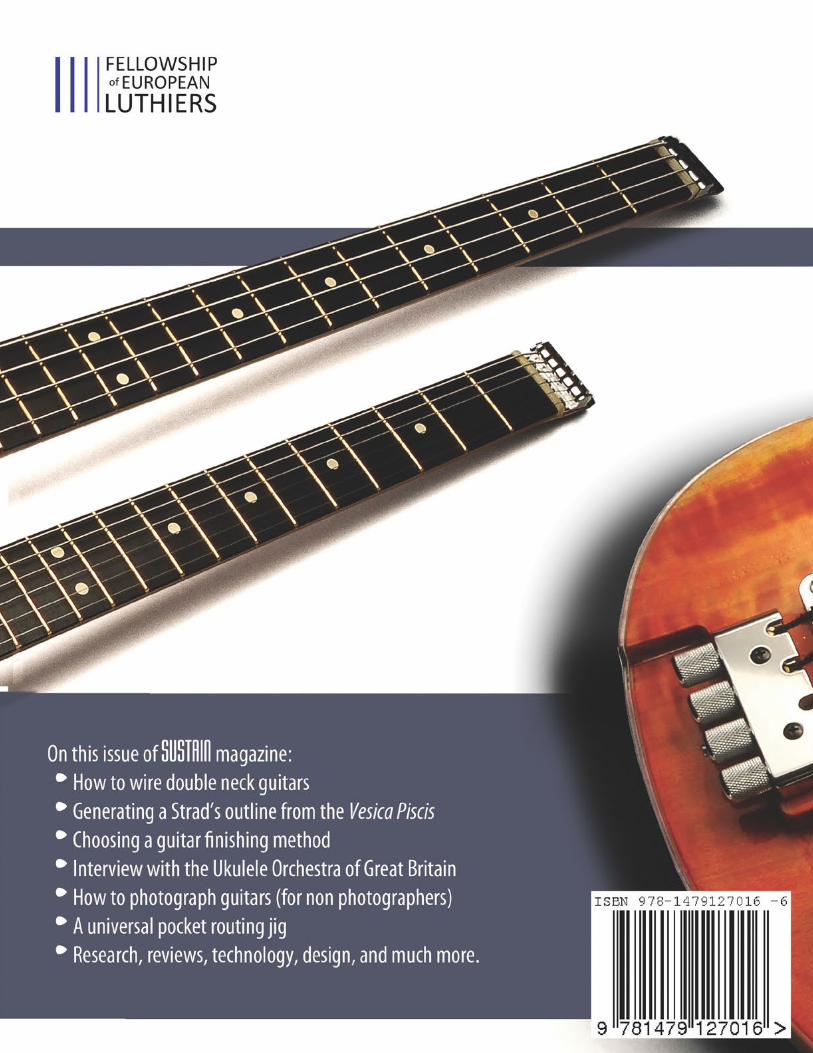
Issue #1
74


