Commercial R Amana® is a Registered Trademark of Maytag Corporation. Brand used under license. Service / Training Manual High Speed Combination Oven AXP / MXP - 60 Hz MXP22QT December 2011 16400012
Transcript
Commercial
R
Amana® is a Registered Trademark of Maytag Corporation. Brand used under license.
Service / Training ManualHigh Speed Combination Oven
AXP / MXP - 60 Hz
MXP22QT
December 2011
16400012
Important Safety Information
1
Important Notices for Servicers and Consumers
ACP will not be responsible for personal injury or property damage from improper service procedures. Pride and
workmanship go into every product to provide our customers with quality products. It is possible, however, that during
its lifetime a product may require service. Products should be serviced only by a quali"ed service technician who is
familiar with the safety procedures required in the repair and who is equipped with the proper tools, parts, testing
instruments and the appropriate service information. IT IS THE TECHNICIANS RESPONSIBLITY TO REVIEW ALL
APPROPRIATE SERVICE INFORMATION BEFORE BEGINNING REPAIRS.
! WARNINGTo avoid risk of severe personal injury or death, disconnect power before working/servicing on appliance to avoid
STEP 1 - Unpack Oven � � � � � � � � � � � � � � � � � � � � � � � � � � � � � � � � � � � � � � � � � � � � � � � � � � � � �� � � � � � � � � � � � � � �Oven ClearancesK L M N O P N O Q R K S T O U V W X Y Z [ \ ] ^ K _S N ` T a b c W a a N d W Q a T W b Q e f Y g h i V S _ N jV a T W O W X V T W O N k X ` Q N l N j N m T X h M N On X Q T O X W Q U N X W a Y g o p q _ S N ` T a b c W a a N dW O N k X ` Q N l N j N m T X h r O N l T O W U ON m T X S W s X N Q N l T O W Q T l O N l T O a s W X `a U j T N j T a T V Q O U V W a l W O Q b U b O T ` k V T ` ht L K a a N d W Q a T W b Q e f Y g h i V S _ u T Q d T T X W U O` U b V R W O v T N X u W V w N j N m T X W X ` u W V wd W a a h] L K a a N d W Q a T W b Q e f Y g h i V S _ N jV a T W O W X V T W O N k X ` b U ` T b N j N m T X hx L n X b Q W a a V N S u U X W Q U N X N m T X b N N m T Xu N Q Q N S U b W Q a T W b Q y j T T Q Y z i h g V S _
µ ¶ · ¶ ¸ ¹ º » ¸ º ¼ ½ ¾ ¹ ¿ À · ¶ ¹ Á Â À Ã ½ À Ä · º ¸ ¿ À · ¶ ¹ Á ¿ ¹ À ¹ ¶ Å ¶ Ã ¹ Æ Ç È É Ê Ë Ì Í Î Í Ï Ð Ñ Í Ò Ó Ô Õ Ö Ñ × Ö Ì Ö Ø Ö Ù Ì Ö Ú Ì Í É Ñ Ì Ù Ñ ÍHigh Speed Commercial Combination Oven
Temperatures are displayed in ºF for 60 Hz models 11 Temperature Scale
Off
Displays every 7 days
Displays every 30 days
12 Clean Filter
Displays every 90 days
From Preheat, go to Ready 13 Auto Menu
From Preheat, go to Menu
No individual tube programming 14 Magnetron Control
Individual Tube Programming
No microwave only mode 15 Microwave Only Mode
Allow microwave only mode
Do not save after manual cook 16 Manual Program Save
Save after manual cook
2 Hours
4 Hours
8 Hours
17 Automatic Shut Off
Disable
Begin Transfer: Card to Oven 18 Data Transfer
Begin Transfer: Oven to Card
Temperatures are displayed in ºC for 50 Hz models
91 Preheat Temperature* Enter Temperature in 5° increments
200°F (95°C) - 520°F (270°C)
* Option 19 not on all models
To program the oven using the EZCard: Oven must be in Standby mode (Preheat must be OFF) 1. Open protective cover from bottom of keypad. 2. Insert the EZCard into the slot located below the vertical keypad. Note: The EZCard can be inserted forwards or backwards. 3. From Standby, press and hold the “2” pad to go to “User Options”. 4. Go to Option #18 by pressing “Prev Option” on the screen or repeatedly pressing “Next Option” 5. Select the desired operation by highlighting “Transfer card to oven” or “Transfer oven to card” with the knob. 6. Press the “Start” pad to begin the transfer (The screen will indicate transferring and indicate done when transfer is complete.)
8. Remove EZCard and close the protective cover.
Note: You can exit from programing the oven by pressing “off” keypad.
È É Ê Ë Ì ÌÍ ÎÈ É Ê Ë Ì ÌÏ Ë Ð ÑÒ Ó Ô Õ Ö × Ø Ù Ù Ò Ú Û Ü Ý Õ Ö × Ø Ù ÙÞ Ø ß Ü à Ø á â ã á Ù â ã á à ä Ø Ø ÝÖ Û à Ô ã Ø × â Ô Ó å
æ ç É èé Ñ ê ë Ê
ì ë Ñ í È É Ê ë ë Ñî ï ð î ñ ñò Ê Ë ó Ê ç ôõ ë ô Î ë Ê ç ê í Ê ëì ç Ñ í ç Ì ö Ë Ë è
ï í ô ÷ ë Êò ç ø ùÈ ê Ë ÎÈ ê ç Ê ê
ú × Ô Ó Ó à Ø Ú × Ô á Ô Û à Ø û Ô Ü Ø × à ü × Ü Ø û Ô Ü Ø ä ä åý þ Û Ü ß â Ù Ù Ö Ø Ü à â Ü ü Ô à Ø × ü Ü â ä à Ô ÿ Ú Ô × Û à ü × Ôâ Ó Ø û Ô × � � � � þ � � � � � � å� � � � � � � � � � � �ú × Ô Ó Ó à Ø Ö á Ô Ö � Ó Ô à à Ô ÿ Ú Ô × Û à ü × Ôú × Ô Ó Ó à Ø Ö á Û Ü ã Ô à Ô ÿ Ú Ô × Û à ü × Ô åú × Ô Ó Ó � ü ÿ � Ô × � Ô � Ú Û Ý Ó à Ø Ô Ü à Ô × Ø ×Ö á Û Ü ã Ô à Ô ÿ Ú Ô × Û à ü × Ô åú × Ô Ó Ó � Ü à Ô × à Ø Ó Û û Ô å
� � � � � � � � � � �ú × Ô Ó Ó à Ø Ú × Ø ã × Û ÿ Ü Ô ß Ú × Ø Ý ü Ö à Ø ×Ö á Û Ü ã Ô Ô � â Ó à â Ü ã Ú × Ø ã × Û ÿ Ó åú × Ô Ó Ó à Ø Ó à Û × à Ý Û à Û � Ô � à × Û Ü Ó ä Ô × åú × Ô Ó Ó à Ø Ö á Û Ü ã Ô Ú Û Ó Ó ß Ø × Ý å � � � Õ Ô Ù Ô Ö à à Ø Ú × Ø ã × Û ÿ Ü Ô ß Ú × Ø Ý ü Ö à Ø ×Ö á Û Ü ã Ô Ô � â Ó à â Ü ã Ú × Ø ã × Û ÿ Ó å� � � Õ Ô Ù Ô Ö à à Ø Ý Ô Ù Ô à Ô Ú × Ø ã × Û ÿ Ó å � � ! � � � � � � � � �ú × Ô Ó Ó ä Ø × ÿ Û Ü ü Û Ù Ö Ø Ø � â Ü ã å
" ! � � � � � � � � � � � �ú × Ô Ó Ó à Ø Ö á Û Ü ã Ô Ó Ô à à â Ü ã Ø × ÿ Ø û Ô ü Ú à ØÛ Ü Ø à á Ô × Ó Ô à à â Ü ã åú × Ô Ó Ó à Ø ÿ Ø û Ô ü Ú à Ø Û Ü Ø à á Ô × á â ã á Ù â ã á à Ô ÝÛ × Ô Û å" ! � � � � � � # � � � � � �ú × Ô Ó Ó à Ø Ö á Û Ü ã Ô Ó Ô à à â Ü ã Ø × ÿ Ø û Ô Ý Ø ß Ü à ØÛ Ü Ø à á Ô × Ó Ô à à â Ü ã åú × Ô Ó Ó à Ø ÿ Ø û Ô Ý Ø ß Ü à Ø Û Ü Ø à á Ô ×á â ã á Ù â ã á à Ô Ý Û × Ô Û å
" � � � � � � � � �ú × Ô Ó Ó à Ø Ó à Û × à Ö Ø Ø � â Ü ã Ö � Ö Ù Ô åú × Ô Ó Ó à Ø Ó Û û Ô Ø Ú à â Ø Ü â Ü Ø Ú à â Ø Ü ÿ Ø Ý Ô åú × Ô Ó Ó à Ø Ó à Ø Ú Ö Ø Ø � â Ü ã Ö � Ö Ù Ô åú × Ô Ó Ó à Ø Ô � â à Ø Ú à â Ø Ü â Ü Ø Ú à â Ø Ü ÿ Ø Ý Ô å
$ ! � � � � � � �ú × Ô Ó Ó × Ô Ú Ô Û à Ô Ý Ù � à Ø × Ô à ü × Ü à Ø ÿ Û â Ü ÿ Ô Ü ü åú × Ô Ó Ó à Ø ã Ø à Ø Ú × Ô û â Ø ü Ó Ó Ö × Ô Ô Ü åú × Ô Ó Ó × Ô Ú Ô Û à Ô Ý Ù � à Ø Ô � â à Ú × Ø ã × Û ÿ ÿ Ø Ý Ô åú × Ô Ó Ó à Ø Ô × Û Ó Ô Û Ö á Û × Û Ö à Ô × å � � � � � � � �ú × Ô Ó Ó à Ø Ó Û û Ô Û ÿ Ô Ü ü åú × Ô Ó Ó à Ø Ó Û û Ô Û % & � Ò & ' � ( ( )Ú × Ø ã × Û ÿ åú × Ô Ó Ó à Ø ã Ø à Ø Ü Ô � à Ó Ö × Ô Ô Ü åú × Ô Ó Ó à Ø Ó Û û Ô Û Ü Û ÿ Ô å
� $ � � � � � � � *ú × Ô Ó Ó à Ø â Ü Ú ü à à Ô ÿ Ú Ô × Û à ü × ÔÓ Ô à à â Ü ã Ó åú × Ô Ó Ó à Ø Ó Ô Ù Ô Ö à ÿ Ô Ü ü â à Ô ÿ Ó åú × Ô Ó Ó à Ø â Ü Ú ü à Ü Û ÿ Ô Ó Ø äÿ Ô Ü ü â à Ô ÿ Ó å1 32
4 65
7 8
0
9
abc def
jklghi
. ’ - #
mno
tuvpqrs wxyz
& /
Ç á Ô Ø û Ô Ü ä Û Ü ß â Ù Ù Ö Ø Ü à â Ü ü Ô à Ø × ü Ü à Ø Ö Ø Ø Ùà á Ô Ø û Ô Ü å Ç á Ô Ø û Ô Ü � Ø Ø Ù â Ü ã % Ø Ý Ô + Ö Ø ÜÛ Ú Ú Ô Û × Ó Û Ü Ý Ó à Û � Ó Ø Ü ü Ü à â Ù à á Ô Ø û Ô Üà Ô ÿ Ú Ô × Û à ü × Ô â Ó � Ô Ù Ø ß � � � � þ ý � � � � � åÇ Ø Û û Ø â Ý Ý Û ÿ Û ã Ô à Ø à á Ô Ö Ø Ü û Ô Ö à â Ø Ü ÿ Ø à Ø ×Ý Ø Ü Ø à à ü × Ü Ø ä ä Ú Ø ß Ô × � � ü Ü Ú Ù ü ã ã â Ü ã à á Ôü Ü â à Ø × Ó á ü à à â Ü ã Ø ä ä à á Ô Ú Ø ß Ô × � × Ô Û � Ô × ü Ü à â Ùà á Ô ä Û Ü Ó à Ø Ú Ó åÇ á Ô ( û Ô Ü ( ä ä + Ö Ø Ü Û Ú Ú Ô Û × Ó ä Ø × � ÿ â Ü ü à Ô Óà á Ô Ü à á Ô Ý â Ó Ú Ù Û � ã Ø Ô Ó � Ù Û Ü � å1 Sandwich
2 Meat
3 Vegetarian
4 Seafood
5 Pasta-Pizza
6 Bake-Dess
7
8
9
0
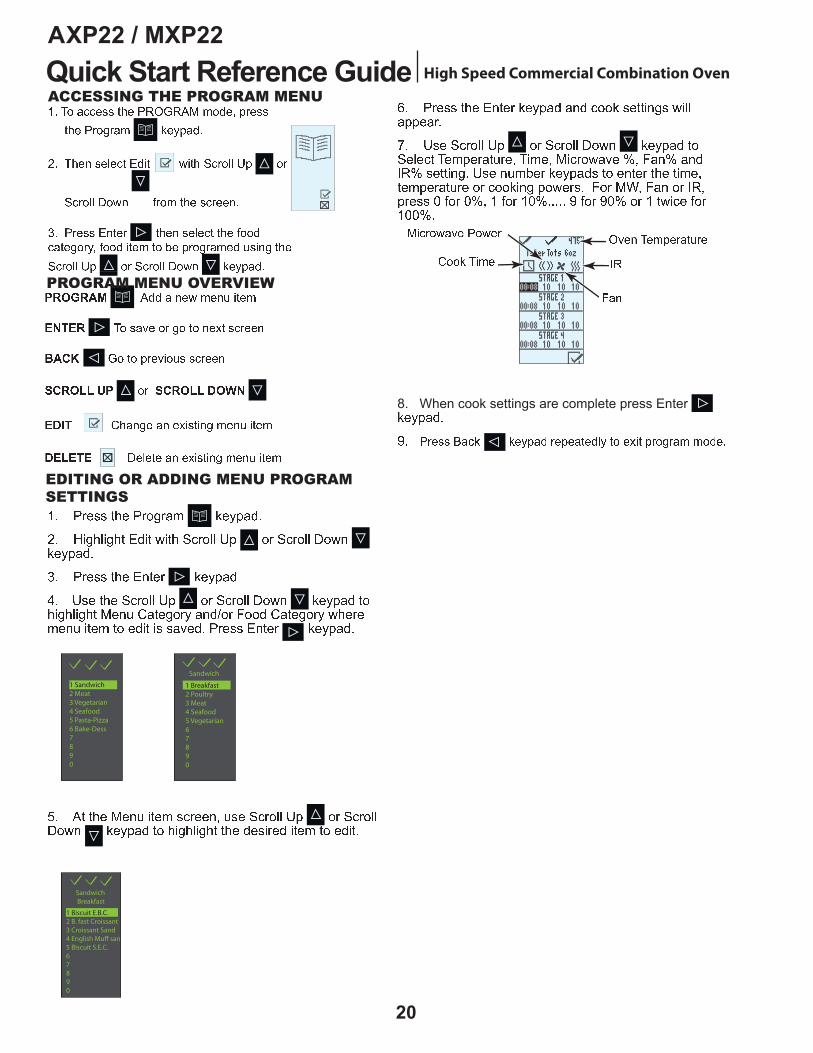
, á Ô Ü Ø û Ô Ü à Ô ÿ Ú Ô × Û à ü × Ô â Ó Ø ü àØ ä × Û Ü ã Ô Ø ä Û Ö Ø Ø � â Ü ã Ú × Ø ã × Û ÿÓ Ô à Ú Ø â Ü à å & Ù â Ü Ô ß â Ù Ù � Ô à á × üà á Û à â à Ô ÿ Ø × â à Ô ÿ Ó Ú × Ô û Ô Ü à â Ü ãâ à à Ø � Ô Ó Ô Ù Ô Ö à Ô Ý å ú Ù Û Ö Ô à á ÔØ û Ô Ü â Ü ú × Ø ã × Û ÿ % Ø Ý Ô à Øû â Ô ß à Ô ÿ Ú Ô × Û à ü × Ô Ó Ô à Ú Ø â Ü à Ø äà á Û à Ö Ø Ø � â Ü ã Ú × Ø ã × Û ÿ å + ä à á Ôà Ô ÿ Ú Ô × Û à ü × Ô Ø ä à á Ô Ø û Ô Ü Ü Ô Ô Ý Óà Ø � Ô Ö á Û Ü ã Ô Ý Û ä à Ô × × Ô û â Ô ß â Ü ãà Ô ÿ Ú Ô × Û à ü × Ô ä Ø × à á Ô Ö Ø Ø � â Ü ãÚ × Ø ã × Û ÿ - Ô � â à Ú × Ø ã × Û ÿ ÿ â Ü ãÿ Ø Ý Ô Û Ü Ý Ö á Û Ü ã Ô Ø û Ô Üà Ô ÿ Ú Ô × Û à ü × Ô å� . / 0 . � 1 � � �
2 3 � 4 � � 1 � � . � 5 6 . �
� . � 7 � � 5 � � 1 � � . � 5 6 . � # � . 8 3 8 0 � 9 / 8 :( û Ô Ü Ü Ø à ü Ú à Ø à Ô ÿ Ú Ô × Û à ü × ÔÓ Ô à Ú Ø â Ü à åú × Ô á Ô Û à à Ô ÿ Ú Ô × Û à ü × Ô ß Û × Ü â Ü ã ß â Ù Ùü Ü à â Ù à Ô ÿ Ú Ô × Û à ü × Ô Ó Ô à Ú Ø â Ü à â Ó ÿ Ô à å
î ï ð î ñ ñò Ê Ë ó Ê ç ôõ ë ô Î ë Ê ç ê í Ê ëì ç Ñ í ç Ì ö Ë Ë è
ï í ô ÷ ë Êò ç ø ùÈ ê Ë ÎÈ ê ç Ê ê
High Speed Commercial Combination Oven
MAIN COOKING MENU
& ä à Ô × à á Ô Ø û Ô Ü á Û Ó Ú × Ô á Ô Û à Ô Ý - à á Ô ÿ Ô Ü ü Û Ú Ú Ô Û × Ó å Ç á Ô Ø û Ô Ü Ö Ø ÿ Ô ÓÚ × Ô Ú × Ø ã × Û ÿ ÿ Ô Ý ß â à á Ó Ô û Ô × Û Ù ÿ Ô Ü ü â à Ô ÿ Ó à Ø Ó â ÿ Ú Ù â ä � Ö Ø Ø � â Ü ã å� � Û ÿ Ú Ù Ô Ó Ø ä ú × Ô Ú × Ø ã × Û ÿ ÿ Ô Ý % Ô Ü ü + à Ô ÿ Ó + Ü Ö Ù ü Ý Ô V
Cooking with Preprogrammed PadsÇ Ø Ö Ø Ø � ä Ø Ø Ý ü Ó â Ü ã Ú × Ô Ú × Ø ã × Û ÿ ÿ Ô Ý ÿ Ô Ü ü â à Ô ÿ ÓW å & ä à Ô × Ø û Ô Ü á Û Ó Ú × Ô á Ô Û à Ô Ý à Ø à á ÔÝ Ô Ó â × Ô Ý à Ô ÿ Ú Ô × Û à ü × Ô å Õ Ö × Ø Ù Ù Ø ×Ú × Ô Ó Ó Ü ü ÿ � Ô × à Ø Ö á Ø Ø Ó Ô Ý Ô Ó â × Ô Ýä Ø Ø Ý Ö Û à Ô ã Ø × � ä × Ø ÿ ÿ Ô Ü ü å� å � á Ø Ø Ó Ô ÿ Ô Ü ü â à Ô ÿ ã × Ø ü ÚÛ Ü Ý Ú × Ô Ó Ó � Ü à Ô × à Ø Ó Ô Ù Ô Ö à åX å Y â ã á Ù â ã á à â à Ô ÿ � Ø ü ß â Ó á à Ø Ö Ø Ø � å / 5 � : + ä à á Ô × Ô â Ó Û Ù â Ü Ô à á × Ø ü ã á à á Ô ÿ Ô Ü üâ à Ô ÿ - à á Ô Ü Ú × Ô á Ô Û à à Ô ÿ Ú Ô × Û à ü × Ô â ÓÝ â ä ä Ô × Ô Ü à à á Û Ü ÿ Ô Ü ü â à Ô ÿ Ú × Ô Ó Ô àà Ô ÿ Ú Ô × Û à ü × Ô å Ç á Ô Ö Ø Ü à × Ø Ù ß â Ù Ù Ü Ø à Û Ù Ù Ø ß� Ø ü à Ø Ó Ô Ù Ô Ö à à á Û à â à Ô ÿ åZ å ( Ú Ô Ü Ø û Ô Ü Ý Ø Ø × - Ú Ù Û Ö Ôä Ø Ø Ý â Ü Ø û Ô Ü Û Ü Ý Ö Ù Ø Ó Ô Ý Ø Ø × å� å ú × Ô Ó Ó � Ü à Ô × à Ø Ó à Û × à Ö Ø Ø � â Ü ãÚ × Ø Ö Ô Ó Ó å[ å & à Ô Ü Ý Ø ä Ö Ø Ø � â Ü ã Ö � Ö Ù Ô - Ø û Ô Ü� Ô Ô Ú Ó Û Ü Ý Ý â Ó Ú Ù Û � Ó Û Ü â ÿ Û à â Ø Ü Û à× â ã á à à Ø â Ü Ý â Ö Û à Ô ä Ø Ø Ý Ö Û Ü � Ô × Ô ÿ Ø û Ô Ý å
W � X1 32
4 65
7 8
0
9
abc def
jklghi
. ’ - #
mno
tuvpqrs wxyz
& /
1 Sandwich
2 Meat
3 Vegetarian
4 Seafood
5 Pasta-Pizza
6 Bake-Dess
7
8
9
0
\ ] ^ _ ` a b ` c d\ e f g h d ^ i\ j _ ` d\ k _ ` b f f l\ m _ n _ d ` ^ o ` p\ ] ^ _ ` a b ` c d\ q g p r s\ m _ n _ d ` t h _ c\ u v v _ d o w _ ^ c\ e f d ` d f _ c\ k x ` h h y q ` ^ n _ e o w w `\ e ` c d `\ j o c r _ h h ` p _ f g c
\ e f g h d ^ i\ ] _ _ b\ e f ^ a\ u v v _ d o w _ ^ c\ ] ^ _ ` a b ` c d\ z o c s\ j o c r\ ] ^ _ ` l\ { _ c c _ ^ d c\ k p ` r a c\ ] ^ _ ` a b ` c d\ k | _ _ d
é Ñ ê ë Ê1 Sandwich
2 Meat
3 Vegetarian
4 Seafood
5 Pasta-Pizza
6 Bake-Dess
7
8
9
0
1 Biscuit E.B.C.
2 B. fast Croissant
3 Croissant Sand
4 English Mu" san
5 Biscuit S.E.C.
6
7
8
9
0
Sandwich
Breakfast
æ ç É è
1 Breakfast
2 Poultry
3 Meat
4 Seafood
5 Vegetarian
6
7
8
9
0
Sandwich
1 Sandwich
2 Meat
3 Vegetarian
4 Seafood
5 Pasta-Pizza
6 Bake-Dess
7
8
9
0
/ 5 � : % Ô Ü ü + à Ô ÿ Ó ÿ Û � û Û × � � � ÿ Ø Ý Ô Ù å
Program to the MenuÛ Ö á â Ô û Ô Ý ä × Ø ÿ ÿ Û Ü ü Û Ù Ö Ø Ø � â Ü ã - Ó Û û Ô à á Ôÿ Û Ü ü Û Ù Ö Ø Ø � â à Ô ÿ VW å Ç Ø Ó Û û Ô - Ú × Ô Ó Ó � Ü à Ô × � Ô � Ú Û Ý å / 5 � : ( Ú à â Ø Ü � ÿ ü Ó à � Ô Ó Ô à à Ø Ó Û û ÔÛ ä à Ô × ÿ Û Ü ü Û Ù Ö Ø Ø � å� å Y â ã á Ù â ã á à % Ô Ü ü � Û à Ô ã Ø × � � � ü Ó â Ü ã Õ Ö × Ø Ù Ù Ò Ú Ø ×Õ Ö × Ø Ù Ù Þ Ø ß Ü � Ô � Ú Û Ý Ø × Ö × Ô Û à Ô Ü Ô ß % Ô Ü ü � Û à Ô ã Ø × �Ü Û ÿ Ô å ú × Ô Ó Ó � Ü à Ô × � Ô � Ú Û Ý åX å Y â ã á Ù â ã á à ä Ø Ø Ý Ö Û à Ô ã Ø × � � � ü Ó â Ü ã Õ Ö × Ø Ù Ù Ò Ú Û Ü ÝÕ Ö × Ø Ù Ù Þ Ø ß Ü � Ô � Ú Û Ý à Ø Ó Ô Ù Ô Ö à Ø Ú Ô Ü ÿ Ô Ü ü Ù Ø Ö Û à â Ø Ü åZ å + Ü à á Ô % Ô Ü ü + à Ô ÿ Ó Ö × Ô Ô Ü - á â ã á Ù â ã á à à á Ô Ù Ø Ö Û à â Ø Ü ß á Ô × Ô� Ø ü ß â Ó á à Ø Û Ý Ý à á Ô Ü Ô ß Ü Û ÿ Ô å� å , á Ô Ü Ü Ô ß Ù Ø Ö Û à â Ø Ü â Ó á â ã á Ù â ã á à Ô Ý ú × Ô Ó Ó ú × Ø ã × Û ÿ� Ô � Ú Û Ý å[ å Ò Ó Ô � ü ÿ � Ô × KEYPAD � Ô � Ú Û Ý Ó à Ø Ô Ü à Ô × â à Ô ÿ Ü Û ÿ Ô å Ò Ó Ô¹ Û Ö � � Ô � Ú Û Ý à Ø Ý Ô Ù Ô à Ô Û Ü � ÿ â Ó à Û � Ô Ó å Ç á â Ó Ó à Ô ÚÜ Ô Ô Ý Ó à Ø � Ô × Ô Ú Ô Û à Ô Ý ä Ø × Ô Û Ö á ÿ Ô Ü ü Ù Ô û Ô Ù å Õ Ô Ô ü Ó Ô ×Ø Ú à â Ø Ü � ä Ø × à Ô � à Ö Û Ó Ô Ø Ú à â Ø Ü Ó åµ å ú × Ô Ó Ó � Ü à Ô × � Ô � Ú Û Ý× Ô Ú Ô Û à Ô Ý Ù � à Ø à Û � Ô � Ø ü à Ø à á Ô % Û â Ü % Ô Ü ü Ó Ö × Ô Ô Ü å
W å ú × Ô Ó Ó à á Ô ú × Ø ã × Û ÿ � Ô � Ú Û Ý å� å Y â ã á Ù â ã á à � Ý â à ß â à á Õ Ö × Ø Ù Ù Ò Ú Ø × Õ Ö × Ø Ù Ù Þ Ø ß Ü� Ô � Ú Û Ý åX å ú × Ô Ó Ó à á Ô � Ü à Ô × � Ô � Ú Û ÝZ å Ò Ó Ô à á Ô Õ Ö × Ø Ù Ù Ò Ú Ø × Õ Ö × Ø Ù Ù Þ Ø ß Ü � Ô � Ú Û Ý à Øá â ã á Ù â ã á à % Ô Ü ü � Û à Ô ã Ø × � Û Ü Ý � Ø × þ Ø Ø Ý � Û à Ô ã Ø × � ß á Ô × Ôÿ Ô Ü ü â à Ô ÿ à Ø Ô Ý â à â Ó Ó Û û Ô Ý å ú × Ô Ó Ó � Ü à Ô × � Ô � Ú Û Ý å� å & à à á Ô % Ô Ü ü â à Ô ÿ Ó Ö × Ô Ô Ü - ü Ó Ô Õ Ö × Ø Ù Ù Ò Ú Ø × Õ Ö × Ø Ù ÙÞ Ø ß Ü � Ô � Ú Û Ý à Ø á â ã á Ù â ã á à à á Ô Ý Ô Ó â × Ô Ý â à Ô ÿ à Ø Ô Ý â à å
Ó Ô Õ Ö Ô × Ø º ¡ ¡ ¥ � � � � � � ¦ � � � �Ù Ú Û Ù Ô Ü ¢ ¥ « � � � � � � � � ¢ § � � � �Ý × Þ ß à � � � � « � ¦ ¢ ¢ § � � � �á Þ Ô Õ â â ã Ó � á Þ Ô Õ â â ä Õ å ÚÙ ä æ Û ç � ¥ � � � ¥ � � � � ¢ � � � � � � � ¦ � � � �ä Ù â Ù Û Ù è � ± � � � ¥ � � � � ¢ � � � � � � � ¦ � � � �
[ å ú × Ô Ó Ó à á Ô � Ü à Ô × � Ô � Ú Û Ý Û Ü Ý Ö Ø Ø � Ó Ô à à â Ü ã Ó ß â Ù ÙÛ Ú Ú Ô Û × åµ å Ò Ó Ô Õ Ö × Ø Ù Ù Ò Ú Ø × Õ Ö × Ø Ù Ù Þ Ø ß Ü � Ô � Ú Û Ý à ØÕ Ô Ù Ô Ö à Ç Ô ÿ Ú Ô × Û à ü × Ô - Ç â ÿ Ô - % â Ö × Ø ß Û û Ô ¶ - þ Û Ü ¶ Û Ü Ý+ ¸ ¶ Ó Ô à à â Ü ã å Ò Ó Ô Ü ü ÿ � Ô × � Ô � Ú Û Ý Ó à Ø Ô Ü à Ô × à á Ô à â ÿ Ô -à Ô ÿ Ú Ô × Û à ü × Ô Ø × Ö Ø Ø � â Ü ã Ú Ø ß Ô × Ó å þ Ø × % , - þ Û Ü Ø × + ¸ -Ú × Ô Ó Ó � ä Ø × � ¶ - W ä Ø × W � ¶ å å å å å � ä Ø × � � ¶ Ø × W à ß â Ö Ô ä Ø ×W � � ¶ å� Ô � Ú Û Ý å� å é � � ¢ ¢ ð ¥ § ¨ ¨ � » � ¥ ¡ � � � � ¥ � � ¡ ± » � � � � � � � � � ¥ � � ¡ � £
1 Breakfast
2 Poultry
3 Meat
4 Seafood
5 Vegetarian
6
7
8
9
0
Sandwich
1 Biscuit E.B.C.
2 B. fast Croissant
3 Croissant Sand
4 English Mu" san
5 Biscuit S.E.C.
6
7
8
9
0
Sandwich
Breakfast
ç ¨ Ü � � � ê « � � Ü � � � � � ¥ � ¦ � �® ¯ ¥ �¤ � § � � ¥ « � é � � �
13 Temperature Scale Temperatures are displayed in °F for 60Hz
models
Temperatures are displayed in °C for 50Hz
models
14 Clean Filter Reminder Off
Displays every 7 days
Displays every 30 days
Displays every 90 days
15 (Microwave) Only Allow microwave only mode
No microwave only mode
16 Auto Off Disable
2 Hours
4 Hours
8 Hours
17 Data Transfer Begin Transfer: Card to Oven. Press Program
Keypad
Begin Transfer: Oven to Card. Press Program
Keypad
Air Filters
On Sides
CLEAN
FILTERS
� � � � � � ! " � # � � $ $ � % & � ' ( ) � * � + ! � � ! " � � , , -. / 0 1 2 3 4 1 5 6 3 7 1 8 7 9 4 1 8 3 4 1 6 : 6 3 2 ; 3 7 7 3 2 3 : < 1 = 5 > ? /@ A B C D E F C G A H I F ; 1 : 3 6 1 5 6 3 8 1 1 ? 9 J K /L / M 6 1 N N > J ? O 3 P ? 7 O 1 Q R S 5 > ? 7 3 K 3 7 3 Q T N 1 6 U 5 7 9 3 J N S /V / W 3 7 3 U 5 7 9 3 J X . Y ; = 5 6 1 N N 9 J K Q Z > 8 < S 3 6 6 1 5 1 > 7 1 ? P = 5 6 1 N N 9 J K Q [ J 7 1 6 S\ / ] 1 P 1 8 7 7 O 1 ? 1 N 9 6 1 ? 3 5 1 6 > 7 9 3 J ; = O 9 K O P 9 K O 7 9 J K Q ^ 6 > J N : 1 6 8 > 6 ? 7 3 3 4 1 J S 3 6 Q ^ 6 > J N : 1 6 3 4 1 JS _ 9 7 O 7 O 1 í § � ± ± î � � í § � ± ± è � � ¨ � » � ¥ ¡ /@ A B C D ` > 9 7 > 7 P 1 > N 7 E F C G A H I F ; 1 : 3 6 1 5 6 3 8 1 1 ? 9 J K 7 3 ] 7 1 5 a /a / M 6 1 N N 7 O 1 Q M 6 3 K 6 > 2 S 5 > ? 7 3 ; 1 K 9 J 7 O 1 7 6 > J N : 1 6 b ^ O 1 N 8 6 1 1 J _ 9 P P 9 J ? 9 8 > 7 1 S ^ 0 c d ] e [ 0 0 f d W S > J ? 9 J ? 9 8 > 7 1Q g U d [ S _ O 1 J 7 6 > J N : 1 6 9 N 8 3 2 5 P 1 7 1 / h @ A B C D ^ O 1 N 8 6 1 1 J _ 9 P P 9 J ? 9 8 > 7 1 Q d U i c 0 g S 9 : 7 O 1 ? > 7 > < 1 = 9 N J 3 7? 1 7 1 8 7 1 ? /
AXP20 / MXP20, AXP22 / MXP22
60 Hz Oven Construction4
Air Filters
Top Outer
Panel
Left Outer
Panel
Outercase Back
OVEN CONSTRUCTION
PANELS (TOP & SIDE)
Right Outer
Panel
Torx (T-15)
Torx (T-15)
Door
AXP
j % ) � � % � � # & � k + � � l l % % � � ! * � ! * ) � � ! % k j m n o ! % ) p
q ) � r st � � % � � ! * �! * ) � � ) � + ) j m n o! % ) p
q ) � r l # & �k + � � l ! % ! * � ) � + )+ � & ! * � � & % r � $ % )) � � % � + l s
Small Fuses
F2,F3,F4 (12 amp)
F2 - Convection Motor
F3 - Magnetron # 1
F4 - Magnetron # 2
Large Fuses
F1,F5,F6 (25 amp)
*F1 - Main Fuse
F5 - Convection Heater
F6 - Radiant Heater
Triac (TR3)
Magnetron # 1
High Voltage Transformers
Magnetron TCO’s
Temp Sensor
(RTD Convection)
Switch
(Primary)
Triac (TR2)
Triac (TR1)
(Magnetron # 1)
HV Transformers
Magnetrons
Fuses
Sensor
Triac’s
Magnetron TCO’s
Capacitor / Diodes
Capacitor
Diode
(Right Side)
Capacitor
Diode
(Left Side)
Magnetron # 2
(Magnetron # 2)
(Convection Heater)
*Note: If Main Fuse (F1) is blown
replace Relay Monitor
Board and Power Relay.
Convection Heater Element
Limiter
*Power Relay
Triac
(TR4) -Radiant
Heater
Convection
Motor
Main Board
*Relay Monitor
Board
Cooling Fans
Thermocouple (RTD)
Temp Sensor(RTD Radiant)
Power Supply Board(24 VDC)
Circuit Boards
Power Relay
Limiter
Triac
Thermocouple (RTD)
Temp Sensor (RTD)
Cooling Fans
Convection Motor
Snubber
*Note: If Main Fuse (F1) is blown
replace Relay Monitor Board
and Power Relay.
Catalytic Converter
(Located inside plenum)
Display Board
Touch Panel Assembly
Control Holder
Touch Screen Display *Knob Collar
Knob
Data Key Board
Data Key Board Holder
AXP20 / MXP20 CONTROL PANEL ASSEMBLY
Data Key Plug
* Caution: Do not handle touch screen display
by the sides. This may damage the display
circuitry. Handle using the corners.
Bezel
Filter
Board
USB Board
Eschutcheon
Touch Panel Assembly
Display Board
VFD Board
AXP22 / MXP22 CONTROL PANEL ASSEMBLY
USB Port Plug
See Detail Below
Antenna Motor
Cam
Gear Assembly
Antenna
Rivet, Plastic
Radiant Heater
Alignment Arrows
Gear Assembly
Antenna
Rivet, *Plastic
Antenna Motor
Cam
*Note: Plastic Rivet
cannot be reused.
Note: Requires 15/16” (26mm)
Deep Socket
Flat Washer
Multi-Wave Spring Washer
Lock Nut
+ ) � ) � k l + q � + " l � % � u v ( w w x y z v ( w w x � % & � l s { + � � | � # & � + ) � + � + # l + " l � + + ) # | * !* + � & % ) l � $ ! * + � & r + � � | � & � } # ! r * # q * # � q l � & � � � r � % � � ! # � | � � ! ~ ! � & ~ + � ! � � � + ~ + � & q � ) + � # q! ) + � # � ! + l l � & # � r + � � | � # & � r # ! * # � ! + l l + ! # % � # � ! ) � q ! # % � si 1 6 > 2 9 8 ^ 6 > =` > 4 1 K � 9 ? 1
q + � " � ) � k l + q � & r # ! * % � ! ) � k l + q # � | r + � � | � # & � s � � ) + � # q ! ) + � $ % ) " % ! * r + � � | � # & � + ) � + � + # l + " l � + + � k + ) + ! � } # ! r * # q * # � q l � & � ' n - q � ) + � # q ! ) + � + � & + ! � " � % $ * # | * ! � � k � ) + ! � ) � � + l � ) r # ! * # � ! + l l + ! # % � # � ! ) � q ! # % � si 1 6 > 2 9 8 ^ 6 > =
AXP20 / MXP20, AXP22 / MXP22
60 Hz Interlock Switch Service5
Oven Switch Replacement &
Interlock Switch Adjustment
Figure 1
Attach Ohm-Meter to
Wire Harness Connectors
Mounting Screw
When the door is opened or closed, the left door hinge activates the secondary / monitor switches.
1. Connect an ohm-meter to wire harness (as shown in figure 1, to verify switch activation).
Note: The switch assembly should activate when the door gap is approximately 1/4 inch (6mm).
Switch Adjustment:
1. Loosen mounting screws.
2. Slide adjustment lever for proper switch activation.
3. Tighten mounting screws.
4. Preheat oven to set temperature and verify switch adjustment settings and function.
Note: To ensure proper switch adjustment, the switch mounting MUST be tightened after each adjustment
prior to testing the door alignment.
Removal:
1. Remove switch assembly
mounting screw.
2. Push switch assembly 1/2 inch (13mm)
towards back of oven.
3. Twist mounting leg towards
oven cavity to release mounting tab.
4. Push assembly towards back of oven
to remove.
Note: New replacement switch assembly
has been adjusted at the factory, no adjustment
should be necessary.
Switch Test:
Switch Adjustment
Lever
Mounting Screw
Mounting Leg
Replacement
Adjustment
AXP20 / MXP20, AXP22 / MXP22
60 Hz Oven Performance Test6
USING OVEN AS A MICROWAVE OVEN
This option is only available if the oven cavity temperature is less than 200°F.
When user option MICROWAVE ONLY is set as a default, the MICROWAVE
ONLY button appears on the PREHEAT MENU.
To run Performance Test using microwave only follow these steps:
2. Press MICROWAVE ONLY button.
3. Press manual cook.
1. Place filled (1000 ml) test bowl in oven.
6. Oven will beep, remove test bowl from oven.
PREHEAT MENU
4. Press Pad 3 twice for 33 seconds.
5. Press Start.
7. Press OFF to return to PREHEAT MENU.
See page 11 for Oven Performance Test procedure.
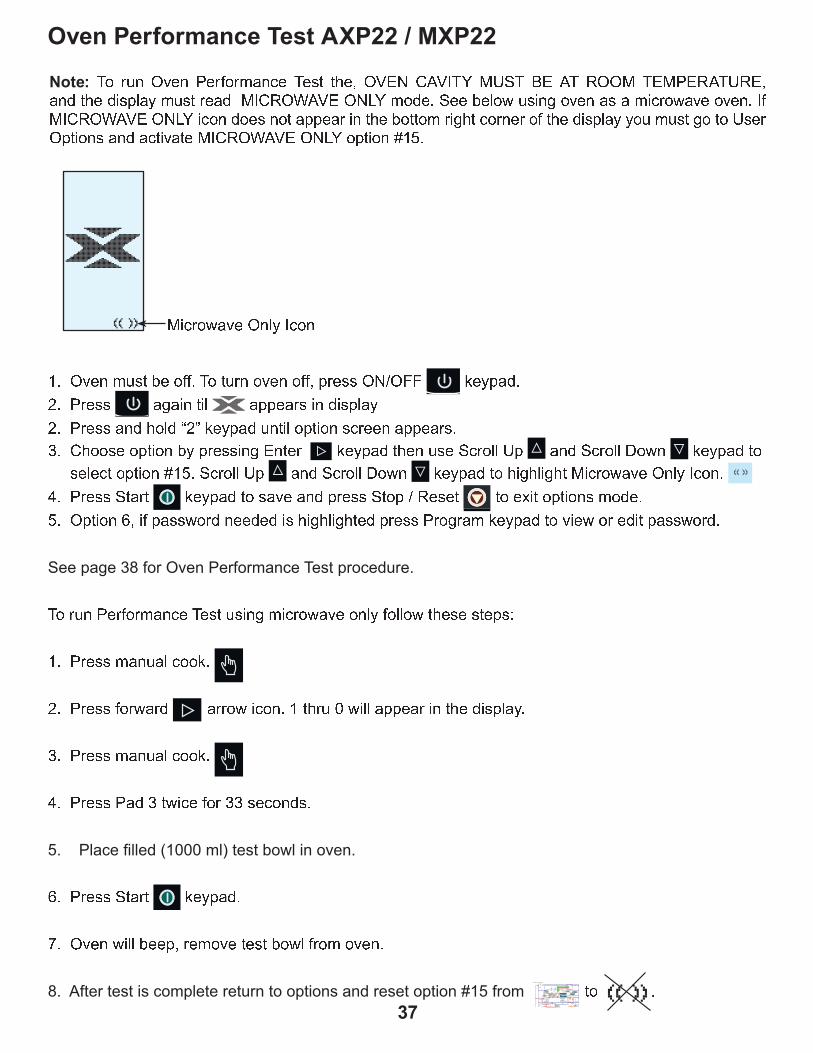
j % ) � � � � � � ( � ) $ % ) � + � q � j � ! ! * � ~ � � � � � u � � j � z � � j � � u j t � � z j � z ( � t u j � t � ~ + � & ! * �& # k l + � � � ! ) � + & z � � t � { u � � � � � � � % & � s � � � " � l % r � # � | % � � � + + � # q ) % r + � � % � � � s � $ z � � t � { u � �� � � � # � % ! # � & # k l + � � % � � � ! | % ! % � � ) � k ! # % � + � & + q ! # � + ! � z � � t � { u � � � � � � % k ! # % � sn s � � � � � � ! " � � , , sw s ( ) � + � & * % l & ( + & � w � $ % ) o � q % � & s� s t % ! + ! � & # + l ! % * # | * l # | * ! � u � � � { z � � t � { u � � � � � � � % & � s� s ( ) � � u � � sKEYPAD
j % ) � � � � � � ( � ) $ % ) � + � q � j � ! ! * � ~ � � � � � u � � j � z � � j � � u j t � � z j � z ( � t u j � t � ~+ � & ! * � & # k l + � � � ! ) � + & z � � t � { u � � � � � � � % & � s � � � " � l % r � # � | % � � � + + � # q ) % r + � � % � � � s � $z � � t � { u � � � � � � # q % � & % � � % ! + k k � + ) # � ! * � " % ! ! % � ) # | * ! q % ) � � ) % $ ! * � & # k l + � � % � � � ! | % ! % � � )� k ! # % � + � & + q ! # � + ! � z � � t � { u � � � � � � % k ! # % � � n o sz # q ) % r + � � � � l � � q % �n s � � � � � � ! " � % $ $ s j % ! � ) � % � � � % $ $ ~ k ) � � � y � , , } � � k + & sw s ( ) � + | + # � ! # l + k k � + ) # � & # k l + �w s ( ) � + � & * % l & � w � } � � k + & � � ! # l % k ! # % � q ) � � � + k k � + ) s� s � * % % � % k ! # % � " � k ) � # � | � � ! � ) } � � k + & ! * � � � � � q ) % l l � k + � & � q ) % l l � % r � } � � k + & ! % � l � q ! % k ! # % � � n o s � q ) % l l � k + � & � q ) % l l � % r � } � � k + & ! % * # | * l # | * ! z # q ) % r + � � � � l � � q % � s� s ( ) � � ! + ) ! } � � k + & ! % + � � + � & k ) � � ! % k y t � � ! ! % � p # ! % k ! # % � � % & � so s � k ! # % � � ~ # $ k + r % ) & � � � & � & # * # | * l # | * ! � & k ) � ( ) % | ) + � } � � k + & ! % � # � r % ) � & # ! k + r % ) & s
j % ) � � ( � ) $ % ) � + � q � j � ! � # � | � # q ) % r + � � % � l � $ % l l % r ! * � � ! � k �n s ( ) � � + � � + l q % % } sw s ( ) � $ % ) r + ) & + ) ) % r # q % � s n ! * ) � � r # l l + k k � + ) # � ! * � & # k l + � s� s ( ) � � + � � + l q % % } s� s ( ) � ( + & � ! r # q � $ % ) � � � q % � & s� s ( ) � � ! + ) ! } � � k + & s� s � � � � r # l l " � � k ~ ) � � % � � ! � ! " % r l $ ) % � % � � � s
AXP20 P1333601M
Radiant
RTD
Convection
RTD
! % s
All Amana and Menumaster microwave oven power outputs are rated using the IEC705 standards. Using the IEC705 test method requires precision measurements and equipment that is not practical to be performed in the field. Using the test shown below will indicate if the oven performance is satisfactory. Test equipment required:
1000 ml test container and thermometer (ACP Power Test Bowl part # 12018801).
Digital watch / watch with a second hand for use on ovens with electromechanical timers.
Important Notes: Low line voltage will cause low temperature rise / power output.
Ovens must be on a dedicated circuit, properly grounded, and polarized. Other equipment on the same circuit may cause a low temperature rise / power output.
This test and results are not a true IEC705 test procedures and are only intended to provide servicers with an easy means of determining if the microwave oven cooking output is correct.
Procedure
1. Fill the test container to the 1000 ml line with cool tap water.
NOTE: Water temperature should be approximately 60 F / 16 C
2. Using the thermometer, stir water for five to ten seconds; measure, and record the temperature (T1).3. Place test container of water in the center of oven cavity and close door. 4. Heat the water for a 33-second full power cycle.
NOTE: Use a digital watch or a watch with a second hand for ovens with electromechanical timers.
5. At end of the cycle, remove test container. Using the thermometer, stir water for five to ten seconds and record temperature (T2).
6. Subtract the starting water temperature (T1), from the ending water temperature (T2) to obtain the temperature rise ( T).
7. If the temperature rise ( T) meets or exceeds the minimum, the test is complete. If the temperature rise ( T) fails to meet the minimum temperature rise, test the line voltage to verify it is correct. Then repeat steps 1-6 making sure to change the water. If the temperature rise ( T) fails to meet the minimum temperature rise again the oven will require service.
Minimum Temperature Rise at Thirty -Three (33) Seconds Run Time
T Cooking T Cooking T Cooking T Cooking (°F) Power Output (°F) Power Output (°C) Power Output (°C) Power Output
To avoid risk of electrical shock, personal injury or death; disconnect power to oven and discharge capacitor before servicing, unless testing requires power.
Illustration Component Test Results
Thermal cutout Disconnect all wires from TCO. Measure resistance across terminals.
Control TCO ............................................. Magnetron TCO .......................................
Closed at 235 F (113 C) and open at
150 F (66 C)
Open at 300 F (149 C) and closed at
257 F (125 C)
Diode Discharge Capacitor Remove diode lead from capacitor and connect ohmmeter. Reverse leads for second test.
Infinite resistance should be measured
in one direction and 50K or more in the opposite direction.
NOTE: Ohmmeter must contain a battery of 6 volts minimum.
MT2
MT1 GATE
Triac Disconnect wires to triac. Measure resistance from:
MT1 to MT2..............................................MT1 to Gate ............................................. MT2 to Gate .............................................All terminals to ground .............................
Caution - Do not operate oven with
wire to terminal MT2 removed. Infinite
Approximately 15 , then reverse
meter leads 30 Infinite Infinite
Triac 1 (top) is for front element Triac 2 (middle) is for rear element
Measure voltage from: MT1 to Gate
0.8 VAC when energized. If no voltage, check H.V. board and wiring.
Capacitor Discharge Capacitor Remove wires from capacitor terminals and connect ohmmeter, set on highest resistance scale to terminals. Also check between each terminal and capacitor case..............................................
Between Terminals: Meter should momentarily deflect towards zero then
return to over 5 M . If no deflection occurs, or if continuous deflection occurs, replace capacitor. Terminal to Case: Infinite resistance
Snubber assembly Disconnect wires to snubber. Measure resistance across terminals..........
Infinite
Magnetron Discharge Capacitor Remove wires from magnetron and connect ohmmeter to terminals. Also check between each terminal and ground.
Between Terminals: Less than 1 Each terminal to ground measures Infinite resistance.
Note: This test is not conclusive. If oven does not heat and all other components test good replace the magnetron and retest.
Cooling blower motor
Measure voltage at motor
Approximately 24 vdc at incoming leads
Stirrer motor Remove all wires from terminals. Measure resistance from: Terminal to terminal.....................................
Approximately 29K
Interlock, primaryRemove violet and orange from terminals.
NO to Common (Door Open)......................NO to Common (Door Closed)....................
Infinite
Continuity
Measure resistance from:
! WARNING
To avoid risk of electrical shock, personal injury or death; disconnect power to oven and discharge capacitor before servicing, unless testing requires power.
Illustration Component Test Results
Transformer Discharge Capacitor Remove all wires from terminals. Measure resistance from: 230 to COM..................................................208 to COM..................................................230 to Ground ..............................................208 to Ground ..............................................Terminal 5 to 6 .............................................Terminal 4 to Ground...................................
Less than 1
Less than 1 Infinite Infinite
Less than 1
Approximately
Convection blower motor
Perform service test on low and high speed
to verify operation. Service test procedure
is located in Service Test section.
Convection heating element
Disconnect wires from terminals. Measure resistance across heating element. Element 2000 W ....................... Approximately 19 - 22
Cavity heating element
Disconnect wires from terminals. Measure resistance across heating element. Element 3000 W ......................... Approximately 14
Thermocouple
(RTD)
Temperature
32 F .............................................................
350 F ...........................................................
Resistance
1000
1654
0 1
2 4 6 8
Relay This relay contains a diode in the coil circuit.
Measure resistance from: Terminal 0 to terminal 1 (coil) ............
0 1
2 4 6 8
Approximately 6 to 7 M
NOTE: Analog meter is recommended for measurement.
NOTE: If using a digital meter it must contain a battery of 6 volts minimum.
Wire harness High voltage board to display module harness
Test continuity of wires ............................. Indicates continuity
46
J2
GND
J1
Power supply board
24 VoltRed J2-1 to White J2-6 Power Supply Board Approximately 24 vdc
Terminal 0 - 1 Line Voltage
Terminal 2 - 6 Line Voltage
Terminal 4 - 8 Line Voltage7
6
2
8
31
54
9
10
TERMINAL DESIGNATION STICKER
Limiter, Electronic
Input voltage Orange J1-1 to Red J1-3................ Line Voltage
(Convection Heater)
(Cavity Heater)
Orange 9 to Red 10......................................... Line Voltage
Yellow 6 to Yellow 7 ........................................ Approximately 24 vdc
Temp Sensor
Temp Sensor
AXP20 / MXP20 60 Hz
Service Test8
Access to Service Mode
Screen While at the Main Screen, press the following sequence on the keypad:
NOTE: The “MICROWAVE ONLY” button may or may not be present.
Oven Information
Screen This screen is Oven Information showing the versions of software in the control boards and information about door cycles and tube hours.
NEXT TEST: Press this pad to go to the next Service Mode Test
PREV TEST: Press this pad to go to the previous Service Mode Test
CLEAR INFO: Press this pad to reset the Door Cycles and Tube Hours back to zero.
EXIT: Press this pad to return to the ovens Main Menu
Hidden Pad
1
1. Press OFF pad until PRESS TO
PREHEAT appears.
2. Press Hidden Pad.
3. Press pads 1 - 3 - 5 - 7 - 9
The display indicates SERVICE MODE.
1.0
.64
Manual Operation of Magnetrons #1 & #2
Screen This screen will allow operation of Magnetron #1 and #2 together and show the number of amps being drawn.
NEXT TEST: Press this pad to go to the next Service Mode Test
PREV TEST: Press this pad to go to the previous Service Mode Test
TURN ON: This pad will toggle between turning the magnetrons on and off.
CANCEL: Press this pad to return to the Main Menu
RANGE: Under normal operation, each mag’s amp draw should be 5 – 12 amps.
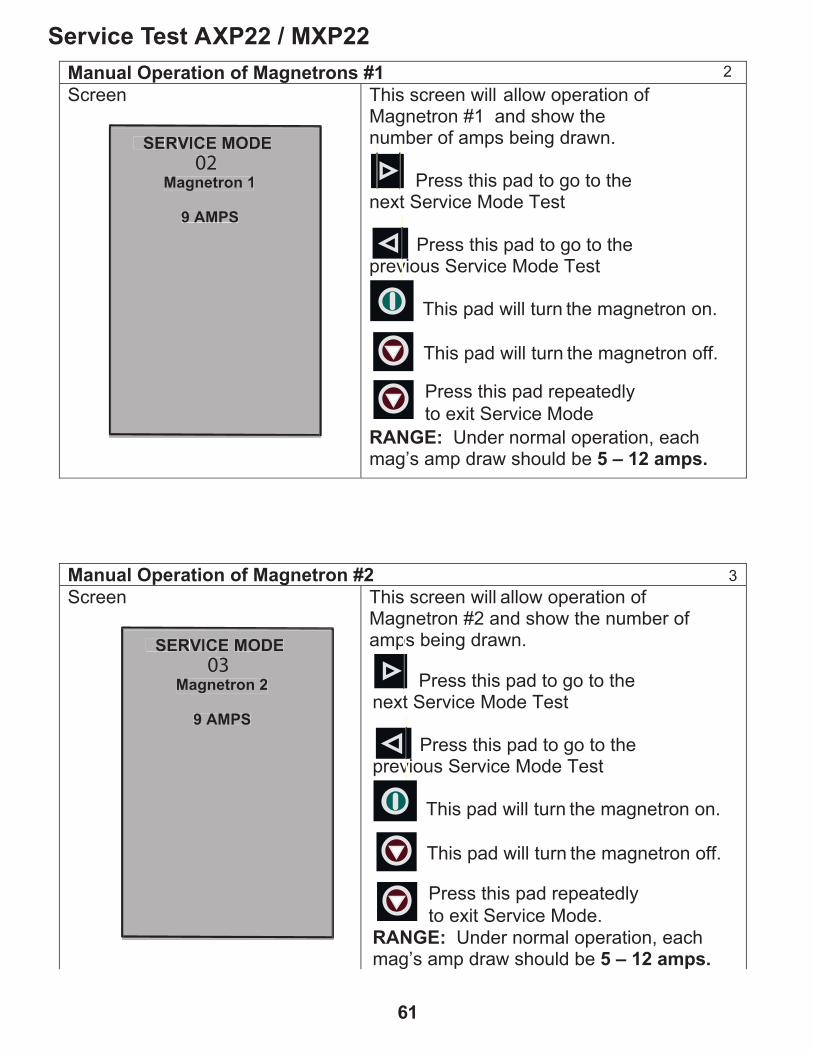
Manual Operation of Magnetron #1
Screen This screen will allow operation of Magnetron #1 and show the number of amps being drawn.
NEXT TEST: Press this pad to go to the next Service Mode Test
PREV TEST: Press this pad to go to the previous Service Mode Test
TURN ON: This pad will toggle between turning the magnetron on and off.
CANCEL: Press this pad to return to the Main Menu
RANGE: Under normal operation, the amp draw should be 5 – 12 amps.
2
3
Manual Operation of Magnetron #2
Screen This screen will allow operation of Magnetron #2 and show the number of amps being drawn.
NEXT TEST: Press this pad to go to the next Service Mode Test
PREV TEST: Press this pad to go to the previous Service Mode Test
TURN ON: This pad will toggle between turning the magnetron on and off.
CANCEL: Press this pad to return to the Main Menu
RANGE: Under normal operation, the amp draw should be 5 – 12 amps.
Convection Heater
Screen This screen will allow operation of the convection heater and show the number of amps being drawn.
NEXT TEST: Press this pad to go to the next Service Mode Test
PREV TEST: Press this pad to go to the previous Service Mode Test
TURN ON: This pad will toggle between turning the heater on and off.
CANCEL: Press this pad to return to the Main Menu
RANGE: Under normal operation, the amp draw should be 5 – 12 amps.
4
5
Radiant Heater
Screen This screen will allow operation of the radiant heater and show the number of amps being drawn.
NEXT TEST: Press this pad to go to the next Service Mode Test
PREV TEST: Press this pad to go to the previous Service Mode Test
TURN ON: This pad will toggle between turning the heater on and off.
CANCEL: Press this pad to return to the Main Menu
RANGE: Under normal operation, the amp draw should be 10 – 16 amps.
Convection Fan – Low Speed Screen This screen will allow operation of the
convection fan at a low speed and show the number of amps being drawn.
NEXT TEST: Press this pad to go to the next Service Mode Test
PREV TEST: Press this pad to go to the previous Service Mode Test
TURN ON: This pad will toggle between turning the convection fan on and off at a low speed.
CANCEL: Press this pad to return to the Main Menu
RANGE: Under normal operation, the amp draw is too low to read.
6
7
0
Convection Fan – High Speed
Screen This screen will allow operation of the convection fan at a high speed and show the number of amps being drawn.
NEXT TEST: Press this pad to go to the next Service Mode Test
PREV TEST: Press this pad to go to the previous Service Mode Test
TURN ON: This pad will toggle between turning the convection fan on and off at a high speed.
CANCEL: Press this pad to return to the Main Menu
RANGE: Under normal operation, the amp draw should be 0.6 – 2.6 amps.
Cooling Fan
Screen This screen will allow operation of the cooling fan show the number of amps being drawn.
NEXT TEST: Press this pad to go to the next Service Mode Test
PREV TEST: Press this pad to go to the previous Service Mode Test
TURN ON: This pad will toggle between turning the cooling fan on and off.
CANCEL: Press this pad to return to the Main Menu
RANGE: Under normal operation, the amp draw should be 0.9 – 2.5 amps.
8
9
(It may not read amps)
(It may not read amps)
Antenna Motor
Screen This screen will allow operation of the antenna motor show the number of amps being drawn.
NEXT TEST: Press this pad to go to the next Service Mode Test
PREV TEST: Press this pad to go to the previous Service Mode Test
TURN ON: This pad will toggle between turning the antenna motor on and off.
CANCEL: Press this pad to return to the Main Menu
RANGE: Under normal operation, the amp draw may be to low to read.
RTD Status
Screen This screen will show the temperatures being reported to the RTD’s in the oven. The maximum temps seen by the controller are also recorded for diagnostic purposes.
NEXT TEST: Press this pad to go to the next Service Mode Test
PREV TEST: Press this pad to go to the previous Service Mode Test
CANCEL: Press this pad to return to the Main Menu
CLEAR INFO: Press this pad to reset the Maximum RTD temps to zero.
10
11
0
Memory / Network Status
Screen This screen will show which memory chips are present and if the oven is hooked up to an external network.
NEXT TEST: Press this pad to go to the next Service Mode Test
PREV TEST: Press this pad to go to the previous Service Mode Test
CANCEL: Press this pad to return to the Main Menu
Error List
Screen This screen will show a description of the types of errors that can occur.
NEXT TEST: Press this pad to go to the next Service Mode Test
PREV TEST: Press this pad to go to the previous Service Mode Test
CANCEL: Press this pad to return to the Main Menu
12
13
Error History
Screen This screen will show the previous error codes that have occurred in the oven.
NEXT TEST: Press this pad to go to the next Service Mode Test
PREV TEST: Press this pad to go to the previous Service Mode Test
SCROLL: This pad will advance through the history of the error codes. (1-10)
CANCEL: Press this pad to return to the Main Menu
Voltage Switching
Screen This screen will show the line voltage detected by the oven.
NEXT TEST: Press this pad to go to the next Service Mode Test
PREV TEST: Press this pad to go to the previous Service Mode Test
CANCEL: Press this pad to return to the Main Menu
Note: To clear codes: Press and hold Pad 1
until Code(s) disappear.
G2
C0
H1
B0
14
15
208
AXP20 / MXP20 60 Hz
Troubleshooting9
1. No Line Voltage
2. Inoperative Power Cord3. Inoperative Fuse
5. Inoperative Touch Screen
6. Inoperative Main Control Board
7. Inoperative Display Board
8. Inoperative -24 Volt Power Supply Board
9. Broken or Loose Wire Connection
Yes
Error Code
Appears
1. Refer To Display Diagnostics
PLUG OVEN IN
No
No
PREHEAT TEMP = 520 F
PRESS TO
PREHEAT
PROGRAMCHANGE
TEMP
PREHEAT TEMP = 520 F
PROGRAMCHANGE
TEMP
2. Clear Error History
After Oven is Repaired
(NORMAL DISPLAY)
(NORMAL DISPLAY)
POWER UP CONDITION
Go to PREHEAT Condition
PRESS TO
PREHEAT
See component test procedures section
for testing procedures and results.
4. Inoperative Filter Board
Inoperative Display Board
Inoperative Touch Screen
Yes
PRESS TO PREHEAT
Push Knob In
or
Touch
On Touch Screen
No
Yes
OVEN REACHES
TEMPERATURENo
1. Inoperative Thermocouple
2. Inoperative Radiant Heater
3. Inoperative Convection Heater
4. Inoperative Temp Sensor (RTD Radiant)
5. Inoperative Main Board
6. Broken or Loose Wire
OVEN
PREHEATING
PREHEAT TEMP = 520 F
PROGRAMCHANGE
TEMP
MENU
BACKMANUAL
COOK
1 2
3 4
5 6
READY
PREHEAT TEMP = 520 F
PROGRAMMANUAL
COOK
MENU CHANGE
TEMP
PREHEAT CONDITION
Indicates Rising Temperature
OVEN
PREHEATING
PREHEAT TEMP = 520 F
PROGRAMCHANGE
TEMP
MENU
BACKMANUAL
COOK
1 2
3 4
5 6
READY
PREHEAT TEMP = 520 F
PROGRAMMANUAL
COOK
MENU CHANGE
TEMP
(NORMAL DISPLAY)
(NORMAL DISPLAY) (NORMAL DISPLAY)
Indicates Temperature Reached
See component test procedures section
for testing procedures and results.
See component test procedures section
for testing procedures and results.
SERVICE MODE
MAGNETRONS #1 & #2
MAGNETRON #1: 0 AMPS
MAGNETRON #2: 0 AMPS
ACCEPTABLE RANGE:
Inoperative Touch Panel
Inoperative Touch Screen
Yes
SERVICE TEST
1. Press Off Pad Repeatedly
Until Press to Preheat Appears2. Press Hidden Pad
3. Press Pads 1-3-5-7-9
No
PRESS TURN ON
No
Inoperative Main Board
COOLING FANS
TURNS ON
Yes
No
1. Inoperative Power Relay
2. Inoperative Primary Switch
3. Inoperative Secondary Switch
4. Fuse (F3)
5. Fuse (F4)
7. Inoperative Main Board8. Inoperative Capacitor
9. Inoperative Diode
10. Inoperative H.V. Transformer
NEXT
TESTPREV
TEST
CANCELTURN
ON
MAGNETRON #1: 5-12 AMPS
MAGNETRON #2: 5-12 AMPS
SERVICE MODE
OVEN INFORMATION
DISPLAY VERSION: 0.39
MAIN VER: 0.46 EE 0.3
DOOR CYCLES 20,156
TUBE HRS: 2156 EE 255
NEXT
TESTPREV
TEST
EXITCLEAR
INFO
PRESS NEXT TEST
Yes
MICROWAVE CONDITION
S SEERRVIVICCEE MOMODDEE
O OVEN VEN INFOINFORMATRMATIONION
DISPDISPLAY LAY VERSVERSION:ION: 0.3 0.399
MAINMAIN VER VER: 0.: 0.46 E46 EE 0.E 0.33
DOORDOOR CYC CYCLES LES 20,120,15656
TUBETUBE HRS HRS: 21: 2156 E56 EE 25E 2555
NEXTNEXT
TESTTESTPREVPREV
TESTTEST
EXITEXITCLEACLEARR
INFOINFO
SESERRVIVICCEE MOMODDEE
MAGNMAGNETROETRONS #NS #1 & 1 & #2#2
MAGNMAGNETROETRON #1N #1: 0 : 0 AMPSAMPS
MAGNMAGNETROETRON #2N #2: 0 : 0 AMPSAMPS
ACCEACCEPTABPTABLE RLE RANGEANGE::
NEXTNEXT
TESTTESTPREVPREV
TESTTEST
CANCCANCELELTURNTURN
ONON
Hidden Pad
No
Inoperative Touch Screen
Yes
(NORMAL DISPLAY)
(NORMAL DISPLAY)
6. Inoperative Triac (TR1, TR2)
See component test procedures section
for testing procedures and results.
See component test procedures section
for testing procedures and results.
See component test procedures section
for testing procedures and results.
See component test procedures section
for testing procedures and results.
1. Unplug / plug oven in
2. If code continues to appear
replace Electronic Limiter.
3. If code continues to appear
after replacing Electronic
Limiter replace Thermocouple.
CODE G0
1. Inoperative Monitor Switch
2. Interlock Switch Assembly out of adjustment
3. Broken or loose wire connection
1. Interlock Switch Assembly out of adjustment
2. Inoperable Monitor Switch
3. Broken or loose wire connection
OPERATIONAL CODES
CALL SERVICE
CODE G0
CALL SERVICE
OPEN
DOOR
OPEN
DOOR
PLACE FOOD
CLOSE DOOR
PLACE FOOD
CLOSE DOOR
IN OVEN
During oven operation the display may indicate one of the following:
1. When you press the pad/ knob to preheat the oven the display indicates.
2. During cooking, the oven display indicates.
1. After food is placed in the oven the door is closed the display indicates.
1. After food is placed in the oven the door is closed the display indicates.
See component test procedures section
for testing procedures and results.
See component test procedures section
for testing procedures and results.
Note: When replacing thermocouple
position the thermocouple in the same
position in the cabinet as the original
thermocouple.
Change Option Code #10 to OFF
Option #12 This is activated at the factory.
It will appear every 7 days.
Note: Customer can change this option
as desired. See Quick Start Reference
Guide section.
PREHEAT
OVEN NOT AT
PREHEAT
OVEN NOT AT
TEMPERATURE
FILTER
CLEAN
FILTER
CLEAN
1. At the end of a cook cycle and the food is removed and the door is closed the display indicates.
2. When a pad is pressed the display indicates.
1. Normal do not service the oven for this.
RESTART
PROGRAM
CHECK DOOR
1. Door not fully closed.2. Inoperative Power Relay.
Screen While in the OFF mode, press the following sequence on the keypad:
Oven Information
Screen This screen is Oven Information showing the versions of software in the control boards and information about door cycles and tube hours.
Press this pad to go to the next Service Mode Test
Press this pad to go to the previous Service Mode Test
Press 0 pad for 5 seconds to reset the Door Cycles and Tube Hours back to zero.
1
1. Press OFF pad until Icon appears.
2. Press Hidden Pad.
3. Press pads 1 - 3 - 5 - 7 - 9
The display indicates SERVICE MODE.
1 32
4 65
7 8
0
9
abc def
jklghi
. ’ - #
mno
tuvpqrs wxyz
& /
Hidden Pad
SERVICE MODE
OVEN INFORMATION
DISPLAY VERSION: 11
MAIN VER: 73
EE 3
DOOR CYCLES 1149
TUBE HRS: 2156
01
SSEERRVVIICCEE MMOODDEE
O OVEVEN N ININFOFORMRMATATIOIONN
DIDISPSPLALAY Y VEVERSRSIOION:N: 1 111
MAMAININ V VERER: : 7373
EEEE 3 3
DODOOROR C CYCYCLELES S 11114949
TUTUBEBE H HRSRS: : 21215656
0011cyclescycl
previous
Servi
O Pad
Press this pad repeatedly
to exit Service Mode.
Manual Operation of Magnetrons #1
Screen This screen will allow operation of Magnetron #1 and show the number of amps being drawn.
Press this pad to go to the next Service Mode Test
Press this pad to go to the previous Service Mode Test
This pad will turn the magnetron on.
RANGE: Under normal operation, each mag’s amp draw should be 5 – 12 amps.
Manual Operation of Magnetron #2
Screen This screen will allow operation of Magnetron #2 and show the number of amps being drawn.
2
3
SERVICE MODE
Magnetron 1
9 AMPS
02
SSEERRVVIICCEE MMOODDEE
MaMagngnetetroron n 11
9 9 AMAMPSPS
0022
numbernumber
previous
SERVICE MODE
Magnetron 2
9 AMPS
03
SSEERRVVIICCEE MMOODDEE
MaMagngnetetroron n 22
9 9 AMAMPSPS
0033
This pad will turn the magnetron off.
Press this pad to go to the next Service Mode Test
Press this pad to go to the previous Service Mode Test
This pad will turn the magnetron on.
RANGE: Under normal operation, each mag’s amp draw should be 5 – 12 amps.
amps
previous
This pad will turn the magnetron off.
Press this pad repeatedly
to exit Service Mode
Press this pad repeatedly
to exit Service Mode.
Convection Heater
Screen This screen will allow operation of the convection heater and show the number of amps being drawn.
5
SERVICE MODE
ConvectionHeater
8 AMPS
04
SESERRVIVICCEE MOMODDEE
CoConvnvecectitiononHeHeataterer
8 8 AMAMPSPS
0044
Press this pad to go to the next Service Mode Test
Press this pad to go to the previous Service Mode Test
This pad will turn the heater on.
RANGE: Under normal operation, the amp draw should be 5 – 12 amps.
amps
previous
This pad will turn the heater off.
RANGE:
Radiant Heater
Screen This screen will allow operation of the radiant heater and show the number of amps being drawn.
6
SERVICE MODE
Radiant Heater
11 AMPS
05
SESERRVIVICCEE MOMODDEE
RaRadidianant t HeHeataterer
1111 A AMPMPSS
0055
Press this pad to go to the next Service Mode Test
Press this pad to go to the previous Service Mode Test
This pad will turn the heater on.
Press this pad repeatedly
to exit Service Mode.
RANGE: Under normal operation, the amp draw should be 10 – 16 amps.
amps
previous
This pad will turn the heater off.
Press this pad repeatedly
to exit Service Mode.
Convection Fan – Low Speed Screen This screen will allow operation of the
convection fan at a low speed and show the number of amps being drawn.
7
Press this pad to go to the next Service Mode Test
Press this pad to go to the previous Service Mode Test
This pad will turn the fan on low speed.
RANGE: Under normal operation, the amp draw is too low to read.
number
previous
This pad will turn the fan off.
SERVICE MODE
Convection Fan
Low
0.0 AMPS
06
SESERRVIVICCEE MOMODDEE
CoConvnvecectitionon F Fanan
LoLoww
0.0.0 0 AMAMPSPS
0066
Convection Fan – High Speed Screen This screen will allow operation of the
convection fan at a high speed and show the number of amps being drawn.
8
Press this pad to go to the next Service Mode Test
Press this pad to go to the previous Service Mode Test
This pad will turn the fan on high speed.
RANGE: Under normal operation the amp draw is too low to read.
number
previous
This pad will turn the fan off.
SERVICE MODE
Convection Fan
High
0.0 AMPS
07
SESERRVIVICCEE MOMODDEE
CoConvnvecectitionon F Fanan
HiHighgh
0.0.0 0 AMAMPSPS
0077
Press this pad repeatedly
to exit Service Mode
Press this pad repeatedly
to exit Service Mode
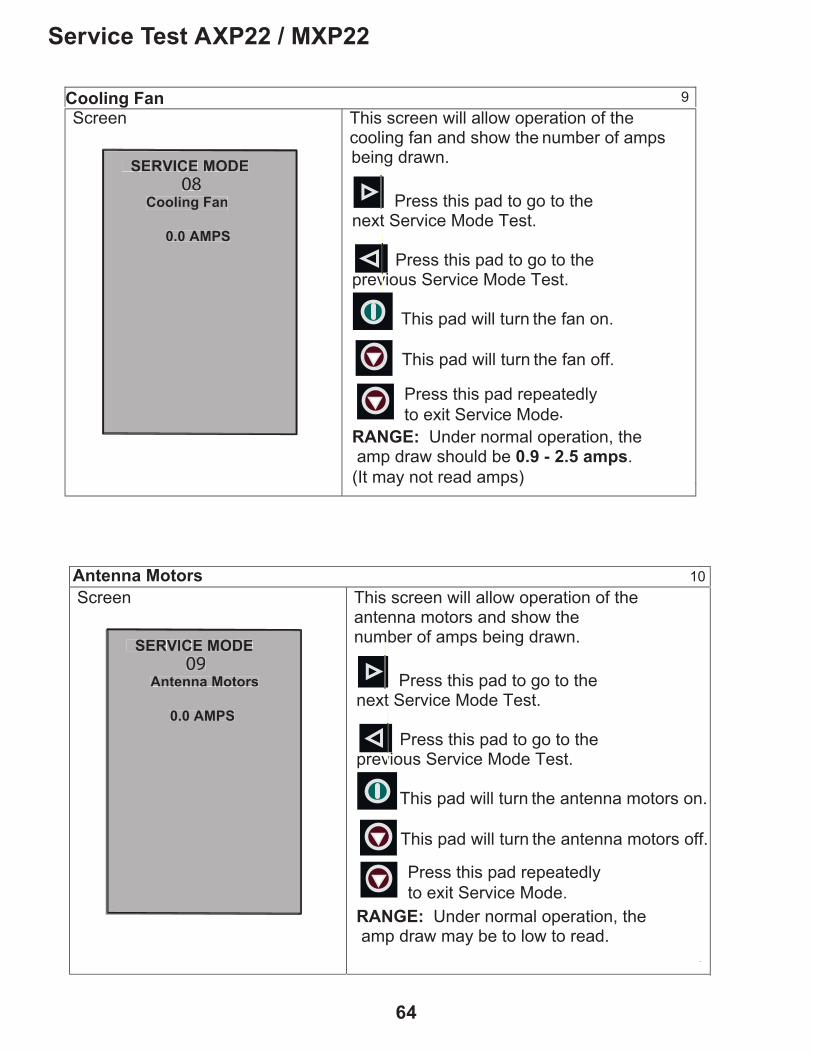
Cooling Fan Screen This screen will allow operation of the
cooling fan and show the number of amps
9
Press this pad to go to the next Service Mode Test.
Press this pad to go to the previous Service Mode Test.
This pad will turn the fan on.
RANGE: Under normal operation, the amp draw should be 0.9 - 2.5 amps.
(It may not read amps)
previous
This pad will turn the fan off.
SERVICE MODE
Cooling Fan
0.0 AMPS
08
SESERRVIVICCEE MOMODDEE
CoCoololining g FaFann
0.0.0 0 AMAMPSPS
0088
Antenna Motors
Screen This screen will allow operation of the antenna motors and show the number of amps being drawn.
10
Press this pad to go to the next Service Mode Test.
Press this pad to go to the previous Service Mode Test.
This pad will turn the antenna motors on.
RANGE: Under normal operation, the amp draw may be to low to read.
number
previous
This pad will turn the antenna motors off.
RANGE:
SERVICE MODE
Antenna Motors
0.0 AMPS
09
SESERRVIVICCEE MOMODDEE
AnAntetennnna a MoMototorsrs
0.0.0 0 AMAMPSPS
0099
being drawn.
Press this pad repeatedly
to exit Service Mode.
Press this pad repeatedly
to exit Service Mode.
RTD Status
Screen This screen will show the temperatures being reported to the RTD’s in the oven. The maximum temps seen by the controller are also recorded for diagnostic purposes.
11
SERVICE MODE
RTD’s
Radiant RTD 182
Conv RTD 174
Max Radiant 520
Max Conv 177
10
SSEERRVVIICCEE MMOODDEE
RTRTD’D’ss
RaRadidianant t RTRTD D 181822
CoConvnv R RTDTD 1 17474
MaMax x RaRadidianant t 5 52020
MaMax x CoConvnv 171777
1100
Press this pad to go to the next Service Mode Test.
Press this pad to go to the previous Service Mode Test. previousprevious
Press the 0 pad for 5 seconds to reset the
Maximum RTD temps to zero.
Memory / Network Status
Screen This screen will show which memory chipsare present and if the oven is hooked up to
an external network.
12
SERVICE MODE
Memory / Network
Chassis Memory
Present
DataKey
Absent
RS4485 Network
OK
11
SSEERRVVIICCEE MMOODDEE
MeMemomoryry / / N Netetwoworkrk
ChChasassisis s MeMemomoryry
P Preresesentnt
D DatataKaKeyey
AbAbsesentnt
R RS4S448485 5 NeNetwtwororkk
OKOK
1111
Press this pad to go to the next Service Mode Test.
Press this pad to go to the previous Service Mode Test. previous
.
Press this pad repeatedly
to exit Service Mode
Press this pad repeatedly
to exit Service Mode
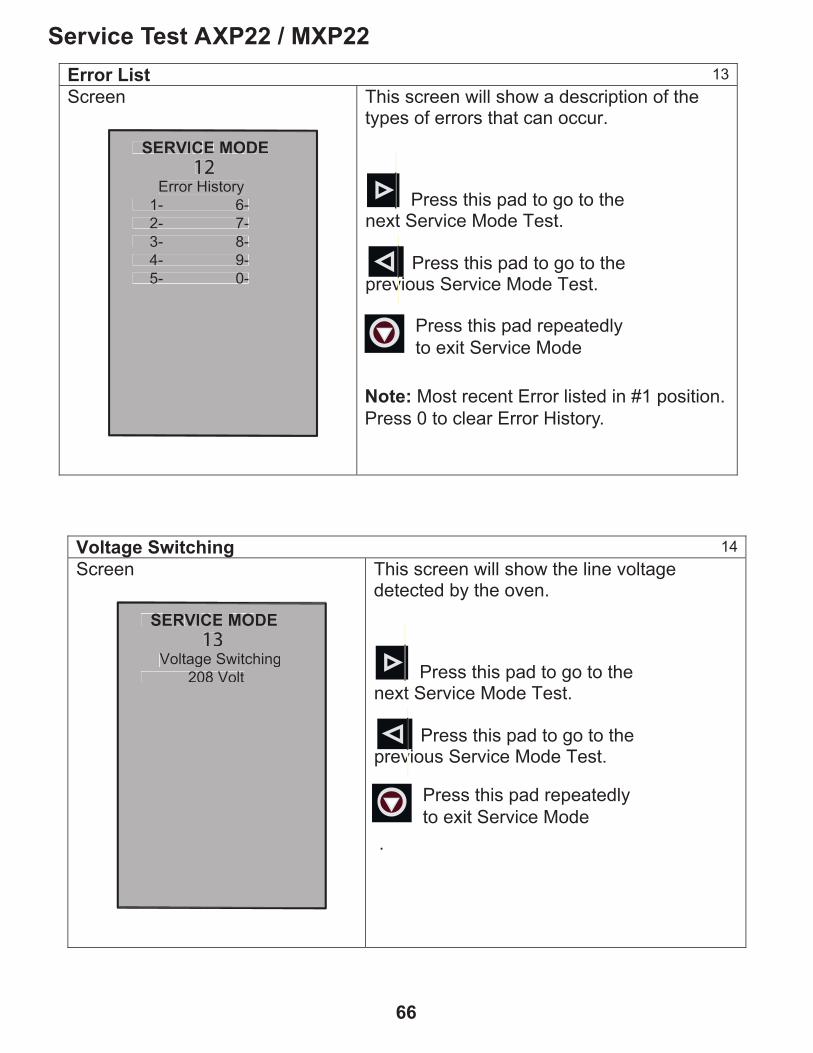
Error List
Screen This screen will show a description of thetypes of errors that can occur.
13
SERVICE MODE
Error History
1- 6-
2- 7-
3- 8-
4- 9-
5- 0-
12
SSEERRVVIICCEE MMOODDEE
ErErroror r HiHiststororyy
1-1- 6 6--
2-2- 7 7--
3-3- 8 8--
4-4- 9 9--
5-5- 0 0--
1122
Press this pad to go to the next Service Mode Test.
Press this pad to go to the previous Service Mode Test. previous
Voltage Switching
Screen This screen will show the line voltage detected by the oven.
14
SERVICE MODE
Voltage Switching
208 Volt
13
SSEERRVVIICCEE MMOODDEE
VoVoltltagage e SwSwititchchiningg
2 20808 V Vololtt
1133
Press this pad to go to the next Service Mode Test.
Press this pad to go to the previous Service Mode Test. previous
.
Press this pad repeatedly
to exit Service Mode
Press this pad repeatedly
to exit Service Mode
Note: Most recent Error listed in #1 position.
Press 0 to clear Error History.
AXP22 / MXP22 60 Hz
Troubleshooting12
1. No Line Voltage
2. Inoperative Power Cord3. Inoperative Fuse
4. Inoperative Main Control Board
5. Inoperative Display Board
6. Inoperative -24 Volt Power Supply Board
7. Broken or Loose Wire Connection
Yes
Error Code
Appears
1. Refer To Display Diagnostics Section
PLUG OVEN IN
No
No
2. Clear Error History
After Oven is Repaired
(NORMAL DISPLAY)
(NORMAL DISPLAY)
POWER UP CONDITION
Go to PREHEAT Condition
See component test procedures section
for testing procedures and results.
Inoperative Display Board
Yes
PRESS On / OFF
TO PREHEAT
No
Yes
OVEN REACHES
TEMPERATURE
Approximately 12 minutes
No1. Inoperative Thermocouple
2. Inoperative Radiant Heater
3. Inoperative Convection Heater
4. Inoperative Temp Sensor (RTD Radiant)
5. Inoperative Main Board
6. Broken or Loose Wire
PREHEAT CONDITION
(NORMAL DISPLAY)
(NORMAL DISPLAY)
See component test procedures section
for testing procedures and results.
See component test procedures section
for testing procedures and results.
1 Sandwich
2 Meat
3 Vegetarian
4 Seafood
5 Pasta-Pizza
6 Bake-Dess
7
8
9
0
1 32
4 65
7 8
0
9
abc def
jklghi
. ’ - #
mno
tuvpqrs wxyz
& /
1 32
4 65
7 8
0
9
abc def
jklghi
. ’ - #
mno
tuvpqrs wxyz
& /
SERVICE MODE
MAGNETRON 1
0 AMPS
Yes
SERVICE TEST
1. Press Off Pad Repeatedly
Until Press to Off Icon Appears2. Press Hidden Pad
3. Press Pads 1-3-5-7-9
No
PRESS START
No
1. Inoperative Main Board
COOLING FANS
TURNS ON
Yes
No
1. Inoperative Power Relay
2. Inoperative Primary Switch
3. Inoperative Secondary Switch
4. Fuse (F3)
5. Fuse (F4)
7. Inoperative Main Board8. Inoperative Capacitor
9. Inoperative Diode
10. Inoperative H.V. Transformer
MAGNETRON #1: 5-12 AMPS
SERVICE MODE
OVEN INFORMATION
DISPLAY VERSION: 11
MAIN VER: 73
EE 3
DOOR CYCLES 1149
TUBE HRS: 2156
PRESS ENTER
Yes
MICROWAVE CONDITION
Hidden Pad
No
Yes
(NORMAL DISPLAY)
(NORMAL DISPLAY)
6. Inoperative Triac (TR1, TR2)
See component test procedures section
for testing procedures and results.
See component test procedures section
for testing procedures and results.
See component test procedures section
for testing procedures and results.
See component test procedures section
for testing procedures and results.
01
SESERRVIVICCEE MOMODDEE
MAGNMAGNETROETRON 1 N 1
0 AM0 AMPSPS
S SEERRVIVICCEE MOMODDEE
O OVEN VEN INFOINFORMATRMATIONION
DISPDISPLAY LAY VERSVERSION:ION: 11 11
MAINMAIN VER VER: 73: 73
EE 3EE 3
DOORDOOR CYC CYCLES LES 11491149
TUBETUBE HRS HRS: 21: 2156 56
0101
02
Repeat test for
Service Mode 03
Magnetron 2
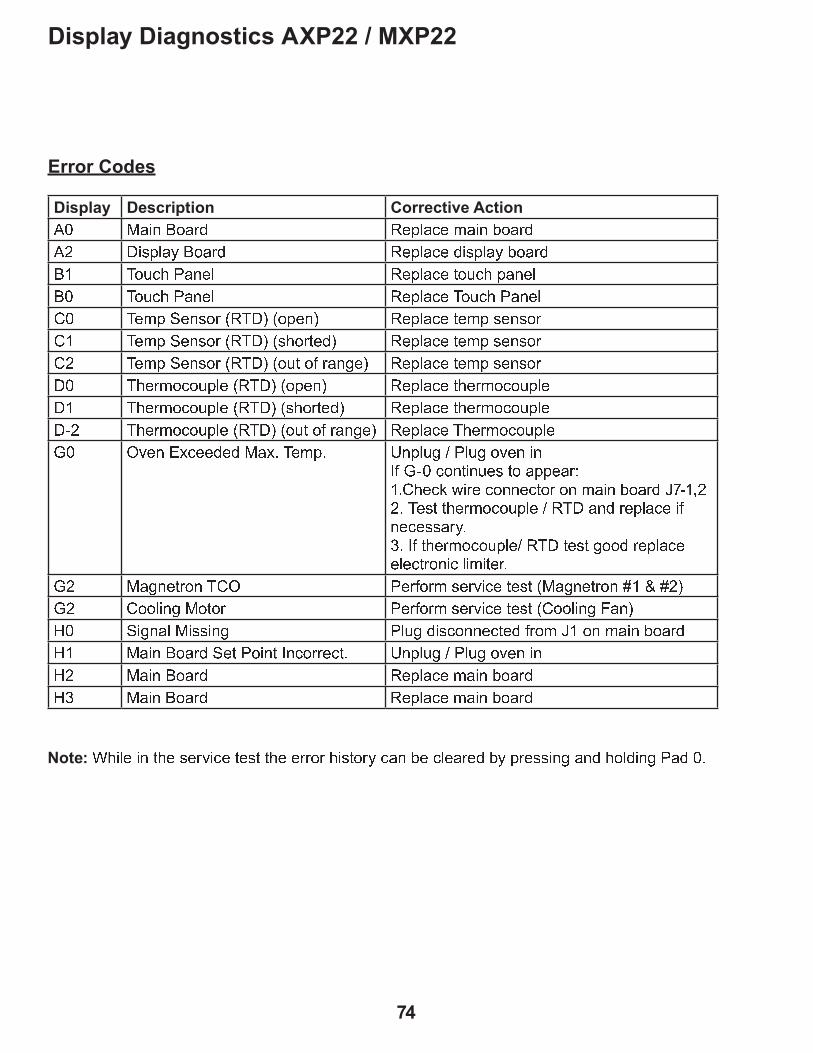
1. Touch Panel
Unplug / plug oven in
1. Check wire connector on
main board J7-1,2
2. Test thermocouple / RTD
and replace if necessary.
3. If thermocouple/ RTD test
good replace electronic limiter.
OPERATIONAL CODESDuring oven operation the display may indicate one of the following:
1. When you press the pad to preheat the oven the display indicates.
2. During cooking, the oven display indicates.G0
If G-0 continues to appear:
1. Door not fully closed.2. Inoperative Power Relay.
3. Inoperative Primary Interlock Switch.
4. Inoperative Secondary Interlock Switch.
5. Interlock Switch Assembly out of Adjustment.
6. Broken or Loose Wire Connection.
7. Inoperative HV System (Magnetron).
Change Option Code #12 to OFF
PREHEAT
OVEN NOT AT
PREHEAT
OVEN NOT AT
TEMPERATURE
1. At the end of a cook cycle and the food is removed and the door is closed the display indicates.
2. When a pad is pressed the display indicates.
Preheat Warning
1. End of cook cycle oven is operating normally.
1. After food is placed in the oven the door is closed the display indicates.
2. During a cook cycle the oven stops.
Check Door
OPERATIONAL CODES
1. During the cook cycle the door is opened or the stop key is pressed once the display indicates.
2. Press start key to continue cook cycle or press stop key twice to cancel cook cycle.
Change Option Code #07 to Opening door resets timer to
disable feature.
(This is normal operation).
To disable pause feature:
Pause
CHASSIS
MEMORY
ERROR
1. Unplug the oven and remove right side panel.
2. Disconnect the data key board connector
from the display board (Figure 1).
3. Plug the oven in (See Caution below).
4. Carefully reinstall data keyboard connector
onto the display board.
5. Press and hold Pad 2 ( The display will
indicate user options).
6. Press Save pad.
Note: If chassis memory error returns replace
data keyboard.
CAUTION
Oven is energized, use care when plugging connector into data key board.
Option #12 This is activated at the factory.
It will appear every 7 days.
Note: Customer can change this option
as desired. See Quick Start Reference
Guide section.
FILTER
CLEAN
FILTER
CLEAN
1. Normal operation do not service the oven for this.
ß à á á â ã ä å æ â ç ç è é ê â ä
AXP22 / MXP22 60 Hz
Display Diagnostics13
ë ì í î ï ð ñ ò î ó ô õ ö ÷ ø î ù ö ú î ï ð û ò î ó ôë ü ý ï þ ÷ ø î ÿ ñ ò î ó ô õ ö ÷ ø î ù ö ô ï þ ÷ ø î ÿ û ò î ó ôñ � � ò � ù � � î ð ö ø õ ö ÷ ø î ù ö � ò � ù � ÷ î ð ö øñ ì � ò � ù � � î ð ö ø õ ö ÷ ø î ù ö � ò � ù � � î ð ö ø� ì � ö ú ÷ � ö ð þ ò ó � õ � ý � ò ÷ ö ð õ ö ÷ ø î ù ö � ö ú ÷ þ ö ð þ ò ó� � � ö ú ÷ � ö ð þ ò ó � õ � ý � þ � ò ó � ö ô õ ö ÷ ø î ù ö � ö ú ÷ þ ö ð þ ò ó� ü � ö ú ÷ � ö ð þ ò ó � õ � ý � ò � � ò ó î ð � ö õ ö ÷ ø î ù ö � ö ú ÷ þ ö ð þ ò óý ì � � ö ó ú ò ù ò � ÷ ø ö � õ � ý � ò ÷ ö ð õ ö ÷ ø î ù ö � � ö ó ú ò ù ò � ÷ ø öý � � � ö ó ú ò ù ò � ÷ ø ö � õ � ý � þ � ò ó � ö ô õ ö ÷ ø î ù ö � � ö ó ú ò ù ò � ÷ ø öý � ü � � ö ó ú ò ù ò � ÷ ø ö � õ � ý � ò � � ò ó î ð � ö õ ö ÷ ø î ù ö � � ö ó ú ò ù ò � ÷ ø ö ì � � ö ð � � ù ö ö ô ö ô í î � � � ö ú ÷ � � ð ÷ ø � � � � ø � � ò � ö ð ï ð� � ì ù ò ð � ï ð � ö þ � ò î ÷ ÷ ö î ó �� � � � ö ù � � ï ó ö ù ò ð ð ö ù � ò ó ò ð ú î ï ð û ò î ó ô � � � � � üü � � ö þ � � � ö ó ú ò ù ò � ÷ ø ö � õ � ý î ð ô ó ö ÷ ø î ù ö ï ð ö ù ö þ þ î ó ÿ �� � � � � ö ó ú ò ù ò � ÷ ø ö � õ � ý � ö þ � � ò ò ô ó ö ÷ ø î ù öö ø ö ù � ó ò ð ï ù ø ï ú ï � ö ó � ü í î � ð ö � ó ò ð � � � � ö ó ò ó ú þ ö ó � ï ù ö � ö þ � � í î � ð ö � ó ò ð � � � � ü ü � ò ò ø ï ð � í ò � ò ó � ö ó ò ó ú þ ö ó � ï ù ö � ö þ � � � ò ò ø ï ð � � î ð ì � ï � ð î ø í ï þ þ ï ð � � ø � � ô ï þ ù ò ð ð ö ù � ö ô ó ò ú � � ò ð ú î ï ð û ò î ó ô � í î ï ð ñ ò î ó ô � ö � � ò ï ð � � ð ù ò ó ó ö ù � � � ð ÷ ø � � � � ø � � ò � ö ð ï ð ü í î ï ð ñ ò î ó ô õ ö ÷ ø î ù ö ú î ï ð û ò î ó ô � í î ï ð ñ ò î ó ô õ ö ÷ ø î ù ö ú î ï ð û ò î ó ô! � ï ø ö ï ð � � ö þ ö ó � ï ù ö � ö þ � � � ö ö ó ó ò ó � ï þ � ò ó ÿ ù î ð û ö ù ø ö î ó ö ô û ÿ ÷ ó ö þ þ ï ð � î ð ô � ò ø ô ï ð � � î ô ì �