29
Session 11 Introduction to Robotics and Programming mBot >_ {Code4Loop}; Roochir Purani
Session 11Introduction to Robotics and Programming mBot
>_ {Code4Loop};Roochir Purani
RECAP from last 2 sessions3D Programming with Events and Messages• Homework Review /Questions
• Understanding 3D Programming environment, events, and objects. Understanding of Camera movement through the story scene.
• Progress check on Project work and presentation questions.
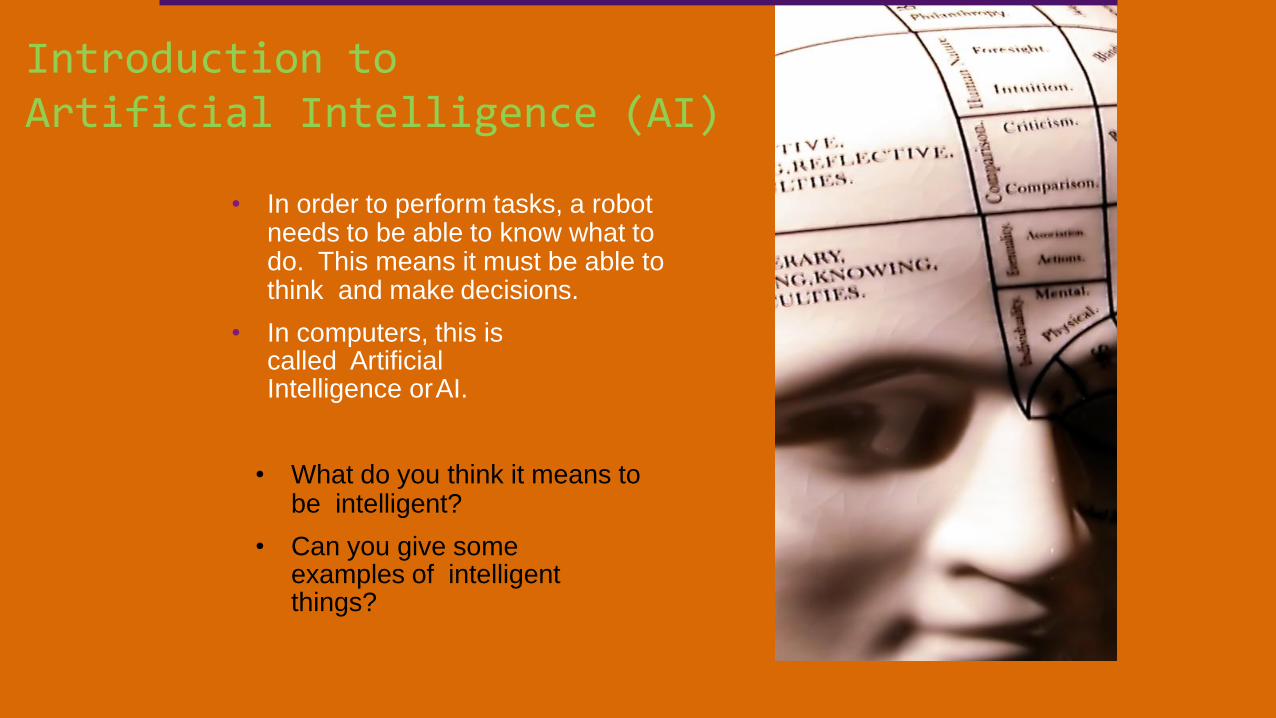
• In order to perform tasks, a robot needs to be able to know what to do. This means it must be able to think and make decisions.
• In computers, this iscalled Artificial Intelligence orAI.
• What do you think it means tobe intelligent?
• Can you give some examples of intelligentthings?
Introduction toArtificial Intelligence (AI)
• Can you give some examples of things that possess artificialintelligence?
• Let's watch more movie clips thatshow Hollywood's interpretations of artificial intelligence and robotics.
• While you watch the movie clips, think about how Hollywood's version is the same as and different from the definitions we have just been discussing.
Artificial Intelligence (continued)
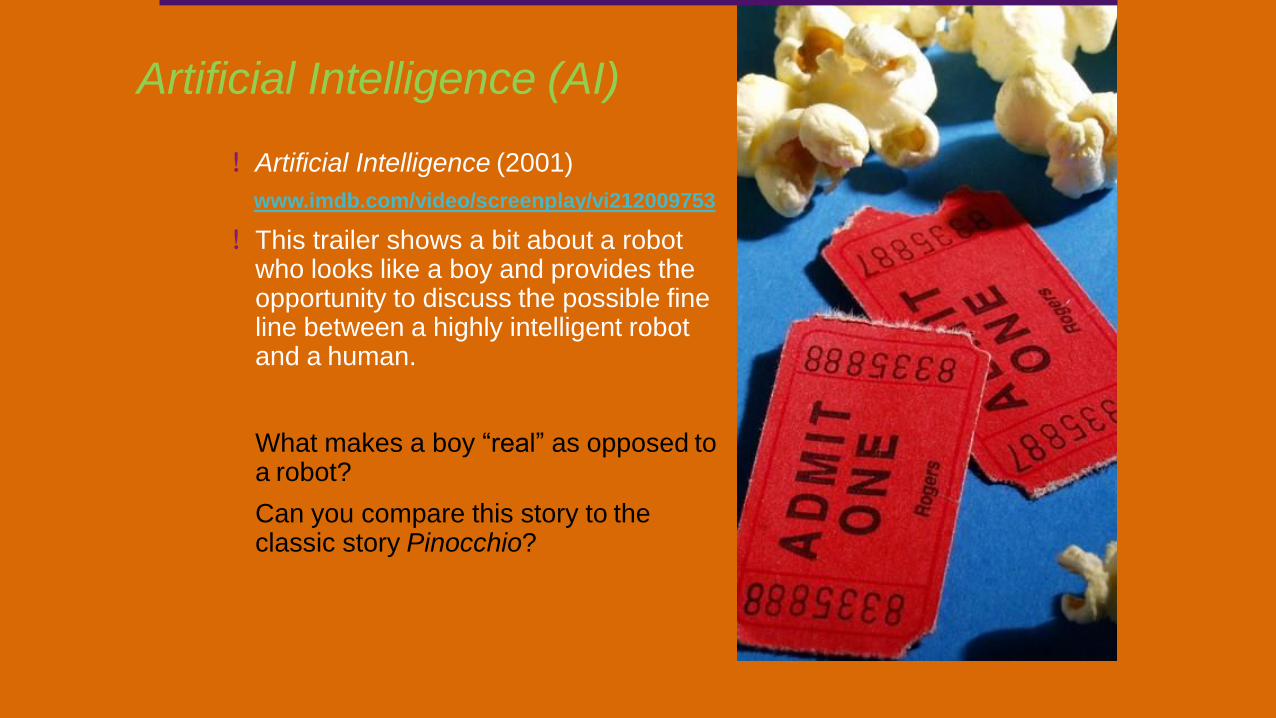
! Artificial Intelligence (2001)
www.imdb.com/video/screenplay/vi212009753
! This trailer shows a bit about a robot who looks like a boy and provides the opportunity to discuss the possible fine line between a highly intelligent robot and a human.
What makes a boy “real” as opposed to a robot?
Can you compare this story to the classic story Pinocchio?
Artificial Intelligence (AI)

! How is Hollywood's version of robotics the same as what we have discussed here?
! How is it different?
! How is Hollywood's version of artificial intelligence the same as what we have discussed here?
! How is it different?
! How has Hollywood's vision of robotics changed in the last 100 years?
Artificial Intelligence: Discussion

Introduction to Braitenberg Vehicles
• We have discussed that robots need intelligence in order to be controlled.
• We often use the term behavior to describe how the controller works and reacts to its environment.
• There are many, many different ways to design robot behaviors.
• Here we will look at one simple way of defining behaviors, created by a psychologist named ValentinoBraitenberg.
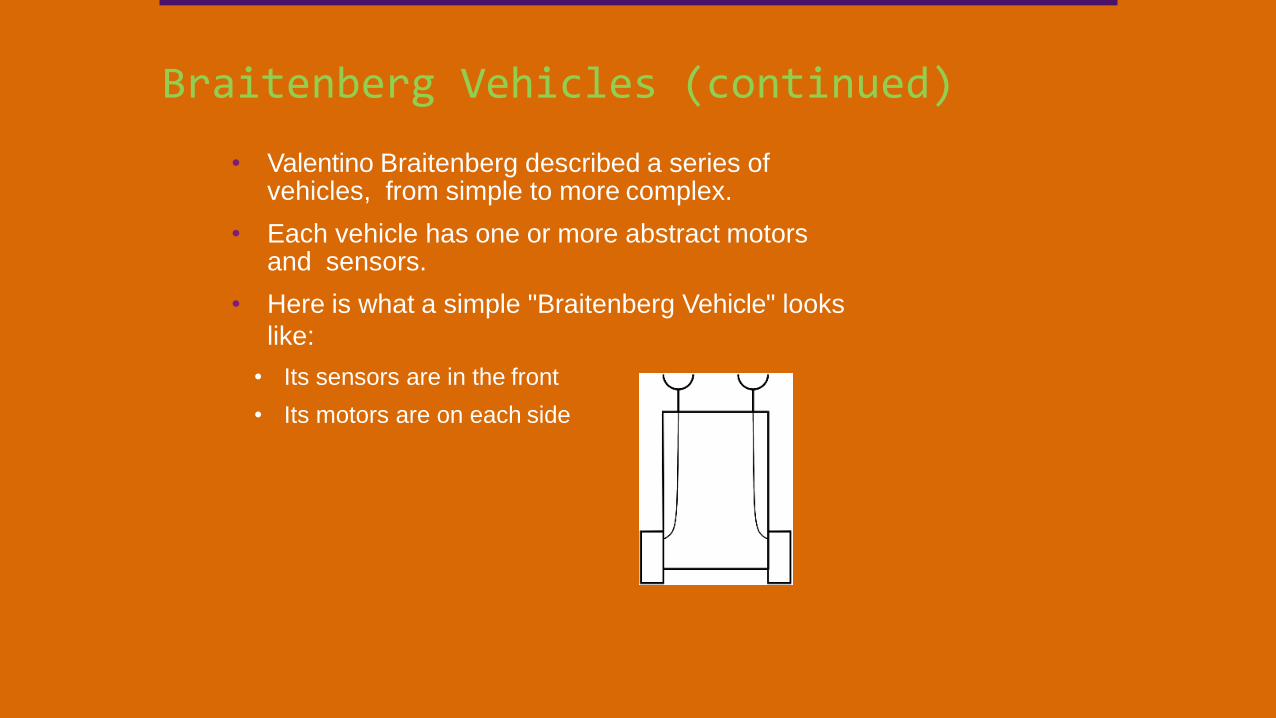
• Valentino Braitenberg described a series of vehicles, from simple to more complex.
• Each vehicle has one or more abstract motors and sensors.
• Here is what a simple "Braitenberg Vehicle" looks
like:
• Its sensors are in the front
• Its motors are on each side
Braitenberg Vehicles (continued)

• In order for a robot to move, there must be physicalconnections (e.g., wires) between the robot's sensors and its motors. These connections can be:
• Positive
• A sensed property has a positive effect on a motor by providing more power in relation to higher sensory input.
• Negative
• A sensed property has a negative effect on a motor by providing less power in relation to higher sensory input.
Braitenberg Vehicles (continued)
• Braitenberg labeled robot reactions in terms that describe how humans react.
• The next slides shows one examples of simple vehicles that Braitenberg created and named:
• "aggression"
• "fear"
• "love"
• "exploration"
Braitenberg Vehicles (continued)
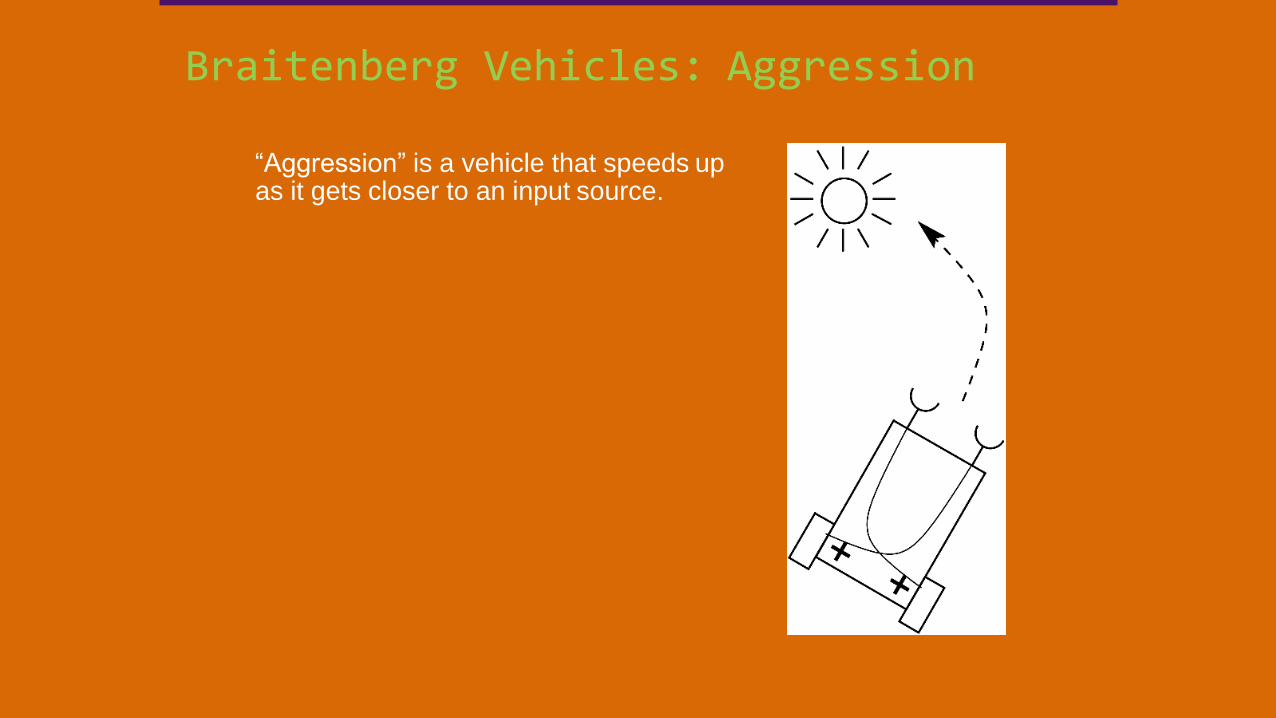
“Aggression” is a vehicle that speeds up as it gets closer to an input source.
Braitenberg Vehicles: Aggression
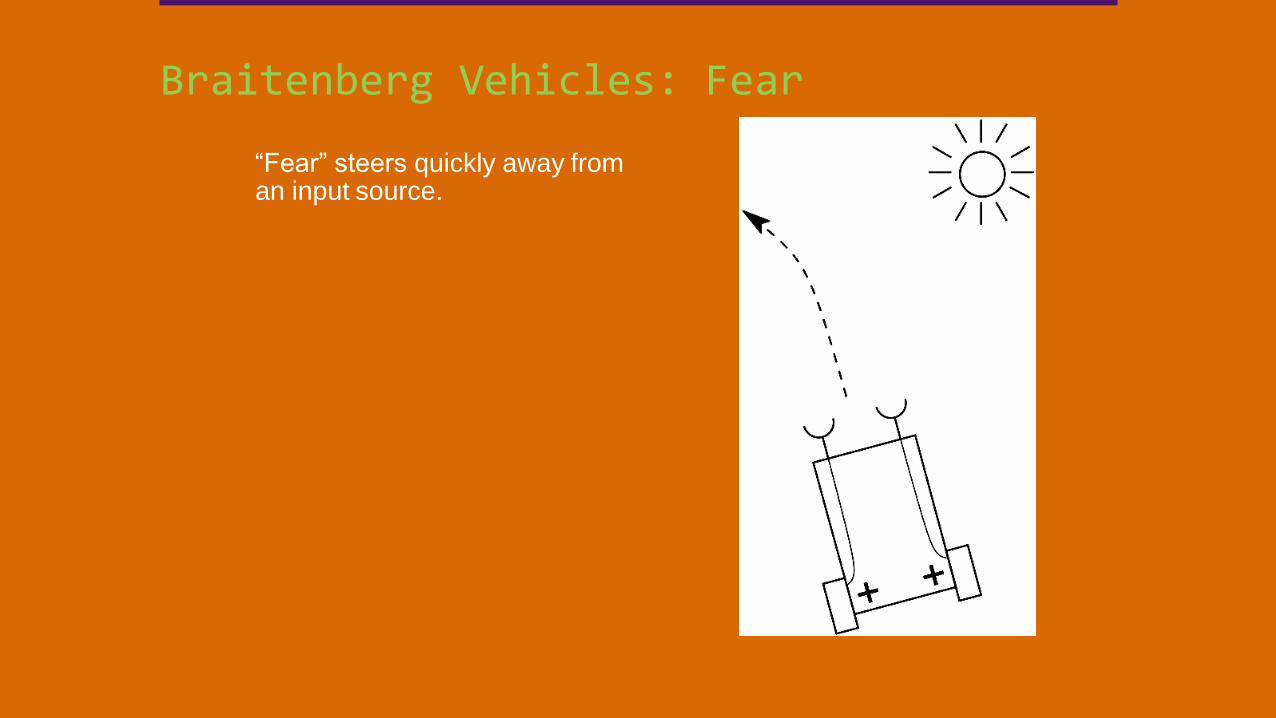
“Fear” steers quickly away from an input source.
Braitenberg Vehicles: Fear
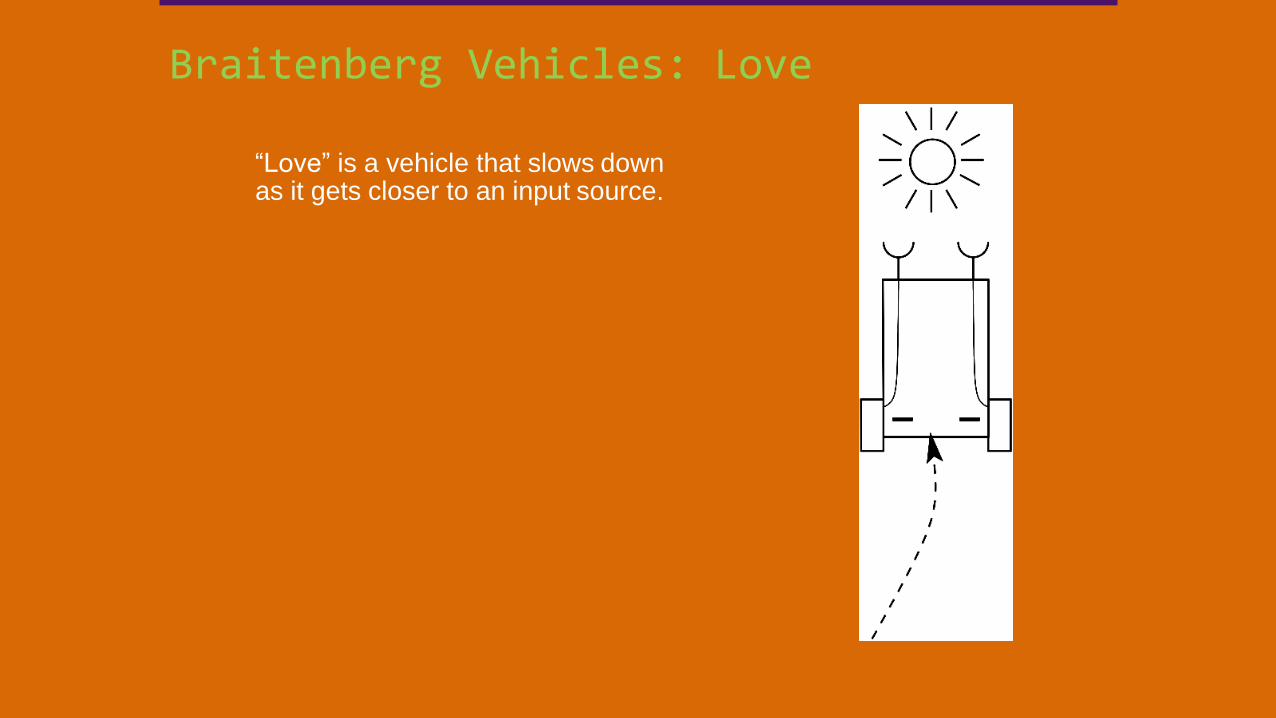
“Love” is a vehicle that slows down as it gets closer to an input source.
Braitenberg Vehicles: Love
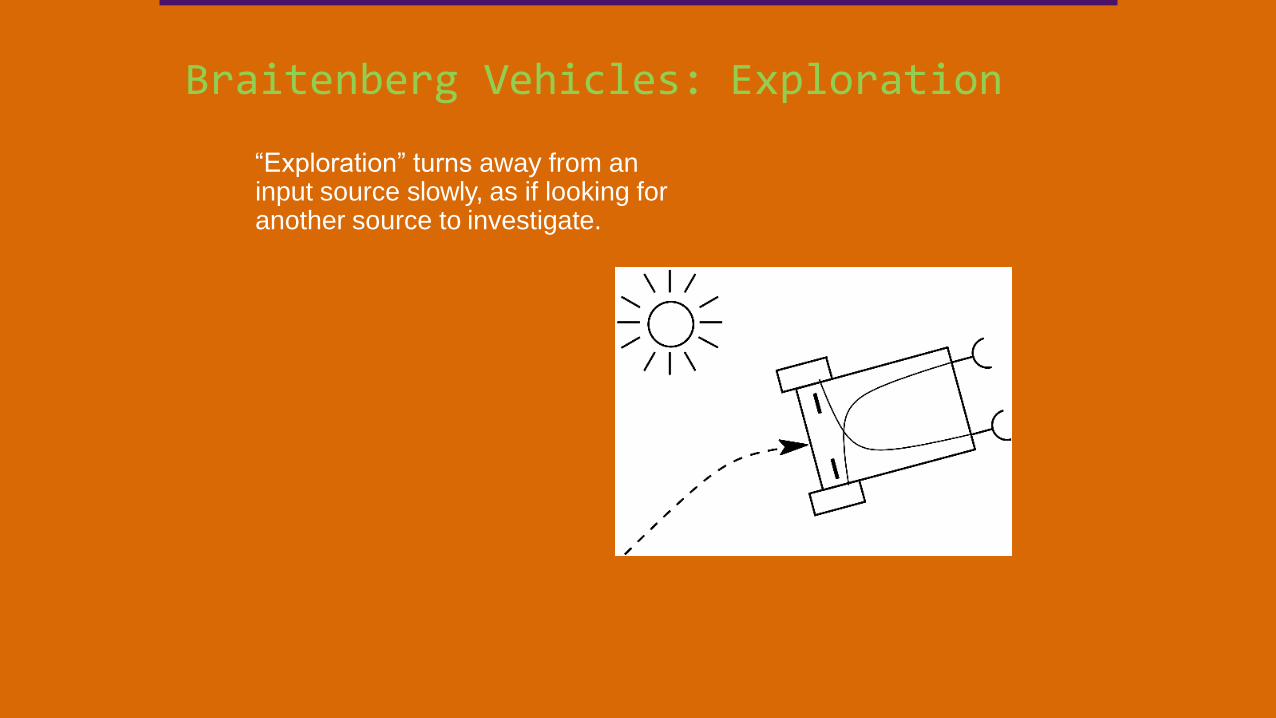
“Exploration” turns away from an input source slowly, as if looking for another source to investigate.
Braitenberg Vehicles: Exploration

Robotics Introduction
• Robots come in different sizes and shapes because of the functions and use that they provide to humans.
• Input Devices: Sensors provide input to the computers.
• Output Devices: LED’s, Display screens, motors, actuators, servo motors
• Processing Unit: CPU is an ARM processor on Arduino Uno motherboard
• Multiple sensors on board : Light sensorSound SensorMultiple LEDs, Button, Buzzer for sounds, Wi-fi Connection to connect to the
One computer
• Next slide shows the main computer picture.
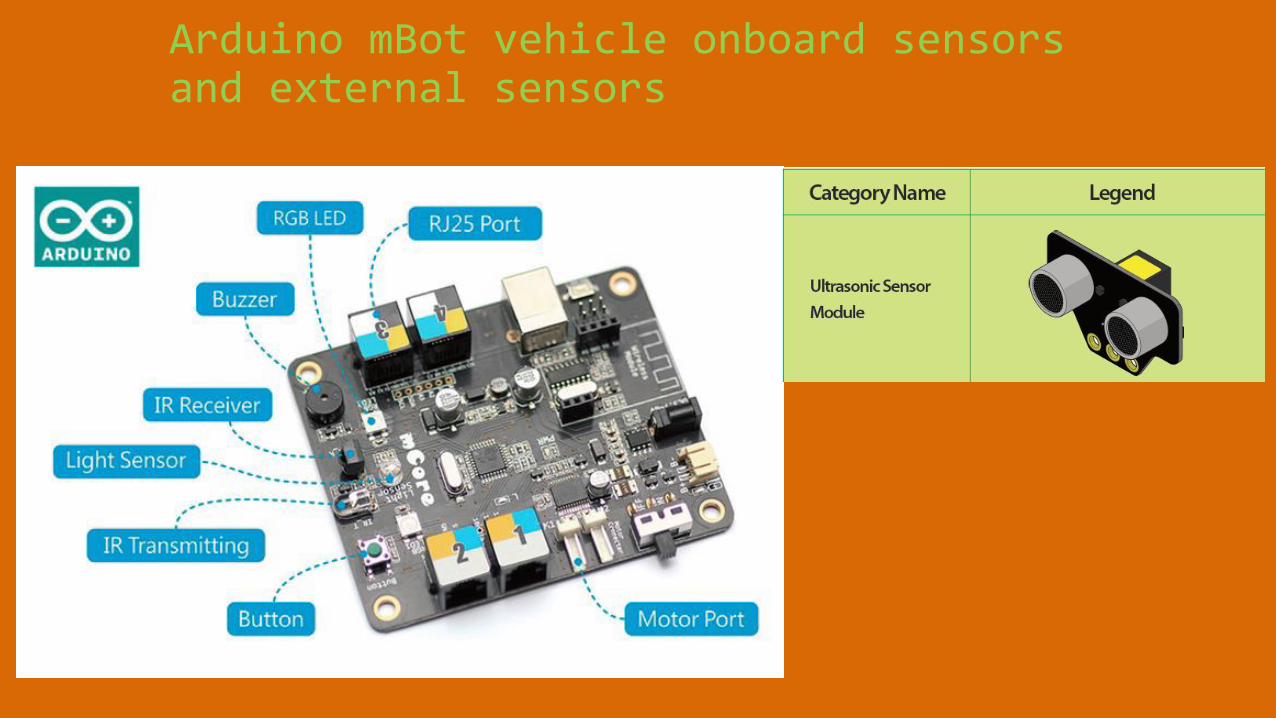
Arduino mBot vehicle onboard sensors and external sensors

! Now you will experiment with an mBot robot vehicle using Programming language Scratch and Robot extension to connect to mBot
! Follow the instructions on the lab worksheet.
! The lab has two parts:
1. Each student identifies the part of the robot including sensors
2. Object collision hands on
3. Each student program the movement to complete the robot
route/journey
mBot Robot Movement : Activity
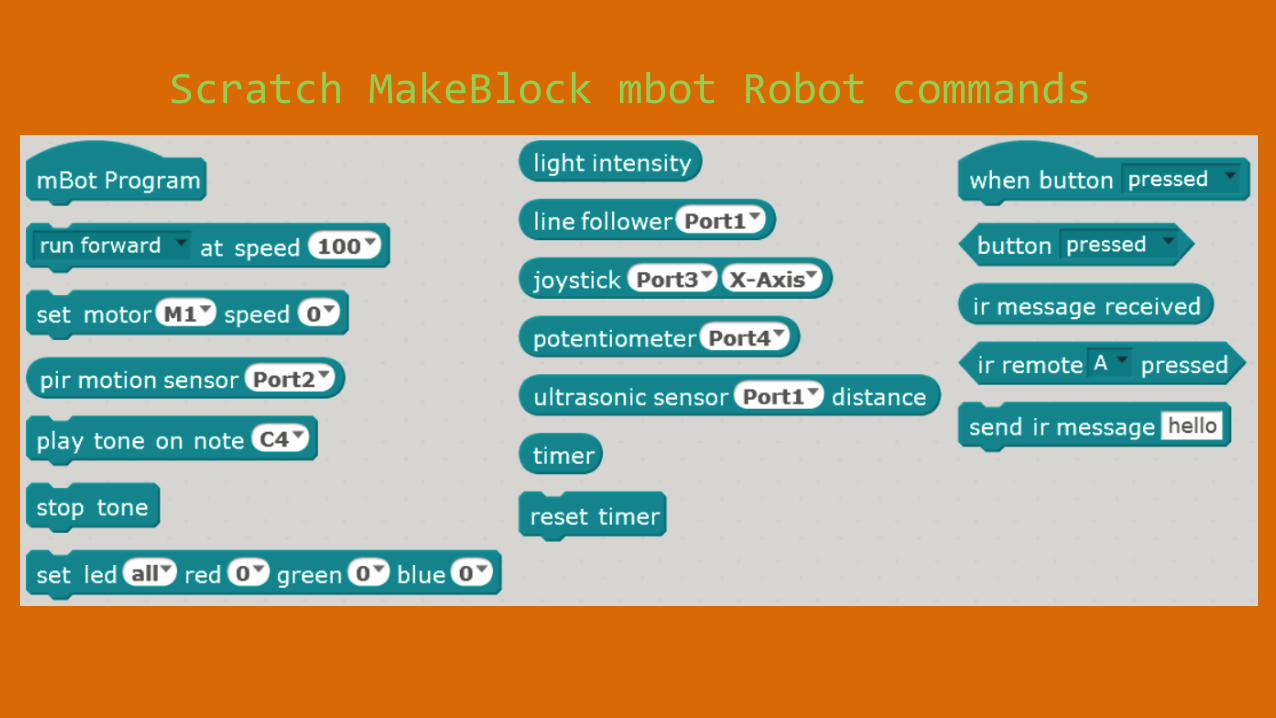
Scratch MakeBlock mbot Robot commands

Step 1
• Make the robot move forward
at speed 50
• Turn LED Light Green
Robot Programming activity
Step 2
• Make the robot turn left
Step 3
• Make the robot turn right
• Turn LED Light Red
Step 4
• Make the robot reverse
(backward)
• Make sound C4, E4 C4 E4
Step 5
• Make robot read Ultrasonic
sensor values
Step 6 Collision detection and avoidance
• Robot act based on the value
• Move forward
• check for condition –
• If Reading value is < 5, Stop
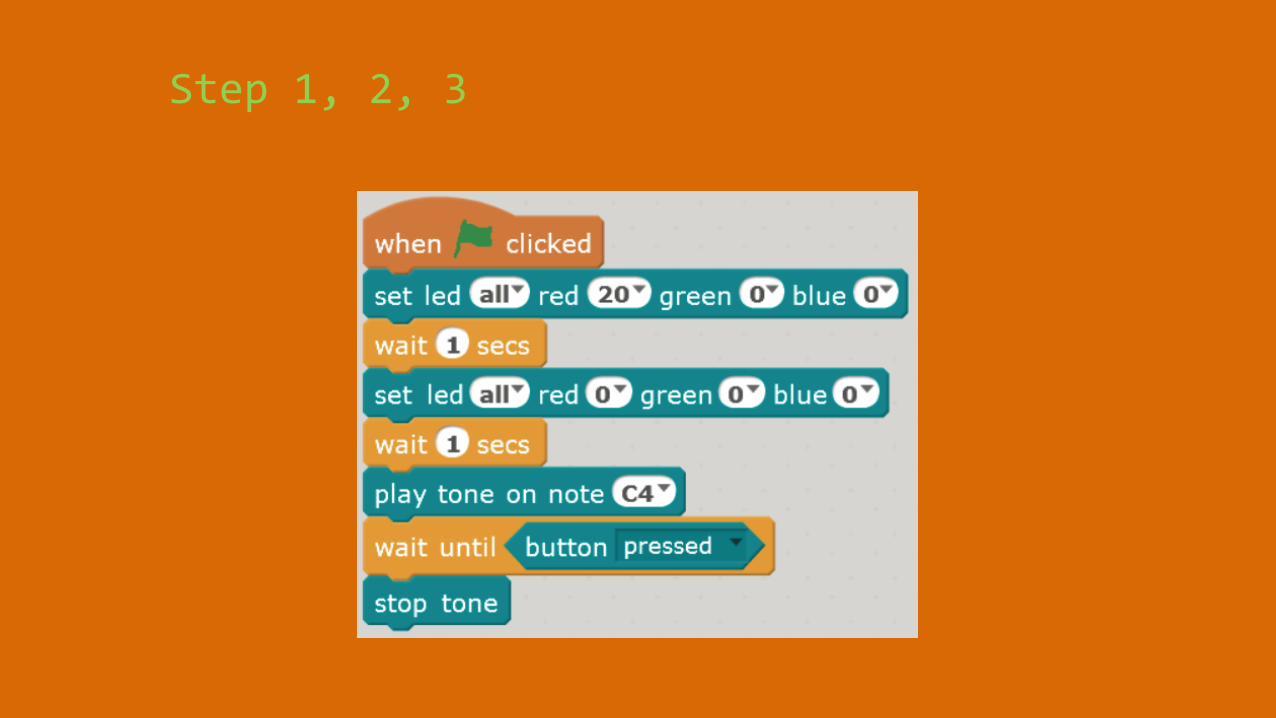
Step 1, 2, 3
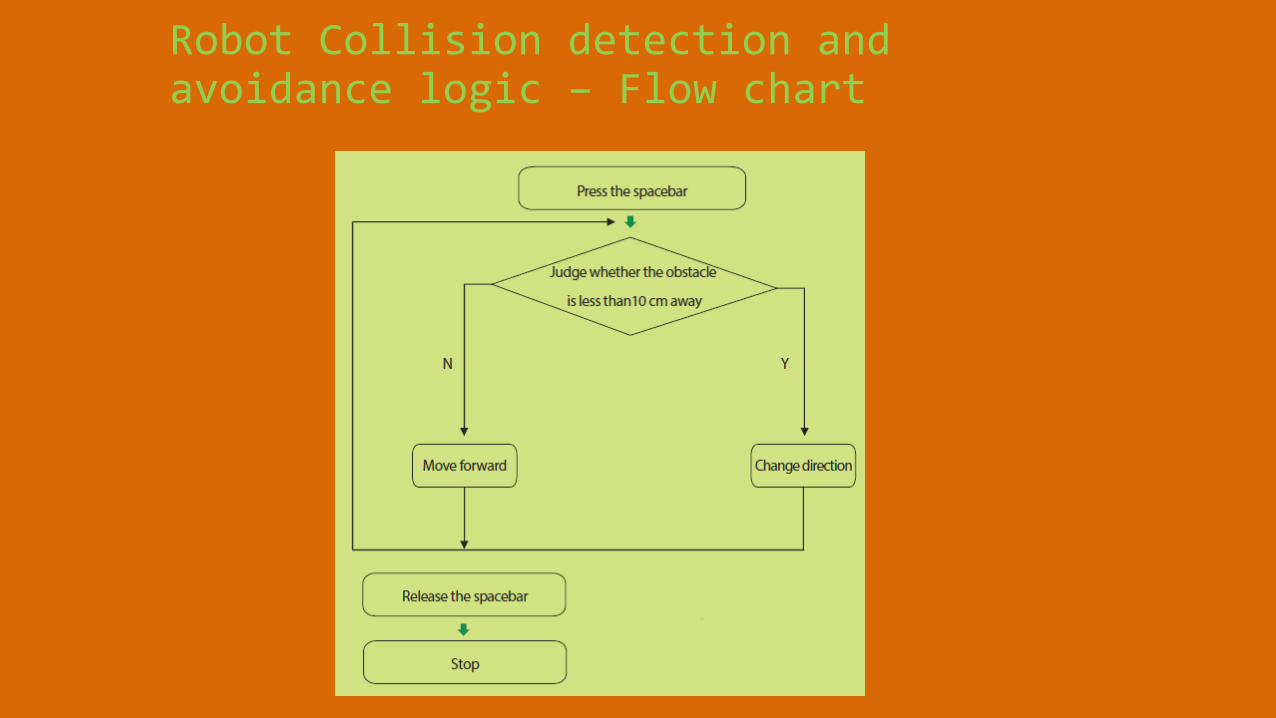
Robot Collision detection and avoidance logic – Flow chart
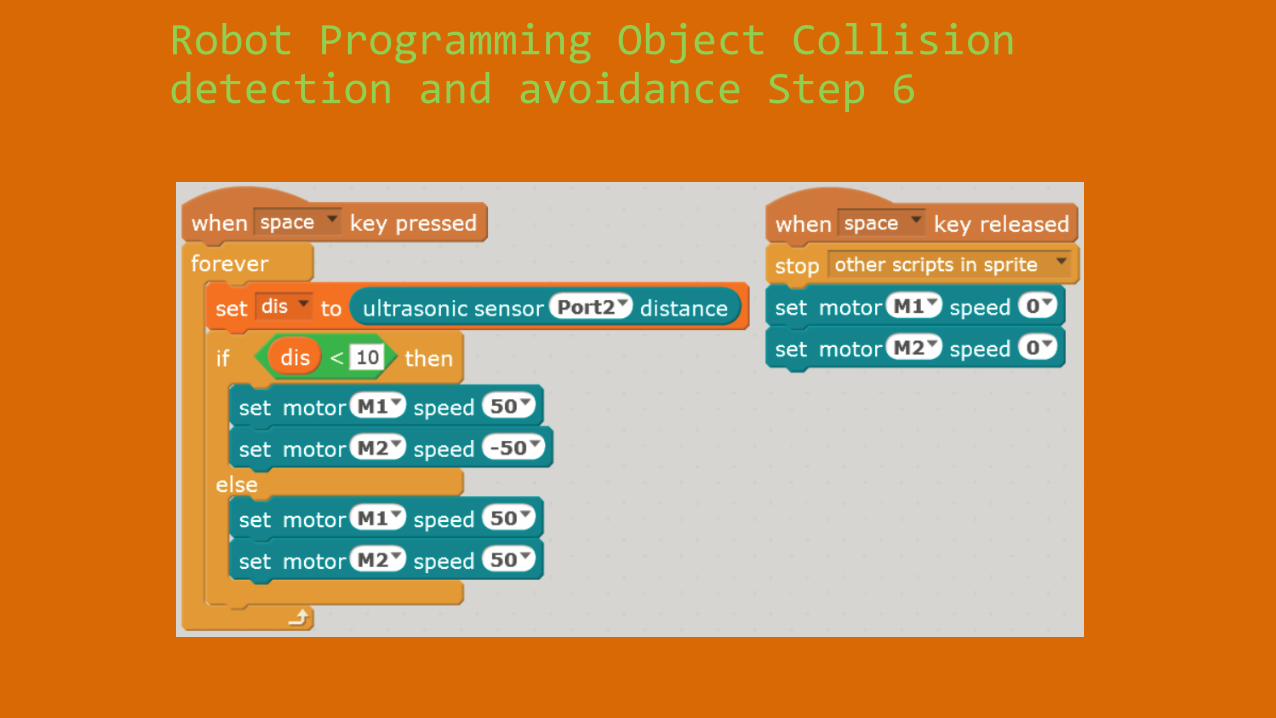
Robot Programming Object Collision detection and avoidance Step 6
Homework
• Identify 5 different kinds of robots that you may have seen or heard about and identify their function/what they are used for.
• Continue to refine your project and presentation. Setup 1-on-1 time.

Session 11 Extra “How to Present” GuideHints and Tips
>_ {Code4Loop};Roochir Purani
Organizing your presentation
Duration of Presentation: 10 Minute or less per Student
Here are some steps to follow when organizing your project presentation:
• Make sure your project is fully tested and complete.
• Plan to demonstrate how you used the concepts learned in this course.
• If it is a group presentation, plan who will do which parts of the presentation.
• Be clear and Loud so everyone can hear you.
• No hands in the pocket
• Look at Audience (they are all familiar to you, and feel comfortable)
• No Umm’s and Uhh’s Try to avoid these if possible.
• Say Short and Clear Sentences.
Preparing Presentation Guidelines
Create a presentation outline to plan your complete animation project
presentation. : Introduction, Presentation of the project, Conclusions
• Section 1: Introduction
• Introduce yourself. Gain your listeners’ attention.
• Say the theme of the project.
• Give the overview of your project.
• Give the audience a reason to listen to the presentation.
• Say why you picked it and what you liked about it.
• What is the usefulness of the project and may be One or Two features.
Project Presentation Guidelines
• Section 2: Presentation of the project
• Organize the presentation in a logical flow.
• Show all capabilities of your project.
• User screens, navigation, action, menu, help, documentation etc.
• Demonstrate how different course concepts were used in the over project.
• e.g. Use of Flow chart, Screen design (Show printout OR on the Screen)
• If-then-else, Forever loop, variables and data, events and messagestesting, debugging, documentation,
• If possible, include helpful transitions between different topic.
• e.g How does a different scene work? How does user get score, what happens when some events occur?
Project Presentation Guidelines
• Section 3: Conclusion
• Summarize the project in a memorable way.
• Motivate the audience to respond.
• Ask questions :
• Did you like it?
• What would you like to see different?
• Have the audience Try and Share with others!!
• Provide closure.
• Thank the audience for listening.

Thank you!


