Section 8: Purchase Orders 8.0 Overview SAP Purchase Orders The Purchase Order is a document used to request items or services from a vendor or supplier. The purchase order can be created using electronic requisitions manually entered or via SRM or can be created directly without a requisition. A requisition will be created for each Purchase Order whenever possible. Purchase orders numbers are system generated in a numerical sequence, are 10 digits long and will begin with a 45. The Hospital buyer is responsible to: create PO’s for replenishment of CI materials from system generated reqs. create PO’s for Direct Purchased Materials (non-stock) create Rush Purchase orders for SCI Output off all purchase orders created (with the exception of system generated SCI purchase orders). manage open PO’s (Backorder processing) Note : Regular Purchase orders for SCI are created via an automatic purchase order job that runs daily which batches all requisitions for Vendor SCI, generates the purchase orders and sends them electronically through GHX to SCI. USL stock materials can come from 3 sources: SCI, CI or SAFE. USL stock items are automatically ordered from their source through the bar code scanning process. When a stock item is counted at less than its ROP, MRP creates a PURREQ for the ROQ against SCI or a RESERVATION against CI or SAFE. 8.1 Components of a Purchase Order The purchase order screen is split into three sections: the header section at the top, Item Overview in the middle and Item details on the bottom. Details that pertain to the whole purchase order such as Rev 003 Page 1
Transcript
Section 8: Purchase Orders
8.0 Overview SAP Purchase Orders
The Purchase Order is a document used to request items or services from a vendor or supplier. The purchase order can be created using electronic requisitions manually entered or via SRM or can be created directly without a requisition. A requisition will be created for each Purchase Order whenever possible. Purchase orders numbers are system generated in a numerical sequence, are 10 digits long and will begin with a 45.
The Hospital buyer is responsible to: create PO’s for replenishment of CI materials from system generated reqs. create PO’s for Direct Purchased Materials (non-stock) create Rush Purchase orders for SCI Output off all purchase orders created (with the exception of system generated
SCI purchase orders). manage open PO’s (Backorder processing)
Note: Regular Purchase orders for SCI are created via an automatic purchase order job that runs daily which batches all requisitions for Vendor SCI, generates the purchase orders and sends them electronically through GHX to SCI.
USL stock materials can come from 3 sources: SCI, CI or SAFE. USL stock items are automatically ordered from their source through the bar code scanning process. When a stock item is counted at less than its ROP, MRP creates a PURREQ for the ROQ against SCI or a RESERVATION against CI or SAFE.
8.1 Components of a Purchase Order
The purchase order screen is split into three sections: the header section at the top, Item Overview in the middle and Item details on the bottom. Details that pertain to the whole purchase order such as payment terms or vendor address are entered and /or found in the Header section. Details that pertain to a particular item, such as account assignment, tax codes, and vendor material number are entered and /or found in the Item Detail section.
When creating a purchase order in SAP, the system will not allow you to save until all mandatory fields have been entered and will prompt you to complete these fields each time you hit the enter key.
Once all fields are complete in the header, line item overview section and the item detail section, the system will allow you to save. The purchase order number will be displayed on the bottom left hand corner of your screen.
Rev 003
Page 1
Section 8: Purchase Orders
This screen shot displays the layout of a purchase order in SAP.
The following outlines some of the key fields that need to be entered in a purchase order:
1) Purchasing Organizations Select 3SO from the drop down list
Rev 003
Page 2
Section 8: Purchase Orders
2) Company CodeSelect your Hospital from the drop down list: Examples of Company Codes are BGH; HDH; JMF; KGH; PCC; PSF; QHC.
3) Plant number Each Hospital site has been assigned a Plant number. For Example: for Company Code Providence Care, the site for St Mary’s of the Lake is plant number SML1.
4) Account Assignment
The Account assignment outlines what type of purchase order it is, For example, purchase orders with account assignment – K are direct to Cost center orders, F are internal orders (used at KGH only), W are for Free of charge (transaction automatically removes the IR requirement), and Z is for orders that do not require a goods receipt (i.e. Services, or orders for goods being delivered off-site). Select the correct Account Assignment from the drop down list.
Rev 003
Page 3
Section 8: Purchase Orders
Rev 003
Page 4
Section 8: Purchase Orders
8.2 Creating a Purchase Order:
To get to the Create Purchase order screen you can either:
Using the menu tree go to SAP go to Logistics → Materials Management → Purchasing → Purchase Order → Create →Vendor/Supplying Plant Known
Or, enter Transaction Code ME21N in the command field.
See BPP_MM CREATE PURCHASE ORDER (ME21N) for procedural steps to create a Purchase order.
Rev 003
Page 5
Section 8: Purchase Orders
8.3 Creating Different Types of Purchase Orders:
A. Create Purchase Order for Direct Charge/Non-Stock Materials
Use transaction ME21N and See BPP_MM CREATE PURCHASE ORDER (ME21N) for procedural steps to execute.
Remember when creating purchase order for stock or non stock items to create with reference to a contract when the item has a contract or create from the purchase requisition first which will automatically assign to the purchase order if there is one. The above BPP is also used to create non stock orders with account assignment.
B. Assign & Process stock for (CI) ME57
Use this function to prepare the requisitions from central inventory and then proceed directly to purchase order creation for items to each vendor.
See BPP_MM ASSIGN AND PROCESS PURCHASE REQUISITIONS (ME57) for procedural steps to execute, or steps below
Rev 003
Page 6
Section 8: Purchase Orders
Then EXECUTE
Rev 003
Page 7
Insert your inventory Purchasing Group here.
Section 8: Purchase Orders
Rev 003
Page 8
Section 8: Purchase Orders
Then
Rev 003
Page 9
Section 8: Purchase Orders
Then select correct vendor for multiple sourced items.
Then
Rev 003
Page 10
Section 8: Purchase Orders
Then click into the NB (Standard PO).
Rev 003
Page 11
Section 8: Purchase Orders
If you are okay with the assignment, then click
Note: When multiple info records exist, multiple selections will be displayed. Double-click on the preferred assignment (hierarchy is 3PL, contract, PO). This
Rev 003
Page 12
Section 8: Purchase Orders
vendor will be assigned to this material. (You may have to scroll across to validate the purchase unit of measure, if there are multiple info records.)
This will take you to CREATE a PO. Proceed to create a PO as you normally would, using the requisition.
Repeat for all items.
All items without source (w/o source) must be investigated at the end of the process.
C. Create Purchase Order for Assets
Creating a purchase order for an asset at any hospital will be done using Create Purchase order ME21N and using text instead of using material number. The line will be set up as “K” to cost center account assignment. Finance will advise what the cost center number will be. They will also supply Purchasing with the “Asset tag(s)”.
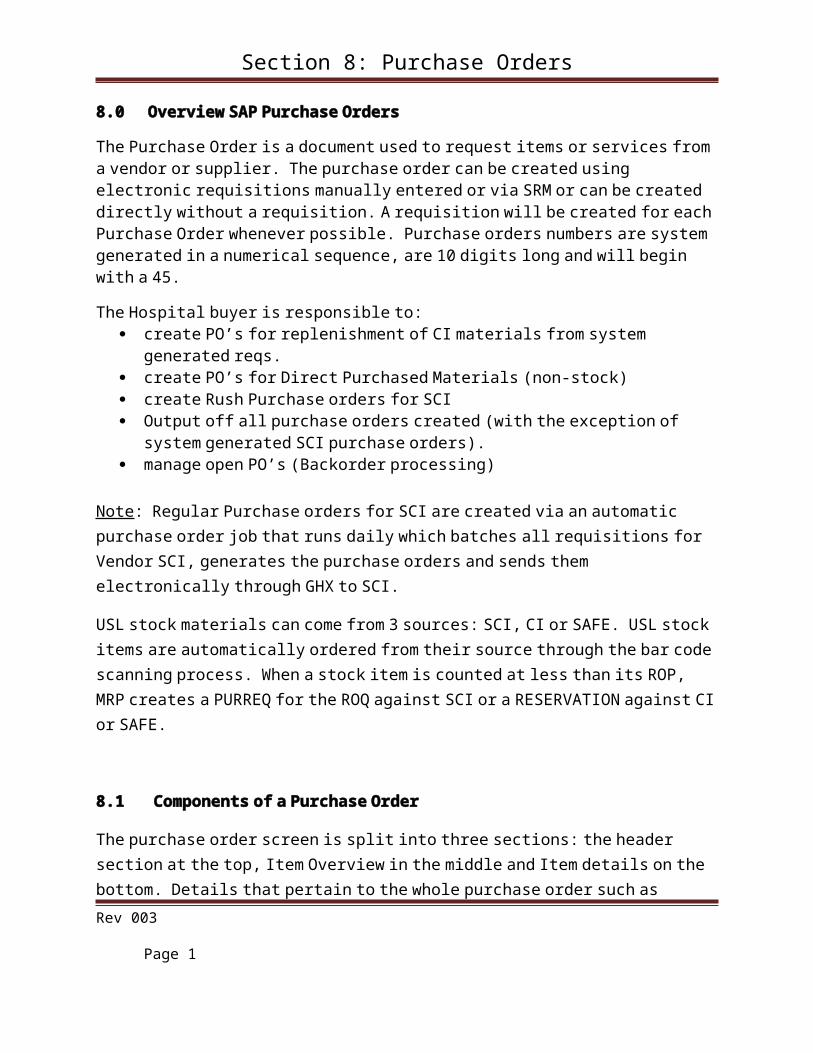
Purchasing when creating the purchase order will enter the “Asset tag number” in the item details section on “Material Data” tab using field “EAN/UPC”
When purchase order issued the buyer will send the tags to receiving.
When the “Asset” arrives the receiver will complete the goods receipt and document the serial number on the “item text” field of the goods receipt screen.
D. Create Purchase Order for Free Goods (No Value)
Rev 003
Page 13
Section 8: Purchase Orders
There are times that a buyer will need to create a purchase order for items that need to be ordered and received but that has no value and therefore there will not be an invoice. Create your purchase order using ME21N but select the “W” for the Account Assignment. This will allow you to create your purchase order without entering a price which would normally be a mandatory field. For this type of purchase order under the “Invoice” tab of the item details section the check box beside “Inv. Receipt” will not be checked.
You can also create this type of order by selecting the check box under the “Free” column on the line item. This will also allow the price field to be blank and the invoice receipt box to not be checked.
The check box beside Goods receipt will remain selected meaning a goods receipt is required.
E. Create Purchase Orders for Consignment items
All consignment items are handled as non-stock materials. The purchase order will have 2 lines for each item; a line for the item used to be billed by the Vendor and another line to order the replacement item at no cost.
We handle the replenishment and payment of consignment items via the purchase order “Cost Assignment” field as follows:
“Z” – acts to authorize payment of the used consignment item – No goods receipt, item value considered and allows for an invoice to be processed against this line.
“W” – acts to replenish the item free of charge and requires a goods receipt (GR).
Any PO which requires the serial number must be faxed to the vendor. The serial number is added to the text field.
Rev 003
Page 14
Section 8: Purchase Orders
F. Create Purchase Order Service
Using transaction code ME21N the buyer will create an order for services using the standard purchase order create process for material number (service description).
Difference is if the service has already been completed or there will not be any goods to arrive at receiving then the “Goods Receipt” check will be removed from the “Goods Receipt” box on the “Delivery” tab of the item details view.
In addition the buyer will need to go to the Header details section of the purchase order under “Texts” tab and click on “Header Note”. Then put cursor in the blank continuous text box and double click. This will open up the text box. If you have “Standard text” set up go to “Include> text>Standard.”
You will get a pop up window and to search for a standard text you can type. Or use drop down and under “name” field use part of the text name or use * astrisk for wild search. Click Execute.
Click the box beside the name you want and click on the Check Mark.
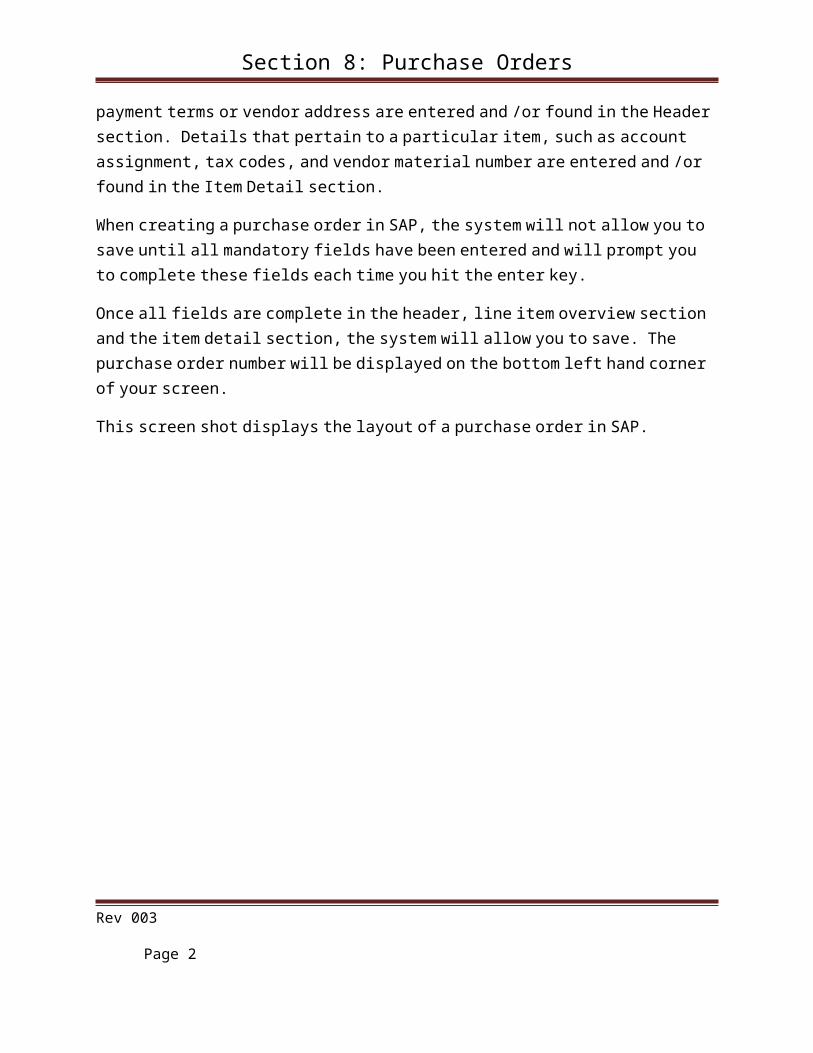
In this case we want to choose “ZPRCH-HEADER NOTE P A/P
Rev 003
Page 15
Section 8: Purchase Orders
“
It will populate the name in the Text Name field.
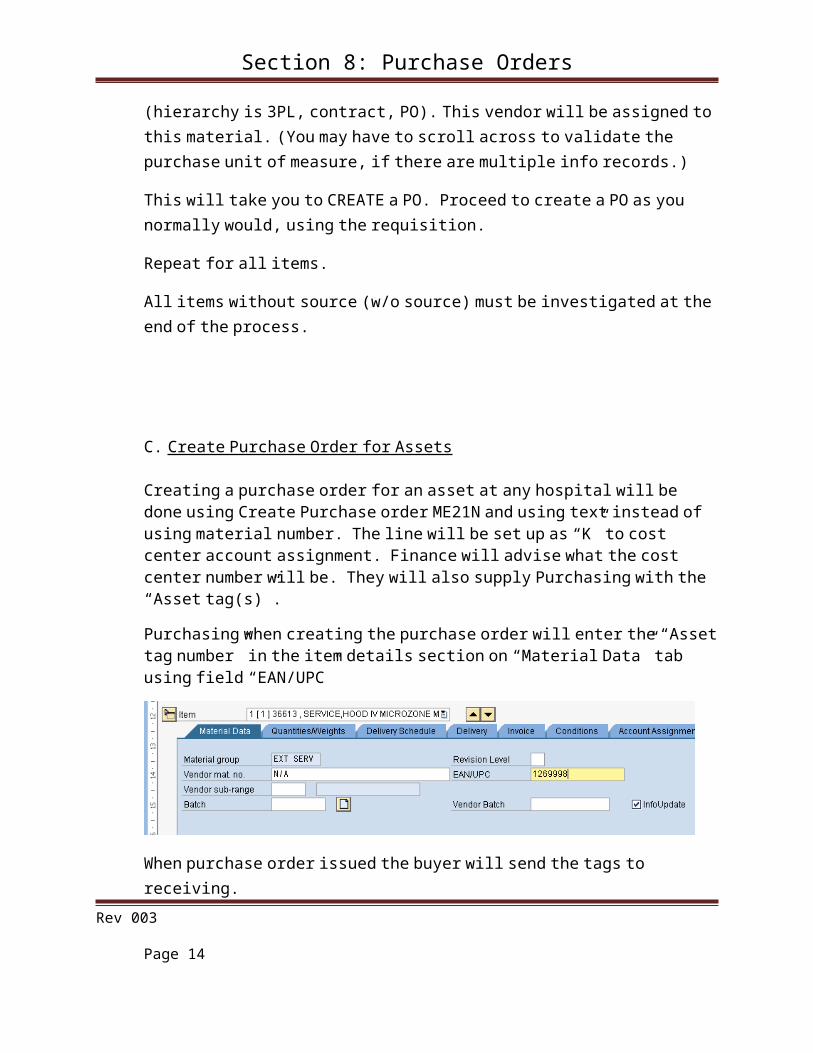
Click “Expand Immediately” and click “check mark”.
SAP will populate the original opened text box with the details from the standard text. This can be adjusted to reflect any changes needed for this specific purchase order. Now green arrow back out and when pop up box asks “Save changes in text first” click yes. It will save the text and take you back to out of the large text box.
This text is to advise Accounts Payable that they need to send the invoice to the department head for signature approval since no goods receipt completed.
8.4 Purchase Order Display and Change
To display a purchase order use transaction code - ME23N
Rev 003
Page 16
Section 8: Purchase Orders
To open a purchase order in change mode use - ME22N
See BPP_MM CREATE PURCHASE ORDER (ME21N) this will give you screen shots on what you will see when in ME21N display.
When in display or change you can toggle back and forth by using the following
symbol . If you opened the purchase order using ME23N to view and then needed to make a change simply select this icon and it will switch your purchase order to change mode.
To swich to a different purchase order from the current purchase order you are
in, you can select the icon. It will then prompt you to enter in the purchase order number that you wish to go to and then hit <enter> to go to it.
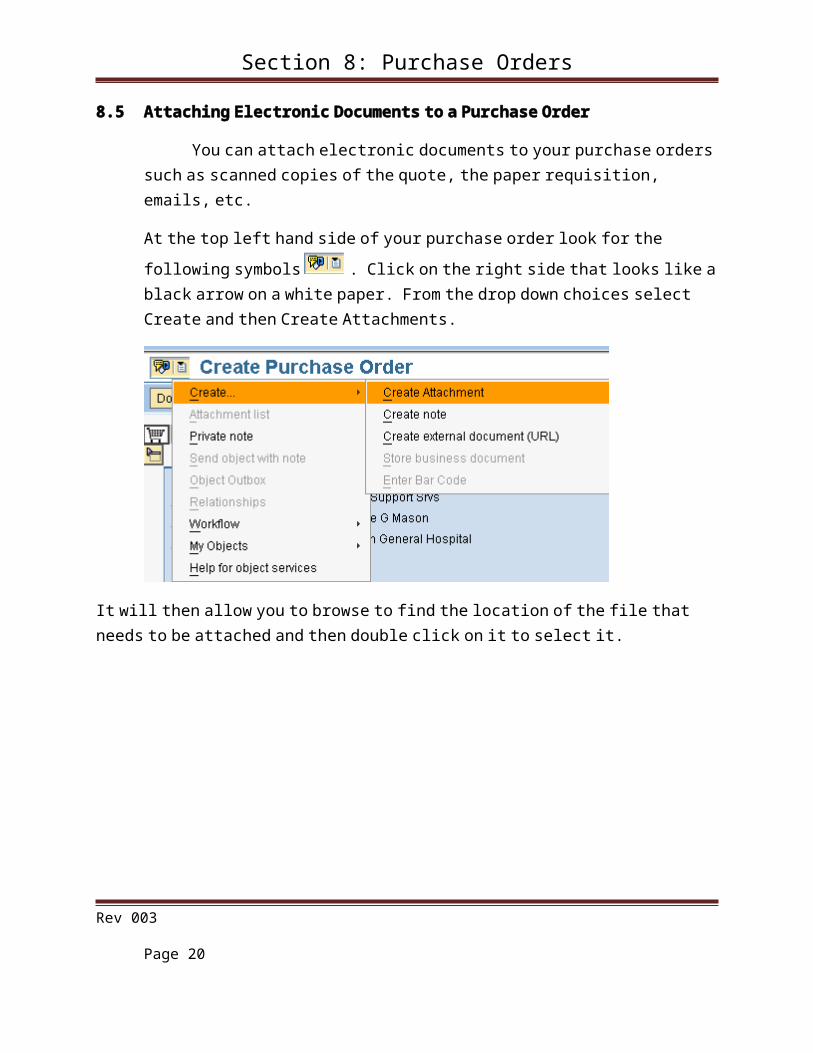
8.5 Attaching Electronic Documents to a Purchase Order
You can attach electronic documents to your purchase orders such as scanned copies of the quote, the paper requisition, emails, etc.
At the top left hand side of your purchase order look for the following symbols
. Click on the right side that looks like a black arrow on a white paper. From the drop down choices select Create and then Create Attachments.
Rev 003
Page 17
Section 8: Purchase Orders
It will then allow you to browse to find the location of the file that needs to be attached and then double click on it to select it.
Rev 003
Page 18
Section 8: Purchase Orders
To see if the document was successfully attached select the left side of icon
and then select the “paper with paper clip” icon to see the list of all attached documents. To display the document, double click on it.
8.6 Searching for Purchase Orders in SAP:
There are a few ways to search for purchase orders, which are called List displays, and which search you choose will depend on what information you have to search with. The following are some searches you may find useful:
A. Search for Purchase orders by Material Number - ME2M - See BPP_MM PURCHASING DOCUMENTS PER MATERIAL (ME2M)
B. Search for Purchase orders by document number (ie:Purchase Order number) ME2N - See BPP_MM PURCHASING DOCUMENTS PER MATERIAL (ME2M) * use this BPP as well for to search for ME2N
C. Search for Purchase orders by Vendor - ME2L
Rev 003
Page 19
Section 8: Purchase Orders
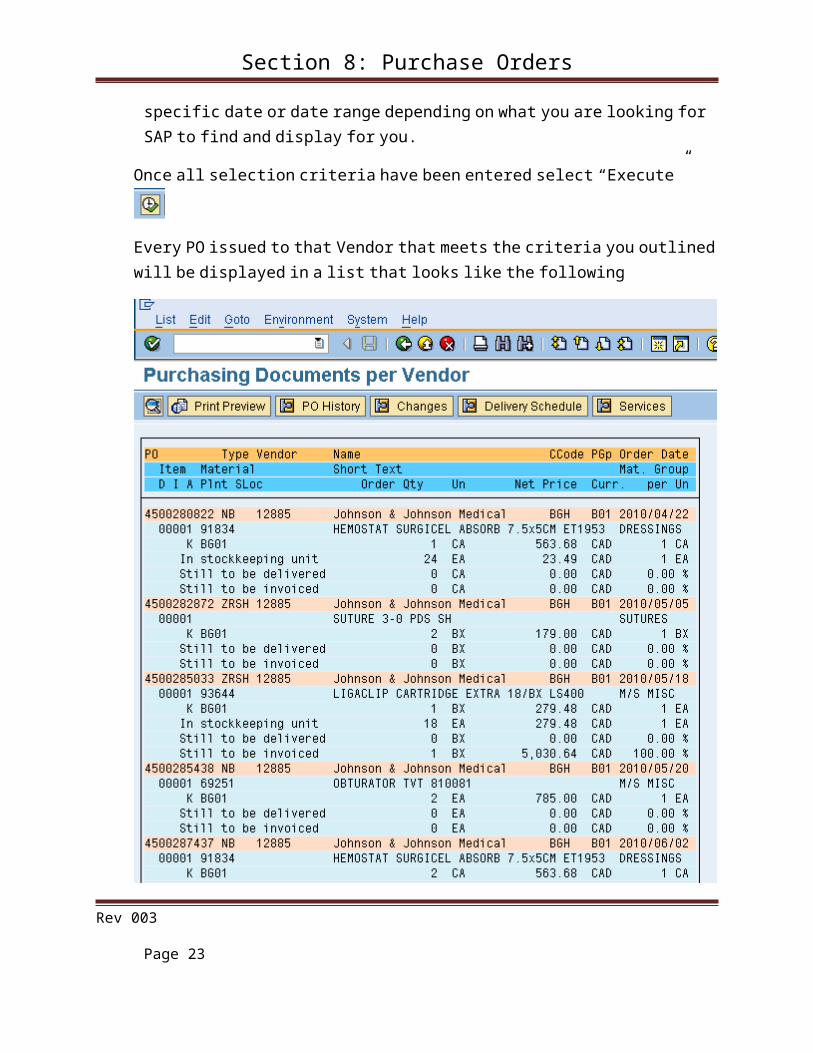
This Search will provide you a list of all purchase orders for the Vendor you entered in the top field titled “vendor”. You can add other selection criteria such as Plant, Purchasing Group or a specific date or date range depending on what you are looking for SAP to find and display for you.
Once all selection criteria have been entered select “Execute”
Every PO issued to that Vendor that meets the criteria you outlined will be displayed in a list that looks like the following
Rev 003
Page 20
Section 8: Purchase Orders
Once you see the PO you wish to view, double click on the PO and it will take you into that purchase order in display mode.
D. Search for a purchase order by Tracking Number - ME2B – If a tracking number is entered in your purchase order you can search by it to find the corresponding Purchase order. See BPP_MM PUR DOCS PER TRACKING NUMBER (ME2B) for procedural steps to execute.
E. Search by Account Assignment - ME2K - See BPP_MM PURCHASE ORDER BY ACCOUNT ASSIGNMENT (ME2K) for procedural steps to execute.
Rev 003
Page 21
Section 8: Purchase Orders
F. Search by Material Group - ME2CUse this function to view purchase orders by Material Group. Use the above BPP as how to complete this search. Only difference is choosing a Material Group.
8.7 Clipboard Use for Text
Instead of using Standard Text you can set up 5 standard Clipboards to pull into your purchase orders. Clipboards created are only available for use by the user that created them.
To create a clipboard:
When you have Continous Text display box open go to “Goto>User Clipboard>Clipboard 1”. It will open a new text box headed “Change Clipboard 1. You can type any details you want on the screen. Then “Save” document. Double click in the Header (Must have vendor).
When you want to use in future go to “Include>Storage system>user clipboard> clipboard 1 or any of the other clipboard numbers. The details in clipboard will populate on the Header note section.
8.8 Properly Closing a Purchase Order
It is the buyer’s responsibility to run reports for any open orders. When an order is found and no more goods receipts or invoice receipts are expected then the buyer needs to correctly close the order.
When a line item is open for goods receipt and no longer needed to close this go to the “Delivery” tab of the item details section and click “Delivery complete” box. This will close the line item and keep the requisition closed.
When a line item is open for invoice receipt and we will not be getting one you need to manually fix this. Go to “Invoice” tab in the item details section and click on the “Final Invoice” tab. This will close the order.
Rev 003
Page 22
Section 8: Purchase Orders
8.9 Purchase Order Output (Print/Fax) and EDI - ME9F
Once a purchase order is created you will need to then output that purchase order to the Vendor. The possible output choices are 1) print a hardcopy (NEU1); 2) Fax using the SAP system called autofax (FAX) and 3) send via EDI (NEU). The options available for output will depend on the capabilities of the Vendor and SAP will be set up to provide the output options allowable for that vendor’s capabilities.
Use this function to choose how you are going to transmit your purchase document to the vendor -See BPP_MM MESSAGE OUTPUT PURCHASE ORDER (ME9F) for procedural steps to execute.
To determine if the Purchase Order was successfully faxed, execute the following process:
Go to Business Workplace.
Go to Documents.
Go to Outbox.
Review all documents by date. All red boxes should be investigated and corrected. Vendor Master changes should be generated for any incorrect fax numbers.
8.10 Reprinting a Purchase Order
8.10.1To Reprint a PO That Has Not Been ChangedOpen PO in change mode
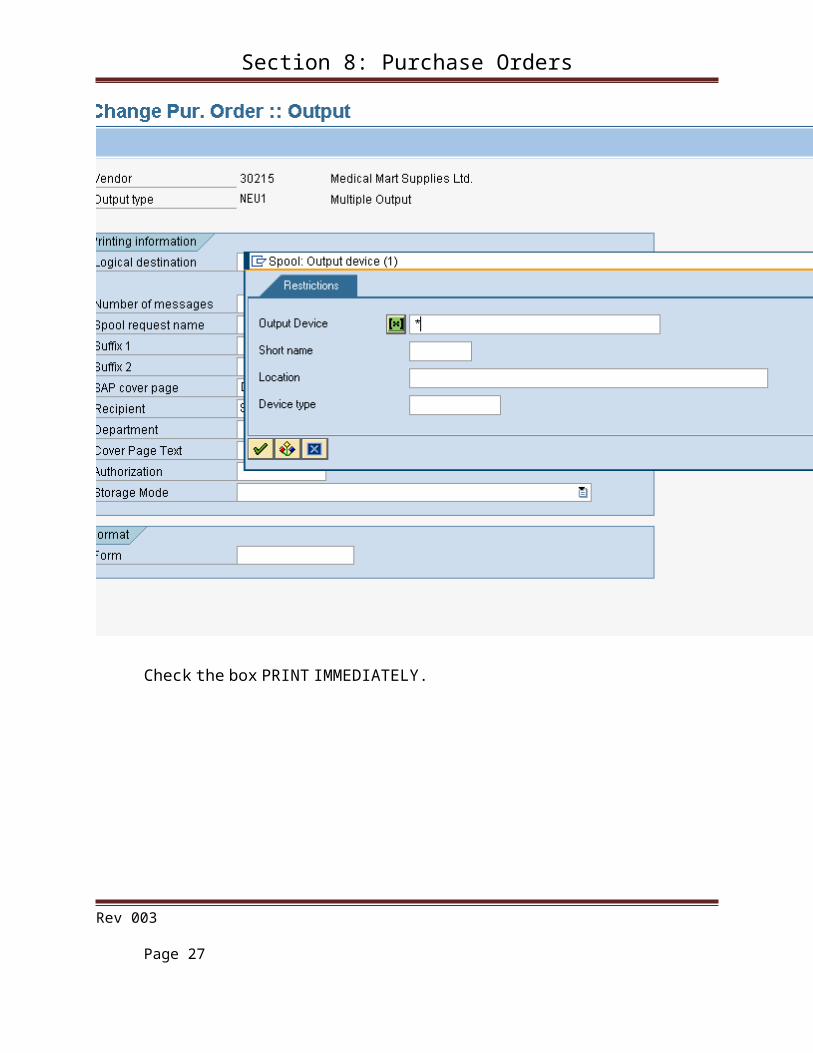
Go to messages Pick an output line . Input NEU1 and Print Output Save Can be put in yellowed line if available. Display Pur. Order :Output Input into LOGICAL DESTINATION * , then select your printer.
Rev 003
Page 23
Section 8: Purchase Orders
Check the box PRINT IMMEDIATELY.
Rev 003
Page 24
Section 8: Purchase Orders
Enter green check and green arrow back Then save The PO should be printing. These steps must be followed twice to print a PO in its entiretyThe first print will print only changes. The second print will print the entire changed PO.
8.10.2. To Reprint a PO That Has Been Changed
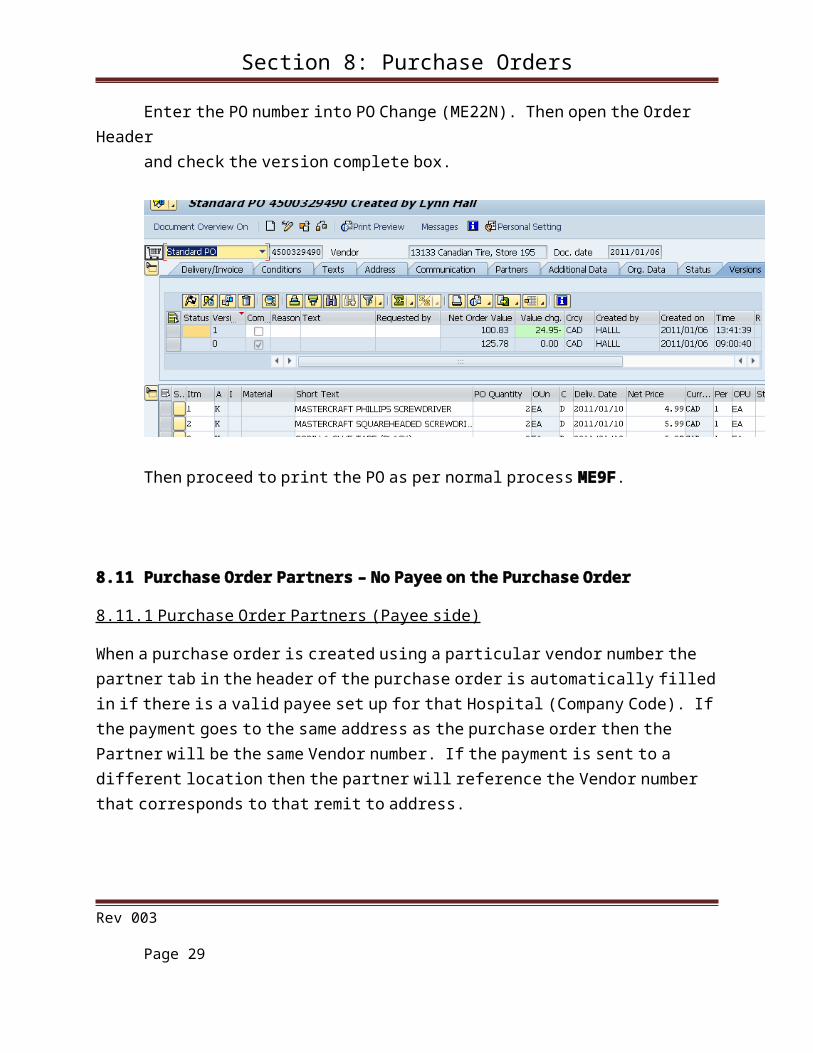
The Purchase Order must be completed prior to reprinting. To reprint the PO, Enter the PO number into PO Change (ME22N). Then open the Order Header and check the version complete box.
Rev 003
Page 25
Section 8: Purchase Orders
Then proceed to print the PO as per normal process ME9F.
8.11 Purchase Order Partners – No Payee on the Purchase Order
8.11.1 Purchase Order Partners (Payee side)
When a purchase order is created using a particular vendor number the partner tab in the header of the purchase order is automatically filled in if there is a valid payee set up for that Hospital (Company Code). If the payment goes to the same address as the purchase order then the Partner will be the same Vendor number. If the payment is sent to a different location then the partner will reference the Vendor number that corresponds to that remit to address.
If a purchase order is created using a purchasing vendor where the payee side is not created for that particular hospital then the partner tab will remain blank.
When it is noticed that the partner does not automatically fill in then the buyer needs to complete a vendor master request form and send it to 3SO to have the payee side created or extended. Once this is done, all purchase orders already created for the Vendor will need to be updated by purchasing using the process below. For all future purchase orders using that Vendor the correct Partner should automatically populate in the partner tab of the PO header.
8.11.2 Adding a Partner to a Purchase Order
Rev 003
Page 26
Section 8: Purchase Orders
How to add a partner into a purchase order after 3SO has extended the payment side of a vendor:
Go to purchase order change (ME22N) and enter purchase order number:
In purchase order header, select the Partners Tab - the screen should look blank - see below:
Go to 1st line and add the following:
Under Funct - select PI from the drop down list:
Rev 003
Page 27
Section 8: Purchase Orders
Next enter the SAP vendor number in the Number field and hit enter - SAP should fill in the Vendor Name automatically:
Next, save the purchase order and advise A/P that it is ready to be processed.
8.11.3 Updating all Purchase Orders with the Correct Partner by Vendor
Rev 003
Page 28
Section 8: Purchase Orders
Once it is identified by AP that a Vendor did not have a valid partner and it is requested to be created or extended, all purchase orders created prior to the system update will need to be corrected manually. The following process explains how to clean up by vendor:
Use transaction code ME2L to run a list of all purchase orders created for that particular


![CONTRACT FOR CRUDE BLCOseacbc7aad7115c8f.jimcontent.com/download/version... · Web view2011-11-12 · COST INSURance FREIGHT. sale purchase contract (CIF [PORT]) crude oil. Sale](https://static.documents.pub/doc/80x56/5b3363ae7f8b9a2c0b8d4c08/contract-for-crude-b-web-view2011-11-12-cost-insurance-freight-sale-purchase.jpg)


