41
SESSION TWO DATA COLLECTION
| Date post: | 23-Dec-2015 |
| Category: |
Documents |
| Upload: | beatrice-fitzgerald |
| View: | 214 times |
| Download: | 0 times |

SESSION TWO
DATA COLLECTION

1. LocationsLocations are the start of your data collection. Every piece of equipment must exist somewhere. So, in the data collection sheet there is a column for Location Code. This code MUST exist in the location list. The location list must include any place you would perform maintenance. If you want someone to be able to submit a work order for an issue in a location, that location NEEDS to be in this list.
2. Equipment Your equipment list will consist of any type of asset you maintain. This may vary from conveyor equipment to vehicles to fire sprinklers to sinks and drinking fountains. If it can broken or repaired or put on a work order for any reason, you want it in this list. There is a column here to place the location code in which this equipment exists and that code MUST be on your location sheet.
3. PM Request Codes 4. PM Schedules

In Sprocket, all work orders regardless whether they are preventive or corrective MUST have a request code. This is a code that carries the values that will be placed on the work order when it generates. This would include the procedures for the PM, estimated hours to complete the work, and any other consistent information with this PM such as responsible supervisor, employee or shift (if applicable).
Once all the equipment, location, and PM request code data is complete, you can begin compiling your PM schedules. You will organize the equipment list by equipment system (i.e., slider bed conveyors, right angel transfers etc.) and give each asset a start date or ‘next due date’ and an interval such as Quarterly or Annual for scheduled maintenance. Let’s say an asset has multiple schedules such as a monthly, semiannual, and annual PM. The asset would have three line items on the PM schedules sheet-one for monthly, one for semiannual, and one for annual. Each schedule MUST have its own PM request code with specific instructions for this scheduled PM. The request code MUST exist in the PM Request Codes list. The equipment on the PM MUST exist in the Equipment list and MUST have a location that exists in the Location list.
When all this information is uploaded into Sprocket and PMs begin generating, Sprocket will generate the PM which will have the asset attached to it. The asset will automatically pull in the location it exists in based on what was uploaded from the Equipment data template. The PM will automatically pull in the PM procedures and estimated hours to complete based on what was uploaded from the request code data template. The PM will generate based on the schedule mapped out in the PM schedule template.
OverviewUpturn will provide templates to populate your facility Locations, Equipment, Shops/Crafts, People/Groups, Request Codes, Preventive Maintenance Procedures/Schedules, and Inventory. This session will provide guidance on best practices for collecting information and what procedure to follow during the data collection process.
SECTION ONEData Collection Overview

Data Collection – Accounting Codes• Accounting Codes- Used for financial reporting and tracking. You can specify Account
Codes on the following objects: Request Codes, Purchase Requests, Locations, Equipment, People, Shops, Customers, Time and Material Transactions
• Account Code Name- Unique identifier for the accounting record
• Description- Short Description of the Accounting Record
• Code- Corresponding Code for the Accounting record that can come from a third party accounting system.

Data Collection – Event Accounts• Event Accounts- Event Accounts are records that are set up for different types
of events, such as Football games, concerts, etc. The Event Account table can be also used for another segment of an accounting string if needed.
• Examples: Sporting events, concerts, conferences, etc.
• Name- Unique Identifier of the Event Account Record
• Description- Short Description of the Event Account record that could help with searching and displaying of the account.

Data Collection – Project Accounts• Project Accounts- Project Accounts can be used to track the material and labor for a given
project. You are able to place a Project Account onto any type of Work Orders and Purchase Requests for a specified project. These Accounts can also have a specified Vendor to tie material and labor costs back to as well. If Project Accounts are not needed, then you can use the Project Account Table to house other records, such as another segment to an Accounting string.
• Name- Unique Identifier for the Project Account record
• Description- Short Description of the Project Account record to help search for and display throughout the system
• Vendor- You can specify a Vendor on a Project Account. The Vendor needs to already exist in the Sprocket database. *See “Vendor” data collection spreadsheet
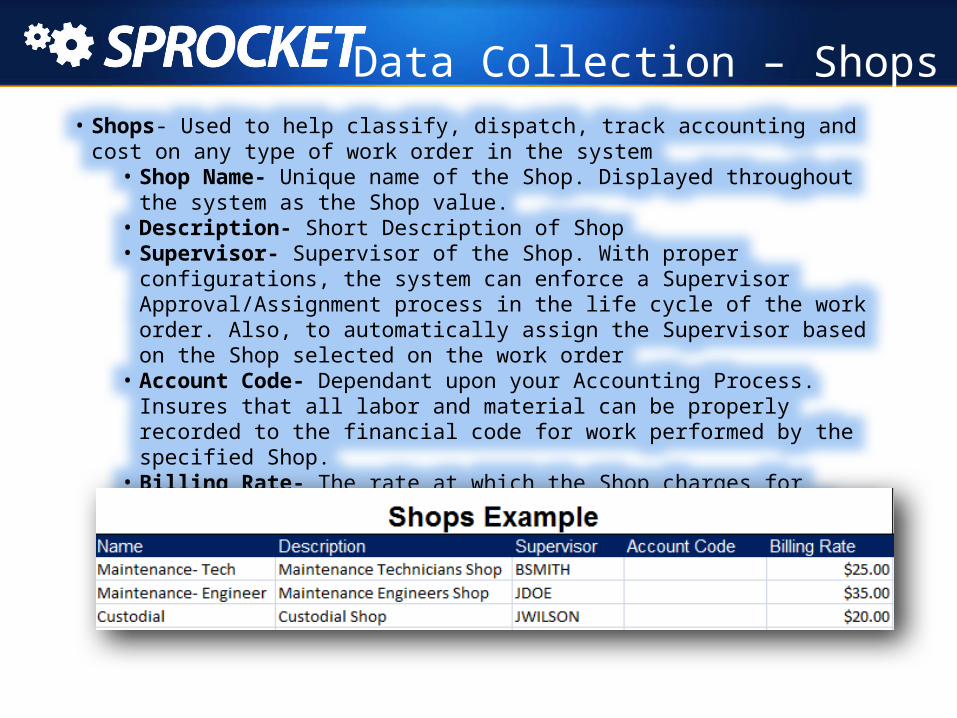
Data Collection – Shops• Shops- Used to help classify, dispatch, track accounting and cost on any type of work order in
the system• Shop Name- Unique name of the Shop. Displayed throughout the system as the Shop
value.• Description- Short Description of Shop• Supervisor- Supervisor of the Shop. With proper configurations, the system can enforce
a Supervisor Approval/Assignment process in the life cycle of the work order. Also, to automatically assign the Supervisor based on the Shop selected on the work order
• Account Code- Dependant upon your Accounting Process. Insures that all labor and material can be properly recorded to the financial code for work performed by the specified Shop.
• Billing Rate- The rate at which the Shop charges for hourly labor. Setup during site configuration and allows you to bill from Shop or Craft.

Data Collection – Crafts• Crafts- Also known as “Trades”, can be used to help classify, dispatch and track costs
on any work order in the system• Craft Name- Unique name of the Craft. Displayed throughout the system as the
Craft value.• Description- Short Description of Craft• Billing Rate- The rate at which the Craft charges for hourly labor. Setup during
site configuration and allows you to bill from Shop or Craft.

Data Collection - Priorities• Priorities- Used to apply an importance/urgency of submitted or generated work
requests. By utilizing the SLA Number and Interval values, you can establish an “End Date”(aka Target Comp Date) based off of the Create Date or Date Opened or Target Start, then adding the S specified SLA. For Example, if I created a work order on 12/27, that had a Priority with a SLA Number of 3 and Interval of Calendar Days, the “End Date” would automatically calculate to 12/30.
• Priority Name- Unique name of the Priority. Displayed throughout the system as the Priority value.
• Description- Short Description of Priority
• SLA Number- The number that is used to calculate in conjunction with the interval to establish the End Date

Data Collection - Priorities• SLA Interval- Defines the parameter of the SLA calculation in conjunction with
the SLA number to establish the End Date• Hours• Calendar Days• Business Hours
• Based off Company working Schedule• Business Days
• Based off Company working schedule• First Day of Month
• Calculates End Date as the First Day of the next calendar month• Last Day of Month
• Calculates End Date as the Last Day of the current calendar month

Data Collection – Work Types• Work Types- Used to categorize type of work within a given work order. For
example, I could have a Request Type of “Work Order” that could be specified with a work type of Corrective Maintenance or Repair or Routine or Project or Safety, etc… This provides more detail to the work order to allow for more defined dispatching and reporting
• Work Type Name- Unique name of the Work Type. Displayed throughout the system as the Work Type value.
• Description- Short Description of the Work Type.

Data Collection - Vendors• Vendors- Used for Inventory Purchasing. Also for Contractors, which can be added as a Vendor
record and then tied to corresponding People records.
• Vendor Name- The unique identifier of the Vendor/Contractor• Description- Short Description of the Vendor/Contractor• Customer Account- The Account that your organization may be for that particular
Vendor/Contractor• Address 1- Address of Vendor• Address 2- Additional Address of Vendor• City- City of where the Vendor/Contractor resides• State/Province- State or Province of where the Vendor/Contractor resides• Postal Code- Postal code for Vendor/Contractor• Country- Country of where the Vendor/Contractor resides• Phone- Primary Phone number for the Vendor/Contractor• Email- Primary Email for the Vendor/Contractor• Fax- Primary Fax Number for the Vendor/Contractor

Data Collection – People•People- The People records in Sprocket are people/objects/vendors/contractors that will ever be in Sprocket for any of the following ways; to submit requests, to submit work orders, be assigned to work orders, track labor, mange the site or access it for any reason. But note that not all users need to be active. You can have People records in the system to track work performed and/or labor & materials for reporting purposes without that user ever logging in. For example, if I had a project in Sprocket setup and had outside contractors perform the work, I would put in those Contractors in as people with the Active checkbox set to False, so I could assign work orders, time and materials towards that Contractor for reporting and record keeping purposes.
• Username- Unique identifier of the Person record. The Username will be the value displayed in the Person fields throughout the system, i.e.- Employee, Supervisor, Requested By, etc.
• First Name- The first name of the person record
• Last Name- The last name of the person record
• Title- The position/role in the organization and/or Sprocket management
• Email- User’s email address that will be used for any notifications that will be sent through Sprocket

Data Collection – People Continued
• Phone #- Phone number, Pager Number, or extension of the user record.
• Group- Security Group assigned to the user for access and role in the Sprocket System
• License- Purchase Sprocket License for access into the System. This is dependent on the agreed upon contract.
• Mobile- Access only to the Mobile Application.
• User- Full User access to the system, depending on the role of the user in the organization.
• Web Requestor- Unlimited License Availability. Restricted access to Sprocket to only submit and review submitted work requests.

Data Collection – People• IsEmployee?- True or False flag to allow the assignment of work orders to the User
• IsSupervisor?- True or False flag to allow the user to be assigned as the Supervisor on a Shop and/or Work Order
• IsRequestedBy?- True or False flag to allow the user to be the Requested By on any type of work order
• Active?- True or False flag to allow the user to be considered Active in the system. If marked as False, user will not be able to log into the system.
• Supervisor- The user’s Supervisor/Manager within the organization
• Vendor- The entity of which the user may be tied. For example, the user maybe a contractor that is from ABC Electric. You would tie the user to the ABC Electric Vendor record that you created previously.
• Wage Rate- The Salary or Hourly rate at which the employee’s labor is tracked
• Shop- The Shop(s) that the user is tied to
• Craft- The Craft(s) that the user is tied to

Data Collection – Customers
• Customers- Customers can be defined as a client or someone who requests services from you and your company.• Customer Name- Unique Identifier for the Customer record• Description- Short Description of the Customer Record• Account Code- The Account Code that is specified for any material and/or time transactions
on that Customer record• Billing Code- Also known as the Billing Multiplier for materials and time specified for the
Customer Record• Address 1- Physical Address of the Customer record• Address 2- Secondary Address for the Customer record• City- The City of which the Customer resides• State/Province- State or Province that the Customer resides• Postal Code- Zip Code or Postal Code for the Customer record• Phone- Contact Phone number for the Customer record• Email- Contact Email for the Customer record• Fax- Fax Number for the Customer record

Hierarchy Data CollectionThe next 2 Data Collection templates will ask to put the data together hierarchical format to build out the Location structure and Equipment System classifications. Locations and Equipment Systems are design to support a Parent/Child relationship to allow for easy management, ease of use, reporting and other features in the system. For example, you could setup Automatic Dispatching to “John Doe” for anything created with “Building 1” or its Children Locations with one Dispatching Rule. Also, for reporting on any Equipment that was tied to the “HVAC121:Air Dist. System” or its Children.
Building 1
Floor 1
Floor 1: Room 101
Floor 1: Room 102
Floor2
Floor 2: Room 201
HVAC121:Air Dist. System
HVAC121-10: AHU
HVAC121-1010: AHU 3
to 24 Tons
HVAC121-1011: AHU
25 to 50 Tons
HVAC121-12: Fan Coil Unit

Data Collection - LocationsLocation- Locations are a Parent child structure of your facility locations. This is typically designed in a
building, Floor, and Room Structure. In a Manufacturing facility your location may be zone, stations etc…. The amount of detail that your Location structure needs depends on your operational and reporting goals with your company. If you would like to report on specific stations/rooms, or would like to have specific locations for your equipment, you may need be more detailed in the breakdown of your Location Structure.• Location Parent - This the “Parent” to other Location(s) For Example:
• WLC Master. (Top Level Parent)• BLDG1 (Parent Location = WLC Master)
• Floor 1 (Parent Location = BLDG1)• Room 101 (Parent Location = Floor 1)

Data Collection - Locations
• Location Identifier - This is a hard coded Unique Name that Identifies your location(s) For Example: BLDG1, BLDG2, BLDG3, BLDG4, etc. Note: Since these names can grow exponentially, you will want to keep the naming simple, yet easy to identify the meaning. Admin Building Floor 1, Room 102 would be BLDG1-FL1-102
• Location Name - This is the actual Name of your Location(s) For Example: BLDG1 or Building 1 = Location Description of “Admin Building”, BLDG2 or Building 2 = “Food Court”, BLDG3 = “Science Building”, etc.
• Location Description - Is the Description of the actual Name of your Location(s) - Name and Description are very similar, however; Description can describe the actual room e.g. Admin Office 103 - VACANT or Admin Office 104 is a Conference Room.
• Account Code- You can tie an Account Code to specific locations for Billing and/or Accounting for Time and Materials spent on those locations.

Data Collection – Equipment Systems
Equipment Systems- Equipment Systems or also known as classifications, are used to setup the relationship between the Equipment records and appropriate procedures(Request Codes) in Sprocket. By setting up the Equipment Systems in a hierarchy, this allows you to easily report on and manage the records. Please review the examples on the data collection spreadsheet.• Equipment System Parent- The “Parent” of the subsequent Equipment System records• Equipment System Name- The Unique Identifier of the Equipment System record.• Equipment System Description- Short Description of the Equipment System record to
easily search and display throughout the system.

Data Collection – EquipmentEquipment
Can be specified as A/C units on the roof to the conveyor out on the production floor
Collect the equipment that your facilities department is responsible for maintaining and equipment that they may care to report on, in or outside, your facility.
Equipment details can be important to the facilities’ goals for preventive maintenance, work order tracking, capital asset management and forecasting. Its important gather all the information needed to fit your facilities’ goals.

Data Collection - EquipmentThe following fields are available, but not limited to, for data collection:
• Equipment Identifier - This uniquely identifies the piece of equipment• Equipment Description - Short Description of the piece of equipment• Equipment System - This identifies the system the piece of asset belongs to and also
can be used to classify the asset to relate it to standard PM Procedure.• Equipment Type – Generic classification/grouping of the piece of equipment. More
than 1 equipment can share the same type.• Attribute Sub Type – Helps classify the equipment into a more define category that
can be used for reporting, preventive maintenance and creating custom fields to show/hide for that classification.• Location- NOTE - This column needs to match exactly to your Location Identifier from
your Location Data Collection Spreadsheet• DeviceID – Secondary asset identifier that can be used help match to an existing
nameplate number• Manufacturer – Manufacturer name that assembled/constructed the Equipment• Model – Manufacturer’s classification of the asset• Serial – Unique sequence of numbers and/or letters established by the manufacturer

Data Collection - Equipment• Account Code – Dependant upon your Accounting Process. Insures that all labor
and material can be properly recorded for financials on that piece of equipment. Tied back to the Account Code table.• Purchase Date - Date Equipment was Purchased• Purchase Price - Price of Equipment when Purchased• Replacement Cost - Current Estimated Cost to Replace Equipment Item, that
includes the estimated labor and materials to install the piece of equipment.• Warranty Expiration Date - Date Equipment Warranty Expires• Install Date - Date the Equipment was installed in your facility

Data Collection – Request Types• Request Types- Used to categorize different types of work and provide the ability to
specify a unique work flow for that type of work. For example, the status progression of a Routine Work Order may differ from the status progression of a Preventive Maintenance work order. By separating the two by Request Type, this allows you to customize the work flow uniquely for each.
• Request Type Name- Unique Identifier of the Request Type record• Description- Short Description of the Request Type and intended workflow• Requires Supervisor Approval?- True or False flag that will carry this
configuration down to all Request Codes under the given Request Type. When Checked, this will force any work order using this Request Type to require a Supervisor or Assistant Supervisor on the work order to Approve or Deny the work order before any progression can be made.

Data Collection – Request Types
• Requires Supervisor Assignment?- True or False flag that will carry this configuration down to all Request Codes under the given Request Type. When Checked, this will force any work order using this Request Type to require a Supervisor or Assistant Supervisor on the work order to Assign the work order before any progression can be made.
• Default Open Status- The Status you want this Request Type to be in upon creation. For example, when a Work Order Request Type is submitted, I want the status to say “Waiting For Assignment”.

Data Collection – Request Codes• Request Codes- These are the templates for the work orders for their respective Request
Type. Used to help categorize predefined work activities that may be generated or submitted. The data collection template will come with examples of Service Request and Work Order Request Codes. Please feel free to use the examples, make adjustments or create your own.• Request Name- Unique Identifier of the Request Code record• Description- Short Description of the Request Code record to make searching easier
and to display throughout the system.• Request Type- The Request Type you want the Request Code to fall under for status
progression and work flow. • Estimated Hours- Estimated Time, start to finish, that it will take to complete the job
for the Request Code record. This includes gathering supplies, performing the work and closing out.
• Procedure Hours- Estimated Time to complete just the job procedure for the Request Code
• Estimated Material Cost- The estimated material cost to complete the job for the Request Code

Data Collection – Request Codes
• Account Code- The accounting code specified that all labor an/or material will need to be accounted for on the work orders that use the Request Code. Tied back to the Account Code table.
• Project Account- Tied back to the Project Account table if the Request Code is used for a Project.
• Event Account- Tied back to the Event Account table if the Request Code is used for Events
• Action Log- Tied back to the Action Log table for automatic assignment to the specified Action Log of any work order that uses the Request code.
• Craft- Tied back to the Craft table. This will auto-populate on any work order that uses the Request Code.
• Equipment System (Preventive Maintenance)- Tied back to the Equipment System table to classify the Request Code to the appropriate equipment classification for Preventive Maintenance. Primarily used for Preventive Maintenance Request Codes.
• JobPlanInterval (Preventive Maintenance)- The interval number that ties in with the JobPlanRecurrence to calculate a schedule for the Request Code.

Data Collection – Request Codes
• JobPlanRecurrence (Preventive Maintenance)– The recurrence type that ties in with the JobPlanInterval number to calculate a schedule for the Request Code. For example, Daily, Weekly, Monthly and Yearly. With a JobPlanInterval number of “3” and JobPlanRecurrence of “Monthly”, you would have a Quarterly PM Request Code.
• Shop- Tied back to the Shop table. This will auto-populated on any work order that uses the Request Code.
• Priority- Tied back to the Priority table. This will auto-populated on any work order that uses the Request Code.
• Work Type- Tied back to the Work Type table. This will auto-populated on any work order that uses the Request Code.
• Supervisor- Tied back to the People table for users that are flagged as “Is Supervisor”. This will auto-populate on any work order that uses the Request Code.
• Employee- Tied back to the People table for users that are flagged as “Is Employee”. This will auto-populate on any work order that uses the Request Code.

Data Collection – Request Codes
• Requires Supervisor Approval?- True or False flag that will force the work order using the Request Code to have a Supervisor or Assistant Supervisor that is on the work order Approve or Deny before any other progressions can be made.
• Requires Supervisor Assignment?- True or False flag that will force the work order using the Request Code to have a Supervisor or Assistant Supervisor that is on the work order Assign it before any other progressions can be made.
• Is PM Request?- True or False flag that will make the Request Code available when creating Preventive Maintenance Projects.
• Comments- Free Text box that allows you enter any comments or procedures for the Request Code to have them auto-populate on any work order that uses that Request Code. Typically used for Safety and PM Procedures for Preventive Maintenance Work Orders.

Data Collection – Inventory Storerooms
Storerooms- These are locations that you will keep stocked materials, such as Warehouses, closets, carts, trucks, etc…• Storeroom Name- Unique Identifier of the Storeroom record• Storeroom Description- Short description of the Storeroom record.

Data Collection – Inventory Items Details
Inventory Items- These are Inventory Items that your facility will keep in stock at one of the specified Storerooms. Storeroom Name- Tied to the Storeroom table. This the Storeroom(s) that the item will reside in. One
inventory item can be located in multiple storerooms with different stock counts and reorder points. Please create multiple rows for these items in the spreadsheet.
Product Identifier- The Unique Identifier of the item with in Sprocket. Inventory Item Description- Short Description of the inventory item record. This description will be
used throughout the system for searching and displaying. Order UOM- The unit of measure for ordering the inventory item. Issue UOM- The unit of measure at which you issue the item out as. Last Or Current Cost- The last or current cost of the inventory item on a per unit basis. Storeroom Abrv.- Abbreviation of the Storeroom Name above for creating the Storeroom location
record. Cabinet (Segment 1)- The first segment of the Storeroom Location of the Inventory Item.
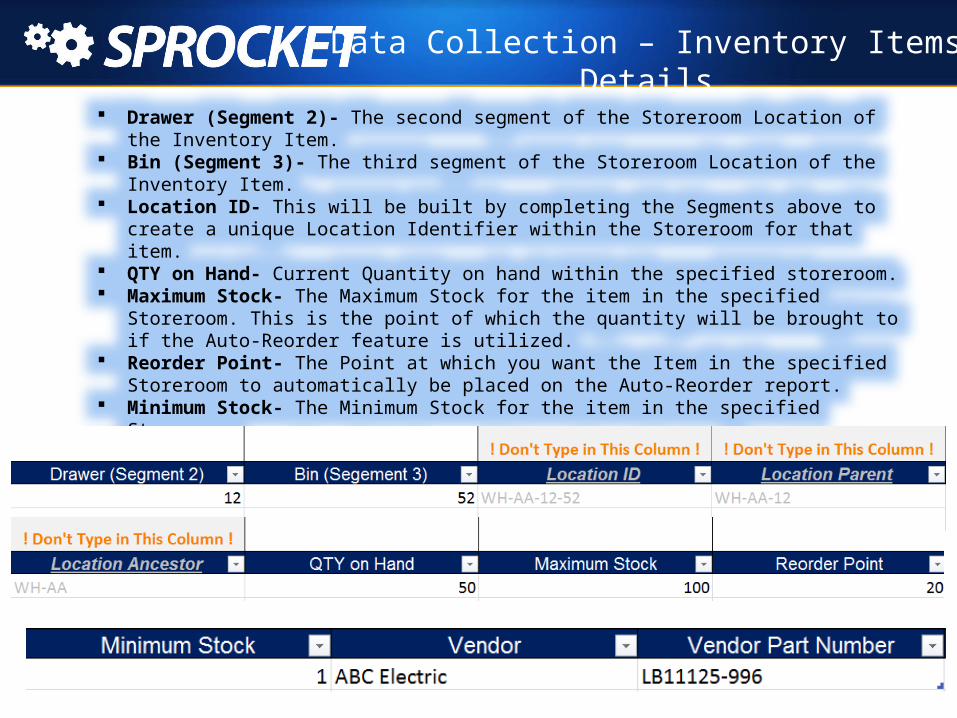
Data Collection – Inventory Items Details Drawer (Segment 2)- The second segment of the Storeroom Location of the Inventory Item. Bin (Segment 3)- The third segment of the Storeroom Location of the Inventory Item. Location ID- This will be built by completing the Segments above to create a unique Location Identifier
within the Storeroom for that item. QTY on Hand- Current Quantity on hand within the specified storeroom. Maximum Stock- The Maximum Stock for the item in the specified Storeroom. This is the point of
which the quantity will be brought to if the Auto-Reorder feature is utilized. Reorder Point- The Point at which you want the Item in the specified Storeroom to automatically be
placed on the Auto-Reorder report. Minimum Stock- The Minimum Stock for the item in the specified Storeroom. Vendor- The preferred Vendor used to purchase the Inventory Item from. If the item can be purchased
from multiple Vendors, please add column headers on the Spreadsheet to specify the other Vendors and their respective Part Number.
Vendor Part Number- The Vendors unique identifier for the Inventory Item.

Data Collection Advanced Dispatching and Action Logs
Action Logs- can be setup by creating Logs that have the option of assigning a Supervisor and/or Employee to. Once Logs are created, the rules then can be setup to pick-up certain criteria on the work orders upon creation and automatically put them in that specified log.• Action Log Name- The Unique Identifier of the Action Log record• Description- Short Description of the Action Log record for displaying
throughout the system• Employee- The Employee value that you want any type of work order to be
assigned to when the Action Log is selected through the Request Code or Dispatching Action Log Rules.
• Supervisor- The Supervisor value that you want any type of work order to be assigned to when the Action Log is selected through the Request Code or Dispatching Action Log Rules.
Data Collection – Action Log Dispatch Rules
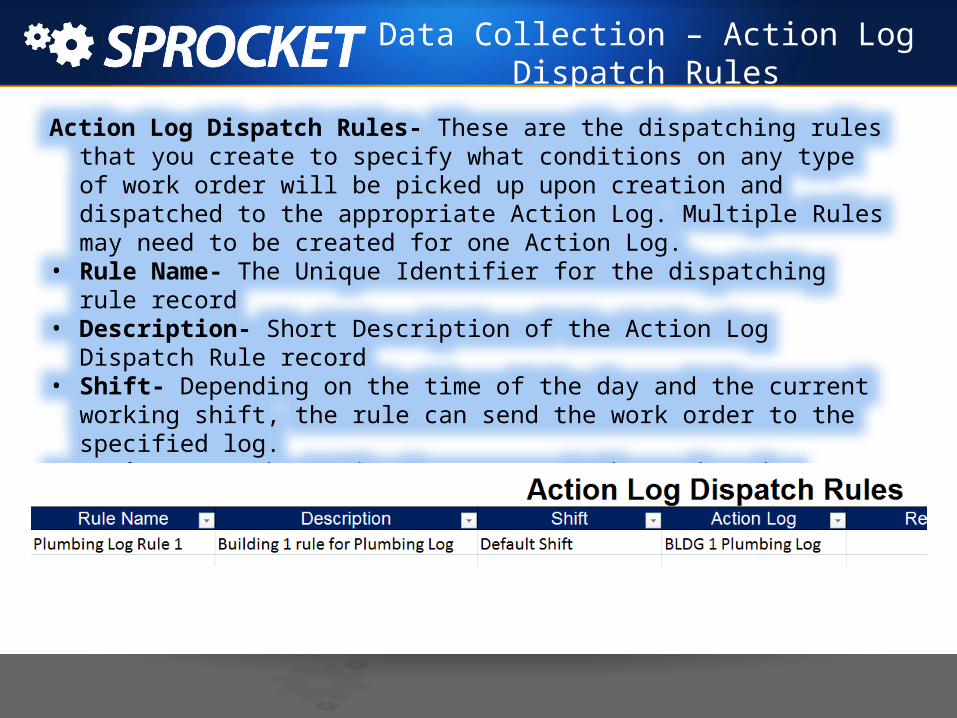
Action Log Dispatch Rules- These are the dispatching rules that you create to specify what conditions on any type of work order will be picked up upon creation and dispatched to the appropriate Action Log. Multiple Rules may need to be created for one Action Log.
• Rule Name- The Unique Identifier for the dispatching rule record• Description- Short Description of the Action Log Dispatch Rule record• Shift- Depending on the time of the day and the current working shift, the rule can
send the work order to the specified log.• Action Log- The Action Log you want the work order record to go to when the
conditions are met on the Action Log Dispatch Rule.

Data Collection – Action Log Dispatch Rules
The following values are available for creating a Dispatch Rule:
• Request• Customer• Account Code• Shop• Craft• Equipment• Location• (Location) Include Children?• Work Type

Data Collection – Email Notifications
Email Notifications- These are the email notifications that can be sent from Sprocket to notify the appropriate users of any Save Event in Sprocket. In order for the notifications to be delivered, the users have to be in the system and have valid email address on their record, with the exception of Contacts that can be written in on the Work Order upon creation.
• Type- Distinguishes whether the email notification was a System Default or Custom during the implementation process.
• File Name- The unique name of the email document.• Condition- Describes the actions/conditions that would cause the email to evaluate and send
the notification to the appropriate users.

Data Collection – Email Notifications
• Subject Line- What you want the Subject Line in the Email to state for the email notification.• PDF Attachment- True or False flag that allows you to choose if you want the email to be sent
with a PDF Attachment.• ActionLog.Employee- When set to True, the email will send to the Employee on the Action Log
specified on the Work Order.• ActionLog.Supervisor- When set to True, the email will send to the Supervisor on the Action
Log specified on the Work Order.• ParentWorkOrder.Person- When set to True, the email will send to the Person Asset on the
Parent Work Order of the Project.• ParentWorkOrder.RequestedBy- When set to True, the email will send to the Requested By on
the Parent Work Order of the Project.

Email Notifications Continued
• ParentWorkOrder.Supervisor- When set to True, the email will send to the Supervisor on the Parent Work Order of the Project.
• ParentWorkOrder.Employee- When set to True, the email will send to the Employee on the Parent Work Order of the Project.
• Request.Supervisor- When set to True, the email will send to the Supervisor specified on the Request Code for the Work Order.
• Request.Employee- When set to True, the email will send to the Employee specified on the Request Code for the Work Order.
• Person- When set to True, the email will send to the Person Asset specified on the work order.
• RequestedBy- When set to True, the email will send to the Request By specified on the work order.
• ContactIdentifier- When set to True, the email will send to the Contact Identifier specified on the work order.

Email Notifications Continued
• Supervisor- When set to True, the email will send to the Supervisor specified on the work order.
• Employee- When set to True, the email will send to the Employee specified on the work order.
• WorkOrderStatus.ApprovalGroup- When set to True, the email will send to all users that are in the specified Approval Group for the Status Type of the work order
• Group- Allows you to specify a specific user or Group that you want the email to send to when email evaluates .

Data Collection
You have now learned how to prepare your Data for Import into Sprocket. In Session 3 you will learn Work Order Grid and Form Layouts. If you have further questions, please contact your Sprocket Consultant.


