Website: www.warriorsystem.com Created April 9, 2007
Windows® is a registered trademark of Microsoft Corporation in the United States and/or other countries. All other product names are trademarks of their respective companies.
Table of Contents INTRODUCTION ................................................................................................................................................ 6
1 WARRIOR SOFTWARE INSTALLATION ................................................................................................................. 6 1.1 Distribution Media ........................................................................................................................ 6 1.2 New Installation Warrior Software from CD ................................................................................ 6 1.3 Warrior CD will not self start or autorun ................................................................................... 13 1.4 Setting up a Short Cut to Windows Explorer on the Desktop...................................................... 13 1.5 Warrior Shortcut Icon ................................................................................................................. 15 1.6 Loading Drivers for Warrior Hardware ..................................................................................... 19 1.7 Key Software Authorization Setup............................................................................................... 24 1.8 Printer Installation...................................................................................................................... 26
1.8.1 Windows XP Printer Installation.............................................................................................................26 1.8.2 Warrior Printer Installation .....................................................................................................................34 1.8.3 Printing to PDF .......................................................................................................................................39 1.8.4 Printing to TIFF.......................................................................................................................................40
5 Setting a Computer Up To Run Warrior
6 Setting a Computer Up to Run Warrior
Introduction The purpose of this article is to aid the first time user in the set up and installation of Warrior 7.0, creating useful shortcuts to be placed on the desktop, loading drivers for Warrior hardware, and installing printers to be used by Warrior 7.0 Software. Warrior software Release 7.0 is a second-generation 32-bit program. The Warrior software is a mature logging environment that stresses ease of use, wide versatility, with a true multi-tasking environment. The Warrior software runs on Windows Operating Systems (Windows 2000, Windows XP, and Windows Vista).
1 Warrior Software Installation
1.1 Distribution Media The Warrior Data Acquisition Software version 7.0 (XXXXXX) or latest is distributed on one CDROM. Or the software is downloadable in the form of a single executable file WAR7CHXXXXXX.exe from the web site http://www.warriorsystem.com/ under DOWNLOADS this file should be copied to a temporary directory and run to expand itself. To install the Warrior software runs the SETUP.EXE.
1.2 New Installation Warrior Software from CD Previous to the installation of the Warrior software we recommend to update the Windows operating system through the Internet connection.
Restart the computer and turn OFF the Interface Panel Power supply Do NOT connect the Warrior Interface Panel to the computer before installing the Warrior 7.0 Software. This could cause problems in the later
installation of hardware drivers. The Warrior Data Acquisition Software CDs are set up to be self loading on most Windows Operating System computers. The Operating system must be any version of Windows 2000, Windows XP, or Windows VISTA. After a fresh restart of the computer, open the CD tray, insert the Warrior Software CD, and close the tray. The Windows Operating System will look for an autorun file on the CD to start the loading procedure. The interactive menu shown in figure 1 should appear. Be sure that the CD player has stopped operating before assuming that the autorun file did not execute. There are several reasons that the autorun file may not execute. The two most like causes are the operating system may have autorun capability shut off or existing software on the computer may not allow software to run directly from the CD. Solutions for these problems will be discussed later.
From the Interactive Menu, click on [Install Warrior 7.0 Software].
8 Setting a Computer Up to Run Warrior
FIG: .2 Warrior 7.0 Version 070322
Click Next to continue with the Setup program. Normally the Warrior Software is not installed in Demonstration mode. Do NOT check the Install for Demonstration / Training box. Click the [Next] button.
FIG: 3 Warrior Software Setup
9 Setting a Computer Up To Run Warrior
The Install Shield Wizard will begin, and bring up the recommendations and copyright warning window. Click on the [Next] button.
FIG: 4 Setup directories
Install to default directory C:\Warrior, Click Next The user may select a directory other than Warrior in which to install the Warrior software. However, the C:\Warrior directory is the standard and is the default. Click the [Next] button.
FIG: 5 Select Directory
10 Setting a Computer Up to Run Warrior
A selection is given for the type of software installation. The installation is the same whether you choose Typical, Compact, or Custom. Click the [Next] button.
FIG:.6 Setup Options
A summary will be shown of the installation options. Click the [Next] Button Fig: 2.5 Shows the choice of setup types available. Typical installs all the available items, Compact installs the minimum set of items and Custom allows you to choose which items to install. For a new installation, select the Typical option. If you wish to install to a directory other than the default (\Warrior), change the Install to entry now (However, this is not recommended). Click on Install to copy the programs, data and other files. Select the Typical option, and then click Next.
11 Setting a Computer Up To Run Warrior
FIG: 7 Setup Ready to install
The Install Shield wizard will now begin the process of installing the Warrior Software onto the computer Click Next to continue.
12 Setting a Computer Up to Run Warrior
FIG: 8 Decompress and install the warrior files
Allow the software to decompress, extract files, and create icons until it is finished. Click the [Finish] button to allow the computer to reboot and finish the installation procedure
13 Setting a Computer Up To Run Warrior
FIG: 9 Setup has finished.
Remove any disk from their drives, and click Finish to complete setup.
1.3 Warrior CD will not self start or autorun Some computers may have the autorun capability turned of so that CDs will not automatically start loading software. Run the file CD-Start.exe from the CD.
1.4 Setting up a Short Cut to Windows Explorer on the Desktop Windows Explorer is very useful when using Warrior software. It can be used to copy or make backups of Warrior Databases to CD, floppy, or external devices. It can also be used to delete older databases to free disk space. To create a short cut on the Windows Desktop, click on the Windows [Start] button. Click on [Programs] then [Accessories]. Windows Explorer will be listed in the Accessories Menu. Right click on [Windows Explorer]. Click on [Send To >]. Finally click on [Desktop (Create Shortcut)]. When Windows Explorer is started, it defaults to the My Documents folder. To move to the Warrior\Data folder, you must click on the “My Computer”, then the “C:\”, then on the Warrior folder, and finally on Data. By modifying the properties of the shortcut, the default can be set to C:\warrior\Data. To modify the default folder, right click on the Windows Explorer shortcut on the Windows desktop, and click on properties.
14 Setting a Computer Up to Run Warrior
FIG: 10 Add Icon Windows explorer The target folder will be highlighted. Click after the existing text in the target box. Add a space and then the text “/e,C:\warrior\Data”. Now click the [Apply] button and then the [OK] button in that order.
FIG: 11 Shortcut
15 Setting a Computer Up To Run Warrior
1.5 Warrior Shortcut Icon Perhaps the easiest way to set up a short cut to a program group is through the use of Windows Explorer All Users .
FIG:12 Explore All Users
On Start Right Click and select Explore All Users
FIG: 13 Select Start Menu\Programs\Warrior 7.0
Documents and Settings” folder and click on the + to the left of that folder. Find the “All Users” folder and click on the + to the left of that folder. Find the “Start Menu” folder and click the + to the left of that. Find the “Programs” folder and click the + to the left of that. Find the “Warrior 7.0” folder and right click on that. Now, click on [Send To>], then click on [Desktop (Create Shortcut)].
16 Setting a Computer Up to Run Warrior
FIG: 14 Send the Shortcut Icon to Desktop
FIG: 15 Copy the Shortcut Warrior 7.0 and Paste to Start Menu
It is recommended that two of the Windows Explorer folder options be changed. From the Windows Explorer menu bar, click on “Tools”. Then click on “Folder Options”.
17 Setting a Computer Up To Run Warrior
FIG: 16 Open the shortcut warrior 7.0 and Select Tools\Folder option
On the “General” sheet, under “Browse folders”, select the “Open each folder in its own window” option. This allows folders, when viewed, to be set up individually
FIG: 17 Folder Options
Next, click on the “View” tab, at the top of the window. You may need to scroll down to find the “Hidden files and folders” options. Select the “Show hidden files and folders” option. Directly beneath that, un-check the box for “Hide extensions for known file types”. Then click the [Apply] button. Finally click the [OK] button to close the Folder Options window.
18 Setting a Computer Up to Run Warrior
FIG: 18 View setup If the user would like the Warrior Group Box to come up on the screen when the computer starts, the shortcut on the desktop can be copied and placed into the Windows Program Startup folder. Minimize Windows Explorer by clicking the [-] of the three icons in the upper right corner. Find the shortcut to Warrior 7.0 on the desktop. Right click on the Shortcut and select [Copy. Reopen Windows Explorer by clicking on it on the task bar. You will need to locate the C :\ Documents and Settings \ All Users\ Start Menu \ Programs Folder where we just found the Warrior 7.0 folder. In the “Programs” Folder, find the “Startup” Folder and right click on it. Select [Paste] to place the shortcut into the Startup folder. Check Use Windows classic Folders open each folder in the same window, and Double click to open an item (single click to select) select Apply and OK.
19 Setting a Computer Up To Run Warrior
FIG: 19 Select View\Toolbars uncheck Standard Buttons, Address Bar, Link, and check Tiles
FIG: 20 Resize the Window and move to right bottom side
1.6 Loading Drivers for Warrior Hardware
Do NOT connect the Warrior Interface Panel to the computer before installing the Warrior 7.0 Software. This could cause problems in the later installation of hardware drivers.
Loading the drivers for Warrior Hardware is normally a straightforward procedure if done in the proper sequence as the Windows Hardware Wizard finds the new hardware. After the Warrior 7.0 Software has been installed on the computer, connect the USB cable to the computer and to the Warrior Interface Panel and turn on the interface panel. The Found New Hardware Wizard will come up. It is not necessary to look on the Internet for driver. Select “No, not this time” and click next.
20 Setting a Computer Up to Run Warrior
FIG: 21 Install Driver
If the Warrior Software CD is still in the computer, select “Install the software automatically.
FIG:22 Driver Setup
21 Setting a Computer Up To Run Warrior
FIG: 23 Driver installations You may see a notification concerning Microsoft Windows Logo testing. Select [Continue Anyway]. The New Hardware Wizard should now finish loading the drivers and notify you. Click the [Finish] button
FIG: 24 Driver installations
22 Setting a Computer Up to Run Warrior
FIG:25 CYSTD Driver In the event that you get an unable to install new hardware notification, click the [<Back] button. This will allow you to tell the Hardware Wizard where to search for the drivers.
FIG: 26 Cannot install the Driver
Select the “Install from a list or specific location (Advanced)” option, and click the [Next>] button.
23 Setting a Computer Up To Run Warrior
FIG: 27 Select Specific Location Choose the “Search for the best in these locations” options and check both choices for the “Search removable media (floppy, CD-ROM …) and “Include this location in the search.” You can either use the [Browse] button to select the path to C:\WARRIOR\DRIVERs or type C:\WARRIOR\DRIVERS in the box. Click the [Next>] button and driver loading should continue as described above.
FIG: 28 Select Driver Be aware there may be as many as four to six drivers to be loaded, depending upon the equipment.
24 Setting a Computer Up to Run Warrior
1.7 Key Software Authorization Setup Allow complete and unrestricted operation of the Cased Hole and/or Open Hole Software.
FIG: 29 Select Control Panel
FIG: 30 Panel type
The software read automatically the Panel Type from the USB key inside the panel
25 Setting a Computer Up To Run Warrior
FIG: 31 Click on Add Code
This box is used for entering a sixteen digit Hex code for systems that have been installed with a software full time key.
FIG: 32 Authorization Code
Type a new Key Authorization Code (16 Hex Digits).
FIG: 33 Notes
Type the notes about the Key Number, Panel Type, Software version, and Logging Unit as a reference.
26 Setting a Computer Up to Run Warrior
1.8 Printer Installation. 1.8.1 Windows XP Printer Installation To facilitate this operation a USB Port has been assign on the Interface Panel (rear Plate) and marker “Plotter”. It is recommended to use this USB port for your printer connection. Install the printer in windows XP first. The warrior software CD must be in the CD Device. Plug in Belkin USB Printer Adapter cable into any available USB port. Do not remove the Belkin USB printer from the chose USB port Do not plug-in the USB printer adapter to different USB port Turn Printer On. Select setting/Printers and Faxes
FIG: 34 Windows XP Control Panel
Select Printers and Faxes
27 Setting a Computer Up To Run Warrior
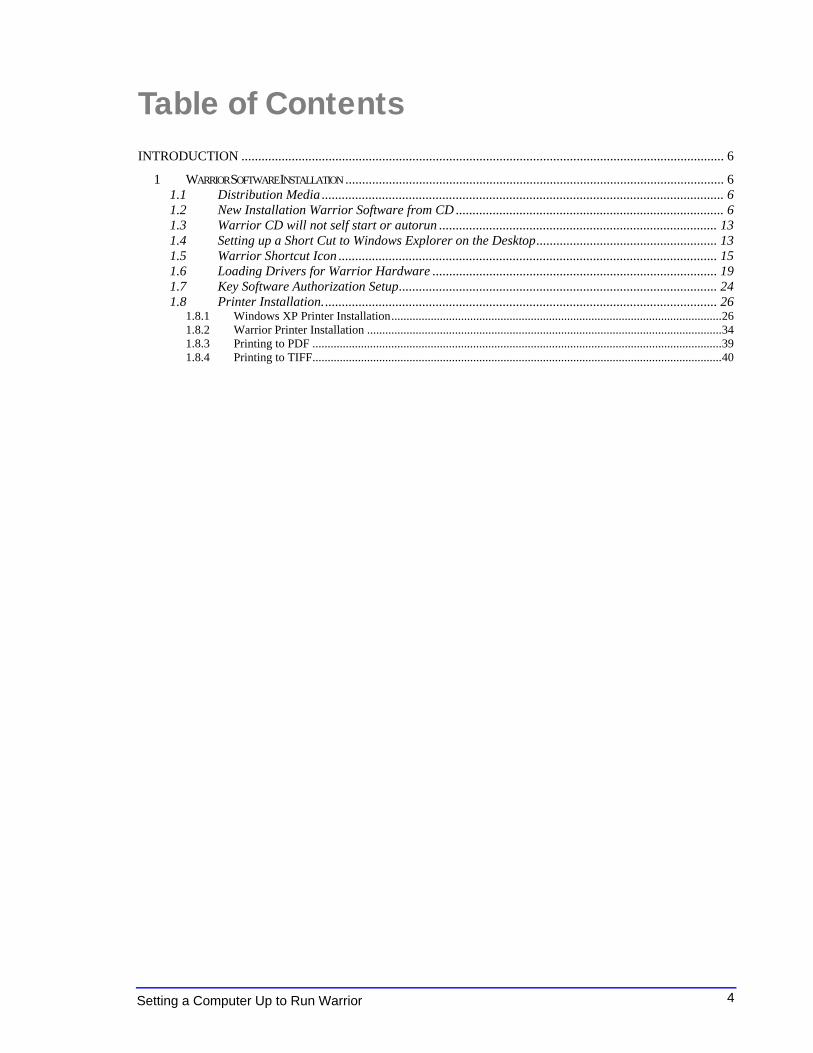
FIG: 35 Printers and Faxes Window
Add Printer
FIG: 36 Add Printer Wizard
Select Next
FIG: 37 Local Printer
28 Setting a Computer Up to Run Warrior
Uncheck (Automatically detect and install my Plug and Play printer) and Select Local printer attached to this computer Select Next
FIG: 38 Select a Printer Port
Select USB Port USB0001 to start.
FIG: 39 Install Driver.
Select Manufacturer Printrex and Model Printrex 840DL/G the driver is in the CD select “Have Disk”
29 Setting a Computer Up To Run Warrior
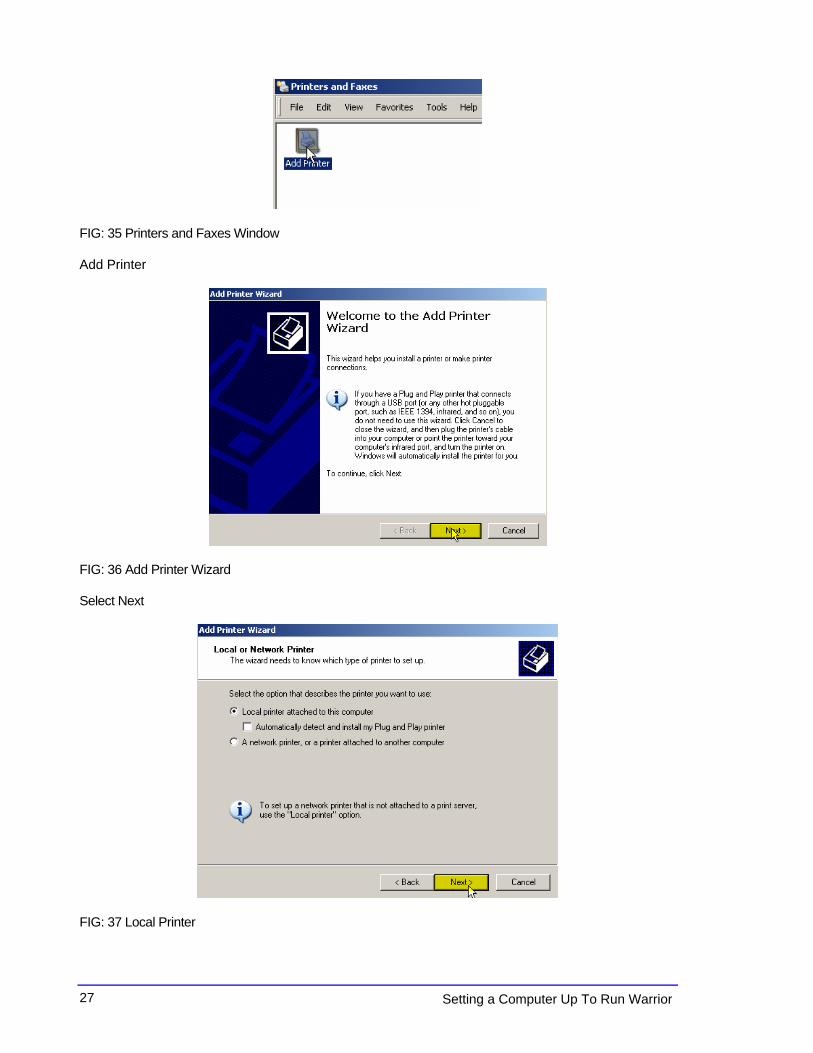
FIG: 40 Install from Disk
Select the CD Driver in this case is D: and “Browse”
FIG: 41 Printrex Drives options.
Select the Driver PRINTREX WIN2K, this driver is to install in WIN2K and windows XP.
30 Setting a Computer Up to Run Warrior
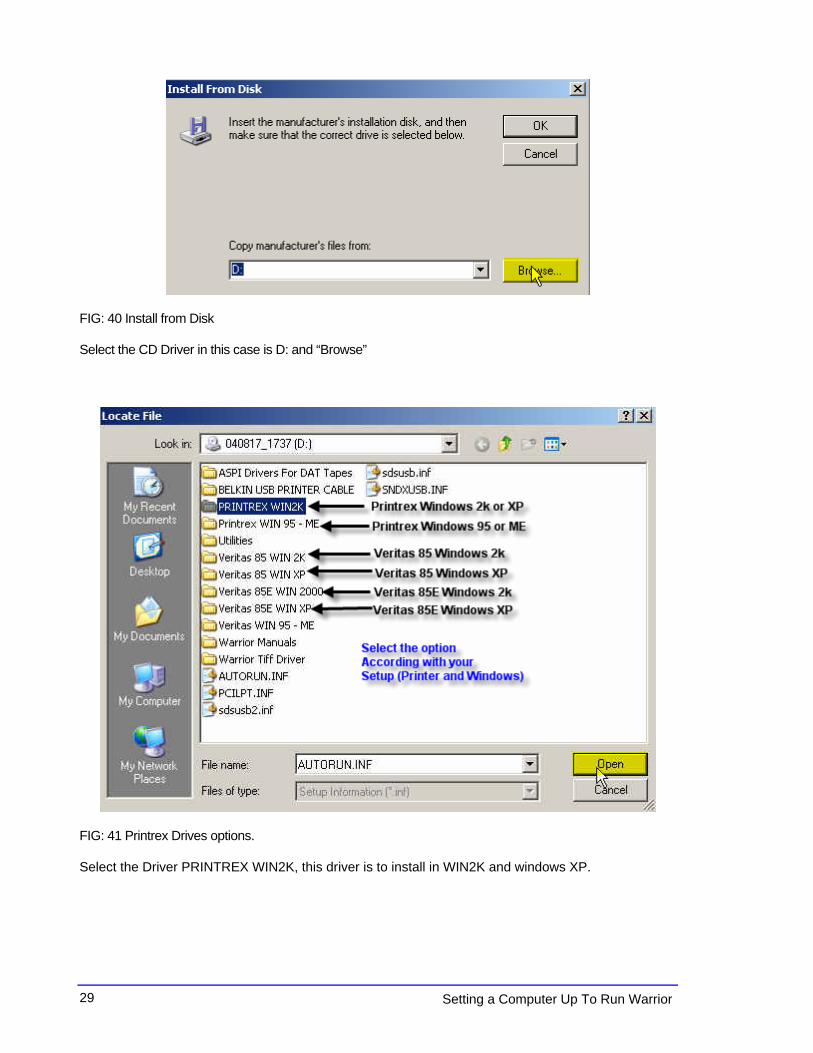
FIG: 42 Select the drive
Run the Drive
FIG: 43 Install the Printer Drive
Select 840DL/G or the model is connecting to the PC.
31 Setting a Computer Up To Run Warrior
FIG: 44 Set the driver
Select replace existing driver
FIG: 45 Printer Name
Type the name or let the default Printer.
32 Setting a Computer Up to Run Warrior
FIG: 46 Printer sharing
Select do not Share this printer
FIG: 47 Test Printout
Select Yes
33 Setting a Computer Up To Run Warrior
FIG: 48 Continuing Installation.
FIG: 49 Completing the Add Printer
Select Finish.
34 Setting a Computer Up to Run Warrior
FIG: 50 Test Page
The Printer Test Page must appear. At this point the Printer is installed in windows XP and then select OK.
FIG: 51 Printers and Faxes
Check if the Printrex 840DL/G is set as default
1.8.2 Warrior Printer Installation There are two different methods that Warrior uses to print. If you want a hardcopy of your log while you are logging, then you must print to a Direct printer. For good quality color prints, or to print to a printer that is not in the list of Direct printers, select the option Enable printing through Windows printer.
35 Setting a Computer Up To Run Warrior
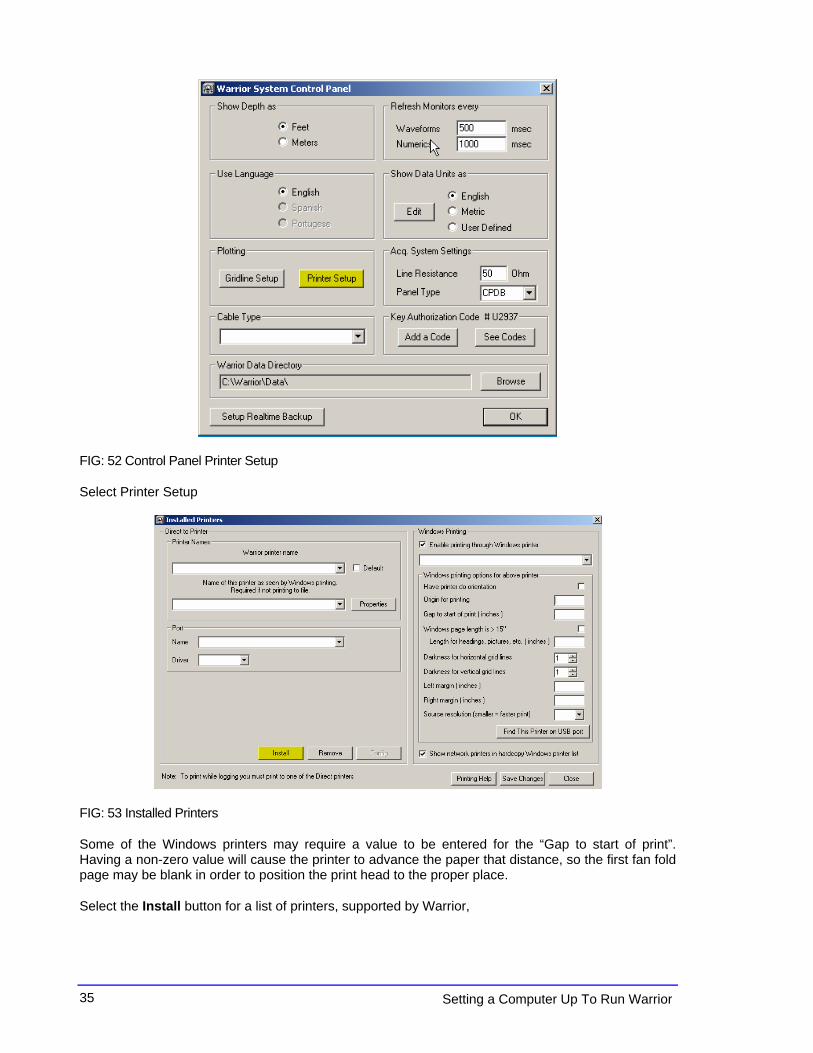
FIG: 52 Control Panel Printer Setup
Select Printer Setup
FIG: 53 Installed Printers
Some of the Windows printers may require a value to be entered for the “Gap to start of print”. Having a non-zero value will cause the printer to advance the paper that distance, so the first fan fold page may be blank in order to position the print head to the proper place.
Select the Install button for a list of printers, supported by Warrior,
36 Setting a Computer Up to Run Warrior
for printing whilst logging. When this box is checked, either a (Direct) or (Windows) label for each available printer is shown when printing from Warrior. For fan fold printing, set the printer page size to twice the size of one fan fold page.
FIG: 54 Install Printer
Open the Drop- down box
FIG: 55 Install Printer
Select Printrex
FIG: 56 Install Printer
Click over Install
37 Setting a Computer Up To Run Warrior
FIG: 57 Printrex 820/840 Plotter Configuration
For fan fold printing, set the printer page size to twice the size of one fan fold page
Select Save
FIG: 58 Installed Printers
Select on the Drop-down the Printer Model Printrex 840DL/G
38 Setting a Computer Up to Run Warrior
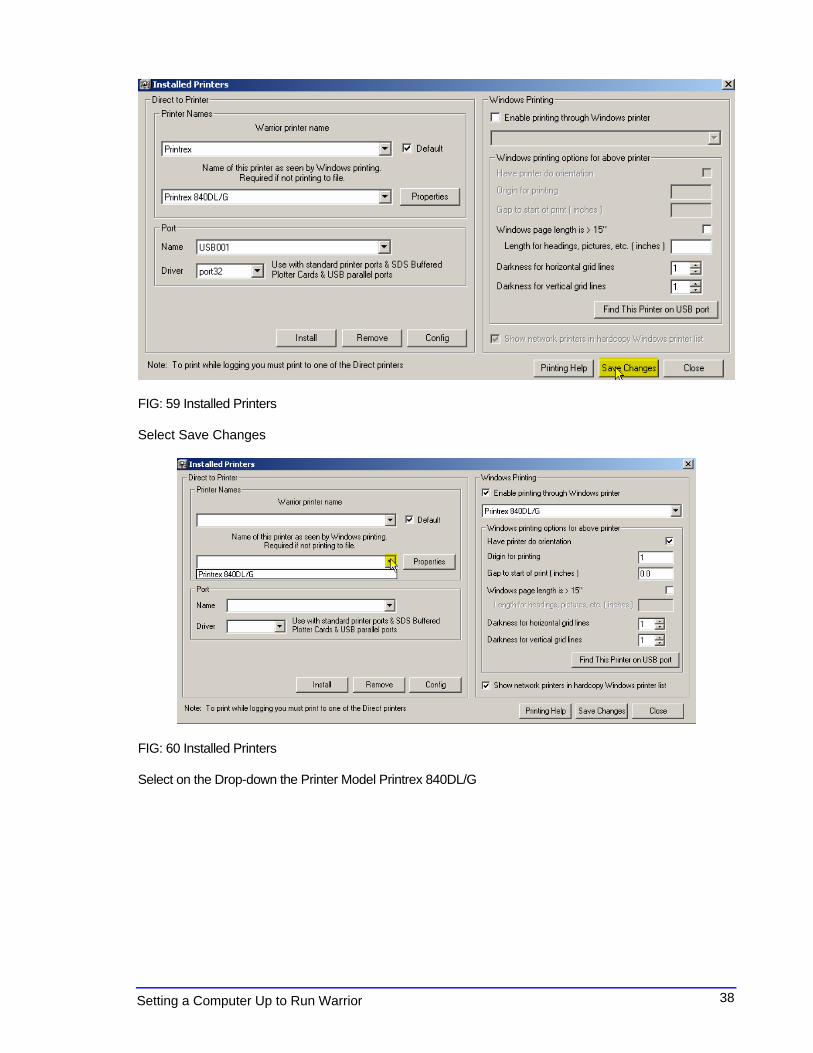
FIG: 59 Installed Printers
Select Save Changes
FIG: 60 Installed Printers
Select on the Drop-down the Printer Model Printrex 840DL/G
39 Setting a Computer Up To Run Warrior
FIG: 61 Installed Printers
Select on the Drop-down Printrex
FIG: 62 Installed Printers
1.8.3 Printing to PDF Warrior supports direct printing to PDF files through its own driver. Before creating a PDF output, determine what the customer intends to do with the file and configure the PDF options accordingly. If it is intended only to view the PDF on the screen, then the driver should be set to Continuous Viewable Image and Color. If the customer intends to print the PDF, then it should be set to Continuous Printable Image and Color or Monochrome, depending on the printer being used. In addition, it may be important to set the page size to match the page size of the customer's printer; otherwise gaps between pages can appear. Furthermore, there is a trade off between file size and quality. The higher the dpi setting, the better the quality normally, but the file size is larger. Some experimentation may be required with the
40 Setting a Computer Up to Run Warrior
customer to produce optimal results. This is also true for the selected compression mode. For most situations, FLATE compression works well. 1.8.4 Printing to TIFF Warrior also supports direct printing to TIFF files through its own driver. Again, determine what the file is intended for and configure the driver accordingly. Note that the driver supports TIFF single continuous pages of longer than 90 inches. However, many TIFF applications (including Warrior fax) do not support this, so before increasing the maximum page length is sure that the customer can read such files.