service marks of Polycom, Inc. and are registered and/or common law marks in the United States and various other countries. August 2014
Setting up the Polycom® EagleEyeTM Director
3
4
1
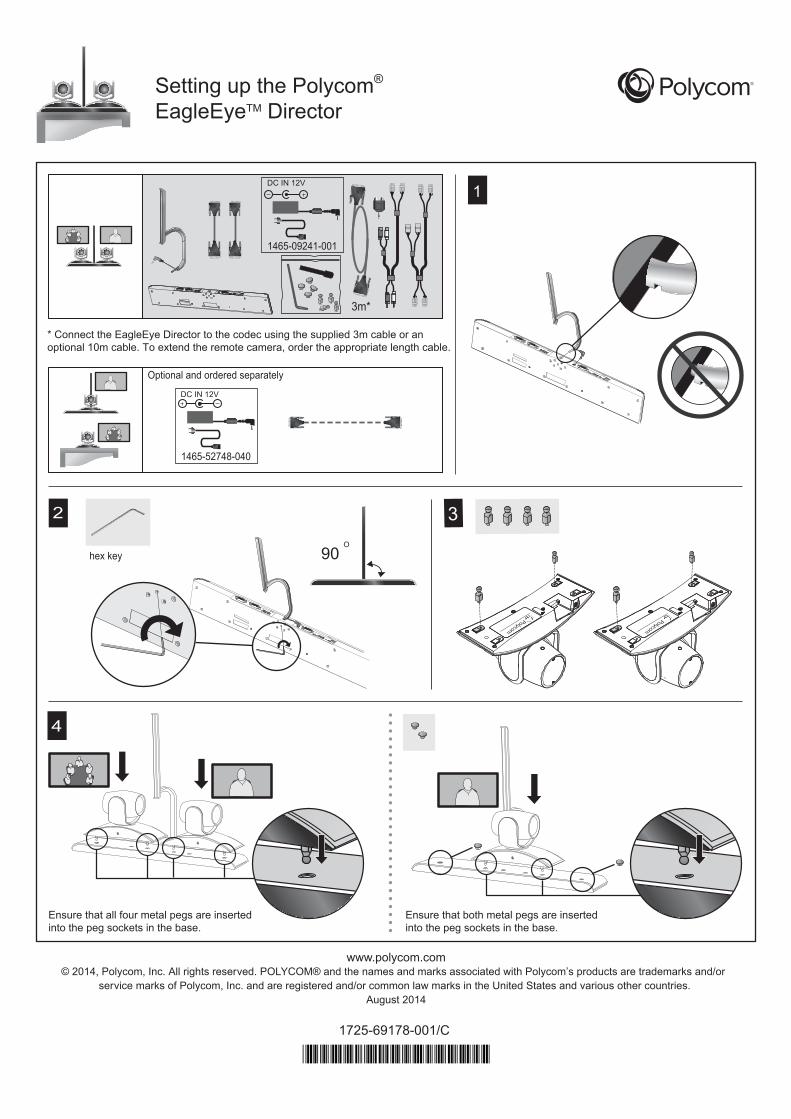
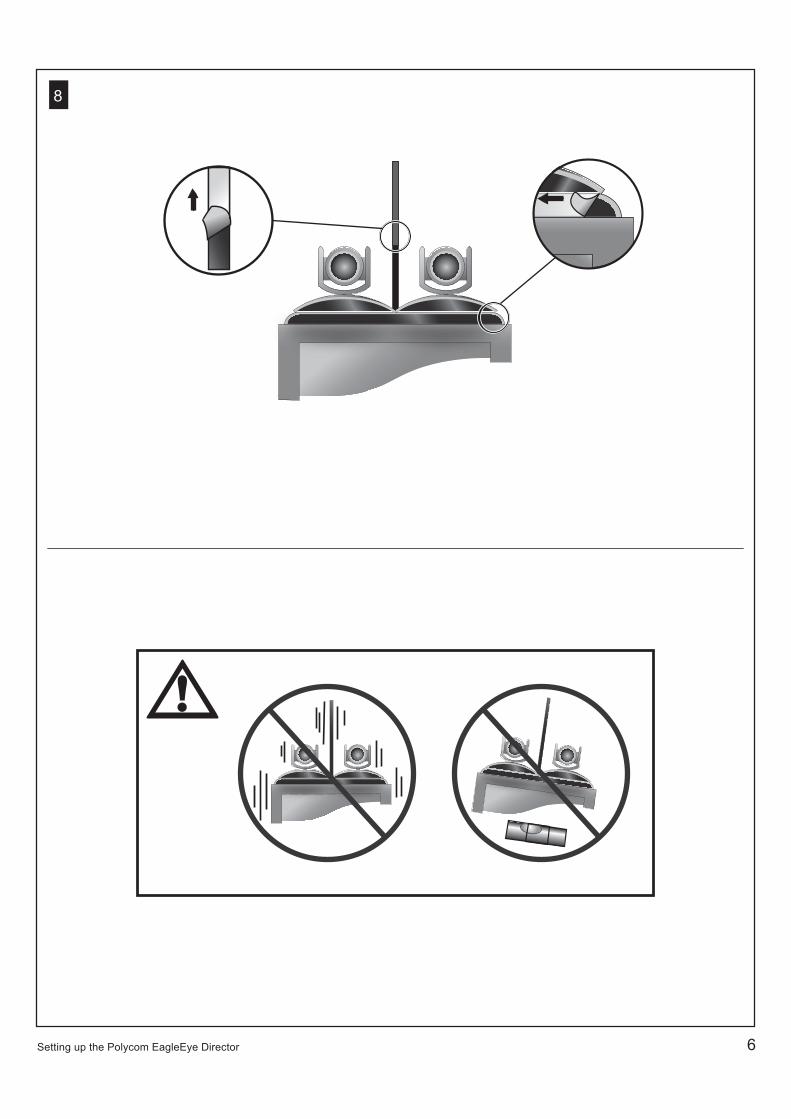
Ensure that all four metal pegs are insertedinto the peg sockets in the base.
Ensure that both metal pegs are insertedinto the peg sockets in the base.
2
90O
hex key
1725-69178-001/C
DC IN 12V
3m*
* Connect the EagleEye Director to the codec using the supplied 3m cable or anoptional 10m cable. To extend the remote camera, order the appropriate length cable.
1465-09241-001
DC IN 12V
1465-52748-040
Optional and ordered separately
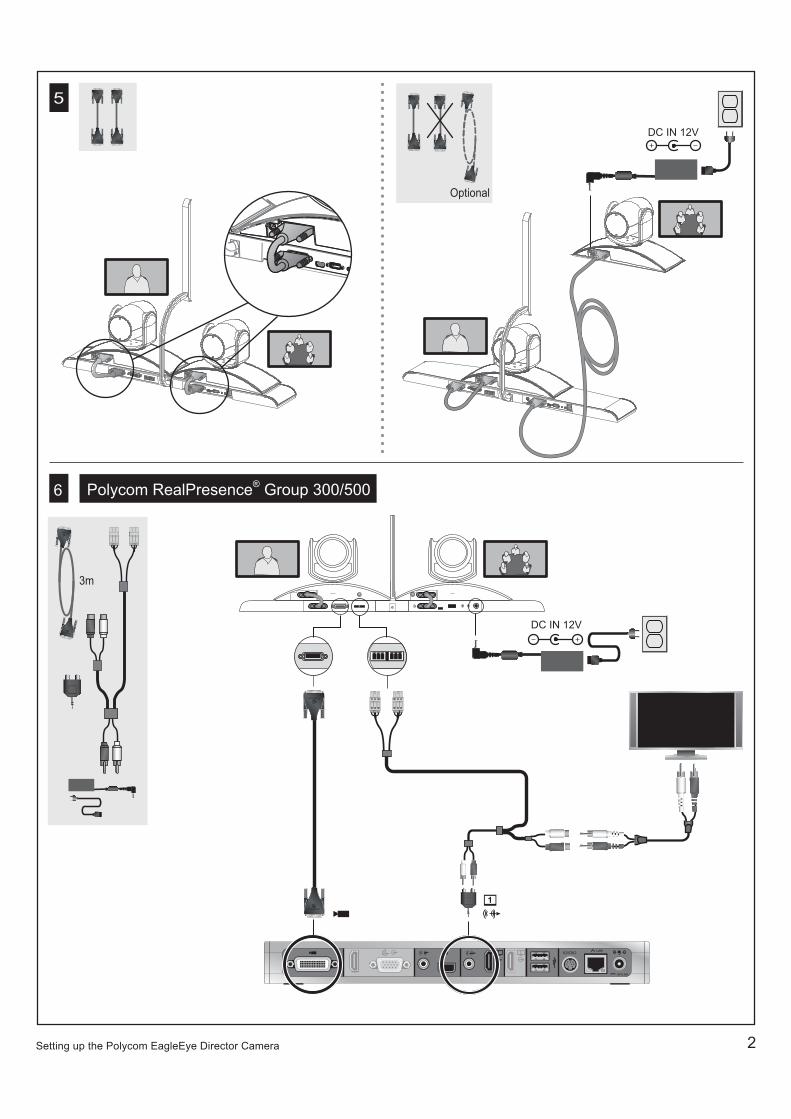
5
2 Setting up the Polycom EagleEye Director Camera
12V 6.25A
21
Polycom RealPresence® Group 300/5006
DC IN 12V
DC IN 12V
3m
Optional
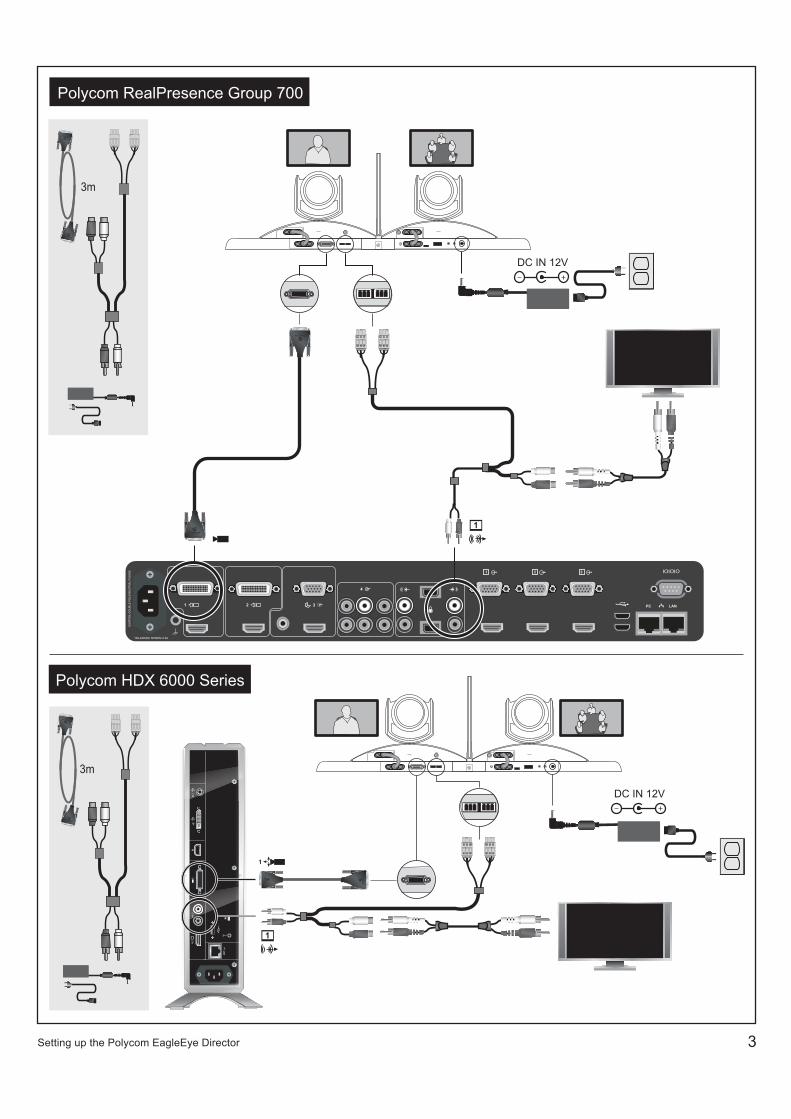
3 Setting up the Polycom EagleEye Director
3m
Polycom HDX 6000 Series
DC IN 12V
4
1 2 3
31 2
100-240VAC 50/60Hz 2.3A
DC IN 12V
3m
Polycom RealPresence Group 700
4 Setting up the Polycom EagleEye Director
2 1
100-240VAC 50/60Hz 4A
LANIR
5
4
3 VCR/DVD1
4
Y C3 VCR/DVD
Y CVCR/DVD3
4 3 VCR/DVD1
2
Y C
1
2
1
IOIOIO
Y C
Polycom HDX 9006Polycom HDX 9001, 9002, and 9004
DC IN 12V
Polycom HDX 9000 Series
3m
Polycom HDX 7000 or 8000 Series
44V
CR
/DV
D
3
VC
R/D
VD
3
AU
X
DC IN 12V
3m
5Setting up the Polycom EagleEye Director
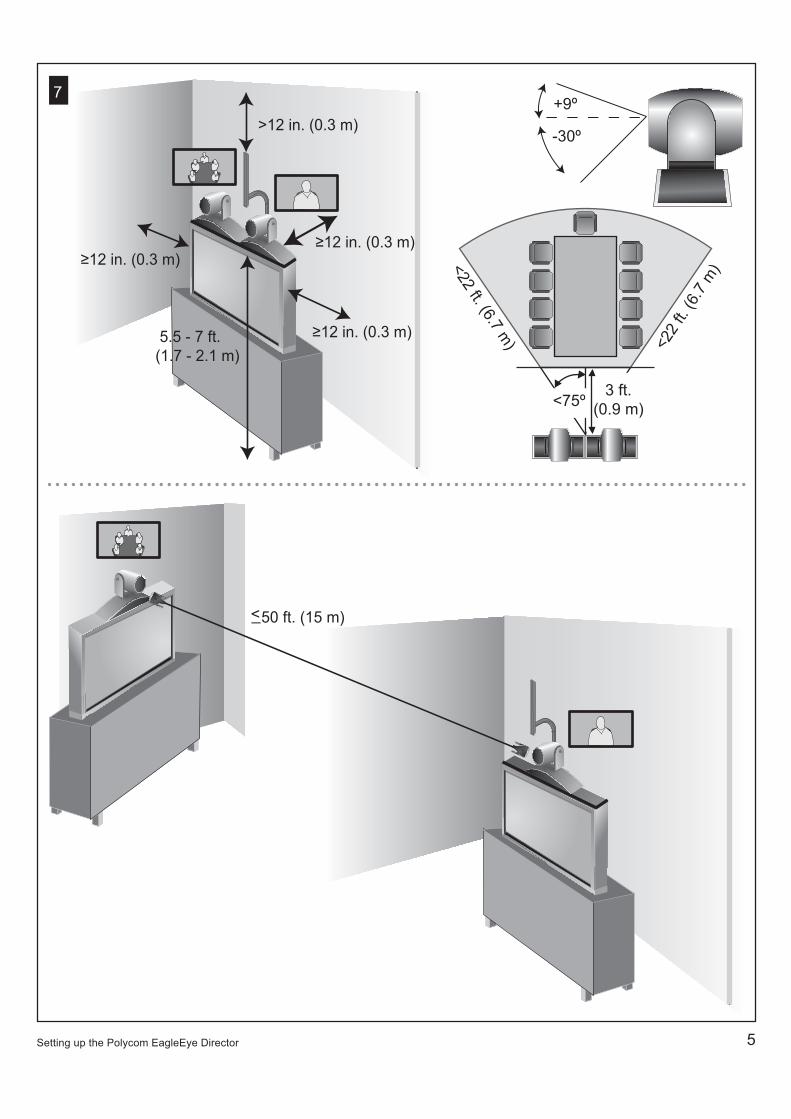
7
50 ft. (15 m) <_
+9º
-30º
≥12 in. (0.3 m) ≥12 in. (0.3 m)
≥12 in. (0.3 m) 5.5 - 7 ft.(1.7 - 2.1 m)
>12 in. (0.3 m)
<22
ft. (6
.7 m
)<22 ft. (6.7 m)
3 ft.(0.9 m)<75º
8
6Setting up the Polycom EagleEye Director
English
HDX version 3.0.1 or later:
• From the local interface, go to System > Admin Settings > Cameras > Camera Settings. Select Detect Camera.
• From the local interface, go to System > Admin Settings > Cameras > Camera Calibration. Follow the calibration directions on the screen.
RealPresence Group Series version 4.0 or later:
• From the local interface, go to Administration > Camera Tracking > Calibration.Follow the calibration directions on the screen.
For more information, refer to the Administrator’s Guide and User’s Guide for your product available at support.polycom.com.
Deutsch
HDX Version 3.0.1 oder neuer:
• Verwenden Sie auf der lokalen Benutzeroberfläche die Befehlsfolge System > Admin-Einstellungen > Kameraeinstellungen > Kameraeinstellungen. Wählen Sie Kamera erkennen.
• Verwenden Sie auf der lokalen Benutzeroberfläche die Befehlsfolge System > Admin-Einstellungen > Kameraeinstellungen > Kamera-Kalibrierung. Befolgen Sie die Anweisungen zur Kalibrierung auf dem Bildschirm.
RealPresence Group-Serie Version 4.0 oder neuer:
• Verwenden Sie auf der lokalen Benutzeroberfläche die Befehlsfolge Verwaltung > Kamera Tracking > Kalibrierung.Befolgen Sie die Anweisungen zur Kalibrierung auf dem Bildschirm.
Weitere Informationen finden Sie im Administrator-Handbuch und Benutzerhandbuch für Ihr Produkt auf support.polycom.com.
Español HDX dispone de la versión 3.0.1 o superior del software:
• En la interfaz local, diríjase a Sistema > Configuraciones de admin. > Cámaras > Configuración de las cámaras. Seleccione Detectar cámara.
• En la interfaz local, diríjase a Sistema > Configuraciones de admin. > Cámaras > Calibración de la cámara. Siga las instrucciones de calibración de la pantalla.
RealPresence Group Series dispone de la versión 4.0 o superior del software:
• En la interfaz local, diríjase a Administración > Seguimiento de cámara > Calibración.Siga las instrucciones de calibración de la pantalla.
Si desea obtener más información, consulte la Guía del Administrador y la Guía del usuario de su producto, disponible en support.polycom.com.
9
Setting up the Polycom EagleEye Director 7
FrançaisVersion HDX 3.0.1 ou une version ultérieure:
• Dans l'interface locale, sélectionnez Système > Paramètres administrateur > Caméras > Réglages des caméras.Sélectionnez Détecter la caméra.
• Dans l'interface locale, sélectionnez Système > Paramètres administrateur > Caméras > Calibrage des caméras.Suivez les instructions de calibrage qui s’affichent à l’écran.
RealPresence Group Series version 4.0 ou une version ultérieure:
• Dans l'interface locale, accédez à Administration > Caméra Tracking > Étalonnage.Suivez les instructions de calibrage qui s’affichent à l’écran.
Pour de plus amples informations, reportez-vous au Guide de l'administrateur et au Guide d'utilisation de votre produit, disponibles sur le site support.polycom.com.
ItalianoHDX versione 3.0.1 o successiva:
• Dall'interfaccia locale, accedere a Sistema > Impostazioni amministratore > Telecamere > Impost. della telecamera. Selezionare Rileva telecamera.
• Dall'interfaccia locale, accedere a Sistema > Impostazioni amministratore > Telecamere > Calibrazione telecamera. Seguire le istruzioni per la calibrazione visualizzate sullo schermo.
RealPresence Group Series versione 4.0 o successiva:
• Dall'interfaccia locale, accedere a Amministrazione > Monitoraggio > Calibrazione telecamera.Seguire le istruzioni per la calibrazione visualizzate sullo schermo.
Per ulteriori informazioni, consultare la Guida per l'amministratore e la Guida per l'utente per il prodotto disponibili sul sito Web support.polycom.com.
Magyar HDX 3.0.1 verzió vagy újabb:
• A helyi interfészen lépjen a Rendszer > Adminisztrátori beállítások > Kamerák > Kamerabeállítások menüpontra. Válassza a Kamera észlelése menüpontot.
• A helyi interfészen lépjen a Rendszer > Adminisztrátori beállítások > Kamerák > Kamera kalibrálása menüpontra. Kövesse a képernyőn megjelenő kalibrálási utasításokat.
RealPresence Group Series 4.0 verzió vagy újabb:
• A helyi interfészen lépjen az Adminisztráció > Camera Tracking > kalibrálása.Kövesse a képernyőn megjelenő kalibrálási utasításokat.
További információkért tekintse meg a termékhez tartozó adminisztrátori kézikönyvet és felhasználói útmutatót itt: support.polycom.com.
Setting up the Polycom EagleEye Director 8
Polski Wersja HDX 3.0.1 lub nowsze:
• W interfejsie lokalnym wybierz kolejno opcje System > Ustawienia administratora > Kamery > Ustawienia kamery. Wybierz opcję Wykryj kamerę.
• W interfejsie lokalnym wybierz kolejno opcje System > Ustawienia administratora > Kamery > Kalibracja kamery. Postępuj zgodnie z instrukcjami kalibracji wyświetlanymi na ekranie.
Wersja RealPresence Group Series 4.0 lub nowsze:
• W interfejsie lokalnym wybierz kolejno opcje Administracja > Śledzenie kamery > Kalibracja.Postępuj zgodnie z instrukcjami kalibracji wyświetlanymi na ekranie.
Aby uzyskać więcej informacji, zapoznaj się z Podręcznikiem administratora i Podręcznikiem użytkownika produktu w witrynie support.polycom.com.
Português HDX versão 3.0.1 ou posterior:
• Na interface local, vá para Sistema > Configurações de administrador > Câmeras > Configurações da câmera. Selecione Detectar câmera.
• Na interface local, vá para Sistema > Configurações de administrador > Câmeras > Calibração da câmera. Siga as instruções de calibração na tela.
RealPresence Group versão da série 4.0 ou posterior:
• Na interface local, vá para Administração > câmera de monitoramento > calibragem.Siga as instruções de calibração na tela.
Para obter mais informações, consulte o Guia do Administrador e Guia do Usuário para o seu produto disponível em support.polycom.com.
Русский
HDX версии 3.0.1 или более поздней версии:
• В локальном интерфейсе выберите пункт Система > Параметры админ. > Камеры > Параметры камеры. Выберите Обнар. камеры.
• В локальном интерфейсе выберите пункт Система > Параметры админ. > Камеры > Калибрация камеры. Следуйте инструкциям по калибровке на экране.
RealPresence Group серия версии 4.0 или более поздней версии:
• В локальном интерфейсе выберите пункт Администрирование > Камеры слежения > Калибровка.Следуйте инструкциям по калибровке на экране.
Для получения дополнительной информации см. Руководство администратора и Руководство пользователя для вашего продукта доступна на support.polycom.com.
Setting up the Polycom EagleEye Director 9
한국어
HDX 버전 3.0.1 이상 :
• 로컬 인터페이스에서 시스템 > 관리자 설정 > 카메라 > 카메라 설정으로 이동합니다 .카메라 검색을 선택합니다 .
• 로컬 인터페이스에서 시스템 > 관리자 설정 > 카메라 > 카메라 교정으로 이동합니다 . 화면의 교정 지시를 따르십시오 .
RealPresence Group 시리즈 버전 4.0 이상 :
• 로컬 인터페이스에서 관리 > 카메라 추적 > 보정으로 이동합니다 .화면의 교정 지시를 따르십시오 .
자세한 내용은 관리자 가이드 및 support.polycom.com 에서 제공하는 귀하의 제품에 대한 사용 설명서를 참조하십시오 .


![- download.xbox.comdownload.xbox.com/content/43430814/DDDA_360_DigitalManual_POR_0423.pdf · Xbox 360 Kinect ® Sensor, and ... Visão de Câmera] Sacar Arma Guardar Arma x Pegar/Agarrar/Levantar](https://static.documents.pub/doc/80x56/5bf5878009d3f27c7c8b7ce0/-xbox-360-kinect-sensor-and-visao-de-camera-sacar-arma-guardar-arma.jpg)

