19
Setting Up & Using the HNI (HON ® , Gunlocke ® , Paoli ® ) PSN Updated May 2016
| Date post: | 13-Apr-2018 |
| Category: |
Documents |
| Upload: | truongngoc |
| View: | 216 times |
| Download: | 1 times |

Setting Up & Using the HNI (HON®, Gunlocke®, Paoli®) PSN
Updated May 2016
© 2016 ECi Software Solutions, Inc.
ContentsSetting Up the HNI PSN ........................................................................................................3
Receiving Authorization..............................................................................................................................................3Contacting Your HNI Vendor......................................................................................................................................3Setting Up the Vendor Database .............................................................................................................................3Setting Up Salesperson Contacts ............................................................................................................................5Setting Up DSR for Salespersons .............................................................................................................................6Setting Up Furniture Contracts.................................................................................................................................7Setting Up P/O Communication Defaults.............................................................................................................8
Using the HNI PSN ..............................................................................................................11Importing the SIF .........................................................................................................................................................11Building the P/O .......................................................................................................................................................... 14Uploading the P/O ..................................................................................................................................................... 16Receiving Acknowledgments ................................................................................................................................ 19

3
Setting Up & Using the HNI (HON, Gunlocke, Paoli) PSN
continue to next page
Setting Up the HNI PSNBefore you set up parameters for HNI, make sure you have PSN set up. If this is your first PSN vendor and PSN is not already set up, start by following the steps in Setting Up PSN (pdf ) on the Customer Support Center.
Once PSN is set up, setting parameters to communicate with HNI involves the following:
1. Receiving authorization.
2. Contacting your HNI vendor (HON®, Gunlocke®, or Paoli®).
3. Setting up the vendor database.
4. Setting up salesperson contacts.
5. Setting up DSR for salespersons.
6. Setting up furniture contracts.
7. Setting up P/O communication defaults.
Receiving AuthorizationContact ECi Support at [email protected] to request authorization.
Contacting Your HNI VendorContact your HNI vendor for your user name and password. The HNI PSN is currently available for HON, Gunlocke, and Paoli. Also ask for all eligible contract numbers and expiration dates.
Setting Up the Vendor DatabaseUse the following instructions to set up the appropriate destination ID for your vendor and select the features to enable:
1. Set up your HNI vendor. You must set up a separate vendor for HON, Gunlocke, and Paoli.
1.1 From the Master Menu, double-click .
1.2 In the Vendor Master tab, click .
1.3 Click the Vendor # box and enter an account number for your HNI company.
1.4 Click the Name box and enter a name for your HNI company. Gunlocke is entered as an example.
1.5 Click the down arrow in the Comm box and select HNI. Select HNI as the communication type for HON, Gunlocke, and Paoli.
1.6 Click .

4
Setting Up & Using the HNI (HON, Gunlocke, Paoli) PSN
continue to next page
2. Set PSN parameters. These parameters need to be set for each vendor that you are using.
2.1 Click . The Supply Options dialog box opens.
2.2 In the Location box, enter a G/L location, or accept the default of 1.
5
Setting Up & Using the HNI (HON, Gunlocke, Paoli) PSN
continue to next page
Note: The settings in the Supply Options dialog box are location-specific. If you enter the destination ID, sign on ID, and password for location 1 only, and you have multiple locations, these settings are used for each location. However, if you set up multiple locations in the Supply Options dialog box, for example 1 and 3, no default is used. You must enter settings for every location separately.
2.3 In the Destination ID box, enter the destination ID for your company. The destination ID must be entered in ALL CAPS. For example, enter GUNLOCKE.
2.4 In the Sign On ID box, enter your sign on ID (valid email address). If your email address exceeds 20 characters, it cannot be entered, so follow the instructions under the heading Setting Up Salesperson Contacts.
2.5 In the Sign On Pass box, enter the password provided by your HNI company.
Note: If you enter a sign on ID and password in the Salesperson Contacts window, this information overrides the values listed in the Vendor Supply Option dialog box. For more information, see the heading Setting Up Salesperson Contacts.
2.6 From the Supported Features list, click Purchase Order.
2.7 Click Exit.
3. Click .
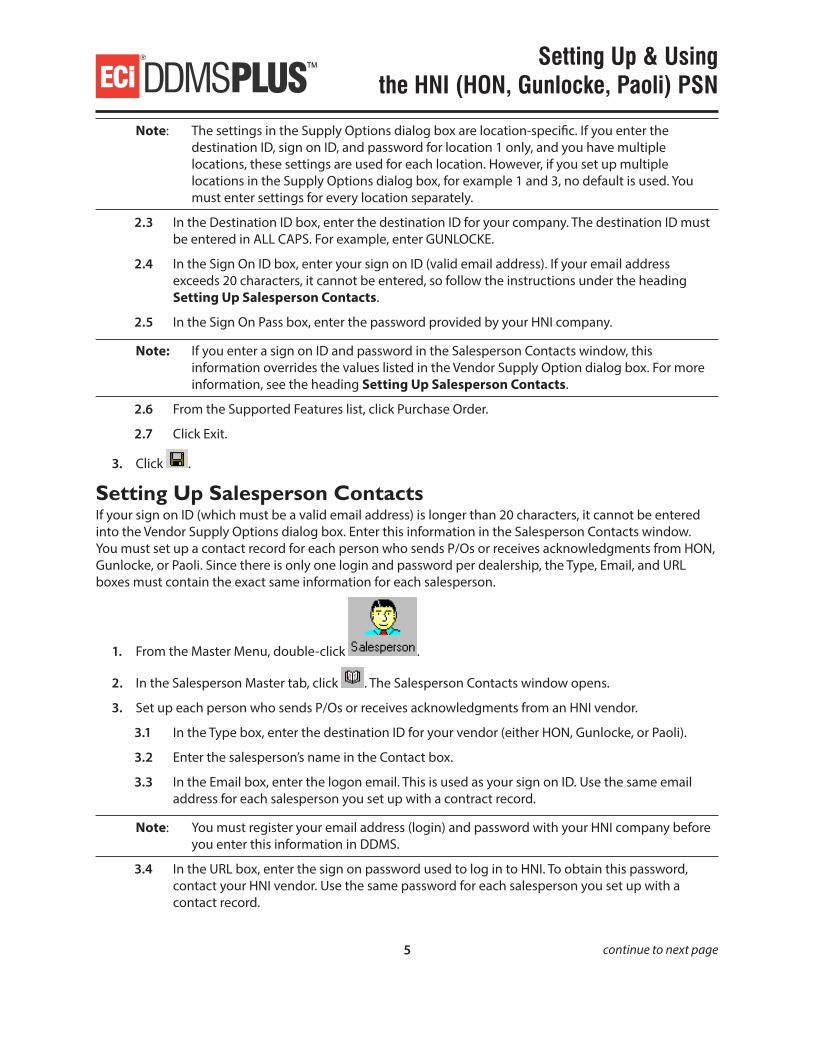
Setting Up Salesperson ContactsIf your sign on ID (which must be a valid email address) is longer than 20 characters, it cannot be entered into the Vendor Supply Options dialog box. Enter this information in the Salesperson Contacts window. You must set up a contact record for each person who sends P/Os or receives acknowledgments from HON, Gunlocke, or Paoli. Since there is only one login and password per dealership, the Type, Email, and URL boxes must contain the exact same information for each salesperson.
1. From the Master Menu, double-click .
2. In the Salesperson Master tab, click . The Salesperson Contacts window opens.
3. Set up each person who sends P/Os or receives acknowledgments from an HNI vendor.
3.1 In the Type box, enter the destination ID for your vendor (either HON, Gunlocke, or Paoli).
3.2 Enter the salesperson’s name in the Contact box.
3.3 In the Email box, enter the logon email. This is used as your sign on ID. Use the same email address for each salesperson you set up with a contract record.
Note: You must register your email address (login) and password with your HNI company before you enter this information in DDMS.
3.4 In the URL box, enter the sign on password used to log in to HNI. To obtain this password, contact your HNI vendor. Use the same password for each salesperson you set up with a contact record.

6
Setting Up & Using the HNI (HON, Gunlocke, Paoli) PSN
continue to next page
Note: When a salesperson whose information is entered into the Salesperson Contacts window is logged into the system, the log in ID and password in the Salesperson Contacts window overrides the information listed in the Vendor Supply Options dialog box.
3.5 Click .
3.6 Repeat these steps for each salesperson who sends P/Os or receives acknowledgments from HON, Gunlocke, or Paoli. When you do, be sure the Type, Email, and URL boxes contain the same information for each of your salespersons (users) since there is only one login and password per dealership.
Setting Up DSR for SalespersonsYou can set up your system to identify the DSR (Dealer Sales Representative) salesperson of record for this order. When you place the order, the system defaults to assign the salesperson 100% of the responsibility for the order. However, you can divide this 100% among up to three salespersons. For example, you could give 60% to Sam, 20% to Mary, and 20% to John.
To do this, you must set up a contact record for each salesperson who may be considered a DSR salesperson. Using the Salesperson Contact window, there are only two boxes you must complete: the Name and Email boxes. For this feature to work properly, you must leave the Type box blank.
1. From the Master Menu, double-click .
2. In the Salesperson Master Tab, click .
3. In the Salesperson Contacts window, set up each person who may be considered a DSR salesperson. To do so, click .
4. When the cursor moves to the Type box, press Tab to leave the Type box blank.
5. In the Contact box, enter the salesperson’s name.
6. Click the Email box and enter the salesperson’s email address. These are the only two boxes you need to complete.
7
Setting Up & Using the HNI (HON, Gunlocke, Paoli) PSN
continue to next page
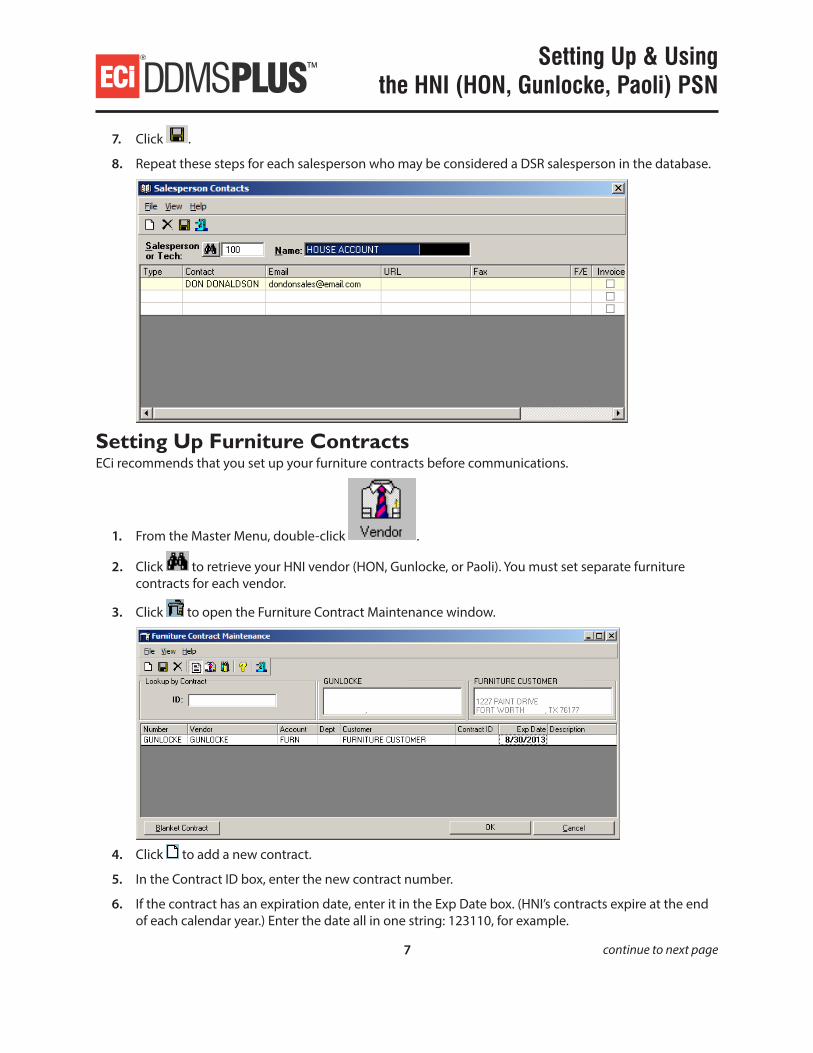
7. Click .
8. Repeat these steps for each salesperson who may be considered a DSR salesperson in the database.
Setting Up Furniture ContractsECi recommends that you set up your furniture contracts before communications.
1. From the Master Menu, double-click .
2. Click to retrieve your HNI vendor (HON, Gunlocke, or Paoli). You must set separate furniture contracts for each vendor.
3. Click to open the Furniture Contract Maintenance window.
4. Click to add a new contract.
5. In the Contract ID box, enter the new contract number.
6. If the contract has an expiration date, enter it in the Exp Date box. (HNI’s contracts expire at the end of each calendar year.) Enter the date all in one string: 123110, for example.

8
Setting Up & Using the HNI (HON, Gunlocke, Paoli) PSN
continue to next page
7. Press Enter. The date displays as 12/31/2010.
8. To add a description for this contract, click the Description box and enter the description.
9. Continue adding all eligible contracts for your HNI vendor. (If a contract is specific to a particular customer, you can select their customer account number and/or department. Start typing in the Account box to open the Customer Query box.)
10. When you finish, click OK.
11. At the Save Changes prompt, click Yes. The cursor returns to the Vendor window and the contract information you specified is saved.
Setting Up P/O Communication DefaultsTo place an order with HON, Gunlocke, or Paoli you must set up default parameters in the Communicate P/Os window.
These parameters include information such as the account number, contract number, and bill-to address. These parameters are defaults only and may be overridden when you send the P/O to your HNI company.
Note: You must set up communication defaults for each location that communicates via PSN.
1. From the Master Menu, double-click . The Purchase Order Entry Master tab opens.
2. Click the down arrow in the Action Code box and select Communicate. The Communicate P/Os window opens.
3. From the Vendor Type grid, click HON, Gunlocke, or Paoli.
4. Click the View menu and select Default Vendor Options. The Communication Options dialog box opens.
9
Setting Up & Using the HNI (HON, Gunlocke, Paoli) PSN
continue to next page
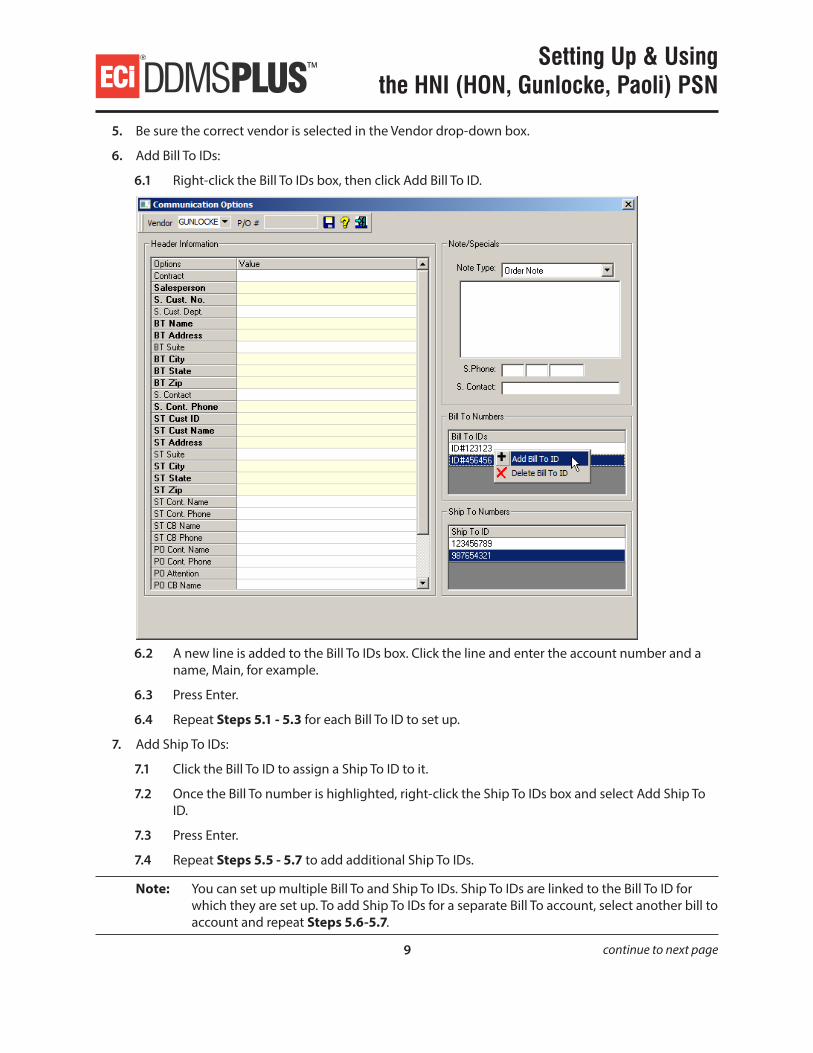
5. Be sure the correct vendor is selected in the Vendor drop-down box.
6. Add Bill To IDs:
6.1 Right-click the Bill To IDs box, then click Add Bill To ID.
6.2 A new line is added to the Bill To IDs box. Click the line and enter the account number and a name, Main, for example.
6.3 Press Enter.
6.4 Repeat Steps 5.1 - 5.3 for each Bill To ID to set up.
7. Add Ship To IDs:
7.1 Click the Bill To ID to assign a Ship To ID to it.
7.2 Once the Bill To number is highlighted, right-click the Ship To IDs box and select Add Ship To ID.
7.3 Press Enter.
7.4 Repeat Steps 5.5 - 5.7 to add additional Ship To IDs.
Note: You can set up multiple Bill To and Ship To IDs. Ship To IDs are linked to the Bill To ID for which they are set up. To add Ship To IDs for a separate Bill To account, select another bill to account and repeat Steps 5.6-5.7.

10
Setting Up & Using the HNI (HON, Gunlocke, Paoli) PSN
continue to next page
8. Delete a Bill To or Ship To ID:
8.1 Click the line to delete.
8.2 Right-click the same line and click Delete Bill To ID or Delete Ship to ID.
8.3 In the message box, click Yes.
9. In the Header Information section, the required default options are listed in bold on the left side of the window. You must enter a value in all of these boxes before any information can be transmitted to your HNI vendor.
If you do not set any defaults, you must manually enter the information each time you build a P/O for HON, Gunlocke, or Paoli.
To set defaults, click a box name and enter a value. Box names in bold are required. For example, click Contract and enter the contract number in the Value box. Click to look up the contract.
Set up the following recommended defaults:
9.1 Click the S Cust No box to access the drop-down arrow. Click the arrow and select the default Bill To ID from the IDs set up in the Bill To IDs box in Step 5.
9.2 In the BT (billto) boxes, enter the address to which to send your company’s invoices.
9.3 In the S Contact box, enter the name of your company’s A/P clerk.
9.4 Click the ST Cust ID box to access the drop-down arrow. Click the arrow and select the default Ship To ID from the IDs set up in the Ship To IDs box in Step 6.
11
Setting Up & Using the HNI (HON, Gunlocke, Paoli) PSN
continue to next page
9.5 In the ST (shipto) boxes, enter your company’s warehouse address where the shipment is to be delivered. If there is an alternate shipto address on the purchase order, the system populates them with the customer’s shipto address from the ticket.
9.6 In the ST Contact box, enter the name of the person at the warehouse who is to receive the shipment.
9.7 In the Output Path box, enter the same value as in the Outbound Volume/Folder field in the (L6X) PSN Parameter screen. Enter the true network path as \\ddmsserver name\path. For example, a valid path is \\ddmsserver\ddms\w2.
9.8 In the Input Path box, enter the same value as in the Inbound Volume/Folder field in the text-based (L6X) screen. Enter the true network path as \\ddmsserver name\path. For example, a valid path is \\ddmsserver\ddms\w2.
10. Click .
Using the HNI PSNUsing the HNI PSN involves the following:
• Importing the SIF
• Building the P/O
• Uploading the P/O
• Receiving Acknowledgments
Importing the SIFThird party packages like 2020 Worksheet and Project Spec are known as specification or specifier software. They simplify the process of developing specifications for furniture orders. You can easily import the resulting quotes or orders directly into the DDMS through a SIF file. This application imports standard SIF format specification files (the file format used by 2020 Worksheet, Project Spec, and many other specifier programs) and releases them to orders. You can use any specifier program that supports the SIF format and still send your furniture sales through the same order and accounting flow as other transactions.
1. From the Master Menu, double-click .
2. In the Order Style menu, click the down arrow and select Furniture.
3. In the Action Code menu, click the down arrow and select Order.
4. Click to select the customer for this furniture order.
5. Assign a project number to the order. For instructions, see the online help. Each order or quote that you place must be assigned a project number. This number ties together all the customer’s invoices for the project and helps you easily track the project.
6. In the Furniture portion of the window, click Furniture Profile Settings. The Furniture Profile Settings box displays. You should complete the following date boxes each time you begin an order: Customer Due, Est Delivery, and Est Install.

12
Setting Up & Using the HNI (HON, Gunlocke, Paoli) PSN
continue to next page
Note: Be sure the Dates and Sort/Group Desc boxes are checked. They let you view the dates, the sort and group descriptions, and the tag information while placing the order. Checking these boxes allows you to enter information in these sections in the Item Detail tab.
7. In addition to the date and viewing options, you can also change posting dates, default options, dealer shipto information, and printing instructions. For details, see the online help.
8. When you complete the changes, click Save.
9. Click the Item Detail tab.
10. Click or press F12.
11. Scroll to the location on your network hard drive where the file is stored.
12. Select the file to import.
13. When the Process SIF File prompt displays, click Yes.
14. The items move from the file to a Furniture order. At this point, you can add bid numbers to items.
Note: The bid number populates the Communication window to be sent to your HNI vendor. If there are multiple bid numbers on the order, only the first bid number is displayed in the Communication window; however, all lines are sent to your HNI vendor.

13
Setting Up & Using the HNI (HON, Gunlocke, Paoli) PSN
continue to next page
14.1 Select an item on the order.
14.2 Press F8. The Item Settings dialog box opens.
14.3 Click the Furniture Bid Number box and enter the bid number.

14
Setting Up & Using the HNI (HON, Gunlocke, Paoli) PSN
continue to next page
14.4 Click OK.
15. Add notes or tag information to the order, if necessary.
15.1 Press F11. The Order Notes box opens. For more information on adding notes, see the online help.
15.2 To add tags, click the drop-down arrow next to Line Item and select Tag. The Tag boxes allow you to enter tags that match the five industry standard tags:
• Tag 1: TG (Tag)
• Tag 2: GC (Generic Code)
• Tag 3: L1 (Alias 1)
• Tag 4: L2 (Alias 2)
• Tag 5: L3 (Alias 3)
16. Click OK.
17. Click the Order Totals tab.
18. If you have add-on items set up in the text-based (LGC1) Furniture Add On Item Parameters screen, the items are automatically added to the order (if the items are required) or the Furniture Addon Items dialog box opens so you can select the items to add to this order.
To add items to the order, enter the quantity of each item in the Qty box. For example, to add one freight charge, type 1 in the Qty box next to the freight item.
When you finish adding items, click OK. If you are not adding items to the order, click Cancel. The Order Totals tab opens.
19. At this point, you can end the order or make changes to the ending order status or printer information, and enter an end line special. For details on changing this information, see the online help.
20. To automatically build the purchase order when the order is ended, click Build P/O.
21. Click Accept Order.
Note: Using the F11 Order Notes box, you can also manually add, change, or delete option numbers and descriptions without a specifier program. In the Purchase Order Entry window, press F11 to access the Order Notes dialog box. Enter the option number and option description using the correct order and specifier format.
Building the P/OAfter importing the SIF, the Purchase Order Info dialog box opens.
1. Make sure the correct vendor is in the Vendor box. The Vendor box defaults to the vendor for the last item on the order. To change it, enter the vendor’s name or account number over the existing
vendor, or click to open the Vendor Query dialog box.
2. Use the Purchase Order Info dialog box to specify information for this purchase order, including the following.

15
Setting Up & Using the HNI (HON, Gunlocke, Paoli) PSN
continue to next page
• P/O Number.
• Ship Date: This is the date sent to Global as Requested Delivery Date.
• Ship To: Enter the shipping address to which to ship items on the purchase order.
• End the P/O: Check this box to end the P/O before you can transmit it to HNI.
3. To view global information, click Global Info. The P/O Global Settings dialog box opens. The system displays information for the vendor (manufacturer). You can use this dialog box to specify a vendor contract.
3.1 If you don’t know the vendor contract, click to open the Furniture Contract dialog box. You can also use this dialog box to enter a P/O description, a category code, and any comments.
3.2 When you finish, click OK. The cursor returns to the Purchase Order Information dialog box.
4. When you finish entering information, click Accept. The Items to Be Purchased dialog box opens. The system automatically checks the items that match the vendor alias, HON, for example, and displays them in this box.
5. To deselect an item, click it. To reselect an item, click it again.

16
Setting Up & Using the HNI (HON, Gunlocke, Paoli) PSN
continue to next page
6. You can use this dialog box to limit to a specific SIF file. To do so, click the down arrow in the SIF Limit box and select the SIF file by which to limit this P/O.
7. Click Put On P/O.
8. At the Finished Adding Items to P/O message, click OK.
9. The Purchase Order Information dialog box reopens for every vendor match on the order. However, the second time this box opens, you must manually select the vendor.
10. After you select the vendor to send the purchase order to, enter the appropriate information.
11. When the Items to Be Purchased dialog box reopens, select the items to purchase and click Put On P/O. When all the items on the order are on a P/O, the Finished Adding Items to P/O # message displays.
12. Click OK. The cursor returns to the Global tab.
Uploading the P/OAfter building the P/O, you can upload it with the following instructions:
1. From the Master Menu, double-click .
2. In the Action Code drop-down menu, click Communicate.
3. From the Vendor Type grid, click the plus sign next to HNI to expand the list to include all of your HNI vendors.

17
Setting Up & Using the HNI (HON, Gunlocke, Paoli) PSN
continue to next page
Note: You can set or change communication defaults for this vendor. Refer back to the heading Setting Up P/O Communication Defaults.
4. Click the appropriate vendor. The Purchase Order Browse dialog box opens.
5. Click the check box of the P/O to select.
Note: In the Purchase Order Browse dialog box, you can limit to any of the following: PO #, Vendor #, Vendor Name, Location (G/L location), Acknowledgment (acknowledgment #), Order Date, Due Date (P/O requested ship date), Total (total amount of the P/O), and Line (number of lines on the P/O).
6. Click OK.
7. Click Next. The Vendor Options tab opens.
8. You can change the default settings. All required boxes are bold and must be filled before you can continue.
8.1 In the S Cust No box, the default Bill To ID displays. Click the drop-down menu to select a different Bill To ID.
8.2 In the ST Cust ID box, the default Ship To ID for the default Bill To displays. If you change the Bill To ID, the Ship To ID box becomes blank, and you must select a new Ship To ID. Use the drop-down menu to select a Ship To ID.
Note: All Bill To IDs and corresponding Ship To IDs must be set up in the Default Vendor Options dialog box.
8.3 The DSR (Dealer Sales Representative) boxes show the name and email addresses of the salespersons of record for this order. The DSR Name 1 box defaults to the salesperson assigned to the order when the order was placed. The DSR Percent 1 box defaults to 100%.

18
Setting Up & Using the HNI (HON, Gunlocke, Paoli) PSN
continue to next page
However, you can split the percentage amount among up to three different salespersons. To do so, double-click the DSR Name 2 box in the Options column. The Salesperson Query dialog box automatically opens so you can select the DSR salesperson. (Do not click the DSR Name 2 Value box. Instead, double-click the DSR Name 2 box in the Options column.)
Then, click the DSR Percent 2 Value box and select the percentage to assign.
Repeat these steps to assign a percentage to a third salesperson. The percentage in the DSR Percent 1 box is automatically adjusted as you assign percentages.
9. Use the Notes/Specials section to add notes or specials to the P/O. These appear on the HNI site in the Comments box.
9.1 Click the Note Type drop-down menu and select the type of note to add. You can select Order Note, Shipping Tag, Shipping Attention, and Shipping Instructions.
9.2 To enter an order note, a shipping tag, or shipping instructions, click the text box below the Note Type box.
9.3 Enter the text for the note. For example, you might type Ship Via UPS as a shipping instruction.
9.4 To enter a shipping attention, click the first S Phone box.
9.5 Enter the shipto contact’s area code.
9.6 Enter the shipto contact’s phone number in the second and third boxes.
9.7 Click the S Contact box. Enter the shipto contact’s name.
9.8 In the Ship Condition box, select Deliver By to deliver on or before the specified Due Date. Select Deliver On to deliver only on the specified delivery date.

19
Setting Up & Using the HNI (HON, Gunlocke, Paoli) PSN
Note: The Due Date is pulled from the Ship Date in the Purchase Order Info dialog box. You can change this date in the Vendor Options tab.
9.9 When all the required boxes are populated, click Next. The Complete tab opens.
10. Click Build. The P/O you selected is transmitted to your HNI company’s Web site.
• https://honlogin.hon.com/
• https://login.gunlockeadvantage.com
• https://login.paoliconnect.com/
For more information, contact your HNI vendor.
Receiving AcknowledgmentsUse the Receive action in the Purchase Order Entry Communicate dialog box to import the acknowledgment. For more information, see Setting Up & Using Furniture Acknowledgments (pdf ) on the Customer Support Center.


