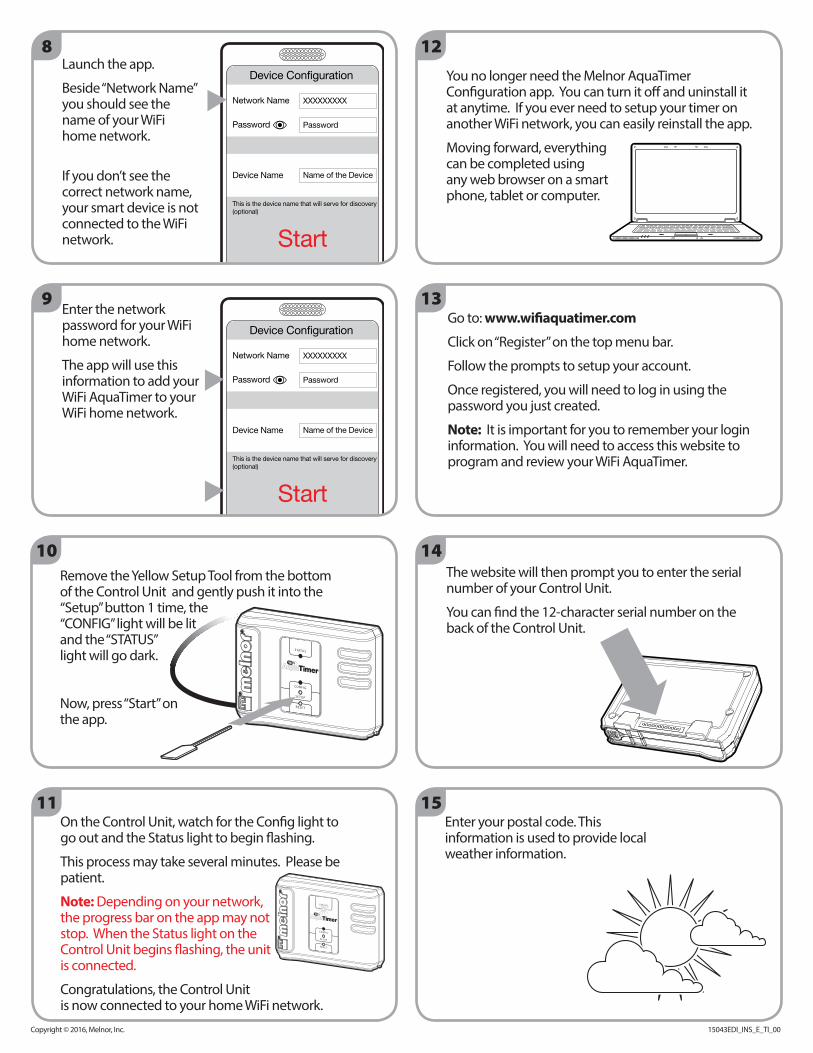
10Remove the Yellow Setup Tool from the bottom of the Control Unit and gently push it into the “Setup” button 1 time, the “CONFIG” light will be lit and the “STATUS” light will go dark.
Now, press “Start” on the app.
13Go to: www.wifi aquatimer.com
Click on “Register” on the top menu bar.
Follow the prompts to setup your account.
Once registered, you will need to log in using the password you just created.
Note: It is important for you to remember your login information. You will need to access this website to program and review your WiFi AquaTimer.
12You no longer need the Melnor AquaTimer Confi guration app. You can turn it off and uninstall it at anytime. If you ever need to setup your timer on another WiFi network, you can easily reinstall the app.
Moving forward, everything can be completed using any web browser on a smart phone, tablet or computer.
14The website will then prompt you to enter the serial number of your Control Unit.
You can fi nd the 12-character serial number on the back of the Control Unit.
8Launch the app.
Beside “Network Name” you should see the name of your WiFi home network.
If you don’t see the correct network name, your smart device is not connected to the WiFi network.
15Enter your postal code. This information is used to provide local weather information.
11On the Control Unit, watch for the Confi g light to go out and the Status light to begin fl ashing.
This process may take several minutes. Please be patient.
Note: Depending on your network, the progress bar on the app may not stop. When the Status light on the Control Unit begins fl ashing, the unit is connected.
Congratulations, the Control Unit is now connected to your home WiFi network.
TM
9Enter the network password for your WiFi home network.
The app will use this information to add your WiFi AquaTimer to your WiFi home network.
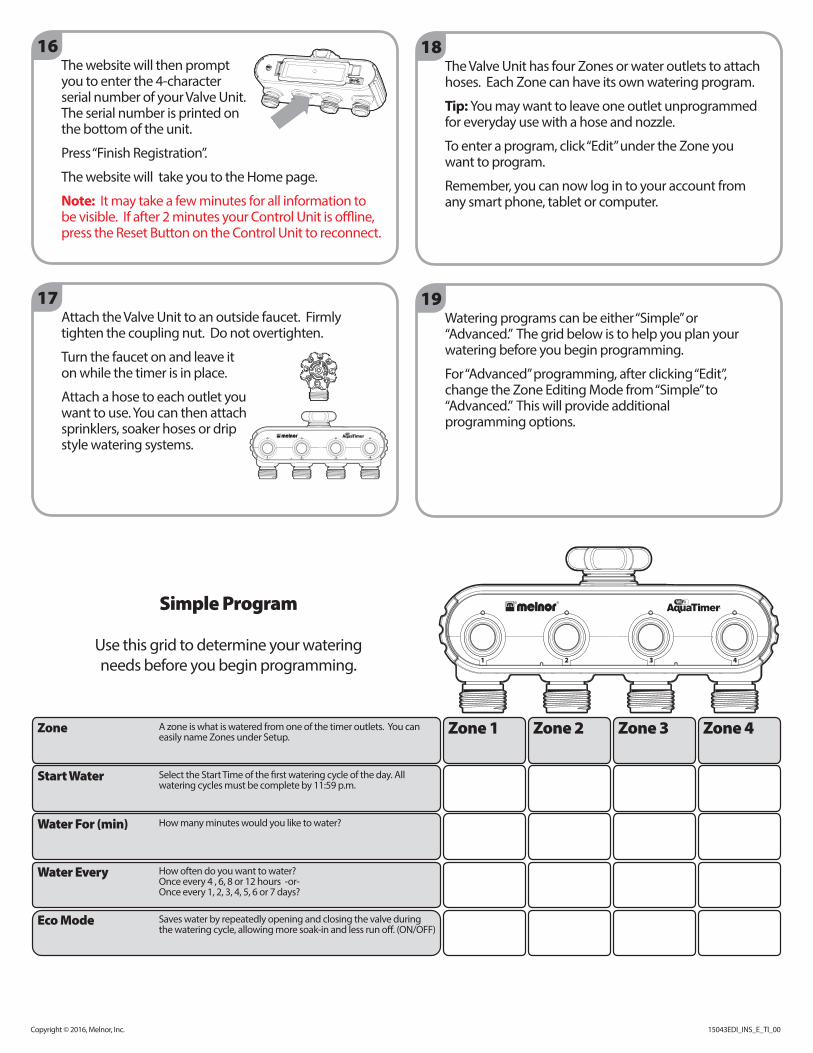
A zone is what is watered from one of the timer outlets. You can easily name Zones under Setup.
Select the Start Time of the first watering cycle of the day. All watering cycles must be complete by 11:59 p.m.
How many minutes would you like to water?
How often do you want to water? Once every 4 , 6, 8 or 12 hours -or- Once every 1, 2, 3, 4, 5, 6 or 7 days?
Saves water by repeatedly opening and closing the valve during the watering cycle, allowing more soak-in and less run off. (ON/OFF)
TM
15043
1 2 3 4
Simple Program
Use this grid to determine your wateringneeds before you begin programming.
16The website will then prompt you to enter the 4-character serial number of your Valve Unit. The serial number is printed on the bottom of the unit.
Press “Finish Registration”.
The website will take you to the Home page.
Note: It may take a few minutes for all information to be visible. If after 2 minutes your Control Unit is offl ine, press the Reset Button on the Control Unit to reconnect.
18The Valve Unit has four Zones or water outlets to attach hoses. Each Zone can have its own watering program.
Tip: You may want to leave one outlet unprogrammed for everyday use with a hose and nozzle.
To enter a program, click “Edit” under the Zone you want to program.
Remember, you can now log in to your account from any smart phone, tablet or computer.
19Watering programs can be either “Simple” or “Advanced.” The grid below is to help you plan your watering before you begin programming.
For “Advanced” programming, after clicking “Edit”, change the Zone Editing Mode from “Simple” to “Advanced.” This will provide additional programming options.
17Attach the Valve Unit to an outside faucet. Firmly tighten the coupling nut. Do not overtighten.
Turn the faucet on and leave it on while the timer is in place.
Attach a hose to each outlet you want to use. You can then attach sprinklers, soaker hoses or drip style watering systems.
Zone 1 Zone 2 Zone 3 Zone 4Zone A zone is what is watered from one of the timer outlets. You can easily name Zones under Setup.
Watering Mode
Select Day(s) to Water
Select from Multiple Days (to select specific days of the week); Even Days (even numbered calendar days); Odd Days (odd numbered calendar days)
If you selected Multiple Days above, choose which days you want to water. Each watering cycle can be different.
Start Water
Water For (min)
Eco Mode
Select the Start Time for each watering cycle. All watering cycles must be complete by 11:59 p.m. In Advanced Mode, each cycle can have its own start time.
How many minutes would you like to water? In Advanced Mode, each cycle can have its own watering duration.
Saves water by repeatedly opening and closing the valve during the watering cycle, allowing more soak-in and less run off. (ON/OFF) In Advanced Mode you can determine specific lengths for the watering (ECO Time On) and soaking periods (ECO Time Off).
TM
15043
1 2 3 4
Advanced Program
Use this grid to determine your wateringneeds before you begin programming.
FCC 15.19(a) (3): This device complies with part 15 of the FCC Rules.Operation is subject to the following two conditions:(1) This device may not cause harmful interference, and(2) This device must accept any interference received, including interference that may cause undesired operation.
FCC 15.105 (b): This equipment has been tested and found to comply with the limits for a Class B digital device, pursuant to Part 15 of the FCC Rules. These limits are designed to provide reasonable protection against harmful interference in a residential installation.
This equipment generates, uses, and can radiate radio frequency energy and, if not installed and used in accordance with the instructions, may cause harmful interference to radio communications. However, there is no guarantee that interference will not occur in a particular installation. If this equipment does cause harmful interference to radio or television reception, which can be determined by turning the equipment off and on, the user is encouraged to try to correct the interference by one or more of the following measures:- Reorient or relocate the receiving antenna.- Increase the separation between the equipment and receiver.- Connect the equipment into an outlet on a circuit diff erent from that to which the receiver is connected.- Consult the dealer or an experienced radio/TV technician for help.
FCC 15.21: CAUTION: Changes or modifi cations not approved by the responsible party could void the user’s authority to operate this equipment.
This device complies with Industry Canada license-exempt RSS standard(s).Operation is subject to the following two conditions:(1) this device may not cause interference, and(2) this device must accept any interference, including interference that may cause undesired operation of the device.
The antenna(s) used for this transmitter must be installed to provide a separation distance of at least 20 cm from all persons and not be co-located with any other transmitters except in accordance with FCC multi-transmitter product procedures.
FCC 15.19(a) (3): Cet appareil est conforme à la partie 15 du règlement de la FCC.Son utilisation est soumise aux deux conditions suivantes :(1) il ne doit pas émettre d’interférences nuisibles, et(2) il doit tolérer toute interférence reçue, y compris celles qui peuvent causer un fonctionnement non souhaité.
FCC 15.105 (b): Cet appareil a été essayé et trouvé conforme aux limites pour un appareil numérique de classe B, conformément à la Partie 15 du règlement de la FCC. Ces limites sont conçues pour fournir une protection raisonnable contre les parasites nuisibles dans une installation résidentielle.
Cet appareil génère, utilise et peut émettre des fréquences radio et, s’il n’est pas installé et utilisé conformément aux instructions du fabricant, peut causer des interférences nuisibles aux communications radio. Rien ne garantit cependant que des interférences ne se produiront pas dans une installation particulière. Si cet appareil cause de fait des interférences nuisibles à la réception radio ou télévisée, ce qui peut se déterminer en allumant et en éteignant l’appareil, il est recommandé à l’utilisateur d’essayer d’éliminer les interférences à l’aide d’une ou de plusieurs des mesures suivantes :• réorienter ou déplacer l’antenne de réception,• augmenter la distance entre l’appareil et le récepteur,• relier l’appareil à une prise ou à un courant diff érent de celui utilisé pour le récepteur, ou• consulter et demander l’aide du détaillant ou d’un réparateur radio/télé qualifi é.
FCC 15.21: ATTENTION : Les changements ou modifi cations non approuvés par le responsable peuvent annuler l’autorisation donnée à l’utilisateur de faire fonctionner cet appareil.
Cet appareil est conforme aux normes RSS d’exemption de licence d’Industrie Canada.Son utilisation est soumise aux deux conditions suivantes :(1) il ne doit pas émettre d’interférences nuisibles, et(2) il doit tolérer toute interférence reçue, y compris celles qui peuvent causer un fonctionnement non souhaité.
La ou les antennes utilisées pour cet émetteur doivent être installées pour fournir une distance d’au moins 20 cm par rapport à toute personne et ne doivent pas être placées à proximité d’aucun autre émetteur, à moins de respecter les règles de la FCC concernant les émetteurs multiples.
Melnor, Inc., 109 Tyson Drive, Winchester, Virginia 22603, U.S.A.
Batteries :1. Use only alkaline batteries in this device.2. Remove depleted batteries from device.3. Do not mix diff erent types of batteries or new batteries with used ones.4. Batteries should be inserted with the correct polarity.5. Do not short circuit the terminals.6. Do not throw batteries into the fi re.7. Used batteries should be returned to the place responsible for collecting and recycling.
Warning: Intended for outdoor use only. Severe electrical shock could result if water is sprayed into outlets or sources of electrical current. Do not use water more than 115°F (46°C). Do not use when the ambient air temperature is less 40°F (4.5°C). When not in use, drain and store indoors away from freezing temperatures.