87
SEWWHAT-PRO USER MANUAL v4.3.0 FEBRUARY 17, 2018 S & S COMPUTING Oak Ridge, TN 37830
SEWWHAT-PRO USER MANUAL
v4.3.0
FEBRUARY 17, 2018 S & S COMPUTING
Oak Ridge, TN 37830
SewWhat-Pro
1
Table of Contents 1. Introduction ................................................................................................................................ 4
1.1 Getting Started ...................................................................................................................... 4 1.2 Backup/Customize SWP ....................................................................................................... 5 1.3 Contact Us ............................................................................................................................. 5 1.4 FAQ ....................................................................................................................................... 6 1.5 Purchase SewWhat-Pro ........................................................................................................ 6 1.6 Videos ................................................................................................................................... 7
2. Menus ........................................................................................................................................ 7 2.1 File menu ............................................................................................................................... 7 2.2 Edit menu .............................................................................................................................. 8 2.3 View menu ............................................................................................................................. 9 2.4 Tools menu .......................................................................................................................... 10 2.5 Options menu ...................................................................................................................... 11 2.6 Window menu ...................................................................................................................... 11 2.7 Help menu ........................................................................................................................... 12
3. File Commands ........................................................................................................................ 12 3.1 New ..................................................................................................................................... 12 3.2 Open .................................................................................................................................... 13 3.3 Merge .................................................................................................................................. 13 3.4 Close ................................................................................................................................... 13 3.5 Save .................................................................................................................................... 14 3.6 Save As ............................................................................................................................... 14 3.7 EMail ................................................................................................................................... 14 3.8 Print ..................................................................................................................................... 14 3.9 Print Preview ....................................................................................................................... 15 3.10 Page Setup ........................................................................................................................ 15 3.11 Exit .................................................................................................................................... 16
4. Edit Commands ....................................................................................................................... 16 4.1 Undo .................................................................................................................................... 16 4.2 Redo .................................................................................................................................... 17 4.3 Order Threads ..................................................................................................................... 17 4.4 Delete Threads .................................................................................................................... 18 4.5 Join Threads ........................................................................................................................ 19 4.6 Filter Stitches ....................................................................................................................... 19 4.7 Split Pattern ......................................................................................................................... 19 4.8 Cut ....................................................................................................................................... 19 4.9 Copy .................................................................................................................................... 20 4.10 Paste ................................................................................................................................. 20 4.11 All Objects ......................................................................................................................... 20 4.12 Next Object ........................................................................................................................ 20 4.13 Previous Object ................................................................................................................. 20
5. View Commands ...................................................................................................................... 21 5.1 Toolbars and Docking Windows .......................................................................................... 21
5.1.1 Standard ........................................................................................................................ 21
5.1.2 Lettering ........................................................................................................................ 21
5.1.3 Rotation Bar .................................................................................................................. 21
5.1.4 Sew and Show Bar ........................................................................................................ 21
5.2 Large Toolbar Icons ............................................................................................................ 21 5.3 Application Look .................................................................................................................. 21

SewWhat-Pro
2
5.4 Jump Stitches ...................................................................................................................... 22 5.5 Grid Lines ............................................................................................................................ 22 5.6 Grid Labels .......................................................................................................................... 22 5.7 Snap to Grid ........................................................................................................................ 22 5.8 Stitch Points ........................................................................................................................ 22 5.9 Texture ................................................................................................................................ 22 5.10 Album Icons ....................................................................................................................... 22 5.11 Stitch Histogram ................................................................................................................ 24
6. Tools Commands ..................................................................................................................... 25 6.1 Add Border .......................................................................................................................... 25 6.2 Add Nap-Tack Stitches ....................................................................................................... 30 6.3 Adjust Density ..................................................................................................................... 31 6.4 Applique Cutter .................................................................................................................... 33 6.5 Arch Text ............................................................................................................................. 35 6.6 Basting Stitch ...................................................................................................................... 36 6.7 Batch Convert ...................................................................................................................... 36 6.8 Media Writer ........................................................................................................................ 38 6.9 Resize Pattern ..................................................................................................................... 39 6.10 Emb Lettering .................................................................................................................... 40 6.11 Sew Lettering .................................................................................................................... 40 6.12 SewWrite Lettering ............................................................................................................ 44 6.13 Write D1 Media.................................................................................................................. 45 6.14 Fabric ................................................................................................................................ 46 6.15 Center Pattern ................................................................................................................... 47
7. Options Commands ................................................................................................................. 47 7.1 Applique Cutting .................................................................................................................. 47 7.2 File ....................................................................................................................................... 48 7.3 File Associations ................................................................................................................. 49 7.4 Grid ...................................................................................................................................... 50 7.5 Hoop .................................................................................................................................... 50 7.6 Image .................................................................................................................................. 50 7.7 Project ................................................................................................................................. 51 7.8 Units .................................................................................................................................... 53 7.9 Languages ........................................................................................................................... 53
8. Window Commands ................................................................................................................. 53 8.1 All ........................................................................................................................................ 53 8.2 New ..................................................................................................................................... 54 8.3 Cascade .............................................................................................................................. 54 8.4 Size ..................................................................................................................................... 54 8.5 Tile ....................................................................................................................................... 54
9. Help Commands ...................................................................................................................... 54 9.1 Tip of the Day ...................................................................................................................... 54 9.2 Help Topics ......................................................................................................................... 54 9.3 Auto-Update ........................................................................................................................ 55 9.4 Update Now ......................................................................................................................... 55 9.5 Restore Defaults.................................................................................................................. 55 9.6 About SewWhat-Pro ............................................................................................................ 55 9.7 Change (History) Log .......................................................................................................... 55 9.8 Context Help ........................................................................................................................ 55
10. Sewing Topics ........................................................................................................................ 55 10.1 Reflect Pattern................................................................................................................... 55 10.2 Rotate Pattern ................................................................................................................... 56 10.3 Thread Palette Editor ........................................................................................................ 56 10.4 Workspace View................................................................................................................ 57
11. Toolbars ................................................................................................................................. 59 11.1 Standard ............................................................................................................................ 59

SewWhat-Pro
3
11.2 Lettering ............................................................................................................................ 61 11.3 Print Preview ..................................................................................................................... 62 11.4 Rotation Bar ...................................................................................................................... 63 11.5 Scroll Bars ......................................................................................................................... 63 11.6 Sew and Show Bar ............................................................................................................ 63 11.7 Separation Mode (Cutting) ................................................................................................ 64 11.8 Split at Stitch ..................................................................................................................... 75 11.9 Status bar .......................................................................................................................... 78 11.10 Zoom control ................................................................................................................... 78
12. Utilities.................................................................................................................................... 79 12.1 Add Font ............................................................................................................................ 79 12.2 File Open Dialog................................................................................................................ 79 12.3 File Save As Dialog ........................................................................................................... 81 12.4 Hoop Size .......................................................................................................................... 82 12.5 Hoop Calibration................................................................................................................ 84 12.6 Print Setup ......................................................................................................................... 85 12.7 Print Setup Dialog ............................................................................................................. 85
SewWhat-Pro
4
1. Introduction
1.1 Getting Started
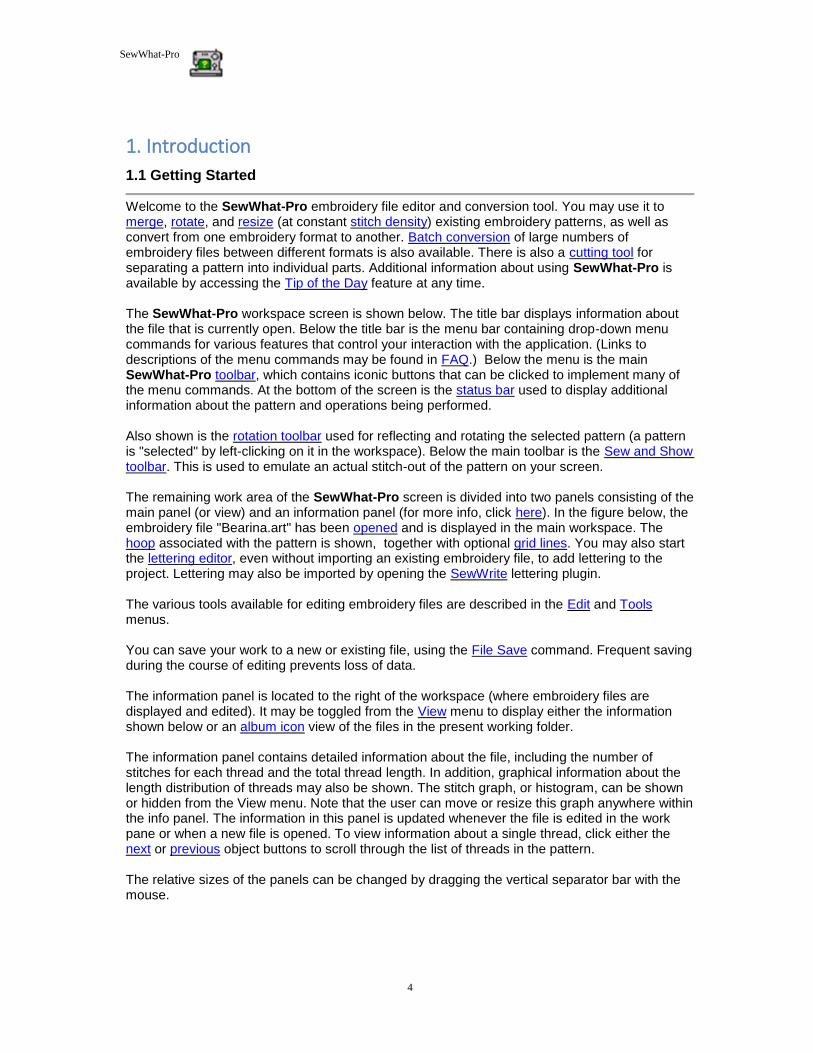
Welcome to the SewWhat-Pro embroidery file editor and conversion tool. You may use it to merge, rotate, and resize (at constant stitch density) existing embroidery patterns, as well as convert from one embroidery format to another. Batch conversion of large numbers of embroidery files between different formats is also available. There is also a cutting tool for separating a pattern into individual parts. Additional information about using SewWhat-Pro is available by accessing the Tip of the Day feature at any time. The SewWhat-Pro workspace screen is shown below. The title bar displays information about the file that is currently open. Below the title bar is the menu bar containing drop-down menu commands for various features that control your interaction with the application. (Links to descriptions of the menu commands may be found in FAQ.) Below the menu is the main SewWhat-Pro toolbar, which contains iconic buttons that can be clicked to implement many of the menu commands. At the bottom of the screen is the status bar used to display additional information about the pattern and operations being performed. Also shown is the rotation toolbar used for reflecting and rotating the selected pattern (a pattern is "selected" by left-clicking on it in the workspace). Below the main toolbar is the Sew and Show toolbar. This is used to emulate an actual stitch-out of the pattern on your screen. The remaining work area of the SewWhat-Pro screen is divided into two panels consisting of the main panel (or view) and an information panel (for more info, click here). In the figure below, the embroidery file "Bearina.art" has been opened and is displayed in the main workspace. The hoop associated with the pattern is shown, together with optional grid lines. You may also start the lettering editor, even without importing an existing embroidery file, to add lettering to the project. Lettering may also be imported by opening the SewWrite lettering plugin. The various tools available for editing embroidery files are described in the Edit and Tools menus. You can save your work to a new or existing file, using the File Save command. Frequent saving during the course of editing prevents loss of data. The information panel is located to the right of the workspace (where embroidery files are displayed and edited). It may be toggled from the View menu to display either the information shown below or an album icon view of the files in the present working folder. The information panel contains detailed information about the file, including the number of stitches for each thread and the total thread length. In addition, graphical information about the length distribution of threads may also be shown. The stitch graph, or histogram, can be shown or hidden from the View menu. Note that the user can move or resize this graph anywhere within the info panel. The information in this panel is updated whenever the file is edited in the work pane or when a new file is opened. To view information about a single thread, click either the next or previous object buttons to scroll through the list of threads in the pattern. The relative sizes of the panels can be changed by dragging the vertical separator bar with the mouse.

SewWhat-Pro
5
1.2 Backup/Customize SWP
To enable customization of your copy of SewWhat-Pro, certain files used for fabrics, quilts and threads are
stored in a special folder in your Documents directory called SSBackup (see Figure below). At any time,
you may add your own files to any of these folders to extend the basic set of fabrics, quilts or thread data
that ship with SewWhat-Pro. (Quilt files must be in VIP format.) In addition, the "MyStash.bin" file, used
to maintain a copy of your thread stash , is stored there (it should NOT be edited except through the stash
editor in SewWhat-Pro).
This folder also enables you to backup and transfer your customized files to another computer where you
have installed SewWhat-Pro. For backup purposes, copy the entire SSBackup folder to your backup media
(such as a USB stick). To transfer your files to a new computer, just copy the entire SSBackup folder from
your existing computer to the Documents folder on your new computer.
Fig. 1. SSBackup folder
1.3 Contact Us
SewWhat-Pro
6
If you have any questions about the SewWhat-Pro program, or any suggestions for improvements or additional features you would like to see added, please contact us at [email protected]
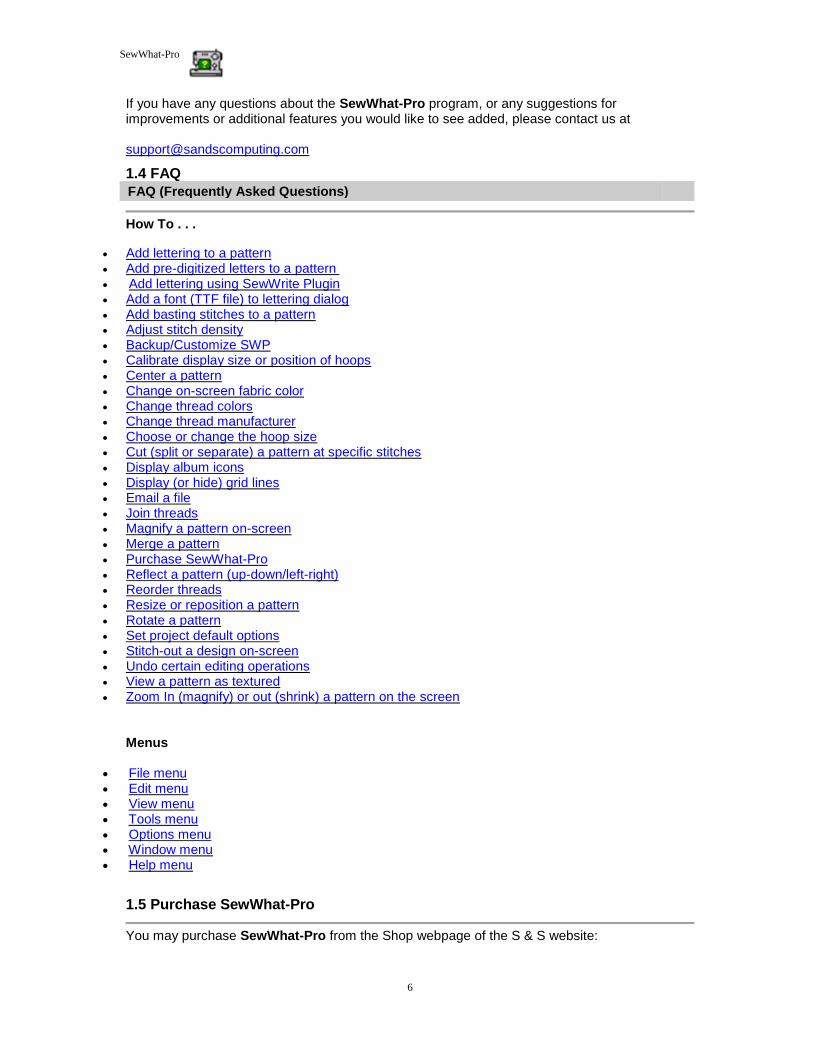
1.4 FAQ
FAQ (Frequently Asked Questions)
How To . . .
• Add lettering to a pattern • Add pre-digitized letters to a pattern • Add lettering using SewWrite Plugin • Add a font (TTF file) to lettering dialog • Add basting stitches to a pattern • Adjust stitch density • Backup/Customize SWP
• Calibrate display size or position of hoops • Center a pattern • Change on-screen fabric color • Change thread colors • Change thread manufacturer • Choose or change the hoop size • Cut (split or separate) a pattern at specific stitches • Display album icons • Display (or hide) grid lines • Email a file • Join threads • Magnify a pattern on-screen • Merge a pattern • Purchase SewWhat-Pro • Reflect a pattern (up-down/left-right) • Reorder threads • Resize or reposition a pattern • Rotate a pattern • Set project default options • Stitch-out a design on-screen • Undo certain editing operations • View a pattern as textured • Zoom In (magnify) or out (shrink) a pattern on the screen
Menus
• File menu • Edit menu • View menu • Tools menu • Options menu • Window menu • Help menu
1.5 Purchase SewWhat-Pro
You may purchase SewWhat-Pro from the Shop webpage of the S & S website:
SewWhat-Pro
7
http://sandscomputing.com/products-shop/ or any of our reseller websites. Click the SewWhat-Pro product listing and use the Add-to-Cart button to purchase the license. If you want to order a CD, use the down-arrow on the Add-to-Cart button to select the CD version of the software. To update to the latest version of the software, use the Download button on the Shop->SewWhat-Pro webpage of our website. There is a 30 day DEMO period during which you may use the software. The only restriction during this evaluation period is on the total number of files allowed to be saved (60) and the total number of color stops saved per file (no more than 3). Once the DEMO has expired (or sooner), you can either uninstall the software or purchase a license (Add-to-Cart). If you purchase a license, the registration information will be emailed to you and you can register the DEMO to make it a licensed copy with no restrictions. You DO NOT have to uninstall the DEMO if you want to keep the software, but only register it after receiving the license information.
1.6 Videos
Video tutorials for SewWhat-Pro can be found and viewed at this location (videos) on our website. Scroll to the "videos" button to open the carousel.
2. Menus
2.1 File menu
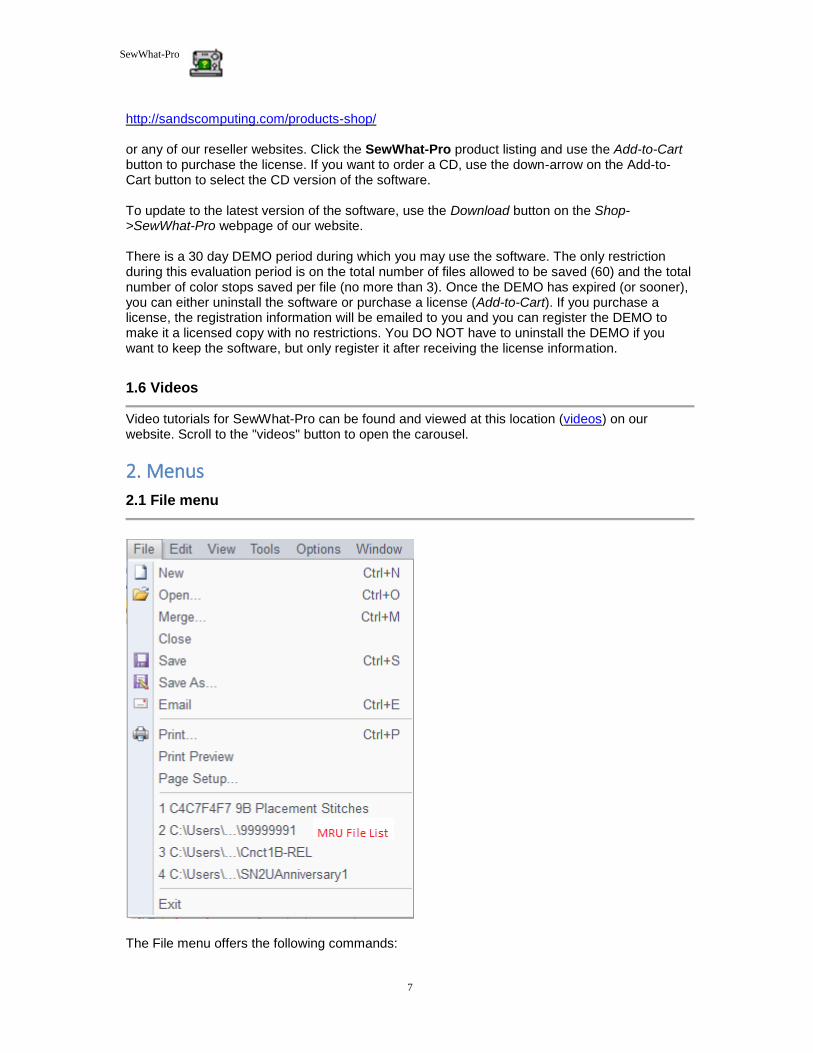
The File menu offers the following commands:

SewWhat-Pro
8
New Creates a new blank sewing pattern file.
Open Opens an existing sewing pattern file.
Merge Merge a pattern file from disk with the presently active (opened) file.
Close Closes the presently active pattern file.
Save Saves an opened pattern file, using the same file name.
Save As Saves an opened pattern file to a specified file name.
Email Send an embroidery file as an attachment via email
Print Prints the pattern and design information.
Print Preview Displays the pattern on the screen as it would appear printed.
Page Setup Selects printing options.
Exit Exits the SewWhat-Pro application.
2.2 Edit menu
The Edit menu offers the following commands:
Undo Reverse (undo) previous editing operation.
Redo Reverse (redo) previous undo operation
Order Threads Reorders, joins and/or deletes threads from one list.
Delete Threads Deletes threads based on length or number of stitches.
Join Threads Joins threads of a given color.
Filter Stitches Eliminate stitches based on length criterion.
Split Pattern Splits pattern (or thread) according to user-drawn region.
Cut Deletes presently selected pattern from the document and moves it to the clipboard.
SewWhat-Pro
9
Copy Copies presently selected pattern from the document to the clipboard.
Paste Pastes a pattern from the clipboard into the document.
All Objects Selects all objects (threads) and makes them available for editing.
Next Object Makes next (thread) object available for editing.
Previous Object Makes previous (thread) object available for editing.
2.3 View menu
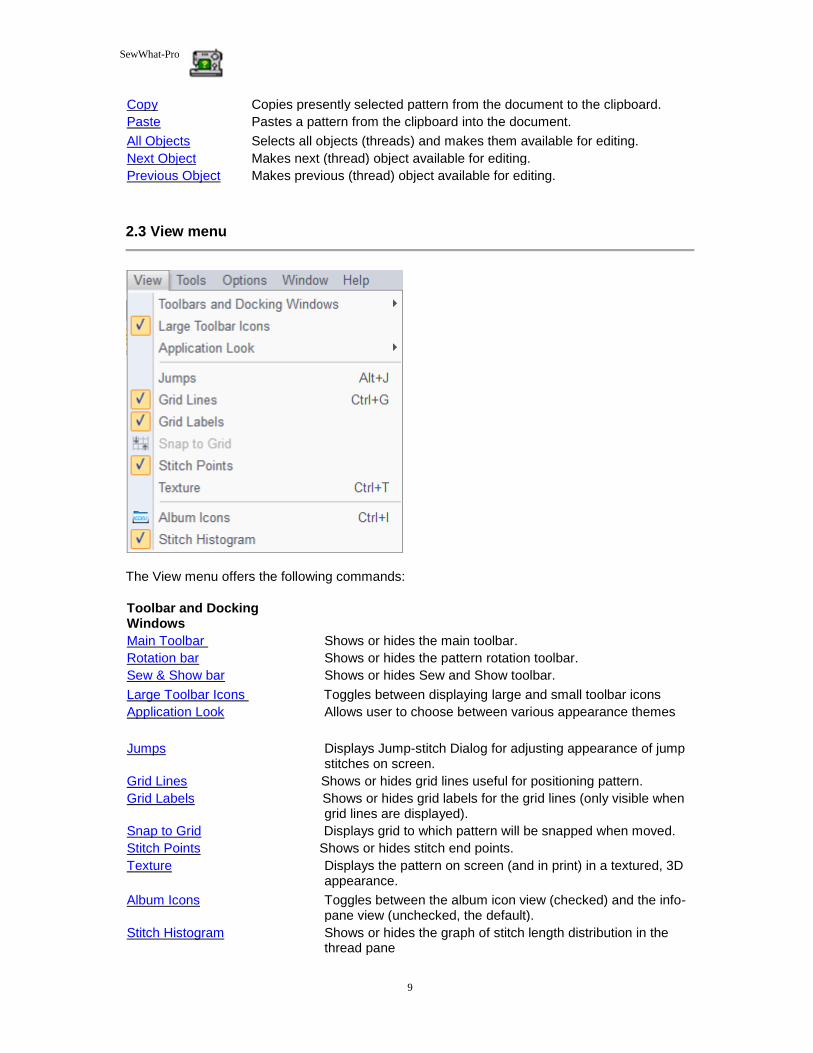
The View menu offers the following commands:
Toolbar and Docking Windows
Main Toolbar Shows or hides the main toolbar.
Rotation bar Shows or hides the pattern rotation toolbar.
Sew & Show bar Shows or hides Sew and Show toolbar.
Large Toolbar Icons To Toggles between displaying large and small toolbar icons
Application Look Allows user to choose between various appearance themes
Jumps Displays Jump-stitch Dialog for adjusting appearance of jump stitches on screen.
Grid Lines S Shows or hides grid lines useful for positioning pattern.
Grid Labels S S Shows or hides grid labels for the grid lines (only visible when grid lines are displayed).
Snap to Grid Disp Displays grid to which pattern will be snapped when moved.
Stitch Points Shows or hides stitch end points.
Texture Displays the pattern on screen (and in print) in a textured, 3D appearance.
Album Icons Toggles between the album icon view (checked) and the info-pane view (unchecked, the default).
Stitch Histogram Shows or hides the graph of stitch length distribution in the thread pane

SewWhat-Pro
10
2.4 Tools menu
The Tools menu offers the following commands:
Add Border Add a border to an existing pattern.
Add Nap-Tack Stitches
Add stitches beneath selected pattern/colors to tack-down nap.
Adjust Density
Adjust (increase/decrease) stitch density for selected pattern.
Applique Cutter
Saves high-resolution jpg files for selected dielines/tackdowns.
Arch Text Arrange individual letters on an arch.
Basting Stitch Adds basting stitches around pattern and/or around hoop.
Batch Convert
Begin batch conversion dialog.
Media Writer
Write files to external media (SM/CF/USB) for Brother,
Elna, various Janome and Singer machines
Resize Pattern
Enter exact new sizes for a pattern.
Emb Lettering
Insert pre-digitized lettering into an embroidery pattern from
the keyboard.
Sew Lettering Insert lettering/monograms into an embroidery pattern.
SewWrite Lettering1
Use SewWrite plugin to insert lettering/monograms into
pattern.
SewWhat-Pro
11
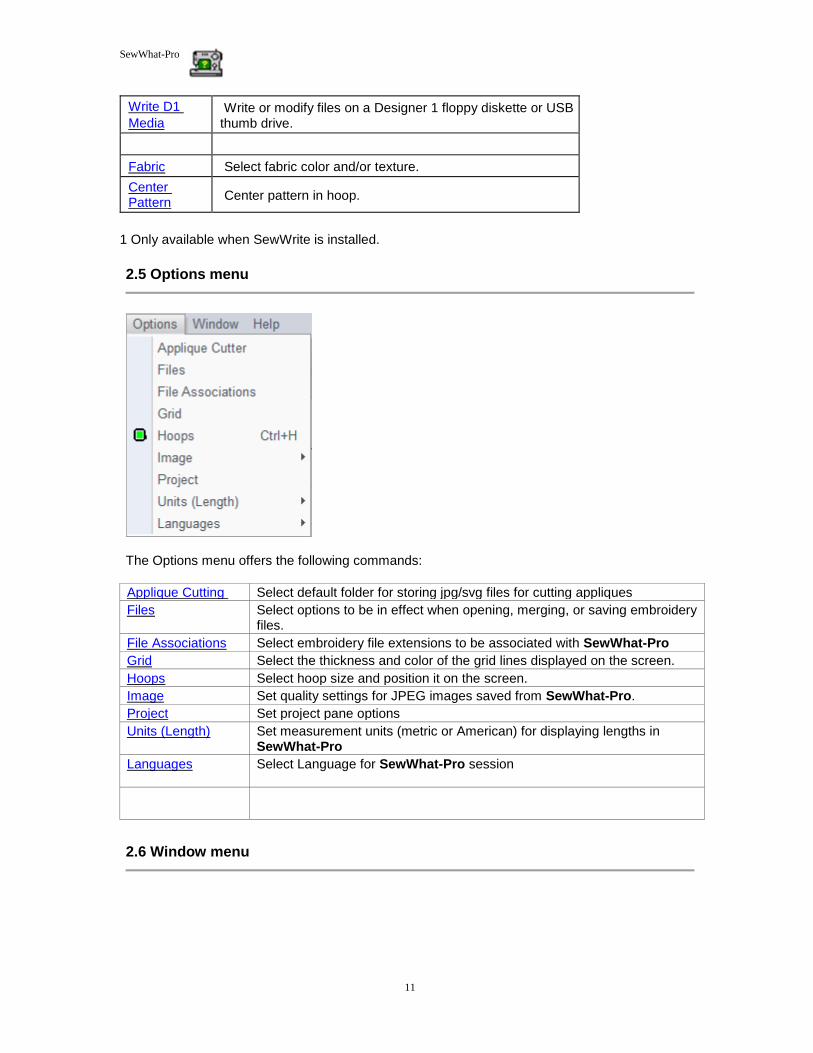
Write D1
Media Write or modify files on a Designer 1 floppy diskette or USB thumb drive.
Fabric Select fabric color and/or texture.
Center Pattern
Center pattern in hoop.
1 Only available when SewWrite is installed.
2.5 Options menu
The Options menu offers the following commands:
Applique Cutting Select default folder for storing jpg/svg files for cutting appliques
Files Select options to be in effect when opening, merging, or saving embroidery files.
File Associations Select embroidery file extensions to be associated with SewWhat-Pro
Grid Select the thickness and color of the grid lines displayed on the screen.
Hoops Select hoop size and position it on the screen.
Image Set quality settings for JPEG images saved from SewWhat-Pro.
Project Set project pane options
Units (Length) Set measurement units (metric or American) for displaying lengths in SewWhat-Pro
Languages Select Language for SewWhat-Pro session
2.6 Window menu

SewWhat-Pro
12
The Window menu offers the following commands, which enable you to arrange multiple views of multiple documents in the application window:
New Window Creates a new window that views the same document.
Cascade Arranges windows in an overlapped fashion.
Tile Arranges windows in non-overlapped tiles.
Windows 1, 2, ... Goes to specified window (if more than one is open).
2.7 Help menu
The Help menu offers the following commands, which provide assistance for using SewWhat-Pro:
Tip of the Day Displays a useful suggestion for using SewWhat-Pro.
Help topics Lists help topics.
Restore Defaults Reset the default (installation) setting in the registry.
Auto-Update Toggles on/off the auto-update feature in SewWhat-Pro.
Update Now Checks website for available update of SewWhat-Pro.
About SewWhat-Pro Display program information, version number, copyright.
Change (History) Log Displays history of changes to SewWhat-Pro.
3. File Commands
3.1 New
SewWhat-Pro
13
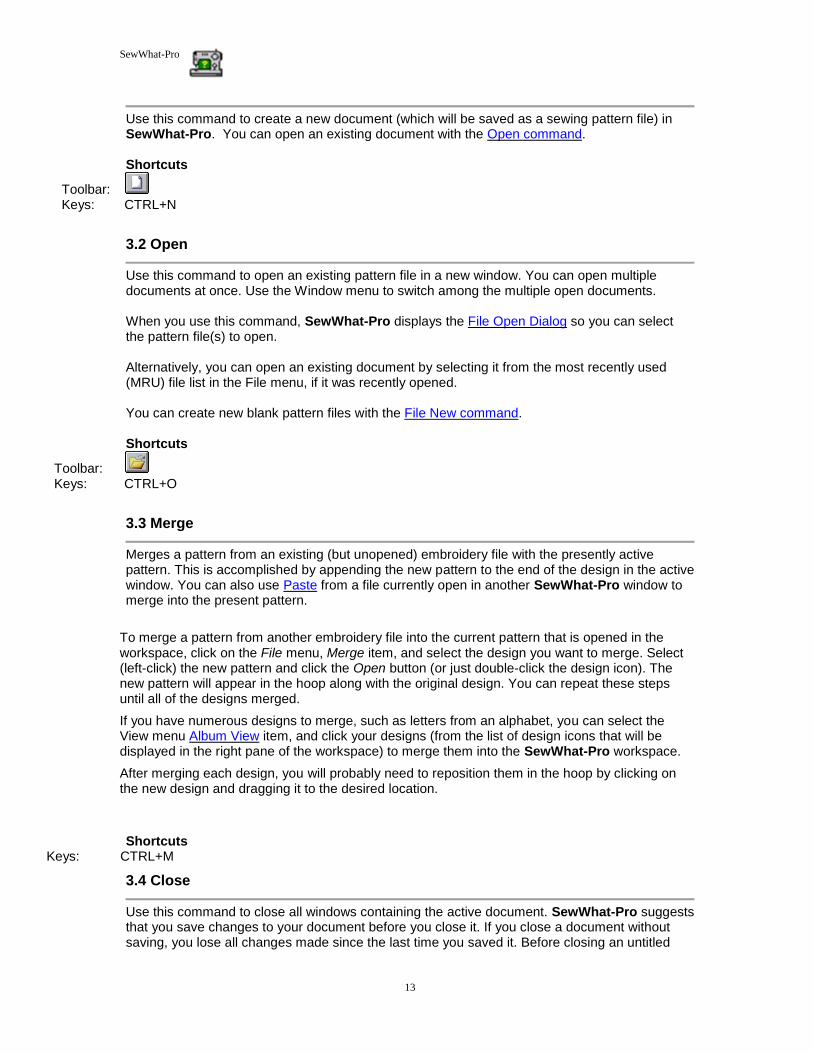
Use this command to create a new document (which will be saved as a sewing pattern file) in SewWhat-Pro. You can open an existing document with the Open command.
Shortcuts
Toolbar: Keys: CTRL+N
3.2 Open
Use this command to open an existing pattern file in a new window. You can open multiple documents at once. Use the Window menu to switch among the multiple open documents. When you use this command, SewWhat-Pro displays the File Open Dialog so you can select the pattern file(s) to open. Alternatively, you can open an existing document by selecting it from the most recently used (MRU) file list in the File menu, if it was recently opened. You can create new blank pattern files with the File New command. Shortcuts
Toolbar: Keys: CTRL+O
3.3 Merge
Merges a pattern from an existing (but unopened) embroidery file with the presently active pattern. This is accomplished by appending the new pattern to the end of the design in the active window. You can also use Paste from a file currently open in another SewWhat-Pro window to merge into the present pattern.
To merge a pattern from another embroidery file into the current pattern that is opened in the workspace, click on the File menu, Merge item, and select the design you want to merge. Select (left-click) the new pattern and click the Open button (or just double-click the design icon). The new pattern will appear in the hoop along with the original design. You can repeat these steps until all of the designs merged.
If you have numerous designs to merge, such as letters from an alphabet, you can select the View menu Album View item, and click your designs (from the list of design icons that will be displayed in the right pane of the workspace) to merge them into the SewWhat-Pro workspace.
After merging each design, you will probably need to reposition them in the hoop by clicking on the new design and dragging it to the desired location.
Shortcuts
Keys: CTRL+M
3.4 Close
Use this command to close all windows containing the active document. SewWhat-Pro suggests that you save changes to your document before you close it. If you close a document without saving, you lose all changes made since the last time you saved it. Before closing an untitled

SewWhat-Pro
14
document, SewWhat-Pro displays the File Save As Dialog and suggests that you name and save the document. Shortcuts
Mouse: Close a document by clicking the Close icon on the document's window
Keys: CTRL+F4 closes a document window
3.5 Save
Use this command to save the active document to its current name and directory. When you save a document for the first time, SewWhat-Pro displays the File Save As Dialog so you can name your document. If you want to change the name and directory of an existing document before you save it, choose the File Save As command. Shortcuts
Toolbar: Keys: CTRL+S
3.6 Save As
Use this command to save and rename the active document. SewWhat-Pro displays the File Save As dialog box so you can rename your embroidery file and change its file type (extension).
To save a pattern with its existing name, folder, and extension, use the Save command.
3.7 EMail
Use this File menu item to email a copy of the pattern file in the SewWhat-Pro workspace. The file must be saved before it can be sent.
Shortcuts
Toolbar:
3.8 Print
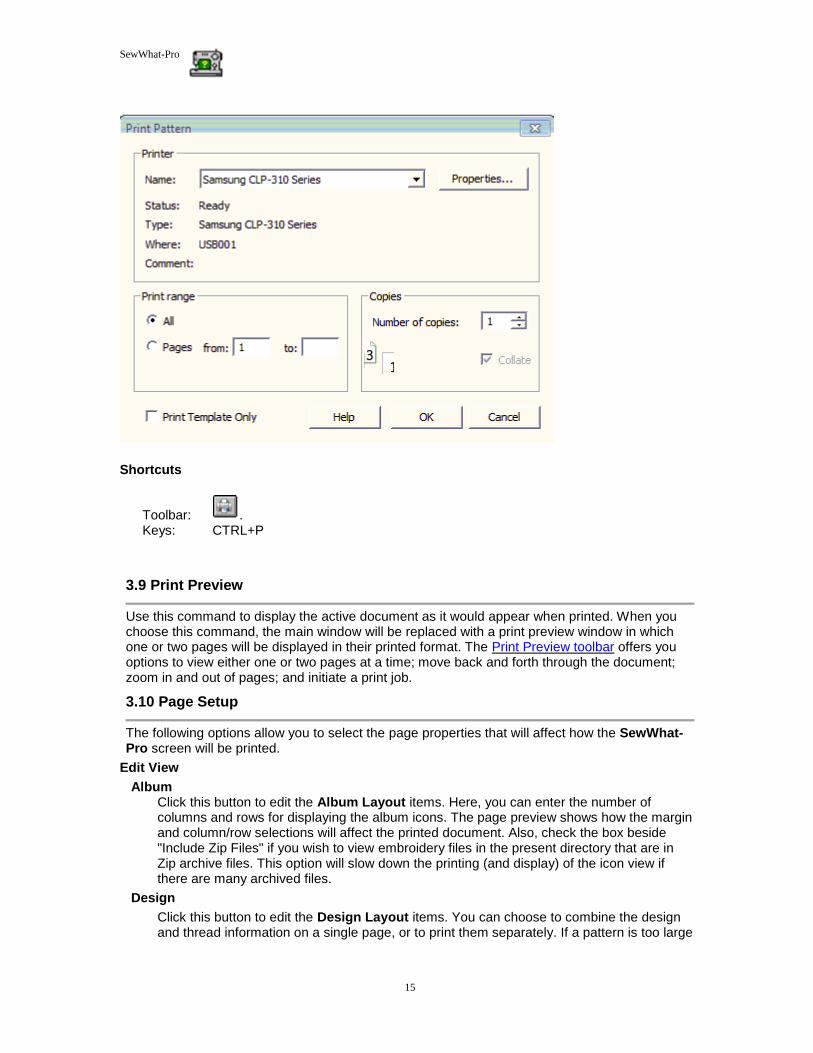
Use this command to print a SewWhat-Pro document. This command presents a print dialog (see below), where you may specify the range of pages to be printed, the number of copies, the destination printer, and other printer setup properties.
When the Info Pane is activated in the View menu, then the pattern displayed in the workspace, together with other information chosen in the Page Setup dialog, will be printed. In this mode, there is an option to print a template only. When the Album (or Icon) view is selected (by checking Album Icons), then an album of all the embroidery files in the present directory will be printed.
SewWhat-Pro
15
Shortcuts
Toolbar: . Keys: CTRL+P
3.9 Print Preview
Use this command to display the active document as it would appear when printed. When you choose this command, the main window will be replaced with a print preview window in which one or two pages will be displayed in their printed format. The Print Preview toolbar offers you options to view either one or two pages at a time; move back and forth through the document; zoom in and out of pages; and initiate a print job.
3.10 Page Setup
The following options allow you to select the page properties that will affect how the SewWhat-Pro screen will be printed.
Edit View
Album Click this button to edit the Album Layout items. Here, you can enter the number of columns and rows for displaying the album icons. The page preview shows how the margin and column/row selections will affect the printed document. Also, check the box beside "Include Zip Files" if you wish to view embroidery files in the present directory that are in Zip archive files. This option will slow down the printing (and display) of the icon view if there are many archived files.
Design
Click this button to edit the Design Layout items. You can choose to combine the design and thread information on a single page, or to print them separately. If a pattern is too large

SewWhat-Pro
16
to fit onto a single page, then choosing the "separate" option will allow the design to be automatically split over several pages.
Paper Size Select the size of paper that the document is to be printed on.
Paper Source Some printers offer multiple trays for different paper sources. Specify the tray here.
Orientation Choose Portrait or Landscape.
Margins Enter the page margins here.
Printer Displays a dialog box for selecting the printer you want to use. Choose the Default Printer, or choose the Name option and select one of the currently installed printers shown in the box. You install printers and configure ports using the Windows Control Panel. Choose the Properties option to further refine the printer properties.
3.11 Exit
Use this command to end your SewWhat-Pro session. You can also use the Close command on the application Control menu. SewWhat-Pro prompts you to save documents with unsaved changes. Shortcuts
Mouse: Click the application's Exit (close SewWhat-Pro) menu button.
Keys: ALT+F4 closes the SewWhat-Pro window or dialog box
4. Edit Commands
4.1 Undo
Use this command to reverse the last editing actions, if possible. The Undo command is dimmed (inactive) on the standard toolbar and Edit menu if there are no actions to reverse. In SewWhat-Pro, the following operations may be undone:
Undo Operation Effect of Undo
Merge Merged pattern deleted
Delete pattern or object
Deleted pattern or object restored
Color change Original thread color restored
Move, scaled rotate Original position, size, orientation of pattern or object restored
Density adjustment Restores stitch density
Cut (split) pattern Restores original (uncut) pattern. In cut mode, restores previous cut state

SewWhat-Pro
17
Shortcuts
Toolbar: Keys: CTRL+Z
4.2 Redo
Use this command to reverse the last undo actions, if possible. The Redo command is dimmed (inactive) on the standard toolbar and Edit menu if there are no undo actions to reverse. Making a new edit after either an undo or redo will clear the redo list. That means if you want to Redo an Undo action, you should do it before performing any additional edits. Shortcuts
Toolbar: Keys: CTRL+Y
4.3 Order Threads
Choose this option from the Edit menu to display a dialog (Fig. 1) with a list for ordering, joining and/or deleting threads from your active design. The present thread colors and their order are displayed in the "Old Thread" column. The "New Order" column is active, so you can click on a number there to reorder (or join or delete it). You can use TAB or Arrow Keys as well to navigate quickly in the active column. When finished, you should press "Enter" and then the "OK" button to accept your changes. To reorder the threads comprising your patterns, enter in the New Order column of the list box the order number that the original thread (whose number is given in the Old Thread column) should have in the newly ordered pattern. For example, if you want the old stitch #5 to be the new stitch #1, then enter a 1 in the New Order column of row 5. To delete a thread from the new pattern, enter either a blank or a zero (0) in the New Order column corresponding to the row number of the old stitch to delete. For example, to delete old stitch #2, enter a blank (or 0) in the New Order column of row 2. To join two or more threads, enter in the New Order column the same new stitch number for each of the rows of the corresponding old threads. Thus, to join old stitches #2 and #4, for example, and stitch them out as the third stitch, enter a 3 in the New Order column of rows 2 and 4.

SewWhat-Pro
18
Fig 1. Dialog for entering new thread order. Above, old color #5 has been reordered to be new color #1. Shortcuts You can quickly reorder a single thread in the Thread Info pane by holding down the Shift+Left Mouse button and dragging the color to the stop where you want it to be placed. Release the mouse button to drop the color onto the new stop position. If you drag a color up, it will be placed at the stop position just above the stop where you drop it; dragging down will place the color below the drop stop.
4.4 Delete Threads
Choose this option from the Edit menu to display a dialog for deleting threads from your design. Threads may be deleted either based on the number of stitches and/or the length of thread in a particular color.
SewWhat-Pro
19
An alternative way to eliminate a specific thread is to right-click on the thread color button in the Thread Palette. Then select the Delete Thread menu item. Another way to delete an entire from a pattern thread is to scroll through the individual thread objects using the Next or Previous buttons, and then press the Delete keyboard button when the desired thread is highlighted.
4.5 Join Threads
Choose this option from the Edit menu to display a dialog for joining threads of the same color in your design. Threads may be joined either based on being adjacent or by specifying their number on the thread tool bar.
4.6 Filter Stitches
Choose this option from the Edit menu to display a dialog for eliminating stitches that are shorter than a user-selectable length. The stitches are joined with the previous one(s) until the new combined stitch length is larger than the length you have entered. Important Note: This operation cannot be "undone" with the Edit-Undo feature. Therefore, it is recommended to save a copy of the file before applying any filtering, in case you want to restore the pattern to the unfiltered state.
4.7 Split Pattern
This toolbar button or Edit menu item allows you to split a pattern (or thread object) into separate colors which are subsequently grouped into a single pattern. This may be used to cut a pattern that is too large to fit into an available hoop, or to split a single thread into two or more threads which can be separately colored. After clicking the Split Pattern button (or menu item), SewWhat-Pro enters Separation Mode. In this mode, you must click out a set of points around the part of the pattern to be split. This will define a polygon which will separate (cut) the pattern into two separate regions: the region inside the polygon, which will be treated as a new color; and the rest of the pattern, which will remain unchanged. See the description of the Separation Mode Toolbar for detailed cutting instructions.
Shortcuts
Toolbar:
4.8 Cut
Use this command to remove (cut) the currently selected pattern from the document and put it on the clipboard. This command is unavailable if there is no pattern currently selected. Cutting data to the clipboard replaces the contents previously stored there. Cut data can be subsequently pasted into another pattern. See also Split Pattern, Delete Threads. Shortcuts
Toolbar: Keys: CTRL+X, Delete

SewWhat-Pro
20
4.9 Copy
Use this command to copy the selected pattern onto the clipboard. This command is unavailable if there is no pattern selected. Copying data to the clipboard replaces the contents previously stored there. Shortcuts
Toolbar: Keys: CTRL+C
4.10 Paste
Use this command to insert a copy of the pattern in the clipboard at the insertion point. This command is unavailable if the clipboard is empty. A bitmap of the pattern is also stored in the clipboard, allowing you to paste the clipboard contents into other standard applications, such as a word processor. Shortcuts
Toolbar: Keys: CTRL+V, SHIFT+INS
4.11 All Objects
This state behavior is activated by default. After a design is saved, the individual threads (objects) are grouped into patterns. By left-clicking with the mouse anywhere within a pattern, the entire pattern can be edited (deleted, resized, moved, reflected, scaled). In contrast, by selecting the Next Object (or Previous Object ) button or menu item, individual thread objects can be edited. Shortcuts
Toolbar: Keys: CTRL+A
4.12 Next Object
When this button is activated, the user can select an individual thread object for customized editing. This is useful, for example, if only certain (but not all) thread colors require removal or resizing. Pressing this button scrolls through all the thread colors in increasing order of appearance on the thread selection bar. Shortcuts
Toolbar: Keys: CTRL+N
4.13 Previous Object
See the description of the Next Object button. In contrast to the next object button, pressing this button scrolls through the thread colors backwards. Shortcuts
SewWhat-Pro
21
Toolbar: Keys: CTRL+R
5. View Commands
5.1 Toolbars and Docking Windows
5.1.1 Standard
Use this command to display or hide the Standard Toolbar, which includes buttons for some of the most common commands in SewWhat-Pro, such as File Open. A check mark appears next to the menu item when the Toolbar is displayed.
5.1.2 Lettering
Use this command to display and hide the Lettering bar . A check mark appears next to the menu item when this bar is displayed.
5.1.3 Rotation Bar
Use this command to display and hide the Rotation bar . A check mark appears next to the menu item when this bar is displayed.
5.1.4 Sew and Show Bar
Use this command to display and hide the Sew and Show bar. A check mark appears next to the menu item when this bar is displayed.
5.2 Large Toolbar Icons
Click this View menu item to toggle between the small and large main toolbar icons.
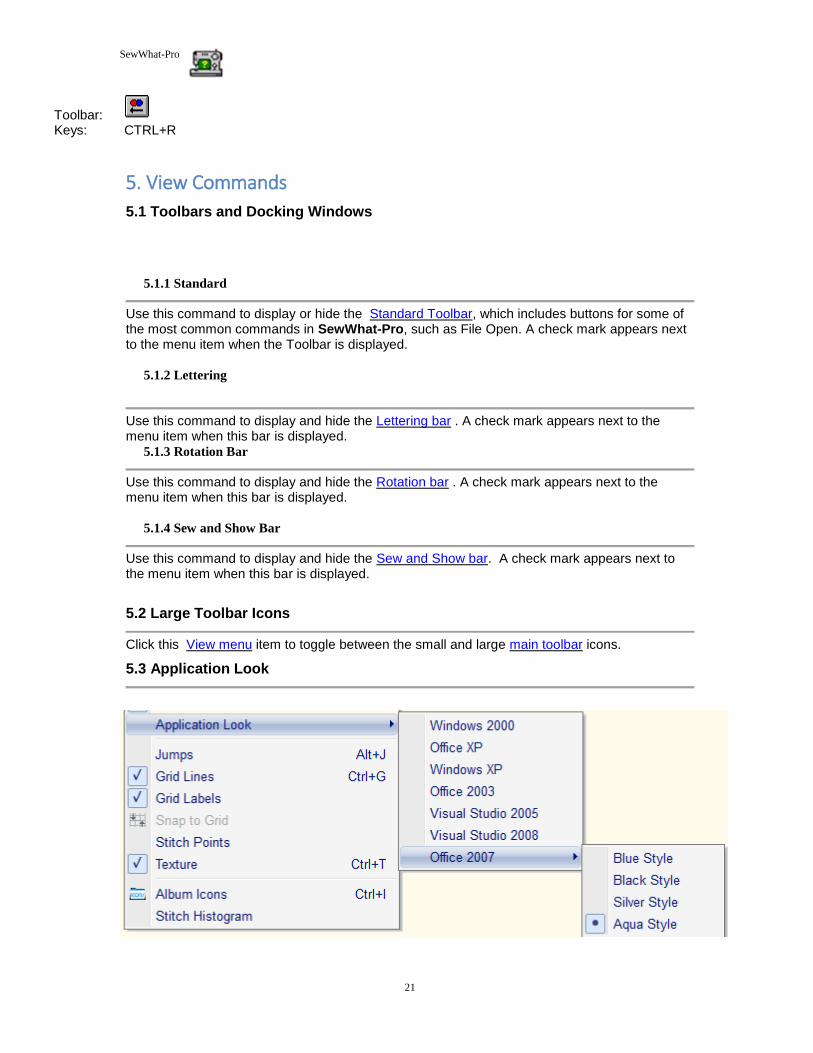
5.3 Application Look
SewWhat-Pro
22
Use this menu item to change the application look by choosing from a variety of appearance themes. In the
example above, the "Aqua Style" theme for Office 2007 has been selected.
5.4 Jump Stitches
This menu launches a dialog box which allows the user to choose the manner in which jump stitches (needle-up) are viewed on screen. The default is for these stitches to be hidden, but the user can override this behavior and show the jumps as dashes or thick lines to distinguish them from the ordinary (needle-down) stitches.
5.5 Grid Lines
Use this View Menu item to display (or hide) grid lines on the screen. Grid lines may be helpful for accurately placing a pattern within the hoop.
5.6 Grid Labels
This View menu item is used to display (checked) or hide (unchecked) labels for the Grid Lines.
5.7 Snap to Grid
This View menu item is used to turn on/off the snap-to-grid feature. When this is on, grid lines will appear in the hoop. These are used for accurately aligning the pattern. When the pattern is moved - either by pressing the arrow keys or with the mouse - the pattern will be automatically aligned (snapped) to the nearest grid line. You may choose from a variety of grid separations in the Options/Grid menu item. Shortcuts
Toolbar:
5.8 Stitch Points
This item displays (checked) or hides (unchecked) the end points for each stitch. This is useful for locating a particular stitch in the pattern. You may have to magnify the pattern on the screen to see the stitch points.
5.9 Texture
This View menu item can be selected to display the stitched pattern on screen (and in print mode) in a textured (sometimes called "3D") appearance.
5.10 Album Icons
This View menu item toggles between the Information Pane (Fig. 1), which shows pattern information for the presently active pattern, and the icon (or album) view (Fig. 2), which displays thumbnails of the embroidery files in the current work folder (directory) and previously opened ones as well. (The work folder is the one containing the last file that was opened by SewWhat-Pro.)
SewWhat-Pro
23
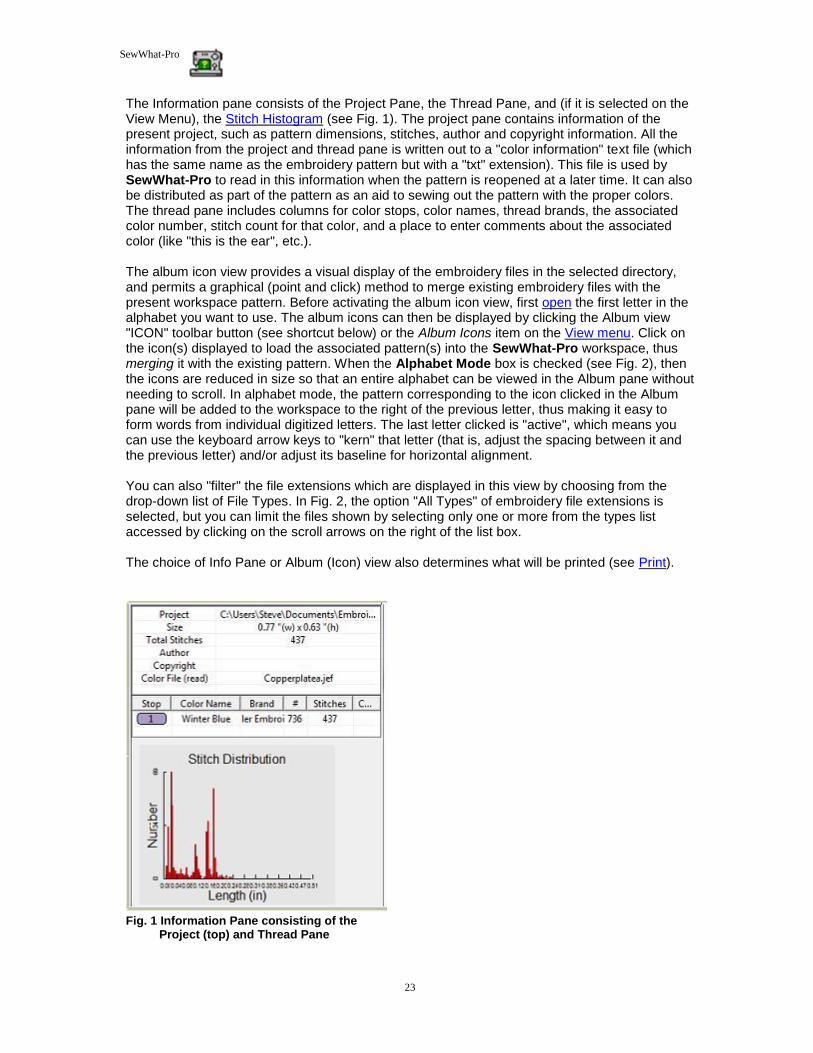
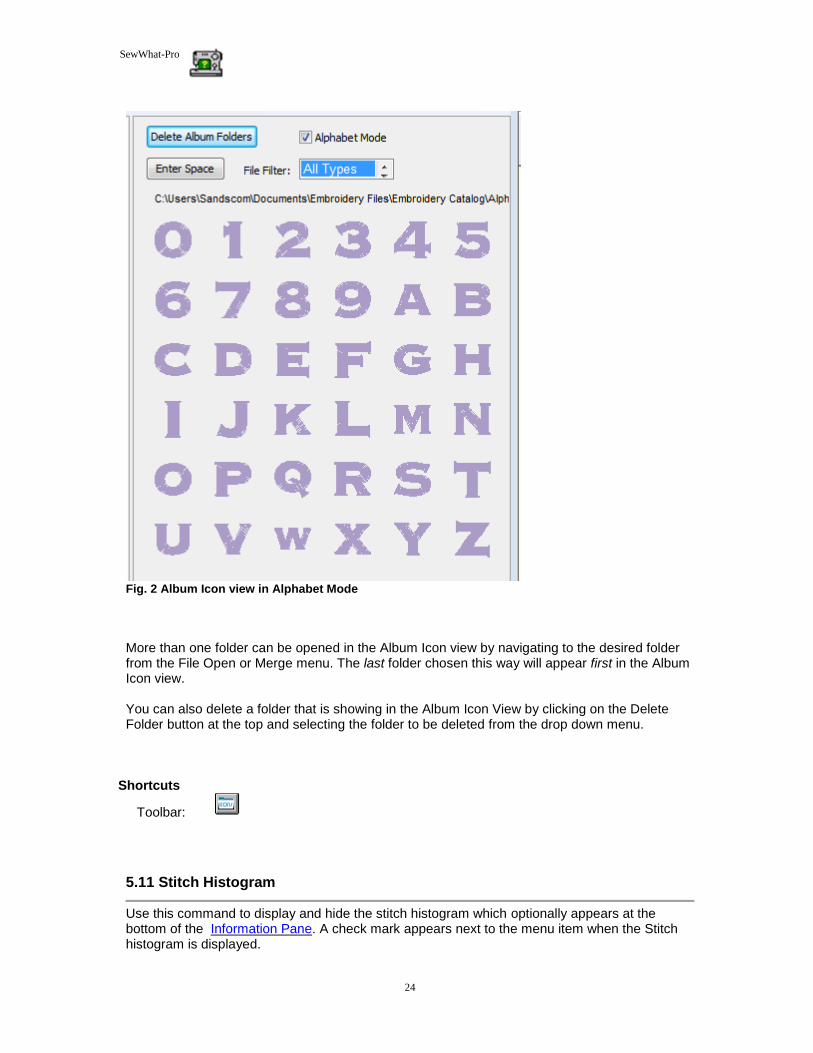
The Information pane consists of the Project Pane, the Thread Pane, and (if it is selected on the View Menu), the Stitch Histogram (see Fig. 1). The project pane contains information of the present project, such as pattern dimensions, stitches, author and copyright information. All the information from the project and thread pane is written out to a "color information" text file (which has the same name as the embroidery pattern but with a "txt" extension). This file is used by SewWhat-Pro to read in this information when the pattern is reopened at a later time. It can also be distributed as part of the pattern as an aid to sewing out the pattern with the proper colors. The thread pane includes columns for color stops, color names, thread brands, the associated color number, stitch count for that color, and a place to enter comments about the associated color (like "this is the ear", etc.). The album icon view provides a visual display of the embroidery files in the selected directory, and permits a graphical (point and click) method to merge existing embroidery files with the present workspace pattern. Before activating the album icon view, first open the first letter in the alphabet you want to use. The album icons can then be displayed by clicking the Album view "ICON" toolbar button (see shortcut below) or the Album Icons item on the View menu. Click on the icon(s) displayed to load the associated pattern(s) into the SewWhat-Pro workspace, thus merging it with the existing pattern. When the Alphabet Mode box is checked (see Fig. 2), then the icons are reduced in size so that an entire alphabet can be viewed in the Album pane without needing to scroll. In alphabet mode, the pattern corresponding to the icon clicked in the Album pane will be added to the workspace to the right of the previous letter, thus making it easy to form words from individual digitized letters. The last letter clicked is "active", which means you can use the keyboard arrow keys to "kern" that letter (that is, adjust the spacing between it and the previous letter) and/or adjust its baseline for horizontal alignment. You can also "filter" the file extensions which are displayed in this view by choosing from the drop-down list of File Types. In Fig. 2, the option "All Types" of embroidery file extensions is selected, but you can limit the files shown by selecting only one or more from the types list accessed by clicking on the scroll arrows on the right of the list box. The choice of Info Pane or Album (Icon) view also determines what will be printed (see Print).
Fig. 1 Information Pane consisting of the Project (top) and Thread Pane
SewWhat-Pro
24
Fig. 2 Album Icon view in Alphabet Mode More than one folder can be opened in the Album Icon view by navigating to the desired folder from the File Open or Merge menu. The last folder chosen this way will appear first in the Album Icon view. You can also delete a folder that is showing in the Album Icon View by clicking on the Delete Folder button at the top and selecting the folder to be deleted from the drop down menu.
Shortcuts
Toolbar:
5.11 Stitch Histogram
Use this command to display and hide the stitch histogram which optionally appears at the bottom of the Information Pane. A check mark appears next to the menu item when the Stitch histogram is displayed.

SewWhat-Pro
25
The stitch histogram (an example is shown below) is a graph of the number of stitches in the current pattern (or the selected threads) displayed as a bar graph (histogram) versus stitch length. In this example, most of the stitches are about 1.5 mm in length and there are essentially no stitches below about 0.5 mm. This information is useful, for example, to determine if there are lots of very small stitches - that could cause needle breakage - if they are not removed. The Filter Stitches tool can be used to remove such stitches.
6. Tools Commands
6.1 Add Border
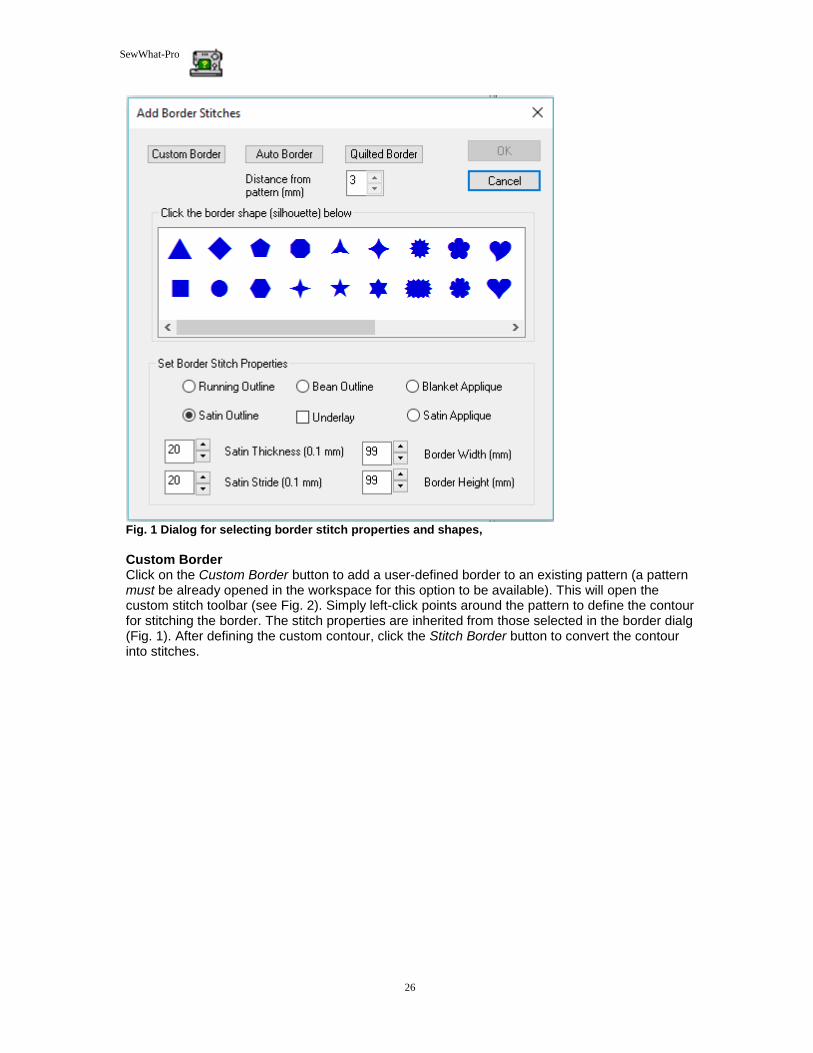
Use this Tools menu item or toolbar button to open the dialog (Fig. 1) for selecting a border to add to the SewWhat-Pro workspace. The shape of the border can be chosen by clicking on one of the border silhouettes in a scrollable list. Properties of the stitch used for the border - such as the thickness and stride for satin borders (separation of stitches along the border curve) - can be set by clicking the up-down vertical controls. The width and height of the bounding rectangle enclosing the border can be set as well (Border Width and Border Height settings). For Satin Outline stitches, the underlay option can be checked (or unchecked) to create (suppress) a loose running stitch beneath the satin finish stitches. It is advisable to set the border properties here, rather than resizing after the border has been added to the SewWhat-Pro workspace. Try to select the correct aspect ratio (ratio of border height to border width) here, otherwise resizing later will not preserve a uniform border thickness. You can also double-click the border do edit it and reset the properties.
SewWhat-Pro
26
Fig. 1 Dialog for selecting border stitch properties and shapes, Custom Border Click on the Custom Border button to add a user-defined border to an existing pattern (a pattern must be already opened in the workspace for this option to be available). This will open the custom stitch toolbar (see Fig. 2). Simply left-click points around the pattern to define the contour for stitching the border. The stitch properties are inherited from those selected in the border dialg (Fig. 1). After defining the custom contour, click the Stitch Border button to convert the contour into stitches.
SewWhat-Pro
27
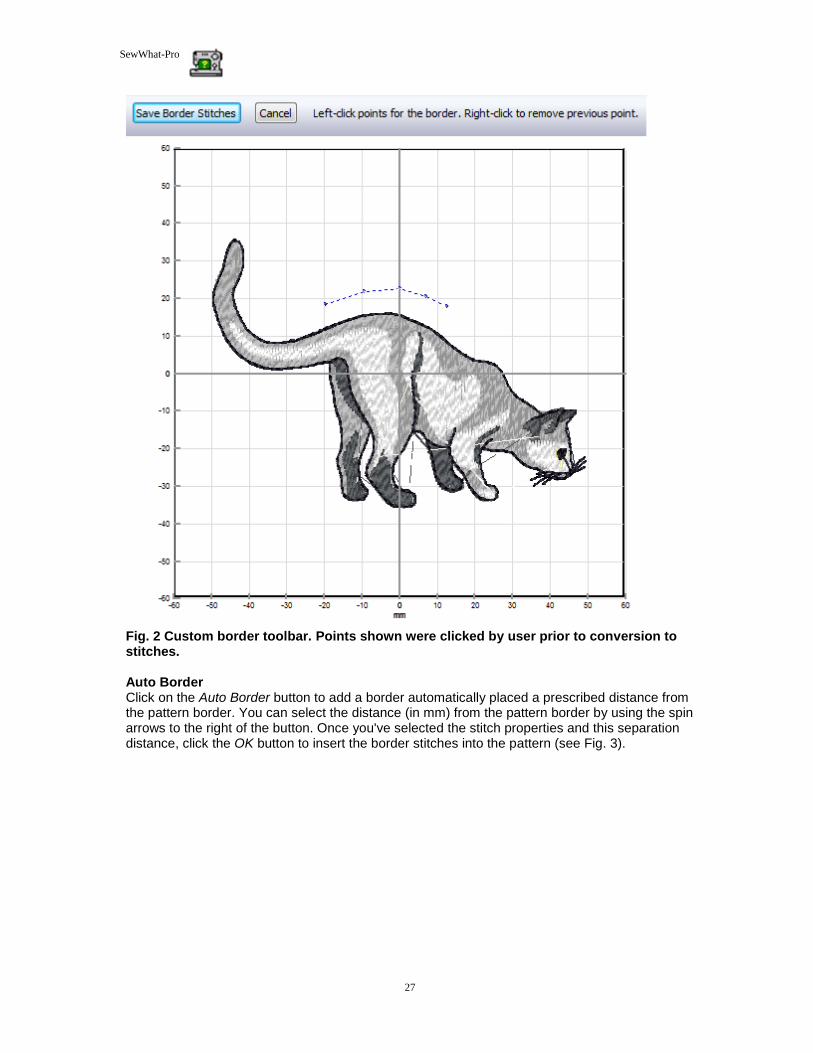
Fig. 2 Custom border toolbar. Points shown were clicked by user prior to conversion to stitches. Auto Border Click on the Auto Border button to add a border automatically placed a prescribed distance from the pattern border. You can select the distance (in mm) from the pattern border by using the spin arrows to the right of the button. Once you've selected the stitch properties and this separation distance, click the OK button to insert the border stitches into the pattern (see Fig. 3).

SewWhat-Pro
28
Fig 3. Auto border stitches.
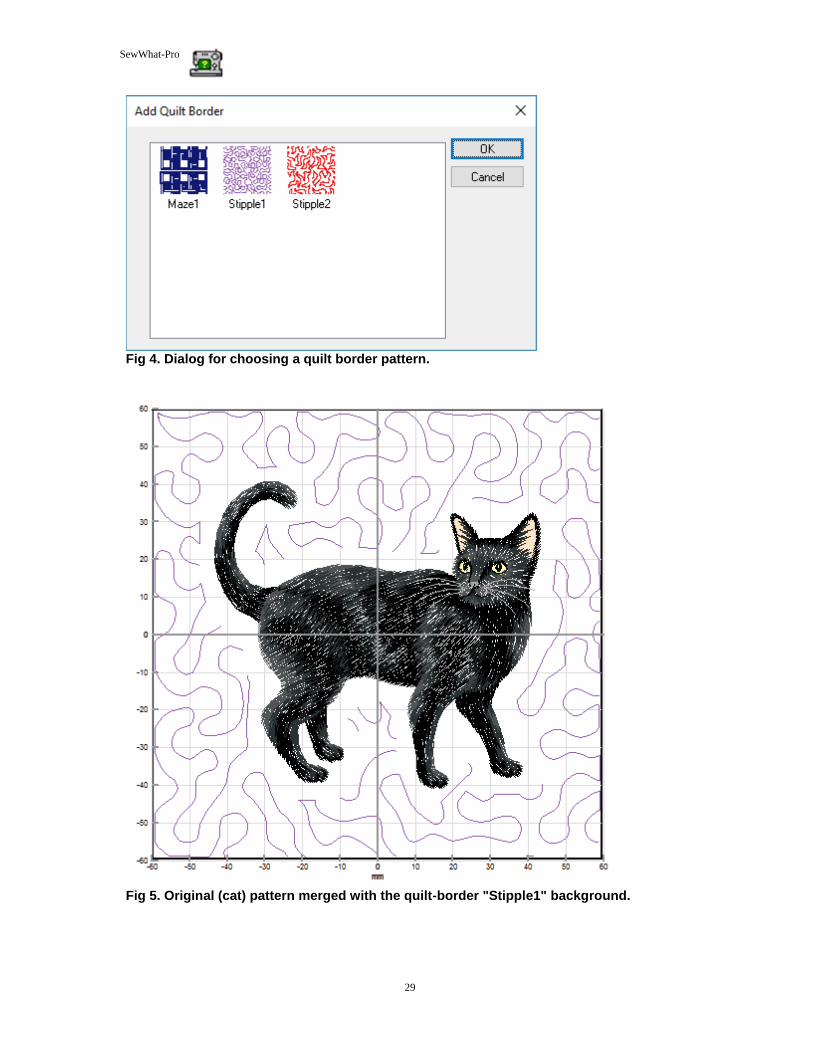
Quilt Border
Click on the Quilt Border button to add quilting stitches around the entire pattern. The distance from the pattern for the quiliting background can be selected. When the OK button is pressed, you may then choose the type of quilt border to add to your pattern (see Fig. 4). In this example, we have chosen the "Stipple1" quilting pattern. Once the OK button on this dialog is clicked, the quilt border is automatically cut to fit around the existing pattern (Fig. 5) and appears as the last color stop in the thread list.
SewWhat-Pro
29
Fig 4. Dialog for choosing a quilt border pattern.
Fig 5. Original (cat) pattern merged with the quilt-border "Stipple1" background.

SewWhat-Pro
30
Shortcuts
Toolbar: Keys:
6.2 Add Nap-Tack Stitches
Use this Tools menu item to add nap-tack stitches underneath the selected colors (or patterns) in the SewWhat-Pro workspace. The purpose of these stitches is to sew down (tack ) medium or high nap fabric such as towels, fleece, etc. so the actual design doesn’t get lost in the nap.
The nap-tack stitch properties can be set in the dialog shown in Fig. 1. The thickness of the margin around the pattern (in units of 0.1 mm) can be adjusted between 1 - 20 by clicking the scroll arrows to the right of the text box. The density of the nap stitches is adjustable for Low-Medium (lower density) and Medium-High (higher density) piles. The angle of the stitches can
also be selected. When the "Select Border Shape" box is left unchecked, the nap-tack stitches
follow the outline of the pattern (as shown in Fig. 2b). Checking that box allows you to choose a border shape instead of the pattern outline for delimiting the stitches.
Fig 1.
Figure 2 below shows an example letter pattern. In Fig. 2a, the letter appears before the addition of the nap-tack stitches. After clicking on this tools menu item and pressing the OK button on the properties box, a layer of nap-tack stitches was added beneath the pattern (Fig 2b) to flatten the nap before the original (top) pattern is sewn. Note that these stitches are added to the thread pane as black thread. They should be sewn with a thread color that closely matches the fabric color.
On high nap fabrics, it may be necessary to further increase the density of the nap-tack stitches. To do this, select the color block added for the nap-tack stitches (thread #1, at the beginning of the thread list), click the Adjust Density toolbar button (or CTRL+A after selecting thread #1 from the thread pane), adjust the density appropriately and click OK. This will change the number of stitches for that color block only.

SewWhat-Pro
31
Fig 2a Fig 2b
6.3 Adjust Density
Use this Tools menu command to open a dialog (see Fig. 1) for adjusting the stitch density or the pull compensation of the currently-selected colors (or the entire pattern). If no colors or pattern parts are selected, then the density and/or pull compensation adjustment will be applied to the entire pattern when you click the OK button. Both the density and pull adjustments are cumulative, which means that if you adjusted the density previously by a factor of 1.1, and then apply another density adjustment of 1.1, then the net change in the density from the original pattern settings will be 1.1 X 1.1 = 1.21. For this reason, there is a column showing the previous values that you applied for both adjustments. If you want to erase the previous adjustments and restart from the original settings, just use the Undo (Ctrl-Z) key combo.

SewWhat-Pro
32
Fig 1 Dialog for adjusting the stitch density and pull compensation
Stitch Density Stitch density is inversely related to the mean separation between adjacent lines of fill stitches: smaller separations correspond to higher densities, and vice versa. Choosing an adjustment factor greater than 1.0 will increase the stitch density, and a factor less than 1.0 will decrease the density. For example, a factor of 1.50 will increase the stitch density by 1½ (or 150%). Note that you do not have to resize a pattern first to change its density. Moreover, you may adjust the density before or after resizing the pattern (although if the "Auto-adjust stitch density" box is selected in the resize dialog, no further density adjust is required). The usual situation for applying density adjustment arises when the pattern has been manually resized by using the mouse to drag the selection rectangle corners. As an example, suppose you first resize a pattern to make it smaller by 25%, so it is reduced to 75% of its original size. (Hint: when resizing and using the mouse, it is advisable to hold down the Ctrl key to keep the pattern's aspect ratio constant.) The stitches are now likely to be too dense by that same amount (25%). In the density adjustment dialog, choosing a density factor of 0.75 will reduce the pattern density by 25%. The average stitch lengths (stitch point-to-stitch point separation) are not affected by the density adjustment. Only the separation between adjacent lines of fill stitching is affected. Therefore, the total stitch length for each thread will be changed (approximately) by the value of the density adjustment factor and the total number of stitches will change too by about the same factor. Usually the stitch number change will not be quite as large (or small) as the stipulated factor change in the density, depending on the fraction of overall stitches that are run stitches compared to fill stitches.

SewWhat-Pro
33
Pull Compensation It may be desirable to add "pull-compensation" to parts (or all) of a pattern to (1) increase the width of satin stitches; (2) to counteract "pulling" of the underlying fabric; or (3) for visual effect, such as making lettering appear bolder. The amount of compensation added to the start and end of each satin row is given in embroidery points (0.1 mm units). So the value of "8" entered in Fig. 1 indicates a total of 1.6 mm (2 X 0.8) will be added to each row of satin stitches for the selected color stops. Fig. 2 shows this widening effect on a satin stitch of adding pull-compensation of 0.5 mm.
Fig 2. Pull-compensation of 0.5mm (on the right) added to a satin stitch (original on left). You may cancel a stitch or pull-compensation adjustment by pressing the Undo (Ctrl-Z) key combination.
Shortcuts
Toolbar: Keys: CTRL+A
6.4 Applique Cutter
Use this Tools menu command to open a dialog (see Figure 1) which displays the separate dieline outlines for the applique that you wish to cut fabric interiors for, using Cameo Silhouette©, etc. cutting technology. In the example file shown in Fig. 1, there were three separate applique dielines selected and labelled 01 - 03. The output directory for the cut files is displayed at the top left and can be selected from the Applique Cutting option menu.

SewWhat-Pro
34
Figure 1 The "Applique Cutout" dialog. Follow these steps to create the applique cutouts from your applique design currently loaded in the SewWhat-Pro workspace:
1. In SewWhat-Pro, select the dieline blocks in the Thread pane by holding down the Ctrl key and left-clicking the associated color blocks. You should select ALL the dielines to be cut at once, rather than one at a time, to avoid overwriting the cutout files.
2. Click on the Applique Cutout toolbar button (or this Tools menu item) to open the dialog shown in Fig. 1.
3. Select the type(s) of cutout files to save by checking the appropriate box. The choices are JPG or SVG (or both). At least one type must be selected.
4. To make the cutouts slightly larger than dieline (which is often desirable for easy tack-down of the applique), use the Inflation factor slider to inflate the cutout by a factor greater than 1.00. For example, choosing a factor of 1.05 will make the saved cutout 5% larger than the dieline contour.
5. Save the cutout files by clicking the Save Cutouts button. The numbers in the upper left corner will be appended to the embroidery file name to uniquely identify each cutout file. (If files with that name already exist, an additional "a" or "b", etc. will be added to the name so the files will
SewWhat-Pro
35
not be overwritten.) Each outline will be saved in its own separate file in the either the same folder as the original embroidery file (the default) or the one selected in the Options menu. The dieline blocks (jpg/svg files) are now ready to be imported into your cutting software.
Shortcuts
Toolbar: Keys:
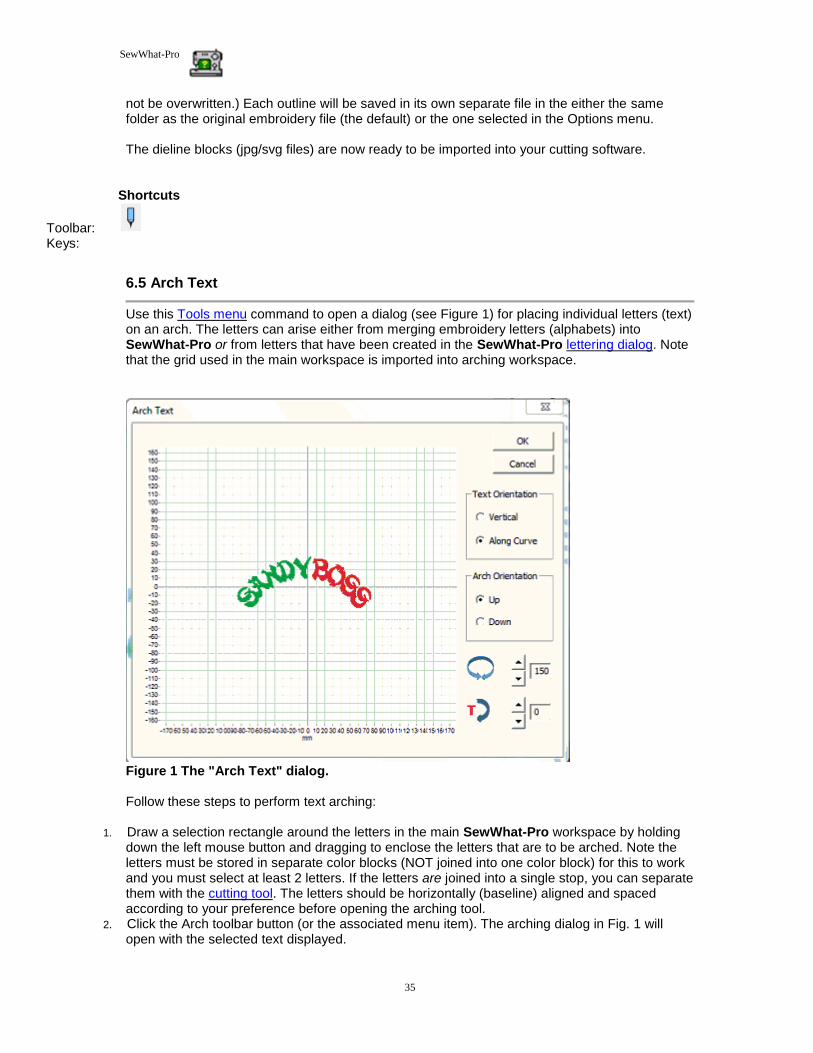
6.5 Arch Text
Use this Tools menu command to open a dialog (see Figure 1) for placing individual letters (text) on an arch. The letters can arise either from merging embroidery letters (alphabets) into SewWhat-Pro or from letters that have been created in the SewWhat-Pro lettering dialog. Note that the grid used in the main workspace is imported into arching workspace.
Figure 1 The "Arch Text" dialog. Follow these steps to perform text arching:
1. Draw a selection rectangle around the letters in the main SewWhat-Pro workspace by holding down the left mouse button and dragging to enclose the letters that are to be arched. Note the letters must be stored in separate color blocks (NOT joined into one color block) for this to work and you must select at least 2 letters. If the letters are joined into a single stop, you can separate them with the cutting tool. The letters should be horizontally (baseline) aligned and spaced according to your preference before opening the arching tool.
2. Click the Arch toolbar button (or the associated menu item). The arching dialog in Fig. 1 will open with the selected text displayed.

SewWhat-Pro
36
3. There are two controls for adjusting the arched lettering. They are interactive – the changes you make will appear as you click the controls:
1. You can adjust the curvature of the arch by clicking the spin-control next to the rotation icon (the two-headed arrow in Fig. 1 displaying the value 150 degrees). Clicking on the up-arrow will increase this value and lead to a more circular arch; clicking the down-arrow will decrease this value leading to a "flatter" arch.
2. You can position the lettering on the arch by clicking the lower spin-control next to the "text rotation" icon (with the red "T" in Fig. 1, displaying 0 degrees). A value of "0" in this case means that the lettering is arranged symmetrically around the vertical axis. Increasing (or decreasing) this value will move all the letters along the arch by the indicated number of degrees.
4. Choose the letter arrangement - either vertical or along (parallel to) the arch (as shown in Fig. 1).
5. The lettering can be arranged "up" on the arch (as shown in Fig.1) or "down". Click "OK" when you have adjusted the text arch to your specifications. If you want to edit the arch, click the undo (Ctrl-Z) key combination, and repeat steps 1-5.
Shortcuts
Toolbar: Keys:
6.6 Basting Stitch
Use this Tools menu command to open a dialog for adding basting stitches to the present pattern. These may be used, for example, to tack down a fabric to backing material prior to stitching, without using sticky spray that may gum up your needle. The dialog allows you to select where the basting stitches should be sewn. You may choose to baste around the pattern and/or around the hoop perimeter by checking the appropriate check-box. The check status is retained from the previous time this dialog was opened, so you may want to reset a check (by clicking the box) if you have previously added basting to the design. The length of the basting running stitches may also be selected in 2 mm increments up to 12 mm. The basting stitches are automatically inserted at the top of the stitch list so they will be sewn first. Note that it is a good practice to add the basting stitches to the pattern after all other changes have been made. This will prevent adding multiple basting stitches in the same place and is especially true if you baste around the pattern, since the pattern size and position determine where the basting stitches are placed. After inserting these stitches into the pattern, they may be deleted at any time from the stitch list in the Thread Pane if they are no longer desired (by right-clicking on the top-most color stop and choosing Delete). Basting Stitches Not Grabbing the Bobbin Thread on Your Embroidery Machine Some users may find that the basting stitches inserted with SewWhat-Pro are not grabbing the bobbin thread. To fix that problem, turn the embroidery machine flywheel toward you to lower the needle and keep turning it to bring it back up. This action will grab the bobbin thread and pull it up and you can then pull it out a couple of inches before continuing to stitch.
6.7 Batch Convert

SewWhat-Pro
37
The batch conversion utility on the Tools menu allows the user to convert multiple embroidery files of possibly different types to other embroidery file types. Launching the batch utility initiates a sequence of dialogs that collect the various files to be converted, determine where the converted files should be stored, and choose what the converted file type should be. Options include
• automatically centering converted patterns • overwriting existing files of the same name • preserving (in the batch directory) the directory tree structure of the original files.
There is a batch pane in the status bar which displays a progress bar showing the completion status of the submitted job. The batch conversion runs as a background job, so you may continue editing or viewing patterns even while conversion is in progress. Detailed instructions for using this utility follow. The first page of this utility opens a Windows Explorer© dialog to select files - or directories of files – that you want to convert. Hold down the Shift (or Control) key to select multiple files. Drag the files – by holding down the left mouse button while you move the mouse cursor over the list box - into the File Conversion list box and drop them there (by releasing the mouse button). You may select Zip file archives containing embroidery files, as well. When you are finished selecting the embroidery files for conversion, press the Next button to reveal the actual batch conversion dialog (shown below).

SewWhat-Pro
38
On the first line, you may enter the path of the directory where the converted files will be placed. If you want to choose an existing directory, click the Browse button to see a directory tree to choose from. When choosing a conversion directory, you may also check the button Preserve directory tree, which will store the converted files in the conversion folder with a tree structure similar to the source tree. Alternatively, you may choose the option Store files in source directory. With this option selected, the converted files will be stored in the same directory (or directories) as the original files. Next, select the file filter types (that is, the type of embroidery file) that the files should be converted to by clicking on the file types in the Embroidery Extensions list box. Hold down the Ctrl (or Shift) key to select multiple types. Finally, choose the remaining conversion options by checking the appropriate boxes, and press the Convert button to start the batch conversion process. Since the batch conversion runs in the background, so you can continue using SewWhat-Pro in the meantime (all functions are available except for batch conversion). During the batch conversion process, the status bar will display a progress bar showing the completion state. When the conversion of the selected files is finished the status bar will display the message "Batch Finished". If you checked the "Save Log File" option, a log file will be saved in the folder designated on Line 1.This file contains some details about the files that were converted. If you do not designate a folder on Line 1, or if the designated folder does not have write permission, then the log file will be written in the "C:\Embroidery Batch" default folder.
Shortcuts
Toolbar: Keys: CTRL+B
6.8 Media Writer
This utility allows you to write embroidery files to any removable media such as Smart Media® (SM) or Compact Flash® or USB stickes for use with Elna®, Singer®, Janome® and Brother® embroidery machines which are capable of reading these media. Also, it may be used with Brother machines that read floppy disks. Before using this utility, certain setup functions need to be performed initially. Next to the Selected Embroidery Machine text at the top of the media writing dialog is a drop-down combo box. Click the down scroll arrow to open a scrollable list of available embroidery machine types (Brother, Elna, Janome types, or Singer). Use the scroll arrows to bring your machine type into view, and select it from the list by clicking on it. This selection will be saved for future use and can be changed at any time if you have multiple machines. (Note that any files you have chosen to write will be automatically cleared from the selection lists when the embroidery type is changed.) From the list of available removable drives, click the appropriate checkbox with your mouse to select the letter of the drive where your card is inserted. (The removable drive will only appear in this list if a card is inserted.) You may insert a card, and check the corresponding drive letter, at any time before the files are written to the card. Any embroidery files already on the card and in the appropriate folders will be added to the list of files to be written. The next step in writing files to your removable media is to copy existing embroidery files to the file list in this dialog. If you inserted a card that already has files on it in the appropriate folders, they will appear automatically as icons in the file list when this dialog is opened. You may add to those files, or first press the Clear Files button to remove the existing files or remove individual files by clicking on their icons and pressing the delete key. (The actual files will be deleted from the card only after any new files are written.) Click the Browse button to open an Explorer-style

SewWhat-Pro
39
window for locating the embroidery files to be written. Alternatively, Windows Explorer can be opened for file selection. (However, the advantage of using the Browse-button Explorer is that only embroidery files will be displayed.) Use the left button of your mouse, or arrow keys, to select files in the Explorer window. Hold down the Shift key to select multiple files. The selected files can be dragged and dropped into the file list. It is important to realize that the process of copying files to the list does not move or delete the original files on your hard drive or CD. Note that it is not necessary to convert embroidery files to Singer (*.xxx) or Janome (*.jef) format before dragging them into the file list. They will be automatically converted to the correct format when written out to the media card. After filling the list with the embroidery file(s) you want written to the card, click the Finish button on the Explorer dialog to close it. Then click the Write Files button, which will have become activated after closing the Explorer dialog. This will write the files in the proper format for the chosen embroidery machine. At this point you must have already inserted a card into the selected drive to continue. Cards, USB sticks or floppies created by the SewWhat-Pro Media Writer utility may be freely distributed, subject to any license restrictions associated with the original pattern files. Shortcuts
Toolbar:
6.9 Resize Pattern
Use this Tools menu item to accurately resize the active (selected) pattern. You may enter the new pattern dimensions in either mm or in units, depending on the units settings in the Options menu. To avoid distorting the image, check the Lock Aspect Ratio box. If, after resizing, you want the stitch density to be automatically adjusted, check the Auto-adjust stitch density box. You can also graphically resize (and reposition) the selected pattern with the mouse. Turning on grid lines can be helpful during such operations. The first step is to select the pattern by clicking anywhere in the pattern with the left mouse button. A resizing rectangle will appear around the pattern, and the cursor will change to a four-headed arrow. Resize handles (solid squares) will appear at the corners and midpoints of the resize rectangle.
• To resize the pattern:
1. Position the mouse at one of the resize handles of the selection rectangle. The cursor changes
to a diagonal two-headed resizing arrow. 2. Move one of the corners (or sides) with the mouse, dragging the pattern in or out to its final
desired size. Use the corners to preserve the pattern aspect ratio (relative height to width ratio). Use the side buttons to stretch or shrink the pattern either horizontally or vertically.
3. To accurately preserve the aspect ratio (relative width-to-height) during resizing, hold down the Ctrl key while dragging the resize handle.
• To move the pattern within the hoop:
Hold down the left mouse button and drag it to a new position or use the keypad arrow keys.
Observations: Both these operations affect the size and position of the pattern as it is stitched out. This is in
contrast to zooming , which simply changes the apparent size of the pattern on the screen without affecting the actual stitch-out size.
SewWhat-Pro
40
Resizing a design with the mouse does not automatically preserve the stitch density of the
design. (Hint: holding down the Ctrl-key when resizing with the mouse will preserve the aspect ratio of the design.) For size changes of more than 10%, it is therefore advisable to either resize from this toolbar button or to select the adjust density toolbar item after graphically resizing. Shortcuts
Toolbar:
6.10 Emb Lettering
This Tools menu item opens the EmbLetters applications, which allows you to enter pre-digitized lettering from the keyboard. The SewWhat-Pro (SWP) window is automatically minimized (to the taskbar) when the EmbLetters application is opened. To restore the SWP window, click on the CLOSE File menu item in EmbLetters when you are finished typing the letters to enter into the SWP workspace. During the current SWP editing session, you may double-click the lettering entered through EmbLetters to reopen (and edit) what you typed. You may view a video describing how to use EmbLetters by clicking this link. Shortcuts
Lettering Toolbar:
6.11 Sew Lettering
This Tools menu item opens the monogramming dialog (below) which allows you to add lettering (or more generally, any alphabetical or dingbat font) to an embroidery pattern.

SewWhat-Pro
41
This dialog allows you to
• Enter lines of text from your keyboard and view them in a preview panel at a reduced size to see how they will appear when stitched out
• Adjust properties of the lettering, including • font family • font size • font attributes (italic, bold, etc) • line spacing for multiple lines of text • Set the stitch type (outline, appliqué, fill - either satin or column) • Set the stitch properties (density, length, angle of fill) • Select monogram styles and specialty layout styles • Save lettering settings from this dialog or retrieve settings from a previous lettering session • Add True-Type© fonts (TTF) to the font list appearing in this dialog
Each one of these features is described below. Entering text in the lettering dialog

SewWhat-Pro
42
Place the selection point in the text edit box in the top of this dialog (by clicking there) and enter and edit text from the keyboard. As you type text into the edit box at the top of this dialog, it will appear (usually in a reduced size) in the preview box at the bottom of the dialog. You may edit the text in the edit box. For example, press the Backspace or Delete keys to delete letters, and press Enter to start a new line of text. The size of the text pattern that will eventually be stitched is also displayed. Font properties Click the Font and Size button to display a Windows Font Selection dialog. Font sizes are indicated in points. One point is 1/72 inch (3 points are approximately 1 mm). You can select the font size by clicking on the font size selection (combo) box, or by typing the size (in points) in the font-size edit box. The font family (face name) can be chosen from the font selection (combo) box. Any True Type© font can be used. Note in addition to standard alphabetical characters, various iconic symbols (boxes or dingbats) can also be displayed. For example, the font Holidays MT in lower case has many interesting icons representing various holidays. The color of the font will determine the thread color used and may also be selected. Choose OK to accept your selections. The font and size will appear in the text box next to the Font and Size button. Note that the text size refers to the font height (in mm) and text-string width (in mm). These dimensions are indicated below for the text string "Tiger" written in a 72-pt (~24 mm) font size. The light gray grid has a spacing of 10 mm. The horizontal extent of the string is 47 mm. The indicated string height of 25 mm is not just the distance from the top of the T to the bottom of the g, but also includes some blank space (so-called internal leading) above the T, which can be used for accent marks.
Stitch Type There are options to choose either (or both) outline and fill stitches. These are described below: Running Outline This is a straight stitch for outlining the lettering. You may set the length of a running stitch (in 0.1mm units) with the Stitch Length control. Satin Outline This is a zigzag (satin) stitch. Both the length and height of the stitch may be set from the Satin Height and Satin Width controls. The number of repetitions of the outline stitches may be adjusted with the Passes control (a setting of 1 means a single pass).

SewWhat-Pro
43
Satin/Blanket Applique The appliqué stitch is a combination of a running stitch to outline the fabric and a satin (or blanket) stitch to tack-down and trim the border. To apply the appliqué, follow these steps: 1. Position the appliqué fabric on the (hooped) base fabric. 2. Baste the appliqué fabric to the base fabric. 3. Stitch color 1, the outline of the letter, to hold the fabric in place along its border. 4. Remove hoop from machine without moving the embroidery arm. 5. Cut out the appliqué around the stitching line. Cut just outside of, and as close as possible to, the stitching line. 6. Reinsert the hoop onto machine (without moving the embroidery arm) and stitch color 2, the satin stitch outline. Fill (Area-Filling) or Satin (column) The Fill or Satin (column) stitch options will produce a solid filled pattern (rather than an outline). The density (for fill and satin stitches) and stitch angle (for fill stitches) are set in the Stitch Properties boxes (see below). Satin or Running Border You can check one of the border option boxes to outline a filled pattern with either satin or running (straight) stitches. Stitch properties You can select the following stitch properties: Underlay Underlay consists of sparse running stitches which are added to the pattern underneath the final fill stitches, to ensure good registration (alignment) of the final stitches by preventing bunching or pulling of the fabric. It is recommended – especially for wider letters and large fonts. Density This setting adjusts the fill or satin stitch density. Three values (Low/Normal/High) are available. For most projects, Normal is the recommended setting. Angle The angle spin control allows you to choose the angle – with respect to the vertical – at which the fill stitches will be sewn. (This does not apply to the Satin stitches which are sewn along the centerline of the font letters.) Monogram styles The monogramming options are applied to any of stitch types. They determine the layout of a monogram (or lettering) and can be chosen by opening the combo box and clicking the desired style (the Diamond Shape style has been chosen above). For some of the monogram features, additional adjustment of the letter height and/or the letter position can be done with the two scroll-controls located at the Edit Features pane just below the styles pane. For example, to increase (decrease) the size of the one enlarged letter, click the scale factor spin-control button up (down). To adjust the vertical position of the enlarged letter, click the Adjust-position button. To enter a monogram consisting of variable letter heights that is not one of the available styles, you must enter each letter as a separate "string". Specialty styles
SewWhat-Pro
44
There are two specialty styles for creating lettering layouts (this combo box is hidden by the drop-down styles in the example box). A special curve editor opens when you click one of the specialty styles. It allows you to modify the curve properties for laying out your lettering. There are also two possible orientations for the lettering on the curve (or polygon): either vertical or normal (at right angles to the curve). You can select the orientation by clicking the appropriate button (Vertical or Normal Text) at the top of the editor. When you have finished editing, click the OK button to exit the curve editor. Bézier curve A Bézier curve is defined by the four control points that appear in the editor. The two end points can be used to stretch or contract the curve, and the two other control points adjust the slope of the curve at the two ends. With the left mouse button, click on one of the control points and the cursor will change to a four-headed arrow. Hold down the mouse button and drag the control point to reshape the curve into the desired shape. Polygon The default "polygon" is just a line between the two endpoints. You can change the slope or length of this line by left-clicking one or the other point and dragging it. You can add points to the curve by clicking at the desired location, or Ctrl-click an existing point to at a point between it and the previous point on the curve. To delete a point, Shift-click on it. When all text editing is completed, click the "OK" button to sew the text into the pattern file and return to the SewWhat-Pro workspace (if no pattern is presently open, a new file will be opened). While the workspace is open, you may double-click on the lettering to reopen the lettering dialog for further editing. Settings: Retrieve and Save You can retrieve existing settings (or save your current ones) by clicking one (or the other) of these buttons. SewWhat-Pro ships with a number of font settings that have been tested to produce good stitch-outs. You may import one of these and use the settings as a guide for your own monogram work. Add User Fonts Click this button to import additional fonts into the Monogram Fonts dialog. The fonts read in this way will only be available in the SewWhat-Pro monogram editor. You can delete fonts that you no longer want to use by clicking the Del User Fonts button. Shortcuts
Lettering Toolbar:
6.12 SewWrite Lettering
When the SewWrite(c) plugin is installed on your computer, this Tools menu item opens the SewWrite application to add lettering and monogramming into the SewWhat-Pro workspace. The user interface in the SewWrite plugin is very similar to the stand-alone SewWrite workspace, with the exception that the embroidery lettering cannot be saved with a specified file name (indeed, there is no "Save As" option in the plugin). Rather, the file name is chosen internally by SewWhat-Pro. Otherwise, all the features in the stand-alone SewWrite application are available in the plugin. When you are finished entering the lettering in SewWrite, save it and then close SewWrite to return to SewWhat-Pro. The lettering will appear automatically in the current pattern in SewWhat-Pro. If you need to edit the lettering, double-click it will reopen SewWrite to allow further changes to be made.

SewWhat-Pro
45
Shortcuts
Toolbar:
6.13 Write D1 Media
This item allows you to create a Designer 1 (D1) compatible floppy diskette or USB thumb drive, for use
with the Husqvarna- Viking Designer 1© embroidery machine. The files can also be saved in a compressed Zip archive file (*.zip format) for subsequent redistribution (by email, for example) or decompression to readable media. The first time this utility is used, you should choose the default drive and the Zip-archive directory (where zipped D1 files will be stored). You may change these settings at any time. The utility will automatically detect if the inserted media is a thumb drive or floppy drive, and the "Write" button will display this when it becomes activated (after files are entered into the conversion list). If you insert a floppy diskette or USB drive that already contains D1 files and menus, SewWhat-Pro will automatically read the existing files into their menu lists into the D1 creation dialog. Any files which are not D1-compatible files will be automatically erased from the diskette prior to writing the new D1 information. It is therefore not necessary to use a clean diskette or USB stick. Note that any files on the diskette that are NOT D1 (*.shv) files will be erased. Before beginning to fill the menus on the D1 dialog, you may enter an informative name in the "Disk Project Title" edit box for the set of files you intend to save. This name will be used to label the D1-floppy diskette (or the Zip file). Existing D1 floppy disks or USB thumb drives can be modified by adding (or deleting) files to the various menu lists, as described below. Also, you can choose to either view icons of the files in the menu lists or to hide them, by clicking the "Show/Hide Icons" button. The first step in the creation of the D1 disk (or Zip archive) is to copy embroidery files from your hard drive (or a CD) to the menu folders in this dialog. Click the "Browse" button on the top right of this dialog to open an Explorer-style window for locating the embroidery files to be included in this project. (Here, a project refers to the set of files that will eventually be written to either a D1 disk or Zip archive file.) Alternatively, Windows Explorer can be opened for file selection. (However, the advantage of using the Browse-button Explorer is that only embroidery files will be displayed.) Use the left button of your mouse, or arrow keys, to select files in the Explorer window. Hold down the Shift or Ctrl keys to select multiple files. The selected files can be dragged and dropped into one (or several) of the four menu folders in the dialog. To delete files from a menu, select them with the mouse and press the Delete key, or press the Clear Menu button to clear all files from the currently selected menu. It is important to realize that the process of copying files to the menu folders does not move or delete the original files on your hard drive or CD. Also note that the embroidery files do not have to be in D1 (.shv) file format prior to using this utility. They will be automatically converted when they are written to the disk or zip file. After filling the menu(s) with embroidery files, click the Finish button on the Explorer dialog to close it. Then click one of the buttons Write Floppy (or Write USB) or Write Zip . This will write the files in the proper D1-compatible format, together with all the required D1 menu files, to either a disk or a Zip archive file, respectively. At this point, if the disk is not empty and it is not already an existing D1-compatible disk, a message will appear to inform you that all files on the disk drive will be deleted if you decide to continue. If you choose to write a zip archive file, the name of the zip file will be based on the Project Title, and it will be stored in the default Zip directory you chose earlier. Note: you must extract the

SewWhat-Pro
46
D1-Zip archive file to a fresh disk, in order to use that disk in the D1 embroidery machine. Simply copying the zip archive file to a disk will not work! The D1-compatible disks or Zip files created by SewWhat-Pro may be freely distributed, subject to any license restrictions associated with the original pattern files. This explicit license accompanies all D1 disks or Zip files created with the SewWhat-Pro utility. Shortcuts
Toolbar:
6.14 Fabric
Displays a fabric color and pattern selection dialog (Fig. 1) for choosing the fabric color, which is the background color displayed on the SewWhat-Pro screen.You can also select a textured fabric pattern for the background by pressing the "Select Fabric" button. User-defined fabrics can be added as .bmp, .jpg, .png, or .gif files to the SewWhat-Pro "Fabrics" folder. This is helpful for visualizing how a pattern will appear on a given fabric and for selecting appropriate thread colors. Note that any of the choices made here have no effect at all on the embroidery pattern saved by SewWhat-Pro.
Fig 1. Dialog for selecting fabric color and pattern
The Fabric Color Palette provides 48 standard colors and permits the addition of another 16 custom colors. Click on the "Define Custom Colors" button to reveal the color picker. Existing custom colors can be changed as required. In Fig.1 we have added a lavender shade to the custom colors. The "Select Fabric" button opens a dialog displayng the various fabrics available (merged with the basic or custom color). After a fabric is selected, it is shown in Fig. 1 (lower right corner).

SewWhat-Pro
47
Once this choice is accepted by clicking the OK button, the fabric and color will be added to the hoop beneath the embroidery pattern. There are two types of colors and fabrics that can be added to the hoop. They are accessed by clicking one of the two radio buttons shown in Fig. 1. IMPORTANT: the Applique button will only be enabled if one or more die-line or tack-down thread colors are selected from the thread pane before this dialog is opened. You can select individual applique color stops by Ctrl-clicking them in the thread dialog pane. Background Adds the chosen color/fabric to the entire hoop. Applique Adds the chosen color/fabric to the selected parts of the applique. This overrides the background selection for the parts of the applique corresponding to the selected die-line or tack-down stitches. Default Check this box to make the current selection for the background (color and fabric) the default when opening a new pattern. Shortcuts
Toolbar: Keys: CTRL+F
6.15 Center Pattern
This toolbar button or Tools menu item can be used to center a pattern in the on-screen hoop. Shortcuts
Toolbar:
7. Options Commands
7.1 Applique Cutting
Use this option to set the default folder location for storing files (JPG/SVG) for cutting applique outlines.
The dialog shown in Fig. 1 opens to allow you to select from two options for saving the cut files. You can
select either the same folder as the applique embroidery file or (as shown in Fig. 1) you can assign a user-
defined folder to store all your cut files. In the figure, we've chosen a folder called "Cameo" to store our cut
files to send to the Cameo© Cutter.
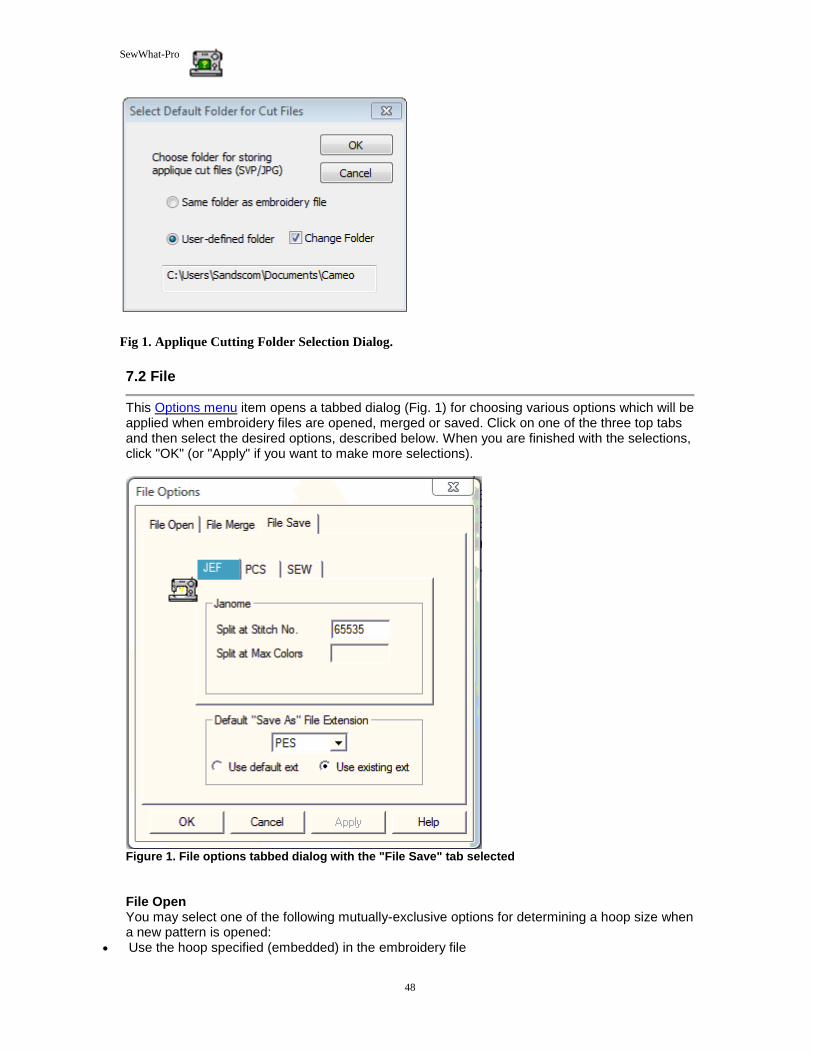
SewWhat-Pro
48
Fig 1. Applique Cutting Folder Selection Dialog.
7.2 File
This Options menu item opens a tabbed dialog (Fig. 1) for choosing various options which will be applied when embroidery files are opened, merged or saved. Click on one of the three top tabs and then select the desired options, described below. When you are finished with the selections, click "OK" (or "Apply" if you want to make more selections).
Figure 1. File options tabbed dialog with the "File Save" tab selected File Open You may select one of the following mutually-exclusive options for determining a hoop size when a new pattern is opened:
• Use the hoop specified (embedded) in the embroidery file

SewWhat-Pro
49
• Use the default hoop chosen when you select the hoop size for each individual file type. If you have not set hoop size defaults, click the Set Hoop Options button to do so at any time
• Use a single machine-specific hoop size for all embroidery file types. Again, you must select this machine hoop size in the Hoops Options menu or by pressing the Set Hoop Options button File Merge There are two sets of options that determine how a pattern is merged into an existing hoop. These include options for adjusting the hoop size and for determining the placement of the new (merged) pattern. Hoop adjustment
• Auto-resize the primary hoop (the one into which the new pattern will be merged) if the new pattern is larger than the primary hoop
• Keep the primary hoop size even if the new pattern does not fit into it Merged file placement
• When the new file is merged, keep the same distance from the center of the primary hoop that the new pattern had in its own hoop
• Place the new (merged) pattern in the upper left corner of the primary hoop • Center the new pattern in the primary hoop (even if it was not centered in its own hoop)
File Save
• Default file–type extension. This is the file extension that will appear when the File/Save As menu item is clicked and if the use default ext(ension) radio button is checked. If the use existing ext(ension ) radio button is checked, the default is used only if there is no initial file extension available (such as when a lettering pattern is being generated in SewWhat-Pro).
• Various options for splitting files based on maximum allowable colors or stitches. • Maximum hoop size. Patterns exceeding this will be automatically resized to fit into the maximum
hoop.
7.3 File Associations
This Options menu item opens a dialog (Fig. 1) used to select embroidery file extensions to be associated with SewWhat-Pro. Files with the associated extension will be automatically opened in SewWhat-Pro when they are double-clicked in Windows Explorer.
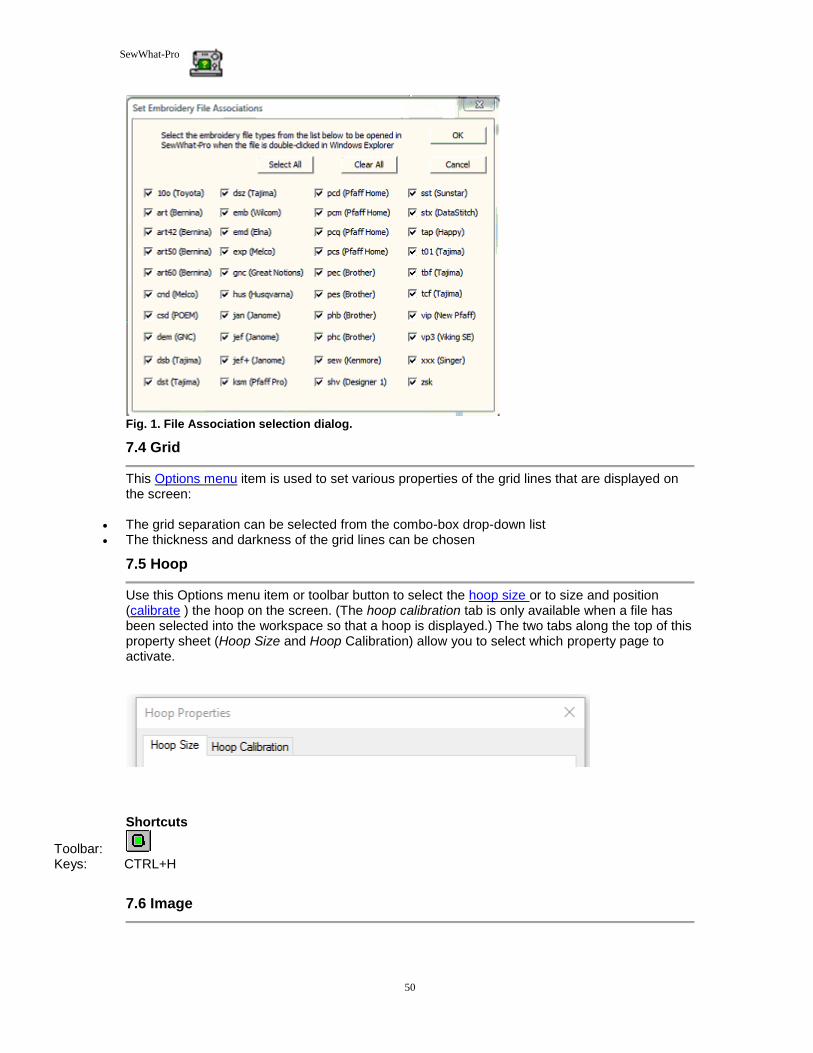
SewWhat-Pro
50
Fig. 1. File Association selection dialog.
7.4 Grid
This Options menu item is used to set various properties of the grid lines that are displayed on the screen:
• The grid separation can be selected from the combo-box drop-down list • The thickness and darkness of the grid lines can be chosen
7.5 Hoop
Use this Options menu item or toolbar button to select the hoop size or to size and position (calibrate ) the hoop on the screen. (The hoop calibration tab is only available when a file has been selected into the workspace so that a hoop is displayed.) The two tabs along the top of this property sheet (Hoop Size and Hoop Calibration) allow you to select which property page to activate.
Shortcuts
Toolbar: Keys: CTRL+H
7.6 Image
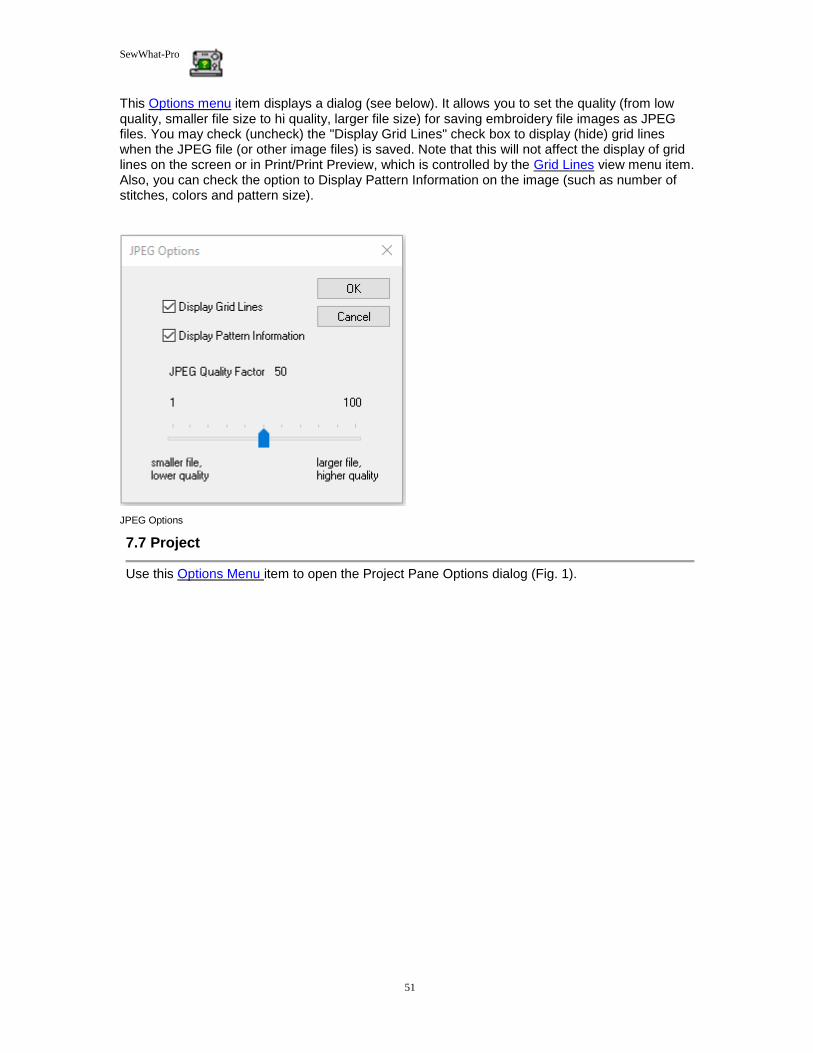
SewWhat-Pro
51
This Options menu item displays a dialog (see below). It allows you to set the quality (from low quality, smaller file size to hi quality, larger file size) for saving embroidery file images as JPEG files. You may check (uncheck) the "Display Grid Lines" check box to display (hide) grid lines when the JPEG file (or other image files) is saved. Note that this will not affect the display of grid lines on the screen or in Print/Print Preview, which is controlled by the Grid Lines view menu item. Also, you can check the option to Display Pattern Information on the image (such as number of stitches, colors and pattern size).
JPEG Options
7.7 Project
Use this Options Menu item to open the Project Pane Options dialog (Fig. 1).

SewWhat-Pro
52
Fig. 1. Project Pane options dialog.
This dialog allows you to choose various options for the project-pane display, including:
o default thread brand (manufacturer) o this includes a button to edit a special My Stash "brand" (see description below)
which can be customized (for example, to include only threads owned by the user)
o docked vs floating thread palette editor o whether to auto-save a color text file whenever an embroidery file is saved o source for thread colors if no color (txt) file is found, which can either be from the
default thread brand or the colors stored in the embroidery file. o default for column #4 in the thread pane (which toggles between showing
stitches or length for each thread color)
Create/Edit “My Stash” Thread Brand
Click on the “Edit Thread Stash” button to create (or edit) a user-defined customizable thread brand. The interactive dialog shown below (Fig. 2) is opened. It allows you to choose threads from various manufacturers and combine them into a single thread brand called "My Stash". This is useful, for example, to limit the thread palette selections to threads (possibly from different manufacturers) that you own or want to use in your patterns. To add threads from one or more manufacturers, first click on a thread brand in the manufacturer list on the left. In the example below, Arc Poly thread has been clicked for editing and is hi-lited. Brands that contribute threads to the thread stash are listed in red. (In Fig. 2, ARC Poly and Coats and Clark have threads in My Stash.) This populates the thread list on the right with threads available for that brand. Select the threads to add to your stash by clicking threads in the right pane. Use Ctrl+Click for multiple selections or to toggle existing selections. When you
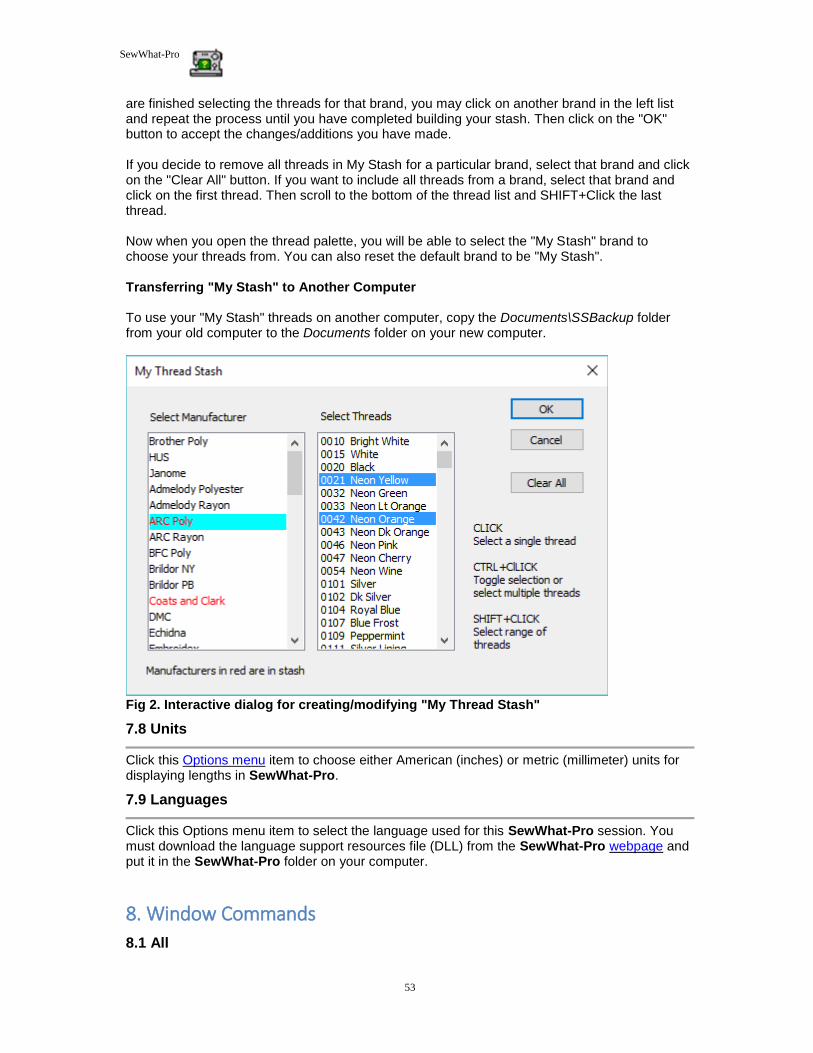
SewWhat-Pro
53
are finished selecting the threads for that brand, you may click on another brand in the left list and repeat the process until you have completed building your stash. Then click on the "OK" button to accept the changes/additions you have made. If you decide to remove all threads in My Stash for a particular brand, select that brand and click on the "Clear All" button. If you want to include all threads from a brand, select that brand and click on the first thread. Then scroll to the bottom of the thread list and SHIFT+Click the last thread. Now when you open the thread palette, you will be able to select the "My Stash" brand to choose your threads from. You can also reset the default brand to be "My Stash". Transferring "My Stash" to Another Computer To use your "My Stash" threads on another computer, copy the Documents\SSBackup folder from your old computer to the Documents folder on your new computer.
Fig 2. Interactive dialog for creating/modifying "My Thread Stash"
7.8 Units
Click this Options menu item to choose either American (inches) or metric (millimeter) units for displaying lengths in SewWhat-Pro.
7.9 Languages
Click this Options menu item to select the language used for this SewWhat-Pro session. You must download the language support resources file (DLL) from the SewWhat-Pro webpage and put it in the SewWhat-Pro folder on your computer.
8. Window Commands
8.1 All
SewWhat-Pro
54
SewWhat-Pro displays a list of currently open document windows at the bottom of the Window menu. A check mark appears in front of the document name of the active window. Choose a document from this list to make its window active.
8.2 New
Use this command to open a new window with the same contents as the active window. You can open multiple document windows to display different parts or views of a document at the same time. If you change the contents in one window, all other windows containing the same document reflect those changes. When you open a new window, it becomes the active window and is displayed on top of all other open windows.
8.3 Cascade
Use this command to arrange multiple opened windows in an overlapped fashion.
8.4 Size
Use this command to display a four-headed arrow so you can size the active window with the arrow keys. After the pointer changes to the four-headed arrow:
1. Press one of the DIRECTION keys (left, right, up, or down arrow key) to move the pointer to the border you want to move.
2. Press a DIRECTION key to move the border. 3. Press ENTER when the window is the size you want.
Note: This command is unavailable if you maximize the window. Shortcut
Mouse: Drag the size bars at the corners or edges of the window.
8.5 Tile
Use this command to arrange multiple opened windows in a non-overlapped fashion.
9. Help Commands
9.1 Tip of the Day
When SewWhat-Pro initially runs, a brief message appears with a helpful suggestion for using this application more efficiently. By clicking this Help menu item, you can view and scroll through the "tip of the day" messages whenever the application is open.
9.2 Help Topics
Use this command to display the opening screen ("Get Started") of Help. From the opening screen, you can jump to step-by-step instructions for using SewWhat-Pro and various types of reference information.
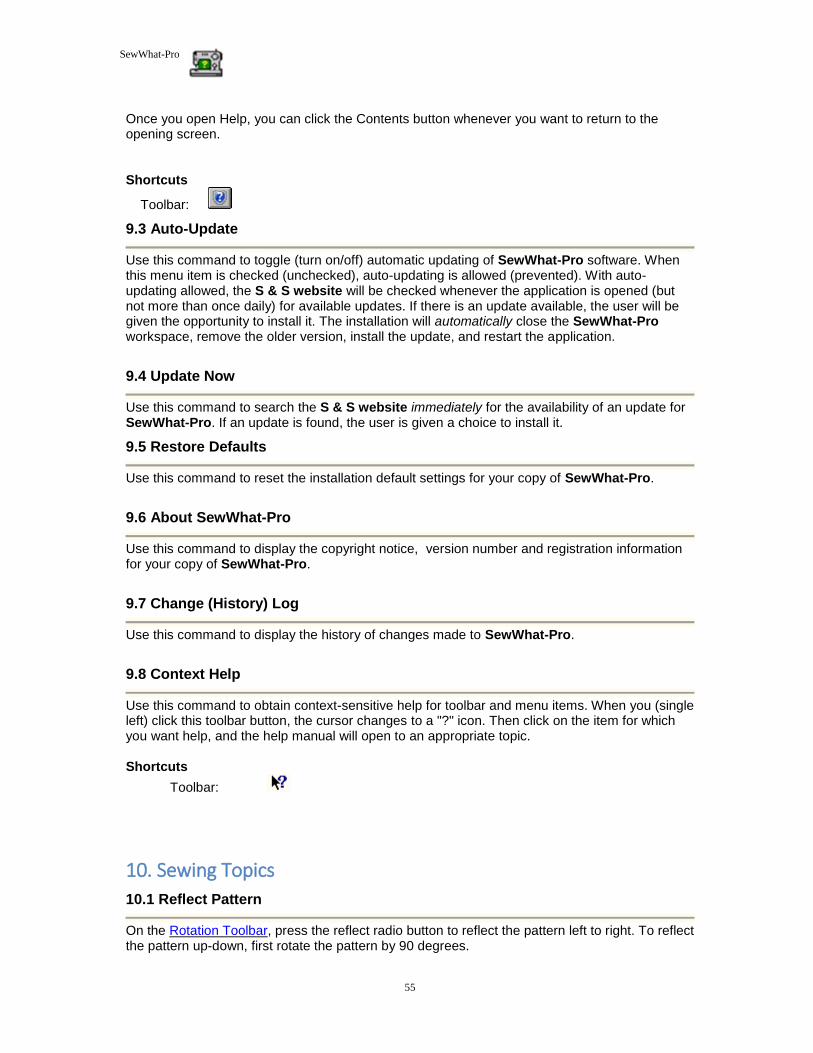
SewWhat-Pro
55
Once you open Help, you can click the Contents button whenever you want to return to the opening screen. Shortcuts
Toolbar:
9.3 Auto-Update
Use this command to toggle (turn on/off) automatic updating of SewWhat-Pro software. When this menu item is checked (unchecked), auto-updating is allowed (prevented). With auto-updating allowed, the S & S website will be checked whenever the application is opened (but not more than once daily) for available updates. If there is an update available, the user will be given the opportunity to install it. The installation will automatically close the SewWhat-Pro workspace, remove the older version, install the update, and restart the application.
9.4 Update Now
Use this command to search the S & S website immediately for the availability of an update for SewWhat-Pro. If an update is found, the user is given a choice to install it.
9.5 Restore Defaults
Use this command to reset the installation default settings for your copy of SewWhat-Pro.
9.6 About SewWhat-Pro
Use this command to display the copyright notice, version number and registration information for your copy of SewWhat-Pro.
9.7 Change (History) Log
Use this command to display the history of changes made to SewWhat-Pro.
9.8 Context Help
Use this command to obtain context-sensitive help for toolbar and menu items. When you (single left) click this toolbar button, the cursor changes to a "?" icon. Then click on the item for which you want help, and the help manual will open to an appropriate topic. Shortcuts
Toolbar:
10. Sewing Topics
10.1 Reflect Pattern
On the Rotation Toolbar, press the reflect radio button to reflect the pattern left to right. To reflect the pattern up-down, first rotate the pattern by 90 degrees.

SewWhat-Pro
56
10.2 Rotate Pattern
You can use the freehand rotation knob to rotate the selected pattern. Alternatively, use the Rotation Toolbar to rotate (counter-clockwise) the selected pattern by 90, 10, or 1 degree increments.
10.3 Thread Palette Editor
The Thread Palette is displayed whenever a color button in the Thread (Information) Pane is clicked. When it is docked below the Thread Pane (as shown in Fig. 1), its display toggles with the Stitch Histogram. It can be resized by dragging the horizontal separator bar between it and the thread pane. When it is floating (Fig. 2), it can be moved to any convenient location by dragging it and resized by left-click dragging its corners or sides. In either mode, the palette can be hidden by clicking outside the Information Pane or, when it is floating, by clicking on the "X" in the upper right corner.
Fig 1. Docked thread palette

SewWhat-Pro
57
Fig 2. Floating thread palette.
Clicking one of the palette colors in the Thread Pane will open the palette editor. To change the corresponding thread color in the pattern, just click on a color in the palette. This will automatically update the Thread Pane and pattern color. The palette of colors is associated with a particular thread manufacturer. The list of manufacturers can be changed by choosing from the drop-down combo Thread Palette list. The Search (Name/#) edit box allows you enter the Thread number or Thread Name and bring that item into view in the list. In Fig. 1, the name "Khaki" was typed. The order of threads appearing in the Thread Color dialog can be changed by clicking one of the three column headers. The threads may be ordered by Color, Thread Name, or Thread # attribute. The palette editor will remain visible until you either (1) click outside the Information Pane to deselect all the threads; (2) Ctrl+Click in the thread pane to select multiple threads; (3) change to the Album-Icon view. Print Thread Palette Click on the Print button to print a copy of all the colors and thread names/numbers in the chosen thread palette.
10.4 Workspace View
The SewWhat-Pro screen is divided into two workspaces: 1. main workspace (or view) 2. information panel

SewWhat-Pro
58
The relative sizes of these two spaces, or panels, can be changed by dragging the vertical separator bar between them with the mouse. Main Workspace This contains the current pattern that you are editing. It also displays the hoop enclosing the pattern as shown below:
Grid dimensions (in either metric or American units) can be toggled on or off, as well as grid lines useful for accurate positioning of the pattern in the hoop. Information Panel This panel is divided into three parts (see below). The Project Pane (top part) contains information about the file, including the total number of stitches and the pattern dimensions. Here you may enter Author and Copyright information for this pattern. The Color File name in the second column may be clicked to change the file from which SewWhat-Pro reads the thread information. By default, it looks for a color text file with the same name as the current embroidery file. Also, click on the first column Color File (read or write) to toggle between the file that SewWhat-Pro will read or write to store its color information. The next lower part of the information panel is the Thread Information Pane. It contains detailed information about each thread in the design. There is a heading bar which identifies the information in each column below it. Click the Brand column header to simultaneously change the thread brand for all threads in the pattern. Click the Stitches column to toggle between the total stitches for each color and the total thread lengths (not including bobbin thread). Click a color button in the first column to open the Thread Palette editor (it is docked at the bottom of the Information Pane where the Stitch Histogram is located) to edit individual color and thread manufacturer information. Right-click on a color button to invoke a popup menu with several editing options:
1. Delete the presently-selected thread

SewWhat-Pro
59
2. Toggle a selection criterion to apply color editing to a single thread (the default) or to all threads that match the chosen color. By enabling this option, you can preserve the color scheme in a large design by editing all matching colors simultaneously, while just having to edit a single color. To choose several threads to edit at once, use Ctrl+Left Mouse click to select the threads. You can reorder the threads in the Thread Info panel by holding down the Shift+Left Mouse button and dragging the color to the stop where you want it. Release the mouse button to drop the color onto the new stop position. The bottom of the information panel is used to display a Stitch Histogram giving a graphical display of the length distribution of threads in the pattern. This chart can be moved and resized anywhere within the info panel. It can be hidden by unchecking the Stitch Histogram item in the View menu. When a thread is selected in the thread pane, the histogram is replaced by the Thread Palette, as described above. The information panel is updated whenever a new file appears in the working panel. Also, the thread information is limited to a single thread when either the Next Object or Previous Object button is selected.
11. Toolbars
11.1 Standard

SewWhat-Pro
60
The standard (main) toolbar is displayed across the top of the application window, below the menu bar. It provides quick mouse access to many tools used in SewWhat-Pro. To hide or display the main toolbar, select the Standard Toolbar item from the View menu. Click To
Open a new document.
Open an existing document. SewWhat-Pro displays the Open dialog box, in which you can locate and open the desired file.
Save the active document or template with its current name. If you have not named the document, SewWhat-Pro displays the Save As dialog box.
Save the active document or template with a new name and file type. SewWhat-Pro displays the Save As dialog box.
Print the active document.
Email an embroidery file.
Cut (delete) selected pattern from the document and stores it on the clipboard.
Copy the selected pattern to the clipboard.
Insert the pattern stored in the clipboard into the active window.
Undo last action (activated if possible).
Redo last undo action (activated if possible).
Snap to grid.
Adds a border to the pattern.
Perform batch conversion of multiple embroidery files.

SewWhat-Pro
61
Create Designer 1 floppy disk.
Create or edit Smart Media card for Singer/EMD embroidery machine.
Select hoop size to fit pattern.
Select fabric color.
Resize a pattern.
Adjust stitch density.
Enter cutting mode to split designs.
Applique Cutout tool.
Reselects All objects after Next or Previous object selection.
Select Next object in pattern for individual editing.
Select Previous object in pattern for individual editing.
Center pattern in hoop.
Information about using SewWhat-Pro.
Context sensitive help.
11.2 Lettering
Toggles Album View (to view icons for all embroidery files in working directory) with project view. Used to click icons to enter lettering (or other patterns)
Enter lettering (including monogramming) based on Windows TTF fonts into pattern.
Enter pre-digitized lettering from the keyboard.
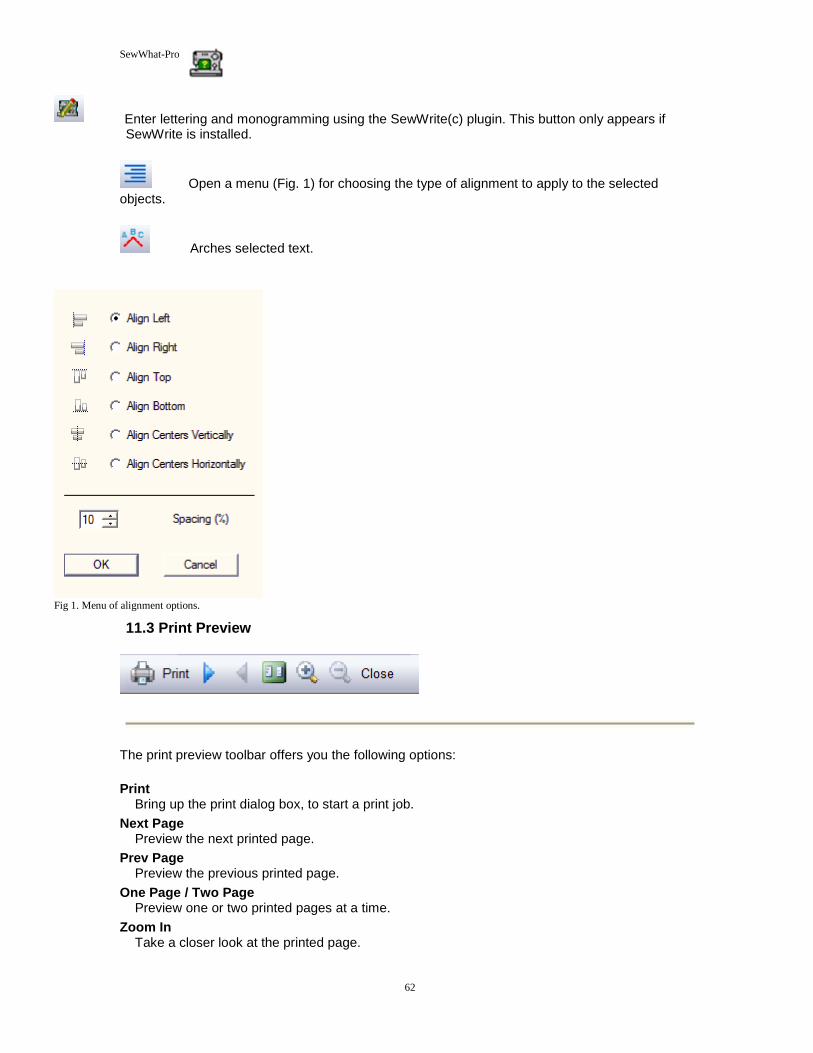
SewWhat-Pro
62
Enter lettering and monogramming using the SewWrite(c) plugin. This button only appears if SewWrite is installed.
Open a menu (Fig. 1) for choosing the type of alignment to apply to the selected objects.
Arches selected text.
Fig 1. Menu of alignment options.
11.3 Print Preview
The print preview toolbar offers you the following options:
Print Bring up the print dialog box, to start a print job.
Next Page Preview the next printed page.
Prev Page Preview the previous printed page.
One Page / Two Page Preview one or two printed pages at a time.
Zoom In Take a closer look at the printed page.
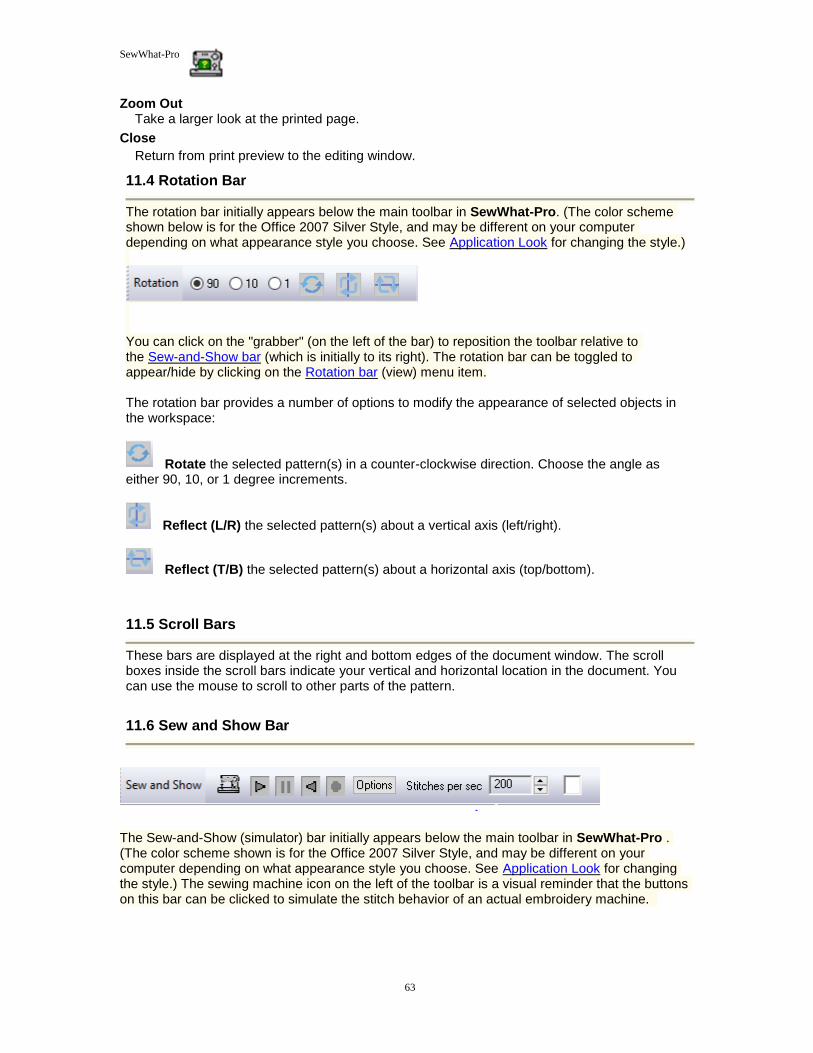
SewWhat-Pro
63
Zoom Out Take a larger look at the printed page.
Close Return from print preview to the editing window.
11.4 Rotation Bar
The rotation bar initially appears below the main toolbar in SewWhat-Pro. (The color scheme shown below is for the Office 2007 Silver Style, and may be different on your computer depending on what appearance style you choose. See Application Look for changing the style.)
You can click on the "grabber" (on the left of the bar) to reposition the toolbar relative to the Sew-and-Show bar (which is initially to its right). The rotation bar can be toggled to appear/hide by clicking on the Rotation bar (view) menu item. The rotation bar provides a number of options to modify the appearance of selected objects in the workspace:
Rotate the selected pattern(s) in a counter-clockwise direction. Choose the angle as either 90, 10, or 1 degree increments.
Reflect (L/R) the selected pattern(s) about a vertical axis (left/right).
Reflect (T/B) the selected pattern(s) about a horizontal axis (top/bottom).
11.5 Scroll Bars
These bars are displayed at the right and bottom edges of the document window. The scroll boxes inside the scroll bars indicate your vertical and horizontal location in the document. You can use the mouse to scroll to other parts of the pattern.
11.6 Sew and Show Bar
The Sew-and-Show (simulator) bar initially appears below the main toolbar in SewWhat-Pro . (The color scheme shown is for the Office 2007 Silver Style, and may be different on your computer depending on what appearance style you choose. See Application Look for changing the style.) The sewing machine icon on the left of the toolbar is a visual reminder that the buttons on this bar can be clicked to simulate the stitch behavior of an actual embroidery machine.
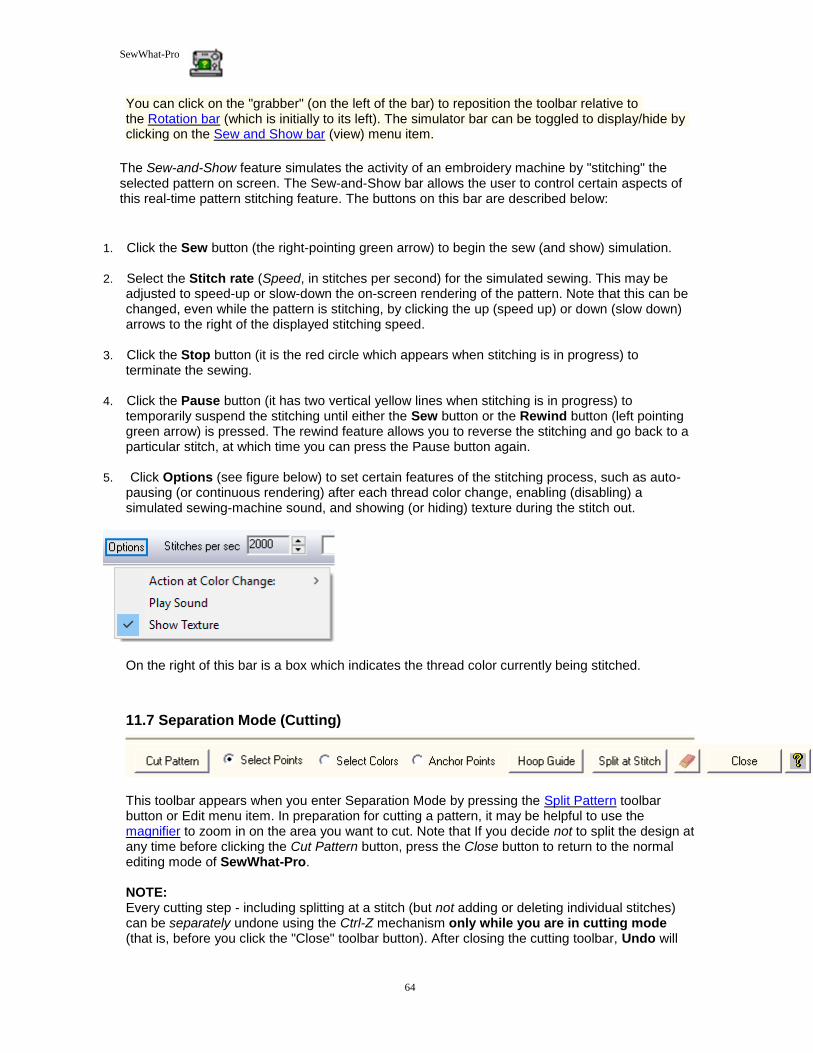
SewWhat-Pro
64
You can click on the "grabber" (on the left of the bar) to reposition the toolbar relative to the Rotation bar (which is initially to its left). The simulator bar can be toggled to display/hide by clicking on the Sew and Show bar (view) menu item.
The Sew-and-Show feature simulates the activity of an embroidery machine by "stitching" the selected pattern on screen. The Sew-and-Show bar allows the user to control certain aspects of this real-time pattern stitching feature. The buttons on this bar are described below:
1. Click the Sew button (the right-pointing green arrow) to begin the sew (and show) simulation. 2. Select the Stitch rate (Speed, in stitches per second) for the simulated sewing. This may be
adjusted to speed-up or slow-down the on-screen rendering of the pattern. Note that this can be changed, even while the pattern is stitching, by clicking the up (speed up) or down (slow down) arrows to the right of the displayed stitching speed.
3. Click the Stop button (it is the red circle which appears when stitching is in progress) to
terminate the sewing. 4. Click the Pause button (it has two vertical yellow lines when stitching is in progress) to
temporarily suspend the stitching until either the Sew button or the Rewind button (left pointing green arrow) is pressed. The rewind feature allows you to reverse the stitching and go back to a particular stitch, at which time you can press the Pause button again.
5. Click Options (see figure below) to set certain features of the stitching process, such as auto-
pausing (or continuous rendering) after each thread color change, enabling (disabling) a simulated sewing-machine sound, and showing (or hiding) texture during the stitch out.
On the right of this bar is a box which indicates the thread color currently being stitched.
11.7 Separation Mode (Cutting)
This toolbar appears when you enter Separation Mode by pressing the Split Pattern toolbar button or Edit menu item. In preparation for cutting a pattern, it may be helpful to use the magnifier to zoom in on the area you want to cut. Note that If you decide not to split the design at any time before clicking the Cut Pattern button, press the Close button to return to the normal editing mode of SewWhat-Pro. NOTE: Every cutting step - including splitting at a stitch (but not adding or deleting individual stitches) can be separately undone using the Ctrl-Z mechanism only while you are in cutting mode (that is, before you click the "Close" toolbar button). After closing the cutting toolbar, Undo will

SewWhat-Pro
65
restore the state prior to when the cutting mode was first started. For example, if you made 10 cuts and/or stitch splits, you can undo them one at a time only while in cutting mode. If you undo after closing the cutting toolbar, all 10 cuts/splits will be undone at once. There are two (mutually exclusive) radio buttons - Select Points and Select Colors - which control what operations will be performed by a left mouse click. You can check one or the other to define the mode of operation. When the Select Points button is checked, then left mouse clicks will create vertex points (where the mouse cursor is) which define the contour used to cut the pattern (see the discussion below). When the Select Colors button is checked, left mouse clicks will select the thread color block associated with the clicked region and highlights the selected color in the Thread Pane. After choosing the colors, click on the Select Points button to return to cutting mode and the selected threads will be highlighted in the workspace image. You may display the whole pattern at any time by clicking on the All Objects main toolbar button. The following table gives a summary of the mouse clicks and control keys that can be used when the cutting mode toolbar is active:
CLICK HOLD DOWN MODE ACTION
Left Mouse SELECT POINTS Enter a vertex for the cutting contour
Left Mouse SELECT COLOR Select a specific color block in the pattern
Right Mouse Delete last vertex point
Left Mouse SHIFT Move the hoop guide clicked in
Right Mouse SHIFT/CTRL Delete last hoop guide
Left Mouse CTRL Duplicate and move an existing hoop guide
How to cut a pattern Follow the steps below to cut an existing pattern into two (or more) separate patterns. It is assumed the Select Points button is checked. 1. Left-click with the mouse at points around the area of the pattern to be cut. Each click will create a cutting point, or vertex, which will be joined to the preceding point to form a cutting polygonal contour. Continue left-clicking a series of vertices (points) – which will be connected by dashed lines defining the edges of a polygon – to surround the region (object) to be cut. You can go around the region in either a clockwise or counter-clockwise direction, but be sure that the dashed contour lines do not intersect. To remove any previous point(s), right-click the mouse anywhere in the workspace. 2. Once you have created the "cookie-cutter" polygonal boundary around the object to be cut, press the Cut Pattern button and the selected region will be cut (separated) from the rest of the pattern. A menu will pop-up with options for handling the cut threads (important exception: no menu pop-up occurs if you are splitting a pattern to fit a positional hoop since it is assumed that the entire pattern is to be retained - see the discussion for splitting in a positional hoop, below): Remove Interior Cut and remove the part inside the polygon boundary Remove Exterior Cut and remove the part outside the polygon boundary Cut and Save All Retain both parts of the pattern. New thread colors will be automatically added to the end of the thread list in the Thread Pane. These represent the threads for the separated pattern, which may be edited now or later when you return to normal editing mode. For this option, the addition of these threads are the only indication that the pattern has been cut.

SewWhat-Pro
66
Cut/Save Interior Cut and remove the part inside the polygon boundary. You will be given the opportunity to save the cut part of the pattern to a new file. 3. You can make multiple cuts while in this mode. When all cuts are finished, press the Close button to return to the normal editing mode of SewWhat-Pro. Helpful Hint:
To cut through a single color block - even if it is on top of another - follow the steps above, but first select the block to cut either by Ctrl-clicking the associated thread color button in the Thread (Project) Pane or by checking the Select Color button on this toolbar and clicking the color directly in the pattern. This will highlight the desired color block and all subsequent cutting will be limited to that block (or blocks) once you have checked the Select Points button. You can switch to a different block by clicking a different thread color button, without leaving Separation mode.
For example, consider the pattern shown below. The Peridot (second color stop) is sewn as a single color block. It is desired to make the frog's head a slightly different shade of green from his body. One way to accomplish this would be to separate the green part of the head from the remaining part of the body and legs, and then recolor the new color block. (Another way is to use the Split at Stitch option, see below.) This can be easily accomplished - without cutting through any of the other colors - by first Ctrl-clicking on the Peridot color stop button in the Thread Pane. This will highlight the green part of the pattern so that the cutting boundary can be easily clicked around the head alone (see second figure below).
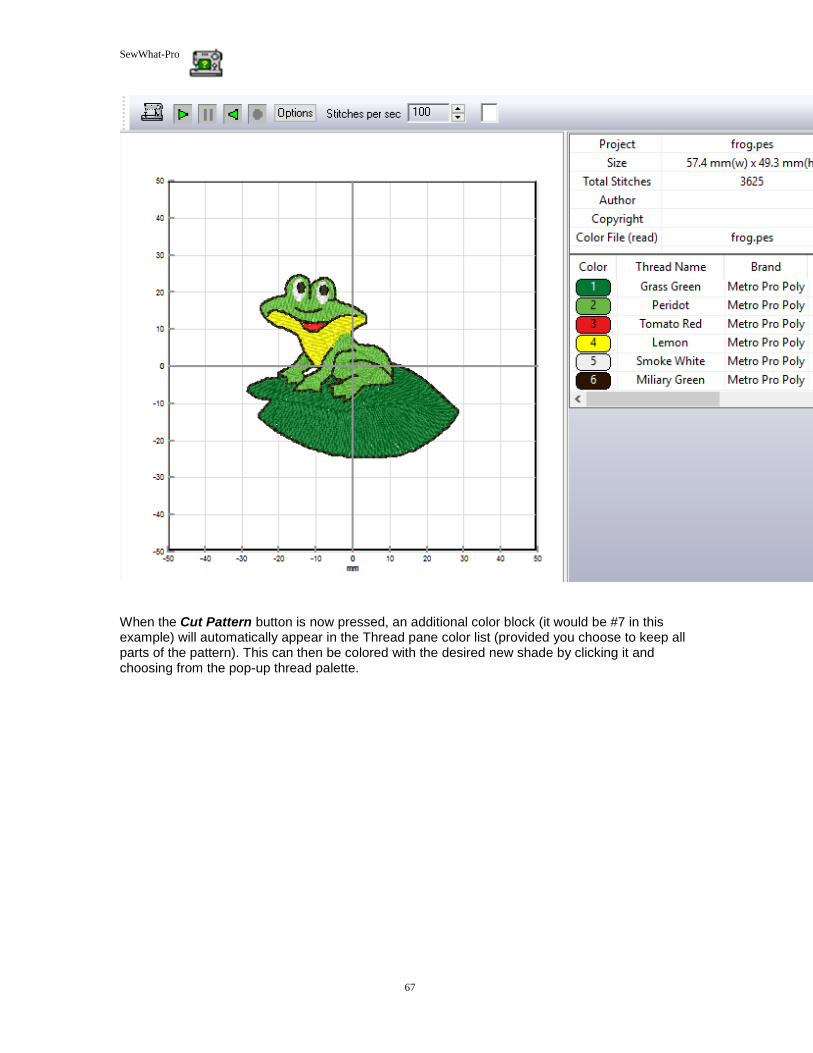
SewWhat-Pro
67
When the Cut Pattern button is now pressed, an additional color block (it would be #7 in this example) will automatically appear in the Thread pane color list (provided you choose to keep all parts of the pattern). This can then be colored with the desired new shade by clicking it and choosing from the pop-up thread palette.

SewWhat-Pro
68
After moving the new color stop (#7) - by shift+dragging it and dropping it after color stop 2 - and recoloring it to Neon Green, the resulting pattern is shown below.
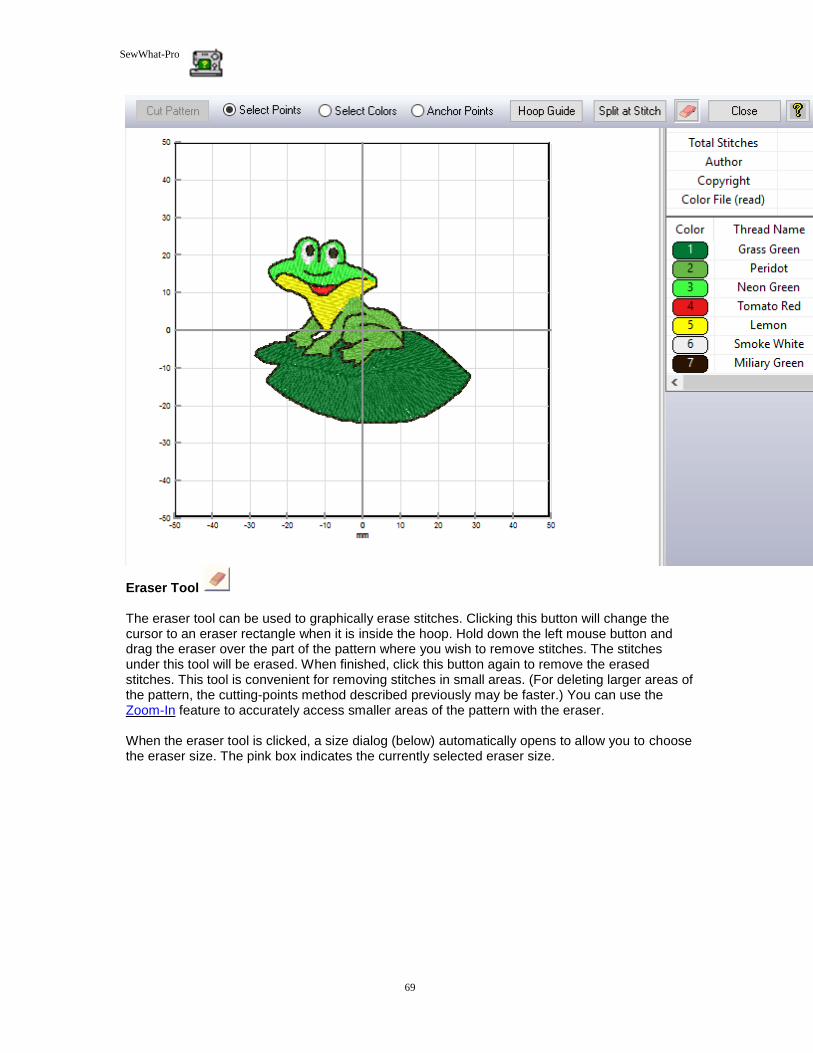
SewWhat-Pro
69
Eraser Tool The eraser tool can be used to graphically erase stitches. Clicking this button will change the cursor to an eraser rectangle when it is inside the hoop. Hold down the left mouse button and drag the eraser over the part of the pattern where you wish to remove stitches. The stitches under this tool will be erased. When finished, click this button again to remove the erased stitches. This tool is convenient for removing stitches in small areas. (For deleting larger areas of the pattern, the cutting-points method described previously may be faster.) You can use the Zoom-In feature to accurately access smaller areas of the pattern with the eraser. When the eraser tool is clicked, a size dialog (below) automatically opens to allow you to choose the eraser size. The pink box indicates the currently selected eraser size.
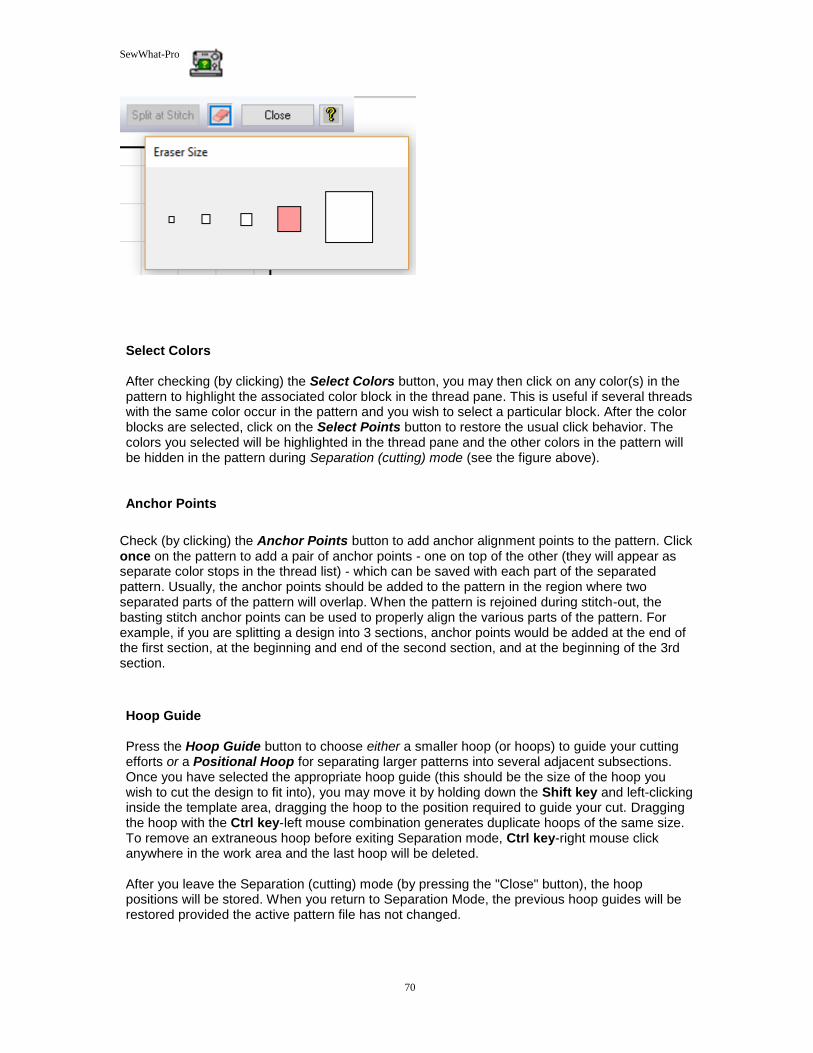
SewWhat-Pro
70
Select Colors After checking (by clicking) the Select Colors button, you may then click on any color(s) in the pattern to highlight the associated color block in the thread pane. This is useful if several threads with the same color occur in the pattern and you wish to select a particular block. After the color blocks are selected, click on the Select Points button to restore the usual click behavior. The colors you selected will be highlighted in the thread pane and the other colors in the pattern will be hidden in the pattern during Separation (cutting) mode (see the figure above). Anchor Points
Check (by clicking) the Anchor Points button to add anchor alignment points to the pattern. Click once on the pattern to add a pair of anchor points - one on top of the other (they will appear as separate color stops in the thread list) - which can be saved with each part of the separated pattern. Usually, the anchor points should be added to the pattern in the region where two separated parts of the pattern will overlap. When the pattern is rejoined during stitch-out, the basting stitch anchor points can be used to properly align the various parts of the pattern. For example, if you are splitting a design into 3 sections, anchor points would be added at the end of the first section, at the beginning and end of the second section, and at the beginning of the 3rd section.
Hoop Guide Press the Hoop Guide button to choose either a smaller hoop (or hoops) to guide your cutting efforts or a Positional Hoop for separating larger patterns into several adjacent subsections. Once you have selected the appropriate hoop guide (this should be the size of the hoop you wish to cut the design to fit into), you may move it by holding down the Shift key and left-clicking inside the template area, dragging the hoop to the position required to guide your cut. Dragging the hoop with the Ctrl key-left mouse combination generates duplicate hoops of the same size. To remove an extraneous hoop before exiting Separation mode, Ctrl key-right mouse click anywhere in the work area and the last hoop will be deleted. After you leave the Separation (cutting) mode (by pressing the "Close" button), the hoop positions will be stored. When you return to Separation Mode, the previous hoop guides will be restored provided the active pattern file has not changed.

SewWhat-Pro
71
Cutting Patterns to Fit Positional Hoops Large patterns meant to fit into positional hoops (used to embroider patterns without re-hooping) must usually be cut into several pieces that will fit into the various hoop sections. (It should be noted that the Positional Hoop is not the same as the Continuous or Endless Hoop.) For some Husqvarna (HUS-VIP) and Pfaff (VP3) machines, patterns for the positional hoops do not have to be cut so the user will be given the opportunity decide whether to cut the pattern (or not). Here, we describe how to take a large design that has not been digitized for the positional hoop and split it into different smaller portions that will fit into one or another of the positional hoop sections. This is done by using a combination of the cutting toolbar functions and the Split at Stitch option (see below). Here are the steps for cutting a design in SewWhat-Pro for use with a positional hoop: 1. Open a design in one of the available positional hoops for your machine (see the Hoop options for a description of positional hoops). You will see the positional hoop arrows on the left (or top) of the hoop, depending on its orientation. Most positional hoops need to have the pattern arranged in a particular orientation, so that after you save the split pattern, it may be rotated by 90-degrees. 2. Clicking a positional hoop arrow button will highlight the associated hoop position in a unique color, i.e. red, blue, or green. In general, the pattern will be too big to fit into just one of the hoop sections, which therefore requires splitting the pattern. (Indeed, if the pattern fits just one of the positional hoop sections, you should save it in that smaller hoop size!) See the figure below which shows a pattern in the Janome GigaHoop.

SewWhat-Pro
72
3. Now that you have determined that the full design will not fit into a single hoop section, you should next find out if it requires cutting or if individual color stops can be arranged so that they will fit completely into one or another of the hoop sections. (In the latter case, SewWhat-Pro will automatically rearrange the stops to fit the appropriate hoop sections.) The easiest way to make this determination it to attempt to save (Save As) the pattern. If splitting is not necessary, the pattern will be saved. If splitting is required, a list of the color stops that must be cut will be presented and you should proceed to step 4. In this example, it is necessary to cut all four colors as indicated by the following dialog:
4. Before proceeding with cutting, make sure the positional hoops are highlighted as described in step 2. This will provide guides for the cutting process. Next, highlight the color stops - by Ctrl-clicking the associated stops in the thread list. (You can also click the colors directly in the pattern after first selecting the "Select Colors" option on the cutting toolbar.) You may want to highlight one (or a few) colors at a time. In this example, we found that clicking the first two colors (the red and the yellow) in the list produced the figure shown below (the figure on the left is before cutting, the figure on the right is after cutting). Note that in the overlap region of the two hoops (below the top of the P2 hoop and above the bottom of the P1 hoop), there is a region where both the red and yellow patterns are connected by jump stitches (not visible - the "void" between the two halves of the pattern). Proceed to draw the cutting outline (the dots connected by the dashed cutting contour in the figure on the left below) through this central region and around the bottom half of the pattern, being careful not to intersect the pattern except through the portion in the overlap region. Note that when the "Cut Pattern" button is finally clicked, this will separate the original two colors blocks into four, consisting of the two on top and the two on the bottom. The bottom two new color blocks consist of the region encircled by the cutting bottom and are shown highlighted in the figure below on the right.

SewWhat-Pro
73
In general, try to cut through a part of the pattern that is "thin" and/or possibly hidden beneath another color. If at all possible try to cut through as many colors as possible at once, but at the very least, try to preserve the order of the colors (after cutting) by selecting the colors to cut from the top to the bottom of the thread list. Use the cookie-cutter clicking method described above to encircle the region of the pattern that needs to be cut, taking care that at least one of the sections of the cut pattern will fit into one of the positional hoop sections. Multiple cuts may be required if the pattern is very elongated. The Split at Stitch function can be used when a single thread connects disparate regions of the pattern (by a jump stitch, for example). In the example shown here, the third color block must be cut through the middle of the bow - there was no other choice. The fourth block was easily separated and the resulting split pattern fit into the Gigahoop. It is often useful to magnify around the region of the pattern being split, so you can avoid having the cutting boundary intersect parts of the pattern that do not need to be split. By highlighting only the parts of the pattern that need splitting, you will guarantee that no other parts of the pattern will be inadvertently cut. 5. When you have created your cutting boundary, click the "Cut Pattern" button. The colors in the part of the pattern you enclosed with the cutting boundary will appear as additional color stops at the bottom of the thread list, corresponding to the split part of the pattern. For this reason, it is a good idea to always enclose the bottom part of the pattern with your cutting boundary, so that part of the split will appear at the bottom of the thread list. Repeat steps 4-5 until all the colors in your pattern that require splitting have been cut and fit entirely within one or another of the hoop sections. Now Save the pattern again. If your cutting succeeded in splitting the pattern into individual hoops, your file will be saved. If not, the remaining color stops to be split will again be identified and you can repeat the steps above.

SewWhat-Pro
74
Important note for Brother, Husqvarna and Janome users If you used any of the Husqvarna or Brother positional hoops, or the Janome Giga-Hoop, additional files will be saved to use with the positional hoops. The suffix "_1" or "_2" (or “_3” for Husqvarna/Brother hoops) will be appended to the file name, indicating the positional hoop corresponding to the pattern stored in that file. These files are optional to use for Brother machines, since the single (combined) file can be used instead. Split at Stitch You may click the Split at Stitch toolbar button to open the advanced toolbar for splitting the pattern at a specific stitch (or stitches). Cutting Example The figure below shows a pattern opened in SewWhat-Pro where the top half of the flame was cut as a separate pattern from the bottom half. A set of points was clicked out in a clockwise manner in the order indicated by the numbers (the last point – point 5 – is optional (since the last and first points are automatically joined). Once you have returned to normal editing mode, the separated thread color(s) may be edited just like any other distinct thread(s) in your pattern. For example, you can click on one or the other pattern formed by the threads cut during the editing session and move, rotate, delete, copy, etc. those threads as desired. In the example above, the top of the flame was to be used as a pocket-topper so the bottom part of the pattern would be deleted. Note that sometimes the selection box may cover the entire (uncut) pattern if a stray thread or jump stitch occurred. In that case, just move the pattern in a direction away from the cut to determine which pattern is actually selected. Then perform any further editing on the selected pattern.

SewWhat-Pro
75
Saving a cut pattern If your original pattern was cut to fit it into a smaller available hoop (rather than reducing the pattern size), then you will need to save the various cut portions into separate files (be sure to use the available hoop size when saving). You can do that by selecting, copying and then pasting the various portions of the cut pattern into New pattern files (see the instructions for Copying and Pasting). Use the Grid Line and Grid Labels View Menu items to help with aligning your cut patterns. For the example considered here, select the top half of the flame and Copy it (Edit/Copy menu) to the clipboard. Then from the File menu, choose the New option to open a new SewWhat-Pro workspace and Paste the top half of the flame into that blank workspace. Save the file with an appropriate name – like Flame_top – after positioning it relative to the Grid lines and labels of the on-screen hoop.
11.8 Split at Stitch

SewWhat-Pro
76
This toolbar allows you to split a single thread into separate color blocks so these can be subsequently removed, reordered or recolored. Also, the selected stitch (or multiple stitches selected by holding down the SHIFT key while left-clicking the stitch points) can be moved (by holding down the CTRL key and dragging the point(s) to the desired new location) or deleted (by clicking the DELETE button on the toolbar). This is useful for repositioning a small number of errant stitches that may exist in the pattern or changing the local density. Additional stitches may be inserted (by clicking the Insert button) after the selected stitch. This is useful for increasing the local density in an under-dense region of the pattern. For all the operations described below, the Select Point button should be checked. If the Select Colors button is checked instead, then clicking on a color in the pattern will display the associated color stop in the thread pane. This is useful for identifying the color stops for sections of the pattern. Split For example, in the pattern of a frog (Fig.1), the head and feet may be sewn with a single thread, but you would would like them to be different shades of green. The Split button splits the design thread block at a designated stitch (that you have clicked) within a single thread. Follow these steps to split a pattern at a designated stitch:
1. Select a thread (or threads) by either clicking on the associated color stop(s) in the Thread Pane (hold down the Ctrl key to select multiple threads) or press the Select Colors button and then click on the colors in the pattern. If you want to display the whole pattern, skip this step.
2. It is helpful to magnify the pattern so it is large enough to view individual stitch points. If you skip this step, then clicking on the pattern may appear to do nothing, because you have missed clicking on a stitch point.
3. Click on (or near) any point to select it as the split point. You may reclick to choose another point before performing the actual split. Or, if the point is hidden under (or obscured by) others, use the up (right) or down (left) arrow keys to scroll up or down in the stitch point order until you get to the point for splitting. The point will be highlighted and its stitch number will be automatically displayed on the screen. If this does not happen, it is likely you did not click close enough to an actual stitch point in the pattern.
4. You may want to run the Sew & Show simulator at a slow stitch speed to help isolate the point at which splitting is desired.
5. Once the stitch number has been selected, press the Split button to perform the actual splitting. You may perform multiple splitting while in this mode by repeating the steps above. When you are finished, click the Close button to return to the separation mode (cutting) toolbar. Fgure 1 shows the green color stop of the frog image (magnified 3.8 times so stitch points were visible) used in the Separation Mode Toolbar example. The Sew & Show simulator was run to identify the point (#10368) as the one appropriate for splitting the frog's head from the rest of light green part of the pattern. Clicking on that point in the magnified pattern displays the stitch number in the pattern. Pressing the Split button will split the thread at that point and two light-green color stops will automatically appear in the Thread pane.

SewWhat-Pro
77
Fig 1 Delete The selected stitches maybe be deleted by clicking this toolbar button or the Delete keyboard key. Insert Click this toolbar button to insert an extra stitch before the selected one. Add Lock Click this toolbar button to add a lock stitch after the selected stitch. Selecting/Moving Multiple Stitches at Once Holding down the SHIFT key allows you to select several points at once for editing (deleting and moving). The points can be selected either by left-clicking them or by using the keyboard arrow keys to select the preceding or following points in the design. In Fig. 2a, four points on the satin stitch have been selected (solid red squares), ending with stitch #2325. Note that they were left-clicked since they are NOT consecutive points. Releasing the SHIFT key and then holding down the CTRL key, one of the selected points was moved to widen the satin stitch in this particular area and all four points were shifted simultaneously. If the Delete button or keyboard key had been pressed instead, all four points would have been deleted.
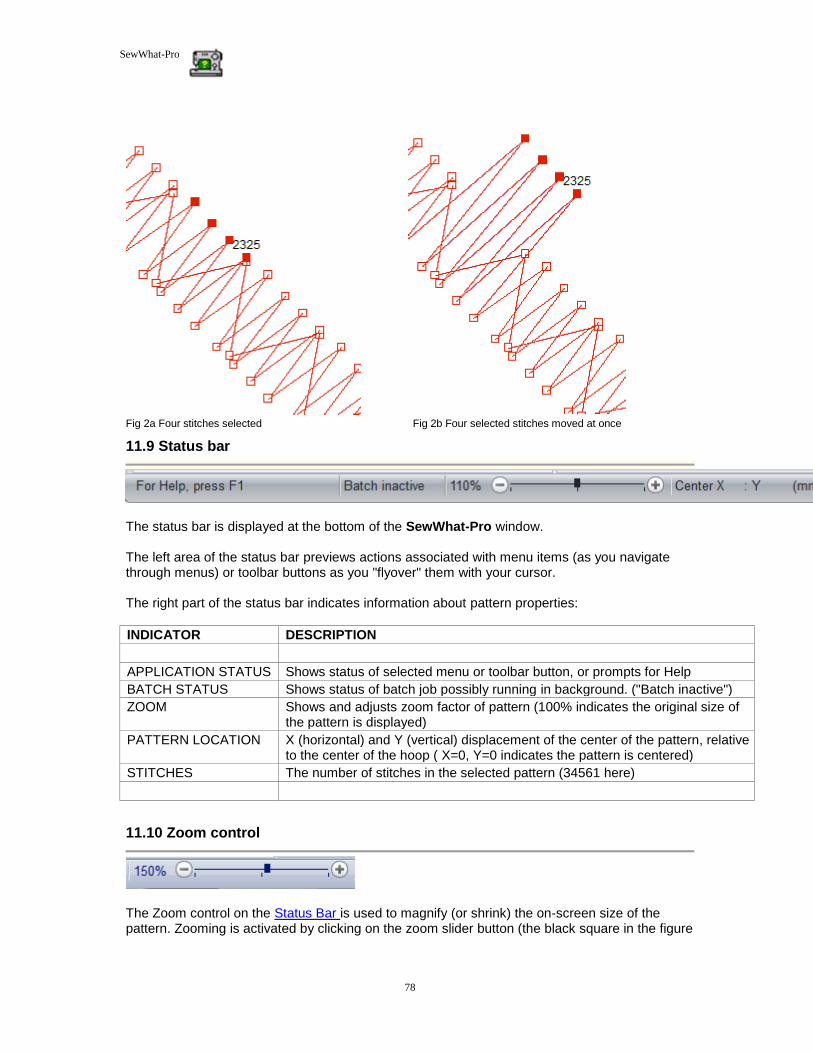
SewWhat-Pro
78
Fig 2a Four stitches selected Fig 2b Four selected stitches moved at once
11.9 Status bar
The status bar is displayed at the bottom of the SewWhat-Pro window. The left area of the status bar previews actions associated with menu items (as you navigate through menus) or toolbar buttons as you "flyover" them with your cursor. The right part of the status bar indicates information about pattern properties:
INDICATOR DESCRIPTION
APPLICATION STATUS Shows status of selected menu or toolbar button, or prompts for Help
BATCH STATUS Shows status of batch job possibly running in background. ("Batch inactive")
ZOOM Shows and adjusts zoom factor of pattern (100% indicates the original size of the pattern is displayed)
PATTERN LOCATION X (horizontal) and Y (vertical) displacement of the center of the pattern, relative to the center of the hoop ( X=0, Y=0 indicates the pattern is centered)
STITCHES The number of stitches in the selected pattern (34561 here)
11.10 Zoom control
The Zoom control on the Status Bar is used to magnify (or shrink) the on-screen size of the pattern. Zooming is activated by clicking on the zoom slider button (the black square in the figure

SewWhat-Pro
79
above). Once the zoom control has been activated, actual zooming can be done in several ways: 1. Drag the slider-button to the right to zoom-in (magnify) the pattern, or to the left to shrink it 2. Click to the right of the button to magnify, or to the left, to shrink, the pattern 3. Click on the "+" or "-" buttons to move in 10% increments 4. Use the arrow keys on the keyboard to zoom-in or out 5. Turn the mouse scroll wheel Zooming in (magnifying) can be useful for viewing individual stitches. Zooming out is useful if the pattern is too large to display in the workspace without scrolling. Note that zooming has no effect on the actual pattern size (unlike resizing). Rather, it only affects the size of the viewed image on the screen. Zooming a particular region To zoom a specific region of the pattern, center the region in the workspace pane. Then when you magnify (or shrink) the pattern, that region should stay centered and in view. Note that you may have to first enlarge the pattern a little to be able to center the desiired region.
12. Utilities
12.1 Add Font
You may add fonts (stored as TTF files) to the font list in the SewWhat-Pro Lettering Dialog in several ways:
1. Click the Add User Fonts button on the lettering dialog. The added fonts will be loaded into the font list and will be available in all future SewWhat-Pro work sessions. However, they will not be available to other programs unless the SewWhat-Pro program is also open. To use the new font(s), you must click the Font and Size button and select the font to use it from the drop-down list.
2. To temporarily add fonts (to any program), double-click the font files (*.TTF) to open them, and then minimize them to the taskbar, keeping them open. Then open SewWhat-Pro and the font(s) should appear in the font list of the lettering dialog while the TTF files remain open.
3. To permanently add new fonts, go to Control Panel/Fonts and use the Windows Font Installer (c) to install the new fonts there.
12.2 File Open Dialog
This dialog (see Fig. 1) allows you to navigate to a folder (or drive) to find a file to open (or merge) into the current SewWhat-Pro workspace. When you click on a file in the Explorer window, it will display in the preview pane on the right.
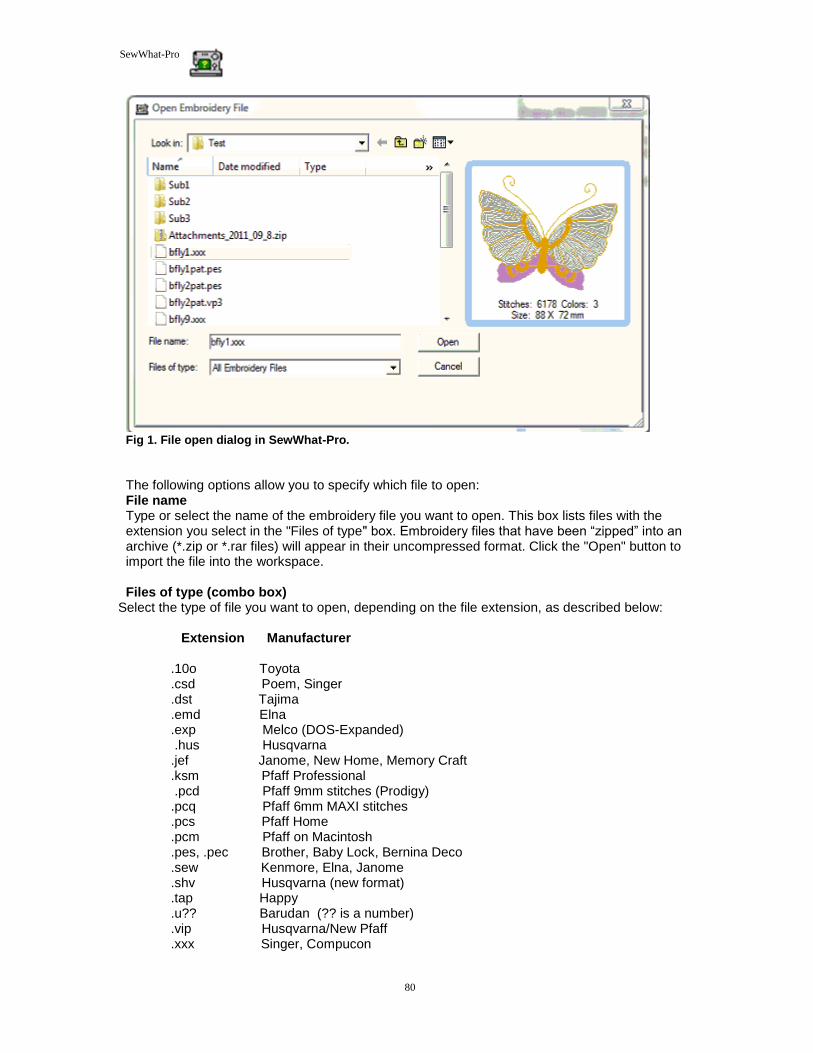
SewWhat-Pro
80
Fig 1. File open dialog in SewWhat-Pro. The following options allow you to specify which file to open: File name Type or select the name of the embroidery file you want to open. This box lists files with the extension you select in the "Files of type" box. Embroidery files that have been “zipped” into an archive (*.zip or *.rar files) will appear in their uncompressed format. Click the "Open" button to import the file into the workspace. Files of type (combo box)
Select the type of file you want to open, depending on the file extension, as described below:
Extension Manufacturer
.10o Toyota .csd Poem, Singer .dst Tajima .emd Elna .exp Melco (DOS-Expanded) .hus Husqvarna .jef Janome, New Home, Memory Craft .ksm Pfaff Professional .pcd Pfaff 9mm stitches (Prodigy) .pcq Pfaff 6mm MAXI stitches .pcs Pfaff Home .pcm Pfaff on Macintosh .pes, .pec Brother, Baby Lock, Bernina Deco .sew Kenmore, Elna, Janome .shv Husqvarna (new format) .tap Happy .u?? Barudan (?? is a number) .vip Husqvarna/New Pfaff .xxx Singer, Compucon

SewWhat-Pro
81
.zsk ZSK .zip Zip Archive
Choosing a zip archive file that contains one of the preceding sewing pattern files will
automatically extract that file to your hard disk when you click the "open" button. Once a file is selected, a preview of its contents is shown in the dialog box. Look in
Select the directory (or drive) which SewWhat-Pro searches for the file that you want to open.
12.3 File Save As Dialog
This dialog (see Fig. 1) allows you to choose the name and extension (type) of the file to be saved, as well as the folder to save the file in.
Fig 1. SewWhat-Pro File Save As dialog. The following options allow you to specify the name and location of the file you're about to save: File name Type a new filename to save an embroidery file with a different name. SewWhat-Pro adds the extension you specify in the "Save as type" box. Save in Select the folder in which you want to store the embroidery file. Save as type Select a new file extension (type) for the saved file. Save as Single Pattern

SewWhat-Pro
82
For PES and VP3 file types, you can choose between storing multiple pattern files as one (single) pattern (check this box) or retain multiple patterns in the saved file. For all other file types, a single pattern will be stored automatically. For positional hoops, this option is ignored.
12.4 Hoop Size Use this Options menu item to display the tabbed dialog for selecting hoop sizes. The tabs are grouped across the top by machine manufacturer type (Babylock, Bernina, etc).
Figure 1 Dialog displayed by clicking the "Hoop Size" tab
• The tabs allow you to display the available hoop sizes for various embroidery machine manufacturers. In Fig. 1, the manufacturer "Brother" has been selected by clicking on that tab. Use the horizontal scroll buttons (to the right of the tabs) to find a manufacturer if it is not displayed. The list of hoops for that manufacturer and the selected machine type will be displayed in the list box. In Fig.1, the selected machine type is the Brother "PE770". You can use the optional vertical scrollbar (to the right of the hoop list) to display the complete list of hoop sizes. Select the desired hoop size by clicking on the radio button beside the hoop description. Your selection will be highlighted and can be altered at any time before you close this dialog by clicking on a different hoop size. Once you have selected the desired hoop size, you may also set this to be the default for your machine by checking the Set Default Hoop button. This is the hoop that patterns without internal hoop information will open into, or all patterns if the File

SewWhat-Pro
83
Options Use Default Machine Hoop button is also checked. The embroidery file types supported by this manufacturer can be seen by scrolling the Emb Types list. Setting this type will change the current pattern to that type when the OK button is clicked.
• Positional Hoops are included in the hoop size list (you may have to scroll to the bottom of the list) and are labeled as such. They will appear in the SewWhat-Pro workspace with arrow-markers to indicate the position of the hoop stops for the overlap hoop sections. You can click those markers to display the individual hoop positions. In the positional hoop shown in Fig. 2, there are 3 hoop positions P1-P3. Below, the middle hoop position P2 has been clicked to show the (green) hoop at that position. See separation mode toolbar for further information about cutting patterns to fit positional hoops.
• Hoop Insert Displays (or hides) a user-selectable hoop insert (for example, a "Fast Frame"). When this button is clicked, the hoop insert dimensions dialog is displayed (see Fig. 3). You can set the width and height for the insert hoop, and whether or not it will be displayed in the SewWhat-Pro workspace. If the width or height of the insert exceeds the hoop dimensions, it will not be displayed even if the display check box is checked. The position of the hoop insert relative to the hoop center can be set with the "Offset Center" values. For the Horz(izontal) setting, positive values will move the insert center to the right of the hoop center and negative values move it to the left. For the Vert(ical) setting, positive values will move the insert center up relative to the hoop center and negative values move it down. This is useful for non-centered hoop inserts.
• User Hoops On the far right of the tab list (use the horizontal scroll arrows to get there) is a special User hoop tab. You can enter your own special hoop sizes there by typing into the edit box the height (H) and width (W) of the hoop in the presently selected units (mm or in). Be sure to enter this information in the format "H X W". Note that this feature is included as a convenience for on-screen display, but in general, the user hoop will not be retained when the file is saved. Rather, the nearest available hoop for that embroidery type will be used.

SewWhat-Pro
84
Figure 2 A three-position positional hoop, with positions P1, P2, P3 displayed in SewWhat-Pro.
Fig 3 Dialog for displaying and setting the Hoop Insert dimensions
12.5 Hoop Calibration The Hoop Calibration dialog is used to set the position and screen size of the hoops displayed by SewWhat-Pro. Use the vertical (horizontal) spin control to change the vertical (horizontal) position and/or size of the hoop on the screen (see Fig. 1). Click the Position Hoop button to move the hoop on your screen. Click the Calibrate Hoop Size button to adjust the size of the hoop on your screen. You only need to adjust the size of one hoop, and that will be sufficient to guarantee that all other hoops will be properly sized. An easy way to calibrate the hoop size is to mark the current hoop

SewWhat-Pro
85
dimensions on a piece of paper and then hold that paper to your screen until the hoop dimensions match.
Figure 1 Hoop Calibration dialog to adjust the displayed hoop size and position.
12.6 Print Setup
Use this command to select a printer and a printer connection. This command presents a Print Setup dialog box, where you specify the printer and its connection.
12.7 Print Setup Dialog
The following options allow you to select the destination printer and its connection.
Printer Select the printer you want to use. Choose the Default Printer; or choose the Specific Printer option and select one of the current installed printers shown in the box. You install printers and configure ports using the Windows Control Panel.
Orientation Choose Portrait or Landscape.
Paper Size Select the size of paper that the document is to be printed on.
Paper Source Some printers offer multiple trays for different paper sources. Specify the tray here.

SewWhat-Pro
86
Options Displays a dialog box where you can make additional choices about printing, specific to the type of printer you have selected.
Network Choose this button to connect to a network location, assigning it a new drive letter.


