24
1 ShaderWorks Library Manager
| Date post: | 24-Oct-2014 |
| Category: |
Documents |
| Upload: | gloria-antonio |
| View: | 71 times |
| Download: | 8 times |
1
ShaderWorks Library Manager
2
Table of contents Requirements .................................................................................................................................................................... 3
Installation ........................................................................................................................................................................ 3
Installed files and folders .................................................................................................................................................. 3
Known limitations ............................................................................................................................................................. 3
Help and support .............................................................................................................................................................. 3
Running the script ............................................................................................................................................................. 4
Set shortcuts manually .................................................................................................................................................. 5
Removing the default Poser library shortcut ............................................................................................................ 5
Add definitely the script to the Python Palette ........................................................................................................ 5
Interface overview ............................................................................................................................................................ 6
The tree view .................................................................................................................................................................... 7
Browse (B) tab ............................................................................................................................................................... 9
Browse (B) tab – Right click menu ............................................................................................................................ 9
Favourites (F) tab ........................................................................................................................................................ 11
Connection (C) tab ...................................................................................................................................................... 12
Runtimes (R) tab and Libraries (L) tab ........................................................................................................................ 12
Thumbnail view ............................................................................................................................................................... 13
Selected Items ................................................................................................................................................................. 14
Loading options ............................................................................................................................................................... 15
Smart MAT (and a mini walkthrough) ......................................................................................................................... 16
Thumbnail’s edit menu ............................................................................................................................................... 18
Copy/Move .............................................................................................................................................................. 18
Delete ...................................................................................................................................................................... 18
Rename ................................................................................................................................................................... 18
Save to library ................................................................................................................................................................. 19
History ............................................................................................................................................................................. 22
References ...................................................................................................................................................................... 23
Options ............................................................................................................................................................................ 24

3
Requirements Poser 8 with latest service release.
Installation This product comes with one zip file:
Semi-027_xxxx.zip The zip file contains the scripts. The scripts must be installed in the main Poser runtime, in this specific folder: <POSER APPLICATION>: Runtime\Python\poserScripts\ShaderWorks\ShaderWorksLibraryManager The zip file contains the folder structure: you only need to unzip it in the Poser folder, keeping the folder structure.
Note: The Install from Zip Archive in the Content Room won’t install the files in the main Poser folder, but in the Download runtime. This is not a correct installation and the script won’t work!
Installed files and folders \Runtime \Python\poserScripts\ShaderWorks \Runtime \Python\poserScripts\ShaderWorks\ShaderWorksLibraryManager \Runtime \Python\poserScripts\ShaderWorks\ShaderWorksLibraryManager\Default.png \Runtime \Python\poserScripts\ShaderWorks\ShaderWorksLibraryManager\ShaderWorksAdvancedLibraryManager.py \Runtime \Python\poserScripts\ScriptsMenu\ShaderWorks - Library Manager\ShaderWorks Library Manager.py \Runtime \Python\poserScripts\ScriptsMenu\ShaderWorks - Library Manager\Utilities\1a-Set Shortcut.py \Runtime \Python\poserScripts\ScriptsMenu\ShaderWorks - Library Manager\Utilities\1b-Restore Shortcut.py \Runtime \Python\poserScripts\ScriptsMenu\ShaderWorks - Library Manager\Utilities\2a-Add to python palette.py \Runtime \Python\poserScripts\ScriptsMenu\ShaderWorks - Library Manager\Utilities\2b-Restore python palette.py Notice that the script will create some new folders (instances, presets, favourites and temp) inside the main script folder.
Known limitations - Creating a new runtime is not possible: this is (actually?) a Poser Python limitation. To create a new runtime,
you must open the default Flex Library from Poser 8 (from the Windows menu: Libraries) - Docking is… not always acting as it should. It is not possible to keep exactly the docked position, so the dialog
might sometime be docked somewhere else (instead of being on the top-right, it usually go on the bottom-right). This really depends on your docking configuration.
- The script cannot be launched on Poser 8 startup. - The script can be located in any room… but cannot be in two rooms simultaneously: you must close it in the
first room before switching to another room.
Help and support This script was created by Basil Gass, aka Semidieu. For questions and support, http://www.runtimedna.com or email [email protected]
4
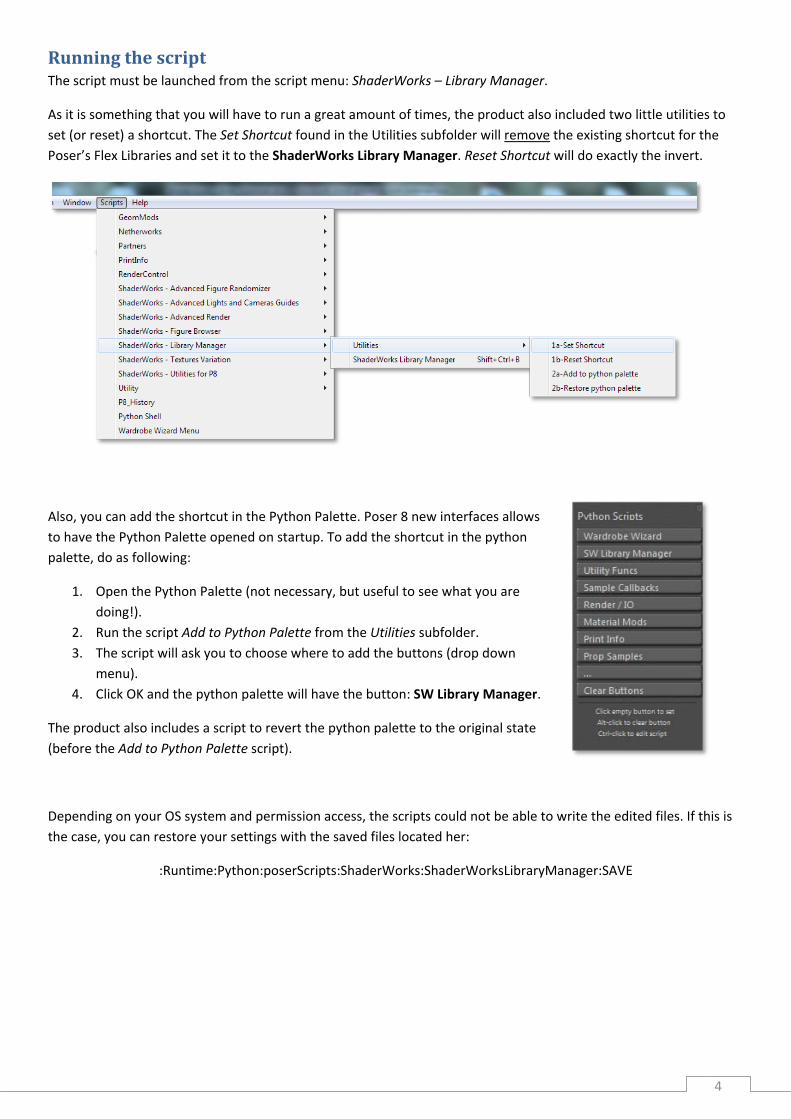
Running the script The script must be launched from the script menu: ShaderWorks – Library Manager.
As it is something that you will have to run a great amount of times, the product also included two little utilities to set (or reset) a shortcut. The Set Shortcut found in the Utilities subfolder will remove the existing shortcut for the Poser’s Flex Libraries and set it to the ShaderWorks Library Manager. Reset Shortcut will do exactly the invert.
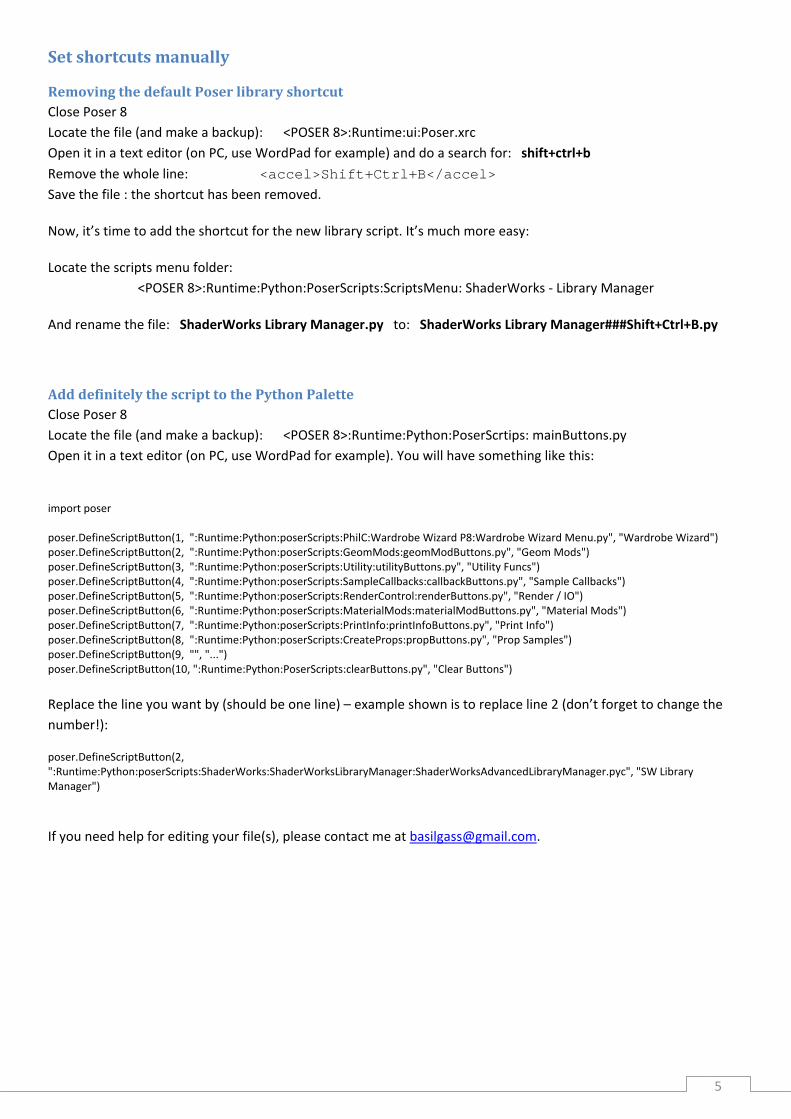
Also, you can add the shortcut in the Python Palette. Poser 8 new interfaces allows to have the Python Palette opened on startup. To add the shortcut in the python palette, do as following:
1. Open the Python Palette (not necessary, but useful to see what you are doing!).
2. Run the script Add to Python Palette from the Utilities subfolder. 3. The script will ask you to choose where to add the buttons (drop down
menu). 4. Click OK and the python palette will have the button: SW Library Manager.
The product also includes a script to revert the python palette to the original state (before the Add to Python Palette script).
Depending on your OS system and permission access, the scripts could not be able to write the edited files. If this is the case, you can restore your settings with the saved files located her:
:Runtime:Python:poserScripts:ShaderWorks:ShaderWorksLibraryManager:SAVE
5
Set shortcuts manually
Removing the default Poser library shortcut Close Poser 8 Locate the file (and make a backup): <POSER 8>:Runtime:ui:Poser.xrc Open it in a text editor (on PC, use WordPad for example) and do a search for: shift+ctrl+b Remove the whole line: <accel>Shift+Ctrl+B</accel> Save the file : the shortcut has been removed.
Now, it’s time to add the shortcut for the new library script. It’s much more easy:
Locate the scripts menu folder: <POSER 8>:Runtime:Python:PoserScripts:ScriptsMenu: ShaderWorks - Library Manager
And rename the file: ShaderWorks Library Manager.py to: ShaderWorks Library Manager###Shift+Ctrl+B.py
Add definitely the script to the Python Palette Close Poser 8 Locate the file (and make a backup): <POSER 8>:Runtime:Python:PoserScrtips: mainButtons.py Open it in a text editor (on PC, use WordPad for example). You will have something like this:
import poser poser.DefineScriptButton(1, ":Runtime:Python:poserScripts:PhilC:Wardrobe Wizard P8:Wardrobe Wizard Menu.py", "Wardrobe Wizard") poser.DefineScriptButton(2, ":Runtime:Python:poserScripts:GeomMods:geomModButtons.py", "Geom Mods") poser.DefineScriptButton(3, ":Runtime:Python:poserScripts:Utility:utilityButtons.py", "Utility Funcs") poser.DefineScriptButton(4, ":Runtime:Python:poserScripts:SampleCallbacks:callbackButtons.py", "Sample Callbacks") poser.DefineScriptButton(5, ":Runtime:Python:poserScripts:RenderControl:renderButtons.py", "Render / IO") poser.DefineScriptButton(6, ":Runtime:Python:poserScripts:MaterialMods:materialModButtons.py", "Material Mods") poser.DefineScriptButton(7, ":Runtime:Python:poserScripts:PrintInfo:printInfoButtons.py", "Print Info") poser.DefineScriptButton(8, ":Runtime:Python:poserScripts:CreateProps:propButtons.py", "Prop Samples") poser.DefineScriptButton(9, "", "...") poser.DefineScriptButton(10, ":Runtime:Python:PoserScripts:clearButtons.py", "Clear Buttons")
Replace the line you want by (should be one line) – example shown is to replace line 2 (don’t forget to change the number!):
poser.DefineScriptButton(2, ":Runtime:Python:poserScripts:ShaderWorks:ShaderWorksLibraryManager:ShaderWorksAdvancedLibraryManager.pyc", "SW Library Manager")
If you need help for editing your file(s), please contact me at [email protected].
6
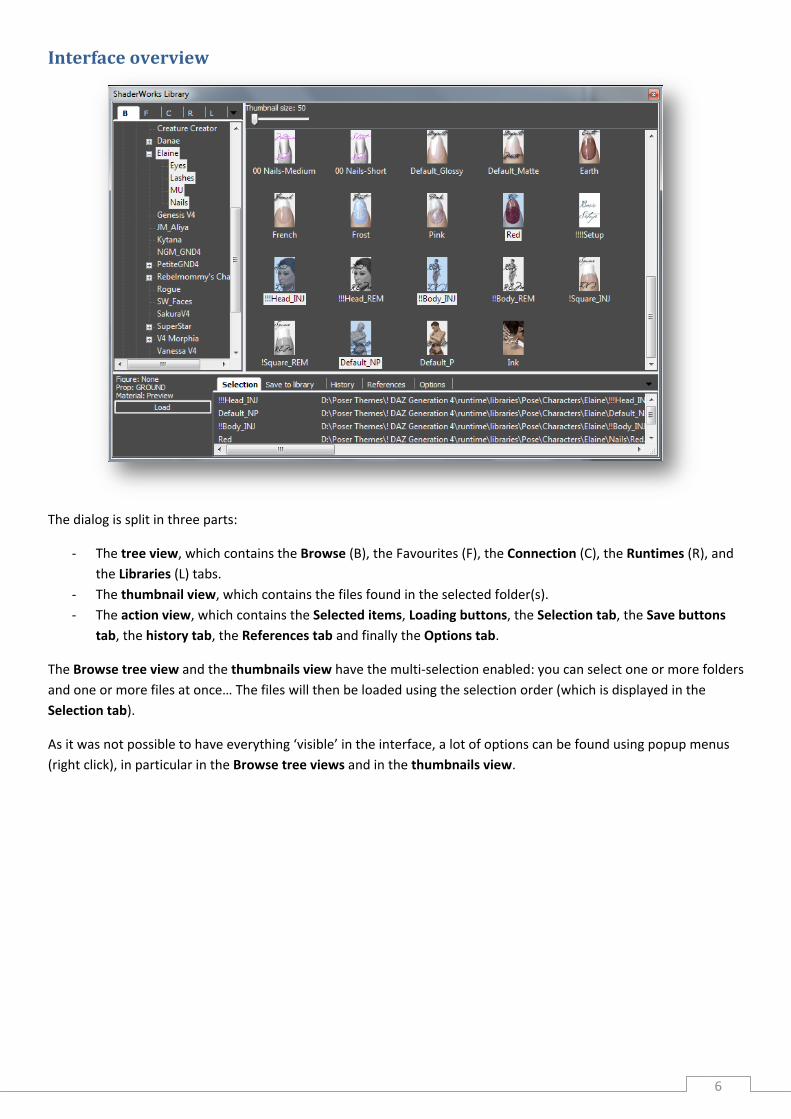
Interface overview
The dialog is split in three parts:
- The tree view, which contains the Browse (B), the Favourites (F), the Connection (C), the Runtimes (R), and the Libraries (L) tabs.
- The thumbnail view, which contains the files found in the selected folder(s). - The action view, which contains the Selected items, Loading buttons, the Selection tab, the Save buttons
tab, the history tab, the References tab and finally the Options tab.
The Browse tree view and the thumbnails view have the multi-selection enabled: you can select one or more folders and one or more files at once… The files will then be loaded using the selection order (which is displayed in the Selection tab).
As it was not possible to have everything ‘visible’ in the interface, a lot of options can be found using popup menus (right click), in particular in the Browse tree views and in the thumbnails view.
7
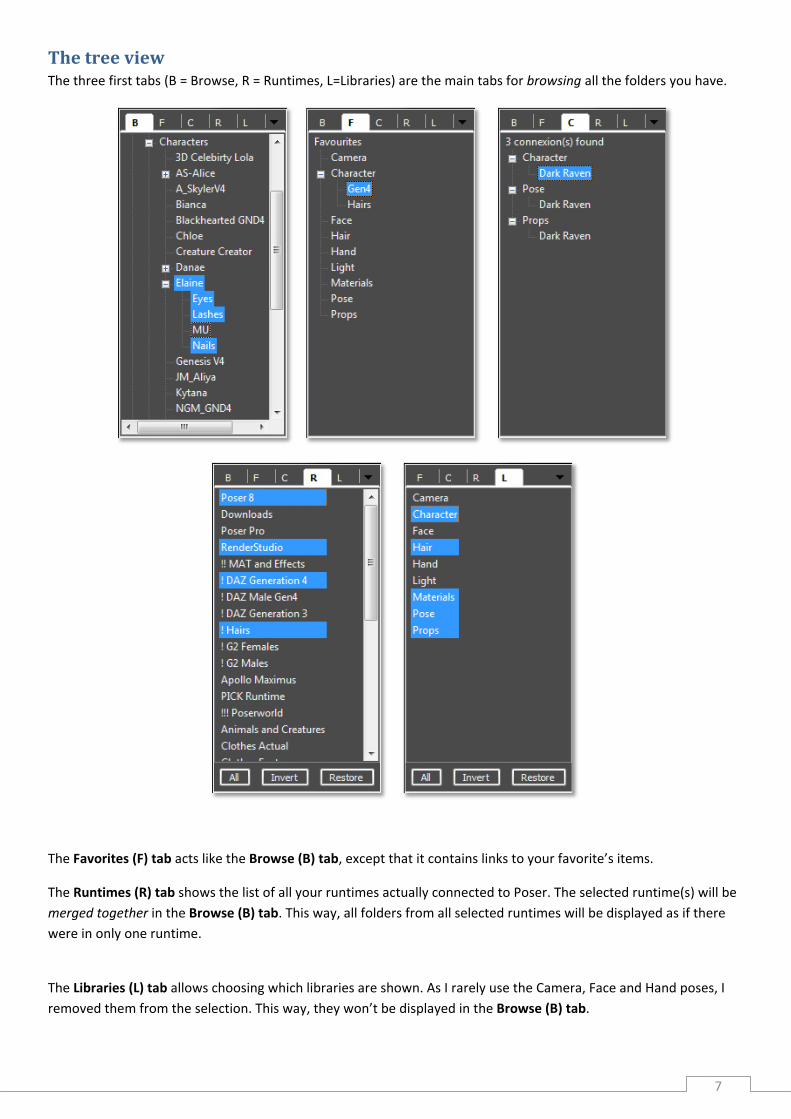
The tree view The three first tabs (B = Browse, R = Runtimes, L=Libraries) are the main tabs for browsing all the folders you have.
The Favorites (F) tab acts like the Browse (B) tab, except that it contains links to your favorite’s items.
The Runtimes (R) tab shows the list of all your runtimes actually connected to Poser. The selected runtime(s) will be merged together in the Browse (B) tab. This way, all folders from all selected runtimes will be displayed as if there were in only one runtime.
The Libraries (L) tab allows choosing which libraries are shown. As I rarely use the Camera, Face and Hand poses, I removed them from the selection. This way, they won’t be displayed in the Browse (B) tab.

8
The Connection (C) tab is a particular tab… For the selected folder, it tries to find all ‘similar’ folder(s) in the different libraries. It can be used in four different ways:
- Opening the Connection (C) tab and double clicking the first line. - In the Browse (B) tab, right clicking a folder will give you two choices:
o Get Connection… It will search for all similar folders. o Get Connection (advanced)… It does the same, except that it asks the
folder name to search. - In the Thumbnail view, right clicking an item will open the ‘Get Connection
(advanced)…’ dialog.
For more details for the Connection (C) tab, see Connection (C) tab
9
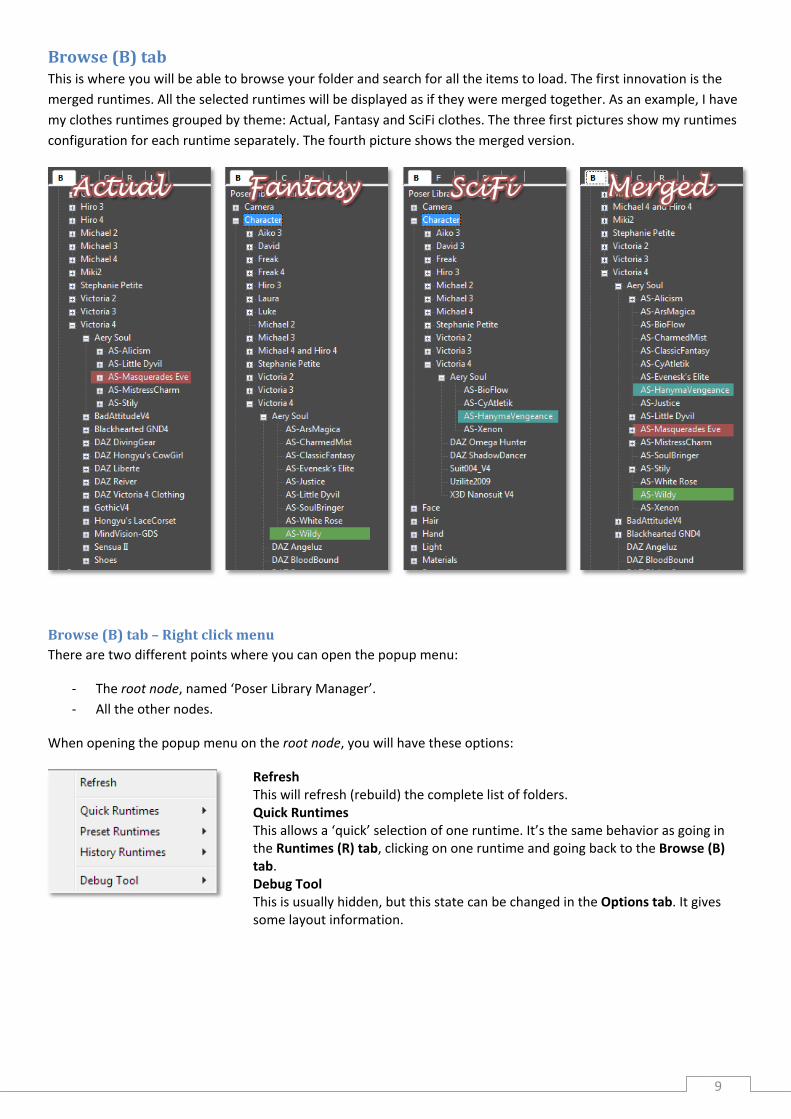
Browse (B) tab This is where you will be able to browse your folder and search for all the items to load. The first innovation is the merged runtimes. All the selected runtimes will be displayed as if they were merged together. As an example, I have my clothes runtimes grouped by theme: Actual, Fantasy and SciFi clothes. The three first pictures show my runtimes configuration for each runtime separately. The fourth picture shows the merged version.
Browse (B) tab – Right click menu There are two different points where you can open the popup menu:
- The root node, named ‘Poser Library Manager’. - All the other nodes.
When opening the popup menu on the root node, you will have these options:
Refresh This will refresh (rebuild) the complete list of folders. Quick Runtimes This allows a ‘quick’ selection of one runtime. It’s the same behavior as going in the Runtimes (R) tab, clicking on one runtime and going back to the Browse (B) tab. Debug Tool This is usually hidden, but this state can be changed in the Options tab. It gives some layout information.

10
When opening the popup menu on any other node than the root node, you will have these options:
Get connection… The script will search all similar folders to the currently selected folder. If something is found, it will automatically switch to the Connection (C) tab.
Get connection (advanced)… The script will ask for a search pattern. The default pattern is the one used for the Get connection…
New folder… This will create a new folder in the currently selected folder(s). Don’t forget: the runtimes are merged, so the new folder can be created in more than one runtime at once!
Editing… This will open a submenu, allowing deleting, renaming, moving or copying folders. Depending on the selection, not all editing controls are available:
• Deleting is disabled if more than one folder is selected. The option can be shown again if you open the popup menu while holding the Shift and Ctrl (Cmd) key down.
• Renaming can be done one only one folder (but can be in multiple runtimes). • Moving/Copying are ‘merged’ together. Once the files are copied, the script will ask if it should delete the
old files or not. While holding the Shift key down, you will also get another Move/Copy option, with a submenu: this is a convenient way to move the folders in another
Refresh This will refresh the display for all subfolders contained in the selected folder(s). This is sometimes useful, in particular if some folders where created manually from outside Poser.
Expand this branch This will open all subfolders from the selected branch. Depending on the number of subfolders, this can be time consuming…
Quick Selection This shows all the runtimes where the folder(s) are pointing to. This is a convenient way to select one runtime only. If there is only one runtime selected, this is not displayed!
Quick Runtimes This is a convenient way to select only one runtime. Instead of clicking on the Runtime (T) tab, select one runtime and clicking again on the Browse (B) tab, this is done with the popup menu.
Preset Runtimes As you can select multiple runtimes, it is necessary to be able to quickly change through different combination of runtimes. This allows to have presets of runtimes selection.
History Runtimes As soon as something was loaded with the library manager, this submenu will be available. It contains all runtimes that were used. It’s a convenient way to select one runtime only.

11
Add folder to favourite… This will open a submenu, containing the corresponding library folder structure. The selected folder will be then linked to a favourite folder. All files in this folder will be displayed (so if you change the contents, it will change in the favourite folder).
Debug Tool This submenu can be hidden using the Debug option in the Option tab. It contains various information on the window (size, folders selected, …)
Favourites (F) tab The Favourites (F) tab manages all your preferred content, as if it was a single runtime. The tree view contains the folders structures of your favourites items (the folder structure can be located in the Favourites folder inside the main script folder). As for the Browse (B) tab, the tree view also has a right click menu:
New folder… will create a new folder.
Editing… will open a submenu, allowing to delete, rename or move the favourites items.
Refresh will reload the subfolders.
Expand this branch will expand (open) all subfolders from the selected folder.
When selecting a folder from the Favourites (F) tab, the script will search for all files linked to this folder. There are two kinds of links:
- File link: this is a simple favourite file (the file was added using the Thumbnail view right click menu). If the original file is move, delete or renamed, the script won’t see it anymore.
- Folder link: this is a ‘dynamic’ set of links. All files found in the linked folder will be displayed dynamically. If a file is renamed, it will still show in this link.
The Thumbnail view also reacts differently when you are using the Favourites (F) tab for editing the files. See also: Thumbnail’s edit menu.
12
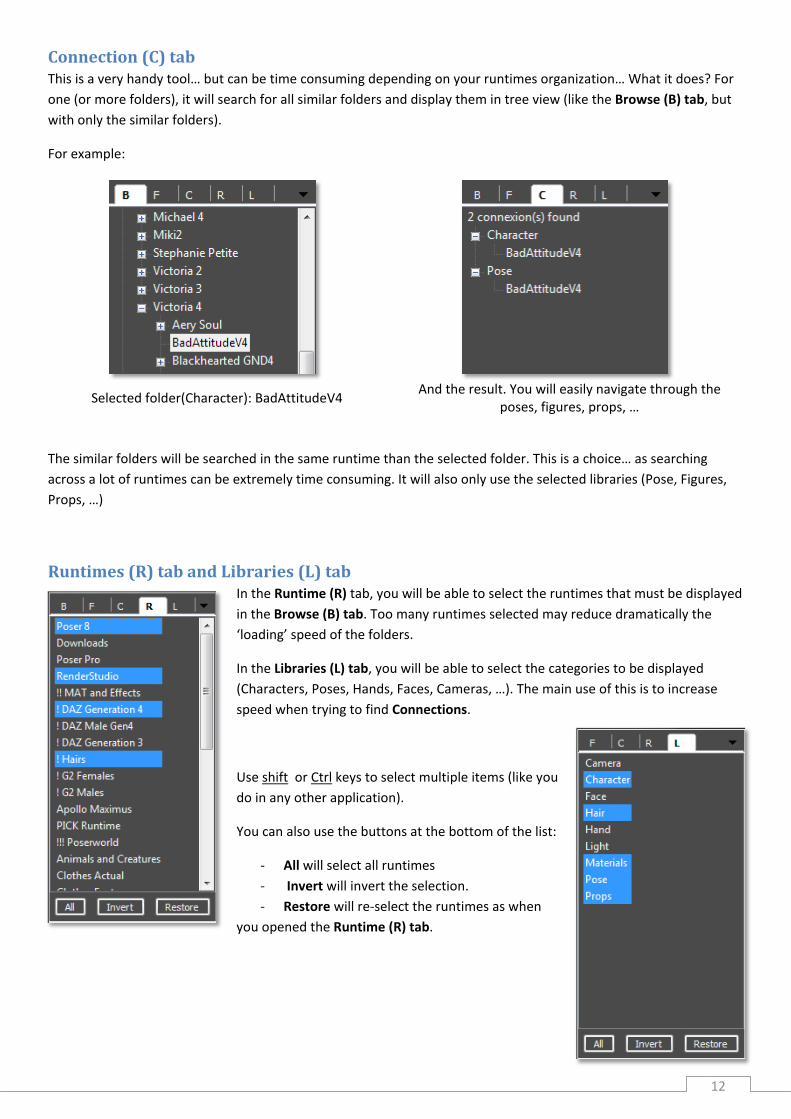
Connection (C) tab This is a very handy tool… but can be time consuming depending on your runtimes organization… What it does? For one (or more folders), it will search for all similar folders and display them in tree view (like the Browse (B) tab, but with only the similar folders).
For example:
Selected folder(Character): BadAttitudeV4 And the result. You will easily navigate through the
poses, figures, props, …
The similar folders will be searched in the same runtime than the selected folder. This is a choice… as searching across a lot of runtimes can be extremely time consuming. It will also only use the selected libraries (Pose, Figures, Props, …)
Runtimes (R) tab and Libraries (L) tab In the Runtime (R) tab, you will be able to select the runtimes that must be displayed in the Browse (B) tab. Too many runtimes selected may reduce dramatically the ‘loading’ speed of the folders.
In the Libraries (L) tab, you will be able to select the categories to be displayed (Characters, Poses, Hands, Faces, Cameras, …). The main use of this is to increase speed when trying to find Connections.
Use shift or Ctrl keys to select multiple items (like you do in any other application).
You can also use the buttons at the bottom of the list:
- All will select all runtimes - Invert will invert the selection. - Restore will re-select the runtimes as when
you opened the Runtime (R) tab.
13
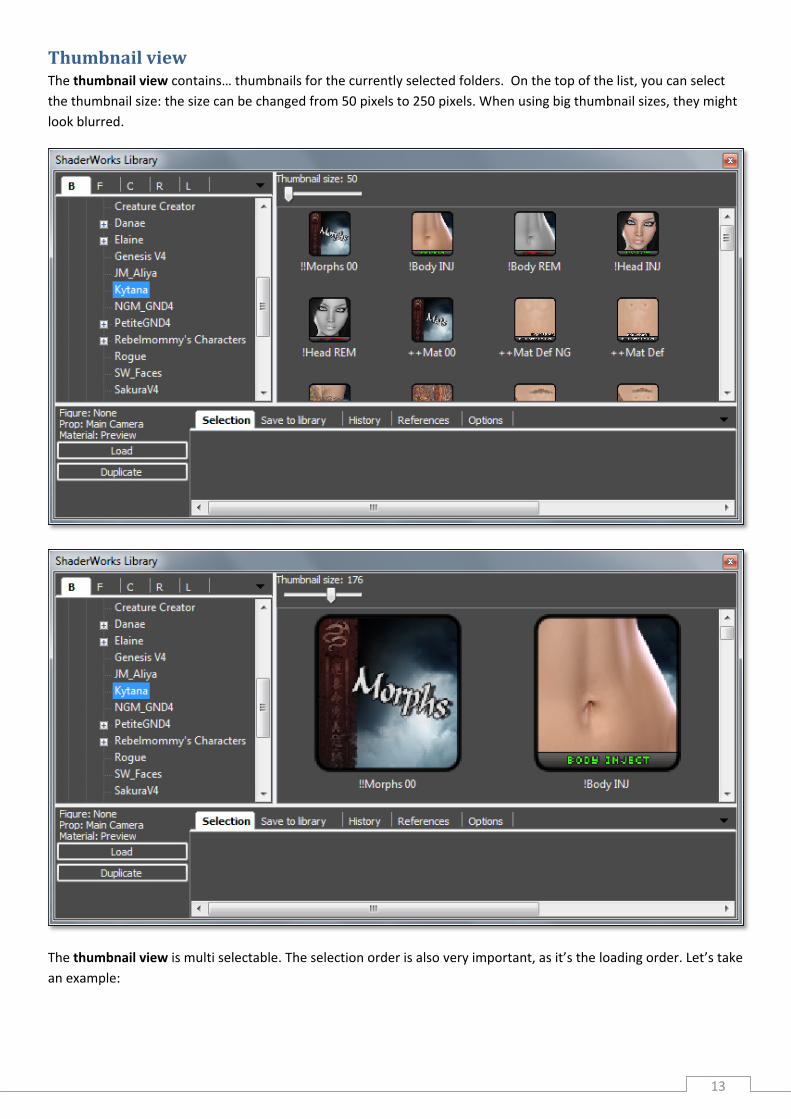
Thumbnail view The thumbnail view contains… thumbnails for the currently selected folders. On the top of the list, you can select the thumbnail size: the size can be changed from 50 pixels to 250 pixels. When using big thumbnail sizes, they might look blurred.
The thumbnail view is multi selectable. The selection order is also very important, as it’s the loading order. Let’s take an example:

14
I’m using Kytana, which contains a lot of MAT poses. You can see in the Selection tab at the bottom the files selected. The file at the top will be loaded on first. This way, the script will first load the main textures, then add the tattoos, the eyes colors, some makeup, the lashes transparencies, the lips colors and finally the nails colors. This is the correct way to load the MATs.
But if I had selected the main textures at the end, it would have overwritten all the MATs options already loaded. So, select the file as if you had loaded them manually, in the correct order!
Selected Items
On the lower left corner of the window, the selected items are displayed. Sometimes, when changing the scene items, it does not always automatically update. A single click on any of the items will allow displaying the correct item. Usually, doing anything in the script will update it (select a file for example).
Also, the Selected Items texts also have a popup menu. When right clicking the:
- Figure label, you will be able to choose a figure; - Prop label, you will be able to choose either a body actor or a prop; - Material label, you will be able to choose a material from any figure or prop.

15
Loading options You can simply ‘load’ the selected file by double clicking it (one file at a time). This is the same effect than using the Flex Library from Poser. But the script offers much more possibilities. When the files are selected, the script will analyze the files and determine all the possibilities. In particular, it will:
- detect a figure in the props library (like all clothes from Poser 8); - detect if a pose file is a MAT pose or a regular pose; - detect if a prop is a smart prop.
Depending on the files analysis, you will have up to three choices at the bottom left of the Library Manager. The Load Buttons do not contain all options. Some more options are also available using the right click popup menu. In particular, the selected items can be loaded on a figure or prop that is not selected.
Character (alternatively, figures in the prop library) Load This will load the figure. Conform This will load and conform the figure
A figure must be selected for this option to be available. Conform and magnets This will load, conform and apply the magnets. Duplicate This will load the figure and duplicate a number of times specified by the user. Pose (regular poses or morphs), Face poses. Load This will load the pose. MAT pose or material collection Load This will load the MAT pose. Smart MAT This will try to load the MAT pose on the correct figure automatically. The
available figures are the selected figure and its conformed clothes. See Smart MAT (LINK TO SMART MAT).
Props Load This will load the prop. Duplicate This will load the prop and duplicate a number of times specified by the user. Parent to… This will load and parent the prop to a specific actor, given by the user. Load Smart Prop This will load the smart prop. Hairs Load This will load the hair prop. Hands Load on left hand This will load the hand pose on the left hand. Load on right hand This will load the hand pose on the right hand. Load on both hands This will load the hand pose on the left and right hand. Materials Load material set on… This will load the material to a selection of materials, given by the user. Lights Load This will replace the current light settings by the new one. Add This will add the new light settings over the existing one. Camera Load This will load the camera settings.

16
Smart MAT (and a mini walkthrough) Smart MAT will try to apply the materials to the correct figure. The best thing is to take an example: I’m using Victoria 4 with Bad Attitude clothes by LittleFox. The clothes with its expansion contain 24 items.
1. Run the script. 2. Browse to the Victoria 4 folder and load her. 3. Browse to the Bad Attitude for V4 clothes (in character library). Select all the clothes and click on Conform
and magnets.

17
4. Right click on the folder and choose Get Connection… After a few seconds, the Connection (C) tab opens with the Bad Attitude clothes and the poses, which contains the materials.
5. Ctrl + Click on each material you want to load. 6. Click on Smart MAT. All materials will automatically be applied to its correct clothes.
How this works… It’s important to explain, as sometimes it won’t work. The script does two things:
- It checks all the materials that are contained in the MAT pose (or material collection). These materials must match the materials from the figure. Not all materials from the figure must be in the MAT pose, but all materials contained in the MAT pose must match the materials in the figure.
- If more than one MAT pose or figure shares the same materials, the script will try to identify the correct MAT pose by its name. In most of the case, if the clothes and the MAT pose have similar names, it should find the correct clothes.
Again, it doesn’t work for all clothes. If the Debug option is set to 2, the right click menu will have a ‘Debug’ submenu for the Smart MAT, showing which MAT pose will be used on the figure(s).
18
Thumbnail’s edit menu The right click menu contains the loading options (see Loading options) and some other tools, in particular:
- Editing (move, copy, delete, rename) - Selection (select all, invert, choose) - Debug information for Smart MAT.
As the Selection and Debug don’t need any explanation (Debug is explained above: Smart MAT (and a mini walkthrough)), the Editing function needs some details:
Copy/Move This will copy or move the selected file(s). Notice that all corresponding files are copied (png, rsr or pmd). Once copied, the script will ask you if you want to delete the old files (means you want to move the files).
While holding the Shift key when opening the popup menu, it will also create another Move/Copy submenu which contains the folder of the selected runtime. This is a convenient way to copy or move the file(s) quickly.
Delete This will delete the file and all its corresponding files (png, rsr or pmd). For the pmd file, it will ask you if you want to delete it or not.
If you are browsing the using the Favourites (F) tab, you will not delete the original file, but only remove the link to the file. If the file comes from a linked folder, the script will ask if it should remove the folder link.
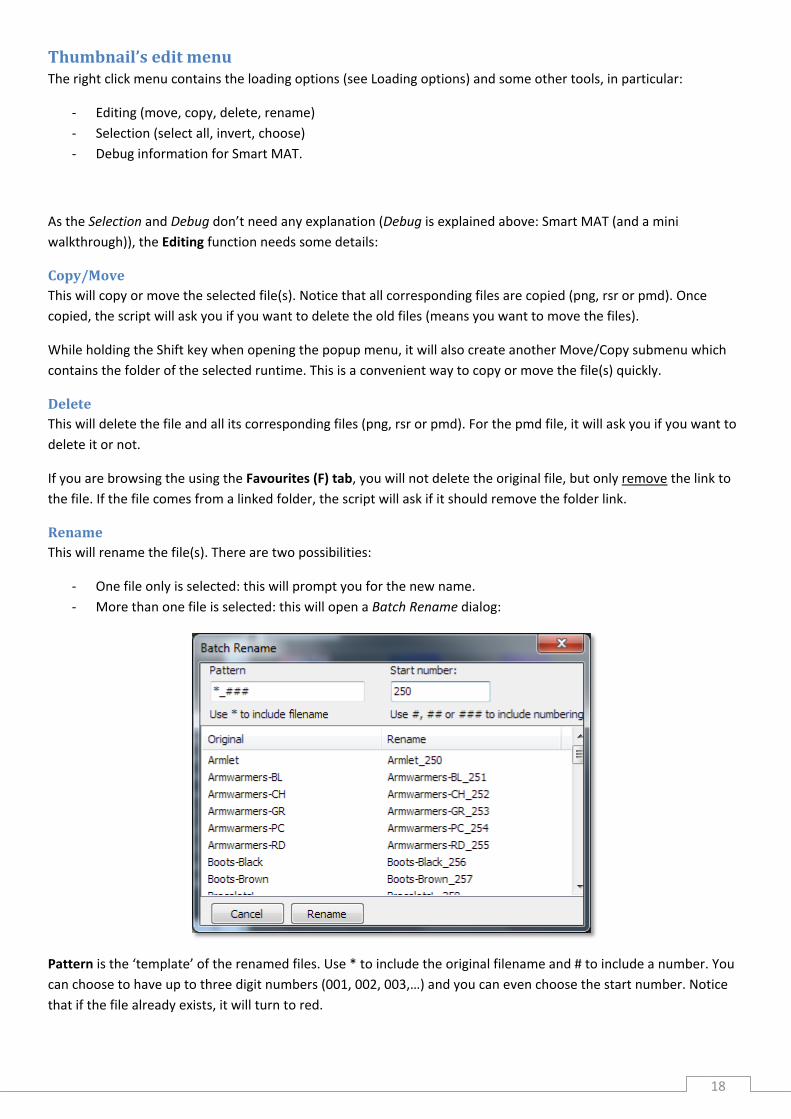
Rename This will rename the file(s). There are two possibilities:
- One file only is selected: this will prompt you for the new name. - More than one file is selected: this will open a Batch Rename dialog:
Pattern is the ‘template’ of the renamed files. Use * to include the original filename and # to include a number. You can choose to have up to three digit numbers (001, 002, 003,…) and you can even choose the start number. Notice that if the file already exists, it will turn to red.
19
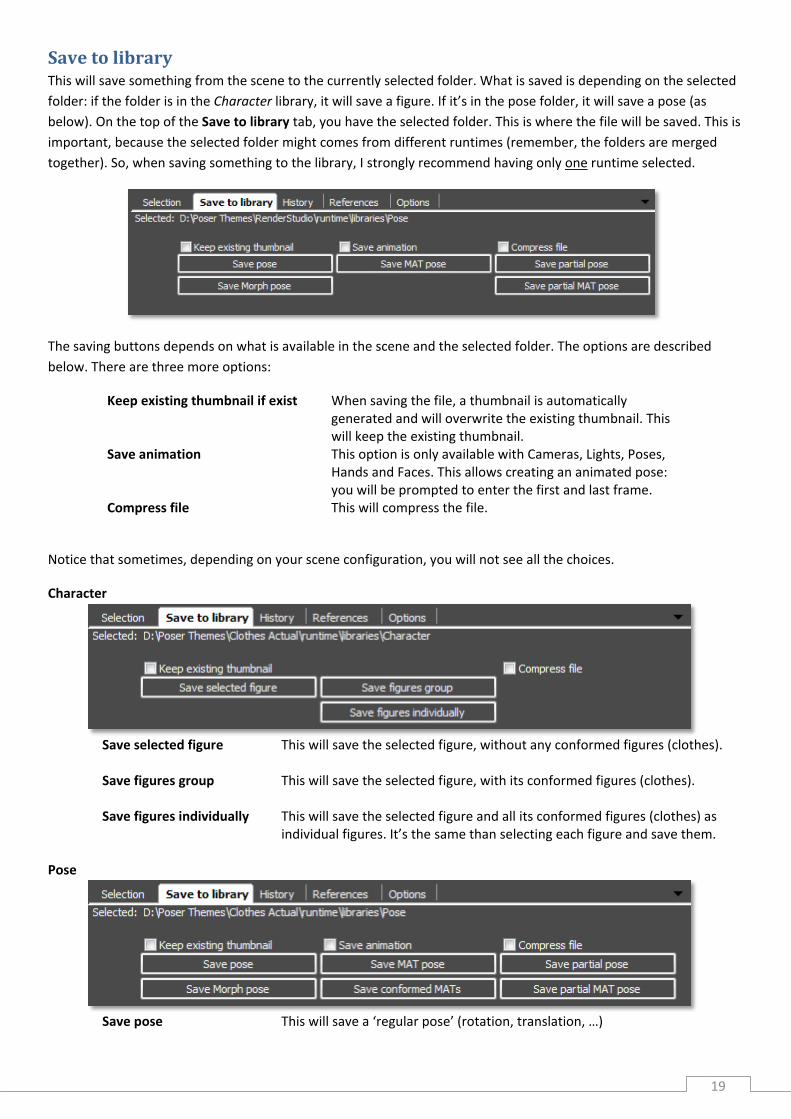
Save to library This will save something from the scene to the currently selected folder. What is saved is depending on the selected folder: if the folder is in the Character library, it will save a figure. If it’s in the pose folder, it will save a pose (as below). On the top of the Save to library tab, you have the selected folder. This is where the file will be saved. This is important, because the selected folder might comes from different runtimes (remember, the folders are merged together). So, when saving something to the library, I strongly recommend having only one runtime selected.
The saving buttons depends on what is available in the scene and the selected folder. The options are described below. There are three more options:
Keep existing thumbnail if exist When saving the file, a thumbnail is automatically generated and will overwrite the existing thumbnail. This will keep the existing thumbnail.
Save animation This option is only available with Cameras, Lights, Poses, Hands and Faces. This allows creating an animated pose: you will be prompted to enter the first and last frame.
Compress file This will compress the file.
Notice that sometimes, depending on your scene configuration, you will not see all the choices.
Character
Save selected figure This will save the selected figure, without any conformed figures (clothes).
Save figures group This will save the selected figure, with its conformed figures (clothes).
Save figures individually This will save the selected figure and all its conformed figures (clothes) as
individual figures. It’s the same than selecting each figure and save them. Pose
Save pose This will save a ‘regular pose’ (rotation, translation, …)
20
Save Morph pose This will save a morph pose for the currently selected actor: the morph values are saved, but no injection information (they will need to be injected before using the poses if necessary). If Advanced Figure Randomizer is installed in Poser 8, it will use the internal morph creation, allowing having the injection deltas included.
Save MAT pose This will save the MAT pose.
Save conformed MATs If the selected figure has conforming clothes, this will allow saving the MAT pose for all clothes at once. The filenames will be generated using the figure name and a prefix or a suffix. For example, *-set1 will save your clothes like this:
- Firstclothname-set1 - Secondclothname-set1 - Thirdclothname-set1
Save partial pose This will save a partial regular pose: for example, you could save only the arms poses.
Save partial MAT pose This will save a partial MAT pose. You will have the choice to select which materials are saved (skin only for example). It is not a partial pose that will change only the diffuse color for example.
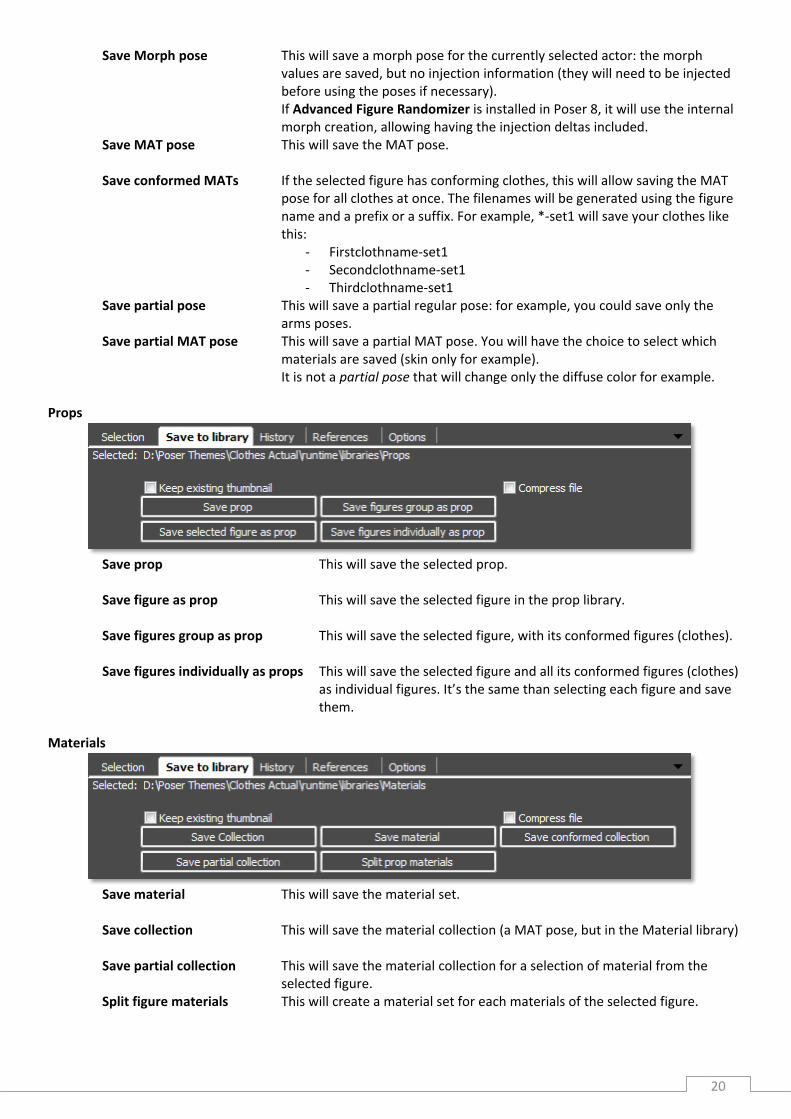
Props
Save prop
This will save the selected prop.
Save figure as prop
This will save the selected figure in the prop library.
Save figures group as prop
This will save the selected figure, with its conformed figures (clothes).
Save figures individually as props
This will save the selected figure and all its conformed figures (clothes) as individual figures. It’s the same than selecting each figure and save them.
Materials
Save material
This will save the material set.
Save collection
This will save the material collection (a MAT pose, but in the Material library)
Save partial collection This will save the material collection for a selection of material from the selected figure.
Split figure materials
This will create a material set for each materials of the selected figure.

21
Hairs
Save hair prop
This will save the hair prop
Face
Save expression (all morphs)
This will save the face pose, including all morphs.
Save expression (select morphs) This will save the face pose, including a selection of morphs given by the user:
6. The Non zero button will select all morphs that are not set to 0.0, allowing a quick selection of all your morphs!
22
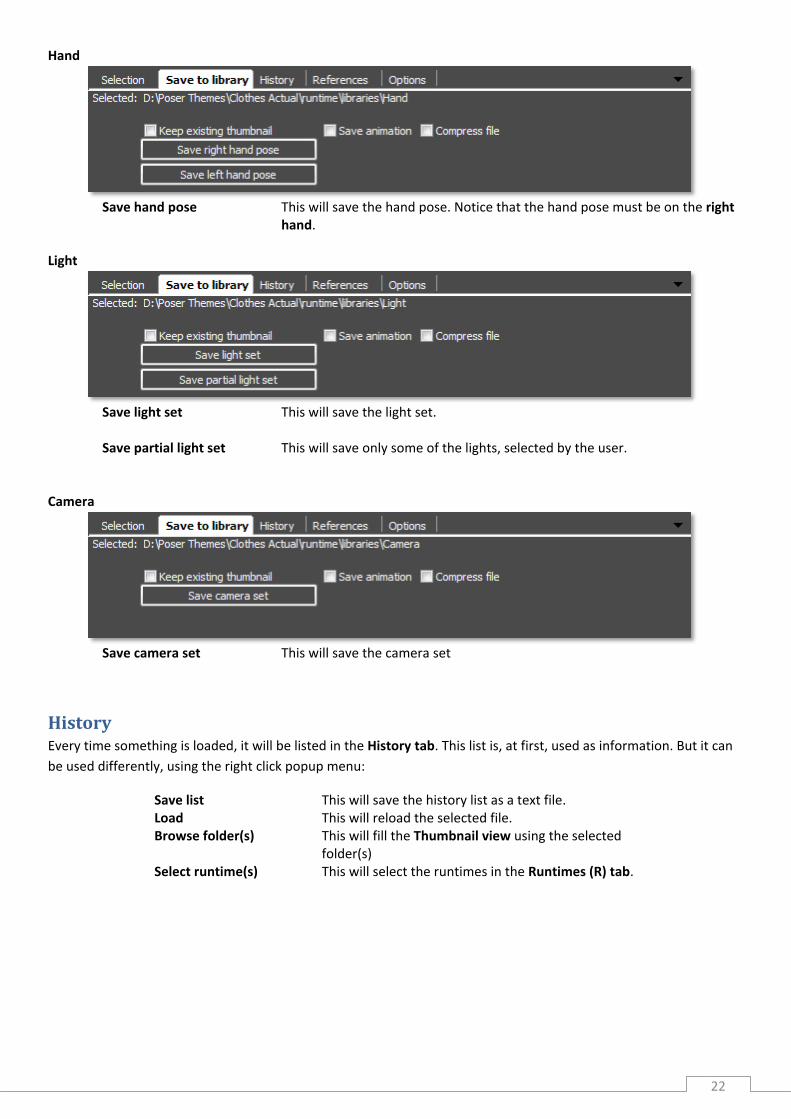
Hand
Save hand pose This will save the hand pose. Notice that the hand pose must be on the right
hand. Light
Save light set
This will save the light set.
Save partial light set
This will save only some of the lights, selected by the user.
Camera
Save camera set
This will save the camera set
History Every time something is loaded, it will be listed in the History tab. This list is, at first, used as information. But it can be used differently, using the right click popup menu:
Save list This will save the history list as a text file. Load This will reload the selected file. Browse folder(s) This will fill the Thumbnail view using the selected
folder(s) Select runtime(s) This will select the runtimes in the Runtimes (R) tab.
23
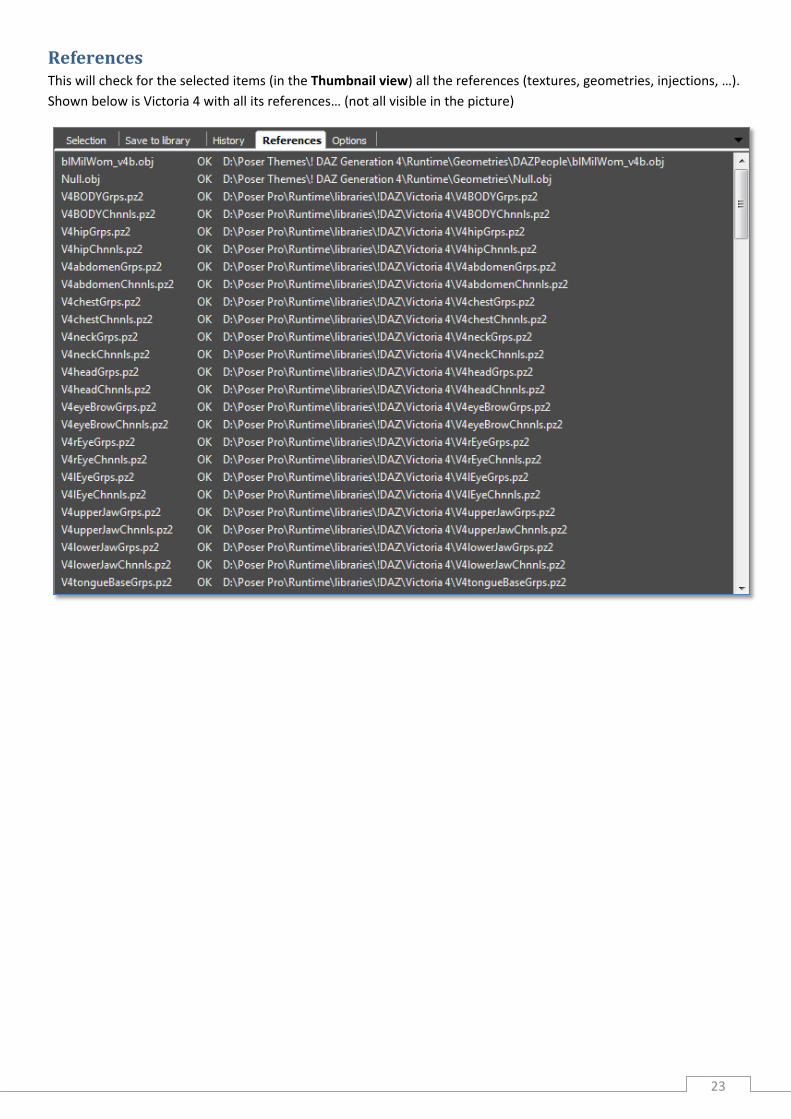
References This will check for the selected items (in the Thumbnail view) all the references (textures, geometries, injections, …). Shown below is Victoria 4 with all its references… (not all visible in the picture)

24
Options This contains the various script options…
Save settings This will save the current settings (runtimes, libraries, sizes, position, docking) as the default settings.
Debug This will switch between the various debug modes: Debug=0: this means no information are displayed. Debug=1: this will display a lot of information. This is used for debugging and is not suited for ‘everyday’ use. Debug=2: this will display a ‘silent debug tool’, available in some various popup menus.
Clear Instances This will remove all the ‘instances’. An instance is a little configuration file that contains the runtimes, the libraries, the history files, … Every time the same scene is opened, the script will load the corresponding instance.
Clear temp. files This will clear the temporary files created by the script. In most of the case, the temporary file should be cleared automatically, but sometimes, some files are not deleted…
Wait 0.5 seconds… This is a little ‘partial’ solution for the ‘freezing’ problem when loading multiple files at once. It does not completely solve it, but it’s better.
Drag docking enabled This will make the main dialog dockable or not. Use Poser type colors This will switch between the default color or the Poser style color. A restart of the
script is necessary for the color to be correctly displayed.


