S S h h a a r r e e P P o o i i n n t t 2 2 0 0 1 1 3 3 L L e e v v e e l l 2 2 C C o o m m p p u u t t e e r r T T r r a a i i n n i i n n g g S S o o l l u u t t i i o o n n s s S S t t u u d d e e n n t t G G u u i i d d e e Version 1.1 Revision Date Nov 7, 2013 Course Length 3 hours
Creating a New Team Site ................................................................................................... 5 Viewing Permissions ............................................................................................................................................. 7 Adding and Deleting Users .................................................................................................................................... 8
Working With Apps in SharePoint ....................................................................................... 9 Understanding App and Web Parts ......................................................................................................................... 9 Adding an App to Your Site ................................................................................................................................. 10 List or Library Settings ........................................................................................................................................ 10 Creating a Column in Your App or Library ............................................................................................................. 11 Removing a Column from an App ......................................................................................................................... 11 Recommended Document Library Settings ............................................................................................................ 12
Setting Site Navigation and Appearance........................................................................... 13 Adding App Parts to a Page ................................................................................................................................. 13 Adding Web Parts to a Page ................................................................................................................................ 13 Modifying a Web Part .......................................................................................................................................... 14 Deleting a Web Part ............................................................................................................................................ 15 Changing the Look and Feel of Your Site .............................................................................................................. 16 Branding Your Team Site .................................................................................................................................... 17
6. Decide if you want to use the same permissions as the parent site or use unique permissions for your site. If you choose unique permissions, you will have to give names for each group. See below Fig 2.
7. Decide on how you will navigate to the sub site; either on the Quick Launch bar on the left and/or on the Top link bar of the parent site.
8. Choose whether you will use the top link bar off the parent site. 9. Click Create.
Understanding App and Web Parts Apps are what were known as lists and libraries in the past. They are self-contained objects that can hold a variety of different content. App Parts contain all the items that are in the full App, however Apps Parts can contain a more customized view of the items in the App. They can be viewed on their own or with others on a page via Web Parts. Deleting an App Part does not affect the original App.
1. Select > Site Settings. 2. Click Add an App. 3. Select the type of App you wish to create. 4. Type a name for the App. It will then appear as New and can
start to be used by your team.
List or Library Settings Customizing can be done to Apps to meet your needs. To do that, go to List or Library Settings then click List or Library settings.
In the List Settings many changes can be made such as:
1. Renaming and adding or removing it from the Quick Launch bar
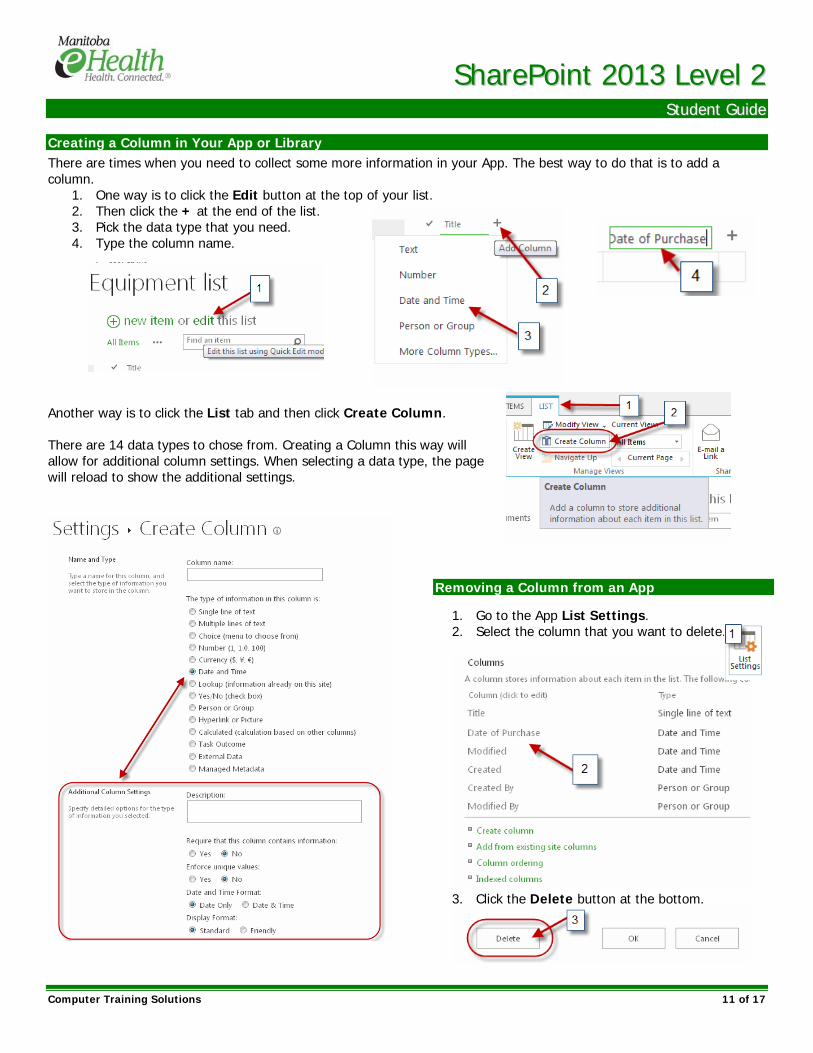
Creating a Column in Your App or Library There are times when you need to collect some more information in your App. The best way to do that is to add a column.
1. One way is to click the Edit button at the top of your list. 2. Then click the + at the end of the list. 3. Pick the data type that you need. 4. Type the column name.
Another way is to click the List tab and then click Create Column. There are 14 data types to chose from. Creating a Column this way will allow for additional column settings. When selecting a data type, the page will reload to show the additional settings.
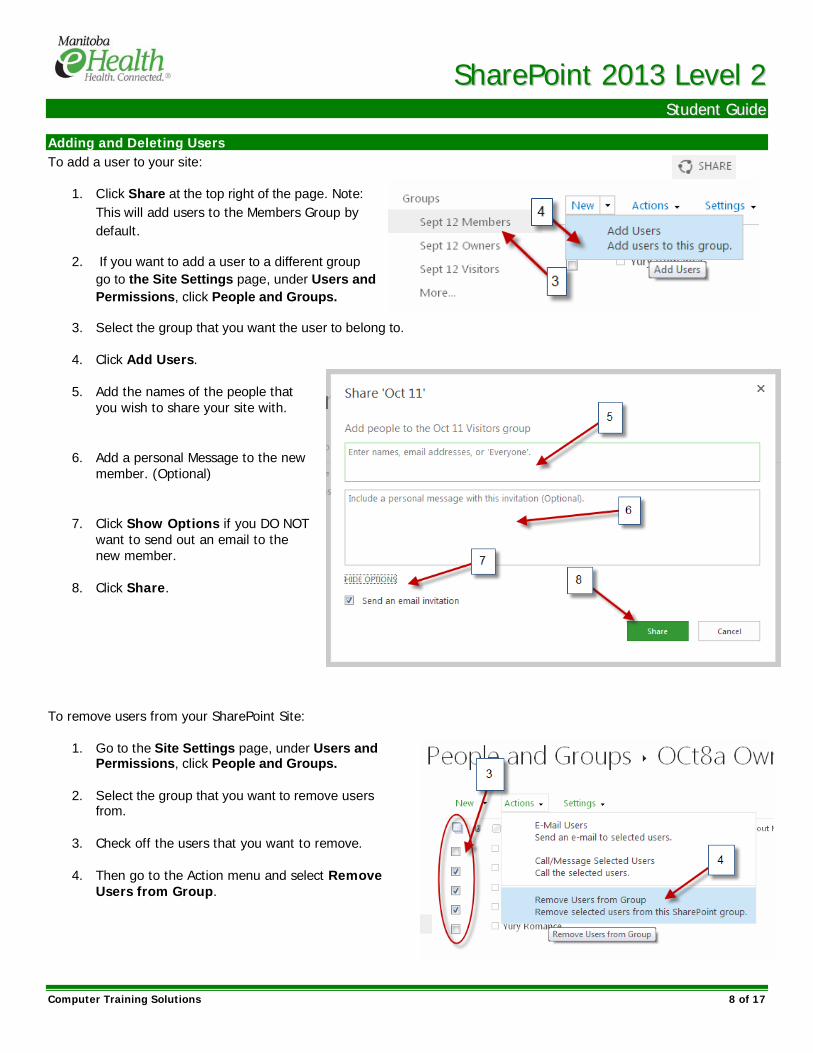
Removing a Column from an App
1. Go to the App List Settings. 2. Select the column that you want to delete.
4. Select any of the Categories and Parts that are available for your site. 5. Select the location. 6. Click Add.
Modifying a Web Part 1. In Edit mode, select the Web Part that you want to modify. 2. In the drop down menu, click Edit Web Part.
The Web Part Properties Panel will opn on the right. Depending on what the Web Part function is, you will be able to set the Part settings, Appearance, Layout, and any Advanced settings.
Branding Your Team Site As a site librarian you can brand your team site with the corporate or team logo and add convenient links at the top and left of the home page.
Select > Site Settings. Under Look and Feel, you will notice options to change the site name, description, and logo, and add items to the Quick Launch and Top Link Bar. The Tree view will allow you to show or hide the Quick Launch and Tree view.