Page 1
Shark Rocket Powerhead AH401 BeltReplacement
This guide will help replace the belt of the Shark Rocket Powerhead AH401 Belt Replacement.
Written By: Shobhit Dabral
Shark Rocket Powerhead AH401 Belt Replacement Draft: 2018-03-30Guide ID: 102984 -
This document was generated on 2019-10-05 04:55:42 PM (MST).
© iFixit — CC BY-NC-SA www.iFixit.com Page 1 of 11
Page 2
INTRODUCTION
Over time, the belt will wear off, which will cause the brushroll to stop rolling/spinning. This guide willdemonstrate how to remove the belt properly. The belt is attached to the motor but the motor doesnot need to be removed. The screws holding the motor in place will have to be loosened in order forthe belt to come off.
TOOLS:T15 Torx Screwdriver (1)T10 Torx Screwdriver (1)Phillips #2 Screwdriver (1)
PARTS:Post-Motor Filter (1)Filter Grill (1)
Shark Rocket Powerhead AH401 Belt Replacement Draft: 2018-03-30Guide ID: 102984 -
This document was generated on 2019-10-05 04:55:42 PM (MST).
© iFixit — CC BY-NC-SA www.iFixit.com Page 2 of 11
Page 3
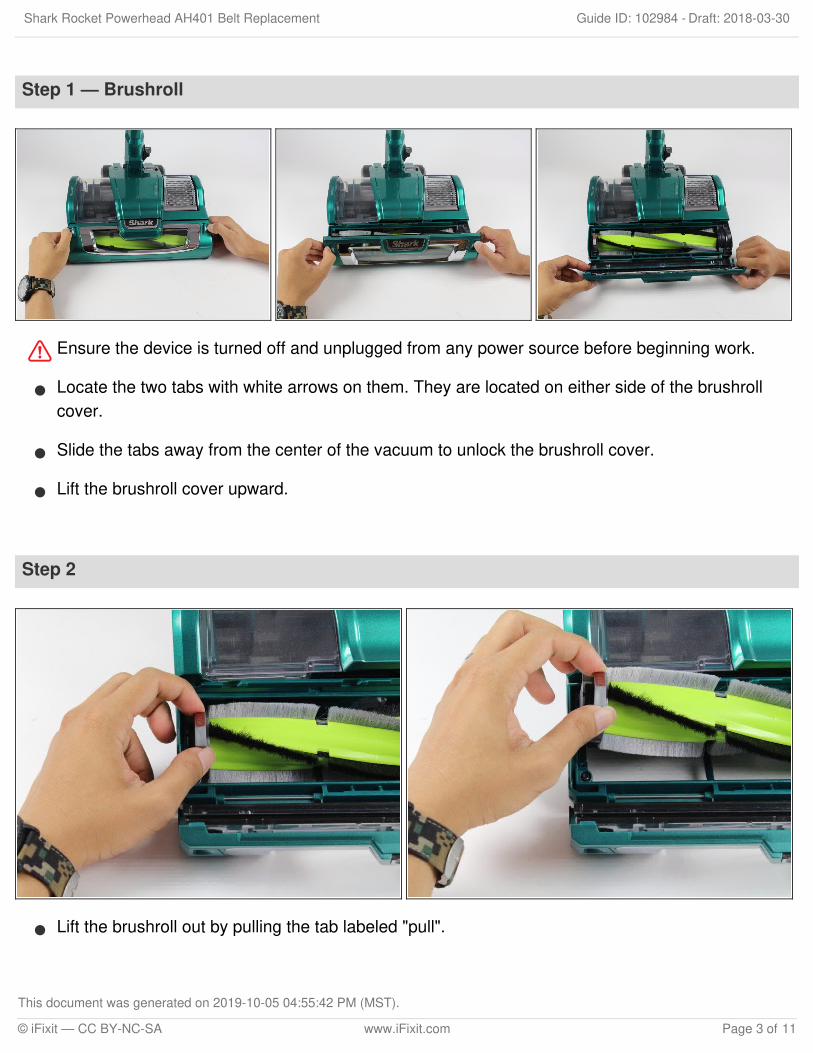
Step 1 — Brushroll
Ensure the device is turned off and unplugged from any power source before beginning work.
Locate the two tabs with white arrows on them. They are located on either side of the brushrollcover.
Slide the tabs away from the center of the vacuum to unlock the brushroll cover.
Lift the brushroll cover upward.
Step 2
Lift the brushroll out by pulling the tab labeled "pull".
Shark Rocket Powerhead AH401 Belt Replacement Draft: 2018-03-30Guide ID: 102984 -
This document was generated on 2019-10-05 04:55:42 PM (MST).
© iFixit — CC BY-NC-SA www.iFixit.com Page 3 of 11
Page 4
Step 3 — Back Panel Screws
Flip the device over so that the bottom is face up.
Remove the eight screws shown by rotating counter-clockwise with a T15 Torx screwdriver.
Two 14 mm Torx screws
Two 16 mm Torx screws
Four 21 mm Torx screws
Shark Rocket Powerhead AH401 Belt Replacement Draft: 2018-03-30Guide ID: 102984 -
This document was generated on 2019-10-05 04:55:42 PM (MST).
© iFixit — CC BY-NC-SA www.iFixit.com Page 4 of 11
Page 5
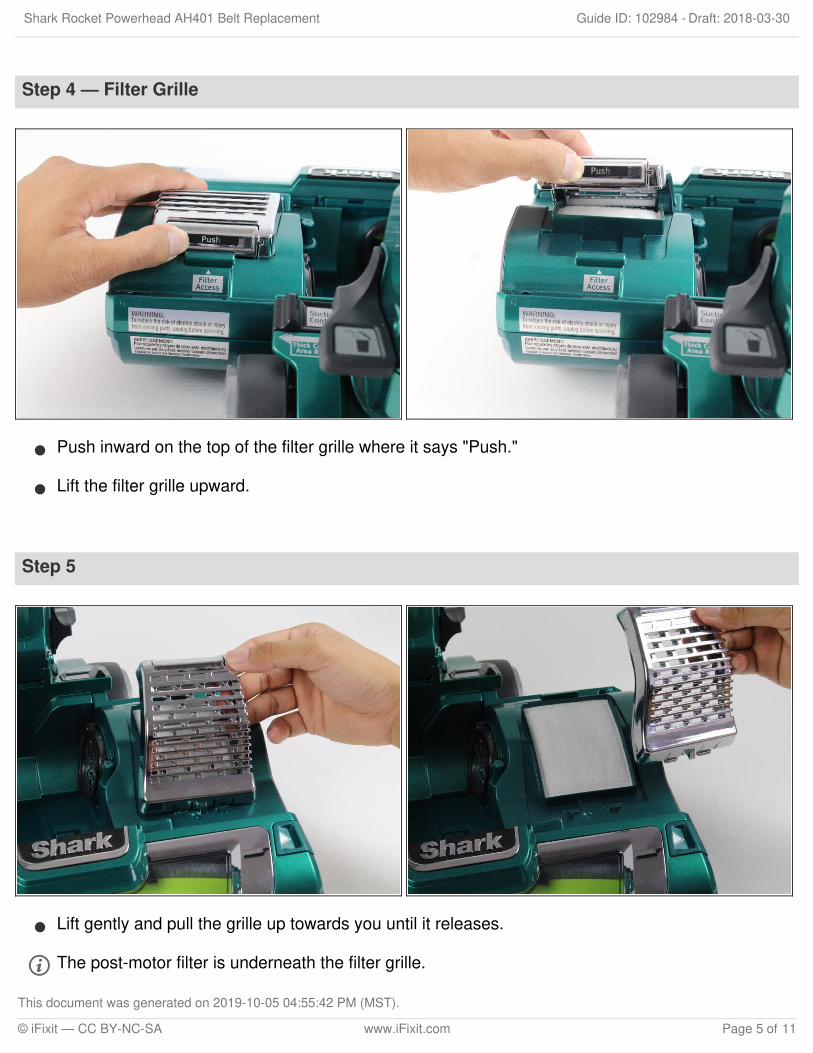
Step 4 — Filter Grille
Push inward on the top of the filter grille where it says "Push."
Lift the filter grille upward.
Step 5
Lift gently and pull the grille up towards you until it releases.
The post-motor filter is underneath the filter grille.
Shark Rocket Powerhead AH401 Belt Replacement Draft: 2018-03-30Guide ID: 102984 -
This document was generated on 2019-10-05 04:55:42 PM (MST).
© iFixit — CC BY-NC-SA www.iFixit.com Page 5 of 11
Page 6
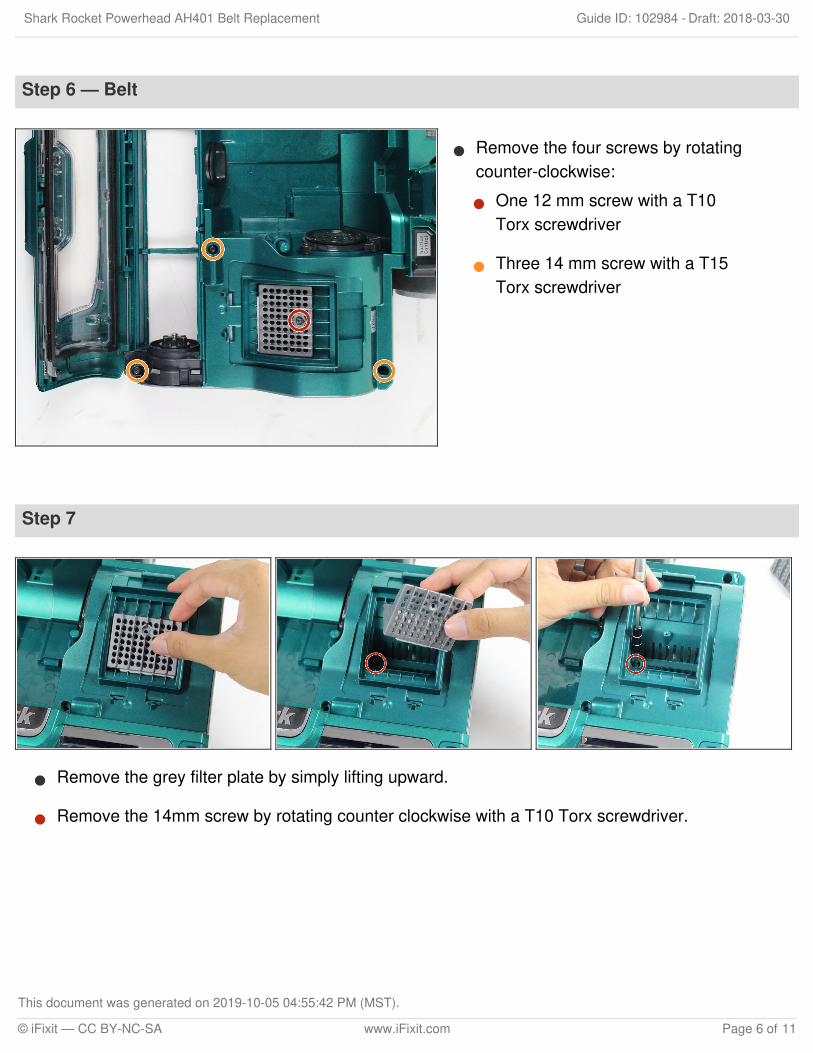
Step 6 — Belt
Remove the four screws by rotatingcounter-clockwise:
One 12 mm screw with a T10Torx screwdriver
Three 14 mm screw with a T15Torx screwdriver
Step 7
Remove the grey filter plate by simply lifting upward.
Remove the 14mm screw by rotating counter clockwise with a T10 Torx screwdriver.
Shark Rocket Powerhead AH401 Belt Replacement Draft: 2018-03-30Guide ID: 102984 -
This document was generated on 2019-10-05 04:55:42 PM (MST).
© iFixit — CC BY-NC-SA www.iFixit.com Page 6 of 11
Page 7
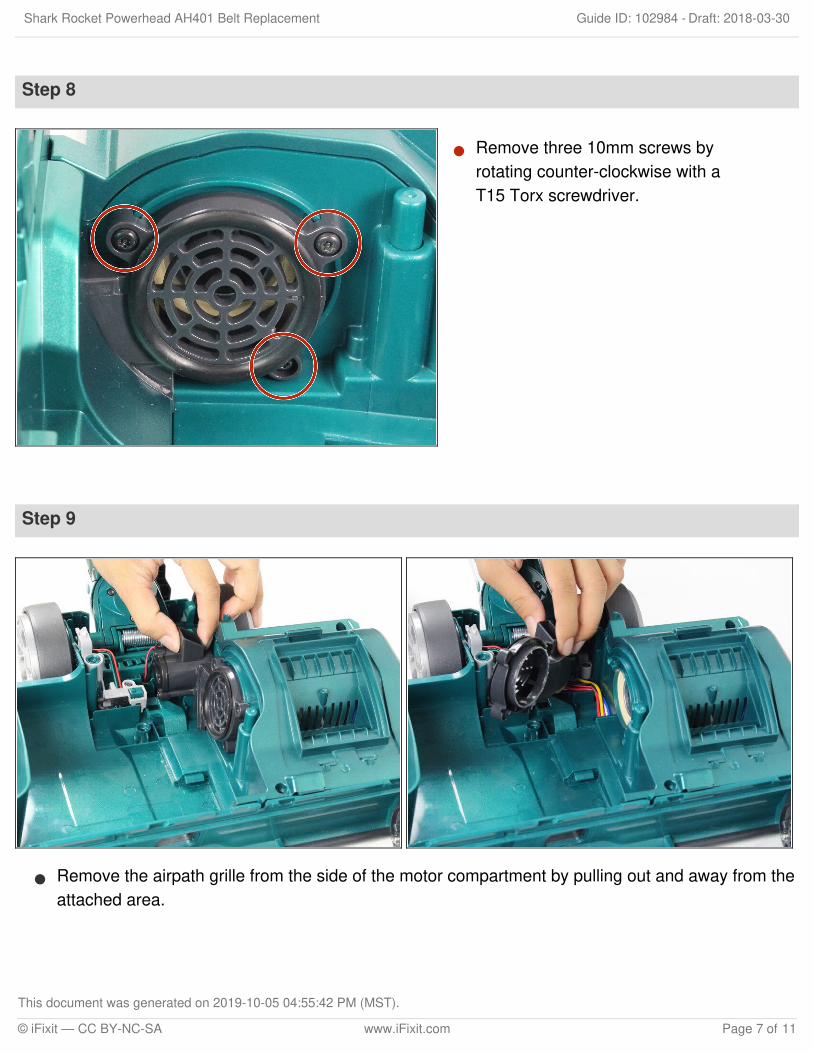
Step 8
Remove three 10mm screws byrotating counter-clockwise with aT15 Torx screwdriver.
Step 9
Remove the airpath grille from the side of the motor compartment by pulling out and away from theattached area.
Shark Rocket Powerhead AH401 Belt Replacement Draft: 2018-03-30Guide ID: 102984 -
This document was generated on 2019-10-05 04:55:42 PM (MST).
© iFixit — CC BY-NC-SA www.iFixit.com Page 7 of 11
Page 8
Step 10
Remove the motor compartment panel by lifting up and away from the device.
Step 11
Remove one 14mm screw by rotating counter-clockwise with a T15 Torx screwdriver.
Shark Rocket Powerhead AH401 Belt Replacement Draft: 2018-03-30Guide ID: 102984 -
This document was generated on 2019-10-05 04:55:42 PM (MST).
© iFixit — CC BY-NC-SA www.iFixit.com Page 8 of 11
Page 9
Step 12
Disconnect the motor side panel by lifting the motor and panel up and out.
This step may require some wiggling to loosen the panel before it becomes free.
Step 13
Remove one 9mm screw by rotatingcounter-clockwise with a Phillips #2screwdriver.
This screw allows the side panel tobe removed.
Shark Rocket Powerhead AH401 Belt Replacement Draft: 2018-03-30Guide ID: 102984 -
This document was generated on 2019-10-05 04:55:42 PM (MST).
© iFixit — CC BY-NC-SA www.iFixit.com Page 9 of 11
Page 10
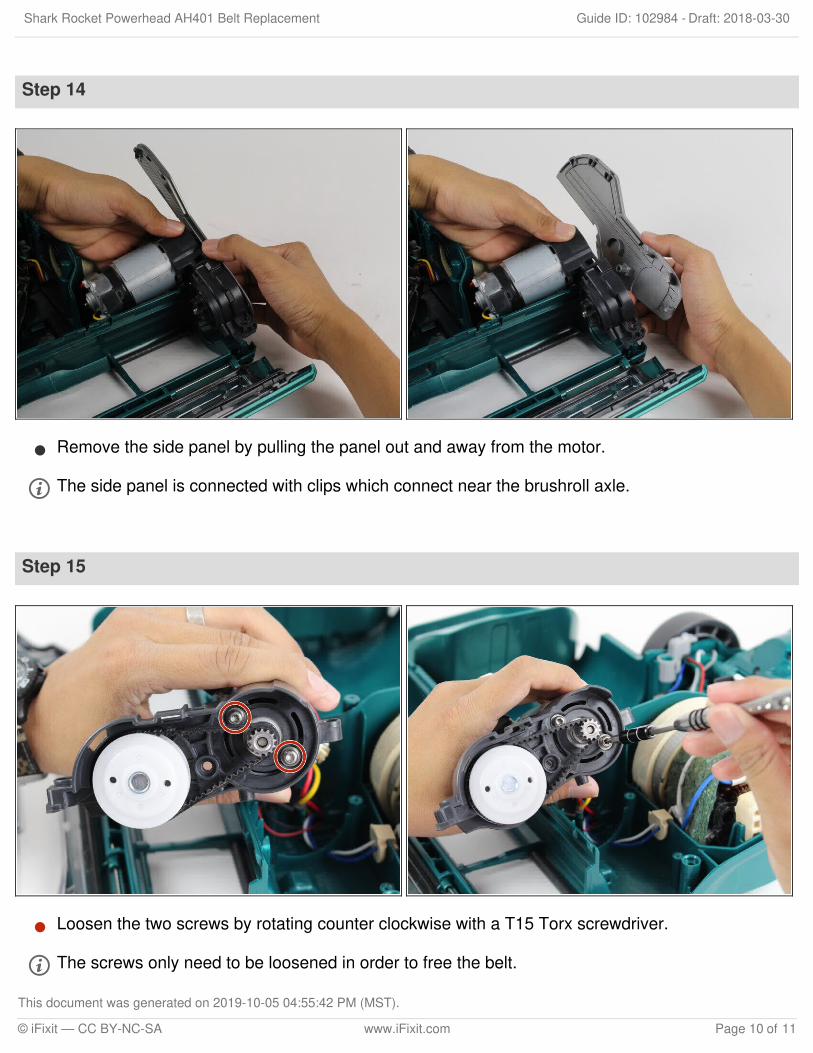
Step 14
Remove the side panel by pulling the panel out and away from the motor.
The side panel is connected with clips which connect near the brushroll axle.
Step 15
Loosen the two screws by rotating counter clockwise with a T15 Torx screwdriver.
The screws only need to be loosened in order to free the belt.
Shark Rocket Powerhead AH401 Belt Replacement Draft: 2018-03-30Guide ID: 102984 -
This document was generated on 2019-10-05 04:55:42 PM (MST).
© iFixit — CC BY-NC-SA www.iFixit.com Page 10 of 11
Page 11
To reassemble your device, follow these instructions in reverse order.
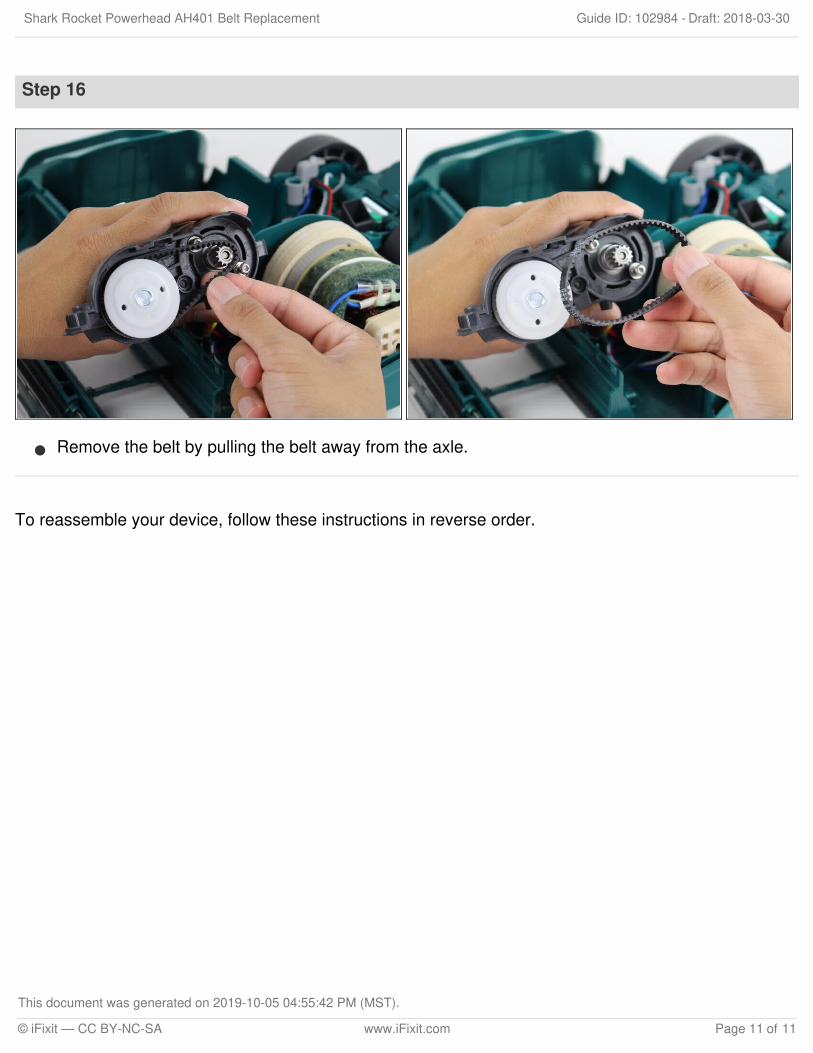
Step 16
Remove the belt by pulling the belt away from the axle.
Shark Rocket Powerhead AH401 Belt Replacement Draft: 2018-03-30Guide ID: 102984 -
This document was generated on 2019-10-05 04:55:42 PM (MST).
© iFixit — CC BY-NC-SA www.iFixit.com Page 11 of 11