78
| Date post: | 24-Oct-2014 |
| Category: |
Documents |
| Upload: | julia-bolderson |
| View: | 675 times |
| Download: | 5 times |
Introduction These rules have been designed to be a fun set of pseudo-skirmish rules that draw on many of the principles that one will find in TooFatLardies rules without attempting to be a hugely serious simulation. Rather, these rules are ideal for reliving some of the literary exploits of heroes such as Richard Sharpe or Harry Flashman with between 30 and 120 figures a side and set against the colourful background of the black-powder era. The central premise of the rules is that success on the battlefield is generally down to the leadership of a small band of men, of all ranks and social stations, who drive other less dynamic souls forward to achieve their goals. It is these Big Men and their actions that stand tall in the pages of military history and, as with all of our rules, this is reflected here. We make no apologies for the hierarchical “class structure” that is in-built to Sharp Practice. This is, however, not the class system of the British establishment in the early nineteenth century, but rather the literary structure, where it is really only the main characters that we want to read about, the rest are there to provide some background colour and meet terrible ends while the heroes live to fight another day. These rules have the same emphasis. The rules contain an optional section on Napoleonic drill, giving the gamer the chance to replicate some of the small unit tactics of the period, however this is by no means necessary for the more light-hearted games. We have attempted to provide all the ingredients for a game as serious or as swashbuckling as the mood takes. Sharp Practice is built around many simple but enjoyable and, we hope, sophisticated rule mechanisms that provide a relatively comprehensive set of rules for most circumstances that the literary world throws at us. There will, of course, be situations that are thrown up by games for which we have not legislated. Here our advice is simply “Make it up”, the general tongue-in-cheek heroic thrust of the rules should act as your guide. My thanks must go to the large number of play-testers around the world who helped make these rules possible, and to Simon Bargery of Bolt Action Miniatures who, while sitting in the less than luxurious departure lounge at Dunkirk Ferry Port, first suggested that we write a set of Napoleonic skirmish rules. The gamer will find some free Sharp practice cards and Blinds to download on the TooFatLardies Yahoo Group, why not join today and enjoy the most comprehensive support in the hobby. Enjoy playing Sharp Practice. If all else fails, remember it is better to die bravely than a coward, but sometimes dying humorously can be better still! Richard Clarke Lard Island, 2008
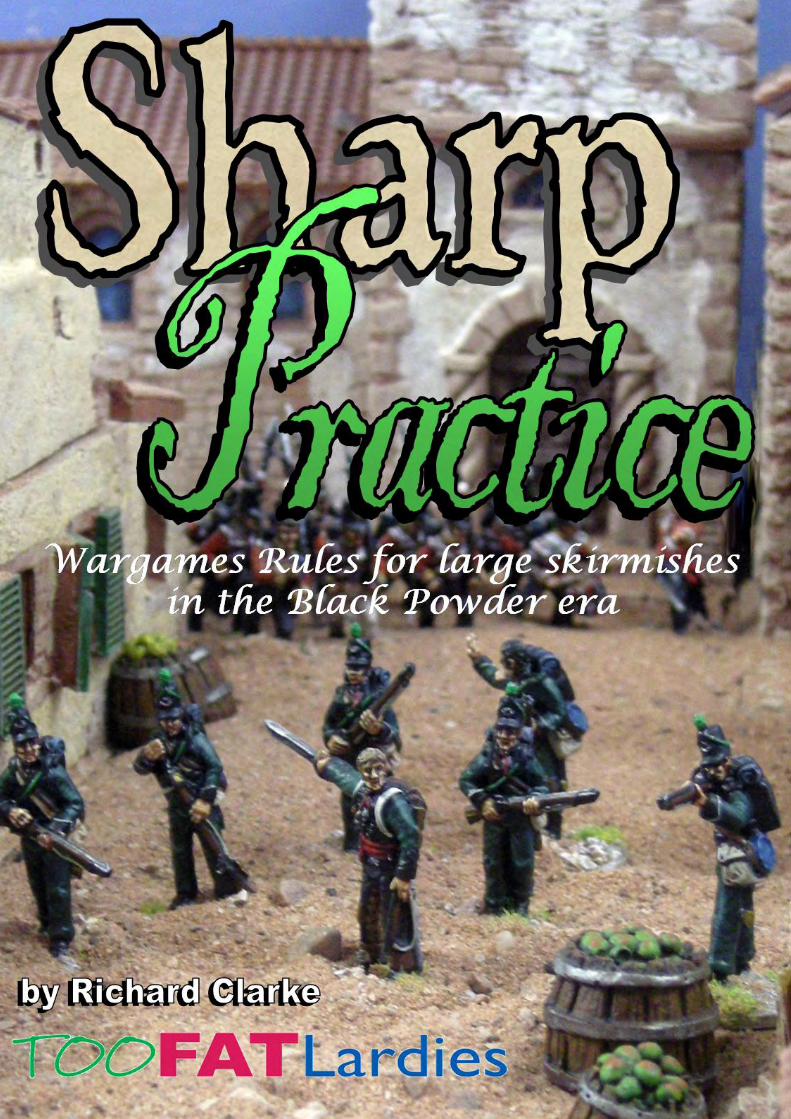
Cover photo features the superb Riflemen by Alban Miniatures www.albanminiatures.com
SHARP PRACTICE Page 1 www.toofatlardies.co.uk
SHARP PRACTICE Table of Contents
1. THE CHARACTERS ..............................................................................5
2. TURN SEQUENCE ................................................................................5 2.1 THE CARDS ........................................................................................................................................... 5
2.1.1 What Do The Cards Mean? ............................................................................................................ 5 Big Men Cards ....................................................................................................................................................... 5 Blinds ..................................................................................................................................................................... 5 Grasp the Nettle .................................................................................................................................................... 5 Sentry ..................................................................................................................................................................... 6 Sharp Practice........................................................................................................................................................ 6 The Blank card....................................................................................................................................................... 6 Tiffin ....................................................................................................................................................................... 6
2.2 BIG MEN AND INITIATIVE ..................................................................................................................... 6 2.3 COMMANDING FORMATIONS ................................................................................................................. 7
2.3.1 Toot Toot, Parp Parp! ..................................................................................................................... 7 Whistles.................................................................................................................................................................. 7 Light Infantry Bugles ............................................................................................................................................ 7 Cavalry Trumpets.................................................................................................................................................. 7 Infantry Drums...................................................................................................................................................... 8
2.3.2 Chain of Command ......................................................................................................................... 8 2.4 A GROUP’S TURN .................................................................................................................................. 8
2.4.1 Action Dice ...................................................................................................................................... 9 2.5 TROOP TYPES........................................................................................................................................ 9
3 TROOP TYPES & ORGANISATION...................................................10 3.1 FORMATIONS....................................................................................................................................... 10
3.1.1 Breaking Formations.................................................................................................................... 10 3.2 INFANTRY OF THE LINE....................................................................................................................... 10
Line....................................................................................................................................................................... 10 Column ................................................................................................................................................................. 11 Square .................................................................................................................................................................. 11
3.3 LIGHT INFANTRY FORMATIONS........................................................................................................... 11 3.4 SENTRIES ............................................................................................................................................. 11
4 RANDOM EVENTS & THE BONUS DECK.......................................12 4.1 FIRING RANDOM EVENTS.................................................................................................................... 12 4.2 MOVEMENT RANDOM EVENTS ............................................................................................................ 13 4.3 THE BONUS DECK ............................................................................................................................. 13 4.4 THE BONUS CARDS............................................................................................................................ 14
5 MOVEMENT.........................................................................................15 5.1 HIDDEN MOVEMENT ON BLINDS ....................................................................................................... 15 5.2 TABLETOP MOVEMENT ....................................................................................................................... 15 5.3 TERRAIN EFFECTS & OBSTACLES ....................................................................................................... 16 5.4 MOVEMENT IN VARYING TERRAIN....................................................................................................... 16 5.5 ASSUMING FORMATIONS..................................................................................................................... 16 5.6 CHANGING FACING AND FORMATION ................................................................................................ 16 5.7 INTERPENETRATION............................................................................................................................ 17
SHARP PRACTICE Page 2 www.toofatlardies.co.uk
6 SPOTTING............................................................................................17 6.1 AUTOMATIC SPOTTING........................................................................................................................ 17
7 FIRING..................................................................................................18 7.1 WHO CAN FIRE?.................................................................................................................................. 18 7.2 HOW TO FIRE ...................................................................................................................................... 18
Line Troops .......................................................................................................................................................... 18 Light Troops Skirmishing ................................................................................................................................... 19 Artillery Pieces..................................................................................................................................................... 19
7.3 EFFECT OF HITS.................................................................................................................................. 19 7.3.1 Hits on Formations ....................................................................................................................... 19
7.4 HITS ON BIG MEN ............................................................................................................................... 20 7.4.1 Which Means What?..................................................................................................................... 20
Lightly wounded .................................................................................................................................................. 20 Badly wounded..................................................................................................................................................... 20 Dulce et decorum est............................................................................................................................................ 20
7.4.2 Replacing Big Men........................................................................................................................ 20 7.5 BOTTLE ............................................................................................................................................... 20 7.6 SHOOTING “DONKEY WALLOPERS” ..................................................................................................... 21
7.6.1 Big Men on Horses........................................................................................................................ 21 7.7 SHOOTING GUNNERS .......................................................................................................................... 21 7.8 AMBUSCADES...................................................................................................................................... 21 7.9 CHOSEN MAN...................................................................................................................................... 22 7.10 TAP RELOAD ....................................................................................................................................... 22 7.11 LOADING SERVICE .............................................................................................................................. 22 7.12 PICKING ON BIG MEN ......................................................................................................................... 22
8 FISTICUFFS.........................................................................................23 8.1 HAND TO HAND COMBAT .................................................................................................................... 23 8.2 RESULTS OF FISTICUFFS..................................................................................................................... 24 8.3 CAVALRY CHARGES............................................................................................................................. 24 8.4 FISTICUFFS IN BUILDINGS AND SHIPS ................................................................................................ 24 8.5 LADDERS IN ATTACKS ......................................................................................................................... 24 8.6 EN GARDE!.......................................................................................................................................... 25
9 TASKS...................................................................................................26 9.1 DOING THINGS.................................................................................................................................... 26 9.2 CARRYING BLOOMIN’ HEAVY THINGS................................................................................................. 26 9.3 SILENT BUT DEADLY .......................................................................................................................... 26
10 DERRING-DO.......................................................................................28 10.1 FALLS.............................................................................................................................................. 28
11 AFFAIRE DE COEUR..........................................................................29
12 HELLO SAILOR!..................................................................................30 12.1 GENERAL OVERVIEW .......................................................................................................................... 30
12.1.1 Boats ........................................................................................................................................... 30 12.1.2 Boat Movement .......................................................................................................................... 30 12.1.3 Spotting ...................................................................................................................................... 30
SHARP PRACTICE Page 3 www.toofatlardies.co.uk
12.1.4 Shooting at Boats....................................................................................................................... 30 12.1.5 Shooting from Boats .................................................................................................................. 31 12.1.6 Repairing Boats.......................................................................................................................... 31 12.1.7 Boats Hitting Things & Sinking ............................................................................................... 31 12.1.8 Sailors at Close Quarters .......................................................................................................... 31 12.1.9 Grappling..................................................................................................................................... 31
13 WALLAHS ............................................................................................32 13.1 WALLAHS’ WEAPONS .......................................................................................................................... 32
Jezail .................................................................................................................................................................. 32 Bows & Arrows ................................................................................................................................................ 32 Blow Darts ....................................................................................................................................................... 32 Big Choppers ................................................................................................................................................... 32
14 HONEST INJUN ..................................................................................33 14.1 WAR PARTY......................................................................................................................................... 33 14.2 HUNTING PARTY ................................................................................................................................. 33 14.3 INDIAN MOVEMENT ............................................................................................................................ 33 14.4 INDIAN BONUS CARDS ......................................................................................................................... 33
Bad Medicine ....................................................................................................................................................... 33 Vamose ................................................................................................................................................................. 33 War Cry ................................................................................................................................................................ 33
15 CREATING BIG MEN..........................................................................34 STATUS......................................................................................................................................................... 34 PHYSIQUE..................................................................................................................................................... 34 LOOKS .......................................................................................................................................................... 34 POPULARITY ................................................................................................................................................. 35 BREEDING .................................................................................................................................................... 35 SWORDSMANSHIP ......................................................................................................................................... 35 HORSEMANSHIP............................................................................................................................................ 35 PERSONALITY ............................................................................................................................................... 36
Personalities Defined.............................................................................................................................. 36 Personality Failings................................................................................................................................ 36 Personality Attributes ............................................................................................................................ 37
16 OPTIONAL RULES..............................................................................38 16.1 THE DEVILS OWN LUCK! .................................................................................................................... 38 16.2 SILLY WEAPONS.................................................................................................................................. 38
Nock’s Volley Gun................................................................................................................................................ 38 Blunderbus........................................................................................................................................................... 38 Shotguns and Fowling pieces .............................................................................................................................. 38 Rockets ................................................................................................................................................................. 38
16.3 FOREIGN JOHNNIES ............................................................................................................................ 39 Breeding ............................................................................................................................................................... 39 Personality ........................................................................................................................................................... 39 Personality Failings............................................................................................................................................. 39
16.4 LOOTING ............................................................................................................................................. 39 16.5 NIGHT FIGHTING ................................................................................................................................ 40
17 BALANCING YOUR FORCES ............................................................41 17.1 GRASP THE NETTLE CARDS ................................................................................................................ 41 17.2 BIGGER FORCES? ................................................................................................................................ 41
SHARP PRACTICE Page 4 www.toofatlardies.co.uk
APPENDIX ONE
STEP SHARPLY: NAPOLEONIC DRILL SIMPLIFIED ..........................42
APPENDIX TWO
NATIONAL CHARACTERISTICS..............................................................53 BRITAIN........................................................................................................................................................ 53 FRANCE ........................................................................................................................................................ 55 PORTUGAL .................................................................................................................................................... 57 SPAIN ........................................................................................................................................................... 59 PRUSSIAN ..................................................................................................................................................... 60 AUSTRIAN EMPIRE ....................................................................................................................................... 62 RUSSIA ......................................................................................................................................................... 64
SHARP PRACTICE
© Richard Clarke 2008
www.toofatlardies.co.uk

SHARP PRACTICE Page 5 www.toofatlardies.co.uk
1. The Characters Sharp Practice is a game all about men and their initiative; their ability to grasp the nettle in the heat of battle and lead their men to victory. This, indeed, is a thread that runs through all TooFatLardies games – we are interested in the impact of men on war, believing that it is the heroic actions of a few that sweep other lesser men on to achieve great things in their own right. For the first time, however, we have stepped away from attempting a pure simulation of war. Here we have attempted to create a set of rules that look at the deeds of literary heroes, where free rein may be given to our natural fascination with incredible and death-defying deeds, where can create on the tabletop stories that can fire our imagination. Let us look first then at the characters in our stories. There are two sorts of men in Sharp Practice, Big Men, the battlefield leaders we have mentioned above, and ordinary Men. The former are individuals whore role is to lead so that others may follow. The latter operate in Groups of up to twelve in number, or larger Formations; it is they who do the bidding of their betters but whose blood will buy the ultimate victory. Left to their own devices they will stand, fight and be intelligent enough to take advantage of whatever cover is nearby, but they will not act with any initiative or take the battle to the enemy. It is the actions of the Big Men that will lead these men forward. This they do, as we shall see, by using their Initiative. 2. Turn Sequence The sequence of play in Sharp Practice is determined by the cards in the Game Deck. This contains cards for each Big Man and a number of additional cards that will be used to reflect the initiative of the forces involved in any fight. These cards are as follows. 2.1 The Cards One for each Big Man Blinds card, one for each nationality Grasp the Nettle cards, marked by nation and Status level The Sharp Practice card A Sentry card The Blank card Tiffin card 2.1.1 What Do The Cards Mean? Big Men Cards One card is included in the Game Deck for each Big Man. Upon it being dealt he may take his turn, using his Initiative to influence Groups of men within his influence distance or to simply take his own go. Blinds One Blinds card for each nationality or faction involved in the action. On this card all blinds of that force may take their turn, moving or spotting. The troops represented by the blind may fire, but if they do so they will be placed on the table and will remain so for the rest of the game. Troops operate on the Blinds card while they are unspotted or during the turn that they are spotted, after which they will rely on Big Men to influence them. See section 5.1 Grasp the Nettle Grasp the Nettle cards are there to vary the level of initiative that a Big Man has. These cards are added to the deck, being force specific and with a status level attached, as per section 17, Balancing your Force. Once dealt they are left in play, ready to be used by any subsequent Big Men of that Status level or above when his card is dealt. They give that Big Man one additional Initiative Point for each card available to him for that turn. If he uses the card it is returned to the deck to be shuffled in for the next turn, if not it may be left in play for a subsequent Big Man to use.

SHARP PRACTICE Page 6 www.toofatlardies.co.uk
Sentry Sentries operate slightly differently to other troops in that they have a very specific job to do. They will act upon this card being dealt. Sharp Practice One card is in the deck for a force highly skilled in musketry. On this card a Group or Formation may fire immediately, or if unloaded it may completely reload. This is the only National Characteristic card in the Game deck, all others will be in the Bonus Deck, see section 4.3. The Blank card An optional addition, but highly useful for timing the arrival of reinforcements or triggering pre-planned events. Tiffin* This card ends the turn. Any Big Man who has not had his card dealt will lose his turn. Any Group of men that has not been activated during the turn may now take its go with two Action dice, spotting, firing or adjusting their position, but not moving (unless they are cavalry attacking, see section 8.3). Troops on Blinds may choose to deploy and take their turn on the Tiffin card. We recommend using one Tiffin card, but some gamers who prefer less friction in their game do add a second, ending the turn once both Tiffin cards have been dealt. *Whilst Tiffin is an Anglo-Indian term for a light snack it was not out of place amongst British armies of the Napoleonic Wars, especially as Wellington himself was an old India hand. 2.2 Big Men and Initiative In order to get things to happen on the battlefield we need Big Men and their Initiative. The level of Initiative that they have is equal to their Status, as follows.
STATUS DESCRIPTION INITIATIVE LEVEL INFLUENCE RANGE IV Cock o’ the Walk 4 18” III Jolly Good Chap 3 14” II Fine Fellah 2 10” I Young Buck 1 6”
When their card is turned they may add any Grasp the Nettle cards to enhance their Initiative for that turn and then use this to influence the men around them who are under his command (see 2.3.2). Big Men may do the following for one Initiative
• He, or the Group he is with, may take their turn immediately, spotting, moving, loading, firing or attempting a task.
• He may activate a nearby Group under his command and within his Influence range that he can see to take their turn immediately. He may command multiple Groups or Formations if he has more than one Initiative.
• He may order an attached musician to issue commands to a Formation that he commands to take their go immediately. Orders sent by musicians or whistles do not require line of sight however they must be relayed to all the troops in that unit, not just some.
• He may form two adjoining Groups or Formations together into a larger Formation • He may remove one point of Shock from a single Group that he is physically with. • He may lead a charge • He may encourage any Group within his influence distance to join in Fisticuffs • He may add fervour to a charge, see 8.1 • He may attempt to perform a task or act of Derring-Do • He may combine any two immediately adjacent Groups of six men or less, as long as they have
no Shock points on either Group, to form a larger Group. • He may call forth a man with specialist skills to undertake a task. • He may order a Group or Formation (if he has sufficient initiative) to “Make Ready” and prepare
to fire later in the turn.

SHARP PRACTICE Page 7 www.toofatlardies.co.uk
2.3 Commanding Formations When Groups combine to make a Formation (see section 3.1) they may be commanded by a Big Man who has sufficient Initiative to command that many Groups. So, for example, a Captain who is a Jolly Good Chap and has three Initiatives may command a Formation of up to three Groups strong. When in Formation the senior Big Man will command, being responsible for any movement and firing that the Formation undertakes with his Initiative. More junior Big Men with the Formation will then be responsible only for maintaining the combat effectiveness of the Formation by removing Shock points as and when they are suffered. This reflects the real command structure within the unit and the role of subordinate officers and NCOs. To do this each Big Man must attach himself to one Group within the Formation. Big Men may find themselves commanding even larger Formations when utilising the services of a musician. However when this is the case they are restricted to the range of commands that was available and all the men under their command will, unless specifically ordered otherwise with an Initiative, obey the commands given in that manner. See below.
2.3.1 Toot Toot, Parp Parp! Big Men may use musical instruments, such as the bugle, drum or whistles to extend their area of influence. To do this they must be accompanied by a musician (obviously) or posses a whistle. As a rule Light infantry will use bugles and horns and they, along with Naval Officers, will also have whistles, Infantry of the Line will use drums and cavalry trumpets. It costs one Initiative to get a musician to play a call, or to use a whistle. Any musician should be attached to the most senior officer in a unit. If that officer is killed the musician will move to within influence distance of the next officer of rank. If all officers are rendered hors de combat then an NCO may command a musician. Whistles A whistle will have a range of 18” and will allow an officer or NCO to influence all of his troops in that range by issuing the following orders: Halt - Remain stationary Advance - Advance forward to the front only Rally - Form up around the whistle blower Retire - Fall back directly to the rear Fire - Fire at will Cease Fire - Stop firing Light Infantry Bugles A Bugle will have a range of 24” and will allow an officer (or an NCO if no officer is present) to influence all of his troops in that range by issuing the following orders: Halt - Remain stationary Extend - Form a skirmish line Close - Form a tighter line Advance - Advance forward to the front only Retire - Fall back directly to the rear Fire - Fire at will Cease Fire - Stop firing Assemble - Form up around the bugler Cavalry Trumpets A trumpet will have a range of 24” and will allow an officer to influence an officer to influence all of his troops in that range with any of the following orders: Advance to the Front - Advance straight ahead Advance Right - Advance to the right Advance Left - Advance to the left Charge - CHARGE! Walk - Move at Walk speed Trot - Move at Trot Speed

SHARP PRACTICE Page 8 www.toofatlardies.co.uk
A B
Gallop - Move at Gallop Speed Halt - Halt Mount - Get on your horse Dismount - Get off your horse Fire - Use carbines Recall - Fall back two turns movement at trot or gallop, form up on the
trumpeter Infantry Drums A drum will have a range of 18” and will allow an officer to influence all of his troops in that range with any of the following orders: Advance - Advance straight ahead Retire - Retire directly to the rear Halt - Stand on the current position Form Line - Form a line on the current position Form Column - Form a Column on the current position Fire - Fire on command 2.3.2 Chain of Command Big Men influencing troops around them must be aware of the chain of command. In normal circumstances a Big Man may only give orders to troops from his parent Regiment. He may not issue commands to troops who are directly under the command of a superior officer. He may, however, issue commands to troops who are under the command of more junior officers. In some situations the chain of command rules may be ignored. A Big Men in, or entering into, Fisticuffs may take any men along who are within his influence range. Troops whose own commander has been killed or badly wounded may be influenced by other Big Men from any unit. 2.4 A Group’s Turn A Group of men or Formation are activated (i.e. may take their turn) when acting on a Big Man’s Initiative or, if they have not received any Initiative during that turn, on the turn of the Tiffin card. What they may do is restricted by the number of Action Dice they have and the circumstances. When a Big Man gives an Initiative to activate a Group it may immediately use its full allocation of Action Dice for that turn. With these it can Spot, Move, Fire, Reload, undertake a task, or any combination of the five.
When taking their turn on the Tiffin Card the Group may Spot, Fire, Reload, continue with an on-going task (but not start a fresh one) but may not move (with the exception of cavalry charging towards an enemy, see section 8.3). They may, however, use 1D6 of movement for no cost in Action Dice to reposition within any terrain feature that they occupy or deploy into a terrain feature. For example (at left) Group A may reposition themselves, deploying into the adjacent building or
its garden as it is immediately next to them. Group B may not do so as it is too far away. Alternatively a Group or Formation may “Make Ready”, standing their ground and waiting to fire on the senior Big Man’s command (this is only available to a Big Man with a Status of 2 or higher and costs all of his Initiative for the turn, irrespective of how many points he has). Once a Group or Formation gets the order to “Make Ready” they may then fire at any time subsequently during the turn.

SHARP PRACTICE Page 9 www.toofatlardies.co.uk
2.4.1 Action Dice All Groups have two Action Dice which they may use when they take their turn. Each action undertaken will cost them dice as follows.
ACTION COST Move 1D6 inches 1 Dice Cross a low obstacle 1 Dice Cross a High Obstacle 2 Dice Enter an unbarred Building 1 Dice Dismounting 1Dice Fire 1 Dice Reload rifle 2 Dice Tap load rifle 1 Dice Reload musket 1 Dice Spot 1 Dice Open ranks 1 Dice Attempt a task 1 Dice Reload artillery piece 2 Dice
Groups may choose to duplicate actions, for example spotting twice, or spot once with an enhanced chance, adding +1 to their dice throw. To represent an unloaded Group or Formation we place smoke in front of it to suggest it has just fired. Kapok works well for this. 2.5 Troop Types In Sharp Practice troops are generally defined as being in one of four classes, these being Elite, Good, Regular or Poor. These ratings represent the general training and morale of the unit (we assume that better trained troops have higher morale, feel free to adjust that in specific scenarios) and will directly affect the firing ability and the resilience of the troops in battle. Additionally they may also be rated according to their type, such as Lights, Grenadiers or Guards, or for their demeanour, aggressive or weedy coves; cavalry may have superior mounts and, naturally, will be designated as per their branch, Lancers, Dragoons and so on.

SHARP PRACTICE Page 10 www.toofatlardies.co.uk
3 Troop Types & Organisation In the formal warfare of the 18th and 19th centuries the way troops behaved largely depended on their training. In small units the tactics would largely be linear, with light troops especially suited to the level of game that we are aiming at here. Nevertheless we have presented other options for troops of the Line to allow them to choose denser column Formations. This section is, in reality, a highly simplified nod in the general direction of the period drill books, however it will probably suffice for most gamers. Should they wish for more flavour of this nature then they may consult the “Step Sharply” Appendix to the rules which goes further down that road. Many television or film renditions of Napoleonic warfare are achieved with small numbers representing larger Formations, and, if the gamer wishes, there is no reason why he cannot introduce some man to figure ratio for the Groups of men, leaving the Big Men alone to represent individuals. In general Eighteenth century Formations were more exclusively linear, and as the nineteenth century progressed the loose line of the light infantryman became more the norm. In any case we would recommend the following Formations and restrictions which will allow you to represent most forces of the black powder period. 3.1 Formations With larger games of Sharp Practice the gamer may find that there are some significant benefits in joining Groups together to form Formations. A Formation is nothing more than Groups of troops that, under the command of one Big Men, are conforming to one of the basic Formations of the period. When rallying a Formation Big Men may remove Shock points from any component Group without having to necessarily be in contact with them, it is sufficient to be in contact with part of the Formation as a whole. Single Groups may not be considered as formed. Whilst all Groups in a Formation will dice once for movement, all moving at that rate, they are restricted to moving at the rate of the slowest Group when that is adjusted to reflect any points of Shock that the Group has. So if four Groups were combined in a Formation and three had one point of Shock whilst the fourth has two points of Shock the whole Formation would move with a -2” as per section 5.2. 3.1.1 Breaking Formations Formations may be broken by a whole raft of events. Formations which fall below the required strength automatically cease to be considered a Formation. Sub-Groups within the Formation retiring due to Shock will break the continuity of a multiple Group Formation. Cavalry or infantry contacting a Formation in the flank or rear will immediately make it unformed, then fighting it as such in Fisticuffs. Formations may be broken by being physically divided by enemy action or even by random events, such as mad pigs running through them, horses falling on them, or friendly troops who, for whatever reason, interpenetrate, or are interpenetrated by, the Formation. Some terrain may be so rough as to break a formation, and any loss in a round of Fisticuffs will break a formation. 3.2 Infantry of the Line Infantry of the Line would, as their name suggests, operate in a linear Formation, engaging troops to their front, firing in volleys to maximise the psychological and physical impact. Their movement tended to be slow and methodical in order to achieve that uniformity of action. To reflect this troops of the Line get a benefit when firing from being in a line Formation where their fire discipline can be used to best effect. They have a very limited arc of fire, only being able to target enemy Groups or Formations that are at least partially immediately to their front. Columns were in reality used for movement, and in battle actually were a series of lines deployed in a manner that facilitated as rapid movement as possible, with squares restricted to seeing off cavalry. Line A line Formation may be two or three ranks deep. It will add +1 to each dice when firing. A Formation may act as a single Group, so long as the commander has sufficient initiative to command that number of men or he is using musical commands to control it. .

SHARP PRACTICE Page 11 www.toofatlardies.co.uk
Troops in a line must fire immediately to their front. The front two ranks may all fire at full effect, the third rank counting only half of its numbers. If the enemy has multiple Groups within their arc of fire they must share the hits equally between all the Groups, see section 7.3.1. In fisticuffs all the figures in a contacted Group or Groups may fight. Any additional troops overlapping may break ranks and join the scrimmage but only when instructed to do so by a Big Man. Column In order to form a column two or more Groups must combine under a Big Man of sufficient Status to lead them. They may fire out of the front or side faces, but with the same limitations as a line. Once numbers fall to less than twelve men it is considered to no longer be a Formation. A column spreads any casualties and Shock points equally over all the Groups within the Formation rather than concentrating them all on the Group facing the enemy. Any casualties are removed from the rear of the Formation. This keeps it moving faster for longer and improves its chances in Fisticuffs. In Fisticuffs the first four ranks all fight in the first turn with the rest of the column supporting. They rear ranks may move to join the fight after the first round. Square A square, even a small one, is very effective against cavalry as it presents a solid obstacle with all-round firepower. It may be formed with a minimum of two Groups and once numbers fall to less than twelve men it is no longer considered to be a Formation. Within Sharp Practice squares are considered to be defended if the outer two ranks are not firing but are presenting their bayonet. An undefended square is where the front ranks have fired in this turn. A square presents a dense target and will suffer more casualties from infantry or artillery fire as a result. 3.3 Light Infantry Formations Light infantry were trained to operate in a looser, more flexible Formation and fire at longer ranges than their comrades in the line. Light infantrymen have much more freedom in selecting their targets; as such they may fire at any target within a forward 180 degree arc of their pair. Light infantrymen will never be considered formed into bodies of more than one Group. The standard practice was for riflemen to operate in pairs, with one firing while the other loaded or advanced by rushes. This meant that half the unit was loaded at any time, thereby avoiding being caught unloaded. To reflect this, the player should consider only firing half of a unit at a time when the enemy are nearby. 3.4 Sentries These are men who have been told off from their parent Group to undertake the role of sentry. They have their own card entitled “Sentries”. Within Sharp Practice these can be useful outposts and early warning systems, especially for any force in a defensive position. Within the rules these count as one man who functions autonomously while on piquet duty. In Sharp Practice Sentries may operate with two Action dice in a turn, which they may use to spot, fire or retire towards their parent Group Spotting is undertaken as normal, firing is done with one dice at a target in the open, or as a signal to warn his comrades. Once a sentry abandons his post he may only move until he rejoins his parent Group, doing so with 2D6 on the Tiffin card. Cavalry piquets may move at the faster cavalry speeds (see section 5.2)

SHARP PRACTICE Page 12 www.toofatlardies.co.uk
4 Random Events & the Bonus Deck Random events may be seen as an optional part of the rules, however we believe that they can add colour to games if, like seasoning, they are used lightly. More important than the random events themselves are the Bonus cards that are generated which are used to differentiate the forces participating. A random event may be triggered when any Group or Formation (not Blinds) moves or fires. The 1’s and 6’s are noted. If there are more 1’s than 6’s then a random event occurs. Roll two dice, the first providing the dice score on the left hand side of the table, the second the score across the top. Cross reference the two to get the result for either Firing or Movement random events.
DICE 1 2 3 4 5 6 1 10 10 10 10 10 10 2 10 10 10 10 10 10 3 10 1 2 3 4 10 4 10 5 6 7 8 10 5 10 10 9 10 10 10 6 10 10 10 10 10 10
4.1 Firing Random Events
1 The firing Group is low on ammunition. Fire at short range only until resupplied. 2 Damp squib! – The powder’s damp. No firing by that Group until resupplied. 3 Broken Flint – One man has a broken flint. Each turn roll 5 or 6 to replace it. 4 Smoke – Cough! A pall of smoke hangs across the immediate front of the firers, reducing
visibility to 6”. Firing through this will be done with one third less dice than normal. The smoke clears on the third subsequent Tiffin card.
5 Fouled barrels. The firing Group has fouled barrels, they fire with a -1 to hit until water can be found to clean them out. The Group must retire from combat to do this.
6 Looting – 2 or 3 men (dice for which) within 12” of a building slope off to loot a property. They will be moved there immediately and remain until contacted by a Big Man
7 Fire! The building nearest to the firers has caught alight (if within 12” of the firer or target). Smoke will start to emerge next turn. Any troops within must put the fire out within three turns or abandon the place. It takes a water card to douse a fire.
8 Fear. One Big Man with the target Group is struck down by fear. He takes his move immediately, running to the rear with as many men as he can command. Next turn he must remain stationary or retire further.
9 Damn & Blast! Scared by the firing some local livestock have escaped. 2D6” movement. Each turn roll a deviation dice to see which direction they head in. They will disrupt any Formation that they contact, leaving it unformed. They will halt once 9” or more from any humans.
10 Bonus Card – draw one bonus card immediately
SHARP PRACTICE Page 13 www.toofatlardies.co.uk
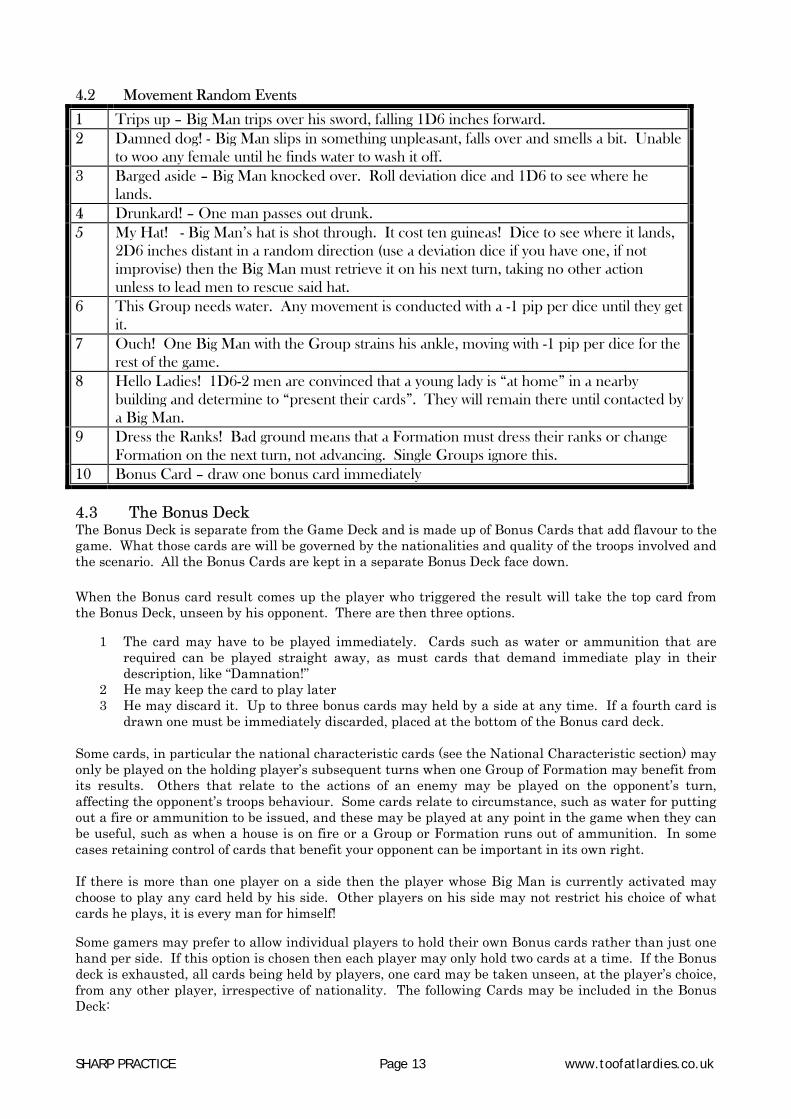
4.2 Movement Random Events
1 Trips up – Big Man trips over his sword, falling 1D6 inches forward. 2 Damned dog! - Big Man slips in something unpleasant, falls over and smells a bit. Unable
to woo any female until he finds water to wash it off. 3 Barged aside – Big Man knocked over. Roll deviation dice and 1D6 to see where he
lands. 4 Drunkard! – One man passes out drunk. 5 My Hat! - Big Man’s hat is shot through. It cost ten guineas! Dice to see where it lands,
2D6 inches distant in a random direction (use a deviation dice if you have one, if not improvise) then the Big Man must retrieve it on his next turn, taking no other action unless to lead men to rescue said hat.
6 This Group needs water. Any movement is conducted with a -1 pip per dice until they get it.
7 Ouch! One Big Man with the Group strains his ankle, moving with -1 pip per dice for the rest of the game.
8 Hello Ladies! 1D6-2 men are convinced that a young lady is “at home” in a nearby building and determine to “present their cards”. They will remain there until contacted by a Big Man.
9 Dress the Ranks! Bad ground means that a Formation must dress their ranks or change Formation on the next turn, not advancing. Single Groups ignore this.
10 Bonus Card – draw one bonus card immediately 4.3 The Bonus Deck The Bonus Deck is separate from the Game Deck and is made up of Bonus Cards that add flavour to the game. What those cards are will be governed by the nationalities and quality of the troops involved and the scenario. All the Bonus Cards are kept in a separate Bonus Deck face down. When the Bonus card result comes up the player who triggered the result will take the top card from the Bonus Deck, unseen by his opponent. There are then three options.
1 The card may have to be played immediately. Cards such as water or ammunition that are required can be played straight away, as must cards that demand immediate play in their description, like “Damnation!”
2 He may keep the card to play later 3 He may discard it. Up to three bonus cards may held by a side at any time. If a fourth card is
drawn one must be immediately discarded, placed at the bottom of the Bonus card deck. Some cards, in particular the national characteristic cards (see the National Characteristic section) may only be played on the holding player’s subsequent turns when one Group of Formation may benefit from its results. Others that relate to the actions of an enemy may be played on the opponent’s turn, affecting the opponent’s troops behaviour. Some cards relate to circumstance, such as water for putting out a fire or ammunition to be issued, and these may be played at any point in the game when they can be useful, such as when a house is on fire or a Group or Formation runs out of ammunition. In some cases retaining control of cards that benefit your opponent can be important in its own right. If there is more than one player on a side then the player whose Big Man is currently activated may choose to play any card held by his side. Other players on his side may not restrict his choice of what cards he plays, it is every man for himself! Some gamers may prefer to allow individual players to hold their own Bonus cards rather than just one hand per side. If this option is chosen then each player may only hold two cards at a time. If the Bonus deck is exhausted, all cards being held by players, one card may be taken unseen, at the player’s choice, from any other player, irrespective of nationality. The following Cards may be included in the Bonus Deck:
SHARP PRACTICE Page 14 www.toofatlardies.co.uk
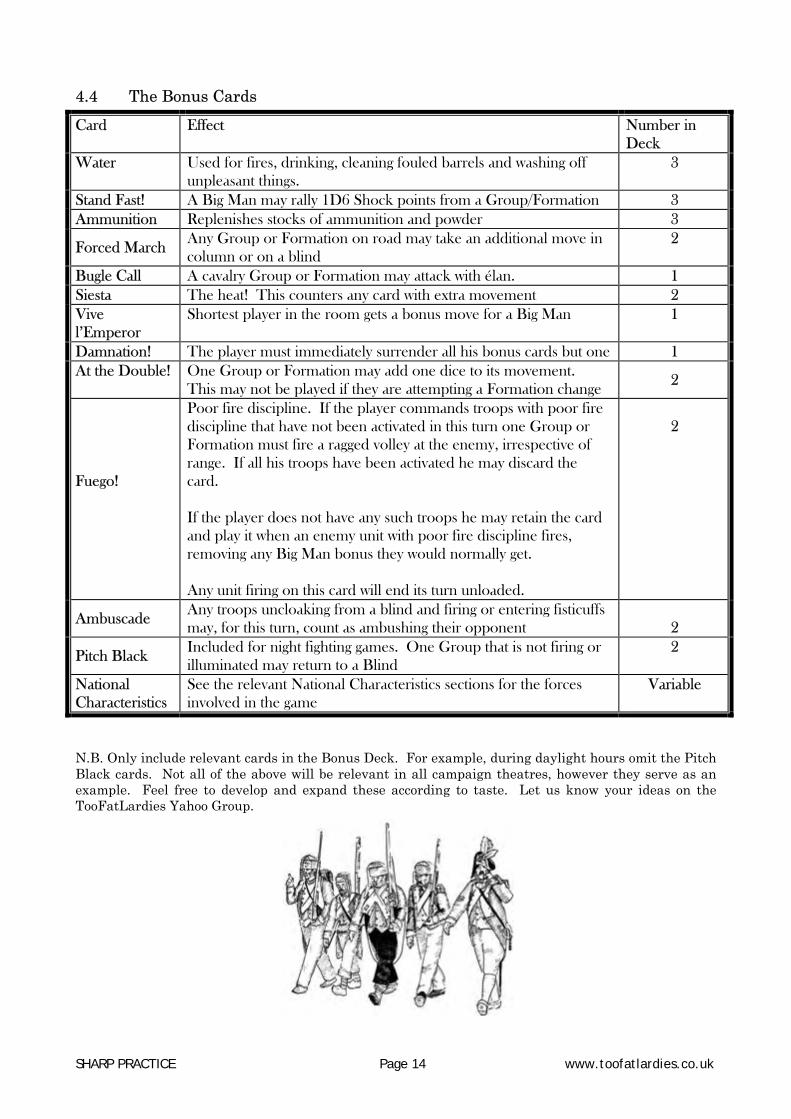
4.4 The Bonus Cards
N.B. Only include relevant cards in the Bonus Deck. For example, during daylight hours omit the Pitch Black cards. Not all of the above will be relevant in all campaign theatres, however they serve as an example. Feel free to develop and expand these according to taste. Let us know your ideas on the TooFatLardies Yahoo Group.
Card Effect Number in Deck
Water Used for fires, drinking, cleaning fouled barrels and washing off unpleasant things.
3
Stand Fast! A Big Man may rally 1D6 Shock points from a Group/Formation 3 Ammunition Replenishes stocks of ammunition and powder 3
Forced March Any Group or Formation on road may take an additional move in column or on a blind
2
Bugle Call A cavalry Group or Formation may attack with élan. 1 Siesta The heat! This counters any card with extra movement 2 Vive l’Emperor
Shortest player in the room gets a bonus move for a Big Man 1
Damnation! The player must immediately surrender all his bonus cards but one 1 At the Double! One Group or Formation may add one dice to its movement.
This may not be played if they are attempting a Formation change
2
Fuego!
Poor fire discipline. If the player commands troops with poor fire discipline that have not been activated in this turn one Group or Formation must fire a ragged volley at the enemy, irrespective of range. If all his troops have been activated he may discard the card. If the player does not have any such troops he may retain the card and play it when an enemy unit with poor fire discipline fires, removing any Big Man bonus they would normally get. Any unit firing on this card will end its turn unloaded.
2
Ambuscade Any troops uncloaking from a blind and firing or entering fisticuffs may, for this turn, count as ambushing their opponent
2
Pitch Black Included for night fighting games. One Group that is not firing or illuminated may return to a Blind
2
National Characteristics
See the relevant National Characteristics sections for the forces involved in the game
Variable
SHARP PRACTICE Page 15 www.toofatlardies.co.uk
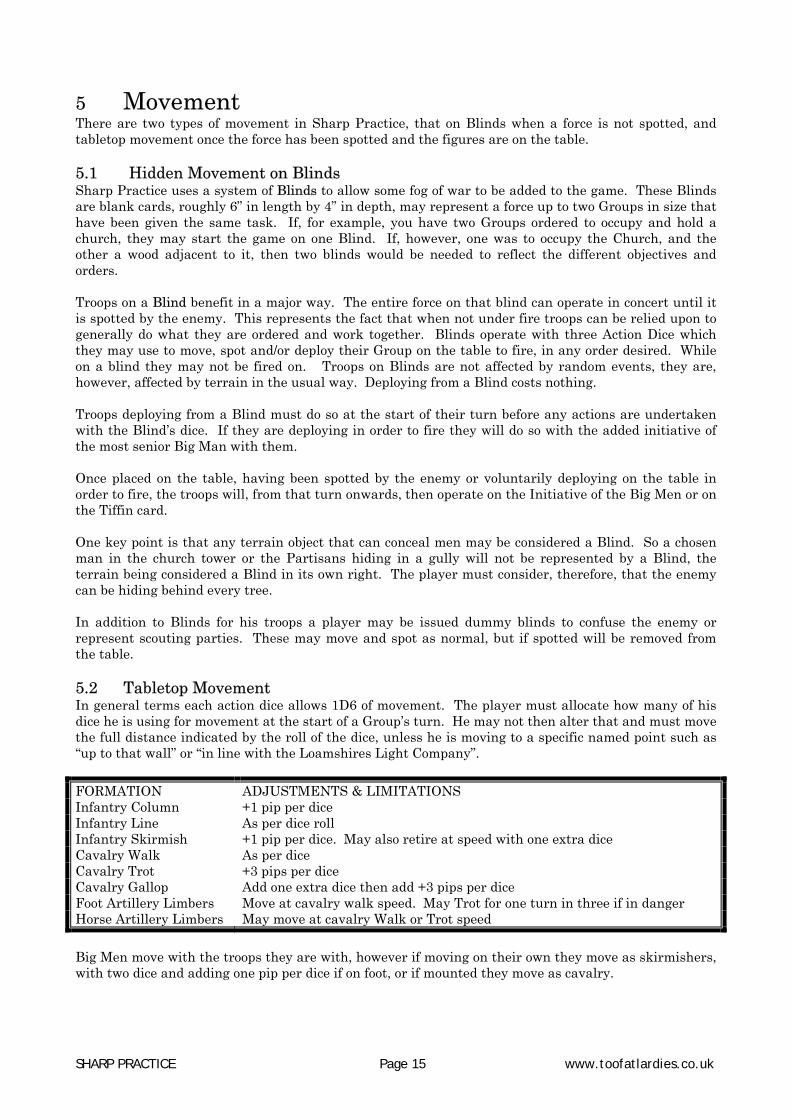
5 Movement There are two types of movement in Sharp Practice, that on Blinds when a force is not spotted, and tabletop movement once the force has been spotted and the figures are on the table. 5.1 Hidden Movement on Blinds Sharp Practice uses a system of Blinds to allow some fog of war to be added to the game. These Blinds are blank cards, roughly 6” in length by 4” in depth, may represent a force up to two Groups in size that have been given the same task. If, for example, you have two Groups ordered to occupy and hold a church, they may start the game on one Blind. If, however, one was to occupy the Church, and the other a wood adjacent to it, then two blinds would be needed to reflect the different objectives and orders. Troops on a Blind benefit in a major way. The entire force on that blind can operate in concert until it is spotted by the enemy. This represents the fact that when not under fire troops can be relied upon to generally do what they are ordered and work together. Blinds operate with three Action Dice which they may use to move, spot and/or deploy their Group on the table to fire, in any order desired. While on a blind they may not be fired on. Troops on Blinds are not affected by random events, they are, however, affected by terrain in the usual way. Deploying from a Blind costs nothing. Troops deploying from a Blind must do so at the start of their turn before any actions are undertaken with the Blind’s dice. If they are deploying in order to fire they will do so with the added initiative of the most senior Big Man with them. Once placed on the table, having been spotted by the enemy or voluntarily deploying on the table in order to fire, the troops will, from that turn onwards, then operate on the Initiative of the Big Men or on the Tiffin card. One key point is that any terrain object that can conceal men may be considered a Blind. So a chosen man in the church tower or the Partisans hiding in a gully will not be represented by a Blind, the terrain being considered a Blind in its own right. The player must consider, therefore, that the enemy can be hiding behind every tree. In addition to Blinds for his troops a player may be issued dummy blinds to confuse the enemy or represent scouting parties. These may move and spot as normal, but if spotted will be removed from the table. 5.2 Tabletop Movement In general terms each action dice allows 1D6 of movement. The player must allocate how many of his dice he is using for movement at the start of a Group’s turn. He may not then alter that and must move the full distance indicated by the roll of the dice, unless he is moving to a specific named point such as “up to that wall” or “in line with the Loamshires Light Company”. FORMATION ADJUSTMENTS & LIMITATIONS Infantry Column +1 pip per dice Infantry Line As per dice roll Infantry Skirmish +1 pip per dice. May also retire at speed with one extra dice Cavalry Walk As per dice Cavalry Trot +3 pips per dice Cavalry Gallop Add one extra dice then add +3 pips per dice Foot Artillery Limbers Move at cavalry walk speed. May Trot for one turn in three if in danger Horse Artillery Limbers May move at cavalry Walk or Trot speed Big Men move with the troops they are with, however if moving on their own they move as skirmishers, with two dice and adding one pip per dice if on foot, or if mounted they move as cavalry.
SHARP PRACTICE Page 16 www.toofatlardies.co.uk
Any Shock points that a Group has suffered will reduce its movement by one inch per pip from the total score rolled. Formations roll once for movement, all the component Groups conforming to that speed, however they move at the speed of the slowest Group once Shock points have been accounted for. Cavalry moving from or slowing to a halt must take their first and last whole turn of movement at the walk. Cavalry moving in Formation may do so without difficulty whilst moving at the walk or trot. They may move one turn in Formation at the gallop but on the second consecutive turn of galloping all Formation will be lost and the Groups moved separately. Unlimbering guns takes one full turn stationary, with the gun being placed within 4” or the limber. After unlimbering guns must be loaded before they can fire. Beasts of Burden. Pack horses, donkeys, mules and oxen may be used to carry packs or pull carts. With their loads they move at 2D6 inches per turn. Without loads donkeys and mules may be ridden, moving at -1 pip per dice at the walk, and +1 pip per dice at the ungainly gallop. 5.3 Terrain Effects & Obstacles Poor terrain may affect movement by a -1 or -2 to the pips on each dice rolled. In slightly broken terrain movement is reduced by -1 pip per dice, whereas in a heavy terrain -2 pips are deducted from each dice. For example, a Group of French infantry moving through a swamp allocate two dice to moving. They roll 6 and 1. With -2 on each die the net result is 4 and 0 (ignore negative results) so they move 4”. When Groups or Formations encounter a linear obstacle, such as a wall, a fence or a hedge they may cross this at the cost of one or two Action dice depending on its size. Naturally some such obstacles may only be crossed using aids such as ladders. Cavalry Groups crossing linear obstacles may do so with no problems for very small obstacles, or may encounter some difficulties. In some cases Formations may be broken, or for larger obstacles it may be decided that a Derring-Do roll is required. See section 10. Cavalry Groups may not move in Heavy terrain if mounted nor may they maintain Formation in any broken terrain 5.4 Movement in varying Terrain Troops that are moving in more than one terrain type may pro-rata their movement to take that into account. This does not relate to crossing obstacles. 5.5 Assuming Formations There are benefits associated with forming Groups into larger Formations. Within the rules the term Formation is used specifically to describe Groups that have joined together to form a larger more coherent body of men. Groups of the same Regiment who wish to join together to form larger Formations do this by moving into place as normal, the distance covered being dictated by their normal movement allowance. Once in place they require one Initiative from a Big Man to join one Group to another Group or to an existing Formation (see section 2.2). This represents the need to dress the ranks once in place and is required before the benefits of being in Formation may be enjoyed. If a Formation is disrupted, making it unformed, the process of forming up using the Big Man’s initiative must be repeated. 5.6 Changing Facing and Formation Men in Groups may change their facing at no cost on their turn. Formations that wish to change face will reduce their movement allowance by 1” for turning the facing of the men 90º, that is each man turning to face left or right, or 2” for the men to turn 180º, facing to the rear.
SHARP PRACTICE Page 17 www.toofatlardies.co.uk
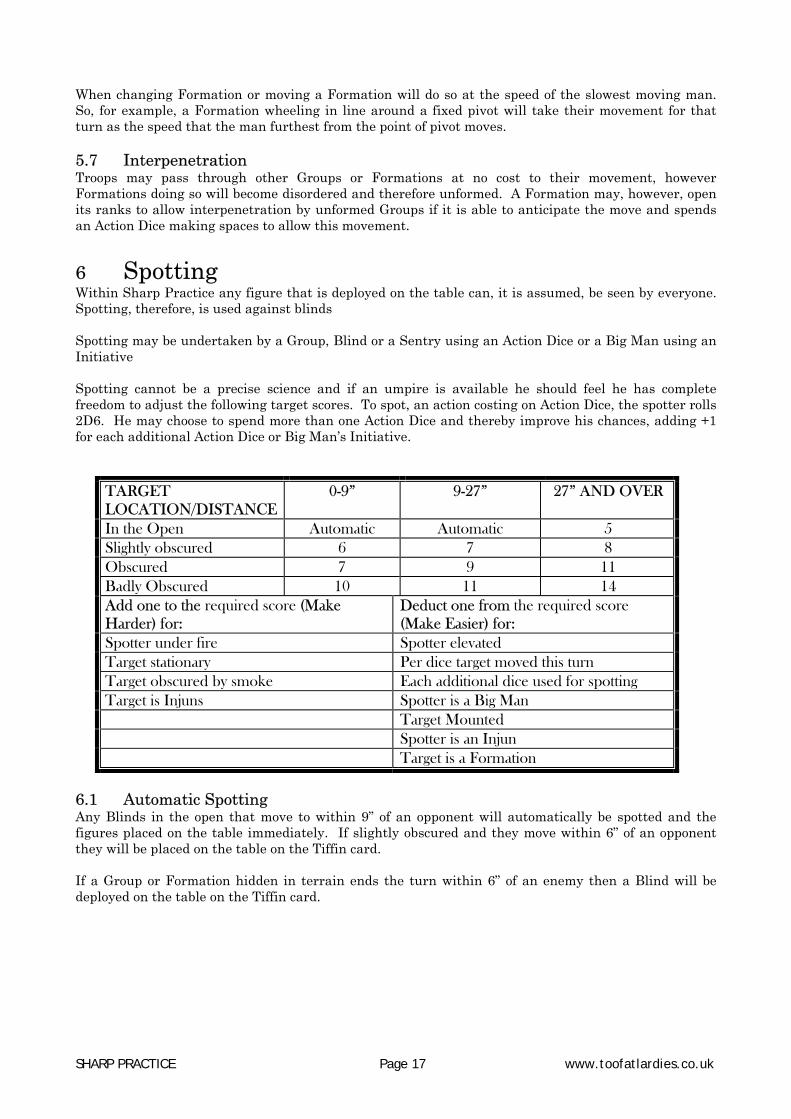
When changing Formation or moving a Formation will do so at the speed of the slowest moving man. So, for example, a Formation wheeling in line around a fixed pivot will take their movement for that turn as the speed that the man furthest from the point of pivot moves. 5.7 Interpenetration Troops may pass through other Groups or Formations at no cost to their movement, however Formations doing so will become disordered and therefore unformed. A Formation may, however, open its ranks to allow interpenetration by unformed Groups if it is able to anticipate the move and spends an Action Dice making spaces to allow this movement. 6 Spotting Within Sharp Practice any figure that is deployed on the table can, it is assumed, be seen by everyone. Spotting, therefore, is used against blinds Spotting may be undertaken by a Group, Blind or a Sentry using an Action Dice or a Big Man using an Initiative Spotting cannot be a precise science and if an umpire is available he should feel he has complete freedom to adjust the following target scores. To spot, an action costing on Action Dice, the spotter rolls 2D6. He may choose to spend more than one Action Dice and thereby improve his chances, adding +1 for each additional Action Dice or Big Man’s Initiative.
TARGET LOCATION/DISTANCE
0-9” 9-27” 27” AND OVER
In the Open Automatic Automatic 5 Slightly obscured 6 7 8 Obscured 7 9 11 Badly Obscured 10 11 14 Add one to the required score (Make Harder) for:
Deduct one from the required score (Make Easier) for:
Spotter under fire Spotter elevated Target stationary Per dice target moved this turn Target obscured by smoke Each additional dice used for spotting Target is Injuns Spotter is a Big Man Target Mounted Spotter is an Injun Target is a Formation
6.1 Automatic Spotting Any Blinds in the open that move to within 9” of an opponent will automatically be spotted and the figures placed on the table immediately. If slightly obscured and they move within 6” of an opponent they will be placed on the table on the Tiffin card. If a Group or Formation hidden in terrain ends the turn within 6” of an enemy then a Blind will be deployed on the table on the Tiffin card.

SHARP PRACTICE Page 18 www.toofatlardies.co.uk
7 Firing 7.1 Who Can Fire? Any Group may fire on their turn for the cost of 1 Action Point. Infantry in a line Formation may only fire straight ahead. Individual Groups and Light troops may fire with a 180 degree arc of fire to their front. Troops in buildings are limited to two men firing from each window or doorway. Intervening friendly troops may interfere with firing on an opponent, common sense must rule here in assessing this. In the diagram at right British line Z may fire at either French Groups A or B. If it wishes to fire at Group C it will have to wheel to bring that unit at least partially into its arc of fire, as indicated by the two arrows. Big Men or musicians with a Group or Formation do not count towards the number of men firing, they are assumed to be directing the fire, not actually firing themselves. 7.2 How to Fire Each Group (Formations always break their fire down by Groups) rolls one D6 for each figure firing with the following adjustments for class (round up).
TROOPS ADJUSTMENT Elite +1 dice per four men firing
Good +1 dice per five men firing Average No adjustment
Poor -1 dice per five men firing
For an artillery piece roll 10 dice for a Light gun, 12 dice for a Heavy gun, 6 dice for a Swivel Gun and 18 dice for a Carronade. The number of dice to be rolled is then adjusted according to the following list, then the scores required to hit are shown on the tables according to the firer’s type and situation. Firing on a Big Man’s Initiative: Add 1D6 for Big Man’s status level Each two Shock points on the Firer’s Group: Remove one firing dice First volley: Add two firing dice Firer is a Formation in Line: +1 to each dice. Target is a Formation in line: +1 to each dice Target is an enfiladed line or column Add one extra dice and add +1 to each dice Target is a Formation in square Add two extra dice and add +1 to each dice Target in soft cover: Remove half the dice (round up for odds) Target in hard cover: Remove three-quarters of dice (round up) Line Troops
0-9” 9-18” 18-27” 27-36” 36”+ Musket 5-6 6 - - - Baker Rifle 5-6 5-6 6 - - Minie Rifle 5-6 5-6 6 6 - Carbine 6 - - - -
A
B
C
Z

SHARP PRACTICE Page 19 www.toofatlardies.co.uk
Light troops that are deployed in a line Formation will fire as Line troops. If they are operating as skirmishers, however, they will fire on the table below. Light Troops Skirmishing
0-12” 12-24” 24-36” 36-48” Musket 4-6 5-6 - - Baker Rifle 4-6 4-6 5-6 - Minie Rifle 4-6 4-6 5-6 6
Artillery Pieces
0-9” 9-18” 18-27” 27-36” 36”+ Light Gun 4-6 4-6 5-6 6 6 Heavy Gun 3-6 4-6 5-6 5-6 5-6 Swivel Gun 4-6 5-6 6 - - Carronade 2-6 4-6 - - -
7.3 Effect of Hits Each hit is rolled for to see how effective it was.
1-2 Near miss, no effect 3-5 Shock 6 Kill
A miss means just that, it missed, but the enemy troops know they are under fire. A Shock point is a negative cohesion factor and represents pinning and suppressing within the rules. As Groups accumulate Shock points they will move more slowly, eventually halting altogether, and fire less effectively. As a result of multiple Shock points troops may lose their bottle and retire or even rout. (See section 7.5 Bottle) A kill is one man rendered hors de combat for the duration of the game. It may well be that many of the “dead” are in fact badly wounded. 7.3.1 Hits on Formations Casualties suffered in any turn, be they kills or Shock points, will be shared equally between the Groups in an enemy column or line if all the Groups that form the line are in the same range band allocating them to the nearest groups first. Where a line Formation has Groups in two range bands all the casualties will be shared equally between any Groups in the closest band. In the example shown the line on the left will share all casualties between Groups 3 and 4. The column on the right will share the casualties between all four Groups. So five kills on the column will have the odd one applied to Group 1 as it is nearest to the firer.
3 1
4
2
1
9”
2 3
4
9”
SHARP PRACTICE Page 20 www.toofatlardies.co.uk
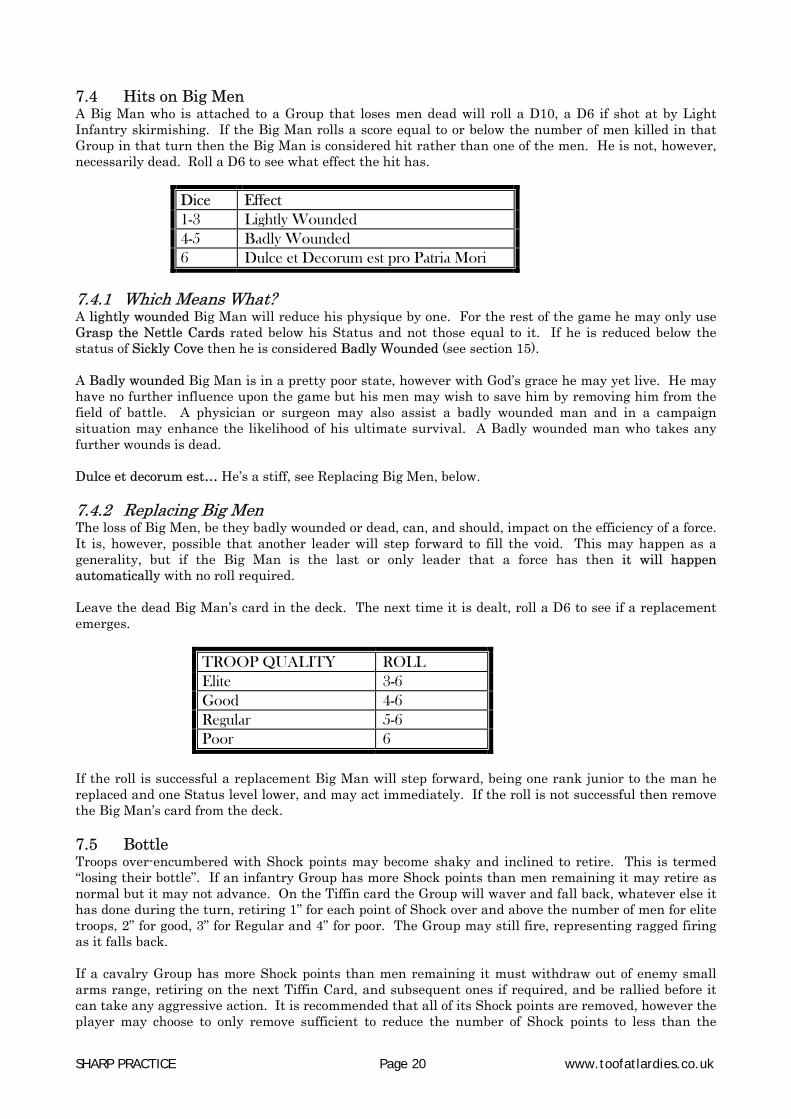
7.4 Hits on Big Men A Big Man who is attached to a Group that loses men dead will roll a D10, a D6 if shot at by Light Infantry skirmishing. If the Big Man rolls a score equal to or below the number of men killed in that Group in that turn then the Big Man is considered hit rather than one of the men. He is not, however, necessarily dead. Roll a D6 to see what effect the hit has.
Dice Effect 1-3 Lightly Wounded 4-5 Badly Wounded 6 Dulce et Decorum est pro Patria Mori
7.4.1 Which Means What? A lightly wounded Big Man will reduce his physique by one. For the rest of the game he may only use Grasp the Nettle Cards rated below his Status and not those equal to it. If he is reduced below the status of Sickly Cove then he is considered Badly Wounded (see section 15). A Badly wounded Big Man is in a pretty poor state, however with God’s grace he may yet live. He may have no further influence upon the game but his men may wish to save him by removing him from the field of battle. A physician or surgeon may also assist a badly wounded man and in a campaign situation may enhance the likelihood of his ultimate survival. A Badly wounded man who takes any further wounds is dead. Dulce et decorum est… He’s a stiff, see Replacing Big Men, below. 7.4.2 Replacing Big Men The loss of Big Men, be they badly wounded or dead, can, and should, impact on the efficiency of a force. It is, however, possible that another leader will step forward to fill the void. This may happen as a generality, but if the Big Man is the last or only leader that a force has then it will happen automatically with no roll required. Leave the dead Big Man’s card in the deck. The next time it is dealt, roll a D6 to see if a replacement emerges.
TROOP QUALITY ROLL Elite 3-6 Good 4-6 Regular 5-6 Poor 6
If the roll is successful a replacement Big Man will step forward, being one rank junior to the man he replaced and one Status level lower, and may act immediately. If the roll is not successful then remove the Big Man’s card from the deck. 7.5 Bottle Troops over-encumbered with Shock points may become shaky and inclined to retire. This is termed “losing their bottle”. If an infantry Group has more Shock points than men remaining it may retire as normal but it may not advance. On the Tiffin card the Group will waver and fall back, whatever else it has done during the turn, retiring 1” for each point of Shock over and above the number of men for elite troops, 2” for good, 3” for Regular and 4” for poor. The Group may still fire, representing ragged firing as it falls back. If a cavalry Group has more Shock points than men remaining it must withdraw out of enemy small arms range, retiring on the next Tiffin Card, and subsequent ones if required, and be rallied before it can take any aggressive action. It is recommended that all of its Shock points are removed, however the player may choose to only remove sufficient to reduce the number of Shock points to less than the
SHARP PRACTICE Page 21 www.toofatlardies.co.uk
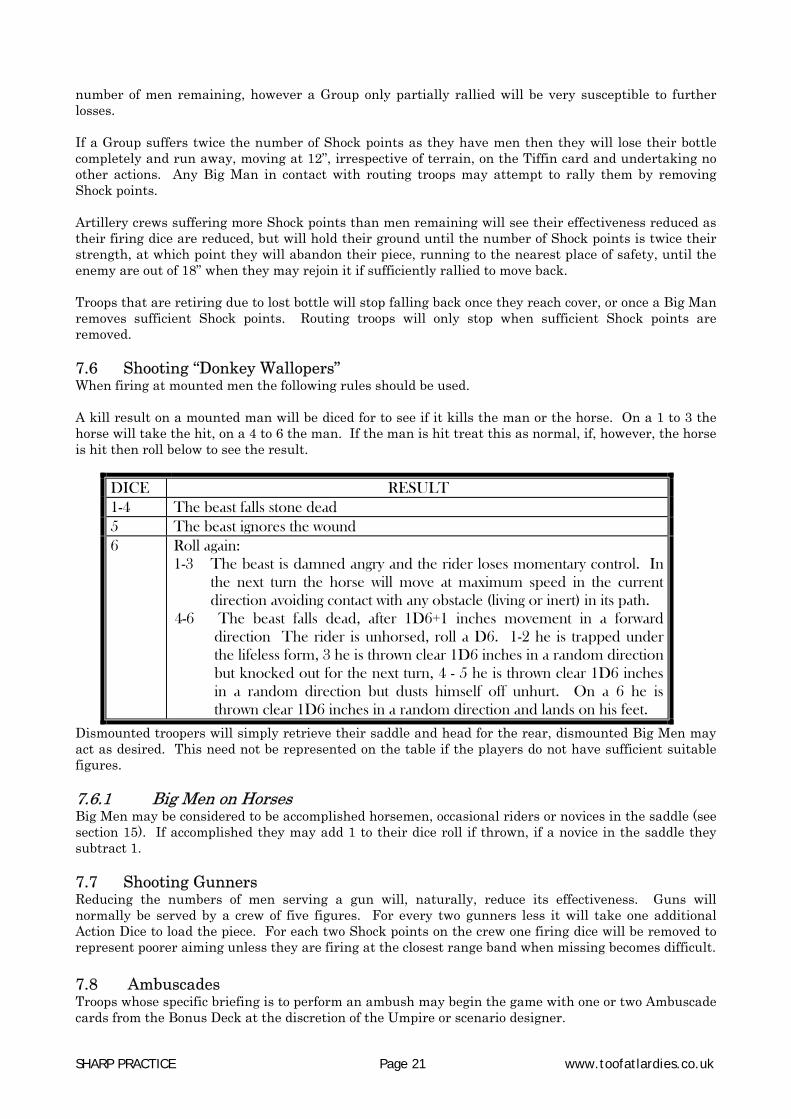
number of men remaining, however a Group only partially rallied will be very susceptible to further losses. If a Group suffers twice the number of Shock points as they have men then they will lose their bottle completely and run away, moving at 12”, irrespective of terrain, on the Tiffin card and undertaking no other actions. Any Big Man in contact with routing troops may attempt to rally them by removing Shock points. Artillery crews suffering more Shock points than men remaining will see their effectiveness reduced as their firing dice are reduced, but will hold their ground until the number of Shock points is twice their strength, at which point they will abandon their piece, running to the nearest place of safety, until the enemy are out of 18” when they may rejoin it if sufficiently rallied to move back. Troops that are retiring due to lost bottle will stop falling back once they reach cover, or once a Big Man removes sufficient Shock points. Routing troops will only stop when sufficient Shock points are removed. 7.6 Shooting “Donkey Wallopers” When firing at mounted men the following rules should be used. A kill result on a mounted man will be diced for to see if it kills the man or the horse. On a 1 to 3 the horse will take the hit, on a 4 to 6 the man. If the man is hit treat this as normal, if, however, the horse is hit then roll below to see the result.
DICE RESULT 1-4 The beast falls stone dead 5 The beast ignores the wound 6 Roll again:
1-3 The beast is damned angry and the rider loses momentary control. In the next turn the horse will move at maximum speed in the current direction avoiding contact with any obstacle (living or inert) in its path.
4-6 The beast falls dead, after 1D6+1 inches movement in a forward direction The rider is unhorsed, roll a D6. 1-2 he is trapped under the lifeless form, 3 he is thrown clear 1D6 inches in a random direction but knocked out for the next turn, 4 - 5 he is thrown clear 1D6 inches in a random direction but dusts himself off unhurt. On a 6 he is thrown clear 1D6 inches in a random direction and lands on his feet.
Dismounted troopers will simply retrieve their saddle and head for the rear, dismounted Big Men may act as desired. This need not be represented on the table if the players do not have sufficient suitable figures. 7.6.1 Big Men on Horses Big Men may be considered to be accomplished horsemen, occasional riders or novices in the saddle (see section 15). If accomplished they may add 1 to their dice roll if thrown, if a novice in the saddle they subtract 1. 7.7 Shooting Gunners Reducing the numbers of men serving a gun will, naturally, reduce its effectiveness. Guns will normally be served by a crew of five figures. For every two gunners less it will take one additional Action Dice to load the piece. For each two Shock points on the crew one firing dice will be removed to represent poorer aiming unless they are firing at the closest range band when missing becomes difficult.
7.8 Ambuscades Troops whose specific briefing is to perform an ambush may begin the game with one or two Ambuscade cards from the Bonus Deck at the discretion of the Umpire or scenario designer.

SHARP PRACTICE Page 22 www.toofatlardies.co.uk
A Group or Formation performing an ambush may only do so if they begin the turn on Blinds. It is voluntarily deployed by the player and fires or moves into Fisticuffs in that turn whilst playing an Ambuscade card. If this card is played the player may move his blind 6” in any direction at which point he will deploy the figures onto the table and launch his attack from that location. Troops who successfully perform an ambush with the use of an Ambuscade card will double the number of Shock points that they cause with their fire in that turn. 7.9 Chosen Man This man will be part of a Group of rifle-armed light infantry, noted for his skill. When present he may be called forward by a Big Man, at the cost of one Initiative dice, to undertake some act of marksmanship, such as targeting a Big Man. A Chosen Man may fire at a target with an enhanced chance of success. He rolls one dice, unmodified whatever the circumstances, on the fire chart using one range further than normal. For example a normal rifleman firing at 24” to 36” required 5 or 6 to hit. A Chosen Man will achieve that at range 36” to 48”, ignoring any cover. In the turn that this happens the rest of that Group may do nothing but watch in awe at such skill. A Chosen Man that rolls a 1 on his roll to hit has run out of finely milled gunpowder and my not attempt such an action for the rest of the game. 7.10 Tap Reload Rifle armed troops normally load more slowly than those with smoothbore weapons as well as choosing their targets with more care. This is reflected by giving troops who were noted marksmen a better chance of despatching a Big Man. They may, however, choose to opt for speed and simply tap-reload their weapons, without the use of wadding. As a long term plan this is poor as it causes damage to the rifling on their weapon, however in extremis it may be an attractive option. Rifle armed troops selecting that option reload quicker and fire as though Infantry of the Line with a musket. They will also revert to a D10 when rolling for any hits on Big Men. 7.11 Loading Service If a player commands a force of infantry where not all are able to see their target he may wish to instruct the surplus men to load and then hand the weapons to their comrades who are able to fire, in order to maximise firepower. In this case each man who has a loader may be considered to be loading at the cost of one Action Dice less than normal. 7.12 Picking on Big Men Naturally Big Men may choose to move independently of any Group. If this is the case they may not be fired on unless by a Chosen Man, however the enemy may attempt to capture them, recognising their worth as a potential source of inFormation or maybe for an opportunity of revenge! To capture a Big Man a Group must move to contact him. The Big Man may engage them in Fisticuffs, but if he loses or the dice are 4:1 in favour of his attackers he is considered overwhelmed and captured. Alternatively an opposing Big Man may challenge him to a duel in the hope of besting him in one-to-one combat.
SHARP PRACTICE Page 23 www.toofatlardies.co.uk
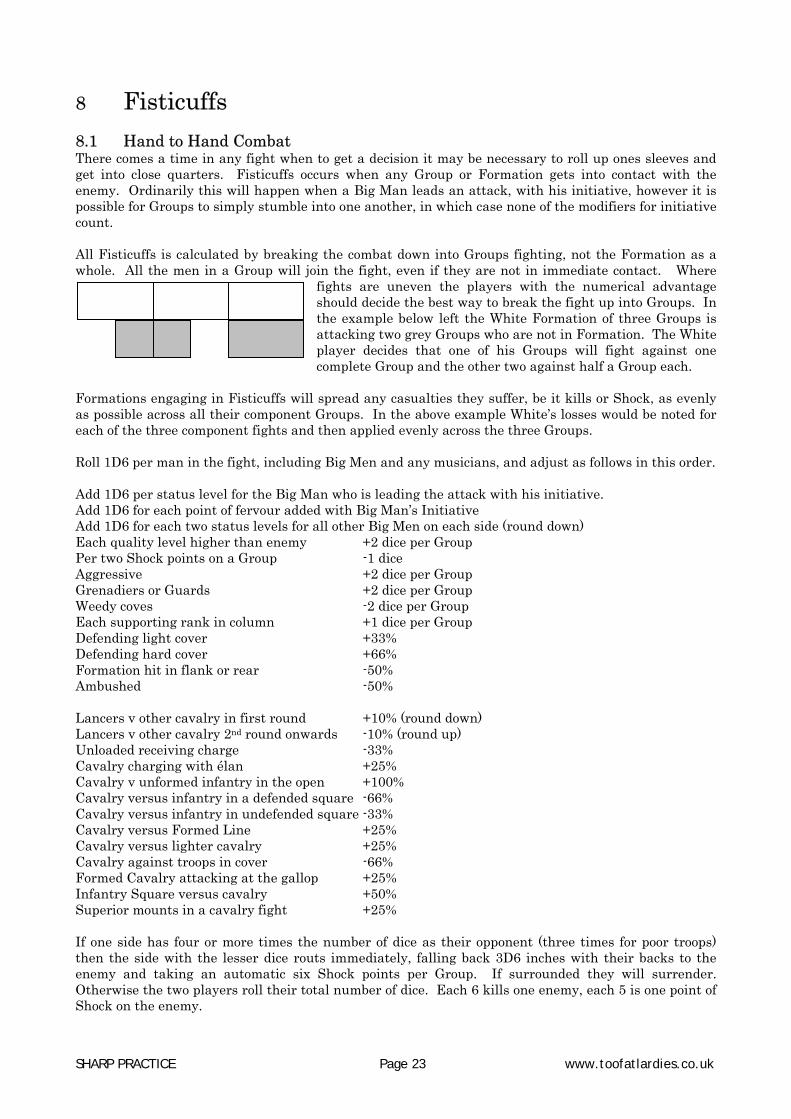
8 Fisticuffs 8.1 Hand to Hand Combat There comes a time in any fight when to get a decision it may be necessary to roll up ones sleeves and get into close quarters. Fisticuffs occurs when any Group or Formation gets into contact with the enemy. Ordinarily this will happen when a Big Man leads an attack, with his initiative, however it is possible for Groups to simply stumble into one another, in which case none of the modifiers for initiative count. All Fisticuffs is calculated by breaking the combat down into Groups fighting, not the Formation as a whole. All the men in a Group will join the fight, even if they are not in immediate contact. Where
fights are uneven the players with the numerical advantage should decide the best way to break the fight up into Groups. In the example below left the White Formation of three Groups is attacking two grey Groups who are not in Formation. The White player decides that one of his Groups will fight against one complete Group and the other two against half a Group each.
Formations engaging in Fisticuffs will spread any casualties they suffer, be it kills or Shock, as evenly as possible across all their component Groups. In the above example White’s losses would be noted for each of the three component fights and then applied evenly across the three Groups. Roll 1D6 per man in the fight, including Big Men and any musicians, and adjust as follows in this order. Add 1D6 per status level for the Big Man who is leading the attack with his initiative. Add 1D6 for each point of fervour added with Big Man’s Initiative Add 1D6 for each two status levels for all other Big Men on each side (round down) Each quality level higher than enemy +2 dice per Group Per two Shock points on a Group -1 dice Aggressive +2 dice per Group Grenadiers or Guards +2 dice per Group Weedy coves -2 dice per Group Each supporting rank in column +1 dice per Group Defending light cover +33% Defending hard cover +66% Formation hit in flank or rear -50% Ambushed -50% Lancers v other cavalry in first round +10% (round down) Lancers v other cavalry 2nd round onwards -10% (round up) Unloaded receiving charge -33% Cavalry charging with élan +25% Cavalry v unformed infantry in the open +100% Cavalry versus infantry in a defended square -66% Cavalry versus infantry in undefended square -33% Cavalry versus Formed Line +25% Cavalry versus lighter cavalry +25% Cavalry against troops in cover -66% Formed Cavalry attacking at the gallop +25% Infantry Square versus cavalry +50% Superior mounts in a cavalry fight +25% If one side has four or more times the number of dice as their opponent (three times for poor troops) then the side with the lesser dice routs immediately, falling back 3D6 inches with their backs to the enemy and taking an automatic six Shock points per Group. If surrounded they will surrender. Otherwise the two players roll their total number of dice. Each 6 kills one enemy, each 5 is one point of Shock on the enemy.

SHARP PRACTICE Page 24 www.toofatlardies.co.uk
8.2 Results of Fisticuffs Compare both sides' losses of dead (not Shock points) and refer to the list below: Draw: Fight again immediately. This occurs for a maximum of three rounds, after
which both sides retire 2” to take a breather, recommencing on any participating Big Man’s card if he so desires.
Defeated by 1: Thrown back 6” (12” for cavalry) facing your enemy, may act as desired. Defeated by 2: Thrown back 9” (18” for cavalry) facing your enemy, add a further two Shock
points. You may only fire in your next turn. Defeated by 3: Thrown back 12” (24” for cavalry) facing your enemy, add a further two Shock
points per Group. You may only fire in your next turn Defeated by 4 or more: Thrown back 18” (24” for cavalry), double the number of Shock points taken. If
no escape the survivors surrender. The winner allocates guards at 1 to 5 ratio. No movement or firing in the next turn.
Elite troops ignore a defeat by 1, and fight again immediately. Poor troops who lose will consider their defeat one level worse than it is, so a “defeated by 2” becomes “defeated by 3” and so on. Troops who are ambushed by their opponent playing the Ambuscade card and entering into fisticuffs will double the number of Shock points taken in the first round of the fight. European troops will never surrender to Wallahs as they know they’ll be sliced up like a kipper, they will fight on to the death. 8.3 Cavalry Charges A cavalry Group or Formation that is moving towards the enemy at the trot or gallop may, if they are not activated during a turn, choose to move on the Tiffin card. If they do so they will lose Formation and move as separate Groups. Any infantry Group or Formation that loses to cavalry and is Defeated by 2 or more will automatically rout 12". If the cavalry have taken less than 50% of the kills that the defeated infantry took then they are under control and may act as the player desires. If, however they took 50% or more kills than the infantry then they are out of control and will pursue, remaining in contact with the routers until they kill them all, drive them from the table, or are interrupted by other enemy troops entering into Fisticuffs with them. The routers continue to run at 12" per turn. 8.4 Fisticuffs in Buildings and Ships Buildings or large multi-decked ships must be captured one floor at a time. Any troops on the level of a building or deck of the ship that is being attacked may join in Fisticuffs to defend it. If they are defeated and a withdraw result is achieved then they may, if the structure allows, retire to a higher or lower floor or deck. This will, however, be limited to three men per turn if the only access is a ladder rather than a stairway. If no retreat is possible the rank and file will surrender whilst the Big Men may attempt to escape via acts of Derring-Do if they have access to windows or the likes. Troops defending a level of a building or ship against an enemy attacking from a different level, above or below, count as defending light cover if the enemy is attacking up a broad stairway, or hard cover if they are attacking up a ladder or narrow stairway. 8.5 Ladders in Attacks Ladders may be used to enter buildings and cross obstacles or move between decks or floors. A Group assaulting a wall with a ladder will use one action point to put the ladder in place. To climb the ladder takes one whole turn during which the men on it may not fire or spot. Up to three men may move onto the ladder in a turn. The lead man may engage any enemy at the top in fisticuffs. If the Group on the ladder are defeated any losses are taken from the top of the ladder downwards.

SHARP PRACTICE Page 25 www.toofatlardies.co.uk
If more than one ladder is used then the attacking player may choose to combine any of the men at the top of the ladders within 6” of each other into one fisticuffs attack. A defender at the top of the ladder has no restrictions on how many men may engage in fisticuffs other than their being able to be physically able to engage the enemy. Descending ladders is done at a rate of one storey per action dice. A maximum of three men may descend a ladder in one turn. 8.6 En Garde! Whilst gentlemen may engage in fisticuffs they may choose to challenge a foe to individual combat; a duel. They will only choose to do this against persons of a similar social standing. All officers are considered gentlemen, whatever their background. Civilians may only be considered gentlemen if born to that class. Money is a very poor indicator of class. Indeed a wealthy merchant is “in trade” and would be considered socially inferior to a poor gentleman farmer. A Duke, however, may not avoid the challenge of the lowest ranking commissioned officer without loss of face and prestige. In the heat of battle a duel will always be fought with swords rather than pistols. To initiate a duel the Big Man who’s turn it is will invite his opponent to fight man to man. The opposing Big Man may refuse, in which case his Status level is immediately reduced by one and remains reduced for the duration of the game (and campaign if one is being fought). The duel is fought to a conclusion immediately unless it runs over four rounds of combat, in which case both parties are considered to be having a breather. The duel may then resume upon either Big Man’s next card or one party may elect to run away, losing one Status level in the process. For each level of the Big Man’s physique roll a D6. Add an extra dice for an accomplished swordsman or reduce it by one for a Slasher. Now compare the results. Each 6 will reduce their opponent’s physique rating by one. When reduced to one point of physique a gentleman may admit defeat with his honour intact and may surrender his sword, being taken prisoner. A Big Man who’s physique is reduced to zero is dead. Whether killing his opponent or accepting his sword the victorious Big Man will see his status level immediately increase by one to a maximum of four. Cads and Bounders will think nothing of engaging an opponent in a duel and then ordering their henchmen to seize him, in which case the additional men join in a round of normal Fisticuffs, overpowering their opponent and capturing him if they win the Fisticuffs or the dice are 4:1 or more in their favour. Honourable, Chivalrous and Devout men would not do such a thing, however a Sanctimonious one can usually find a way to justify his actions. See Section 15. There may be times when a gentleman finds that he has no option but to fight in such a manner against foes from lower social orders. Naturally neither side will be obliged to have much regard for rules of gentlemanly conduct in such a situation. If obliged to fight an opponent from the lower orders the Big Man will fight with dice for his physique and swordsmanship whereas the low chap will get only one dice unless a Big Man, in which case he will be assumed to have a physique of 2 unless otherwise decided by the umpire.
SHARP PRACTICE Page 26 www.toofatlardies.co.uk
9 Tasks 9.1 Doing Things Literary tales seem often to be filled with “tasks” for our heroes to perform. This can be as simple as freeing a damsel from her corset to picking the lock of the Imperial treasure house. In all cases the format for achieving these tasks can be simplified by allocating a set numerical value. Each turn a Big Man or Group undertakes a task they will roll 2D6. The total rolled is noted and then when the cumulative reaches the required total the task is complete. No other task may be undertaken while working on a specialist task. Some such values are as follows: Set a mine: 11 Douse with spirits and light: 10 Light with no spirits: 26 Set up a beacon: 18 Crack a safe: 30 Pick a lock: 10 Open a window: 6 Open a window silently: 12 Remove a lady’s corset: 7 Remove own corset: 10 Break down a small door: 8 (+1 for each man over 3 in Group) Break down a large door: 12 (+1 for each man over 5 in Group) Break down a HUGE door: 24 (+1 for each man over 8 in Group, -1 for each man under 5) These are, of course, only a guide-line sample. The game designer may choose to allocate any numerical value he desires to any task. Some tasks may require the total to be reached in a single roll, in which case there is no cumulative tally kept. For example Sergeant Paisley attempts to lift a cannon barrel that is trapping the legs of a wounded officer. To achieve this Herculean act of strength the umpire decides that he must roll 11 or 12 on 2D6 in each turn that an attempt is made. Picking a pocket is another such example. 9.2 Carrying Bloomin’ Heavy Things Soldiers may at some point be called upon to carry items or people whose weight impedes their movement. This may be a looted grandfather clock, their wounded Captain or a drunken comrade. As a rule of thumb one man carrying such an item will move with -2 pips per movement dice. Two men sharing the load will move with -1 pip per movement dice. 9.3 Silent But Deadly The literary world of the nineteenth century is, for better or worse, populated by a significant number of ne’er-do-wells whose exploits have taught them skills that a God-fearing man would not credit. Picking pockets or locks, despatching a lone sentry silently are either the work of footpads who will end their days in Australia or heroic fellows, depending on their social status. Such men may be Big Men, or may be members of their Group who are called forth when required to undertake such a specialist task at the cost of one initiative point for their officer. Their skills can specifically be described as follows. 1. Silent but deadly. Specialise in silent killing, creeping about and snooping. May operate up to 9”
away from his Group or Blind, allowing him to creep up on his target to despatch him with a knife. Roll 2D6 on the Sneaky Actions chart below.
2. Bludger. Well versed in the art of the bludgeon or cosh. As above, but specialises in knocking out
rather than killing. Ideal for taking prisoners who may be less than willing. Roll 2D6 on the Sneaky Actions chart below.
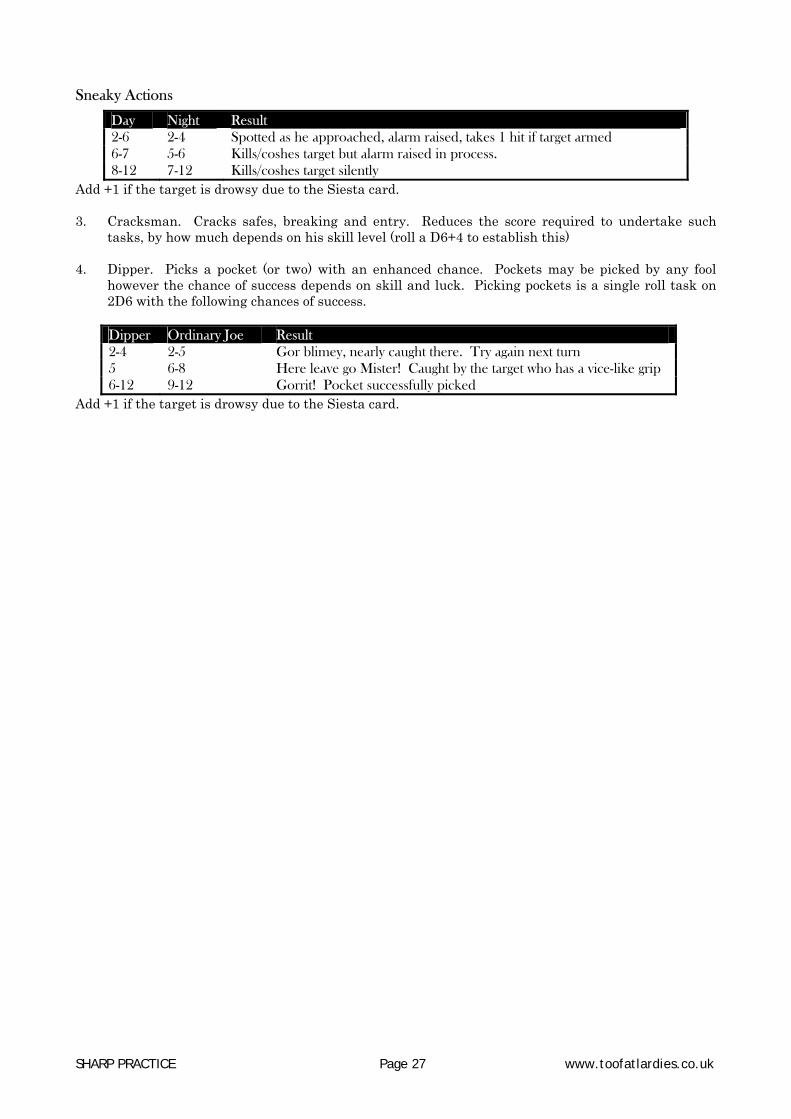
SHARP PRACTICE Page 27 www.toofatlardies.co.uk
Sneaky Actions
Add +1 if the target is drowsy due to the Siesta card. 3. Cracksman. Cracks safes, breaking and entry. Reduces the score required to undertake such
tasks, by how much depends on his skill level (roll a D6+4 to establish this) 4. Dipper. Picks a pocket (or two) with an enhanced chance. Pockets may be picked by any fool
however the chance of success depends on skill and luck. Picking pockets is a single roll task on 2D6 with the following chances of success.
Dipper Ordinary Joe Result 2-4 2-5 Gor blimey, nearly caught there. Try again next turn 5 6-8 Here leave go Mister! Caught by the target who has a vice-like grip 6-12 9-12 Gorrit! Pocket successfully picked
Add +1 if the target is drowsy due to the Siesta card.
Day Night Result 2-6 2-4 Spotted as he approached, alarm raised, takes 1 hit if target armed 6-7 5-6 Kills/coshes target but alarm raised in process. 8-12 7-12 Kills/coshes target silently

SHARP PRACTICE Page 28 www.toofatlardies.co.uk
10 Derring-Do Big Men may choose to engage in acts of Derring-Do, or they may be forced to do so, such as when their capture by the enemy is imminent. Largely what foolhardy enterprise they choose to embark upon will be thrown up by the game, however examples may be leaping from roof to roof, swinging from chandeliers, hurling themselves from speeding trains and generally attempting to avoid death through dangerous behaviour. It is impossible to legislate for every such act, however the umpire should consider what chances he things that the Big Man has and roll a D6 on the following table.
CHANCE DICE Good chance 2-6 Fair chance 3-6 Even chance 4-6 Poor chance 5-6 Slim chance 6
If they succeed then they live to fight another day. If they fail then the umpire must decide what damage they have taken. The Falls charts may assist him here. 10.1 Falls Big Men who fall can do anything from getting away scot-free to breaking their necks. Use the following tables to decide their fate based on whether they get a hard or soft landing. Falls onto hard ground
HEIGHT HARD LANDING SOFT LANDING Up to One storey Roll 1 dice No effect Up to two storeys Roll 2 dice Roll 1 dice Up to three storeys Roll 4 dice Roll 2 dice Up to four storeys Roll 6 dice Roll 4 dice Five storeys or more Dead Roll 6 dice
Roll the relevant number of dice on the table below.Apply the effects as in section 7.4.1.
Dice Effect 1-2 No effect 3-4 Light Wound 5 Badly Wounded 6 Dulce et Decorum est pro Patria Mori
Landings in water are considered safe provided there is sufficient depth. Rivers, lakes, ponds and sizeable water features are safe, lesser features, such as streams may be counted as either hard or soft landings as per the scenario.

SHARP PRACTICE Page 29 www.toofatlardies.co.uk
11 Affaire de Coeur Literary ladies seem to fall into two categories, those who are simply there to provide the hero with a “love interest” and those powerful women who present a threat. A Big Man may attempt to use his looks, charm and, God forbid, money to woo these ladies for his own ends. With the former this may be recreational, with the latter a smile and a wink could suffice to save his life. Either way his success will depend on several factors, his looks being foremost. How they manifest that interest will, undoubtedly, depend on the scenario and the ladies’ morals, but suffice to say that a lady will not kill, or have killed, a Big Man in whom she has an interest. Roll 2D6 and adjust as below to see if the lady concerned is interested. Big Man is a hideous freak -4 Big Man has a face like a pig’s backside -2 Big Man is no looker -1 Big Man is fair of face +1 Big Man is a Handsome Devil +3 Big Man is Charismatic +1 Big Man is a Strapping Fellow or Giant +1 Lady is happily married/engaged -2 Lady is no “lady” at all +3 Big Man is wealthy +2 Big Man is VERY wealthy +4 TOTAL RESULT 2-3 You vile toad! – You disgust her! 4-6 Most certainly not! – She hates you 7-8 No – Damn your impudence 9-10 Hmm… Well, she’s not killed you... 11 Rather! This lady is most certainly interested! 12 I say! Perhaps retiring to somewhere more private may be appropriate…
SHARP PRACTICE Page 30 www.toofatlardies.co.uk
12 Hello Sailor! If you seek a life in close proximity with other men, many of whom wear their hair in pigtails, where alcohol abuse and whips are all part of the daily routine (not to mention other unmentionable behaviour) then it’s the Royal Navy for you! Within Sharp Practice we are more concerned with the exploits of small groups of daring men who form the Naval Landing Parties or Pirates than the events on the open seas (see Kiss Me Hardy for more nautical fun with Ships of the Line!), as such the rules below are tailored for such chaps. 12.1 General Overview As a rule the men of the Navy, Marines or Pirates move, fight and spot just like their comrades on terra firma. The Marines may be considered more akin to musket armed Light Infantry as they are likely to be operating on their own initiative more than an Infantryman of the Line. They may, however, also choose to adopt Formations, unlike your run of the mill sailors. 12.1.1 Boats There are two main sorts of boats in Sharp Practice, Small Boats and Longboats. The former can carry a limited number of people depending on size, some of whom must row in order to propel the craft. As a guide a small boat may not carry any guns, will be propelled by two to six rowers and can then carry four more men. Very small craft, such as rowing boats may be as small as two rowers and just two passengers. Small boats have a strength of 8. Longboats may carry up to two Groups, one of twelve sailors to propel it, and one of twelve as passengers. In addition they may carry two Big Men. Longboats can be unarmed or armed with a cannon, usually a 6pdr or smaller, a light carronade, usually an 18 pdr, or swivel guns. Longboats have a strength of 12. 12.1.2 Boat Movement Boats moving under human propulsion will move at 3D6 inches with a full complement of rowers. If moving with the tide or flow of a river they will add +2 pips to each movement dice. If moving against the tide or flow they will subtract -1 from the dice. If moving across the tide they will drift one inch each turn in the relevant direction on the Tiffin card. If moving across a fast flowing river they will drift two inches per turn with the direction of the flow on the Tiffin Card. Getting in or out of boats takes one Action dice for nautical chaps, two for Landlubbers like soldiers. Oars may be muffled, clearly only appropriate at night, but this will reduce movement by one dice per turn. Boats moving with sails are outside the scope of these rules, however a glance at TFL’s Kiss Me Hardy rule set will suffice to outline the basics of such activities. 12.1.3 Spotting During the hours of daylight boats will be very easy to spot, whereas at night spotting becomes very difficult. In both cases boats will start the game represented by a blind each. Better quality sailors, Jolly Jack Tars, will get one dummy blind for each three boats, whereas poor sailors, Lubbers, will get only one dummy blind for their entire force. These dummies may be moved and spot as normal but will be removed from play once spotted. 12.1.4 Shooting at Boats Infantry firing at boats will hit the crew, treating them as in light cover as the craft will provide some minimal cover whilst the boat moving about on the water will make aiming difficult. Artillery firing at boats will fire as normal but will only hit their target if they roll more 6’s than 1’s, otherwise the shot is considered to have fallen harmlessly in the water. If an artillery piece does hit a boat then casualties are calculated as normal. Another D6 is then rolled to see what damage the boat has taken. The total rolled is deducted from the boat’s strength. When the boat’s strength total is reached or exceeded then the boat will sink.
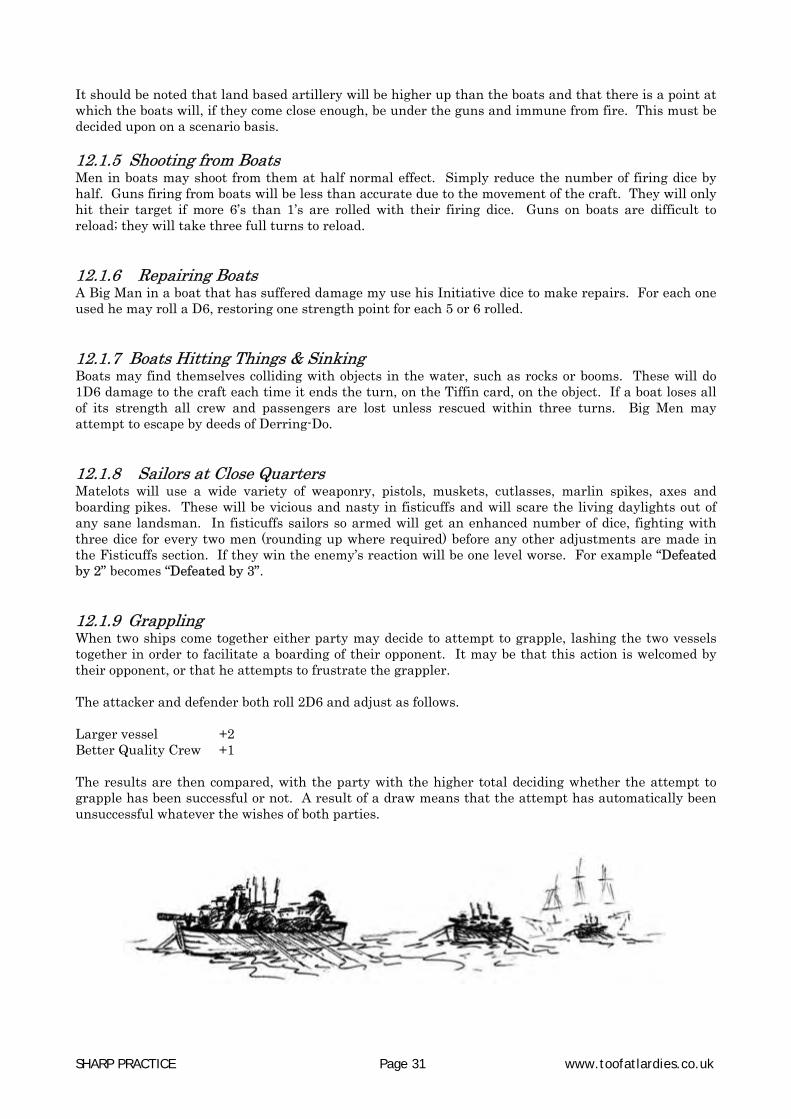
SHARP PRACTICE Page 31 www.toofatlardies.co.uk
It should be noted that land based artillery will be higher up than the boats and that there is a point at which the boats will, if they come close enough, be under the guns and immune from fire. This must be decided upon on a scenario basis. 12.1.5 Shooting from Boats Men in boats may shoot from them at half normal effect. Simply reduce the number of firing dice by half. Guns firing from boats will be less than accurate due to the movement of the craft. They will only hit their target if more 6’s than 1’s are rolled with their firing dice. Guns on boats are difficult to reload; they will take three full turns to reload. 12.1.6 Repairing Boats A Big Man in a boat that has suffered damage my use his Initiative dice to make repairs. For each one used he may roll a D6, restoring one strength point for each 5 or 6 rolled. 12.1.7 Boats Hitting Things & Sinking Boats may find themselves colliding with objects in the water, such as rocks or booms. These will do 1D6 damage to the craft each time it ends the turn, on the Tiffin card, on the object. If a boat loses all of its strength all crew and passengers are lost unless rescued within three turns. Big Men may attempt to escape by deeds of Derring-Do. 12.1.8 Sailors at Close Quarters Matelots will use a wide variety of weaponry, pistols, muskets, cutlasses, marlin spikes, axes and boarding pikes. These will be vicious and nasty in fisticuffs and will scare the living daylights out of any sane landsman. In fisticuffs sailors so armed will get an enhanced number of dice, fighting with three dice for every two men (rounding up where required) before any other adjustments are made in the Fisticuffs section. If they win the enemy’s reaction will be one level worse. For example “Defeated by 2” becomes “Defeated by 3”. 12.1.9 Grappling When two ships come together either party may decide to attempt to grapple, lashing the two vessels together in order to facilitate a boarding of their opponent. It may be that this action is welcomed by their opponent, or that he attempts to frustrate the grappler. The attacker and defender both roll 2D6 and adjust as follows. Larger vessel +2 Better Quality Crew +1 The results are then compared, with the party with the higher total deciding whether the attempt to grapple has been successful or not. A result of a draw means that the attempt has automatically been unsuccessful whatever the wishes of both parties.

SHARP PRACTICE Page 32 www.toofatlardies.co.uk
13 Wallahs Non-Europeans may, of course, field regular troops, indeed some forces, such as the Sikh Khalsa or the troops of Tippoo Sultan were extremely well drilled and fought in the European manner thanks to imported military advisors. These fight as regular troops rather than Wallahs. Wallahs are specifically local sorts in uncivilised non-European environments, such as Badmashes in India. They operate in Groups of up to a dozen or, if combined by a Big Man, in Mobs. Their size being limited to the numbers by the status of the Big Man commanding them; a level two Big Man may command up to two Groups, level 3 up to three, and so on. These bodies are known as mobs. Mobs cannot be commanded or controlled with musical instruments; they have no familiarity with the Terpsichorean muse. Often mobs will not have access to fire-arms, or at best will have a smattering of primitive pieces. In this case they will hurl rocks, furniture, tea pots or anything else they can get their thieving hands on up to a range of 9”. These weapons hit on a 6 on a D6. Their preference is, however, to get stuck in to fisticuffs where they fight as aggressive troops. Some Wallahs’ may have native weapons, for these see the section on Wallahs’ Weapons. If a mob is commanded by a Big Man who is killed the mob will continue in play for this and the next full turn in the hope of another Big Man turning up to command them. If none does then they will slope off back to the bazaar. If a lesser Big Man arrives then any numbers above the size mob he may command will desert him. Some lower orders in Europe may be considered as Wallahs. Wallahs are never gentlemen. 13.1 Wallahs’ Weapons Some Wallahs will have armed themselves with weapons available in their neck of the woods. These will operate as separate weapons teams or Chosen Men to be called forth from the ranks to exercise their speciality. Jezail The Jezail has an extremely long range and may fire at a target with an enhanced chance of success. The firer rolls one dice on the fire chart for Minie rifles. Light cover is ignored, for hard cover subtract -1 from the dice. Bows & Arrows Bows and arrows are used by teams of up to four men. They fire once for each action point expended counting as Muskets. Any hits roll on the following table for effect.
1-3 Near miss, no effect 4-5 Shock point 6 Kill
Blow Darts Often poisoned, these darts are fired by a man who is part of a gang of Wallahs, noted for his skill. When present he may be called forward by a Big Man, at the cost of one Initiative dice, to undertake some act of marksmanship. With a range of 12” they may fire once in a turn and hit on a 4-6. Men hit by poisoned darts will roll on the damage table with a +1. Big Men hit will do the same on their table. Big Choppers Close quarter weaponry such as scimitars, poleaxes and clubs have no ranged fire capability, but are particularly suited to fisticuffs. Groups so armed will add one additional dice per three men fighting, rounding up where necessary, before any other amendments are made in the fisticuffs section.

SHARP PRACTICE Page 33 www.toofatlardies.co.uk
14 Honest Injun North American Indians tend to be viewed in two ways in literature, either the noble savage that we see in Last of the Mohicans or the ignoble killer that dominates pulp fiction. Within Sharp Practice we leave the judgements to the scenario’s creator, however there are two sorts of Indians in the rules; the War Party and the Hunting Party. 14.1 War Party A War Party is made up of one or more Groups of Indians who are intent upon counting coup and setting about their foe with a vengeance. A War Party is typically a force that is fighting for a cause. This may be that of defending its own lands, following a charismatic leader or fired up with cheap whiskey (which is a pretty good cause in its own right!). A War Party will have three Action Dice per Group. A War Party may undertake an Ambush against any sized force and the player will begin the game with one Ambuscade card from the Bonus Deck in hand. A War Party will not be prone to looting until after a battle. 14.2 Hunting Party Maybe hunting for Buffalo, more likely loot, these Indians have little interest in dying for a cause, but they seek to enrich themselves at the expense of the palefaces. A Hunting Party would represent auxiliaries fighting for the white men, or a Group out to kill a few settlers and loot the wagons. These Indians have two Action Dice normally, however they do get an extra dice if they have achieved their objectives and are heading for home or are affected by the Bad Medicine card. A hunting party may only undertake an ambush against a smaller force. A Hunting Party is prone to Looting. 14.3 Indian Movement Indians are fleet of foot and add one pip to their movement dice in all situations. If, for example, they are moving through heavy terrain that would normally remove two pips per dice they will only lose one pip. 14.4 Indian Bonus Cards When Indians are involved the following cards are included in the Bonus deck. Bad Medicine – One card is included in the Bonus deck. When the Indian player draws this card, or his opponent plays it, the Indian Group that has lost the most men dead will retire directly from the table on its subsequent moves. It may only be stopped if it is contacted by a leader of its tribe that it recognises as being worthy of obeying. Vamose – Three cards are added to the Bonus deck. When played one Indian Group that is out of line of sight from an opponent may revert to Blind. Two blinds are used, one being the real one, the other a dummy. War Cry – Two cards are added to the Bonus Deck. When this card is played one enemy Group of the player’s choice within 18” will be struck with fear and have 1D6 wounds added. Limitiations Indians many not assume Formations. Indians fired on by artillery will double the number of Shock points inflicted. Indians are very susceptible to looting.

SHARP PRACTICE Page 34 www.toofatlardies.co.uk
15 Creating Big Men There may be something to be said for making this section of the rules optional, however if we are to add an extra dimension to our games, thereby enhancing the enjoyment of the players, then I think that the rules here can provide a lot of fun and really personalise the characters that inhabit our wargames tables to reflect those literary heroes that we all enjoy. Big Men may, of course, be tailor-made to represent those literary characters, or they may be generated in a random fashion by using the steps below. Status First the Character’s status must be diced for. This may, to an extent, reflect his rank.
RANK DICE STATUS Major or Above 1, 2, 3
4, 5, 6 Jolly Good Chap Cock o’ the Walk
Captain 1, 2, 3 4, 5 6
Fine Fellah Jolly Good Chap Cock o’ the Walk
Lieutenant 1,2,3 4,5 6
Young Buck Fine Fellah Jolly Good Chap
NCO 1, 2 3, 4 5 6
Young Buck Fine Fellah Jolly Good Chap Cock o’ the Walk
Physique Each Big Man will have a physique rated between 3 and 6 as follows. Roll 1D6 Looks Whilst not much good on the battlefield a man’s looks may help him conquer in Affaire de Coeur. Roll 2D6 on the following table.
DICE LOOKS 2 Pretty Boy – Is that make-up he’s wearing?! 3,4 Handsome Devil – Hello ladies! 5,6 Fair of Face – A pleasant looking sort 7 Plain – remarkably unremarkable 8,9 No looker – It’s a shame, maybe some kind hearted girl will favour him? 10,11 Face like a pig’s backside – Only his mother could love him 12 Hideous freak – his mother sold him to a circus!
DICE PHYSIQUE RATING DESCRIPTION 1 3 A sickly cove 2, 3 4 An average stamp 4, 5 5 A strapping fellow 6 6 A giant of a man
SHARP PRACTICE Page 35 www.toofatlardies.co.uk
Popularity When you’re lying, dying on Afghanistan’s plains, will anybody care enough to help you? Roll a D6
DICE POPULARITY 1 Universally detested, no sane man would help you, even if they could 2 Disliked, however if you’re at risk the offer of a reward could bring help 3 You’ve never done anyone any harm, if there is little or no risk involved people
will help you 4-5 A popular cove, men will risk a degree of danger to assist you 6 Universally loved, men will risk death, or worse, to save you
Breeding A gentleman’s background can have a significant impact on his career. Clearly only officers have breeding. To establish the background of your Big Man roll 2D6
DICE RESULT 2 An urchin from the Orphanage, up from the ranks, no money, no influence,
avoids the officers’ mess as he is unsure which cutlery to use. 3, 4 New Money. A mill owner’s son. Rich as Cresus but with little or no
influence, and no breeding whatsoever. Only a gentleman due to his uniform.
5, 6 Nabob. The family fortune is less than 100 years old, mainly accrued selling slaves to the Fever Islands. Has an allowance from his father, but not rich.
7, 8 To the Manor Born. Old money. His family arrived with the Conquest, he has influence at Horseguards or the Admiralty. 33% chance of serious wealth, 33% chance of abject poverty.
9, 10 General’s Son. And grandson for that matter. Influence at Horseguards or the Admiralty is extensive but cash is not bountiful but allows for a comfortable life.
11, 12 Minor Royalty. Not quite sure where he stands in line to the throne, twenty-somethingth. Influence is taken as read, money in spades.
Swordsmanship Only gentlemen will have skills in swordsmanship. These may affect his chances of survival in a duel.
DICE ABILITY 1 A slasher 2-5 A fair hand 6 An accomplished swordsman
Horsemanship Equestrian skills can be a great asset. Roll a dice to establish the Big Man’s ability in the saddle. Cavalrymen will add +2 to the role.
DICE ABILITY 1 A novice in the saddle 2-5 Occasional horseman 6 An accomplished horseman
SHARP PRACTICE Page 36 www.toofatlardies.co.uk
Personality Big Mens’ personalities will dictate how they behave on the battlefield and what attributes or failings they suffer from. Roll 2D6 on the following table.
DICE PERSONALITY ATTRIBUTES FAILINGS 12 Cad 33% chance of one Lecherous+ one other 11 Bounder 33% chance of one Two 10 Chivalrous One None 9 Honourable One One 8 Honourable One None 7 Honourable None None 6 Honourable One None 5 Honourable One One 4 Chivalrous One None 3 Devout 50% chance of one None 2 Sanctimonious None One
Personalities Defined Cad May accept the sword of a bested foe, unless he is a challenger in an affaire de Coeur. He
may defend his own honour and his country’s flag if it suits him to do so. He may defend a lady’s honour only if he attempts to remove it himself afterwards. He will attempt to woo any attractive female, irrespective of her social standing.
Bounder A Bounder lacks any honour. He will never accept the sword of a bested foe. He may
defend his own or a lady’s honour and his country’s flag if it suits him to do so. Chivalrous He will always accept the sword of a bested foe. He will always defend his country’s flag,
his honour and that of any lady, whatever her social standing. Honourable Largely without faults, if he has any they are unknown to his comrades thus far. He will
always accept the sword of a bested enemy; always defend his country’s flag, his honour and that of any lady…unless he considers that it conflicts with his suppressed personality failing.
Devout He will always accept the sword of a bested opponent unless he is a Godless heathen. He
will always defend his country’s flag, his honour and that of any lady. Sanctimonious Will accept the sword of a bested opponent unless he is a Godless heathen or a terrible
sinner. In public he will always defend his country’s flag, his honour and that of any lady, but in private his personality failing will mean that he acts differently.
Personality Failings For each personality failing roll a D6 to select one of the following six options. Lecherous A lustful beast who will attempt to satisfy his carnal urges at every opportunity. Roll
2D6, adding +1 for a Naval Officer.
DICE PREFERENCE 2-9 A ladies man 10-11 Prefers male company 12+ Never leave unaccompanied in a farmyard

SHARP PRACTICE Page 37 www.toofatlardies.co.uk
Avarice Constantly seeking to increase his financial wealth. He cannot be trusted with money
and will sacrifice his honour for filthy lucre. Gluttony Who ate all the pies? This man would desert his post for a steak and kidney pudding.
He will suffer a -1 on all derring-do rolls and +1 on damage for any falls. Envy His jealousy of others many lead to his downfall. Or theirs! In each game he will be
jealous of at least one compatriot Big Man. Select whom by scenario or dice for it. He cannot be seen to sacrifice his honour, but if they meet a terrible end then so much the better.
Pride This man will refuse to allow any other to issue orders to the men he commands. His
men may not be influenced by the Initiative of other Big Men. Lush Rather too fond of the bottle, his actions are not always rational. In a duel he will fight
with one less dice than normal. If lightly wounded he will immediately fall asleep and may only be woken by the most senior officer on his side. For falls test with a -1.
Personality Attributes For each personality attribute roll a D6 to select one of the following six options. Charismatic A chap much liked by both sexes. This man is a natural leader, wit and raconteur. He
may use Grasp the Nettle cards of any level during the game. Lion Hearted As brave as a lion, this man never flinches in the face of the enemy. Men in the Group
that he is personally with will not lose their bottle until they receive twice the number of Shock points as they have men in the Group. He gets +1 for Derring-Do rolls.
Linguist A talented speaker of foreign tongues, fluent in many European languages and a
remarkable ability with Wallahs. Athlete Strong and agile, sometimes surprisingly so for his build. +1 on acts of Derring-Do
generally and +2 on acts of agility and strength. Man of Letters An incredible affinity with words and numbers, this chap is well read and his knowledge
is invaluable when it comes to intelligence work, engineering or solving other mental conundrums.
Countryman With a passion for field sports this chap is never happier than when riding to hounds (if
a gentleman) or observing God’s creatures and shooting them. He has a natural eye for the lie of the land, gets a +1 when spotting, is always an accomplished horseman and knows all about setting traps and following spoor.

SHARP PRACTICE Page 38 www.toofatlardies.co.uk
16 Optional Rules 16.1 The Devils Own Luck! Some characters seem to have the luck of the Devil, and in Sharp Practise this is represented by cards for the most prestigious characters. These cards are essentially “Get out of Jail Free cards” that the player may hold and use just once during a game, discarding it to the bottom of the bonus card deck. They may only be played when a Big Man is killed and will restore him back to life immediately. This is the bullet being stopped by the pocket Bible or the cigar case. 16.2 Silly Weapons In the pages of literary warfare we are sometimes faced with weapons that are, to say the least, out of the ordinary. One example would be the seven barrelled Nock’s Volley gun which, after rejection by the Royal Navy due to its propensity for breaking the shoulder of the firer, found it way into the world of literary heroes. More run of the mill examples are blunderbusses and fowling pieces which tended to be used by civilians Nock’s Volley Gun In order to fire such a weapon a character must be at least a strapping fellow, no-one else would be foolhardy enough to attempt such an action. The weapon would be slow to reload, each barrel requiring one initiative dice to load. When fired its effect should be calculated per loaded barrel (it may be fired partially loaded) as though each were a musket being fired by an Infantryman of the Line. For example a Sergeant firing a Nock with all seven barrels loaded would roll seven dice, requiring 5 or 6 to hit at up to 9” and 6 to hit between 9” and 18”. Blunderbus A blunderbuss is treated somewhat differently to other weapons in that it spreads its shot over a wide area. As such the firer selects an aiming point 9” away from himself and rolls 2D6. On a result of 2 to 5 the aiming point moves 2” to the left, on 6 to 8 it remains where it is, on 9 to 12 it shifts 2” to the right. It now fires creating a damage cone 9” long and 4” wide at it’s furthest point from the gun, 2” each side of the aiming point. Any figure in that cone takes one hit and rolls for effect with a -1 on the dice. Shotguns and Fowling pieces The standard weapon of the peasantry or impromptu weapon of the gentry, these are considered as line muskets with a maximum range of 12”. A gentleman will fire with a +1 on his dice. Rockets There are three types of rocket in Sharp Practice, Big, Standard and Little. Big ones are Congreve scale affairs, with Standard and Small ones being more in line with those used in China and India. Rockets are fired using launching troughs or stands that require one turns setting up and one turn to load. Little rockets are limited to 36 range whereas a Standard or Bug rocket will travel up to 60”. When a rocket is fired the target is declared. A D6 is then rolled for each 12” of the rocket’s movement, applying the result after that distance unless 4 is rolled when the distance to the point of impact is measured from the firer if in the first 12” of flight, or from the last 12” way-point rolled for.
DICE ADJUSTMENT 1 Rocket turns 90° left 2 Rocket veers 6” to the left 3 Rocket continues on course 4 Rocket moves 1D10+2” & explodes 5 Rocket veers 6” to the right 6 Rocket turns 90° right
SHARP PRACTICE Page 39 www.toofatlardies.co.uk
The rocket will keep moving until it explodes or completes its flight at the limit of its range at which point it will explode. A Big rocket has a blast radius of 4”, a Standard one of 3” and a Little rocket 2”. For a Big rocket roll 12 dice, for a Standard rocket roll 8 dice, for a Little rocket roll 6 dice. Hits are achieved on a 4, 5 or 6 with any Shock points doubled. Any Formation is broken. Any Group passed through by a rocket becomes unformed and take 1D6 points of Shock. For cavalry this Shock is doubled. 16.3 Foreign Johnnies It could be said (with some justification) that our literary heroes tend to come up against enemies who are, as a rule, less than kind. There is little point in our heroic officer from the 95th Rifles discovering that his arch-enemy is a chivalrous and honourable man who gives flowers to old grannies and sweets to urchins! In this case authors tend to fall back on the unwritten rule that Foreign Johnnies are deplorable bad eggs. If this is the case it may well be that an alternative Big Man generating system is required. Use the normal system but apply the following tongue-in-cheek changes. Breeding Foreign Johnnies have no breeding, they are normally of low moral standing and eat garlic for breakfast. Personality Big Mens’ personalities will dictate how they behave on the battlefield and what attributes or failings they suffer from. Roll 2D6 on the following table.
DICE PERSONALITY ATTRIBUTES FAILINGS 12 Chivalrous One None 11 Honourable One None 10 Honourable One One 9 Bounder One Two 8 Bounder One Two 7 Cad None Lust + two others 6 Cad One Lust + one other 5 Sanctimonious None One 4 Sanctimonious None One 3 Devout 50% chance of one None 2 Chivalrous None One
Personality Failings Whereas a stout Anglo-Saxon sort will attempt to suppress and hide his failings, Foreign Johnnies will boast openly of theirs and apply them with a despicable zeal. The exception here is the Sanctimonious foreigner who will still hide his failings, like the hypocrite he is. 16.4 Looting Any troops may be prone to looting when presented with the opportunity. Regular troops will not, in normal circumstances, stop to loot while they are in action. However if an enemy withdraws before them they may well turn their hand to it. Gentlemen do not loot openly, however they may discretely “liberate” items of worth or cash if it falls into their hands. A Group that is looting will immediately take 1D6 Shock points which represents a loss of order that their officers and NCOs need to overcome before getting them to function normally.
SHARP PRACTICE Page 40 www.toofatlardies.co.uk
Groups of irregulars, such as Wallahs or Indians, will take 2D6 Shock points if they are looting their game objective. For example, if a mob of Wallahs breaks into the Residency at Lootonistan as the British defenders withdraw each mob will take 2D6 Shock points as the capture of the Residency is their main objective. If they had simply stumbled on a chest of money, not their main objective, they would have taken only 1D6 Shock points. 16.5 Night Fighting To represent fighting at night we suggest that spotting is treated as significantly harder up to 18” and anything above that cannot be spotted unless illuminated. Illumination can come from several sources, ranging from a small lantern to a large burning carcass. As a guideline we suggest that a lantern will light an area of 4” radius, a carcass or bonfire will illuminate an area 12” around it with. Troops that are moving in illuminated areas are spotted automatically, troops who are stationary must be spotted as normal but with a -1 on the dice. Troops that fire at night will be placed on the table. Two Dead of Night cards will be added to the Bonus Deck. Firing at an enemy at night will be done with one third dice less than normal, this being removed after all other factors have been considered.

SHARP PRACTICE Page 41 www.toofatlardies.co.uk
17 Balancing Your Forces With Sharp Practice it is important to balance the forces deployed against the numbers and quality of Big Men in order to get a game that is enjoyable and sensible in it result. A force that is over-endowed with Big Men of great quality will find it too easy to remove Shock points and to perform acts out of all proportion to what their historical counterparts could have achieved. In order to achieve this correct balance the following table will act as a guideline for troops of all qualities fielding between one and six Groups.
Unit Type
Number
of Groups
1st Big Man
Grade
2nd Big Man
Grade
3rd Big Man
Grade
4th Big Man
Grade
5th Big Man
Grade
6th Big Man
Grade
Grasp the Nettle Cards
1 3 or 4 - - - - - 1 2 3 or 4 2 or 3 - - - - 1 3 3 or 4 2 or 3 2 - - - 2 4 3 or 4 2 or 3 2 2 - - 3 5 4 3 2/3 2 1 - 3
Elite Troops
6 4 3 2/3 2 1 1 3 1 3 - - - - - 1 2 3 2 - - - - 2 3 3 2 2 - - - 2 4 3 2 2 1 - - 2 5 3 2 or 3 2 1 1 - 3
Good
Troops
6 3 2 or 3 2 1 1 - 3 1 2 or 3 - - - - - 1 2 2 or 3 - - - - - 1 3 3 2 1 - - - 2 4 3 2 1 1 - - 2 5 3 2 1 1 - - 2
Regular Troops
6 3 2 1 1 1 - 2 1 2 - - - - - 1 2 2 1 - - - - 1 3 2 1 1 - - - 1 4 2 1 1 - - - 2 5 2 or 3 1 1 1 - - 2
Poor
Troops
6 3 1 1 1 - - 2 17.1 Grasp the Nettle Cards As can be seen above the number of Grasp the Nettle cards in the deck depend in the quality of the troops fielded. There should always be one such card in the deck for lowest Grade of Big Man in a force, with the next card being the Grade of the most senior Big Man, or second most senior Big Man for Elite or Good troops. After that other ranks may be added. 17.2 Bigger Forces? You can, of course, field larger forces that the six Group maximum covered in the above table. Indeed we see no reason why, if you have the space available, double that number may be fielded. If this is the case we would recommend always having a musician present and attached to the overall commander so that he may control the larger force. Increase the number of Big Men on a pro-rata basis.

SHARP PRACTICE Page 42 www.toofatlardies.co.uk
Appendix One
Step Sharply Napoleonic Drill Simplified
Napoleonic drill is, to say the very least, a complex affair. Fortunately for us the larger the unit gets the more complicated things becomes, so we, at the very bottom of the chain can restrict ourselves to drill in its simplest form. What follows is basic indeed and players who take pleasure in representing this are should feel free to add their own ideas from the drill manuals of the period. Prussian & French Systems At the time of the French Revolution the drill practiced throughout Europe was based on the Prussian model of Frederick the Great, a formal system that made much of maintaining the relative positioning of units for the purpose of drill. In France, however, the revolution brought a fresh opportunity to assess tactics, and here the writings of the Comte de Guibert, an aristocrat who had died just before the Revolution but whose study of drill had been extensive, found favour. With hindsight it is astounding to see that the basic building block of the de Guibert system of drill had not been adopted previously, for its simplicity is its key. The following diagram shows the relationship between the file and the rank (1a). The basis of Frederican Prussian drill is seen (1b) with an open column advancing with equal distance between the elements, allowing it to turn rapidly from column of march into line Formation by simply wheeling (or turning in the parlance of the period) the elements to the left flank, forming a line (1c). We must be quite specific here, as the relative positioning of a unit had to remain constant. In the Prussian drill system the lead element always had to be at the head of the column and on the right of the line, restricting such a turn into line to the left and not the right. Hence the famous manoeuvre at Leuthen where Frederick deployed across the face of the Austrians, seemingly dangerously in column but ever-ready to swing into line at a moments notice.
Successful as this manoeuvre could be, and Frederick certainly believed in it, the weaknesses are clear. The column cannot deploy to the right, for fear of disordering the component elements that have been trained to fight in one very specific order. The net result was that against an enemy with any more vigour than the Austrians the Prussians were forced to deploy their forces early due to the complex manoeuvres in all but the simplest “left turn” option. The simplest analogy is that this is a car that can only turn left.
Rank File
Frontage equals distance between elements of the column
1a 1b 1c
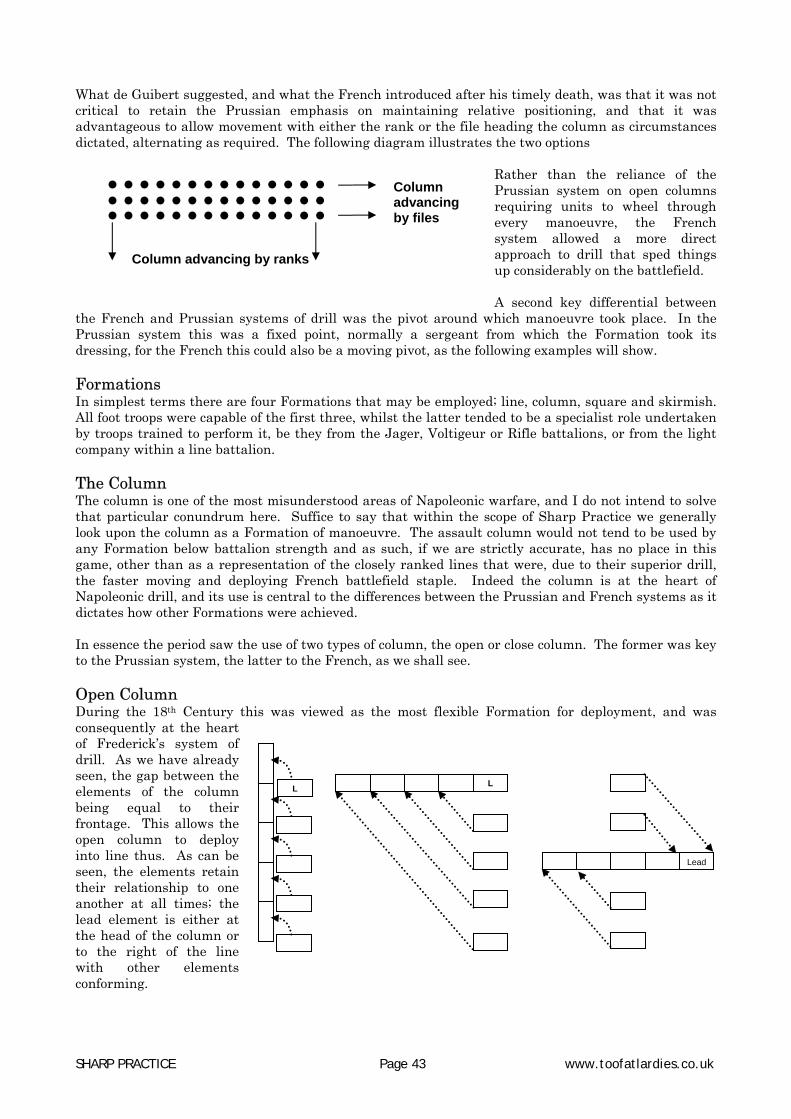
SHARP PRACTICE Page 43 www.toofatlardies.co.uk
What de Guibert suggested, and what the French introduced after his timely death, was that it was not critical to retain the Prussian emphasis on maintaining relative positioning, and that it was advantageous to allow movement with either the rank or the file heading the column as circumstances dictated, alternating as required. The following diagram illustrates the two options
Rather than the reliance of the Prussian system on open columns requiring units to wheel through every manoeuvre, the French system allowed a more direct approach to drill that sped things up considerably on the battlefield. A second key differential between
the French and Prussian systems of drill was the pivot around which manoeuvre took place. In the Prussian system this was a fixed point, normally a sergeant from which the Formation took its dressing, for the French this could also be a moving pivot, as the following examples will show. Formations In simplest terms there are four Formations that may be employed; line, column, square and skirmish. All foot troops were capable of the first three, whilst the latter tended to be a specialist role undertaken by troops trained to perform it, be they from the Jager, Voltigeur or Rifle battalions, or from the light company within a line battalion. The Column The column is one of the most misunderstood areas of Napoleonic warfare, and I do not intend to solve that particular conundrum here. Suffice to say that within the scope of Sharp Practice we generally look upon the column as a Formation of manoeuvre. The assault column would not tend to be used by any Formation below battalion strength and as such, if we are strictly accurate, has no place in this game, other than as a representation of the closely ranked lines that were, due to their superior drill, the faster moving and deploying French battlefield staple. Indeed the column is at the heart of Napoleonic drill, and its use is central to the differences between the Prussian and French systems as it dictates how other Formations were achieved. In essence the period saw the use of two types of column, the open or close column. The former was key to the Prussian system, the latter to the French, as we shall see. Open Column During the 18th Century this was viewed as the most flexible Formation for deployment, and was consequently at the heart of Frederick’s system of drill. As we have already seen, the gap between the elements of the column being equal to their frontage. This allows the open column to deploy into line thus. As can be seen, the elements retain their relationship to one another at all times; the lead element is either at the head of the column or to the right of the line with other elements conforming.
Column advancing by ranks
Column advancing by files
L
Lead
L

SHARP PRACTICE Page 44 www.toofatlardies.co.uk
1 2 3 4
Close Column The Close Column was, logically, a tighter Formation that without the French option of advancing by rank or file would be far less easy to deploy from, unless one was taking the option of forming a Closed Square of the Prussian model. Prussian troops would use this Formation only if they felt that they may need to very quickly defend itself against cavalry, in which case the open column would close up in anticipation of that, before deploying its outer ranks for all-round defence. As a norm, however, the Close column was generally used by the French or the British, the latter having simultaneously developed similar systems under the progressive patronage of Dundas (who, it must be said, saw personally what drill changes Frederick the Great was developing but that never were adopted due to his death) and other even more radical modernisers. For ease however we shall refer to the modern system as the French system. In the examples below only the French system could achieve the manoeuvres in the left and centre diagram, a Prussian column would be obliged to move into open column in order to achieve the same results due to the emphasis on maintaining the front rank as the lead in any manoeuvre.
The method of changing the direction of a column was also different under the two systems. With the Prussian system the column would wheel around a fixed pivotal point, whilst the French would use their rank and file approach to make the same change in a much quicker time. Below we look, in four stages, at a Prussian unit in open column making a 90º right hand turn.
This looks relatively simple. In each case the elements are making their turn around a fixed pivotal point and then, their facing changed to the new direction, they continue their march. What this fails to tell us is that while each element is making its turn the elements behind are bunching up as the distance travelled in the turn is greater, by some 50%, than the gap between the elements. In phases 2, 3 and 4 one can see the rear elements bunched up and waiting while the element
in front completes its wheel. What we also need to consider is that while the elements make this turn the ones that have preceded them are also having to mark time, as if they continued their march at normal speed the gaps between the elements would be extended above the regulation distance, so when they wheeled into line the formation would have significant gaps along its face between each element. All in all, a very slow process.

SHARP PRACTICE Page 45 www.toofatlardies.co.uk
1 2
The alternative is to make the change of direction in close column. Here too the Prussian and French systems are very different, as we can see at right. At first glance the two appear different in the way they are conducted, but not dissimilar in effort. This is, however, deceptive. The Prussians in example 1 maintain their front rank to lead the manoeuvre, as always, whilst in example 2 the French shift between rank and files to make the same turn. In the Prussian example there are, as with the open column example, lots of troops doing very little at any point in time while the ranks wheel around the fixed pivot. For the French the independence of movement allowed to the component elements of the Formation allow the change to be made much more quickly. A particularly graphic example of the differences between the two systems is to look at a diagrammatic representations of a Prussian Open Column and a French Close Column forming line of battle to the right of their current position. First the Prussian system.
Seven stages, of which only three can be performed at normal speed and, critically, this involves the famous Frederican left turn option that the Prussians are meant to be good at. They certainly cannot replicate this if they wished to deploy to the left of their original advance.
1 2 3 4
5 6
7

SHARP PRACTICE Page 46 www.toofatlardies.co.uk
Compare this with the French Close Column undertaking the same manoeuvre.
Very little needs to be said other than the French system was reckoned to be eight times as quick as that used by the Prussians who, like Britain after Waterloo, believed that the system used in the greatest successes must be infallible, and therefore preserved it even in the face of disaster. The ability to change between rank and file for deployment, combined with the independence of action allowed to the component elements, means that the entire process is completed much faster than the Prussian model. Indeed the French system allowed for a much more flexible approach to Formations and a faster deployment on the battlefield. The following diagram of the “Prompt Manoeuvre” is an example of that, where movement by rank and file are combined. The three lead elements in this example are throughout led by their front ranks, as shown by the solid arrows, whilst the forth, fifth and sixth elements change to column of files in quick step, dotted arrows, before reverting to ranks. The Line The infantry line of the Napoleonic wars was normally two or three ranks deep, depending on the doctrine of the army concerned and the manpower available. The very premise of the line was to achieve maximum delivery of firepower, and to achieve this frontage was considered the critical factor. As such even armies such as the French who preferred the denser Formation for the purposes of maintaining morals through mass would often use a two deep line in order to maintain their frontage, especially from 1813 onwards when the losses suffered in Russia the previous year meant that manpower was severely limited. Linear Tactics Here the differences between the Prussian and French systems would dictate what tactics a unit could use. Under both French and Prussian systems a line could advance directly forwards (example 1 below) or if it needed to adjust its positioning it could march in echelon at up to 45º (example 2). The advance in echelon may be no more acute than 45º from the perpendicular, anything more than that will require more complex evolutions of drill, as can be seen in 3 and 4. Example 3 is the French
1
2
3
4
5
1 2 4 5
4
3
2
1
5
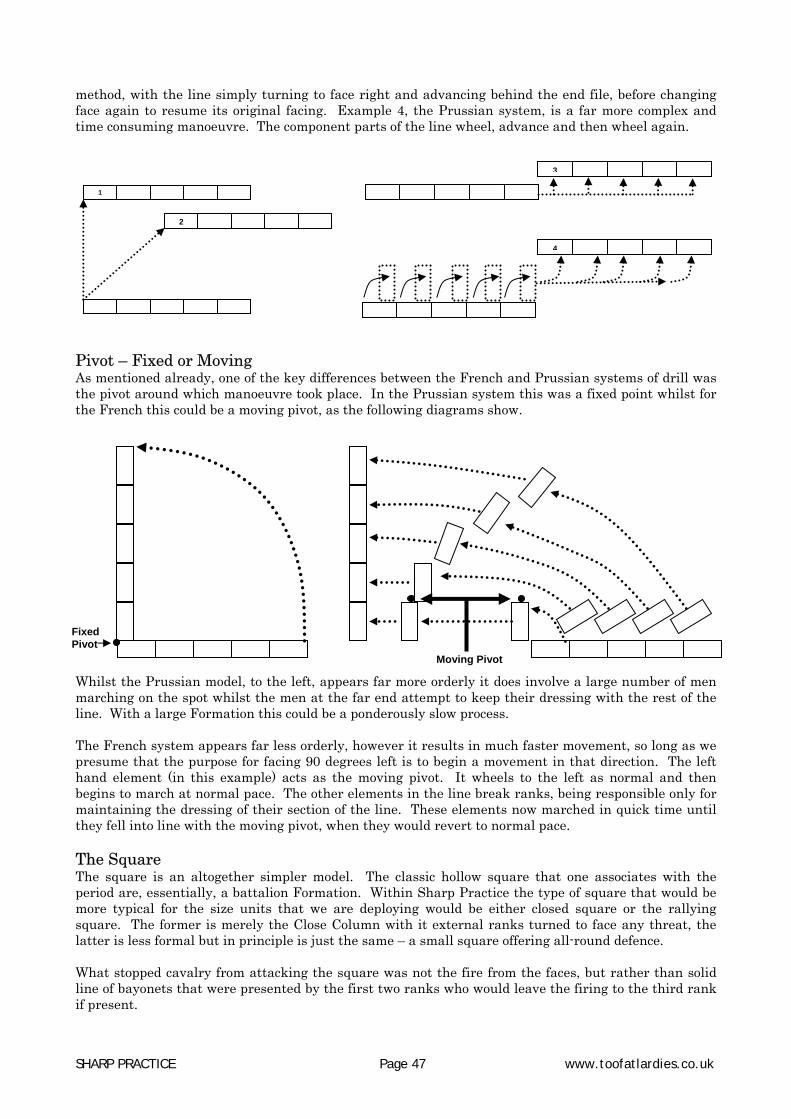
SHARP PRACTICE Page 47 www.toofatlardies.co.uk
method, with the line simply turning to face right and advancing behind the end file, before changing face again to resume its original facing. Example 4, the Prussian system, is a far more complex and time consuming manoeuvre. The component parts of the line wheel, advance and then wheel again.
Pivot – Fixed or Moving As mentioned already, one of the key differences between the French and Prussian systems of drill was the pivot around which manoeuvre took place. In the Prussian system this was a fixed point whilst for the French this could be a moving pivot, as the following diagrams show.
Whilst the Prussian model, to the left, appears far more orderly it does involve a large number of men marching on the spot whilst the men at the far end attempt to keep their dressing with the rest of the line. With a large Formation this could be a ponderously slow process. The French system appears far less orderly, however it results in much faster movement, so long as we presume that the purpose for facing 90 degrees left is to begin a movement in that direction. The left hand element (in this example) acts as the moving pivot. It wheels to the left as normal and then begins to march at normal pace. The other elements in the line break ranks, being responsible only for maintaining the dressing of their section of the line. These elements now marched in quick time until they fell into line with the moving pivot, when they would revert to normal pace. The Square The square is an altogether simpler model. The classic hollow square that one associates with the period are, essentially, a battalion Formation. Within Sharp Practice the type of square that would be more typical for the size units that we are deploying would be either closed square or the rallying square. The former is merely the Close Column with it external ranks turned to face any threat, the latter is less formal but in principle is just the same – a small square offering all-round defence. What stopped cavalry from attacking the square was not the fire from the faces, but rather than solid line of bayonets that were presented by the first two ranks who would leave the firing to the third rank if present.
2 1
3
4
Fixed Pivot
Moving Pivot

SHARP PRACTICE Page 48 www.toofatlardies.co.uk
Skirmish The development of the art of skirmishing was largely as a result of British experiences within North America where American light troops had taken on formed units in a way previously thought unfeasible. Indeed if one looks at the light infantry units of the eighteenth century in Europe one sees a force designed for the small actions of “Kleine Krieg”, rather than use in the larger pitched battles. By the 1790s this had changed. Now the light infantry were present in the main battles and with a very clear role to undertake. They preceded the more rigid Formations of the main battle line, covering their deployment in the initial stages of the battle, but their chief role was to win the battle for supremacy over enemy skirmishers, driving them back on their supports, and then threaten the enemy’s solid formations, wearing them down and unsettling them before the main lines contacted by sniping at their officers and NCOs and generally hampering their movement, command and control and morale. The fact that the skirmishers would generally cover the entire width of the battlefield also allowed them to seek out weaknesses in the enemy deployment and funnel that information back up the chain of command. Almost universally skirmishers operated in pairs, one remaining loaded while the other chose his target and fired. The roles would then reverse. In an advance the pair would take turns to rush forward, covered by their partner, largely preceding the modern infantry tactics of today. The intervals between the pairs differed from nation to nation, the French chose 15 paces, the Austrians 6 and the Russians officially worked from 5 but their troops had a tendency to bunch up even closer. In reality the terrain was the greatest decider on how they deployed, with use of cover being an important part of their doctrine. As a whole light troops were better trained in marksmanship than their comrades in the line who simply relied on mass to achieve their result. This is reflected in the firing tables in the rules, with longer ranges available to light troops to reflect this training. Historically they used this to great advantage, especially so the British Riflemen who were able to hit at their opponents long before the musket could challenge them. Formations were nebulous affairs within light Formations. The section under the NCO or officer being far more the tactical unit of necessity and choice in the open Formation. Within French service the Platoon broke down into three wings, the centre under a Captain was made up of 45 men who retained their bayonets fixed and acted as a rallying point for the force. The right and left wings both operated under the command of their Lieutenants and provided the main skirmishing force. They threw forward the 26 men of their first two ranks in skirmish order, whilst holding back their third rank as a formed reserve of 19 men, including the officer and his musician to relay orders. This third rank could provide reinforcements for the skirmish line. British skirmishers tended to be of two sorts, either the left flank Light company from a line battalion or specialist light troops from the Light Division or the Rifle Regiments. Either way their modus operandii in the set-piece battle was slightly different in battle to that of the French, largely due to the tactics employed by the Duke of Wellington. With the Duke’s emphasis on defensive tactics the British main line would tend to be deployed out of sight of their French opponents on a reverse slope of a ridge of hill, in order to confuse the enemy as to their position, and in order to avoid the worst of the enemy artillery fire. The British tended, therefore, to site their guns forward of the main line, on the crest of the hill or ridge, in order to fire down on any advancing French Formation and disrupt its progress. The roles of the light troops was, consequently, to defend the guns from French light infantry who would be pushed forward in an attempt to kill off the gun crews. They tended, therefore, to act more independently, with sections of ten men being the normal tactical sub-unit, three of such being commanded by an officer, sixty or so men in all making up the Company under its Captain. So typical was this battle plan that the Riflemen were allowed a very large degree of independence due to their familiarity with it. If threatened by enemy cavalry, for example, they were not expected to await any word of command, but were free to run back and shelter in the infantry squares as soon as the threat

SHARP PRACTICE Page 49 www.toofatlardies.co.uk
became apparent. Once the threat was removed they would resume their forward positions and continue as before. Cavalry The cavalry of the Napoleonic age was largely organised in an identical manner throughout the European nations. A Regiment was normally four squadrons, although losses could mean that this was reduced to three, each of which was theoretically between 75 and 250 men. Typically, however, 75 to 100 men was the norm. Some nations broke down the squadron into two groups, some into four, but as a rule the squadron on the battlefield operated as a whole unless smaller groups were deployed as outposts or patrols. A typical deployment of a cavalry squadron can be seen below. The whole squadron can be seen with the troopers arrayed in line of two ranks with the command elements shown by black dots. In detail we can see one quarter of the squadron with its officer and NCOs in position. Cavalry tactics are potentially even more confusing than those of the infantry, however for forces of the size likely to be employed in Sharp Practice this is greatly simplified by the fact that the squadron would normally operate in a two rank line at all times, with the smallest column width in battle being the half squadron or company. It is worth saying that the normal deployment for a larger cavalry force was either in line or echelon, the latter being considered preferable if a change of direction was thought likely.
Troopers Corporals Sergeant Lieutenant
Line Echelon

SHARP PRACTICE Page 50 www.toofatlardies.co.uk
Using Drill For Table-Top Formations When moving Groups that are in Formation the player will roll once for movement, with all Groups in the Formation moving that distance. If turning or wheeling the movement is measured for the figure that moves the furthest in the turn. A Formation that is contacted by the enemy whilst changing Formation will become disrupted, their Formation broken. When Groups join to make a Formation we recommend that they are deployed in ranks and files rather than in single ranks. So in the following Formation the Groups would form up thus: This structure presumes a three rank line however works just as well with two ranks. It allows the Groups to also form the manoeuvre elements in a column and is the most efficient structure for command and control. If taking the above example Group D was to break ranks, either advancing or retiring, Groups A to C would be left in Formation whilst Group E would be unformed and a single Group. The following Formations may provide the gamer with an indication of what manoeuvres his forces may undertake on the battlefield. We can assume that the player will be familiar with the basic line Formation, and that the way that moves and operates as a single entity needs no explanation, equally so with simple manoeuvres such as turning to face in order to retire. More complex drill may be utilised in order get the best results from moving your Groups and Formations. The following are a selection of Formations and drills that may be used. Groups complying with these formations are considered to be in Formation even when the drill dictates that they are not physically attached to other Groups in that formation.
Step One Step Two Step Three
Retire Firing in Line
Alternating elements about face, retire, the turn to face firing to cover the withdrawal of their comrades
A B C D E
Advance in Line firing by divisions Step One Step Two Step Three

SHARP PRACTICE Page 51 www.toofatlardies.co.uk
Column and Line Formation Changes
Lead Left face
Open column to line
Lead
Line to Close column
Lead
Line to Close column on centre May form on any element
Wheel, forward or back
Moving or Wheeling Sideways Advance or retire in echelon Echelon Change of position
Lead
Echelon Change of Position
Step One
Step Two
In Step two the unit may form line on any element it desires
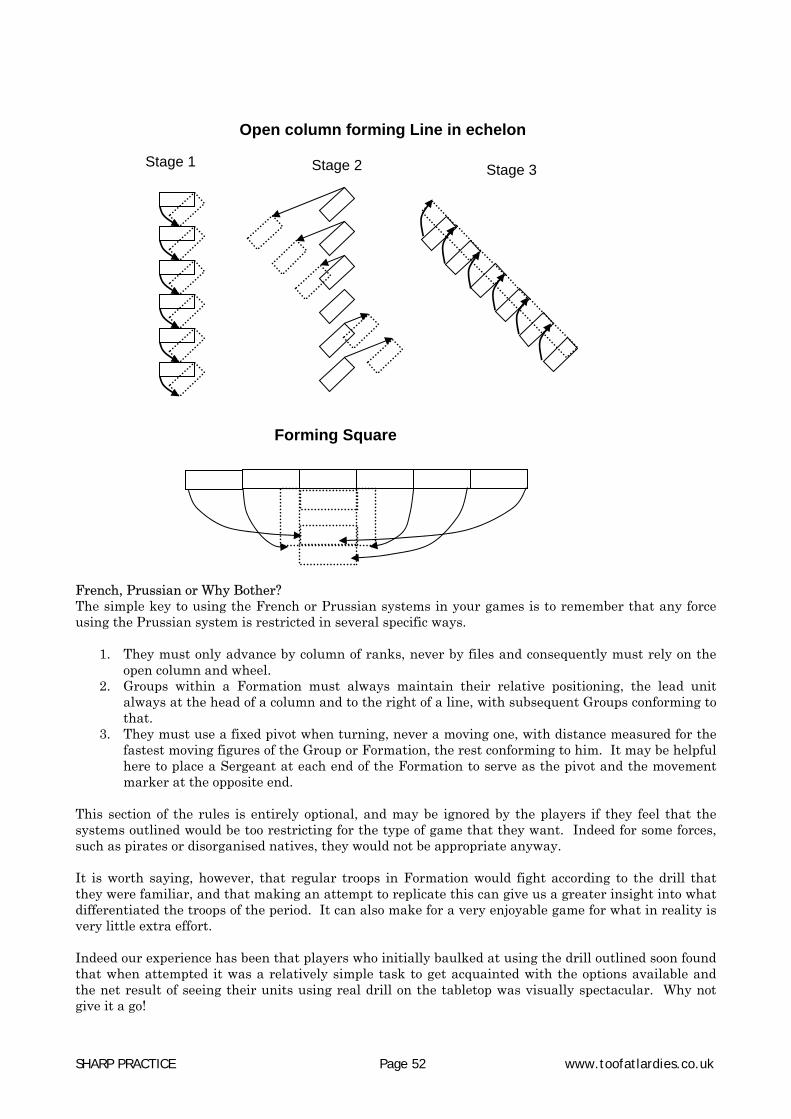
SHARP PRACTICE Page 52 www.toofatlardies.co.uk
French, Prussian or Why Bother? The simple key to using the French or Prussian systems in your games is to remember that any force using the Prussian system is restricted in several specific ways.
1. They must only advance by column of ranks, never by files and consequently must rely on the open column and wheel.
2. Groups within a Formation must always maintain their relative positioning, the lead unit always at the head of a column and to the right of a line, with subsequent Groups conforming to that.
3. They must use a fixed pivot when turning, never a moving one, with distance measured for the fastest moving figures of the Group or Formation, the rest conforming to him. It may be helpful here to place a Sergeant at each end of the Formation to serve as the pivot and the movement marker at the opposite end.
This section of the rules is entirely optional, and may be ignored by the players if they feel that the systems outlined would be too restricting for the type of game that they want. Indeed for some forces, such as pirates or disorganised natives, they would not be appropriate anyway. It is worth saying, however, that regular troops in Formation would fight according to the drill that they were familiar, and that making an attempt to replicate this can give us a greater insight into what differentiated the troops of the period. It can also make for a very enjoyable game for what in reality is very little extra effort. Indeed our experience has been that players who initially baulked at using the drill outlined soon found that when attempted it was a relatively simple task to get acquainted with the options available and the net result of seeing their units using real drill on the tabletop was visually spectacular. Why not give it a go!
Open column forming Line in echelon
Stage 1 Stage 2 Stage 3
Forming Square

SHARP PRACTICE Page 53 www.toofatlardies.co.uk
Appendix Two National Characteristics
Within Sharp Practice a system of national characteristics is used to differentiate between the various nations and their forces. The prime mechanism for this is the use of cards that are added to the Bonus Deck that are force specific and also the cards that the player may begin the game holding. For the forces of each nation we suggest the number and type of cards that are added to the deck, along with an explanation of what effect the card has. Additionally listed is the number of cards that the player may begin the game holding. Once the scenario has been explained the player may then choose any cards from the Bonus Deck that he may hold at the start of the game. These can then be played as and when the player sees fit. It is suggested that the players give some consideration to what they wish to achieve with regards their objectives and then choose their cards accordingly. In addition to the Bonus Cards we have attempted to give an indication of the organisation and strength of the units fielded by each nation. This can only be a guideline, especially when on campaign and losses meant that theoretical strengths became increasingly less relevant and commanders made do with what they had. We have also given guidelines to which drill system, French or Prussian, the nations used. Armed with the above the gamer should be able to field forces that are essentially realistic in their composition and representative in the way they act. Naturally some of the bonus cards conform to long established stereotypes, but these are only guidelines; the players should feel free to concoct their own ideas for Bonus Cards, especially scenario driven ones that can bring real individuality to your games.
Britain
There is much debate around the contribution that Britain and the Duke of Wellington made to defeating Napoleon. To some the British forces in the Peninsula were a constant sore that Napoleon ignored for too long at his cost. The victory at Waterloo was a masterful piece of soldiering by the Iron Duke and the stoic fortitude of the British redcoat made him unbeatable. To others the war in Spain and Portugal was a side-show, with the bulk of the fighting being done by the German nations and the Russians, indeed Waterloo itself was a victory for German soldiers, who rescued the Duke of Wellington and thereby seized victory. Whichever truth you choose to believe, what is clear is that the British provided some of the most consistently solid soldiers in Europe, both in the ranks and in command. Their proficiency with their muskets, and a drill system as progressive as that of France, allowed them to dominate the battlefields of the Iberian Peninsula and later Belgium. In the British Army the organisation was notably different from the European system. The battalion was typically commanded by a Colonel and comprised eight battalion, or ‘centre’ companies, one Light company and a Grenadier company. In theory the ten companies would total around 100 men each. but that was rarely, if ever, achieved. More typically companies fell to as low as half of that paper strength.
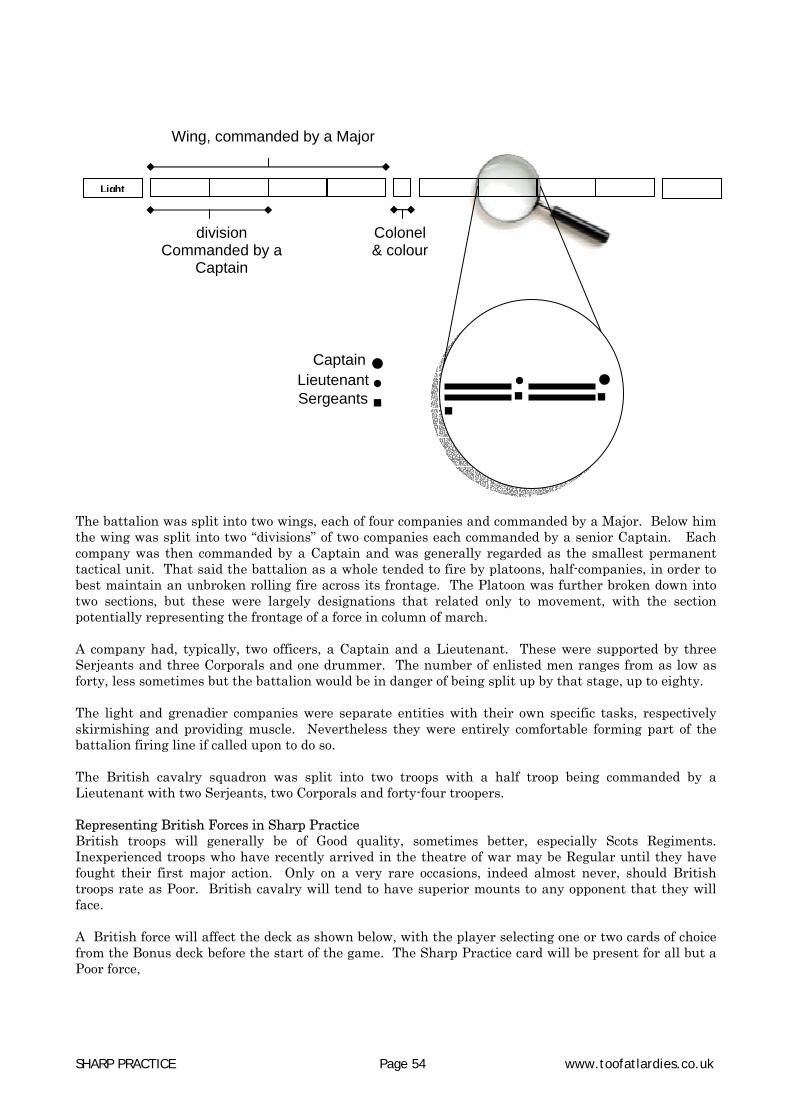
SHARP PRACTICE Page 54 www.toofatlardies.co.uk
The battalion was split into two wings, each of four companies and commanded by a Major. Below him the wing was split into two “divisions” of two companies each commanded by a senior Captain. Each company was then commanded by a Captain and was generally regarded as the smallest permanent tactical unit. That said the battalion as a whole tended to fire by platoons, half-companies, in order to best maintain an unbroken rolling fire across its frontage. The Platoon was further broken down into two sections, but these were largely designations that related only to movement, with the section potentially representing the frontage of a force in column of march. A company had, typically, two officers, a Captain and a Lieutenant. These were supported by three Serjeants and three Corporals and one drummer. The number of enlisted men ranges from as low as forty, less sometimes but the battalion would be in danger of being split up by that stage, up to eighty. The light and grenadier companies were separate entities with their own specific tasks, respectively skirmishing and providing muscle. Nevertheless they were entirely comfortable forming part of the battalion firing line if called upon to do so. The British cavalry squadron was split into two troops with a half troop being commanded by a Lieutenant with two Serjeants, two Corporals and forty-four troopers. Representing British Forces in Sharp Practice British troops will generally be of Good quality, sometimes better, especially Scots Regiments. Inexperienced troops who have recently arrived in the theatre of war may be Regular until they have fought their first major action. Only on a very rare occasions, indeed almost never, should British troops rate as Poor. British cavalry will tend to have superior mounts to any opponent that they will face. A British force will affect the deck as shown below, with the player selecting one or two cards of choice from the Bonus deck before the start of the game. The Sharp Practice card will be present for all but a Poor force,
Light
Wing, commanded by a Major
division Commanded by a
Captain Colonel & colour
t
LieutenantSergeants
Captain
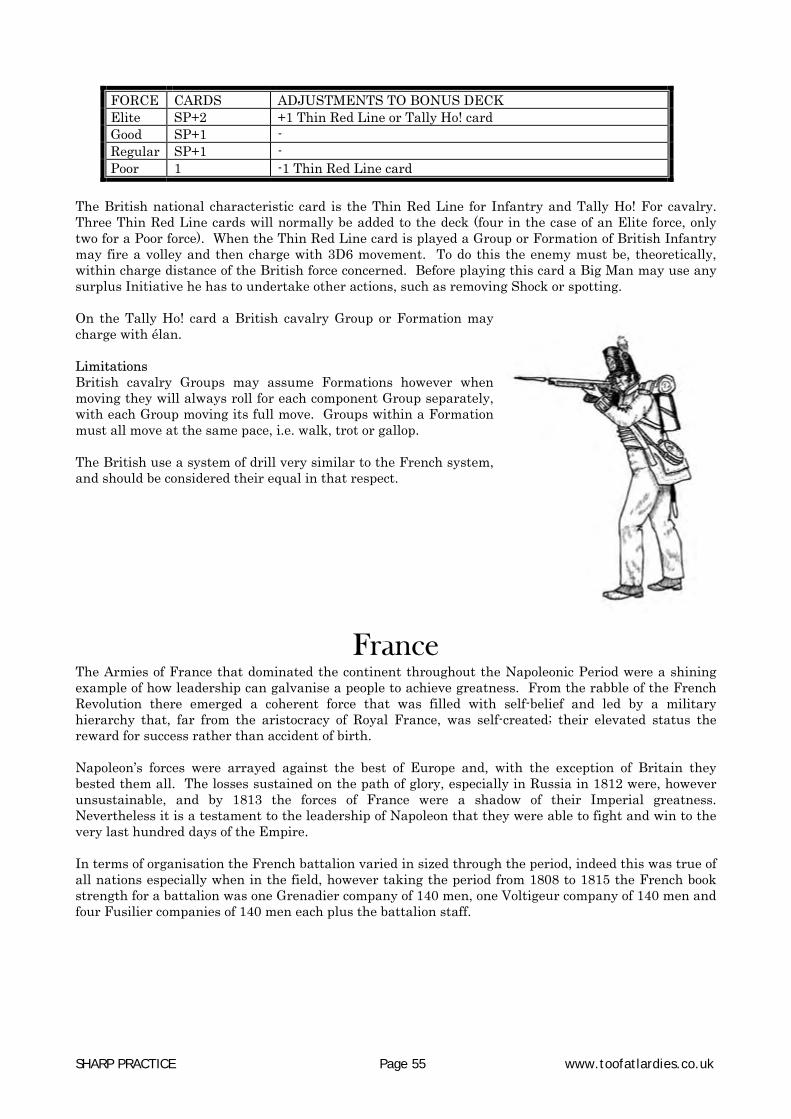
SHARP PRACTICE Page 55 www.toofatlardies.co.uk
FORCE CARDS ADJUSTMENTS TO BONUS DECK Elite SP+2 +1 Thin Red Line or Tally Ho! card Good SP+1 - Regular SP+1 - Poor 1 -1 Thin Red Line card
The British national characteristic card is the Thin Red Line for Infantry and Tally Ho! For cavalry. Three Thin Red Line cards will normally be added to the deck (four in the case of an Elite force, only two for a Poor force). When the Thin Red Line card is played a Group or Formation of British Infantry may fire a volley and then charge with 3D6 movement. To do this the enemy must be, theoretically, within charge distance of the British force concerned. Before playing this card a Big Man may use any surplus Initiative he has to undertake other actions, such as removing Shock or spotting. On the Tally Ho! card a British cavalry Group or Formation may charge with élan. Limitations British cavalry Groups may assume Formations however when moving they will always roll for each component Group separately, with each Group moving its full move. Groups within a Formation must all move at the same pace, i.e. walk, trot or gallop. The British use a system of drill very similar to the French system, and should be considered their equal in that respect.
France
The Armies of France that dominated the continent throughout the Napoleonic Period were a shining example of how leadership can galvanise a people to achieve greatness. From the rabble of the French Revolution there emerged a coherent force that was filled with self-belief and led by a military hierarchy that, far from the aristocracy of Royal France, was self-created; their elevated status the reward for success rather than accident of birth. Napoleon’s forces were arrayed against the best of Europe and, with the exception of Britain they bested them all. The losses sustained on the path of glory, especially in Russia in 1812 were, however unsustainable, and by 1813 the forces of France were a shadow of their Imperial greatness. Nevertheless it is a testament to the leadership of Napoleon that they were able to fight and win to the very last hundred days of the Empire. In terms of organisation the French battalion varied in sized through the period, indeed this was true of all nations especially when in the field, however taking the period from 1808 to 1815 the French book strength for a battalion was one Grenadier company of 140 men, one Voltigeur company of 140 men and four Fusilier companies of 140 men each plus the battalion staff.
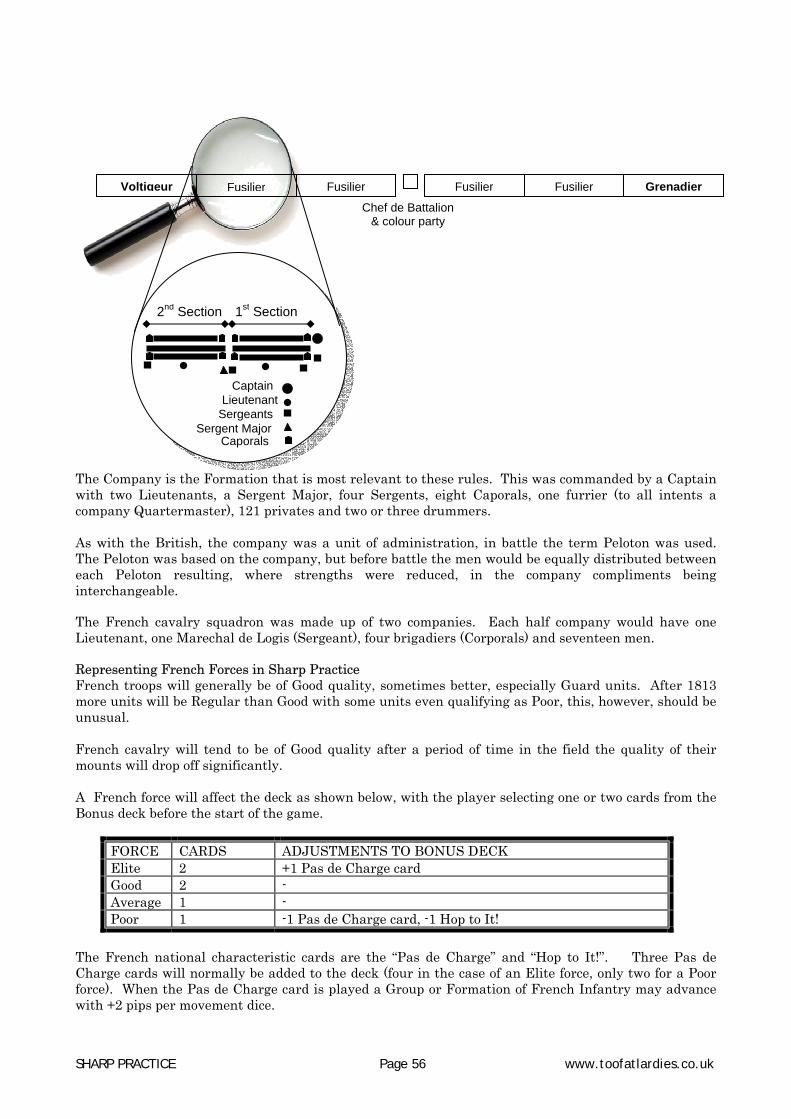
SHARP PRACTICE Page 56 www.toofatlardies.co.uk
The Company is the Formation that is most relevant to these rules. This was commanded by a Captain with two Lieutenants, a Sergent Major, four Sergents, eight Caporals, one furrier (to all intents a company Quartermaster), 121 privates and two or three drummers. As with the British, the company was a unit of administration, in battle the term Peloton was used. The Peloton was based on the company, but before battle the men would be equally distributed between each Peloton resulting, where strengths were reduced, in the company compliments being interchangeable. The French cavalry squadron was made up of two companies. Each half company would have one Lieutenant, one Marechal de Logis (Sergeant), four brigadiers (Corporals) and seventeen men. Representing French Forces in Sharp Practice French troops will generally be of Good quality, sometimes better, especially Guard units. After 1813 more units will be Regular than Good with some units even qualifying as Poor, this, however, should be unusual. French cavalry will tend to be of Good quality after a period of time in the field the quality of their mounts will drop off significantly. A French force will affect the deck as shown below, with the player selecting one or two cards from the Bonus deck before the start of the game.
FORCE CARDS ADJUSTMENTS TO BONUS DECK Elite 2 +1 Pas de Charge card Good 2 - Average 1 - Poor 1 -1 Pas de Charge card, -1 Hop to It!
The French national characteristic cards are the “Pas de Charge” and “Hop to It!”. Three Pas de Charge cards will normally be added to the deck (four in the case of an Elite force, only two for a Poor force). When the Pas de Charge card is played a Group or Formation of French Infantry may advance with +2 pips per movement dice.
Fusilier
2nd Section
Chef de Battalion& colour party
Lieutenant Sergeants
Captain
Fusilier Fusilier FusilierVoltigeur Grenadier
Sergent Major Caporals
1st Section

SHARP PRACTICE Page 57 www.toofatlardies.co.uk
Three Hop to It cards will be included (two for a Poor force) in the deck. On the Hop to It card a fleet-footed French Formation may change Formation at the quick march with one extra movement dice for the duration of the manoeuvre (not the turn, the entire manoeuvre). Before playing these cards a Big Man may use any surplus Initiative he has to undertake other actions, such as removing Shock or spotting.
Portugal Dragged into the Napoleonic Wars by Spain’s alliance with France, the Portuguese made every effort to resist Franco-Spanish aggression, looking to their old ally, Britain, for assistance. What the British found was an army in the shoddiest of states, with little discipline or backbone and virtually incapable of defending itself. Under patronage of British General Beresford the Portuguese Army was rebuilt, its officer corps stiffened with British officers from company level all the way up to the high command. This led to rapid improvements, with the infantry carving for itself an enviable reputation for bravery and aggression. The Portuguese model was originally based along similar lines to the Spanish, with four companies of Fusiliers, one of Cacadores and one of Grenadiers, however with the reorganisation of 1808 the structure changed, with eight companies of Fusiliers and two of Grenadiers forming a Regiment, there being deployed in two battalions, each of four companies of Fusiliers and one of Grenadiers. The Cacadores now formed light infantry battalions, no longer serving as an integral part of the line battalions. Each company would be commanded by a Capitão with one Tenente, two Alferes (Ensign), one Primo-Sargento, two Segundo-Sargentos, eight Cabos, two musicians and 126 enlisted men. They followed the British model deploying in two ranks and used the French system of drill after reorganisation.

SHARP PRACTICE Page 58 www.toofatlardies.co.uk
Representing Portuguese Forces in Sharp Practice Portuguese troops will generally be of Poor quality before Beresford’s reorganisation, after which Regular will be normal, increasing to Good towards 1812 onwards. Portuguese cavalry were consistently poor throughout the period, Poor or Regular at best A Portuguese force will affect the deck as shown below, with the player selecting one or two cards from the Bonus deck before the start of the game. After 1812 a Sharp Practice card may be added to the Game Deck for Cacadores units
The Portuguese national characteristic card is Fighting Cocks. Three Fighting Cocks cards will normally be added to the deck (four in the case of an Elite force, only two for a Poor force). The Fighting Cocks card is used when a Portuguese Group of Formation loses a round of Fisticuffs, reducing the effect of the loss by up to two levels. So a force that lost the Fisticuffs by one or two will keep fighting, one that loses by three with count as losing only by one. Prior to 1808 all Portuguese troops will have Poor Fire Discipline The Portuguese used the Prussian system of drill until their reorganisation after which they may use the French system.
FORCE CARDS ADJUSTMENTS TO BONUS DECK Elite 2 +1 Fighting Cocks Good 1 Average 1 Poor - Poor Fire Discipline, -1 Fighting Cocks
Coronel & Bandeira party
TenenteSargentos
Capitão
Fuzileiro Companhias
Grenadeiros Companhia
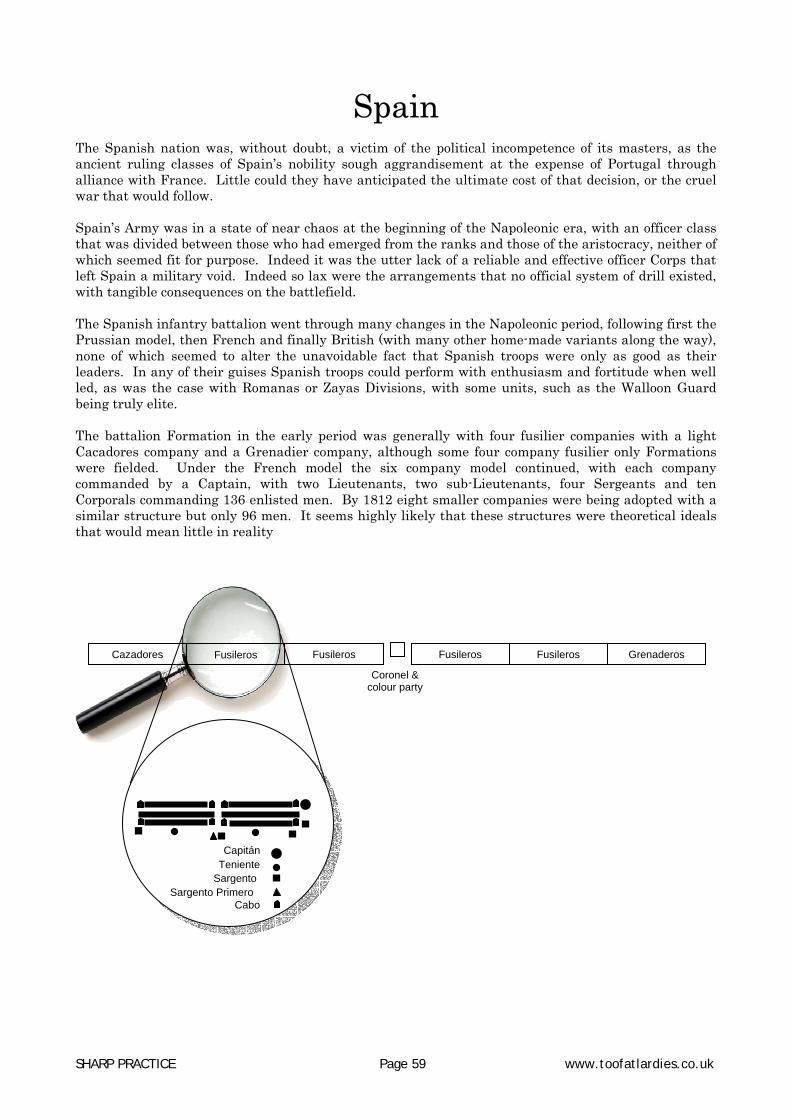
SHARP PRACTICE Page 59 www.toofatlardies.co.uk
Spain The Spanish nation was, without doubt, a victim of the political incompetence of its masters, as the ancient ruling classes of Spain’s nobility sough aggrandisement at the expense of Portugal through alliance with France. Little could they have anticipated the ultimate cost of that decision, or the cruel war that would follow. Spain’s Army was in a state of near chaos at the beginning of the Napoleonic era, with an officer class that was divided between those who had emerged from the ranks and those of the aristocracy, neither of which seemed fit for purpose. Indeed it was the utter lack of a reliable and effective officer Corps that left Spain a military void. Indeed so lax were the arrangements that no official system of drill existed, with tangible consequences on the battlefield. The Spanish infantry battalion went through many changes in the Napoleonic period, following first the Prussian model, then French and finally British (with many other home-made variants along the way), none of which seemed to alter the unavoidable fact that Spanish troops were only as good as their leaders. In any of their guises Spanish troops could perform with enthusiasm and fortitude when well led, as was the case with Romanas or Zayas Divisions, with some units, such as the Walloon Guard being truly elite. The battalion Formation in the early period was generally with four fusilier companies with a light Cacadores company and a Grenadier company, although some four company fusilier only Formations were fielded. Under the French model the six company model continued, with each company commanded by a Captain, with two Lieutenants, two sub-Lieutenants, four Sergeants and ten Corporals commanding 136 enlisted men. By 1812 eight smaller companies were being adopted with a similar structure but only 96 men. It seems highly likely that these structures were theoretical ideals that would mean little in reality
Fusileros Coronel &
colour party
Teniente Sargento
Capitán
Fusileros Fusileros Fusileros
Sargento Primero Cabo
GrenaderosCazadores
SHARP PRACTICE Page 60 www.toofatlardies.co.uk
Much of the hardest fighting in Spain was undertaken by Guerilla forces who represented the biggest threat to the French forces, tying down large numbers and damaging the morale of their enemy. Representing Spanish Forces in Sharp Practice Spanish regular troops in the early period will generally be of Poor quality, sometimes Regular, as will those serving in King Joseph’s Army. Throughout the period the quality of Spanish troops was dependent on the diligence of their commanders but by 1812 and onwards Spanish units could range from Poor to Good with Elite being a rarity. The Guerillas may be anything from Poor to Elite (the latter being extremely rare however) but may not operate in Formation. Poorer Groups of Guerillas, especially untrained civilians, may behave like Wallahs. A Spanish force will affect the deck as shown below, with the player selecting one or two cards from the Bonus deck before the start of the game.
FORCE CARDS ADJUSTMENTS TO BONUS DECK Elite 2 No Poor fire discipline Good 1 Troops may have poor fire discipline Average 1 Troops have poor fire discipline, +1 Poor Fire discipline card Poor - Troops have poor fire discipline, +1 Poor Fire discipline card
The Spanish national characteristic card is Ancient Relics (not a reference to their high command!). Two Ancient Relic cards will normally be added to the deck. When the Ancient Relic card is played one Spanish Big Man may double the number of Shock points that he removes as he flamboyantly brandishes the underpants of Santiago (or some other piece of dubious knitwear). The Spanish used the Prussian system of drill until their reorganisation along French lines in 1808 after which they may use the French system.
Prussian
The Prussian Army of Frederick the Great established a reputation for efficiency, discipline and, most important of all, winning. Indeed so proud were the Prussians of the model that they created they attempted to do all that they could to preserve it for future wars, resulting in an army that entered the Napoleonic Wars as a relic preserved from former times and, as was seen at Jena, unable to cope with the tactical developments that had left it behind. With the defeat of Prussia in 1806 the Prussians were obliged to reassess their methods and to rebuild their armed forces based on the concept of a citizen army, a Volk im Waffen, that allowed them to circumvent treaty agreements imposed on them by the French. They emerged in 1813 as a strong force, motivated by the desire for revenge, something they achieved completely in 1815.
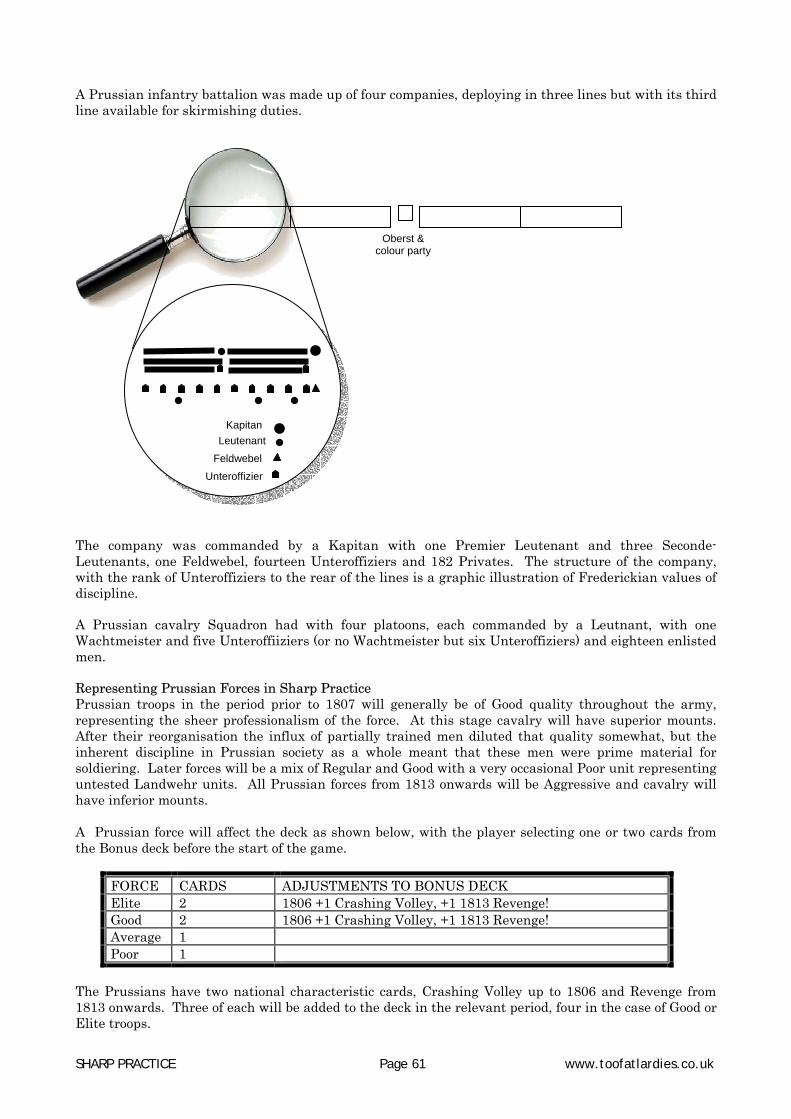
SHARP PRACTICE Page 61 www.toofatlardies.co.uk
A Prussian infantry battalion was made up of four companies, deploying in three lines but with its third line available for skirmishing duties.
The company was commanded by a Kapitan with one Premier Leutenant and three Seconde-Leutenants, one Feldwebel, fourteen Unteroffiziers and 182 Privates. The structure of the company, with the rank of Unteroffiziers to the rear of the lines is a graphic illustration of Frederickian values of discipline.
A Prussian cavalry Squadron had with four platoons, each commanded by a Leutnant, with one Wachtmeister and five Unteroffiiziers (or no Wachtmeister but six Unteroffiziers) and eighteen enlisted men. Representing Prussian Forces in Sharp Practice Prussian troops in the period prior to 1807 will generally be of Good quality throughout the army, representing the sheer professionalism of the force. At this stage cavalry will have superior mounts. After their reorganisation the influx of partially trained men diluted that quality somewhat, but the inherent discipline in Prussian society as a whole meant that these men were prime material for soldiering. Later forces will be a mix of Regular and Good with a very occasional Poor unit representing untested Landwehr units. All Prussian forces from 1813 onwards will be Aggressive and cavalry will have inferior mounts. A Prussian force will affect the deck as shown below, with the player selecting one or two cards from the Bonus deck before the start of the game.
FORCE CARDS ADJUSTMENTS TO BONUS DECK Elite 2 1806 +1 Crashing Volley, +1 1813 Revenge! Good 2 1806 +1 Crashing Volley, +1 1813 Revenge! Average 1 Poor 1
The Prussians have two national characteristic cards, Crashing Volley up to 1806 and Revenge from 1813 onwards. Three of each will be added to the deck in the relevant period, four in the case of Good or Elite troops.
Oberst & colour party
Leutenant Kapitan Feldwebel
Unteroffizier

SHARP PRACTICE Page 62 www.toofatlardies.co.uk
When the Crashing Volley card is played one Prussian Line Formation that is loaded may fire doubling the number of Shock points that it inflicts in that turn. When the Revenge card is played one Prussian Group of Formation may remove 1D6 Shock points. The Prussians used the Prussian system of drill until their reorganisation when they adopted the French system.
Austrian Empire The Austrians were throughout the entire Napoleonic period France’s most implacable enemy, seizing every opportunity to make war on what their ultra-conservative rulers saw as the evil of Republicanism. The Austrian Army was a mix of all of the subject nations that made up the Hapsburg Empire, each with its own traits and characteristics, which made their performance on the field of battle variable. In truth Austria’s chief failings were two-fold. Firstly the Prussian system of drill made their forces unwieldy and slow on the battlefield. Secondly the high command was hide-bound in its practices, and often overly cautious, however this was tempered to a degree by a young junior officer corps that was keen for change. An Austrian Infantry battalion was made up of six Fusilier companies in time of war, the Grenadier companies being sent off to form their own battalions.
Oberst & colour party
Leutenant Kapitan Feldwebel Corporals

SHARP PRACTICE Page 63 www.toofatlardies.co.uk
Each Company was commanded by a Hauptmann with an OverLeutnant, an UnterLeutnant an Ensign, two Prima Planna senior NCOs, a Feldwebel, six Sergeants, twelve Corporals, two drummers and 180 enlisted men. Hungarian Fusilier companies were somewhat larger at 200 men each, German and Hungarian Grenadiers companies at 120 and 150 men respectively. The Company was deployed in four Zugs as shown above. Austrian Jager companies ranged widely in size, from 60 to 200 men. Their first and second ranks were musket armed whilst the third rank had rifles. Austrian cavalry squadrons were, like their infantry companies, split into four Zuge ,each commanded by an Ober or UnterLeutenant with four NCOs and twenty troopers. Representing Austrian Forces in Sharp Practice Austrian troops throughout the period will generally be of Regular quality with a fair leavening of Poor and Good units and a few Elite. An Austrian force will affect the deck as shown below, with the player selecting one or two cards from the Bonus deck before the start of the game.
FORCE CARDS ADJUSTMENTS TO BONUS DECK Elite 2 +1 Stoic Stalwarts Good 2 Average 1 -1 Stoic Stalwarts Poor 1 -2 Stoic Stalwarts
The Austrian national characteristic card is “Stoic Stalwarts”, three of which will be added to the Bonus Deck, four if Elite, two if Average and one if Poor. When this is played any Big Man rallying a stationary Austrian Group of Formation may remove an extra 1D6 points of Shock. Additionally the Austrians may have a Hapsburg Hero among their ranks. At the start of each game roll a D6, on a 1 or 2 a single Hapsburg Hero card will be added to he Bonus Deck. When this is drawn an Austrian Big Man may chose one of the following bonuses.
1. Motivate his men to perform a Crashing Volley, doubling the number of Shock points inflicted. 2. Lead his men in a vigorous charge, adding one additional kill to the normal result and then
reducing the level of defeat or increasing the level of victory by one. Limitations Language differences between the Regiments of the Austrian Empire mean that a Big Man attempting to command troops from a different Regiment will double the usual number of Initiatives required. He will also roll a dice to see if he has been understood. On a 1,2 or 3 he fails to make himself understood and loses those Initiatives he used in trying.

SHARP PRACTICE Page 64 www.toofatlardies.co.uk
Russia At the time of the Napoelonic Wars Russia was a relatively young nation, its Empire even younger, but one seeking to establish its place high in the order of nations. Under a series of progressive rulers, from Peter the Great onwards, Russia sought to Europeanise its systems, albeit maintaining its vast serf peasantry in abject poverty. Despite their lowly status the peasantry provided a willing source of manpower for the Tsar’s armies, and fought with stoic bravery throughout the period. Indeed the leadership of generals such as Suvorov, coupled with the Russian winter, led them to defeat Napoleon’s Grand Armee inflicting losses so severe that this signalled the beginning of the end for the First Empire. Prior to 1810 a Russian Battalion had four companies of its own troop type, so a Musketeer battalion had four companies of Musekteers, a Grenadier one for our Grenadiers, and so on. After 1810 the organisation changed, with Jager, Musketeer and Fusulier battalions having three companies of those troops and one of Grenadiers.
When in line Formation the Grenadiers made up the right hand company. Each company was commanded by a Kapitan with a First Lieutenant (Poruchik), a Second Lieutenant (Podporuchik), an Ensign (Praporshchik), a Senior NCO (Feldfebel , 11 NCOs (Unterofitzery) and 141 enlisted men. This force was divided into two Platoons (vzvody). The Jagers theoretically skirmished like those of other nations, but there was a tendency for them to bunch up, somewhat negating the advantages of open order. A Russian cavalry squadron was made up of two polvzvody (Companies) each of two vzvody (platoons). In a platoon one Lieutenant was supported by four NCOs and 31 privates. Representing Russian Forces in Sharp Practice Russian troops throughout the period will generally be of Regular quality with some Good and Elite units.
Colonel & colour party
Leutenant Kapitan Senior NCO Junior NCO

SHARP PRACTICE Page 65 www.toofatlardies.co.uk
A Russian force will affect the deck as shown below, with the player selecting one or two cards from the Bonus deck before the start of the game. FORCE CARDS ADJUSTMENTS TO BONUS DECK Elite 2 +1 Card of Player’s Choice Good 2 Average 1 Poor 1 -1 Card of Player’s Choice The Russians have three national characteristic card, “vodka, “Icon” and “Stoic Serfs”, one each of which will normally be added to the Bonus Deck, (one extra if Elite, one less if Poor). When the Vodka card is played is is played any Group or Formation of Russian Infantry may advance towards the enemy with +2 pips per movement dice. When the Icon Card is played one Russian Big Man may double the number of Shock points that he removes as his padre displays an Icon. When the “Stoic Serfs” card is played any Big Man rallying a stationary Russian Group that has more Shock points than men remaining may remove an extra 1D6 points of Shock. Limitations Russian troops will not lose their bottle until they have double the number of Shock points that they have men. They will then act as normal depending on their quality.
SHARP PRACTICE Page 66 www.toofatlardies.co.uk
Example of Game Play
The Turn Sequence The umpire shuffles the cards ready to begin a new turn. The first card out is a British Grasp the Nettle Card of Level 2, this is set aside to be used by any subsequent British Big Man with a Status of 2 or more. The next card out is Sergeant Nobby Clarke who, as he only has a Status of 1 may not use the grasp the Nettle Card, he can consequently only activate the Group he is with using his one Initiative. The group shoots at the French in the barn with their first Action Dice and reloads with their second Action Dice. The next card out is Captain Roger Boyes RN. Boyes has a Status of 3, giving him three Initiatives. He may, however, use the Grasp the Nettle card that is in play, giving hi four Initiatives for this turn. He orders the two groups nearest to him to charge the French in the barn, adding two points of Fervour with the other two Initiatives. They enter Fisticuffs and drive out the Crapauds with terrible casualties. The next card is the Tiffin card. This signifies that any units that have not been activated may take their turn now. Two Groups of French in the orchard fall in that bracket and they now fire on Sergeant Clarke’s Group. The turn ends and the cards are shuffled again for the next turn. Big Men in Command Captain Hugh Jarce is keen to combine five groups of British red-coats into a Formation in order to get them to act in concert and benefit from the massed fire effect of a formed line. In the last turn he and several other Big Men got the Groups to move into position so that they formed a line. In this turn he will use his three Initiatives, as per his Status level of 3, to join three of the Groups together. Lieutenant Combes will use his two Initiatives to add a further two Groups to that formation. On the next turn Captain Jarce, as the senior officer present, will command the Formation. However with only three Initiatives he cannot command such a large body on his own. Fortunately he has a drummer with him who, on one of Jarce’s Initiatives, may issue one of the commands available from the list of drum commands. Jarce selects the “Advance” option and the whole Formation rolls two dice Action Dice and advances as one body. Whilst the Formation is maintained Lieutenant Combes and any other Big Men attached will only be able to use their Initiative to remove Shock from the Formation, representing their keeping the Formation dressed and effective. Breaking Formations Jarce’s Formation is up against a French line which it enters a fire-fight with. The French first volley kills some of Jarce’s men and inflicts six points of Shock on the Formation. There will be equally divided, giving four Group one point of Shock each and the fifth Group two points of Shock. Until the Shock is removed or reduced by the Big Men the Formation’s speed will be reduced by 2” when moving, i.e. it moves at the pace of the slowest Group. The fire-fight continues and Jarce’s Groups are reduced to just seven men apiece. The second Group from the right ends the turn with eight points of Shock which means that it has lost its bottle, and on the Tiffin card it must retire. Being Good troops they will fall back just 2”, however this is enough to break the formation. The three Groups to the left will remain in Formation, whilst the one that retired and the Group now isolated on its right will operate as individual Groups. They may, of course, be rallied and moved back into Formation, however this will use the Big Mens’ Initiative. As the Formation has been broken Lieutenant Combes and any other Big Men may move to rally these Groups and restore them to the line, but while doing so they cannot influence the Formation in any way.

SHARP PRACTICE Page 67 www.toofatlardies.co.uk
Movement Sergeant Petain is commanding a Group of 10 Voltigeurs. On the turn of his card he wants to move them across a ploughed field towards a wall where they may take cover and shoot at a British line. He uses his Initiative to activate his Group. The advance with two Initiative dice, rolling 3 and 5. They are Skirmishers so may add +1 pip to each dice, making the total 10”, however they ploughed field is heavy going, reducing their speed by -1 pip per dice, bringing the distance travelled down to 8”. Unfortunately they have one point of Shock from taking fire earlier and this reduces the total moved to 7”. Spotting Alferez Salazar is commanding two Groups of Cacadores in an olive grove just outside a Spanish village. His men are sheltering behind a small broken down stone wall. In the village Lieutenant Chirac (intent on European domination as usual!) is looking out of the upstairs window of the Inn. He is sure he saw movement in the olive grove that is 23” away and will use his Initiative to spot. Normally this would be a slightly obscured target requiring a roll of 7 or more on 2D6, however Salazar’s men are a Formation which makes them easier to spot (there are simply more of them so harder to hide) so that makes it a 6 required. But Chirac has a Status of 2 and is using both of his Initiatives to spot, so that gives him a further +1, and he is upstairs so he gets another +1 for being elevated. So he needs a mere 4 on 2D6. He spots Salazar and his men, but unfortunately he had used all of his Initiative this turn so he cannot activate his Group and get them to fire. They will have to wait for either another Big Man to activate them or for the Tiffin card before they can shoot at the Cacadores. Firing A group of eight Prussian infantry under Feldwebel Helmutt Rasche is advancing across an open field intent on attacking another Group of ten French line infantry. The French are, naturally, not keen on this idea so decide to open fire in the hope of persuading the Prussians to go away. There are ten men firing, giving them ten dice, and they are good troops so they gat an extra dice for every five men, so twelve dice. This is not their first volley but they are operating on the initiative of Caporal Mitterand who has a Status of 1, so they get an extra dice. So 13 dice in all. The Prussians are not in Formation, they are a single Group so can’t be (we assume all single groups are operating in a fairly loose formation) but they also don’t benefit from any cover. At a range of 9” the French will hit on 5 or 6 on each dice. They achieve 6 hits. The Prussian player now rolls to see the effect of the French firing. He rolls, 1,2,3,4,5,6 (amazingly) resulting in three points of Shock and one kill. This will reduce the Group’s movement by 3” and removed one dice from any firing (that would be two dice if there had been four points of Shock) until the shock can be removed. Next time Feldwebel Rasche might try avoiding open terrain. Fisticuffs Rather pleased with their firing Caporal Mitterand decides to charge the Prussians and finish them off. On his Initiative the ten French infantry rush forward with the bayonet (we assume that they are not fools and know when to attach bayonets and when to remove them). The French get eleven dice, one for each man and one for the Big Man. They get an extra dice for Mitterand’s Status of 1. With no spare Initiative the Caporal cannot add fervour, so that’s their lot, 12 dice. Rashe now has seven men, he lost one dead to the French volley. So the Prussian get eight dice including the Feldwebel’s. He does not have sufficient Status to add any further dice for being there, but the three points of Shock will remove 1 dice, and his men are not in any cover so their total is just seven dice. The French roll two sixes and two fives. The Prussians roll one six and two fives. The Prussians have lost two men dead and lost the fight by a net one 6, so defeated by one they are thrown back 6” and their level of shock is increased to 5. They roll a D10 to see if Feldwebel Rasche was a casualty – one a 1 he will need to roll on the Hits on Bog Men table – but he is safe. The French lose one man and have two points of Shock.

SHARP PRACTICE Page 68 www.toofatlardies.co.uk
Umpiring A successful skirmish game will rely more than anything else on a good umpire to elevate it from the run of the mill dice rolling exercise into something that really comes to life and, for the players and umpire alike, can be one of the most enjoyable forms of wargaming. The place to start here is the design of the skirmish. What we seek to create is a miniature world in which heroes can become the stuff of legends. Try to populate your world with the type of characters that your heroes can interface with in a suitable manner. Think ahead when planning your scenario. Who is likely to live in that Inn or that village? What would motivate them; greed, patriotism, alcohol, an un-natural desire to spend time with parrots? Just a short time spent sketching out even the briefest of backdrops for one or two characters will pay dividends in your games. Like the Big Men in your Regiments these villages will themselves need Big Men, not necessarily to fight, but to stand out whilst the general population will be less memorable. Think about why your handful of Riflemen are going to that village. Nothing happens without reason and in a literary world the reasons are generally exciting or important ones. You can add the extra ingredient by introducing friction between the characters, jealousy, greed, covetousness are all great starting points, however do remember that a game seasoned lightly with one Contessa will probably be more enjoyable than one swamped in half a dozen of them. The next real opportunity for the umpire is the running of the game. More than any other type of wargame the skirmish game calls upon the umpire to bring the game to life, rather like a Games Master in a role-playing game would do. Seek opportunities to add colour to your games, these are not just faceless soldiers waiting to die their miniature death, they are real people who will behave in the way that real people do. If a Private falls down drunk then there is no reason why you can’t use the tables in the Big Man character generation section to see how popular the Private is. Will his mates abandon him to the French or, despite the risks involved, will they seek to rescue him. One of the best ways we have found to add colour to our games is to link them together is the manner that an author would link a series of books. If, for example, the Rifles Captain commits an act of cowardice in one game then the next game will be his opportunity to regain his honour by an heroic deed. As our characters come up against their opponents they may find that time and again it is the same foe that thwarts their plans, and soon those individuals find that they may be fighting their own private battle against the backdrop of our games. Campaigns are always fun, but in this situation it is more often than not just as easy to keep things relaxed, continuing the next game with an on-going theme from the last, allowing the players to develop a relationship with the characters and the characters themselves to develop in their own way, as they ALWAYS do. Be warned, the Big Man that you will design to be a hero will usually end up an abject failure, whereas the ones that were there just to fill in gaps will emerge as huge characters in their own rights. Reward and penalise them by increasing or decreasing their Status is they perform consistently badly or well. However you play Sharp Practice do enjoy yourself. Please join us on the TooFatLardies Yahoo Group where we can answer any questions that you may have or discuss ideas for developing games further. Don’t forget our Summer and Christmas Specials will always have scenarios and add-ons for Sharp Practice as well as our other rule sets.
www.toofatlardies.co.uk

Mov
emen
t
FOR
MA
TIO
N
AD
JUST
ME
NTS
& L
IMIT
ATI
ON
S In
fant
ry C
olum
n +1
pip
per
dic
e In
fant
ry L
ine
As
per
dice
roll
Infa
ntry
Ski
rmis
h +1
pip
per
dic
e. M
ay a
lso
retir
e at
spe
ed w
ith o
ne
extr
a di
ce
Cav
alry
Wal
k A
s pe
r di
ce
Cav
alry
Tro
t +3
pip
s pe
r di
ce
Cav
alry
Gal
lop
Add
one
ext
ra d
ice
then
add
+3
pips
per
dic
e
Foot
A
rtill
ery
Lim
bers
M
ove
at c
aval
ry w
alk
spee
d.
May
Tro
t fo
r on
e tu
rn in
thre
e if
in d
ange
r H
orse
A
rtill
ery
Lim
bers
M
ay m
ove
at c
aval
ry W
alk
or T
rot s
peed
Spot
ting
TA
RG
ET
L
OC
AT
ION
/DIS
TA
NC
E
0-9”
9-
27”
27”
AN
D
OV
ER
In
the
Ope
n A
utom
atic
A
utom
atic
5
Slig
htly
obs
cure
d 6
7 8
Obs
cure
d 7
9 11
B
adly
Obs
cure
d 10
11
14
A
dd o
ne to
the
requ
ired
sco
re (M
ake
Har
der)
fo
r:
Ded
uct o
ne fr
om th
e re
quir
ed s
core
(M
ake
Eas
ier)
for:
Sp
otte
r un
der
fire
Spot
ter
elev
ated
T
arge
t sta
tiona
ry
Per
dic
e ta
rget
mov
ed th
is tu
rn
Tar
get o
bscu
red
by s
mok
e E
ach
addi
tiona
l dic
e us
ed fo
r sp
ottin
g
Tar
get i
s In
juns
Sp
otte
r is
a B
ig M
an
T
arge
t Mou
nted
Spot
ter
is a
n In
jun
T
arge
t is
a Fo
rmat
ion
Firi
ng
Lin
e T
roop
s
0-9”
9-
18”
18-2
7”
27-3
6”
36”+
M
uske
t 5-
6 6
- -
- B
aker
Rifl
e 5-
6 5-
6 6
- -
Min
ie R
ifle
5-6
5-6
6 6
- C
arbi
ne
6 -
- -
-
Lig
ht T
roop
s Sk
irm
ishi
ng
0-
12”
12-2
4”
24-3
6”
36-4
8”
Mus
ket
4-6
5-6
- -
Bak
er R
ifle
4-6
4-6
5-6
- M
inie
Rifl
e 4-
6 4-
6 5-
6 6
Art
iller
y P
iece
s
0-9”
9-
18”
18-2
7”
27-3
6”
36”+
L
ight
Gun
4-
6 4-
6 5-
6 6
6 H
eavy
Gun
3-
6 4-
6 5-
6 5-
6 5-
6 Sw
ivel
Gun
4-
6 5-
6 6
- -
Car
rona
de
2-6
4-6
- -
-
TR
OO
PS
AD
JUST
ME
NT
E
lite
+1 d
ice
per
four
men
firi
ng
Goo
d +1
dic
e pe
r fiv
e m
en fi
ring
A
vera
ge
No
adju
stm
ent
Poo
r -1
dic
e pe
r fiv
e m
en fi
ring
1-2
Nea
r m
iss,
no
effe
ct
3-5
Shoc
k 6
Kill
Firi
ng o
n a
Big
Man
’s In
itiat
ive:
A
dd 1
D6
for S
tatu
s le
vel
Eac
h tw
o Sh
ock
poin
ts :
R
emov
e on
e fir
ing
dice
Fi
rst v
olle
y:
A
dd tw
o fir
ing
dice
Fi
rer
is a
For
mat
ion
in L
ine:
+1 to
eac
h di
ce.
Targ
et is
a F
orm
atio
n in
line
:
+1 to
eac
h di
ce
Targ
et is
an
enfil
aded
line
or
colu
mn
Add
one
ext
ra d
ice
and
add
+1
to e
ach
dice
Ta
rget
is a
For
mat
ion
in s
quar
e A
dd tw
o ex
tra
dice
and
add
+1
to e
ach
dice
Ta
rget
in s
oft c
over
: R
emov
e ha
lf th
e di
ce (
roun
d up
for
odds
) Ta
rget
in h
ard
cove
r: R
emov
e th
ree-
quar
ters
of
dice
(r
ound
up)