1 / Sheet Metalworking Analysis DFM Concurrent Costing DFMA ® Boothroyd Dewhurst, Inc. Sheet Metalworking Analysis In this tutorial, we follow the steps used to create a turret press and a compound die analysis for the part modeled in the sample file sheet metal stamped part.dfmx included with your installa�on (\data\samples) of DFM Concurrent Cos�ng. A turret presswork analysis 1. Start a new analysis in DFM Concurrent Cos�ng. 2. In the Part Descrip�on panel, enter end plate for the Part name, press the tab key twice to move to the Life volume field. Enter 25000. Verify the Manufacturing profile is set to BDI North America. 3. For Envelope shape, choose the stepped block. Enter the dimensions as shown below. 4. With this data entered, click the Select process and material bu�on. 5. For the process choose the Sheet metal stamping category and the Turret press process. For material, choose Low carbon steel, cold rolled, commercial quality from the Carbon steel category. The process and material selec�on entries both show green indicators, meaning there are no prac�cal limita�ons. Click the OK bu�on to calculate some preliminary results.
Transcript
1 / Sheet Metalworking Analysis
DFM Concurrent CostingDFMA®
Boothroyd Dewhurst, Inc.
Sheet Metalworking AnalysisIn this tutorial, we follow the steps used to create a turret press and a compound die analysis for the part modeled in the sample file sheet metal stamped part.dfmx included with your installa�on (\data\samples) of DFM Concurrent Cos�ng.
A turret presswork analysis1. Start a new analysis in DFM Concurrent Cos�ng.
2. In the Part Descrip�on panel, enter end plate for the Part name, press the tab key twice to move to the Life volume field. Enter 25000. Verify the Manufacturing profile is set to BDI North America.
3. For Envelope shape, choose the stepped block. Enter the dimensions as shown below.
4. With this data entered, click the Select process and material bu�on.
5. For the process choose the Sheet metal stamping category and the Turret press process. For material, choose Low carbon steel, cold rolled, commercial quality from the Carbon steel category. The process and material selec�on entries both show green indicators, meaning there are no prac�cal limita�ons. Click the OK bu�on to calculate some preliminary results.
2 / Sheet Metalworking Analysis
DFM Concurrent CostingDFMA®
Boothroyd Dewhurst, Inc.
6. The focus on the Process Chart is now Turret pressworking and the Responses Panel on the right has default data from the Part Descrip�on panel and the Machine and Material libraries.
7. We are now going to replace some of the default informa�on used in the original es�mate to improve the accuracy of the results. In the Basic data sec�on, change the Batch size to 2500.
8. No�ce that an op�mal sheet size has been selected, with the number of parts per sheet calculated from the sheet size. The so�ware has also es�mated the unfolded length and width of the part.
9. We can more accurately define the fla�ened dimensions. In the Part basic data sec�on, change Unfolded length to 4.47; and enter 3.6 for Unfolded width.
10. Click the Calculate bu�on, to apply these changes to the Cost results box.
11. Note the next data box, Addi�onal setups, where the so�ware has specified an addi�onal machine setup, a press brake, to form the bend. We accept this, and move to the data box, Turret pressworking blank data.
Completing part geometry data1. To specify part geometry data, click the calculator bu�on located next to the appropriate field.
2. First we will define the area of the blank. Click the bu�on next to the Area of Blank field.
3. On the Shapes toolbar, click the rectangle bu�on to add the rectangular area to the Geometry Chart. Press the Tab key to accept the name. On the right panel, enter its dimensions, 2.25 and 4.47. Tab to move from field to field. Click the rectangle bu�on again, and enter the dimensions 1.35 and 4.47. No�ce the total area of 16.092 in the lower le� box. The checkbox indicates whether or not we want to transfer this data to the Responses Panel.
The Chart now looks like this:
3 / Sheet Metalworking Analysis
DFM Concurrent CostingDFMA®
Boothroyd Dewhurst, Inc.
4. Click OK. No�ce that the total area of the blank has been transferred from the calculator to the Area of blank field.
5. Now click the for the Perimeter punched field.
6. This calculator toolbar contains a set of bu�ons for inpu�ng lines, arcs and profiles. You can use the Group bu�on to organize shapes. For this rectangular part, click the toolbar bu�on Line-length specified 3 �mes, to add 3 line segments, to the Geometry Chart.
Enter the line length and repeat count for each entry as follows:
Line length Repeat
4.47 2
2.25 2
1.35 2
No�ce the perimeter totals have been calculated in the lower le� box.
7. Since we hadn’t entered any profiles, these checkboxes remain unchecked and will not be transferred. Click OK to transfer the Perimeter punched and Perimeter hits to the Responses fields.
8. To determine the area and perimeter of punched holes, click the next to Number of punched holes in the Turret pressworking features data group. In this calculator, add 3 entries for circular holes from the toolbar. The diameter and repeat count for each are as follows:
Diameter of hole Repeat
.24 2
.6 4
.16 2
4 / Sheet Metalworking Analysis
DFM Concurrent CostingDFMA®
Boothroyd Dewhurst, Inc.
9. Observe the totals for holes punched, including the number of holes, the area of holes and the number of punches required. In this example, all the holes are regular and can be created with standard punches. No custom punches are necessary. Click OK.
10. To complete the Geometry Calculator entries, click the next to the Number of bends in the Press brake 1 data group. Add a bend by clicking the bend bu�on (the only bu�on available) and entering the length of 4.47. Click OK.
The geometry specifica�ons are now complete for this part.
Updating the results1. On the Responses Panel, when the Turret pressworking is highlighted on the Process Chart, the data entered in the
Calculators has been transferred and locked so it will not change value when a Calculate is done. Here is the transferred data from the Area of blank and Perimeter punched geometry calculators.
2. Similarly, the data we calculated on the Punched holes and Number of bends calculators has been copied to the Turret pressworking features data box.
5 / Sheet Metalworking Analysis
DFM Concurrent CostingDFMA®
Boothroyd Dewhurst, Inc.
3. Click the Calculate bu�on to update the Cost results; the turret press por�on of the analysis is complete.
4. Change the name on the tab from Original to Turret. Double-click in the tab name to put it into edit mode, type and press the Enter key.
5. Save your analysis (File menu→Save.) Name the file by typing endplate new into the File name field in the Save dialog. Click the Save bu�on.
The setups for the turret pressworking analysisThe so�ware has automa�cally added two machine setups for comple�ng the cost analysis. Each of these setups and the opera�ons completed on them has response data which can be edited. No further changes are necessary for this part, but we will review one of the setups.
1. Click the Trumpf Truma�c TC2010R Turret Press on the Process Chart.
6 / Sheet Metalworking Analysis
DFM Concurrent CostingDFMA®
Boothroyd Dewhurst, Inc.
2. In the responses on the right panel you can edit the data for the turret press. No�ce that the first response, Machine selec�on, is a checkbox for Automa�c selec�on? of the machine.
This means that the so�ware automa�cally selects an appropriately sized machine from the Machine Library. The turret press chosen for this analysis was automa�cally selected by the so�ware because it was the least expensive turret press in the Machine Library that could process the 0.075 inch thick, 48 inch long by 36 inch wide sheet used to make the endplates.
3. The setup rates and �mes for this machine are set in the Load and unload sheet opera�on under the setup entry, shown on the next page.
Now we are going to change the sheet metal process type and do a cost comparison of the two processes.
A compound die analysis1. Make a copy of the turret press analysis (Click the tab. Edit->Copy, Edit->Paste)
2. A copy is created at the second tab of the Process Chart. Double-click the new tab and type Compound for the name and press the Enter key.
3. With Low carbon steel, cold rolled, commercial quality sheet metal part highlighted on the Process Chart, click the Select process and material bu�on.
4. In the selec�on window, in the Sheet metal stamping category, choose Compound die for the process. For the material, again choose the Carbon steel category, Low carbon steel, cold rolled, commercial quality.
5. Click the OK bu�on in the selec�on window. The Process Chart now appears:
7 / Sheet Metalworking Analysis
DFM Concurrent CostingDFMA®
Boothroyd Dewhurst, Inc.
6. The Compound die stamping process is highlighted on the Process Chart. There are three setups now: the separate bend forming setup is s�ll needed, and there is now an addi�onal power shearing setup for cu�ng the sheet into strips for processing.
7. No�ce on the Responses Panel that response fields common to both processes have been transferred from the Turret process to the Compound die stamping process. In the Part basic data box, the unfolded length and width of the part have been copied from the turret analysis. The addi�onal response, Processing direc�on, lets you indicate the part unfolded dimension that will lie along the strip length. The default Processing direc�on gives the op�mal part layout, which will result in maximum material u�liza�on.
8. In the Addi�onal setups box, the values from the turret analysis have been copied. We are going to make a change here, because of the different capabili�es with a stamping setup. Change the Press brake value to 0 and the Die bend forming value to 1. Click the Calculate bu�on. The so�ware has replaced the press brake setup with a 32 Ton Minster stamping press for the die bend forming opera�on.
9. In the next data box, Compound die opera�on data, the geometry values have been copied from the turret analysis.
10. With the Compound die stamping process s�ll highlighted on the Process Chart, we need to edit the Form bends 1 data box. Edit the Number of bends to 1; and the Length of bend lines to 4.47. When we switched to a die bend forming opera�on from a press brake, the so�ware did not assume the bend is the same. As with the other geometry features, it is not required that you use the Geometry Calculator to enter the dimension (or total dimensions) for the bends.
11. Click the Calculate bu�on to update the Cost results. Highlight the top entry on the Process Chart to see the total Cost results:
8 / Sheet Metalworking Analysis
DFM Concurrent CostingDFMA®
Boothroyd Dewhurst, Inc.
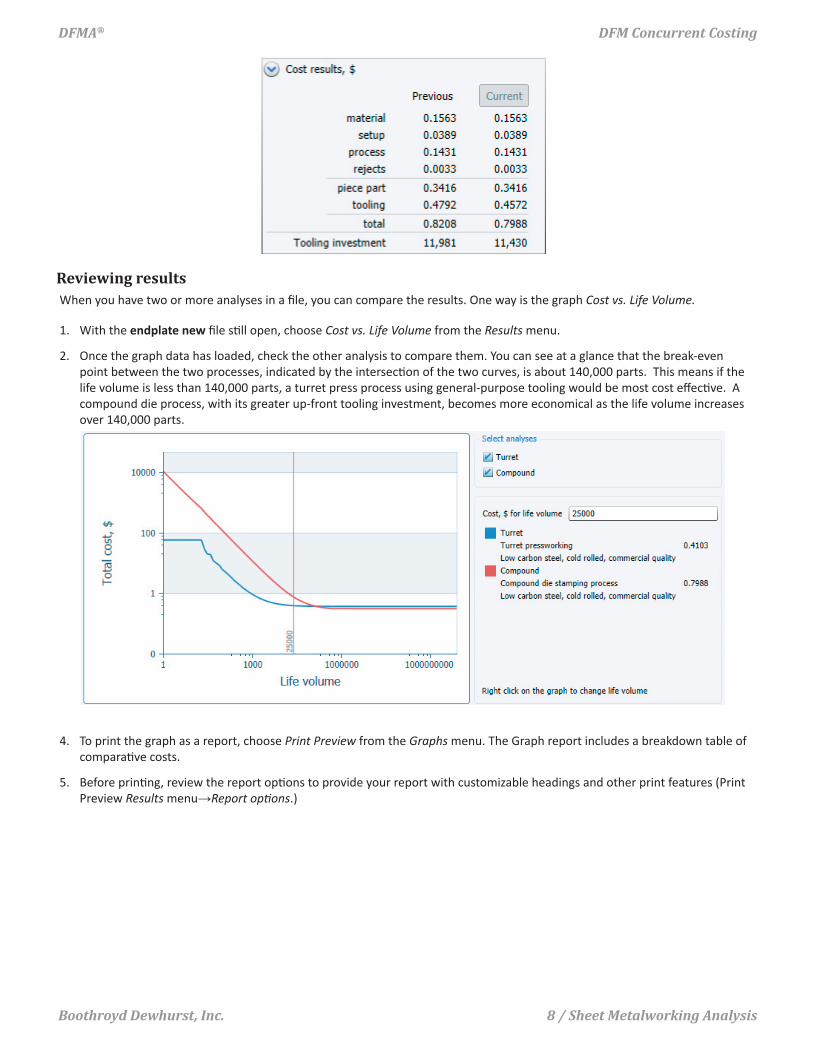
Reviewing resultsWhen you have two or more analyses in a file, you can compare the results. One way is the graph Cost vs. Life Volume.
1. With the endplate new file s�ll open, choose Cost vs. Life Volume from the Results menu.
2. Once the graph data has loaded, check the other analysis to compare them. You can see at a glance that the break-even point between the two processes, indicated by the intersec�on of the two curves, is about 140,000 parts. This means if the life volume is less than 140,000 parts, a turret press process using general-purpose tooling would be most cost effec�ve. A compound die process, with its greater up-front tooling investment, becomes more economical as the life volume increases over 140,000 parts.
4. To print the graph as a report, choose Print Preview from the Graphs menu. The Graph report includes a breakdown table of compara�ve costs.
5. Before prin�ng, review the report op�ons to provide your report with customizable headings and other print features (Print Preview Results menu→Report op�ons.)