56
Instructions for preparation of SICAT CLASSICGUIDE and SICAT OPTIGUIDE SICAT SURGICAL GUIDES

Instructions for preparation of SICAT CLASSICGUIDE and SICAT OPTIGUIDE
SICAT SurgICAl guIdeS

Table of conTenTs
1. sIcaT surgIcal guIdes 51.1 SICAT Surgical Guide types 61.2 Definition of terms 81.3 Decision-making aid: classIcGUIDE or oPTIGUIDE? 10
2. sIcaT classIcguIde 132.1 SICAT classIcGUIDE workflow 132.2 Conventional radiographic template 142.3 Direct radiographic template 182.4 Radiographic template for the edentulous jaw 202.5 3D X-ray (Conebeam or CT) 262.6 3D X-ray (Sirona system) 282.7 Scanning parameters for CT and Conebeam systems 292.8 Preventing potential errors 30
3. sIcaT oPTIguIde 333.1 SICAT oPTIGUIDE workflow 333.2 Preparation of oPTIGUIDE 343.3 General instruction about 3D X-ray scans (oPTIGUIDE) 353.4 General instructions about the optical 3D scan (oPTIGUIDE) 353.5 Preventing potential errors 36
4. dIgITal ImPlanT PlannIng 394.1 Implant planning 394.2 Ordering of surgical guides 40

5. shIPmenT To sIcaT 435.1 Ordering SICAT classIcGUIDE 445.2 Ordering SICAT oPTIGUIDE (Option 1) 455.3 Ordering SICAT oPTIGUIDE (Option 2) 46
6. sIcaT documenTaTIon 496.1 Surgical guide report 496.2 Accuracy report 506.3 Drill report 50
7. handlIng of The surgIcal guIde 53

1. SICAT SurgICAl guIdeS

5
1. SICAT Surgical Guides
SICAT Surgical Guides
1. SICAT Surgical guides
SICAT Surgical Guides support you in implementing the implant plan you have created us-ing SICAT planning software (GALILEOS Implant or SICAT Implant). SICAT Surgical Guides are custom-made for the respective patient and guide your drill to the planned positions in the patient's jaw with the aid of guide sleeves.

6
1. SICAT Surgical Guides SICAT Surgical Guide types
SICAT ClASSICGuIde SICAT OpTIGuIde
1.1 SICAT Surgical guide types
Two types of surgical guides are available: SICAT ClASSICGUIDE and SICAT OPTIGUIDE.
The SICAT laboratory converts ClASSICGUIDEs directly into accurate surgical guides on the basis of radiographic templates and 3D X-ray data. ClASSICGUIDEs are available teeth and mucosa supported with optional fixation using anchor pins, fixation screws or micro-implants.
OPTIGUIDEs are fabricated directly in the SICAT laboratory on the basis of optical sur-face scan data and 3D X-ray data. Radiographic templates do not need to be used with OPTIGUIDE. OPTIGUIDEs are available teeth supported.

7
1. SICAT Surgical Guides SICAT Surgical Guide types
Please note that under certain circumstances, the use of OPTIGUIDE is limited or that in some cases, the use of ClASSICGUIDE is recommended. Please use the decision-making aid provided on page 10.
� Astra Tech � Biomet 3iTM
� CAMLOG® � Dentaurum � Dentsply Friadent � MEISINGER
� MIS® Implant Technologies � Nobel BiocareTM
� SIC Invent � Straumann® � Zimmer® Dental
The sleeve systems available for both versions are pilot sleeves, a generic sleeve-in-sleeve system, and master sleeves for guided surgical systems. These guided surgical systems generally offer a complete procedure, from the initial osteotomy all the way to implant in-sertion. Among others, the guided systems by the following manufacturers are supported by SICAT:
Visit SICAT's website www.sicat.com to find the guided systems currently supported.

8
1. SICAT Surgical Guides Definition of terms
1.2 definition of terms
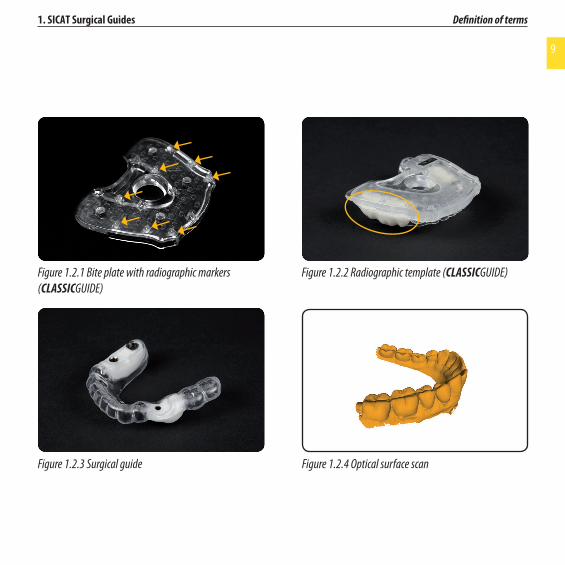
1.2.1 Bite plate with radiographic markers (CLASSICGUIDE)The bite plate serves as a basis for the radiographic template and has radiographic markers (fiducial markers - see marking). Please use only SICAT bite plate kits. SICAT bite plate kits consist of a bite plate for fabricating a radiographic template, a CD-ROM for storing implant planning data and a small padded shipping package.
1.2.2 Radiographic template (CLASSICGUIDE)The patient wears the radiographic template during the 3D scanning process. The radio-opaque prosthetic proposal, which may be incorporated in the radiographic template (see marking), is visible in the 3D X-ray and serves the dentist in charge of treatment as a basis for implant planning.
1.2.3 Surgical guideA surgical guide (ClASSICGUIDE or OPTIGUIDE) is custom-made for your specific patient. Once the surgical guide is placed on the patient's jaw, it uses sleeves to help guide your surgical instruments and, if appropriate, your implant, accurately to the position you have previously planned.
1.2.4 Optical surface scanAn optical surface scan is obtained by scanning a stone model with a 3D scanner or by scanning the jaw with a 3D intraoral camera.
9
1. SICAT Surgical Guides Definition of terms
Figure 1.2.1 Bite plate with radiographic markers (ClASSICGuIde)
Figure 1.2.2 Radiographic template (ClASSICGuIde)
Figure 1.2.3 Surgical guide Figure 1.2.4 Optical surface scan

1.3 decision-making aid: ClASSICGUIDE or OPTIGUIDE? SICATSurgical guides
ClASSICGUIDEConventional
radiographic template
Several missing teeth
Several missing teeth
ClASSICGUIDEConventional
radiographic template
ClASSICGUIDEConventional
radiographic template
Major metal artifacts likely
Partially edentulous jaw
edentulousjaw
Minor metal artifacts likely
ClASSICGUIDEDirect
radiographic template
1 to 2 missing teeth
1 to 2 missing teeth
ClASSICGUIDEDirect
radiographic template
ClASSICGUIDERadiographic template for the edentulous jaw
OPTIGUIDE(good tooth support
necessary)OPTIGUIDE
10
1. SICAT Surgical Guides Decision-making aid: ClASSICGUIDE or OpTIGUIDE?


2. SICAT ClASSICguIde

13
2. SICAT CLASSICGUIDE SICAT CLASSICGUIDE workflow
2. SICAT ClASSICguIde
SICAT ClASSICGUIDE is based on a patient-specific radiographic template which can be prepared in one of three different ways depending on indication. ClASSICGUIDEs are transformed centrally in the SICAT laboratory directly from the radiographic template. A high-quality radiographic template is therefore essential for the quality of the surgical guide.
2.1 SICAT ClASSICGUIDE workflow
indication
preparation of the radio-
graphictemplate
conebeam/ct Scan
implantplanning
preparation of the
Surgicalguide
at Sicat
Surgery

14
2. SICAT CLASSICGUIDE Conventional radiographic template
Only use current impressions/stone models. A modified anatomical situa-tion will result in a poorly-fitting surgical guide.
Use only thermoforming sheets which bond to PMMA. Intermediate sheets must be removed after the thermoforming process. This is the only way to ensure a durable bond between bite plate, thermoformed stent and pros-thetic proposal.
2.2 Conventional radiographic template
Your dental laboratory will need the following to fabricate a radiographic template with a radio-opaque prosthetic proposal:
� stone model (type 4 plaster) of the patient's jaw;
� bite plate with fiducial markers (available at www.sicat.com);
� hard-elastic, transparent thermoforming sheet which bonds to PMMA (thickness min. 1.5 mm to max. 2.0 mm);
� thermoforming device;
� cold-curing acrylic (PMMA);
� radio-opaque acrylic or barium sulfate powder;
� A current list of recommended materials can be found at www.sicat.com.

15
2. SICAT CLASSICGUIDE Instructions for fabricating a conventional radiographic template
The quality and currency of the impression and stone model are essential for the precise fit of the radiographic template and the surgical guide and are therefore crucial for accurate implantation.
Instructions for fabricating a conventional radiographic template
2.2.1 Produce a stone model made of super-hard plaster (type 4) with a wax-up. The height of the stone model may not exceed 4 cm, as the shipping parcel has been designed for this maximum height.
2.2.2 Prepare a thermoformed stent (thickness min. 1.5 mm to max. 2.0 mm) on the stone model with wax-up and then remove the wax-up from the thermoformed stent.
2.2.3 Block out undercuts and isolate the stone model from the acrylic.
Figure 2.2.1 Figure 2.2.2 Figure 2.2.3

16
2. SICAT CLASSICGUIDE Instructions for fabricating a conventional radiographic template
Areas not shown in green should under no circumstances be altered. Fidu-cial markers may not be altered or covered with acrylic! The area shown in orange may not be altered or covered with acrylic as it serves as a fixing location for the fabrication of the surgical guide.
2.2.4 Pour radio-opaque acrylic into the area of the thermoformed stent where the wax-up was previously located.
If you do not have ready-to-use radio-opaque acrylic, mix cold-curing acrylic with 15 % barium sulfate in relation to the weight of the PMMA powder until it has a viscous con-sistency. Make sure that the PMMA powder is mixed smoothly and thoroughly with the barium sulfate (no lumps).
2.2.5 The prosthetic proposal prepared in this way must sit flush on the gingiva.
2.2.6 For small jaws, the bite plate can be shortened in the areas shown in green.
Figure 2.2.4 Figure 2.2.6Figure 2.2.5

17
2. SICAT CLASSICGUIDE Instructions for fabricating a conventional radiographic template
2.2.7 Mix cold-cure resin (without barium sulfate) until it has a viscous consistency. To etch the surfaces, apply cold-cure resin to the top of the thermoformed stent and the bite plate (side facing away from the fiducial markers). Pour the acrylic onto the bite plate (side without the fiducial markers). Make sure you use sufficient acrylic, as this serves both to bond the bite plate and the thermoformed stent and to stabilize the radiographic template.
2.2.8 Position the thermoformed stent in the frontal area of the bite plate on the side which does not have the fiducial markers.
2.2.9 Press the thermoformed stent located on the stone model onto the bite plate until the acrylic has cured. Check that the radiographic template fits securely and stable on the stone model.
Figure 2.2.7 Figure 2.2.9Figure 2.2.8

18
2. SICAT CLASSICGUIDE Direct radiographic template
2.3 direct radiographic template
The direct radiographic template should only be used with one or two missing teeth when visualization of a prosthetic proposal in the X-ray is not necessary or is displayed by a virtual prosthetic proposal (e.g. CEREC AC from Sirona Dental Systems).
Utilization of bite registration material allows immediate fabrication of a radiographic template directly in the patient's mouth. There is no need to make a radiographic tem-plate based on a stone model with the aid of thermoforming for the time being.
Only bite registration materials approved by SICAT should be used (e.g. Kettenbach Futar® Scan, R-Dental Metal Bite, Heraeus Kulzer Flexitime® Bite).
See www.sicat.com for a complete list of all recommended materials.
The radiographic template is the basis for the subsequent ClASSICGUIDE. A firm and stable fit on the patient's jaw is therefore of critical importance.
Please ensure that the corresponding stone model is sent to SICAT with every radiographic template.

19
2. SICAT CLASSICGUIDE Instructions for the fabrication of a direct radiographic template
Instructions for the fabrication of a direct radiographic template
2.3.1 Drill 4 holes (Ø 4 mm) in the SICAT bite plate in the pre-specified positions.
2.3.2 Apply bite registration material over the whole inner surface area of the bite plate. The holes ensure that the registration is retained on the bite plate.
2.3.3 Take the impression in the patient's mouth.
Figure 2.3.1 Figure 2.3.2 Figure 2.3.3
Check that the radiographic template fits securely and stable in the patient's mouth. If the fit is inadequate, repeat the process.
Apply only one layer of bite registration material. The bite registration ma-terial is not used to stabilize the surgical guide, but only to reproduce an accurate position.

20
2. SICAT CLASSICGUIDE Radiographic template for the edentulous jaw
2.4 Radiographic template for the edentulous jaw
A total denture of approximately the desired final result with regard to aesthetics, occlu-sion and physical attributes is necessary to fabricate a radiographic template for the eden-tulous jaw.
The basis for the radiographic template is a copy of the total denture made with acrylics of differing radio-opacity so that the teeth and gingival surface can be visualized accord-ingly in the X-ray.
If no denture corresponding to the final result is available, a wax-up has to be prepared beforehand.
Original situation Radiographic template 3D X-ray image

21
2. SICAT CLASSICGUIDE Instructions for the fabrication of a radiographic template for the edentulous jaw
Instructions for the fabrication of a radiographic template for the edentulous jaw
2.4.1 Check the fit of the total denture in the patient's mouth. If the denture does not have a form-fit on the gingiva, it will be necessary to mold the patient's gingival situation using reline material. To reline the denture, use it like an impression tray to prepare an impression of the current mucosal situation (like when relining). Use silicone re-line material.
2.4.2 Create a stone model from the total denture (relined if necessary), which represents the current mucosal situation of the patient's jaw.
Figure 2.4.1 (a) Figure 2.4.1 (b) Figure 2.4.2
A good form-fit of the total denture is very important, as the duplicated total denture serves as a basis for the radiographic template.
22
2. SICAT CLASSICGUIDE Instructions for the fabrication of a radiographic template for the edentulous jaw
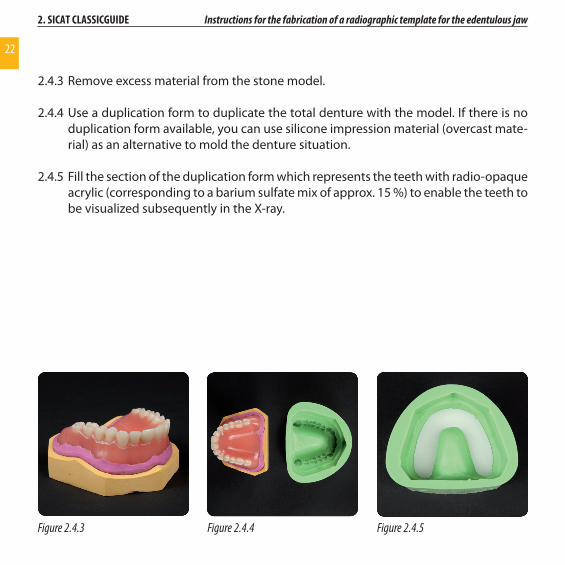
2.4.3 Remove excess material from the stone model.
2.4.4 Use a duplication form to duplicate the total denture with the model. If there is no duplication form available, you can use silicone impression material (overcast mate-rial) as an alternative to mold the denture situation.
2.4.5 Fill the section of the duplication form which represents the teeth with radio-opaque acrylic (corresponding to a barium sulfate mix of approx. 15 %) to enable the teeth to be visualized subsequently in the X-ray.
Figure 2.4.3 Figure 2.4.4 Figure 2.4.5

23
2. SICAT CLASSICGUIDE Instructions for the fabrication of a radiographic template for the edentulous jaw
2.4.6 Now place the stone model representing the current mucosal situation in the dupli-cation form, locating it on the radio-opaque acrylic of the dental arch which is still soft. The acrylic mix must contact the surface of the model so that the dental arch acquires the shape of the mucosal situation.
2.4.7 Allow the dental arch made of radio-opaque acrylic to cure.
2.4.8 Then reduce the barium sulfate cast to obtain a separated dental arch. Separate the teeth so that these can be visualized individually in the X-ray and are clearly visible.
2.4.9 Place the separated dental arch in the duplication form.
Figure 2.4.6 Figure 2.4.9Figure 2.4.8

24
2. SICAT CLASSICGUIDE Instructions for the fabrication of a radiographic template for the edentulous jaw
2.4.10 Place the stone model representing the current mucosal situation in the duplica-tion form flush with the dental arch.
2.4.11 Allow the radio-opaque acrylic with a barium sulfate mix of 8 % to flow into one of the holes of the duplication form. Using an 8 % barium sulfate mix will help dif-ferentiate gingiva and teeth clearly in the X-ray later. If using ready-mixed material, use 50 % of the material with 50 % neutral PMMA.
2.4.12 Once curing is complete, a duplicate of the denture made of different mixes of radio-opaque acrylic will be obtained.
2.4.13 Mix cold-cure resin (without barium sulfate) until it has a viscous consistency. To etch the surfaces, apply cold-cure resin to the underside of the bite plate (side without fiducial markers). Pour the acrylic onto the bite plate. The area shown in orange should not be covered with acrylic or removed. Make sure you use suffi-cient acrylic, as this serves both to bond the bite plate and the thermoformed stent and to stabilize the radiographic template.
Figures 2.4.10 and 2.4.11 Figure 2.4.12 Figure 2.4.13

25
2. SICAT CLASSICGUIDE Instructions for the fabrication of a radiographic template for the edentulous jaw
Figure 2.4.14 (a) Figure 2.4.15Figure 2.4.14 (b)
2.4.14 Position the duplicated total denture made of the acrylic/barium sulfate mix on the bite plate. Press the duplicated total denture onto the bite plate until the acrylic has cured. Make sure that the radiographic template is located securely and ac-curately on the stone model.
TIP: For small jaws, the bite plate can be shortened in the areas shown in green (Figure 2.4.15).
26
2. SICAT CLASSICGUIDE 3D X-ray (Conebeam or CT)
2.5 3d X-ray (Conebeam or CT)
2.5.1 General notes for the use of radiographic templates (ClASSICGUIDE)
For optimum scanning results, please observe the general instructions below:
� Check that the radiographic template is securely located and stable.
� Bite plate, thermoformed stent and any prosthetic proposal must remain firmly bonded to one another, even under mechanical load. The resin must be fully cured.
� Scan the patient wearing the radiographic template.
� The radiographic template must be located on the patient's jaw without gaps and be secure and stable.
� Jaws should be scanned individually.
� The occlusion plane must be aligned in parallel with the slice (see Figure 2.5.1).
� Slightly pad bite (e.g. with cotton wool pads).
� Non-fixed metal parts in the opposing jaw (e.g. dentures) should be removed.
� The teeth of the opposing jaw should not touch the fiducial markers of the radio-graphic template.

27
2. SICAT CLASSICGUIDE 3D X-ray (Conebeam or CT)
Switch off any algorithms used to reduce metal artifacts, as they may also have an impact on the markers.
Figure 2.5.1 Alignment of the occlusion plane in parallel with the slice

28
2. SICAT CLASSICGUIDE 3D X-ray (Sirona system)
2.6 3d X-ray (Sirona system)
2.6.1 Prepare the scan by selecting the appropriate bite plate holder (upper or lower jaw).
2.6.2 Let the patient try on the radiographic template. Check that the radiographic tem-plate is secure and stable.
2.6.3 Close the swivel arm and adjust the system height until the incisors and the ball of the bite plate holder are at the same level.
2.6.4 Now guide the patient carefully onto the bite plate holder. The patient should bite gently on the bite plate holder. The radiographic template should now be in a hori-zontal position.
2.6.5 Start the scanning process on your Conebeam system.
If your Conebeam sys-tem has several scanning modes to choose from, please select mode VO1.
Figure 2.6.4. (a) Figure 2.6.4 (b)

29
2. SICAT CLASSICGUIDE Scanning parameters for CT and Conebeam systems
2.7 Scanning parameters for CT and Conebeam systems
If the patient is being scanned elsewhere and not in your presence, practice with him/her how to fit the radiographic template correctly.
The radiographic template may not be altered after the X-ray scan.
All fiducial markers should be clearly visible in the scan. No gap may be vis-ible between the radiographic template and the jaw.
Please inform your patient that the radiographic template must be located on the jaw without gaps, and be secure and stable, and that he/she may not move during the scanning process.
� Gantry tilt = 0°
� Slice thickness < 0.7 mm
� Parallel slices
� DICOM 3 format
For optimum scanning results, always follow the instructions for use of your Conebeam or CT radiographic system.

30
2. SICAT CLASSICGUIDE Preventing potential errors
2.8 Preventing potential errors
2.8.1 Incorrect positioning of the radiographic templateIn this example, a gap of approximately 2 mm can be seen between the radiographic template and the tooth. If it cannot be guaranteed that the template is positioned in exactly the same way during the scanning process and during actual surgery, the accuracy of the drilled holes could be significantly reduced.
2.8.2 Patient movementIf the patient inadvertently moves during the scanning process, this will cause move-ment artifacts. These make the fiducial markers and important anatomical structures difficult to detect. It is therefore important to tell the patient before the scanning process starts that he/she should not move during the procedure. Figure 2.8.2 shows structures in duplicate. It is not possible to create a surgical guide. A new scan is required.
2.8.3 Unclear fiducial markersIn order to be able to fabricate an accurate ClASSICGUIDE surgical guide, the fidu-cial markers must appear clearly and without errors. If the opposing jaw has struc-tures which absorb X-rays to a significant extent (e.g. gold or ceramic crowns) and these structures are located close to the fiducial markers, it helps to pad the patient's bite with cotton rolls.

31
2. SICAT CLASSICGUIDE Preventing potential errors
Figure 2.8.1 Incorrect fit Figure 2.8.2 Patient movement
Figure 2.8.3 Unclear fiducial markers

3. SICAT OPTIguIde

33
3. SICAT OPTIGUIDE SICAT OPTIGUIDE workflow
3. SICAT OPTIguIde
SICAT OPTIGUIDE is based on the superimposition of optical surface scan data from a jaw and the corresponding 3D X-ray data. Together with implant planning and the desired selection of sleeves, SICAT fabricates an accurate surgical guide. Production of a radio-graphic template based on a bite plate is not required for OPTIGUIDE.
3.1 SICAT OPTIGUIDE workflow
indication conebeam/ct Scan
production of optical
Surface Scan or Stone
model
implantplanning
preparation of the
Surgicalguide
at Sicat
Surgery
If you are uncertain before taking the X-ray whether the current case is suitable for OPTIGUIDE, scan the patient with a radiographic template and then decide after assessing the X-ray. If in doubt, contact the SICAT Support.

34
3. SICAT OPTIGUIDE Preparation of OPTIGUIDE
3.2 Preparation of OPTIGUIDE
To prepare a SICAT OPTIGUIDE you can either
� import an optical surface scan straight into the SICAT software program (GALILEOS Implant/SICAT Implant) and super-impose the X-ray data set, or
� enclose an exact stone model with your order which can be scanned and superimposed by SICAT.
Do not use alginate impressions to create accurate stone models.
For OPTIGUIDE, ensure that the patient has sufficient remaining teeth to provide reliable support for the surgical guide. If this is not the case, follow the CLASSICGUIDE workflow.
For OPTIGUIDE, check the registration between the optical surface scan and the X-ray scan. Inaccurate registration will lead to deviations in implement-ing the implant plan.
For OPTIGUIDE ensure that the optical surface scan corresponds exactly to the current situation in the jaw. It will otherwise be impossible to fit the surgical guide accurately, and this may lead to a deviation from the planned implant position.

35
3. SICAT OPTIGUIDE General instruction about 3D X-ray scans (OPTIGUIDE)
3.3 general instruction about 3d X-ray scans (OPTIGUIDE)
For optimum scanning results, please observe the general instructions below:
� Do not scan patient with the occlusion closed. Slightly pad bite (e.g. with cotton pads).
� Non-fixed metal parts in the opposing jaw (e.g. dentures) should be removed.
� If possible, scan at least 3/4 of the curve of the jaw. This increases the likelihood of being able to use sufficient artifact-free teeth for registration.
3.4 general instructions about the optical 3d scan (OPTIGUIDE)
If possible, scan at least 3/4 of the curve of the jaw in order to ensure that the surgical guide is stable and to increase the likelihood of being able to use sufficient artifact-free teeth for registration.
If it is likely that a 3D X-ray will have a high number of metal artifacts (e.g. numerous gold or ceramic crowns), follow the CLASSICGUIDE workflow. OPTIGUIDE cannot be fabricated if there is an abundance of metal artifacts.

36
3. SICAT OPTIGUIDE Preventing potential errors
3.5 Preventing potential errors
3.5.1 Patient movementIf the patient inadvertently changes position during the scanning process, this will cause movement artifacts which cause the image to be blurred. This makes it hard to register the optical surface scan and the X-ray. It is therefore important to tell the patient before the scanning process starts that he/she should not move during the procedure. Precise registration is not possible with a scan of this type. It is not pos-sible to create a surgical guide. A new scan is required.
3.5.2 Metal artifactsThe precise shape of a tooth restored using metal or ceramic cannot be reproduced clearly in an X-ray scan due to metal artifacts. These teeth, and in many cases also adjacent teeth impaired by these metal artifacts, can be used neither for registration nor for assessing a registration. This is why OPTIGUIDE is not indicated in cases with major metal artifacts. In contrast, CLASSICGUIDE is relatively insensitive to metal artifacts.
3.5.3 Optical surface scan does not correspond to jaw situationThe surgical guide is fabricated on the basis of the optical surface scan. Faulty scan data can lead to a surgical guide not fitting the patient's jaw correctly. It is therefore essential to ensure that the optical surface scan precisely corresponds to the pa-tient's situation.

37
3. SICAT OPTIGUIDE Preventing potential errors
Figure 3.5.1 Patient movement Figure 3.5.2 Metal artifacts
Figure 3.5.3 Optical surface scan does not correspond to jaw situation

4. Digital implant planning

39
4. Digital implant planning Implant planning
4. Digital implant planning
4.1 implant planningTo prevent planning errors, please follow the important tips below when executing your implant plan:
4.1.1 Unsuitable drill pathIn this implant plan, the drill path comes too close to a tooth, so the drill sleeve and the final drill would collide with the adjacent tooth.
4.1.2 Collision of drill sleeves In this implant plan, the drill sleeves of the two implants collide. The visualization of the drill sleeves renders this clearly visible.
Figure 4.1.1 Unsuitable drill path Figure 4.1.2 Collision of drill sleeves
tip: Right-click on the implant and select "Visualize drill path" to have the drill path of the pilot or the final drill displayed. To visualize drill sleeves, se-lect the relevant sleeve system from the implant dialog.

40
4. Digital implant planning Ordering of surgical guides
Figure 4.2.1
4.2 Ordering of surgical guides
To order surgical guides, please only use the order wizard in the software.
4.2.1 Under Surgery, click on the surgical guide wizard icon to start.
4.2.2 Select the type of surgical guide you would like to order.
4.2.3 Follow the instructions in the order wizard until the surgical guide order is complete.
Figure 4.2.2

41
4. Digital implant planning Ordering of surgical guides
A guided surgery kit from the implant manufacturer is essential for select-ing a guided implant system - e.g. CAMLOG® Guide from CAMLOG, Naviga-tor® from Biomet 3iTM, etc.
It is essential to follow the instructions for use for the planning program in question (GALILEOS Implant, SICAT Implant) for further helpful tips on implant planning.
Please note that in the event of the patient's jaw opening being limited, it can be more difficult, if not impossible, to introduce the drill into the sleeve, especially in posterior positions.

6. SICAT doCumenTATIon

43
6. SICAT documentation Surgical guide report
6. SICAT documentation
You will receive the documents below from SICAT, along with your customized surgical guide (CLASSICGUIDE or oPTIGUIDE).
6.1 Surgical guide reportThe main component of the report is the implant-specific depth information. The distanc-es between the top and bottom edges of the drill sleeve and the apical end of the implant are quoted. These distances can be compared with the scale on the drill during surgery.
Distance from the upper edge of the drill sleeve to the apical end of the implantDistance from the lower edge of the drill sleeve to the apical end of the implantSpecifications of the implant used
1
2
12
3
3

44
6. SICAT documentation Accuracy report
6.2 Accuracy reportThe accuracy report states the deviations of the positions of the actual sleeves in relation to the digital implant plan. SICAT guarantees manufacturing deviation accuracy of max. 0.5 mm at the apical end of the implant.
6.3 drill reportIf you are using a sleeve system from an implant manufacturer which requires a drill pro-tocoll, SICAT will send the report generated accordingly along with your surgical guide.
Please note that individual arrangements with SICAT Support are also noted on the surgical guide report.


5. Shipment to SiCAt
43
5. Shipment to SICAT
5. Shipment to SiCAt
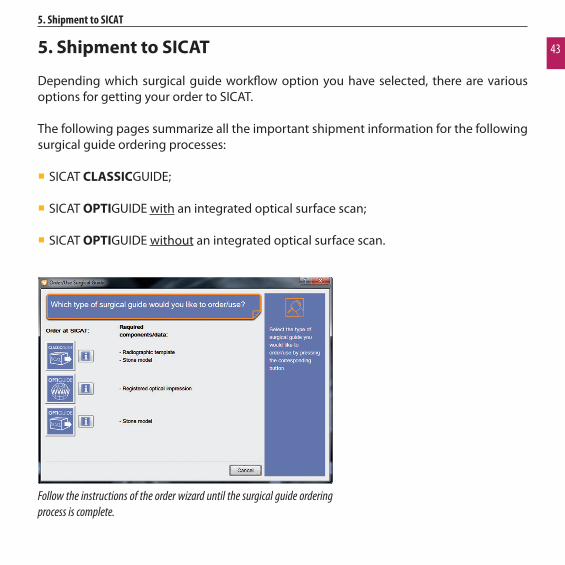
Depending which surgical guide workflow option you have selected, there are various options for getting your order to SICAT.
The following pages summarize all the important shipment information for the following surgical guide ordering processes:
� SICAT CLASSiCGUIDE;
� SICAT optiGUIDE with an integrated optical surface scan;
� SICAT optiGUIDE without an integrated optical surface scan.
Follow the instructions of the order wizard until the surgical guide ordering process is complete.

44
5. Shipment to SICAT Ordering SICAT CLASSICGUIDE
5.1 ordering SiCAt CLASSiCGUIDE
SICAT produces a patient-specific CLASSiCGUIDE for you. Please send the components below to:
SICATAbteilung SGLSchwertberger Straße 1453177 Bonn, Germany
1. 3D planning data on CD, generated with the order wizard in a SICAT planning pro-gram (GALILEOS Implant, SICAT Implant).
2. if appropriate, order forms (generated from a SICAT planning program) with pay-ment information if no direct debit authorization has been given. Please don't forget your signature!
3. Radiographic template for preparation of a CLASSiCGUIDE (disinfected and dry in the polyethylene bag with a silica gel pack).
4. Stone model.
Label the CD and the stone model with the patient ID quoted in the surgical guide order (e.g. name, date of birth).
Please ensure sufficient padding when packing to prevent the stone model or radiographic template from breaking.

45
5. Shipment to SICAT Ordering SICAT OPTIGUIDE (Option 1)
5.2 ordering SiCAt optiGUIDE (option 1)
With an integrated optical surface scan:
SICAT produces the patient-specific optiGUIDE for you. Please only use the order wizard in the software (SICAT Implant, GALILEOS Implant).
� You can send the order to SICAT online using the order wizard.
� Alternatively, you can also send SICAT the order on CD. In this case, label the CD with the patient ID quoted in the surgical guide order (e.g. name, date of birth) and send it to SICAT, Abt. SGL.
� If you have not authorized a direct debit, please fax the signed order form to SICAT separately or enclose it with your package.

46
5. Shipment to SICAT Ordering SICAT OPTIGUIDE (Option 2)
5.3 ordering SiCAt optiGUIDE (option 2)
Without an integrated optical surface scan:
SICAT produces the patient-specific optiGUIDE for you. Please send the components be-low to:
SICATAbteilung SGLSchwertberger Straße 1453177 Bonn, Germany
1. 3D planning data on CD, generated with the order wizard in a SICAT planning pro-gram (SICAT Implant, GALILEOS Implant).
2. if appropriate, order form (generated from a SICAT planning program) with payment information if no direct debit authorization has been given. Please don't forget your signature!
3. Stone model.
Label the CD and the stone model with the patient ID quoted in the surgical guide order (e.g. name, date of birth).
Please ensure sufficient padding when packing to prevent the stone model from breaking.

7. Handling of tHe surgical guide

49
7. Handling of the surgical guide
Ensure that you have the right drills to fit the sleeves.
The drill should be inserted in the sleeve of the surgical guide before rotation begins. If drills are inserted into the sleeve already rotating, this may cause the drill to tilt under certain circumstances.
7. Handling of the surgical guide
Before using the surgical guide, we recommend that you follow the steps below:
� Please protect the surgical guide from direct sunlight and elevated temperatures to prevent it from deforming. Check the surgical guide before surgery.
� Make sure that the surgical guide can be positioned without gaps and is secure and stable on the stone model, if available. Ensure that the position of the drill sleeves is in line with your implant plan. Do not use the surgical guide if this inspection is unsuccessful.
� Ensure that the surgical guide is secure and stable on the jaw during use; otherwise the holes are likely to be less accurate.
� Before using the surgical guide, check all drills and drill sleeves which are going to be used for damages. Use only drills and sleeves in perfect condition in order to prevent drills from tilting in a sleeve.

50
7. Handling of the surgical guide
Disinfect the surgical guide only with disinfectants approved for this application.
Ensure adequate cooling during drilling.
Always follow the instructions for use for your guided surgical system.
SICAT internal sleeves must be sterilized before use.
Do not employ heat-based methods (e.g. autoclaves) for disinfecting or sterilizing the surgical guide, as they could cause it to deform.
When using the surgical guide, ensure that it does not leave its correct position as a result of the intermittent drilling process. Fixate the surgical guide by hand, or use previously planned fixation screws through corresponding sleeves.

51
7. Handling of the surgical guide
Ensure that excessive force is not exerted on the drill sleeve during the drilling process; this prevents the sleeve from bursting. Sleeves which are planned close to adjacent teeth, in particular, have only a limited amount of retaining material (acrylic) available to hold the sleeves.
Ensure that excessive force is not exerted on the surgical guide during use; this will prevent it from breaking.
Check the surgical guide for obvious defects on receipt - for example loose sleeves, sharp edges or transport damage. Ensure that the surgical guide supplied is the correct guide for your patient.
In the unlikely event that it should become apparent during surgery that the surgical guide cannot be used, please ensure that you can still perform surgery safely without it.

Stat
uS:
06-
01-2
013
501
/06-
13-E
N
CONTACT
SICat GmbH & Co. KG ■ bruNNENallEE 6 ■ 53177 boNN, GErmaNy ■ [email protected] ■ www.SICat.dE
Manufacturer
SICAT GMbH & Co. KGBrunnenallee 653177 Bonn, Germany
T +49 (0)228 / 854697-0F +49 (0)228 / 854697-99
SurGICAl GuIde SupporTT +49 (0)228 / [email protected]


