2 1 Thank you for purchasing the Korg LP-180 digital piano. Notice regarding disposal (EU only) If this symbol is shown on the product, manual, baery, or package, you must dispose of it in the correct manner to avoid harm to human health or damage to the environment. Contact your local administrative body for details on the correct dis- posal method. If the baery contains heavy metals in excess of the regulated amount, a chemical symbol is displayed below the symbol on the battery or battery package. THE FCC REGULATION WARNING (for USA) NOTE: This equipment has been tested and found to comply with the limits for a Class B digital device, pursuant to Part 15 of the FCC Rules. These limits are designed to provide reasonable protection against harmful interference in a residential instal- lation. This equipment generates, uses, and can radiate radio frequency energy and, if not installed and used in accordance with the instructions, may cause harmful interference to radio communications. However, there is no guarantee that interfer- ence will not occur in a particular installation. If this equipment does cause harmful interference to radio or television reception, which can be determined by turning the equipment off and on, the user is encouraged to try to correct the interference by one or more of the following measures: • Reorient or relocate the receiving antenna. • Increase the separation between the equipment and receiver. • Connect the equipment into an outlet on a circuit different from that to which the receiver is connected. • Consult the dealer or an experienced radio/TV technician for help. If items such as cables are included with this equipment, you must use those included items. Unauthorized changes or modification to this system can void the user’s authority to operate this equipment. Keep this manual After reading this manual, please keep it for later reference. Keeping foreign matter out of your equipment Never set any container with liquid in it near this equip- ment. If liquid gets into the equipment, it could cause a breakdown, fire, or electrical shock. Be careful not to let metal objects get into the equipment. If something does slip into the equipment, unplug the AC adapter from the wall outlet. Then contact your nearest Korg dealer or the store where the equipment was purchased. Assembling the Stand Warning At least one other person must help you assemble the stand. Caution during assembly In order to assemble the stand safely, please observe the fol- lowing points. • Make sure that you have the correct part in the correct orientation, and perform the assembly in the order given. • The LP-180 may fall when applying force too much to the front side of it before fixing the LP-180 to the stand. You should be careful in handling it. Other cautions Please check the following points after assembly. • Loosened screws The screws may loosen as time passes after assembly. You should periodically check whether any screws have be- come loose. If you feel that the stand vibrates excessively, it is possible that screws have come loose. If so, re-tighten them. • When moving the digital piano to another location To move the assembled stand, remove the AC adapter cord and the pedal cord from the stand, close the key cover, and then move it slowly with at least two people keeping it as level as possible. • Disassembly If you need to disassemble the stand, do so by reversing the steps of the assembly procedure. After disassembly, keep the screws and other parts in a safe place so that they are not lost. The LP-180 should always be laid down before it’s disassembled. Assembly procedure You’ll need a Phillips (+) screwdriver. 1. Put the protective sheet, which had covered the LP-180, on a flat floor, and place the LP-180 on that sheet with its rear facing the floor. Ensure that the LP-180’s key cover will not to open until the end of the assembly. 2. Make sure that all of the following parts are available. Pedal unit Back board Side panel (right) Side panel (left) Pedal cord Screws (M6) x 8 pcs. Caps x 8 pcs. 3. Fasten the LP-180 and the back borad to the right and left side panels using eight screws (M6). First temporarily tighten* the screws on the right side panel, and then temporarily tighten* the screws on the left side panel. * To temporarily tighten the screws is to tighten them leaving a clearance of about 2 mm. LP-180 Screws (M6) Screws (M6) Side panel (right) Side panel (left) Be careful not to pinch your fingers. 4. Raise the assembled stand slowly with two people. 5. Then, firmly tighten all the screws that are temporarily tightened in step 3. When tightening the screws on the LP-180, adjust the up/ down and front/rear positions on the left and right side panels so that they are equal. 6. Ensure that the stand has no gaps and is not tilted, and that all the screws are tightened firmly. 7. Put caps on the screw heads on the right and left side panels. Protective sheet LP-180 Caps EX1/2_GE1/2_UK_AU * All product names and company names are the trademarks or registered trademarks of their respective owners. Location Using the unit in the following locations can result in a mal- function. • In direct sunlight • Locations of extreme temperature or humidity • Excessively dusty or dirty locations • Locations of excessive vibration • Close to magnetic fields Power supply Please connect the designated AC adapter to an AC outlet of the correct voltage. Do not connect it to an AC outlet of volt- age other than that for which your unit is intended. Interference with other electrical de- vices Radios and televisions placed nearby may experience recep- tion interference. Operate this unit at a suitable distance from radios and televisions. Handling To avoid breakage, do not apply excessive force to the switches or controls. Care If the exterior becomes dirty, wipe it with a clean, dry cloth. Do not use liquid cleaners such as benzene or thinner, or cleaning compounds or flammable polishes. Precautions
Transcript
21
Thank you for purchasing the Korg LP-180 digital piano.
Notice regarding disposal (EU only)If this symbol is shown on the product, manual, battery, or package, you must dispose of it in the correct manner to avoid harm to human health or damage to the environment. Contact your local administrative body for details on the correct dis-posal method. If the battery contains heavy metals
in excess of the regulated amount, a chemical symbol is displayed below the symbol on the battery or battery package.
THE FCC REGULATION WARNING (for USA)NOTE: This equipment has been tested and found to comply with the limits for a Class B digital device, pursuant to Part 15 of the FCC Rules. These limits are designed to provide reasonable protection against harmful interference in a residential instal-lation. This equipment generates, uses, and can radiate radio frequency energy and, if not installed and used in accordance with the instructions, may cause harmful interference to radio communications. However, there is no guarantee that interfer-ence will not occur in a particular installation. If this equipment does cause harmful interference to radio or television reception, which can be determined by turning the equipment off and on, the user is encouraged to try to correct the interference by one or more of the following measures: • Reorient or relocate the receiving antenna. • Increase the separation between the equipment and receiver. • Connect the equipment into an outlet on a circuit different
from that to which the receiver is connected. • Consult the dealer or an experienced radio/TV technician for
help.If items such as cables are included with this equipment, you must use those included items.Unauthorized changes or modification to this system can void the user’s authority to operate this equipment.
Keep this manualAfter reading this manual, please keep it for later reference.
Keeping foreign matter out of your equipmentNever set any container with liquid in it near this equip-ment. If liquid gets into the equipment, it could cause a breakdown, fire, or electrical shock.Be careful not to let metal objects get into the equipment. If something does slip into the equipment, unplug the AC adapter from the wall outlet. Then contact your nearest Korg dealer or the store where the equipment was purchased.
Assembling the StandWarning
At least one other person must help you assemble the stand.
Caution during assemblyIn order to assemble the stand safely, please observe the fol-lowing points.• Make sure that you have the correct part in the correct
orientation, and perform the assembly in the order given.
• The LP-180 may fall when applying force too much to the front side of it before fixing the LP-180 to the stand. You should be careful in handling it.
Other cautionsPlease check the following points after assembly.• Loosenedscrews
The screws may loosen as time passes after assembly. You should periodically check whether any screws have be-come loose. If you feel that the stand vibrates excessively, it is possible that screws have come loose. If so, re-tighten them.
• WhenmovingthedigitalpianotoanotherlocationTo move the assembled stand, remove the AC adapter cord and the pedal cord from the stand, close the key cover, and then move it slowly with at least two people keeping it as level as possible.
• DisassemblyIf you need to disassemble the stand, do so by reversing the steps of the assembly procedure. After disassembly, keep the screws and other parts in a safe place so that they are not lost.
The LP-180 should always be laid down before it’s disassembled.
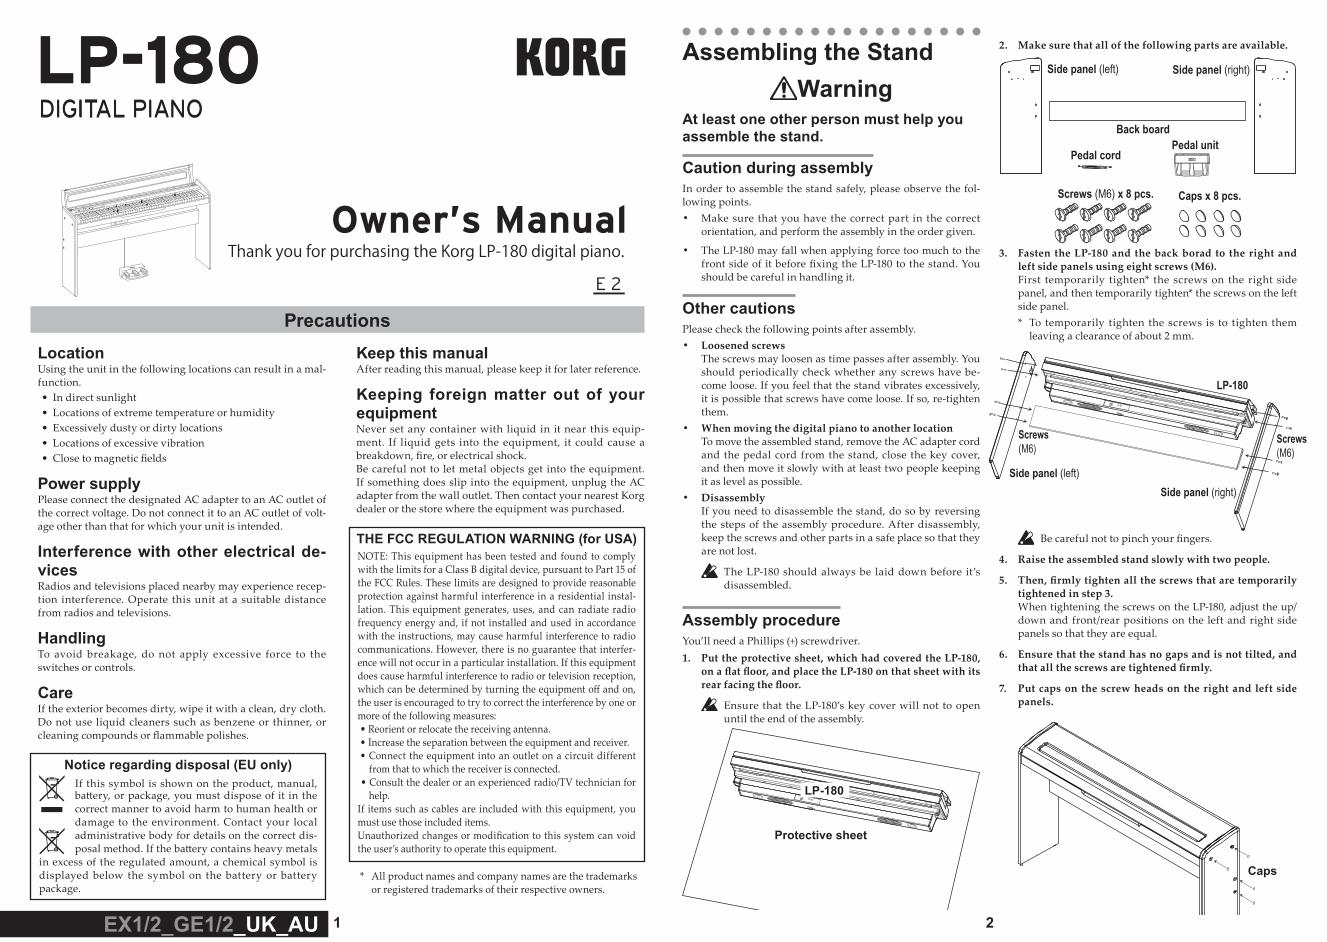
Assembly procedureYou’ll need a Phillips (+) screwdriver.1. Puttheprotectivesheet,whichhadcoveredtheLP-180,
3. FastentheLP-180andthebackboradtotherightandleftsidepanelsusingeightscrews(M6).First temporarily tighten* the screws on the right side panel, and then temporarily tighten* the screws on the left side panel.* To temporarily tighten the screws is to tighten them
leaving a clearance of about 2 mm.
LP-180
Screws(M6)
Screws(M6)
Side panel (right)Side panel (left)
Be careful not to pinch your fingers.
4. Raisetheassembledstandslowlywithtwopeople.
5. Then,firmlytightenallthescrewsthataretemporarilytightenedinstep3.When tightening the screws on the LP-180, adjust the up/down and front/rear positions on the left and right side panels so that they are equal.
* All product names and company names are the trademarks or registered trademarks of their respective owners.
LocationUsing the unit in the following locations can result in a mal-function.• In direct sunlight• Locations of extreme temperature or humidity• Excessively dusty or dirty locations• Locations of excessive vibration• Close to magnetic fields
Power supplyPlease connect the designated AC adapter to an AC outlet of the correct voltage. Do not connect it to an AC outlet of volt-age other than that for which your unit is intended.
Interference with other electrical de-vicesRadios and televisions placed nearby may experience recep-tion interference. Operate this unit at a suitable distance from radios and televisions.
HandlingTo avoid breakage, do not apply excessive force to the switches or controls.
CareIf the exterior becomes dirty, wipe it with a clean, dry cloth. Do not use liquid cleaners such as benzene or thinner, or cleaning compounds or flammable polishes.
Precautions
43
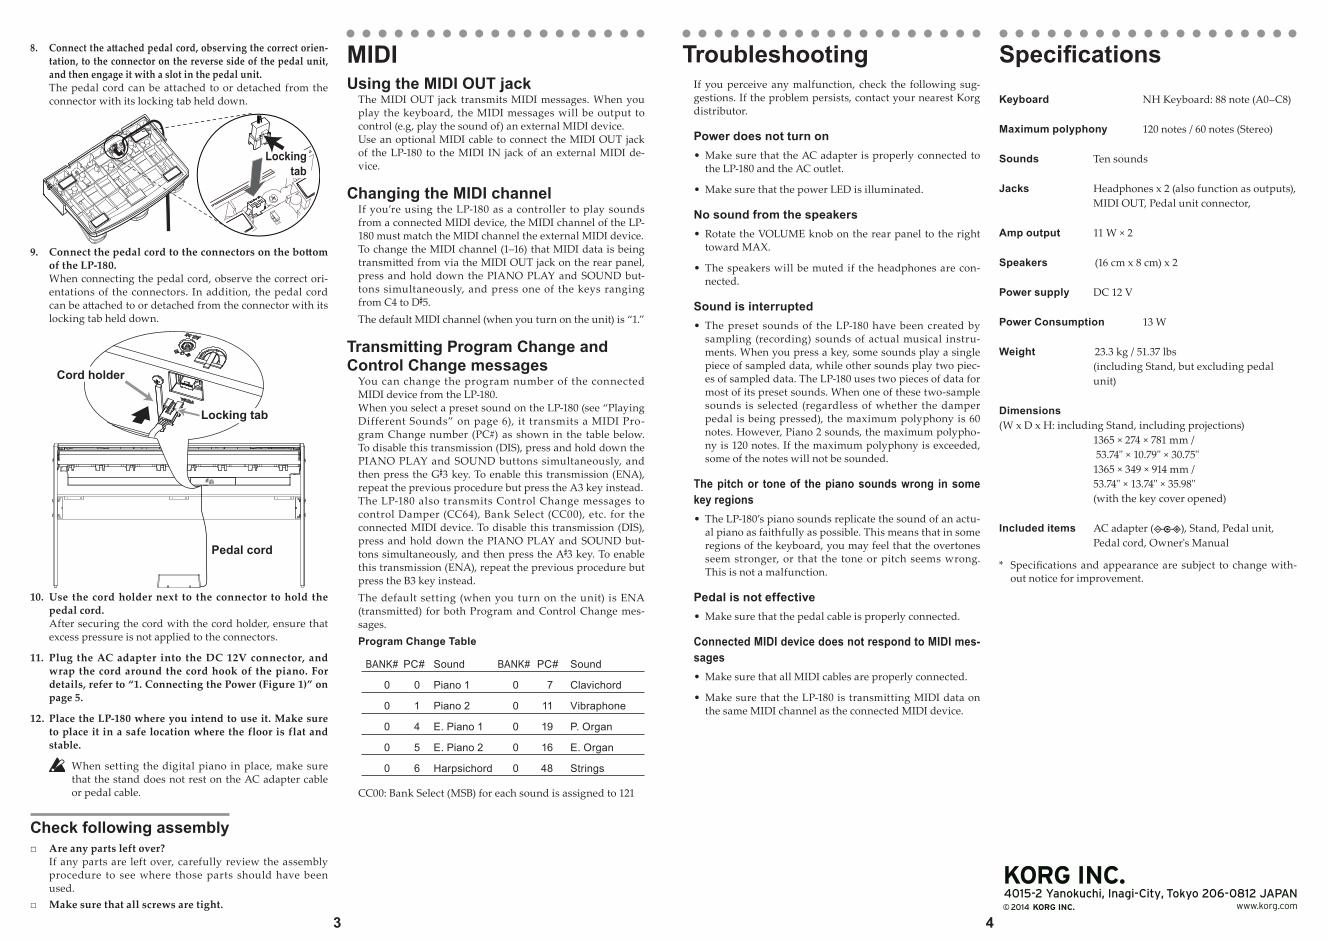
8. Connecttheattachedpedalcord,observingthecorrectorien-tation,totheconnectoronthereversesideofthepedalunit,andthenengageitwithaslotinthepedalunit.The pedal cord can be attached to or detached from the connector with its locking tab held down.
Lockingtab
9. ConnectthepedalcordtotheconnectorsonthebottomoftheLP-180.When connecting the pedal cord, observe the correct ori-entations of the connectors. In addition, the pedal cord can be attached to or detached from the connector with its locking tab held down.
Pedal cord
Locking tab
Cord holder
10. Usethecordholdernext to theconnector toholdthepedalcord.After securing the cord with the cord holder, ensure that excess pressure is not applied to the connectors.
11. Plug theACadapter into theDC12Vconnector,andwrapthecordaroundthecordhookofthepiano.Fordetails,referto“1.ConnectingthePower(Figure1)”onpage5.
When setting the digital piano in place, make sure that the stand does not rest on the AC adapter cable or pedal cable.
Check following assembly□ Areanypartsleftover?
If any parts are left over, carefully review the assembly procedure to see where those parts should have been used.
□ Makesurethatallscrewsaretight.
MIDIUsing the MIDI OUT jack
The MIDI OUT jack transmits MIDI messages. When you play the keyboard, the MIDI messages will be output to control (e.g, play the sound of) an external MIDI device. Use an optional MIDI cable to connect the MIDI OUT jack of the LP-180 to the MIDI IN jack of an external MIDI de-vice.
Changing the MIDI channelIf you’re using the LP-180 as a controller to play sounds from a connected MIDI device, the MIDI channel of the LP-180 must match the MIDI channel the external MIDI device.To change the MIDI channel (1–16) that MIDI data is being transmitted from via the MIDI OUT jack on the rear panel, press and hold down the PIANO PLAY and SOUND but-tons simultaneously, and press one of the keys ranging from C4 to D#5.The default MIDI channel (when you turn on the unit) is “1.”
Transmitting Program Change and Control Change messages
You can change the program number of the connected MIDI device from the LP-180.When you select a preset sound on the LP-180 (see “Playing Different Sounds” on page 6), it transmits a MIDI Pro-gram Change number (PC#) as shown in the table below. To disable this transmission (DIS), press and hold down the PIANO PLAY and SOUND buttons simultaneously, and then press the G#3 key. To enable this transmission (ENA), repeat the previous procedure but press the A3 key instead.The LP-180 also transmits Control Change messages to control Damper (CC64), Bank Select (CC00), etc. for the connected MIDI device. To disable this transmission (DIS), press and hold down the PIANO PLAY and SOUND but-tons simultaneously, and then press the A#3 key. To enable this transmission (ENA), repeat the previous procedure but press the B3 key instead.The default setting (when you turn on the unit) is ENA (transmitted) for both Program and Control Change mes-sages.Program Change Table
BANK# PC# Sound BANK# PC# Sound
0 0 Piano 1 0 7 Clavichord
0 1 Piano 2 0 11 Vibraphone
0 4 E. Piano 1 0 19 P. Organ
0 5 E. Piano 2 0 16 E. Organ
0 6 Harpsichord 0 48 Strings
CC00: Bank Select (MSB) for each sound is assigned to 121
TroubleshootingIf you perceive any malfunction, check the following sug-gestions. If the problem persists, contact your nearest Korg distributor.
Power does not turn on• Make sure that the AC adapter is properly connected to
the LP-180 and the AC outlet.
• Make sure that the power LED is illuminated.
No sound from the speakers• Rotate the VOLUME knob on the rear panel to the right
toward MAX.
• The speakers will be muted if the headphones are con-nected.
Sound is interrupted• The preset sounds of the LP-180 have been created by
sampling (recording) sounds of actual musical instru-ments. When you press a key, some sounds play a single piece of sampled data, while other sounds play two piec-es of sampled data. The LP-180 uses two pieces of data for most of its preset sounds. When one of these two-sample sounds is selected (regardless of whether the damper pedal is being pressed), the maximum polyphony is 60 notes. However, Piano 2 sounds, the maximum polypho-ny is 120 notes. If the maximum polyphony is exceeded, some of the notes will not be sounded.
The pitch or tone of the piano sounds wrong in some key regions• The LP-180’s piano sounds replicate the sound of an actu-
al piano as faithfully as possible. This means that in some regions of the keyboard, you may feel that the overtones seem stronger, or that the tone or pitch seems wrong. This is not a malfunction.
Pedal is not effective• Make sure that the pedal cable is properly connected.
Connected MIDI device does not respond to MIDI mes-sages• Make sure that all MIDI cables are properly connected.
• Make sure that the LP-180 is transmitting MIDI data on the same MIDI channel as the connected MIDI device.
Jacks Headphones x 2 (also function as outputs), MIDI OUT, Pedal unit connector,
Amp output 11 W × 2
Speakers (16 cm x 8 cm) x 2
Power supply DC 12 V
Power Consumption 13 W
Weight 23.3 kg / 51.37 lbs (including Stand, but excluding pedal unit)
Dimensions (W x D x H: including Stand, including projections)
1365 × 274 × 781 mm / 53.74" × 10.79" × 30.75" 1365 × 349 × 914 mm / 53.74" × 13.74" × 35.98" (with the key cover opened)
Included items AC adapter ( ), Stand, Pedal unit, Pedal cord, Owner's Manual
* Specifications and appearance are subject to change with-out notice for improvement.
65
Connecting audio componentsYou can use the phones jacks ( ) as line-out jacks to connect powered speakers or audio components to the keyboard. For such connections, use commercially-available cables that are appropriate for the components that you’re using.
Before connecting audio components, make sure that you turn off the power to the unit and the audio components. Otherwise, damage to the unit or other components may occur.
Playing Different SoundsThe LP-180 features 10 preset sounds.Pressing the SOUND button repeatedly will change the sound in the following sequence.Piano 1 → Piano 2 → E. Piano 1 → E. Piano 2 → Harpsichord → Clavichord → Vibraphone → P. Organ → E. Organ → StringsAfter Strings, the sound will return to Piano 1. Pressing the PIANO PLAY button will switch any sound to Piano 1.Whenever you turn on the unit, the default preset sound (Piano 1) will be recalled.
Piano 1: Elegant and warm grand piano
Piano 2: Clear and bright grand piano
E. Piano 1: Smooth, authentic electric piano
E. Piano 2: Modern, percussive electric piano
Harpsichord: Classical harpsichord
Clavichord: Expressive electric clavichord
Vibraphone: Smooth vibraphone
P. Organ: Pipe organ
E. Organ: Drawbar electronic organ
Strings: Ensemble string section
You can also change the sound by pressing one of the keys ranging from C7 to A7 while simul-taneously pressing and holding down the PIANO PLAY and SOUND buttons. (Please refer to “Key Functions” on pages 7 and 8 .)
Using the pedal unitConnect the pedal unit (included) to the connector on the underside of the keyboard. Once the pedal unit is connected you can effectively express your performances using the damper, soste-nuto and soft functions.
Soft pedalPressing this pedal will make the tone softer. You can control the softness of the tone depending on how far down you press the pedal (“half-pedaling”).
Sostenuto pedalPressing this pedal will apply the damper effect only to the notes that are already be-ing held down on the keyboard. Only these notes will be sustained. The damper ef-fect will not be applied to any additional notes that you play while holding down the Sostenuto pedal.
Damper pedalPressing this pedal will sustain the sound, producing a richly resonant decay. In ad-dition, you can change the applied conditions of the damper according to the depth that the tone pedal of piano 1 and 2 is pressed. (“half-pedaling”).
Soft pedalSostenuto pedal
Damper pedal
PIANO PLAY button
SOUNDbutton
Before you begin playingAbout the included standThe LP-180 is used with the included stand. Make sure that you read the “Assembling the stand” section that can be found on page 2 before proceeding.
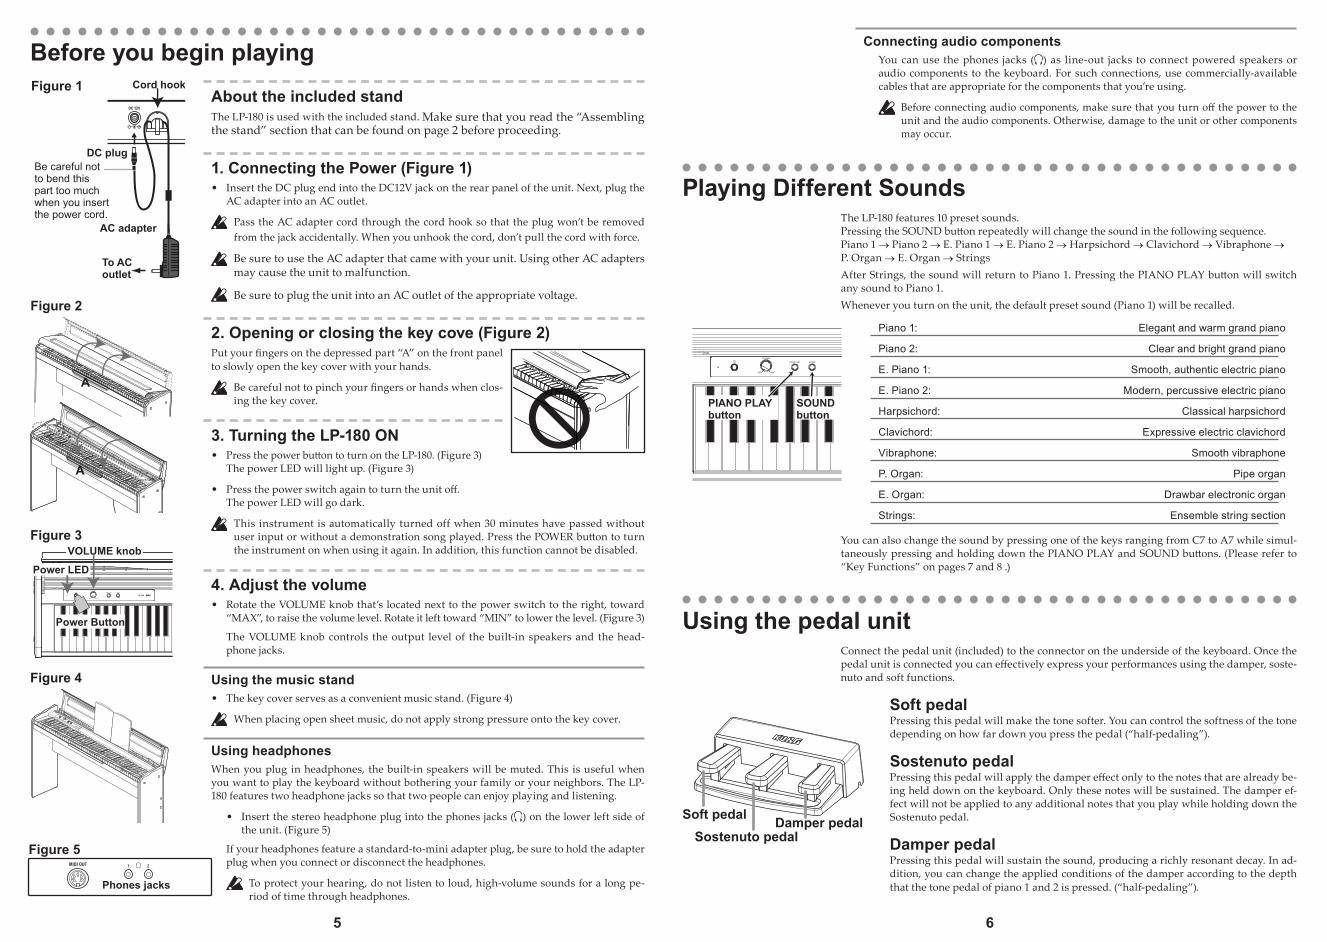
1. Connecting the Power (Figure 1)• Insert the DC plug end into the DC12V jack on the rear panel of the unit. Next, plug the
AC adapter into an AC outlet.
Pass the AC adapter cord through the cord hook so that the plug won’t be removed from the jack accidentally. When you unhook the cord, don’t pull the cord with force.
Be sure to use the AC adapter that came with your unit. Using other AC adapters may cause the unit to malfunction.
Be sure to plug the unit into an AC outlet of the appropriate voltage.
2. Opening or closing the key cove (Figure 2)Put your fingers on the depressed part “A” on the front panel to slowly open the key cover with your hands.
Be careful not to pinch your fingers or hands when clos-ing the key cover.
3. Turning the LP-180 ON• Press the power button to turn on the LP-180. (Figure 3)
The power LED will light up. (Figure 3)
• Press the power switch again to turn the unit off. The power LED will go dark.
This instrument is automatically turned off when 30 minutes have passed without user input or without a demonstration song played. Press the POWER button to turn the instrument on when using it again. In addition, this function cannot be disabled.
4. Adjust the volume• Rotate the VOLUME knob that’s located next to the power switch to the right, toward
“MAX”, to raise the volume level. Rotate it left toward “MIN” to lower the level. (Figure 3)
The VOLUME knob controls the output level of the built-in speakers and the head-phone jacks.
Using the music stand• The key cover serves as a convenient music stand. (Figure 4)
When placing open sheet music, do not apply strong pressure onto the key cover.
Using headphonesWhen you plug in headphones, the built-in speakers will be muted. This is useful when you want to play the keyboard without bothering your family or your neighbors. The LP-180 features two headphone jacks so that two people can enjoy playing and listening.
• Insert the stereo headphone plug into the phones jacks ( ) on the lower left side of the unit. (Figure 5)
If your headphones feature a standard-to-mini adapter plug, be sure to hold the adapter plug when you connect or disconnect the headphones.
To protect your hearing, do not listen to loud, high-volume sounds for a long pe-riod of time through headphones.
To AC outlet
Figure 1
AC adapter
DC plug
Cord hook
Be careful not to bend this part too much when you insert the power cord.
A
A
Figure 2
Figure 3VOLUME knob
Power LED
Power Button
Figure 4
Figure 5
Phones jacks
87
Using Other FunctionsThe LP-180 allows you to play back demo songs or adjust various functions by pressing a specific key while also pressing and holding down the PIANO PLAY and SOUND buttons. Please refer to the “MIDI” section on the next page for more information on MIDI channels and program change messages.
While pressing and holding down the PIANO PLAY and SOUND buttons, do not play the key-board. Otherwise, you might get an unexpected result.
For information on the functions that are assigned to the keys, please refer to “Key Functions” on pages 7 and 8.
About the confirmation soundWhen you press a key to adjust settings for a function, you will hear the confirmation sound. To turn this sound off, simultaneously press and hold down the PIANO PLAY and SOUND buttons and press the A#0 key. To turn on the confirmation sound, repeat the previous procedure but press B0 instead of A#0. The confirmation sound is set to On by default (when you turn the unit on).
Playing Back SongsThe LP-180 features 10 songs that use 10 preset sounds.While pressing and holding down the PIANO PLAY and SOUND buttons, press one of the keys ranging from C6 to A6 (on the right side of the keyboard). The song assigned to the key that you pressed (as shown below) will start play-ing. Playback starts from the selected song, then continues and repeats all songs in ascending order until you stop playback.
1
2 4 7 9
3 5 6 8 10
To stop playback, press the PIANO PLAY and SOUND but-tons simultaneously.
During playback of a song, you can switch the sound using the PIANO PLAY and SOUND buttons while playing the keyboard. The effect setting of the song will also be applied to the sound.
Even if you change the sound during playback of a song, the corresponding MIDI data (such as MIDI Pro-gram Change messages) will not be output.
Song name1 (Piano 1): Un Sospiro /F.Liszt
2 (Piano 2): Amazing Grace/Hymn (arr. : N.Nishi)
3 (E. Piano 1): Ramble/M.Sakaguchi
4 (E. Piano 2): KORG Orignal
5 (Harpsichord): Invention No.8/J.S.Bach
6 (Clavichord): KORG Orignal
7 (Vibraphone): KORG Orignal
8 (P. Organ): Toccata in D moll/J.S.Bach
9 (E. Organ): KORG Orignal
10 (Strings): First Snow/M.Sakaguchi
Effects (Reverb and Chorus)You can use a reverb effect to add depth to the sound, and a chorus effect to add width and space.• Simultaneously press and hold down the PIANO PLAY
and SOUND buttons, and then press the A5 key to turn on the reverb effect. To turn off the reverb effect, repeat the previous procedure but press the G#5 key instead of A5.
• Simultaneously press and hold down the PIANO PLAY and SOUND buttons, and then press the B5 key to turn on the chorus effect. To turn off the chorus effect, repeat the previous procedure but press the A#5 key instead of B5.
You can apply effects to each preset sound. When you turn on the power to the unit, the effects will use the optimum settings for each preset sound.
Key Touch Control functionThe Key Touch Control function enables you to change the way that your playing strength will affect the output level. You can set this function by using the white keys in a range from D2 to F2. (See the figure on the left.)• To play fortissimo with soft strokes (Light touch), press
and hold down the PIANO PLAY and SOUND buttons , and then press the D2 key.
• To play fortissimo with very strong strokes (Heavy touch), press and hold down the PIANO PLAY and SOUND buttons, and then press the F2 key.
• To simulate a normal piano touch (Standard touch), press and hold down the PIANO PLAY and SOUND buttons, and then press the E2 key.
The default setting (when you turn on the unit) is Standard touch.
Transpose function (Shifting the key)In some cases, a song may be written in a difficult key (e.g., using many black keys), or you may wish to shift the key to match another instrument or vocalist. In such cases, you can transpose (shift the key) to use an easier fingering, or to use the same familiar fingering to play in a different key. This is called the Transpose function. You can shift the key in a range of eleven semitones.For example if you transpose upward by one semitone, playing the notes shown in the score on the left below will produce the pitch that’s shown in the score on the right.
• To transpose the key, press and hold down the PIANO PLAY and SOUND buttons, and then press a key from F#2 to B3 or from C#3 to F3. The name of the key that you pressed will become the transposed key.
For example, if you wish to use the C3 key to play note A2 (lower by three semitones), press and hold down the PIANO PLAY and SOUND buttons, and press the A2 key. If you wish to use the C3 key to play note D#3 (higher by three semitones), press and hold down the PIANO PLAY and SOUND buttons, and press the D#3 key.To reset the Transpose function to “No Transposition (+/-0),” press and hold down the PIANO PLAY and SOUND but-tons, and then press the C3 key.The default setting (when you turn on the unit) is “No Transposition.”
Pitch Control function (Tuning)When you’re playing together with other instruments, you can use this the Pitch Control function to fix any slight dif-ferences in pitch between instruments. You can adjust the tuning of the LP-180 in half-step (0.5) Hz intervals over a range of 427.5–452.5 Hz (Hertz) by using the E5 and F5 keys.• Press and hold down the PIANO PLAY and SOUND but-
tons, then press the E5 key to lower the pitch in 0.5Hz steps each time your press it, or press the F5 key repeatedly to raise the pitch in 0.5Hz steps each time you press it.
• To reset the pitch to 440Hz, press and hold down the PIANO PLAY and SOUND buttons, and press the E5 and F5 keys simultaneously.
T he default set t i ng (when you t ur n on t he u n it) i s A4=440Hz.