31
June 2015 Siebel 81.06 OUI –Job Aids & Learning Bytes 1 SIEBEL 81.06 OUI TRAINING JOB AIDS & LEARNING BYTES ADP CANADA – JUNE 2015

June 2015 Siebel 81.06 OUI –Job Aids & Learning Bytes 1
SIEBEL 81.06 OUI TRAINING JOB AIDS & LEARNING BYTES
ADP CANADA – JUNE 2015
June 2015 Siebel 81.06 OUI –Job Aids & Learning Bytes 2
Table of Contents Set-Up for Siebel Open UI in Chrome .......................................................................................................... 4
1. Download Google Chrome ................................................................................................................ 4
2. Authenticate Single Sign-on to the ADP Associate Portal from Google Chrome: ............................. 4
3. Set up the ADP Associate Portal as a default web page in Google Chrome: .................................... 5
4. Upgrade Chrome settings to allow pop-ups ..................................................................................... 6
5. Siebel CRM Page Zoom ..................................................................................................................... 6
New Look & Feel ........................................................................................................................................... 7
1. Accessing Siebel Open UI .................................................................................................................. 7
2. Icons .................................................................................................................................................. 8
3. Home Screen Search Fields ............................................................................................................. 10
4. Service Request Due Dates ............................................................................................................. 10
5. Hyperlinks ....................................................................................................................................... 11
6. Child Service Request Indicator ...................................................................................................... 12
7. Account Alerts ................................................................................................................................. 12
8. Notifications for Watchers .............................................................................................................. 13
Customer Dashboard in Open UI ............................................................................................................... 14
1. Customer Dashboard in Open UI .................................................................................................... 14
Inactivating Contacts .................................................................................................................................. 16
1. Inactivate a Contact from one company code ................................................................................ 16
2. Inactivate a Contact from ALL company codes ............................................................................... 17
F9 Email ....................................................................................................................................................... 18
1. F9 Email ........................................................................................................................................... 18
Attachments ............................................................................................................................................... 21
1. Attachments .................................................................................................................................... 21
2. Viewing Attachments ...................................................................................................................... 21
3. Export Function ............................................................................................................................... 22
Quick Fill Template for Personal Use ......................................................................................................... 24
1. Quick Fill Template for Personal Use .............................................................................................. 24
Menu Dropdown ........................................................................................................................................ 25
1. Menu Dropdown ............................................................................................................................. 25

June 2015 Siebel 81.06 OUI –Job Aids & Learning Bytes 3
Navigation .................................................................................................................................................. 26
1. Validation / Error Messages ............................................................................................................ 26
2. New Arrow Icons ............................................................................................................................. 26
3. Copying data from an un-editable field .......................................................................................... 27
Functionality ............................................................................................................................................... 28
1. Applet Fields .................................................................................................................................... 28
2. Calendar Function ........................................................................................................................... 29
3. Print Function .................................................................................................................................. 30
SR Abstract & Description .......................................................................................................................... 31
1. Spell Check ...................................................................................................................................... 31
2. Expand Text Fields........................................................................................................................... 31
June 2015 Siebel 81.06 OUI –Job Aids & Learning Bytes 4
Set-Up for Siebel Open UI in Chrome Use this job aid to:
1. Download Google Chrome 2. Authenticate single sign-on to the ADP Associate Portal from Google Chrome 3. Set up the ADP Associate Portal as a default web page in Google Chrome 4. Upgrade Chrome settings to allow pop-ups 5. Siebel CRM Page Zoom
Please Note: The URL for Siebel CRM, https://crm.adp.com has NOT CHANGED
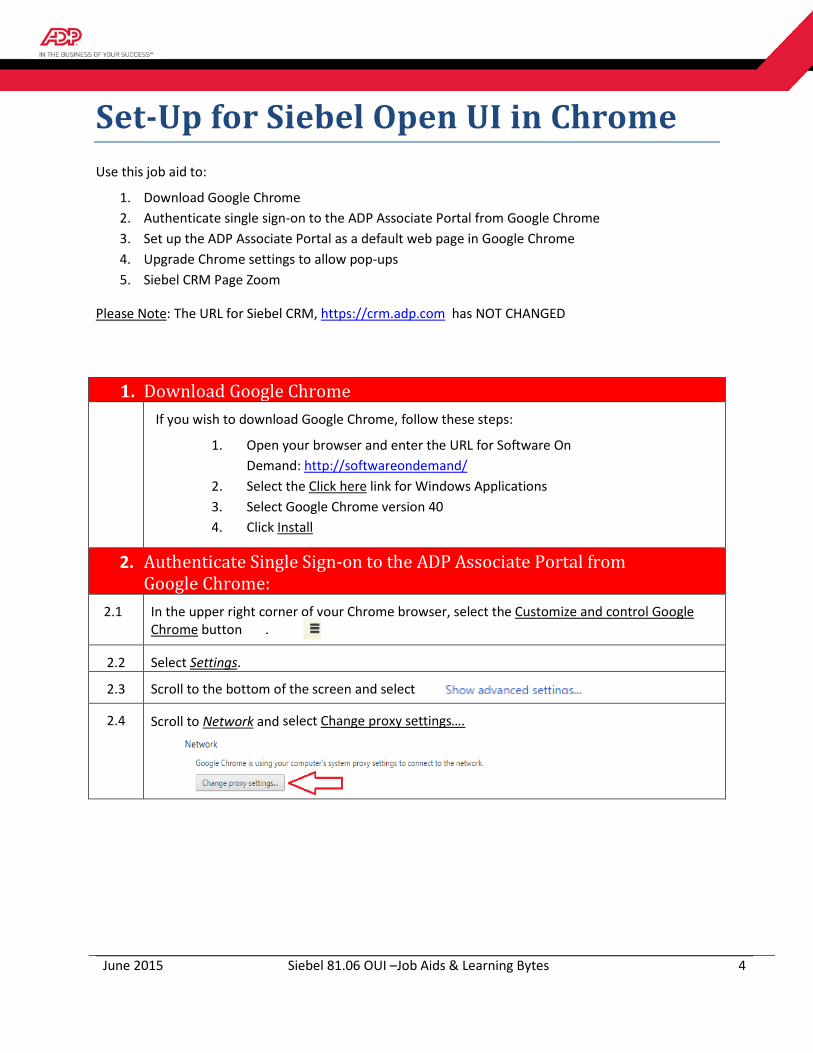
1. Download Google Chrome If you wish to download Google Chrome, follow these steps:
1. Open your browser and enter the URL for Software On Demand: http://softwareondemand/
2. Select the Click here link for Windows Applications 3. Select Google Chrome version 40 4. Click Install
2. Authenticate Single Sign-on to the ADP Associate Portal from Google Chrome:
2.1 In the upper right corner of your Chrome browser, select the Customize and control Google Chrome button .
2.2 Select Settings.
2.3 Scroll to the bottom of the screen and select
2.4 Scroll to Network and select Change proxy settings….
June 2015 Siebel 81.06 OUI –Job Aids & Learning Bytes 5
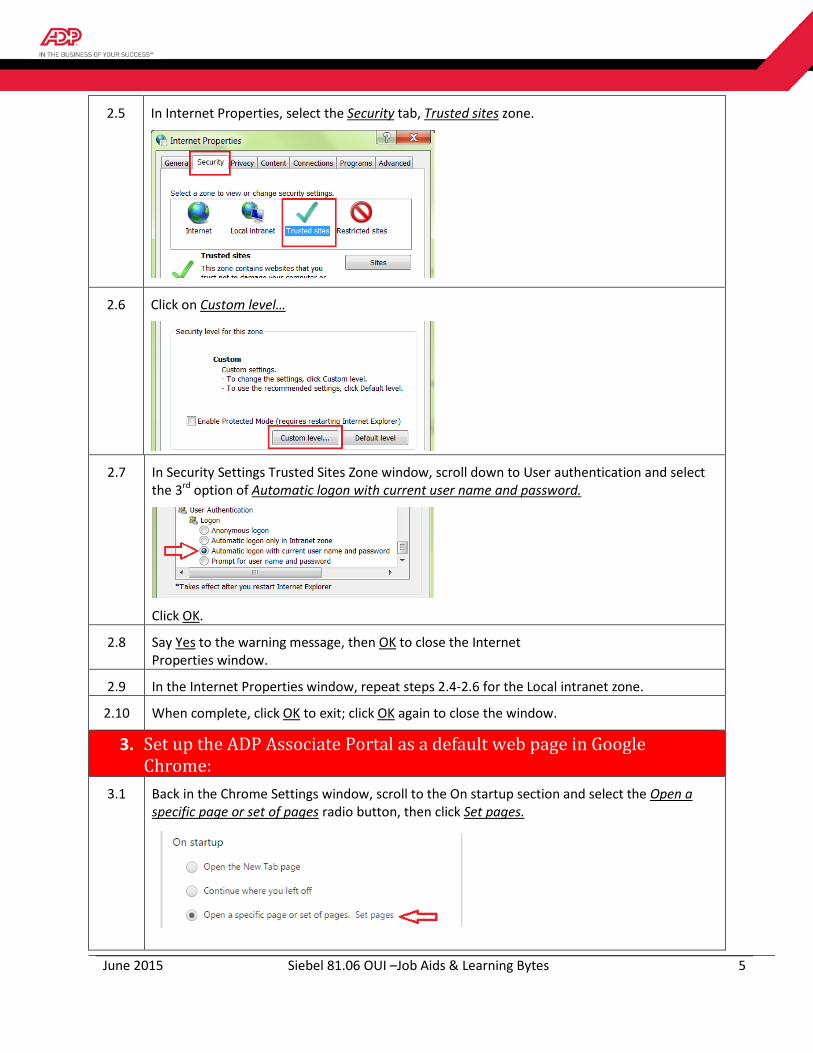
2.5 In Internet Properties, select the Security tab, Trusted sites zone.
2.6 Click on Custom level…
2.7 In Security Settings Trusted Sites Zone window, scroll down to User authentication and select the 3rd option of Automatic logon with current user name and password.
Click OK.
2.8 Say Yes to the warning message, then OK to close the Internet Properties window.
2.9 In the Internet Properties window, repeat steps 2.4-2.6 for the Local intranet zone.
2.10 When complete, click OK to exit; click OK again to close the window.
3. Set up the ADP Associate Portal as a default web page in Google Chrome:
3.1 Back in the Chrome Settings window, scroll to the On startup section and select the Open a specific page or set of pages radio button, then click Set pages.
June 2015 Siebel 81.06 OUI –Job Aids & Learning Bytes 6
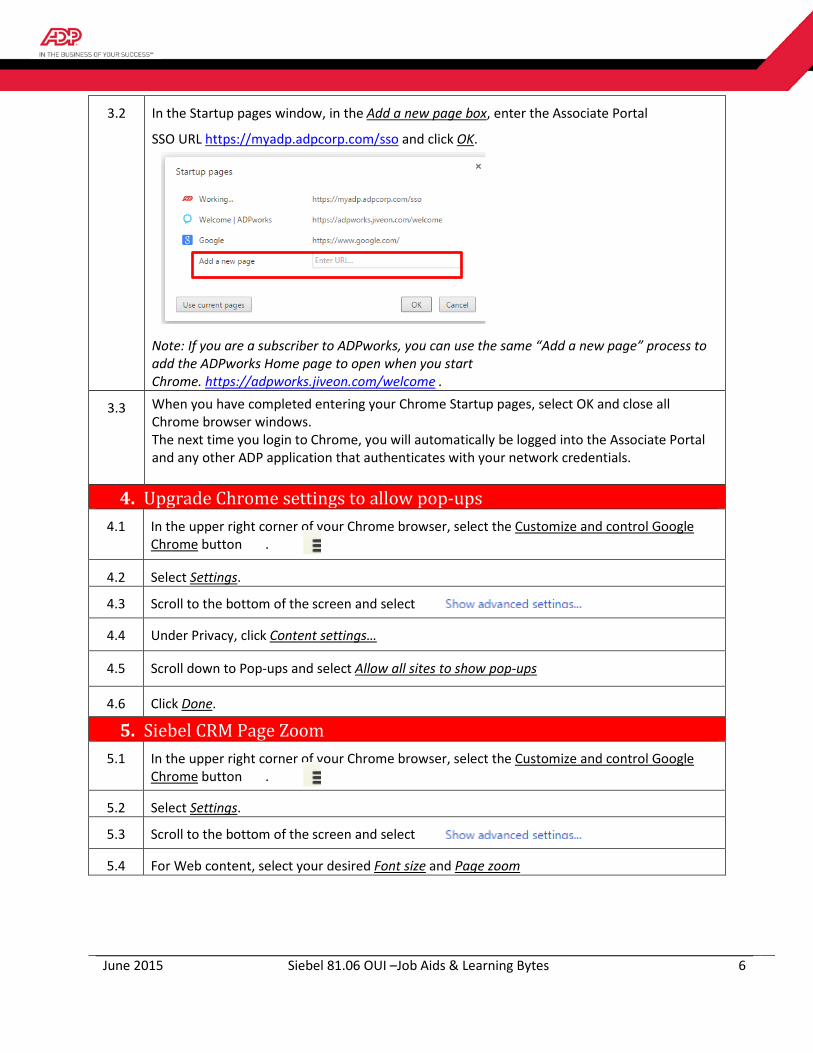
3.2 In the Startup pages window, in the Add a new page box, enter the Associate Portal
SSO URL https://myadp.adpcorp.com/sso and click OK.
Note: If you are a subscriber to ADPworks, you can use the same “Add a new page” process to add the ADPworks Home page to open when you start Chrome. https://adpworks.jiveon.com/welcome .
3.3 When you have completed entering your Chrome Startup pages, select OK and close all Chrome browser windows. The next time you login to Chrome, you will automatically be logged into the Associate Portal and any other ADP application that authenticates with your network credentials.
4. Upgrade Chrome settings to allow pop-ups 4.1 In the upper right corner of your Chrome browser, select the Customize and control Google
Chrome button .
4.2 Select Settings.
4.3 Scroll to the bottom of the screen and select
4.4 Under Privacy, click Content settings…
4.5 Scroll down to Pop-ups and select Allow all sites to show pop-ups
4.6 Click Done.
5. Siebel CRM Page Zoom 5.1 In the upper right corner of your Chrome browser, select the Customize and control Google
Chrome button .
5.2 Select Settings.
5.3 Scroll to the bottom of the screen and select
5.4 For Web content, select your desired Font size and Page zoom
June 2015 Siebel 81.06 OUI –Job Aids & Learning Bytes 7
New Look & Feel Use this job aid to learn about these changes with Open UI:
1. Accessing Siebel Open UI 1. Logging On 2. Available Browsers
2. Icons 1. Toolbar Icons 2. View Link Icons 3. Standard and Custom Icons
3. Home Screen Search Fields
4. Service Request Due Dates 5. Hyperlinks 6. Child Service Request Indicator 7. Accounts Alerts 8. Notifications for Watchers
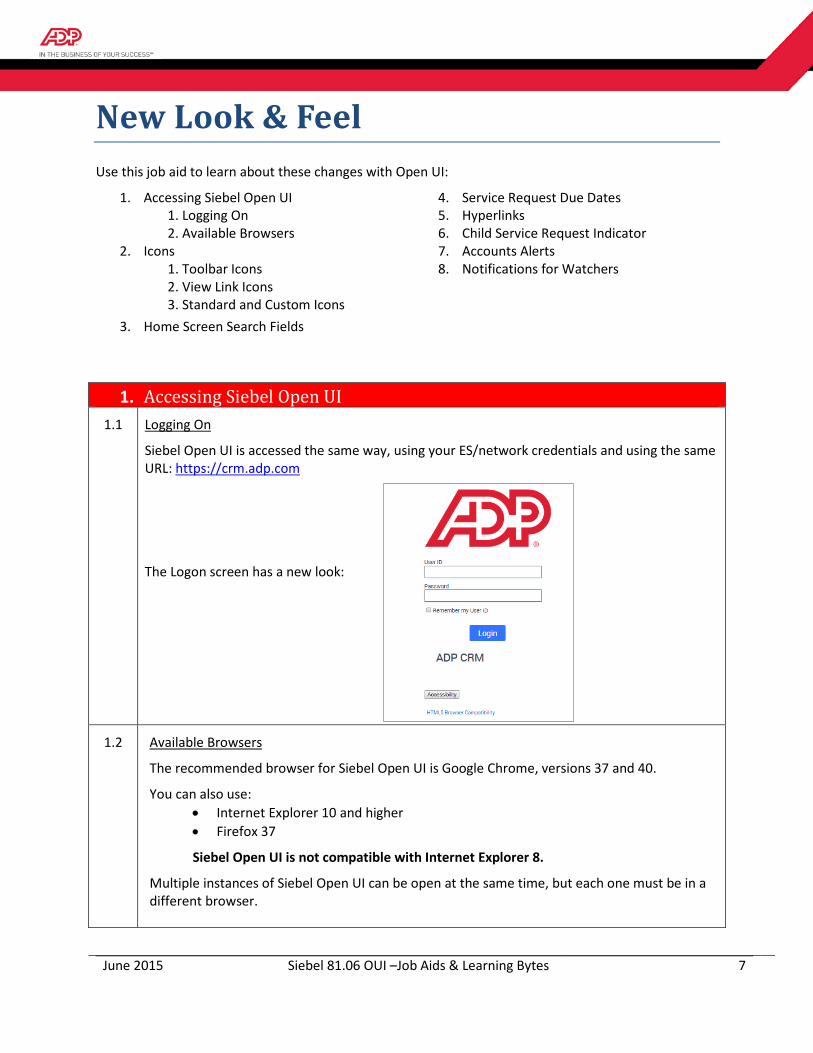
1. Accessing Siebel Open UI 1.1 Logging On
Siebel Open UI is accessed the same way, using your ES/network credentials and using the same URL: https://crm.adp.com
The Logon screen has a new look:
1.2 Available Browsers
The recommended browser for Siebel Open UI is Google Chrome, versions 37 and 40.
You can also use: • Internet Explorer 10 and higher • Firefox 37
Siebel Open UI is not compatible with Internet Explorer 8.
Multiple instances of Siebel Open UI can be open at the same time, but each one must be in a different browser.
June 2015 Siebel 81.06 OUI –Job Aids & Learning Bytes 8
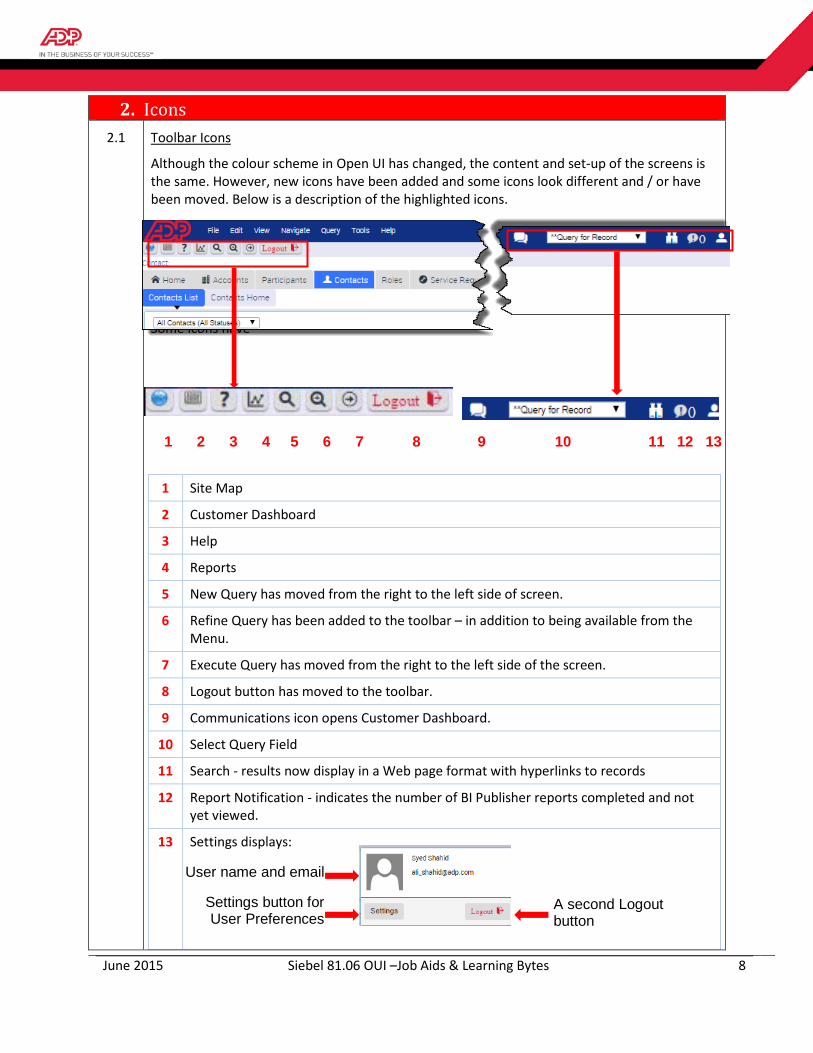
2. Icons 2.1 Toolbar Icons
Although the colour scheme in Open UI has changed, the content and set-up of the screens is the same. However, new icons have been added and some icons look different and / or have been moved. Below is a description of the highlighted icons.
Some icons have
Toolbar Icons
1 Site Map
2 Customer Dashboard
3 Help
4 Reports
5 New Query has moved from the right to the left side of screen.
6 Refine Query has been added to the toolbar – in addition to being available from the Menu.
7 Execute Query has moved from the right to the left side of the screen.
8 Logout button has moved to the toolbar.
9 Communications icon opens Customer Dashboard.
10 Select Query Field
11 Search - results now display in a Web page format with hyperlinks to records
12 Report Notification - indicates the number of BI Publisher reports completed and not yet viewed.
13 Settings displays:
1 2 3 4 5 6 7 8 9 10 11 12 13
User name and email
Settings button for User Preferences
A second Logout button
June 2015 Siebel 81.06 OUI –Job Aids & Learning Bytes 9
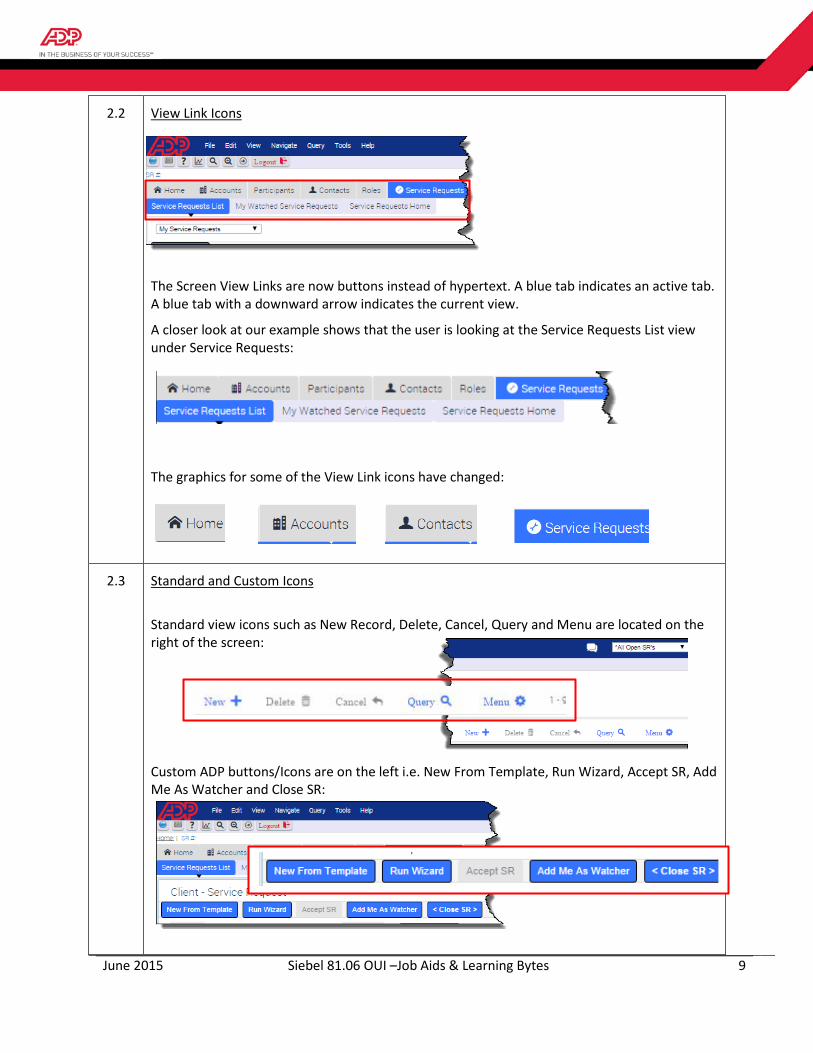
2.2 View Link Icons
The Screen View Links are now buttons instead of hypertext. A blue tab indicates an active tab. A blue tab with a downward arrow indicates the current view.
A closer look at our example shows that the user is looking at the Service Requests List view under Service Requests:
The graphics for some of the View Link icons have changed:
2.3 Standard and Custom Icons
Standard view icons such as New Record, Delete, Cancel, Query and Menu are located on the right of the screen:
Custom ADP buttons/Icons are on the left i.e. New From Template, Run Wizard, Accept SR, Add Me As Watcher and Close SR:

June 2015 Siebel 81.06 OUI –Job Aids & Learning Bytes 10
Where the Show More button used to be are arrows – click an arrow to see either the previous or next record.
3. Home Screen Search Fields The Search fields in Home screen views are all Case Sensitive – as indicated in the
Accounts Home screen below:
4. Service Request Due Dates On the Service Requests Home page an applet for SRs Due Today has been added above Recent
Records.
The screens affected are:
• Home • Contacts Home • Service Requests Home • Activities Home
June 2015 Siebel 81.06 OUI –Job Aids & Learning Bytes 11
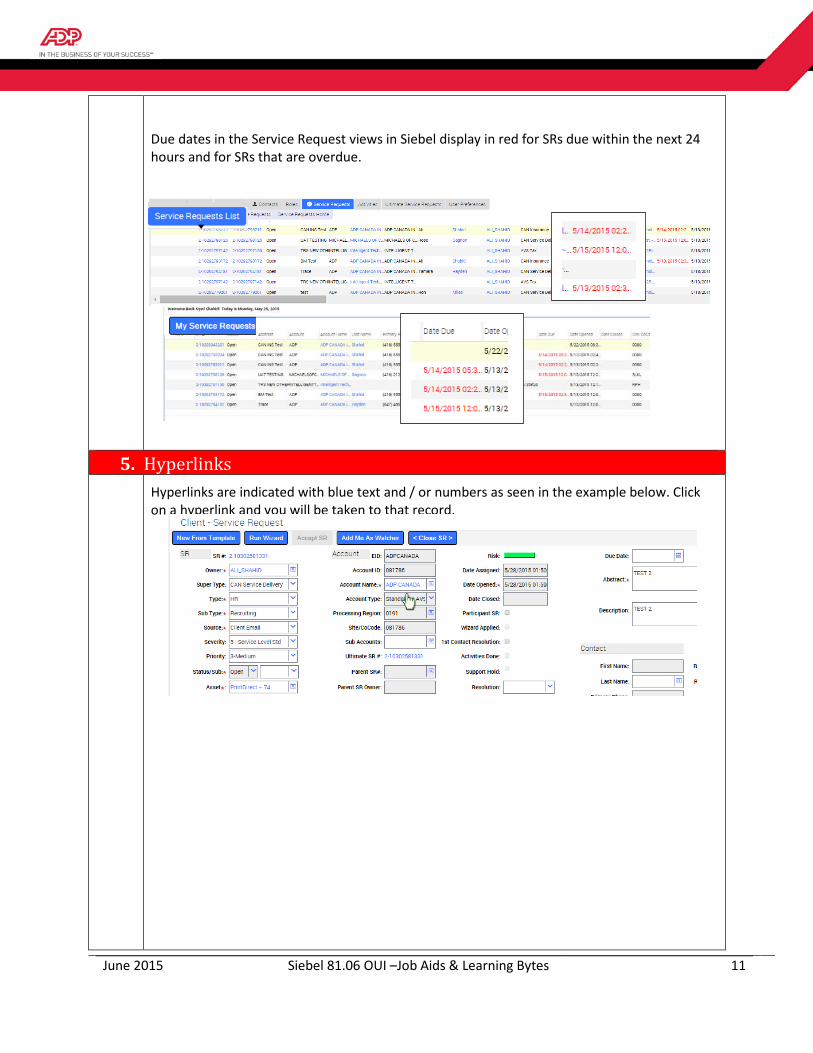
Due dates in the Service Request views in Siebel display in red for SRs due within the next 24 hours and for SRs that are overdue.
5. Hyperlinks Hyperlinks are indicated with blue text and / or numbers as seen in the example below. Click
on a hyperlink and you will be taken to that record.

June 2015 Siebel 81.06 OUI –Job Aids & Learning Bytes 12
Please note that Hyperlinking to an SR defaults to the Alerts view. Scroll up to see details for the service request.
6. Child Service Request Indicator The Child SR check box indicator was removed from the list view and only shows in the detail
or form view.
7. Account Alerts Account Alerts are now sorted with the most urgent alerts listed first.
Within each category of urgency, the most recent alerts are listed in this order:
1st Account alerts
2nd Asset alerts
3rd Contact alerts
June 2015 Siebel 81.06 OUI –Job Aids & Learning Bytes 13
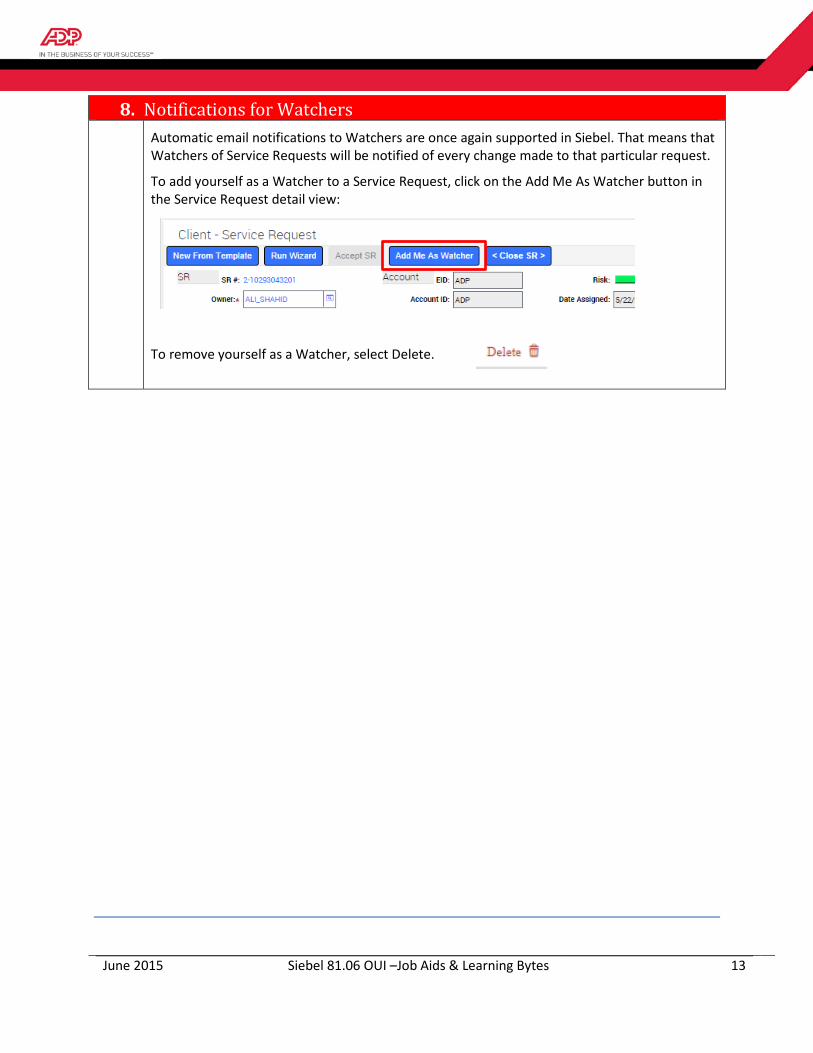
8. Notifications for Watchers Automatic email notifications to Watchers are once again supported in Siebel. That means that
Watchers of Service Requests will be notified of every change made to that particular request.
To add yourself as a Watcher to a Service Request, click on the Add Me As Watcher button in the Service Request detail view:
To remove yourself as a Watcher, select Delete.
June 2015 Siebel 81.06 OUI –Job Aids & Learning Bytes 14
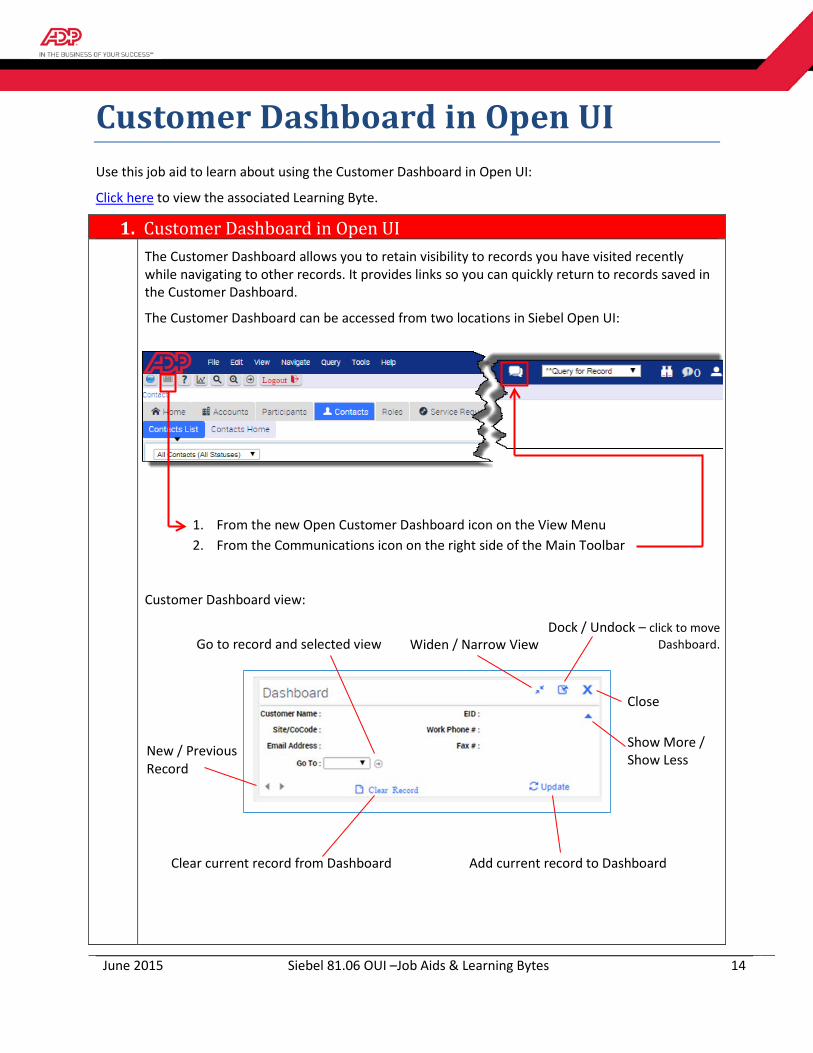
Customer Dashboard in Open UI Use this job aid to learn about using the Customer Dashboard in Open UI:
Click here to view the associated Learning Byte.
1. Customer Dashboard in Open UI The Customer Dashboard allows you to retain visibility to records you have visited recently
while navigating to other records. It provides links so you can quickly return to records saved in the Customer Dashboard.
The Customer Dashboard can be accessed from two locations in Siebel Open UI:
1. From the new Open Customer Dashboard icon on the View Menu 2. From the Communications icon on the right side of the Main Toolbar
Customer Dashboard view:
New / Previous Record
Clear current record from Dashboard Add current record to Dashboard
Go to record and selected view
Show More / Show Less
Close
Widen / Narrow View Dock / Undock – click to move
Dashboard.
June 2015 Siebel 81.06 OUI –Job Aids & Learning Bytes 15
To add a record to the Customer Dashboard:
1. Access it from either the View menu or Main Toolbar 2. Select the record you wish add 3. Click Update in the Customer Dashboard
You can show or hide the Customer Dashboard.
NOTE: Records are cleared from the Customer Dashboard when you log off.

June 2015 Siebel 81.06 OUI –Job Aids & Learning Bytes 16
Inactivating Contacts Use this job aid to learn how to inactivate contacts in Open UI:
1. Inactivate a Contact from one company code 2. Inactivate a Contact from all company codes
Click here to view the associated Learning Byte.
1. Inactivate a Contact from one company code The Delete button was removed in the Contacts view tab from the Contacts and Roles applets
of the Accounts List.
With Open UI, rather than deleting a Contact, the Contact is Inactivated.
To inactivate a contact from one company code:
1. From the Accounts List screen, click on the Account Name hyperlink 2. Select the Contacts view tab 3. Locate and highlight the contact that you want to inactivate from this company code 4. You can either:
a. Click in the Account Contact Status field and select Inactive
(If the Account Contact Status field is not visible, select Menu in the Contacts applet and then Columns Displayed to add this column). Or,
b. Click on the Inactivate button
a.
b.
June 2015 Siebel 81.06 OUI –Job Aids & Learning Bytes 17
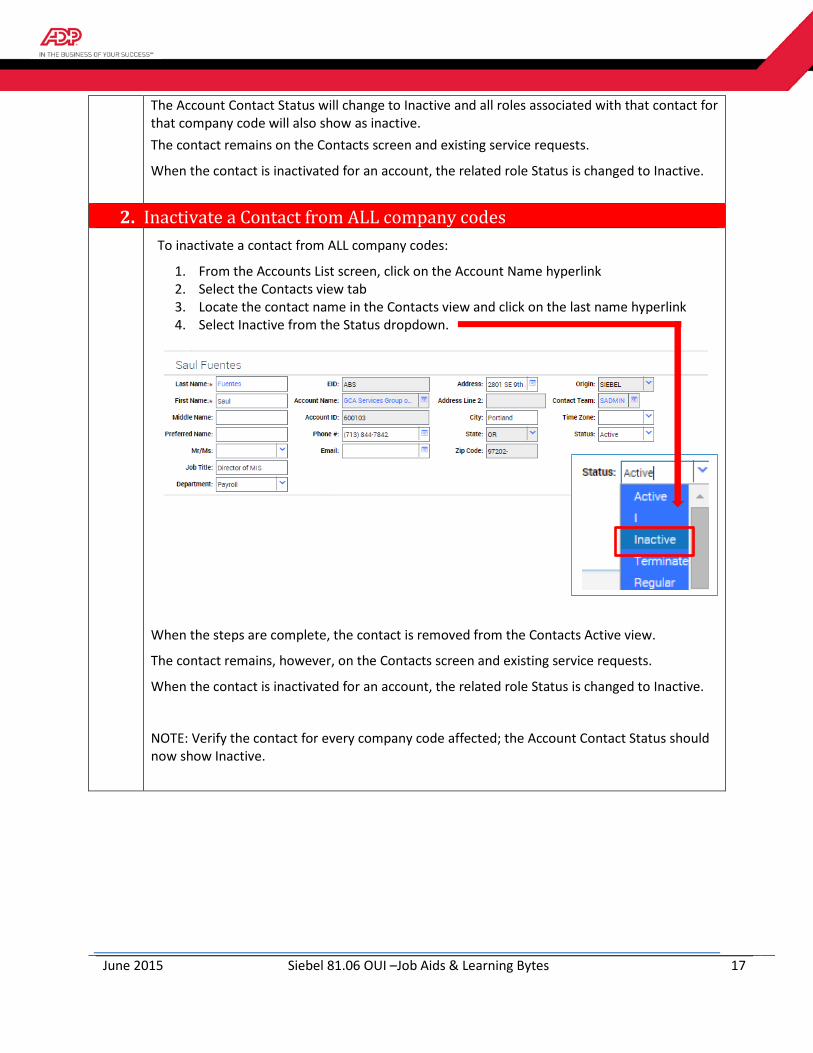
The Account Contact Status will change to Inactive and all roles associated with that contact for that company code will also show as inactive. The contact remains on the Contacts screen and existing service requests.
When the contact is inactivated for an account, the related role Status is changed to Inactive.
2. Inactivate a Contact from ALL company codes To inactivate a contact from ALL company codes:
1. From the Accounts List screen, click on the Account Name hyperlink 2. Select the Contacts view tab 3. Locate the contact name in the Contacts view and click on the last name hyperlink 4. Select Inactive from the Status dropdown.
When the steps are complete, the contact is removed from the Contacts Active view.
The contact remains, however, on the Contacts screen and existing service requests.
When the contact is inactivated for an account, the related role Status is changed to Inactive.
NOTE: Verify the contact for every company code affected; the Account Contact Status should now show Inactive.
June 2015 Siebel 81.06 OUI –Job Aids & Learning Bytes 18
F9 Email Use this job aid to review important changes about F9 Email:
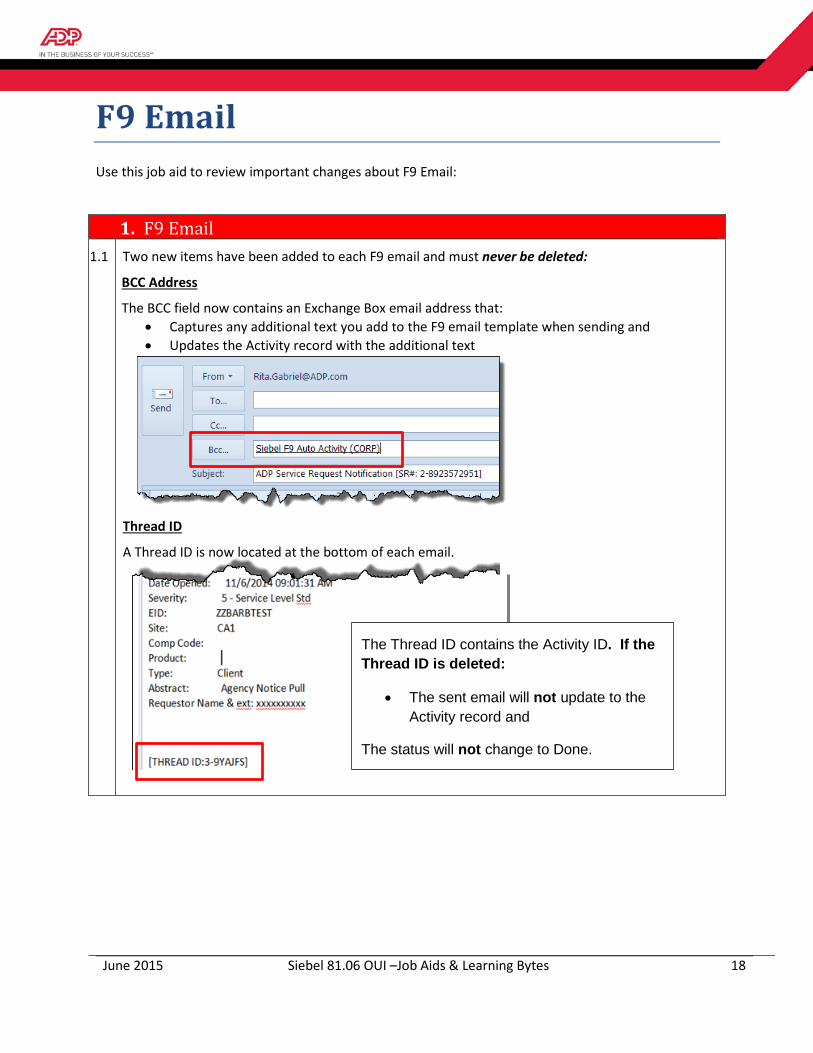
1. F9 Email 1.1 Two new items have been added to each F9 email and must never be deleted:
BCC Address
The BCC field now contains an Exchange Box email address that: • Captures any additional text you add to the F9 email template when sending and • Updates the Activity record with the additional text
Thread ID
A Thread ID is now located at the bottom of each email.
The Thread ID contains the Activity ID. If the Thread ID is deleted:
• The sent email will not update to the Activity record and
The status will not change to Done.
June 2015 Siebel 81.06 OUI –Job Aids & Learning Bytes 19
1.2 Email formatting is not available in Open UI when creating templates When creating F9 Email Templates do not use the following:
• Non-standard fonts (i.e. Comic Sans, use default font only) • Font Size (use default) • Font Color (use default) • Bullets • Highlighted text • Tables
If email templates include text formatting, email messages will show HTML formatting codes. Example: The <b>brown</b> dog.
Also limit: And: • Hyperlink use • Spacing
• Avoid adding SR Descriptions
Please note that although Formatting looks as if it’s available under Administration – All Templates, it is not.
1.3 Troubleshooting for F9 email not opening
For computers that are busy with heavy processing or slower computers, after the user selects a template and clicks OK the Outlook window opens and then goes away.
If this occurs, do not press F9 again. Each time you press F9 an Email-Outbound activity is added to the SR.
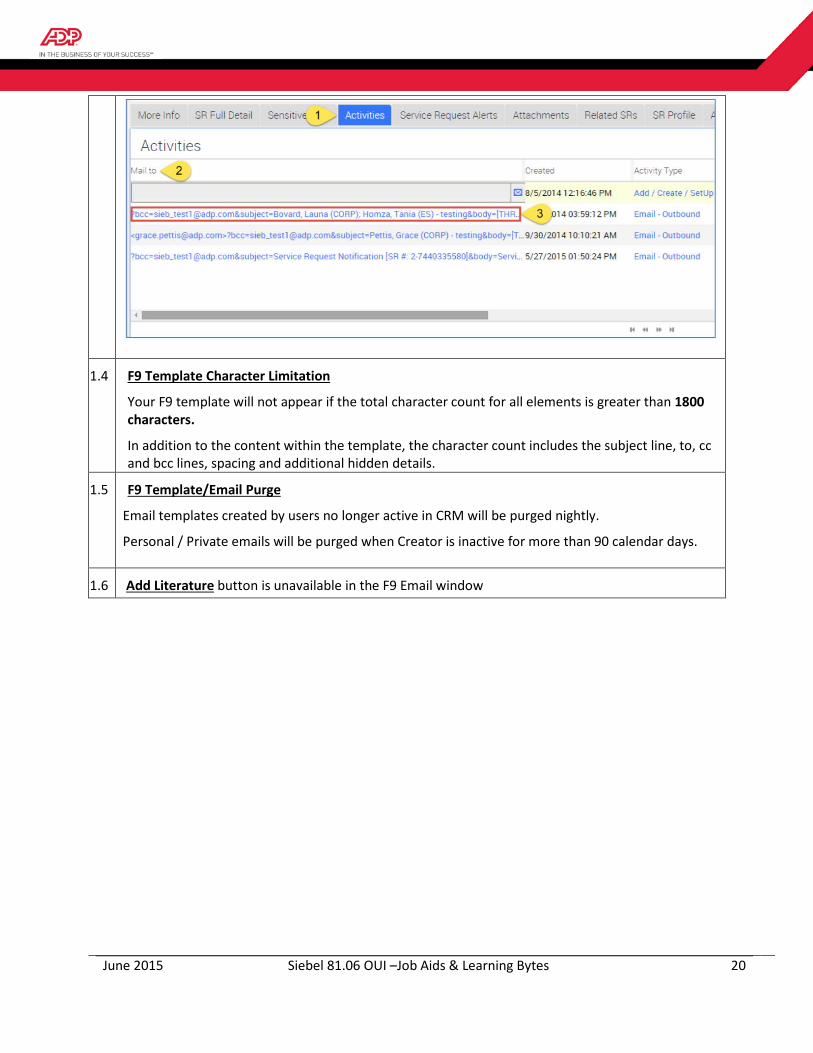
If the F9 email is not listed in the Outbound Email view of the activity, then the email was not sent. You can send the email as follows:
1. Go to the Activities view of the service request.
2. From the Siebel CRM View menu, select Columns Displayed and add the Mail To field to the
Activities list view.
3. In the Activities list, select the hyperlink in the Mail To field. This opens the email in Outlook and
you can send the email.
Note: see screen-shot below
June 2015 Siebel 81.06 OUI –Job Aids & Learning Bytes 20
1.4 F9 Template Character Limitation
Your F9 template will not appear if the total character count for all elements is greater than 1800 characters.
In addition to the content within the template, the character count includes the subject line, to, cc and bcc lines, spacing and additional hidden details.
1.5 F9 Template/Email Purge
Email templates created by users no longer active in CRM will be purged nightly.
Personal / Private emails will be purged when Creator is inactive for more than 90 calendar days.
1.6 Add Literature button is unavailable in the F9 Email window

June 2015 Siebel 81.06 OUI –Job Aids & Learning Bytes 21
Attachments Use this job aid to review important changes in Open UI affecting:
1. Attachments 1. Drag and Drop 2. Activity Record
2. Viewing Attachments Click here to view the associated Learning Byte for Viewing Attachments
3. Export Function Click here to view the associated Learning Byte for Export Function.
1. Attachments 1.1 Drag and Drop
You can still drag and drop documents from your desktop or folder into the Attachments view of your Service Request.
To Drag and Drop an Outlook email:
Save the Outlook Email to your desktop Then drag it into the Attachments view of your Service Request
1.2 Activity Record
An Attachment sent within an F9 email is now captured under the F9 Activity record.
2. Viewing Attachments Depending on your browser settings, you may be prompted to save the attachment prior to
viewing the file. If you do not want the system to produce this pop up message every time you select an attachment, update your Google Chrome browser settings:
1. Select the “Customize and control Google Chrome” option on the right side of the browser address bar
2. Select Settings.
3. Scroll to the bottom of the screen and select
4. Locate the “Downloads” section
5. Uncheck the “Ask where to save each file before downloading” box
June 2015 Siebel 81.06 OUI –Job Aids & Learning Bytes 22
6. Click on and select Exit. Then log back in to the Chrome application.
Note: Opening PDF Attachments: If you have issues trying to open a PDF attachment or other PDF file from the Chrome browser, you may need to disable the default Chrome PDF Viewer: 1. Open a new tab in Chrome
2. In the browser address field, type chrome:plugins and press Enter
3. Under Chrome PDF viewer, click Disable
4. Under Adobe Reader, click Enable
5. Close the Plug-ins tab
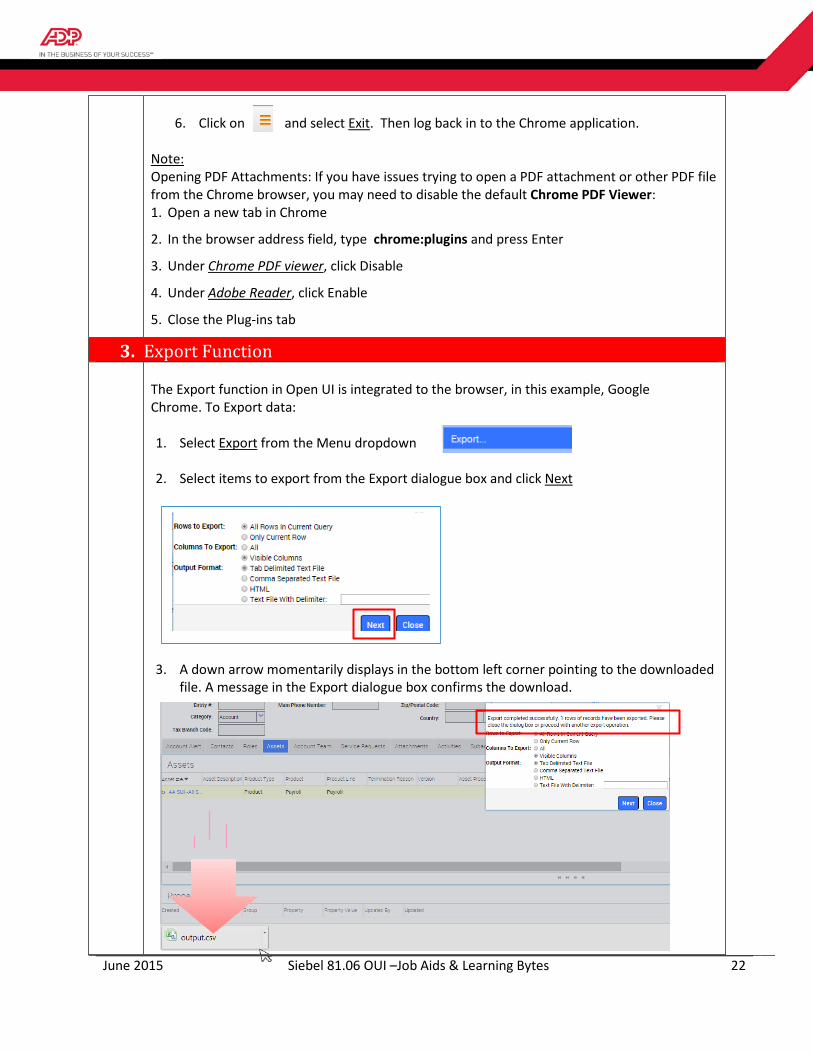
3. Export Function 4.
The Export function in Open UI is integrated to the browser, in this example, Google Chrome. To Export data:
1. Select Export from the Menu dropdown 2. Select items to export from the Export dialogue box and click Next
3. A down arrow momentarily displays in the bottom left corner pointing to the downloaded file. A message in the Export dialogue box confirms the download.

June 2015 Siebel 81.06 OUI –Job Aids & Learning Bytes 23
4. Click on the file to view.
Note:
Depending on your browser settings you may receive a pop-up asking where you want to save the file whenever you use the Export function.
To eliminate this pop-up:
1. In the upper right corner of your Chrome browser, select the Customize and
control Google Chrome button .
2. Select Settings.
3. Scroll to the bottom of the screen and select
4. Scroll down to Downloads
5. Uncheck the box:
6. Click and select Exit.
June 2015 Siebel 81.06 OUI –Job Aids & Learning Bytes 24
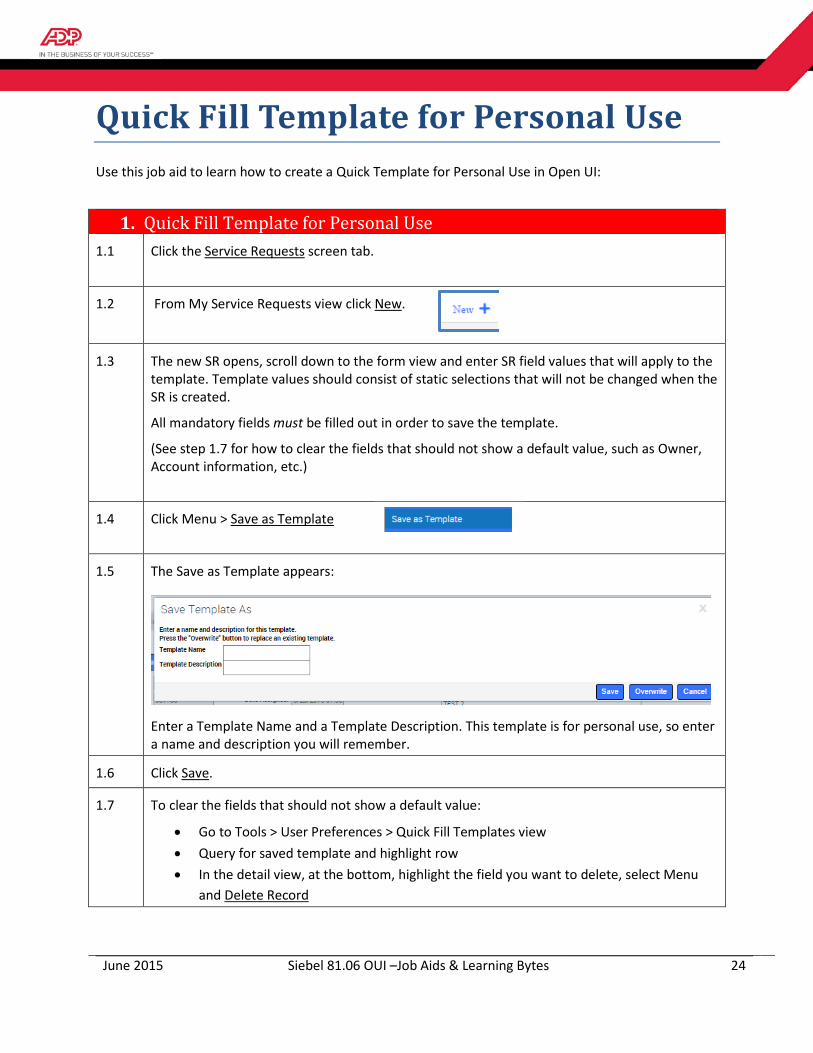
Quick Fill Template for Personal Use Use this job aid to learn how to create a Quick Template for Personal Use in Open UI:
1. Quick Fill Template for Personal Use 1.1 Click the Service Requests screen tab.
1.2 From My Service Requests view click New.
1.3 The new SR opens, scroll down to the form view and enter SR field values that will apply to the template. Template values should consist of static selections that will not be changed when the SR is created.
All mandatory fields must be filled out in order to save the template.
(See step 1.7 for how to clear the fields that should not show a default value, such as Owner, Account information, etc.)
1.4 Click Menu > Save as Template
1.5 The Save as Template appears:
Enter a Template Name and a Template Description. This template is for personal use, so enter a name and description you will remember.
1.6 Click Save.
1.7 To clear the fields that should not show a default value:
• Go to Tools > User Preferences > Quick Fill Templates view • Query for saved template and highlight row • In the detail view, at the bottom, highlight the field you want to delete, select Menu
and Delete Record
June 2015 Siebel 81.06 OUI –Job Aids & Learning Bytes 25
Menu Dropdown Use this job aid to learn about these menu changes with Open UI:
Click here to view the associated Learning Byte.
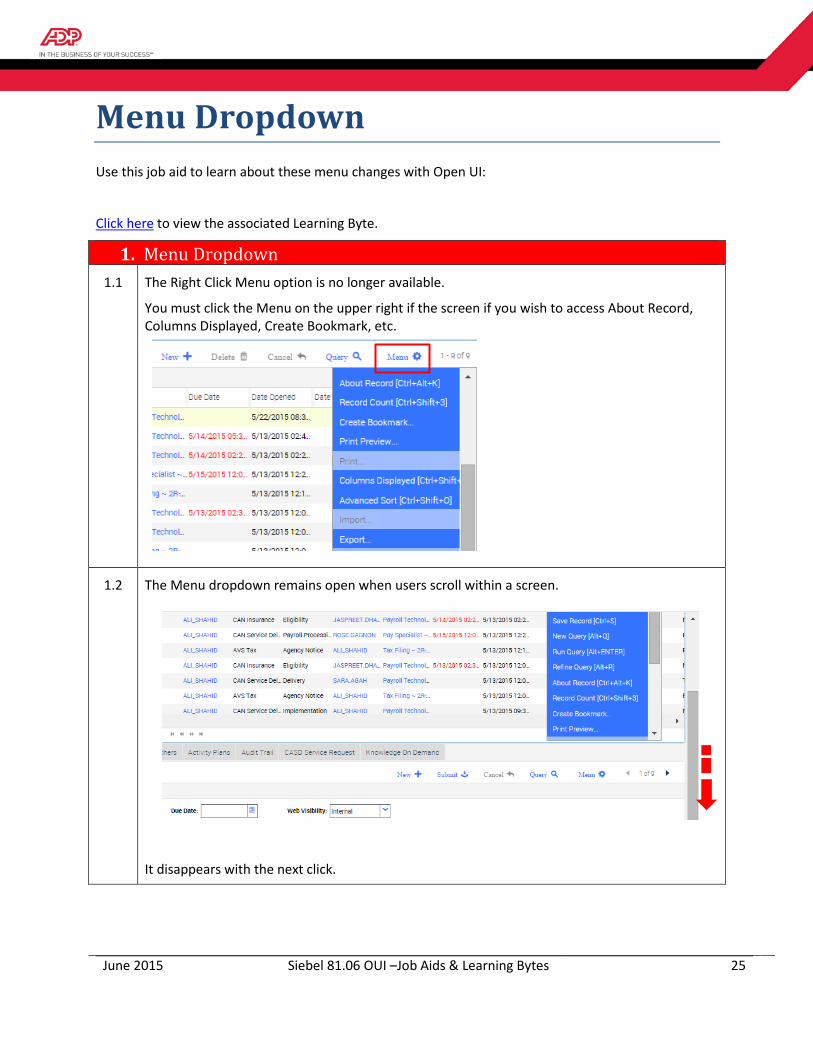
1. Menu Dropdown 1.1 The Right Click Menu option is no longer available.
You must click the Menu on the upper right if the screen if you wish to access About Record, Columns Displayed, Create Bookmark, etc.
1.2 The Menu dropdown remains open when users scroll within a screen.
It disappears with the next click.

June 2015 Siebel 81.06 OUI –Job Aids & Learning Bytes 26
Navigation Use this job aid to learn about these changes with Open UI:
1. Validation / Error Messages 2. Arrow icons instead of scroll bars 3. Copying data from an un-editable field
Click here to view the associated Learning Byte.
1. Validation / Error Messages Validation or Error message boxes are text and now appear as Chrome messages at the top-
centre rather than the middle of the screen. Example:
2. New Arrow Icons The vertical scroll bar has been replaced with arrow icons at the bottom of list applets.
Here’s an example from the Service Requests List view with a close-up of the arrows:
Hovering over one of the arrow icons displays what it represents; in this case the next record set - the next 10 records.
You can also choose Previous Set, Previous Record and Next Record.
June 2015 Siebel 81.06 OUI –Job Aids & Learning Bytes 27
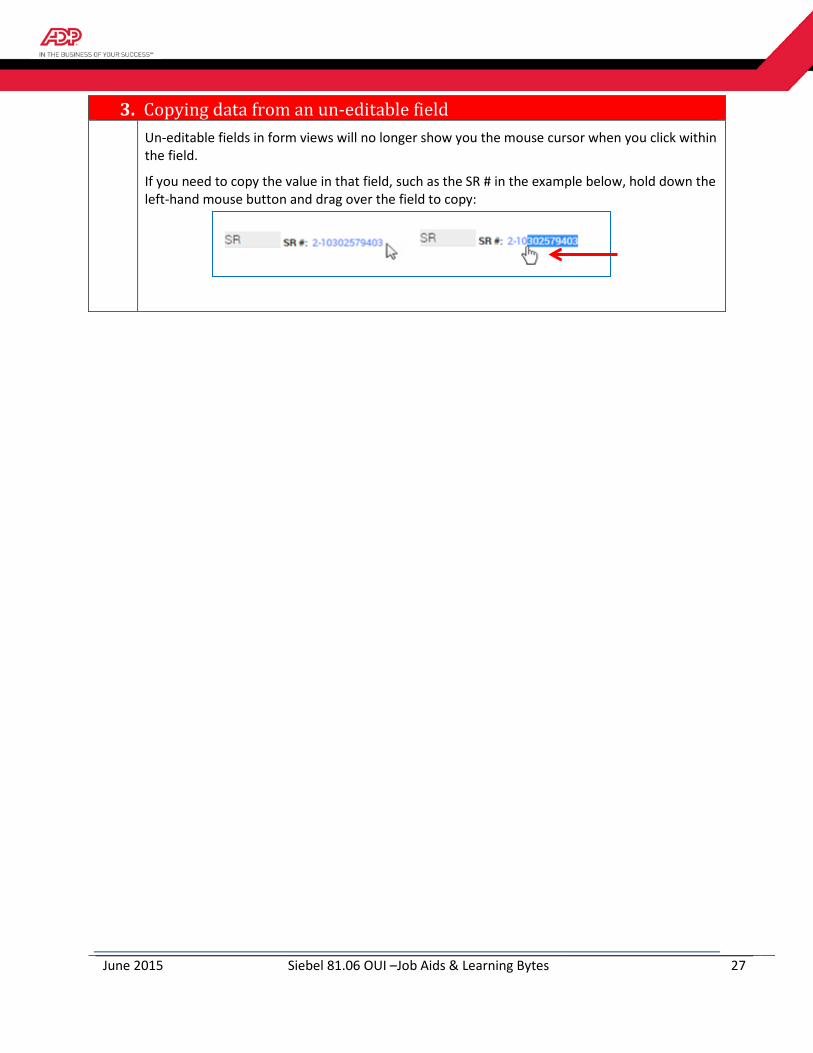
3. Copying data from an un-editable field Un-editable fields in form views will no longer show you the mouse cursor when you click within
the field.
If you need to copy the value in that field, such as the SR # in the example below, hold down the left-hand mouse button and drag over the field to copy:
June 2015 Siebel 81.06 OUI –Job Aids & Learning Bytes 28
Functionality Use this job aid to learn about these changes with Open UI:
1. Applet Fields 2. Calendar Function 3. Print Function
Click here to view the associated Learning Byte.
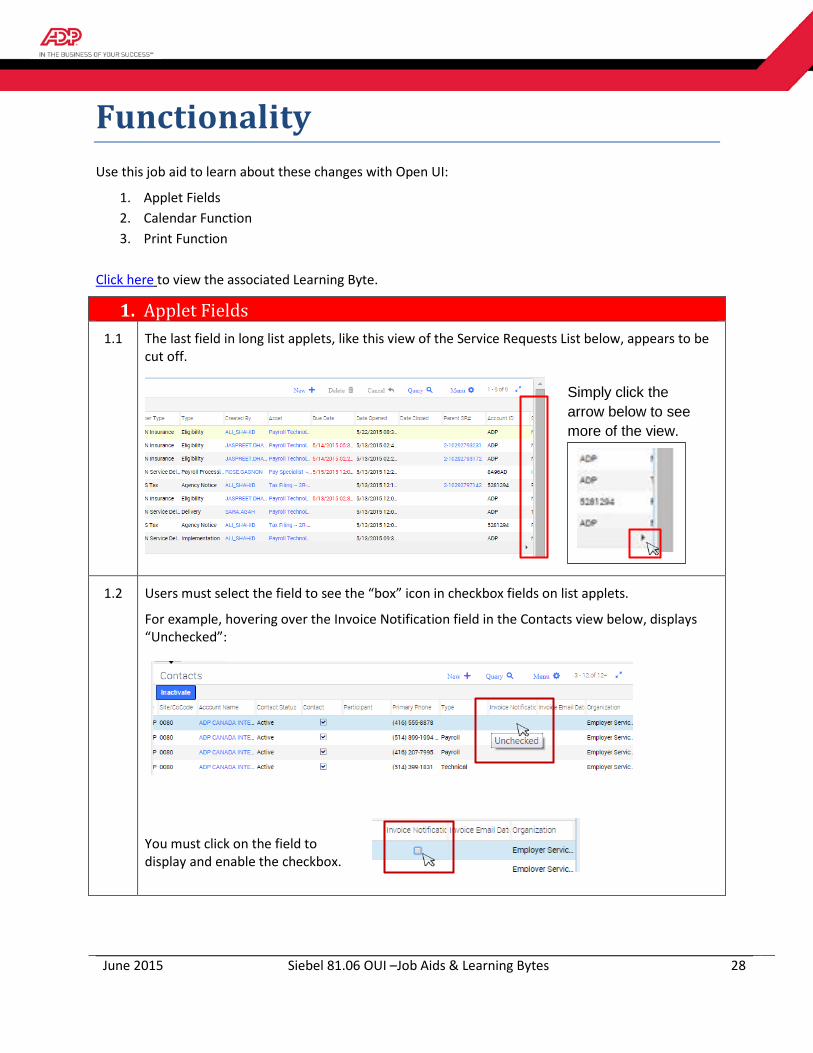
1. Applet Fields 1.1 The last field in long list applets, like this view of the Service Requests List below, appears to be
cut off.
1.2 Users must select the field to see the “box” icon in checkbox fields on list applets.
For example, hovering over the Invoice Notification field in the Contacts view below, displays “Unchecked”:
You must click on the field to display and enable the checkbox.
Simply click the arrow below to see more of the view.

June 2015 Siebel 81.06 OUI –Job Aids & Learning Bytes 29
1.3 Previously, when tabbing within a form applet, the entire value within a field was highlighted, making it easy to delete text in error.
With Open UI, the Tab function now places the cursor at the end of the field value instead, for example, as in the Abstract and Description fields of your Service Request:
2. Calendar Function The Calendar has a new look and feel in
Open UI.
To enter a date:
1. Click on the calendar day
For Time:
1. Click on the Time field and enter the digits
Or
2. Adjust the hour and minute sliders
3. To record the current time and date, simply click Now.
When you are finished, click Done.
1
2
4
3
June 2015 Siebel 81.06 OUI –Job Aids & Learning Bytes 30
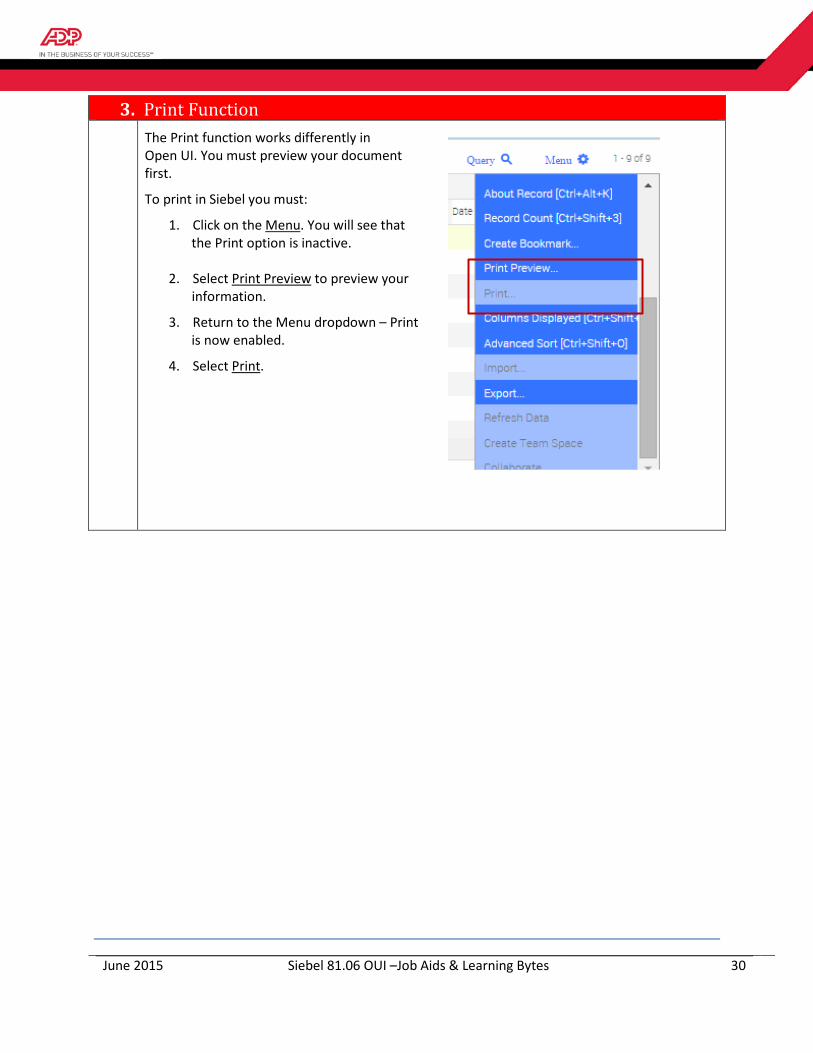
3. Print Function The Print function works differently in
Open UI. You must preview your document first.
To print in Siebel you must:
1. Click on the Menu. You will see that the Print option is inactive.
2. Select Print Preview to preview your
information.
3. Return to the Menu dropdown – Print is now enabled.
4. Select Print.
June 2015 Siebel 81.06 OUI –Job Aids & Learning Bytes 31
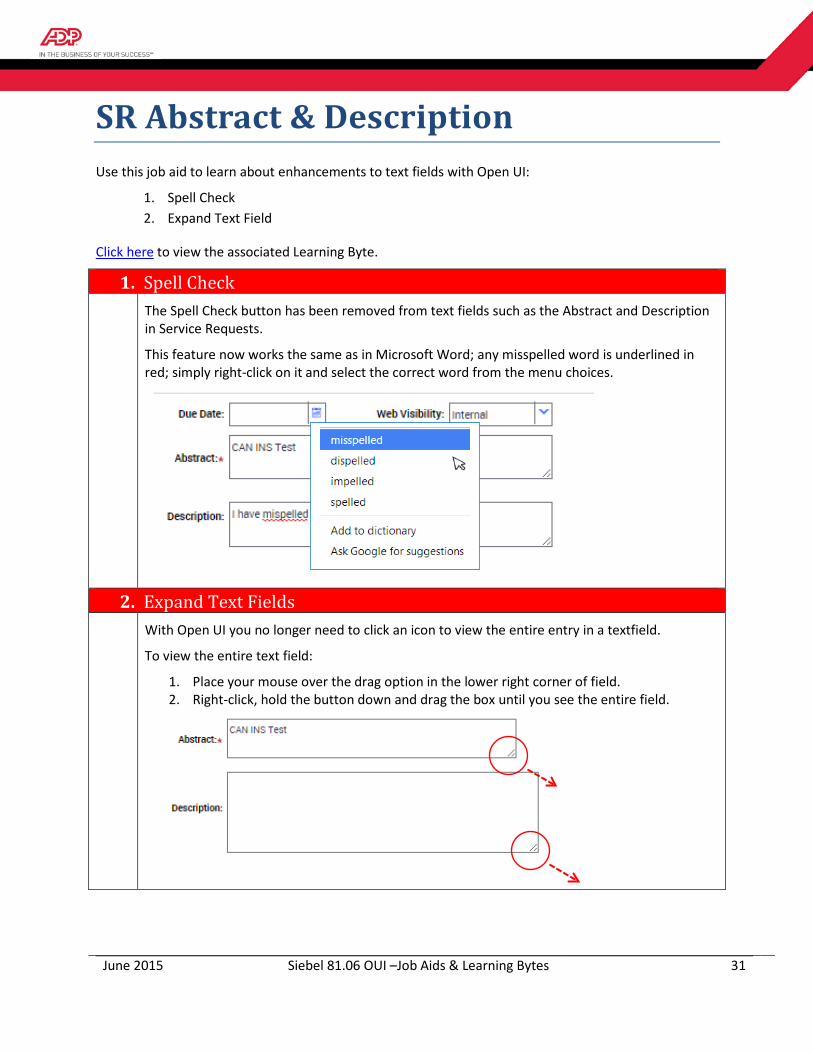
SR Abstract & Description Use this job aid to learn about enhancements to text fields with Open UI:
1. Spell Check 2. Expand Text Field
Click here to view the associated Learning Byte.
1. Spell Check The Spell Check button has been removed from text fields such as the Abstract and Description
in Service Requests.
This feature now works the same as in Microsoft Word; any misspelled word is underlined in red; simply right-click on it and select the correct word from the menu choices.
2. Expand Text Fields With Open UI you no longer need to click an icon to view the entire entry in a textfield.
To view the entire text field:
1. Place your mouse over the drag option in the lower right corner of field. 2. Right-click, hold the button down and drag the box until you see the entire field.


