sig pro SP2340 SP2009 WARNING Please read and understand the instructions and procedures outlined in this manual before using this firearm. If you have any questions, please call or write: SIGARMS Inc. 18 Industrial Drive Exeter, NH 03833 (603) 772 2302 Handling and Safety Instructions
Transcript
sig proSP2340SP2009
WARNINGPlease read and understand the
instructions and procedures outlined in this manual before using this firearm.
If you have any questions, please call or write:
SIGARMS Inc.18 Industrial DriveExeter, NH 03833
(603) 772 2302Handling and Safety Instructions
SIGARMS SIGPRO OM 6/6/01 3:33 PM Page 1
WARNING Always use the decocking lever to decock your SIG SAUER pistol. This is the only way to safely lower the hammer from the cocked position and pre-vent an accidental discharge. This warning applies to all pistols with decocking levers.
The positive way to safely lower the hammer is by use of the decocking lever. Never lower the hammer by pulling the trigger and attempting to ease the hammer forward manually. Manually lowering the hammer is danger-ous and prevents full application of the pistol's safety features.
The decocking lever is the only proper means of lowering the hammer and assuring that the hammer rests in the intercept notch.
Again, DO NOT THUMB THE HAMMER DOWN: the consequence can be serious injury or death - only and ALWAYS use the decocking lever!
You should become familiar with your pistol and its operation beforeusing any live ammunition or actual shooting.
Study the instructions carefully and make sure you understandthe pistol’s operating guidelines.
SIGARMS SIGPRO OM 6/6/01 3:33 PM Page 2
sig pro™1
Table of Contents
1 General Instructions 22 Safety Regulations 33 Product Description 43.1 Main parts 43.2 Main features 53.3 Scope of supply 54 Transporting the Pistol 65 Handling the Pistol 65.1 General remarks 65.2 Initial preparation 65.3 Ammunition 65.4 Loading the magazine 75.5 Loading the pistol (ready to fire) 75.6 Discharging a shot 85.7 Reloading during shooting 95.8 Unloading the pistol 95.8.1 Unloading the pistol,
magazine not empty 95.8.2 Unloading the pistol,
magazine empty, slide open 106 Sight Correction 116.1 Sight correction for windage 116.2 Sight correction for elevation 116.3 Rear and front sight variants 126.4 Rear and front sight keys 127 Maintenance of the Pistol 137.1 Stripping the pistol 137.2 Cleaning the pistol 167.3 Assembling the pistol 187.4 Verification of functions 187.5 Care of the pistol 20
8 Function of the Pistol 218.1 Function sequence when loading 218.1.1 Magazine inserted 218.1.2 Function sequence when loading 228.2 Function sequence when decocking 238.2.1 Hammer decocking 238.3 Function sequence when firing in
“Double Action” mode 248.3.1 Hammer cocking with the trigger 248.3.2 Firing the pistol 258.3.3 Function sequence at shot discharge 268.4 Function sequence at case ejection
and automatic reloading 278.4.1 Unlocking 278.4.2 Function sequence at case ejection
and hammer cocking 288.5 Function sequence when firing in
“Single Action” mode 298.6 Function sequence after discharge of last ro u n d 309 Pistol Service and Repairs 319.1 Cause and correction of malfunctions 319.2 Safekeeping and storage of the pistol 329.3 Shipping the pistol 3210 Technical Specifications / Accessories 3410.1 SP 2009 / SP 2340 3411 Spare Parts List 3511.1 SP 2009 / SP 2340 35
SIGARMS SIGPRO OM 6/6/01 3:33 PM Page 1
sig pro™
Instructions
1 General Instructions
Be sure to read through these instructions carefully beforeany manipulation on this sig pro™ pistol.
Understanding these instructions and the technically correctimplementation of the information contained therein areimperative to correct preparation and safety during handling,care and maintenance of this sig pro™ pistol. Do not use thepistol until you have fully understood all safety instructions andits handling procedures. Should you require further informa-tion, do not hesitate to contact your dealer, importer or themanufacturer.
Please observe all local and national legislation governing theownership, carrying and use of firearms.
Be aware that these pistols, like all firearms, are dangerous.Consequently, the pistol accompanying these Handling andSafety Instructions has been sold under the expressunderstanding that the manufacturer and the importer of thepistol decline any responsibility for consequences ofmanipulations with or on the pistol. This applies in particular toliability for bodily harm or damage to property resulting inwhole or in part from:
– discharge with criminal intent or through negligence,
– improper or careless handling,
– defective, incorrect, hand-loaded or reloaded ammunition,
– inadequate care of the pistol (e.g. corrosion, damage),
– disregard of malfunctions,
– resale in contradiction of regional legislation,
– other circumstances beyond our direct and immediate control.
These limitations apply regardless of whether liability is asserted on the basis of contract, negligence or strict liability(including any failure to warn).
The manufacturer and the importers are not liable forincidental or consequential damages such as loss of use ofproperty, commercial loss or loss of earnings and profits.
– 2 –
California Proposition 65 Warning“Discharging firearms in poorly ventilated areas, cleaning
firearms, or handling ammunition may result in exposure to leadand other substances known to cause birth defects, reproductive
harm, and other serious physical injury. Have adequate ventilation at all times. Wash hands thoroughly after exposure.”
SIGARMS SIGPRO OM 6/6/01 3:33 PM Page 2
sig pro™
2 Safety Regulations
Never use the pistol when under the influence of alcohol ordrugs, during illness or other complaints; they can influenceyour judgement and reflexes.Always consider the pistol as loaded and unsafe until youhave verified that it is not through the unloading procedure(see Sect. 5.8).During all manipulations, keep the muzzle of the pistolpointed in a safe direction. Safe directions are defined asareas where there are no people, other living creatures orother people’s property.Never point the pistol at doors, window panes, walls,concrete, stones or other flat surfaces (including water).Shots can penetrate such surfaces, or be deflected intounsafe directions by them. Never aim at yourself or other living creatures.Never rely on safety mechanisms. They are never a sub-stitute for careful and correct handling of the pistol.Always handle your pistol as if the safety mechanisms weredefective. The best safety device is correct, well-exercisedand secure handling of the pistol.Never shoot a pistol into which there has been ingress ofwater, sand, dirt or other foreign bodies. Never decock the hammer by restraining the hammer andsimultaneously pulling the trigger.Never let a loaded pistol out of your hands.Always unload the pistol immediately after shooting, before putting it down, holstering it or handing it to anotherauthorized person.
Never hand over the pistol to any person who has notthoroughly familiarized himself or herself with the safetyregulations and handling of the pistol by reading the ac-companying instructions.Never leave the pistol unattended. Unauthorized personscould cause damage with it, threaten or kill other people, for which you could be held liable. Never store the pistol loaded, but remove the magazine and verify that there is no round in the barrel chamber byfollowing the unloading procedure (see Sect. 5.8).Always keep the pistol and the ammunition in differentplaces and ensure that neither can fall into the hands of un-authorized persons or children.
In the individual sections of these instructions, the fol-lowing safety indications alert you to various risks:
Information on risks which, if not scrupulouslyobserved, can directly lead to severe bodily harmor death.
Information on risks which, if not scrupulouslyobserved, can lead to bodily harm, damage toproperty and damage to the pistol.
Information on technical requirements which, ifnot scrupulously observed, can lead to damageto the pistol.
Safety Regulations
– 3 –
SIGARMS SIGPRO OM 6/6/01 3:33 PM Page 3
– 4 –sig pro™
Product Description
– 4 –
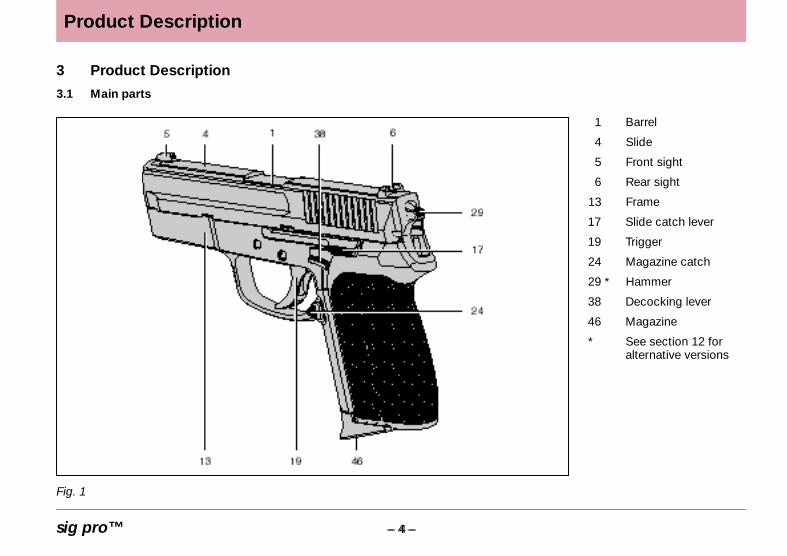
3 Product Description
3.1 Main parts
1 Barrel
4 Slide
5 Front sight
6 Rear sight
13 Frame
17 Slide catch lever
19 Trigger
24 Magazine catch
29 * Hammer
38 Decocking lever
46 Magazine
* See section 12 foralternative versions
Fig. 1
SIGARMS SIGPRO OM 6/6/01 3:33 PM Page 4
sig pro™
Product Description
– 5 –
3.2 Main features
sig pro™ pistols are modern hand weapons complying withthe latest technical advances in weapon design for military,police and sporting use. They operate on the principle of themechanically locked, recoil-operated pistol with semi-automatic reloading. The automatic firing pin safety lock,safety notch on the hammer, decocking lever and the double-action trigger ensure safe carrying of the weapon andpermanent, rapid firing readiness without actuating a manualsafety lock. The decocking lever permits safe unlocking of thehammer in the safety notch without operation of the trigger.The firing pin remains locked during decocking by theautomatic firing pin safety device. The distinctive contrastsights in conjunction with the ergonomically favourable gripdesign permit rapid, precision target acquisition and firing. Theenclosed design prevents the penetration of dirt inside theweapon.
sig pro™ pistols are available as Double-Action/Single-Action(DA/SA) as well as Double-Action-Only (DAO) models. TheDAO version has no decocking lever 38. This difference isdescribed in detail in sections 8 “Function of pistol” and 5“Handling of pistol”.
3.3 Scope of supply
Included:– 1 Pistol– 2 Magazines– 1 Extra Grip– 1 Trigger Lock– 2 Hard Carry Case– 1 Handling and Safety Instructions
SIGARMS SIGPRO OM 6/6/01 3:33 PM Page 5
sig pro™
Transporting Handling
4 Transporting the Pistol
For your own safety and for the safety of others, alwaystransport the pistol in the unloaded condition, decockedand under lock (see Sect. 5.8).
Never carry the pistol on your person with a round in thechamber and the hammer cocked.
Always carry the pistol in such a manner that, should youfall or otherwise slip, you are able to control the direction ofthe muzzle.
Transport the pistol separate from the ammunition.
Ensure that you comply with all regional and national lawsrelating to the transport of firearms.
5 Handling the Pistol
5.1 General remarks
For preservation, the pistol is normally delivered with a lightcoating of protective grease and oils. Before initial preparation,the pistol must be stripped, the protective coatings removedand then relubricated.
5.2 Initial preparation
Procedure1. Strip the pistol (see Sect. 7.1)
2. Clean and relubricate the pistol (see Sect. 7.2)
3. Assemble the pistol (see Sect. 7.3)
5.3 Ammunition
For your pistol, use only commercial grade ammunition inthe original packaging, which corresponds to the calibre ofthe pistol. The correct calibre is stamped on the pistol.
Never use reloaded, “refurbished”, hand-loaded, non-standard ammunition, or ammunition of a different calibre.
Never use dirty, wet, corroded, bent, damaged or oiledammunition.
Never leave ammunition unattended.
– 6 –
SIGARMS SIGPRO OM 6/6/01 3:33 PM Page 6
sig pro™
5.4 Loading the magazine
Procedure1. Place round on feeder 49, close to the magazine lips.
2. Press round down and slip it to the rear.
3. Load the number of rounds that you intend to shoot.
Number of inserted rounds can be checked through the holesof the magazine.
5.5 Loading the pistol (ready to fire)
Never load or unload the pistol inside a vehicle, inside a building or other confined space (except in a designatedfiring range).
Before loading, always wipe off any excess grease and oiland check that there is no obstruction in the bore of thebarrel 1.
Always keep the muzzle of the pistol pointed in a safedirection.
Do not place your finger on trigger 19, but outside of thetrigger guard.
Do not load the pistol by inserting the magazine untilimmediately before shooting.
Never directly draw back hammer 29 by hand in order tocock it.
Never rely on safety mechanisms. They are never asubstitute for careful and correct handling of the pistol.
Never let a loaded pistol out of your hands.
Procedure1. Point the pistol in a safe direction.
2. Insert full magazine 46 and check that it engages.
3. Draw back slide 4 to the stop and allow it to fly forward.
– The pistol is loaded and ready to fire with the singleaction trigger.
– The pistol can then be decocked with decocking lever 38.Now the pistol is loaded, decocked and ready to fire withthe double action trigger.
– The Double Action Only (DAO) pistol is decocked andready to fire.
Double Action Only (DAO) pistols do not have a decockinglever 38. With each cocking or reloading, the hammer 29 Cis caught by the hammer safety notch.
Handling the Pistol
– 7 –
SIGARMS SIGPRO OM 6/6/01 3:33 PM Page 7
sig pro™
Handling the Pistol
5.6 Discharging a shot
Ensure that the target and the environment allow shots tobe fired without danger.
When discharging shots, ensure that neither your fingers,hands or any other part of the body are located in front of,adjacent to, or over the barrel muzzle or the ejector port.
Never allow other persons to stand beside you where theymight be struck by ejected cartridge cases.
Always wear ear protection and safety glasses when shooting. Alert bystanders to the importance of wearing earprotection.
Immediately stop shooting and unload the pistol (see Sect. 9.1) if you suspect that a round has not been cham-bered properly, a case is jammed, a bullet is lodged in thebore, or a discharge sounded or felt weak or abnormal.
Never attempt to dislodge a blockage by firing anotherround.
Procedure1. Aim the pistol at a safe target.
2. Place finger on trigger 19 and pull back trigger 19 todischarge the shot.
3. Keep the pistol aimed at the target and fire further shots asrequired.
4. Remove magazine and unload the pistol (see Sect. 5.8). If the pistol has been fired until the magazine is empty, slide 4 will be caught in the open position. If firing is to continue, reload the pistol (see Sect. 5.7).
After each discharge, Double Action/Single Action pistolsare in the cocked and ready to fire condition.
If you wish to interrupt the shooting session, you mustactuate decocking lever * 38. The pistol is then in theloaded, decocked and ready to fire condition.
After each discharge, Double Action Only (DAO) pistols arein the decocked condition and ready to fire with the doubleaction trigger.
* Not applicable to DAO pistols.
– 8 –
SIGARMS SIGPRO OM 6/6/01 3:33 PM Page 8
sig pro™
5.7 Reloading during shooting
The slide is caught in the open position.
Never let the pistol out of your hands.
Keep the pistol pointed at the safe target.
Procedure1. Remove the empty magazine.
2. Insert full magazine and ensure that it engages.
3. Thumb down slide catch lever 17 or draw back slide 4 tothe stop and allow it to fly forward (see Sect. 5.5).
– The pistol is loaded and ready to fire.
– The pistol can also be decocked with decocking lever 38.(Not applicable to DAO pistols.)
– The pistol is now loaded, decocked and ready to fire.
5.8 Unloading the pistol
5.8.1 Unloading the pistol, magazine not empty
Never let the pistol out of your hands before it is unloaded.
The pistol is loaded, a round is located in the chamber ofthe barrel.
Execute the unloading cycle with only two fingers from therear.
Never place your hand over the ejection port of the slide.
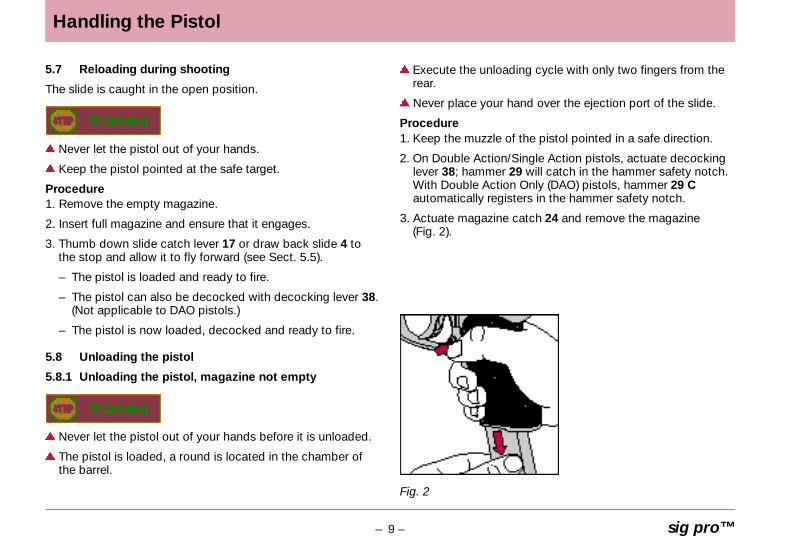
Procedure1. Keep the muzzle of the pistol pointed in a safe direction.
2. On Double Action/Single Action pistols, actuate decockinglever 38; hammer 29 will catch in the hammer safety notch.With Double Action Only (DAO) pistols, hammer 29 Cautomatically registers in the hammer safety notch.
3. Actuate magazine catch 24 and remove the magazine (Fig. 2).
Handling the Pistol
– 9 –
Fig. 2
SIGARMS SIGPRO OM 6/6/01 3:33 PM Page 9
– 10 –
1
sig pro™
4. Draw back slide 4 to the stop and thumb up slide catchlever 17. The round will be ejected and slide 4 caught in itsopen position.
5. Check visually, and manually with a tool, that the round wasejected and that no other round is chambered (Fig. 3).
6. Actuate slide catch lever 17. Slide 4 will be impelledforward.
7. Thumb down decocking lever 38. (Not applicable to DAOpistols.)
8. Empty magazine.
9. Pick up and clean ejected round.
The pistol is unloaded and decocked. It must be cleaned afterevery shooting session (see Sect. 7).
5.8.2 Unloading the pistol, magazine empty, slide open
The pistol must not be put down and out of your hand untilthe magazine is removed and the pistol is unloaded.
Handling the Pistol
Procedure1. Keep the muzzle of the pistol pointed in a safe direction.
2. Actuate magazine catch 24 and remove the magazine (see Fig. 2, page 9).
3. Check that no round is chambered (visually and manuallywith an aid) (Fig. 3).
4. Actuate slide catch lever 17. Slide 4 will be impelledforward.
5. Thumb down decocking lever 38. (Not applicable to DAOpistols.)
The pistol is unloaded and decocked.
Fig. 3
SIGARMS SIGPRO OM 6/6/01 3:33 PM Page 10
– 11 – sig pro™
6 Sight Correction
Any adjustment to sights should only be done on an unloaded pistol, by an armourer, gunsmith or other qualifiedperson. Special tools (see Sect. 6.4) are required for this task. Corrections should first be made to rear sight 6.
6.1 Sight correction for windage
Shifting the rear sight 6Shifting the rear sight 6 by 0.02” to the right alters thepoint of impact by 3” to theright at 25 yard range.
Shifting the front sight 5Shifting the front sight 5 by 0.02” to the left alters thepoint of impact by 3” to theright at 25 yard range.
SIGARMS Inc, has available aCombination Sight PusherTool which makes it easier toadjust sights.
6.2 Sight correction for elevation
Changing the rear sight 6Changing the rear sight 6 for a lower one (one rear sightincrement) alters the point ofimpact by 2” lower at 25 yard range.
Changing the front sight 5Changing the front sight 5 for a higher one (one front sightincrement) alters the point ofimpact by 1” lower at 25 yard range.
Sights
Fig. 4,point of impact left
Fig. 5,point of impact high
SIGARMS SIGPRO OM 6/6/01 3:33 PM Page 11
– 12 –sig pro™
Sight Correction
6.3 Rear and front sight variants
Rear sight variantsNumber 05 06 07 08 09 10
Height .22” .23” .24” .25” .26” .27”
Front sight variantsNumber 05 06 07 08 09
Height .235” .230” .225” .22” .215”
6.4 Rear and front sight keys
Fig. 6, Combined rear andsight tool, from front
Fig. 7, Combined rear and front sight tool, from rear
SIGARMS SIGPRO OM 6/6/01 3:33 PM Page 12
– 13 – sig pro™
7 Maintenance of the Pistol
The magazine must be removed from the pistol.
Before stripping your pistol for cleaning, ensure once againthat it is unloaded (see Sect. 5.8).
7.1 Stripping the pistol
1. Unload the pistol (see Sect. 5.8).
2. Draw back slide 4 to the stop and arrest it in the open position by thumbing up slide catch lever 17 (Fig. 8).
3. Check that no round is chambered (see Fig. 3, page 10).
4. Take the frame and slide in your right hand. Pull the slide 4back slightly to release the slide catch lever 17. Then allowthe slide 4 to move forwards by about 3 mm until the recess4b on the slide 4 rests with its tip against the slide catchlever 17. Press the slide catch lever 17 in from the right andremove from the left (Fig. 9).
Maintenance
Fig. 8
Fig. 9
SIGARMS SIGPRO OM 6/6/01 3:33 PM Page 13
– 14 –sig pro™
Maintenance
5. Follow the slide 4 forwards with your hand until the recoilspring 3 is released.
6. Now slip the complete assembly (slide 4, barrel 1, recoilspring 3 and recoil spring guide 2) forward and off the frame 15.
Recoil spring 3 is compressed. Uncontrolled removal ofrecoil spring guide 2 can cause it and the spring to jumpaway. When stripping, control decompression of the pre-loaded recoil spring 3 with your hand.
Procedure7. Push the recoil spring guide 2 c a refully forw a rds and to one
side or lift off and remove the recoil spring 3 with the re c o i lspring guide 2 f rom the slide 4 (Fig. 11).
Fig. 11
Fig. 10
SIGARMS SIGPRO OM 6/6/01 3:33 PM Page 14
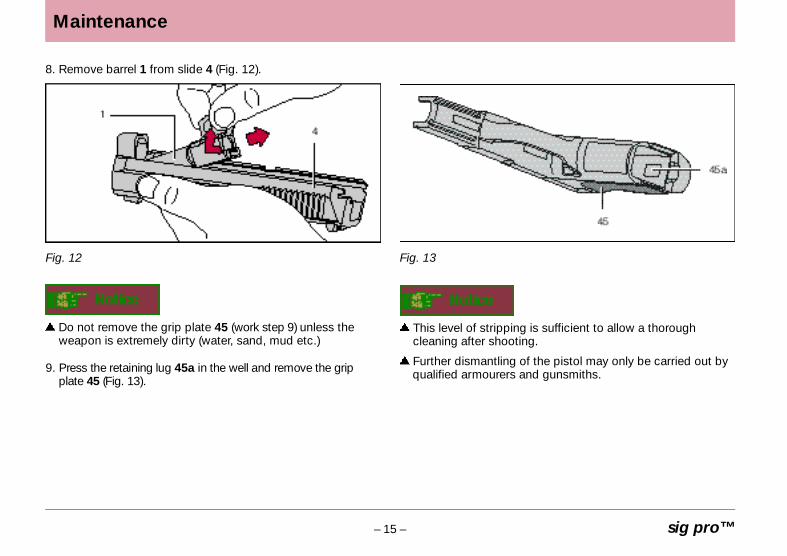
8. Remove barrel 1 from slide 4 (Fig. 12).
Do not remove the grip plate 45 (work step 9) unless theweapon is extremely dirty (water, sand, mud etc.)
9. P ress the retaining lug 45a in the well and remove the gripplate 45 (Fig. 13).
This level of stripping is sufficient to allow a thoroughcleaning after shooting.
Further dismantling of the pistol may only be carried out byqualified armourers and gunsmiths.
Maintenance
– 15 – sig pro™
Fig. 12 Fig. 13
SIGARMS SIGPRO OM 6/6/01 3:33 PM Page 15
Maintenance
– 16 –sig pro™
Procedure1. Lubricate the cleaning brush with gun oil and insert it into
barrel 1 via the chamber. Use brush to carefully remove allpowder residues and dirt in the barrel 1 and chamber.
2. Wipe powder residues and oil from the barrel bore andchamber with cleaning patches.
3. Clean external surfaces of barrel 1 with a brush dipped ingun oil.
4. Clean the metal guide in the frame 13, the inside and out-side surfaces of the slide 4, the locking insert 14 and recoilspring 3 with a brush or rag. Then oil or grease with a clothimpregnated with gun oil or grease.
5. Lightly oil bores of barrel and chamber.
6. If the weapon is extremely dirty (water, sand, mud etc.), inaddition to normal cleaning, the grip plate should be removed (see Sect. 7.1, Point 9). This permits thorough cleaning of the trigger mechanism.
7.2 Cleaning the pistol
Never clean barrel 1 from the muzzle end and do not usesteel wire brush as it can destroy the smooth surface of thebore. Use a suitable cleaning rod and brush of matchingcalibre (see Sect. 12).
Solvents can be harmful to the surface finish of the pistol.Read the manufacturer’s warnings and indications beforeusing solvents or cleansers.
SIGARMS SIGPRO OM 6/6/01 3:33 PM Page 16
7.3 Assembling the pistol
Procedure1. Check that there is no foreign matter inside the pistol.
2. Push the grip plate back on from below until it notcheshome.
3. Place the barrel 1 with the control cam in the slide 4 frombelow.
When recoil spring 3 is inserted into slide 4, it becomes pre-loaded. If the recoil spring guide 2 is not carefully installedin slide 4, it can fly out, together with the recoil spring 3, andinjure you or someone in your vicinity.
4. Insert recoil spring guide 2 with recoil spring 3 into slide 4.
5. Push the entire system onto the frame 13 from the front untilit is correctly on rear side positioned.
6. Push the slide catch lever 17 into position horizontally fromthe left until it rests against the slide 4.
– 17 – sig pro™
Maintenance
Fig. 14, Pistol dismantled for cleaning
SIGARMS SIGPRO OM 6/6/01 3:33 PM Page 17
– 18 –sig pro™
Maintenance
7. Hold the frame 13 with the right hand. Pull the slide 4 backwith the left hand until the recess 4b on the slide 4 coin-cides with the slide catch lever lug 17. Press the slide catchlever 17 into position until it audibly notches home (Fig. 15).
8. Follow the slide 4 forwards with the hand.
9. Thumb down decocking lever 38. (Not applicable for DAOpistols.)
The pistol is unloaded and decocked.
7.4 Verification of functions
Verification of functions must be conducted on the assem-bled pistol:
– to identify causes of malfunction,
– after completion of repairs
– and after each cleaning and assembly of the pistol.
Fig. 15
13
SIGARMS SIGPRO OM 6/6/01 3:33 PM Page 18
– 19 – sig pro™
Procedure
1. Remove the magazine and unload the pistol (see Sect. 5.8).
2. Check the elasticity of recoil spring 3 and the smoothnessof the slide 4 action.
– Draw back slide 4 to the stop and allow it to fly forward.
– Check that slide 4 is impelled forward with sufficientenergy and that it locks up.
– Repeat the verification test.
3. Check the trigger mechanism (DA).
– With hammer 29 decocked, pull trigger 19 through.
– Check that hammer 29 cocks and that at the end oftrigger travel, it strikes firmly forward and comes to rest inthe safety intercept notch.
4. Check trigger travel and trigger interruption.
– With hammer 29 decocked and trigger 19 pulled through,draw back slide 4 to the stop and release it.
– Check that hammer 29 is restrained in its cocked position(trigger remains pulled through). (Not applicable to DAO pistols.)
5. Check simple trigger function (SA).
– Release trigger 19.
– Check that trigger bar 22 reengages and whetherhammer 29 drops when the trigger is pulled again.
6. Check function of decocking lever 38 and safety interceptnotch on hammer 29.
– Cock hammer 29 and decock it with decocking lever 38without touching trigger 19. (Not applicable to DAOpistols.)
– Check that hammer 29 is arrested in the safety interceptnotch before reaching its forward end position and trigger19 is guided to the rest position.
7. Check slide catch lever 17.
– Insert empty magazine, draw back slide 4 to the stopand release it.
– Check that slide 4 remains caught in its rearmost position.
– Actuate slide catch lever 17.
– Check that slide 4 is released and impelled forward withsufficient energy.
– Actuate decocking lever 38. (Not applicable to DAOpistols.)
– Remove magazine.
8. Inspect magazine.
– Check condition of magazine tube 4 6 for signs of damageor dirt (lips and floorplate).
– Check that magazine floorplate is properly secured.
– Check free movement and spring action of feeder 49.
Maintenance
SIGARMS SIGPRO OM 6/6/01 3:33 PM Page 19
– 20 –sig pro™
Maintenance
– Check smooth insertion of magazine into frame 13.
– Check magazine catch 24 for clean engagement andrelease.
9. Inspect external appearance of the pistol.
– Check front sight 5, rear sight 6, grip plate 4 5 for damageand dirt .
– Check that front sight 5, rear sight 6 and grip plate 45are firmly secured.
10. Verification of numbered components.
– Check that serial numbers of barrel 1, slide 4 and frame13 correspond.
7.5 Care of the pistol
Always keep your pistol in immaculate condition and ingood working order.
Always clean your pistol after use.
Never modify or repair parts of your pistol yourself.
Have your pistol checked once every 12 months by aqualified gunsmith or armourer because defects, wear,corrosion, etc. are not always visible from the outside.
For repairs or service work, however, we recommend thatyou return your pistol to the manufacturer who always holdsa full range of replacement parts in stock.
If you order spare parts without returning the pistol, you areresponsible for ordering the correct part and its correctfitting by a qualified gunsmith or armourer.
The manufacturer and importer cannot be held liable forfaults in the pistol or malfunctions if the pistol has beenmodified or non-original parts have been fitted by thirdparties.
SIGARMS SIGPRO OM 6/6/01 3:33 PM Page 20
– 21 – sig pro™
Function
Fig. 16, Pistol with magazine inserted
8 Function of the Pistol
The description offunctions is not a set ofinstructions covering theuse, care or repair of thepistol. Any manipulationson the pistol based on thefollowing description offunctions are strictly pro-hibited.
8.1 Function sequencewhen loading
8.1.1 Magazine inserted
– Full magazine is insertedup to the stop in the frame.
– Magazine catch 24 hasengaged the magazine.
SIGARMS SIGPRO OM 6/6/01 3:33 PM Page 21
– 22 –sig pro™
Function
8.1.2 Function sequencewhen loading
– As slide 4 is drawn back,the hammer 29 is cocked.
– Top round P is thrust upinto the feeding positionby magazine spring 48.
– When slide 4 is released, it is impelled forward bythe compressed recoilspring 3.
– Round P is chambered in the barrel 1 by slide 4.
The pistol is ready to fire.
Hammer 29 is cocked * andcan be decocked * withdecocking lever 38.
* Not applicable to DAOpistols.
Fig. 17, Round being chambered
SIGARMS SIGPRO OM 6/6/01 3:33 PM Page 22
– 23 – sig pro™
8.2 Function sequencewhen decocking *
8.2.1 Hammer decocking *
– Decocking lever * 38 isthumbed down.
– Sear 36 lifts out of registerwith the SA notch 29a ofhammer 29.
– Hammer 29 is releasedand pivoted forward byhammer strut 32 and mainspring 33.
– Hammer 29 engagesdecocking lever 38 andaccompanies this untilbeing intercepted in thesafety notch 29b by sear36 (see Fig. A).
– When decocking lever 38is released, it returns tothe rest position.
Function
Fig. 18, Sear being pivoted out of SA notch
During and after decocking,firing pin 12 remains locked.
Safety intercept notch 29bis the rest position ofhammer 29.
* Not applicable to DAOpistols.
SIGARMS SIGPRO OM 6/6/01 3:33 PM Page 23
– 24 –sig pro™
Function
Fig. 19, Hammer being cocked via trigger action
8.3 Function sequencewhen firing in“Double Action”mode
Firing in “Single Action”mode, see Sect. 8.5.
8.3.1 Hammer cocking withthe trigger
– Trigger 19 is pulled.
– Trigger bar 22 cockshammer 29 via doubleaction notch 29c.
SIGARMS SIGPRO OM 6/6/01 3:33 PM Page 24
– 25 – sig pro™
Function
Fig. 20, Hammer is released “Double Action”
8.3.2 Firing the pistol
– Trigger 19 is pulled up tothe stop.
– Trigger bar 22 pivotssafety lever 30 and sear 36forwards. Safety lever 30raises safety lock 9, thereby liberating firing pin12.
– The control cam of theaction casing 26 guidesthe trigger bar 22 awayfrom the double actionnotch (DA notch) of thehammer 29.
– Hammer 29 is released.
SIGARMS SIGPRO OM 6/6/01 3:33 PM Page 25
– 26 –sig pro™
Function
Fig. 21, Round is discharged
8.3.3 Function sequence atshot discharge
– Hammer 29 is released.
– Via hammer strut 32,mainspring 33 thrustshammer 29 upwards.
– Hammer 29 strikes firingpin 12.
– Firing pin 12 impactsagainst the primer of round P.
SIGARMS SIGPRO OM 6/6/01 3:33 PM Page 26
– 27 – sig pro™
Safety in the case ofincompletely closed slideposition
If slide 4 is not in its fullylocked final position, the reg-ister between safety lever 30and safety lock 9 iscancelled. Also, trigger bar22 is depressed by slide 4,thereby interrupting theremaining trigger functions.
Fig. 22, Barrel is tilted down and arrested
Function
8.4 Function sequence atcase ejection andautomatic reloading
8.4.1 Unlocking
– Blowback reaction gener-ated at discharge thrustsslide 4 to the rear.
– This separates safety lever30 and safety lock 9. Firingpin lock is effective again.
– Slide 4 depresses triggerbar 22, thereby discon-necting trigger bar 22from safety lever 30.
– The barrel 1 must beswung downwards torelease by means of thecontrol cam S inconjunction with the slidecatch lever pivot 17.
SIGARMS SIGPRO OM 6/6/01 3:33 PM Page 27
– 28 –sig pro™
Function
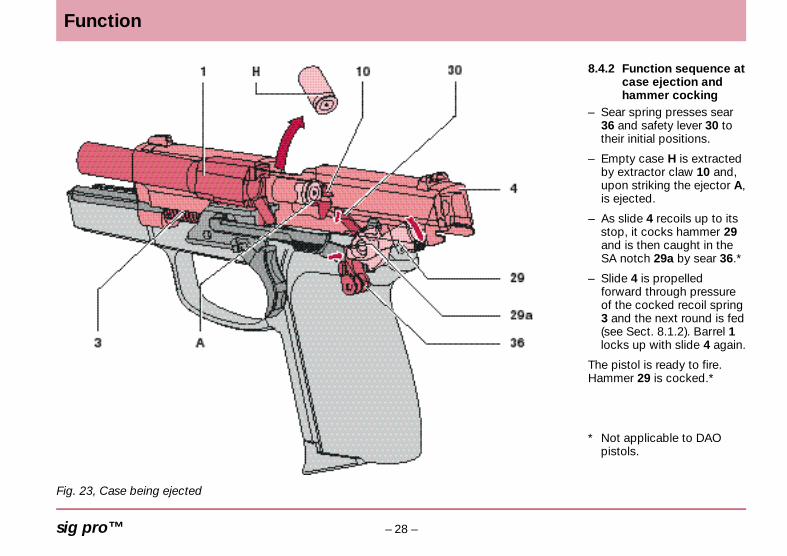
Fig. 23, Case being ejected
8.4.2 Function sequence atcase ejection andhammer cocking
– Sear spring presses sear36 and safety lever 30 totheir initial positions.
– Empty case H is extractedby extractor claw 10 and,upon striking the ejector A,is ejected.
– As slide 4 recoils up to itsstop, it cocks hammer 29and is then caught in theSA notch 29a by sear 36.*
– Slide 4 is propelledforward through pressureof the cocked recoil spring3 and the next round is fed(see Sect. 8.1.2). Barrel 1locks up with slide 4 again.
The pistol is ready to fire.Hammer 29 is cocked.*
* Not applicable to DAOpistols.
SIGARMS SIGPRO OM 6/6/01 3:33 PM Page 28
– 29 – sig pro™
Function
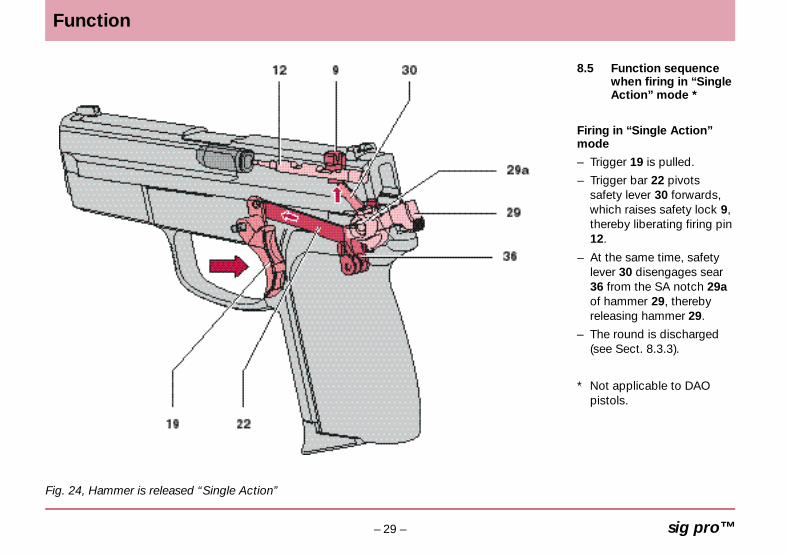
Fig. 24, Hammer is released “Single Action”
8.5 Function sequencewhen firing in “SingleAction” mode *
Firing in “Single Action”mode
– Trigger 19 is pulled.
– Trigger bar 22 pivotssafety lever 30 forwards,which raises safety lock 9,thereby liberating firing pin12.
– At the same time, safetylever 30 disengages sear36 from the SA notch 29aof hammer 29, therebyreleasing hammer 29.
– The round is discharged(see Sect. 8.3.3).
* Not applicable to DAOpistols.
SIGARMS SIGPRO OM 6/6/01 3:33 PM Page 29
– 30 –sig pro™
Function
Fig. 25, When magazine is empty, slide is held open
8.6 Function sequenceafter discharge oflast round
– Blowback reaction gener-ated at discharge thrustsslide 4 to the rear stop.
– In the empty magazine,magazine spring 48 raisesfeeder 49 which alsopresses up slide catchlever 17. Slide catch lever17 registers in notch 4a ofslide 4.
– Slide 4 is arrested in itsopen position.
SIGARMS SIGPRO OM 6/6/01 3:34 PM Page 30
– 31 – sig pro™
Service and Repairs
9 Pistol Service and Repairs
9.1 Cause and correction of malfunctions
Pistol maintenance (cleaning and inspection) according to theinstructions can prevent malfunctions. Should, nevertheless, amalfunction occur during shooting, proceed as follows:
Hold pistol pointed in the firing direction (safe direction) and keep your finger off trigger 19 while you carry out theoperations described in the following.
1. Remove and safeguard the magazine.
2. Draw back slide 4 and arrest it in the open position bythumbing up slide catch lever 17.
3. Verify (visually or with a tool) that there is no bullet, round,case or foreign body in the barrel bore or chamber (see Fig. 3, page GB 10). If a projectile is lodged in the bore, stripthe pistol (see Sect. 7.1) and have the blockage removedwith a suitable tool by a qualified gunsmith.
4. Remove all rounds, cases or foreign bodies. Clean, lubricateand assemble the pistol (see Sect. 7.2/7.3).
5. Have the pistol inspected by an armourer or gunsmith.
Assembly/Malfunction
Ammunition feed: No round chambered.
Slide:Slide does not close properly.
Potential Cause
Magazine not properly inserted,deformed or dirty.
Pistol or rounds dirty or tooheavily greased.
Pistol defective.
Potential Remedy
Insert magazine properlyor replace it.
Strip, clean and lubricate pistol (see Sect. 7.1–7.3); clean or re p l a c ea m m u n i t i o n .
Repair by manufacturer.
SIGARMS SIGPRO OM 6/6/01 3:34 PM Page 31
– 32 –sig pro™
Service and Repairs
Assembly/Malfunction
Case ejection:Spent case sticks in chamber or jamsin ejection port.
Misfire: Hammer strikes, but no discharge.
Potential Cause
Recoil insufficient because of fouling.
Underloaded ammunition.
Pistol defective.
Firing pin sticking in its guide.
Defective ammunition.
Pistol defective.
Potential Remedy
Strip, clean and lubricate pistol (seeSect. 7.1–7.3)
Replace ammunition.
Repair by manufacturer.
Strip, clean and lubricate pistol (seeSect. 7.1–7.3). Have pistol checked bya rm o u re r.
Manually cycle slide to chamber newround.
Repair by manufacturer.
9.2 Safekeeping and storage of the pistol
Always store your pistol unloaded and in cleaned condition.
Store your pistol separate from its ammunition and under lock and key. The pistol and ammunition must not be accessible to children and other inexperienced or unauthorized persons.
9.3 Shipping the pistol
Familiarize yourself fully with local legislation governing theshipping and transportation of firearms.
1. Check the pistol to ensure that it is unloaded and decocked.
SIGARMS SIGPRO OM 6/6/01 3:34 PM Page 32
– 33 – sig pro™
Service and Repairs
2. Pack the pistol well (if possible in its original packaging) toprevent damage in transit. To prevent the pistol beingrecognized as such during shipping, wrap the original pack-aging in a second outer layer. Do not include carrying cases, telescopic sights, scope mounts or otheraccessories in the shipment.
3. Enclose a letter stating the following:
– your full name
– your full address (mention street, not P.O. Box)
– your daytime telephone number
– model and serial numbers of the pistol
– detailed description of the problem encountered or theservice work to be performed.
4. Send the pistol properly insured and carriage-paid(packages without correct postage will not be accepted) to:
SIGARMS Inc.ATTN: Service Department18 Industrial DriveExeter NH 03833/USAPhone 603-772-2302Fax 603-772-9082
Before returning the firearm contact Customer Service at603-772-2302 for an RMA number. Clearly mark thisnumber on the outside of your package - this number willassist us in tracking the status of your return.
IF YOU DO NOT UNDERSTAND THE INSTRUCTIONSFOR OPERATING YOUR PISTOL, IT IS YOUR
RESPONSIBILITY TO CALL OUR SERVICE DEPARTMENT: Phone # 603 772-2302BEFORE USING YOUR FIREARM.
Warranty Statement
Based on Magnuson-Moss Warranty Act, SIGARMS Inc. offers no express warranty on their product line. However, SIGARMS Inc. recognizes its obligations concerning service to owners of SIGARMS products.SIGARMS Inc. stands behind its products and will continue to provide service to their product line as they have over the years. SIGARMS Inc. products will be serviced for a period of one year from date of retail purchase, for defects in materials or workman ship, at no charge to the purchaser. Be sure to retain your sales slip as proof of purchase date when making a claim.