Silver Peak EdgeConnect and Check Point Network Security as a Service Integration Guide Silver Peak EdgeConnect and Check Point Network Security as a Service Integration Guide 201487-001 Rev A
Transcript
Silver PeakEdgeConnect and CheckPoint NetworkSecurity as a Service Integration Guide
Silver Peak
EdgeConnect and Check Point Network Security as a Service
Integration Guide
201487-001 Rev A
Silver PeakEdgeConnect and CheckPoint NetworkSecurity as a Service Integration Guide
About this guide 4What is Check Point Network Security as a Service? 5Registering a new account 6
Creating a site at the Check Point Infinity portal 7Protecting sites using GRE tunnels 7Configuring your SD-WAN router to route traffic through Check Point Network Security as a Service 11
Setting up Silver Peak EdgeConnect 14Setting up a single GRE tunnel 15
Configuring a deployment profile 15Configuring Business Intent Overlay policies 16Applying the overlay to the appliance 17Setting up pass-through tunnels 18Checking your route policies 19Monitoring the traffic flow 19
Setting up an active-active configuration 21Configuring a deployment profile 21Configuring Business Intent Overlay policies 22Applying the overlay to the appliance 23Setting up pass-through tunnels 24Checking your route policies 25Confirming the flow behavior 25
Setting up an active-standby configuration 27Configuring a deployment profile 27Configuring Business Intent Overlay policies 28Applying the overlay to the appliance 29Setting up pass-through tunnels 30Checking your route policies 31Monitoring the traffic flow 31Confirming the flow behavior 32
Monitoring cybersecurity events using the Check Point Infinity portal 33
Support 36
Related Documentation 37
Silver PeakEdgeConnect and CheckPoint NetworkSecurity as a Service Integration Guide
The following are trademarks of Silver Peak Systems, Inc.: Silver Peak SystemsTM, the Silver Peak logo, Network MemoryTM, Silver Peak NX-SeriesTM, Silver Peak VX-SeriesTM, Silver Peak VRX-SeriesTM, Silver PeakSilver Peak Unity EdgeConnectTM, and Silver Peak OrchestratorTM. All trademark rights reserved. All other brand or product names are trademarks or registered trademarks of their respective companies or organizations.
Warranties and Disclaimers
THIS DOCUMENTATION IS PROVIDED “AS IS” WITHOUT WARRANTY OF ANY KIND, EITHER EXPRESSED OR IMPLIED, INCLUDING, BUT NOT LIMITED TO, THE IMPLIED WARRANTIES OF MERCHANTABILITY, FITNESS FOR A PARTICULAR PURPOSE, OR NON-INFRINGEMENT. SILVER PEAK SYSTEMS, INC. ASSUMES NO RESPONSIBILITY FOR ERRORS OR OMISSIONS IN THIS DOCUMENTATION OR OTHER DOCUMENTS WHICH ARE REFERENCED BY OR LINKED TO THIS DOCUMENTATION. REFERENCES TO CORPORATIONS, THEIR SERVICES AND PRODUCTS, ARE PROVIDED “AS IS” WITHOUT WARRANTY OF ANY KIND, EITHER EXPRESSED OR IMPLIED. IN NO EVENT SHALL SILVER PEAK SYSTEMS, INC. BE LIABLE FOR ANY SPECIAL, INCIDENTAL, INDIRECT OR CONSEQUENTIAL DAMAGES OF ANY KIND, OR ANY DAMAGES WHATSOEVER, INCLUDING, WITHOUT LIMITATION, THOSE RESULTING FROM LOSS OF USE, DATA OR PROFITS, WHETHER OR NOT ADVISED OF THE POSSIBILITY OF DAMAGE, AND ON ANY THEORY OF LIABILITY, ARISING OUT OF OR IN CONNECTION WITH THE USE OF THIS DOCUMENTATION. THIS DOCUMENTATION MAY INCLUDE TECHNICAL OR OTHER INACCURACIES OR TYPOGRAPHICAL ERRORS. CHANGES ARE PERIODICALLY ADDED TO THE INFORMATION HEREIN; THESE CHANGES WILL BE INCORPORATED IN NEW EDITIONS OF THE DOCUMENTATION. SILVER PEAK SYSTEMS, INC. MAY MAKE IMPROVEMENTS AND/OR CHANGES IN THE PRODUCT(S) AND/OR THE PROGRAM(S) DESCRIBED IN THIS DOCUMENTATION AT ANY TIME.
Silver Peak Systems, Inc.2860 De La Cruz BoulevardSanta Clara, CA 95050
About this guideThis guide describes how to set up GRE tunnels and service chain traffic from a Silver Peak® EdgeConnect™ appliance to the Check Point Network Security as a Service by completing four major steps.
1. Create a site using the Check Point Infinity portal.
2. Add the Check Point tunnels to the Silver Peak Business Intent Overlay policy.
3. Monitor end-to-end traffic using Silver Peak flow monitoring.
4. Monitor cybersecurity events using the Check Point Infinity portal.
Silver PeakEdgeConnect and CheckPoint NetworkSecurity as a Service Integration Guide
What is Check Point Network Security as a Service?
Check Point Network Security as a Service is a cloud security platform that provides Check Point threat prevention and access control for branch offices. You can connect your existing routing equipment or SD-WAN device to the Network Security as a Service without additional dedicated hardware.
Network Security as a Service is a full software-as-a-service model that eliminates the need for maintenance from the user.
The Check Point security product line includes the following features.
Prevent known attacks using reputation services, signatures, and bot communication prevention.
Prevent unknown attacks using cloud-based sandboxing.
An access control policy that includes content awareness, HTTPS inspection, and application control.
A web-based management system for security events and log monitoring, as well as policy and site configuration.
Silver PeakEdgeConnect and CheckPoint NetworkSecurity as a Service Integration Guide
If you don't have an account to access the Check Point Infinity portal, you can register for one at https://portal.checkpoint.com/register/cloudguardnsaas. Follow the steps on the screen to complete your registration.
NOTE On the main screen, make sure Network Security As A Service displays on the screen and the NETWORK icon is highlighted in pink. This indicates that you're creating the correct Check Point account.
NOTE Using Check Point Network Security as a Service depends on your purchased software license. For more information about licensing, contact your Check Point sales representative or check for updates on the Check Point user community page.
Figure 1: Registering a new account for Network Security as a Service.
A site represents your branch office that uses a Silver Peak EdgeConnect appliance.
4. In the Site Name field, enter a name for the site location.
5. In the Location of the cloud service field, select a location that is near your site.
Check Point Network Security as a Service inspects traffic from your branch office to the internet with a cloud service that's in one of these locations. To ensure best performance, select the location of the cloud service that is closest to the location of your site. For some countries, such as those in South America or the Middle East, the best choice for the location of the cloud service might be a strong cross-country internet link.
6. In the Comments field, enter an optional description of the site.
7. Select Next to set up router details.
Silver PeakEdgeConnect and CheckPoint NetworkSecurity as a Service Integration Guide
3. View the tunnel addresses, the tunnel failover functionality, and the traffic routes by viewing the instructions.
The instructions contain the following.
The IP address and destinations for each of the two GRE tunnels.
The fail over or fail open options for the tunnels.
The access routes to route traffic from the internal networks to the Check Point service. The routes and networks are protected by Check Point Network Security as a Service.
Silver PeakEdgeConnect and CheckPoint NetworkSecurity as a Service Integration Guide
Setting up Silver Peak EdgeConnectTo secure internet traffic and for direct internet breakout from the branch, Silver Peak supports internet pass-through tunnels to Check Point Network Security as a Service. You can set up EdgeConnect appliances with the following use cases.
Configure EdgeConnect with a single GRE tunnel.
Configure EdgeConnect with a two tunnel active-active setup.
Configure EdgeConnect with a two tunnel active-standby setup.
NOTE Use Silver Peak EdgeConnect version 8.1.9.0 or later and Silver Peak Orchestrator version 8.5.0 or later.
Silver PeakEdgeConnect and CheckPoint NetworkSecurity as a Service Integration Guide
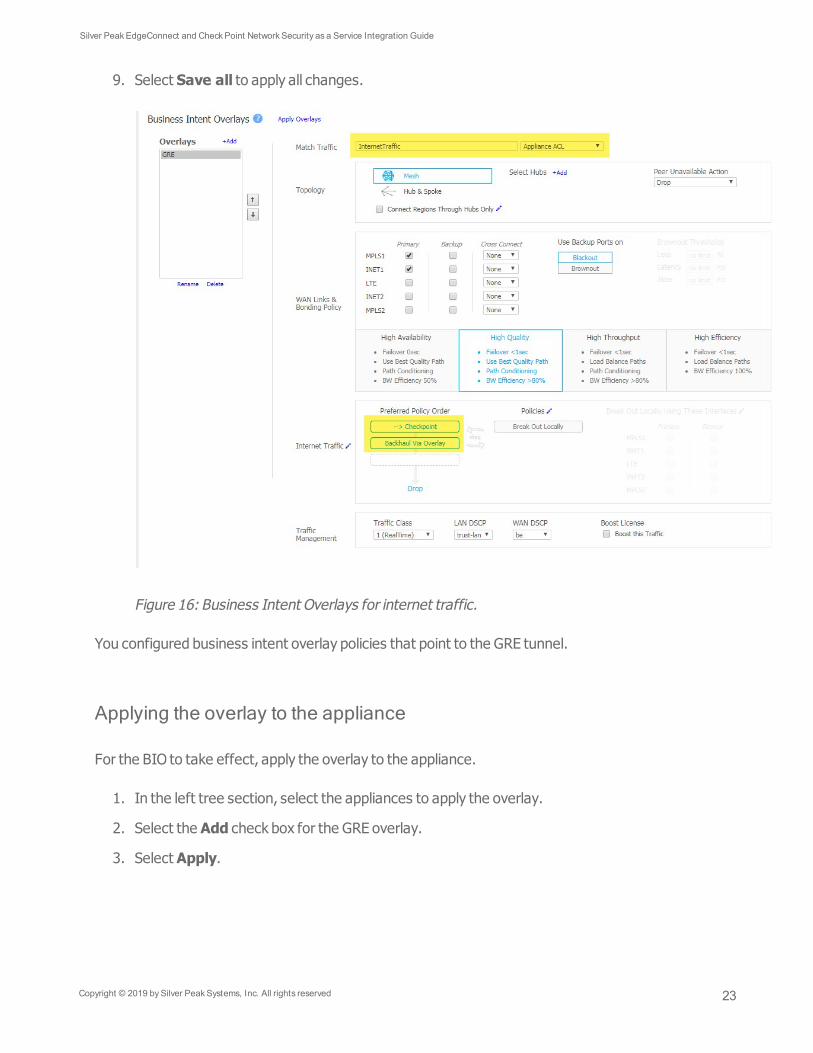
A business intent overlay (BIO) specifies how traffic with particular characteristics are handled within the network. For GRE tunnels to Check Point, this example uses an overlay called GRE with an overlay ACL called InternetTraffic that defines the web traffic.
To use the GRE tunnels in a business intent overlay, complete the following steps.
1. In the Orchestrator main screen, select Business Intent Overlay.
The Business Intent Overlay screen opens.
2. From the Overlays list, choose GRE or the overlay of your choice.
3. In the Internet Traffic section, select the pencil icon next to Policies.
4. In the Service Name field, add a new service object that represents the Check Point peer/service. Enter a name that describes the Check Point service such as "Check Point Cloud."
5. Select Add.
6. Select Close to return to the previous screen.
7. From the Business Intent Overlay screen, move the Check Point service to the Preferred Policy Order section.
8. In the Preferred Policy Order section, move the Check Point service above the other policies.
NOTE By moving the Check Point service to the top of the list, all internet-bound traffic passes through the Check Point GRE tunnel. If the tunnel is down, the traffic backhauls by using the overlay.
Silver PeakEdgeConnect and CheckPoint NetworkSecurity as a Service Integration Guide
A BIO automates the creation of route policies, and generally determines to which destination a packet is routed. Route policy settings are used for exceptions to the BIO configuration.
1. In the Orchestrator main screen, select Configuration > Route Policies.
2. View your route policy to make sure your tunnels are set up correctly.
Figure 13: Route policies.
Monitoring the traffic flow
After you set up GRE tunnels, examine the traffic behavior.
1. In the Orchestrator main screen, select Monitoring > Active & Recent Flows.
2. Monitor the traffic flows in the flows table.
Silver PeakEdgeConnect and CheckPoint NetworkSecurity as a Service Integration Guide
A business intent overlay (BIO) specifies how traffic with particular characteristics are handled within the network. In an active-active configuration, create a single service that points to the two Check Point GRE tunnels in the BIO screen.
To use the GRE tunnels in a business intent overlay, complete the following steps.
1. In the Orchestrator main screen, select Business Intent Overlay.
The Business Intent Overlay screen opens.
2. From the Overlays list, choose GRE or the overlay of your choice.
3. In the Internet Traffic section, select the pencil icon next to Policies.
4. In the Service Name field, add a new service object that represents the Check Point peer/service. Enter a name that describes the Check Point service such as "Check Point Cloud."
5. Select Add.
6. Select Close to return to the previous screen.
7. From the Business Intent Overlay screen, move the Check Point service to the Preferred Policy Order section.
8. In the Preferred Policy Order section, move the Check Point service above the other policies.
NOTE By moving the Check Point service to the top of the list, all internet-bound traffic passes through the Check Point GRE tunnel. If the tunnel is down, the traffic backhauls by using the overlay.
Silver PeakEdgeConnect and CheckPoint NetworkSecurity as a Service Integration Guide
15. Create a second tunnel by repeating steps 5 through 14. Give the second tunnel an alias name, such as to_Checkpoint_2.
Figure 18: Passthrough tunnels.
Checking your route policies
A BIO automates the creation of route policies, and generally determines to which destination a packet is routed. Route policy settings are used for exceptions to the BIO configuration.
1. In the Orchestrator main screen, select Configuration > Route Policies.
2. View your route policy to make sure your tunnels are set up correctly.
Figure 19: Route policies.
Confirming the flow behavior
Confirm that the flows are behaving correctly.
1. Send four flows to the internet. Confirm that two flows go through the first Check Point tunnel. Confirm that the other two flows go through the second Check Point tunnel.
Figure 20: Example of four traffic flows to the internet.
Silver PeakEdgeConnect and CheckPoint NetworkSecurity as a Service Integration Guide
A business intent overlay (BIO) specifies how traffic with particular characteristics are handled within the network. In an active-active configuration, create two services that point to the Check Point GRE tunnels Checkpoint and Checkpoint_2 in the BIO screen.
To use the GRE tunnels in a business intent overlay, complete the following steps.
1. In the Orchestrator main screen, select Business Intent Overlay.
The Business Intent Overlay screen opens.
2. From the Overlays list, choose GRE or the overlay of your choice.
3. In the Internet Traffic section, select the pencil icon next to Policies.
4. In the Service Name field, add a new service object that represents the Check Point peer/service. Enter a name that describes the Check Point service such as "Check Point Cloud."
5. Select Add.
6. Select Close to return to the previous screen.
7. From the Business Intent Overlay screen, move the Check Point service to the Preferred Policy Order section.
8. In the Preferred Policy Order section, add the Check Point services, one below the other.
NOTE By moving the Check Point service to the top of the list, all internet-bound traffic passes through the Check Point GRE tunnel. If the tunnel is down, the traffic backhauls by using the overlay.
Silver PeakEdgeConnect and CheckPoint NetworkSecurity as a Service Integration Guide
15. Create a second tunnel by repeating steps 5 through 14. Use the service name Checkpoint_2 and the alias name to_Checkpoint_2.
Figure 26: Passthrough tunnels.
Checking your route policies
A BIO automates the creation of route policies, and generally determines to which destination a packet is routed. Route policy settings are used for exceptions to the BIO configuration.
1. In the Orchestrator main screen, select Configuration > Route Policies.
2. View your route policy to make sure your tunnels are set up correctly.
Figure 27: Route policies.
Monitoring the traffic flow
After you set up GRE tunnels, examine the traffic behavior.
1. In the Orchestrator main screen, select Monitoring > Active & Recent Flows.
2. Monitor the traffic flows in the flows table.
Figure 28: Monitoring flows.
Silver PeakEdgeConnect and CheckPoint NetworkSecurity as a Service Integration Guide
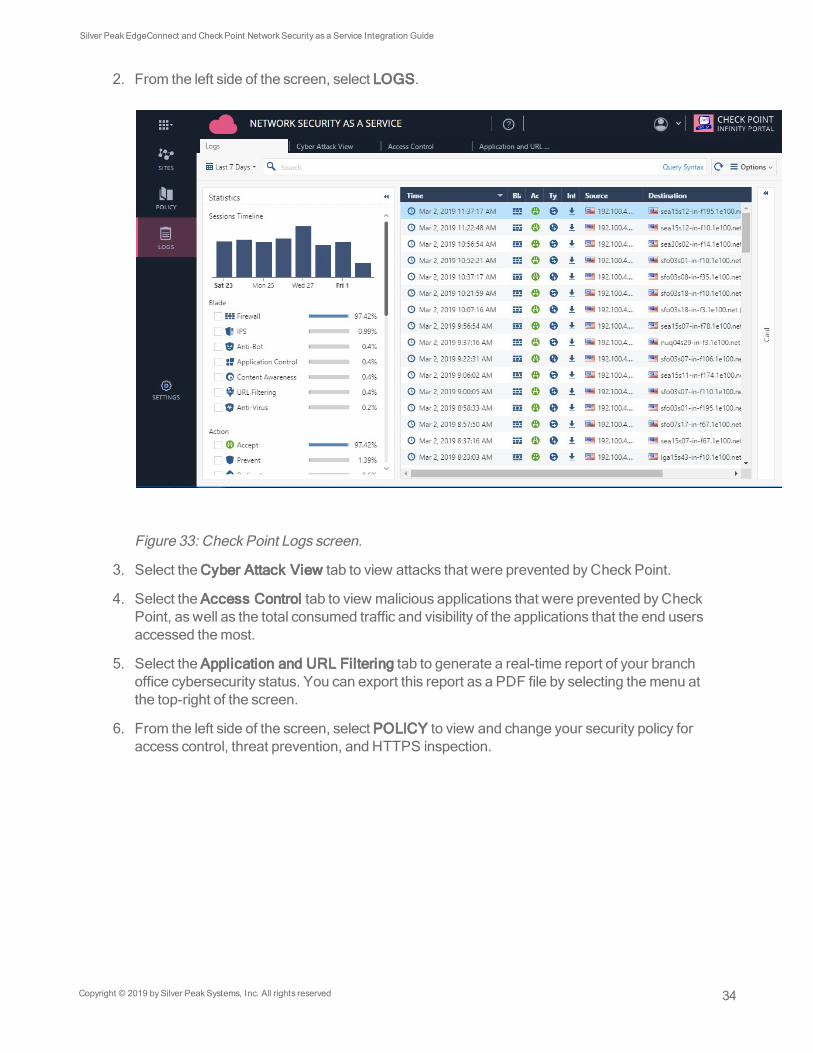
Monitoring cybersecurity events using the Check Point Infinity portalUsing the Check Point Infinity portal, you can monitor which attacks were prevented by the Check Point cybersecurity features.
1. Sign in to the Check Point Infinity portal at https://portal.checkpoint.com.
The NETWORK SECURITY AS A SERVICE screen opens.
NOTE If you don't see the correct screen, select the application switcher icon at the top-left corner, then select Network Security as a Service.
Figure 32: Changing applications in the Check Point Infinity portal.
3. Select the Cyber Attack View tab to view attacks that were prevented by Check Point.
4. Select the Access Control tab to view malicious applications that were prevented by Check Point, as well as the total consumed traffic and visibility of the applications that the end users accessed the most.
5. Select the Application and URL Filtering tab to generate a real-time report of your branch office cybersecurity status. You can export this report as a PDF file by selecting the menu at the top-right of the screen.
6. From the left side of the screen, select POLICY to view and change your security policy for access control, threat prevention, and HTTPS inspection.
Silver PeakEdgeConnect and CheckPoint NetworkSecurity as a Service Integration Guide