SIEMENS Page 1 of 18 Operating Web Server Operating Web Server With the new LOGO! 8 you can monitor and control your application via PC, smartphone or tablet via the integrated web server with all conventional browsers via the integrated web server. Opening program and changing message text properties Note: In this example the “Migration_of_older_programs_to_LOGO!_8.lsc” program from the “Migration of older programs to LOGO! 8” example is used which you can download in “New examples for LOGO! 8” at the LOGO! homepage. Open your program.
Transcript
SIEMENS
Page 1 of 18 Operating Web Server
Operating Web Server
With the new LOGO! 8 you can monitor and control your application via PC, smartphone or tablet via the integrated web server with all conventional browsers via the integrated web server.
Opening program and changing message text properties
Note: In this example the “Migration_of_older_programs_to_LOGO!_8.lsc” program from the “Migration of older programs to LOGO! 8” example is used which you can download in “New examples for LOGO! 8” at the LOGO! homepage.
Open your program.
SIEMENS
Page 2 of 18 Operating Web Server
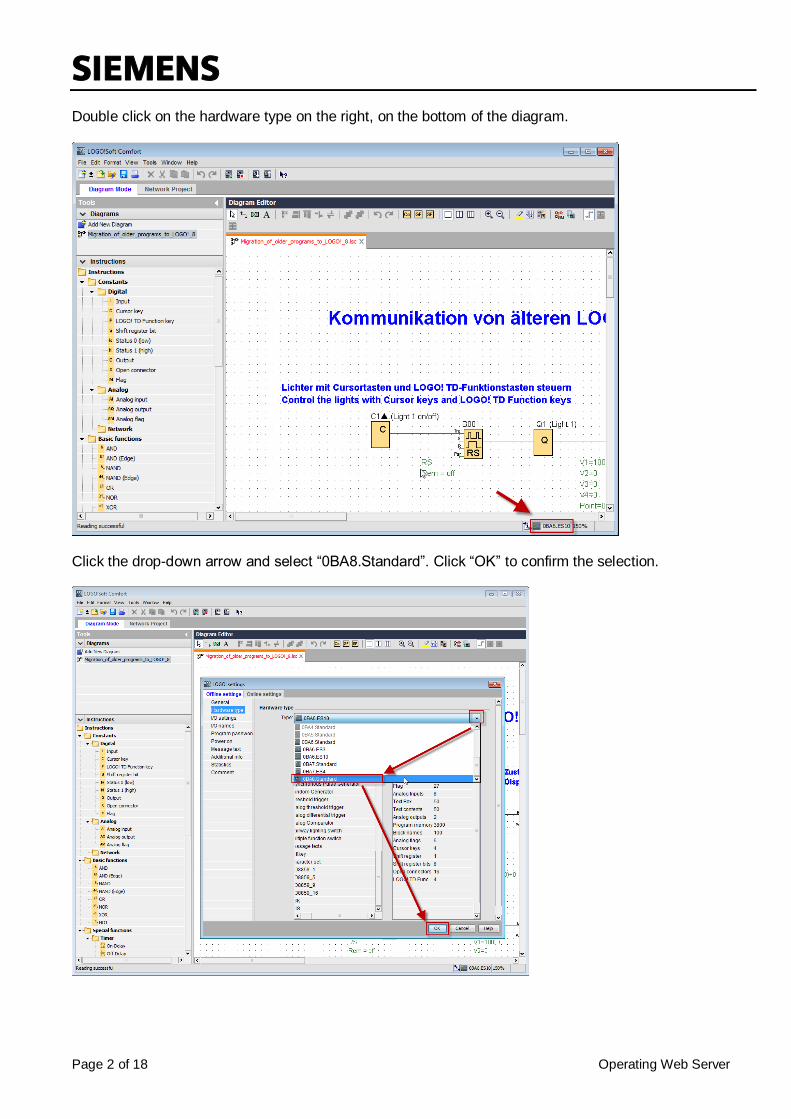
Double click on the hardware type on the right, on the bottom of the diagram.
Click the drop-down arrow and select “0BA8.Standard”. Click “OK” to confirm the selection.
SIEMENS
Page 3 of 18 Operating Web Server
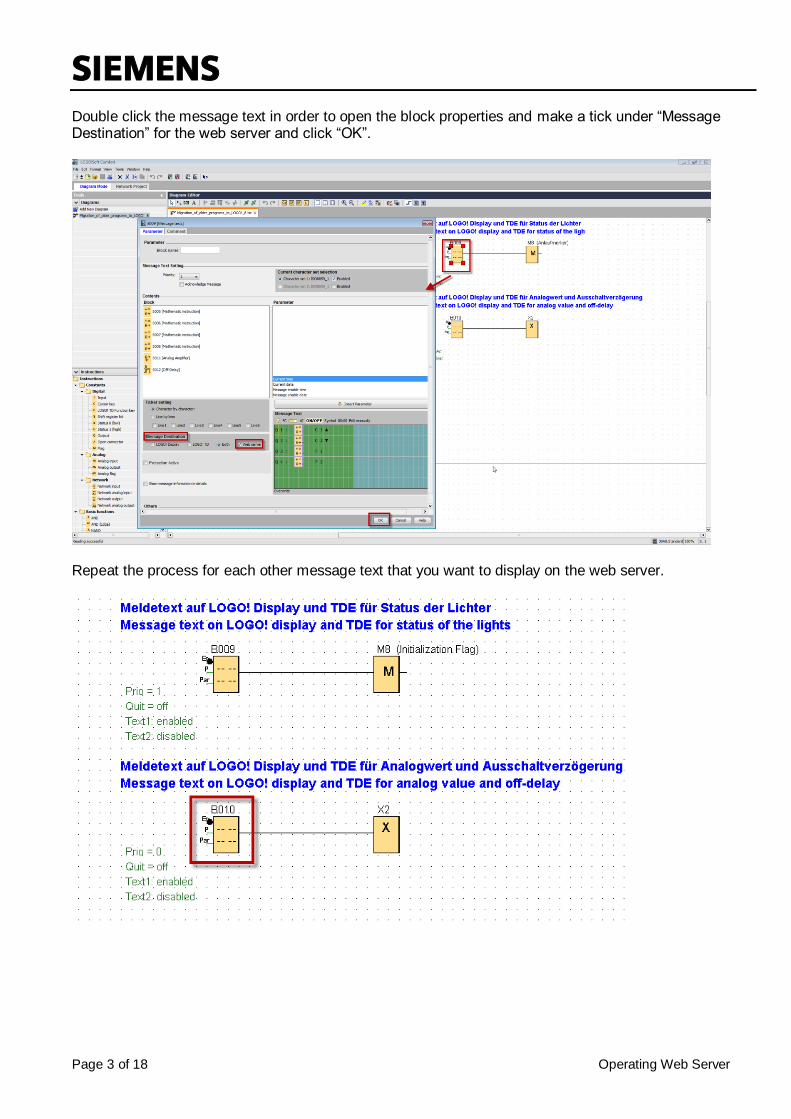
Double click the message text in order to open the block properties and make a tick under “Message Destination” for the web server and click “OK”.
Repeat the process for each other message text that you want to display on the web server.
SIEMENS
Page 4 of 18 Operating Web Server
Downloading program in LOGO! 8 Now you can download your existing LOGO! program to LOGO! 8. Click the “Download” button or click Ctrl+D.
Alternatively, you can also navigate in the menu to “Tools > Transfer > PC -> LOGO!”.
SIEMENS
Page 5 of 18 Operating Web Server
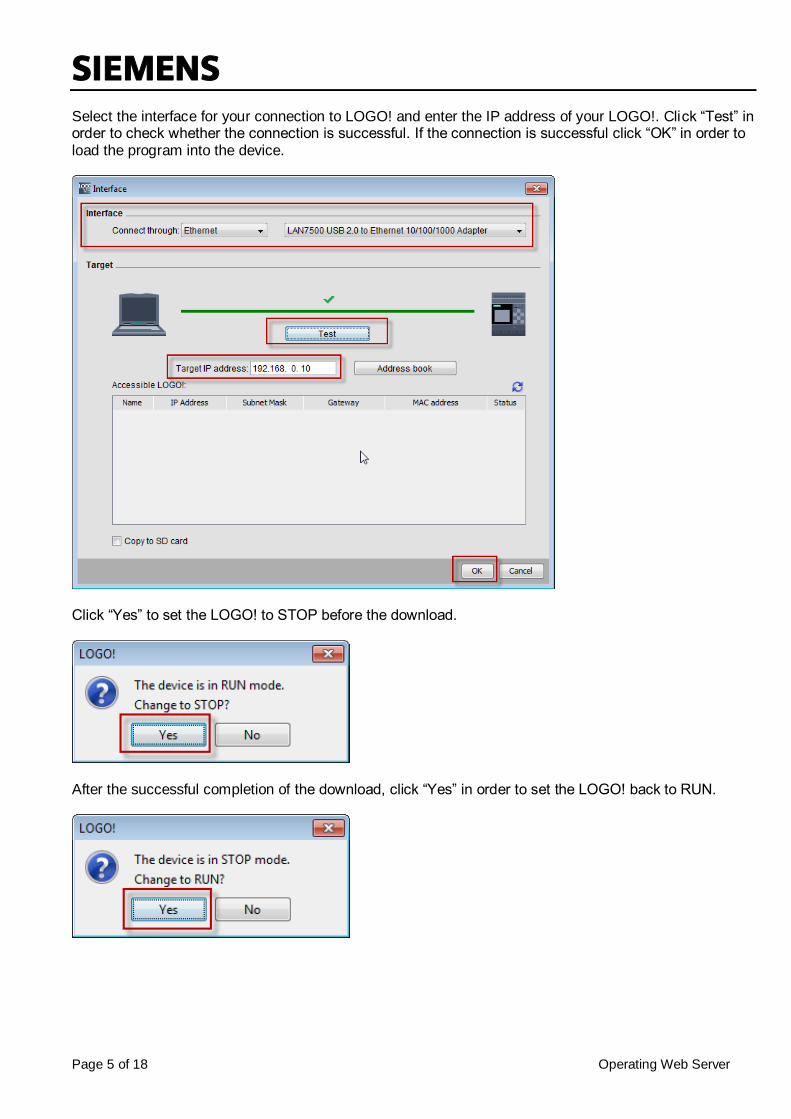
Select the interface for your connection to LOGO! and enter the IP address of your LOGO!. Click “Test” in order to check whether the connection is successful. If the connection is successful click “OK” in order to load the program into the device.
Click “Yes” to set the LOGO! to STOP before the download.
After the successful completion of the download, click “Yes” in order to set the LOGO! back to RUN.
SIEMENS
Page 6 of 18 Operating Web Server
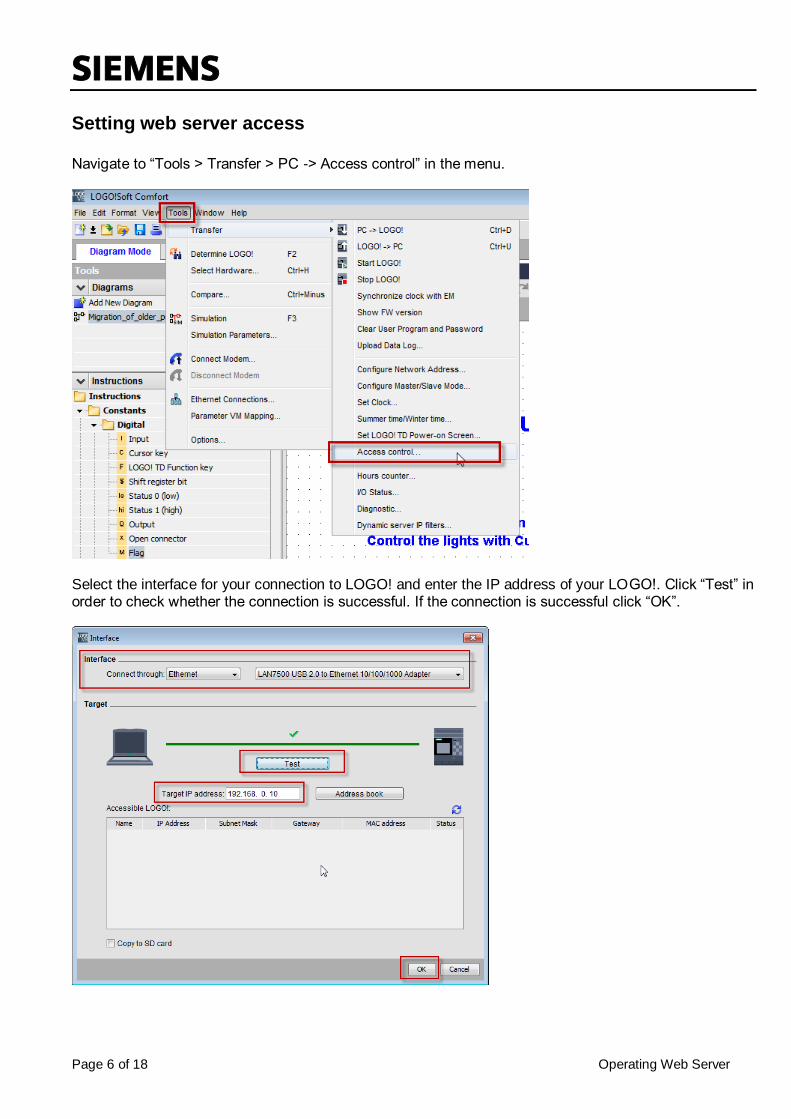
Setting web server access Navigate to “Tools > Transfer > PC -> Access control” in the menu.
Select the interface for your connection to LOGO! and enter the IP address of your LOGO!. Click “Test” in order to check whether the connection is successful. If the connection is successful click “OK”.
SIEMENS
Page 7 of 18 Operating Web Server
Click “Yes” to set the LOGO! to STOP.
Navigate to the “Web server access” item and set the tick for “Allow Web server access”.
Confirm the warning message that appears with “Yes”.
SIEMENS
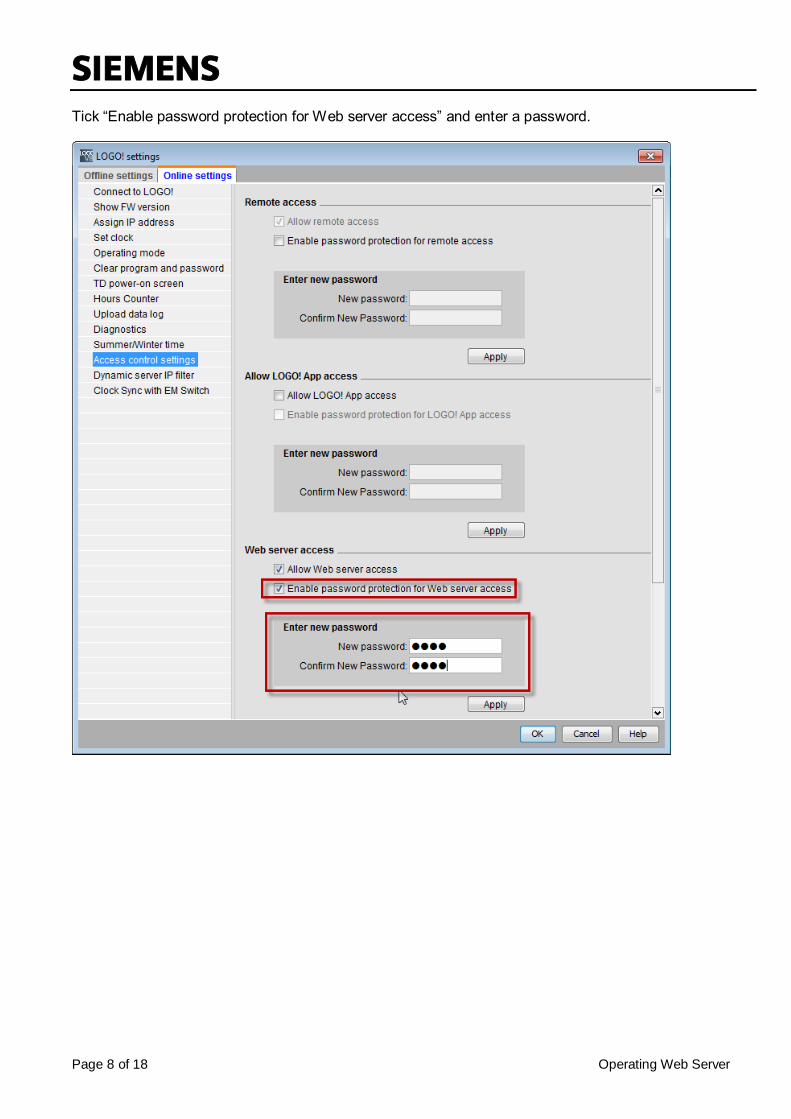
Page 8 of 18 Operating Web Server
Tick “Enable password protection for Web server access” and enter a password.
SIEMENS
Page 9 of 18 Operating Web Server
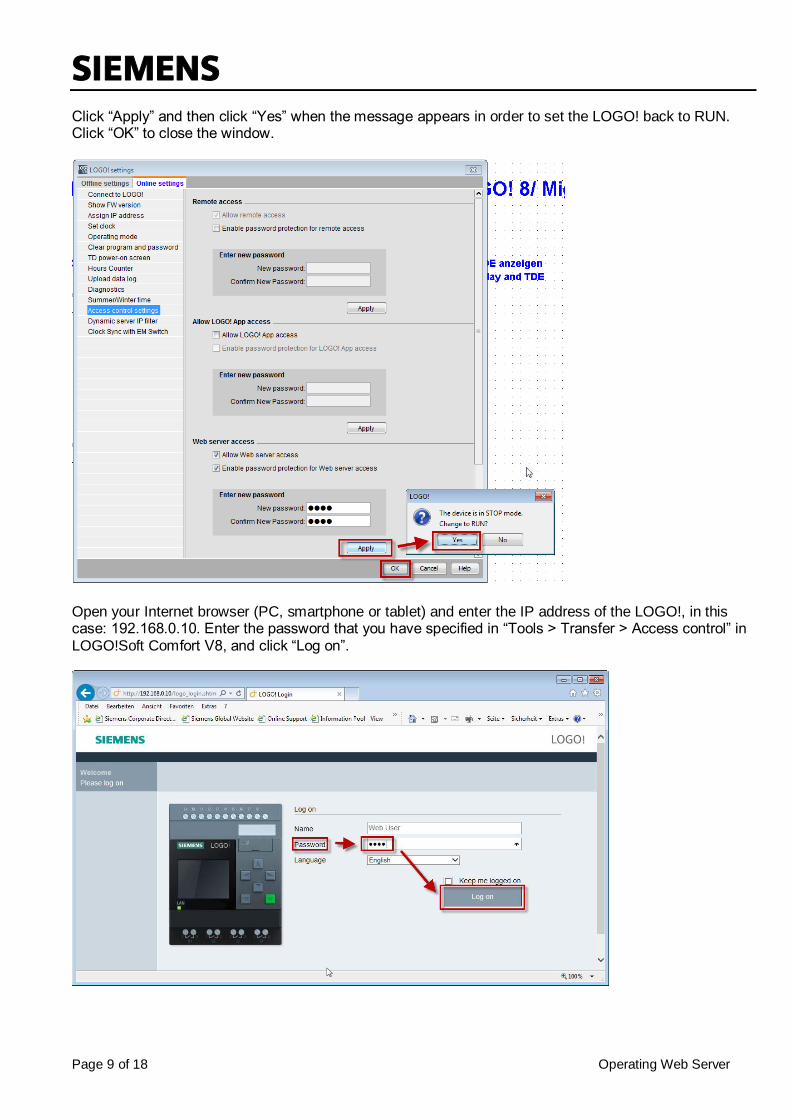
Click “Apply” and then click “Yes” when the message appears in order to set the LOGO! back to RUN. Click “OK” to close the window.
Open your Internet browser (PC, smartphone or tablet) and enter the IP address of the LOGO!, in this case: 192.168.0.10. Enter the password that you have specified in “Tools > Transfer > Access control” in LOGO!Soft Comfort V8, and click “Log on”.
SIEMENS
Page 10 of 18 Operating Web Server
The web server can called with the following devices and browsers:
With all conventional PC Web browsers (Internet Explorer, Chrome, FireFox, …)
With all smartphones (optimized resolution) (Android, iOS, WindowsPhone, … with the conventional Internet browser (Opera, Chrome, ….))
With tablet PCs (optimized resolution) (Android, iOS, Windows, … with the conventional Internet browser)
In the window that opens up, you will be shown all system information for your LOGO! basic module.
SIEMENS
Page 11 of 18 Operating Web Server
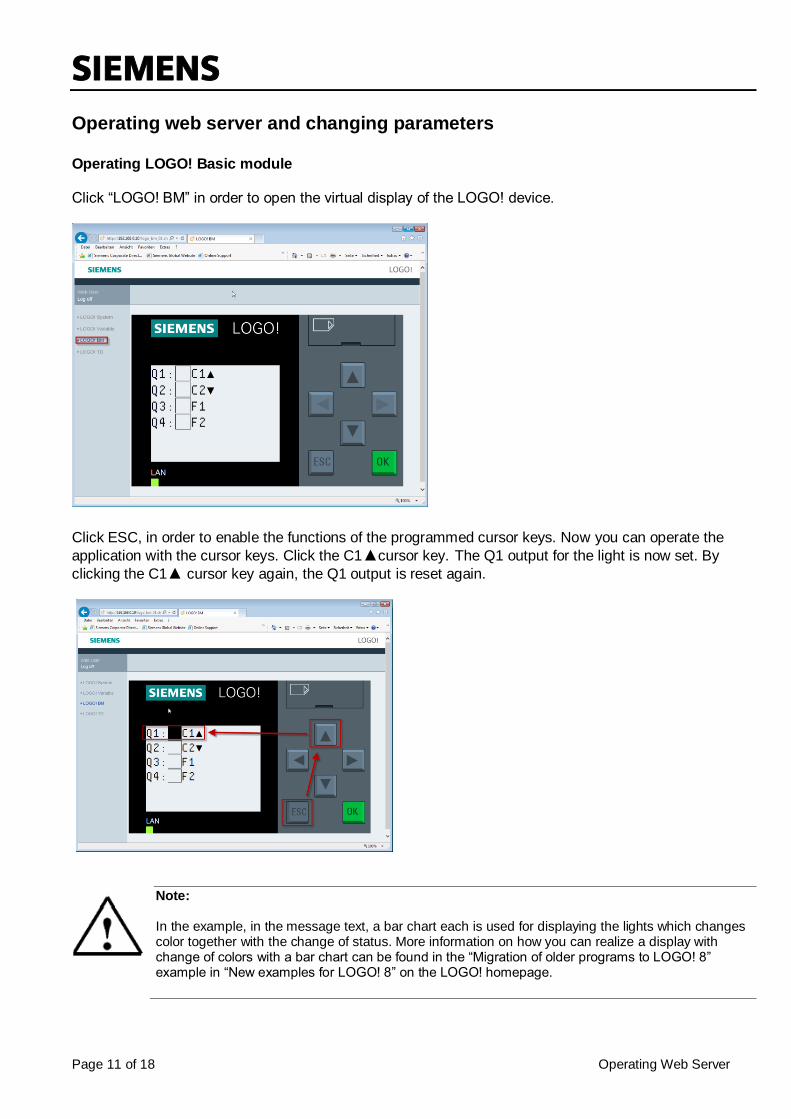
Operating web server and changing parameters Operating LOGO! Basic module Click “LOGO! BM” in order to open the virtual display of the LOGO! device.
Click ESC, in order to enable the functions of the programmed cursor keys. Now you can operate the
application with the cursor keys. Click the C1▲cursor key. The Q1 output for the light is now set. By
clicking the C1▲ cursor key again, the Q1 output is reset again.
Note: In the example, in the message text, a bar chart each is used for displaying the lights which changes color together with the change of status. More information on how you can realize a display with change of colors with a bar chart can be found in the “Migration of older programs to LOGO! 8” example in “New examples for LOGO! 8” on the LOGO! homepage.
SIEMENS
Page 12 of 18 Operating Web Server
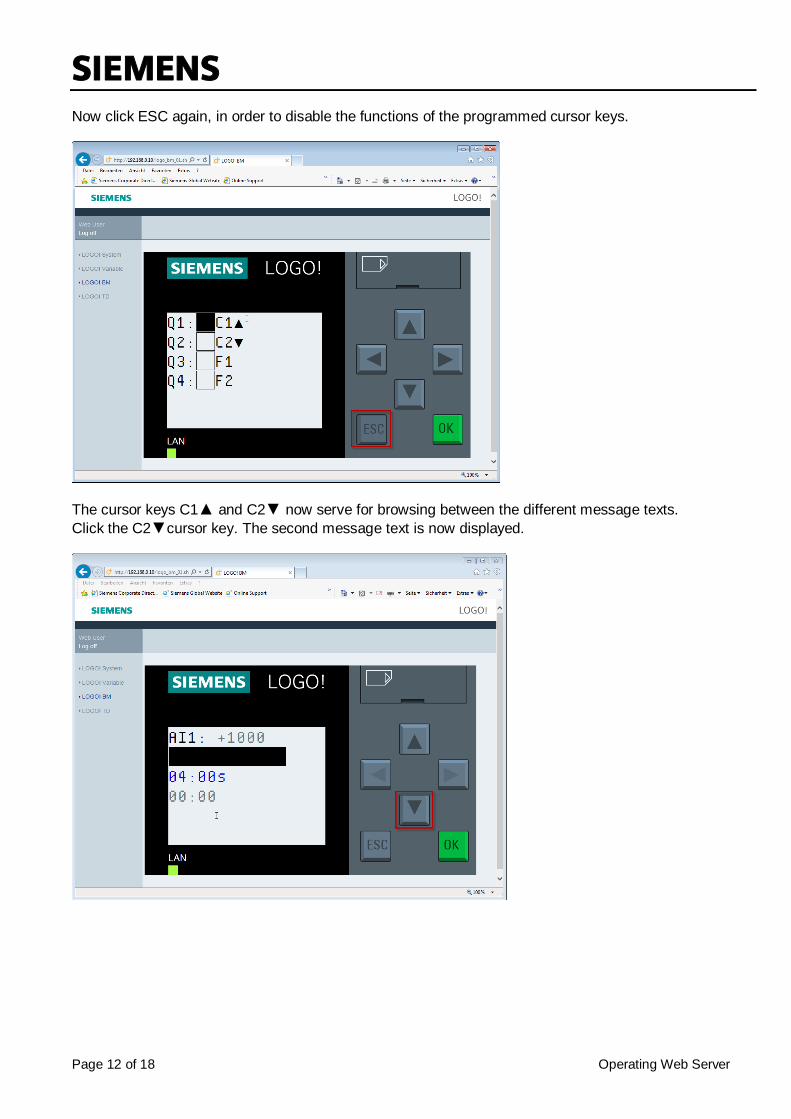
Now click ESC again, in order to disable the functions of the programmed cursor keys.
The cursor keys C1▲ and C2▼ now serve for browsing between the different message texts.
Click the C2▼cursor key. The second message text is now displayed.
SIEMENS
Page 13 of 18 Operating Web Server
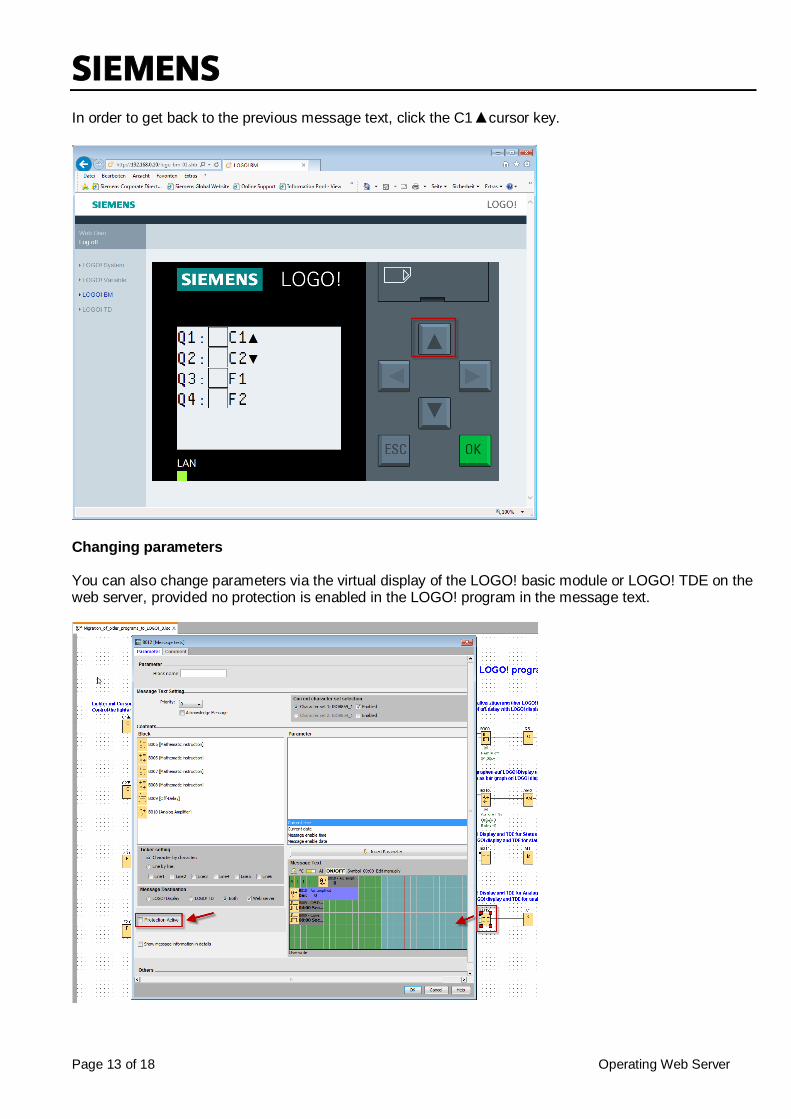
In order to get back to the previous message text, click the C1▲cursor key.
Changing parameters You can also change parameters via the virtual display of the LOGO! basic module or LOGO! TDE on the web server, provided no protection is enabled in the LOGO! program in the message text.
SIEMENS
Page 14 of 18 Operating Web Server
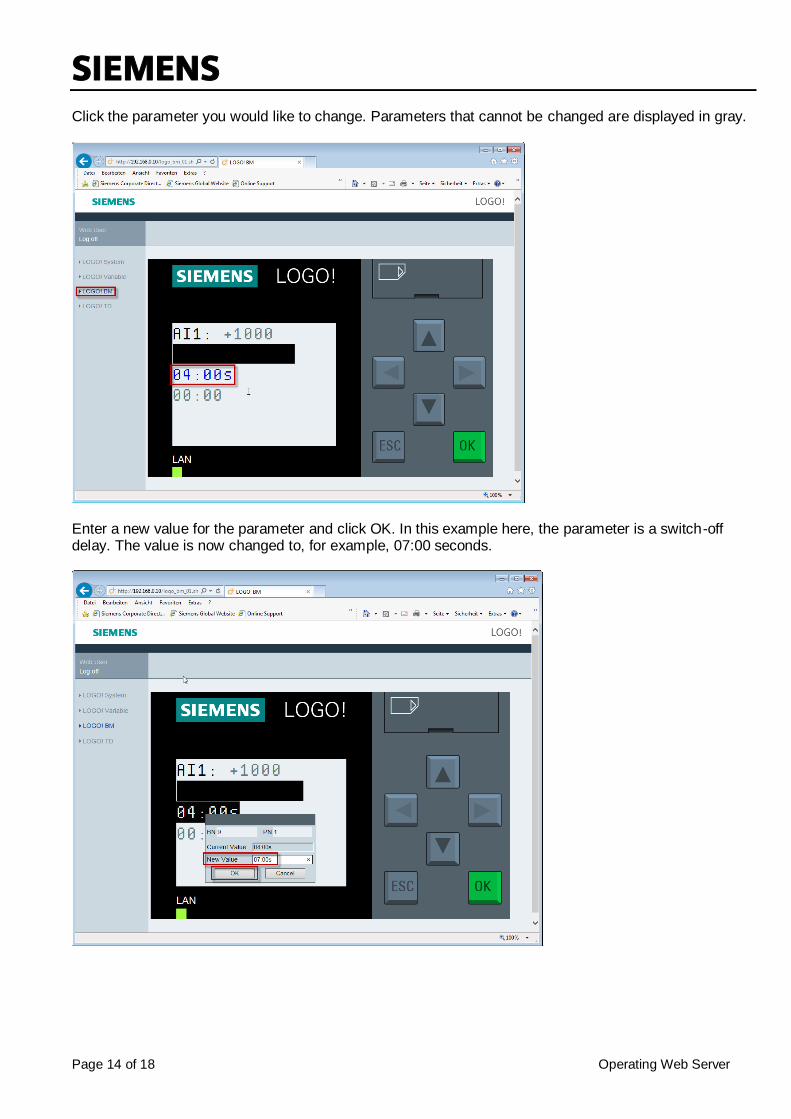
Click the parameter you would like to change. Parameters that cannot be changed are displayed in gray.
Enter a new value for the parameter and click OK. In this example here, the parameter is a switch-off delay. The value is now changed to, for example, 07:00 seconds.
SIEMENS
Page 15 of 18 Operating Web Server
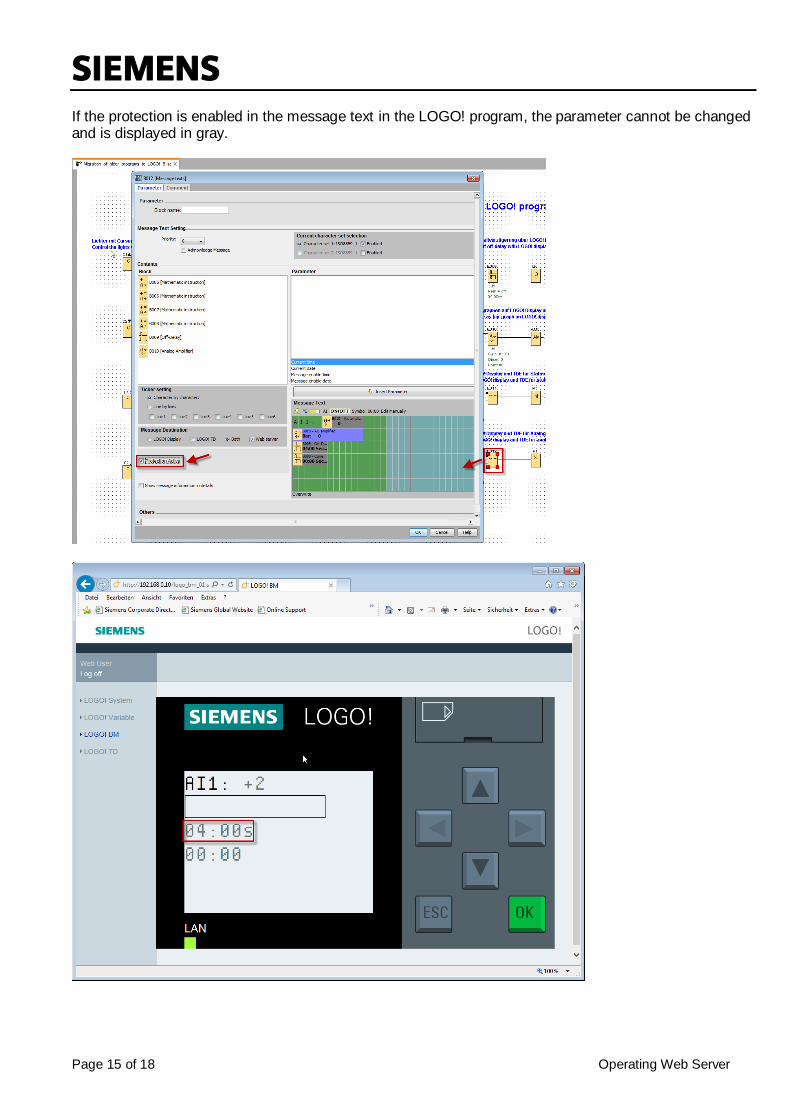
If the protection is enabled in the message text in the LOGO! program, the parameter cannot be changed and is displayed in gray.
SIEMENS
Page 16 of 18 Operating Web Server
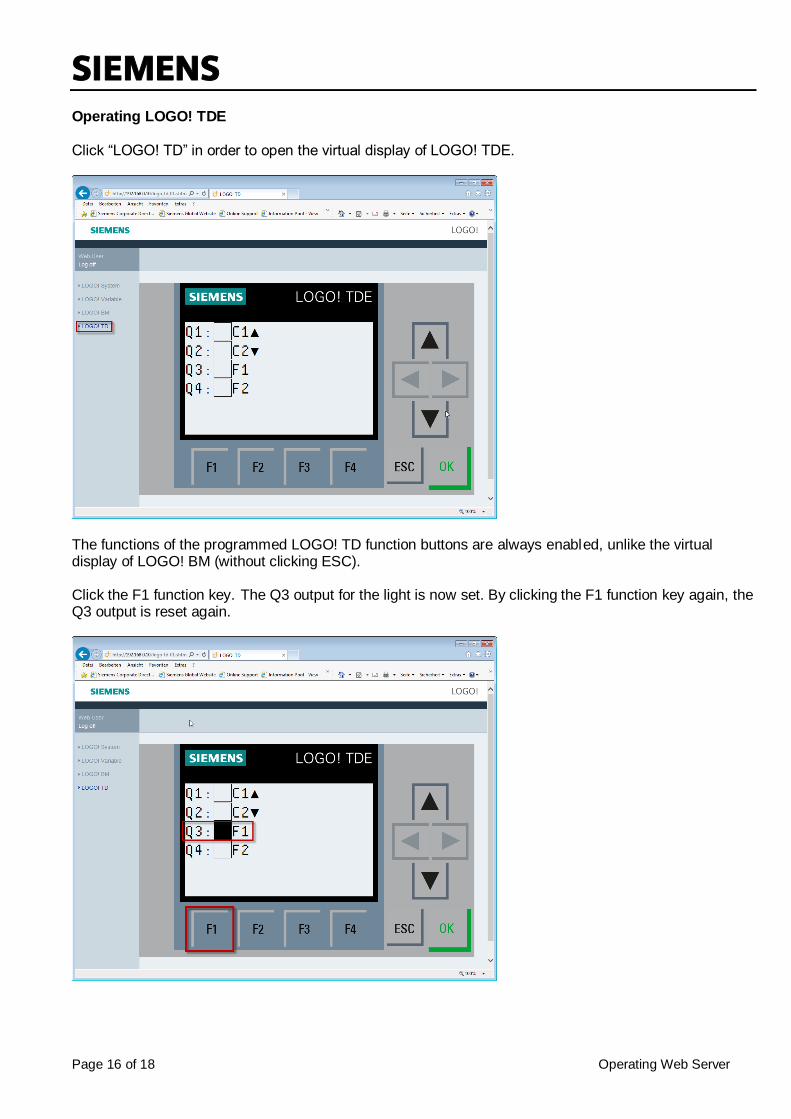
Operating LOGO! TDE Click “LOGO! TD” in order to open the virtual display of LOGO! TDE.
The functions of the programmed LOGO! TD function buttons are always enabled, unlike the virtual display of LOGO! BM (without clicking ESC). Click the F1 function key. The Q3 output for the light is now set. By clicking the F1 function key again, the Q3 output is reset again.
SIEMENS
Page 17 of 18 Operating Web Server
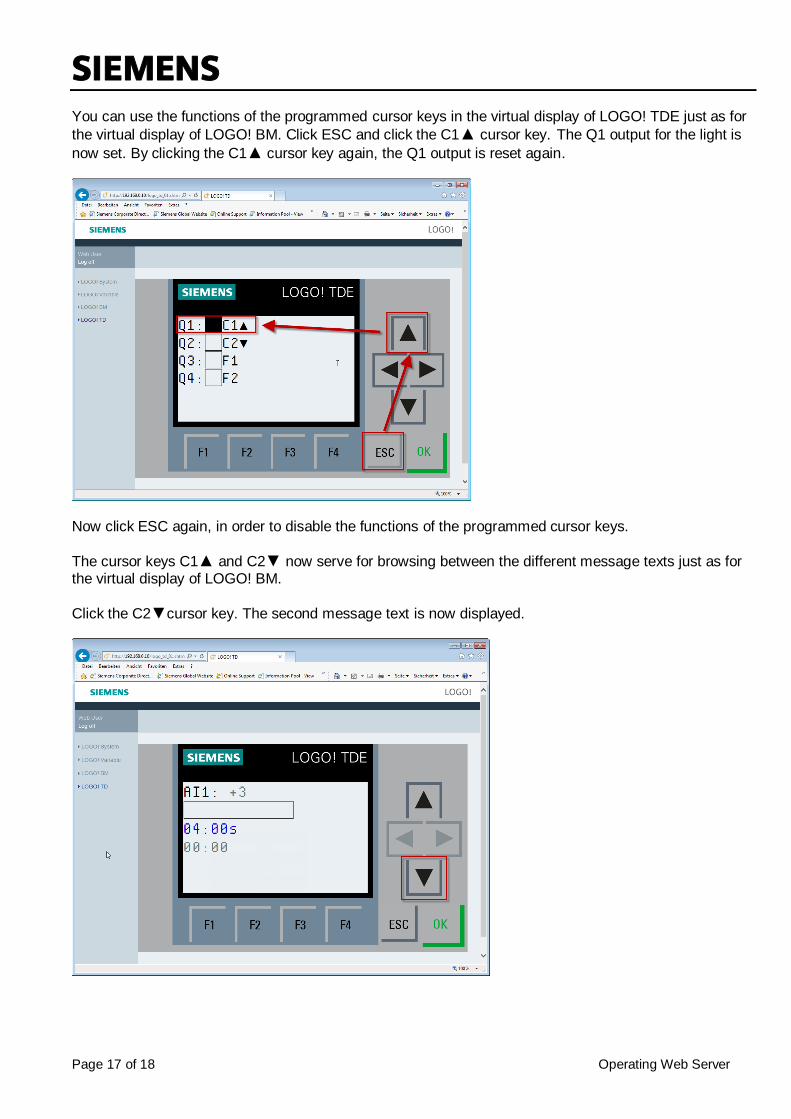
You can use the functions of the programmed cursor keys in the virtual display of LOGO! TDE just as for
the virtual display of LOGO! BM. Click ESC and click the C1▲ cursor key. The Q1 output for the light is
now set. By clicking the C1▲ cursor key again, the Q1 output is reset again.
Now click ESC again, in order to disable the functions of the programmed cursor keys.
The cursor keys C1▲ and C2▼ now serve for browsing between the different message texts just as for the virtual display of LOGO! BM.
Click the C2▼cursor key. The second message text is now displayed.
SIEMENS
Page 18 of 18 Operating Web Server
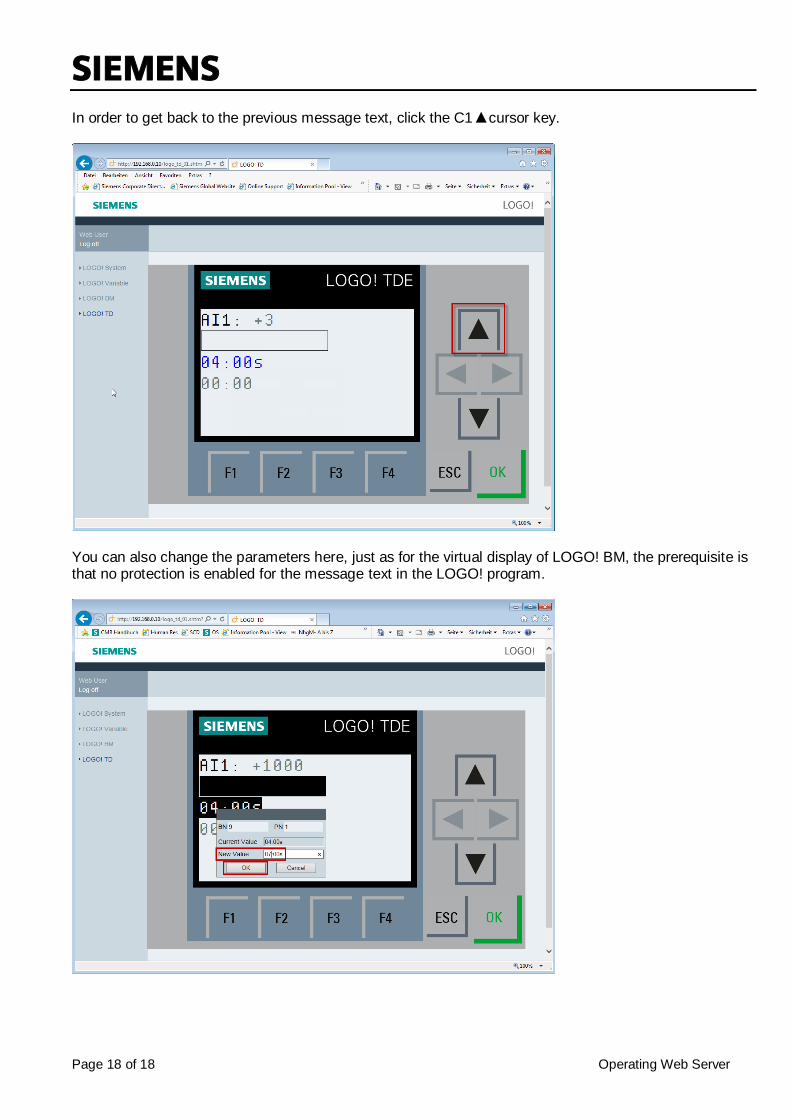
In order to get back to the previous message text, click the C1▲cursor key.
You can also change the parameters here, just as for the virtual display of LOGO! BM, the prerequisite is that no protection is enabled for the message text in the LOGO! program.