8.1 SIP Gateway Configuration .............................................................................................. 14 8.1.1 Element Manager Login ...................................................................................... 14 8.1.2 Select one of the Element Manager links. ........................................................... 15 8.1.3 Configuration of the ‘SIP Trunk Zone’. .............................................................. 15 8.1.4 Configuration section of Bandwidth Zones. ........................................................ 16 8.1.5 System Overview................................................................................................. 16 8.1.6 IP Telephony Nodes. ........................................................................................... 17 8.1.7 Node Details (SIPGw). ........................................................................................ 18 8.1.8 Virtual Trunk Gateway Configuration Details. ................................................... 19 8.1.9 D-Channels. ......................................................................................................... 23 8.1.10 D-Channels 51 Property Configuration. .............................................................. 24 8.1.11 Routes and Trunks ............................................................................................... 25 8.1.12 Virtual Terminal Sessions.................................................................................... 30 8.1.13 Virtual Terminal Sessions.................................................................................... 31 8.1.14 CLI outputs commands for CS1000 Configuration............................................. 32
9 Avaya Aura™ Session Manager System Configuration..................................................................... 38 9.1 Set Up System Information............................................................................................... 38 9.2 Avaya Aura Session Manager with System Manager release 5.2. SP2 SIP Configuration Guide 44
9.2.1 Setup Network Routing Policy ............................................................................ 44 9.2.2 Specify SIP Domain ............................................................................................ 45 9.2.3 Add Location ....................................................................................................... 45 9.2.4 Add Adaptations Modules ................................................................................... 48 9.2.5 Add SIP Entities .................................................................................................. 50 9.2.6 Add Routing Policies........................................................................................... 55 Routing Policies describe the situations which calls will be routed to the SIP Entities specified as shown above. A routing policy must be added for Nortel CS1000 and EdgeMarc E-SBC. To add a routing policy, simply select ‘Routing Policies’ on the left and click on the New button on the right. Fill in the following:....................................... 55 9.2.7 Add Dial Patterns................................................................................................. 58 9.2.8 Add Session Manager .......................................................................................... 65
Property of Cox Communications, Inc. Version 1.1 Page 2 of 81
9.2.9 Define Local Host Names.................................................................................... 68 9.2.10 Define Time Range and Personal Settings .......................................................... 70
10 Appendix............................................................................................................................................. 71 10.1 Appendix A: DHCP Server and Default Settings (Information Only) ............................. 71
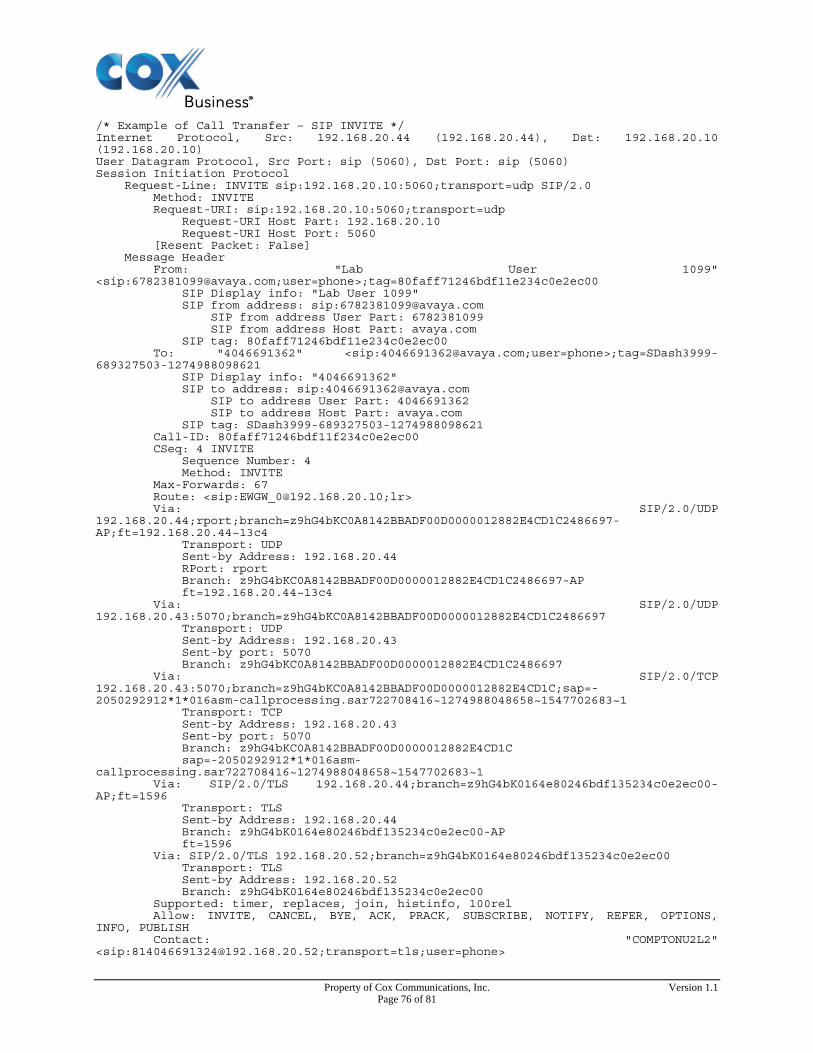
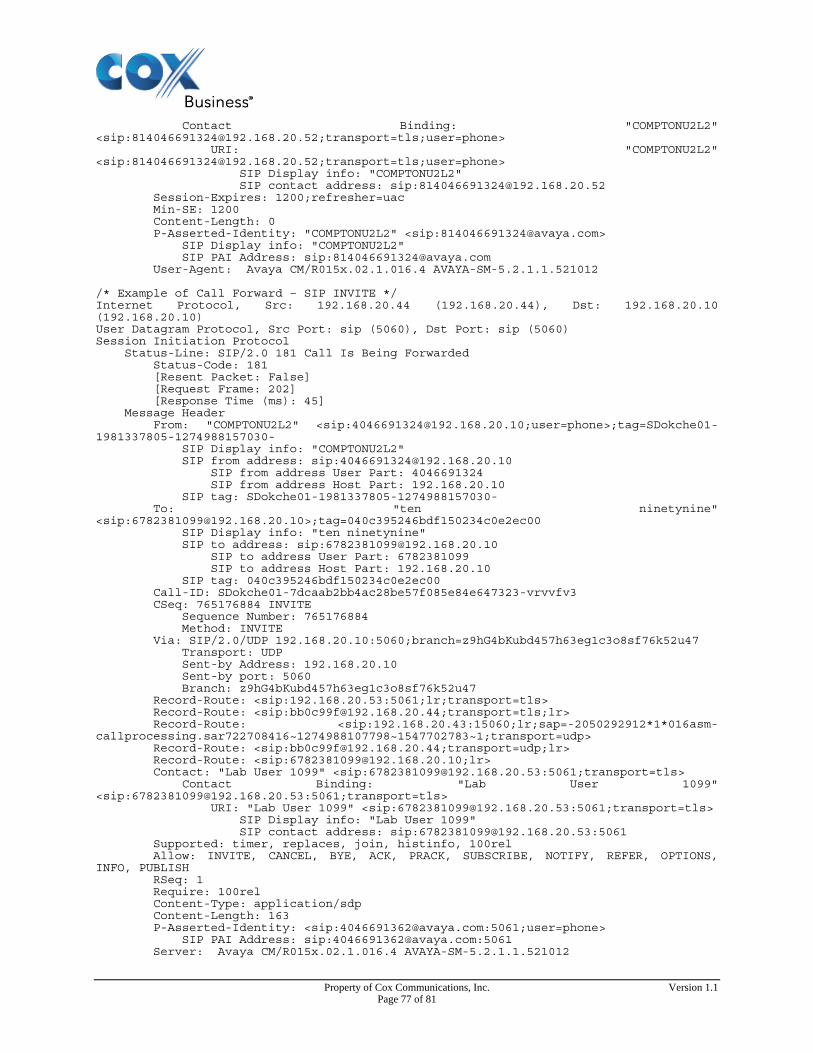
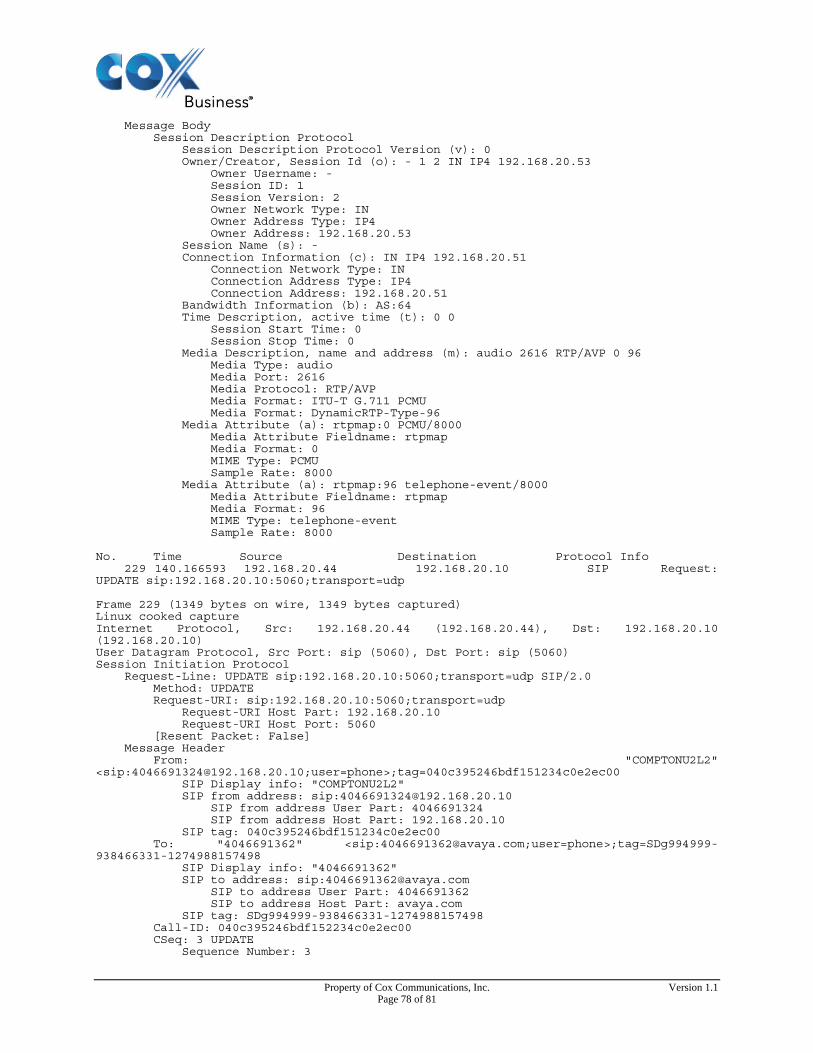
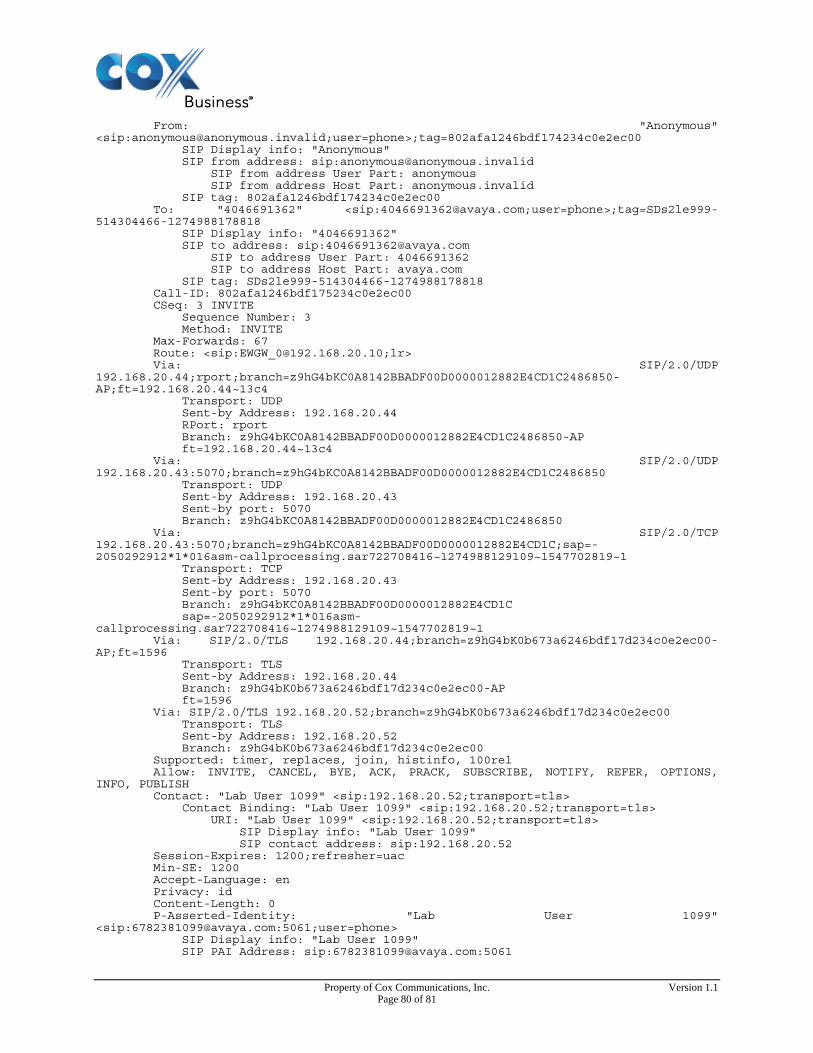
10.1.1 The DHCP Server on Communication Manager Branch..................................... 71 10.2 Appendix B: CS1K Patches .............................................................................................. 71 10.3 Appendix C: Sample SIP Traces for Avaya Session Manager and EdgeMarc 6400 E-SBC 75
Table of Figures Figure 1 – Cox Fiber Network ...................................................................................................................... 5 Figure 2 – Reference Network Architecture ................................................................................................. 6 Figure 3 – SIP Trunk Lab Reference Network ............................................................................................. 7 Figure 4 – Avaya/Nortel Element Manager Login Screen.......................................................................... 14 Figure 5 – Avaya/Nortel Element Manager Links Screen .......................................................................... 14 Figure 6 – Avaya/Nortel Element Manager Bandwidth Zones & Numbering Zones Screen..................... 15 Figure 7 – Avaya/Nortel Element Manager Bandwidth Zones Detail ........................................................ 15 Figure 8 – Zones Basic Property and Bandwidth Management Screen...................................................... 16 Figure 9 – Avaya/Nortel Element Manager System Overview .................................................................. 16 Figure 10 – Avaya/Nortel Element Manager IP Telephony Nodes ............................................................ 17 Figure 11 – Avaya/Nortel Element Manager Node Details (SIPGw) (1 of 2) ............................................ 17 Figure 12 – Avaya/Nortel Element Manager Node Details (SIPGw) (2 of 2) ............................................ 18 Figure 13 – Virtual Trunk Gateway Configuration – Node Details............................................................ 19 Figure 14 – Virtual Trunk Gateway Configuration - SIPGW..................................................................... 20 Figure 15 – Virtual Trunk Gateway Configuration: SIP URI Map............................................................. 21 Figure 16 – Virtual Trunk Gateway Configuration: User Information Fields ............................................ 21 Figure 17 – Virtual Trunk Gateway Configuration: CIT Settings .............................................................. 22 Figure 18 – Virtual Trunk Gateway Configuration: CTI CLID.................................................................. 22 Figure 19 – Virtual Trunk Gateway Configuration: Subscriber and Auto Attendant Service .................... 23 Figure 20 – Avaya/Nortel Element Manager D-Channels Configuration................................................... 23 Figure 21 – Avaya/Nortel Element Manager D-Channels Property Configuration Screen ........................ 24 Figure 22 – Avaya/Nortel Element Manager Routes and Trunks Configuration Screen............................ 25 Figure 23 – Route 51 Trunk Listing............................................................................................................ 26 Figure 24 – Route 51 Property Configuration (1 of 2)................................................................................ 27 Figure 25 – Route 51 Property Configuration (1 of 4)................................................................................ 28 Figure 26 – Route 51 Property Configuration (3 of 4)................................................................................ 29 Figure 27 – Route 51 Property Configuration (4 of 4)................................................................................ 29 Figure 28 – Avaya/Nortel Element Manager Virtual Terminal Sessions ................................................... 30 Figure 29 – Virtual Terminal Active Session ............................................................................................. 31 Figure 30 – Interactive Virtual Terminal Sessions ..................................................................................... 31 Figure 31 – CLI output for DCH and DMI................................................................................................. 32 Figure 32 – CLI output for Route 51 .......................................................................................................... 33 Figure 33 – CLI output for Route 52 .......................................................................................................... 34 Figure 34 – CLI output Area Codes and RLIs (1 of 3) ............................................................................... 35 Figure 35 – CLI output for Area Codes and RLIs (2 of 3) ......................................................................... 36 Figure 36 – CLI output for Area Codes and RLIs (3 of 3) ......................................................................... 37 Figure 37 – IP Settings on your PC............................................................................................................. 38 Figure 38 – Avaya Aura Login ................................................................................................................... 39 Figure 39 – Avaya Aura Session Manager Selection.................................................................................. 39 Figure 40 – Avaya Aura Session Manager Administration ........................................................................ 40
Property of Cox Communications, Inc. Version 1.1 Page 3 of 81
Property of Cox Communications, Inc. Version 1.1 Page 4 of 81
1 Audience This document is intended for the SIP Trunk customer’s technical staff and Avaya Value Added Retailer (VAR) having installation and operational responsibilities. 2 Introduction This Configuration Guide describes configuration steps for Cox SIP Trunking to an Avaya/Nortel CS1000 PBX v6.0 with Avaya Aura Session Manager v5.2 SP2. Cox SIP Trunking is a scalable and efficient IP trunking telecommunication solution for your business that provides all the traditional services such as Direct Inward Dialing, Hunting, Calling Name, Calling Number, Local/Long Distance and Cox network-based Business Continuity options, including:
Burstable Trunk Capacity – Dynamically increases call capacity during peak busy periods so your customers never receive a busy signal.
Call Forward Always – On the trunk group pilot number for all calls in case of an outage (flood, fire, power outage, etc.).
Call Forward Not Reachable – On the trunk group pilot number that operates on a per-call contingency basis to forward the call to any PSTN number (e.g. call center or alternate office location) during temporary call completion impairments.
Route Exhaustion – automatic reroute of trunk group calls to any PSTN phone number (i.e., a call center) if calls can’t be completed to the PBX.
Support for geo-redundant PBX deployments and automatic reroute of SIP Trunks to the backup customer data center.
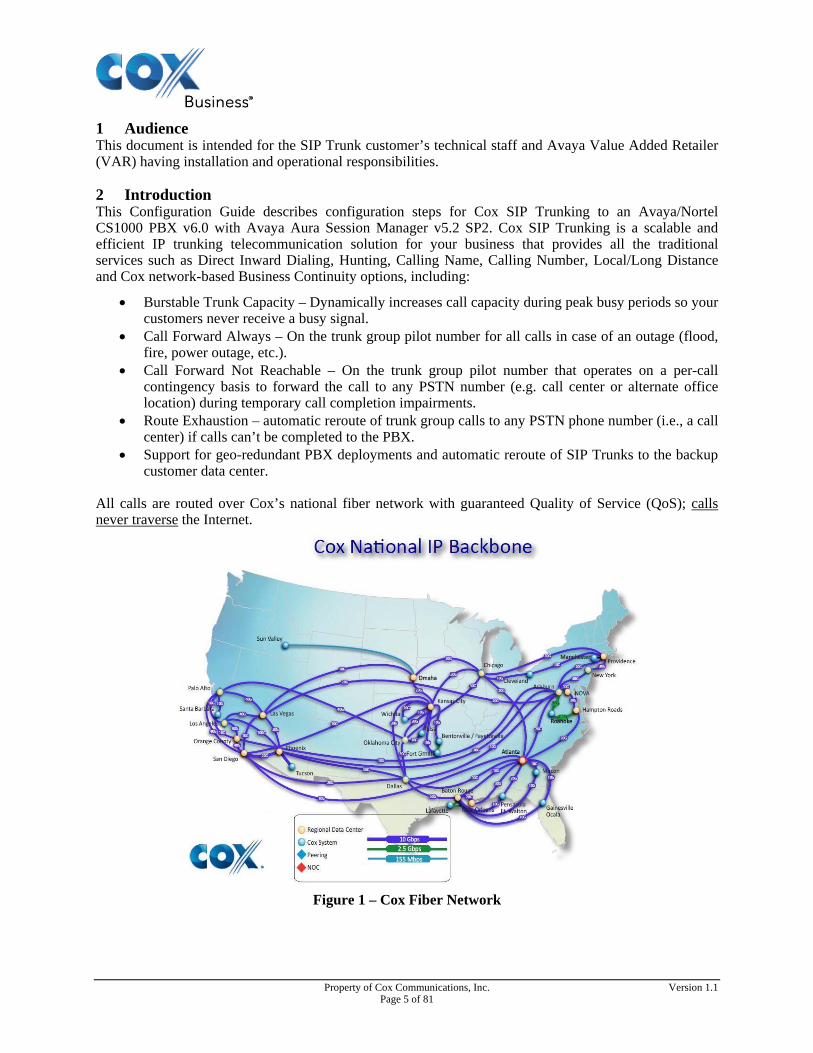
All calls are routed over Cox’s national fiber network with guaranteed Quality of Service (QoS); calls never traverse the Internet.
Figure 1 – Cox Fiber Network
Property of Cox Communications, Inc. Version 1.1 Page 5 of 81
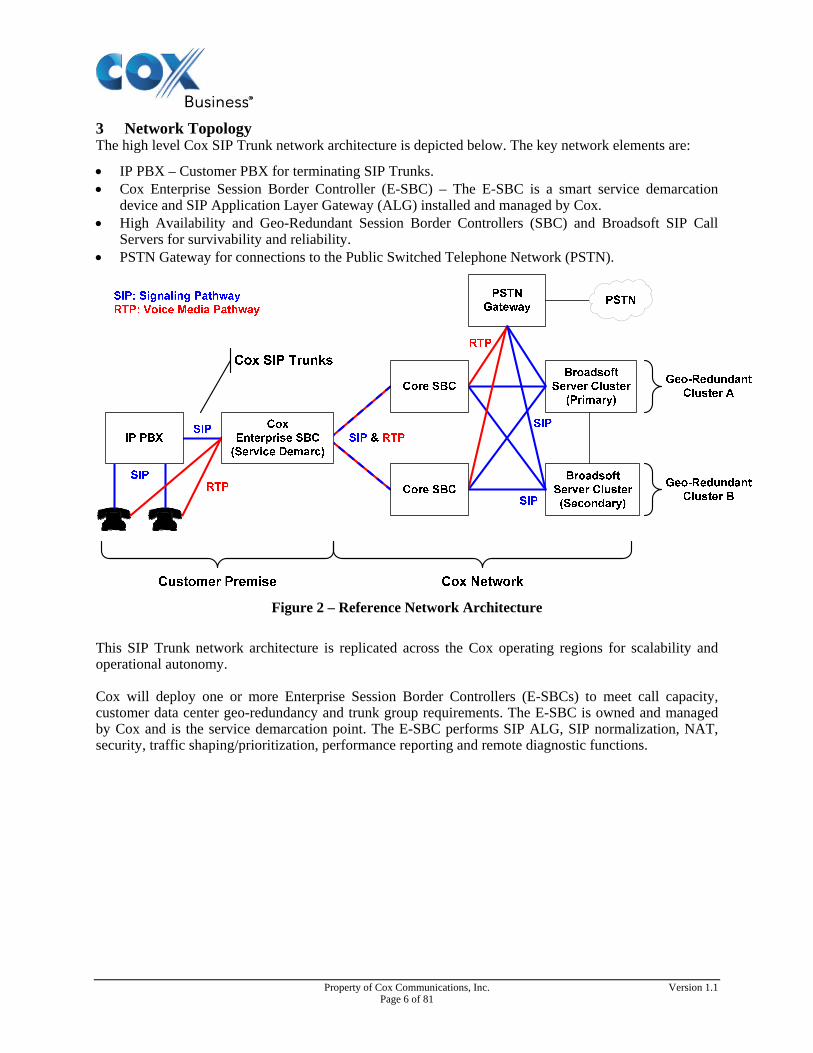
3 Network Topology The high level Cox SIP Trunk network architecture is depicted below. The key network elements are:
IP PBX – Customer PBX for terminating SIP Trunks. Cox Enterprise Session Border Controller (E-SBC) – The E-SBC is a smart service demarcation
device and SIP Application Layer Gateway (ALG) installed and managed by Cox. High Availability and Geo-Redundant Session Border Controllers (SBC) and Broadsoft SIP Call
Servers for survivability and reliability. PSTN Gateway for connections to the Public Switched Telephone Network (PSTN).
Figure 2 – Reference Network Architecture
This SIP Trunk network architecture is replicated across the Cox operating regions for scalability and operational autonomy. Cox will deploy one or more Enterprise Session Border Controllers (E-SBCs) to meet call capacity, customer data center geo-redundancy and trunk group requirements. The E-SBC is owned and managed by Cox and is the service demarcation point. The E-SBC performs SIP ALG, SIP normalization, NAT, security, traffic shaping/prioritization, performance reporting and remote diagnostic functions.
Property of Cox Communications, Inc. Version 1.1 Page 6 of 81
4 Lab Network Configuration The lab network for the SIP Trunk reference configuration is illustrated in Figure 3 and is representative of an Avaya Aura Session Manager geo-redundant deployment with the CS-1000 (CS1K) PBX.
Figure 3 – SIP Trunk Lab Reference Network
The lab network consists of the following components:
Avaya Aura™ Session Manager – The Session Manager provides a centralize SIP routing engine and integration of different services that enables communications between diverse SIP-enabled elements, e.g., IP PBXs, gateways, SIP applications, voice mail systems, etc. across the enterprise. The Session Manager enabled enterprise to implement centralized and policy-based routing, flexible dial plans, and consolidated trunking. Session Manager acts as a SIP interoperability facilitator among different SIP entities of a CS1000 SIP solution.
Avaya Aura™ System Manager – Provides a common administration interface for centralized management of all Avaya Aura Session instances in an enterprise environment.
Avaya/Nortel CS1000 – The Nortel CS1000 Communication Server (CS) 1000 is a robust and highly scalable IP PBX that supports traditional Meridian features as well as new IP telephony features, including Session Initiation Protocol (SIP). With the CS 1000, customers can evolve from a traditional TDM network to a converged IP network. The CS 1000 is an IP PBX that supports TDM PBX capabilities. Unlike traditional, circuit-switched PBX systems, the IP-based CS 1000 Core Call Server has no dedicated switching infrastructure. All voice communication between network elements uses a Telephony LAN (TLAN) subnet. Evolving to the CS 1000 and a converged IP network provides several advantages.
Property of Cox Communications, Inc. Version 1.1 Page 7 of 81
Nortel Media Gateway – Provides the physical interfaces and media resources for Nortel CS1000. Nortel IP Phones – Represented with Nortel 1120E, 1230, and 1140E Series IP Telephones
running SIP. The Cox E-SBC – The Edgewater Networks’ (www.edgewaternetworks.com) EdgeMarc 6400.
The EdgeMarc is the service demarcation point between customer’s LAN network and Cox’s WAN network and provides firewall/NAT traversal, B2BUA and SIP Application-level gateway. The EdgeMarc has diverse routes to a primary and secondary Acme SBC.
Acme Packet Net-Net 9200 Session Border Controllers (SBC) – In practice, these are deployed in high availability and geo-redundant pairs.
4.1 Hardware Components Avaya s8800 Server for System Manager and Session Managers Nortel Media Gateway Controller (MGC) 4.0 Nortel co-resident Call Server, Signaling Server, Network Routing Service (NRS), and Unified
Communications Management (UCM) Avaya/Nortel 1120E IP Deskphone Avaya/Nortel 1230 IP Deskphone Avaya/Nortel 1140E IP Deskphone EdgeMarc 6400lf E-SBC Acme Net-Net 9200 SBC
4.2 Software Requirements Avaya/Nortel CS1K Call Server release 6, version 4021 Avaya/Nortel CS1K Signaling Server release 6.00.18.00 Avaya/Nortel CS1K Patches applied (see Appendix B below for all the listing) Avaya Aura System Manager release 5.2 (SP 2) Avaya Aura Session Manager release 5.2.2.0.522009 EdgeMarc E-SBC 6400lf release 9.12.5
4.3 IP Subnet Recommendation Routing and technical support are greatly simplified if the Cox E-SBC (EdgeMarc) is in the same subnet / VPN as the Avaya TLAN. Network best practices must applied, please consult with your Avaya/Nortel technical representative.
4.4 Example Configuration Information The specific values listed in Table 1 below and in subsequent sections are used in this lab configuration described in this document, and are for illustrative purposes only. Customers must obtain and use the specific values for their own specific configurations. Table 1 – Example IP Address Configuration
Component Cox Lab Value Your Value
Avaya System Manager Management IP Address 192.169.20.40
Avaya Session Manager Management IP Address #1 192.168.20.40
Management IP Address #2 192.168.20.42
Property of Cox Communications, Inc. Version 1.1 Page 8 of 81
Property of Cox Communications, Inc. Version 1.1 Page 9 of 81
Component Cox Lab Value Your Value SIP IP Address #1 192.168.20.10
SIP IP Address #2 192.168.30.10
Avaya/Nortel LAN TLAN 192.168.20.0/24
ELAN 10.10.1.0/24
Avaya/Nortel Meridian Integrated Recorded Announcements (MiRAN) MiRAN IP Address 192.168.20.110
Avaya/Nortel Media Gateway Controller (MGC) 4.0 MGC 4.0 TLAN IP 192.168.20.108
MGC 4.0 ELAN IP 10.10.1.8
MGC 4.0 DB1 192.168.20.112
MGC 4.0 DB2 192.168.20.113
Avaya/Nortel Media Gateway Controller (MGC) 8.0 MGC 8.0 TLAN IP 192.168.20.109
MGC 8.0 ELAN IP 10.10.1.9
MGC 8.0 DB1 192.168.20.114
MGC 8.0 DB2 192.168.20.115
Avaya/Nortel SIP Gateway A Endpoint Name coxlabss01
Node ID 1111
Primary UCM, SS, NRS TLAN IP
192.168.20.101
Primary UCM, SS, NRS ELAN IP
10.10.1.106
Avaya/Nortel SIP Gateway B Endpoint Name coxlabss02
Node ID 1121
Alternate UCM, SS, NRS TLAN IP
192.168.20.121
Alternate UCM, SS, NRS ELAN IP
10.10.1.107
E-SBC EdgeMarc 6400’s LAN Subnet Mask 255.255.255.0
LAN IP Address #1 192.168.20.100
LAN IP Address #2 192.168.20.120
5 Overview Avaya Aura™ Session Manager is the centralize control point of contact for all SIP-based communication for both internal and external services. Session Manager established SIP connections, process SIP sessions, and normalizes disparate SIP network components and provides a central contact point for external SIP trunking to the PSTN. The various SIP network components are represented as “SIP Entities” and the SIP Trunks between Session Manager and those components are represented as “Entity Links”. Thus, for example, rather the Avaya Communication Manager connecting directly to all the Service Providers, but relies on Session Manager to route calls to the correct destination. This reduces the complexity of the dial plan and trunking administration needed.
5.1 Routing Policies Routing Policies define how Session Manager routes calls between different SIP elements on the network. Routing Policies are dependent on several related items:
5.2 SIP Trunking Call Flows To understand how Cox’s SIP Trunking calls are handled by Session Manager and CS1000, we will described three basic call flows in this section, however for briefness not all possible call flows are described in this document.
Property of Cox Communications, Inc. Version 1.1 Page 10 of 81
6 Features Tested
6.1 SIP Trunk Supported Features The following SIP Trunk capabilities and features are supported:
Inbound and outbound calls G.711ulaw CODEC with 20 msec packetization rate Calling Party Number Presentation and Restriction DTMF translation to/from SIP signaling-based to RTP media-based (RFC 2833) High Availability (HA) Acme SBC Geo-Redundancy Acme SBC BroadWorks SIP Feature Server High Availability and Geo-Redundancy End-to-end SIP Trunk voice Quality of Service (QoS) Burstable Trunk capacity Business Continuity: Trunk Group Route Exhaustion
6.2 Avaya/Nortel CS1000 Tested Features The following Avaya/Nortel CS1000 PBX features were successfully tested with Cox SIP Trunking for calls that traverse the SIP Trunks:
3-Way Calling Auto-Attendant Authorization Codes Blind Call Transfer Call Forward Busy Call Forward No Answer Call Forward Always Call Hold Calling Line ID Blocking per Call Call Park Call Pickup Call Waiting Caller ID – Name and Number Call Intercept Consultative Call Transfer Customer defined Calling Line ID outside the Trunk Group DID range (“spoofing”) Caller ID – Blocked call to Off-net number Do Not Disturb Group ID Delivery Sequential Ring Simultaneous Hunt Voice Mail (DTMF digits)
Property of Cox Communications, Inc. Version 1.1 Page 11 of 81
6.3 Call Testing The following call types and optional Cox network-based features were verified with Cox SIP Trunks:
Account Codes (Network Based) Authorization Codes (Network Based) Auto Attendant (Network Based) Hunt Groups (Network Based) 211 – Community Information and Referral Services 311 – Non-Emergency Police and Other Governmental Services 411 – Local Directory Assistance 511 – Traffic and Transportation Information (US); Provision of Weather and Traveller
Information Services (Canada) 611 – Repair Service 711 – Telecommunications Relay Service (TRS) 811 – One Call Services to Protect Pipeline and Utilities from Excavation Damage (US); Non-
Urgent Health Teletriage Services (Canada) 911 – Emergency Services International Calls Long Distance – 10- and 11-Digit Dialing Local call – 7- and 10-Digit Dialing Premium Services 900/976 Toll free 800/866/877/888 Directory Assistance 7-, 10- and 11-Digit Dialing 1+(NPA)-555-1212 10-10 Dialing Around G.711 Fax and Modem
6.4 Features Not Supported G.729, G.726 CODECs T.38 Fax Relay (Cox will support T.38 in 4Q11)
Property of Cox Communications, Inc. Version 1.1 Page 12 of 81
7 Caveats There is no known caveat as of this writing. 8 Avaya Aura™ CS1000 and Session Manager Configuration Walkthrough The following SIP Trunk configuration is based on the network configuration described above. The configuration example covers the following:
Managing CS1000 with Element Manager Configuration of SIP Trunk Zone Configuration of IP Telephony Nodes Virtual Trunk Gateway Configuration Administration D-Channel Administration routes and trunks Virtual Terminal Sessions
The Avaya/Nortel CS1000 configuration detailed in this document is based on a lab environment with a basic dial plan to ensure interoperability between the Cox SIP network and Avaya Aura communications solution. Attention to detail is required to ensure these commands are implemented for successful SIP Trunk operation.
Property of Cox Communications, Inc. Version 1.1 Page 13 of 81
8.1 SIP Gateway Configuration
Figure 4 – Avaya/Nortel Element Manager Login Screen
8.1.1 Element Manager Login
The IP Telephony and IP Trunk configuration is only configurable via Element Manager, which can only be accessed through Unified Common Manager. User a browser (IE is the only supported Web Brower) and point to http://192.168.20.106 (or 192.168.20.107) and log in.
Figure 5 – Avaya/Nortel Element Manager Links Screen
Property of Cox Communications, Inc. Version 1.1 Page 14 of 81
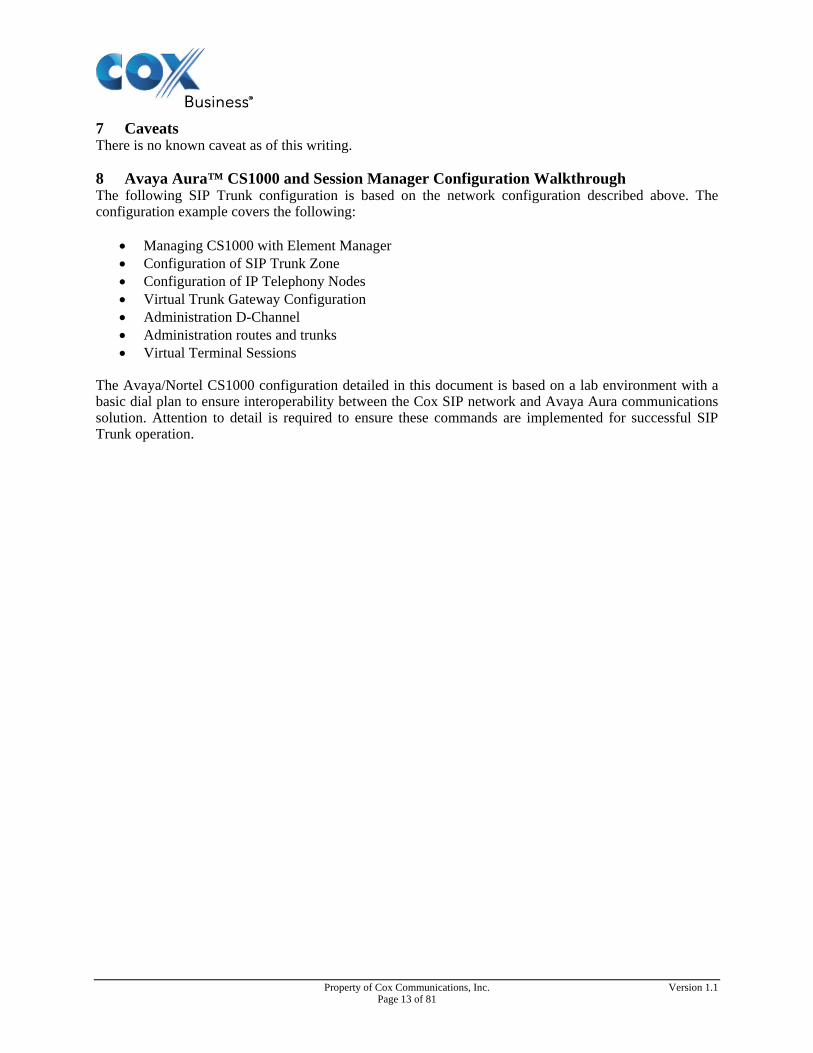
8.1.2 Select one of the Element Manager links. Select ever ‘EM on coxlabss01’ or ‘EM on coxlabss02’. That is the CS1K Signaling Server one and two, respectively.
Figure 6 – Avaya/Nortel Element Manager Bandwidth Zones & Numbering Zones Screen
8.1.3 Configuration of the ‘SIP Trunk Zone’.
Figure 7 – Avaya/Nortel Element Manager Bandwidth Zones Detail
Property of Cox Communications, Inc. Version 1.1 Page 15 of 81
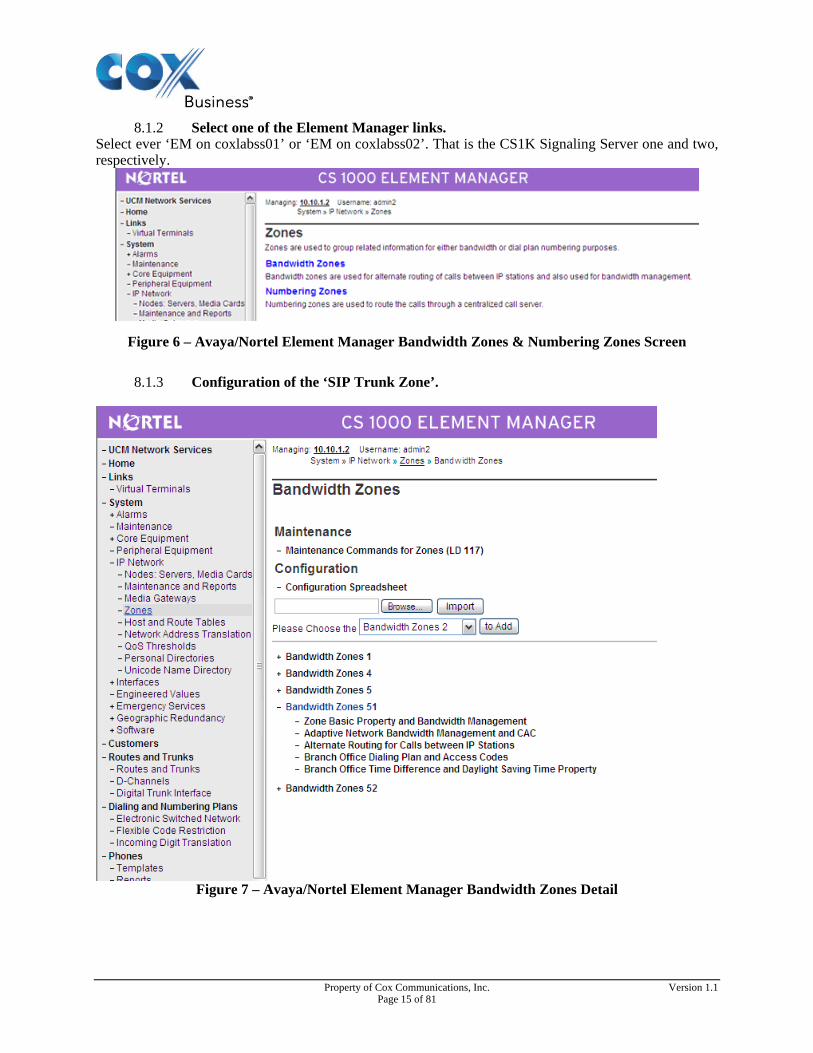
8.1.4 Configuration section of Bandwidth Zones. Each gateway’s SIP Trunks are in their own bandwidth management zone. The SIP Trunks of SIP Gateway A are on zone 51 and the SIP Trunks for SIP Gateway B are in zone 52.
Figure 8 – Zones Basic Property and Bandwidth Management Screen
The zone is configured as a virtual trunk zone. Both zones are configured the same. The ‘Best Quality’ bandwidth strategy means the PBX will try to use G.711 first when negotiating a codec. G.729A is turned off and is not available to the SIP Gateways.
8.1.5 System Overview. When you open Element Manager, the IP Node configuration pages can be found by clicking on ‘Node, Servers, and Media Cards’ in the left menu tab.
Figure 9 – Avaya/Nortel Element Manager System Overview
Property of Cox Communications, Inc. Version 1.1 Page 16 of 81
8.1.6 IP Telephony Nodes. Each Signaling Server can register 1800 SIP Trunks and 1200 H.323. Only the leader Signaling Server of a node can facilitate IP trunk registration. Node 1111 is SIP Gateway A, and Node 1121 is SIP Gateway B. SIPGW-A has 15 SIP Trunks registered to it and SIPGW-B has 14 SIP trunks registered to it.
Figure 10 – Avaya/Nortel Element Manager IP Telephony Nodes
Figure 11 – Avaya/Nortel Element Manager Node Details (SIPGw) (1 of 2)
Property of Cox Communications, Inc. Version 1.1 Page 17 of 81
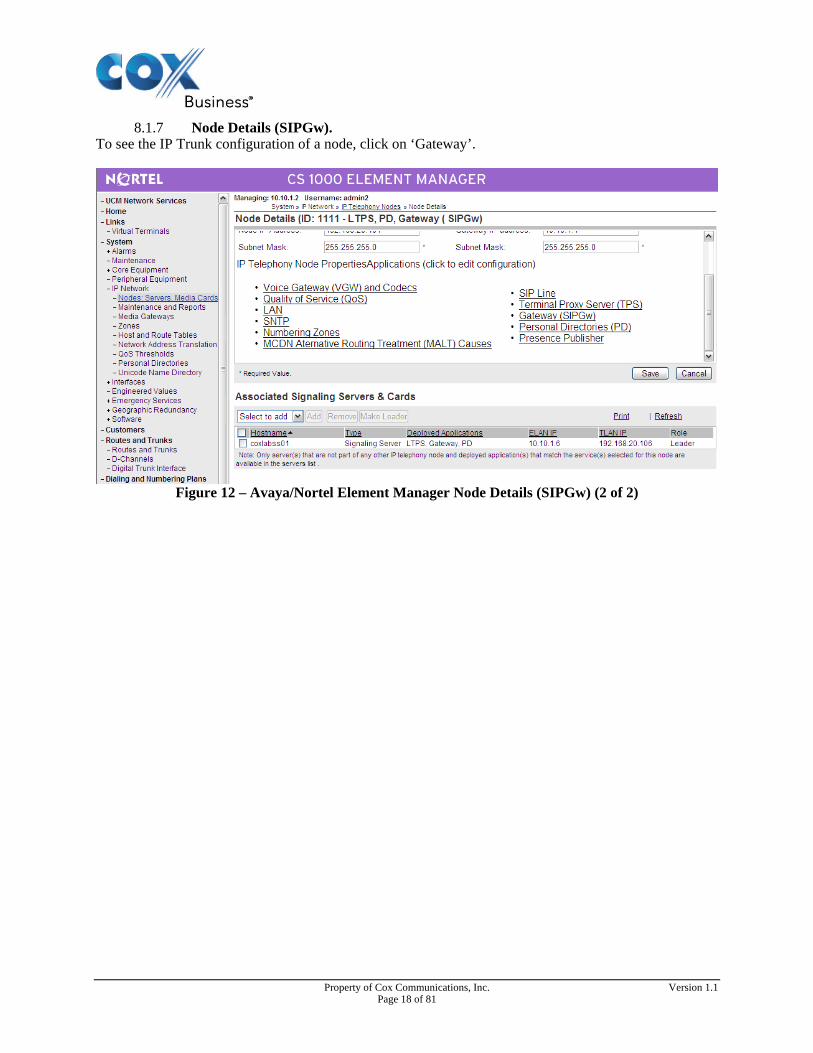
8.1.7 Node Details (SIPGw). To see the IP Trunk configuration of a node, click on ‘Gateway’.
Figure 12 – Avaya/Nortel Element Manager Node Details (SIPGw) (2 of 2)
Property of Cox Communications, Inc. Version 1.1 Page 18 of 81
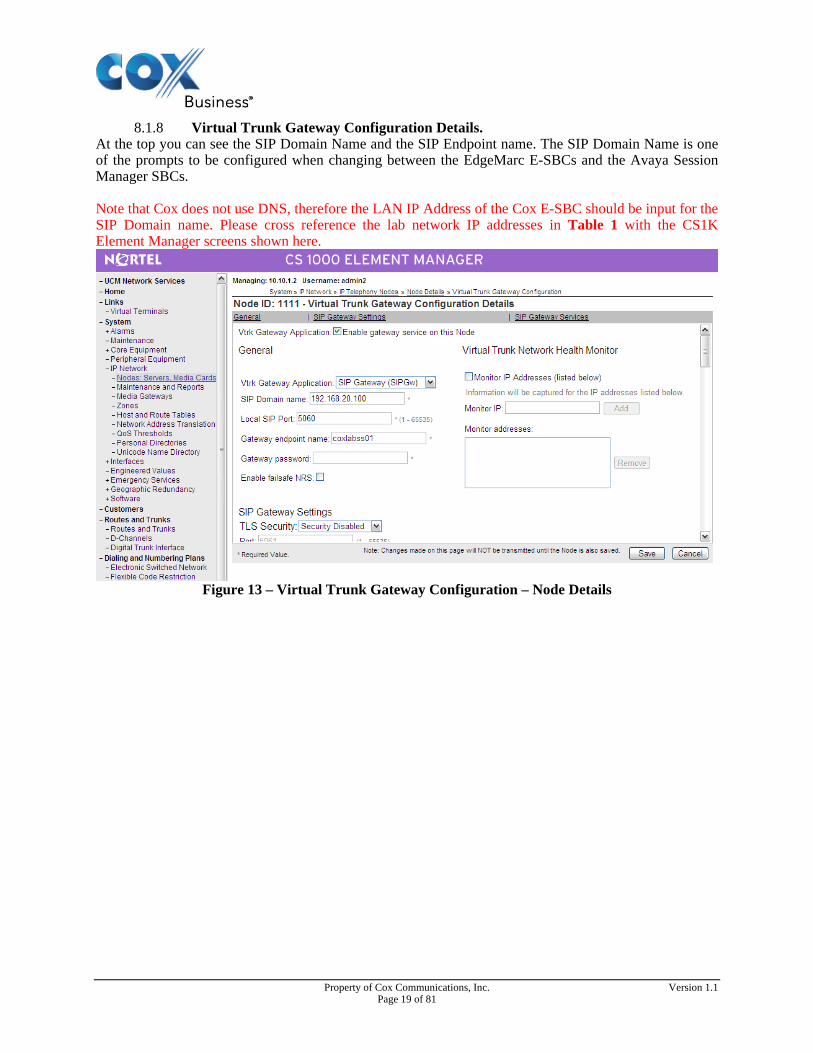
8.1.8 Virtual Trunk Gateway Configuration Details. At the top you can see the SIP Domain Name and the SIP Endpoint name. The SIP Domain Name is one of the prompts to be configured when changing between the EdgeMarc E-SBCs and the Avaya Session Manager SBCs. Note that Cox does not use DNS, therefore the LAN IP Address of the Cox E-SBC should be input for the SIP Domain name. Please cross reference the lab network IP addresses in Table 1 with the CS1K Element Manager screens shown here.
Property of Cox Communications, Inc. Version 1.1 Page 19 of 81
The following shows the configuration of SIPGW-A when it is connected to EdgeMarc E-SBC-1. Notice that SIP Domain Name is 192.168.20.100. If it was SIPGW-B, the SIP Domain Name would be 192.168.20.120, which would start the configuration of the connection between it and EdgeMarc E-SBC-2.
The Primary TLAN IP Address of the Proxy or Redirect server is the IP address of the device the CS1000E is sending calls to and from the SIP Gateway facilitated by the IP telephony node.
Property of Cox Communications, Inc. Version 1.1 Page 20 of 81
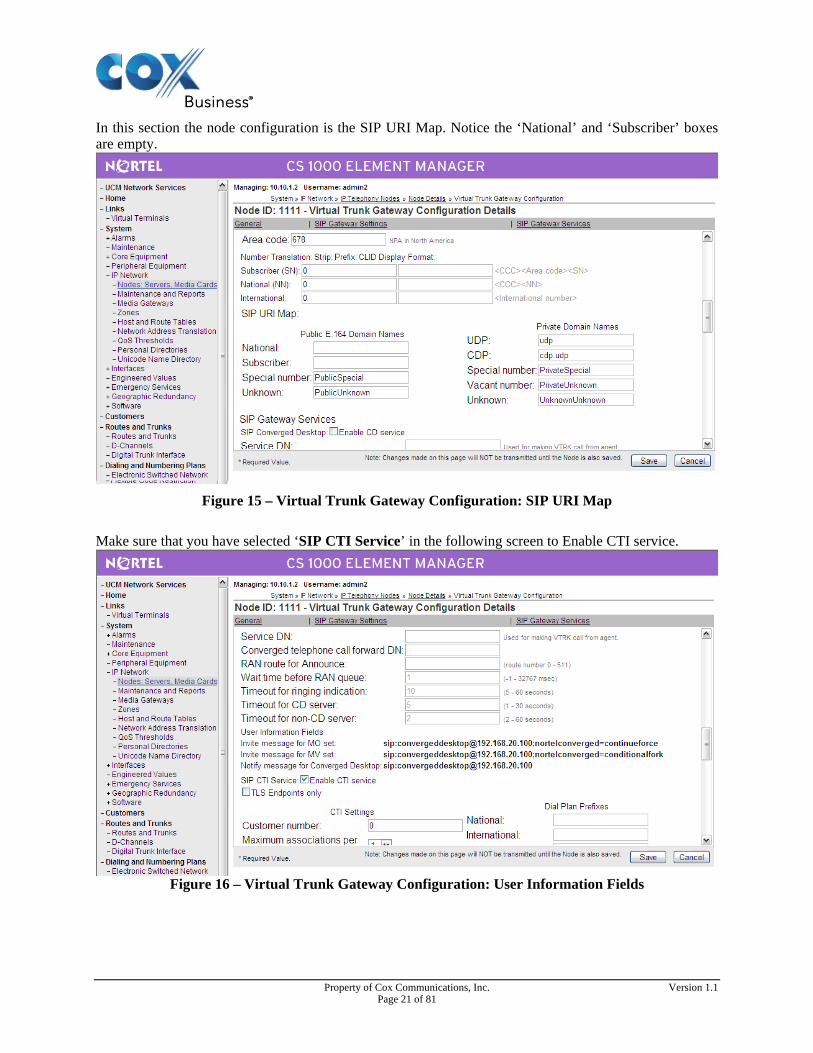
In this section the node configuration is the SIP URI Map. Notice the ‘National’ and ‘Subscriber’ boxes are empty.
Figure 15 – Virtual Trunk Gateway Configuration: SIP URI Map
Make sure that you have selected ‘SIP CTI Service’ in the following screen to Enable CTI service.
Figure 16 – Virtual Trunk Gateway Configuration: User Information Fields
Property of Cox Communications, Inc. Version 1.1 Page 21 of 81
Property of Cox Communications, Inc. Version 1.1 Page 22 of 81
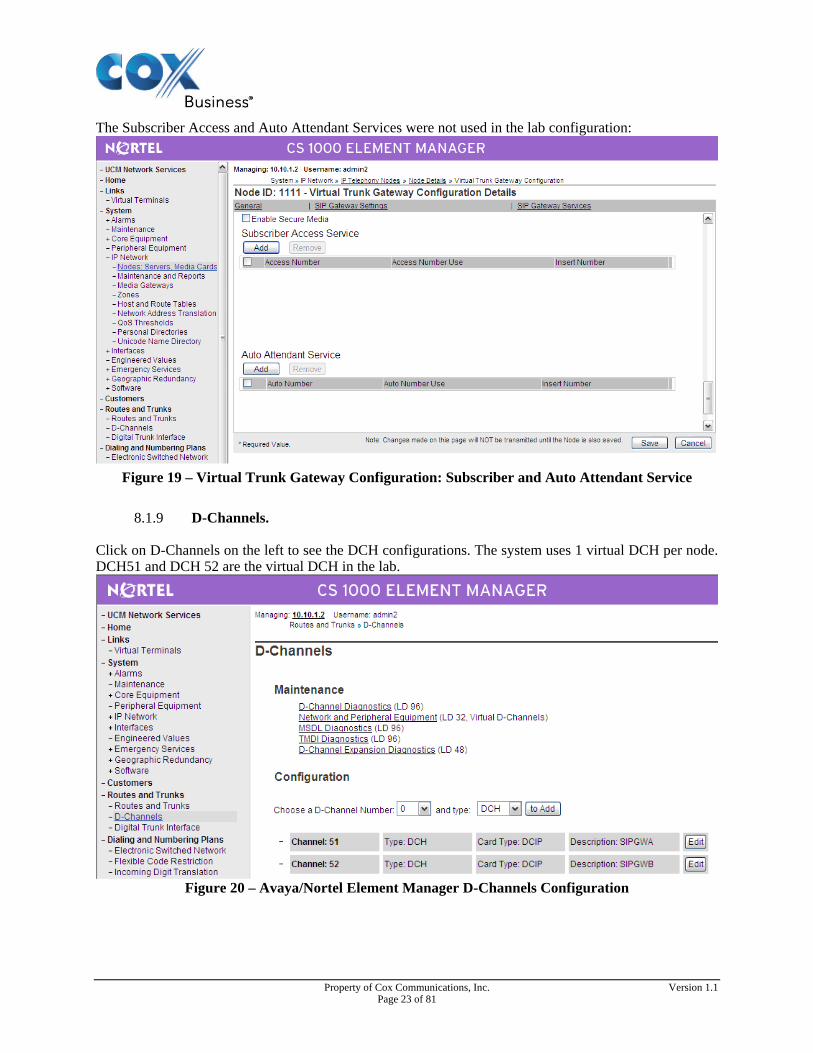
The Subscriber Access and Auto Attendant Services were not used in the lab configuration:
Figure 19 – Virtual Trunk Gateway Configuration: Subscriber and Auto Attendant Service
8.1.9 D-Channels.
Click on D-Channels on the left to see the DCH configurations. The system uses 1 virtual DCH per node. DCH51 and DCH 52 are the virtual DCH in the lab.
Figure 20 – Avaya/Nortel Element Manager D-Channels Configuration
Property of Cox Communications, Inc. Version 1.1 Page 23 of 81
8.1.10 D-Channels 51 Property Configuration. The USR parameter is set to ISLD. The IFC parameter is set to SL1.
Figure 21 – Avaya/Nortel Element Manager D-Channels Property Configuration Screen
Property of Cox Communications, Inc. Version 1.1 Page 24 of 81
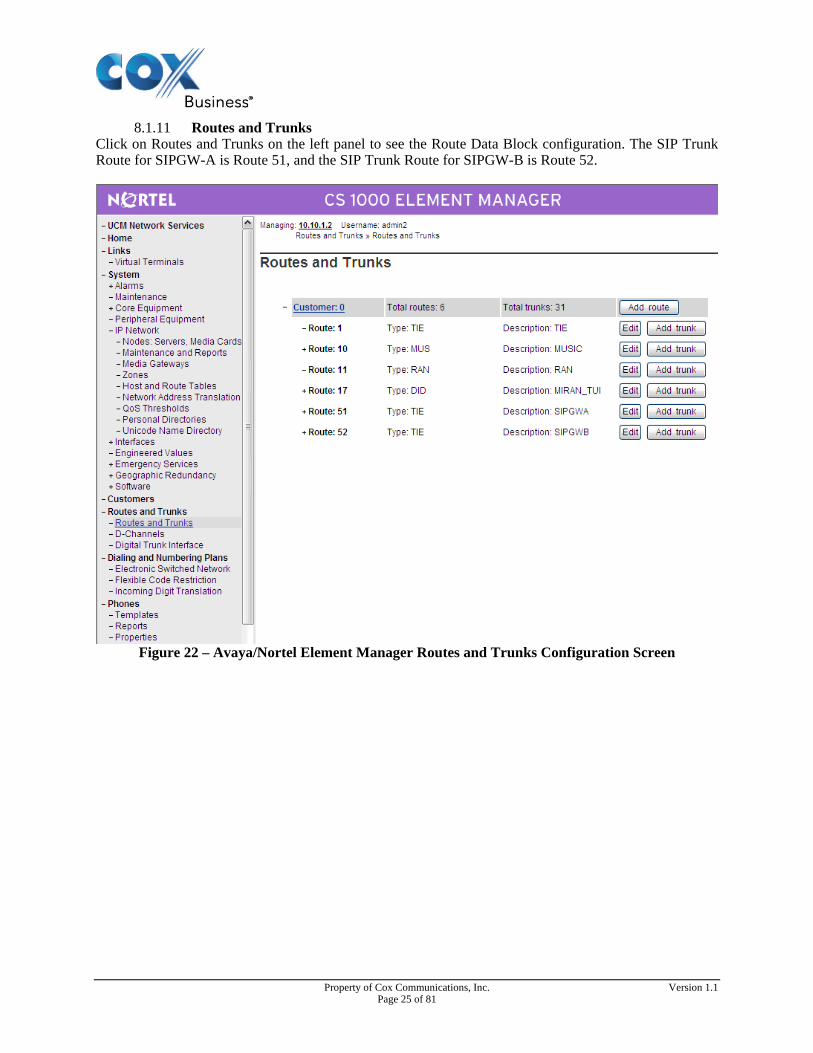
8.1.11 Routes and Trunks Click on Routes and Trunks on the left panel to see the Route Data Block configuration. The SIP Trunk Route for SIPGW-A is Route 51, and the SIP Trunk Route for SIPGW-B is Route 52.
Figure 22 – Avaya/Nortel Element Manager Routes and Trunks Configuration Screen
Property of Cox Communications, Inc. Version 1.1 Page 25 of 81
Click the Route name to expand it to view the Trunks and ‘Edit’ to see the configuration.
Figure 23 – Route 51 Trunk Listing
Property of Cox Communications, Inc. Version 1.1 Page 26 of 81
To see the configuration of a trunk, click ‘Edit’ on a Trunk. For example: Route 51.
Figure 24 – Route 51 Property Configuration (1 of 2)
Property of Cox Communications, Inc. Version 1.1 Page 27 of 81
Figure 25 – Route 51 Property Configuration (1 of 4)
Property of Cox Communications, Inc. Version 1.1 Page 28 of 81
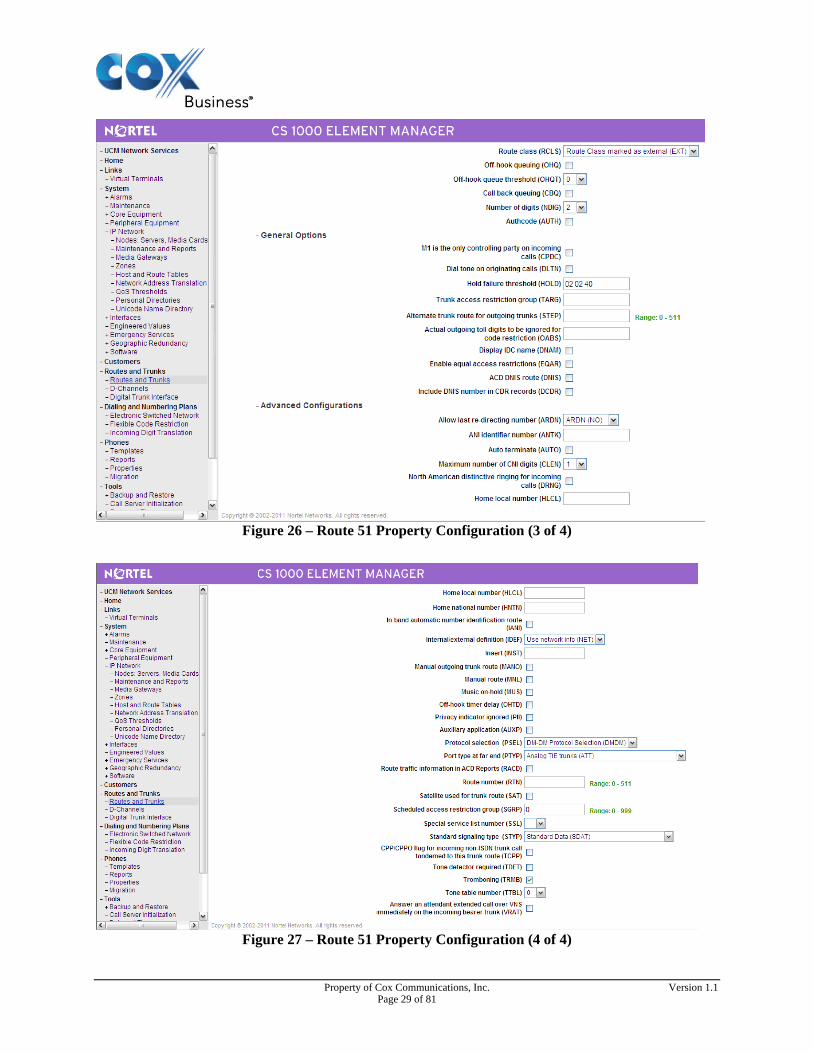
Figure 26 – Route 51 Property Configuration (3 of 4)
Figure 27 – Route 51 Property Configuration (4 of 4)
Property of Cox Communications, Inc. Version 1.1 Page 29 of 81
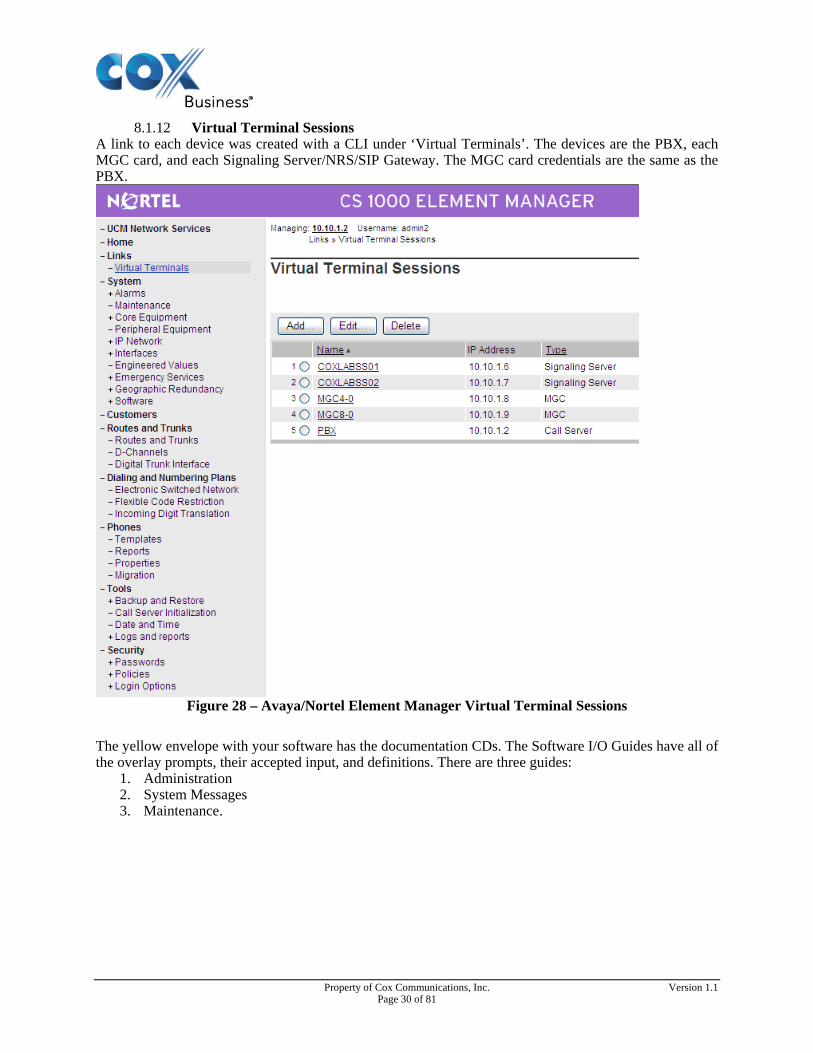
8.1.12 Virtual Terminal Sessions A link to each device was created with a CLI under ‘Virtual Terminals’. The devices are the PBX, each MGC card, and each Signaling Server/NRS/SIP Gateway. The MGC card credentials are the same as the PBX.
Figure 28 – Avaya/Nortel Element Manager Virtual Terminal Sessions
The yellow envelope with your software has the documentation CDs. The Software I/O Guides have all of the overlay prompts, their accepted input, and definitions. There are three guides:
1. Administration 2. System Messages 3. Maintenance.
Property of Cox Communications, Inc. Version 1.1 Page 30 of 81
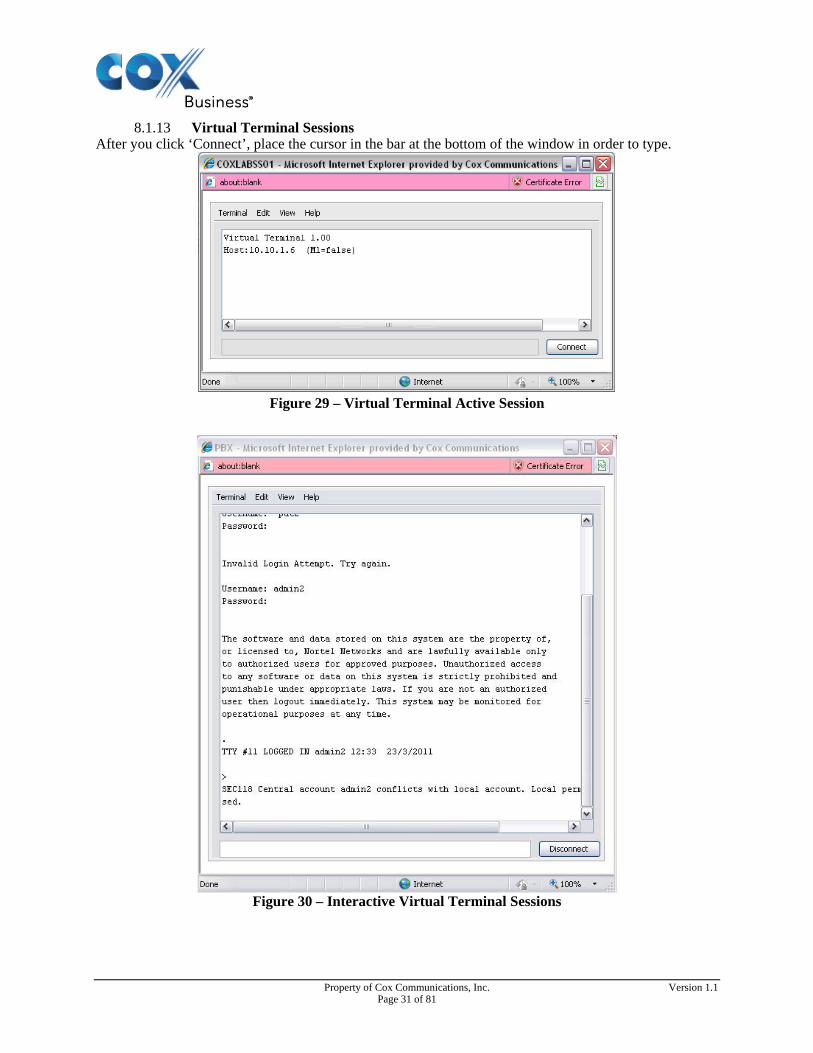
8.1.13 Virtual Terminal Sessions After you click ‘Connect’, place the cursor in the bar at the bottom of the window in order to type.
Figure 29 – Virtual Terminal Active Session
Figure 30 – Interactive Virtual Terminal Sessions
Property of Cox Communications, Inc. Version 1.1 Page 31 of 81
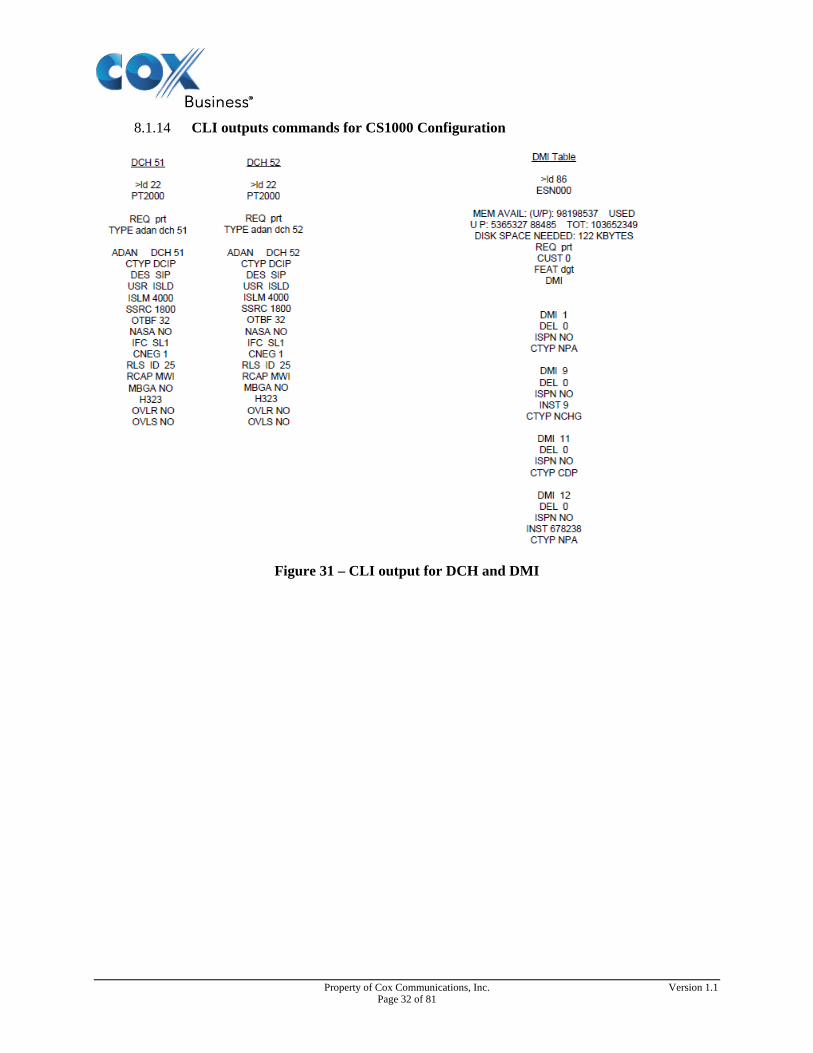
8.1.14 CLI outputs commands for CS1000 Configuration
Figure 31 – CLI output for DCH and DMI
Property of Cox Communications, Inc. Version 1.1 Page 32 of 81
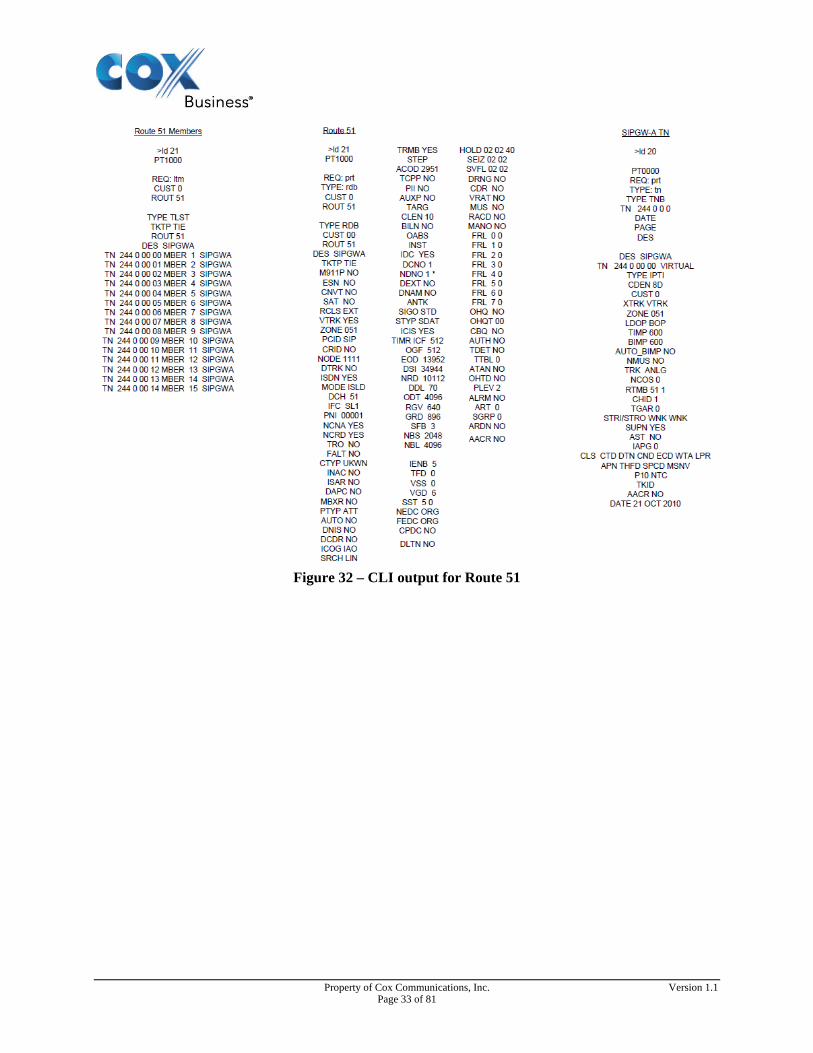
Figure 32 – CLI output for Route 51
Property of Cox Communications, Inc. Version 1.1 Page 33 of 81
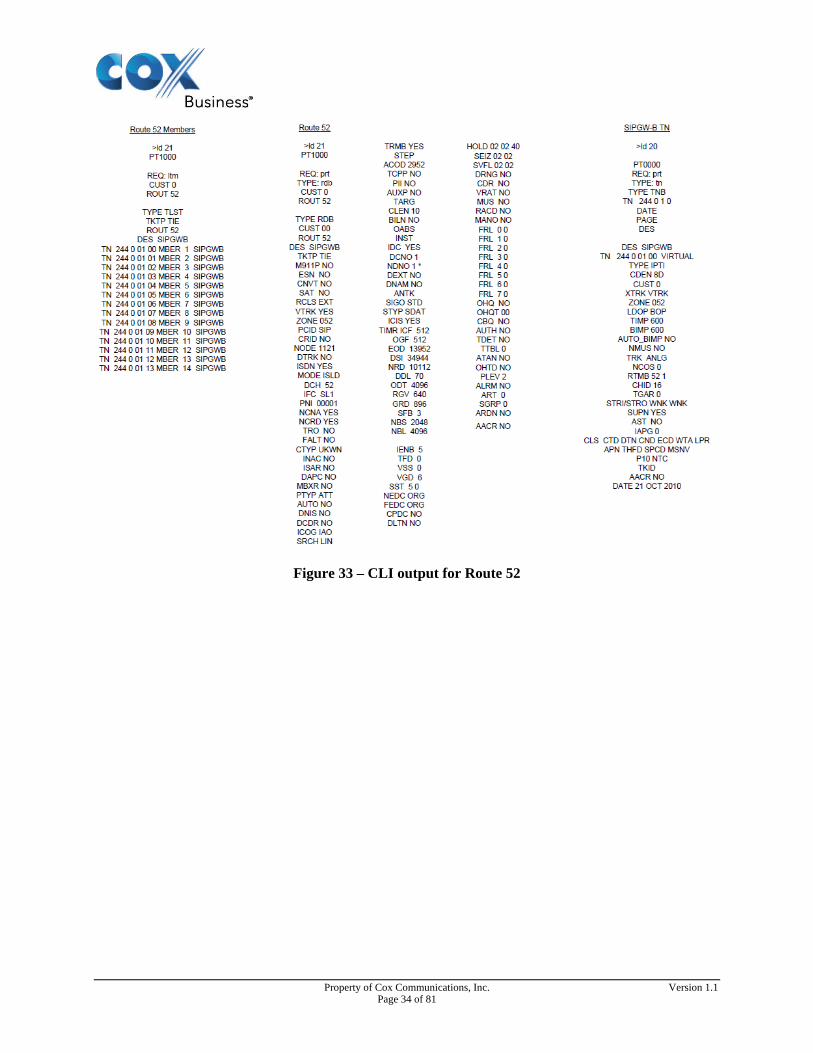
Figure 33 – CLI output for Route 52
Property of Cox Communications, Inc. Version 1.1 Page 34 of 81
Figure 34 – CLI output Area Codes and RLIs (1 of 3)
Property of Cox Communications, Inc. Version 1.1 Page 35 of 81
Figure 35 – CLI output for Area Codes and RLIs (2 of 3)
Property of Cox Communications, Inc. Version 1.1 Page 36 of 81
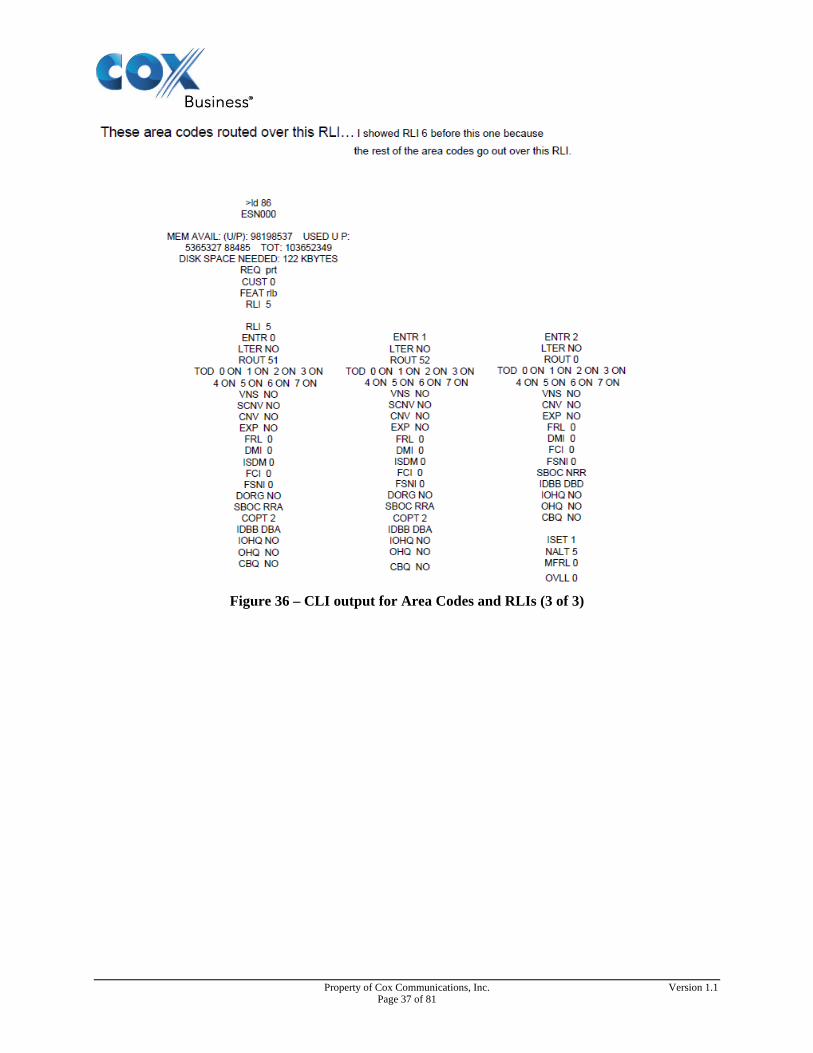
Figure 36 – CLI output for Area Codes and RLIs (3 of 3)
Property of Cox Communications, Inc. Version 1.1 Page 37 of 81
9 Avaya Aura™ Session Manager System Configuration This section provides the procedures for configuring Session Manager. The procedures include the following items: Network Routing Policy
SIP Domain Logical/Physical location that can be occupied by SIP Entities SIP Entities corresponding to CS1000 and Session Manager Adaptations Modules Entity Links, which define the SIP Trunks parameters used by Session Manager when routing
calls to/from SIP Entities Routing Policies, which control call routing between the SIP Entities Dial Patterns, which govern to which SIP Entity a call is routed
Session Manager
Session Manager Administration - Session Manager, corresponding to the Session Manager Server to be managed by System Manager Network Configuration Local Host Name Resolution - Local host name resolution entries corresponding to fully qualified
domain names (FQDN’s) SIP Firewall – Firewall configuration - Rules System Status - System State Administration
9.1 Set Up System Information To do this, you will need to connect to the Avaya Aura Session Manager:
1. Connect LAN cable to Avaya Aura Session Manager Server 2. Set TCP/IP properties as follows:
Figure 37 – IP Settings on your PC
Property of Cox Communications, Inc. Version 1.1 Page 38 of 81
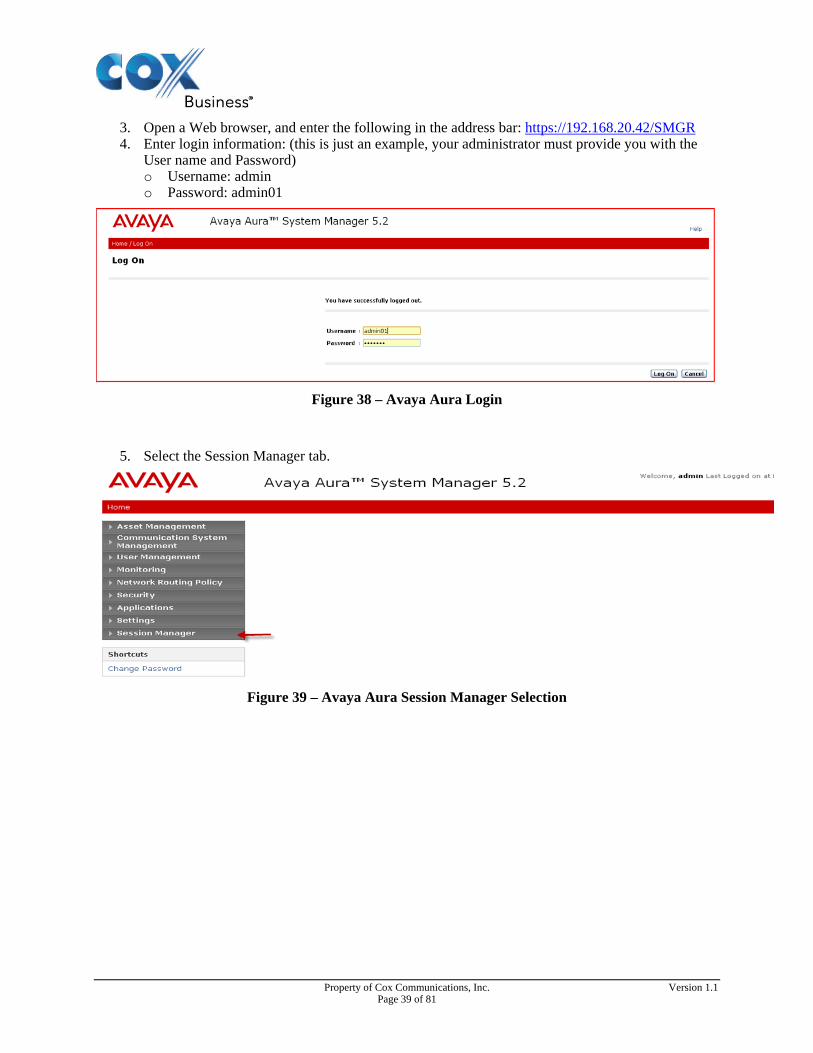
3. Open a Web browser, and enter the following in the address bar: https://192.168.20.42/SMGR 4. Enter login information: (this is just an example, your administrator must provide you with the
User name and Password) o Username: admin o Password: admin01
Figure 38 – Avaya Aura Login
5. Select the Session Manager tab.
Figure 39 – Avaya Aura Session Manager Selection
Property of Cox Communications, Inc. Version 1.1 Page 39 of 81
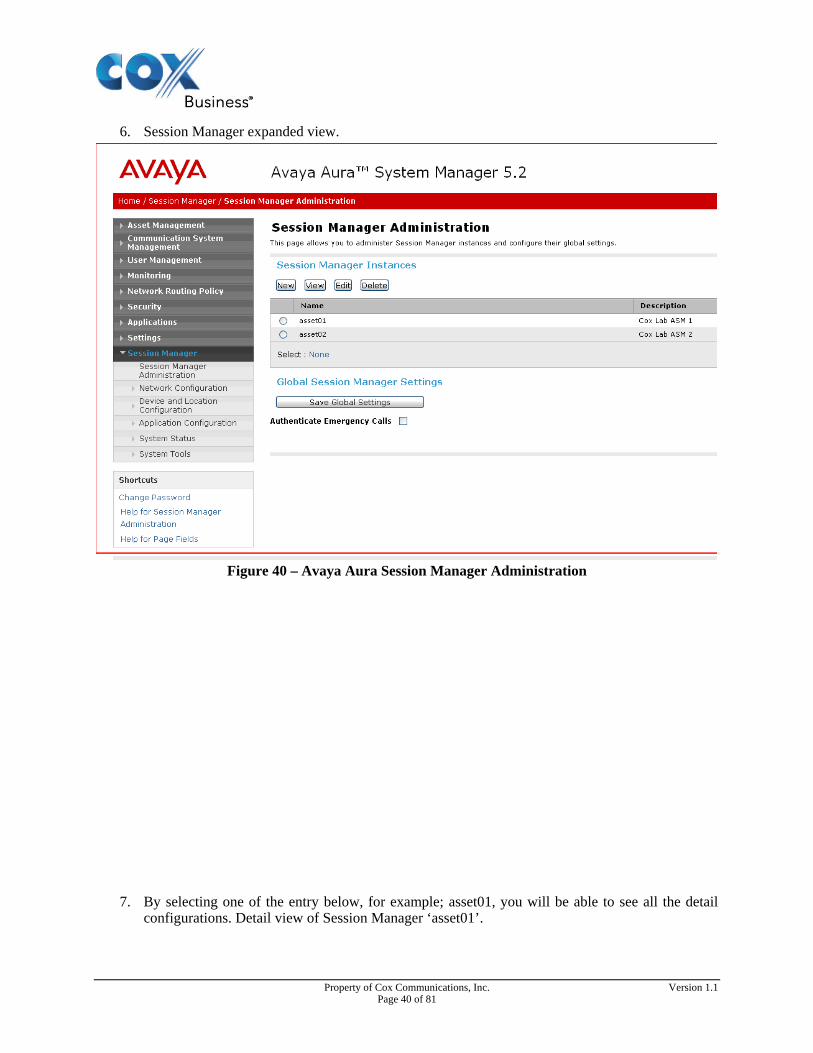
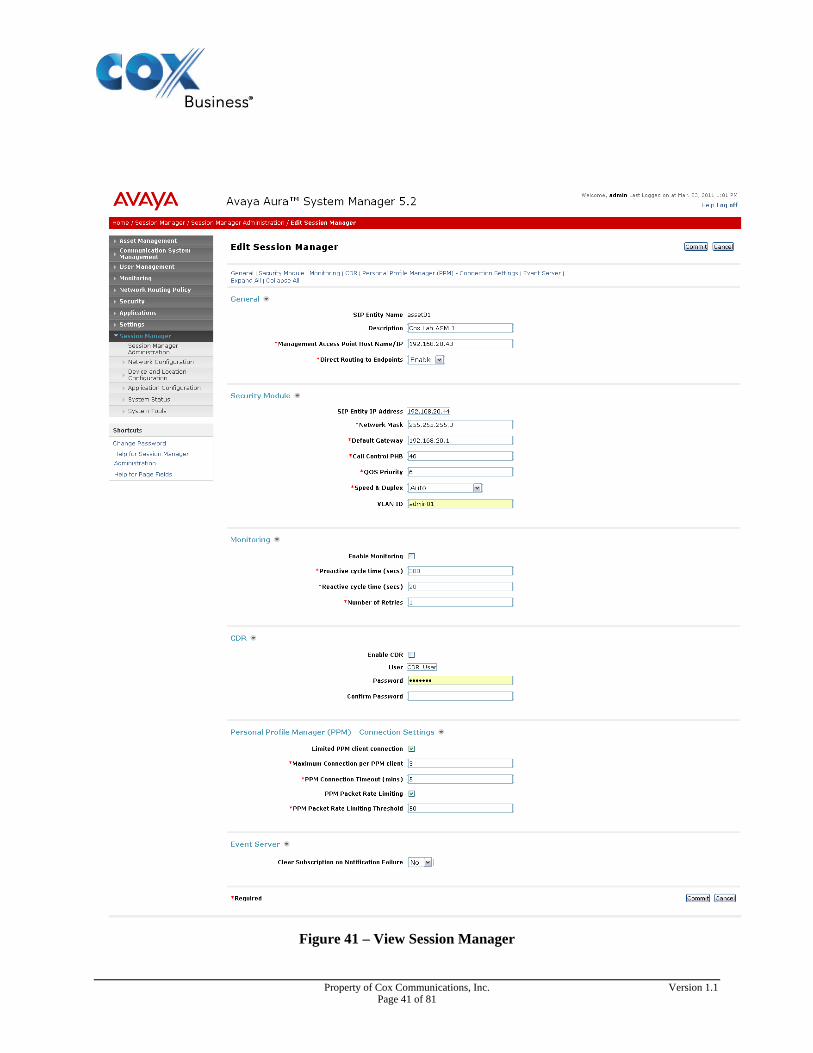
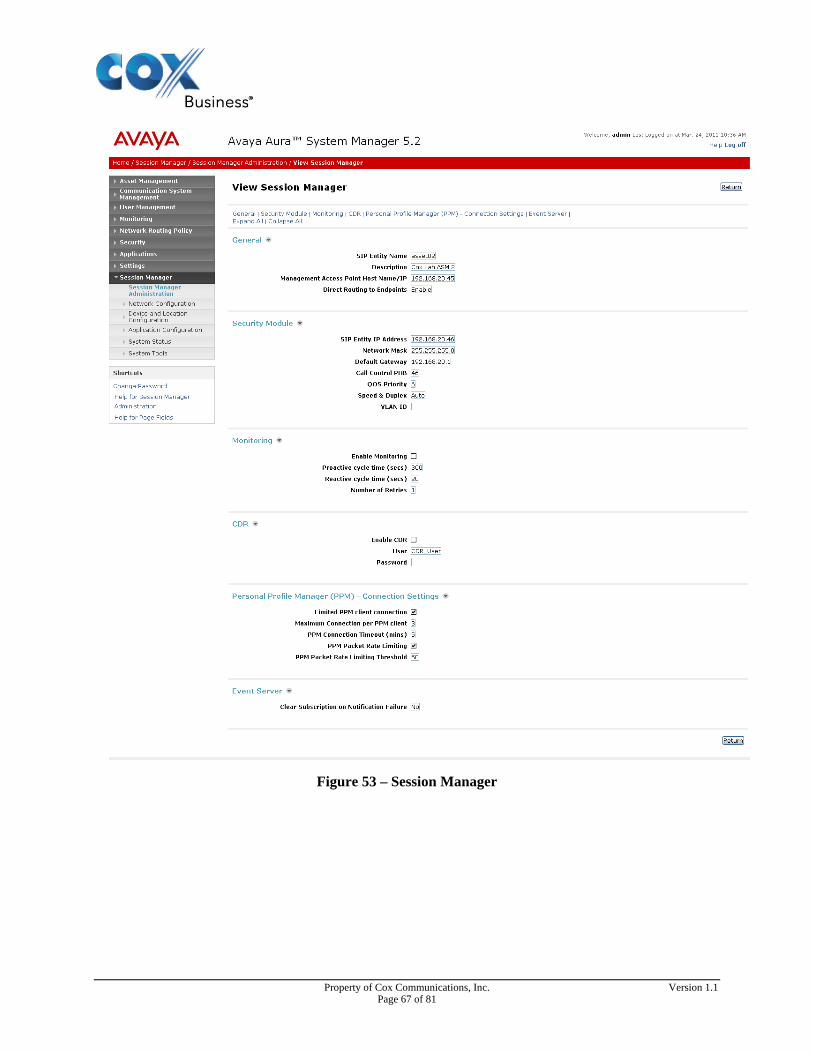
7. By selecting one of the entry below, for example; asset01, you will be able to see all the detail configurations. Detail view of Session Manager ‘asset01’.
Property of Cox Communications, Inc. Version 1.1 Page 40 of 81
Figure 41 – View Session Manager
Property of Cox Communications, Inc. Version 1.1 Page 41 of 81
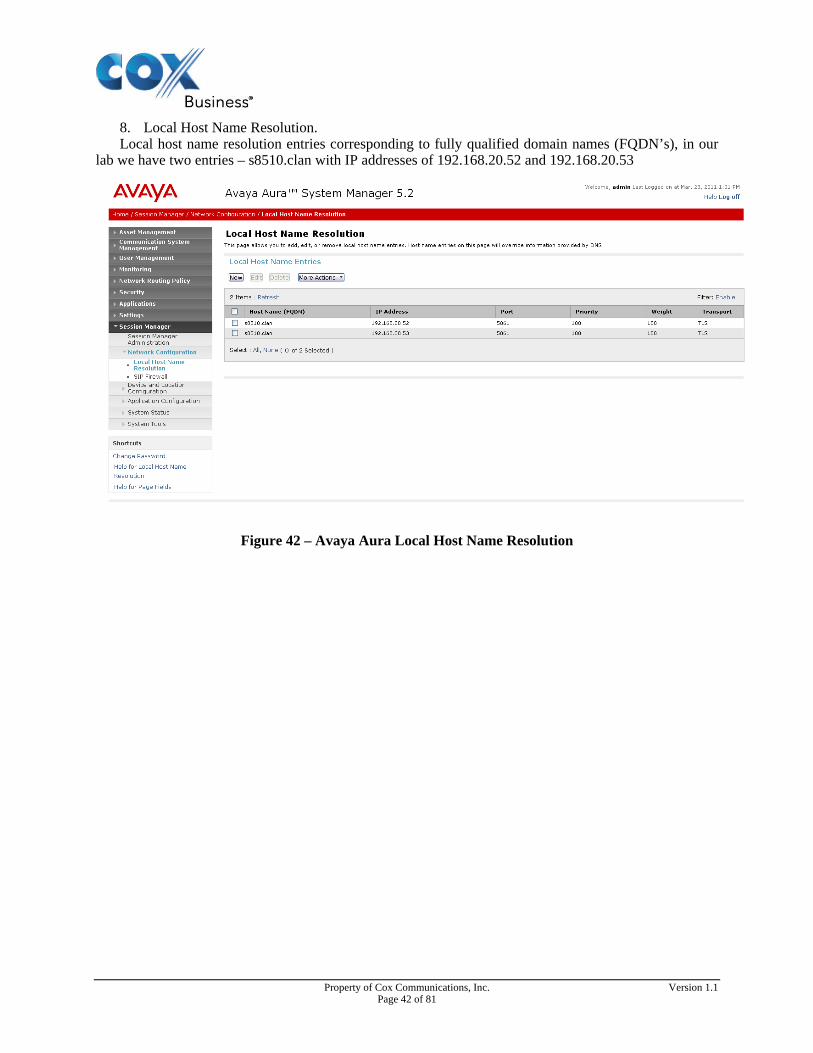
8. Local Host Name Resolution. Local host name resolution entries corresponding to fully qualified domain names (FQDN’s), in our
lab we have two entries – s8510.clan with IP addresses of 192.168.20.52 and 192.168.20.53
Figure 42 – Avaya Aura Local Host Name Resolution
Property of Cox Communications, Inc. Version 1.1 Page 42 of 81
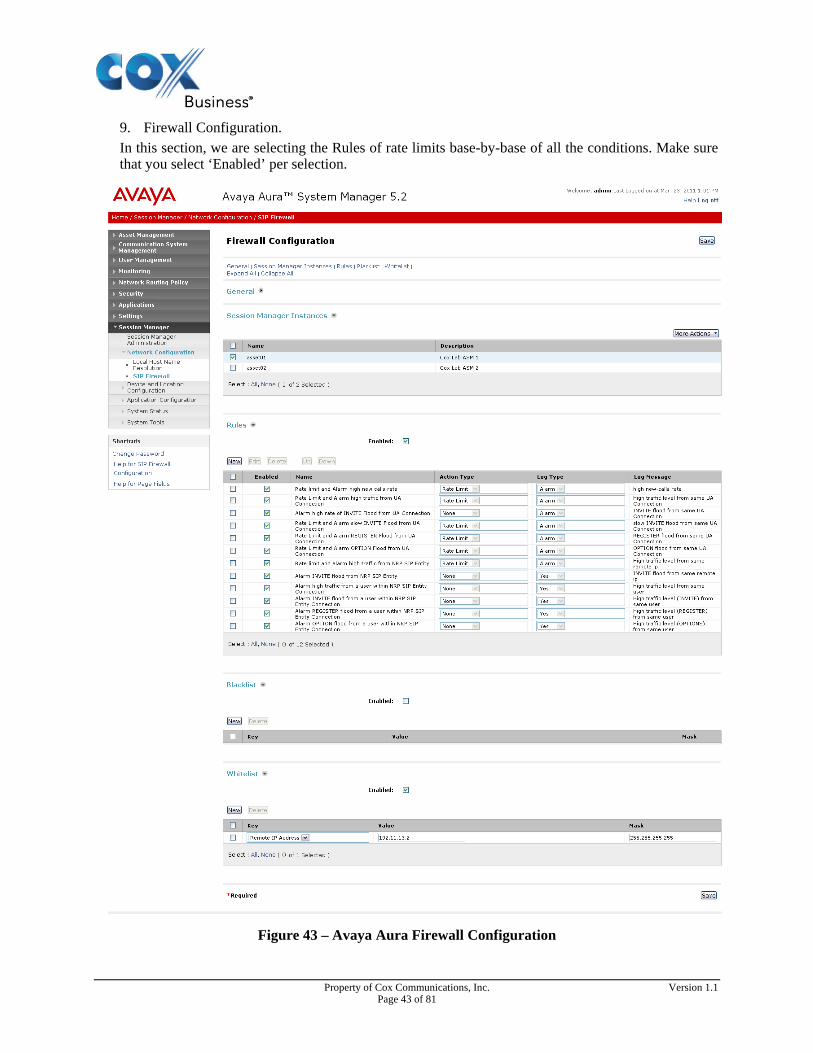
9. Firewall Configuration. In this section, we are selecting the Rules of rate limits base-by-base of all the conditions. Make sure that you select ‘Enabled’ per selection.
Figure 43 – Avaya Aura Firewall Configuration
Property of Cox Communications, Inc. Version 1.1 Page 43 of 81
9.2 Avaya Aura Session Manager with System Manager release 5.2. SP2 SIP Configuration Guide
9.2.1 Setup Network Routing Policy The above screen show the overall step-by-step the required to setup the Network Routing Policy
Figure 44 – Introduction to Network Routing Policy (NRP)
Property of Cox Communications, Inc. Version 1.1 Page 44 of 81
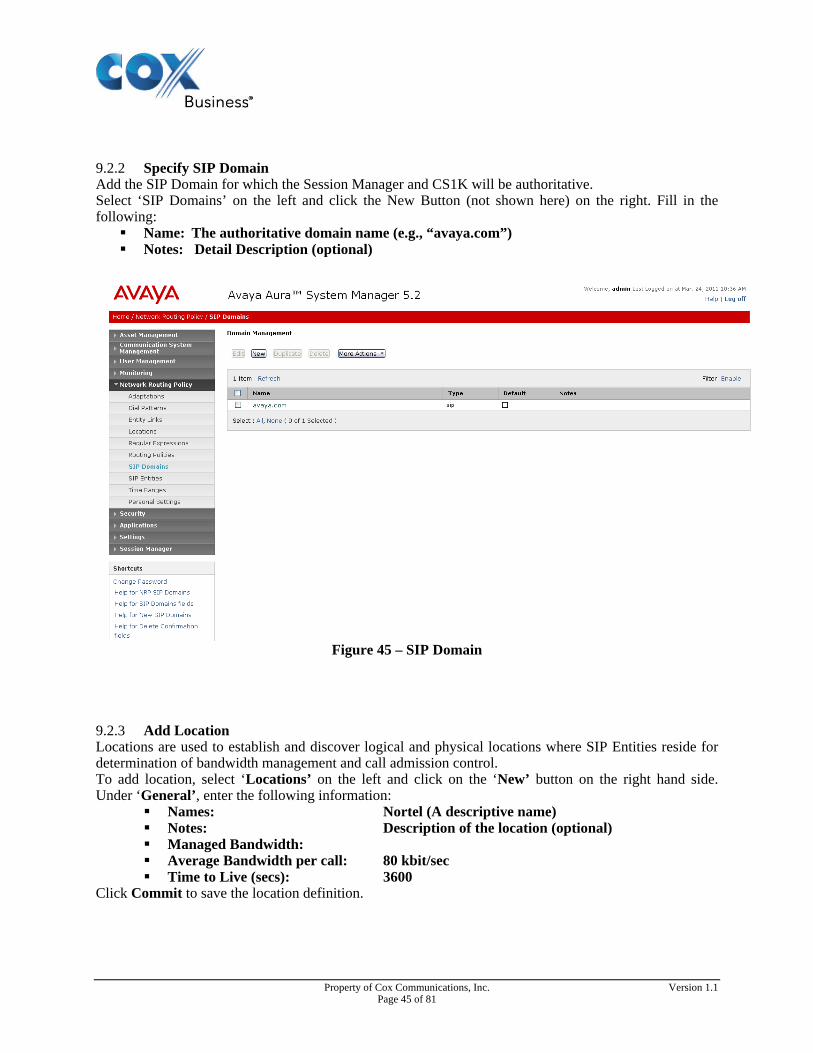
9.2.2 Specify SIP Domain Add the SIP Domain for which the Session Manager and CS1K will be authoritative. Select ‘SIP Domains’ on the left and click the New Button (not shown here) on the right. Fill in the following: Name: The authoritative domain name (e.g., “avaya.com”) Notes: Detail Description (optional)
Figure 45 – SIP Domain
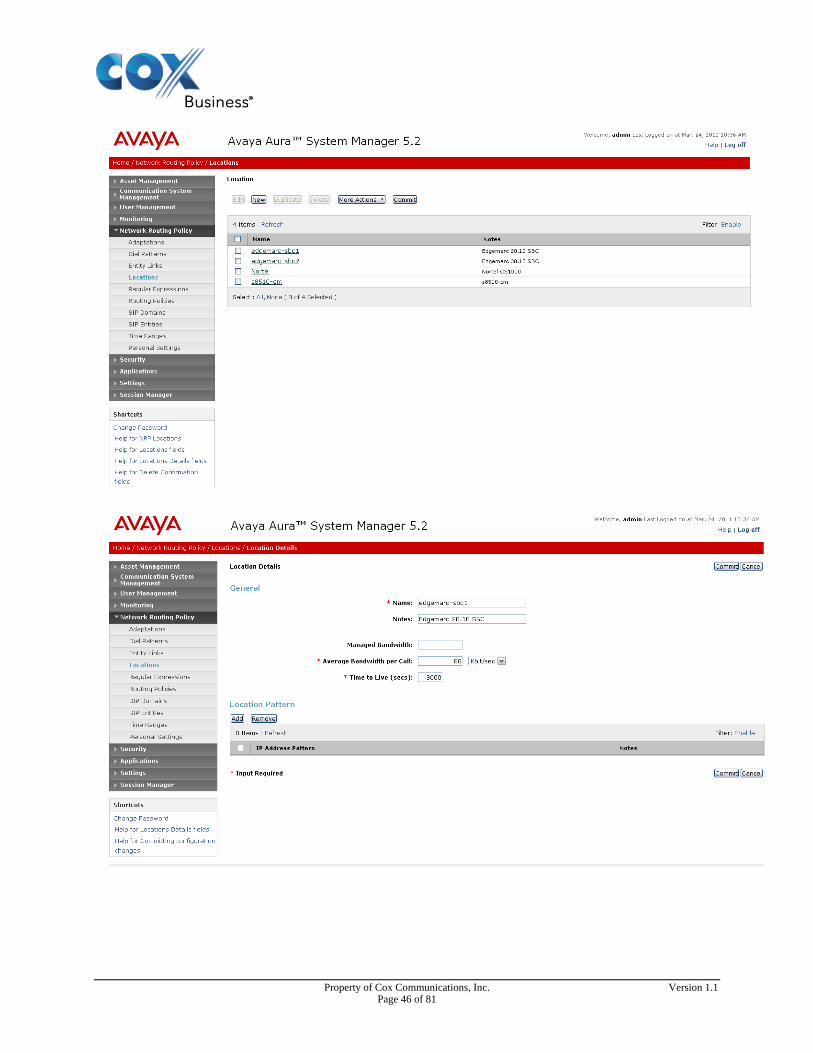
9.2.3 Add Location Locations are used to establish and discover logical and physical locations where SIP Entities reside for determination of bandwidth management and call admission control. To add location, select ‘Locations’ on the left and click on the ‘New’ button on the right hand side. Under ‘General’, enter the following information:
Names: Nortel (A descriptive name) Notes: Description of the location (optional) Managed Bandwidth: Average Bandwidth per call: 80 kbit/sec Time to Live (secs): 3600
Click Commit to save the location definition.
Property of Cox Communications, Inc. Version 1.1 Page 45 of 81
Property of Cox Communications, Inc. Version 1.1 Page 46 of 81
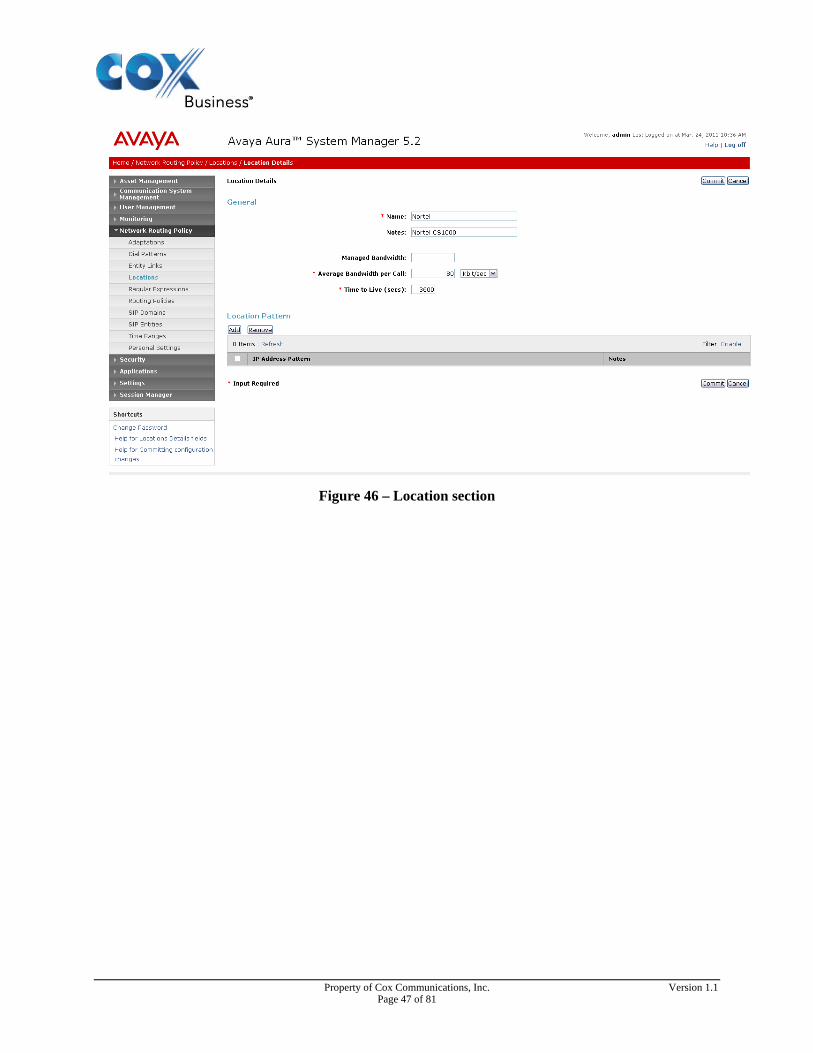
Figure 46 – Location section
Property of Cox Communications, Inc. Version 1.1 Page 47 of 81
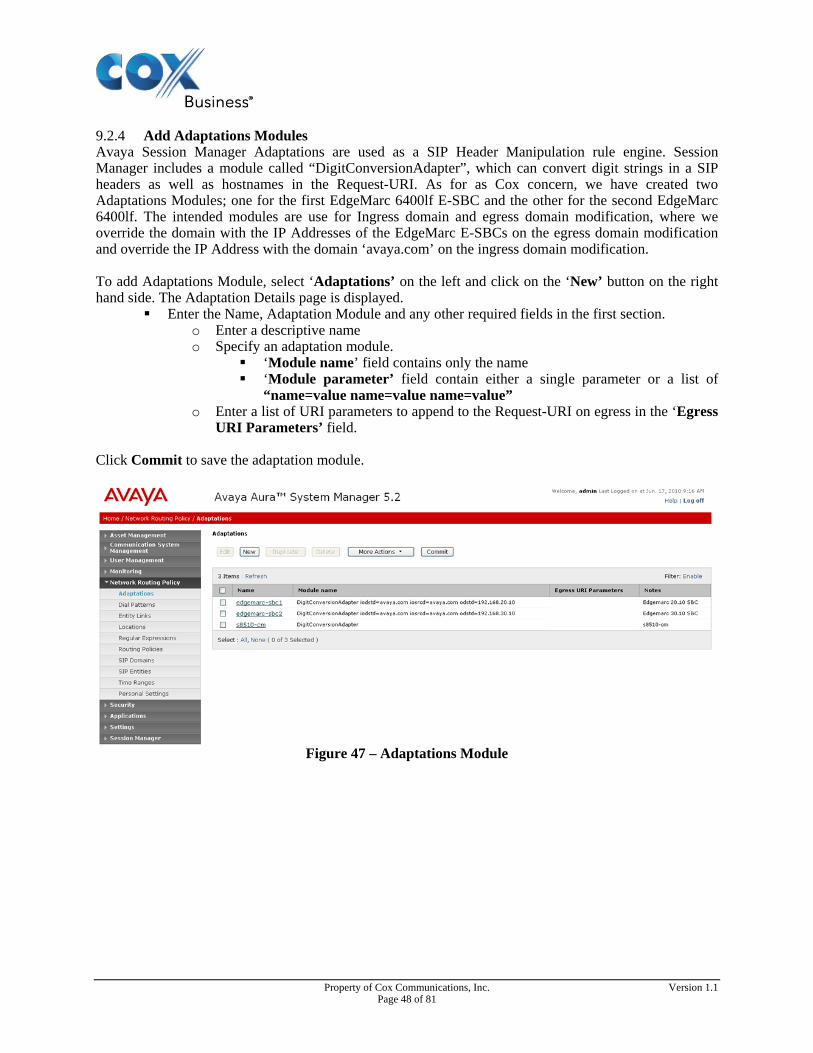
9.2.4 Add Adaptations Modules Avaya Session Manager Adaptations are used as a SIP Header Manipulation rule engine. Session Manager includes a module called “DigitConversionAdapter”, which can convert digit strings in a SIP headers as well as hostnames in the Request-URI. As for as Cox concern, we have created two Adaptations Modules; one for the first EdgeMarc 6400lf E-SBC and the other for the second EdgeMarc 6400lf. The intended modules are use for Ingress domain and egress domain modification, where we override the domain with the IP Addresses of the EdgeMarc E-SBCs on the egress domain modification and override the IP Address with the domain ‘avaya.com’ on the ingress domain modification. To add Adaptations Module, select ‘Adaptations’ on the left and click on the ‘New’ button on the right hand side. The Adaptation Details page is displayed.
Enter the Name, Adaptation Module and any other required fields in the first section. o Enter a descriptive name o Specify an adaptation module.
‘Module name’ field contains only the name ‘Module parameter’ field contain either a single parameter or a list of
“name=value name=value name=value” o Enter a list of URI parameters to append to the Request-URI on egress in the ‘Egress
URI Parameters’ field. Click Commit to save the adaptation module.
Figure 47 – Adaptations Module
Property of Cox Communications, Inc. Version 1.1 Page 48 of 81
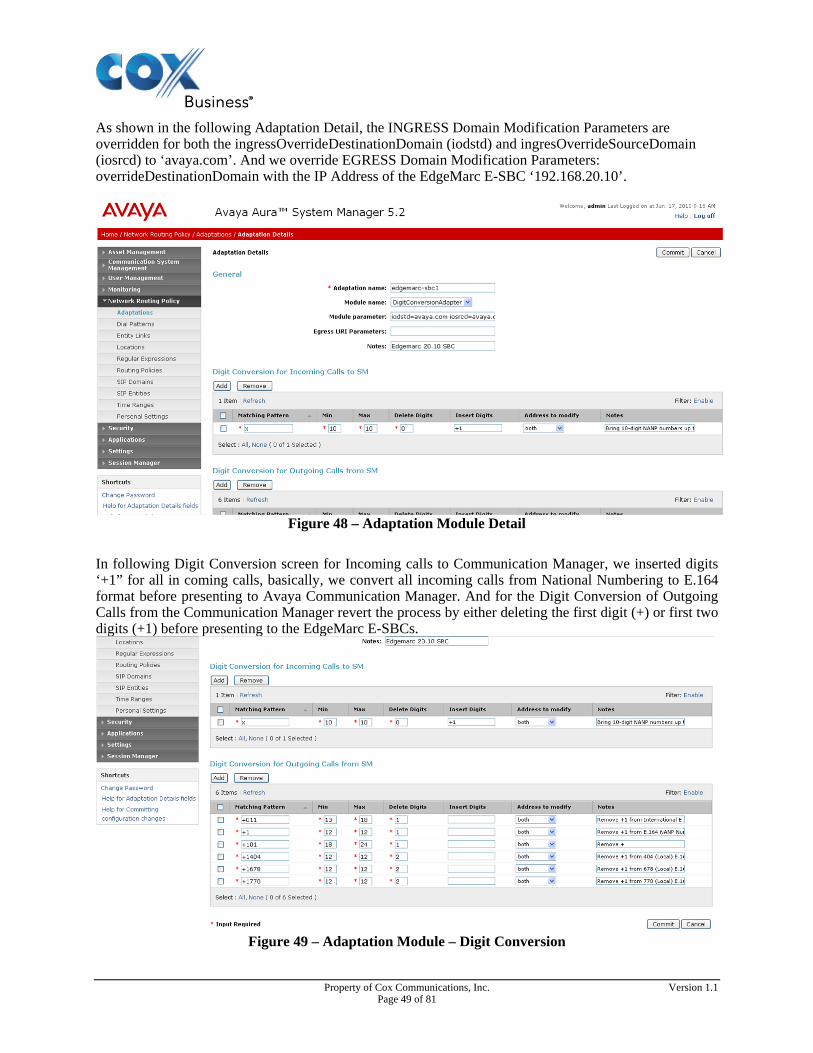
As shown in the following Adaptation Detail, the INGRESS Domain Modification Parameters are overridden for both the ingressOverrideDestinationDomain (iodstd) and ingresOverrideSourceDomain (iosrcd) to ‘avaya.com’. And we override EGRESS Domain Modification Parameters: overrideDestinationDomain with the IP Address of the EdgeMarc E-SBC ‘192.168.20.10’.
Figure 48 – Adaptation Module Detail
In following Digit Conversion screen for Incoming calls to Communication Manager, we inserted digits ‘+1” for all in coming calls, basically, we convert all incoming calls from National Numbering to E.164 format before presenting to Avaya Communication Manager. And for the Digit Conversion of Outgoing Calls from the Communication Manager revert the process by either deleting the first digit (+) or first two digits (+1) before presenting to the EdgeMarc E-SBCs.
Figure 49 – Adaptation Module – Digit Conversion
Property of Cox Communications, Inc. Version 1.1 Page 49 of 81
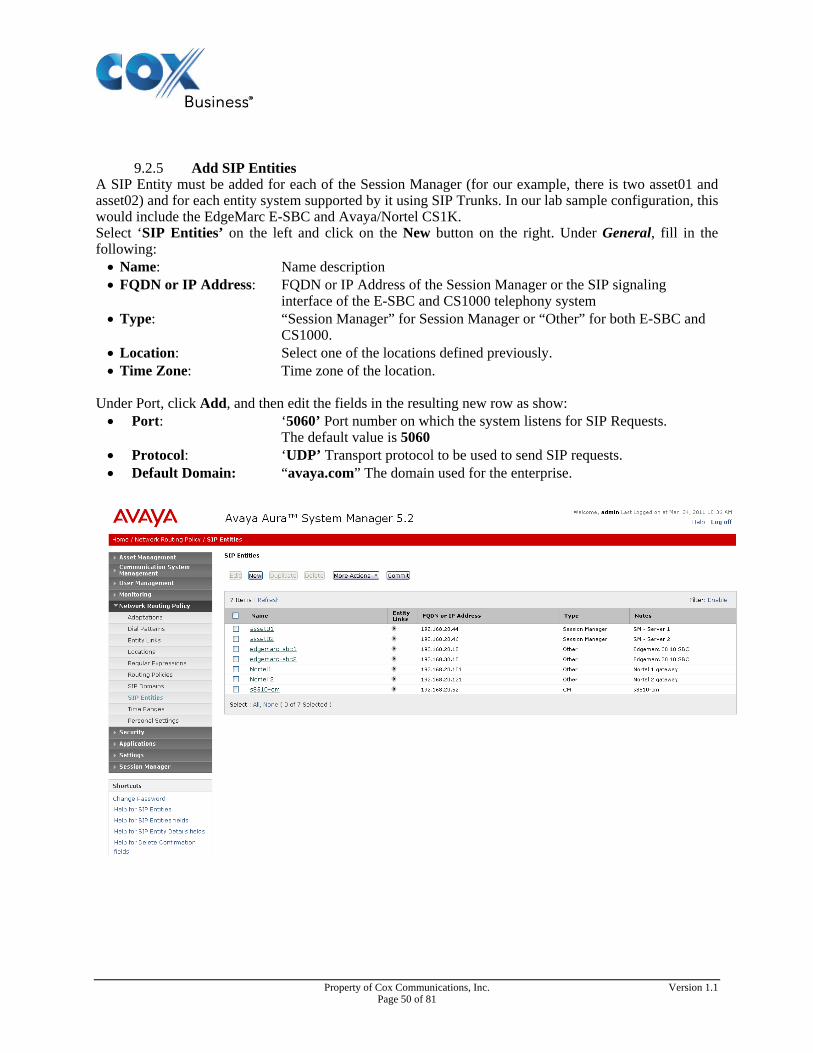
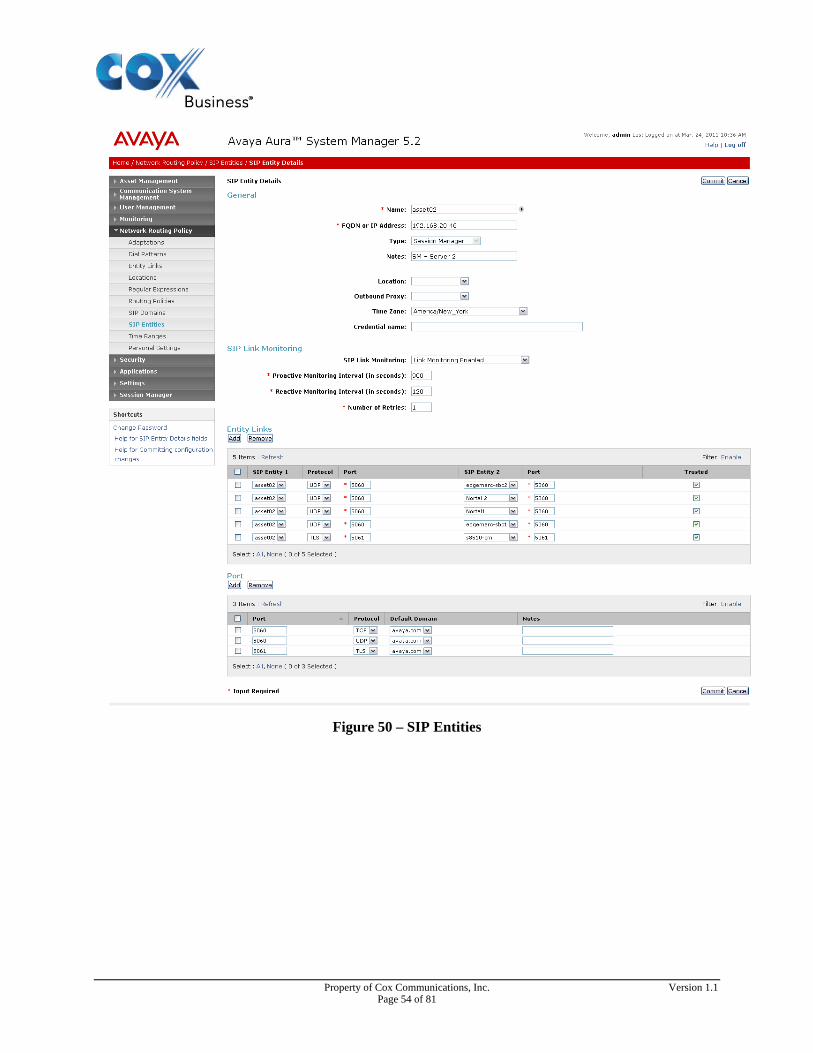
9.2.5 Add SIP Entities A SIP Entity must be added for each of the Session Manager (for our example, there is two asset01 and asset02) and for each entity system supported by it using SIP Trunks. In our lab sample configuration, this would include the EdgeMarc E-SBC and Avaya/Nortel CS1K. Select ‘SIP Entities’ on the left and click on the New button on the right. Under General, fill in the following: Name: Name description FQDN or IP Address: FQDN or IP Address of the Session Manager or the SIP signaling interface of the E-SBC and CS1000 telephony system Type: “Session Manager” for Session Manager or “Other” for both E-SBC and CS1000. Location: Select one of the locations defined previously. Time Zone: Time zone of the location.
Under Port, click Add, and then edit the fields in the resulting new row as show: Port: ‘5060’ Port number on which the system listens for SIP Requests.
The default value is 5060 Protocol: ‘UDP’ Transport protocol to be used to send SIP requests. Default Domain: “avaya.com” The domain used for the enterprise.
Property of Cox Communications, Inc. Version 1.1 Page 50 of 81
Property of Cox Communications, Inc. Version 1.1 Page 51 of 81
Property of Cox Communications, Inc. Version 1.1 Page 52 of 81
Property of Cox Communications, Inc. Version 1.1 Page 53 of 81
Figure 50 – SIP Entities
Property of Cox Communications, Inc. Version 1.1 Page 54 of 81
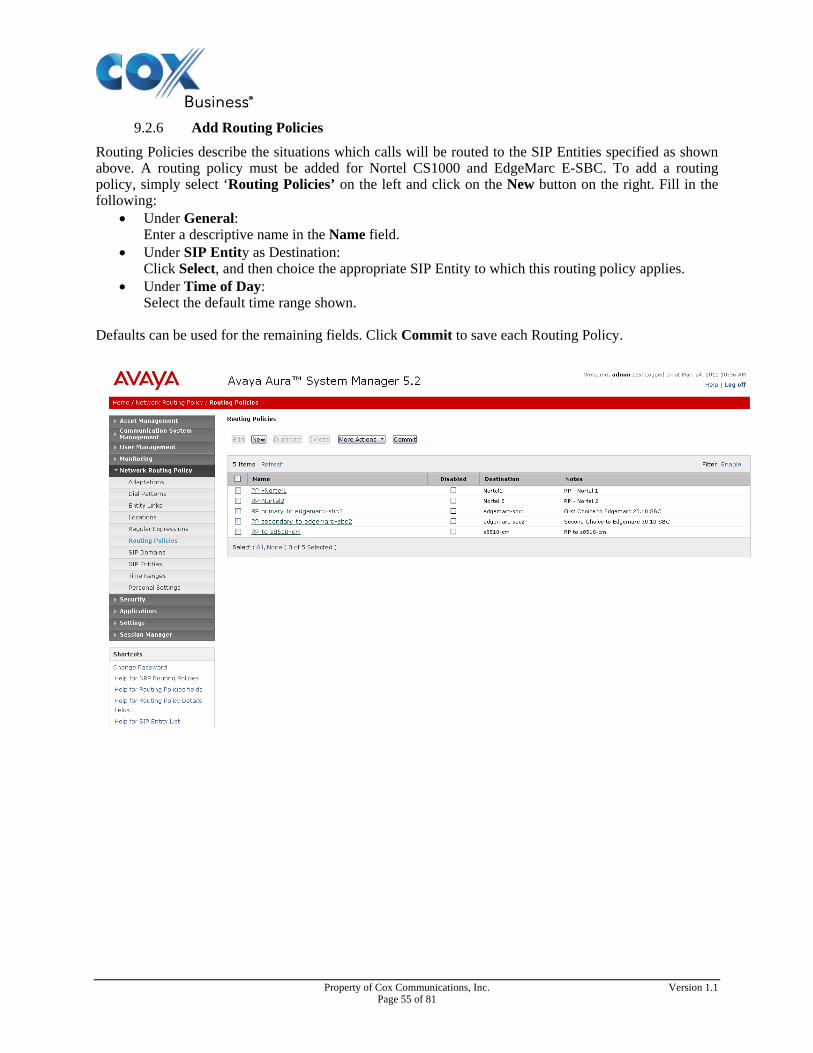
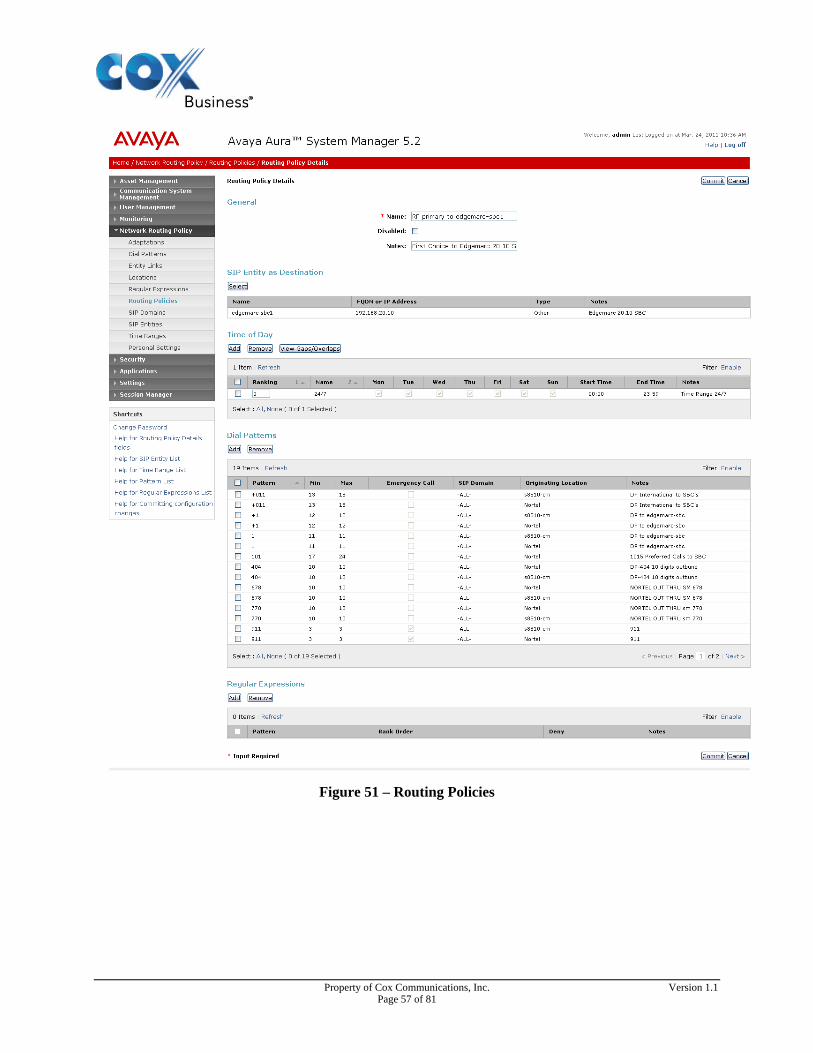
9.2.6 Add Routing Policies
Routing Policies describe the situations which calls will be routed to the SIP Entities specified as shown above. A routing policy must be added for Nortel CS1000 and EdgeMarc E-SBC. To add a routing policy, simply select ‘Routing Policies’ on the left and click on the New button on the right. Fill in the following:
Under General: Enter a descriptive name in the Name field.
Under SIP Entity as Destination: Click Select, and then choice the appropriate SIP Entity to which this routing policy applies.
Under Time of Day: Select the default time range shown.
Defaults can be used for the remaining fields. Click Commit to save each Routing Policy.
Property of Cox Communications, Inc. Version 1.1 Page 55 of 81
Property of Cox Communications, Inc. Version 1.1 Page 56 of 81
Figure 51 – Routing Policies
Property of Cox Communications, Inc. Version 1.1 Page 57 of 81
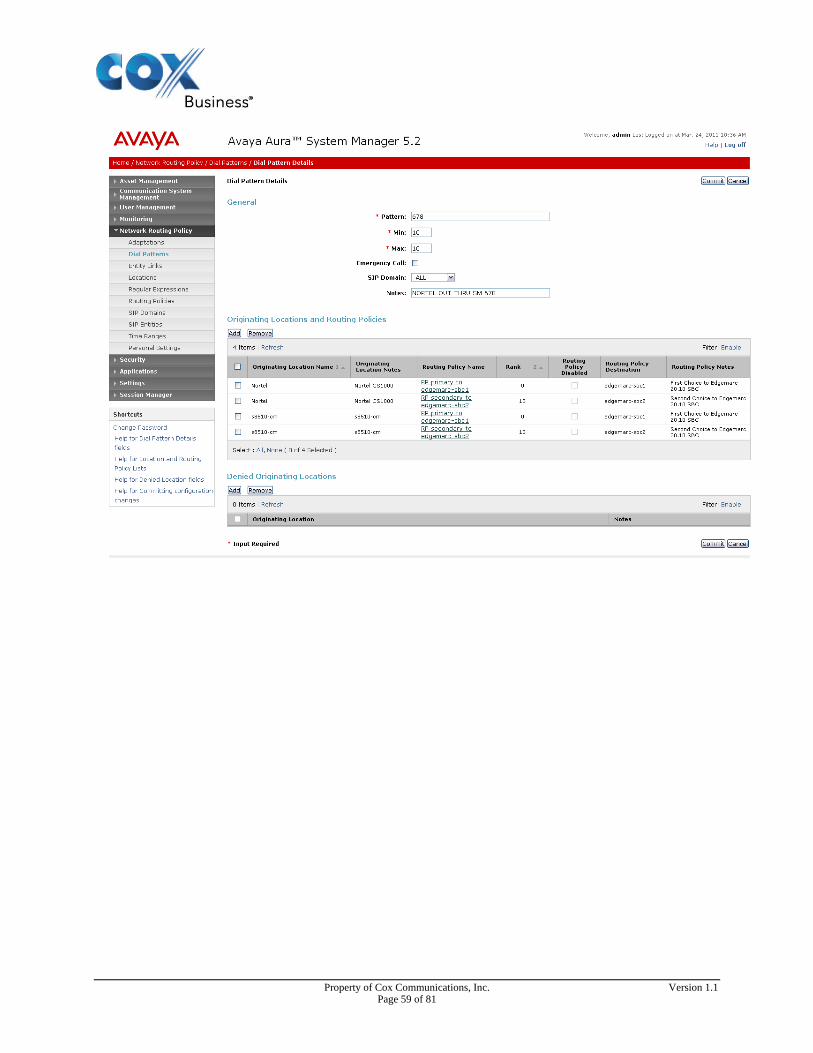
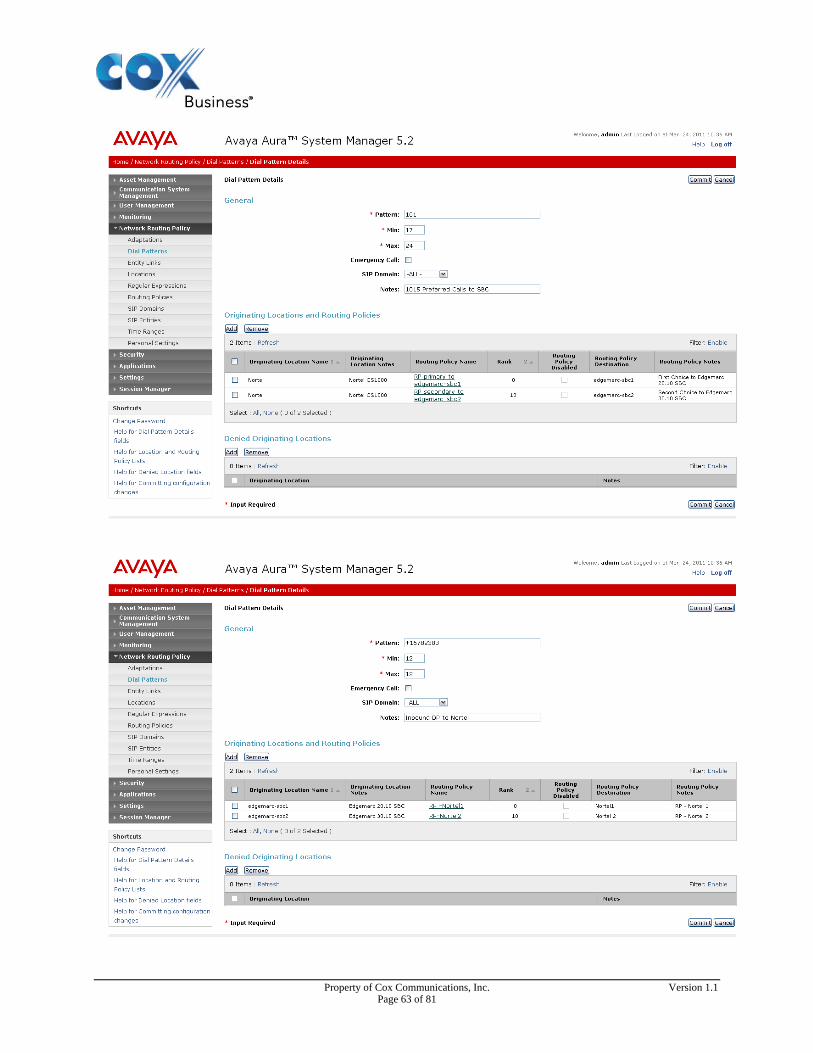
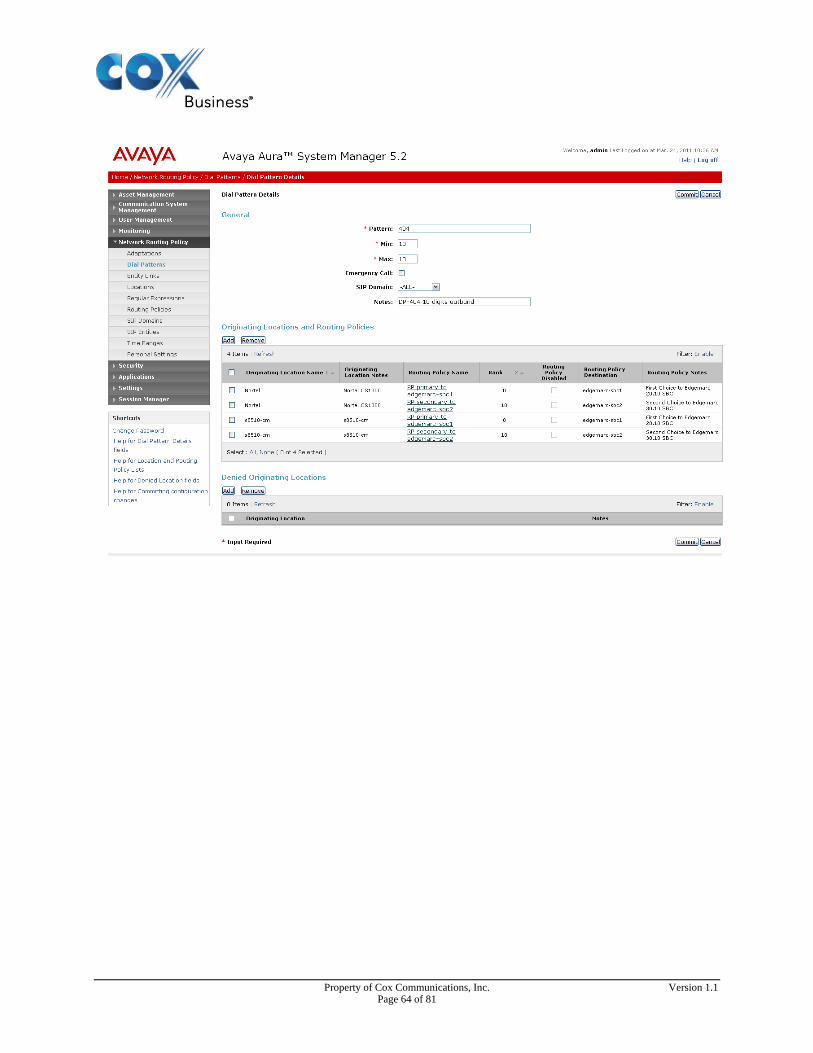
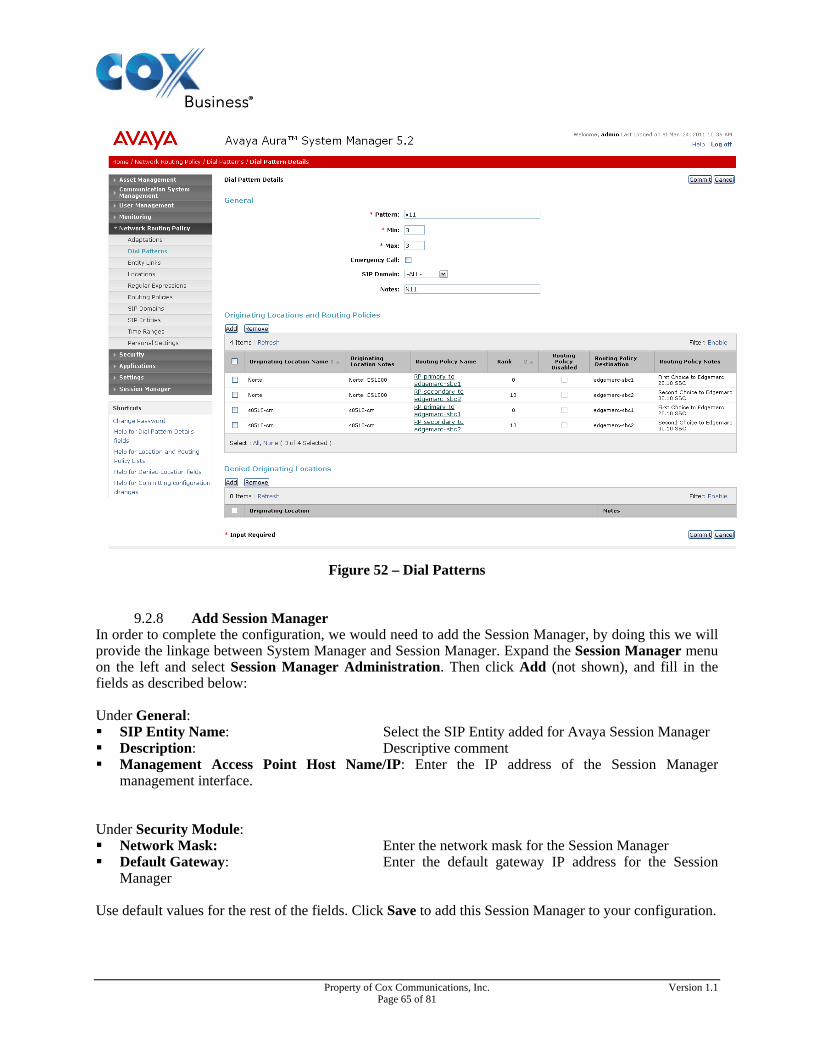
9.2.7 Add Dial Patterns Here we will define dial patterns to direct ingress and egress calls to the appropriate SIP Entity. Call begins with 1678283 should be routed to CS1000. And anything that begins with 1 or +1 should be routed to EdgeMarc E-SBC as shown above. To add a dial pattern, select ‘Dial Patterns’ on the left and click on the New Button on the right and fill in the following fields: Under General: Pattern: Dialed number or prefix. Min: Minimum length of dialed number Max: Maximum length of dialed number SIP Domain: SIP domain specified below section Notes: Comment or detail description
Under Originating Locations and Routing Policies: Click Add, and then select location and routing policy from the list. Default values can be used for the remaining fields. Click Summit to save each dial pattern.
Property of Cox Communications, Inc. Version 1.1 Page 58 of 81
Property of Cox Communications, Inc. Version 1.1 Page 59 of 81
Property of Cox Communications, Inc. Version 1.1 Page 60 of 81
Property of Cox Communications, Inc. Version 1.1 Page 61 of 81
Property of Cox Communications, Inc. Version 1.1 Page 62 of 81
Property of Cox Communications, Inc. Version 1.1 Page 63 of 81
Property of Cox Communications, Inc. Version 1.1 Page 64 of 81
Figure 52 – Dial Patterns
9.2.8 Add Session Manager In order to complete the configuration, we would need to add the Session Manager, by doing this we will provide the linkage between System Manager and Session Manager. Expand the Session Manager menu on the left and select Session Manager Administration. Then click Add (not shown), and fill in the fields as described below: Under General: SIP Entity Name: Select the SIP Entity added for Avaya Session Manager Description: Descriptive comment Management Access Point Host Name/IP: Enter the IP address of the Session Manager
management interface. Under Security Module: Network Mask: Enter the network mask for the Session Manager Default Gateway: Enter the default gateway IP address for the Session
Manager Use default values for the rest of the fields. Click Save to add this Session Manager to your configuration.
Property of Cox Communications, Inc. Version 1.1 Page 65 of 81
Property of Cox Communications, Inc. Version 1.1 Page 66 of 81
Figure 53 – Session Manager
Property of Cox Communications, Inc. Version 1.1 Page 67 of 81
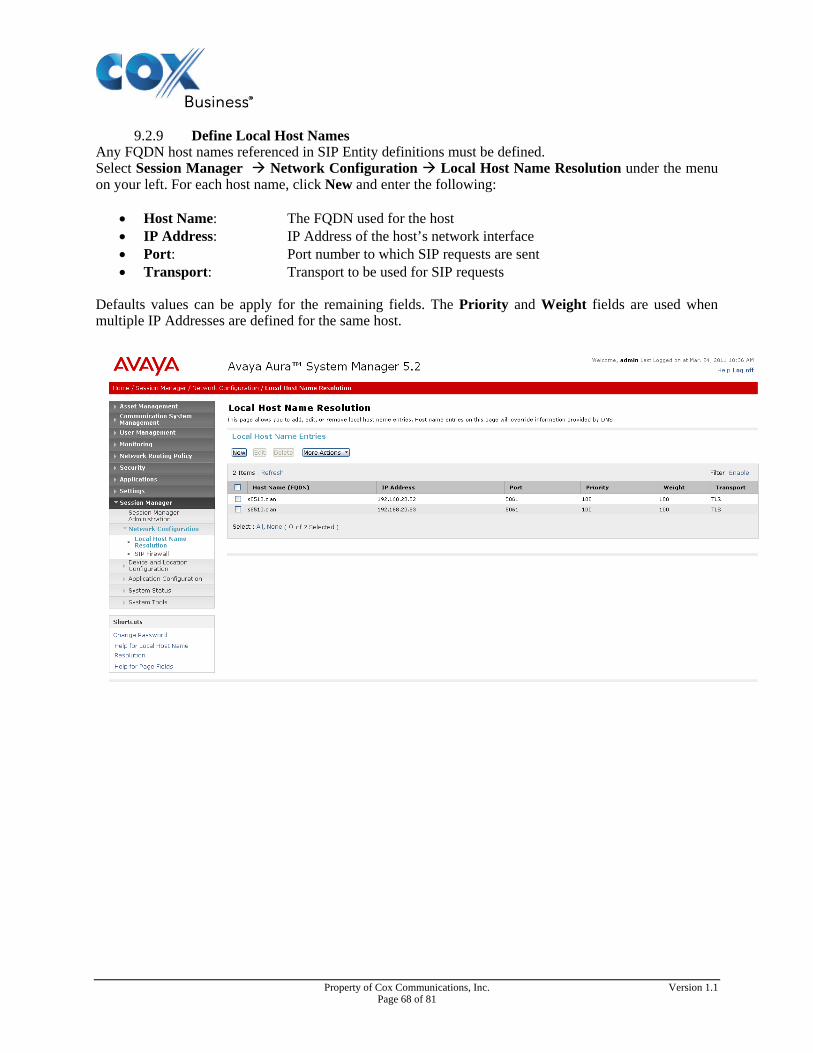
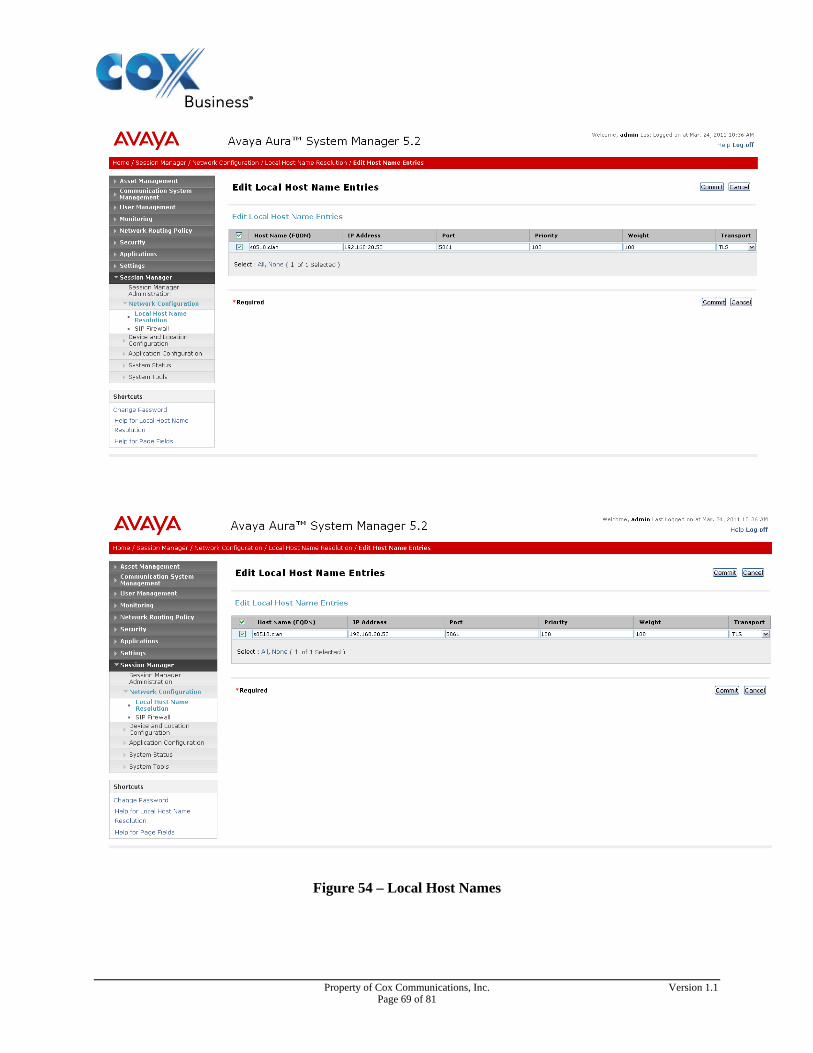
9.2.9 Define Local Host Names Any FQDN host names referenced in SIP Entity definitions must be defined. Select Session Manager Network Configuration Local Host Name Resolution under the menu on your left. For each host name, click New and enter the following:
Host Name: The FQDN used for the host IP Address: IP Address of the host’s network interface Port: Port number to which SIP requests are sent Transport: Transport to be used for SIP requests
Defaults values can be apply for the remaining fields. The Priority and Weight fields are used when multiple IP Addresses are defined for the same host.
Property of Cox Communications, Inc. Version 1.1 Page 68 of 81
Figure 54 – Local Host Names
Property of Cox Communications, Inc. Version 1.1 Page 69 of 81
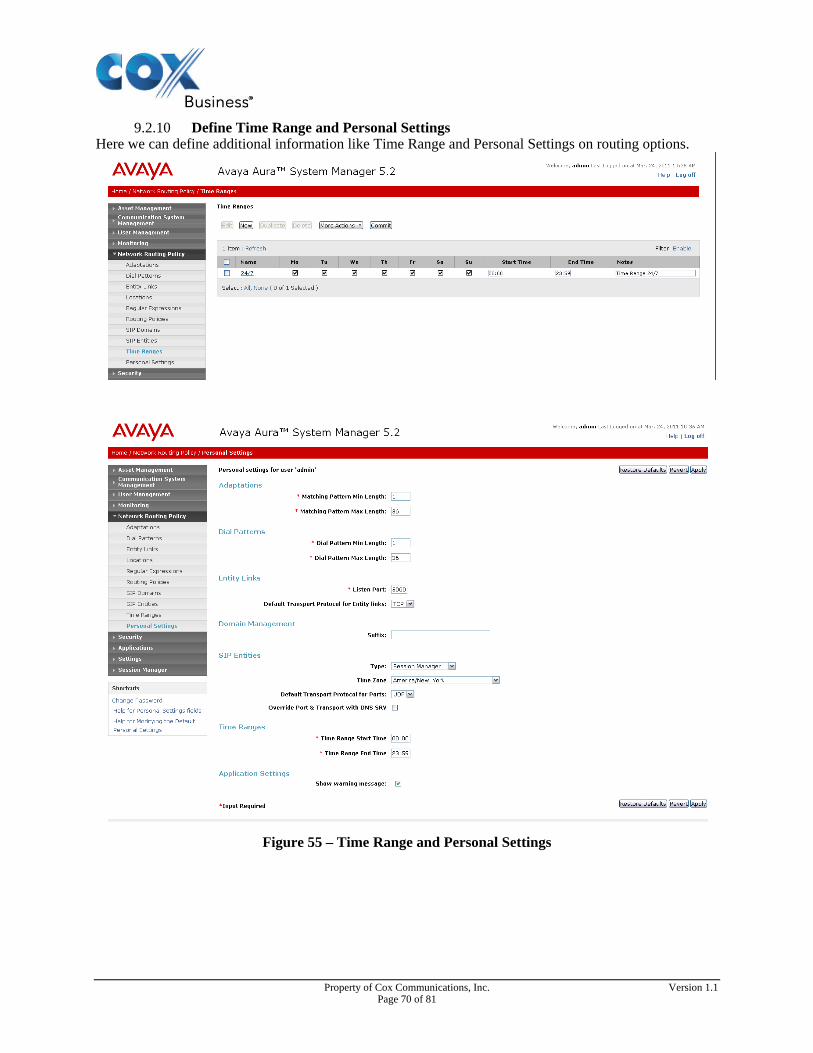
9.2.10 Define Time Range and Personal Settings Here we can define additional information like Time Range and Personal Settings on routing options.
Figure 55 – Time Range and Personal Settings
Property of Cox Communications, Inc. Version 1.1 Page 70 of 81
10 Appendix
10.1 Appendix A: DHCP Server and Default Settings (Information Only) Cox recommends static IP addressing for the IP phones. However, if you decide to use DHCP for dynamic IP address assignments for the phones, take note of the information below in section 10.1.1:
10.1.1 The DHCP Server on Communication Manager Branch An IP station needs an IP address to register. A Dynamic Host Configuration Protocol (DHCP) server provides each IP station with a unique IP address. If the DHCP server on Communication Manager Branch is used, it is administered using the Branch Device Manager interface. If the DHCP administration is incorrect or if there is a problem with the DHCP server, the IP stations will not receive an IP address and will not be able to register with the call server. You can verify the performance of the Communication Manager Branch DHCP server by clicking DHCP Server under Maintenance and Monitoring > Platform > Data Services. The DHCP Server Bindings and Statistics screen displays. The DHCP Server Bindings and Statistics screen provides a list of assigned IP addresses, as well as statistics about the overall performance of the DHCP server such as:
The number of requests for IP addresses. The number of IP stations that were declined. The number of IP addresses that were released.
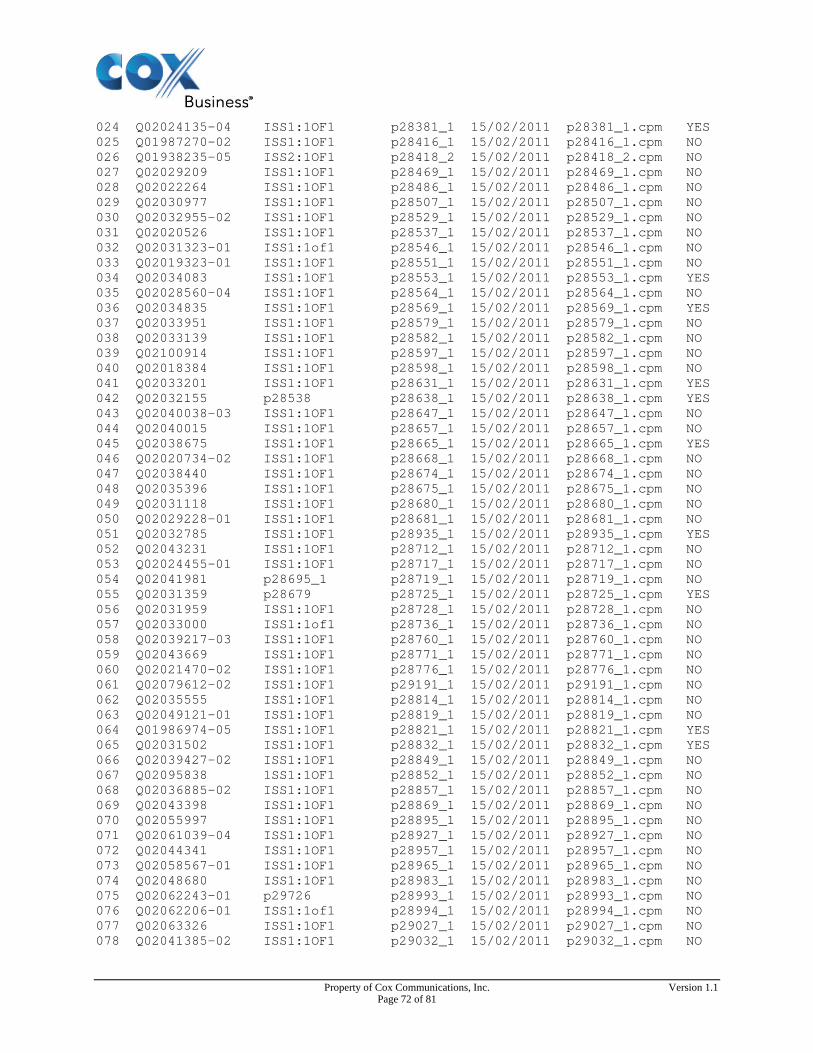
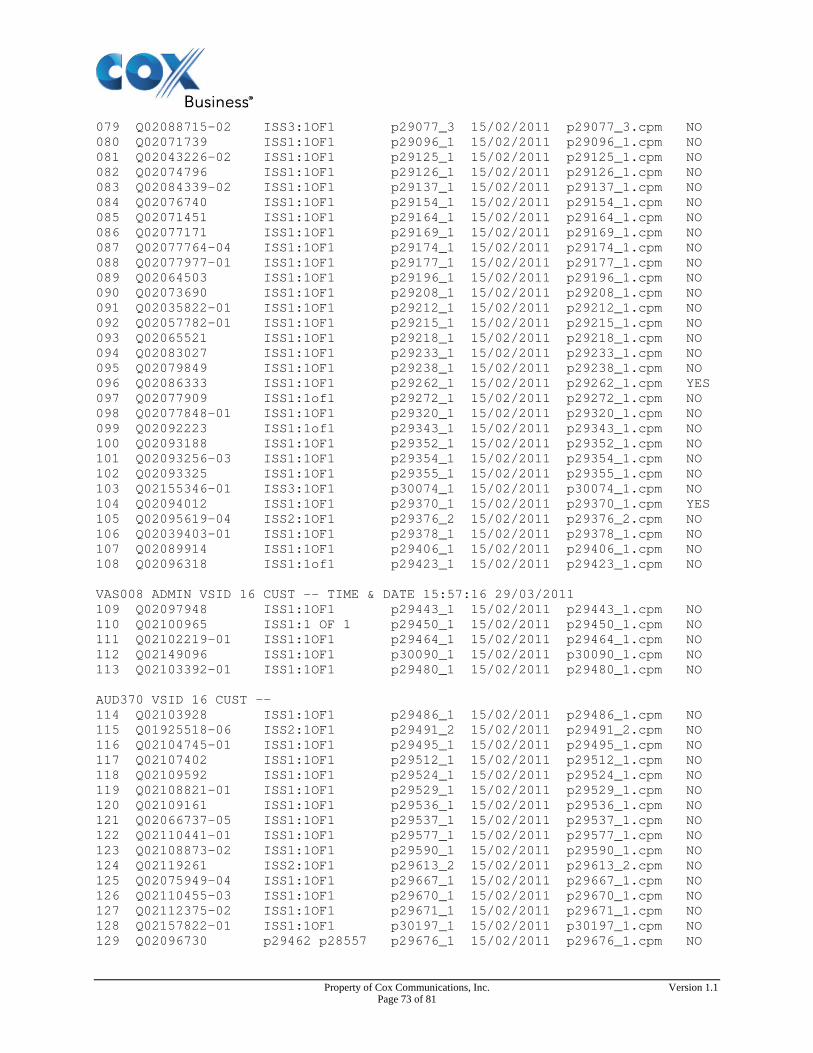
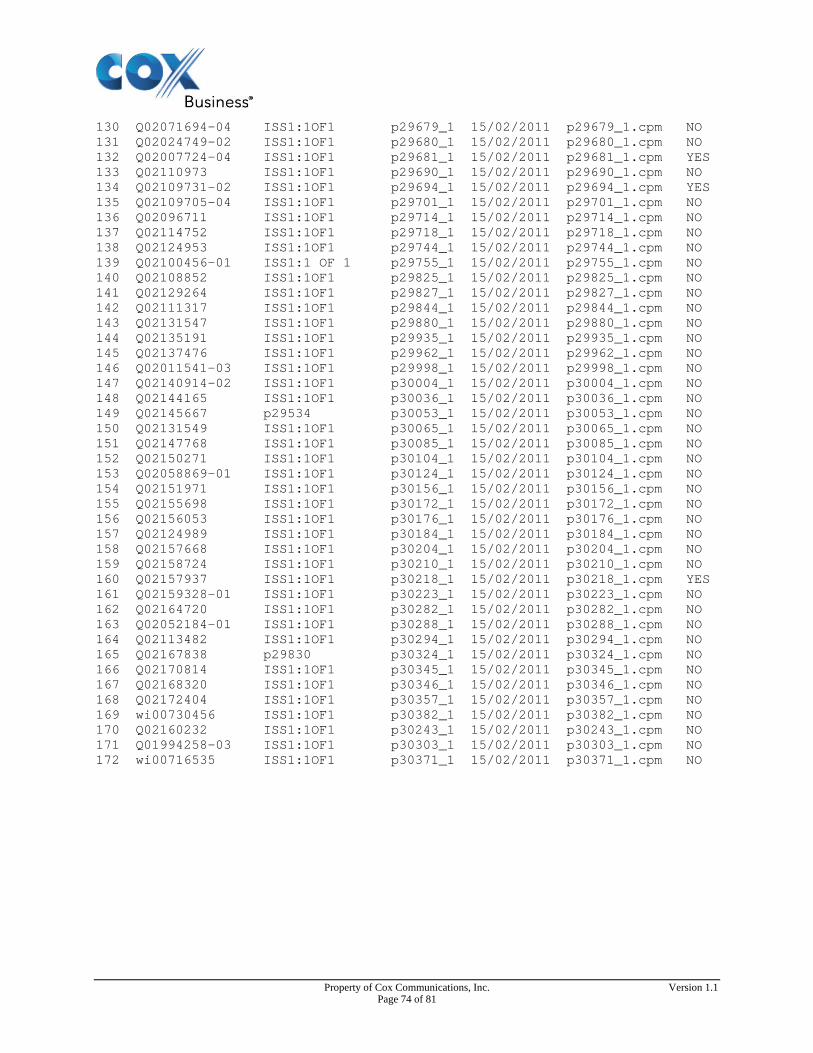
10.2 Appendix B: CS1K Patches IN-SERVICE PEPS PAT# CR # PATCH REF # NAME DATE FILENAME SPECINS 000 Q02038482 ISS1:1OF1 p28682_1 15/02/2011 p28682_1.cpm NO 001 Q00350041-01 ISS1:1OF1 p16376_1 15/02/2011 p16376_1.cpm NO 002 Q00349046-03 ISS1:1OF1 p17588_1 15/02/2011 p17588_1.cpm NO 003 Q01725096-03 ISS1:1OF1 p23200_1 15/02/2011 p23200_1.cpm NO 004 Q01680019 ISS1:1OF1 p24307_1 15/02/2011 p24307_1.cpm NO 005 Q02097405 ISS1:1OF1 p24463_1 15/02/2011 p24463_1.cpm NO 006 Q01782930-01 ISS1:1OF1 p24964_1 15/02/2011 p24964_1.cpm NO 007 Q01873266-02 ISS1:1OF1 p25747_1 15/02/2011 p25747_1.cpm NO 008 Q01884473-01 ISS1:1OF1 p26726_1 15/02/2011 p26726_1.cpm NO 009 Q01974578-04 ISS1:1OF1 p27329_1 15/02/2011 p27329_1.cpm NO 010 Q01974383-02 ISS1:1OF1 p27378_1 15/02/2011 p27378_1.cpm NO 011 Q01983521-04 ISS1:1OF1 p27616_1 15/02/2011 p27616_1.cpm NO 012 Q02092594 ISS1:1OF1 p27830_1 15/02/2011 p27830_1.cpm NO 013 Q01999478-01 ISS1:1OF1 p27897_1 15/02/2011 p27897_1.cpm NO 014 Q02064793-06 ISS1:1OF1 p27947_1 15/02/2011 p27947_1.cpm NO 015 Q02007976-03 ISS1:1OF1 p28028_1 15/02/2011 p28028_1.cpm NO 016 Q02007476 ISS1:1OF1 p28031_1 15/02/2011 p28031_1.cpm NO 017 Q01849803 ISS1:1OF1 p28064_1 15/02/2011 p28064_1.cpm YES 018 Q02011613-01 ISS1:1OF1 p28108_1 15/02/2011 p28108_1.cpm NO 019 Q01982233-06 ISS1:1OF1 p28172_1 15/02/2011 p28172_1.cpm NO 020 Q01976701-01 ISS1:1OF1 p28211_1 15/02/2011 p28211_1.cpm NO 021 Q02019660-04 ISS2:1OF1 p28252_2 15/02/2011 p28252_2.cpm NO 022 Q02017013-01 ISS1:1OF1 p28313_1 15/02/2011 p28313_1.cpm NO 023 Q02097631 ISS1:1OF1 p28328_1 15/02/2011 p28328_1.cpm NO
Property of Cox Communications, Inc. Version 1.1 Page 71 of 81
024 Q02024135-04 ISS1:1OF1 p28381_1 15/02/2011 p28381_1.cpm YES 025 Q01987270-02 ISS1:1OF1 p28416_1 15/02/2011 p28416_1.cpm NO 026 Q01938235-05 ISS2:1OF1 p28418_2 15/02/2011 p28418_2.cpm NO 027 Q02029209 ISS1:1OF1 p28469_1 15/02/2011 p28469_1.cpm NO 028 Q02022264 ISS1:1OF1 p28486_1 15/02/2011 p28486_1.cpm NO 029 Q02030977 ISS1:1OF1 p28507_1 15/02/2011 p28507_1.cpm NO 030 Q02032955-02 ISS1:1OF1 p28529_1 15/02/2011 p28529_1.cpm NO 031 Q02020526 ISS1:1OF1 p28537_1 15/02/2011 p28537_1.cpm NO 032 Q02031323-01 ISS1:1of1 p28546_1 15/02/2011 p28546_1.cpm NO 033 Q02019323-01 ISS1:1OF1 p28551_1 15/02/2011 p28551_1.cpm NO 034 Q02034083 ISS1:1OF1 p28553_1 15/02/2011 p28553_1.cpm YES 035 Q02028560-04 ISS1:1OF1 p28564_1 15/02/2011 p28564_1.cpm NO 036 Q02034835 ISS1:1OF1 p28569_1 15/02/2011 p28569_1.cpm YES 037 Q02033951 ISS1:1OF1 p28579_1 15/02/2011 p28579_1.cpm NO 038 Q02033139 ISS1:1OF1 p28582_1 15/02/2011 p28582_1.cpm NO 039 Q02100914 ISS1:1OF1 p28597_1 15/02/2011 p28597_1.cpm NO 040 Q02018384 ISS1:1OF1 p28598_1 15/02/2011 p28598_1.cpm NO 041 Q02033201 ISS1:1OF1 p28631_1 15/02/2011 p28631_1.cpm YES 042 Q02032155 p28538 p28638_1 15/02/2011 p28638_1.cpm YES 043 Q02040038-03 ISS1:1OF1 p28647_1 15/02/2011 p28647_1.cpm NO 044 Q02040015 ISS1:1OF1 p28657_1 15/02/2011 p28657_1.cpm NO 045 Q02038675 ISS1:1OF1 p28665_1 15/02/2011 p28665_1.cpm YES 046 Q02020734-02 ISS1:1OF1 p28668_1 15/02/2011 p28668_1.cpm NO 047 Q02038440 ISS1:1OF1 p28674_1 15/02/2011 p28674_1.cpm NO 048 Q02035396 ISS1:1OF1 p28675_1 15/02/2011 p28675_1.cpm NO 049 Q02031118 ISS1:1OF1 p28680_1 15/02/2011 p28680_1.cpm NO 050 Q02029228-01 ISS1:1OF1 p28681_1 15/02/2011 p28681_1.cpm NO 051 Q02032785 ISS1:1OF1 p28935_1 15/02/2011 p28935_1.cpm YES 052 Q02043231 ISS1:1OF1 p28712_1 15/02/2011 p28712_1.cpm NO 053 Q02024455-01 ISS1:1OF1 p28717_1 15/02/2011 p28717_1.cpm NO 054 Q02041981 p28695_1 p28719_1 15/02/2011 p28719_1.cpm NO 055 Q02031359 p28679 p28725_1 15/02/2011 p28725_1.cpm YES 056 Q02031959 ISS1:1OF1 p28728_1 15/02/2011 p28728_1.cpm NO 057 Q02033000 ISS1:1of1 p28736_1 15/02/2011 p28736_1.cpm NO 058 Q02039217-03 ISS1:1OF1 p28760_1 15/02/2011 p28760_1.cpm NO 059 Q02043669 ISS1:1OF1 p28771_1 15/02/2011 p28771_1.cpm NO 060 Q02021470-02 ISS1:1OF1 p28776_1 15/02/2011 p28776_1.cpm NO 061 Q02079612-02 ISS1:1OF1 p29191_1 15/02/2011 p29191_1.cpm NO 062 Q02035555 ISS1:1OF1 p28814_1 15/02/2011 p28814_1.cpm NO 063 Q02049121-01 ISS1:1OF1 p28819_1 15/02/2011 p28819_1.cpm NO 064 Q01986974-05 ISS1:1OF1 p28821_1 15/02/2011 p28821_1.cpm YES 065 Q02031502 ISS1:1OF1 p28832_1 15/02/2011 p28832_1.cpm YES 066 Q02039427-02 ISS1:1OF1 p28849_1 15/02/2011 p28849_1.cpm NO 067 Q02095838 1SS1:1OF1 p28852_1 15/02/2011 p28852_1.cpm NO 068 Q02036885-02 ISS1:1OF1 p28857_1 15/02/2011 p28857_1.cpm NO 069 Q02043398 ISS1:1OF1 p28869_1 15/02/2011 p28869_1.cpm NO 070 Q02055997 ISS1:1OF1 p28895_1 15/02/2011 p28895_1.cpm NO 071 Q02061039-04 ISS1:1OF1 p28927_1 15/02/2011 p28927_1.cpm NO 072 Q02044341 ISS1:1OF1 p28957_1 15/02/2011 p28957_1.cpm NO 073 Q02058567-01 ISS1:1OF1 p28965_1 15/02/2011 p28965_1.cpm NO 074 Q02048680 ISS1:1OF1 p28983_1 15/02/2011 p28983_1.cpm NO 075 Q02062243-01 p29726 p28993_1 15/02/2011 p28993_1.cpm NO 076 Q02062206-01 ISS1:1of1 p28994_1 15/02/2011 p28994_1.cpm NO 077 Q02063326 ISS1:1OF1 p29027_1 15/02/2011 p29027_1.cpm NO 078 Q02041385-02 ISS1:1OF1 p29032_1 15/02/2011 p29032_1.cpm NO
Property of Cox Communications, Inc. Version 1.1 Page 72 of 81
079 Q02088715-02 ISS3:1OF1 p29077_3 15/02/2011 p29077_3.cpm NO 080 Q02071739 ISS1:1OF1 p29096_1 15/02/2011 p29096_1.cpm NO 081 Q02043226-02 ISS1:1OF1 p29125_1 15/02/2011 p29125_1.cpm NO 082 Q02074796 ISS1:1OF1 p29126_1 15/02/2011 p29126_1.cpm NO 083 Q02084339-02 ISS1:1OF1 p29137_1 15/02/2011 p29137_1.cpm NO 084 Q02076740 ISS1:1OF1 p29154_1 15/02/2011 p29154_1.cpm NO 085 Q02071451 ISS1:1OF1 p29164_1 15/02/2011 p29164_1.cpm NO 086 Q02077171 ISS1:1OF1 p29169_1 15/02/2011 p29169_1.cpm NO 087 Q02077764-04 ISS1:1OF1 p29174_1 15/02/2011 p29174_1.cpm NO 088 Q02077977-01 ISS1:1OF1 p29177_1 15/02/2011 p29177_1.cpm NO 089 Q02064503 ISS1:1OF1 p29196_1 15/02/2011 p29196_1.cpm NO 090 Q02073690 ISS1:1OF1 p29208_1 15/02/2011 p29208_1.cpm NO 091 Q02035822-01 ISS1:1OF1 p29212_1 15/02/2011 p29212_1.cpm NO 092 Q02057782-01 ISS1:1OF1 p29215_1 15/02/2011 p29215_1.cpm NO 093 Q02065521 ISS1:1OF1 p29218_1 15/02/2011 p29218_1.cpm NO 094 Q02083027 ISS1:1OF1 p29233_1 15/02/2011 p29233_1.cpm NO 095 Q02079849 ISS1:1OF1 p29238_1 15/02/2011 p29238_1.cpm NO 096 Q02086333 ISS1:1OF1 p29262_1 15/02/2011 p29262_1.cpm YES 097 Q02077909 ISS1:1of1 p29272_1 15/02/2011 p29272_1.cpm NO 098 Q02077848-01 ISS1:1OF1 p29320_1 15/02/2011 p29320_1.cpm NO 099 Q02092223 ISS1:1of1 p29343_1 15/02/2011 p29343_1.cpm NO 100 Q02093188 ISS1:1OF1 p29352_1 15/02/2011 p29352_1.cpm NO 101 Q02093256-03 ISS1:1OF1 p29354_1 15/02/2011 p29354_1.cpm NO 102 Q02093325 ISS1:1OF1 p29355_1 15/02/2011 p29355_1.cpm NO 103 Q02155346-01 ISS3:1OF1 p30074_1 15/02/2011 p30074_1.cpm NO 104 Q02094012 ISS1:1OF1 p29370_1 15/02/2011 p29370_1.cpm YES 105 Q02095619-04 ISS2:1OF1 p29376_2 15/02/2011 p29376_2.cpm NO 106 Q02039403-01 ISS1:1OF1 p29378_1 15/02/2011 p29378_1.cpm NO 107 Q02089914 ISS1:1OF1 p29406_1 15/02/2011 p29406_1.cpm NO 108 Q02096318 ISS1:1of1 p29423_1 15/02/2011 p29423_1.cpm NO VAS008 ADMIN VSID 16 CUST -- TIME & DATE 15:57:16 29/03/2011 109 Q02097948 ISS1:1OF1 p29443_1 15/02/2011 p29443_1.cpm NO 110 Q02100965 ISS1:1 OF 1 p29450_1 15/02/2011 p29450_1.cpm NO 111 Q02102219-01 ISS1:1OF1 p29464_1 15/02/2011 p29464_1.cpm NO 112 Q02149096 ISS1:1OF1 p30090_1 15/02/2011 p30090_1.cpm NO 113 Q02103392-01 ISS1:1OF1 p29480_1 15/02/2011 p29480_1.cpm NO AUD370 VSID 16 CUST -- 114 Q02103928 ISS1:1OF1 p29486_1 15/02/2011 p29486_1.cpm NO 115 Q01925518-06 ISS2:1OF1 p29491_2 15/02/2011 p29491_2.cpm NO 116 Q02104745-01 ISS1:1OF1 p29495_1 15/02/2011 p29495_1.cpm NO 117 Q02107402 ISS1:1OF1 p29512_1 15/02/2011 p29512_1.cpm NO 118 Q02109592 ISS1:1OF1 p29524_1 15/02/2011 p29524_1.cpm NO 119 Q02108821-01 ISS1:1OF1 p29529_1 15/02/2011 p29529_1.cpm NO 120 Q02109161 ISS1:1OF1 p29536_1 15/02/2011 p29536_1.cpm NO 121 Q02066737-05 ISS1:1OF1 p29537_1 15/02/2011 p29537_1.cpm NO 122 Q02110441-01 ISS1:1OF1 p29577_1 15/02/2011 p29577_1.cpm NO 123 Q02108873-02 ISS1:1OF1 p29590_1 15/02/2011 p29590_1.cpm NO 124 Q02119261 ISS2:1OF1 p29613_2 15/02/2011 p29613_2.cpm NO 125 Q02075949-04 ISS1:1OF1 p29667_1 15/02/2011 p29667_1.cpm NO 126 Q02110455-03 ISS1:1OF1 p29670_1 15/02/2011 p29670_1.cpm NO 127 Q02112375-02 ISS1:1OF1 p29671_1 15/02/2011 p29671_1.cpm NO 128 Q02157822-01 ISS1:1OF1 p30197_1 15/02/2011 p30197_1.cpm NO 129 Q02096730 p29462 p28557 p29676_1 15/02/2011 p29676_1.cpm NO
Property of Cox Communications, Inc. Version 1.1 Page 73 of 81
130 Q02071694-04 ISS1:1OF1 p29679_1 15/02/2011 p29679_1.cpm NO 131 Q02024749-02 ISS1:1OF1 p29680_1 15/02/2011 p29680_1.cpm NO 132 Q02007724-04 ISS1:1OF1 p29681_1 15/02/2011 p29681_1.cpm YES 133 Q02110973 ISS1:1OF1 p29690_1 15/02/2011 p29690_1.cpm NO 134 Q02109731-02 ISS1:1OF1 p29694_1 15/02/2011 p29694_1.cpm YES 135 Q02109705-04 ISS1:1OF1 p29701_1 15/02/2011 p29701_1.cpm NO 136 Q02096711 ISS1:1OF1 p29714_1 15/02/2011 p29714_1.cpm NO 137 Q02114752 ISS1:1OF1 p29718_1 15/02/2011 p29718_1.cpm NO 138 Q02124953 ISS1:1OF1 p29744_1 15/02/2011 p29744_1.cpm NO 139 Q02100456-01 ISS1:1 OF 1 p29755_1 15/02/2011 p29755_1.cpm NO 140 Q02108852 ISS1:1OF1 p29825_1 15/02/2011 p29825_1.cpm NO 141 Q02129264 ISS1:1OF1 p29827_1 15/02/2011 p29827_1.cpm NO 142 Q02111317 ISS1:1OF1 p29844_1 15/02/2011 p29844_1.cpm NO 143 Q02131547 ISS1:1OF1 p29880_1 15/02/2011 p29880_1.cpm NO 144 Q02135191 ISS1:1OF1 p29935_1 15/02/2011 p29935_1.cpm NO 145 Q02137476 ISS1:1OF1 p29962_1 15/02/2011 p29962_1.cpm NO 146 Q02011541-03 ISS1:1OF1 p29998_1 15/02/2011 p29998_1.cpm NO 147 Q02140914-02 ISS1:1OF1 p30004_1 15/02/2011 p30004_1.cpm NO 148 Q02144165 ISS1:1OF1 p30036_1 15/02/2011 p30036_1.cpm NO 149 Q02145667 p29534 p30053_1 15/02/2011 p30053_1.cpm NO 150 Q02131549 ISS1:1OF1 p30065_1 15/02/2011 p30065_1.cpm NO 151 Q02147768 ISS1:1OF1 p30085_1 15/02/2011 p30085_1.cpm NO 152 Q02150271 ISS1:1OF1 p30104_1 15/02/2011 p30104_1.cpm NO 153 Q02058869-01 ISS1:1OF1 p30124_1 15/02/2011 p30124_1.cpm NO 154 Q02151971 ISS1:1OF1 p30156_1 15/02/2011 p30156_1.cpm NO 155 Q02155698 ISS1:1OF1 p30172_1 15/02/2011 p30172_1.cpm NO 156 Q02156053 ISS1:1OF1 p30176_1 15/02/2011 p30176_1.cpm NO 157 Q02124989 ISS1:1OF1 p30184_1 15/02/2011 p30184_1.cpm NO 158 Q02157668 ISS1:1OF1 p30204_1 15/02/2011 p30204_1.cpm NO 159 Q02158724 ISS1:1OF1 p30210_1 15/02/2011 p30210_1.cpm NO 160 Q02157937 ISS1:1OF1 p30218_1 15/02/2011 p30218_1.cpm YES 161 Q02159328-01 ISS1:1OF1 p30223_1 15/02/2011 p30223_1.cpm NO 162 Q02164720 ISS1:1OF1 p30282_1 15/02/2011 p30282_1.cpm NO 163 Q02052184-01 ISS1:1OF1 p30288_1 15/02/2011 p30288_1.cpm NO 164 Q02113482 ISS1:1OF1 p30294_1 15/02/2011 p30294_1.cpm NO 165 Q02167838 p29830 p30324_1 15/02/2011 p30324_1.cpm NO 166 Q02170814 ISS1:1OF1 p30345_1 15/02/2011 p30345_1.cpm NO 167 Q02168320 ISS1:1OF1 p30346_1 15/02/2011 p30346_1.cpm NO 168 Q02172404 ISS1:1OF1 p30357_1 15/02/2011 p30357_1.cpm NO 169 wi00730456 ISS1:1OF1 p30382_1 15/02/2011 p30382_1.cpm NO 170 Q02160232 ISS1:1OF1 p30243_1 15/02/2011 p30243_1.cpm NO 171 Q01994258-03 ISS1:1OF1 p30303_1 15/02/2011 p30303_1.cpm NO 172 wi00716535 ISS1:1OF1 p30371_1 15/02/2011 p30371_1.cpm NO
Property of Cox Communications, Inc. Version 1.1 Page 74 of 81